1 The basics ....................................................................................................................................................... 1
2 Using the on-screen keyboard ...................................................................................................................... 2
3 Navigating the Home screen .......................................................................................................................... 3
4 Using apps and widgets ................................................................................................................................. 5
5 Using the cameras .......................................................................................................................................... 7
6 Connecting to networks ................................................................................................................................. 9
7 Using Settings ............................................................................................................................................... 10
8 Securing your tablet ..................................................................................................................................... 12
9 Backing up and recovering your data ......................................................................................................... 13
10 More HP resources ..................................................................................................................................... 15
Index ................................................................................................................................................................... 16
iii
iv
1The basics
To start using your tablet, follow these instructions:
NOTE:For basic operating instructions, see the printed Quick Start guide included in the box with
your tablet.
1.Connect the micro USB cable to the tablet and to the adapter, and then connect the adapter to a
power outlet.
NOTE:Only the HP 5V 2A adapter included with your tablet is recommended for charging the
tablet.
2.Press the power button on the top edge to turn on the tablet.
The first time you turn on the tablet, a Welcome screen is displayed.
3.Follow the on-screen instructions to select a language.
4.Sign in using the email address and password for your Google™ account. You can use an email
address for any of the following Google accounts:
●Gmail™
●YouTube™
●
Google Apps™
●
AdWords™
●Any other Google product
If you don’t have a Google account, you can create one now.
NOTE:When you sign into a Google account, the email, contacts, calendar events, and data
associated with that account are synchronized with your tablet. If you have additional Google
accounts, you can add them later.
1
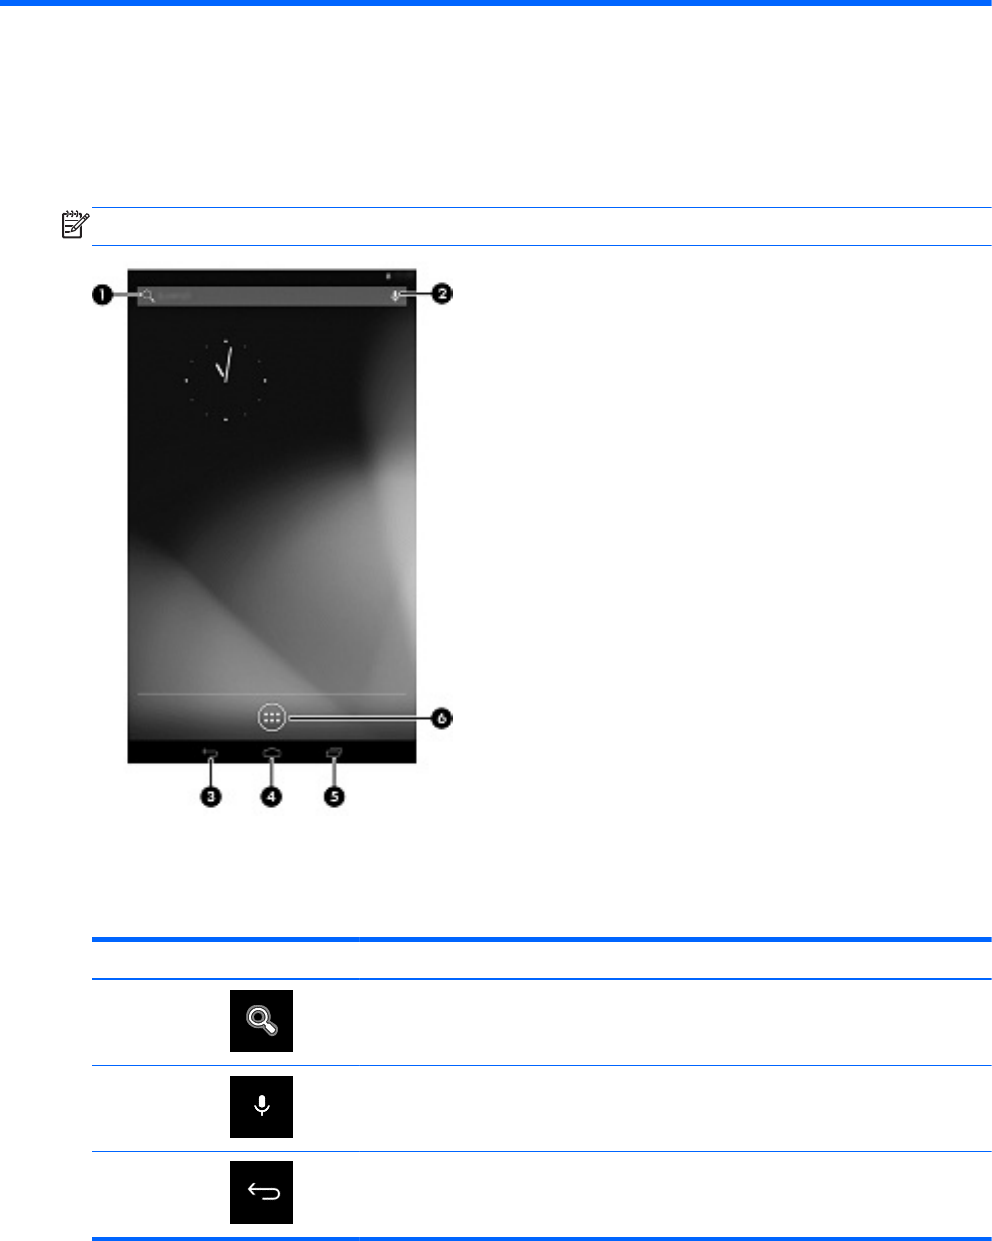
2Using the on-screen keyboard
1.To open the on-screen keyboard, touch the text field at the top of the screen. Type one or more
keywords, and then tap the magnifying glass icon
.
2.
To use voice search, touch the microphone icon
at the top of the screen, and then speak
one or more keywords.
NOTE:The appearance of the keyboard may vary.
2Chapter 2 Using the on-screen keyboard
3Navigating the Home screen
The Home screen provides a central location where you can access information and email, browse
the Web, stream videos, view photos, and access social media websites.
NOTE:The appearance of the Home screen may vary.
●
Swipe down from the top to display notifications.
●
Swipe up from the bottom to display Google Now cards.
●
Touch an icon to perform the action described in the table.
IconDescription
(1)
Search—Type one or more keywords to search with Google.
(2)
Voice search—Touch the microphone icon, and then speak one or more keywords to
search with Google.
(3)
Back—Opens the previous screen.
3
IconDescription
(4)
Home—Opens the central Home screen.
●
To see a left or right Home screen, swipe to the left or right.
●
To quickly return to the Home screen, touch the Home icon.
(5)
Recent apps—Opens a list of apps that you have used recently.
●
Touch an app to open it.
●
To remove an app from the list, swipe it to the left or right.
(6)
All apps—Displays a list of all apps.
To see all widgets, tap the Widgets tab.
4Chapter 3 Navigating the Home screen
4Using apps and widgets
Apps are shortcuts placed on the Home screen and used to open applications installed on your
tablet.
Widgets are apps with special functionality that displays content that is updated frequently. You can
view the updated content without opening the widget.
To see all apps, touch the All apps icon.
1.To open an app, touch the icon. To return to the Home screen, touch the Home icon.
2.To add an app to the Home screen, touch and hold the app until the Home screen appears, and
then slide it to the location where you want it to be.
3.To remove an app from the Home screen, touch and hold the app, and then drag it to the
Remove icon at the top of the screen.
To see all widgets, touch the All apps icon, and then touch the Widgets tab.
1.To open a widget, touch the icon. To return to the Home screen, touch the Home icon.
2.To add a widget to the Home screen, touch and hold the widget until the Home screen appears,
and then slide it to the location where you want it to be.
3.To remove a widget from the Home screen, touch and hold the widget, and then drag it to the
Remove icon at the top of the screen.
Using Gmail
1.Touch the All apps icon, touch Settings, and then under ACCOUNTS, touch Add account.
2.Touch Google, and then follow the on-screen instructions.
3.To access your Gmail account, touch All apps, and then touch Gmail.
Using the calendar
1.Touch the All apps icon, and then touch the Calendar icon.
2.To add the Calendar to the Home screen, touch and hold the Calendar icon until it appears on
the Home screen.
3.To access the calendar, touch the Calendar icon, and then follow the on-screen instructions.
NOTE:When you add a Google account, the email, calendar, and contacts associated with the
account are synchronized automatically.
Using Google Now—Google Now uses time of day, your current location, and your location history
to display information on your commute. Information from other Google products, such as your Web
history or your calendar, is used to display appointment reminders, maps, sports scores, and flight
status.
1.To opt into Google Now, swipe up from the bottom of the screen, and then follow the on-screen
instructions.
2.To display Google Now cards, swipe up from the bottom of the screen.
5
Using the clock
1.Touch the All apps icon, and then touch the Clock icon.
2.To add the Clock to the Home screen, touch and hold the Clock icon until it appears on the
Home screen.
3.To add an alarm, touch the Clock icon, tap Set alarm, and then follow the on-screen
instructions.
4.Touch Done.
Using Beats Audio
1.Touch the All apps icon, and then touch the Settings icon.
2.To turn on Beat Audio, under DEVICE, touch Beats Audio.
3.Touch one of the following to select the mode that you want to use:
●
Beats On-Ear
●
Beats In-Ear
●
Beats Passive
NOTE:Third-party headphones (purchased separately) can be used to obtain maximum
benefit from Beats Audio.
Downloading apps—Download apps, music, books, games, and more from the Google Play Store.
1.Touch the All apps icon, and then touch the Play Store icon.
2.Touch a category.
– or –
Tap the Search icon, and then type a keyword in the search field.
3.To download and install an app, follow the on-screen instructions.
Uninstalling apps
1.Touch the All apps icon, and then touch the Settings icon.
2.Under DEVICE, touch Storage, and then touch Apps.
3.Touch the app that you want to uninstall, and then touch Uninstall.
4.Touch OK, and then touch OK again.
6Chapter 4 Using apps and widgets
5Using the cameras
Take photos with the rear camera, and take your own photo or take screenshots with the front
camera.
Taking a photo with the rear camera
1.To open the camera app, touch the All apps icon, and then touch the Camera icon.
2.To take a photo, focus on the subject, and then touch the blue circle.
The photo is saved in the Gallery.
Taking your own photo
1.To open the camera app, touch the All apps icon, and then touch the Camera icon.
2.To take a photo, touch the rotating camera icon above the blue circle, and then touch the blue
circle.
The photo is saved in the Gallery.
Recording a video
1.To open the camera app, touch the All apps icon, and then touch the Camera icon.
2.To record a video, touch the video camera icon to the left of the blue circle.
The blue circle turns red.
3.To begin recording, touch the red circle.
4.To stop recording, touch and hold the red circle.
The video is saved in the Gallery.
Taking a screenshot
▲
Press the power button and the volume down button at the same time for about 1 second.
A message is displayed when the screenshot is saved in the Gallery.
Viewing photos or videos
1.To view the photos or videos in your Gallery, touch the All apps icon, and then touch the
Gallery icon.
2.To delete a photo or video, touch the photo or video, and then touch the Remove icon in the
upper-right corner of the screen.
Printing photos
1.Touch the All apps icon, and then touch the Gallery icon.
2.Touch the photo to select it, touch the Menu icon in the upper-right corner, and then touch Print.
3.The first time that you use the printing function, follow the on-screen instructions to select a
printer.
4.Select the number of copies.
7
5.To select options, touch the down arrow, and then follow the on-screen instructions.
6.Touch Print.
A message is displayed to indicate the print status.
– or –
Activate HP e-Print, which allows you to print directly to an HP ePrint-enabled printer. For more
information, go to
http://www.hp.com/go/2eprint.
1.Touch the All apps icon, touch the HP ePrint icon, follow the on-screen instructions, and then
touch Activate.
An activation code is emailed to the email address that you entered.
2.Touch the All apps icon, touch the HP ePrint icon, enter the activation code, and then touch
Activate.
8Chapter 5 Using the cameras
6Connecting to networks
Connect to a wireless network—Browse the Web, read your email, or perform other online
activities.
NOTE:You must be connected to a wireless network before you can connect to the Internet.
1.To connect to a wireless network, touch the All apps icon, and then touch Settings.
2.Under WIRELESS & NETWORKS, be sure that Wi-Fi is turned on.
3.Touch Wi-Fi, and then touch one of the available networks that is displayed.
4.Type the security key if required, and then touch Connect.
NOTE:To remove a wireless network to which you have previously connected, touch the name of
the network, and then touch Forget.
Connect to Bluetooth®—Pair a Bluetooth device, such as a headset, keyboard, or mouse with your
tablet.
1.To connect to a Bluetooth device, turn on the Bluetooth device.
2.Touch the All apps icon, and then touch Settings.
3.Under WIRELESS & NETWORKS, turn on Bluetooth, and then touch Bluetooth.
4.Touch your device name to make it Visible to all nearby Bluetooth devices.
5.To find available Bluetooth devices, touch SEARCH FOR DEVICES.
6.When the device name appears, touch it to pair the device to your tablet.
NOTE:To maximize battery life, turn off Bluetooth when not in use.
Connect to a Windows® computer
NOTE:USB tethering must be turned off before you can use USB to transfer files between your
tablet and the computer.
1.Connect the micro USB cable to your tablet and to a Windows computer.
The USB storage appears as a drive on your computer.
2.You can copy files back and forth as you would with any other external device.
3.When you are finished, disconnect the USB cable.
9
7Using Settings
Use Settings for connecting to networks, set preferences, and find information about your tablet.
▲
To access Settings, touch the All apps icon, and then touch Settings.
– or –
Swipe down from the top, and then touch the Settings icon.
The following categories are displayed:
●
WIRELESS & NETWORKS
◦
Wi-Fi—Enable or disable Wi-Fi, and connect to a wireless network so that you check email,
search the Web, or access social media websites.
◦
Bluetooth—Enable or disable Bluetooth, and pair a Bluetooth device, such as a headset
or keyboard, with your tablet.
◦
Data usage—View a graph of the data used during the selected period. The data usage by
each installed app is also displayed.
◦
More...—Enable or disable Airplane mode or VPN.
●
DEVICE
◦
Sound—Select Volumes, Default notification, and enable or disable Touch sounds and
Screen lock sound.
◦
Beats Audio—Enable or disable Beats Audio, and select HEADPHONE SETTINGS.
◦Display—Select Brightness, Wallpaper, Sleep, and Font size.
◦
Storage—View available space in tablet memory and SD™ card memory (if installed).
◦
Battery—View battery charge percentage and battery usage by various features.
◦
Apps—View downloaded apps and running apps. To view information or uninstall an app,
touch the app.
●
PERSONAL
◦
Location services—Enable or disable Location & Google search.
◦Security—Set preferences for SCREEN SECURITY, PASSWORDS, DEVICE
ADMINISTRATION, and CREDENTIAL STORAGE.
◦
Language & input—Set preferences for
Language, KEYBOARD & INPUT METHODS,
SPEECH, and MOUSE/TRACKPAD.
◦
Backup & reset—Set preferences for BACKUP & RESTORE, and PERSONAL DATA.
10Chapter 7 Using Settings
●
ACCOUNTS—Existing accounts are displayed.
◦Add an email account or another type of account—Under ACCOUNTS, touch + Add
account, and then follow the on-screen instructions.
◦
Sync an account—Under ACCOUNTS, touch the name of the account. Touch the name of
the account again, touch the Menu icon in the upper-right corner of the screen, and then
touch Sync now.
◦
Remove an account—Under ACCOUNTS, touch the name of the account. Touch the
name of the account again, touch the Menu icon in the upper-right corner of the screen,
and then touch Remove account.
●
SYSTEM
◦
Date & time—Enable or disable Automatic date & time, and select preferences for time
zone, time format, and date format.
◦
Accessibility—Enable or disable TalkBack, Large text, Auto-rotate screen, Speak
passwords, Text-to-speech output, Touch & hold delay, and Enhance web
accessibility.
◦
Developer options—Enable or disable various Developer options.
CAUTION:Enabling this setting may cause errors on your tablet.
◦
About tablet—Display the software version and legal information for your tablet.
11
8Securing your tablet
To prevent others from accessing the data on your tablet, select a screen lock method.
Set a screen lock
1.To access Settings, touch the All apps icon, and then touch Settings.
2.Under PERSONAL, touch Security, and then under SCREEN SECURITY, touch Screen lock.
3.Under Choose screen lock, select one of the following types of screen locks, and then follow
the on-screen instructions.
NOTE:If you have previously set a screen lock, you must unlock the screen before changing
the lock settings.
●
Slide—Unlock the screen by swiping to the right.
●
Face Unlock—Unlock the screen by looking at the screen.
●
Pattern—Draw a simple pattern to unlock the screen.
●
Pin—Enter four or more numbers to unlock the screen.
●
Password—Enter four or more letters or numbers. This option provides the most
Gebruikershandleiding.com neemt misbruik van zijn services uitermate serieus. U kunt hieronder aangeven waarom deze vraag ongepast is. Wij controleren de vraag en zonodig wordt deze verwijderd.
Product:
Spelregels forum
Om tot zinvolle vragen te komen hanteren wij de volgende spelregels:
lees eerst de handleiding door;
controleer of uw vraag al eerder door iemand anders is gesteld;
probeer uw vraag zo duidelijk mogelijk te stellen;
heeft u een probleem en al geprobeerd om dit op te lossen, vermeld dit erbij aub;
heeft u een oplossing gekregen van een bezoeker dan horen wij dat graag in dit forum;
wilt u een reactie geven op een vraag of antwoord, gebruik dan niet dit formulier maar klik op de knop 'reageer op deze vraag';
uw vraag wordt direct op de website gezet; vermijd daarom persoonlijke gegevens in te vullen;
Belangrijk! Als er een antwoord wordt gegeven op uw vraag, dan is het voor de gever van het antwoord nuttig om te weten als u er wel (of niet) mee geholpen bent! Wij vragen u dus ook te reageren op een antwoord.
Belangrijk! Antwoorden worden ook per e-mail naar abonnees gestuurd. Laat uw emailadres achter op deze site, zodat u op de hoogte blijft. U krijgt dan ook andere vragen en antwoorden te zien.
Abonneren
Abonneer u voor het ontvangen van emails voor uw HP Slate 7 bij:
nieuwe vragen en antwoorden
nieuwe handleidingen
U ontvangt een email met instructies om u voor één of beide opties in te schrijven.
Ontvang uw handleiding per email
Vul uw emailadres in en ontvang de handleiding van HP Slate 7 in de taal/talen: Engels als bijlage per email.
De handleiding is 0,52 mb groot.
U ontvangt de handleiding per email binnen enkele minuten. Als u geen email heeft ontvangen, dan heeft u waarschijnlijk een verkeerd emailadres ingevuld of is uw mailbox te vol. Daarnaast kan het zijn dat uw internetprovider een maximum heeft aan de grootte per email. Omdat hier een handleiding wordt meegestuurd, kan het voorkomen dat de email groter is dan toegestaan bij uw provider.
Uw handleiding is per email verstuurd. Controleer uw email
Als u niet binnen een kwartier uw email met handleiding ontvangen heeft, kan het zijn dat u een verkeerd emailadres heeft ingevuld of dat uw emailprovider een maximum grootte per email heeft ingesteld die kleiner is dan de grootte van de handleiding.
Er is een email naar u verstuurd om uw inschrijving definitief te maken.
Controleer uw email en volg de aanwijzingen op om uw inschrijving definitief te maken
U heeft geen emailadres opgegeven
Als u de handleiding per email wilt ontvangen, vul dan een geldig emailadres in.
Uw vraag is op deze pagina toegevoegd
Wilt u een email ontvangen bij een antwoord en/of nieuwe vragen? Vul dan hier uw emailadres in.