Finding information ............................................................................................................................................... 2
2 Getting to know your computer ...................................................................................................................... 4
Right ....................................................................................................................................................................... 4
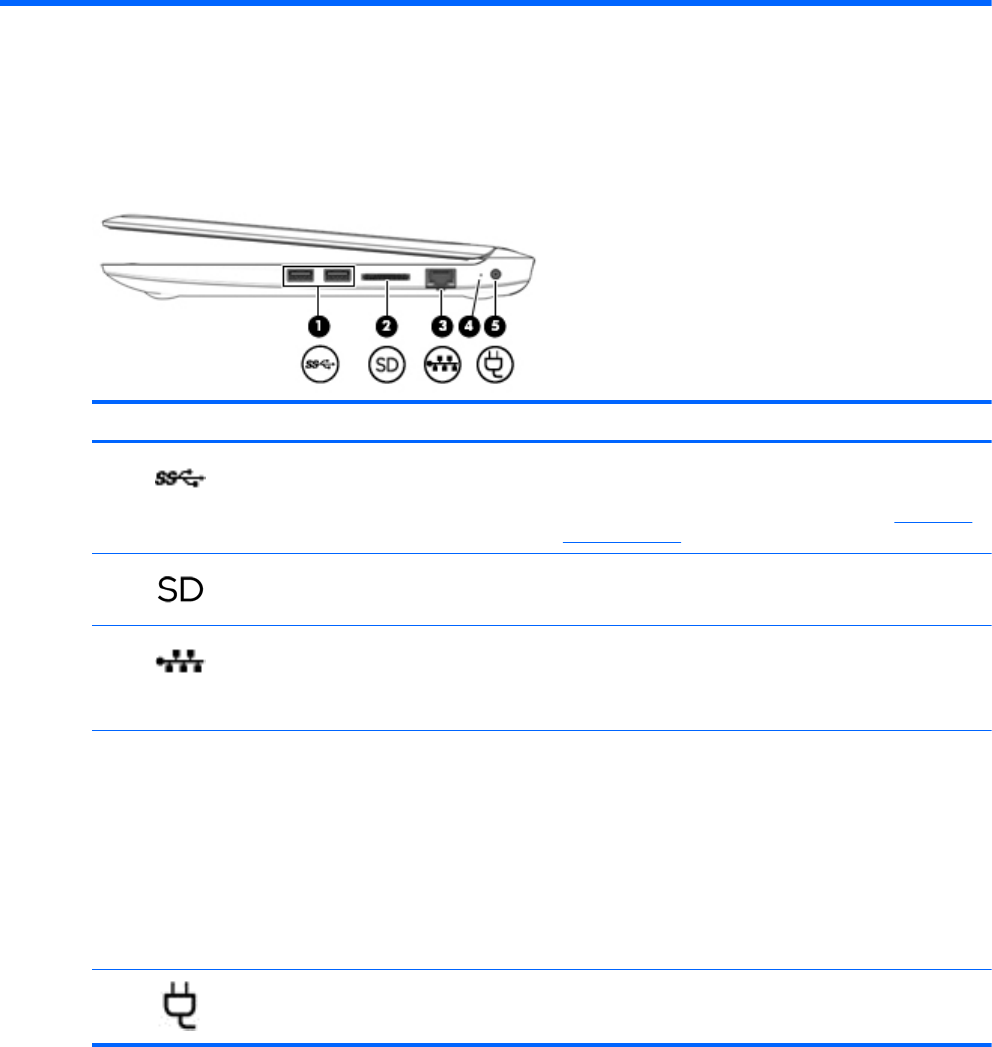
Left ......................................................................................................................................................................... 5
Top ......................................................................................................................................................................... 7
Top cover ............................................................................................................................................. 7
Front ..................................................................................................................................................................... 11
3 Connecting to a network .............................................................................................................................. 12
Connecting to a wireless network ....................................................................................................................... 12
Using the wireless controls ............................................................................................................... 12
Using the wireless button ............................................................................................... 12
Using operating system controls ................................................................................... 13
Using a WLAN ..................................................................................................................................... 13
Using an Internet service provider ................................................................................. 13
Setting up a WLAN .......................................................................................................... 14
Configuring a wireless router ......................................................................................... 14
Protecting your WLAN ..................................................................................................... 14
Connecting to a WLAN ..................................................................................................... 15
Using HP Mobile Broadband (select models only) ............................................................................ 15
Inserting and removing a SIM ......................................................................................... 16
Using Bluetooth wireless devices ..................................................................................................... 17
Connecting to a wired network ........................................................................................................................... 17
Connecting to a local area network (LAN) ........................................................................................ 17
4 Navigating using the keyboard, touch gestures and pointing devices .............................................................. 19
Using pointing devices ......................................................................................................................................... 19
Using the keyboard .............................................................................................................................................. 23
Using Windows shortcut keys ........................................................................................................... 23
Identifying the hot keys .................................................................................................................... 23
Using keypads ................................................................................................................................... 24
Using the embedded numeric keypad ............................................................................ 25
Turning the embedded numeric keypad on and off .................................... 26
Switching key functions on the embedded numeric keypad ....................... 26
Using an optional external numeric keypad .................................................................. 26
Using the media activity controls ........................................................................................................................ 27
Video .................................................................................................................................................................... 29
Configuring audio for HDMI ............................................................................................................... 32
Discovering and connecting to Miracast-compatible wireless displays (select models only) ........ 32
6 Power management ..................................................................................................................................... 33
Shutting down the computer .............................................................................................................................. 33
Setting power options ......................................................................................................................................... 34
Using power-saving states ............................................................................................................... 34
Initiating and exiting Sleep ............................................................................................. 34
Enabling and exiting user-initiated Hibernation ............................................................ 34
Using the power meter and power settings ................................................................... 34
Setting password protection on wakeup ....................................................................... 35
vi
Using battery power .......................................................................................................................... 35
Finding additional battery information .......................................................................... 35
Using Battery Check ........................................................................................................ 36
Displaying the remaining battery charge ....................................................................... 36
Maximizing battery discharge time ................................................................................ 36
Resolving a low battery level ....................................................................... 37
Inserting or removing the battery .................................................................................. 37
Inserting a battery ........................................................................................ 37
Removing a battery ...................................................................................... 37
Conserving battery power .............................................................................................. 38
Using external AC power ................................................................................................................... 38
Testing an AC adapter ..................................................................................................... 39
7 External cards and devices ........................................................................................................................... 40
Using memory card readers (select models only) .............................................................................................. 40
Inserting a memory card ................................................................................................................... 40
Removing a memory card ................................................................................................................. 40
Using a USB device ............................................................................................................................................... 41
Connecting a USB device ................................................................................................................... 42
Removing a USB device ..................................................................................................................... 42
Using optional external devices .......................................................................................................................... 42
Using optional external drives .......................................................................................................... 43
Using hard drives ................................................................................................................................................. 44
Protecting the computer ..................................................................................................................................... 47
Using passwords .................................................................................................................................................. 47
Setting passwords in Windows ......................................................................................................... 48
Setting passwords in Computer Setup ............................................................................................. 49
vii
Managing a BIOS administrator password ....................................................................................... 49
Entering a BIOS administrator password ....................................................................... 50
Managing a Computer Setup DriveLock password ........................................................................... 50
Setting a DriveLock password ........................................................................................ 51
Entering a DriveLock password ...................................................................................... 51
Changing a DriveLock password ..................................................................................... 52
Using antivirus software ..................................................................................................................................... 54
Using firewall software ....................................................................................................................................... 54
Using HP Client Security ...................................................................................................................................... 54
Installing an optional security cable ................................................................................................................... 55
Cleaning your computer ...................................................................................................................................... 56
Cleaning the display (All-in-Ones or Notebooks) ........................................................... 56
Cleaning the sides or cover ............................................................................................. 56
Cleaning the TouchPad, keyboard, or mouse ................................................................ 57
Updating programs and drivers .......................................................................................................................... 57
Using SoftPaq Download Manager ...................................................................................................................... 57
11 Backup and recovery .................................................................................................................................. 58
Backing up your information ............................................................................................................................... 58
Performing a system recovery ............................................................................................................................ 58
Using the Windows recovery tools ................................................................................................... 59
Using f11 recovery tools ................................................................................................................... 59
Using Windows operating system media (purchased separately) ................................................... 60
Using Windows Refresh or Windows Reset ...................................................................................... 61
Using HP Software Setup .................................................................................................................. 61
12 Computer Setup (BIOS), MultiBoot, and HP PC Hardware Diagnostics (UEFI) .................................................... 62
Using Computer Setup ......................................................................................................................................... 62
Navigating and selecting in Computer Setup ................................................................................... 62
Restoring factory settings in Computer Setup ................................................................................. 63
Updating the BIOS ............................................................................................................................. 64
viii
Determining the BIOS version ........................................................................................ 64
Downloading a BIOS update ........................................................................................... 64
Using MultiBoot ................................................................................................................................................... 65
About the boot device order ............................................................................................................. 65
Using HP PC Hardware Diagnostics (UEFI) .......................................................................................................... 67
Downloading HP PC Hardware Diagnostics (UEFI) to a USB device .................................................. 68
13 Support ..................................................................................................................................................... 69
Contacting support .............................................................................................................................................. 69
Input power .......................................................................................................................................................... 71
Appendix A Traveling with the computer .......................................................................................................... 72
Appendix B Troubleshooting ........................................................................................................................... 73
The computer is unable to start up .................................................................................................. 73
The computer screen is blank ........................................................................................................... 73
Software is functioning abnormally ................................................................................................. 74
The computer is on but not responding ........................................................................................... 74
The computer is unusually warm ..................................................................................................... 74
An external device is not working ..................................................................................................... 74
The wireless network connection is not working ............................................................................. 75
A disc does not play ........................................................................................................................... 75
A movie is not visible on an external display .................................................................................... 75
The process of burning a disc does not begin, or it stops before completion ................................. 76
Appendix C Electrostatic discharge .................................................................................................................. 77
Index ............................................................................................................................................................. 78
ix
x
1Welcome
After you set up and register the computer, it is important to take the following steps:
●
Take a minute to browse the printed Windows Basics guide to explore the new Windows® features.
TIP:To quickly return to the computer Start screen from an open app or the Windows desktop, press
the Windows key
on your keyboard. Pressing the Windows key again will return you to the
previous screen.
●
Connect to the Internet—Set up your wired or wireless network so that you can connect to the
Internet. For more information, see
Connecting to a network on page 12.
●
Update your antivirus software—Protect your computer from damage caused by viruses. The
software is preinstalled on the computer. For more information, see
Using antivirus software
on page 54.
●
Get to know your computer—Learn about your computer features. See
Getting to know your computer
on page 4 and Navigating using the keyboard, touch gestures and pointing devices on page 19 for
additional information.
●
Find installed software—Access a list of the software preinstalled on the computer:
From the Start screen, type a, click Apps, and then select from the displayed options. For details about
using the software included with the computer, see the software manufacturer's instructions, which
may be provided with the software or on the manufacturer's website.
●
Back up your hard drive by creating recovery discs or a recovery flash drive. See
Backup and recovery
on page 58.
1
Finding information
You have already used Setup Instructions to turn on the computer and locate this guide. To locate resources
that provide product details, how-to information, and more, use this table.
ResourcesFor information about
Setup Instructions poster
●
How to set up the computer
●
Help to identify computer components
Windows Basics guideOverview of using Windows®
HP Support Assistant
To access HP Support Assistant, from the Start screen,
select the HP Support Assistant app.
To access the latest user guide, go to
http://www.hp.com/
support, and select your country. Select Drivers &
Downloads, and then follow the on-screen instructions.
●
Operating system information
●
Software, driver, and BIOS updates
●
Troubleshooting tools
●
How to access support
Worldwide support
To get support in your language, go to
http://welcome.hp.com/country/us/en/
wwcontact_us.html.
●
Online chat with an HP technician
●
Email support
●
Support telephone numbers
●
HP service center locations
HP website
To access the latest user guide, go to
http://www.hp.com/
support, and select your country. Select Drivers &
Downloads, and then follow the on-screen instructions.
●
Support information
●
Ordering parts and finding additional help
●
Accessories available for the device
Safety & Comfort Guide
To access this guide:
▲
From the Start screen, type support, and then
select the HP Support Assistant app.
– or –
Go to
http://www.hp.com/ergo.
●
Proper workstation setup, posture, health, and work habits
●
Electrical and mechanical safety information
Regulatory, Safety, and Environmental Notices
To access this guide:
1.From the Start screen, type support, and then
select the HP Support Assistant app.
2.Select My computer, and then select User guides.
●
Regulatory and safety information
●
Battery disposal information
Limited Warranty*
To access this guide, from the Start screen, select the HP
Support Assistant app, select My computer, and then
select Warranty and services.
– or –
Go to
http://www.hp.com/go/orderdocuments.
Warranty information
*You can find the expressly provided HP Limited Warranty applicable to your product located with the user guides on your computer
and/or on the CD/DVD provided in the box. In some countries/regions, HP may provide a printed HP Limited Warranty in the box. For
some countries/regions where the warranty is not provided in printed format, you may request a printed copy from
http://www.hp.com/go/orderdocuments or write to:
2Chapter 1 Welcome
ResourcesFor information about
●
North America: Hewlett-Packard, MS POD, 11311 Chinden Blvd., Boise, ID 83714, USA
●
Europe, Middle East, Africa: Hewlett-Packard, POD, Via G. Di Vittorio, 9, 20063, Cernusco s/Naviglio (MI), Italy
●
Asia Pacific: Hewlett-Packard, POD, P.O. Box 200, Alexandra Post Office, Singapore 911507
When you request a printed copy of your warranty, please include your product number, warranty period (found on your service label),
name, and postal address.
IMPORTANT:Do NOT return your HP product to the addresses above. For U.S. support, go to
Gebruikershandleiding.com neemt misbruik van zijn services uitermate serieus. U kunt hieronder aangeven waarom deze vraag ongepast is. Wij controleren de vraag en zonodig wordt deze verwijderd.
Product:
Spelregels forum
Om tot zinvolle vragen te komen hanteren wij de volgende spelregels:
lees eerst de handleiding door;
controleer of uw vraag al eerder door iemand anders is gesteld;
probeer uw vraag zo duidelijk mogelijk te stellen;
heeft u een probleem en al geprobeerd om dit op te lossen, vermeld dit erbij aub;
heeft u een oplossing gekregen van een bezoeker dan horen wij dat graag in dit forum;
wilt u een reactie geven op een vraag of antwoord, gebruik dan niet dit formulier maar klik op de knop 'reageer op deze vraag';
uw vraag wordt direct op de website gezet; vermijd daarom persoonlijke gegevens in te vullen;
Belangrijk! Als er een antwoord wordt gegeven op uw vraag, dan is het voor de gever van het antwoord nuttig om te weten als u er wel (of niet) mee geholpen bent! Wij vragen u dus ook te reageren op een antwoord.
Belangrijk! Antwoorden worden ook per e-mail naar abonnees gestuurd. Laat uw emailadres achter op deze site, zodat u op de hoogte blijft. U krijgt dan ook andere vragen en antwoorden te zien.
Abonneren
Abonneer u voor het ontvangen van emails voor uw HP ProBook 11 EE G1 bij:
nieuwe vragen en antwoorden
nieuwe handleidingen
U ontvangt een email met instructies om u voor één of beide opties in te schrijven.
Ontvang uw handleiding per email
Vul uw emailadres in en ontvang de handleiding van HP ProBook 11 EE G1 in de taal/talen: Engels als bijlage per email.
De handleiding is 3,73 mb groot.
U ontvangt de handleiding per email binnen enkele minuten. Als u geen email heeft ontvangen, dan heeft u waarschijnlijk een verkeerd emailadres ingevuld of is uw mailbox te vol. Daarnaast kan het zijn dat uw internetprovider een maximum heeft aan de grootte per email. Omdat hier een handleiding wordt meegestuurd, kan het voorkomen dat de email groter is dan toegestaan bij uw provider.
Uw handleiding is per email verstuurd. Controleer uw email
Als u niet binnen een kwartier uw email met handleiding ontvangen heeft, kan het zijn dat u een verkeerd emailadres heeft ingevuld of dat uw emailprovider een maximum grootte per email heeft ingesteld die kleiner is dan de grootte van de handleiding.
Er is een email naar u verstuurd om uw inschrijving definitief te maken.
Controleer uw email en volg de aanwijzingen op om uw inschrijving definitief te maken
U heeft geen emailadres opgegeven
Als u de handleiding per email wilt ontvangen, vul dan een geldig emailadres in.
Uw vraag is op deze pagina toegevoegd
Wilt u een email ontvangen bij een antwoord en/of nieuwe vragen? Vul dan hier uw emailadres in.