101743
82
Verklein
Vergroot
Pagina terug
1/88
Pagina verder
user's manual
hp
photosmart
720 series
digital
camera
Trademark and copyright information
© Copyright 2002 Hewlett-Packard Company
All rights are reserved. No part of this document may be photocopied,
reproduced, or translated to another language without the prior written
consent of Hewlett-Packard Company.
The information contained in this document is subject to change
without notice. Hewlett-Packard shall not be liable for errors contained
herein or for consequential damages in connection with the furnishing,
performance, or use of this material.
Microsoft® and Windows® are U.S. registered trademarks of
Microsoft Corporation.
Apple, Macintosh, and Mac are registered trademarks of Apple
Computer, Inc.
SD Logo is a trademark.
Materials disposal
This HP product contains the following materials that might require
special handling at end-of-life:
z Mercury in the fluorescent lamp in the image LCD.
z Alkaline manganese dioxide-zinc or lithium-iron disulfide AA
batteries.
z Lead in the solder and some component leads.
Disposal of this material can be regulated because of environmental
considerations. For disposal or recycling information, please contact
your local authorities or the Electronic Industries Alliance (EIA)
(www.eiae.org).
Table of Contents
5
1-Getting started . . . . . . . . . . . . . . . . . . . . . . . . . .9
Camera Parts . . . . . . . . . . . . . . . . . . . . . . . . . . . . . 10
Setup . . . . . . . . . . . . . . . . . . . . . . . . . . . . . . . . . . . 15
Attaching the wrist strap . . . . . . . . . . . . . . . . . . 15
Installing the batteries . . . . . . . . . . . . . . . . . . . 15
Inserting the memory card (optional) . . . . . . . . . 16
Turning on power . . . . . . . . . . . . . . . . . . . . . . 16
Choosing the language . . . . . . . . . . . . . . . . . . 17
Setting the date and time . . . . . . . . . . . . . . . . . 17
Installing the software . . . . . . . . . . . . . . . . . . . 18
Windows . . . . . . . . . . . . . . . . . . . . . . . . . 18
Macintosh . . . . . . . . . . . . . . . . . . . . . . . . 19
2-Taking pictures . . . . . . . . . . . . . . . . . . . . . . . . .21
Taking still pictures . . . . . . . . . . . . . . . . . . . . . . . . . 21
Using focus lock . . . . . . . . . . . . . . . . . . . . . . . 21
Using instant review . . . . . . . . . . . . . . . . . . . . . 22
Recording video clips . . . . . . . . . . . . . . . . . . . . . . . 22
Recording audio . . . . . . . . . . . . . . . . . . . . . . . . . . . 23
Using preview mode . . . . . . . . . . . . . . . . . . . . . . . . 23
Using the self-timer and burst features . . . . . . . . . . . 24
Using the self-timer . . . . . . . . . . . . . . . . . . . . . 24
Using burst . . . . . . . . . . . . . . . . . . . . . . . . . . . 24
Using zoom . . . . . . . . . . . . . . . . . . . . . . . . . . . . . . 25
Optical zoom . . . . . . . . . . . . . . . . . . . . . . . . . 25
Digital zoom . . . . . . . . . . . . . . . . . . . . . . . . . . 25
Using the flash . . . . . . . . . . . . . . . . . . . . . . . . . . . . 26
Changing the image quality . . . . . . . . . . . . . . . . . . 27
6 hp photosmart 720 user’s manual
3-Using playback and the main menu . . . . . . . 29
Using playback to view images . . . . . . . . . . . . . . . .29
Using the main menu . . . . . . . . . . . . . . . . . . . . . . . .31
Rotating images . . . . . . . . . . . . . . . . . . . . . . . .32
Deleting images . . . . . . . . . . . . . . . . . . . . . . . .32
Recording audio clips . . . . . . . . . . . . . . . . . . . .33
Viewing thumbnail images . . . . . . . . . . . . . . . .34
Magnifying images . . . . . . . . . . . . . . . . . . . . . .34
Using the setup menu . . . . . . . . . . . . . . . . . . . .35
Exposure settings . . . . . . . . . . . . . . . . . . . .36
Date & time . . . . . . . . . . . . . . . . . . . . . . . .38
Welcome screen . . . . . . . . . . . . . . . . . . . .38
USB configuration setting . . . . . . . . . . . . . .39
Move images to card . . . . . . . . . . . . . . . . .40
Language . . . . . . . . . . . . . . . . . . . . . . . . .40
4-Using hp instant share . . . . . . . . . . . . . . . . . . 41
Using hp instant share to print pictures . . . . . . . . . . .43
Using the hp instant share e-mail service . . . . . . . . . .44
Adding, modifying, and removing e-mail addresses
44
Selecting images to be e-mailed . . . . . . . . . . . .45
Windows . . . . . . . . . . . . . . . . . . . . . . . . .46
Macintosh . . . . . . . . . . . . . . . . . . . . . . . . .46
5-Unloading, printing, & displaying images . . 47
Unloading to a computer . . . . . . . . . . . . . . . . . . . . .47
Printing images . . . . . . . . . . . . . . . . . . . . . . . . . . . .48
Displaying images on a TV . . . . . . . . . . . . . . . . . . .49
Displaying a slideshow . . . . . . . . . . . . . . . . . . .49
7
6-Troubleshooting and support . . . . . . . . . . . . .51
Problems and solutions . . . . . . . . . . . . . . . . . . . . . . 51
Error messages . . . . . . . . . . . . . . . . . . . . . . . . . . . . 56
Error messages on the camera . . . . . . . . . . . . . 56
Error messages on the computer . . . . . . . . . . . . 59
Getting assistance . . . . . . . . . . . . . . . . . . . . . . . . . 60
Finding help on the web . . . . . . . . . . . . . . . . . . 60
HP product support . . . . . . . . . . . . . . . . . . 60
HP photosmart website . . . . . . . . . . . . . . . 60
HP accessibility website . . . . . . . . . . . . . . . 60
Contacting hp customer support . . . . . . . . . . . . 60
How hp can help . . . . . . . . . . . . . . . . . . . 60
Before you call . . . . . . . . . . . . . . . . . . . . . 61
Obtaining support in the United States . . . . . . . 61
Free telephone support for one year . . . . . . 61
After the first year . . . . . . . . . . . . . . . . . . . 61
Upgraded warranty options . . . . . . . . . . . 62
Obtaining support worldwide . . . . . . . . . . . . . . 62
Hewlett-Packard limited warranty statement . . . . . . . 66
Regulatory information . . . . . . . . . . . . . . . . . . . . . . 67
Appendix A: Batteries and accessories . . . . . .69
Managing batteries . . . . . . . . . . . . . . . . . . . . . . . . 69
Extending battery life . . . . . . . . . . . . . . . . . . . . 70
Rechargeable batteries . . . . . . . . . . . . . . . . . . . 70
Power conservation . . . . . . . . . . . . . . . . . . . . . 71
Purchasing accessories . . . . . . . . . . . . . . . . . . . . . . 71
Appendix B: Camera dock . . . . . . . . . . . . . . . . .73
Unloading images to a computer using the dock . . . . 75
Printing images using the dock . . . . . . . . . . . . . . . . 76
Displaying images on a TV using the dock . . . . . . . . 76
Appendix C: Specifications . . . . . . . . . . . . . . . .77
8 hp photosmart 720 user’s manual
1-Getting started 9
Getting started
The HP Photosmart 720 digital camera is a 3.3 mega-pixel
camera with 3x optical zoom and 4x digital zoom. This
camera has an exciting new feature called HP Instant Share
technology.
With HP Instant Share, you can select images to print or e-mail
automatically the next time you connect the camera to your
computer. You can also bypass the computer altogether and
print the selected pictures directly to any HP Deskjet or
Photosmart printers that are USB-enabled.
You can enhance your experience by purchasing an
HP Photosmart 8881 Camera Dock. The Camera Dock allows
you to easily download images to a computer, send images to
a printer or television, recharge the camera batteries, and
provide a convenient home for your camera.
NOTE A Dock Insert is included in
your camera box. This Dock
Insert enables your camera (and
others of the same model) to use
the HP Camera Dock. Please do
not use it without the Camera
Dock and DO NOT discard it. Instructions for its use are
included with the Camera Dock as well as in Appendix B
of this manual.
1
10 hp photosmart 720 user’s manual
Camera Parts
# Name Description
1 Memory card door Allows access to insert or remove the
memory card. Also allows access to
the connectors for USB, TV, and
power adapter.
2 Memory card slot Allows memory card to be inserted
3 USB connector Provides connection to either a
computer or printer
4 TV connector Provides audio/video output to a TV
5 Power adapter
connector
Provides connection for an optional
HP AC adapter
6
Display button
Turns on Preview mode or turns off
the Image Display
7
Arrow buttons
Moves to menu options and
navigates through images
12
13
14
1
2
3
4
5
6
7
8
9
10
11
1-Getting started 11
8 OK button Press once to turn on Playback
mode, again to turn on Main menu.
Also selects menu options
9
Share button
Turns the Share menu on and off
10 Image Display Provides menu information to
operate the camera. You can also
preview the picture before taking it
and review it afterward
11 Speaker Plays camera sounds and audio
clips
12 Optical viewfinder Allows you to frame the subject of
the picture
13 Viewfinder light Solid green - camera is recording
video or ready to take a still picture
Blinking green - camera unable to
focus or long exposure (hold steady)
Blinking yellow - camera is charging
the flash or saving images to
memory
Blinking red - camera is either:
starting up, charging the battery,
sending/receiving USB, counting
down self-timer, or there is an error
(turn on Image Display to see
message)
14
Zoom
Out/In button
Allows you to zoom in and out
# Name Description
12 hp photosmart 720 user’s manual
# Name Description
1 Microphone Records audio clips
2 Flash Provides additional light to improve
picture-taking
3 Video/Self-timer
light
Solid red - camera is recording video
Blinking red - self-timer is activated
4Wrist/Neck
strap mount
Wrist strap attachment (there is a
mount on both sides of the camera in
case you want to attach a neck strap)
5 Tripod mount Allows camera to be mounted to a
tripod
6 Camera Dock
connector
Provides connection to the optional HP
Camera Dock
7 Battery door Allows access to the batteries
1
2
3
4
7
5
6
1-Getting started 13
# Name Description
1 Shutter button Takes a picture
2
Video button
Records a video clip; press once to
start and press again to stop
3
Flash button
Selects the Flash setting
4
Quality button
Changes image quality from Good
to Better to Best
5
Self-timer/Burst
button
Sets the Self-timer when pressed
once, and sets the Burst feature
when pressed twice
6 Status LCD Displays camera settings and
operating status (see the following
illustration)
7
Power button
Turns the camera power on and off
1
2
3
4
5
6
7
14 hp photosmart 720 user’s manual
# Icon Indicates
1 Red-eye Reduction is active
2
or
Flash On is active
or
Flash Off is active
3 AUTO Auto Flash is active
4Image quality selection
5 Number of images remaining
6 Self-timer is active
7 Burst feature is active
8 Video is being recorded
9Battery condition
10 SD memory card is in the camera
1
2
3
4
5
6
7
8
9
10
1-Getting started 15
Setup
Attaching the wrist strap
Attach the wrist or
neck strap as
shown in the
illustration.
NOTE It is easiest to install the strap by inserting it from the
bottom of the strap mount first.
Installing the batteries
1 With the front of the camera
facing you, slide the latch on
the battery door to the right.
2 Holding on to the latch, pull the
battery door toward you.
3 Insert the batteries as indicated
inside the door.
NOTE For more information
about batteries, refer to
Managing batteries on
page 69.
16 hp photosmart 720 user’s manual
Inserting the memory card (optional)
Your digital camera contains 16 megabytes (MB) of internal
memory so that you can store images and video clips in your
camera. However, you can use an optional memory card
(purchased separately) to expand the camera’s memory to
store more images and video clips
NOTE Your camera supports up to a 128 MB memory card.
After unloading images to your computer, you can reuse the
card.
1 With the camera off, open the
memory card door.
2 Insert the memory card as shown.
3 Close and fasten the memory card
door.
To remove the card, pull it out of the camera.
Turning on power
Press the Power button to turn on
the camera. When the camera is
ready, the viewfinder light stops
blinking.
1-Getting started 17
Choosing the language
The first time you turn the camera on, the following screen
appears and prompts you to choose a language.
1 Scroll to the language that you want
by using the Arrow buttons.
2 Press OK to select the highlighted
language.
Setting the date and time
The camera has a clock that records the date and time at which
you take each picture.
1 Press the OK button repeatedly until
your preferred date format
appears, and then press the right
Arrow button to highlight the
date.
2 Press OK to select the first value,
and then use the buttons to
change it. Press OK to confirm. Set the remaining values in
the same way. (M = Month, D = Day, Y = Year)
3 Press the button to highlight the time format, and then
press OK if you want to change it.
4 Press the button to highlight the time. Set the time values
in the same way you set the date values in step 2.
5 When finished setting the date and time, press the
button to highlight Exit, and then press OK.
18 hp photosmart 720 user’s manual
Installing the software
The camera software allows you to unload images from the
camera, view them, print them, and e-mail them. It also allows
you to configure the Share menu on the camera.
NOTE For Windows computers, the HP Photo & Imaging
software needs at least Internet Explorer 5.0 (Service Pack
2) in order to function properly.
Windows
1 Insert the HP Photo & Imaging CD into the CD drive of your
computer. The installation window automatically appears.
NOTE If the installation window does not appear, click Start,
and then click Run. Type X:\Setup.exe, where X
is the
letter of your CD drive.
2 Click Next, and then follow the on-screen instructions to
install the software.
To install any bonus software:
1 Click Start, click Run, and in the Open box, type
X:\Bonus\setup.exe (where X is the drive letter of your CD
drive).
2 Click OK, and then follow the on-screen instructions to
install the bonus software.
1-Getting started 19
Macintosh
1 Insert the HP Photo & Imaging CD into the CD drive of your
computer.
2 Double-click the CD icon on the desktop.
3 Double-click the installer icon, then follow the instructions on
the screen to install the software.
To install any bonus software:
1 Double-click the Bonus folder icon.
2 Double-click the installer icon for the bonus software.
3 Follow the on-screen instructions to install the software.
20 hp photosmart 720 user’s manual
2-Taking pictures 21
Taking pictures
Taking still pictures
You can take a picture almost any time the camera is on,
regardless of what is being shown on the Image Display. To
take a picture:
1 Frame the subject that you want
to photograph in the viewfinder.
2 Hold the camera steady, and
press the Shutter button. The
camera automatically adjusts
focus and exposure, and then takes the picture.
When you press down the Shutter button, you may notice that
the viewfinder light is red, yellow, or green, and may or may
not be blinking. See the description for Viewfinder light on
page 11.
NOTE To achieve best focus in low light conditions, secure the
camera to a tripod and make sure the focus area has
sufficient contrast.
Using focus lock
Focus Lock allows you to focus on a subject that is not in the
center of the image. It is also useful to verify that your image is
in focus before taking the picture. To use Focus Lock:
1 Press the Shutter button halfway down to lock the exposure
and focus. When exposure and focus are locked, the green
Viewfinder light comes on solid.
2
22 hp photosmart 720 user’s manual
2 When exposure and focus are locked, and you continue to
hold the Shutter button halfway down, you can re-frame or
adjust your subject for proper positioning.
3 Press the Shutter button all the way down until you hear a
click and see the image on the Image Display in Instant
Review.
Using instant review
After you take a picture, the Image Display shows the image
while it is being saved to memory. You can delete the image
before it is saved by pressing the button.
Recording video clips
To record a video clip with audio for up to 30 seconds:
1 Frame the subject that you want to
record.
2 Press and release the Video
button to start recording; REC
appears on the Image Display.
3 To stop recording, press the button again. The camera
automatically stops recording when the maximum clip
length of 30 seconds is reached or memory is full.
After recording has stopped, the last frame of the video clip
remains on the Image Display during Instant Review. During
this time, the video clip is saved to memory unless you choose
to delete it.
During video recording, the green viewfinder light and the red
Video/Self-timer light are on, and you can view the time
remaining on the Image Display. The camera automatically
stops recording when the timer reaches zero. You can delay
recording a video clip for 10 seconds by setting the self-timer.
2-Taking pictures 23
Recording audio
After you take a still picture, you can add an audio annotation
to it (for example to describe the location of the picture). For the
details on how to do this, see Recording audio clips on
page 33.
Using preview mode
You can use the Image Display as a viewfinder and show a
more accurate view of what your picture will look like. This is
useful for close-up photos and for instances in which framing
your subject precisely is important. To take a picture by using
the Image Display:
1 Press the Display button to activate Preview mode.
2 Frame your subject in the Image Display, and then press the
Shutter button.
In the Preview screen, the current
image quality setting (1, 2, or 3
stars) is shown in the lower-left
corner, with the remaining picture
count to the right of the image
quality icons. If you selected any
manual exposure settings, they are
displayed on the top of the screen.
In addition to taking pictures and recording video, you can
zoom in on your subject, adjust the flash setting, or increase
the quality of your image—all from within Preview mode.
NOTE Using the Image Display consumes a large amount of
battery power.
24 hp photosmart 720 user’s manual
Using the self-timer and burst
features
The Self-timer/Burst button activates the Self-timer and
Burst features on the camera.
Using the self-timer
1 Secure the camera to a tripod or set it on a stable surface.
2 Turn the camera on, and then frame your subject in the
viewfinder.
3 Press the button until the Self-timer icon appears
on the Status LCD.
4 Press the Shutter button all the way down, and then release
it. The Video/Self-timer light on the front of the camera
blinks for 10 seconds before the picture is taken.
Using burst
Burst is used to take multiple pictures in a row as quickly as the
camera can. To use Burst:
1 Press the button until the Burst icon appears on
the Status LCD.
2 Frame the subject and press the Shutter button all the way
down and hold it.
3 Flash is disabled and the camera takes pictures as quickly
as possible until the memory is full or the Shutter button is
released.
2-Taking pictures 25
Using zoom
Optical zoom
Press the Zoom Out/Zoom In button to move the lens
between wide angle and telephoto positions (1 to 3x).
You cannot adjust optical zoom while recording video clips.
Digital zoom
1 Press the Display button to turn on Preview mode, and
then frame the picture using the Image Display.
2 Use the Zoom in button to optically zoom in to the
maximum level, then release the button.
3 Press the button again and
hold it until you reach the desired
size in the Image Display. A
yellow border surrounds the area
of the image that will be captured.
4 Make sure the yellow border
frames your subject, and then take
the picture.
To turn digital zoom off, press the Zoom Out button until
zooming stops, or turn off the Image Display.
Digital zoom
screen shot
26 hp photosmart 720 user’s manual
Using the flash
When the camera is turned on, the flash is automatically set to
Auto Flash. If you change the flash setting, the camera will
remain in that setting until you change it again or turn off the
camera.
To set the flash, press the Flash button until the desired
setting appears on the Status LCD. The following table
describes the different flash settings:
Icon Setting Description
Auto Flash The camera measures light and uses the
flash if necessary.
Red-eye
Reduction
The camera measures light and uses the
flash with red-eye reduction if
necessary.
Flash On The camera always flashes. If the light
is behind your subject, you can use the
flash to increase the light on the front of
your subject. This is also called “fill-
flash.”
Flash Off The camera will not flash. Use this
setting when you do not want a flash
(such as with distant objects). This may
result in long exposures that will require
using a tripod.
AUTO
AUTO
2-Taking pictures 27
Changing the image quality
The camera has three image quality settings: Good, Better, and
Best. The current quality setting is displayed on the Status LCD.
To change the image quality setting, press the Quality
button until the desired setting appears on the Status LCD.
The following table identifies the approximate number of
pictures that you can take at each setting based on internal
memory or with a 16 MB memory card (purchased
separately).
Setting Icon Description and capacity
Good This is the most memory-efficient setting, ideal
for images you want to e-mail or post to the
Internet. (16 MB memory holds
approximately 220 images)
Better This setting produces high-quality images and
requires less memory than Best setting. This is
recommended for printing images up to 20
by 25 cm (8 by 10 inches). This is the default
quality setting. (16 MB memory holds
approximately 18 images)
Best This setting produces the highest-quality
images and uses the most memory. This is
recommended if you plan to enlarge images,
or print images to a size larger than 20 by
25 cm (8 by 10 inches). (16 MB internal
memory holds approximately 11 images)
28 hp photosmart 720 user’s manual
3-Using playback and the main menu 29
Using playback and
the main menu
Using playback to view images
After you have taken some pictures or video clips and they are
stored in the camera, you can view them in Playback mode.
1 Press the OK button to activate Playback mode. The most
recently taken or viewed image appears on the Image
Display. If the image is a video clip, it begins playing
automatically within a few seconds.
2 Scroll through the images by using the Arrow buttons.
Press and hold or to scroll automatically. If a video
clip is playing, pressing the button will reset the clip to
the first frame of the video clip.
In addition to seeing the images on the Image Display, some
information about each image is also displayed above and
below the image. The following table describes the information
that may be viewed for each image.
3
30 hp photosmart 720 user’s manual
NOTE To preserve battery life, you can connect to an optional
HP AC adapter while viewing your images. For more
information about accessories for your camera, see
Appendix A: Batteries and accessories on page 69.
If you do not have images stored in your camera or on the
memory card, the No images screen appears on the Image
Display.
# Icon Description
1 Shows the quality setting for the current
image, blank if image is a video clip
2
2X
Digital zoom setting (blank if digital zoom
was not used)
3
12 of 43
Shows the current image number from the
total number of images taken
4
12.25.2001
Date the image was captured
5
or
Visible if the current image has an audio
clip attached to it
Visible if the current image is a video clip
1
2
3
4
5
3-Using playback and the main menu 31
Using the main menu
Use the Main menu to view or modify images in the camera or
to change the camera settings.
1 To view the Main menu from
Playback mode, press the OK
button. If the Image Display is off,
press the OK button twice.
2 Scroll through the Main menu
options using the Arrow
buttons and select an option with
the OK button.
The options available in the Main menu are:
Icon Description
Rotate - rotates the current image 90 degrees
clockwise
Delete - deletes the current image, all images, or
formats internal memory or the memory card. Also
lets you undo the last deletion you made.
Record Audio - allows you to add an audio clip to
still images
View Thumbnails - displays images in camera as
thumbnails (nine per page)
Magnify - magnifies the current image on the Image
Display by 3x or 6x
Setup - allows you to adjust the camera settings
Exit -exits the Main menu
32 hp photosmart 720 user’s manual
Rotating images
NOTE This option works only on still images, not video clips.
1 In Playback mode, scroll to the
image you want by using the
buttons, then press OK to display
the Main menu.
2 In the Main menu, select the
Rotate option. The current
image is rotated 90 degrees
clockwise. While the image is being rotated, a progress bar
appears below the image. If you press OK again while the
progress bar is displayed, the image is rotated again.
Deleting images
1 In Playback mode, scroll to the
image you want by using the
buttons, then press OK to display
the Main menu.
2 In the Main menu, select the
Delete option.
3 In the Delete menu, highlight your
selection, and then press OK.
Menu Item Description
This Image Deletes the current image
All Images
or
All Images on Card
Deletes all images from internal memory
or the memory card (if installed).
Format Memory
or
Format Card
Deletes all images and files from internal
memory or the memory card (if
installed), and formats either internal
memory or the memory card
3-Using playback and the main menu 33
Recording audio clips
NOTE This option works only on still images, not video clips.
1 In Playback mode, scroll to the
image you want by using the
buttons, then press OK to display
the Main menu.
2 In the Main menu, select the
Record Audio option.
Recording starts immediately, and
the time remaining appears in the lower-left portion of the
Image Display. Time remaining is based on free memory or
4:00 minutes, whichever is smaller.
3 Press OK to stop recording. Within 4 seconds of stopping,
you can press the button to cancel what was just
recorded and re-record a new audio clip.
Once an image has an audio clip attached to it, you can go
back later and change it by selecting the image, then opening
the Record Audio option again.
Undelete Appears if you have deleted any images
or video clips. Undelete restores the last
deletion you made. This option is
available until another picture or video
clip is taken, another deletion occurs, or
the camera is turned off or connected to
your computer
Exit Exits the Delete menu
Menu Item Description
34 hp photosmart 720 user’s manual
Viewing thumbnail images
1 In Playback mode, press OK to display the Main menu.
2 In the Main menu, select the View Thumbnails option.
3 Scroll through the thumbnail
images by using the buttons.
The current image is highlighted
with a yellow border. To move to
the next set of images, use the
buttons
4 To view an enlarged image, select
it, and then press OK.
Magnifying images
NOTE This option works only on still images, not video clips.
1 In Playback mode, scroll to the image you want by using
the buttons, then press OK to display the Main menu.
2 In the Main menu, select the Magnify option. This
magnifies the image to three times its size (it does not
permanently alter the image in the camera).
3 Scroll left or right in the image by
using the buttons. To scroll up
and down, press OK to display
the Magnify menu, then press OK
again to select the first icon in the
menu. Use the buttons to
scroll up and down in the image.
4 To magnify the image to six times its size, select the Magnify
More option. To return to Playback Mode, select the
Exit option.
3-Using playback and the main menu 35
Using the setup menu
The Setup menu allows you to set a number of preferences on
the camera, including:
z selecting up to three different exposure settings (exposure
compensation, white balance, and ISO) to use when taking
pictures
z setting date and time
z selecting the image to be used for the welcome screen when
the camera is turned on
z setting the USB configuration (how the camera appears
when connected to a computer)
z moving images from internal memory to a memory card
z selecting the language the camera interface will use
1 In Playback mode, press OK to
display the Main menu. If the
Image Display is off, press OK
twice to get to the Main menu.
2 In the Main menu, select the
Setup option.
36 hp photosmart 720 user’s manual
Exposure settings
Use these settings to override the camera’s automatic exposure
settings. When you change these settings manually, the current
settings appear at the top of the Image Display in Preview
mode (except when you are using Digital Zoom).
1 In the Setup menu, select
Exposure Settings.
2 In the Exposure Settings menu,
use the buttons to scroll to
Exposure Compensation ,
White Balance , or ISO ,
and press OK.
Exposure compensation
This setting ( ) alters the
exposure to compensate for lighting
conditions. Settings range from -1.5
(underexposure) to +1.5
(overexposure). To determine how
much to adjust the setting, take a
picture after you change the setting,
then examine the image in Playback mode. If the image is too
dark, increase the compensation. If the image is too bright,
decrease the compensation.
3-Using playback and the main menu 37
White balance
In some cases, it may be necessary
to pre-set the light source so the
camera can reproduce colors more
accurately. Set the White Balance
( ) according to the following
situations.
ISO
This setting ( ) adjusts how
quickly the camera reacts to light.
Higher ISO numbers allow higher
shutter speeds. Switch to higher
speeds while taking pictures in dark
areas or fast moving objects.
NOTE Higher ISO numbers can
decrease image quality, so use as low an ISO speed as
possible.
Icon Description
Auto Auto - this is the default setting
Daylight - recording outdoors on a bright day
Cloudy - recording under overcast or twilight skies
Tungsten - recording under incandescent lighting
Fluorescent 1- recording under cool or daylight
fluorescent lighting
Fluorescent 2 - recording under warm fluorescent
lighting
38 hp photosmart 720 user’s manual
Date & time
This setting determines the current date and time for the
camera. This is usually done when you first set up the camera,
but you may need to re-set the date and time when you are
travelling to different time zones or when the batteries are out
of the camera for more than10 minutes.
1 In the Setup menu, select Date & Time.
2 Follow the same procedure used in Setting the date and
time on page 17.
Welcome screen
This setting determines the image that appears when the
camera is turned on. You can select any image available in the
camera or the HP logo, which is the default setting.
1 In Playback mode, scroll to the image you want by using
the buttons, then press OK to display the Main menu.
2 In the Main menu, select the Setup option.
3 In the Setup menu, select Welcome Screen.
4 Select This Image to use the
current image, HP Logo to return
to the factory setting, or Exit to
leave the current welcome screen
unchanged.
5 Press OK to activate the selection
you made in the previous step.
3-Using playback and the main menu 39
USB configuration setting
This option determines how the
camera appears when connected to
a computer.
1 In the Setup menu, select the
USB Configuration option.
2 In the USB Configuration menu,
use the Arrow buttons to
make one of the following choices and press OK.
Digital Camera - causes the computer to recognize the
camera as a digital camera (Picture Transfer Protocol
(PTP) standard). This is the default setting on the camera.
Disk Drive - causes the computer to recognize the
camera as a disk drive (Mass Storage Device Class
(MSDC) standard). Use this setting for unloading and
sharing on a Macintosh computer or on Windows
system that does not have the HP Photo & Imaging
software installed on it.
40 hp photosmart 720 user’s manual
Move images to card
This option lets you move images from the camera’s internal
memory to a memory card. It appears only if a memory card is
installed and internal memory contains at least one image.
1 In the Setup menu, select the
option Move Images to Card.
2 If the memory card can store all of
the images from internal memory,
you are prompted to move all
images. If the memory card is
running out of space, you can
move only the number of images that will fit on the card. If
you select Yes to move images, they are moved to the card,
and all moved images are deleted from internal memory.
NOTE When a memory card is inserted, only the images on
the card can be viewed on the Image Display. To view the
images stored in internal memory, remove the memory
card.
Language
This setting determines the language of the menus and the text
on the Image Display.
1 In the Setup menu, select the Language option.
2 Follow the same procedure used in Choosing the language
on page 17.
4-Using hp instant share 41
Using hp instant
share
This camera has an exciting feature called HP Instant Share.
This feature lets you select images in the camera to be
automatically processed later when the camera is connected to
your computer or to certain HP printers.
For example, you can select images that you want to have
printed, then connect the camera to the computer or printer,
and the selected images will be printed automatically.
As another example, you can select images in the camera to
be automatically processed by HP’s e-mail service. When the
camera connects to your computer, the selected images are
e-mailed to family, friends, or any e-mail address that you
specify. The details about this are explained later in this
chapter.
When you press the Share button on the camera, the most
recently taken or viewed image appears on the Image Display,
along with any e-mail or print destinations that have been
selected for the image. The buttons allow you to scroll
through the images to see destinations for the other images in
the camera.
4
42 hp photosmart 720 user’s manual
After you press the Share button, you can activate the
Share menu by pressing OK. The following illustration and
table provide information about the Share menu.
# Icon Description
1 Print 1 copy of current image.
z On 4 by 6 inch paper, the picture is printed 4
by 6 inches (or 10 by 15 cm).
z On 8.5 by 11 inch paper, up to two 4 by 6
inch pictures (Windows) or three 4 by 6 inch
pictures (Macintosh) are printed.
z On A4 paper, up to two A6 size pictures are
printed per page.
z On A6 paper, the picture is printed at A6 size.
2 Print 2 copies of current image.
3 E-mail... Lets you add e-mail addresses to the
Share menu. This procedure is explained later in
this chapter.
4 Check mark indicates the destination has been
selected for the currently displayed image. (You
can select more than one destination per image.)
1
2
3
4
4-Using hp instant share 43
Using hp instant share to print
pictures
1 Turn on the camera, then press the Share button.
2 Use the buttons to scroll to the image you want to print.
Video clips cannot be selected for printing.
3 Press OK to activate the Share menu, then use the
buttons to scroll to the print option you want.
4 Press OK, and a appears next to that option.
5 Scroll to other images by using the buttons and repeat
steps 3 and 4 to select print options for each image.
6 When you are finished selecting all the images you want to
have printed, press the Share button.
7 The next time you connect the camera to your computer or a
compatible printer, the images you selected will be
automatically printed. See Chapter 5: Unloading, printing,
& displaying images on page 47 for information about
connecting the camera to a computer or printer.
NOTE The Share menu creates a standard Digital Print Order
Format (DPOF) file for print options.
44 hp photosmart 720 user’s manual
Using the hp instant share
e-mail service
Using HP Instant Share to e-mail images involves three steps:
1 Adding e-mail addresses to the camera’s Share menu
(using your computer and the camera together).
2 Selecting images to be e-mailed (using the Share menu on
the camera).
3 Connecting the camera to your computer to send selected
images.
Adding, modifying, and removing
e-mail addresses
NOTE You will need an internet connection to complete this
procedure.
1 Turn on the camera, press the Share button, then select
the E-mail... option and press OK. A message on the
camera Display appears asking you to connect the camera
to your computer.
2 Connect the camera to your computer (by using the USB
cable or an optional HP Camera Dock)
3 On the computer, click on Retrieve from Camera.
4 In the screen called Modify Share Menu check to see that
Photo E-mail is visible above the Add... button, then click on
the Add... button.
4-Using hp instant share 45
5 If you are using a Macintosh computer, skip to step 7. If you
are using a computer running Windows, you will be asked
to sign in to HP’s Passport program. HP Passport allows you
to use HP’s free e-mail service and other services that may
be available in the future. The first time you see this screen,
you will need to register as a new user. Follow the
instructions on the screen for doing that.
6 Once you have successfully registered, sign in to the HP
Passport program, and then the Photo E-mail Setup screen
will appear. Here, you can enter an e-mail address and
specify how you want it to appear in the camera’s Share
menu. You can also enter a subject and message to go with
the e-mail that will be sent to that address. After completing
the form, click Next. In the confirmation screen that appears,
click Finish.
7 Your newly added e-mail destination should now appear in
the Modify Share Menu screen (in the Current Share Menu
section). To add additional e-mail addresses to the camera
Share menu, repeat steps 4-6. You will not need to sign in to
the HP Passport program again.
8 When you have finished adding e-mail addresses, click on
Save to Camera to add the new addresses to the camera
Share menu. When the computer confirms that the
addresses were saved to your camera, disconnect the
camera from the computer, and press the Share button to
view the new e-mail destinations in the Share menu.
9 You are now ready to select images on the camera to be
e-mailed. See the next section for how to do this.
Selecting images to be e-mailed
1 Turn on the camera, then press the Share button.
2 Use the buttons to scroll to an image you want to e-mail.
Video clips cannot be selected for e-mail.
46 hp photosmart 720 user’s manual
3 Press OK to activate the Share menu, then use the
buttons to scroll to the e-mail destination that you want to
select.
4 Press OK to select the e-mail destination, and a check mark
appears next to that selection. (You can select more than
one e-mail destination or print option for an image.)
5 Scroll to other images by using the buttons and repeat
steps 3 and 4 to select e-mail destinations for each image.
6 When you are finished selecting all the images you want to
e-mail, press the Share button.
7 The next time you connect the camera to your computer,
images are unloaded to the computer, and the images
selected for e-mail will be sent to their respective
destinations.
The way images are e-mailed works differently on Windows
and Macintosh computers.
Windows
Images are not e-mailed directly to anyone. Rather, a message
is sent to each e-mail address that you selected in the Share
menu. The message contains a thumbnail of each of the
images that were selected for that address, as well as a link to
a web page where the recipient can view the images. From that
web page, the recipient can do things like reply to you or print
the image. This makes it easy for people who use different
e-mail programs to be able to see your images without the
difficulty of dealing with e-mail attachments.
Macintosh
Images are e-mailed directly to recipients using the default
e-mail program on your computer.
5-Unloading, printing, & displaying images 47
Unloading, printing,
& displaying images
Once you have taken pictures, you can unload them from your
camera to a computer, print them directly to a printer, or
display them on a television.
Unloading to a computer
NOTE You can also use the optional HP
Camera Dock to do this task. See
Appendix B: Camera dock on
page 73.
NOTE If you are using a Macintosh
computer, switch the camera to Disk
Drive in the USB Configuration
menu found in the Setup menu.
1 Your camera came with a special
USB cable for connecting the camera
to a computer. Connect the larger end of that USB cable to
the computer.
2 Open the memory card door on the side of the camera and
connect the small end of the USB cable to the USB connector
on the camera.
3 Turn on the camera. The HP Image Unload software will
launch on your computer, and the images in the camera will
automatically unload to the computer. If there were any
images in the camera that were selected in the Share menu
for printing or e-mail, those actions are started after the
images have been unloaded to the computer.
5
48 hp photosmart 720 user’s manual
4 When the unload screen on the computer says Finished,
your images have been saved and shared. You can now
disconnect the camera from the computer.
NOTE To unload the camera images to a computer that does
not have the HP Photo & Imaging software installed on it,
switch the camera to Disk Drive in the USB Configuration
menu found in the Setup menu. This allows the camera to
appear as another disk drive on the computer.
Printing images
NOTE You can also use the optional HP Camera Dock to do
this task. See Appendix B: Camera dock on page 73.
To print images that have been unloaded to the computer, you
can use the HP Photo & Imaging software that was shipped
with the camera.
You can also connect the camera directly to any HP DeskJet or
Photosmart printer that has a USB connection, then print
images selected from the camera Share menu or all images in
the camera.
1 Your camera came with a special USB
cable for connecting the camera
directly to a printer.
2 Connect the square end of the USB
cable to the printer.
3 Open the memory card door on the
side of the camera and connect the
small end of the USB cable to the USB
connector on the camera.
4 Adjust the settings in the Print Setup
menu on the camera to complete the printing process.
5-Unloading, printing, & displaying images 49
Displaying images on a TV
Images in your camera can easily be displayed as a slideshow
on almost any television (TV).
NOTE You can also use the optional HP Camera Dock to do
this task. See Appendix B: Camera dock on page 73.
1 To connect the camera directly to a TV,
you must first purchase an A/V
(Audio/Video) cable. For details, see
Purchasing accessories on page 71.
2 Connect the A/V cable to the TV
connector on your camera and then to
the A/V inputs on the TV.
3 Refer to the documentation for the TV
to determine how to set the TV to take
input from your camera instead of the
antenna or cable TV.
Displaying a slideshow
Once the camera is connected to the TV with the A/V cable or
the optional HP Camera Dock, you are ready to start.
1 Turn on the camera. If you are using an A/V cable, the
Slideshow menu will appear on the camera. If you are using
the HP Camera Dock, the button on the dock should light
up. Press the button, and the Slideshow menu will
appear on the camera. The options in the Slideshow menu
are described in the following table
50 hp photosmart 720 user’s manual
.
2 To change an option, highlight it and press OK. Each time
OK is pressed, the next option is selected. All selections
except Begin are stored in the camera and become the
defaults until changed.
3 To start the slideshow, select Begin. The camera’s Image
Display turns off and the slideshow starts on the TV. The
slideshow begins with the image last taken or viewed and
displays each image in sequence. When the end is reached
the sequence moves to the beginning and continues. Audio
and video clips are always played to completion, regardless
of the rate you specified in the Slideshow menu.
4 To exit the slideshow, unplug the A/V cable or press the
button on the dock.
At any time during the slideshow, you can press the buttons
to move forward or backward. Pressing and holding these keys
auto repeats similar to Playback mode.
NOTE The Main menu and Share menu are available during
the slideshow. You can rotate, delete, view thumbnails,
magnify, share, etc. during the slideshow.
Option Description
NTSC Television Used mostly in North America and Japan
PAL Television Used mostly in Europe and Asia
5 Sec/Image Displays each image for 5 seconds
10 Sec/Image Displays each image for 10 seconds
Manual Advance Waits for you to advance each image
using the buttons on the camera
Begin Starts the slideshow
6-Troubleshooting and support 51
Troubleshooting and
support
Problems and solutions
Problem Possible cause Solution
The camera
does not turn
on.
The batteries
are not
functioning
correctly or are
missing.
Use only photo-quality AA
lithium, alkaline, or
NiMH batteries.
Ensure the batteries are inserted
correctly.
The charge in the batteries can
be low or completely drained.
Try installing new or recharged
batteries.
The HP AC
adapter is
connected to
the camera,
but it is not
connected to a
power outlet.
If you want to use battery power,
disconnect the HP AC adapter
from the camera. If you want to
use AC power, connect the HP
AC adapter to a working
electrical outlet.
The HP AC
adapter is not
functioning
correctly.
Ensure that the HP AC adapter is
not damaged or defective and is
plugged into an electrical outlet
with power.
6
52 hp photosmart 720 user’s manual
The camera
does not
respond when
I press a
button.
The camera is
off.
Turn on the camera.
The camera is
connected to a
computer.
The camera buttons other than
the Power button do not respond
when the camera is connected to
a computer.
The batteries
are drained.
Replace or recharge the
batteries.
The camera
has stopped
operating.
Remove and reinsert the
batteries. Replace the batteries if
necessary.
The camera
does not take
a picture when
I press the
Shutter button.
You did not
press the
Shutter button
hard enough.
Press the Shutter
button all the
way down.
A long delay
occurs
between the
time I press the
Shutter button
and the
camera takes
a picture.
The camera
needs time to
focus and set
exposure
Press the Shutter button halfway
down to let the camera focus,
then when you press all the way
down, there is much less delay.
See Using focus lock on page 21
for more details.
The flash is
recharging.
Wait until the yellow viewfinder
light stops blinking before taking
another picture.
The Self-timer
is activated.
Turn the Self-timer off.
The camera is
still saving the
last picture you
took.
Wait a few seconds for the
camera to finish processing the
image, and then press the
Shutter button.
Problem Possible cause Solution
6-Troubleshooting and support 53
The wrong
date and/or
time is shown.
The batteries
died or were
removed from
the camera for
more than 10
minutes.
Reset the date and time by using
the camera menus. See the
section called Date & time on
page 38.
I replace the
camera
batteries
frequently.
Extended
Image Display
use and
excessive flash
use consume a
lot of battery
power.
Use an HP AC adapter to power
the camera when you are using
the Image Display for an
extended period of time and
when you are unloading several
images to your computer.
Use the flash only when needed.
Do not use ordinary alkaline
batteries. Purchase higher-grade
batteries, such as
ultra” or “premium” grade
alkaline or photo-lithium
batteries, or switch to
rechargeable NiMH batteries.
The NiMH
batteries you
are using were
recharged
incorrectly.
You must recharge all NiMH
batteries after fully draining them
four times for the batteries to
reach their optimum capacity
and performance.
Problem Possible cause Solution
54 hp photosmart 720 user’s manual
My image is
blurry.
Your subject
was too close
to the camera
lens.
Do not try to get closer than the
camera’s minimum focus range
(see Appendix C: Specifications
on page 77).
You moved the
camera while
you took the
picture.
Hold the camera steady as you
press the Shutter button or use a
tripod.
The light is low
and the flash is
turned off.
In dim light, the camera requires
a longer exposure. Use a tripod
to hold the camera steady,
improve lighting conditions, or
use the flash.
My image is
too dark.
There was not
enough light.
Wait for natural lighting
conditions to improve, add
indirect lighting, or adjust the EV
compensation.
The flash was
on, but the
subject was
too far away.
Make sure your subject is within
the flash working distance (see
Appendix C: Specifications on
page 77) or try turning flash off
(will require longer exposure).
A light shone
behind the
subject.
Use the Flash On setting to
brighten the subject when there
is a bright light such as the sun
or a window behind your
subject.
Your finger
blocked the
flash.
Be sure to move your fingers
away from the flash when you
take a picture.
Problem Possible cause Solution
6-Troubleshooting and support 55
My image is
too bright.
The flash
provided too
much light.
Change the flash setting to Flash
Off.
A natural or
artificial
source other
than the flash
provided too
much light.
Try taking the picture from a
different angle. Avoid pointing
the camera directly toward a
bright light or reflective surface
on a sunny day. If there is light
behind your subject, use the
Flash On setting. Adjust the EV
compensation.
You were too
close to the
subject to use
the flash.
Move back from the subject or
set the flash to Flash Off and
take the picture again.
When I
connect the
camera to my
computer, the
software says
it cannot find
the camera.
The camera is
turned off.
Turn on the camera.
The cable is
not connected
correctly.
Make sure that the cable is firmly
connected at both ends.
The camera is
connected to
the computer
through a USB
hub and your
USB hub is not
compatible
with the
camera.
Connect the camera directly to a
USB port on the computer.
Problem Possible cause Solution
56 hp photosmart 720 user’s manual
Error messages
You may receive error messages on the camera’s Image
Display, or on your computer screen.
Error messages on the camera
When I
connect the
camera to a
Macintosh
computer, I do
not get a Disk
Drive icon on
my desktop.
The USB
Configuration
setting is not
set to Disk
Drive.
Change the USB Configuration
setting to Disk Drive.
Message Possible cause Solution
BATTERIES
DEPLETED
Camera is
shutting down
Battery power is
too low to
continue
operation.
Replace or recharge
batteries, or use an
optional HP AC adapter.
Batteries are too
low for Preview
Battery power is
too low to use
Preview mode.
Take pictures with the
Image Display turned off.
Replace or recharge
batteries, or use an
optional HP AC adapter.
Batteries are too
low to record a
video clip.
Battery power is
too low to record
a video clip.
Replace or recharge
batteries, or use an
optional HP AC adapter
during video recording.
Problem Possible cause Solution
6-Troubleshooting and support 57
Unsupported card The card in the
memory slot is
not a memory
card or is not a
supported
memory card.
Ensure that the card is the
proper type for your
camera (see Appendix C:
Specifications on
page 77).
The card requires
formatting
The memory
card needs to be
formatted.
Press OK to display the
Format Card option in the
Delete menu. This will
delete all data on the card.
The card is locked The memory
card is write-
protected.
Unlock the memory card
(latch on edge of card) or
insert a new card.
The card is too full
to move any
images
There is
insufficient room
to move images
to the memory
card.
Unload images from the
memory card to your
computer, then delete all
images on the memory
card.
Invalid date The date was set
incorrectly.
Enter the correct date.
Unsupported
image file
You are trying to
record audio,
magnify, rotate,
or print an
image file that
was not created
by this camera.
Use the computer software
to manipulate the file.
Memory is too full
OR
The card is too full
There is
insufficient room
to rotate an
image or to
record audio.
Unload the images from
the camera or delete
unwanted images.
Message Possible cause Solution
58 hp photosmart 720 user’s manual
Unknown USB
device
The connected
USB device is not
a printer.
Disconnect the current USB
connection and connect to
your printer.
Unsupported
printer
The printer is an
unsupported
device.
Disconnect the USB cable,
and connect to a
supported printer, such as
HP Photosmart or HP
Deskjet.
Unable to
communicate with
printer
The printer has a
problem.
Check the printer.
Disengage photo
tray
The selected
paper size
cannot be used
with the printer
photo tray
Disengage the printer
photo tray, or change the
paper size.
Printer top cover
is open
The printer is
open.
Close the top cover of the
printer.
Incorrect or
missing print
cartridge
The printer
cartridge is the
incorrect model
or is missing.
Install a new printer
cartridge, turn the printer
off, then turn it back on.
Printer has a
paper jam.
There is a paper
jam or the
printer carriage
has stalled.
Turn off the printer. Clear
the paper jam, and then
turn on the printer.
Message Possible cause Solution
6-Troubleshooting and support 59
Error messages on the computer
Printer is out of
paper.
Your printer is
out of paper.
If OK is visible on the
Image Display, load paper
and then press OK on the
camera. Otherwise, load
paper, and then press OK
or Continue on your
printer.
Printing canceled The print job has
been canceled.
Press the OK button on the
camera. Complete the
print request again.
Any error code
numbers that
appear
The camera is
having a
problem that HP
needs to fix
Call HP Support (see
Getting assistance on
page 60).
Message Possible cause Solution
Connection
between the
imaging device
and computer
failed
The camera
might be
connected to a
computer
through a USB
hub.
Try connecting the camera
directly to the computer,
or disconnect other
devices attached to the
hub.
The software says
it cannot find the
connected
camera
The camera is
not working
correctly.
Connect the camera
directly to a USB-enabled
HP DeskJet or Photosmart
printer and print an
image. This will verify that
the image, memory, USB
connection and the USB
cable are functioning
correctly or identify the
failure.
Message Possible cause Solution
60 hp photosmart 720 user’s manual
Getting assistance
Finding help on the web
HP product support
Visit www.hp.com/cposupport/loc/regional.html, select your
language, and then type your camera model in thequick
find” box to find information about setting up and using your
camera, downloading drivers, solving a problem, ordering,
and warranty information.
HP photosmart website
Visit www.hp.com/photosmart for tips on using your camera
more effectively and creatively as well as HP digital camera
driver updates and software.
HP accessibility website
Visit www.hp.com/hpinfo/community/accessibility/prodserv
if you have a disability and need help.
Contacting hp customer support
In addition to the Web, you can contact HP by telephone or
mail for support and service for your camera. Prices,
availability, and hours of support are subject to change without
notice.
How hp can help
The HP support hotline can help resolve problems with setup,
installation, configuration, and operation. For help with non-HP
hardware or software, please contact the manufacturer.
6-Troubleshooting and support 61
Before you call
Review troubleshooting tips.
Have the following information ready before you call:
z serial number (found on the bottom of your camera)
z product name
z date of purchase
Service is free of charge during the warranty period. Beyond
the warranty period, a service fee will be charged.
Obtaining support in the United
States
Free telephone support for one year
Within one year of your purchase, telephone support is
provided to you free of charge. If this is a long distance call for
you, long distance charges will apply.
Call (1) (208) 323-2551.
Our support staff is available from 6 am to 10 pm Mountain
Time, Monday through Friday, or 9 am to 4 pm Saturday.
If you think your HP product might need service, call HP
Customer Support, which can help determine if service is
required. Or, visit www.hp.com/cpsosupport/guide/psd/
repairhelp.html for the nearest sales and service office.
After the first year
Call (1) (208) 323-2551.
A fee of $25.00 per call (U.S.) will be charged to your credit
card. Charges begin only when you connect with a support
technician.
62 hp photosmart 720 user’s manual
Upgraded warranty options
You can select one of the following upgraded warranty options
(available in the U.S. only):
z Standard Next Day Exchange
z Accidental Damage Protection with Next Day Exchange
Upgrade your standard factory warranty to three years with
the HP SupportPack. Service coverage begins on product
purchase date and the pack must be purchased within the first
180 days of product purchase. HP will determine the hardware
service offering based upon the outcome of system self-test
programs run by the customer through the initial call to the HP
Customer Care Center. If during your technical support call it is
determined that your product needs replacement, HP will ship
you this replacement product next business day free of charge.
Optional Accidental Damage Protection is also available. This
warranty upgrade protects against accidental breakage such
as spills, drops, or falls. Both of these warranty upgrades offer
maximized uptime and productivity, the convenience of door-
to-door pickup with delivery, packaging and freight prepaid by
HP.
For more information call 1-888-999-4747 or visit
www.homeandoffice.hp.com and selectwarranty upgrades
under “product support.
Obtaining support worldwide
Telephone support is free for one year in Asia and the South
Pacific, and for 30 days in the Middle East and Africa.
The information contained in this document and the applicable
conditions for HP phone support are subject to change without
notice. Please check for the latest information and conditions at
www.hp.com/cposupport/loc/regional.html.
6-Troubleshooting and support 63
Alternatively, you can ask your dealer or call HP at the phone
number listed in this document. For English support in Europe,
contact +44 (0) 207 512 52 02.
Algeria +213 (0) 61-56-45-43
Argentina 0-810-555-5520
Australia +63 (3) 8877 8000 (or local (03) 8877 8000)
Austria +43 (0) 810-00-6080
Bahrain 800-728
Belgium Dutch: +32 (0)2 626 8806
French: +32 (0)2 626 8807
Brazil (11) 4689-2012 (Grande São Paulo)
0800-157751 (outside Grande São Paulo)
Canada 905-206-4663 (during the warranty period)
877-621-4722 (after the warranty period)
Chile 800 360 999 (Post-sales Home Computing)
China +86 (10) 6564 5959
Colombia 9-800-114-726
Czech Republic +42 (0)2 6130 7310
Denmark +45 39 29 4099
Egypt 02 532 5222
Finland +358 (0)203 47 288
France +33 (0)8 92 69 60 22 (Euro 0.34/minute)
Germany +49 (0)180 52 58 143 (Euro 0.12/minute)
Greece +30 10-60-73-603
Guatemala 1 800 999 5305
64 hp photosmart 720 user’s manual
Hong Kong SAR +852 3002 8555
Hungary +36 (0)1 382 1111
India 1 600 112267 or +91 11 682 6035
Indonesia +62 (21) 350 3408
Ireland +353 (0)1 662 5525
Israel +972 (0) 9-830-4848
Italy +39 02 264 10350
Japan 0570-000-511 (inside Japan)
+81 3 3335-9800 (outside Japan)
Korea, Republic of +82 (2) 3270 0700 (Seoul)
0-80-999-0700 (outside Seoul)
Malaysia 1-800-805-405
Mexico 52 58 9922 (Mexico City)
01-800-472-6684 (outside Mexico City)
Middle East/Africa +44 (0) 207 512 52 02
Morocco +212 224-04747
Netherlands +31 (0)20 606 8751
New Zealand +64 (9) 356 6640
Norway +47 22 11 6299
Peru 0 800 10111
Philippines +63 (2) 867-3551
Poland +48 22 865 98 00
Portugal +351 21 3176333
Puerto Rico 1 877 232 0589
6-Troubleshooting and support 65
Romania +40 1 315 44 42 (or local 01 3154442)
Russian Federation +7 095 797 3520 (Moscow)
+7 812 346 7997 (St. Petersburg)
Saudi Arabia 800 897 14440
Singapore +65 6272-5300
Slovakia +421-2-68208080
South Africa 086 000 1030 (RSA)
+27-11 258 9301 (outside RSA)
Spain +34 902 321 123
Sweden +46 (0)8 619 2170
Switzerland +41 (0)848 80 11 11
Taiwan 0 800 01 0055
Thailand +66 (2) 661 4000
Tunisia +216 6272-5300
Turkey +90 216 579 71 71
Ukraine +7 (380-44) 490-3520
United Arab Emirates 971 4 883 8454
United Kingdom (UK) +44 (0) 207 512 52 02
Venezuela 0 800 4746 8368
Viet Nam +84 (0) 8 823 4530
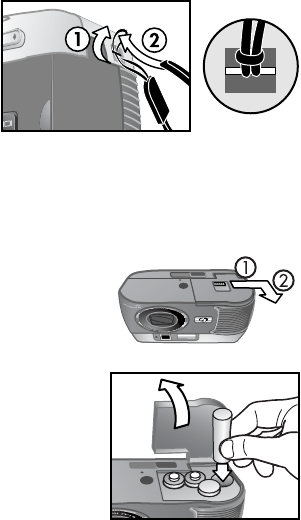
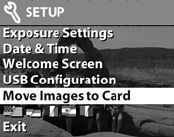
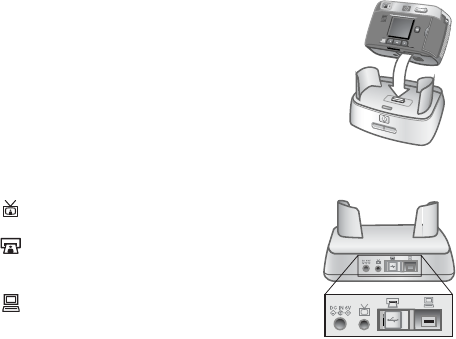
66 hp photosmart 720 user’s manual
Hewlett-Packard limited
warranty statement
The HP photosmart 720 camera comes with a one year limited
warranty.
z HP warrants to you, the end-user customer, that HP hardware,
accessories, software, and supplies will be free from defects in
materials and workmanship after the date of purchase, for the
period specified above. If HP receives notice of such defects during
the warranty period, HP will, at its option, either repair or replace
products which prove to be defective. Replacement products may be
either new or equivalent in performance to new.
z HP warrants to you that HP software will not fail to execute its
programming instructions after the date of purchase, for the period
specified above, due to defects in material and workmanship when
properly installed and used. If HP receives notice of such defects
during the warranty period, HP will replace software which does
not execute its programming instructions due to such defects.
z HP does not warrant that the operation of HP products will be
uninterrupted or error free. If HP is unable, within a reasonable
time, to repair or replace any product to a condition as warranted,
you will be entitled to a refund of the purchase price upon prompt
return of the product.
z HP products may contain remanufactured parts equivalent to new in
performance or may have been subject to incidental use.
z Warranty does not apply to defects resulting from (a) improper or
inadequate maintenance or calibration, (b) software, interfacing,
parts or supplies not supplied by HP, (c) unauthorized modification
or misuse, (d) operation outside of the published environmental
specifications for the product, or (e) improper site preparation or
maintenance.
z TO THE EXTENT ALLOWED BY LOCAL LAW, THE ABOVE
WARRANTIES ARE EXCLUSIVE AND NO OTHER WARRANTY OR
CONDITION, WHETHER WRITTEN OR ORAL, IS EXPRESSED OR
IMPLIED AND HP SPECIFICALLY DISCLAIMS ANY IMPLIED
WARRANTIES OR CONDITIONS OF MERCHANTABILITY,
SATISFACTORY QUALITY, AND FITNESS FOR A PARTICULAR
6-Troubleshooting and support 67
PURPOSE. Some countries, states or provinces do not allow
limitations on the duration of an implied warranty, so the above
limitation or exclusion might not apply to you. This warranty gives
you specific legal rights and you might also have other rights that
vary from country to country, state to state, or province to province.
z HP’s limited warranty is valid in any country or locality where HP
has a support presence for this product and where HP has marketed
this product. The level of warranty service you receive may vary
according to local standards. HP will not alter form, fit or function of
the product to make it operate in a country for which it was never
intended to function for legal or regulatory reasons.
z TO THE EXTENT ALLOWED BY LOCAL LAW, THE REMEDIES IN
THIS WARRANTY STATEMENT ARE YOUR SOLE AND EXCLUSIVE
REMEDIES. EXCEPT AS INDICATED ABOVE, IN NO EVENT WILL
HP OR ITS SUPPLIERS BE LIABLE FOR LOSS OF DATA OR FOR
DIRECT, SPECIAL, INCIDENTAL, CONSEQUENTIAL (INCLUDING
LOST PROFIT OR DATA), OR OTHER DAMAGE, WHETHER BASED
IN CONTRACT, TORT, OR OTHERWISE. Some countries, states or
provinces do not allow the exclusion or limitation of incidental or
consequential damages, so the above limitation or exclusion may
not apply to you.
z THE WARRANTY TERMS CONTAINED IN THIS STATEMENT,
EXCEPT TO THE EXTENT LAWFULLY PERMITTED, DO NOT
EXCLUDE, RESTRICT OR MODIFY AND ARE IN ADDITION TO THE
MANDATORY STATUTORY RIGHTS APPLICABLE TO THE SALE OF
THIS PRODUCT TO YOU.
Regulatory information
For regulatory information, see the regulatory_supplement.htm
file on the software CD that came with your camera.
68 hp photosmart 720 user’s manual
Appendix A: Batteries and accessories 69
Appendix A: Batteries
and accessories
Managing batteries
When the batteries are removed from the camera, the date and
time settings are preserved for approximately 10 minutes. If the
camera is without batteries for longer than 10 minutes, the
clock is set to the last time and date at which the camera was
used. You may be prompted to update the date and time.
The following battery levels are displayed on the Status LCD
and the Image Display.
The camera uses four AA batteries. Acceptable batteries
include photo-lithium, “ultra” or “premium” grade alkaline, or
rechargeable NiMH. For the best results with your camera, use
photo-lithium or NiMH batteries.
NOTE If you do not intend to use your camera for extended
periods of time (more than a month), we strongly
recommend that you remove the batteries from the
camera.
Icon Level Description
Full Batteries have 30 –100 percent
remaining
Partially full Batteries have 10 – 30 percent
remaining
Empty Batteries have less than 10 percent
remaining
None N/A Camera is operating on AC power
70 hp photosmart 720 user’s manual
Extending battery life
z Use an optional HP AC adapter or HP Camera Dock when
unloading pictures to your computer, printing, or connecting
to the TV.
z Use the optical viewfinder to frame pictures instead of the
Image Display. Leave the Image Display off when the
camera is on.
z Turn the camera off during a pause in picture taking.
z Use the Auto Flash setting rather than Flash On or Red-eye
Reduction.
Rechargeable batteries
Nickel Metal Hydride (NiMH) batteries can be recharged by
using a battery charger, the HP Camera Dock, or in the
camera when it is connected to the AC adapter. Some things to
keep in mind when using NiMH batteries are:
z Always recharge all four NiMH batteries at the same time.
One low-charged battery will reduce the battery life for all
four batteries in the camera.
z For NiMH batteries to reach optimal capacity and
performance, they should first be discharged completely
and recharged four separate times.
z After long-term storage of NiMH batteries, recharge them
before using them again. Battery cells generally discharge
at about 1 percent per day at room temperature.
Appendix A: Batteries and accessories 71
Power conservation
To conserve battery power, the Image Display turns off
automatically if there is no button activity for 60 seconds. If no
buttons are pressed for 10 minutes, the camera turns off (unless
it is printing or connected to a computer or TV).
Purchasing accessories
You can purchase additional accessories for your camera from
your local retailer or online at www.hpshopping.com. Some
accessories for the HP photosmart 720 digital camera are
listed below:
z HP AC power adapter (HP Supports only HP AC adapters
and other accessories expressly approved by HP)
North America—C8875A #001
Outside of North America—C8875A #002
z HP Photosmart 8881 Camera Dock
z Secure digital (SD) memory card only (128 MB is the
maximum usable card size)
z HP audio/video accessory cable
(C6324-61601) to connect to a
television.
Note: You can also use any
Y-adapter audio cable with dual
RCA plugs on one end and a 1/8 inch (3.175 mm)
mini-stereo jack on the other end. You will also need an
adapter plug that accepts a 1/8 inch (3.175 mm) jack and
fits into a 3/32 inch (2.38 mm) phone jack.
72 hp photosmart 720 user’s manual
z HP Digital Camera Accessory Kit (Y1788 for United States,
Y1789 for outside the United States). Contents include:
Camera bag
Rechargeable NiMH batteries
Battery charger
z HP Digital Camera Accessory Kit (C8884A). Contents
include:
Camera bag
Rechargeable NiMH batteries
Battery charger
32 MB SD memory card
Tripod
Appendix B: Camera dock 73
Appendix B: Camera
dock
NOTE The HP Camera Dock does not work without AC
power. Be sure to use ONLY the HP AC adapter and the
cables that came with the Camera Dock.
1 Follow the setup instructions provided with the Camera
Dock. This includes installing the Dock Insert onto the dock,
installing rechargeable batteries in the camera, connecting
the AC power source, and connecting the Camera Dock to a
computer, printer, and/or television.
2 Make sure your camera is set up
correctly and remove any cables that
may be attached to it before putting
it in the dock.
3 Place the camera in the Camera
Dock with the rear of the camera
facing the front of the Camera Dock.
The Camera Dock has three I/O connectors on the back:
—Connects to the television
—Connects directly to HP USB
DeskJet and Photosmart printers
—Connects to your computer
There is a sliding door over the
computer and printer connectors that
prevents you from using both connectors at the same time (the
Camera Dock is not a USB hub).
74 hp photosmart 720 user’s manual
The Camera Dock has a light near
the top front that provides battery
charging status. A blinking light
indicates that batteries are charging.
There are two buttons on the front
that light up, showing the camera is
connected to the associated device.
—This button activates the
connection to the computer or the printer, depending on which
of those devices is connected to the dock.
—This button activates the television connection.
The functions of the dock button lights are described below:
State Indication
On Camera Dock has power and a device is
connected. When you press a button for one
device, the other button device light goes out.
Blinking The associated device is active.
Off z The associated device is not connected to the
Camera Dock.
z The associated device is not available because
the other device is active.
z Camera Dock has no power or there is no
camera connected.
Appendix B: Camera dock 75
Unloading images to a
computer using the dock
NOTE If you are using a Macintosh computer, switch the
camera to Disk Drive in the USB Configuration menu
found in the Setup menu.
1 Check that the HP Camera Dock is connected to your
computer.
2 Place the camera in the Camera Dock. It will turn on
automatically, and a dock intro screen will appear.
3 Press the button on the dock to start the unload
process. The HP Image Unload software will launch on your
computer, and the images in the camera will automatically
unload to the computer. If there were any images on the
camera that had been selected in the Share menu for
printing or e-mail, those actions are started after the images
have been unloaded to the computer.
4 The camera will return to the dock intro screen when your
images have been saved and shared. You can now take the
camera out of the dock, or leave it there to recharge the
camera batteries.
76 hp photosmart 720 user’s manual
Printing images using the dock
1 Check that the HP Camera Dock is connected to your
printer. (The dock cannot be connected directly to both a
computer and a printer at the same time).
2 Place the camera in the Camera Dock. It will turn on
automatically, and a dock intro screen will appear.
3 Press the button on the dock to start printing.
4 Adjust the settings in the Print Setup menu on the camera to
complete the printing process.
5 The camera will return to the dock intro screen when
printing is complete. You can now take the camera out of
the dock, or leave it there to recharge the camera batteries.
Displaying images on a TV
using the dock
1 Check that the HP Camera Dock is connected to your TV.
2 Refer to the documentation for your TV to determine how to
set the TV to take video input from your camera instead of
the antenna or cable TV.
3 Place the camera in the dock. It will turn on automatically,
and a dock intro screen will appear.
4 Press the button on the dock, and the Slideshow menu
will appear on the camera’s Image Display.
The rest of this procedure is described in the section Displaying
a slideshow on page 49.
Appendix C: Specifications 77
Appendix C:
Specifications
Feature Description
Resolution 3.15 MP (2048 by 1536 effective pixel count)
3.34 MP (2140 by 1560 total pixel count)
Sensor Diagonal 8.933 mm (Type 1/1.8) CCD
Color depth 30-bit (10 colors by 3 colors)
Capture types Still, Self-timer, Burst, and Video
Memory 16 MB internal memory
Slot for a Secure Digital (SD) memory card
(not MMC card)
Still image
capacity
(for 16 MB of
memory)
Image Approx. File
Quality # Images Size Resolution
220 60 KB 640 by 480
18 800 KB 2048 by 1536
11 1200 KB 2048 by 1536
Lens
Focal length
Wide7 mm
Telephoto – 21 mm
F-Number
Wide – f/2.6 and f/5.9
Telephoto – f/4.8 and f/10.0
Viewfinder Zooming optical viewfinder
78 hp photosmart 720 user’s manual
Zoom 3x optical, 4x digital zoom
7 mm to 21 mm (35 mm equivalent is
approximately 34 mm to 102 mm)
Focus TTL auto focus
Wide: 20 cm to infinity
Telephoto: 20 cm to infinity
Shutter speed 1/1000 to 2 seconds
Flash settings Auto, Red-eye Reduction, Flash On, Flash Off
Flash working
distances
Wide zoom—3.6 m
Telephoto zoom—2.0 m
Exposure
control
Automatic exposure (default)
Can be set manually from -1.5 to +1.5 in 0.5
increments
ISO
(Sensitivity)
Automatic (default)
Can be set manually to 100, 200, and 400
Metering Average
White
Balance
Automatic (default)
Can be set manually to Daylight (5000K),
Cloudy (6500K), Tungsten (2600K),
Fluorescent 1 (6000K), and Fluorescent 2
(3600K)
Image Display
LCD
Color LED Backlit, 1.6 inches (4.1 cm)
polysilicon TFT LCD
Status LCD 10 mm by 25 mm viewable area
Self-Timer 10 second delay
Feature Description
Appendix C: Specifications 79
Audio capture
Still pictures
Up to 4:00 minutes of audio annotation can
be added to each still picture (limited by
available memory)
Video
Audio captured automatically with video
Compressed
format
JPEG (EXIF) for still images
Motion JPEG for video clips
Power 4 AA batteries (included)
Optional HP AC adapter (6V, 2000 mA)
C8875A #001 - North America
C8875A #002 - outside of North America
Slow trickle recharging in camera with
optional HP AC adapter or HP Camera Dock
(100% in 15 hours)
Automatic advanced power management
The camera has a maximum power
consumption of 5 watts (1.2 amps)
Interfaces
z USB to a computer or USB to HP DeskJet
and Photosmart printers
z Audio/Video out to TV
z DC IN 6V
z HP Camera Dock
Feature Description
80 hp photosmart 720 user’s manual
Standards z PTP transfer (15740)
z MSDC transfer
z NTSC/PAL
z JPEG
z Motion JPEG
z DPOF-1
z EXIF
z DCF
Tripod mount Yes
Dimensions External Body Dimensions:118 mm (L) by 52
mm (W) by 75 mm (H)
With lens fully extended:118 mm (L) by 80
mm (W) by 75 mm (H)
Weight 255 grams without batteries
Warranty HP 1 year exchange warranty
Feature Description
Index
81Index
A
AA batteries 69
AC power adapter
connector 10
HP part number 71, 79
accessories for camera 71
alkaline batteries 69
arrow buttons 10
audio clips, record 12
audio clips,record 23, 33
audio/video
cable 71
connector 10, 49
Auto Flash
setting 26
status icon 14
B
batteries
condition icons 69
condition status icon 14
door on camera 12
extend life 70
install 15
rechargeable 70
types to use 69
view levels of life 69
Best quality setting
description 27
resolution 77
Better quality setting
description 27
resolution 77
blinking lights
on camera 11, 21
on dock 74
bonus software 18, 19
burst
button 13
status icon 14
take pictures with 24
buttons
on camera 10
on Camera Dock 74
C
Camera Dock. See HP Camera
Dock
compression format 79
computer
connect camera to 47
connect dock to 73
connections
as a USB Mass Storage Device
Class (MSDC) 39
to Camera Dock 73
to computer 47
to printer 48
to TV 49
USB 39
connectors
audio/video 10, 49
HP Camera Dock 12, 73
power adapter 10
TV 10
USB 10
customer support 60
82 Index
D
date and time
change 38
set 17
delete
images and files 32
images during Instant Review
22
video clips during Instant
Review 22
Digital Print Order Format 43
digital zoom 25
disk drive, connect as 39
Display button 10
dock. See HP Camera Dock
DPOF 43
E
e-mail
addresses, customizing the
Share menu 44
images using HP Instant Share
41
empty batteries, icon 69
enlarge view of images 34
error messages
on camera 56
on computer 59
exposure compensation, setting
36
exposure settings 36
F
files
compression formats 77
delete on memory card 32
DPOF 43
size versus quality 27, 77
flash
button 13
light 12
range 78
settings 26
Flash Off
setting 26
status icon 14
Flash On
setting 26
status icon 14
focus
lock 21
range 78
format memory 32
full batteries, icon 69
G
Good quality setting
description 27
resolution 77
H
help from customer support 60
HP Camera Dock
buttons 74
connect to 12, 73
description 9
display to TV 76
Dock Insert 9, 73
printing from 76
unload images 75
HP Instant Share
button 11
description 9, 41
turn on/off 11
HP web sites 60
83Index
I
Image Display 11
image quality
button 13
status icon 14
images
delete 32
magnify view in camera 34
move from internal memory to
card 40
quality settings 27, 77
remaining in camera 14, 23
rotate 32
thumbnails 34
unloading camera to
computer 47
unloading using Camera Dock
75
view 29
install
batteries 15
bonus software 18, 19
Camera Dock 9
memory card 16
software 18
Instant Share. See HP Instant
Share
internal memory, move images
to memory card 40
ISO, setting 37
L
language
change 40
choose at startup 17
LEDs (lights) on camera
description 10
life of batteries, view 69
lights
on camera, blinking 11, 21
on dock, blinking 74
lock focus 21
M
Macintosh computer
bonus software 19
connect to 47, 75
install software 19
USB setting on camera 39
magnify view of images 34
Main menu 31
on/off button 11
memory card
capacity 77
delete files 32
door 10
install 16
move images to 40
slot 10
status icon 14
menu, Main 31
messages
on camera 56
on computer 59
microphone 12
mount for tripod 12
move images to memory card
40
N
NiMH batteries 69
NTSC video format 50
number of images remaining 23
number of images remaining,
status icon 14
84 Index
O
OK button 11
optical viewfinder 11
optical zoom 25
P
PAL video format 50
photo-lithium batteries 69
Picture Transfer Protocol 39
pictures
instant review 22
review 29
share 41
take 21
thumbnails 34
play video clips 29
Playback mode 29
power
adapter 10
battery level icons 69
button 13
specifications 79
turn on/off 16
Preview mode 23
print images
directly from camera 48
from computer 48
using Camera Dock 76
using HP Instant Share 41
printer
connect dock to 73
connect to camera 48
problems
troubleshooting 51
PTP 39
Q
quality button 13
quality levels
description 27, 77
R
range
flash 78
focus 78
rechargeable batteries 70
record
audio clips 23, 33
video clips 22
record audio clips 12
recycling information 3
Red-eye Reduction
setting 26
status icon 14
review pictures 22
rotate images 32
S
SD card status icon 14
self-timer
button 13
light 12
status icon 14
take pictures with 24
Setup menu 35
Share button 11
Share menu
customize 44
description 42
e-mail service 44
printing options 43
share pictures 41
shutter button
description 13
speed 78
85Index
slideshow
display on TV 49
menu 50
software
bonus 18, 19
install 18
speaker 11
specifications 77
status LCD
icons 14
location 13
T
thumbnail images, view 34
time and date
change 38
set 17
tripod mount 12
troubleshoot problems 51
turn on/off
camera power 13, 16
HP Instant Share 11
Main menu 11
Preview mode 10, 23
TV
button, Camera Dock 74
cable to connect camera 71
configuration setting 50
connect camera to 49
connect dock to 73, 76
connector 10
U
unloading images
camera to computer 47
using Camera Dock 75
USB
change configuration 39
connector, camera 10
connector, Camera Dock 73
V
video
button 13
light 12
recording status icon 14
video clips
play 29
record 22
view
battery life level 69
camera status icons 14
images in camera 29
magnified images 34
thumbnail images 34
viewfinder 11
viewfinder light, description 11
W
warranty 66
warranty upgrade options 62
Web sites for HP 60
welcome screen, customize 38
white balance, setting 37
Windows computer
bonus software 18
install software 18
wrist strap
mount points on camera 12
procedure for attaching 15
86 Index
Z
zoom
button 11
specifications 78
use optical or digital 25
www.hp.com/photosmart
Printed in Singapore 2002
Q2164-90010
*Q2164−90010*
82

Hulp nodig? Stel uw vraag in het forum

Spelregels

Misbruik melden

Gebruikershandleiding.com neemt misbruik van zijn services uitermate serieus. U kunt hieronder aangeven waarom deze vraag ongepast is. Wij controleren de vraag en zonodig wordt deze verwijderd.

Product:

Bijvoorbeeld antisemitische inhoud, racistische inhoud, of materiaal dat gewelddadige fysieke handelingen tot gevolg kan hebben.

Bijvoorbeeld een creditcardnummer, een persoonlijk identificatienummer, of een geheim adres. E-mailadressen en volledige namen worden niet als privégegevens beschouwd.

Spelregels forum

Om tot zinvolle vragen te komen hanteren wij de volgende spelregels:

Belangrijk! Als er een antwoord wordt gegeven op uw vraag, dan is het voor de gever van het antwoord nuttig om te weten als u er wel (of niet) mee geholpen bent! Wij vragen u dus ook te reageren op een antwoord.

Belangrijk! Antwoorden worden ook per e-mail naar abonnees gestuurd. Laat uw emailadres achter op deze site, zodat u op de hoogte blijft. U krijgt dan ook andere vragen en antwoorden te zien.

Abonneren

Abonneer u voor het ontvangen van emails voor uw HP Photosmart 720 bij:


U ontvangt een email met instructies om u voor één of beide opties in te schrijven.


Ontvang uw handleiding per email

Vul uw emailadres in en ontvang de handleiding van HP Photosmart 720 in de taal/talen: Engels als bijlage per email.

De handleiding is 1,41 mb groot.


U ontvangt de handleiding per email binnen enkele minuten. Als u geen email heeft ontvangen, dan heeft u waarschijnlijk een verkeerd emailadres ingevuld of is uw mailbox te vol. Daarnaast kan het zijn dat uw internetprovider een maximum heeft aan de grootte per email. Omdat hier een handleiding wordt meegestuurd, kan het voorkomen dat de email groter is dan toegestaan bij uw provider.

Stel vragen via chat aan uw handleiding

Stel uw vraag over deze PDF

Andere handleiding(en) van HP Photosmart 720

HP Photosmart 720 Gebruiksaanwijzing - Nederlands - 80 pagina's

HP Photosmart 720 Gebruiksaanwijzing - Deutsch - 94 pagina's


Uw handleiding is per email verstuurd. Controleer uw email

Als u niet binnen een kwartier uw email met handleiding ontvangen heeft, kan het zijn dat u een verkeerd emailadres heeft ingevuld of dat uw emailprovider een maximum grootte per email heeft ingesteld die kleiner is dan de grootte van de handleiding.

Er is een email naar u verstuurd om uw inschrijving definitief te maken.

Controleer uw email en volg de aanwijzingen op om uw inschrijving definitief te maken

U heeft geen emailadres opgegeven

Als u de handleiding per email wilt ontvangen, vul dan een geldig emailadres in.

Uw vraag is op deze pagina toegevoegd

Wilt u een email ontvangen bij een antwoord en/of nieuwe vragen? Vul dan hier uw emailadres in.


Info