673725
71
Verklein
Vergroot
Pagina terug
1/77
Pagina verder
User Guide
© Copyright 2017, 2018 HP Development
Company, L.P.
Bluetooth is a trademark owned by its
proprietor and used by HP Inc. under license.
Intel, Celeron, Pentium, and Thunderbolt are
trademarks of Intel Corporation in the U.S. and
other countries. Windows is either a registered
trademark or trademark of Microsoft
Corporation in the United States and/or other
countries.
The information contained herein is subject to
change without notice. The only warranties for
HP products and services are set forth in the
express warranty statements accompanying
such products and services. Nothing herein
should be construed as constituting an
additional warranty. HP shall not be liable for
technical or editorial errors or omissions
contained herein.
Second Edition: March 2018
First Edition: June 2017
Document Part Number: 926689-002
Product notice
This guide describes features that are common
to most products. Some features may not be
available on your computer.
Not all features are available in all editions or
versions of Windows. Systems may require
upgraded and/or separately purchased
hardware, drivers, software or BIOS update to
take full advantage of Windows functionality.
Windows 10 is automatically updated, which is
always enabled. ISP fees may apply and
additional requirements may apply over time
for updates. Go to http://www.microsoft.com
for details.
To access the latest user guides or manuals for
your product, go to http://www.hp.com/
support, and follow the instructions to nd
your product. Then select User Guides.
Software terms
By installing, copying, downloading, or
otherwise using any software product
preinstalled on this computer, you agree to be
bound by the terms of the HP End User License
Agreement (EULA). If you do not accept these
license terms, your sole remedy is to return the
entire unused product (hardware and software)
within 14 days for a full refund subject to the
refund policy of your seller.
For any further information or to request a full
refund of the price of the computer, please
contact your seller.
Safety warning notice
WARNING! To reduce the possibility of heat-related injuries or of overheating the computer, do not place the
computer directly on your lap or obstruct the computer air vents. Use the computer only on a hard, at
surface. Do not allow another hard surface, such as an adjoining optional printer, or a soft surface, such as
pillows or rugs or clothing, to block airow. Also, do not allow the AC adapter to come into contact with the
skin or a soft surface, such as pillows or rugs or clothing, during operation. The computer and the AC adapter
comply with the user-accessible surface temperature limits dened by the International Standard for Safety
of Information Technology Equipment (IEC 60950).
iii
iv Safety warning notice
Processor conguration setting (select products only)
IMPORTANT: Select products are congured with an Intel® Pentium® N35xx/N37xx series or a Celeron®
N28xx/N29xx/N30xx/N31xx series processor and a Windows® operating system. If your computer is
congured as described, do not change the processor conguration setting in mscong.exe from 4 or 2
processors to 1 processor. If you do so, your computer will not restart. You will have to perform a factory
reset to restore the original settings.
v
vi Processor conguration setting (select products only)
Table of contents
1 Starting right ................................................................................................................................................ 1
Best practices ......................................................................................................................................................... 1
More HP resources ................................................................................................................................................. 2
2 Getting to know your computer ...................................................................................................................... 4
Locating hardware ................................................................................................................................................. 4
Locating software .................................................................................................................................................. 4
Right side ............................................................................................................................................................... 5
Left side ................................................................................................................................................................. 6
Display .................................................................................................................................................................... 9
Keyboard area ...................................................................................................................................................... 10
TouchPad ........................................................................................................................................... 10
Lights ................................................................................................................................................. 11
Button ................................................................................................................................................ 12
Special keys ....................................................................................................................................... 13
Action keys ........................................................................................................................................ 14
Bottom ................................................................................................................................................................. 15
Labels ................................................................................................................................................................... 16
HP OMEN Command Center ................................................................................................................................. 18
3 Connecting to a network .............................................................................................................................. 19
Connecting to a wireless network ....................................................................................................................... 19
Using the wireless controls ............................................................................................................... 19
Airplane mode key .......................................................................................................... 19
Operating system controls ............................................................................................. 19
Connecting to a WLAN ....................................................................................................................... 20
Using HP Mobile Broadband (select products only) .......................................................................... 21
Using GPS (select products only) ...................................................................................................... 21
Using Bluetooth wireless devices (select products only) ................................................................. 21
Connecting Bluetooth devices ........................................................................................ 22
Connecting to a wired network—LAN (select products only) ............................................................................. 22
4 Enjoying entertainment features .................................................................................................................. 23
Using the camera ................................................................................................................................................. 23
Using audio .......................................................................................................................................................... 23
Connecting speakers ......................................................................................................................... 23
vii
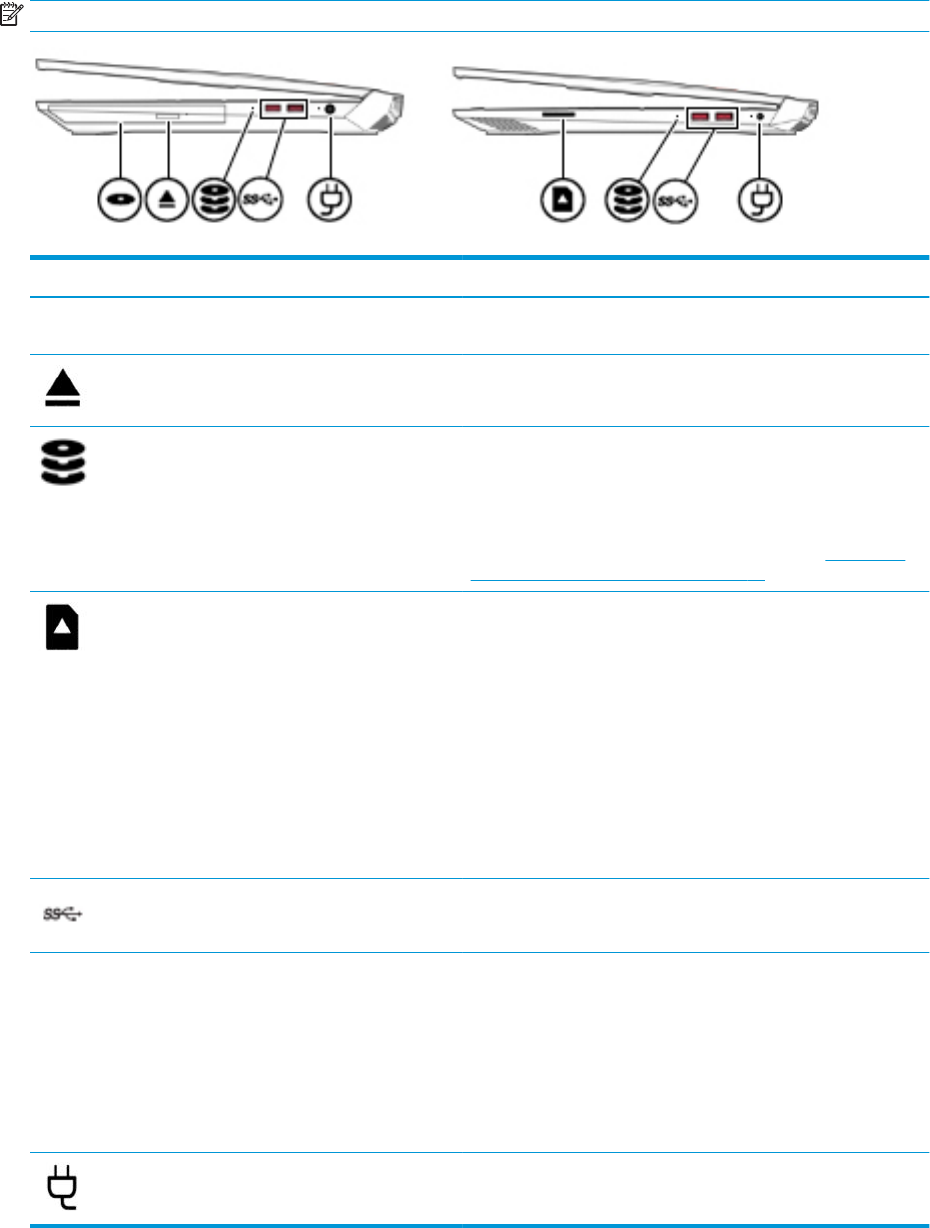
Connecting headphones .................................................................................................................... 23
Connecting a microphone ................................................................................................................. 24
Connecting headsets ......................................................................................................................... 24
Using sound settings ......................................................................................................................... 24
Using video .......................................................................................................................................................... 24
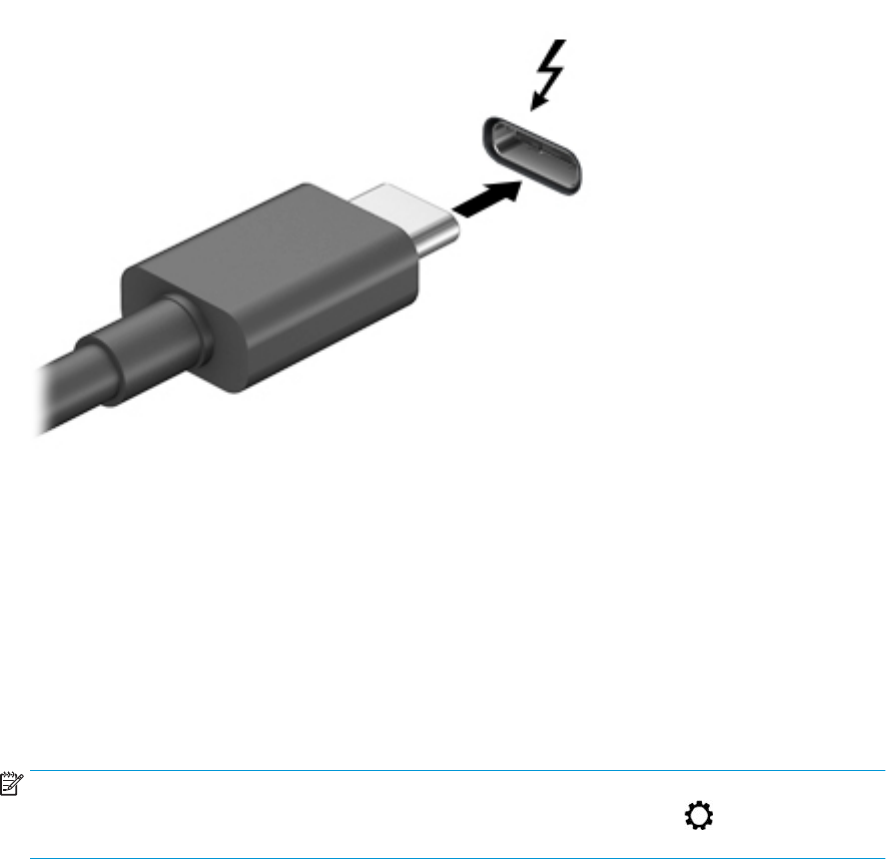
Connecting a Thunderbolt device using a USB Type-C cable (select products only) ....................... 24
Connecting video devices using an HDMI cable (select products only) ............................................ 26
Setting up HDMI audio .................................................................................................... 26
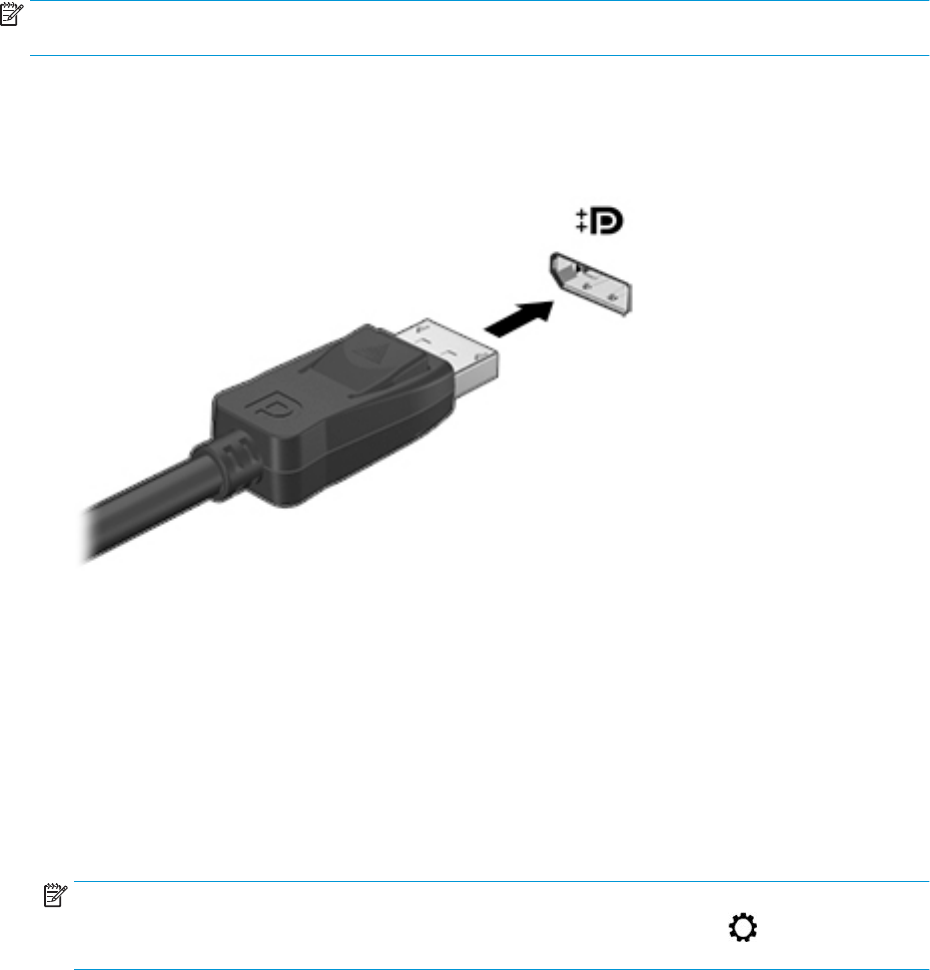
Connecting digital display devices using a Mini DisplayPort cable (select products only) .............. 27
Discovering and connecting to Miracast-compatible wireless displays (select products only) ...... 28
Using data transfer .............................................................................................................................................. 28
Connecting devices to a USB Type-C port (select products only) ..................................................... 28
5 Navigating the screen .................................................................................................................................. 29
Using TouchPad and touch screen gestures ........................................................................................................ 29
Tap ..................................................................................................................................................... 29
Two-nger pinch zoom ..................................................................................................................... 30
Two-nger slide (TouchPad only) ..................................................................................................... 30
Two-nger tap (TouchPad only) ........................................................................................................ 30
Four-nger tap (TouchPad only) ....................................................................................................... 30
Three-nger swipe (TouchPad only) ................................................................................................. 31
One-nger slide (touch screen only) ................................................................................................. 32
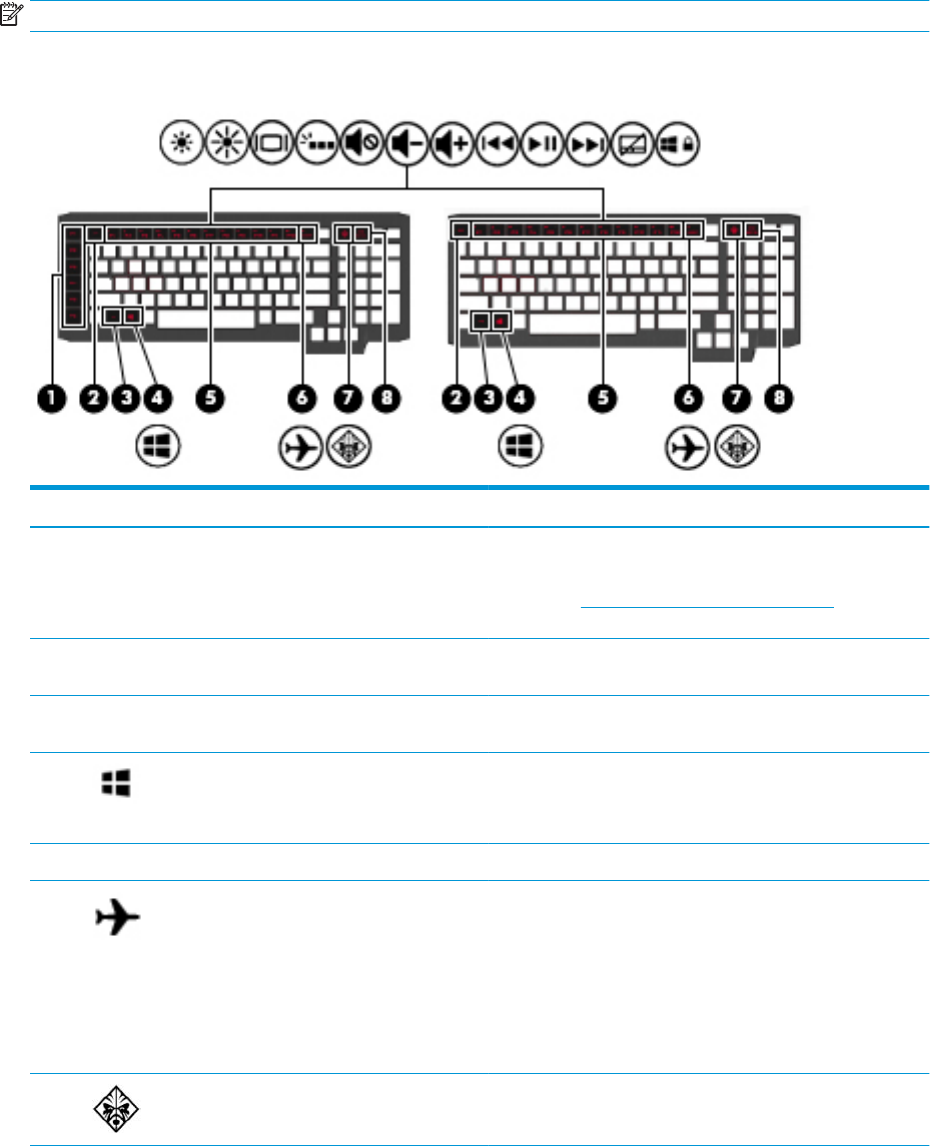
Using an optional keyboard or mouse ................................................................................................................. 32
Using an on-screen keyboard (select products only) .......................................................................................... 32
6 Managing power .......................................................................................................................................... 33
Using Sleep and Hibernation ............................................................................................................................... 33
Initiating and exiting Sleep ............................................................................................................... 33
Initiating and exiting Hibernation (select products only) ................................................................. 34
Shutting down (turning o) the computer .......................................................................................................... 34
Using the Power icon and Power Options ............................................................................................................ 35
Running on battery power ................................................................................................................................... 35
Using HP Fast Charge (select products only) .................................................................................... 35
Displaying battery charge ................................................................................................................. 36
Finding battery information in HP Support Assistant (select products only) .................................. 36
Conserving battery power ................................................................................................................. 36
Identifying low battery levels ........................................................................................................... 36
Resolving a low battery level ............................................................................................................ 37
Resolving a low battery level when external power is available ................................... 37
Resolving a low battery level when no power source is available ................................. 37
Resolving a low battery level when the computer cannot exit Hibernation .................. 37
viii
Factory-sealed battery ...................................................................................................................... 37
Running on external power ................................................................................................................................. 37
7 Maintaining your computer .......................................................................................................................... 39
Improving performance ....................................................................................................................................... 39
Using Disk Defragmenter .................................................................................................................. 39
Using Disk Cleanup ............................................................................................................................ 39
Using HP 3D DriveGuard (select products only) ................................................................................ 39
Identifying HP 3D DriveGuard status .............................................................................. 40
Updating programs and drivers .......................................................................................................................... 40
Cleaning your computer ...................................................................................................................................... 40
Cleaning procedures .......................................................................................................................... 40
Cleaning the display ........................................................................................................ 41
Cleaning the sides or cover ............................................................................................. 41
Cleaning the TouchPad, keyboard, or mouse (select products only) ............................. 41
Traveling with or shipping your computer .......................................................................................................... 41
8 Securing your computer and information ....................................................................................................... 43
Using passwords .................................................................................................................................................. 43
Setting Windows passwords ............................................................................................................. 43
Setting Setup Utility (BIOS) passwords ............................................................................................. 44
Using Windows Hello (select products only) ....................................................................................................... 44
Using Internet security software ......................................................................................................................... 45
Using antivirus software ................................................................................................................... 45
Using rewall software ..................................................................................................................... 45
Installing software updates ................................................................................................................................. 45
Using HP Managed Services (select products only) ............................................................................................ 46
Securing your wireless network .......................................................................................................................... 46
Backing up your software applications and information .................................................................................... 46
Using an optional security cable (select products only) ..................................................................................... 46
9 Using Setup Utility (BIOS) ............................................................................................................................. 47
Starting Setup Utility (BIOS) ................................................................................................................................ 47
Updating Setup Utility (BIOS) .............................................................................................................................. 47
Determining the BIOS version ........................................................................................................... 47
Downloading a BIOS update .............................................................................................................. 48
10 Using HP PC Hardware Diagnostics .............................................................................................................. 49
Using HP PC Hardware Diagnostics Windows ..................................................................................................... 49
Downloading HP PC Hardware Diagnostics Windows ....................................................................... 49
ix
Downloading the latest HP PC Hardware Diagnostics Windows version ....................... 50
Downloading HP Hardware Diagnostics Windows by product name or number
(select products only) ..................................................................................................... 50
Installing HP PC Hardware Diagnostics Windows ............................................................................. 50
Using HP PC Hardware Diagnostics UEFI ............................................................................................................. 50
Starting HP PC Hardware Diagnostics UEFI ....................................................................................... 51
Downloading HP PC Hardware Diagnostics UEFI to a USB ash drive .............................................. 51
Downloading the latest HP PC Hardware Diagnostics UEFI version .............................. 51
Downloading HP PC Hardware Diagnostics UEFI by product name or number
(select products only) ..................................................................................................... 51
Using Remote HP PC Hardware Diagnostics UEFI settings (select products only) ............................................. 52
Downloading Remote HP PC Hardware Diagnostics UEFI ................................................................. 52
Downloading the latest Remote HP PC Hardware Diagnostics UEFI version ................. 52
Downloading Remote HP PC Hardware Diagnostics UEFI by product name or
number ............................................................................................................................ 52
Customizing Remote HP PC Hardware Diagnostics UEFI settings .................................................... 52
11 Backing up, restoring, and recovering .......................................................................................................... 54
Using Windows tools ........................................................................................................................................... 54
Creating HP Recovery media (select products only) ........................................................................................... 54
Using HP Recovery Manager to create recovery media .................................................................... 55
Before you begin ............................................................................................................. 55
Creating the recovery media ........................................................................................... 55
Using the HP Cloud Recovery Download Tool to create recovery media .......................................... 56
Restoring and recovery ........................................................................................................................................ 56
Restoring, resetting, and refreshing using Windows tools .............................................................. 56
Restoring using HP Recovery Manager and the HP Recovery partition ........................................... 56
Recovering using HP Recovery Manager ........................................................................................... 56
Recovering using the HP Recovery partition (select products only) ................................................ 57
Recovering using HP Recovery media ............................................................................................... 57
Changing the computer boot order ................................................................................................... 58
Removing the HP Recovery partition (select products only) ............................................................ 58
12 Specications ............................................................................................................................................ 59
Input power .......................................................................................................................................................... 59
Operating environment ....................................................................................................................................... 60
13 Electrostatic Discharge .............................................................................................................................. 61
14 Accessibility .............................................................................................................................................. 62
Supported assistive technologies ....................................................................................................................... 62
x
Contacting support .............................................................................................................................................. 62
Index ............................................................................................................................................................. 63
xi
xii
1 Starting right
This computer is a powerful tool designed to enhance your work and entertainment. Read this chapter to
learn about best practices after you set up your computer, fun things to do with your computer, and where to
nd additional HP resources.
Best practices
After you set up and register the computer, we recommend the following steps to get the most out of your
smart investment:
Back up your hard drive by creating recovery media. See Backing up, restoring, and recovering
on page 54.
If you haven’t already done so, connect to a wired or wireless network. See details in Connecting to a
network on page 19.
Become familiar with the computer hardware and software. For more information, see Getting to know
your computer on page 4 and Enjoying entertainment features on page 23.
Update or purchase antivirus software. See Using antivirus software on page 45.
Best practices 1
More HP resources
To locate resources that provide product details, how-to information, and more, use this table.
Resource Contents
Setup Instructions Overview of computer setup and features
HP support
For HP support, go to http://www.hp.com/support.
Online chat with an HP technician
Support telephone numbers
Replacement parts videos (select products only)
Maintenance and service guides
HP service center locations
Safety & Comfort Guide
To access this guide:
Select the Start button, select HP Help and Support,
and then select HP Documentation.
‒ or –
Select the Start button, select HP, and then select HP
Documentation.
‒ or –
Go to http://www.hp.com/ergo.
IMPORTANT: You must be connected to the Internet
to access the latest version of the user guide.
Proper workstation setup
Guidelines for posture and work habits that increase your comfort
and decrease your risk of injury
Electrical and mechanical safety information
Regulatory, Safety and Environmental Notices
To access this document:
Select the Start button, select HP Help and Support,
and then select HP Documentation.
‒ or –
Select the Start button, select HP, and then select HP
Documentation.
Important regulatory notices, including information about proper
battery disposal, if needed.
Limited Warranty*
To access this document:
Select the Start button, select HP Help and Support,
and then select HP Documentation.
‒ or –
Select the Start button, select HP, and then select HP
Documentation.
‒ or –
Go to http://www.hp.com/go/orderdocuments.
IMPORTANT: You must be connected to the Internet
to access the latest version of the user guide.
Specic warranty information about this computer
*You can nd your HP Limited Warranty located with the user guides on your product and/or on the CD or DVD provided in the box. In
some countries or regions, HP may provide a printed warranty in the box. For countries or regions where the warranty is not provided
in printed format, you can request a copy from http://www.hp.com/go/orderdocuments. For products purchased in Asia Pacic, you
2 Chapter 1 Starting right
Resource Contents
can write to HP at POD, PO Box 161, Kitchener Road Post Oice, Singapore 912006. Include your product name, and your name, phone
number, and postal address.
More HP resources 3
2 Getting to know your computer
Locating hardware
To nd out what hardware is installed on your computer:
Type device manager in the taskbar search box, and then select the Device Manager app.
A list displays all the devices installed on your computer.
For information about system hardware components and the system BIOS version number, press fn+esc
(select products only).
Locating software
To nd out what software is installed on your computer:
Select the Start button.
‒ or –
Right-click the Start button, and then select Apps and Features.
4 Chapter 2 Getting to know your computer
Right side
NOTE: Refer to the illustration that most closely matches your computer.
Component Description
Optical drive (select products only) Depending on your computer model, reads an optical disc or reads
and writes to an optical disc.
Optical drive eject button (select products only) Releases the optical drive disc tray.
Drive light Blinking white: The hard drive or the solid-state drive is being
accessed.
Amber: HP 3D DriveGuard has temporarily parked the hard
drive.
NOTE: For information about HP 3D DriveGuard, see Using HP 3D
DriveGuard (select products only) on page 39.
Memory card reader Reads optional memory cards that enable you to store, manage,
share, or access information.
To insert a card:
1. Hold the card label-side up, with connectors facing the
computer.
2. Insert the card into the memory card reader, and then press in
on the card until it is rmly seated.
To remove a card:
Press in on the card, and then remove it from the memory card
reader.
USB SuperSpeed ports (2) Connect USB devices, such as a cell phone, camera, activity tracker,
or smartwatch, and provide high-speed data transfer.
AC adapter and battery light White: The AC adapter is connected and the battery is fully
charged.
Blinking white: The AC adapter is disconnected and the battery
has reached a low battery level.
Amber: The AC adapter is connected and the battery is
charging.
O: The battery is not charging.
Power connector Connects an AC adapter.
Right side 5
Left side
NOTE: Refer to the illustration that most closely matches your computer.
Component Description
Security cable slot Attaches an optional security cable to the computer.
NOTE: The security cable is designed to act as a deterrent, but it
may not prevent the computer from being mishandled or stolen.
Mini DisplayPort Connects an optional digital display device, such as a high-
performance monitor or projector.
HDMI port Connects an optional video or audio device, such as a high-denition
television, any compatible digital or audio component, or a high-
speed High-Denition Multimedia Interface (HDMI) device.
RJ-45 (network) jack/status lights Connects a network cable.
White: The network is connected.
Amber: Activity is occurring on the network.
USB SuperSpeed port with HP Sleep and Charge Connects a USB device, provides high-speed data transfer, and even
when the computer is o, charges most products such as a cell
phone, camera, activity tracker, or smartwatch.
USB Type-C port with HP Sleep and Charge Connects a USB device that has a Type-C connector, provides high-
speed data transfer, and even when the computer is o, charges
products such as a cell phone, camera, activity tracker, or
smartwatch.
– or –
Connects a display device that has a USB Type-C connector,
providing DisplayPort output.
NOTE: Cables and/or adapters (purchased separately) may be
required.
Audio-out (headphone)/Audio-in (microphone)
combo jack
Connects optional powered stereo speakers, headphones, earbuds, a
headset, or a television audio cable. Also connects an optional
headset microphone. This jack does not support optional standalone
microphones.
WARNING! To reduce the risk of personal injury, adjust the volume
before putting on headphones, earbuds, or a headset. For additional
safety information, refer to the Regulatory, Safety, and
Environmental Notices.
To access this guide:
Select the Start button, select HP Help and Support, and then
select HP Documentation.
6 Chapter 2 Getting to know your computer
Component Description
NOTE: When a device is connected to the jack, the computer
speakers are disabled.
Audio-in (microphone) jack Connects an optional computer headset microphone, stereo array
microphone, or monaural microphone.
NOTE: The audio-in (microphone) jack does not support optional
combo devices, such as a headset.
NOTE: When devices are connected to the audio-out (headphone)/
Audio-in (microphone) combo jack and the audio-in (microphone)
jack at the same time, the audio-in jack has higher priority.
Memory card reader Reads optional memory cards that enable you to store, manage,
share, or access information.
To insert a card:
1. Hold the card label-side up, with connectors facing the
computer.
2. Insert the card into the memory card reader, and then press in
on the card until it is rmly seated.
To remove a card:
Press in on the card, and then remove it from the memory card
reader.
NOTE: Refer to the illustration that most closely matches your computer.
Component Description
Security cable slot Attaches an optional security cable to the computer.
NOTE: The security cable is designed to act as a deterrent, but it
may not prevent the computer from being mishandled or stolen.
Mini DisplayPort Connects an optional digital display device, such as a high-
performance monitor or projector.
HDMI port Connects an optional video or audio device, such as a high-denition
television, any compatible digital or audio component, or a high-
speed High-Denition Multimedia Interface (HDMI) device.
RJ-45 (network) jack/status lights Connects a network cable.
White: The network is connected.
Amber: Activity is occurring on the network.
Left side 7
Component Description
USB SuperSpeed port with HP Sleep and Charge (2) Connects a USB device, provides high-speed data transfer, and even
when the computer is o, charges most products such as a cell
phone, camera, activity tracker, or smartwatch.
USB Type-C power connector and Thunderbolt port
with HP Sleep and Charge
Connects an AC adapter that has a USB Type-C connector, supplying
power to the computer and, if needed, charging the computer
battery.
– and –
Connects and charges most USB devices that have a Type-C
connector, such as a cell phone, camera, activity tracker, or
smartwatch, and provides high-speed data transfer.
– and –
Connects a display device that has a USB Type-C connector,
providing DisplayPort output.
NOTE: Your computer may also support a Thunderbolt docking
station.
NOTE: Cables and/or adapters (purchased separately) may be
required.
Audio-out (headphone)/Audio-in (microphone)
combo jack
Connects optional powered stereo speakers, headphones, earbuds, a
headset, or a television audio cable. Also connects an optional
headset microphone. This jack does not support optional standalone
microphones.
WARNING! To reduce the risk of personal injury, adjust the volume
before putting on headphones, earbuds, or a headset. For additional
safety information, refer to the Regulatory, Safety, and
Environmental Notices.
To access this guide:
Select the Start button, select HP Help and Support, and then
select HP Documentation.
NOTE: When a device is connected to the jack, the computer
speakers are disabled.
Audio-in (microphone) jack Connects an optional computer headset microphone, stereo array
microphone, or monaural microphone.
NOTE: The audio-in (microphone) jack does not support optional
combo devices, such as a headset.
NOTE: When devices are connected to the audio-out (headphone)/
Audio-in (microphone) combo jack and the audio-in (microphone)
jack at the same time, the audio-in jack has higher priority.
Memory card reader Reads optional memory cards that enable you to store, manage,
share, or access information.
To insert a card:
1. Hold the card label-side up, with connectors facing the
computer.
2. Insert the card into the memory card reader, and then press in
on the card until it is rmly seated.
To remove a card:
Press in on the card, and then remove it from the memory card
reader.
8 Chapter 2 Getting to know your computer
Display
NOTE: Refer to the illustration that most closely matches your computer.
Component Description
Internal microphones (2) Record sound.
Camera light(s) On: One or more cameras are in use.
Camera Allows you to video chat, record video, and record still images. To use
your camera, see Using the camera on page 23. Some cameras also
allow facial recognition logon to Windows, instead of a password
logon. For more information, see Using Windows Hello (select
products only) on page 44.
NOTE: Camera functions vary depending on the camera hardware
and software installed on your product.
WLAN antennas* (2) Send and receive wireless signals to communicate with wireless local
area networks (WLANs).
*The antennas are not visible from the outside of the computer, and antenna location varies. For optimal transmission, keep the areas
immediately around the antennas free from obstructions.
For wireless regulatory notices, see the section of the Regulatory, Safety, and Environmental Notices that applies to your country or
region.
To access this guide:
1. Type support in the taskbar search box, and then select the HP Support Assistant app.
– or –
Click the question mark icon in the taskbar.
2. Select My PC, select the Specications tab, and then select User Guides.
Display 9
Keyboard area
TouchPad
Component Description
(1) TouchPad zone Reads your nger gestures to move the pointer or activate items
on the screen.
NOTE: For more information, see Using TouchPad and touch
screen gestures on page 29.
(2) Left TouchPad button Functions like the left button on an external mouse.
(3) Right TouchPad button Functions like the right button on an external mouse.
10 Chapter 2 Getting to know your computer
Lights
Component Description
(1) Power light On: The computer is on.
Blinking: The computer is in the Sleep state, a power-
saving state. The computer shuts o power to the display
and other unneeded components.
O: The computer is o or in Hibernation. Hibernation is a
power-saving state that uses the least amount of power.
(2) Caps lock light On: Caps lock is on, which switches the key input to all capital
letters.
(3) Mute light On: Computer sound is o.
O: Computer sound is on.
(4) TouchPad light On: The TouchPad is o.
O: The TouchPad is on.
Keyboard area 11
Button
Component Description
Power button When the computer is o, press the button to turn on the
computer.
When the computer is on, press the button briey to
initiate Sleep.
When the computer is in the Sleep state, press the button
briey to exit Sleep.
When the computer is in Hibernation, press the button
briey to exit Hibernation.
CAUTION: Pressing and holding down the power button results
in the loss of unsaved information.
If the computer has stopped responding and shutdown
procedures are ineective, press and hold the power button
down for at least 5 seconds to turn o the computer.
To learn more about your power settings, see your power
options.
Right-click the Power icon , and then select Power
Options.
12 Chapter 2 Getting to know your computer
Special keys
NOTE: Refer to the illustration that most closely matches your computer.
Component Description
(1) Gaming macro keys (select products only) Allow you to create dierent gaming key combinations when
used alone or with the fn, ctrl, alt, or shift keys.
NOTE: See HP OMEN Command Center on page 18 for more
information.
(2) esc key Displays system information when pressed in combination with
the fn key.
(3) fn key Executes specic functions when pressed in combination with
another key.
(4) Windows key Opens the Start menu.
NOTE: Pressing the Windows key again will close the Start
menu.
(5) Action keys Execute frequently used system functions.
(6) INSERT/Airplane mode key (also referred to as
the wireless button)
Turns the insert mode on or o.
– or –
Turns the airplane mode on or o.
Press and hold the key in combination with the fn key.
NOTE: A wireless network must be set up before a
wireless connection is possible.
(7) OMEN key Opens the OMEN Command Center software.
(8) END/PRT SC key Turns the END mode on or o.
– or –
Prints the screen image.
Keyboard area 13
Component Description
Press and hold the key in combination with the fn key.
Action keys
An action key performs the function indicated by the icon on the key. To determine which keys are on your
product, see Special keys on page 13.
To use an action key, press and hold the key in combination with the fn key.
Icon Description
Decreases the screen brightness incrementally as long as you hold down the key.
Increases the screen brightness incrementally as long as you hold down the key.
Switches the screen image between display devices connected to the system. For example, if a monitor is
connected to the computer, repeatedly pressing this key alternates the screen image from the computer
display to the monitor display to a simultaneous display on both the computer and the monitor.
Turns the keyboard backlight o or on.
NOTE: To conserve battery power, turn o this feature.
Mutes or restores speaker or headphone sound.
Decreases speaker or headphone volume incrementally while you hold down the key.
Increases speaker or headphone volume incrementally while you hold down the key.
Plays the previous track of an audio CD or the previous section of a DVD or a Blu-ray Disc (BD).
Starts, pauses, or resumes playback of an audio CD, a DVD, or a BD.
Plays the next track of an audio CD or the next section of a DVD or a BD.
Turns the TouchPad o or on.
Disables the Windows key .
14 Chapter 2 Getting to know your computer
Bottom
Component Description
Vents (2) Enable airow to cool internal components.
NOTE: The computer fan starts up automatically to cool
internal components and prevent overheating. It is normal
for the internal fan to cycle on and o during routine
operation.
Speakers (2) Produce sound.
Bottom 15
Labels
The labels aixed to the computer provide information you may need when you troubleshoot system
problems or travel internationally with the computer. Labels may be in paper form or imprinted on the
product.
IMPORTANT: Check the following locations for the labels described in this section: the bottom of the
computer, inside the battery bay, under the service door, on the back of the display, or on the bottom of a
tablet kickstand.
Service label—Provides important information to identify your computer. When contacting support, you
may be asked for the serial number, the product number, or the model number. Locate this information
before you contact support.
Your service label will resemble one of the examples shown below. Refer to the illustration that most
closely matches the service label on your computer.
Component
(1) HP product name
(2) Model number
(3) Product ID
(4) Serial number
(5) Warranty period
Component
(1) HP product name
(2) Product ID
16 Chapter 2 Getting to know your computer
Component
(3) Serial number
(4) Warranty period
Regulatory label(s)—Provide(s) regulatory information about the computer.
Wireless certication label(s)—Provide(s) information about optional wireless devices and the approval
markings for the countries or regions in which the devices have been approved for use.
Labels 17
HP OMEN Command Center
HP OMEN Command Center allows you to customize your computer for your specic gaming needs. HP OMEN
Command Center is a continuously evolving platform.
To open HP OMEN Command Center, select the Start button, select HP OMEN Command Center, and then
follow the on-screen instructions.
– or –
Select the OMEN key at the top right side of the keyboard.
The HP OMEN Command Center dashboard provides a central location to access and congure the following
features:
NOTE: Features may vary by platform.
Network speed—View and adjust priorities.
Gaming Macro Keys—Congure the P-keys (select products only).
Keyboard lighting—Customize the keyboard lighting.
OMEN Game Stream—Stream your games from anywhere.
Update—Refresh the display.
Help—Access “How to” information and frequently asked questions.
To minimize the dashboard, select the < button at the top of the dashboard.
18 Chapter 2 Getting to know your computer
3 Connecting to a network
Your computer can travel with you wherever you go. But even at home, you can explore the globe and access
information from millions of websites using your computer and a wired or wireless network connection. This
chapter will help you get connected to that world.
Connecting to a wireless network
Your computer may be equipped with one or more of the following wireless devices:
WLAN device—Connects the computer to wireless local area networks (commonly referred to as Wi-Fi
networks, wireless LANs, or WLANs) in corporate oices, your home, and public places such as airports,
restaurants, coee shops, hotels, and universities. In a WLAN, the mobile wireless device in your
computer communicates with a wireless router or a wireless access point.
HP Mobile Broadband Module—Gives you wireless connectivity over a wireless wide area network
(WWAN), a much larger area. Mobile network operators install base stations (similar to cell phone
towers) throughout large geographic areas, eectively providing coverage across entire states, regions,
or even countries.
Bluetooth® device—Creates a personal area network (PAN) to connect to other Bluetooth-enabled
devices such as computers, phones, printers, headsets, speakers, and cameras. In a PAN, each device
communicates directly with other devices, and devices must be relatively close together—typically
within 10 meters (approximately 33 feet) of each other.
Using the wireless controls
You can control the wireless devices in your computer using one or more of these features:
Airplane mode key (also called wireless button or wireless key) (referred to in this chapter as airplane
mode key)
Operating system controls
Airplane mode key
The computer may have an airplane mode key, one or more wireless devices, and one or two wireless lights.
All the wireless devices on your computer are enabled at the factory.
The wireless light indicates the overall power state of your wireless devices, not the status of individual
devices.
Operating system controls
The Network and Sharing Center allows you to set up a connection or network, connect to a network, and
diagnose and repair network problems.
To use operating system controls:
On the taskbar, right-click the network status icon, and then select Open Network and Sharing Center.
‒ or –
On the taskbar, right-click the network status icon, and then select Network & Internet Settings.
Connecting to a wireless network 19
Connecting to a WLAN
NOTE: When you are setting up Internet access in your home, you must establish an account with an
Internet service provider (ISP). To purchase Internet service and a modem, contact a local ISP. The ISP will
help set up the modem, install a network cable to connect your wireless router to the modem, and test the
Internet service.
To connect to a WLAN, follow these steps:
1. Be sure that the WLAN device is on.
2. On the taskbar, right-click the network status icon, and then connect to one of the available networks.
If the WLAN is a security-enabled WLAN, you are prompted to enter a security code. Enter the code, and
then select Next to complete the connection.
NOTE: If no WLANs are listed, you may be out of range of a wireless router or access point.
NOTE: If you do not see the WLAN you want to connect to:
1. On the taskbar, right-click the network status icon, and then select Open Network and Sharing
Center.
2. Select Set up a new connection or network.
A list of options is displayed, allowing you to manually search for and connect to a network or to
create a new network connection.
‒ or –
1. On the taskbar, right-click the network status icon, and then select Network & Internet Settings.
2. Under the Network & Internet Status section, select Network and Sharing Center.
3. Select Set up a new connection or network.
A list of options is displayed, allowing you to manually search for and connect to a network or to
create a new network connection.
3. Follow the on-screen instructions to complete the connection.
After the connection is made, right-click the network status icon at the far right of the taskbar, to verify the
name and status of the connection.
NOTE: The functional range (how far your wireless signals travel) depends on WLAN implementation, router
manufacturer, and interference from other electronic devices or structural barriers such as walls and oors.
20 Chapter 3 Connecting to a network
Using HP Mobile Broadband (select products only)
Your HP Mobile Broadband computer has built-in support for mobile broadband service. Your new computer,
when used with a mobile operator’s network, gives you the freedom to connect to the Internet, send e-mail,
or connect to your corporate network without the need for Wi-Fi hotspots.
You might need the HP Mobile Broadband Module IMEI and/or MEID number to activate mobile broadband
service. The number may be printed on a label located on the bottom of your computer, inside the battery bay,
under the service door, or on the back of the display.
‒ or –
You can nd the number following these steps:
1. On the taskbar, right-click the network status icon.
2. Select Network & Internet Settings.
3. Under the Network & Internet section, select Status.
‒ or –
1. On the taskbar, right-click the network status icon.
2. Select Network & Internet Settings.
3. Under the Network & Internet section, select Cellular, and then select Advanced Options.
Some mobile network operators require the use of a subscriber identity module (SIM) card. A SIM card
contains basic information about you, such as a personal identication number (PIN), as well as network
information. Some computers include a SIM card that is preinstalled. If the SIM card is not preinstalled, it may
be included with the HP Mobile Broadband documents provided with your computer, or the mobile network
operator may provide it separately from the computer.
For information about HP Mobile Broadband and how to activate service with a preferred mobile network
operator, see the HP Mobile Broadband information included with your computer.
Using GPS (select products only)
Your computer may be equipped with a Global Positioning System (GPS) device. GPS satellites deliver location,
speed, and direction information to GPS-equipped systems.
To enable GPS, make sure location is enabled under the Location setting.
1. Type location in the taskbar search box, and then make the selection for location.
2. Follow the on-screen instructions for using location settings.
Using Bluetooth wireless devices (select products only)
A Bluetooth device provides short-range wireless communications that replace the physical cable connections
that traditionally link electronic devices such as the following:
Computers (desktop, notebook)
Phones (cellular, cordless, smartphone)
Imaging devices (printer, camera)
Audio devices (headset, speakers)
Connecting to a wireless network 21
Mouse
External keyboard
Connecting Bluetooth devices
Before you can use a Bluetooth device, you must establish a Bluetooth connection.
1. Type bluetooth in the taskbar search box, and then select Bluetooth and other devices settings.
2. Select Add Bluetooth or other device.
3. Select your device from the list, and then follow the on-screen instructions.
NOTE: If the device requires verication, a pairing code is displayed. On the device you are adding, follow the
on-screen instructions to verify that the code on your device matches the pairing code. For more information,
refer to the documentation provided with the device.
NOTE: If your device does not appear in the list, be sure that Bluetooth on that device is turned on. Some
devices may have additional requirements; refer to the documentation provided with the device.
Connecting to a wired network—LAN (select products only)
Use a LAN connection if you want to connect the computer directly to a router in your home (instead of
working wirelessly), or if you want to connect to an existing network at your oice.
Connecting to a LAN requires an RJ-45 (network) cable and a network jack or an optional docking device or
expansion port, if there is no RJ-45 jack on the computer.
To connect the network cable, follow these steps:
1. Plug the network cable into the network jack (1) on the computer.
2. Plug the other end of the network cable into a network wall jack (2) or router.
NOTE: If the network cable contains noise suppression circuitry (3), which prevents interference from
TV and radio reception, orient the circuitry end of the cable toward the computer.
22 Chapter 3 Connecting to a network
4 Enjoying entertainment features
Use your HP computer as an entertainment hub to socialize via the camera, enjoy and manage your music,
and download and watch movies. Or, to make your computer an even more powerful entertainment center,
connect external devices like a monitor, projector, TV, speakers, or headphones.
Using the camera
Your computer has one or more cameras that enable you to connect with others for work or play. Cameras
may be front facing, rear facing, or pop up. To determine which camera(s) are on your product, see Getting to
know your computer on page 4.
Most cameras allow you to video chat, record video, and record still images. Some also provide HD (high-
denition) capability, apps for gaming, or facial recognition software like Windows Hello. See Securing your
computer and information on page 43 for details about using Windows Hello.
To use your camera, type camera in the taskbar search box, and then select Camera from the list of
applications.
Using audio
You can download and listen to music, stream audio content (including radio) from the web, record audio, or
mix audio and video to create multimedia. You can also play music CDs on the computer (on select models) or
attach an external optical drive to play CDs. To enhance your listening enjoyment, attach external audio
devices such as speakers or headphones.
Connecting speakers
You can attach wired speakers to your computer by connecting them to a USB port or to the audio-out
(headphone)/audio-in (microphone) combo jack on your computer or on a docking station.
To connect wireless speakers to your computer, follow the device manufacturer's instructions. To connect
high-denition speakers to the computer, see Setting up HDMI audio on page 26. Before connecting
speakers, lower the volume setting.
Connecting headphones
WARNING! To reduce the risk of personal injury, lower the volume setting before putting on headphones,
earbuds, or a headset. For additional safety information, see the Regulatory, Safety and Environmental
Notices.
To access this document:
Select the Start button, select HP Help and Support, and then select HP Documentation.
You can connect wired headphones to the headphone jack or to the audio-out (headphone)/audio-in
(microphone) combo jack on your computer.
To connect wireless headphones to your computer, follow the device manufacturer's instructions.
Using the camera 23
Connecting a microphone
To record audio, connect a microphone to the microphone jack on the computer. For best results when
recording, speak directly into the microphone and record sound in a setting free of background noise.
Connecting headsets
WARNING! To reduce the risk of personal injury, lower the volume setting before putting on headphones,
earbuds, or a headset. For additional safety information, see the Regulatory, Safety and Environmental
Notices.
To access this document:
Select the Start button, select HP Help and Support, and then select HP Documentation.
Headphones combined with a microphone are called headsets. You can connect wired headsets to the audio-
out (headphone)/audio-in (microphone) combo jack on your computer.
To connect wireless headsets to your computer, follow the device manufacturer's instructions.
Using sound settings
Use sound settings to adjust system volume, change system sounds, or manage audio devices.
To view or change sound settings:
Type control panel in the taskbar search box, select Control Panel, select Hardware and Sound,
and then select
Sound.
Your computer may include an enhanced sound system by Bang & Olufsen, B&O Play, or another provider. As a
result, your computer may include advanced audio features that can be controlled through an audio control
panel specic to your sound system.
Use the audio control panel to view and control audio settings.
Type control panel in the taskbar search box, select Control Panel, select Hardware and Sound,
and then select the audio control panel specic to your system.
Using video
Your computer is a powerful video device that enables you to watch streaming video from your favorite
websites and download video and movies to watch on your computer when you are not connected to a
network.
To enhance your viewing enjoyment, use one of the video ports on the computer to connect an external
monitor, projector, or TV.
IMPORTANT: Be sure that the external device is connected to the correct port on the computer, using the
correct cable. Follow the device manufacturer's instructions.
For information on using your video features, refer to HP Support Assistant.
Connecting a Thunderbolt device using a USB Type-C cable (select products only)
NOTE: To connect a USB Type-C Thunderbolt™ device to your computer, you need a USB Type-C cable,
purchased separately.
To see video or high-resolution display output on an external Thunderbolt device, connect the Thunderbolt
device according to the following instructions:
24 Chapter 4 Enjoying entertainment features
1. Connect one end of the USB Type-C cable to the USB Type-C Thunderbolt port on the computer.
2. Connect the other end of the cable to the external Thunderbolt device.
3. Press fn+f3 to alternate the computer screen image between 4 display states:
PC screen only: View the screen image on the computer only.
Duplicate: View the screen image simultaneously on both the computer and the external device.
Extend: View the screen image extended across both the computer and the external device.
Second screen only: View the screen image on the external device only.
Each time you press fn+f3 the display state changes.
NOTE: For best results, especially if you choose the "Extend" option, increase the screen resolution of
the external device, as follows. Select the Start button, select the Settings icon , and then select
System. Under Display, select the appropriate resolution, and then select Keep changes.
Using video 25
Connecting video devices using an HDMI cable (select products only)
NOTE: To connect an HDMI device to your computer, you need an HDMI cable, purchased separately.
To see the computer screen image on a high-denition TV or monitor, connect the high-denition device
according to the following instructions:
1. Connect one end of the HDMI cable to the HDMI port on the computer.
2. Connect the other end of the cable to the high-denition TV or monitor.
3. Press fn+f3 to alternate the computer screen image between 4 display states:
PC screen only: View the screen image on the computer only.
Duplicate: View the screen image simultaneously on both the computer and the external device.
Extend: View the screen image extended across both the computer and the external device.
Second screen only: View the screen image on the external device only.
Each time you press fn+f3, the display state changes.
NOTE: For best results, especially if you choose the "Extend" option, increase the screen resolution of
the external device, as follows. Select the Start button, select the Settings icon , and then select
System. Under Display, select the appropriate resolution, and then select Keep changes.
Setting up HDMI audio
HDMI is the only video interface that supports high-denition video and audio. After you connect an HDMI TV
to the computer, you can then turn on HDMI audio by following these steps:
1. Right-click the Speakers icon in the notication area, at the far right of the taskbar, and then select
Playback devices.
2. On the Playback tab, select the name of the digital output device.
3. Click Set Default, and then click OK.
26 Chapter 4 Enjoying entertainment features
To return the audio stream to the computer speakers:
1. Right-click the Speakers icon in the notication area, at the far right of the taskbar, and then click
Playback devices.
2. On the Playback tab, click Speakers.
3. Click Set Default, and then click OK.
Connecting digital display devices using a Mini DisplayPort cable (select products
only)
NOTE: To connect a digital display device to your computer, you need a Mini DisplayPort (DP-DP) cable,
purchased separately.
The Mini DisplayPort connects a digital display device such as a high-performance monitor or projector. The
Mini DisplayPort delivers higher performance than the VGA external monitor port and improves digital
connectivity.
1. Connect one end of the Mini DisplayPort cable to the Mini DisplayPort on the computer.
2. Connect the other end of the cable to the digital display device.
3. Press fn+f3 to alternate the computer screen image between 4 display states:
PC screen only: View the screen image on the computer only.
Duplicate: View the same screen image simultaneously on both the computer and the external
device.
Extend: View the screen image extended across both the computer and the external device.
Second screen only: View the screen image on the external device only.
Each time you press fn+f3, the display state changes.
NOTE: For best results, especially if you choose the "Extend" option, increase the screen resolution of
the external device, as follows. Select the Start button, select the Settings icon , and then select
System. Under Display, select the appropriate resolution, and then select Keep changes.
Using video 27
Discovering and connecting to Miracast-compatible wireless displays (select
products only)
To discover and connect to Miracast-compatible wireless displays without leaving your current apps, follow
the steps below.
To open Miracast:
Type project in the taskbar search box, and then click Project to a second screen. Click Connect to a
wireless display
, and then follow the on-screen instructions.
Using data transfer
Your computer is a powerful entertainment device that enables you to transfer photos, videos, and movies
from your USB devices to view on your computer.
To enhance your viewing enjoyment, use one of the USB Type-C ports on the computer to connect a USB
device, such as a cell phone, camera, activity tracker, or smartwatch, and transfer the les to your computer.
IMPORTANT: Be sure that the external device is connected to the correct port on the computer, using the
correct cable. Follow the device manufacturer's instructions.
For information on using your USB Type-C features, refer to HP Support Assistant.
Connecting devices to a USB Type-C port (select products only)
NOTE: To connect a USB Type-C device to your computer, you need a USB Type-C cable, purchased
separately.
1. Connect one end of the USB Type-C cable to the USB Type-C port on the computer.
2. Connect the other end of the cable to the external device.
28 Chapter 4 Enjoying entertainment features
5 Navigating the screen
You can navigate the computer screen in one or more of the following ways:
Use touch gestures directly on the computer screen
Use touch gestures on the TouchPad
Use an optional mouse or keyboard (purchased separately)
Use an on-screen keyboard
Use a pointing stick
Using TouchPad and touch screen gestures
The TouchPad helps you navigate the computer screen and control the pointer using simple touch gestures.
You can also use the left and right TouchPad buttons as you would use the corresponding buttons on an
external mouse. To navigate a touch screen (select products only), touch the screen directly using gestures
described in this chapter.
You can also customize gestures and view demonstrations of how they work. Type control panel in the
taskbar search box, select
Control Panel, and then select Hardware and Sound. Under Devices and Printers,
select Mouse.
NOTE: Unless noted, gestures can be used on the TouchPad or a touch screen (select products only).
Tap
Use the tap/double-tap gesture to select or open an item on the screen.
Point to an item on the screen, and then tap one nger on the TouchPad zone or touch screen to select
the item. Double-tap an item to open it.
Using TouchPad and touch screen gestures 29
Two-nger pinch zoom
Use the two-nger pinch zoom to zoom out or in on images or text.
Zoom out by placing two ngers apart on the TouchPad zone or touch screen and then moving your
ngers together.
Zoom in by placing two ngers together on the TouchPad zone or touch screen and then moving your
ngers apart.
Two-nger
slide (TouchPad only)
Use the two-nger slide to move up, down, or sideways on a page or image.
Place two ngers slightly apart on the TouchPad zone and then drag them up, down, left, or right.
Two-nger tap (TouchPad only)
Use the two-nger tap to open the menu for an object on the screen.
NOTE: The two-nger tap performs the same function as right-clicking with the mouse.
Tap two ngers on the TouchPad zone to open the options menu for the selected object.
Four-nger tap (TouchPad only)
Use the four-nger tap to open the action center.
30 Chapter 5 Navigating the screen
Tap four ngers on the Touchpad to open the action center and view current settings and notications.
Three-nger swipe (TouchPad only)
Use the three-nger swipe to view open windows and to switch between open windows and the desktop.
Swipe 3 ngers away from you to see all open windows.
Swipe 3 ngers toward you to show the desktop.
Swipe 3 ngers left or right to switch between open windows.
Using TouchPad and touch screen gestures 31
One-nger slide (touch screen only)
Use the one-nger slide to pan or scroll through lists and pages, or to move an object.
To scroll across the screen, lightly slide one nger across the screen in the direction you want to move.
To move an object, press and hold your nger on an object, and then drag your nger to move the object.
Using an optional keyboard or mouse
An optional keyboard or mouse allows you to type, select items, scroll, and perform the same functions as
you do using touch gestures. The keyboard also allows you to use action keys and hot keys to perform specic
functions.
Using an on-screen keyboard (select products only)
1. To display an on-screen keyboard, tap the keyboard icon in the notication area, at the far right of the
taskbar.
2. Begin typing.
NOTE: Suggested words may be displayed above the on-screen keyboard. Tap a word to select it.
NOTE: Action keys and hot keys do not display or function on the on-screen keyboard.
32 Chapter 5 Navigating the screen
6 Managing power
Your computer can operate on either battery power or external power. When the computer is running on
battery power and an external power source is not available to charge the battery, it is important to monitor
and conserve the battery charge.
Some power management features described in this chapter may not be available on your computer.
Using Sleep and Hibernation
CAUTION: Several well-known vulnerabilities exist when a computer is in the Sleep state. To prevent an
unauthorized user from accessing data on your computer, even encrypted data, HP recommends that you
always initiate Hibernation instead of Sleep anytime the computer will be out of your physical possession.
This practice is particularly important when you travel with your computer.
CAUTION: To reduce the risk of possible audio and video degradation, loss of audio or video playback
functionality, or loss of information, do not initiate Sleep while reading from or writing to a disc or an external
media card.
Windows has two power-saving states, Sleep and Hibernation.
Sleep—The Sleep state is automatically initiated after a period of inactivity. Your work is saved to
memory, allowing you to resume your work very quickly. You can also initiate Sleep manually. For more
information, see Initiating and exiting Sleep on page 33.
Hibernation—The Hibernation state is automatically initiated if the battery reaches a critical level. In the
Hibernation state, your work is saved to a hibernation le and the computer powers down. You can also
initiate Hibernation manually. For more information, see Initiating and exiting Hibernation (select
products only) on page 34.
Initiating and exiting Sleep
You can initiate Sleep in any of the following ways:
Close the display (select products only).
Select the Start button, select the Power icon, and then select Sleep.
Press the Sleep hot key; for example, fn+f3 (select products only).
You can exit Sleep in any of the following ways:
Briey press the power button.
If the computer is closed, raise the display (select products only).
Press a key on the keyboard (select products only).
Tap the TouchPad (select products only).
When the computer exits Sleep, your work returns to the screen.
NOTE: If you have set a password to be required on exiting Sleep, you must enter your Windows password
before your work returns to the screen.
Using Sleep and Hibernation 33
Initiating and exiting Hibernation (select products only)
You can enable user-initiated Hibernation and change other power settings and timeouts using Power
Options.
1. Right-click the Power icon , and then select Power Options.
2. In the left pane, select Choose what the power buttons do (wording may vary by product).
3. Depending on your product, you can enable Hibernation for battery power or external power in any of
the following ways:
Power button—Under Power and sleep buttons and lid settings (wording may vary by product),
select When I press the power button, and then select Hibernate.
Sleep button (select products only)—Under Power and sleep buttons and lid settings (wording
may vary by product), select When I press the sleep button, and then select Hibernate.
Lid (select products only)—Under Power and sleep buttons and lid settings (wording may vary by
product), select When I close the lid, and then select Hibernate.
Power menu—Select Change Settings that are currently unavailable, and then, under Shutdown
settings, select the Hibernate check box.
The Power menu can be accessed by selecting the Start button.
4. Select Save changes.
To initiate Hibernation, use the method that you enabled in step 3.
To exit Hibernation, briey press the power button.
NOTE: If you have set a password to be required on exiting Hibernation, you must enter your Windows
password before your work returns to the screen.
Shutting down (turning o) the computer
CAUTION: Unsaved information is lost when the computer shuts down. Be sure to save your work before
shutting down the computer.
The Shut down command closes all open programs, including the operating system, and then turns o the
display and the computer.
Shut down the computer when it will be unused and disconnected from external power for an extended
period.
The recommended procedure is to use the Windows Shut down command.
NOTE: If the computer is in the Sleep state or in Hibernation, rst exit Sleep or Hibernation by briey
pressing the power button.
1. Save your work and close all open programs.
2. Select the Start button, select the Power icon, and then select Shut down.
34 Chapter 6 Managing power
If the computer is unresponsive and you are unable to use the preceding shutdown procedures, try the
following emergency procedures in the sequence provided:
Press ctrl+alt+delete, select the Power icon, and then select Shut down.
Press and hold the power button for at least 10 seconds.
If your computer has a user-replaceable battery (select products only), disconnect the computer from
external power, and then remove the battery.
Using the Power icon and Power Options
The Power icon is located on the Windows taskbar. The Power icon allows you to quickly access power
settings and view the remaining battery charge.
To view the percentage of remaining battery charge, place the mouse pointer over the Power icon
.
To use Power Options, right–click the Power icon , and then select Power Options.
Dierent Power icons indicate whether the computer is running on battery or external power. Placing the
mouse pointer over the icon reveals a message if the battery has reached a low or critical battery level.
Running on battery power
WARNING! To reduce potential safety issues, use only the battery provided with the computer, a
replacement battery provided by HP, or a compatible battery purchased from HP.
When a charged battery is in the computer and the computer is not plugged into external power, the computer
runs on battery power. When the computer is o and unplugged from external power, the battery in the
computer slowly discharges. The computer displays a message when the battery reaches a low or critical
battery level.
Computer battery life varies, depending on power management settings, programs running on the computer,
screen brightness, external devices connected to the computer, and other factors.
NOTE: When you disconnect external power, the display brightness is automatically decreased to conserve
battery charge. Select computer products can switch between graphic modes to conserve battery charge.
Using HP Fast Charge (select products only)
The HP Fast Charge feature allows you to quickly charge your computer battery. Charging time may vary by
+/- 10%. Depending on your computer model and the HP AC adapter provided with your computer, HP Fast
Charge operates in one or more of the following ways:
When the remaining battery charge is between zero and 50%, the battery will charge to 50% of full
capacity in no more than 30 to 45 minutes, depending on your computer model.
When the remaining battery charge is between zero and 90%, the battery will charge to 90% of full
capacity in no more than 90 minutes.
To use HP Fast Charge, shut down your computer, and then connect the AC adapter to your computer and to
external power.
Using the Power icon and Power Options 35
Displaying battery charge
To view the percentage of remaining battery charge, place the mouse pointer over the Power icon .
Finding battery information in HP Support Assistant (select products only)
To access battery information:
1. Type support in the taskbar search box, and then select the HP Support Assistant app.
‒ or –
Select the question mark icon in the taskbar.
2. Select My PC, select the Diagnostics and tools tab, and then select HP Battery Check. If HP Battery
Check indicates that your battery should be replaced, contact support.
HP Support Assistant provides the following tools and information about the battery:
HP Battery Check
Information about battery types, specications, life cycles, and capacity
Conserving battery power
To conserve battery power and maximize battery life:
Lower the brightness of the display.
Select the Power saver setting in Power Options.
Turn o wireless devices when you are not using them.
Disconnect unused external devices that are not plugged into an external power source, such as an
external hard drive connected to a USB port.
Stop, disable, or remove any external media cards that you are not using.
Before you leave your work, initiate Sleep or shut down the computer.
Identifying low battery levels
When a battery that is the sole power source for the computer reaches a low or critical battery level, the
following behavior occurs:
The battery light (select products only) indicates a low or critical battery level.
– or –
The Power icon shows a low or critical battery notication.
NOTE: For additional information about the Power icon, see Using the Power icon and Power Options
on page 35.
36 Chapter 6 Managing power
The computer takes the following actions for a critical battery level:
If Hibernation is disabled and the computer is on or in the Sleep state, the computer remains briey in
the Sleep state and then shuts down and loses any unsaved information.
If Hibernation is enabled and the computer is on or in the Sleep state, the computer initiates
Hibernation.
Resolving a low battery level
Resolving a low battery level when external power is available
Connect one of the following to the computer and to external power:
AC adapter
Optional docking device or expansion product
Optional power adapter purchased as an accessory from HP
Resolving a low battery level when no power source is available
Save your work and shut down the computer.
Resolving a low battery level when the computer cannot exit Hibernation
1. Connect the AC adapter to the computer and to external power.
2. Exit Hibernation by pressing the power button.
Factory-sealed battery
To monitor the status of the battery, or if the battery is no longer holding a charge, run HP Battery Check in
the HP Support Assistant app (select products only).
1. Type support in the taskbar search box, and then select the HP Support Assistant app.
– or –
Select the question mark icon in the taskbar.
2. Select My PC, select the Diagnostics and tools tab, and then select HP Battery Check. If HP Battery
Check indicates that your battery should be replaced, contact support.
The battery[ies] in this product cannot be easily replaced by users themselves. Removing or replacing the
battery could aect your warranty coverage. If a battery is no longer holding a charge, contact support.
When a battery has reached the end of its useful life, do not dispose of the battery in general household
waste. Follow the local laws and regulations in your area for battery disposal.
Running on external power
For information about connecting to external power, refer to the Setup Instructions poster provided in the
computer box.
The computer does not use battery power when the computer is connected to external power with an
approved AC adapter or an optional docking device or expansion product.
WARNING! To reduce potential safety issues, use only the AC adapter provided with the computer, a
replacement AC adapter provided by HP, or a compatible AC adapter purchased from HP.
Running on external power 37
WARNING! Do not charge the computer battery while you are aboard aircraft.
Connect the computer to external power under any of the following conditions:
When charging or calibrating a battery
When installing or updating system software
When updating the system BIOS
When writing information to a disc (select products only)
When running Disk Defragmenter on computers with internal hard drives
When performing a backup or recovery
When you connect the computer to external power:
The battery begins to charge.
The screen brightness increases.
The Power icon changes appearance.
When you disconnect external power:
The computer switches to battery power.
The screen brightness automatically decreases to conserve battery charge.
The Power icon changes appearance.
38 Chapter 6 Managing power
7 Maintaining your computer
It is important to perform regular maintenance to keep your computer in optimal condition. This chapter
explains how to use tools like Disk Defragmenter and Disk Cleanup. It also provides instructions for updating
programs and drivers, steps to clean the computer, and tips for traveling with (or shipping) the computer.
Improving performance
You can improve the performance of your computer by performing regular maintenance tasks with tools such
as Disk Defragmenter and Disk Cleanup.
Using Disk Defragmenter
HP recommends using Disk Defragmenter to defragment your hard drive at least once a month.
NOTE: It is not necessary to run Disk Defragmenter on solid-state drives.
To run Disk Defragmenter:
1. Connect the computer to AC power.
2. Type defragment in the taskbar search box, and then select Defragment and Optimize Drives.
3. Follow the on-screen instructions.
For additional information, access the Disk Defragmenter software Help.
Using Disk Cleanup
Use Disk Cleanup to search the hard drive for unnecessary les that you can safely delete to free up disk space
and help the computer run more eiciently.
To run Disk Cleanup:
1. Type disk in the taskbar search box, and then select Disk Cleanup.
2. Follow the on-screen instructions.
Using HP 3D DriveGuard (select products only)
HP 3D DriveGuard protects a hard drive by parking the drive and halting data requests under either of the
following conditions:
You drop the computer.
You move the computer with the display closed while the computer is running on battery power.
A short time after the end of one of these events, HP 3D DriveGuard returns the hard drive to normal
operation.
NOTE: Only internal hard drives are protected by HP 3D DriveGuard. A hard drive installed in an optional
docking device or connected to a USB port is not protected by HP 3D DriveGuard.
NOTE: Because solid-state drives (SSDs) lack moving parts, HP 3D DriveGuard is unnecessary for these
drives.
Improving performance 39
Identifying HP 3D DriveGuard status
The hard drive light on the computer changes color to show that the drive in a primary hard drive bay and/or
the drive in a secondary hard drive bay (select products only) is parked.
Updating programs and drivers
HP recommends that you update your programs and drivers on a regular basis. Updates can resolve issues
and bring new features and options to your computer. For example, older graphics components might not
work well with the most recent gaming software. Without the latest driver, you would not be getting the most
out of your equipment.
Go to http://www.hp.com/support to download the latest versions of HP programs and drivers. In addition,
register to receive automatic notications when updates become available.
If you would like to update your programs and drivers, follow these instructions:
1. Type support in the taskbar search box, and then select the HP Support Assistant app.
‒ or –
Click the question mark icon in the taskbar.
2. Select My PC, select the Updates tab, and then select Check for updates and messages.
3. Follow the on-screen instructions.
Cleaning your computer
Use the following products to safely clean your computer:
Dimethyl benzyl ammonium chloride 0.3 percent maximum concentration (for example, disposable
wipes, which come in a variety of brands)
Alcohol-free glass-cleaning uid
Solution of water and mild soap
Dry microber cleaning cloth or a chamois (static-free cloth without oil)
Static-free cloth wipes
CAUTION: Avoid strong cleaning solvents that can permanently damage your computer. If you are not sure
that a cleaning product is safe for your computer, check the product contents to make sure that ingredients
such as alcohol, acetone, ammonium chloride, methylene chloride, and hydrocarbons are not included in the
product.
Fibrous materials, such as paper towels, can scratch the computer. Over time, dirt particles and cleaning
agents can get trapped in the scratches.
Cleaning procedures
Follow the procedures in this section to safely clean your computer.
40 Chapter 7 Maintaining your computer
WARNING! To prevent electric shock or damage to components, do not attempt to clean your computer
while it is on.
1. Turn o the computer.
2. Disconnect AC power.
3. Disconnect all powered external devices.
CAUTION: To prevent damage to internal components, do not spray cleaning agents or liquids directly on
any computer surface. Liquids dripped on the surface can permanently damage internal components.
Cleaning the display
Gently wipe the display using a soft, lint-free cloth moistened with an alcohol-free glass cleaner. Be sure that
a display is dry before you close the computer.
Cleaning the sides or cover
To clean the sides or cover, use a soft microber cloth or chamois moistened with one of the cleaning
solutions listed previously, or use an acceptable disposable wipe.
NOTE: When cleaning the cover of the computer, use a circular motion to aid in removing dirt and debris.
Cleaning the TouchPad, keyboard, or mouse (select products only)
WARNING! To reduce the risk of electric shock or damage to internal components, do not use a vacuum
cleaner attachment to clean the keyboard. A vacuum cleaner can deposit household debris on the keyboard
surface.
CAUTION: To prevent damage to internal components, do not allow liquids to drip between the keys.
To clean the TouchPad, keyboard, or mouse, use a soft microber cloth or a chamois moistened with one
of the cleaning solutions listed previously or use an acceptable disposable wipe.
To prevent keys from sticking and to remove dust, lint, and particles from the keyboard, use a can of
compressed air with a straw extension.
Traveling with or shipping your computer
If you have to travel with or ship your computer, follow these tips to keep your equipment safe.
Prepare the computer for traveling or shipping:
Back up your information to an external drive.
Remove all discs and all external media cards, such as memory cards.
Turn o and then disconnect all external devices.
Shut down the computer.
Take along a backup of your information. Keep the backup separate from the computer.
When traveling by air, carry the computer as hand luggage; do not check it in with the rest of your
luggage.
CAUTION: Avoid exposing a drive to magnetic elds. Security devices with magnetic elds include
airport walk-through devices and security wands. Airport conveyer belts and similar security devices
that check carry-on baggage use X-rays instead of magnetism and do not damage drives.
Traveling with or shipping your computer 41
If you plan to use the computer during a ight, listen for the in-ight announcement that tells you when
you are allowed to use your computer. In-ight computer use is at the discretion of the airline.
If you are shipping the computer or a drive, use suitable protective packaging and label the package
“FRAGILE.”
The use of wireless devices may be restricted in some environments. Such restrictions may apply aboard
aircraft, in hospitals, near explosives, and in hazardous locations. If you are uncertain of the policy that
applies to the use of a wireless device in your computer, ask for authorization to use your computer
before you turn it on.
If you are traveling internationally, follow these suggestions:
Check the computer-related customs regulations for each country or region on your itinerary.
Check the power cord and adapter requirements for each location in which you plan to use the
computer. Voltage, frequency, and plug congurations vary.
WARNING! To reduce the risk of electric shock, re, or damage to the equipment, do not attempt
to power the computer with a voltage converter kit sold for appliances.
42 Chapter 7 Maintaining your computer
8 Securing your computer and information
Computer security is essential for protecting the condentiality, integrity, and availability of your information.
Standard security solutions provided by the Windows operating system, HP applications, the Setup Utility
(BIOS), and other third-party software can help protect your computer from a variety of risks, such as viruses,
worms, and other types of malicious code.
IMPORTANT: Some security features listed in this chapter may not be available on your computer.
Using passwords
A password is a group of characters that you choose to secure your computer information and to protect
online transactions. Several types of passwords can be set. For example, when you set up your computer for
the rst time, you were asked to create a user password to secure your computer. Additional passwords can
be set in Windows or in HP Setup Utility (BIOS), which is preinstalled on your computer.
You may nd it helpful to use the same password for a Setup Utility (BIOS) feature and for a Windows security
feature.
To create and save passwords, use the following tips:
To reduce the risk of being locked out of the computer, record each password and store it in a secure
place away from the computer. Do not store passwords in a le on the computer.
When creating passwords, follow requirements set by the program.
Change your passwords at least every 3 months.
An ideal password is long and has letters, punctuation, symbols, and numbers.
Before you send your computer for service, back up your les, delete condential les, and then remove
all password settings.
For additional information about Windows passwords, such as screen-saver passwords:
Type support in the taskbar search box, and then select the HP Support Assistant app.
– or –
Click the question mark icon in the taskbar.
Setting Windows passwords
Password Function
User password Protects access to a Windows user account.
Administrator password Protects administrator-level access to computer contents.
NOTE: This password cannot be used to access Setup Utility
(BIOS) contents.
Using passwords 43
Setting Setup Utility (BIOS) passwords
Password Function
Administrator password Must be entered each time you access Setup Utility (BIOS).
If you forget your administrator password, you cannot
access Setup Utility (BIOS).
Power-on password Must be entered each time you turn on or restart the
computer.
If you forget your power-on password, you cannot turn on or
restart the computer.
To set, change, or delete an administrator or power-on password in Setup Utility (BIOS):
CAUTION: Use extreme care when making changes in Setup Utility (BIOS). Errors can prevent the computer
from operating properly.
NOTE: To start Setup Utility, your computer must be in notebook mode and you must use the keyboard
attached to your notebook. The on-screen keyboard, which displays in tablet mode, cannot access Setup
Utility.
1. Start Setup Utility (BIOS):
Computers or tablets with keyboards:
Turn on or restart the computer, quickly press esc, and then press f10.
Tablets without keyboards:
1. Turn on or restart the tablet, and then quickly hold down the volume up button.
- or -
Turn on or restart the tablet, and then quickly hold down the volume down button.
- or -
Turn on or restart the tablet, and then quickly hold down the Windows button.
2. Tap f10.
2. Select Security, and then follow the on-screen instructions.
Your changes take eect when the computer restarts.
Using Windows Hello (select products only)
On products equipped with a ngerprint reader or an infrared camera, you can use Windows Hello to sign in by
swiping your nger or looking at the camera.
To set up Windows Hello, follow these steps:
1. Select the Start button, select Settings, select Accounts, and then select Sign-in options.
2. Under Windows Hello, follow the on-screen instructions to add both a password and a numeric PIN, and
then enroll your ngerprint or facial ID.
NOTE: The PIN is not limited in length, but it must consist of numbers only. No alphabetic or special
characters are allowed.
44 Chapter 8 Securing your computer and information
Using Internet security software
When you use your computer to access email, a network, or the Internet, you potentially expose your
computer to computer viruses, spyware, and other online threats. To help protect your computer, Internet
security software that includes antivirus and rewall features may be preinstalled on your computer as a trial
oer. To provide ongoing protection against newly discovered viruses and other security risks, security
software must be kept up to date. It is strongly recommended that you upgrade the security software trial
oer or purchase the software of your choice in order to fully protect your computer.
Using antivirus software
Computer viruses can disable programs, utilities, or the operating system, or cause them to function
abnormally. Antivirus software can detect most viruses, destroy them, and in most cases, repair any damage
they have caused.
To provide ongoing protection against newly discovered viruses, antivirus software must be kept up to date.
An antivirus program may be preinstalled on your computer. It is strongly recommended that you use the
antivirus program of your choice in order to fully protect your computer.
For more information about computer viruses, type support in the taskbar search box, and then select the
HP Support Assistant app.
– or –
Click the question mark icon in the taskbar.
Using rewall software
Firewalls are designed to prevent unauthorized access to a system or network. A rewall can be software you
install on your computer and/or network, or it can be a combination of both hardware and software.
There are two types of rewalls to consider:
Host-based rewalls—Software that protects only the computer it is installed on.
Network-based rewalls—Installed between your DSL or cable modem and your home network to
protect all the computers on the network.
When a rewall is installed on a system, all data sent to and from the system is monitored and compared with
a set of user-dened security criteria. Any data that does not meet those criteria is blocked.
Installing software updates
HP, Windows, and third-party software installed on your computer should be regularly updated to correct
security problems and improve software performance.
CAUTION: Microsoft sends out alerts regarding Windows updates, which may include security updates. To
protect the computer from security breaches and computer viruses, install all updates from Microsoft as soon
as you receive an alert.
You can install these updates automatically.
Using Internet security software 45
To view or change the settings:
1. Select the Start button, select Settings, and then select Update & security.
2. Select Windows Update, and then follow the on-screen instructions.
3. To schedule a time for installing updates, select Advanced options, and then follow the on-screen
instructions.
Using HP Managed Services (select products only)
HP Managed Services is a cloud-based IT solution that enables businesses to eectively manage and secure
their company assets. HP Managed Services helps protect devices against malware and other attacks,
monitors device health, and helps reduce time spent solving device and security issues. You can quickly
download and install the software, which is highly cost eective relative to traditional in-house solutions. For
more information, go to https://www.hptouchpointmanager.com/.
Securing your wireless network
When you set up a WLAN or access an existing WLAN, always enable security features to protect your network
from unauthorized access. WLANs in public areas (hotspots) like coee shops and airports may not provide
any security.
Backing up your software applications and information
Regularly back up your software applications and information to protect them from being permanently lost or
damaged through a virus attack or a software or hardware failure.
Using an optional security cable (select products only)
A security cable (purchased separately) is designed to act as a deterrent, but it may not prevent the computer
from being mishandled or stolen. To connect a security cable to your computer, follow the device
manufacturer's instructions.
46 Chapter 8 Securing your computer and information
9 Using Setup Utility (BIOS)
Setup Utility, or Basic Input/Output System (BIOS), controls communication between all the input and output
devices on the system (such as disk drives, display, keyboard, mouse, and printer). Setup Utility (BIOS)
includes settings for the types of devices installed, the startup sequence of the computer, and the amount of
system and extended memory.
NOTE: To start Setup Utility on convertible computers, your computer must be in notebook mode and you
must use the keyboard attached to your notebook.
Starting Setup Utility (BIOS)
CAUTION: Use extreme care when making changes in Setup Utility (BIOS). Errors can prevent the computer
from operating properly.
Turn on or restart the computer, quickly press esc, and then press f10.
Updating Setup Utility (BIOS)
Updated versions of Setup Utility (BIOS) may be available on the HP website.
Most BIOS updates on the HP website are packaged in compressed les called SoftPaqs.
Some download packages contain a le named Readme.txt, which contains information regarding installing
and troubleshooting the le.
Determining the BIOS version
To decide whether you need to update Setup Utility (BIOS), rst determine the BIOS version on your computer.
To reveal the BIOS version information (also known as ROM date and System BIOS), use one of these options.
HP Support Assistant
1. Type support in the taskbar search box, and then select the HP Support Assistant app.
– or –
Click the question mark icon in the taskbar.
2. Select My PC, and then select Specications.
Setup Utility (BIOS)
1. Start Setup Utility (BIOS) (see Starting Setup Utility (BIOS) on page 47).
2. Select Main, select System Information, and then make note of the BIOS version.
3. Select Exit, select No, and then follow the on-screen instructions.
To check for later BIOS versions, see Downloading a BIOS update on page 48.
Starting Setup Utility (BIOS) 47
Downloading a BIOS update
CAUTION: To reduce the risk of damage to the computer or an unsuccessful installation, download and
install a BIOS update only when the computer is connected to reliable external power using the AC adapter. Do
not download or install a BIOS update while the computer is running on battery power, docked in an optional
docking device, or connected to an optional power source. During the download and installation, follow these
instructions:
Do not disconnect power from the computer by unplugging the power cord from the AC outlet.
Do not shut down the computer or initiate Sleep.
Do not insert, remove, connect, or disconnect any device, cable, or cord.
NOTE: If your computer is connected to a network, consult the network administrator before installing any
software updates, especially system BIOS updates.
1. Type support in the taskbar search box, and then select the HP Support Assistant app.
– or –
Click the question mark icon in the taskbar.
2. Click Updates, and then click Check for updates and messages.
3. Follow the on-screen instructions.
4. At the download area, follow these steps:
a. Identify the most recent BIOS update and compare it to the BIOS version currently installed on your
computer. If the update is more recent than your BIOS version, make a note of the date, name, or
other identier. You may need this information to locate the update later, after it has been
downloaded to your hard drive.
b. Follow the on-screen instructions to download your selection to the hard drive.
Make a note of the path to the location on your hard drive where the BIOS update is downloaded.
You will need to access this path when you are ready to install the update.
BIOS installation procedures vary. Follow any instructions that appear on the screen after the download is
complete. If no instructions appear, follow these steps:
1. Type file in the taskbar search box, and then select File Explorer.
2. Click your hard drive designation. The hard drive designation is typically Local Disk (C:).
3. Using the hard drive path you recorded earlier, open the folder that contains the update.
4. Double-click the le that has an .exe extension (for example, lename.exe).
The BIOS installation begins.
5. Complete the installation by following the on-screen instructions.
NOTE: After a message on the screen reports a successful installation, you can delete the downloaded le
from your hard drive.
48 Chapter 9 Using Setup Utility (BIOS)
10 Using HP PC Hardware Diagnostics
Using HP PC Hardware Diagnostics Windows
HP PC Hardware Diagnostics Windows is a Windows-based utility that allows you to run diagnostic tests to
determine whether the computer hardware is functioning properly. The tool runs within the Windows
operating system in order to diagnose hardware failures.
If HP PC Hardware Diagnostics Windows is not installed on your computer, rst you must download and install
it. To download HP PC Hardware Diagnostics Windows, see Downloading HP PC Hardware Diagnostics
Windows on page 49.
After HP PC Hardware Diagnostics Windows is installed, follow these steps to access it from HP Help and
Support or HP Support Assistant.
1. To access HP PC Hardware Diagnostics Windows from HP Help and Support:
a. Select the Start button, and then select HP Help and Support.
b. Right-click HP PC Hardware Diagnostics Windows, select More, and then select Run as
administrator.
– or –
To access HP PC Hardware Diagnostics Windows from HP Support Assistant:
a. Type support in the taskbar search box, and then select the HP Support Assistant app.
– or –
Select the question mark icon in the taskbar.
b. Select Troubleshooting and xes.
c. Select Diagnostics, and then select HP PC Hardware Diagnostics Windows.
2. When the tool opens, select the type of diagnostic test you want to run, and then follow the on-screen
instructions.
NOTE: If you need to stop a diagnostic test at any time, select Cancel.
3. When HP PC Hardware Diagnostics Windows detects a failure that requires hardware replacement, a 24-
digit Failure ID code is generated. For assistance in correcting the problem, contact support, and then
provide the Failure ID code.
Downloading HP PC Hardware Diagnostics Windows
The HP PC Hardware Diagnostics Windows download instructions are provided in English only.
You must use a Windows computer to download this tool because only .exe les are provided.
Using HP PC Hardware Diagnostics Windows 49
Downloading the latest HP PC Hardware Diagnostics Windows version
To download HP PC Hardware Diagnostics Windows, follow these steps:
1. Go to http://www.hp.com/go/techcenter/pcdiags. The HP PC Diagnostics home page is displayed.
2. In the HP PC Hardware Diagnostics section, select Download, and then select the installation location:
To run the tool on your computer, download it to the computer desktop.
– or –
To run the tool from a USB ash drive, download it to a USB ash drive.
3. Select Run.
Downloading HP Hardware Diagnostics Windows by product name or number (select products
only)
NOTE: For some products, it may be necessary to download the software to a USB ash drive by using the
product name or number.
To download HP PC Hardware Diagnostics Windows by product name or number (select products only), follow
these steps:
1. Go to http://www.hp.com/support.
2. Select Get software and drivers, and then enter the product name or number.
3. In the HP PC Hardware Diagnostics section, select Download, and then select the installation location:
To run the tool on your computer, download it to the computer desktop.
– or –
To run the tool from a USB ash drive, download it to a USB ash drive.
4. Select Run.
Installing HP PC Hardware Diagnostics Windows
To install HP PC Hardware Diagnostics Windows, follow these steps:
Navigate to the folder on your computer or the ash drive where the .exe le was downloaded, double-
click the .exe le, and then follow the on-screen instructions.
Using HP PC Hardware Diagnostics UEFI
HP PC Hardware Diagnostics UEFI (Unied Extensible Firmware Interface) allows you to run diagnostic tests to
determine whether the computer hardware is functioning properly. The tool runs outside the operating
system so that it can isolate hardware failures from issues that are caused by the operating system or other
software components.
If your PC will not boot into Windows, you can use HP PC Hardware Diagnostics UEFI to diagnose hardware
issues.
When HP PC Hardware Diagnostics UEFI detects a failure that requires hardware replacement, a 24-digit
Failure ID code is generated. For assistance in correcting the problem, contact support, and provide the Failure
ID code.
NOTE: To start diagnostics on a convertible computer, your computer must be in notebook mode, and you
must use the attached keyboard.
50 Chapter 10 Using HP PC Hardware Diagnostics
NOTE: If you need to stop a diagnostic test, press esc.
Starting HP PC Hardware Diagnostics UEFI
To start HP PC Hardware Diagnostics UEFI, follow these steps:
1. Turn on or restart the computer, and quickly press esc.
2. Press f2.
The BIOS searches three places for the diagnostic tools, in the following order:
a. Connected USB ash drive
NOTE: To download the HP PC Hardware Diagnostics UEFI tool to a USB ash drive, see
Downloading the latest HP PC Hardware Diagnostics UEFI version on page 51.
b. Hard drive
c. BIOS
3. When the diagnostic tool opens, select the type of diagnostic test you want to run, and then follow the
on-screen instructions.
Downloading HP PC Hardware Diagnostics UEFI to a USB ash drive
Downloading HP PC Hardware Diagnostics UEFI to a USB ash drive can be useful in the following situations:
HP PC Hardware Diagnostics UEFI is not included in the preinstall image.
HP PC Hardware Diagnostics UEFI is not included in the HP Tool partition.
The hard drive is damaged.
NOTE: The HP PC Hardware Diagnostics UEFI download instructions are provided in English only, and you
must use a Windows computer to download and create the HP UEFI support environment because only .exe
les are provided.
Downloading the latest HP PC Hardware Diagnostics UEFI version
To download the latest HP PC Hardware Diagnostics UEFI version to a USB ash drive:
1. Go to http://www.hp.com/go/techcenter/pcdiags. The HP PC Diagnostics home page is displayed.
2. In the HP PC Hardware Diagnostics UEFI section, select Download UEFI Diagnostics, and then select
Run.
Downloading HP PC Hardware Diagnostics UEFI by product name or number (select products only)
NOTE: For some products, it may be necessary to download the software to a USB ash drive by using the
product name or number.
To download HP PC Hardware Diagnostics UEFI by product name or number (select products only) to a USB
ash drive:
1. Go to http://www.hp.com/support.
2. Enter the product name or number, select your computer, and then select your operating system.
3. In the Diagnostics section, follow the on-screen instructions to select and download the specic UEFI
Diagnostics version for your computer.
Using HP PC Hardware Diagnostics UEFI 51
Using Remote HP PC Hardware Diagnostics UEFI settings (select
products only)
Remote HP PC Hardware Diagnostics UEFI is a rmware (BIOS) feature that downloads HP PC Hardware
Diagnostics UEFI to your computer. It can then execute the diagnostics on your computer, and it may upload
results to a precongured server. For more information on Remote HP PC Hardware Diagnostics UEFI, go to
http://www.hp.com/go/techcenter/pcdiags, and then select Find out more.
Downloading Remote HP PC Hardware Diagnostics UEFI
NOTE: HP Remote PC Hardware Diagnostics UEFI is also available as a Softpaq that can be downloaded to a
server.
Downloading the latest Remote HP PC Hardware Diagnostics UEFI version
To download the latest Remote HP PC Hardware Diagnostics UEFI version, follow these steps:
1. Go to http://www.hp.com/go/techcenter/pcdiags. The HP PC Diagnostics home page is displayed.
2. In the HP PC Hardware Diagnostics UEFI section, select Download Remote Diagnostics, and then select
Run.
Downloading Remote HP PC Hardware Diagnostics UEFI by product name or number
NOTE: For some products, it may be necessary to download the software by using the product name or
number.
To download HP Remote PC Hardware Diagnostics UEFI by product name or number, follow these steps:
1. Go to http://www.hp.com/support.
2. Select Get software and drivers, enter the product name or number, select your computer, and then
select your operating system.
3. In the Diagnostics section, follow the on-screen instructions to select and download the Remote UEFI
version for the product.
Customizing Remote HP PC Hardware Diagnostics UEFI settings
Using the Remote HP PC Hardware Diagnostics setting in Computer Setup (BIOS), you can perform the
following customizations:
Set a schedule for running diagnostics unattended. You can also start diagnostics immediately in
interactive mode by selecting Execute Remote HP PC Hardware Diagnostics.
Set the location for downloading the diagnostic tools. This feature provides access to the tools from the
HP website or from a server that has been precongured for use. Your computer does not require the
traditional local storage (such as a disk drive or USB ash drive) to run remote diagnostics.
Set a location for storing the test results. You can also set the user name and password settings used for
uploads.
Display status information about the diagnostics run previously.
To customize Remote HP PC Hardware Diagnostics UEFI settings, follow these steps:
1. Turn on or restart the computer, and when the HP logo appears, press f10 to enter Computer Setup.
2. Select Advanced, and then select Settings.
52 Chapter 10 Using HP PC Hardware Diagnostics
3. Make your customization selections.
4. Select Main, and then Save Changes and Exit to save your settings.
Your changes take eect when the computer restarts.
Using Remote HP PC Hardware Diagnostics UEFI settings (select products only) 53
11 Backing up, restoring, and recovering
This chapter provides information about the following processes, which are standard procedure for most
products:
Backing up your personal information—You can use Windows tools to back up your personal
information (see Using Windows tools on page 54).
Creating a restore point—You can use Windows tools to create a restore point (see Using Windows
tools on page 54).
Creating recovery media (select products only)—You can use HP Recovery Manager or HP Cloud
Recovery Download Tool (select products only) to create recovery media (see Creating HP Recovery
media (select products only) on page 54).
Restoring and recovery—Windows oers several options for restoring from backup, refreshing the
computer, and resetting the computer to its original state (see Using Windows tools on page 54).
Removing the Recovery Partition—To remove the Recovery partition to reclaim hard drive space
(select products only), select the Remove Recovery Partition option of HP Recovery Manager. For more
information, see Removing the HP Recovery partition (select products only) on page 58.
Using Windows tools
IMPORTANT: Windows is the only option that allows you to back up your personal information. Schedule
regular backups to avoid information loss.
You can use Windows tools to back up personal information and create system restore points and recovery
media, allowing you to restore from backup, refresh the computer, and reset the computer to its original
state.
NOTE: If computer storage is 32 GB or less, Microsoft System Restore is disabled by default.
For more information and steps, see the Get Help app.
Select the Start button, and then select the Get Help app.
NOTE: You must be connected to the Internet to access the Get Help app.
Creating HP Recovery media (select products only)
After you have successfully set up the computer, use HP Recovery Manager to create a backup of the HP
Recovery partition on the computer. This backup is called HP Recovery media. In cases where the hard drive is
corrupted or has been replaced, the HP Recovery media can be used to reinstall the original operating system.
To check for the presence of the Recovery partition in addition to the Windows partition, right-click the Start
button, select File Explorer, and then select This PC.
NOTE: If your computer does not list the Recovery partition in addition to the Windows partition, contact
support to obtain recovery discs. Go to http://www.hp.com/support, select your country or region, and then
follow the on-screen instructions.
54 Chapter 11 Backing up, restoring, and recovering
On select products, you can use the HP Cloud Recovery Download Tool to create HP Recovery media on a
bootable USB ash drive. For more information, see Using the HP Cloud Recovery Download Tool to create
recovery media on page 56.
Using HP Recovery Manager to create recovery media
NOTE: If you cannot create recovery media yourself, contact support to obtain recovery discs. Go to
http://www.hp.com/support, select your country or region, and then follow the on-screen instructions.
Before you begin
Before you begin, note the following:
Only one set of recovery media can be created. Handle these recovery tools carefully, and keep them in a
safe place.
HP Recovery Manager examines the computer and determines the required media storage capacity.
To create recovery media, use one of the following options:
NOTE: If the computer does not have a recovery partition, HP Recovery Manager displays the Windows
Create a Recovery Drive feature. Follow the on-screen instructions to create a recovery image on a blank
USB ash drive or hard drive.
If your computer has an optical drive with DVD writer capability, be sure to use only high-quality
blank DVD-R, DVD+R, DVD-R DL, or DVD+R DL discs. Do not use rewritable discs such as CD±RW,
DVD±RW, double-layer DVD±RW, or BD-RE (rewritable Blu-ray) discs, which are not compatible with
HP Recovery Manager software.
If your computer does not include an integrated optical drive with DVD writer capability, you can
use an external optical drive (purchased separately) to create recovery discs, as described above. If
an external optical drive is used, you must connect it directly to a USB port on the computer. It
cannot be connected to a USB port on an external device, such as a USB hub.
To create a recovery ash drive, use a high-quality blank USB ash drive.
Be sure that the computer is connected to AC power before you begin creating the recovery media.
The creation process can take an hour or more. Do not interrupt this process.
If necessary, you can exit the program before you have nished creating all of the recovery media. HP
Recovery Manager will nish the current DVD or ash drive. The next time you start HP Recovery
Manager, you will be prompted to continue.
Creating the recovery media
To create HP Recovery media using HP Recovery Manager:
IMPORTANT: For a tablet with a detachable keyboard, connect the tablet to the keyboard base before
beginning these steps.
1. Type recovery in the taskbar search box, and then select HP Recovery Manager.
2. Select Create recovery media, and then follow the on-screen instructions.
If you need to recover the system, see Recovering using HP Recovery Manager on page 56.
Creating HP Recovery media (select products only) 55
Using the HP Cloud Recovery Download Tool to create recovery media
To create HP Recovery media using the HP Cloud Recovery Download Tool:
1. Go to http://www.hp.com/support.
2. Select Software and Drivers, and then follow the on-screen instructions.
Restoring and recovery
Restoring and recovery can be performed using one or more of the following options: Windows tools, HP
Recovery Manager, or the HP Recovery partition.
IMPORTANT: Not all methods are available on all products.
Restoring, resetting, and refreshing using Windows tools
Windows oers several options for restoring, resetting, and refreshing the computer. For details, see Using
Windows tools on page 54.
Restoring using HP Recovery Manager and the HP Recovery partition
You can use HP Recovery Manager and the HP Recovery partition (select products only) to restore the
computer to the original factory state:
Resolving problems with preinstalled applications or drivers—To correct a problem with a
preinstalled application or driver:
1. Type recovery in the taskbar search box, and then select HP Recovery Manager.
2. Select Reinstall drivers and/or applications, and then follow the on-screen instructions.
Using System Recovery—To recover the Windows partition to original factory content, select the
System Recovery option from the HP Recovery partition (select products only) or use the HP Recovery
media. For more information, see Recovering using HP Recovery Manager on page 56. If you have not
already created recovery media, see Creating HP Recovery media (select products only) on page 54.
Using Factory Reset (select products only)—Restores the computer to its original factory state by
deleting all information from the hard drive and recreating the partitions and then reinstalling the
operating system and the software that was installed at the factory (select products only). To use the
Factory Reset option, you must use HP Recovery media. If you have not already created recovery media,
see Creating HP Recovery media (select products only) on page 54.
NOTE: If you have replaced the hard drive in the computer, you can use the Factory Reset option to
install the operating system and the software that was installed at the factory.
Recovering using HP Recovery Manager
You can use HP Recovery Manager software to recover the computer to its original factory state by using the
HP Recovery media that you either created or that you obtained from HP, or by using the HP Recovery
partition (select products only).
If you have not already created HP Recovery media, see Creating HP Recovery media (select products only)
on page 54.
IMPORTANT: HP Recovery Manager does not automatically provide backups of your personal data. Before
beginning recovery, back up any personal data that you want to retain. See Using Windows tools on page 54.
56 Chapter 11 Backing up, restoring, and recovering
IMPORTANT: Recovery through HP Recovery Manager should be used as a nal attempt to correct computer
issues.
NOTE: When you start the recovery process, only the options available for your computer are displayed.
Before you begin, note the following:
HP Recovery Manager recovers only software that was installed at the factory. For software not
provided with this computer, you must either download the software from the manufacturer's website or
reinstall the software from the media provided by the manufacturer.
If the computer hard drive fails, HP Recovery media must be used. This media is created using HP
Recovery Manager. See
Creating HP Recovery media (select products only) on page 54.
If your computer does not allow the creation of HP Recovery media or if the HP Recovery media does not
work, contact support to obtain recovery media. Go to http://www.hp.com/support, select your country
or region, and then follow the on-screen instructions.
Recovering using the HP Recovery partition (select products only)
The HP Recovery partition allows you to perform a system recovery without recovery discs or a recovery USB
ash drive. This type of recovery can be used only if the hard drive is still working.
The HP Recovery partition (select products only) allows System Recovery only.
To start HP Recovery Manager from the HP Recovery partition:
IMPORTANT: For a tablet with a detachable keyboard, connect the tablet to the keyboard base before
beginning these steps (select products only).
1. Type recovery in the taskbar search box, select HP Recovery Manager, and then select Windows
Recovery Environment
.
‒ or –
For computers or tablets with keyboards attached:
Press f11 while the computer boots, or press and hold f11 as you press the power button.
For tablets without keyboards:
Turn on or restart the tablet, quickly hold down the volume up button, and then select f11.
2. Select Troubleshoot from the boot options menu.
3. Select Recovery Manager, and then follow the on-screen instructions.
NOTE: If your computer does not automatically restart in HP Recovery Manager, change the computer
boot order, and then follow the on-screen instructions. See Changing the computer boot order
on page 58.
Recovering using HP Recovery media
If your computer does not have an HP Recovery partition or if the hard drive is not working properly, you can
use HP Recovery media to recover the original operating system and software programs that were installed at
the factory.
Insert the HP Recovery media, and then restart the computer.
Restoring and recovery 57
NOTE: If your computer does not automatically restart in HP Recovery Manager, change the computer
boot order, and then follow the on-screen instructions. See Changing the computer boot order
on page 58.
Changing the computer boot order
If your computer does not restart in HP Recovery Manager, you can change the computer boot order. This is
the order of devices listed in BIOS where the computer looks for startup information. You can change the
selection to an optical drive or a USB ash drive, depending on the location of your HP Recovery media.
To change the boot order:
IMPORTANT: For a tablet with a detachable keyboard, connect the tablet to the keyboard base before
beginning these steps.
1. Insert the HP Recovery media.
2. Access the system Startup menu.
For computers or tablets with keyboards attached:
Turn on or restart the computer or tablet, quickly press esc, and then press f9 for boot options.
For tablets without keyboards:
Turn on or restart the tablet, quickly hold down the volume up button, and then select f9.
‒ or –
Turn on or restart the tablet, quickly hold down the volume down button, and then select f9.
3. Select the optical drive or USB ash drive from which you want to boot, and then follow the on-screen
instructions.
Removing the HP Recovery partition (select products only)
HP Recovery Manager software allows you to remove the HP Recovery partition (select products only) to free
up hard drive space.
IMPORTANT: After you remove the HP Recovery partition, you will not be able to perform System Recovery
or create HP Recovery media. Before removing the Recovery partition, create HP Recovery media. See
Creating HP Recovery media (select products only) on page 54.
Follow these steps to remove the HP Recovery partition:
1. Type recovery in the taskbar search box, and then select HP Recovery Manager.
2. Select Remove Recovery Partition, and then follow the on-screen instructions.
58 Chapter 11 Backing up, restoring, and recovering
12 Specications
Input power
The power information in this section may be helpful if you plan to travel internationally with the computer.
The computer operates on DC power, which can be supplied by an AC or a DC power source. The AC power
source must be rated at 100–240 V, 50–60 Hz. Although the computer can be powered from a standalone DC
power source, it should be powered only with an AC adapter or a DC power source that is supplied and
approved by HP for use with this computer.
The computer can operate on DC power within the following specications. Operating voltage and current
varies by platform. The voltage and current for your computer is located on the regulatory label.
Input power Rating
Operating voltage and current 5 V dc @ 2 A / 12 V dc @ 3 A /15 V dc @ 3 A – 45 W USB-C
5 V dc @ 3 A / 9 V dc @ 3 A / 12 V dc @ 3.75 A /15 V dc @ 3 A – 45 W USB-C
5 V dc @ 3 A / 9 V dc @ 3 A / 10 V dc @ 3.75 A / 12 V dc @ 3.75 A / 15 V dc @ 3 A / 20 V dc @ 2.25 A
– 45 W USB-C
5 V dc @ 3 A / 9 V dc @ 3 A / 12 V dc @ 5 A / 15 V dc @ 4.33 A / 20 V dc @ 3.25 A – 65 W USB-C
5 V dc @ 3 A / 9 V dc @ 3A / 10 V dc @ 5 A / 12 V dc @ 5 A / 15 V dc @ 4.33 A / 20 V dc @ 3.25 A –
65 W USB-C
5 V dc @ 3 A / 9 V dc @ 3 A / 10 V dc @ 5 A / 12 V dc @ 5 A / 15 V dc @ 5 A / 20 V dc @ 4.5 A – 90 W
USB-C
19.5 V dc @ 2.31 A – 45 W
19.5 V dc @ 3.33 A – 65 W
19.5 V dc @ 4.62 A – 90 W
19.5 V dc @ 6.15 A – 120 W
19.5 V dc @ 6.9 A – 135 W
19.5 V dc @ 7.70 A – 150 W
19.5 V dc @ 10.3 A – 200 W
19.5 V dc @ 11.8 A – 230 W
19.5 V dc @ 16.92 A – 330 W
DC plug of external HP power
supply (select products only)
NOTE: This product is designed for IT power systems in Norway with phase-to-phase voltage not exceeding
240 V rms.
Input power 59
Operating environment
Factor Metric U.S.
Temperature
Operating 5°C to 35°C 41°F to 95°F
Nonoperating -20°C to 60°C -4°F to 140°F
Relative humidity (noncondensing)
Operating 10% to 90% 10% to 90%
Nonoperating 5% to 95% 5% to 95%
Maximum altitude (unpressurized)
Operating -15 m to 3,048 m -50 ft to 10,000 ft
Nonoperating -15 m to 12,192 m -50 ft to 40,000 ft
60 Chapter 12 Specications
13 Electrostatic Discharge
Electrostatic discharge is the release of static electricity when two objects come into contact—for example,
the shock you receive when you walk across the carpet and touch a metal door knob.
A discharge of static electricity from ngers or other electrostatic conductors may damage electronic
components.
To prevent damage to the computer, damage to a drive, or loss of information, observe these precautions:
If removal or installation instructions direct you to unplug the computer, rst be sure that it is properly
grounded.
Keep components in their electrostatic-safe containers until you are ready to install them.
Avoid touching pins, leads, and circuitry. Handle electronic components as little as possible.
Use nonmagnetic tools.
Before handling components, discharge static electricity by touching an unpainted metal surface.
If you remove a component, place it in an electrostatic-safe container.
61
14 Accessibility
HP designs, produces, and markets products and services that can be used by everyone, including people with
disabilities, either on a stand-alone basis or with appropriate assistive devices. To access the latest
information on HP accessibility, go to http://www.hp.com/accessibility.
Supported assistive technologies
HP products support a wide variety of operating system assistive technologies and can be congured to work
with additional assistive technologies. Use the Search feature on your device to locate more information
about assistive features.
NOTE: For additional information about a particular assistive technology product, contact customer support
for that product.
Contacting support
We are constantly rening the accessibility of our products and services and welcome feedback from users. If
you have an issue with a product or would like to tell us about accessibility features that have helped you,
please contact us at +1 (888) 259-5707, Monday through Friday, 6 a.m. to 9 p.m. North American Mountain
Time. If you are deaf or hard-of-hearing and use TRS/VRS/WebCapTel, contact us if you require technical
support or have accessibility questions by calling +1 (877) 656-7058, Monday through Friday, 6 a.m. to 9 p.m.
North American Mountain Time.
NOTE: Support is in English only.
62 Chapter 14 Accessibility
Index
A
AC adapter and battery light,
identifying 5
accessibility 62
action keys
identifying 13
using 14
airplane mode 19
airplane mode key 13, 19
antivirus software, using 45
audio 23
HDMI audio 26
headphones 23
headsets 24
microphones 24
sound settings 24
speakers 23
audio-in (microphone) jack 7, 8
audio-out (headphone)/audio-in
(microphone) jack, identifying 6, 8
B
backing up software and
information 46
backup, creating 54
backups 54
battery
conserving power 36
discharging 36
factory-sealed 37
nding information 36
low battery levels 36
resolving low battery level 37
battery charge 36
battery information, nding 36
battery power 35
best practices 1
BIOS
determining version 47
downloading an update 48
starting the Setup Utility 47
updating 47
Bluetooth device 19, 21
Bluetooth label 17
boot order, changing 58
buttons
left TouchPad 10
optical drive eject 5
power 12
right TouchPad 10
C
camera
identifying 9
using 23
camera light, identifying 9
caps lock light, identifying 11
caring for your computer 40
cleaning your computer 40
components
bottom 15
display 9
left side 6
right side 5
connecting to a network 19
connecting to a wireless network 19
connecting to a WLAN 20
connecting to LAN 22
connector, power 5, 8
corporate WLAN connection 20
critical battery level 37
D
data transfer 28
Disk Cleanup software 39
Disk Defragmenter software 39
drive light 5
E
electrostatic discharge 61
END key 13
esc key, identifying 13
external power, using 37
F
factory-sealed battery 37
ngerprints, registering 44
rewall software 45
fn key, identifying 13
four-nger tap TouchPad gesture
30
G
gaming macro keys, identifying 13
GPS 21
H
hardware, locating 4
HDMI port
connecting 26
identifying 6, 7
headphones, connecting 23
headsets, connecting 24
Hibernation
exiting 34
initiated during critical battery
level 37
initiating 34
high-denition devices, connecting
26, 27, 28
HP 3D DriveGuard 39
HP Fast Charge 35
HP Mobile Broadband
activating 21
IMEI number 21
MEID number 21
HP OMEN Command Center 18
HP PC Hardware Diagnostics UEFI
downloading 51
starting 51
using 50
HP PC Hardware Diagnostics Windows
downloading 49
installing 50
using 49
HP Recovery Manager
correcting boot problems 58
starting 57
HP Recovery media
recovery 57
using 55
HP Recovery partition
recovery 57
removing 58
Index 63
HP resources 2
HP Touchpoint Manager 46
I
IMEI number 21
initiating Sleep and Hibernation 33
input power 59
insert key 13
installing
optional security cable 46
internal microphones, identifying 9
Internet security software, using 45
J
jacks
audio-in (microphone) 7, 8
audio-out (headphone)/audio-in
(microphone) 6, 8
network 6, 7
RJ-45 (network) 6, 7
K
keyboard and optional mouse
using 32
keys
action 13
airplane mode 13
END key 13
esc 13
fn 13
insert key 13
OMEN key 13
PRT SC 13
Windows 13
L
labels
Bluetooth 17
regulatory 17
serial number 16
service 16
wireless certication 17
WLAN 17
lights
AC adapter and battery light 5
caps lock 11
drive 5
mute 11
power 11
RJ-45 (network) status 6, 7
TouchPad 11
low battery level 36
M
maintenance
Disk Cleanup 39
Disk Defragmenter 39
updating programs and drivers
40
managing power 33
MEID number 21
memory card reader, identifying 5,
7, 8
memory card, identifying 5, 7, 8
microphone, connecting 24
Mini DisplayPort
connecting 27
identifying 6, 7
minimized image recovery 57
minimized image, creating 56
Miracast 28
mobile broadband
activating 21
IMEI number 21
MEID number 21
mute light, identifying 11
N
network jack, identifying 6, 7
O
OMEN key 13, 18
one-nger slide touch screen
gesture 32
operating environment 60
operating system controls 19
optical drive eject button,
identifying 5
optical drive, identifying 5
original system recovery 56
P
passwords
Setup Utility (BIOS) 44
Windows 43
ports
HDMI 6, 7, 26, 27
Mini DisplayPort 6, 7
USB SuperSpeed 5
USB SuperSpeed port with HP
Sleep and Charge 6, 8
USB Type-C 28
USB Type-C power connector and
Thunderbolt port with HP Sleep
and Charge 8
USB Type-C Thunderbolt 24
USB Type-C with HP Sleep and
Charge 6
power
battery 35
external 37
power button, identifying 12
power connector, identifying 5, 8
Power icon, using 35
power lights, identifying 11
power settings, using 35
product name and number,
computer 16
PRT SC key 13
public WLAN connection 20
R
recovery 54
discs 55, 57
HP Recovery Manager 56
HP Recovery partition 56
media 57
starting 57
supported discs 55
system 56
USB ash drive 57
using HP Recovery media 55
recovery media
creating using HP Cloud Recovery
Download Tool 56
creating using HP Recovery
Manager 55
creating using Windows tools 54
discs 55
HP Recovery partition 54
USB ash drive 55
using 55
recovery partition, removing 58
regulatory information
regulatory label 17
wireless certication labels 17
Remote HP PC Hardware Diagnostics
UEFI settings
customizing 52
using 52
restoring 54
64 Index
RJ-45 (network) jack, identifying 6,
7
RJ-45 (network) status lights,
identifying 6, 7
S
security cable slot, identifying 6, 7
security cable, installing 46
serial number, computer 16
service labels, locating 16
Setup Utility (BIOS) passwords 44
shipping the computer 41
shutdown 34
Sleep
exiting 33
initiating 33
Sleep and Hibernation, initiating 33
slots
memory card reader 5, 7, 8
security cable 6, 7
software
Disk Cleanup 39
Disk Defragmenter 39
locating 4
software installed
locating 4
software updates, installing 45
sound. See audio
sound settings, using 24
speakers
connecting 23
identifying 15
special keys
using 13
supported discs, recovery 55
system recovery 56
system restore point, creating 54
T
tap TouchPad and touch screen
gesture 29
three-nger swipe TouchPad
gesture 31
Thunderbolt port with HP Sleep and
Charge
identifying USB Type-C 8
Thunderbolt, connecting USB Type-
C 24
touch screen gestures
one-nger slide 32
TouchPad
buttons 10
using 29
TouchPad and touch screen gestures
tap 29
two-nger pinch zoom 30
TouchPad gestures
four-nger tap 30
three-nger swipe 31
two-nger slide 30
two-nger tap 30
TouchPad light 11
TouchPad zone, identifying 10
transfer data 28
traveling with the computer 17, 41
turning o the computer 34
two-nger pinch zoom TouchPad and
touch screen gesture 30
two-nger slide TouchPad gesture
30
two-nger tap TouchPad gesture 30
U
unresponsive system 34
updating programs and drivers 40
USB SuperSpeed port with HP Sleep
and Charge, identifying 6, 8
USB SuperSpeed port, identifying 5
USB Type-C port with HP Sleep and
Charge, identifying 6
USB Type-C port, connecting 24, 28
USB Type-C power connector and
Thunderbolt port with HP Sleep and
Charge, identifying 8
using passwords 43
using the keyboard and optional
mouse 32
using the TouchPad 29
V
vents, identifying 15
video
HDMI port 26
Mini DisplayPort 27
Thunderbolt port device 24
USB Type-C 28
wireless displays 28
video, using 24
W
Windows
backup 54
recovery media 54
system restore point 54
Windows Hello 23
using 44
Windows key, identifying 13
Windows passwords 43
Windows tools, using 54
wired network (LAN) 22
wireless button 19
wireless certication label 17
wireless controls
button 19
operating system 19
wireless light 19
wireless network (WLAN)
connecting 20
corporate WLAN connection 20
functional range 20
public WLAN connection 20
wireless network, securing 46
WLAN antennas, identifying 9
WLAN device 17
WLAN label 17
WWAN device 21
Index 65
71

Hulp nodig? Stel uw vraag in het forum

Spelregels

Misbruik melden

Gebruikershandleiding.com neemt misbruik van zijn services uitermate serieus. U kunt hieronder aangeven waarom deze vraag ongepast is. Wij controleren de vraag en zonodig wordt deze verwijderd.

Product:

Bijvoorbeeld antisemitische inhoud, racistische inhoud, of materiaal dat gewelddadige fysieke handelingen tot gevolg kan hebben.

Bijvoorbeeld een creditcardnummer, een persoonlijk identificatienummer, of een geheim adres. E-mailadressen en volledige namen worden niet als privégegevens beschouwd.

Spelregels forum

Om tot zinvolle vragen te komen hanteren wij de volgende spelregels:

Belangrijk! Als er een antwoord wordt gegeven op uw vraag, dan is het voor de gever van het antwoord nuttig om te weten als u er wel (of niet) mee geholpen bent! Wij vragen u dus ook te reageren op een antwoord.

Belangrijk! Antwoorden worden ook per e-mail naar abonnees gestuurd. Laat uw emailadres achter op deze site, zodat u op de hoogte blijft. U krijgt dan ook andere vragen en antwoorden te zien.

Abonneren

Abonneer u voor het ontvangen van emails voor uw HP OMEN by HP - 17-an103 bij:


U ontvangt een email met instructies om u voor één of beide opties in te schrijven.


Ontvang uw handleiding per email

Vul uw emailadres in en ontvang de handleiding van HP OMEN by HP - 17-an103 in de taal/talen: Engels als bijlage per email.

De handleiding is 3,69 mb groot.


U ontvangt de handleiding per email binnen enkele minuten. Als u geen email heeft ontvangen, dan heeft u waarschijnlijk een verkeerd emailadres ingevuld of is uw mailbox te vol. Daarnaast kan het zijn dat uw internetprovider een maximum heeft aan de grootte per email. Omdat hier een handleiding wordt meegestuurd, kan het voorkomen dat de email groter is dan toegestaan bij uw provider.

Stel vragen via chat aan uw handleiding

Stel uw vraag over deze PDF

Andere handleiding(en) van HP OMEN by HP - 17-an103

HP OMEN by HP - 17-an103 Gebruiksaanwijzing - Nederlands - 80 pagina's

HP OMEN by HP - 17-an103 Gebruiksaanwijzing - Deutsch - 81 pagina's


Uw handleiding is per email verstuurd. Controleer uw email

Als u niet binnen een kwartier uw email met handleiding ontvangen heeft, kan het zijn dat u een verkeerd emailadres heeft ingevuld of dat uw emailprovider een maximum grootte per email heeft ingesteld die kleiner is dan de grootte van de handleiding.

Er is een email naar u verstuurd om uw inschrijving definitief te maken.

Controleer uw email en volg de aanwijzingen op om uw inschrijving definitief te maken

U heeft geen emailadres opgegeven

Als u de handleiding per email wilt ontvangen, vul dan een geldig emailadres in.

Uw vraag is op deze pagina toegevoegd

Wilt u een email ontvangen bij een antwoord en/of nieuwe vragen? Vul dan hier uw emailadres in.


Info