604955
94
Verklein
Vergroot
Pagina terug
1/154
Pagina verder
LASERJET PROFESSIONAL P1100 Printer series
User Guide
www.hp.com/support/ljp1100series
HP LaserJet Professional P1100 Printer
series
Copyright and License
© 2015 Copyright HP Development
Company, L.P.
Reproduction, adaptation, or translation
without prior written permission is
prohibited, except as allowed under the
copyright laws.
The information contained herein is subject
to change without notice.
The only warranties for HP products and
services are set forth in the express warranty
statements accompanying such products and
services. Nothing herein should be
construed as constituting an additional
warranty. HP shall not be liable for technical
or editorial errors or omissions contained
herein.
Part number: CE651-91059
Edition 2, 4/2015
Trademark Credits
Adobe
®
, Acrobat
®
, and PostScript
®
are
trademarks of Adobe Systems Incorporated.
Intel® Core™ is a trademark of Intel
Corporation in the U.S. and other countries.
ENERGY STAR and the ENERGY STAR mark
are registered U.S. marks.
Microsoft®, Windows®, Windows® XP,
and Windows Vista® are U.S. registered
trademarks of Microsoft Corporation.
Conventions used in this guide
TIP: Tips provide helpful hints or shortcuts.
NOTE: Notes provide important information to explain a concept or to complete a task.
CAUTION: Cautions indicate procedures that you should follow to avoid losing data or damaging
the product.
WARNING! Warnings alert you to specific procedures that you should follow to avoid personal
injury, catastrophic loss of data, or extensive damage to the product.
ENWW iii
iv Conventions used in this guide ENWW
Table of contents
1 Product basics .................................................................................................................. 1
Product comparison .................................................................................................................. 2
Environmental features .............................................................................................................. 2
Product features ....................................................................................................................... 3
Product views .......................................................................................................................... 4
Front and left side view .............................................................................................. 4
Back view ................................................................................................................ 6
Serial number and product number location ................................................................. 6
Control-panel layout .................................................................................................. 7
2 Software for Windows ..................................................................................................... 9
Supported operating systems for Windows ................................................................................ 10
Supported printer-drivers for Windows ..................................................................................... 10
Priority for print settings .......................................................................................................... 11
Change printer-driver settings for Windows ............................................................................... 12
Remove software for Windows ................................................................................................ 13
Use the uninstall utility to remove Windows software ................................................... 13
Use the Windows Control Panel to remove software .................................................... 13
Supported utilities (wireless models only) ................................................................................... 14
Embedded Web server ............................................................................................ 14
3 Use the product with Mac ............................................................................................... 15
Software for Mac ................................................................................................................... 16
Supported operating systems for Macintosh ................................................................ 16
Supported printer drivers for Macintosh ..................................................................... 16
Remove software for Mac ......................................................................................... 16
Priority for print settings for Mac ............................................................................... 16
Change printer-driver settings for Macintosh ............................................................... 17
Software for Mac computers ..................................................................................... 18
HP Printer Utility for Mac ........................................................................... 18
Install software for Mac computers on a wireless network .............................. 18
ENWW v
Supported utilities for Mac (wireless models only) ........................................................ 19
Embedded Web server ............................................................................. 19
Print with Mac ....................................................................................................................... 20
Create and use printing presets in Macintosh ............................................................. 20
Resize documents or print on a custom paper size ....................................................... 20
Print a cover page ................................................................................................... 20
Print multiple pages on one sheet of paper in Macintosh .............................................. 21
Print on both sides (duplex) ...................................................................................... 21
Print on both sides manually ...................................................................... 21
4 Connect the product ........................................................................................................ 23
Supported network operating systems (wireless models only) ....................................................... 24
USB connection ..................................................................................................................... 25
CD installation ........................................................................................................ 25
Network connection (wireless models only) ............................................................................... 26
Supported network protocols .................................................................................... 26
Install the product on a wireless network with the software CD ...................................... 26
Turn off the product wireless unit ............................................................................... 26
Configure the network product .................................................................................. 27
Use the Wireless Configuration utility ......................................................... 27
Restore default wireless settings .................................................................. 27
View or change network settings ................................................................ 27
Set or change the network password .......................................................... 28
IP address ............................................................................................... 28
Link speed setting ..................................................................................... 28
5 Paper and print media ................................................................................................... 29
Understand paper and print media use ..................................................................................... 30
Special paper or print media guidelines ................................................................................... 31
Change the print driver to match the media type and size ........................................................... 32
Supported paper sizes ............................................................................................................ 33
Supported paper types and tray capacity .................................................................................. 34
Supported paper and print media types ..................................................................... 34
Tray and bin capacity .............................................................................................. 34
Paper orientation for loading trays ........................................................................................... 36
Load paper trays .................................................................................................................... 36
Priority feed slot ...................................................................................................... 36
Input tray ............................................................................................................... 36
Tray adjustment for short media (base models only) ...................................... 37
vi ENWW
6 Print tasks ...................................................................................................................... 39
Cancel a print job .................................................................................................................. 40
Stop the current print job from the control panel (wireless models only) .......................... 40
Stop the current print job from the software program ................................................... 40
Print with Windows ................................................................................................................ 41
Open the Windows printer driver .............................................................................. 41
Get help for any print option with Windows ............................................................... 41
Change the number of print copies with Windows ...................................................... 41
Print colored text as black with Windows ................................................................... 41
Save custom print settings for reuse with Windows ...................................................... 42
Use a printing quick set ............................................................................. 42
Create a custom printing quick set .............................................................. 42
Improve print quality with Windows .......................................................................... 42
Select a page size .................................................................................... 42
Select a custom page size .......................................................... 42
Select a paper type .................................................................................. 42
Select the print resolution .......................................................................... 43
Print the first or last page on different paper with Windows .......................................... 43
Scale a document to fit page size with Windows ........................................................ 43
Add a watermark to a document with Windows ......................................................... 43
Print on both sides (duplex) with Windows ................................................................. 44
Manually print on both sides (duplex) ......................................................... 44
Create a booklet with Windows ................................................................................ 45
Print multiple pages per sheet with Windows .............................................................. 46
Select page orientation with Windows ....................................................................... 46
Use HP ePrint .......................................................................................................... 46
Use HP Cloud Print ................................................................................... 46
Use HP Direct Print (wireless models only) ................................................... 47
Use AirPrint ............................................................................................. 48
7 Manage and maintain the product .................................................................................. 51
Print the information pages ...................................................................................................... 52
Configuration page ................................................................................................. 52
Supplies status page ................................................................................................ 52
Demo page ............................................................................................................ 52
Use the HP Embedded Web Server (wireless models only) .......................................................... 53
Open the HP Embedded Web Server by using a network connection ............................ 53
HP Embedded Web Server sections ........................................................................... 54
Information tab ........................................................................................ 54
Settings tab ............................................................................................. 54
Networking tab ........................................................................................ 54
ENWW vii
Links ....................................................................................................... 54
Economy settings ................................................................................................................... 55
Auto-Off mode ........................................................................................................ 55
Print with EconoMode .............................................................................................. 55
Manage supplies and accessories ............................................................................................ 56
Check and order supplies ........................................................................................ 56
Print-cartridge storage ............................................................................... 56
HP Policy on non-HP print cartridges ........................................................... 56
HP fraud hotline and Web site ................................................................... 56
Recycle supplies ....................................................................................... 56
Replacement instructions .......................................................................................... 57
Redistribute toner ..................................................................................... 57
Replace the print cartridge ........................................................................ 58
Replace the pickup roller ........................................................................... 61
Replace the separation pad ....................................................................... 64
Clean the product .................................................................................................................. 67
Clean the pickup roller ............................................................................................. 67
Clean the paper path .............................................................................................. 68
Clean the print-cartridge area ................................................................................... 69
Clean the exterior ................................................................................................... 71
Product updates ..................................................................................................................... 71
8 Solve problems ............................................................................................................... 73
Solve general problems .......................................................................................................... 74
Troubleshooting checklist .......................................................................................... 74
Factors that affect product performance ..................................................................... 75
Interpret control-panel light patterns .......................................................................................... 76
Clear jams ............................................................................................................................ 79
Common causes of jams .......................................................................................... 79
Jam locations .......................................................................................................... 80
Clear jams from the input tray ................................................................................... 80
Clear jams from the output areas .............................................................................. 83
Clear jams from inside the product ............................................................................ 85
Solve repeated jams ................................................................................................ 86
Change the jam recovery setting ............................................................................... 86
Solve paper-handling problems ................................................................................................ 87
Solve image-quality problems .................................................................................................. 89
Image defect examples ............................................................................................ 89
Light print or faded ................................................................................... 89
Toner specks ............................................................................................ 89
Dropouts ................................................................................................. 90
viii ENWW
Vertical lines ............................................................................................ 90
Gray background ..................................................................................... 90
Toner smear ............................................................................................ 91
Loose toner .............................................................................................. 91
Vertical repetitive defects .......................................................................... 91
Misformed characters ............................................................................... 91
Page skew ............................................................................................... 92
Curl or wave ........................................................................................... 92
Wrinkles or creases .................................................................................. 92
Toner scatter outline ................................................................................. 93
Moisture .................................................................................................. 93
Optimize and improve image quality ......................................................................... 94
Change print density ................................................................................ 94
Solve performance problems ................................................................................................... 95
Solve connectivity problems ..................................................................................................... 96
Solve direct-connect problems ................................................................................... 96
Solve wireless problems ........................................................................................... 96
Solve product software problems ............................................................................................. 98
Solve common Windows problems ........................................................................... 98
Solve common Macintosh problems ........................................................................... 99
Appendix A Supplies and accessories .............................................................................. 103
Order parts, accessories, and supplies ................................................................................... 104
Part numbers ....................................................................................................................... 104
Paper-handling accessories .................................................................................... 104
Print cartridges ...................................................................................................... 104
Cables and interfaces ............................................................................................ 104
Appendix B Service and support ...................................................................................... 105
HP limited warranty statement ................................................................................................ 106
HP's Premium Protection Warranty: LaserJet print cartridge limited warranty statement .................. 108
End User License Agreement .................................................................................................. 109
Customer self-repair warranty service ..................................................................................... 111
Customer support ................................................................................................................. 111
Repack the product .............................................................................................................. 112
Appendix C Specifications ................................................................................................ 113
Physical specifications .......................................................................................................... 114
Power consumption, electrical specifications, and acoustic emissions .......................................... 114
Environmental specifications .................................................................................................. 114
ENWW ix
Appendix D Regulatory information ................................................................................ 115
FCC regulations ................................................................................................................... 116
Environmental product stewardship program ........................................................................... 117
Protecting the environment ...................................................................................... 117
Ozone production ................................................................................................. 117
Power consumption ............................................................................................... 117
Toner consumption ................................................................................................ 117
Paper use ............................................................................................................. 117
Plastics ................................................................................................................. 117
HP LaserJet print supplies ....................................................................................... 117
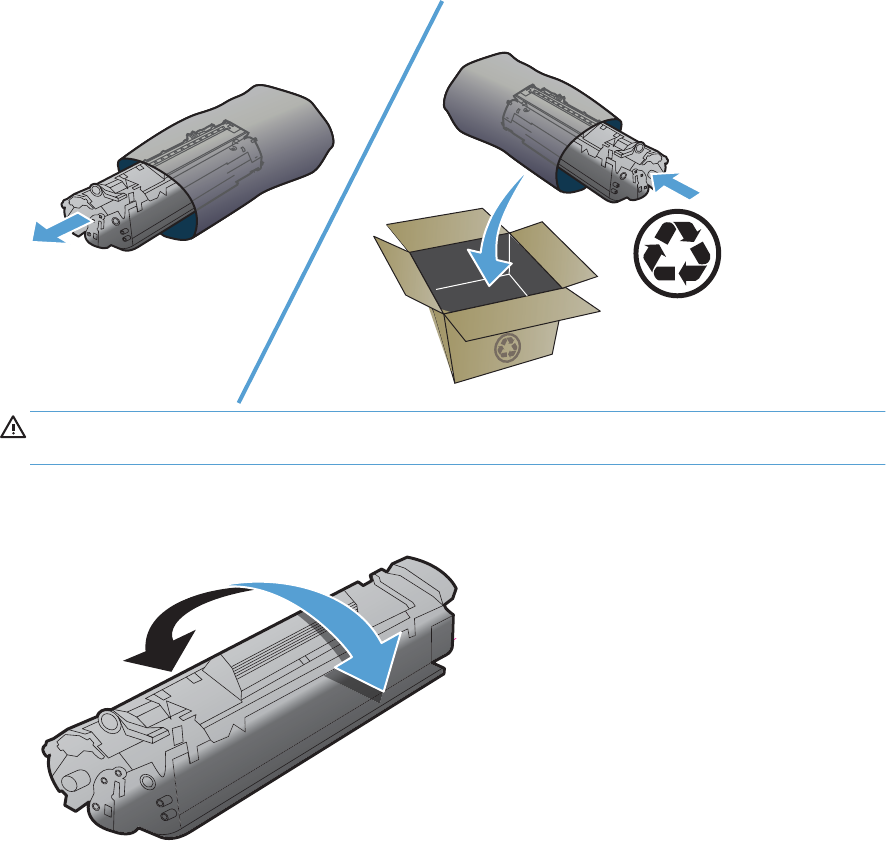
Return and recycling instructions ............................................................................. 118
United States and Puerto Rico .................................................................. 118
Multiple returns (more than one cartridge) .................................. 118
Single returns .......................................................................... 118
Shipping ................................................................................ 118
Non-U.S. returns .................................................................................... 119
Paper .................................................................................................................. 119
Material restrictions ............................................................................................... 119
Disposal of waste equipment by users in private households in the European Union ...... 119
Chemical substances ............................................................................................. 119
Material Safety Data Sheet (MSDS) ......................................................................... 120
For more information ............................................................................................. 120
Declaration of Conformity (HP LaserJet Professional P1102, P1102s, P1106, P1108, and P1109) 121
Declaration of Conformity (HP LaserJet Professional P1102w and P1109w) ................................ 123
Declaration of Conformity (HP LaserJet Pro P1102w and P1109w) ............................................. 125
Safety statements ................................................................................................................. 127
Laser safety .......................................................................................................... 127
Canadian DOC regulations .................................................................................... 127
VCCI statement (Japan) .......................................................................................... 127
Power cord instructions .......................................................................................... 127
Power cord statement (Japan) ................................................................................. 127
EMC statement (Korea) .......................................................................................... 128
Laser statement for Finland ..................................................................................... 129
GS statement (Germany) ........................................................................................ 129
Substances Table (China) ....................................................................................... 130
Restriction on Hazardous Substances statement (Turkey) ............................................. 130
Additional statements for wireless products .............................................................................. 131
FCC compliance statement—United States ................................................................ 131
Australia statement ................................................................................................ 131
Brazil ANATEL statement ........................................................................................ 131
Canadian statements ............................................................................................. 131
x ENWW
European Union regulatory notice ........................................................................... 131
Notice for use in France ......................................................................................... 132
Notice for use in Russia ......................................................................................... 132
Korean statement .................................................................................................. 132
Taiwan statement .................................................................................................. 132
Vietnam Telecom wired marking for ICTQC Type approved products .......................... 133
Index ............................................................................................................................... 135
ENWW xi
xii ENWW
1 Product basics
Product comparison
Environmental features
Product features
Product views
ENWW 1
Product comparison
HP LaserJet Professional P1100 Printer series HP LaserJet Professional P1100w Printer series
Speed: Up to 18 A4 pages per minute (ppm), 19 letter-
size ppm
Tray: 150-sheet input tray
Connectivity: Hi-Speed USB 2.0 port
Duplexing: Manual duplexing (using the printer driver)
Speed: 18 A4 pages per minute (ppm), 19 letter-size
ppm
Trays: 150-sheet main-input tray and 10-sheet priority
input slot
Connectivity: Hi-Speed USB 2.0 port and 802.11b/g
wireless networking
Duplexing: Manual duplexing (using the printer driver)
Environmental features
Recycling Reduce waste by using recycled paper.
Recycle print cartridges by using the HP return process.
Energy savings Save energy with product Auto-Off mode.
Duplex Save paper by using the manual duplex printing setting.
HP Smart Web Printing Use HP Smart Web Printing to select, store, and organize text and graphics from multiple Web
pages and then edit and print exactly what you see onscreen. It gives you the control you need for
printing meaningful information while minimizing waste.
Download HP Smart Web Printing from this Web site:
www.hp.com/go/smartweb.
2 Chapter 1 Product basics ENWW
Product features
Benefit Supporting features
Excellent print
quality
Genuine HP print cartridge.
FastRes 600 setting provides 600 dots per inch (dpi) effective print quality. FastRes 1200
setting provides 1,200 dpi effective print quality.
Adjustable settings to optimize print quality.
Supported operating
systems
Windows Vista (32-bit and 64-bit)
Windows XP (32-bit and 64-bit)
Windows 7
Windows Server 2003 (32-bit and 64-bit)
Windows Server 2008 (32-bit and 64-bit)
Mac OS X v10.4, v10.5, v10.6
Ease of use
The print cartridge is easy to install.
Convenient access to the print cartridge and to the paper path through the print-cartridge
door.
Paper tray can be adjusted with one hand.
Flexible paper
handling
A 10-sheet priority input slot (wireless models only)
A 150-sheet (75 g/m
2
(20 lb) paper) input tray.
A 125-sheet (75 g/m
2
(20 lb) paper) output bin.
Manual duplexing (two-sided printing).
Interface connections
Hi-Speed USB 2.0 port
802.11b/g wireless networking (wireless models only)
Energy savings
After a user-specified time, the Auto-Off feature automatically conserves electricity by
substantially reducing power consumption when the product is not printing.
Economical printing
N-up printing (printing more than one page on a sheet) and the manual two-sided printing
features save paper.
EconoMode printer driver feature saves toner.
Supplies
management
Authentication for genuine HP print cartridges.
Easy ordering for replacement supplies.
Supplies status page shows estimated toner level in the print cartridge. Not available for non-
HP supplies.
Accessibility
The online user guide is compatible with text screen-readers.
All doors and covers can be opened by using one hand.
Security
Kensington lock receptacle on the back of the product.
ENWW
Product features
3
Product views
Front and left side view
3
2
5
6
1
7
4
1 Output bin
2 Foldable output tray extension
3 Input tray
4 Short media extender tool
5 Power button
6 Print-cartridge door lift-tab
7 Control panel
4 Chapter 1 Product basics ENWW
3
2
5
6
1
7
4
1 Output bin
2 Foldable output tray extension
3 Priority input slot
4 Main input tray
5 Power button
6 Print-cartridge door lift-tab
7 Control panel
ENWW
Product views
5
Back view
2
1
3
1 USB port
2 Power connector
3 Kensington lock
Serial number and product number location
The label that contains the product number and serial number is on the rear of the product.
6 Chapter 1 Product basics ENWW
Control-panel layout
NOTE: See Interpret control-panel light patterns on page 76 for a description of what the light
patterns mean.
2
1
1
Attention
light: Indicates that the print cartridge door is open or other errors exist.
2
Ready
light: When the product is ready to print, the ready light is on. When the product is processing data, the
ready light blinks.
2
3
4
5
1
1
Wireless
button: To detect wireless networks, press the wireless button. This button also enables and disables the
wireless feature.
2 Wireless light: When the product is searching for a network, the wireless light blinks. When the product is connected to
a wireless network, the wireless light is on.
3
Attention
light: Indicates that the print cartridge door is open or other errors exist.
ENWW
Product views
7
4
Ready
light: When the product is ready to print, the ready light is on. When the product is processing data, the
ready light blinks.
5 Cancel
button: To cancel the print job, press the cancel button. Press and hold the button for 5 seconds to print a
configuration page.
8 Chapter 1 Product basics ENWW
2 Software for Windows
Supported operating systems for Windows
Supported printer-drivers for Windows
Priority for print settings
Change printer-driver settings for Windows
Remove software for Windows
Supported utilities (wireless models only)
ENWW 9
Supported operating systems for Windows
The product comes with software for the following Windows® operating systems:
Windows Vista (32-bit and 64-bit)
Windows XP (32-bit and 64-bit)
Windows 7
Windows Server 2003 (32-bit and 64-bit)
For more information about upgrading from Windows 2000 Server to Windows Server 2003,
using Windows Server 2003 Point and Print, or using Windows Server 2003 Terminal Services
and Printing, go to
www.microsoft.com.
Windows Server 2008 (32-bit and 64-bit)
Supported printer-drivers for Windows
The product comes with software for Windows that allows the computer to communicate with the
product. This software is called a printer driver. Printer drivers provide access to product features, such
as printing on custom-sized paper, resizing documents, and inserting watermarks.
NOTE: The most recent drivers are available at www.hp.com/support/ljp1100series. Depending on
the configuration of Windows-based computers, the installation program for the product software
automatically checks the computer for Internet access in order to obtain the latest drivers.
In addition to the printer driver that is installed from the product CD, the XML Paper Specification (XPS)
driver is available for download from the Web.
10 Chapter 2 Software for Windows ENWW
Priority for print settings
Changes to print settings are prioritized depending on where the changes are made:
NOTE: The names of commands and dialog boxes might vary depending on your software program.
Page Setup dialog box: Click Page Setup or a similar command on the File menu of the
program you are working in to open this dialog box. Settings changed here override settings
changed anywhere else.
Print dialog box: Click Print, Print Setup, or a similar command on the File menu of the
program you are working in to open this dialog box. Settings changed in the Print dialog box
have a lower priority and usually do not override changes made in the Page Setup dialog box.
Printer Properties dialog box (printer driver): Click Properties in the Print dialog box
to open the printer driver. Settings changed in the Printer Properties dialog box usually do not
override settings anywhere else in the printing software. You can change most of the print settings
here.
Default printer driver settings: The default printer driver settings determine the settings used
in all print jobs, unless settings are changed in the Page Setup, Print, or Printer Properties
dialog boxes.
ENWW
Priority for print settings
11
Change printer-driver settings for Windows
Change the settings for all print
jobs until the software program
is closed
Change the default settings for
all print jobs
Change the product configuration
settings
1. On the File menu in the software
program, click Print.
2. Select the driver, and then click
Properties or Preferences.
The steps can vary; this procedure is
most common.
1. Windows Vista and
Windows 7: Click Start, click
Control Panel, and then in the
category for Hardware and
Sound click Printer.
-or-
Windows XP, Windows
Server 2003, and Windows
Server 2008 (using the
default Start menu view):
Click Start, and then click
Printers and Faxes.
-or-
Windows XP, Windows
Server 2003, and Windows
Server 2008 (using the
Classic Start menu view):
Click Start, click Settings, and
then click Printers.
2. Right-click the driver icon, and then
select Printing Preferences.
1. Windows Vista and
Windows 7: Click Start, click
Control Panel, and then in the
category for Hardware and
Sound click Printer.
-or-
Windows XP, Windows
Server 2003, and Windows
Server 2008 (using the
default Start menu view):
Click Start, and then click
Printers and Faxes.
-or-
Windows XP, Windows
Server 2003, and Windows
Server 2008 (using the
Classic Start menu view):
Click Start, click Settings, and
then click Printers.
2. Ri
ght-click the driver icon, and then
se
lect Properties.
3. Click the Device Settings tab.
12 Chapter 2 Software for Windows ENWW
Remove software for Windows
Use the uninstall utility to remove Windows software
1. Click the Start button, and then click the Programs or All Programs menu item.
2. Click the HP menu item, and then click the HP LaserJet Professional P1100 Printer series
menu item.
3. Click the Uninstall menu item, and then follow the onscreen instructions to remove the software.
Use the Windows Control Panel to remove software
Windows XP, Windows Server 2003, and Windows Server 2008
1. Click the Start button, click the Control Panel item, and then click the Add or Remove
Programs item.
2. Find and select the product from the list.
3. Click the Change/Remove button to remove the software.
Windows Vista and Windows 7
1. Click the Start button, click the Control Panel item, and then click the Programs and
Features item.
2. Find and select the product from the list.
3. Select the Uninstall/Change option.
ENWW
Remove software for Windows
13
Supported utilities (wireless models only)
Embedded Web server
The product is equipped with an embedded Web server, which provides access to information about
product and network activities. This information appears in a Web browser, such as Microsoft Internet
Explorer, Apple Safari, or Firefox.
The embedded Web server resides on the product. It is not loaded on a network server.
The embedded Web server provides an interface to the product that anyone who has a network-
connected computer and a standard Web browser can use. No special software is installed or
configured, but you must have a supported Web browser on your computer. To gain access to the
embedded Web server, type the IP address for the product in the address line of the browser. (To find
the IP address, print a configuration page. For more information about printing a configuration page,
see
Print the information pages on page 52.)
For a complete explanation of the features and functionality of the embedded Web server, see
HP Embedded Web Server sections on page 54.
14 Chapter 2 Software for Windows ENWW
3 Use the product with Mac
Software for Mac
Print with Mac
ENWW 15
Software for Mac
Supported operating systems for Macintosh
The product supports the following Macintosh operating systems:
Mac OS X v10.4, v10.5, and v10.6
NOTE: PPC and Intel® Core™ processors are supported.
Supported printer drivers for Macintosh
The HP LaserJet software installer provides PostScript® Printer Description (PPD) files, a CUPS driver,
and the HP Printer Utilities for Mac OS X. The HP printer PPD file, in combination with the CUPS driver,
provides full printing functionality and access to specific HP printer features.
Remove software for Mac
Use the uninstall utility to remove the software.
1. Browse to the following folder:
Library/Printers/hp/laserjet/P1100_P1560_P1600Series/
2. Double-click the HP Uninstaller.app file.
3. Click the Continue button, and then follow the onscreen instructions to remove the software.
Priority for print settings for Mac
Changes to print settings are prioritized depending on where the changes are made:
NOTE: The names of commands and dialog boxes might vary depending on your software program.
Page Setup dialog box: Click Page Setup or a similar command on the File menu of the
program you are working in to open this dialog box. Settings changed here might override
settings changed anywhere else.
Print dialog box: Click Print, Print Setup, or a similar command on the File menu of the
program you are working in to open this dialog box. Settings changed in the Print dialog box
have a lower priority and do not override changes made in the Page Setup dialog box.
Default printer driver settings: The default printer driver settings determine the settings used
in all print jobs, unless settings are changed in the Page Setup or Print dialog boxes.
16 Chapter 3 Use the product with Mac ENWW
Change printer-driver settings for Macintosh
Change the settings for all print
jobs until the software program
is closed
Change the default settings for
all print jobs
Change the product configuration
settings
1. On the File menu, click Print.
2. Change the settings that you want
on the various menus.
1. On the File menu, click Print.
2. Change the settings that you want
on the various menus.
3. On the Presets menu, click Save
as and type a name for the preset.
These settings are saved in the Presets
menu. To use the new settings, you must
select the saved preset option every time
you open a program and print.
Mac OS X v10.4
1. From the Apple menu, click
System Preferences and then
Print & Fax.
2. Click Printer Setup.
3. Click the Installable Options
menu.
Mac OS X v10.5 and v10.6
1. From the Apple menu, click
System Preferences and then
Print & Fax.
2. Click Options & Supplies.
3. Click the Driver menu.
4. Select the driver from the list, and
configure the installed options.
ENWW
Software for Mac
17
Software for Mac computers
HP Printer Utility for Mac
Use the HP LaserJet Utility to print the product information pages and to change the Auto-Off setting
from a Mac computer.
To open the HP LaserJet Utility, complete the procedure below.
Open the Print Queue, and then click the Utility icon.
Install software for Mac computers on a wireless network
Before installing the product software, make sure the product is not connected to the network using a
network cable.
NOTE: You must have Mac OS X V10.6 to install the product on a wireless network.
To connect the product to a computer on a wireless network, follow these steps:
1. Open Finder in the dashboard.
2. Click Applications, and then double-click System Preferences, and then click Print & Fax.
3. Open Print Queue, click Printer Setup, click the Utility tab, and then click Open Printer
Utility.
4. Click HTMLConfig.
5. Click the Networking tab, and then click Wireless in the list on the left.
6. Under Communication Mode, click Infrastructure, select a network name from the Available
Network Names (SSID) list, and then click the << button.
7. From the Security Mode pop-up menu under Authentication, click WEP.
8. Type the WEP key and then click Apply.
9. Click OK in the confirmation box.
10. Close the HTML Config windows and the Print Queue window.
11. In the Print & Fax window, choose the USB option (listed with the product model) and then click
the minus - button.
12. When the window with the list of printers appears, choose the Bonjour option (listed with the
product model), and then click Add.
18 Chapter 3 Use the product with Mac ENWW
Supported utilities for Mac (wireless models only)
Embedded Web server
Network models are equipped with an embedded Web server, which provides access to information
about device and network activities. This information appears in a Web browser, such as Microsoft
Internet Explorer, Netscape Navigator, Apple Safari, or Firefox.
The embedded Web server resides on the device. It is not loaded on a network server.
The embedded Web server provides an interface to the device that anyone who has a network-
connected computer and a standard Web browser can use. No special software is installed or
configured, but you must have a supported Web browser on your computer. To gain access to the
embedded Web server, type the IP address for the device in the address line of the browser. (To find
the IP address, print a configuration page.)
ENWW
Software for Mac
19
Print with Mac
Create and use printing presets in Macintosh
Use printing presets to save the current printer driver settings for reuse.
Create a printing preset
1. On the File menu, click Print.
2. Select the driver.
3. Select the print settings.
4. In the Presets box, click Save As..., and type a name for the preset.
5. Click OK.
Use printing presets
1. On the File menu, click Print.
2. Select the driver.
3. In the Presets box, select the printing preset that you want to use.
NOTE: To use printer-driver default settings, select Standard.
Resize documents or print on a custom paper size
You can scale a document to fit on a different size of paper.
1. On the File menu, click Print.
2. Open the Paper Handling menu.
3. In the area for Destination Paper Size, select Scale to fit paper size, and then select the
size from the drop-down list.
4. If you want to use only paper that is smaller than the document, select Scale down only.
Print a cover page
You can print a separate cover page for your document that includes a message (such as
“Confidential”).
1. On the File menu, click Print.
2. Select the driver.
20 Chapter 3 Use the product with Mac ENWW
3. Open the Cover Page menu, and then select whether to print the cover page Before
Document or After Document.
4. In the Cover Page Type menu, select the message that you want to print on the cover page.
NOTE: To print a blank cover page, select Standard as the Cover Page Type.
Print multiple pages on one sheet of paper in Macintosh
You can print more than one page on a single sheet of paper. This feature provides a cost-effective way
to print draft pages.
1. On the File menu, click Print.
2. Select the driver.
3. Open the Layout menu.
4. Next to Pages per Sheet, select the number of pages that you want to print on each sheet (1,
2, 4, 6, 9, or 16).
5. Next to Layout Direction, select the order and placement of the pages on the sheet.
6. Next to Borders, select the type of border to print around each page on the sheet.
Print on both sides (duplex)
Print on both sides manually
1. Insert enough paper into the input tray to accommodate the print job. If you are loading special
paper such as letterhead, load it face-down in the tray.
2. On the File menu, click Print.
3. Mac OS X v10.4: In the Layout drop-down list, select the Long-edged binding item or the
Short-edged binding item.
-or-
Mac OS X v10.5 and v10.6: Click the Two-sided check box.
4. Click Print. Follow the instructions in the dialog box that opens on the computer screen before
placing the output stack in the tray for printing the second half.
ENWW
Print with Mac
21
5. Go to the product, and remove any blank paper that is in the tray.
6. Take the printed stack from the output bin, and then insert the stack printed side down into the tray
with the top edge feeding into the product first.
7. At the computer, click the Continue button to finish the print job.
22 Chapter 3 Use the product with Mac ENWW
4 Connect the product
Supported network operating systems (wireless models only)
USB connection
Network connection (wireless models only)
ENWW 23
Supported network operating systems (wireless
models only)
The product supports the following operating systems for wireless printing:
Windows Vista (32-bit and 64-bit)
Windows XP (32-bit and 64-bit)
Windows 7
Windows Server 2003 (32-bit and 64-bit)
Windows Server 2008 (32-bit and 64-bit)
Mac OS X v10.4, v10.5, and v10.6
24 Chapter 4 Connect the product ENWW
USB connection
This product supports a Hi-Speed USB 2.0 connection. You must use an A-to-B type USB cable that is no
longer than 2 m (6.56 ft).
CD installation
1. Insert the software installation CD into the computer CD drive.
NOTE: Do not connect the USB cable until prompted.
2. If the installation program does not start automatically, browse the CD contents and run the
SETUP.EXE file.
3. Follow the onscreen instructions to install the software.
When you use the CD to install the software, you can choose the following types of installations:
Easy Install (recommended)
You will not be prompted to accept or make changes to default settings, and you automatically
will accept the software license agreement.
Advanced Install
You will be prompted to accept or make changes to default settings.
ENWW
USB connection
25
Network connection (wireless models only)
The product can connect to wireless networks.
Supported network protocols
To connect a networking-equipped product to a network, you need a network that uses one of the
following protocols.
TCP/IP (IPv4 or IPv6)
Port 9100
LPR
DHCP
AutoIP
SNMP
Bonjour
SLP
WSD
NBNS
Install the product on a wireless network with the software CD
1. Insert the software CD into the computer CD tray.
If the installation program does not start automatically, browse the CD contents and run the
SETUP.EXE file.
2. Follow the onscreen instructions to complete the product installation.
3. When the installation is complete, if you want to verify that the product has a network IP address,
print a configuration page. Press and hold the product cancel
button until the ready light
blinks, and then release the button to print the configuration page.
Turn off the product wireless unit
If you want to disconnect the product from a wireless network, you can turn off the wireless unit in the
product.
1. At the product control panel, press and hold the wireless button for more than 5 seconds.
2. To confirm that the wireless unit is turned off, print a configuration page, and then verify that the
product IP address is specified as 0.0.0.0 on the configuration page.
26 Chapter 4 Connect the product ENWW
Configure the network product
Use the Wireless Configuration utility
Use the Wireless Configuration utility to configure the product to print on a wireless network.
1. Connect the wireless product to the computer through a USB cable.
2. Click the Start button, and then click the Programs or All Programs menu item.
3. Click the HP menu item, and then click the HP LaserJet Professional P1100 Printer series
menu item.
4. Click the Wireless Configuration menu item.
5. Follow the onscreen instructions to configure the product to print on a wireless network.
Restore default wireless settings
1. Turn the product off.
2. Press and hold the wireless
button and the cancel button, and then turn the product on.
3. Hold the buttons until all the lights blink in unison, and then release the buttons.
View or change network settings
Use the embedded Web server to view or change IP configuration settings.
1. Print a configuration page, and locate the IP address.
If you are using IPv4, the IP address contains only digits. It has this format:
xxx.xxx.xxx.xxx
If you are using IPv6, the IP address is a hexadecimal combination of characters and digits. It
has a format similar to this:
xxxx::xxxx:xxxx:xxxx:xxxx
2. To open the embedded Web server, type the IP address into the address line of a Web browser.
3. Click the Networking tab to obtain network information. You can change settings as needed.
ENWW
Network connection (wireless models only)
27
Set or change the network password
Use the embedded Web server to set a network password or change an existing password.
1. Open the embedded Web server, click the Networking tab, and click the Password link.
NOTE: If a password has previously been set, you are prompted to type the password. Type the
password, and then click the Apply button.
2. Type the new password in the Password box and in the Confirm Password box.
3. At the bottom of the window, click the Apply button to save the password.
IP address
The product IP address can be set manually, or it can be configured automatically using DHCP, BootP,
or AutoIP.
To change the IP address manually, use the HP Embedded Web Server.
1. Open the HP Embedded Web Server, and then click the Networking tab.
2. In the navigation pane, click the IPv4 Configuration link or the IPv6 Configuration link.
3. In the IP Address Configuration section, click the Manual IP option.
4. Type the required data in the Manual IP Address box, the IP Subnet Mask box, and the
Manual Default Gateway box.
5. Click the Apply button.
Link speed setting
Use the Networking tab in the HP Embedded Web Server to set the link speed if necessary. The
setting is on the Advanced page.
Incorrect changes to the link speed setting might prevent the product from communicating with other
network devices. For most situations, leave the product in automatic mode. Changes can cause the
product to turn off, and then on. Only make changes when the product is idle.
28 Chapter 4 Connect the product ENWW
5 Paper and print media
Understand paper and print media use
Special paper or print media guidelines
Change the print driver to match the media type and size
Supported paper sizes
Supported paper types and tray capacity
Paper orientation for loading trays
Load paper trays
ENWW 29
Understand paper and print media use
This product supports a variety of paper and other print media in accordance with the guidelines in this
user guide. Paper or print media that does not meet these guidelines might cause poor print quality,
increased jams, and premature wear on the product.
For best results, use only HP-brand paper and print media designed for laser printers or multiuse. Do
not use paper or print media made for inkjet printers. HP Company cannot recommend the use of other
brands of media because HP cannot control their quality.
It is possible for paper to meet all of the guidelines in this user guide and still not produce satisfactory
results. This might be the result of improper handling, unacceptable temperature and/or humidity levels,
or other variables over which HP has no control.
CAUTION: Using paper or print media that does not meet HP’s specifications might cause problems
for the product, requiring repair. This repair is not covered by the HP warranty or service agreements.
30 Chapter 5 Paper and print media ENWW
Special paper or print media guidelines
This product supports printing on special media. Use the following guidelines to obtain satisfactory
results. When using special paper or print media, be sure to set the type and size in the printer driver
to obtain the best results.
CAUTION: HP LaserJet products use fusers to bond dry toner particles to the paper in very precise
dots. HP laser paper is designed to withstand this extreme heat. Using inkjet paper could damage the
product.
Media type Do Do not
Envelopes
Store envelopes flat.
Use envelopes where the seam
extends all the way to the corner of
the envelope.
Use peel-off adhesive strips that are
approved for use in laser printers.
Do not use envelopes that are
wrinkled, nicked, stuck together, or
otherwise damaged.
Do not use envelopes that have
clasps, snaps, windows, or coated
linings.
Do not use self-stick adhesives or
other synthetic materials.
Labels
Use only labels that have no
exposed backing between them.
Use labels that lie flat.
Use only full sheets of labels.
Do not use labels that have
wrinkles or bubbles, or are
damaged.
Do not print partial sheets of labels.
Transparencies
Use only transparencies that are
approved for use in laser printers.
Place transparencies on a flat
surface after removing them from
the product.
Do not use transparent print media
not approved for laser printers.
Letterhead or preprinted forms
Use only letterhead or forms
approved for use in laser printers.
Do not use raised or metallic
letterhead.
Heavy paper
Use only heavy paper that is
approved for use in laser printers
and meets the weight specifications
for this product.
Do not use paper that is heavier
than the recommended media
specification for this product unless
it is HP paper that has been
approved for use in this product.
Glossy or coated paper
Use only glossy or coated paper
that is approved for use in laser
printers.
Do not use glossy or coated paper
designed for use in inkjet products.
ENWW
Special paper or print media guidelines
31
Change the print driver to match the media type
and size
Selecting media by type and size results in significantly better print quality for heavy paper, glossy
paper, and overhead transparencies. Using the wrong setting can result in unsatisfactory print quality.
Always print by type for special print media, such as labels or transparencies. Always print by size for
envelopes.
NOTE: Depending on the software program, the commands and dialog box names that follow might
be different.
1. On the File menu in the software program, click the Print menu item.
2. Select the driver, and then click the Properties button or the Preferences button.
3. Click the Paper/Quality tab.
4. In the Type is or Size is list box, select the correct media type or size.
5. Click the OK button.
32 Chapter 5 Paper and print media ENWW
Supported paper sizes
This product supports various paper sizes, and it adapts to various media.
NOTE: To obtain best print results, select the appropriate paper size and type in your print driver
before printing.
Table 5-1 Supported paper and print media sizes
Size Dimensions Input tray Priority input slot
(wireless models
only)
Letter 216 x 279 mm (8.5 x 11 in)
Legal 216 x 356 mm (8.5 x 14 in)
A4 210 x 297 mm (8.27 x 11.69 in)
Executive 184 x 267 mm (7.25 x 10.5 in)
A5 148 x 210 mm (5.83 x 8.27 in)
A6 105 x 148 mm (4.13 x 5.83 in)
B5 (JIS) 182 x 257 mm (7.17 x 10.12 in)
16k 184 x 260 mm (7.24 x 10.23 in)
195 x 270 mm (7.68 x 10.62 in)
197 x 273 mm (7.75 x 10.75 in)
Custom Minimum: 76 x 127 mm (3 x 5 in)
Maximum: 216 x 356 mm (8.5 x 14.0 in)
Table 5-2 Supported envelopes and postcards
Size Dimensions Input tray Priority input slot
(wireless models
only)
Envelope #10 105 x 241 mm (4.13 x 9.49 in)
Envelope DL 110 x 220 mm (4.33 x 8.66 in)
Envelope C5 162 x 229 mm (6.93 x 9.84 in)
Envelope B5 176 x 250 mm (6.7 x 9.8 in)
Envelope Monarch 98 x 191 mm (3.9 x 7.5 in)
Double postcard
(JIS)
148 x 200 mm (5.83 x 7.87 in)
ENWW
Supported paper sizes
33
Supported paper types and tray capacity
Supported paper and print media types
For a complete list of specific HP-brand paper that this product supports, go to www.hp.com/support/
ljp1100series.
Paper type (printer driver) Input tray Priority input slot (wireless models
only)
Paper, including the following types:
Plain
Vellum
Recycled
Rough
Envelope
Labels
Cardstock
Transparency
Postcards
Tray and bin capacity
Tray or bin Paper type Specifications Quantity
Input tray Paper Range:
60 g/m
2
(16 lb) bond to 163 g/
m
2
(43 lb) bond
150 sheets of 75 g/m
2
(20 lb)
bond
Envelopes
60 g/m
2
(16 lb) bond to 90 g/
m
2
(24 lb) bond
Up to 10 envelopes
Transparencies Minimum 0.13 mm (0.005 in)
thick
Up to 75 transparencies
34 Chapter 5 Paper and print media ENWW
Tray or bin Paper type Specifications Quantity
Output bin Paper Range:
60 g/m
2
(16 lb) bond to 163 g/
m
2
(43 lb) bond
Up to 125 sheets of 75 g/m
2
(20 lb) bond
Envelopes
Less than 60 g/m
2
(16 lb) bond
to 90 g/m
2
(24 lb) bond
Up to 10 envelopes
Transparencies Minimum 0.13 mm (0.005 in)
thick
Up to 75 transparencies
ENWW
Supported paper types and tray capacity
35
Paper orientation for loading trays
If you are using paper that requires a specific orientation, load it according to the information in the
following table.
Paper type How to load paper
Preprinted or letterhead
Face up
Top edge leading into the product
Prepunched
Face up
Holes toward the left side of the product
Envelope
Face up
Left short edge leading into the product
Load paper trays
CAUTION: If you try to print on media that is wrinkled, folded, or damaged in any way, a jam might
occur. See
Clear jams on page 79 for more information.
Priority feed slot
The priority feed slot holds up to 10 sheets of media or one envelope, one transparency, or one sheet
of labels or cardstock. Load media with the top forward and the side to be printed on facing up. To
prevent jams and skewing, always adjust the side media guides before feeding the media.
Input tray
The input tray holds 150 pages of 75 g/m
2
(20 lb) paper, or fewer sheets of heavier media (a 15 mm
(0.6 in) stack height or less).
Load media with the top forward and the side to be printed on facing up. To prevent jams and
skewing, always adjust the side and front media guides.
NOTE: When you add new media, make sure that you remove all of the media from the input tray
and straighten the entire stack. This helps prevent multiple sheets of media from feeding through the
product at one time, reducing media jams.
36 Chapter 5 Paper and print media ENWW
Tray adjustment for short media (base models only)
To print on media shorter than 185 mm (7.28 in), use the short media extender to adjust your input
tray.
1. Remove the short media extender tool from the storage slot on the left side of the media input
area.
2. Attach the tool to the adjustable media guide.
3. Insert the media into the product until it stops, and then slide the adjustable media guide, with the
tool attached to support the media.
4. When finished printing with short media, remove the short media extender tool, and then place it
back in the storage slot.
ENWW
Load paper trays
37
38 Chapter 5 Paper and print media ENWW
6 Print tasks
Cancel a print job
Print with Windows
ENWW 39
Cancel a print job
You can stop a print job by using the software program.
NOTE: It can take several minutes for all print jobs to clear after you have canceled a print job.
Stop the current print job from the control panel (wireless models
only)
Press the cancel
button on the control panel.
Stop the current print job from the software program
When you send the print job, a dialog box opens briefly on the screen, giving you the option to cancel
the print job.
If several jobs are sent to the product through your software, they might be waiting in a print queue (for
example, in Windows Print Manager). See the software program documentation for specific instructions
about canceling a print job from the computer.
If a print job is waiting in a print queue or print spooler, delete the print job there.
1. Windows Vista and Windows 7: Click Start, click Control Panel, and then in the
category for Hardware and Sound click Printer.
-or-
Windows XP, Windows Server 2003, and Windows Server 2008 (using the
default Start menu view): Click Start, click Settings, and then click Printers and Faxes.
-or-
Windows XP, Windows Server 2003, and Windows Server 2008 (using the
Classic Start menu view): Click Start, click Settings, and then click Printers.
2. In the list of printers, double-click the name of this product to open the print queue or spooler.
3. Select the print job that you want to cancel, right-click the job, and then click the Cancel or
Delete item.
40 Chapter 6 Print tasks ENWW
Print with Windows
NOTE: Depending on the software program, the commands and dialog box names that follow might
be different.
Open the Windows printer driver
1. On the File menu in the software program, click Print.
2. Select the product, and then click Properties or Preferences.
Get help for any print option with Windows
Printer-driver Help is separate from program Help. The printer-driver help provides explanations for the
buttons, check boxes, and drop-down lists that are in the printer driver. It also includes instructions for
performing common printing tasks, such as printing on both sides, printing multiple pages on one sheet,
and printing the first page or covers on different paper.
Activate the printer-driver Help screens in one of the following ways:
In the printer driver Properties dialog box, click the Help button.
Press the F1 key on the computer keyboard.
Click the question-mark symbol in the upper-right corner of the printer driver.
Right-click on any item in the driver.
Change the number of print copies with Windows
1. Open the printer driver, click the Properties or Preferences button, and then click the
Advanced tab.
2. In the Copies area, use the arrow buttons to adjust the number of copies.
If you are printing multiple copies, click the Collate check box to collate the copies.
3. Click the OK button.
Print colored text as black with Windows
1. Open the printer driver, click the Properties or Preferences button, and then click the
Advanced tab.
2. Click the Print All Text as Black check box.
3. Click the OK button.
ENWW
Print with Windows
41
Save custom print settings for reuse with Windows
Use a printing quick set
1. Open the printer driver, and then click the Properties or Preferences button. The Print Tasks
Quick Sets drop-down list appears on all tabs except the Services tab.
2. In the Print Tasks Quick Sets drop-down list , select one of the quick sets, and then click OK to
print the job with the predefined settings.
Create a custom printing quick set
1. Open the printer driver, and then click the Properties or Preferences button. The Print Tasks
Quick Sets drop-down list appears on all tabs except the Services tab.
2. Select an existing quick set as a base.
3. Select the print options for the new quick set.
4. Click Save As, type a name for the quick set, and then click OK.
Improve print quality with Windows
Select a page size
1. Open the printer driver, click the Properties or Preferences button, and then click the Paper/
Quality tab.
2. Select a size from the Size is drop-down list.
3. Click the OK button.
Select a custom page size
1. Open the printer driver, and then click the Paper/Quality tab.
2. Click the Custom button. The Custom Paper Size dialog box opens.
3. Type a name for the custom size, specify the dimensions, and then click Save.
4. Click the Close button, and then click the OK button.
Select a paper type
1. Open the printer driver, click the Properties or Preferences button, and then click the Paper/
Quality tab.
2. Select a type from the Type is drop-down list.
3. Click the OK button.
42 Chapter 6 Print tasks ENWW
Select the print resolution
1. Open the printer driver, click the Properties or Preferences button, and then click the Paper/
Quality tab.
2. In the Print Quality area, select an option from the drop-down list. See the printer-driver online
Help for information about each of the available options.
NOTE: To use a draft-quality resolution, in the Print Quality area, click the EconoMode
check box.
3. Click the OK button.
Print the first or last page on different paper with Windows
1. Open the printer driver, click the Properties or Preferences button, and then click the Paper/
Quality tab.
2. Click the Use Different Paper/Covers check box, and then select the necessary settings for
the front cover, other pages, and back cover.
3. Click the OK button.
Scale a document to fit page size with Windows
1. Open the printer driver, click the Properties or Preferences button, and then click the Effects
tab.
2. Click the Print document on check box, and then select a size from the drop-down list.
3. Click the OK button.
Add a watermark to a document with Windows
1. Open the printer driver, click the Properties or Preferences button, and then click the Effects
tab.
2. Select a watermark from the Watermarks drop-down list.
To print the watermark on the first page only, click the First page only check box. Otherwise,
the watermark is printed on each page.
3. Click the OK button.
ENWW
Print with Windows
43
Print on both sides (duplex) with Windows
Manually print on both sides (duplex)
1. Load paper face-up in the input tray.
2. Open the printer driver, and then click the Properties or Preferences button.
3. Click the Finishing tab.
4. Click the Print On Both Sides (manually) check box. If you will bind the document along the
top edge, click the Flip pages up check box.
5. Click the OK button to print the first side of the job.
44 Chapter 6 Print tasks ENWW
6. Retrieve the printed stack from the output bin, and, maintaining the paper orientation, place it with
the printed-side facing down in the input tray.
7. At the computer, click the Continue button to print the second side of the job.
Create a booklet with Windows
1. Open the printer driver, click the Properties or Preferences button, and then click the
Finishing tab.
2. Click the Print on both sides (manually) check box.
3. In the Booklet layout drop-down list, click the Left binding or Right binding option. The
Pages per sheet option automatically changes to 2 pages per sheet.
4. Click the OK button.
ENWW
Print with Windows
45
Print multiple pages per sheet with Windows
1. Open the printer driver, click the Properties or Preferences button, and then click the
Finishing tab.
2. Select the number of pages per sheet from the Pages per sheet drop-down list.
3. Select the correct options for Print Page Borders, Page Order, and Orientation.
4. Click the OK button.
Select page orientation with Windows
1. Open the printer driver, click the Properties or Preferences button, and then click the
Finishing tab.
2. In the Orientation area, select the Portrait or Landscape option.
To print the page image upside down, select the Rotate by 180 degrees option.
3. Click the OK button.
Use HP ePrint
HP ePrint is a suite of Web-based printing services that enable a supported HP product to print
documents of the following types:
E-mail messages and attachments sent directly to the HP product’s e-mail address
Documents from select mobile device print applications
Use HP Cloud Print
Use HP Cloud Print to print e-mail messages and attachments by sending them to the product's e-mail
address from any e-mail enabled device.
NOTE: The product must be connected to a wired or wireless network. To use HP Cloud Print, you
must first have access to the Internet and enable HP Web Services.
1. Enable HP Web Services in the HP Embedded Web Server (EWS) by following these steps:
a. After the product is connected to the network, print a configuration page and identify the
product IP address.
b. At your computer, open a Web browser and enter the product IP address into the address
line. The HP EWS appears.
46 Chapter 6 Print tasks ENWW
c. Click the HP Web Services tab. If your network does not use a proxy server to access the
Internet, proceed to the next step. If your network uses a proxy server to access the Internet,
follow these instructions before proceeding to the next step:
i. Select the Proxy Settings tab.
ii. Select the Check this box if your network uses a proxy server to access
the Internet check box.
iii. In the Proxy Server field, enter the proxy server address and port number, and then
click the Apply button.
d. Select the HP Web Services tab and click the Enable button. The product configures the
connection to the Internet, and then a message appears informing you that an information
sheet will be printed.
e. Click the OK button. An ePrint page prints out. On the ePrint page, look for the e-mail
address that is automatically assigned to the product.
2. To print a document, attach it to an e-mail message, and then send the message to the product's e-
mail address. Go to
www.hpeprintcenter.com for a list of supported document types
3. Optionally, use the HP ePrintCenter Web site to define security settings and to configure default
print settings for all HP ePrint jobs sent to this product:
a. Open a Web browser and go to
www.hpeprintcenter.com.
b. Click Sign In, and enter your HP ePrintCenter credentials or sign up for a new account.
c. Select your product from the list, or click the + Add printer button to add it. To add the
product, you need the product code, which is the segment of the product e-mail address that
is before the @ symbol.
NOTE: This code is valid for only 24 hours from the time you enable HP Web Services. If it
expires, follow the instructions to enable HP Web Services again, and obtain a new code.
d. Click the Setup button. The HP ePrint Settings dialog box appears. Three tabs are
available:
Allowed Senders. To prevent your product from printing unexpected documents, click
the Allowed Senders tab. Click Allowed Senders Only, and then add the e-mail
addresses from which you want to allow ePrint jobs.
Print Options. To set up default settings for all ePrint jobs sent to this product, click the
Print Options tab, and then select the settings that you want to use.
Advanced. To change the product’s e-mail address, click the Advanced tab.
Use HP Direct Print (wireless models only)
Use HP Direct Print to print directly to the product from any mobile device (such as a smart phone, net
book, or laptop computer).
ENWW
Print with Windows
47
NOTE: No setup is necessary, but HP Direct Print must be enabled. Your mobile device must have an
HP print application installed.
The HP LaserJet Professional P1102w model does not support HP Direct Print.
1. To enable HP Direct Print, follow these steps:
a. After the product is connected to the network, print a configuration page and identify the
product IP address.
b. At your computer, open a Web browser and enter the product IP address into the address
line. The HP EWS screen appears.
c. Click the Networking tab.
d. On the Networking page, click Wireless Direct Setup. Select the check box, enter the
network name (SSID) in the Wireless Direct Printing Name (SSID) field, and then click
the Apply button. The IP address of the mobile device appears in the Networking page.
NOTE: To find the network name (SSID), click the Wireless Configuration menu in the
Networking page.
2. To print a document from an application, select File, and then select Print.
NOTE: If only one product that supports HP Direct Print is connected to the wireless network, the
document prints. If more than one product that supports HP Direct Print is connected, a list of
products appears; you must select your product before proceeding to the next step. If no product is
discovered, follow the instructions in step 1 to connect the product.
Use AirPrint
Direct printing using Apple’s AirPrint is supported for iOS 4.2 or later. Use AirPrint to print directly to
the product from an iPad (iOS 4.2), iPhone (3GS or later), or iPod touch (third generation or later) in
the following applications:
Mail
Photos
Safari
Select third-party applications
NOTE: The product must be connected to a wired or wireless network.
48 Chapter 6 Print tasks ENWW
To print, follow these steps:
1.
Tap the action
item.
2. Tap Print.
NOTE: If you are printing for the first time, or if your previously selected product is not
available, you must select a product before proceeding to the next step.
3. Configure the print options and then tap Print.
ENWW
Print with Windows
49
50 Chapter 6 Print tasks ENWW
7 Manage and maintain the product
Print the information pages
Use the HP Embedded Web Server (wireless models only)
Economy settings
Manage supplies and accessories
Clean the product
Product updates
ENWW 51
Print the information pages
You can print the following information pages.
Configuration page
The configuration page lists current product settings and properties. It also contains a status log report.
To print a configuration page, do the following:
1. Open the printer driver, and then click the Properties or Preferences button.
2. Click the Services tab, and then, in the Print Information Pages drop-down list, click the
Config Page list item.
3. Click the Print button.
On wireless models, you can print the configuration page from the product control panel.
At the control panel, press and hold the cancel
button until the ready light starts blinking,
and then release the button.
Supplies status page
To print the supplies status page, select it from the Print Information Pages drop-down on the
Services tab in the printer driver. The supplies status page provides the following information:
The estimated percentage of toner remaining in the print cartridge
The number of pages and print jobs that have been processed
Ordering and recycling information
Demo page
To print the demo page, select it from the Print Information Pages drop-down on the Services tab
in the printer driver. The demo page contains examples of text and graphics, and is used to show
product print quality.
52 Chapter 7 Manage and maintain the product ENWW
Use the HP Embedded Web Server (wireless models
only)
Use the HP Embedded Web Server (EWS) to view product and network status and to manage printing
functions from a computer.
View product status information
Determine the remaining life on all supplies and order new ones
View and change the product default configuration settings
View and change network configuration
You do not need to install any software on the computer. You only need to use one of these supported
Web browsers:
Internet Explorer 6.0 (and later)
Firefox 1.0 (and later)
Mozilla 1.6 (and later)
Opera 7.0 (and later)
Safari 1.2 (and later)
Konqueror 3.2 (and later)
The HP Embedded Web Server works when the product is connected to a TCP/IP-based network. The
HP Embedded Web Server does not support IPX-based connections or direct USB connections.
NOTE: You do not have to have Internet access to open and use the HP Embedded Web Server.
However, if you click a link on any of the pages, you must have Internet access to go to the site
associated with the link.
Open the HP Embedded Web Server by using a network
connection
To open the HP Embedded Web Server, type the IP address or host name of the product in the address
field of a supported Web browser. To find the IP address, print a configuration page at the product by
pressing and holding the cancel
button when the ready light is on and no other jobs are printing.
Hold the button until the ready
light starts blinking.
TIP: After you open the URL, bookmark it so that you can return to it quickly in the future.
ENWW
Use the HP Embedded Web Server (wireless models only)
53
HP Embedded Web Server sections
Information tab
The Information pages group consists of the following pages:
Device Status displays the status of the product and HP supplies.
Device Configuration shows the information found on the Configuration page.
Supplies Status shows the status of HP supplies and provides part numbers. To order new
supplies, click Order Supplies in the upper-right part of the window.
Network Summary shows the information found on the Network Summary page.
Settings tab
Use this tab to configure the product from your computer. If this product is networked, always consult
with the product administrator before changing settings on this tab.
The Settings tab contains the Printing page where you can view and change the default print job
settings.
Networking tab
Network administrators can use this tab to control network-related settings for the product when it is
connected to an IP-based network.
Links
Links are located in the upper-right part of the status pages. You must have Internet access to use any of
these links. If you use a dial-up connection and did not connect when you first opened the
HP Embedded Web Server, you must connect before you can visit these Web sites. Connecting might
require that you close the HP Embedded Web Server and reopen it.
Shop for Supplies. Click this link to connect to the Sure Supply Web site and order genuine
HP supplies from HP or a reseller of your choice.
Support. Connects to the product support site. You can search for help regarding general topics.
54 Chapter 7 Manage and maintain the product ENWW
Economy settings
Auto-Off mode
Auto-Off is an energy-saving feature of this product. After a user-specified time period, the product
automatically reduces its power consumption (Auto-Off). The product returns to the ready state when a
button is pressed or a print job is received. When the product is in Auto-Off mode, all of the control-
panel LEDs and the power button backlight LED are off.
NOTE: Although the product lights are off in Auto-Off mode, the product will work normally when it
receives a print job.
Change the Auto-Off delay time
You can change how long the product remains idle (Auto-Off delay) before it enters Auto-Off mode.
NOTE: The default Auto-Off delay setting is 5 minutes.
1. Open the printer properties, and then click the Device Settings tab.
2. Select the Auto-Off delay from the Auto-Off drop-down list.
NOTE: The changed setting does not go into effect until a print job is sent to product.
Print with EconoMode
This product has an EconoMode option for printing drafts of documents. Using EconoMode can use less
toner and decrease the cost per page. However, using EconoMode can also reduce print quality.
HP does not recommend the full-time use of EconoMode. If EconoMode is used full-time, the toner
supply might outlast the mechanical parts in the print cartridge. If print quality begins to degrade under
these circumstances, you must install a new print cartridge, even if there is toner supply remaining in
the cartridge.
Enable EconoMode with Windows
1. Open the printer driver, and then click the Properties or Preferences button.
2. Click the Paper/Quality tab.
3. Click the EconoMode check box.
ENWW
Economy settings
55
Manage supplies and accessories
Correctly using, storing, and monitoring the print cartridge can help ensure high-quality print output.
Check and order supplies
Print-cartridge storage
Do not remove the print cartridge from its package until you are ready to use it.
CAUTION: To prevent damage to the print cartridge, do not expose it to light for more than a few
minutes.
HP Policy on non-HP print cartridges
HP Company cannot recommend the use of non-HP print cartridges, either new or remanufactured.
NOTE: Any damage caused by a non-HP print cartridge is not covered under the HP warranty and
service agreements.
To install a new genuine HP print cartridge, see Replace the print cartridge on page 58.
HP fraud hotline and Web site
Call the HP fraud hotline (1-877-219-3183, toll-free in North America) or go to www.hp.com/go/
anticounterfeit when you install an HP print cartridge and the control-panel message says the cartridge
is non-HP. HP will help determine if the cartridge is genuine and take steps to resolve the problem.
Your print cartridge might not be a genuine HP print cartridge if you notice the following:
You are experiencing a high number of problems with the print cartridge.
The cartridge does not look like it usually does (for example, the orange pull tab is missing, or the
packaging differs from HP packaging).
Recycle supplies
To recycle a genuine HP print cartridge, place the used cartridge in the box in which the new cartridge
arrived. Use the enclosed return label to send the used supply to HP for recycling. For complete
information, see the recycling guide that is included with each new HP supply item.
56 Chapter 7 Manage and maintain the product ENWW
Replacement instructions
Redistribute toner
When a small amount of toner remains in print cartridge, faded or light areas might appear on the
printed page. You might be able to temporarily improve print quality by redistributing the toner.
1. Open the print-cartridge door, and then remove the print cartridge.
2. To redistribute the toner, gently rock the print cartridge from front to back.
CAUTION: If toner gets on your clothing, wipe it off with a dry cloth and wash the clothing in
cold water. Hot water sets toner into the fabric.
ENWW
Manage supplies and accessories
57
3. Reinsert the print cartridge into the product, and then close the print-cartridge door.
If the print is still light, install a new print cartridge.
Replace the print cartridge
When a print cartridge approaches the end of useful life, you can continue printing with the current
cartridge until redistributing the toner no longer yields acceptable print quality.
1. Open the print-cartridge door, and then remove the old print cartridge.
58 Chapter 7 Manage and maintain the product ENWW
2. Remove the new print cartridge from the packaging. Place the used print cartridge in the bag and
box for recycling.
CAUTION: To prevent damage to the print cartridge, hold the print cartridge at each end. Do
not touch the cartridge shutter or the roller surface.
3. Grasp both sides of the print cartridge and gently rock the print cartridge to distribute the toner
evenly inside the cartridge.
ENWW
Manage supplies and accessories
59
4. Bend the tab on the left side of the cartridge until the tab breaks loose, and then pull the tab until
all the tape is removed from the cartridge. Place the tab and tape in the print-cartridge box to
return for recycling.
5. Insert the print cartridge in the product, and then close the print-cartridge door.
CAUTION: If toner gets on your clothing, wipe it off with a dry cloth and wash the clothing in
cold water. Hot water sets toner into the fabric.
60 Chapter 7 Manage and maintain the product ENWW
Replace the pickup roller
Normal use with good media causes wear. The use of poor media might require more frequent
replacement of the pickup roller.
If the product regularly mispicks (no media feeds through), you might need to change or clean the
pickup roller. See
Clean the pickup roller on page 67 to order a new pickup roller.
1. Open the print-cartridge door, and then remove the print cartridge.
CAUTION: To prevent damage to the print cartridge, minimize its exposure to direct light.
Cover the print cartridge with a sheet of paper.
ENWW
Manage supplies and accessories
61
2. Find the pickup roller.
3. Release the small, white tabs on each side of the pickup roller, and rotate the pickup roller toward
the front.
4. Gently pull the pickup roller up and out.
62 Chapter 7 Manage and maintain the product ENWW
5. Position the new pickup roller in the slot. The circular and rectangular slots on each side prevents
you from installing the roller incorrectly.
6. Rotate the top of the new pickup roller away from you until both sides snap into place.
7. Insert the print cartridge in the product, and then close the print-cartridge door.
ENWW
Manage supplies and accessories
63
Replace the separation pad
Normal use with good media causes wear. The use of poor media might require more frequent
replacement of the separation pad.
If the product regularly pulls multiple sheets of media at a time, you might need to change the
separation pad.
NOTE: Before you change the separation pad, clean the pickup roller. See Clean the pickup roller
on page 67.
WARNING! Before changing the separation pad, turn the product off, disconnect the power cord
from the wall outlet, and then wait for the product to cool.
1. Disconnect the product power cord from the product.
2. Remove the paper and close the input tray. Set the product on its front.
3. At the bottom of the product, unscrew the two screws holding the separation pad in place.
64 Chapter 7 Manage and maintain the product ENWW
4. Remove the separation pad.
5. Insert the new separation pad, and screw it into place.
ENWW
Manage supplies and accessories
65
6. Reconnect the power cord, and then turn on the product.
66 Chapter 7 Manage and maintain the product ENWW
Clean the product
Clean the pickup roller
If you want to clean the pickup roller before deciding to replace it, follow these instructions:
1. Unplug the power cord from the product and remove the pickup roller as described in
Replace the
pickup roller on page 61.
2. Dab a lint-free cloth in isopropyl alcohol, and scrub the roller.
WARNING! Alcohol is flammable. Keep the alcohol and cloth away from an open flame.
Before you close the product and plug in the power cord, allow the alcohol to dry completely.
NOTE: In certain areas of California, air pollution control regulations restrict the use of liquid
Isopropyl Alcohol (IPA) as a cleaning agent. In those areas of California, please disregard the
previous recommendations and use a dry, lint-free cloth, moistened with water, to clean the pickup
roller.
3. Using a dry, lint-free cloth, wipe the pickup roller to remove loosened dirt.
4. Allow the pickup roller to dry completely before you reinstall it in the product.
5. Reconnect the power cord.
ENWW
Clean the product
67
Clean the paper path
If you are experiencing toner specks or dots on the printouts, clean the paper path. This process uses a
transparency to remove dust and toner from the paper path. Do not use bond or rough paper.
NOTE: For best results use a sheet of transparency. If you do not have any transparencies, you can
use copier-grade media (60 to 163 g/m
2
(16 to 43 lb)) that has a smooth surface.
1. Make sure that the product is idle and the ready light is on.
2. Load media in the input tray.
3. Open the printer Properties.
4. Click the Device Settings tab.
5. In the Cleaning Page area, click the Start button to process the cleaning page.
NOTE: The cleaning process takes about 2 minutes. The cleaning page stops periodically during the
cleaning process. Do not turn the product off until the cleaning process has finished. You might need to
repeat the cleaning process several times to thoroughly clean the product.
68 Chapter 7 Manage and maintain the product ENWW
Clean the print-cartridge area
You do not need to clean the print-cartridge area often. However, cleaning this area can improve the
quality of the printed sheets.
WARNING! Before changing the separation pad, turn the product off, disconnect the power cord
from the wall outlet, and then wait for the product to cool.
1. Disconnect the power cord from the product. Open the print-cartridge door, and then remove the
print cartridge.
CAUTION: Do not touch the black-sponge transfer roller inside the product. Doing so can
damage the product.
CAUTION: To prevent damage, do not expose the print cartridge to light. Cover it with a piece
of paper.
ENWW
Clean the product
69
2. With a dry, lint-free cloth, wipe any residue from the paper-path area and the print-cartridge
cavity.
3. Reinstall the print cartridge, and then close the print-cartridge door.
70 Chapter 7 Manage and maintain the product ENWW
4. Disconnect the power cord.
Clean the exterior
Use a soft, damp, lint-free cloth to wipe dust, smudges, and stains off of the exterior of the device.
Product updates
Software and firmware updates and installation instructions for this product are available at
www.hp.com/support/ljp1100series. Click Downloads and drivers, click the operating system,
and then select the download for the product.
ENWW
Product updates
71
72 Chapter 7 Manage and maintain the product ENWW
8 Solve problems
Solve general problems
Interpret control-panel light patterns
Clear jams
Solve paper-handling problems
Solve image-quality problems
Solve performance problems
Solve connectivity problems
Solve product software problems
ENWW 73
Solve general problems
If the product is not responding correctly, complete the steps in the following checklist, in order. If the
product does not pass a step, follow the corresponding troubleshooting suggestions. If a step resolves
the problem, you can stop without performing the other steps on the checklist.
Troubleshooting checklist
1. Make sure that the product is set up correctly.
a. Press the power button to turn on the product or to deactivate the Auto-Off mode.
b. Check the power-cable connections.
c. Make sure that the line voltage is correct for the product power configuration. (See the label
that is on the back of the product for voltage requirements.) If you are using a power strip
and its voltage is not within specifications, plug the product directly into the wall. If it is
already plugged into the wall, try a different outlet.
d. Make sure that the print cartridge is installed correctly.
e. If none of these measures restores power, contact HP Customer Care.
2. Check the cabling or wireless connection (wireless models only).
a. Check the cable connection between the product and the computer. Make sure that the
connection is secure.
b. Make sure that the cable itself is not faulty by using a different cable, if possible.
c. For a wireless connection, look at the control panel wireless light.
If the light is on, the product has a connection with a network.
If the light is blinking, the product is searching for a network connection. Make sure that
the wireless router or access point and the product are set to use the same mode or
protocol.
If the light is off, the product is not connected to the network and the wireless unit in the
product might be off. Press the wireless button to try connecting to the network, or run
the Wireless Configuration utility to configure the product. See
Use the Wireless
Configuration utility on page 27. To verify that the product finds the network, print a
configuration page. The product should have an IP address assigned to it.
If the product remains unable to connect to the network, uninstall and then reinstall the
product. If the error persists, contact a network administrator or refer to the user manual of
the wireless router or access point.
3. Check to see if any control-panel lights are lit. See
Interpret control-panel light patterns
on page 76.
4. Make sure that the paper that you are using meets specifications.
5. Make sure that the paper is loaded correctly in the input tray.
74 Chapter 8 Solve problems ENWW
6. Make sure that the product software is installed correctly.
7. Verify that you have installed the printer driver for this product. Check the program to make sure
that you are using the printer driver for this product.
8. Print a configuration page. See
Print the information pages on page 52.
a. If the page does not print, verify that the input tray contains paper.
b. If the page jams in the product, see
Clear jams on page 79.
9. Print a small document from a different program that has worked in the past. If this solution works,
then the problem is with the program you are using. If this solution does not work (the document
does not print), complete these steps:
a. Try printing the job from another computer that has the product software installed.
b. Check the USB cable connection. Direct the product to the correct port, or reinstall the
software, selecting the connection type that you are using.
c. If the print quality is unacceptable, complete the following steps:
Verify that the print settings are correct for the media that you are using. See
Change
the print driver to match the media type and size on page 32.
Use the procedures in
Solve image-quality problems on page 89 to solve print-quality
problems.
Factors that affect product performance
Several factors affect the time it takes to print a job:
The use of special paper (such as transparencies, heavy paper, and custom-size paper)
Product processing and download time
The complexity and size of graphics
The speed of the computer you are using
The USB or network connection
The product I/O configuration
ENWW
Solve general problems
75
Interpret control-panel light patterns
Table 8-1 Status-light legend
Symbol for "light off"
Symbol for "light on"
Symbol for "light blinking"
Table 8-2 Control-panel light patterns
Light status State of the product Action
All lights are off.
The product is in Auto-Off mode or is
turned off.
Press the power button to deactivate the
Auto-Off mode or to turn on the product.
Status lights cycle
The status lights cycle during the formatter
initialization period or when the product
is processing a cleaning page.
No action is required. Wait for the
initialization period to end. The product
should enter the ready state when the
initialization period is finished.
Ready light is on, and attention light is
off.
The product is in the ready state. No action is required. The product is
ready to receive a print job.
76 Chapter 8 Solve problems ENWW
Table 8-2 Control-panel light patterns (continued)
Light status State of the product Action
Ready light is blinking, and attention
light is off.
The product is receiving or processing
data.
No action is required. The product is
receiving or processing a print job.
Attention light is blinking, and ready
light is off.
The product has experienced an error
that can be corrected at the product, such
as a jam, an open door, the absence of
a print cartridge, or the absence of paper
in the proper tray.
Inspect the product, determine the error,
and then correct the error. If the error is
the absence of paper in the proper tray
or the product is in a manual feed mode,
put the proper paper in the tray and
follow the onscreen instructions, or open
and close the print-cartridge door to
resume printing.
Attention light is blinking, and ready
light is on.
The product has experienced a continual
error from which it will recover on its
own.
If the recovery is successful, the product
continues to the processing data state
and completes the job.
If the recovery is unsuccessful, the
product continues to the continuable
error state. Try removing any media from
the media path and turning the product
power off, and then on again.
The attention and ready lights are on.
The product has experienced a fatal error
from which it cannot recover.
1. Turn off the product or disconnect
the power cord from the product.
2. Wait 30 seconds, and then turn on
the product or reconnect the power
cord to the product.
3. Wait for the product to initialize.
If the error persists, contact HP customer
support. See
Customer support
on page 111.
ENWW
Interpret control-panel light patterns
77
Table 8-2 Control-panel light patterns (continued)
Light status State of the product Action
The wireless light is blinking.
The product is attempting to locate a
wireless network.
No action is required.
The wireless light is on.
The product is connected to a wireless
network.
No action is required.
The wireless light is off.
The product is not connected to a
network, and the wireless unit in the
product might be turned off.
If the light is off, the product is not
connected to the network and the
wireless unit in the product might be off.
Press the wireless button to try
connecting to the network, or run the
Wireless Configuration utility to
configure the product. See
Use the
Wireless Configuration utility
on page 27. To verify that the product
finds the network, print a configuration
page. The product should have an IP
address assigned to it.
For information about connecting
wirelessly to a network, see
Network
connection (wireless models only)
on page 26.
If the product remains unable to connect
to the network, uninstall and then
reinstall the product. If the error persists,
contact a network administrator or refer
to the user manual of the wireless router
or access point.
78 Chapter 8 Solve problems ENWW
Clear jams
When clearing jams, be careful not to tear jammed paper. If a small piece of paper remains in the
product, it could cause additional jams.
Common causes of jams
The input tray is loaded incorrectly or is too full.
NOTE: When you add new media, always remove all of the media from the input tray and
straighten the entire stack. This helps prevent multiple feeds and reduces media jams.
The media does not meet HP specifications.
The product might need to be cleaned to remove paper dust and other particles from the paper
path.
Loose toner might remain in the product after a media jam. This toner clears up after a few sheets print.
CAUTION: If you get any toner on your clothes, wash them in cold water. Hot water will
permanently set the toner into the fabric.
ENWW
Clear jams
79
Jam locations
Jams can occur at the following locations in the product.
2
3
1
1 Internal areas
2Input tray
3 Output bin
NOTE: Jams can occur in more than one location.
Clear jams from the input tray
CAUTION: Do not use sharp objects, such as tweezers or needle-nose pliers, to remove jams.
Damage caused by sharp objects will not be covered by the warranty.
When removing jammed media, pull the jammed media straight away from the product. Pulling
jammed media out of the product at an angle can damage the product.
80 Chapter 8 Solve problems ENWW
94

Hulp nodig? Stel uw vraag in het forum

Spelregels

Misbruik melden

Gebruikershandleiding.com neemt misbruik van zijn services uitermate serieus. U kunt hieronder aangeven waarom deze vraag ongepast is. Wij controleren de vraag en zonodig wordt deze verwijderd.

Product:

Bijvoorbeeld antisemitische inhoud, racistische inhoud, of materiaal dat gewelddadige fysieke handelingen tot gevolg kan hebben.

Bijvoorbeeld een creditcardnummer, een persoonlijk identificatienummer, of een geheim adres. E-mailadressen en volledige namen worden niet als privégegevens beschouwd.

Spelregels forum

Om tot zinvolle vragen te komen hanteren wij de volgende spelregels:

Belangrijk! Als er een antwoord wordt gegeven op uw vraag, dan is het voor de gever van het antwoord nuttig om te weten als u er wel (of niet) mee geholpen bent! Wij vragen u dus ook te reageren op een antwoord.

Belangrijk! Antwoorden worden ook per e-mail naar abonnees gestuurd. Laat uw emailadres achter op deze site, zodat u op de hoogte blijft. U krijgt dan ook andere vragen en antwoorden te zien.

Abonneren

Abonneer u voor het ontvangen van emails voor uw HP LaserJet Pro P1109 bij:


U ontvangt een email met instructies om u voor één of beide opties in te schrijven.


Ontvang uw handleiding per email

Vul uw emailadres in en ontvang de handleiding van HP LaserJet Pro P1109 in de taal/talen: Engels als bijlage per email.

De handleiding is 2,51 mb groot.


U ontvangt de handleiding per email binnen enkele minuten. Als u geen email heeft ontvangen, dan heeft u waarschijnlijk een verkeerd emailadres ingevuld of is uw mailbox te vol. Daarnaast kan het zijn dat uw internetprovider een maximum heeft aan de grootte per email. Omdat hier een handleiding wordt meegestuurd, kan het voorkomen dat de email groter is dan toegestaan bij uw provider.

Stel vragen via chat aan uw handleiding

Stel uw vraag over deze PDF

Andere handleiding(en) van HP LaserJet Pro P1109

HP LaserJet Pro P1109 Gebruiksaanwijzing - Nederlands - 160 pagina's

HP LaserJet Pro P1109 Gebruiksaanwijzing - Deutsch - 162 pagina's

HP LaserJet Pro P1109 Gebruiksaanwijzing - Français - 162 pagina's

HP LaserJet Pro P1109 Snelstart handleiding - Alle talen - 32 pagina's


Uw handleiding is per email verstuurd. Controleer uw email

Als u niet binnen een kwartier uw email met handleiding ontvangen heeft, kan het zijn dat u een verkeerd emailadres heeft ingevuld of dat uw emailprovider een maximum grootte per email heeft ingesteld die kleiner is dan de grootte van de handleiding.

Er is een email naar u verstuurd om uw inschrijving definitief te maken.

Controleer uw email en volg de aanwijzingen op om uw inschrijving definitief te maken

U heeft geen emailadres opgegeven

Als u de handleiding per email wilt ontvangen, vul dan een geldig emailadres in.

Uw vraag is op deze pagina toegevoegd

Wilt u een email ontvangen bij een antwoord en/of nieuwe vragen? Vul dan hier uw emailadres in.


Info