682155
103
Verklein
Vergroot
Pagina terug
1/104
Pagina verder
User Guide
www.hp.com/support/ljM28MFP
LaserJet Pro MFP M28-M31
HP LaserJet Pro MFP M28-M31
User Guide
Copyright and License
© Copyright 2018 HP Development Company,
L.P.
Reproduction, adaptation, or translation without
prior written permission is prohibited, except as
allowed under the copyright laws.
The information contained herein is subject to
change without notice.
The only warranties for HP products and
services are set forth in the express warranty
statements accompanying such products and
services. Nothing herein should be construed as
constituting an additional warranty. HP shall not
be liable for technical or editorial errors or
omissions contained herein.
Edition 4, 01/2019
Trademark Credits
Adobe
®
, Adobe Photoshop
®
, Acrobat
®
, and
PostScript
®
are trademarks of Adobe Systems
Incorporated.
Apple and the Apple logo are trademarks of
Apple Inc., registered in the U.S. and other
countries.
OS X is a trademark of Apple Inc., registered in
the U.S. and other countries.
AirPrint is a trademark of Apple Inc., registered in
the U.S. and other countries.
iPad is a trademark of Apple Inc., registered in
the U.S. and other countries.
iPod is a trademark of Apple Inc., registered in
the U.S. and other countries.
iPhone is a trademark of Apple Inc., registered in
the U.S. and other countries.
Microsoft® and Windows® are U.S. registered
trademarks of Microsoft Corporation.
UNIX
®
is a registered trademark of The Open
Group.
Table of contents
1 Printer overview ........................................................................................................................................................................................ 1
Warning icons ............................................................................................................................................................................ 2
Printer views .............................................................................................................................................................................. 3
Printer front view ................................................................................................................................................. 3
Printer back view .................................................................................................................................................. 3
Control panel view ............................................................................................................................................... 4
Wireless models .............................................................................................................................. 4
Base models .................................................................................................................................... 5
Printer specications ................................................................................................................................................................ 6
Technical specications ....................................................................................................................................... 6
Supported operating systems ........................................................................................................................... 6
Mobile printing solutions .................................................................................................................................... 7
Printer dimensions .............................................................................................................................................. 8
Power consumption, electrical specications, and acoustic emissions ...................................................... 8
Operating-environment range ........................................................................................................................... 8
Printer hardware setup and software installation .............................................................................................................. 9
2 Paper trays .............................................................................................................................................................................................. 11
Introduction ............................................................................................................................................................................. 12
Load paper trays .................................................................................................................................................................... 12
Input tray ............................................................................................................................................................. 12
Load and print envelopes ..................................................................................................................................................... 13
Introduction ........................................................................................................................................................ 13
Print envelopes .................................................................................................................................................. 13
Envelope orientation ......................................................................................................................................... 13
Load and print labels ............................................................................................................................................................. 14
Introduction ........................................................................................................................................................ 14
Manually feed labels ......................................................................................................................................... 14
Label orientation ............................................................................................................................................... 14
ENWW iii
3 Supplies, accessories, and parts .......................................................................................................................................................... 15
Order supplies, accessories, and parts ............................................................................................................................... 16
Ordering .............................................................................................................................................................. 16
Supplies and accessories ................................................................................................................................. 16
Replace the toner cartridge .................................................................................................................................................. 17
Cartridge information ....................................................................................................................................... 17
Remove and replace the toner cartridge ....................................................................................................... 17
4 Print .......................................................................................................................................................................................................... 21
Print tasks (Windows) ............................................................................................................................................................ 22
How to print (Windows) .................................................................................................................................... 22
Manually print on both sides (Windows) ........................................................................................................ 23
Print multiple pages per sheet (Windows) .................................................................................................... 23
Select the paper type (Windows) .................................................................................................................... 24
Print tasks (OS X) .................................................................................................................................................................... 25
How to print (OS X) ............................................................................................................................................ 25
Manually print on both sides (OS X) ................................................................................................................ 25
Print multiple pages per sheet (OS X) ............................................................................................................ 25
Select the paper type (OS X) ............................................................................................................................ 26
Mobile printing ........................................................................................................................................................................ 27
Introduction ........................................................................................................................................................ 27
Wi-Fi Direct (wireless models only) ................................................................................................................ 27
Enable or disable Wi-Fi Direct ..................................................................................................... 28
Change the printer Wi-Fi Direct name ....................................................................................... 29
AirPrint ................................................................................................................................................................. 29
Android embedded printing (wireless models only) .................................................................................... 30
5 Copy .......................................................................................................................................................................................................... 31
Make a copy ............................................................................................................................................................................. 32
Copy identication card ......................................................................................................................................................... 33
6 Scan .......................................................................................................................................................................................................... 35
Scan by using the HP Scan software (Windows) ............................................................................................................... 36
Scan by using the HP Easy Scan Software (OS X) ............................................................................................................. 37
Additional scan tasks ............................................................................................................................................................. 38
7 Manage the printer ................................................................................................................................................................................. 39
Change the printer connection type (Windows) ................................................................................................................ 40
Advanced conguration with HP Embedded Web Server (EWS) and HP Device Toolbox (Windows) ....................... 41
Advanced conguration with HP Utility for OS X ............................................................................................................... 43
iv ENWW
Open HP Utility ................................................................................................................................................... 43
HP Utility features ............................................................................................................................................. 43
Congure IP network settings .............................................................................................................................................. 45
Introduction ........................................................................................................................................................ 45
Printer sharing disclaimer ................................................................................................................................ 45
View or change network settings ................................................................................................................... 45
Manually congure IPv4 TCP/IP parameters ................................................................................................. 45
Printer security features ....................................................................................................................................................... 47
Introduction ........................................................................................................................................................ 47
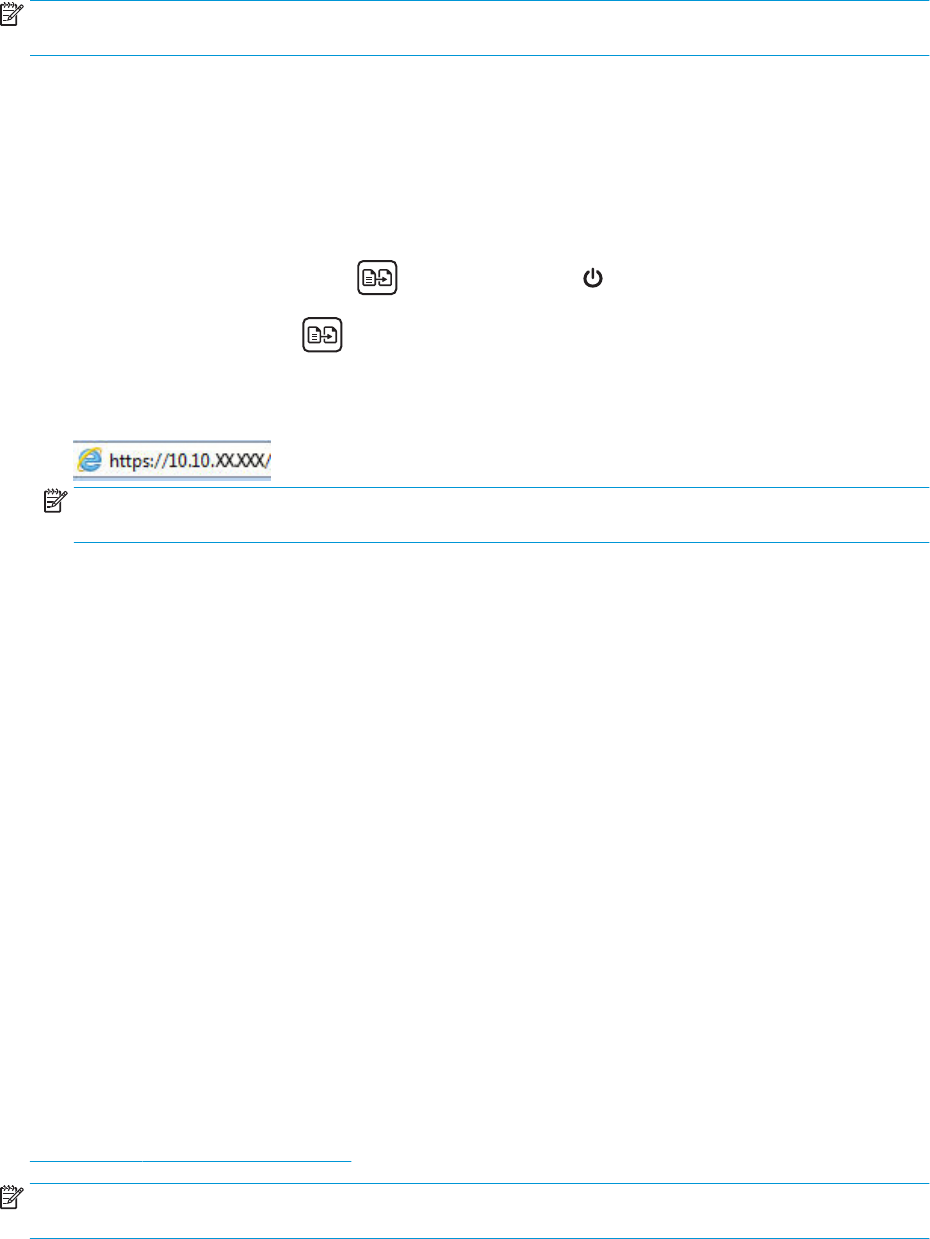
Assign or change the system password using the HP Embedded Web Server ....................................... 47
Energy-conservation settings .............................................................................................................................................. 49
Introduction ........................................................................................................................................................ 49
Set the Sleep/Auto O After Inactivity setting .............................................................................................. 49
Set the Shut Down After Inactivity delay and congure the printer to use 1 watt or less of power .... 50
Set the Delay Shut Down setting .................................................................................................................... 51
Update the rmware .............................................................................................................................................................. 52
Update the rmware using the Firmware Update Utility ............................................................................ 52
8 Solve problems ....................................................................................................................................................................................... 53
Customer support .................................................................................................................................................................. 54
Laser Warning ......................................................................................................................................................................... 55
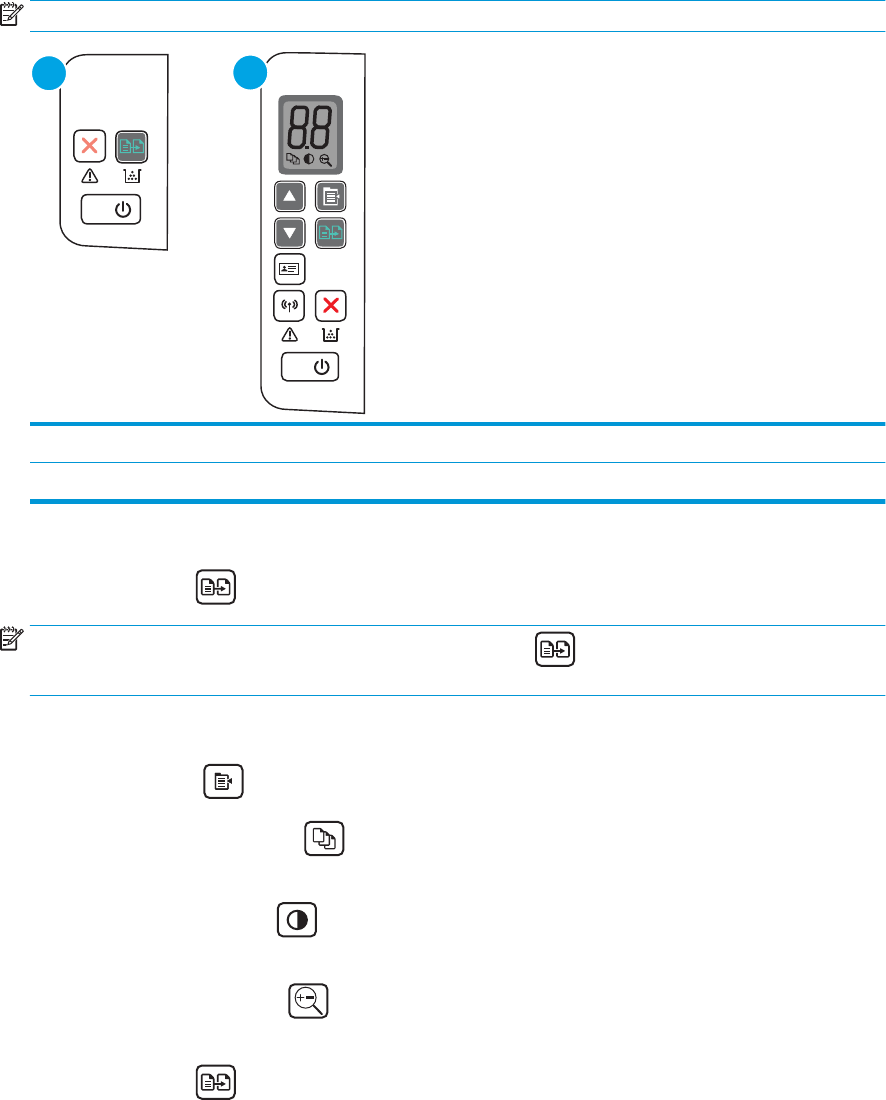
Interpret control-panel light patterns ................................................................................................................................. 56
Restore the factory-set defaults ......................................................................................................................................... 60
A “Cartridge is low” or “Cartridge is very low” message displays ................................................................................... 61
Change the “Very Low” settings ...................................................................................................................... 61
Order supplies .................................................................................................................................................... 62
Printer does not pick up paper or misfeeds ....................................................................................................................... 63
Introduction ........................................................................................................................................................ 63
The product does not pick up paper ............................................................................................................... 63
The product picks up multiple sheets of paper ............................................................................................ 63
Clear paper jams ..................................................................................................................................................................... 64
Introduction ........................................................................................................................................................ 64
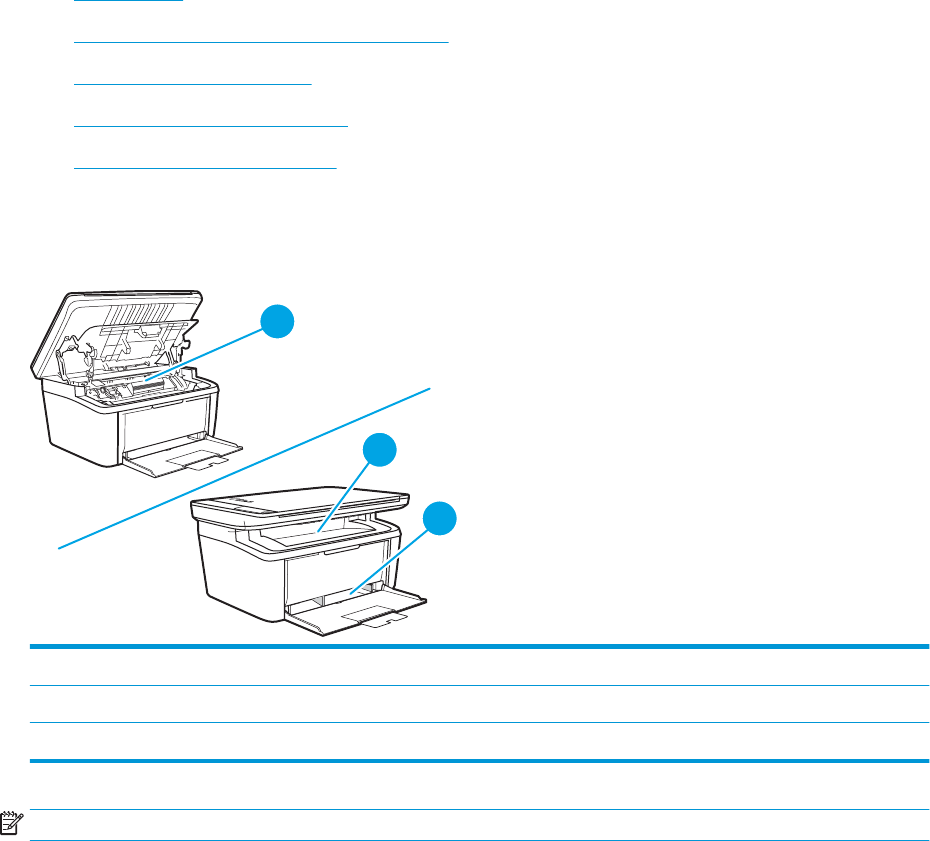
Jam locations ..................................................................................................................................................... 64
Experiencing frequent or recurring paper jams? .......................................................................................... 65
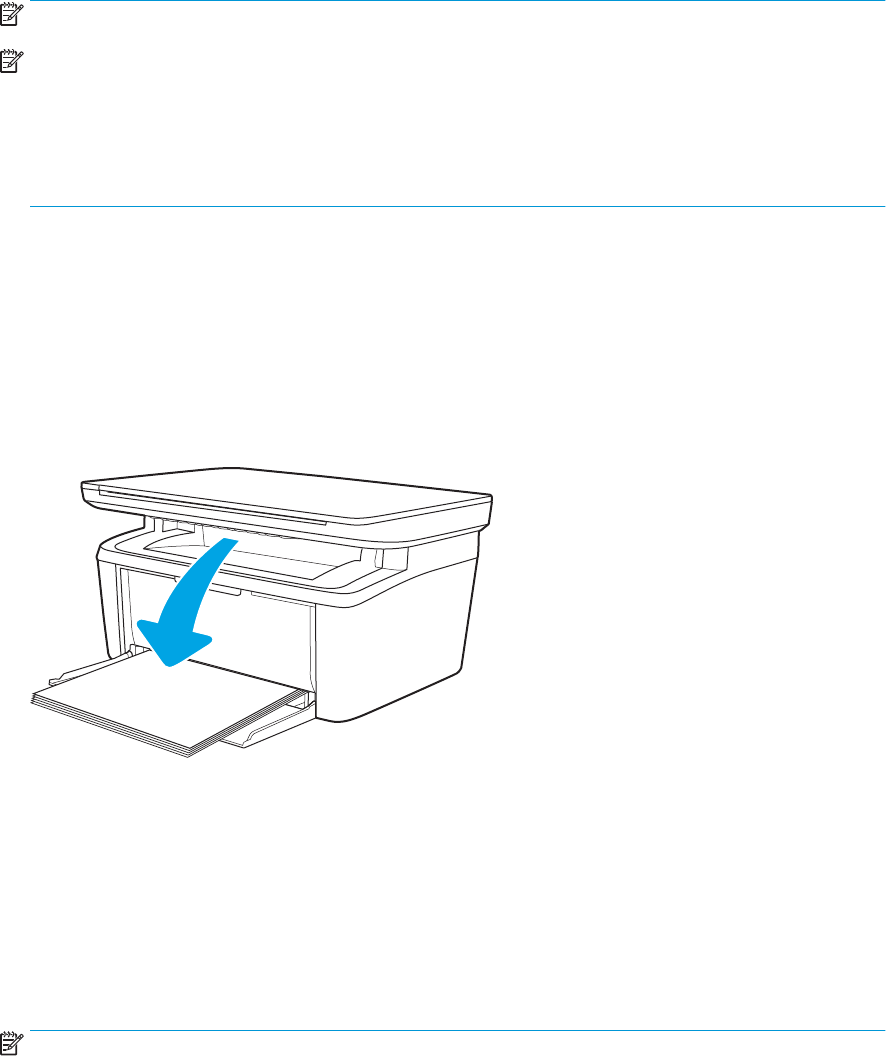
Clear jams from the input tray ......................................................................................................................... 67
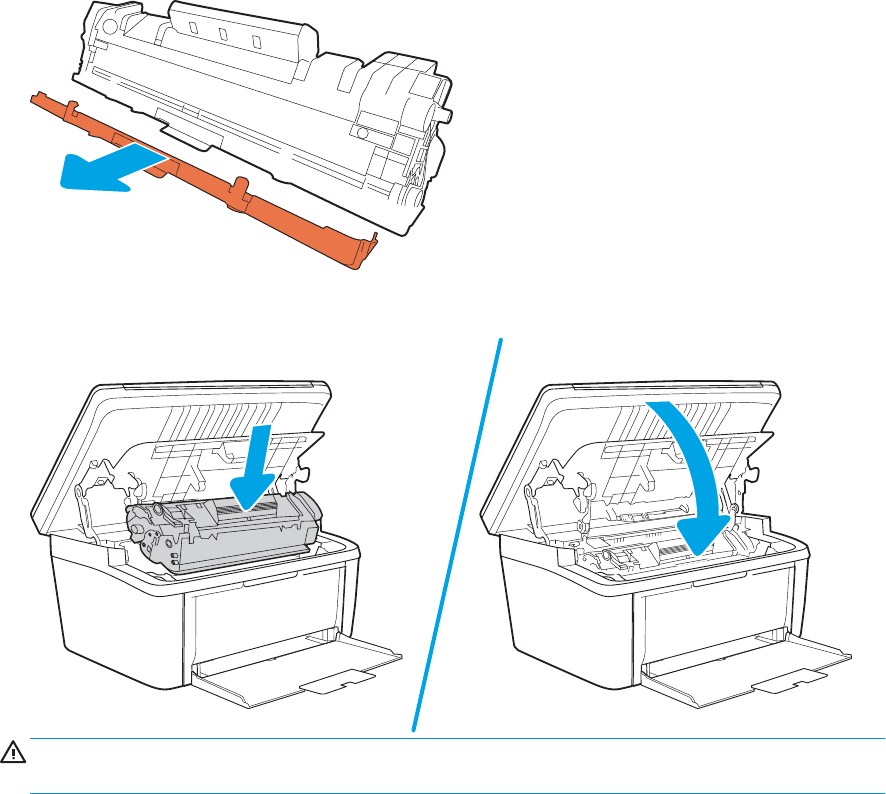
Clear jams from inside the product ................................................................................................................ 69
Clear jams from the output areas ................................................................................................................... 71
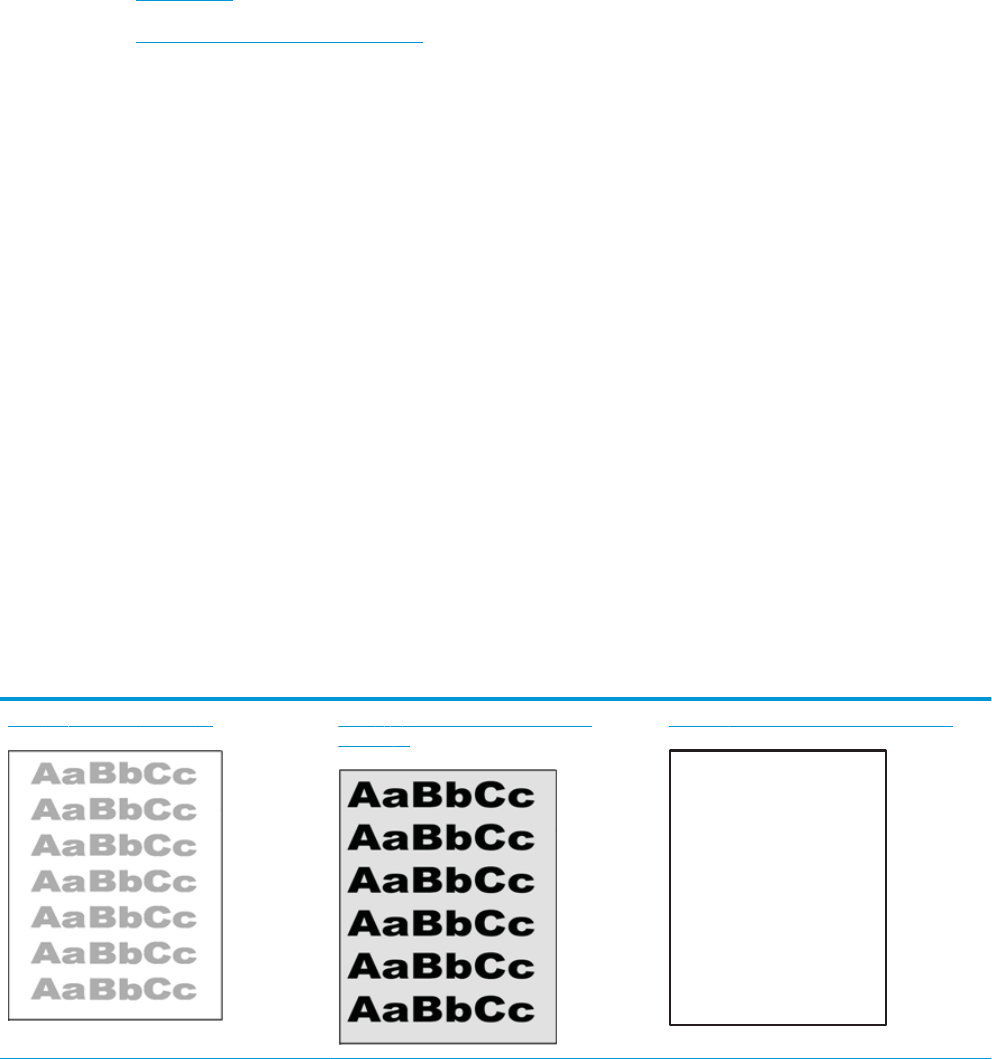
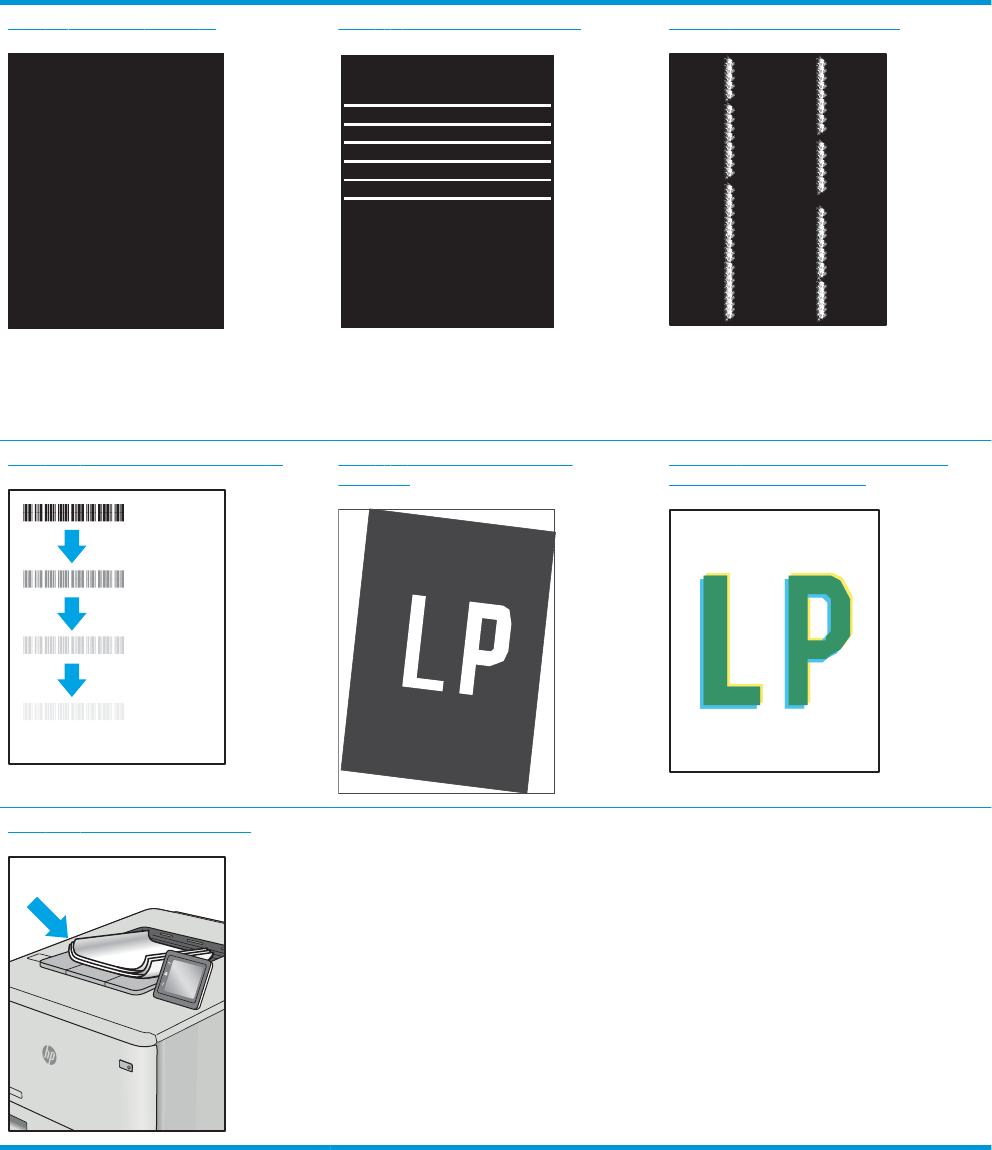
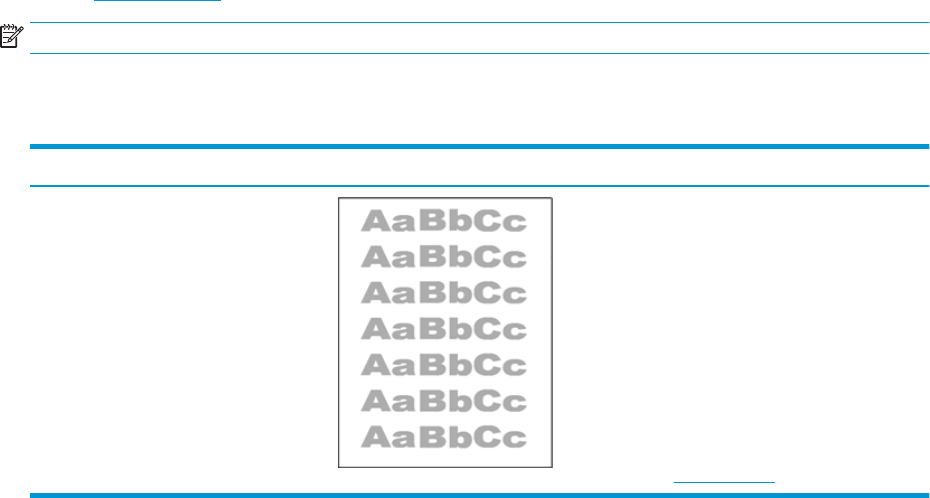
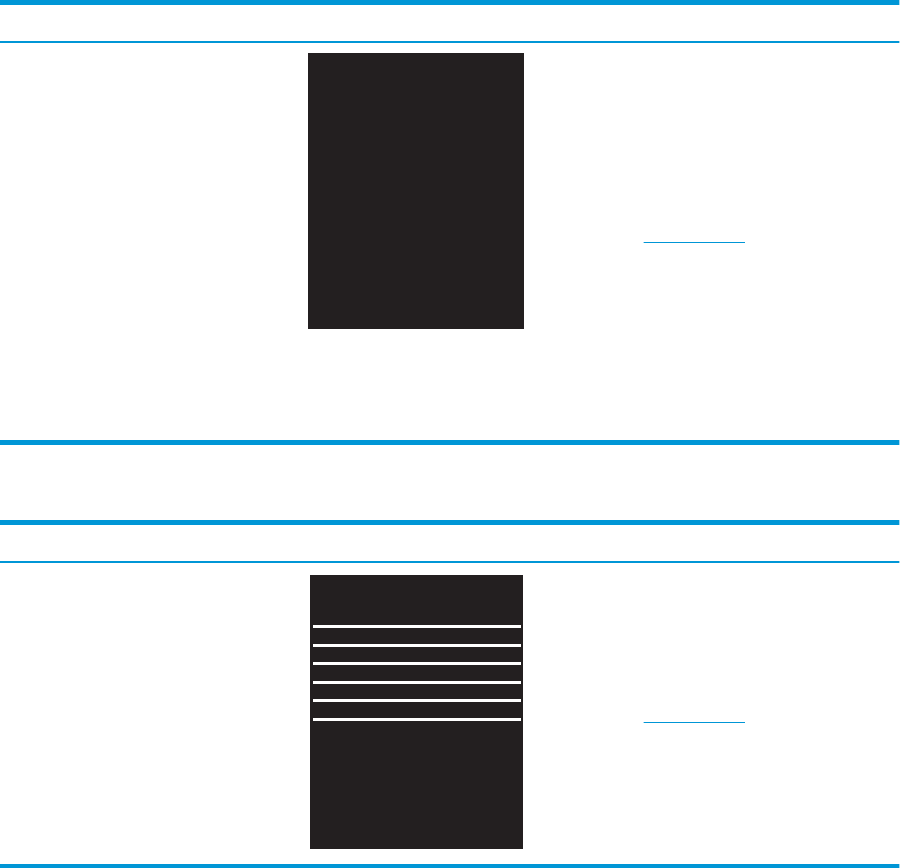
Improve print quality ............................................................................................................................................................. 73
Introduction ........................................................................................................................................................ 73
Update the printer rmware ............................................................................................................................ 73
Print from a dierent software program ....................................................................................................... 73
ENWW v
Check the paper-type setting for the print job ............................................................................................. 74
Check the paper type setting on the printer ............................................................................. 74
Check the paper type setting (Windows) .................................................................................. 74
Check the paper type setting (OS X) .......................................................................................... 74
Check toner-cartridge status ........................................................................................................................... 74
Cartridge cleaning .............................................................................................................................................. 75
Print a cleaning page ......................................................................................................................................... 76
Visually inspect the toner cartridge ................................................................................................................ 76
Check paper and the printing environment ................................................................................................... 76
Step one: Use paper that meets HP specications .................................................................. 76
Step two: Check the environment .............................................................................................. 77
Adjust Print Density ........................................................................................................................................... 77
Resolving print quality problems ......................................................................................................................................... 79
Introduction ........................................................................................................................................................ 79
Troubleshoot print quality problems ............................................................................................................. 79
Improve copy and scan image quality ................................................................................................................................ 87
Introduction ........................................................................................................................................................ 87
Check the scanner glass for dirt and smudges ............................................................................................. 87
Check the paper settings .................................................................................................................................. 87
Optimize for text or pictures ............................................................................................................................ 89
Edge-to-edge copying ...................................................................................................................................... 89
Solve wireless network problems ....................................................................................................................................... 90
Introduction ........................................................................................................................................................ 90
Wireless connectivity checklist ........................................................................................................................ 90
The printer does not print after the wireless conguration completes .................................................... 91
The printer does not print, and the computer has a third-party rewall installed ................................. 91
The wireless connection does not work after moving the wireless router or printer ............................ 91
Cannot connect more computers to the wireless printer ........................................................................... 91
The wireless printer loses communication when connected to a VPN ..................................................... 92
The network does not appear in the wireless networks list ....................................................................... 92
The wireless network is not functioning ........................................................................................................ 92
Perform a wireless network diagnostic test ................................................................................................. 92
Reduce interference on a wireless network .................................................................................................. 93
Index ............................................................................................................................................................................................................. 95
vi ENWW
1 Printer overview
Warning icons
Printer views
Printer specications
Printer hardware setup and software installation
For more information:
In the US, go to www.hp.com/support/ljM28MFP.
Outside the US, go to www.hp.com/support. Select your country/region. Click Product Support &
Troubleshooting. Enter the product name, and then select Search.
HP's all-inclusive help for your product includes the following information:
Install and congure
Learn and use
Solve problems
Download software updates
Join support forums
Find warranty and regulatory information
ENWW 1
Warning icons
Warning icon denitions: The following warning icons may appear on HP products. Apply appropriate caution
where applicable.
Caution: Electric shock
Caution: Hot surface
Caution: Keep body parts away from moving parts
Caution: Sharp edge in close proximity
2 Chapter 1 Printer overview ENWW
Printer views
Printer front view
Printer back view
Control panel view
Printer front view
1
2
3
4
1 Control panel
2 Flatbed scanner
3 Output bin
4 Input tray
Printer back view
1
2
1 Power connection
2 USB interface port
ENWW Printer views 3
Control panel view
Wireless models
1
2
3
4
5
6
7
8
9
10
11
1 Control panel LED display The control panel LED display shows numerical information for copy settings and event
codes.
2 Copy Setup button Use this button to navigate through the Number of Copies, Lighter/Darker, and Reduce/
Enlarge options. The default option is Number of Copies.
3 Start Copy button Use this button to start a copy job. Or, in manual duplex mode, use this button to print the
second side of the page.
4
Cancel button
Press this button to cancel a job.
5 Supplies LED A Supplies light blinks when a supply error occurs, and it glows without blinking when the
supply is very low and replacement is required.
6 Power button/Ready LED Use this button to turn the printer on or o.
The Ready light is on when the printer is ready to print. It blinks when the printer is
receiving print data and dims when the printer is in a low-power state.
7 Attention LED The Attention light blinks when the printer requires user attention. If the Attention light is
on, the printer is in an error state.
8
Wireless button and LED
(wireless models only)
Press this button to turn the wireless feature on or o, or to congure a WiFi Direct
connection.
Press and hold this button to congure a WPS connection.
If the wireless LED light is on, there is a stable wireless connection. If it is blinking, there is
currently no wireless connection, or there is either a WPS or WiFi Direct conguration
process in progress. If it is blinking rapidly, there is an issue with the wireless connection.
9 ID Copy button Use this button to copy an identication card.
10 Down Arrow button Use this button to decrease the value that appears on the display.
11 Up Arrow button Use this button to increase the value that appears on the display.
4 Chapter 1 Printer overview ENWW
Base models
1 Copy ID button (HP LaserJet Pro MFP
M29 only)
Use this button to copy an identication card.
2 Start Copy button Use this button to start a copy job.
3 Supplies LED A Supplies light blinks when a supply error occurs, and it glows without blinking when the
supply is very low and replacement is required.
4 Power button/Ready LED Use this button to turn the printer on or o.
The Ready light is on when the printer is ready to print. It blinks when the printer is
receiving print data and dims when the printer is in a low-power state.
5 Attention LED The Attention light blinks when the printer requires user attention. If the Attention light is
on, the printer is in an error state.
6
Cancel button
Press this button to cancel a job.
ENWW Printer views 5
Printer specications
IMPORTANT: The following specications are correct at the time of publication, but they are subject to change.
For current information, see www.hp.com/support/ljM28MFP.
Technical specications
Supported operating systems
Mobile printing solutions
Printer dimensions
Power consumption, electrical specications, and acoustic emissions
Operating-environment range
Technical specications
See www.hp.com/support/ljM28MFP for current information.
Supported operating systems
The following information applies to the printer-specic Windows and HP print drivers for OS X and to the
software installer.
Windows: The HP Software Installer installs the PCLmS, or PCLm-S driver depending on the Windows operating
system along with optional software when using the full software installer. See the software installation notes
for more information.
OS X: Mac computers are supported with this printer. Download HP Easy Start either from 123.hp.com/LaserJet
or from the Printer Support page, and then use HP Easy Start to install the HP print driver. HP Easy Start is not
included in the HP Software Installer.
1. Go to 123.hp.com/LaserJet.
2. Follow the steps provided to download the printer software.
Linux: For information and print drivers for Linux, go to www.hp.com/go/linuxprinting.
Table
1-1 Supported operating systems and print drivers
Windows 7, 32-bit and 64-bit The HP PCLmS printer-specic print driver is
installed for this operating system as part of
the software installation.
Windows 8, 32-bit and 64-bit The HP PCLmS printer-specic print driver is
installed for this operating system as part of
the software installation.
Windows 8 RT support is provided through
Microsoft IN OS Version 4, 32- bit driver.
Windows 8.1, 32-bit and 64-bit The HP PCLm-S printer-specic print driver
is installed for this operating system as part
of the software installation.
Windows 8.1 RT support is provided through
Microsoft IN OS Version 4, 32- bit driver.
Windows 10, 32-bit and 64-bit The HP PCLm-S printer-specic print driver
is installed for this operating system as part
of the software installation.
6 Chapter 1 Printer overview ENWW
Table 1-1 Supported operating systems and print drivers (continued)
Windows Server 2008 R2, 64-bit The HP PCLm.S printer-specic print driver is
available for download from the printer-
support website. Download the driver, and
then use the Microsoft Add Printer tool to
install it.
Microsoft retired mainstream support for
Windows Server 2008 in January 2015. HP
will continue to provide best eort support
for the discontinued Server 2008 operating
system.
Windows Server 2008 R2, SP1, 64-bit The HP PCLm.S printer-specic print driver is
installed for this operating system as part of
the software installation.
Windows Server 2012 The HP PCLmS printer-specic print driver is
installed for this operating system as part of
the software installation.
Windows Server 2012 R2 The HP PCLm-S printer-specic print driver
is installed for this operating system as part
of the software installation.
Windows Server 2016, 64-bit The HP PCLmS printer-specic print driver is
installed for this operating system as part of
the software installation.
OS X 10.11 El Capitan, OS X 10.12 Sierra,
OS X 10.13
To install the print driver, download HP Easy
Start from 123.hp.com/LaserJet. Follow the
steps provided to install the printer software
and print driver.
NOTE: For a current list of supported operating systems, go to www.hp.com/support/ljM28MFP for HP's all-
inclusive help for the printer.
Mobile printing solutions
HP oers multiple mobile solutions to enable easy printing to an HP printer from a laptop, tablet, smartphone, or
other mobile device. To see the full list and to determine the best choice, go to www.hp.com/go/
LaserJetMobilePrinting.
NOTE: Update the printer rmware to ensure all mobile printing are supported.
Wi-Fi Direct (wireless models only)
HP All-in-One Remote app for iOS and Android devices
Google Cloud Print
AirPrint
Android Printing
ENWW Printer specications 7
Printer dimensions
Figure 1-1 Dimensions for the printer
1
3
2
1
2
3
Printer fully closed Printer fully open
1. Height 196 mm (7.7 in) 447 mm (17.6 in)
2. Width 360 mm (14.2 in) 360 mm (14.2 in)
3. Depth 263 mm (10.4 in) 390 mm (15.4 in)
Weight (with cartridges) 5.3 kg (11.7 lb)
Power consumption, electrical specications, and acoustic emissions
See www.hp.com/support/ljM28MFP for current information.
CAUTION: Power requirements are based on the country/region where the printer is sold. Do not convert
operating voltages. This will damage the printer and void the printer warranty.
Operating-environment range
Environment Recommended Allowed
Temperature 15° to 27°C (59° to 80.6°F) 15° to 30°C (59° to 86°F)
Relative humidity 20% to 70% relative humidity (RH), non-
condensing
10% to 80% (RH), non-condensing
8 Chapter 1 Printer overview ENWW
Printer hardware setup and software installation
For basic setup instructions, see the Setup Poster and Getting Started Guide that came with the printer. For
additional instructions, go to HP support on the Web.
Go to www.hp.com/support/ljM28MFP for HP's all-inclusive help for the printer. Find the following support:
Install and congure
Learn and use
Solve problems
Download software and rmware updates
Join support forums
Find warranty and regulatory information
ENWW Printer hardware setup and software installation 9
10 Chapter 1 Printer overview ENWW
2 Paper trays
Introduction
Load paper trays
Load and print envelopes
Load and print labels
For more information:
The following information is correct at the time of publication. For current information, see www.hp.com/
support/ljM28MFP.
HP's all-inclusive help for the printer includes the following information:
Install and congure
Learn and use
Solve problems
Download software and rmware updates
Join support forums
Find warranty and regulatory information
ENWW 11
Introduction
CAUTION: Keep hands out of paper trays when closing.
All trays must be closed when moving the printer.
Load paper trays
NOTE: To avoid paper jams:
Never add or remove paper from the tray during printing.
Before loading the tray, remove all of the paper from the input tray and straighten the stack.
When loading the tray, do not fan the paper.
Use paper that is not wrinkled, folded, or damaged.
Input tray
Load media with the top forward and the side to be printed on facing up. To prevent jams and skewing, always
adjust the side media guide.
NOTE: When you add new media, make sure that you remove all of the media from the input tray and
straighten the entire stack. This helps prevent multiple sheets of media from feeding through the product at one
time, reducing media jams.
12 Chapter 2 Paper trays ENWW
Load and print envelopes
Introduction
The following information describes how to print and load envelopes. Tray 1 holds up to 5 envelopes.
To print envelopes using the manual feed option, follow these steps to select the correct settings in the print
driver, and then load the envelopes into the tray after sending the print job to the printer.
Print envelopes
1. From the software program, select the Print option.
2. Select the printer from the list of printers, and then click or tap the Properties or Preferences button to
open the print driver.
NOTE: The name of the button varies for dierent software programs.
NOTE: In Windows 10, 8.1, and 8, these applications will have a dierent layout with dierent features
than what is described below for desktop applications. To access the print feature from a Start screen app,
complete the following steps:
Windows 10: Select Print, and then select the printer.
Windows 8 or 8.1: Select Devices, select Print, and then select the printer.
3. Click or tap the Paper/Quality tab.
4. In the Media drop-down list, select Envelope.
5. Click the OK button to close the Document Properties dialog box.
6. In the Print dialog box, click the OK button to print the job.
Envelope orientation
Tray Envelope size How to load envelopes
Tray 1 Envelope #10, Envelope C5, Envelope DL Face up
Short, postage end toward the back of the tray
ENWW Load and print envelopes 13
Load and print labels
Introduction
The following information describes how to print and load labels. Tray 1 holds up to 50 sheets of labels.
To print labels using the manual feed option, follow these steps to select the correct settings in the print driver,
and then load the labels into the tray after sending the print job to the printer. When using manual feed, the
printer waits to print the job until it detects that the tray has been opened.
Manually feed labels
1. From the software program, select the Print option.
2. Select the printer from the list of printers, and then click or tap the Properties or Preferences button to
open the print driver.
NOTE: The name of the button varies for dierent software programs.
NOTE: In Windows 10, 8.1, and 8, these applications will have a dierent layout with dierent features
than what is described below for desktop applications. To access the print feature from a Start screen app,
complete the following steps:
Windows 10: Select Print, and then select the printer.
Windows 8 or 8.1: Select Devices, select Print, and then select the printer.
3. Click the Paper/Quality tab.
4. In the Media drop-down list, select Labels.
5. Click the OK button to close the Document Properties dialog box.
6. In the Print dialog box, click the OK button to print the job.
Label orientation
Tray How to load labels
Tray 1 Face-up
Top edge toward the back of the tray
14 Chapter 2 Paper trays ENWW
3 Supplies, accessories, and parts
Order supplies, accessories, and parts
Replace the toner cartridge
For more information:
The following information is correct at the time of publication. For current information, see www.hp.com/
support/ljM28MFP.
HP's all-inclusive help for the printer includes the following information:
Install and congure
Learn and use
Solve problems
Download software and rmware updates
Join support forums
Find warranty and regulatory information
ENWW 15
Order supplies, accessories, and parts
Ordering
Order supplies and paper www.hp.com/go/suresupply
Order genuine HP parts or accessories www.hp.com/buy/parts
Order through service or support providers Contact an HP-authorized service or support provider.
Order using the HP Embedded Web Server (EWS) To access, in a supported Web browser on the computer, enter the
printer IP address or host name in the address/URL eld. The EWS
contains a link to the HP SureSupply Web site, which provides
options for purchasing Original HP supplies.
Supplies and accessories
Item Description Cartridge number Part number
Supplies
For use only in Europe, Russia, CIS, Mid East and Africa
HP 44A Black Toner Cartridge Standard-capacity replacement black toner
cartridge
44A CF244A
For use only in North America, Latin America, Asia Pacic Countries/Regions (Exclude China, India)
HP 48A Black Toner Cartridge Standard-capacity replacement black toner
cartridge
48A CF248A
For use only in China, India
HP 47A Black Toner Cartridge Standard-capacity replacement black toner
cartridge
47A CF247A
16 Chapter 3 Supplies, accessories, and parts ENWW
Replace the toner cartridge
Cartridge information
Continue printing with the current cartridge until redistributing the toner no longer yields acceptable print quality.
To redistribute the toner, remove the toner cartridge from the printer and gently rock the cartridge back and forth
about its horizontal axis. For graphical representation, see cartridge replacement instructions. Reinsert the toner
cartridge into the printer and close the cover.
Item Description Cartridge number Part number
Supplies
For use only in Europe, Russia, CIS, Mid East and Africa
HP 44A Black Toner Cartridge Standard-capacity replacement black toner
cartridge
44A CF244A
For use only in North America, Latin America, Asia Pacic Countries/Regions (Exclude China, India)
HP 48A Black Toner Cartridge Standard-capacity replacement black toner
cartridge
48A CF248A
For use only in China, India
HP 47A Black Toner Cartridge Standard-capacity replacement black toner
cartridge
47A CF247A
Continue printing with the current cartridge until redistributing the toner no longer yields acceptable print quality.
To redistribute the toner, remove the toner cartridge from the printer and gently rock the cartridge back and forth
about its horizontal axis. For graphical representation, see cartridge replacement instructions. Reinsert the toner
cartridge into the printer and close the cover.
Remove and replace the toner cartridge
When a print cartridge approaches the end of useful life, you can continue printing with the current cartridge
until redistributing the toner no longer yields acceptable print quality.
1. Open the print-cartridge door, and then remove the old print cartridge.
ENWW Replace the toner cartridge 17
2. Remove the new print cartridge from the packaging. Place the used print cartridge in the bag and box for
recycling.
CAUTION: To prevent damage to the print cartridge, hold the print cartridge at each end. Do not touch the
OPC cover or the roller surface.
3. Grasp both sides of the print cartridge and gently rock the print cartridge to distribute the toner evenly
inside the cartridge.
4. Bend the tab on the left side of the cartridge until the tab breaks loose, and then pull the tab until all the
tape is removed from the cartridge. Place the tab and tape in the print-cartridge box to return for recycling.
18 Chapter 3 Supplies, accessories, and parts ENWW
5. Remove the orange cover from the print cartridge.
6. Insert the print cartridge in the product, and then close the print-cartridge door.
CAUTION: If toner gets on your clothing, wipe it o with a dry cloth and wash the clothing in cold water.
Hot water sets toner into the fabric.
ENWW Replace the toner cartridge 19
20 Chapter 3 Supplies, accessories, and parts ENWW
4 Print
Print tasks (Windows)
Print tasks (OS X)
Mobile printing
For more information:
The following information is correct at the time of publication. For current information, see www.hp.com/
support/ljM28MFP.
HP's all-inclusive help for the printer includes the following information:
Install and congure
Learn and use
Solve problems
Download software and rmware updates
Join support forums
Find warranty and regulatory information
NOTE: When the Attention and Ready lights are blinking, the printer is initializing, cleaning, or cooling down.
When the printer is cooling down print jobs might pause. Print jobs will continue when the engine is ready. This
might take several minutes.
To provide productive printing, this HP LaserJet Pro may automatically enter cool down mode under certain
environmental conditions when required.
ENWW 21
Print tasks (Windows)
How to print (Windows)
The following procedure describes the basic printing process for Windows.
1. From the software program, select the Print option.
2. Select the printer from the list of printers. To change settings, click or tap the Properties or Preferences
button to open the print driver.
NOTE: The name of the button varies for dierent software programs.
NOTE: In Windows 10, 8.1, and 8, these applications will have a dierent layout with dierent features
from what is described below for desktop applications. To access the print feature from a Start screen app,
complete the following steps:
Windows 10: Select Print, and then select the printer.
Windows 8.1 or 8: Select Devices, select Print, and then select the printer.
3. Click or tap the tabs in the print driver to congure the available options.
4. Click or tap the OK button to return to the Print dialog box. Select the number of copies to print from this
screen.
5. Click or tap the OK button to print the job.
22 Chapter 4 Print ENWW
Manually print on both sides (Windows)
Use this procedure for printers that do not have an automatic duplexer installed or to print on paper that the
duplexer does not support.
1. From the software program, select the Print option.
2. Select the printer from the list of printers, and then click or tap the Properties or Preferences button to
open the print driver.
NOTE: The name of the button varies for dierent software programs.
NOTE: In Windows 10, 8.1, and 8, these applications will have a dierent layout with dierent features
from what is described below for desktop applications. To access the print feature from a Start screen app,
complete the following steps:
Windows 10: Select Print, and then select the printer.
Windows 8.1 or 8: Select Devices, select Print, and then select the printer.
3. Click the Layout tab.
4. Select the appropriate duplex option from the Print on Both Sides Manually drop-down list, and then click
the OK button.
5. In the Print dialog box, click the OK button to print the job. The printer will print the rst side of all the pages
in the document rst.
6. Retrieve the printed stack from the output bin, and place it with the printed-side facing down, top edge rst
in the input tray.
123
7. At the computer, click the OK button to print the second side of the job.
8. If prompted, select the appropriate control panel button to continue.
Print multiple pages per sheet (Windows)
1. From the software program, select the Print option.
2. Select the printer from the list of printers, and then click or tap the Properties or Preferences button to
open the print driver.
NOTE: The name of the button varies for dierent software programs.
ENWW Print tasks (Windows) 23
NOTE: In Windows 10, 8.1, and 8, these applications will have a dierent layout with dierent features
from what is described below for desktop applications. To access the print feature from a Start screen app,
complete the following steps:
Windows 10: Select Print, and then select the printer.
Windows 8.1 or 8: Select Devices, select Print, and then select the printer.
3. Click or tap the Layout tab.
4. Select the correct Orientation option from the drop-down list.
5. Select the correct number of pages per sheet from the Pages per sheet drop-down list, and then click or
tap the Advanced button.
6. Select the correct Pages per Sheet Layout option from the drop-down list.
7. Select the correct Page Borders option from the drop-down list, click or tap the OK button to close the
Advanced Options dialog box, and then click or tap the OK button to close the Properties or Preferences
dialog box.
8. In the Print dialog box, click the OK button to print the job.
Select the paper type (Windows)
1. From the software program, select the Print option.
2. Select the printer from the list of printers, and then click or tap the Properties or Preferences button to
open the print driver.
NOTE: The name of the button varies for dierent software programs.
NOTE:
Windows 10: Select Print, and then select the printer.
Windows 8.1 or 8: Select Devices, select Print, and then select the printer.
3. Click or tap the Printing Shortcuts tab.
4. From the Paper Type drop-down list, select the correct paper type, and then click or tap the OK button to
close the Properties or Preferences dialog box.
5. In the Print dialog box, click the OK button to print the job.
24 Chapter 4 Print ENWW
Print tasks (OS X)
How to print (OS X)
The following procedure describes the basic printing process for OS X.
1. Click the File menu, and then click the Print option.
2. Select the printer.
3. Click Show Details or Copies & Pages, and then select other menus to adjust the print settings.
NOTE: The name of the item varies for dierent software programs.
4. Click the Print button.
Manually print on both sides (OS X)
NOTE: This feature is available if you install the HP print driver. It might not be available if you are using AirPrint.
1. Click the File menu, and then click the Print option.
2. Select the printer.
3. Click Show Details or Copies & Pages, and then click the Manual Duplex menu.
NOTE: The name of the item varies for dierent software programs.
4. Click the Manual Duplex box, and select a binding option.
5. Click the Print button.
6. Go to the printer, and remove any blank paper that is in Tray 1.
7. Retrieve the printed stack from the output bin and place it with the printed-side facing down in the input
tray.
8. If prompted, touch the appropriate control panel button to continue.
Print multiple pages per sheet (OS X)
1. Click the File menu, and then click the Print option.
2. Select the printer.
3. Click Show Details or Copies & Pages, and then click the Layout menu.
NOTE: The name of the item varies for dierent software programs.
4. From the Pages per Sheet drop-down list, select the number of pages that you want to print on each sheet.
5. In the Layout Direction area, select the order and placement of the pages on the sheet.
6. From the Borders menu, select the type of border to print around each page on the sheet.
7. Click the Print button.
ENWW Print tasks (OS X) 25
Select the paper type (OS X)
1. Click the File menu, and then click the Print option.
2. Select the printer.
3. Click Show Details or Copies & Pages, and then click the Media & Quality menu or the Paper/Quality menu.
NOTE: The name of the item varies for dierent software programs.
4. Select from the Media & Quality or Paper/Quality options.
NOTE: This list contains the master set of options available. Some options are not available on all printers.
Media Type: Select the option for the type of paper for the print job.
Print Quality: Select the resolution level for the print job.
5. Click the Print button.
26 Chapter 4 Print ENWW
Mobile printing
Introduction
HP oers multiple mobile solutions to enable easy printing to an HP printer from a laptop, tablet, smartphone, or
other mobile device. To see the full list and to determine the best choice, go to www.hp.com/go/
LaserJetMobilePrinting.
NOTE: Update the printer rmware to ensure all mobile printing capabilities are supported.
Wi-Fi Direct (wireless models only)
Wi-Fi Direct enables printing from a wireless mobile device without requiring a connection to a network or the
Internet.
Wi-Fi Direct does not support all mobile operating systems. If the mobile device does not support Wi-Fi Direct,
you must change the wireless network connection of the device to the Wi-Fi Direct connection of the printer
before printing.
NOTE: For non-Wi-Fi Direct capable mobile devices, the Wi-Fi Direct connection only enables printing. After
using Wi-Fi Direct to print, you must reconnect to a local network in order to access the Internet.
To access the printer Wi-Fi Direct connection, complete the following steps:
1. Print a conguration page to determine the IP address or host name.
a. Press and hold the Start Copy button until the Ready light begins blinking.
b. Release the Start Copy button.
2. Open a web browser, and in the address line, type the IP address or host name exactly as it displays on the
printer conguration page. Press the Enter key on the computer keyboard. The EWS opens.
NOTE: If the web browser displays a message indicating that accessing the website might not be safe,
select the option to continue to the website. Accessing this website will not harm the computer.
3. On the Networking tab, click the Wi-Fi Direct Setup link in the left navigation pane.
4. Choose one of the following connection methods:
Manual
Automatic
5. On the mobile device, open the Wi-Fi or the Wi-Fi Direct menu.
6. From the list of available networks, select the printer name.
NOTE: If the printer name does not display, you might be out of range of the Wi-Fi Direct signal. Move the
device closer to the printer.
7. If prompted, enter the Wi-Fi Direct password.
ENWW Mobile printing 27
NOTE: For Android devices that support Wi-Fi Direct, if the connection method is set to Automatic, the
connection will occur automatically, without a password prompt. If the connection method is set to Manual,
you will need to either press the Wireless button on the printer to connect to an Android device, or provide a
personal identication number (PIN) — displayed on the printed report — as a password to connect to a
Windows (8.1 or later) device.
NOTE: To access the Wi-Fi Direct password, from the EWS open the Networking tab, and then click Wi-Fi
Direct Setup.
8. Open the document, and then select the Print option.
9. Select the printer from the list of available printers, and then select Print.
10. After the print job is complete, some mobile devices need to be reconnected to the local network.
The following devices and computer operating systems support Wi-Fi Direct:
Android 4.0 and later tablets and phones with the HP Print Service or Mopria mobile printing plugin installed
Most Windows 8.1 computers, tablets, and laptops that have the HP print driver installed
The following devices and computer operating systems do not support Wi-Fi Direct, but can print to a printer that
does:
Apple iPhone and iPad
Mac computers running OS X
For more information on Wi-Fi Direct printing, go to www.hp.com/go/wirelessprinting.
Wi-Fi Direct capabilities can be enabled or disabled from the HP Embedded Web Server (EWS).
Enable or disable Wi-Fi Direct
Wi-Fi Direct capabilities must be enabled rst from the printer EWS.
Step one: Open the HP Embedded Web Server
1. Print a conguration page to determine the IP address or host name.
a. Press and hold the Start Copy button until the Ready light begins blinking.
b. Release the Start Copy button.
2. Open a web browser, and in the address line, type the IP address or host name exactly as it displays on the
printer conguration page. Press the Enter key on the computer keyboard. The EWS opens.
NOTE: If the web browser displays a message indicating that accessing the website might not be safe,
select the option to continue to the website. Accessing this website will not harm the computer.
Step two: Enable or disable Wi-Fi Direct
1. On the Networking tab, click the Wi-Fi Direct Setup link in the left navigation pane.
2. Select the On option, and then click Apply. Selecting the O option disables Wi-Fi Direct printing.
28 Chapter 4 Print ENWW
NOTE: In environments where more than one model of the same printer is installed, it might be helpful to
provide each printer a unique Wi-Fi Direct name for easier printer identication for Wi-Fi Direct printing.
Change the printer Wi-Fi Direct name
Follow this procedure to change the printer Wi-Fi Direct name using the HP Embedded Web Server (EWS):
Step one: Open the HP Embedded Web Server
1. Print a conguration page to determine the IP address or host name.
a. Press and hold the Start Copy button until the Ready light begins blinking.
b. Release the Start Copy button.
2. Open a web browser, and in the address line, type the IP address or host name exactly as it displays on the
printer conguration page. Press the Enter key on the computer keyboard. The EWS opens.
NOTE: If the web browser displays a message indicating that accessing the website might not be safe,
select the option to continue to the website. Accessing this website will not harm the computer.
Step two: Change the Wi-Fi Direct name
1. On the Networking tab, click the Wi-Fi Direct Setup link in the left navigation pane.
2. In the Wi-Fi Direct Name eld, enter the new name.
3. Click Apply.
AirPrint
Direct printing using Apple’s AirPrint is supported for iOS and from Mac computers running OS X 10.7 Lion and
newer. Use AirPrint to print directly to the printer from an iPad, iPhone (3GS or later), or iPod touch (third
generation or later) in the following mobile applications:
Mail
Photos
Safari
iBooks
Select third-party applications
To use AirPrint, the printer must be connected to the same network (sub-net) as the Apple device. For more
information about using AirPrint and about which HP printers are compatible with AirPrint, go to
www.hp.com/go/LaserJetMobilePrinting.
NOTE: Before using AirPrint with a USB connection, verify the version number. AirPrint versions 1.3 and earlier
do not support USB connections.
ENWW Mobile printing 29
Android embedded printing (wireless models only)
HP's built-in print solution for Android and Kindle enables mobile devices to automatically nd and print to HP
printers that are either on a network or within wireless range for Wi-Fi Direct printing.
The print solution is built into the many versions of the operating system.
NOTE: If printing is not available on your device, go to the Google Play > Android apps and install the HP Print
Service Plugin.
For more information on how to use Android embedded printing and which Android devices are supported, go to
www.hp.com/go/LaserJetMobilePrinting.
30 Chapter 4 Print ENWW
5 Copy
Make a copy
Copy identication card
For more information:
The following information is correct at the time of publication. For current information, see www.hp.com/
support/ljM28MFP.
HP's all-inclusive help for the printer includes the following information:
Install and congure
Learn and use
Solve problems
Download software and rmware updates
Join support forums
Find warranty and regulatory information
ENWW 31
Make a copy
Follow these steps to make a copy from the scanner glass:
Load the document on the scanner glass according to the indicators on the printer.
NOTE: The steps vary according to the type of control panel.
2
1
1 Base model LED control panel
2 Wireless model LED control panel
Base model control panel
Press the Start Copy button to start copying.
NOTE: To increase the number of copies, press the Start Copy button repeatedly (up to nine times)
to get multiple copies.
Wireless model control panel
1. Press the Copy Setup button to choose any of the following copy settings.
Select the Number of Copies setting, and then use the arrow keys to adjust the number of
copies.
Select the Lighter/Darker setting, and then use the arrow keys to adjust the darkness setting for
the current copy job.
Select the Enlarge/Reduce setting, and then use the arrow keys to adjust the size percentage of
the copy job.
2. Press the Start Copy button to start copying.
32 Chapter 5 Copy ENWW
Copy identication card
Use the ID Copy feature to copy both sides of identication card, or other small-size documents, onto the same
side of one sheet of paper. The printer prints both images at the same time.
1. Place the ID card onto the left side of the scanner glass.
2. Close the scanner lid and touch the ID Copy button to start copying. When it nishes, the attention
LED blinks.
3. Place the second side of the ID card on the same section of the scanner glass.
4. Touch the ID Copy button again to start copying.
5. The page prints.
ENWW Copy identication card 33
34 Chapter 5 Copy ENWW
6 Scan
Scan by using the HP Scan software (Windows)
Scan by using the HP Easy Scan Software (OS X)
Additional scan tasks
For more information:
The following information is correct at the time of publication. For current information, see www.hp.com/
support/ljM28MFP.
HP's all-inclusive help for the printer includes the following information:
Install and congure
Learn and use
Solve problems
Download software and rmware updates
Join support forums
Find warranty and regulatory information
ENWW 35
Scan by using the HP Scan software (Windows)
Use the HP Scan software to initiate scanning from software on your computer. You can save the scanned image
as a le or send it to another software application.
1. Load the document on the scanner glass according to the indicators on the printer.
2. From the computer, open the HP Printer Assistant.
Windows 10: From the Start menu, click All Apps, click HP, and then select the printer name.
Windows 8.1: Click the down arrow in lower left corner of the Start screen, and then select the printer
name.
Windows 8: Right-click an empty area on the Start screen, click All Apps on the app bar, and then
select the printer name.
Windows 7: From the computer desktop, click Start, select All Programs, click HP, click the folder for
the printer, and then select the printer name.
3. In the HP Printer Assistant, select Scan, and then select Scan a Document or Photo.
4. Adjust the settings if necessary.
5. Click Scan.
36 Chapter 6 Scan ENWW
Scan by using the HP Easy Scan Software (OS X)
Use the HP Easy Scan software to initiate scanning from software on your computer.
1. Load the document on the scanner glass according to the indicators on the printer.
2. From the computer, open HP Easy Scan, which is located in the Applications folder.
3. Follow the on-screen instructions to scan the document.
4. When you have scanned all the pages, click File and then Save to save them to a le.
ENWW Scan by using the HP Easy Scan Software (OS X) 37
Additional scan tasks
Go to www.hp.com/support/ljM28MFP.
Instructions are available for performing specic scan tasks, such as the following:
How to scan a general photo or document
How to scan as editable text (OCR)
How to scan multiple pages into a single le
38 Chapter 6 Scan ENWW
7 Manage the printer
Change the printer connection type (Windows)
Advanced conguration with HP Embedded Web Server (EWS) and HP Device Toolbox (Windows)
Advanced conguration with HP Utility for OS X
Congure IP network settings
Printer security features
Energy-conservation settings
Update the rmware
For more information:
The following information is correct at the time of publication. For current information, see www.hp.com/
support/ljM28MFP.
HP's all-inclusive help for the printer includes the following information:
Install and congure
Learn and use
Solve problems
Download software and rmware updates
Join support forums
Find warranty and regulatory information
ENWW 39
Change the printer connection type (Windows)
If you are already using the printer and you wish to change the way it is connected, use Device Setup & Software
to change the connection. For example, connect the new printer to the computer using a USB, or change the
connection from a USB to a wireless connection.
To open Device Setup & Software, complete the following procedure:
1. Open the HP Printer Assistant.
Windows 10: From the Start menu, click All Apps, click HP, and then select the printer name.
Windows 8.1: Click the down arrow in lower left corner of the Start screen, and then select the printer
name.
Windows 8: Right-click an empty area on the Start screen, click All Apps on the app bar, and then
select the printer name.
Windows 7: From the computer desktop, click Start, select All Programs, click HP, click the folder for
the printer, and then select the printer name.
2. In the HP Printer Assistant, select Tools from the navigation bar, and then select Device Setup & Software.
40 Chapter 7 Manage the printer ENWW
Advanced conguration with HP Embedded Web Server (EWS) and
HP Device Toolbox (Windows)
Use the HP Embedded Web Server to manage printing functions from your computer instead of the printer
control panel.
View printer status information
Determine the remaining life for all supplies and order new ones
View and change tray congurations
Receive notication of printer and supplies events
View and change network conguration
The HP Embedded Web Server works when the printer is connected to an IP-based network. The HP Embedded
Web Server does not support IPX-based printer connections. You do not have to have Internet access to open
and use the HP Embedded Web Server.
When the printer is connected to the network, the HP Embedded Web Server is automatically available.
NOTE: HP Device Toolbox is software used to connect to the HP Embedded Web Server when the printer is
connected to a computer via USB. It is available only if a full installation was performed when the printer was
installed on a computer. Depending on how the printer is connected, some features might not be available.
NOTE: The HP Embedded Web Server is not accessible beyond the network rewall.
Method one: Open the HP Embedded Web Server (EWS) from the software
1. Open the HP Printer Assistant.
Windows 10: From the Start menu, click All Apps, click HP, and then select the printer name.
Windows 8.1: Click the down arrow in lower left corner of the Start screen, and then select the printer
name.
Windows 8: Right-click an empty area on the Start screen, click All Apps on the app bar, and then
select the printer name.
Windows 7: From the computer desktop, click Start, select All Programs, click HP, click the folder for
the printer, and then select the printer name.
2. In the HP Printer Assistant, select Print, and then select HP Device Toolbox.
Method two: Open the HP Embedded Web Server (EWS) from a web browser
1. Print a conguration page to determine the IP address or host name.
a. Press and hold the Start Copy button until the Ready light begins blinking.
b. Release the Start Copy button.
ENWW Advanced conguration with HP Embedded Web Server (EWS) and HP Device Toolbox (Windows) 41
2. Open a web browser, and in the address line, type the IP address or host name exactly as it displays on the
conguration report. Press the Enter key on the computer keyboard. The EWS opens.
NOTE: If the web browser displays a message indicating that accessing the website might not be safe,
select the option to continue to the website. Accessing this website will not harm the computer.
Tab or section Description
Home tab
Provides printer, status, and
conguration information.
Device Status: Shows the printer status and shows the approximate percent life remaining
of HP supplies.
Supplies Status: Shows the approximate percent life remaining of HP supplies. Actual supply
life remaining can vary. Consider having a replacement supply available to install when print
quality is no longer acceptable. The supply does not need to be replaced unless the print
quality is no longer acceptable.
Device Conguration: Shows the information found on the printer conguration page.
Network Summary: Shows the information found on the printer network conguration
page.
Event Log: Shows a list of all printer events and errors.
Open Source Licenses: Shows a summary of the licenses for open source software
programs that can be used with the printer.
System tab
Provides the ability to congure the
printer from your computer.
Device Information: Provides basic printer and company information.
Paper Setup: Change the default paper-handling settings for the printer.
Energy Settings: Change the default times for entering Sleep/Auto O mode or automatic
shut down.
System Setup: Change the system defaults for the printer.
Supply Settings: Change the settings for Cartridge is low alert and other supplies
information.
Service: Perform the cleaning procedure on the printer.
Administration: Set or change the printer password. Enable or disable printer features.
NOTE: The System tab can be password-protected. If this printer is on a network, always
consult with the administrator before changing settings on this tab.
Copy tab Use this tab to set up the default copy settings.
NOTE: The Copy tab can be password-protected. If this printer is on a network, always consult
with the administrator before changing settings on this tab.
Networking tab
(Network-connected printers only)
Provides the ability to change network
settings from your computer.
Network administrators can use this tab to control network-related settings for the printer when
it is connected to an IP-based network. It also allows the network administrator to set up Wi–Fi
Direct functionality. This tab does not appear if the printer is directly connected to a computer.
NOTE: The Networking tab can be password-protected. If this printer is on a network, always
consult with the administrator before changing settings on this tab.
42 Chapter 7 Manage the printer ENWW
Advanced conguration with HP Utility for OS X
Use the HP Utility to check printer status or to view or change printer settings from a computer.
You can use the HP Utility when the printer is connected with a USB cable or is connected to a TCP/IP-based
network.
Open HP Utility
1. At the computer, open the Applications folder.
2. Select HP, and then select HP Utility.
HP Utility features
The HP Utility toolbar includes these items:
Devices: Click this button to show or hide Mac products found by the HP Utility.
All Settings: Click this button to return to the HP Utility main view.
HP Support: Click this button to open a browser and go to the HP support website.
Supplies: Click this button to open the HP SureSupply website.
Registration: Click this button to open the HP registration website.
Recycling: Click this button to open the HP Planet Partners Recycling Program website.
HP Utility consists of pages that you open by clicking in the All Settings list. The following table describes the
tasks that you can perform with HP Utility.
Item Description
Supplies Status Show the printer supplies status and gain access to links for ordering supplies online.
Device Information Show information about the currently selected printer, including the printer Service ID (if
assigned), the rmware version (FW Version), the Serial Number, and the IP address.
Commands Send special characters or print commands to the printer after the print job.
NOTE: This option is available only after you open the View menu and select the Show
Advanced Options item.
File Upload Transfer les from the computer to the printer. You can upload the following types of les:
HP LaserJet printer command language (.PRN)
Portable document format (.PDF)
Postscript (.PS)
Text (.TXT)
Power Management Congure the printer economy settings.
Update Firmware Transfer a rmware update le to the printer.
NOTE: This option is available only after you open the View menu and select the Show
Advanced Options item.
HP Connected Access the HP Connected website.
ENWW Advanced conguration with HP Utility for OS X 43
Item Description
Message Center Display error events that have occurred with the printer.
Network Settings
(Network-connected printers only)
Congure the network settings, such as the IPv4 settings, IPv6 settings, Bonjour settings,
and other settings.
Supplies Management Congure how the printer should behave when supplies are nearing the end of their
estimated life.
Trays Conguration Change paper size and type for each of the trays.
Additional Settings Open the HP Embedded Web Server (EWS) for the printer.
NOTE: USB connections are not supported.
Proxy Server Settings Congure a proxy server for the printer.
44 Chapter 7 Manage the printer ENWW
Congure IP network settings
Introduction
Printer sharing disclaimer
View or change network settings
Manually congure IPv4 TCP/IP parameters
Introduction
Use the following sections to congure the printer network settings.
Printer sharing disclaimer
HP does not support peer-to-peer networking, as the feature is a function of Microsoft operating systems and
not of the HP printer drivers. Go to Microsoft at www.microsoft.com.
View or change network settings
Use the HP Embedded Web Server to view or change IP conguration settings.
1. Open the HP Embedded Web Server (EWS):
a. Print a conguration page to determine the IP address or host name.
i. Press and hold the Start Copy button until the Ready light begins blinking.
ii. Release the Start Copy button.
b. Open a web browser, and in the address line, type the IP address or host name exactly as it displays
on the printer conguration page. Press the Enter key on the computer keyboard. The EWS opens.
NOTE: If the web browser displays a message indicating that accessing the website might not be
safe, select the option to continue to the website. Accessing this website will not harm the computer.
2. Click the Networking tab to obtain network information. Change settings as needed.
Manually congure IPv4 TCP/IP parameters
Use the EWS to manually set an IPv4 address, subnet mask, and default gateway.
1. Open the HP Embedded Web Server (EWS):
a. Print a conguration page to determine the IP address or host name.
i. Press and hold the Start Copy button until the Ready light begins blinking.
ii. Release the Start Copy button.
ENWW Congure IP network settings 45
b. Open a web browser, and in the address line, type the IP address or host name exactly as it displays
on the printer conguration page. Press the Enter key on the computer keyboard. The EWS opens.
NOTE: If the web browser displays a message indicating that accessing the website might not be
safe, select the option to continue to the website. Accessing this website will not harm the computer.
2. Click the Networking tab.
3. In the IPv4 Conguration area, select Manual IP, and then edit the IPv4 conguration settings.
4. Click the Apply button.
46 Chapter 7 Manage the printer ENWW
Printer security features
Introduction
The printer includes several security features to restrict who has access to conguration settings, to secure data,
and to prevent access to valuable hardware components.
Assign or change the system password using the HP Embedded Web Server
Assign an administrator password for access to the printer and the HP Embedded Web Server so that
unauthorized users cannot change the printer settings.
1. Open the HP Embedded Web Server (EWS):
Direct-connected printers
a. Open the HP Printer Assistant.
Windows 10: From the Start menu, click All Apps, click HP, and then select the printer name.
Windows 8.1: Click the down arrow in lower left corner of the Start screen, and then select the
printer name.
Windows 8: Right-click an empty area on the Start screen, click All Apps on the app bar, and then
select the printer name.
Windows 7: From the computer desktop, click Start, select All Programs, click HP, click the folder
for the printer, and then select the printer name.
b. In the HP Printer Assistant, select Print, and then select HP Device Toolbox.
Network-connected printers
a. Print a conguration page to determine the IP address or host name.
i. Press and hold the Start Copy button until the Ready light begins blinking.
ii. Release the Start Copy button.
b. Open a web browser, and in the address line, type the IP address or host name exactly as it displays
on the printer conguration page. Press the Enter key on the computer keyboard. The EWS opens.
NOTE: If the web browser displays a message indicating that accessing the website might not be
safe, select the option to continue to the website. Accessing this website will not harm the computer.
2. On the System tab, click the Administration link in the left navigation pane.
3. In the area labeled Product Security, enter the password in the Password eld.
4. Re-enter the password in the Conrm Password eld.
5. Click the Apply button.
ENWW Printer security features 47
NOTE: Make note of the password and store it in a safe place.
48 Chapter 7 Manage the printer ENWW
Energy-conservation settings
Introduction
Set the Sleep/Auto O After Inactivity setting
Set the Shut Down After Inactivity delay and congure the printer to use 1 watt or less of power
Set the Delay Shut Down setting
Introduction
The printer includes several economy features to conserve energy and supplies.
Set the Sleep/Auto O After Inactivity setting
Use the EWS to set the amount of idle time before the printer enters sleep mode.
Complete the following procedure to change the Sleep/Auto O After setting:
1. Open the HP Embedded Web Server (EWS):
Direct-connected printers
a. Open the HP Printer Assistant.
Windows 10: From the Start menu, click All Apps, click HP, and then select the printer name.
Windows 8.1: Click the down arrow in lower left corner of the Start screen, and then select the
printer name.
Windows 8: Right-click an empty area on the Start screen, click All Apps on the app bar, and then
select the printer name.
Windows 7: From the computer desktop, click Start, select All Programs, click HP, click the folder
for the printer, and then select the printer name.
b. In the HP Printer Assistant, select Print, and then select HP Device Toolbox.
Network-connected printers
a. Print a conguration page to determine the IP address or host name.
i. Press and hold the Start Copy button until the Ready light begins blinking.
ii. Release the Start Copy button.
b. Open a web browser, and in the address line, type the IP address or host name exactly as it displays
on the printer conguration page. Press the Enter key on the computer keyboard. The EWS opens.
NOTE: If the web browser displays a message indicating that accessing the website might not be
safe, select the option to continue to the website. Accessing this website will not harm the computer.
2. Click the System tab, and then select Energy Settings.
ENWW Energy-conservation settings 49
3. From the Sleep/Auto O After Inactivity drop-down, select the time for the delay.
4. Click the Apply button.
Set the Shut Down After Inactivity delay and congure the printer to use 1 watt or less of
power
Use the EWS to set the amount of time before the printer shuts down.
NOTE: After the printer shuts down, the power consumption is 1 watt or less.
Complete the following procedure to change the Shut Down After Delay setting:
1. Open the HP Embedded Web Server (EWS):
Direct-connected printers
a. Open the HP Printer Assistant.
Windows 10: From the Start menu, click All Apps, click HP, and then select the printer name.
Windows 8.1: Click the down arrow in lower left corner of the Start screen, and then select the
printer name.
Windows 8: Right-click an empty area on the Start screen, click All Apps on the app bar, and then
select the printer name.
Windows 7: From the computer desktop, click Start, select All Programs, click HP, click the folder
for the printer, and then select the printer name.
b. In the HP Printer Assistant, select Print, and then select HP Device Toolbox.
Network-connected printers
a. Print a conguration page to determine the IP address or host name.
i. Press and hold the Start Copy button until the Ready light begins blinking.
ii. Release the Start Copy button.
b. Open a web browser, and in the address line, type the IP address or host name exactly as it displays
on the printer conguration page. Press the Enter key on the computer keyboard. The EWS opens.
NOTE: If the web browser displays a message indicating that accessing the website might not be
safe, select the option to continue to the website. Accessing this website will not harm the computer.
2. Click the System tab, and then select Energy Settings.
3. From the Shut Down After Inactivity drop-down, select the time for the delay.
NOTE: The default value is 4 hours.
4. Click the Apply button.
50 Chapter 7 Manage the printer ENWW
Set the Delay Shut Down setting
Use the EWS to select whether or not the printer delays shutting down after the power button is pressed.
Complete the following procedure to change the Delay Shut Down setting:
1. Open the HP Embedded Web Server (EWS):
Direct-connected printers
a. Open the HP Printer Assistant.
Windows 10: From the Start menu, click All Apps, click HP, and then select the printer name.
Windows 8.1: Click the down arrow in lower left corner of the Start screen, and then select the
printer name.
Windows 8: Right-click an empty area on the Start screen, click All Apps on the app bar, and then
select the printer name.
Windows 7: From the computer desktop, click Start, select All Programs, click HP, click the folder
for the printer, and then select the printer name.
b. In the HP Printer Assistant, select Print, and then select HP Device Toolbox.
Network-connected printers
a. Print a conguration page to determine the IP address or host name.
i. Press and hold the Start Copy button until the Ready light begins blinking.
ii. Release the Start Copy button.
b. Open a web browser, and in the address line, type the IP address or host name exactly as it displays
on the printer conguration page. Press the Enter key on the computer keyboard. The EWS opens.
NOTE: If the web browser displays a message indicating that accessing the website might not be
safe, select the option to continue to the website. Accessing this website will not harm the computer.
2. Click the System tab, and then select Energy Settings.
3. Select or clear the Delay when ports are active option.
NOTE: When this option is selected the printer will not shut down unless all ports are inactive. An active
network link will prevent the printer from shutting down.
ENWW Energy-conservation settings 51
Update the rmware
HP oers periodic printer updates. Follow these steps to update the printer rmware for a single printer.
Update the rmware using the Firmware Update Utility
Use these steps to manually download and install the Firmware Update Utility from HP.com.
NOTE: This method is the only rmware update option available for printers connected to the computer via a
USB cable. It also works for printers connected to a network.
NOTE: You must have a print driver installed in order to use this method.
1. Go to www.hp.com/go/support, select your country/region or language, and then click the Software and
Drivers link.
2. Type the printer name in the search eld, press the ENTER button, and then select the printer from the list
of search results.
3. Select the operating system.
4. Under the Firmware section, locate the Firmware Update Utility.
5. Click Download, click Run, and then click Run again.
6. When the utility launches, select the printer from the drop-down list, and then click Send Firmware.
NOTE: To print a conguration page to verify the installed rmware version before or after the update
process, click Print Cong.
7. Follow the on-screen instructions to complete the installation, and then click the Exit button to close the
utility.
52 Chapter 7 Manage the printer ENWW
8 Solve problems
Customer support
Laser Warning
Interpret control-panel light patterns
Restore the factory-set defaults
A “Cartridge is low” or “Cartridge is very low” message displays
Printer does not pick up paper or misfeeds
Clear paper jams
Improve print quality
Resolving print quality problems
Improve copy and scan image quality
Solve wireless network problems
For more information:
The following information is correct at the time of publication. For current information, see www.hp.com/
support/ljM28MFP.
HP's all-inclusive help for the printer includes the following information:
Install and congure
Learn and use
Solve problems
Download software and rmware updates
Join support forums
Find warranty and regulatory information
ENWW 53
Customer support
Get telephone support for your country/region
Have the printer name, serial number, date of purchase, and
problem description ready
Country/region phone numbers are on the yer that was in the box
with the printer or at support.hp.com.
Get 24-hour Internet support, and download software utilities and
drivers
www.hp.com/support/ljM28MFP
Order additional HP service or maintenance agreements www.hp.com/go/carepack
Register the printer www.register.hp.com
54 Chapter 8 Solve problems ENWW
Laser Warning
㨰G㢌
ὀព
CAUTION - CLASS 3B INVISIBLE LASER RADIATION WHEN OPEN. AVOID EXPOSURE TO THE
BEAM.
ATTENTION - RAYONNEMENT LASER INVISIBLE DE ÇLASSE 3B EN CAS D'OUVERTURE. ÉVITEZ
L'EXPOSITION AU FAISCEAU.
VORSICHT - UNSICHTBARE LASERSTRAHLUNG KLASSE 3B, WENN ABDECKUNG
GEÖFFNET. NICHT DEM STRAHL AUSSETZEN.
PRECAUCIÓN – RADIACIÓN LÁSER INVISIBLE DE CLASE 3B PRESENTE AL ABRIR. EVITE LA
EXPOSICIÓN AL HAZ.
VARNING - OSYNLIG LASERSTRÅLNING KLASS 3B VID ÖPPEN LUCKA UNDVIK EXPONERING
FÖR LASERSTRÅLNINGEN.
VAROITUS - LUOKAN 3B NÄKYMÄTTÖMÄLLE LASER-SÄTEILYÄ AVATTUNA. VÄLTÄ
ALTISTUMISTA SÄTEELLE.
- ᢃᔰᰦˈᆈ൘нਟ㿱Ⲵ 3B ㊫◰ݹ䗀ሴˈ䈧䚯ݽ᧕䀖䈕◰ݹ
ᶏDŽ
TG㜨⫠㜤G☥ἽGZiG⽸ᴴ㐐⤼㢨㤴ⵝ㇠㉔㢨ⵝ㻐╝⏼⇌UGṅ㉔㜄G⊬㻐㡸G䙰䚌㐡㐐㝘UG
ࡇࡇࢆ㛤ࡃ࡜ࢡࣛࢫ % ୙ྍど࣮ࣞࢨᨺᑕࡀฟࡲࡍࠋࣅ࣮࣒࡟㌟ࢆࡉࡽࡉ࡞
࠸ࡇ࡜DŽ
ENWW Laser Warning 55
Interpret control-panel light patterns
If the printer requires user conrmation, the LED control panel alternates between Go and a two-digit status
code. If the printer requires attention, the LED control panel alternates between Er and a two-digit error code.
Use the table below to determine any issues with the printer.
Table 8-1 Status-light legend
Symbol for "light o"
Symbol for "light on"
Symbol for "light blinking"
Table 8-2 Control-panel light patterns
Light status Error code State of the printer Action
The Attention light is
blinking.
NOTE: The Supplies
LED might or might
not be on in this state
depending on the
supply status.
Go/01 The printer is in manual-feed mode. Load the correct paper type and size into the input tray.
Press the Start Copy button to continue.
Go/02 The printer is processing a manual
duplex job.
Load the pages into the input tray to print the second
sides. Press the Start Copy button to continue.
Go/03 The paper type or size of the print
job is dierent than the tray settings.
Load the correct paper type and size into the input tray,
or press the Start Copy button to continue with
the paper currently loaded.
Go/04 The printer has received a request to
register this printer with Google
Cloud Print.
Press the Start Copy button to acknowledge this
request.
Go/05 The printer has received a request to
connect to this printer using Wi-Fi
Direct.
Enter the PIN on the printed report on your mobile
device.
Go/06 The printer has received a request to
connect to this printer using Wi-Fi
Direct.
Press the Start Copy button to connect.
Go/P2 An ID Copy job has been started. Turn over the identication card and press the ID Copy
button to continue.
Er/01 The input tray is empty. Load the tray.
Er/02 A door is open. Verify that the top cover is fully closed.
Er/03 The printer failed to pick a sheet of
paper to print.
Press Start Copy to continue.
Er/04 Paper is jammed in the input tray. Clear the jam.
Er/05 Paper is jammed in the toner
cartridge area.
Clear the jam.
Er/06 Paper is jammed in the output bin
area.
Clear the jam.
56 Chapter 8 Solve problems ENWW
Table 8-2 Control-panel light patterns (continued)
Light status Error code State of the printer Action
Er/25 The loaded paper is not the size
needed for the print job.
Replace the paper, or press Start Copy to
continue with the size currently loaded.
Er/26 The printer has experienced a
general engine error.
Press Start Copy to continue.
If the error repeats, turn o the printer. Wait 30
seconds, and then turn on the printer.
Er/81 Incorrect rmware has been loaded.
Press Start Copy to continue. Load the correct
rmware.
The Attention light is
blinking and the
Ready light is on.
Er/08 The supply has reached very low
status and is congured to stop.
The cartridge needs to be replaced, or the cartridge
setting needs to be changed to Continue in the EWS.. If
the supply is congured to Continue, then the Supply
light will be on but no error code will display.
The Attention and
Supply lights are
blinking, and the
Ready light is on.
Er/07 The supply is missing or incorrectly
installed.
Install or reinstall the supply.
Er/11 There is an issue with the cartridge. Make sure the shipping material has been removed
from the cartridge, and that the cartridge is compatible
and not damaged.
Er/14 The toner cartridge has been
protected and is not allowed to be
used in this printer.
Replace the cartridge.
Er/17 An unauthorized toner cartridge is
installed.
Replace the cartridge.
The Attention light is
blinking, and Ready
and Supply lights are
on.
Er/08 The supply has reached very low
status and is congured to stop.
The cartridge needs to be replaced, or the cartridge
setting needs to be changed to Continue in the EWS.. If
the supply is congured to Continue, then the Supply
light will be on but no error code will display.
ENWW Interpret control-panel light patterns 57
Table 8-2 Control-panel light patterns (continued)
Light status Error code State of the printer Action
Attention and Ready
lights are on.
NOTE: The Supplies
LED might or might
not be on in this state
depending on the
supply status.
Er/30 There is an issue with the atbed
scanner.
Turn o the device and then turn it on. If the problem
persists, contact HP support.
Er/50
Er/51
Er/52
Er/54
Er/55
Er/58
Er/59
There is an issue with the print
engine.
Turn o the device and then turn it on. If the problem
persists, contact HP support.
Er/66 There is a problem with the wireless
hardware.
Turn o the device and then turn it on. If the problem
persists, contact HP support.
Attention light is o
and Ready light is on.
NOTE: The Supplies
LED might or might
not be on in this state
depending on the
supply status.
The printer is in Ready mode. The
LCD display will show the current
value for the number of copies.
Attention light is o
and Ready light is on
but dim.
NOTE: The Supplies
LED might or might
not be on in this state
depending on the
supply status.
The printer is in Sleep mode.
58 Chapter 8 Solve problems ENWW
Table 8-2 Control-panel light patterns (continued)
Light status Error code State of the printer Action
Attention light if o
and Ready light is
blinking.
The printer is currently processing a
job. For print and scan jobs, the LCD
display will show the current value
for the number of copies. For copy
jobs, the LCD display will show the
copy number being processed. For ID
copy jobs, the LCD display will show
“P1” while scanning the front of the
identication card, and show “P2”
while scanning the back of the
identication card.
The Attention and
Ready lights are
blinking.
The printer is initializing, cleaning, or
cooling down.
ENWW Interpret control-panel light patterns 59
Restore the factory-set defaults
Restoring the factory-set defaults returns all of the printer and network settings to the factory defaults. It will
not reset the page count. To restore the printer to the factory-default settings, follow these steps.
CAUTION: Restoring the factory-set defaults returns all of the settings to the factory defaults, and it also
deletes any pages that are stored in the memory.
1. Open the HP Embedded Web Server (EWS):
Direct-connected printers
a. Open the HP Printer Assistant.
Windows 10: From the Start menu, click All Apps, click HP, and then select the printer name.
Windows 8.1: Click the down arrow in lower left corner of the Start screen, and then select the
printer name.
Windows 8: Right-click an empty area on the Start screen, click All Apps on the app bar, and then
select the printer name.
Windows 7: From the computer desktop, click Start, select All Programs, click HP, click the folder
for the printer, and then select the printer name.
b. In the HP Printer Assistant, select Print, and then select HP Device Toolbox.
Network-connected printers
a. Print a conguration page to determine the IP address or host name.
i. Press and hold the Start Copy button until the Ready light begins blinking.
ii. Release the Start Copy button.
b. Open a web browser, and in the address line, type the IP address or host name exactly as it displays
on the printer conguration page. Press the Enter key on the computer keyboard. The EWS opens.
NOTE: If the web browser displays a message indicating that accessing the website might not be
safe, select the option to continue to the website. Accessing this website will not harm the computer.
2. On the System tab, click Service.
3. In the Restore Defaults area, click the Restore defaults button.
The printer automatically restarts.
60 Chapter 8 Solve problems ENWW
A “Cartridge is low” or “Cartridge is very low” message displays
Cartridge is low: The printer indicates when a cartridge level is low. Actual cartridge life remaining may vary.
Consider having a replacement available to install when print quality is no longer acceptable. The cartridge does
not need to be replaced now.
Continue printing with the current cartridge until redistributing the toner no longer yields acceptable print quality.
To redistribute the toner, remove the toner cartridge from the printer and gently rock the cartridge back and forth
about its horizontal axis. For graphical representation, see cartridge replacement instructions. Reinsert the toner
cartridge into the printer and close the cover.
Cartridge is very low: The printer indicates when the cartridge level is very low. Actual cartridge life remaining
may vary. Consider having a replacement available to install when print quality is no longer acceptable. The
cartridge does not need to be replaced now unless the print quality is no longer acceptable.
Once an HP toner cartridge has reached Very Low, HP’s Premium Protection Warranty on that toner cartridge has
ended.
Change the “Very Low” settings
You can change the way the printer reacts when supplies reach the Very Low state. You do not have to re-
establish these settings when you install a new toner cartridge.
1. Open the HP Embedded Web Server (EWS):
Direct-connected printers
a. Open the HP Printer Assistant.
Windows 10: From the Start menu, click All Apps, click HP, and then select the printer name.
Windows 8.1: Click the down arrow in lower left corner of the Start screen, and then select the
printer name.
Windows 8: Right-click an empty area on the Start screen, click All Apps on the app bar, and then
select the printer name.
Windows 7: From the computer desktop, click Start, select All Programs, click HP, click the folder
for the printer, and then select the printer name.
b. In the HP Printer Assistant, select Print, and then select HP Device Toolbox.
Network-connected printers
a. Print a conguration page to determine the IP address or host name.
i. Press and hold the Start Copy button until the Ready light begins blinking.
ii. Release the Start Copy button.
ENWW A “Cartridge is low” or “Cartridge is very low” message displays 61
b. Open a web browser, and in the address line, type the IP address or host name exactly as it displays
on the printer conguration page. Press the Enter key on the computer keyboard. The EWS opens.
NOTE: If the web browser displays a message indicating that accessing the website might not be
safe, select the option to continue to the website. Accessing this website will not harm the computer.
2. Select the System tab, and then select Supply Settings.
3. Select one of the following options from the Very Low Setting (Black Cartridge): drop-down:
Select the Stop option to set the printer to stop printing until you replace the cartridge.
Select the Continue option to set the printer to alert you that the cartridge is very low, but to continue
printing.
Order supplies
Order supplies and paper www.hp.com/go/suresupply
Order through service or support providers Contact an HP-authorized service or support provider.
Order using the HP Embedded Web Server (EWS) To access, in a supported on your computer, enter the printer IP
address or host name in the address/URL eld. The EWS contains a
link to the HP SureSupply website, which provides options for
purchasing Original HP supplies.
62 Chapter 8 Solve problems ENWW
Printer does not pick up paper or misfeeds
Introduction
The following solutions can help solve problems if the printer is not picking up paper from the tray or is picking
up multiple sheets of paper at one time. Either of these situations can result in paper jams.
The product does not pick up paper
The product picks up multiple sheets of paper
The product does not pick up paper
If the product does not pick up paper from the tray, try these solutions.
1. Open the product and remove any jammed sheets of paper.
2. Load the tray with the correct size of paper for your job.
3. Make sure the paper size and type are set correctly on the product control panel.
4. Make sure the paper guides in the tray are adjusted correctly for the size of paper. Adjust the guides to the
appropriate indentation in the tray.
5. The rollers above the tray might be contaminated. Clean the rollers with a lint-free cloth dampened with
warm water.
The product picks up multiple sheets of paper
If the product picks up multiple sheets of paper from the tray, try these solutions.
1. Remove the stack of paper from the tray and ex it, rotate it 180 degrees, and ip it over. Do not fan the
paper. Return the stack of paper to the tray.
2. Use only paper that meets HP specications for this product.
3. Use paper that is not wrinkled, folded, or damaged. If necessary, use paper from a dierent package.
4. Make sure the tray is not overlled. If it is, remove the entire stack of paper from the tray, straighten the
stack, and then return some of the paper to the tray.
5. Make sure the paper guides in the tray are adjusted correctly for the size of paper. Adjust the guides to the
appropriate indentation in the tray.
6. Make sure the printing environment is within recommended specications.
ENWW Printer does not pick up paper or misfeeds 63
Clear paper jams
Introduction
The following information includes instructions for clearing paper jams from the printer.
Jam locations
Experiencing frequent or recurring paper jams?
Clear jams from the input tray
Clear jams from inside the product
Clear jams from the output areas
Jam locations
Jams can occur at the following locations in the product.
1
2
3
1 Internal areas
2 Input tray
3 Output bin
NOTE: Jams can occur in more than one location.
64 Chapter 8 Solve problems ENWW
Experiencing frequent or recurring paper jams?
Follow these steps to solve problems with frequent paper jams. If the rst step does not resolve the problem
continue with the next step until you have resolved the problem.
1. If paper has jammed in the printer, clear the jam and then print a conguration page to test the printer.
2. Check that the tray is congured for the correct paper size and type. Adjust paper settings if necessary.
a. Print a conguration page to determine the IP address or host name.
i. Press and hold the Start Copy button until the Ready light begins blinking.
ii. Release the Start Copy button.
b. Open a web browser, and in the address line, type the IP address or host name exactly as it displays
on the printer conguration page. Press the Enter key on the computer keyboard. The EWS opens.
NOTE: If the web browser displays a message indicating that accessing the website might not be
safe, select the option to continue to the website. Accessing this website will not harm the computer.
c. Click the System tab, and then click the Paper Setup page.
d. Select the type of paper that is in the tray.
e. Select the size of paper that is in the tray.
3. Turn the printer o, wait 30 seconds, and then turn it on again.
4. Print a cleaning page to remove excess toner from inside the printer.
a. Open the HP Printer Assistant.
Windows 10: From the Start menu, click All Apps, click HP, and then select the printer name.
Windows 8.1: Click the down arrow in lower left corner of the Start screen, and then select the
printer name.
Windows 8: Right-click an empty area on the Start screen, click All Apps on the app bar, and then
select the printer name.
Windows 7: From the computer desktop, click Start, select All Programs, click HP, click the folder
for the printer, and then select the printer name.
b. In the HP Printer Assistant, select Print, and then select HP Device Toolbox.
c. On the System tab, click Service.
d. In the Fuser Cleaning mode area, click Start to begin the cleaning process.
5. Print a conguration page to test the printer.
a. Press and hold the Start Copy button until the Ready light begins blinking.
b. Release the Start Copy button.
ENWW Clear paper jams 65
If none of these steps resolves the problem, the printer might need service. Contact HP customer support.
66 Chapter 8 Solve problems ENWW
Clear jams from the input tray
CAUTION: Do not use sharp objects, such as tweezers or needle-nose pliers, to remove jams. Damage caused
by sharp objects will not be covered by the warranty.
When removing jammed media, pull the jammed media straight away from the product. Pulling jammed media
out of the product at an angle can damage the product.
NOTE: Depending on where the jam is located, some of the following steps might not be necessary.
1. Open the print-cartridge door, and then remove the print cartridge.
2. Remove the media stack from the input tray.
ENWW Clear paper jams 67
3. With both hands, grasp the side of the jammed media that is most visible (this includes the middle), and
carefully pull it free from the product.
4. Reinstall the print cartridge, and then close the print-cartridge door.
68 Chapter 8 Solve problems ENWW
Clear jams from inside the product
1. Open the print-cartridge door, and then remove the print cartridge.
CAUTION: To prevent damage, do not expose the print cartridge to light. Cover it with a piece of paper.
2. If you can see the jammed paper, carefully grasp the jammed paper, and slowly pull it out of the product.
ENWW Clear paper jams 69
3. Reinstall the print cartridge, and then close the print-cartridge door.
70 Chapter 8 Solve problems ENWW
Clear jams from the output areas
CAUTION: Do not use sharp objects, such as tweezers or needle-nose pliers, to remove jams. Damage caused
by sharp objects will not be covered by the warranty.
1. Open the print-cartridge door, and then remove the print cartridge.
2. Keep the print cartridge door open, and then with both hands, grasp the side of the jammed media that is
most visible (this includes the middle), and carefully pull it free from the product.
ENWW Clear paper jams 71
3. Reinstall the print cartridge, and then close the print-cartridge door.
72 Chapter 8 Solve problems ENWW
Improve print quality
Introduction
Update the printer rmware
Print from a dierent software program
Check the paper-type setting for the print job
Check toner-cartridge status
Cartridge cleaning
Print a cleaning page
Visually inspect the toner cartridge
Check paper and the printing environment
Adjust Print Density
Introduction
The following information provides troubleshooting steps to resolve print-quality problems, including the
following problems:
Smears
Fuzzy print
Dark print
Light print
Streaks
Missing toner
Scattered dots of toner
Loose toner
Skewed images
To resolve these or other print-quality problems, try the following solutions in the order presented.
For information about resolving specic image defects, see the Resolving print quality problems section of this
User Guide.
Update the printer rmware
Try upgrading the printer rmware. For more information, see the Update the rmware section of this User
Guide.
Print from a dierent software program
Try printing from a dierent software program. If the page prints correctly, the problem is with the software
program from which you were printing.
ENWW Improve print quality 73
Check the paper-type setting for the print job
Check the paper type setting when printing from a software program and the printed pages have smears, fuzzy
or dark print, curled paper, scattered dots of toner, loose toner, or small areas of missing toner.
Check the paper type setting on the printer
1. Open the tray.
2. Verify that the tray is loaded with the correct type of paper.
3. Close the tray.
Check the paper type setting (Windows)
1. From the software program, select the Print option.
2. Select the printer, and then click the Properties or Preferences button.
3. Click the Paper/Quality tab.
4. From the Paper Type drop-down list, click the More... option.
5. Expand the list of Type is: options.
6. Expand the category of paper types that best describes your paper.
7. Select the option for the type of paper you are using, and click the OK button.
8. Click the OK button to close the Document Properties dialog box. In the Print dialog box, click the OK button
to print the job.
Check the paper type setting (OS X)
1. Click the File menu, and then click the Print option.
2. In the Printer menu, select the printer.
3. By default, the print driver displays the Copies & Pages menu. Open the menus drop-down list, and then
click the Finishing menu.
4. Select a type from the Media Type drop-down list.
5. Click the Print button.
Check toner-cartridge status
Follow these steps to check the estimated life remaining in the toner cartridges and if applicable, the status of
other replaceable maintenance parts.
Step one: Find supplies information on conguration page
Supplies information is included on the conguration page.
1. Press and hold the Start Copy button until the Ready light begins blinking.
2. Release the Start Copy button.
74 Chapter 8 Solve problems ENWW
Step two: Check supplies status
1. Look at the supplies status report to check the percent of life remaining for the toner cartridges and if
applicable, the status of other replaceable maintenance parts.
Print quality problems can occur when using a toner cartridge that is at its estimated end of life. The
conguration report indicates when a supply level is very low.
Once an HP toner cartridge has reached Very Low, HP’s Premium Protection Warranty on that toner
cartridge has ended.
The toner cartridge does not need to be replaced now unless the print quality is no longer acceptable.
Consider having a replacement available to install when print quality is no longer acceptable.
If you determine that you need to replace a toner cartridge or other replaceable maintenance parts, the
conguration report lists the genuine HP part numbers.
2. Check to see if you are using a genuine HP cartridge.
A genuine HP toner cartridge has “HP” on it, or has the HP logo on it. For more information on identifying
HP cartridges go to www.hp.com/go/learnaboutsupplies.
Cartridge cleaning
During the printing process, cartridges might be contaminated by paper dust and cause print quality issues such
as background issues, vertical dark bands, or repetitive horizontal banding.
Follow these steps to improve the above mentioned print quality issues:
1. Open a web browser, and in the address line type the IP address or host name exactly as it displays on the
printer conguration page. Press the Enter key on the computer keyboard. The EWS opens.
NOTE: If the web browser displays a message indicating that accessing the website might not be safe,
select the option to continue to the website. Accessing this website will not harm the computer.
2. Click the System tab, and then click Service.
3. In the Cartridge Cleaning Mode area, click Start to begin the cleaning process.
Or use the following procedure to start the Cartridge Cleaning mode:
1. Open the HP Printer Assistant.
Windows 10: From the Start menu, click All Apps, click HP, and then select the printer name.
Windows 8.1: Click the down arrow in the lower left corner of the Start screen, and then select the
printer name.
Windows 8: Right-click an empty area on the Start screen, click All Apps on the app bar, and then
select the printer name.
Windows 7: From the computer desktop, click Start, select All Programs, click HP, click the folder for
the printer, and then select the printer name.
2. In the HP Printer Assistant, select Print, and then select HP Device Toolbox.
3. On the System tab, click Service.
4. In the Cartridge Cleaning Mode area, click Start to begin the cleaning process.
ENWW Improve print quality 75
Print a cleaning page
During the printing process paper, toner, and dust particles can accumulate inside the printer and can cause print-
quality issues such as toner specks or spatter, smears, streaks, lines, or repeating marks.
Use the following procedure to print a cleaning page.
1. Open the HP Printer Assistant.
Windows 10: From the Start menu, click All Apps, click HP, and then select the printer name.
Windows 8.1: Click the down arrow in lower left corner of the Start screen, and then select the printer
name.
Windows 8: Right-click an empty area on the Start screen, click All Apps on the app bar, and then
select the printer name.
Windows 7: From the computer desktop, click Start, select All Programs, click HP, click the folder for
the printer, and then select the printer name.
2. In the HP Printer Assistant, select Print, and then select HP Device Toolbox.
3. On the System tab, click Service.
4. In the Fuser Cleaning mode area, click Start to begin the cleaning process.
Visually inspect the toner cartridge
Follow these steps to inspect the toner cartridge.
1. Remove the toner cartridges from the printer, and verify that the sealing tape has been removed.
2. Check the memory chip for damage.
3. Examine the surface of the green imaging drum.
CAUTION: Do not touch the imaging drum. Fingerprints on the imaging drum can cause print-quality
problems.
4. If you see any scratches, ngerprints, or other damage on the imaging drum, replace the toner cartridge.
5. Reinstall the toner cartridge, and print a few pages to see if the problem has resolved.
Check paper and the printing environment
Step one: Use paper that meets HP specications
Some print-quality problems arise from using paper that does not meet HP specications.
Always use a paper type and weight that this printer supports.
Use paper that is of good quality and free of cuts, nicks, tears, spots, loose particles, dust, wrinkles, voids,
staples, and curled or bent edges.
Use paper that has not been previously printed on.
Use paper that does not contain metallic material, such as glitter.
76 Chapter 8 Solve problems ENWW
Use paper that is designed for use in laser printers. Do not use paper that is designed only for use in Inkjet
printers.
Use paper that is not too rough. Using smoother paper generally results in better print quality.
Step two: Check the environment
The environment can directly aect print quality and is a common cause for print-quality or paper-feeding
issues. Try the following solutions:
Move the printer away from drafty locations, such as open windows or doors, or air-conditioning vents.
Make sure the printer is not exposed to temperatures or humidity outside of printer specications.
Do not place the printer in a conned space, such as a cabinet.
Place the printer on a sturdy, level surface.
Remove anything that is blocking the vents on the printer. The printer requires good air ow on all sides,
including the top.
Protect the printer from airborne debris, dust, steam, grease, or other elements that can leave residue
inside the printer.
Adjust Print Density
Complete the following steps to adjust the print density.
1. Open the HP Embedded Web Server (EWS):
Direct-connected printers
a. Open the HP Printer Assistant.
Windows 10: From the Start menu, click All Apps, click HP, and then select the printer name.
Windows 8.1: Click the down arrow in lower left corner of the Start screen, and then select the
printer name.
Windows 8: Right-click an empty area on the Start screen, click All Apps on the app bar, and then
select the printer name.
Windows 7: From the computer desktop, click Start, select All Programs, click HP, click the folder
for the printer, and then select the printer name.
b. In the HP Printer Assistant, select Print, and then select HP Device Toolbox.
Network-connected printers
a. Print a conguration page to determine the IP address or host name.
i. Press and hold the Start Copy button until the Ready light begins blinking.
ii. Release the Start Copy button.
ENWW Improve print quality 77
b. Open a web browser, and in the address line, type the IP address or host name exactly as it displays
on the printer conguration page. Press the Enter key on the computer keyboard. The EWS opens.
NOTE: If the web browser displays a message indicating that accessing the website might not be
safe, select the option to continue to the website. Accessing this website will not harm the computer.
2. Click the System tab, and then select System Setup from the left navigation pane.
3. Select the correct density settings.
4. Click Apply to save the changes.
78 Chapter 8 Solve problems ENWW
Resolving print quality problems
Introduction
Troubleshoot print quality problems
Introduction
The following information provides troubleshooting steps for solving image defect issues, including the following
defects:
Light print
Gray background or dark print
Blank pages
Black pages
Dark or light bands
Dark or light streaks
Missing toner
Skewed images
Colors that do not align
Curled paper
Troubleshoot print quality problems
Table
8-3 Image defects table quick reference
Table 8-4 Light print on page 81 Table 8-5 Gray background or dark print
on page 82
Table 8-6 Blank page — No print on page 82
ENWW Resolving print quality problems 79
Table 8-3 Image defects table quick reference (continued)
Table 8-7 Black page on page 83 Table 8-8 Banding defects on page 83 Table 8-9 Streak defects on page 84
Table 8-10 Fixing/fuser defects on page 85 Table 8-11 Image placement defects
on page 85
Table 8-12 Color plane registrations defects
(color models only) on page 86
Table 8-13 Output defects on page 86
Image defects, no matter the cause, can often be resolved using the same steps. Use the following steps as a
starting point for solving image defect issues.
80 Chapter 8 Solve problems ENWW
1. Reprint the document. Print quality defects can be intermittent in nature or can go away completely with
continued printing.
2. Check the condition of the cartridge. If a cartridge is in a Very Low state (it has passed the rated life),
replace the cartridge.
3. Make sure that the driver and tray print mode settings match the media that is loaded in the tray. Try using
a dierent ream of media or a dierent tray. Try using a dierent print mode.
4. Make sure that the printer is within the supported operating temperature/humidity range.
5. Make sure that the paper type, size, and weight are supported by the printer. See the printer support page
at support.hp.com for a list of the supported paper sizes and types for the printer.
NOTE: The term “fusing” refers to the part of the printing process where toner is aixed to paper.
The following examples depict letter-size paper that has passed through the printer short-edge rst.
Table 8-4 Light print
Description Sample Possible solutions
Light print:
The printed content on the entire page is
light or faded.
1. Reprint the document.
2. Remove the cartridge, and then shake
it to redistribute the toner.
3. Make sure that the cartridge is
installed correctly.
4. Print a conguration report and check
for life and usage of the cartridge.
5. Replace the cartridge.
6. If the problem persists, go to
support.hp.com.
ENWW Resolving print quality problems 81
Table 8-5 Gray background or dark print
Description Sample Possible solutions
Gray background or dark print:
The image or text is darker than expected.
1. Make sure that the paper in the trays
has not already been run through the
printer.
2. Use a dierent paper type.
3. Reprint the document.
4. Mono models only: From the printer
EWS, go to the Adjust Toner Density
menu, and then adjust the toner
density to a lower level.
5. Make sure that the printer is in within
the supported operating temperature
and humidity range.
6. Replace the cartridge.
7. If the problem persists, go to
support.hp.com.
Table 8-6 Blank page — No print
Description Sample Possible solutions
Blank page — No print:
The page is completely blank and contains
no printed content.
1. Make sure that the cartridge is
genuine HP cartridges.
2. Make sure that the cartridge is
installed correctly.
3. Print with a dierent cartridge.
4. Check the paper type in the paper tray
and adjust the printer settings to
match. If necessary, select a lighter
paper type.
5. If the problem persists, go to
support.hp.com.
82 Chapter 8 Solve problems ENWW
Table 8-7 Black page
Description Sample Possible solutions
Black page:
The entire printed page is black.
1. Visually inspect the cartridge to check
for damage.
2. Make sure that the cartridge is
installed correctly.
3. Replace the cartridge
4. If the problem persists, go to
support.hp.com.
Table 8-8 Banding defects
Description Sample Possible solutions
Repetitive wide-pitch banding and Impulse
bands:
Dark or light lines which repeat down the
length of the page. They might be sharp or
soft in nature. The defect displays only in
areas of ll, not in text or sections with no
printed content.
1. Reprint the document.
2. Replace the cartridge.
3. Use a dierent paper type.
4. If the problem persists, go to
support.hp.com.
ENWW Resolving print quality problems 83
Table 8-9 Streak defects
Description Sample Possible solutions
Light vertical streaks:
Light streaks that usually span the length of
the page. The defect displays only in areas
of ll, not in text or sections with no printed
content.
1. Reprint the document.
2. Remove the cartridge, and then shake
it to redistribute the toner.
3. If the problem persists, go to
support.hp.com.
NOTE: Both light and dark vertical streaks
can occur when the printing environment is
outside the specied range for temperature
or humidity. Refer to your printer's
environmental specications for allowable
temperature and humidity levels.
Dark vertical streaks and ITB cleaning
streaks (color models only):
Dark lines which occur down the length of
the page. The defect might occur anywhere
on the page, in areas of ll or in sections
with no printed content.
1. Reprint the document.
2. Remove the cartridge, and then shake
it to redistribute the toner.
3. Print a cleaning page.
4. Check the toner level in the cartridge.
5. If the problem persists, go to
support.hp.com.
84 Chapter 8 Solve problems ENWW
Table 8-10 Fixing/fuser defects
Description Fixing/fuser Possible solutions
Hot fuser oset (shadow):
Slight shadows, or osets, of the image
repeated down the page. The repeated
image might fade with each recurrence.
1. Reprint the document.
2. Check the paper type in the paper tray
and adjust the printer settings to
match. If necessary, select a lighter
paper type.
3. If the problem persists, go to
support.hp.com.
Poor fusing:
Toner rubs o along either edge of page.
This defect is more common at the edges of
high-coverage jobs and on light media types
but can occur anywhere on the page.
1. Reprint the document.
2. Check the paper type in the paper tray
and adjust the printer settings to
match. If necessary, select a heavier
paper type.
3. If the problem persists, go to
support.hp.com.
Table 8-11 Image placement defects
Description Sample Possible solutions
Margins and skew:
The image is not centered, or is skewed on
the page. The defect occurs when the paper
is not positioned properly as it is pulled from
the tray and moves through the paper path.
1. Reprint the document.
2. Remove the paper and then reload the
tray. Make sure that all the paper
edges are even on all sides.
3. Make sure that the top of the paper
stack is below the tray full indicator.
Do not overll the tray.
4. Make sure that the paper guides are
adjusted to the correct size for the
paper. Do not adjust the paper guides
tightly against the paper stack. Adjust
them to the indentations or markings
in the tray.
5. If the problem persists, go to
support.hp.com.
ENWW Resolving print quality problems 85
Table 8-12 Color plane registrations defects (color models only)
Description Sample Possible solutions
Color plane registrations:
One or more color of the planes is not
aligned with the other color planes. The
primary error will typically occur with yellow.
1. Reprint the document.
2. From the printer control panel,
calibrate the printer.
3. If a cartridge has reached a Very Low
state or the printed output is severely
faded, replace the cartridge.
4. From the printer control panel use the
Restore Calibration feature to reset
the printer's calibration settings to the
factory defaults.
5. If the problem persists, go to
support.hp.com.
Table 8-13 Output defects
Description Sample Possible solutions
Output curl:
Printed paper has curled edges. The curled
edge can be along the short or long side of
the paper. Two types of curl are possible:
Positive curl: The paper curls toward
the printed side. The defect occurs in
dry environments or when printing
high coverage pages.
Negative curl: The paper curls away
from the printed side. The defect
occurs in high-humidity environments
or when printing low coverage pages.
1. Reprint the document.
2. Positive curl: From the printer EWS,
select a heavier paper type. The
heavier paper type creates a higher
temperature for printing.
Negative curl: From the printer EWS,
select a lighter paper type. The lighter
paper type creates a lower
temperature for printing. Try storing
the paper in a dry environment prior or
use freshly opened paper.
3. Print in duplex mode.
4. If the problem persists, go to
support.hp.com.
Output stacking:
The paper does not stack well in the output
tray. The stack might be uneven, skewed, or
the pages might be pushed out of the tray
and onto the oor. Any of the following
conditions can cause this defect:
Extreme paper curl
The paper in the tray is wrinkled or
deformed
The paper is a non-standard paper
type, such as envelopes
The output tray is too full
1. Reprint the document.
2. Extend the output bin extension.
3. If the defect is caused by extreme
paper curl, complete the
troubleshooting steps for Output curl.
4. Use a dierent paper type.
5. Use freshly opened paper.
6. Remove the paper from the output
tray before the tray gets too full.
7. If the problem persists, go to
support.hp.com.
86 Chapter 8 Solve problems ENWW
Improve copy and scan image quality
Introduction
If the printer is having image quality problems, rst make sure you are using high-quality originals. If the problem
still exists, try the following solutions in the order presented to resolve the issue.
Check the scanner glass for dirt and smudges
Check the paper settings
Optimize for text or pictures
Edge-to-edge copying
If the issue is not resolved, see “Improve print quality” for further solutions.
Check the scanner glass for dirt and smudges
Over time, specks of debris might collect on the scanner glass and white plastic backing, which can aect
performance. Use the following procedure to clean the scanner.
1. Press the power button to turn the printer o, and then disconnect the power cable from the electrical
outlet.
2. Open the scanner lid.
3. Clean the scanner glass and the white plastic backing underneath the scanner lid with a soft cloth or
sponge that has been moistened with nonabrasive glass cleaner.
CAUTION: Do not use abrasives, acetone, benzene, ammonia, ethyl alcohol, or carbon tetrachloride on
any part of the printer; these can damage the printer. Do not place liquids directly on the glass or platen.
They might seep and damage the printer.
4. Dry the glass and white plastic parts with a chamois or a cellulose sponge to prevent spotting.
5. Connect the power cable to an outlet, and then press the power button to turn the printer on.
Check the paper settings
1. Open the HP Embedded Web Server (EWS):
a. Open the HP Printer Assistant.
Windows 10: From the Start menu, click All Apps, click HP, and then select the printer name.
Windows 8.1: Click the down arrow in lower left corner of the Start screen, and then select the
printer name.
ENWW Improve copy and scan image quality 87
Windows 8: Right-click an empty area on the Start screen, click All Apps on the app bar, and then
select the printer name.
Windows 7: From the computer desktop, click Start, select All Programs, click HP, click the folder
for the printer, and then select the printer name.
b. In the HP Printer Assistant, select Print, and then select HP Device Toolbox.
2. On the Systems tab, click Paper Setup.
3. Change the necessary settings, and then click Apply.
88 Chapter 8 Solve problems ENWW
Optimize for text or pictures
1. Open the HP Embedded Web Server (EWS):
a. Open the HP Printer Assistant.
Windows 10: From the Start menu, click All Apps, click HP, and then select the printer name.
Windows 8.1: Click the down arrow in lower left corner of the Start screen, and then select the
printer name.
Windows 8: Right-click an empty area on the Start screen, click All Apps on the app bar, and then
select the printer name.
Windows 7: From the computer desktop, click Start, select All Programs, click HP, click the folder
for the printer, and then select the printer name.
b. In the HP Printer Assistant, select Print, and then select HP Device Toolbox.
2. On the Copy tab, select the Optimize drop-down list.
3. Select the setting you want to use.
Mixed: Use this setting for documents that contain a mixture of text and graphics.
Text: Use this setting for documents that contain mostly text.
Picture: Use this setting for documents that contain mostly graphics.
4. Change the necessary settings, and then click Apply.
Edge-to-edge copying
The printer cannot print fully edge-to-edge. There is a 4 mm (1/6 in) unprintable border around the page.
Considerations for printing or scanning documents with cropped edges:
When the original is smaller than the output size, move the original 4 mm (1/6 in) away from the corner
indicated by the icon on the scanner. Recopy or scan in this position.
When the original is the size of the printed output that you want, use the Reduce/Enlarge feature to reduce
the image so the copy is not cropped.
ENWW Improve copy and scan image quality 89
Solve wireless network problems
Introduction
Wireless connectivity checklist
The printer does not print after the wireless conguration completes
The printer does not print, and the computer has a third-party rewall installed
The wireless connection does not work after moving the wireless router or printer
Cannot connect more computers to the wireless printer
The wireless printer loses communication when connected to a VPN
The network does not appear in the wireless networks list
The wireless network is not functioning
Perform a wireless network diagnostic test
Reduce interference on a wireless network
Introduction
Use the troubleshooting information to help resolve issues.
NOTE: To determine whether Wi-Fi Direct printing is enabled on your printer, print a conguration page from
the printer control panel
Wireless connectivity checklist
Verify that the printer and the wireless router are turned on and have power. Also make sure that the
wireless radio in the printer is turned on.
Verify that the service set identier (SSID) is correct. Print a conguration page to determine the SSID:
a. Press and hold the Start Copy button until the Ready light begins blinking.
b. Release the Start Copy button.
If you are not sure the SSID is correct, run the wireless setup again
With secured networks, verify that the security information is correct. If the security information is
incorrect, run the wireless setup again.
If the wireless network is working correctly, try accessing other computers on the wireless network. If the
network has Internet access, try connecting to the Internet over a wireless connection.
Verify that the encryption method (AES or TKIP) is the same for the printer as it is for the wireless access
point (on networks using WPA security).
Verify that the printer is within the range of the wireless network. For most networks, the printer must be
within 30 m (100 ft) of the wireless access point (wireless router).
90 Chapter 8 Solve problems ENWW
Verify that obstacles do not block the wireless signal. Remove any large metal objects between the access
point and the printer. Make sure poles, walls, or support columns containing metal or concrete do not
separate the printer and wireless access point.
Verify that the printer is located away from electronic devices that might interfere with the wireless signal.
Many devices can interfere with the wireless signal including motors, cordless phones, security system
cameras, other wireless networks, and some Bluetooth devices.
Verify that the print driver is installed on the computer.
Verify that you have selected the correct printer port.
Verify that the computer and printer connect to the same wireless network.
For OS X, verify that the wireless router supports Bonjour.
The printer does not print after the wireless conguration completes
1. Make sure that the printer is turned on and in the ready state.
2. Turn o any third-party rewalls on your computer.
3. Make sure that the wireless network is working correctly.
4. Make sure that your computer is working correctly. If necessary, restart the computer.
5. Verify that you can open the printer HP Embedded Web Server from a computer on the network.
The printer does not print, and the computer has a third-party rewall installed
1. Update the rewall with the most recent update available from the manufacturer.
2. If programs request rewall access when you install the printer or try to print, make sure you allow the
programs to run.
3. Temporarily turn o the rewall, and then install the wireless printer on the computer. Enable the rewall
when you have completed the wireless installation.
The wireless connection does not work after moving the wireless router or printer
1. Make sure that the router or printer connects to the same network that your computer connects to.
2. Print a conguration page.
3. Compare the service set identier (SSID) on the conguration page to the SSID in the printer conguration
for the computer.
4. If the numbers are not the same, the devices are not connecting to the same network. Recongure the
wireless setup for the printer.
Cannot connect more computers to the wireless printer
1. Make sure that the other computers are within the wireless range and that no obstacles block the signal.
For most networks, the wireless range is within 30 m (100 ft) of the wireless access point.
2. Make sure that the printer is turned on and in the ready state.
3. Make sure there are not more than 5 concurrent Wi-Fi Direct users.
ENWW Solve wireless network problems 91
4. Turn o any third-party rewalls on your computer.
5. Make sure that the wireless network is working correctly.
6. Make sure that your computer is working correctly. If necessary, restart the computer.
The wireless printer loses communication when connected to a VPN
Typically, you cannot connect to a VPN and other networks at the same time.
The network does not appear in the wireless networks list
Make sure the wireless router is turned on and has power.
The network might be hidden. However, you can still connect to a hidden network.
The wireless network is not functioning
1. To verify if the network has lost communication, try connecting other devices to the network.
2. Test network communication by pinging the network.
a. Open a command-line prompt on your computer.
For Windows, click Start, click Run, type cmd, and then press Enter.
For OS X, go to Applications, then Utilities, and open Terminal.
b. Type ping followed by the router IP address.
c. If the window displays round-trip times, the network is working.
3. Make sure that the router or printer connects to the same network that the computer connects to.
a. Print a conguration page.
a. Press and hold the Start Copy button until the Ready light begins blinking.
b. Release the Start Copy button.
b. Compare the service set identier (SSID) on the conguration report to the SSID in the printer
conguration for the computer.
c. If the numbers are not the same, the devices are not connecting to the same network. Recongure
the wireless setup for the printer.
Perform a wireless network diagnostic test
From the printer control panel, you can run a diagnostic test that provides information about the wireless
network settings.
1. Open the HP Embedded Web Server (EWS):
a. Print a conguration page to determine the IP address or host name.
92 Chapter 8 Solve problems ENWW
i. Press and hold the Start Copy button until the Ready light begins blinking.
ii. Release the Start Copy button.
b. Open a web browser, and in the address line, type the IP address or host name exactly as it displays
on the printer conguration page. Press the Enter key on the computer keyboard. The EWS opens.
NOTE: If the displays a message indicating that accessing the website might not be safe, select the
option to continue to the website. Accessing this website will not harm the computer.
2. Select the Networking tab.
3. On the Wireless Conguration page, verify that the On option is selected.
4. Click the Print Test Report button to print a test page that shows test results.
Reduce interference on a wireless network
The following tips can reduce interference in a wireless network:
Keep the wireless devices away from large metal objects, such as ling cabinets, and other electromagnetic
devices, such as microwaves and cordless telephones. These objects can disrupt radio signals.
Keep the wireless devices away from large masonry structures and other building structures. These objects
can absorb radio waves and lower signal strength.
Position the wireless router in a central location in line of sight with the wireless printers on the network.
ENWW Solve wireless network problems 93
94 Chapter 8 Solve problems ENWW
Index
A
accessories
ordering 16
part numbers 16
acoustic specications 8
AirPrint 29
Android devices
printing from 30
B
bin, output
jams, clearing 71
bins, output
locating 3
browser requirements
HP Embedded Web Server 41
C
checklist
wireless connectivity 90
cleaning
glass 87
paper path 76
clearing jams
locations 64
control panel
LED light patterns 56
locating 3
copy identication card 33
copying
edge-to-edge 89
identication card 33
multiple copies 32
optimizing for text or pictures 89
setting paper size and type 87
single copies 32
covers, locating 3
customer support
online 54
D
defaults, restoring 60
dimensions, printer 8
double-sided printing
Mac 25
Windows 23
drivers, supported 6
duplex printing
Mac 25
duplex printing (double-sided)
Windows 23
duplexing
manually (Mac) 25
manually (Windows) 23
E
economy settings 49
electrical specications 8
Embedded Web Server (EWS)
assigning passwords 47
features 41
envelope
orientation 13
envelopes, loading 13
Explorer, versions supported
HP Embedded Web Server 41
F
factory-set defaults, restoring 60
G
glass, cleaning 87
H
HP Customer Care 54
HP Device Toolbox, using 41
HP Easy Scan Software (OS X) 37
HP Embedded Web Server (EWS)
features 41
HP EWS, using 41
HP Scan software (Windows) 36
HP Utility 43
HP Utility for Mac
Bonjour 43
features 43
HP Utility, Mac 43
I
image quality
check toner-cartridge status 74
image quality issues
examples and solutions 79
interface ports
locating 3
Internet Explorer, versions supported
HP Embedded Web Server 41
J
jams
locations 64
output-bin, clearing 71
tray, clearing 67
L
label
orientation 14
labels
printing on 14
labels, loading 14
M
Macintosh
HP Utility 43
manual duplex
Mac 25
Windows 23
memory
included 6
ENWW Index 95
mobile printing
Android devices 30
mobile printing solutions 6
mobile printing, software supported
7
multiple pages per sheet
printing (Mac) 25
printing (Windows) 23
N
network installation 40
network port
locating 3
networks
installing the printer 40
supported 6
number of copies, changing 32
O
on/o button, locating 3
online support 54
operating systems (OS)
supported 6
operating systems, supported 6
ordering
supplies and accessories 16
OS (operating system)
supported 6
output bin
locating 3
P
pages per minute 6
pages per sheet
selecting (Mac) 25
selecting (Windows) 23
paper
selecting 76
paper jams. See jams
paper pickup problems
solving 63
paper type
selecting (Windows) 24
paper types
selecting (Mac) 26
paper, ordering 16
part numbers 16
accessories 16
supplies 16
power
consumption 8
power connection
locating 3
power switch, locating 3
power-down delay
setting 51
print drivers, supported 6
print on both sides
Mac 25
manually, Windows 23
Windows 23
product and serial number label
locating 3
R
restoring factory-set defaults 60
S
scanner
glass cleaning 87
scanning
from HP Easy Scan Software (OS
X) 37
from HP Scan software
(Windows) 36
serial number label
locating 3
settings
factory-set defaults, restoring 60
shut down after delay
setting 50
single-sheet priority feed slot
loading envelopes 13
loading labels 14
sleep delay
disabling 49
enabling 49
software
HP Utility 43
specications
electrical and acoustic 8
status
control panel lights 56
HP Utility, Mac 43
supplies
low threshold settings 61
ordering 16
part numbers 16
status, viewing with HP Utility for
Mac 43
using when low 61
support
online 54
system requirements
HP Embedded Web Server 41
T
technical support
online 54
toner cartridge
low threshold settings 61
using when low 61
toner cartridges
part numbers 16
tray
jams, clearing 67
Tray 1
loading envelopes 13
loading labels 14
trays
capacity 6
included 6
loading 12
locating 3
troubleshooting
check toner-cartridge status 74
LED, errors 56
LED, light patterns 56
paper feed problems 63
wireless network 90
U
USB port
locating 3
W
web browser requirements
HP Embedded Web Server 41
Web sites
customer support 54
weight, printer 8
Wi-Fi Direct printing 7, 27
wireless network
troubleshooting 90
wireless network interference 93
96 Index ENWW
103

Hulp nodig? Stel uw vraag in het forum

Spelregels
1

Forum

HP-LaserJet-Pro-MFP-M28
  • Mijn toestel staat op dubbelzijdig afdrukken, maar ik wens dit niet. Hoe keer ik terug naar enkelzijdig afdrukken ? Bovendien staat de afdruk scheef op het afgedrukte blad: rand van tekst is niet parallel aan de rand van het blad. Gesteld op 4-1-2023 om 00:51

    Reageer op deze vraag Misbruik melden
  • Hoe las ik het probleem op bij foutmelding 06 HP laserjet PRO MFO M28W Gesteld op 23-11-2021 om 12:13

    Reageer op deze vraag Misbruik melden
  • Hoe kan ik bij mijn printer HP laserjet Pro MFP M28w fout melding 06 oplossen Gesteld op 23-11-2021 om 12:04

    Reageer op deze vraag Misbruik melden

Misbruik melden

Gebruikershandleiding.com neemt misbruik van zijn services uitermate serieus. U kunt hieronder aangeven waarom deze vraag ongepast is. Wij controleren de vraag en zonodig wordt deze verwijderd.

Product:

Bijvoorbeeld antisemitische inhoud, racistische inhoud, of materiaal dat gewelddadige fysieke handelingen tot gevolg kan hebben.

Bijvoorbeeld een creditcardnummer, een persoonlijk identificatienummer, of een geheim adres. E-mailadressen en volledige namen worden niet als privégegevens beschouwd.

Spelregels forum

Om tot zinvolle vragen te komen hanteren wij de volgende spelregels:

Belangrijk! Als er een antwoord wordt gegeven op uw vraag, dan is het voor de gever van het antwoord nuttig om te weten als u er wel (of niet) mee geholpen bent! Wij vragen u dus ook te reageren op een antwoord.

Belangrijk! Antwoorden worden ook per e-mail naar abonnees gestuurd. Laat uw emailadres achter op deze site, zodat u op de hoogte blijft. U krijgt dan ook andere vragen en antwoorden te zien.

Abonneren

Abonneer u voor het ontvangen van emails voor uw HP LaserJet Pro MFP M28 bij:


U ontvangt een email met instructies om u voor één of beide opties in te schrijven.


Ontvang uw handleiding per email

Vul uw emailadres in en ontvang de handleiding van HP LaserJet Pro MFP M28 in de taal/talen: Engels als bijlage per email.

De handleiding is 4,92 mb groot.


U ontvangt de handleiding per email binnen enkele minuten. Als u geen email heeft ontvangen, dan heeft u waarschijnlijk een verkeerd emailadres ingevuld of is uw mailbox te vol. Daarnaast kan het zijn dat uw internetprovider een maximum heeft aan de grootte per email. Omdat hier een handleiding wordt meegestuurd, kan het voorkomen dat de email groter is dan toegestaan bij uw provider.

Stel vragen via chat aan uw handleiding

Stel uw vraag over deze PDF

Andere handleiding(en) van HP LaserJet Pro MFP M28

HP LaserJet Pro MFP M28 Gebruiksaanwijzing - Nederlands - 108 pagina's

HP LaserJet Pro MFP M28 Gebruiksaanwijzing - Deutsch - 112 pagina's

HP LaserJet Pro MFP M28 Snelstart handleiding - Alle talen - 32 pagina's


Uw handleiding is per email verstuurd. Controleer uw email

Als u niet binnen een kwartier uw email met handleiding ontvangen heeft, kan het zijn dat u een verkeerd emailadres heeft ingevuld of dat uw emailprovider een maximum grootte per email heeft ingesteld die kleiner is dan de grootte van de handleiding.

Er is een email naar u verstuurd om uw inschrijving definitief te maken.

Controleer uw email en volg de aanwijzingen op om uw inschrijving definitief te maken

U heeft geen emailadres opgegeven

Als u de handleiding per email wilt ontvangen, vul dan een geldig emailadres in.

Uw vraag is op deze pagina toegevoegd

Wilt u een email ontvangen bij een antwoord en/of nieuwe vragen? Vul dan hier uw emailadres in.


Info