Power consumption, electrical specifications, and acoustic emissions .......................................... 10
Operating-environment range .......................................................................................................... 10
Product hardware setup and software installation ............................................................................................ 11
2 Paper trays ................................................................................................................................................. 13
Load paper into the single-sheet slot (Tray 1) ................................................................................................... 14
Load paper into the single-sheet priority feed slot ......................................................................... 14
Load an envelope in the single-sheet priority feed slot (Tray 1) ..................................................... 15
Tray 1 paper orientation ................................................................................................................... 17
Load paper into Tray 2 ......................................................................................................................................... 18
Load paper into Tray 2 ...................................................................................................................... 18
Load envelopes in Tray 2 .................................................................................................................. 20
Tray 2 paper orientation ................................................................................................................... 23
3 Supplies, accessories, and parts ................................................................................................................... 25
Order supplies, accessories, and parts ............................................................................................................... 26
How to print (OS X) ............................................................................................................................ 39
Manually print on both sides (OS X) .................................................................................................. 39
Print multiple pages per sheet (OS X) ............................................................................................... 39
Select the paper type (OS X) ............................................................................................................. 39
Mobile printing ..................................................................................................................................................... 41
Use walk-up USB printing .................................................................................................................................... 43
Make a copy ......................................................................................................................................................... 46
Copy on both sides (duplex) ................................................................................................................................ 47
Copy on both sides manually ............................................................................................................ 47
Scan by using the HP Scan software (Windows) ................................................................................................. 50
Scan by using the HP Scan software (OS X) ........................................................................................................ 51
Scan to a USB flash drive ..................................................................................................................................... 52
Set up Scan to Network Folder ............................................................................................................................ 53
Use the Scan to Network Folder Wizard (Windows) ......................................................................... 53
Set up the Scan to Network Folder feature via the HP Embedded Web Server (Windows) ............. 53
Set up the Scan to Network Folder feature on a Mac ....................................................................... 54
ivENWW
Scan to a network folder ..................................................................................................................................... 56
Set up Scan to E-mail ........................................................................................................................................... 57
Use the Scan to E-Mail Wizard (Windows) ........................................................................................ 57
Set up the Scan to Email feature via the HP Embedded Web Server (Windows) ............................. 57
Set up the Scan to Email feature on a Mac ....................................................................................... 59
Scan to email ....................................................................................................................................................... 61
7 Manage the product ..................................................................................................................................... 63
Use HP Web Services applications ...................................................................................................................... 64
Change the product connection type (Windows) ................................................................................................ 65
Advanced configuration with HP Embedded Web Server (EWS) and HP Device Toolbox (Windows) ................ 66
Advanced configuration with HP Utility for OS X ................................................................................................ 69
Open HP Utility .................................................................................................................................. 69
HP Utility features ............................................................................................................................. 69
Configure IP network settings ............................................................................................................................. 71
View or change network settings ..................................................................................................... 71
Rename the product on a network ................................................................................................... 71
Manually configure IPv4 TCP/IP parameters from the control panel .............................................. 72
Product security features .................................................................................................................................... 73
Print with EconoMode ....................................................................................................................... 74
Configure the Sleep/Auto Off After setting ...................................................................................... 74
Set the Shut Down After delay and configure the product to use 1 watt or less of power ............. 74
Configure the Delay Shut Down setting ........................................................................................... 75
HP Web Jetadmin ................................................................................................................................................. 76
Update the firmware ........................................................................................................................................... 77
Method one: Update the firmware using the control panel ............................................................. 77
Method two: Update the firmware using the Firmware Update Utility ............................................ 78
Customer support ................................................................................................................................................ 80
Control panel help system .................................................................................................................................. 81
Restore the factory-set defaults ........................................................................................................................ 82
A “Cartridge is low” or “Cartridge is very low” message displays on the product control panel ...................... 83
ENWWv
Change the “Very Low” settings ....................................................................................................... 83
Order supplies ................................................................................................................................... 83
Product does not pick up paper or misfeeds ...................................................................................................... 84
The product does not pick up paper ................................................................................................. 84
The product picks up multiple sheets of paper ................................................................................ 84
The document feeder jams, skews, or picks up multiple sheets of paper ...................................... 84
Clear paper jams .................................................................................................................................................. 86
The computer is using the incorrect IP address for the product ................................................... 110
The computer is unable to communicate with the product ........................................................... 110
The product is using incorrect link and duplex settings for the network ...................................... 111
New software programs might be causing compatibility problems ............................................. 111
The computer or workstation might be set up incorrectly ............................................................ 111
The product is disabled, or other network settings are incorrect ................................................. 111
Index ........................................................................................................................................................... 113
ENWWvii
viiiENWW
1Product overview
●
Product views
●
Product specifications
●
Product hardware setup and software installation
For more information:
Go to
www.hp.com/support/colorljM274MFP.
HP's all-inclusive help for the product includes the following information:
●
Install and configure
●
Learn and use
●
Solve problems
●
Download software updates
●
Join support forums
●
Find warranty and regulatory information
ENWW1
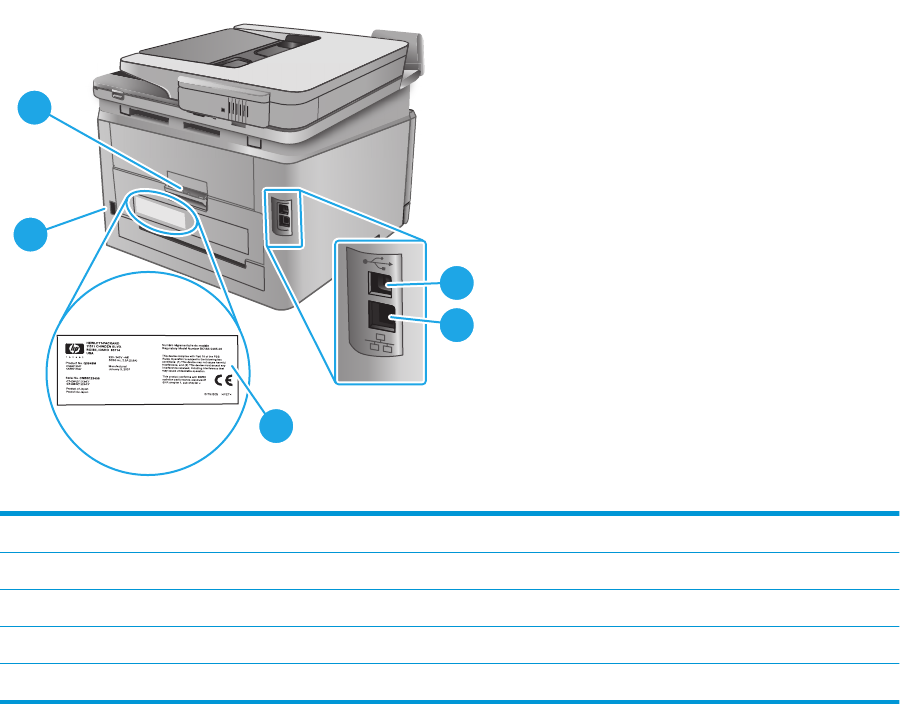
Product views
●
Product front view
●
Product back view
●
Control-panel view
Product front view
1
3
4
2
10
9
8
6
5
7
1Document feeder
2Scanner
3Control panel (tilts up for easier viewing)
4Walk-up USB port for printing and scanning without a computer
5Output bin
6Output bin extension
7Front door (provides toner cartridge access)
8Power on/off button
9Single-sheet priority feed slot (Tray 1)
10Main input tray (Tray 2)
2Chapter 1 Product overviewENWW
Product back view
1
2
4
3
5
1Power connection
2Rear door (provides access for clearing jams)
3USB port
4Ethernet port
5Serial number and product number label
ENWWProduct views3
Control-panel view
4
3
2
1
5
1HP Back buttonReturns to the previous screen
2Home buttonProvides access to the Home screen
3Help buttonProvides access to the control-panel help system
4Color touchscreenProvides access to menus, help animations, and product
information.
5Home page screen indicatorThe display indicates which Home screen the control panel is
currently displaying.
NOTE:While the control panel does not have a standard Cancel button, during many product processes a
Cancel button appears on the touchscreen. This permits users to cancel a process before the product
completes it.
4Chapter 1 Product overviewENWW
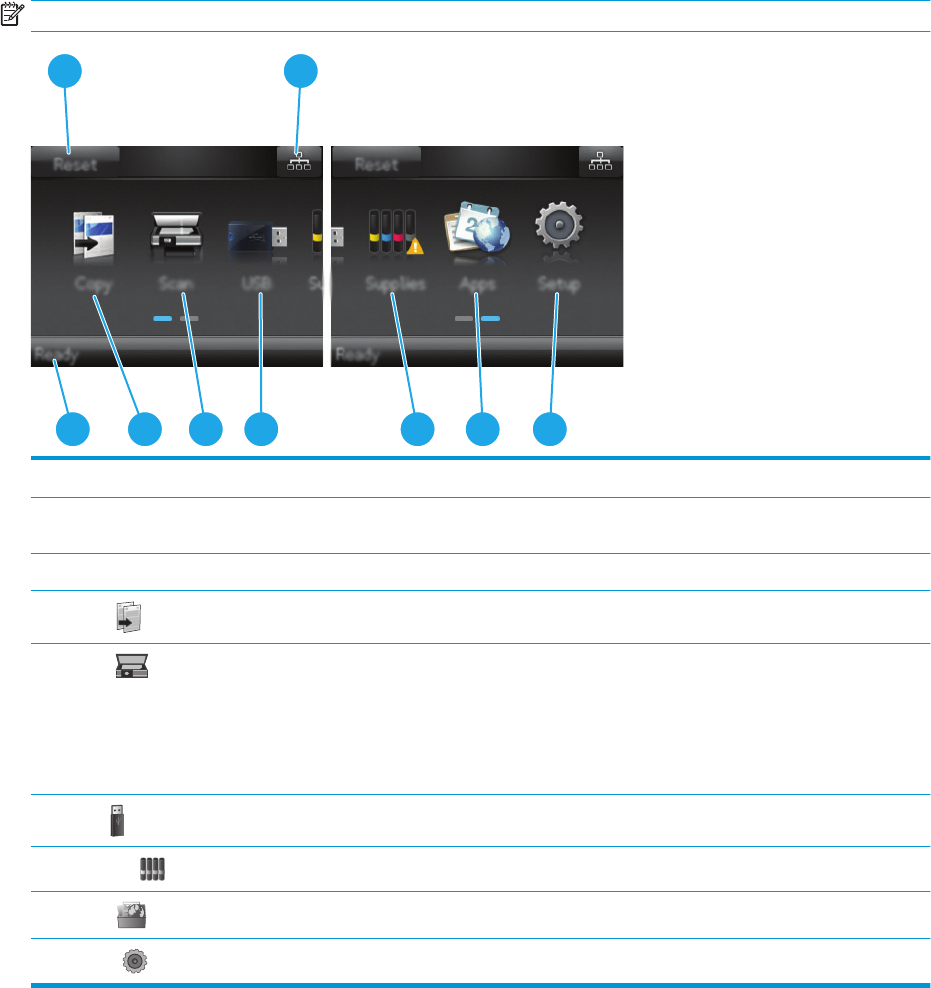
Home screen layout
The Home screen provides access to the product features and indicates the current status of the product.
Return to the Home screen at any time by touching the Home button on the product control panel.
NOTE:The features that appear on the Home screen can vary, depending on the product configuration.
12
3
4568
9
7
1Reset buttonTouch this button to reset any temporary job settings to the default product settings.
2Connection Information
button
Touch this button to open the Connection Information menu, which provides network information.
3Product statusThis screen area provides information about the overall product status.
4
Copy
button
Touch this button to open the copy feature.
5
Scan
button
Touch this button to open the scan features:
●
Scan to USB Drive
●
Scan to Network Folder
●
Scan to E-mail
6
USB
button
Touch this button to open the USB Flash Drive menu.
7
Supplies
button
Touch this button to view information about supplies status.
8
Apps
button
Touch this button to open the Apps menu to print directly from select Web applications.
9
Setup
button
Touch this button to open the Setup menu.
ENWWProduct views5
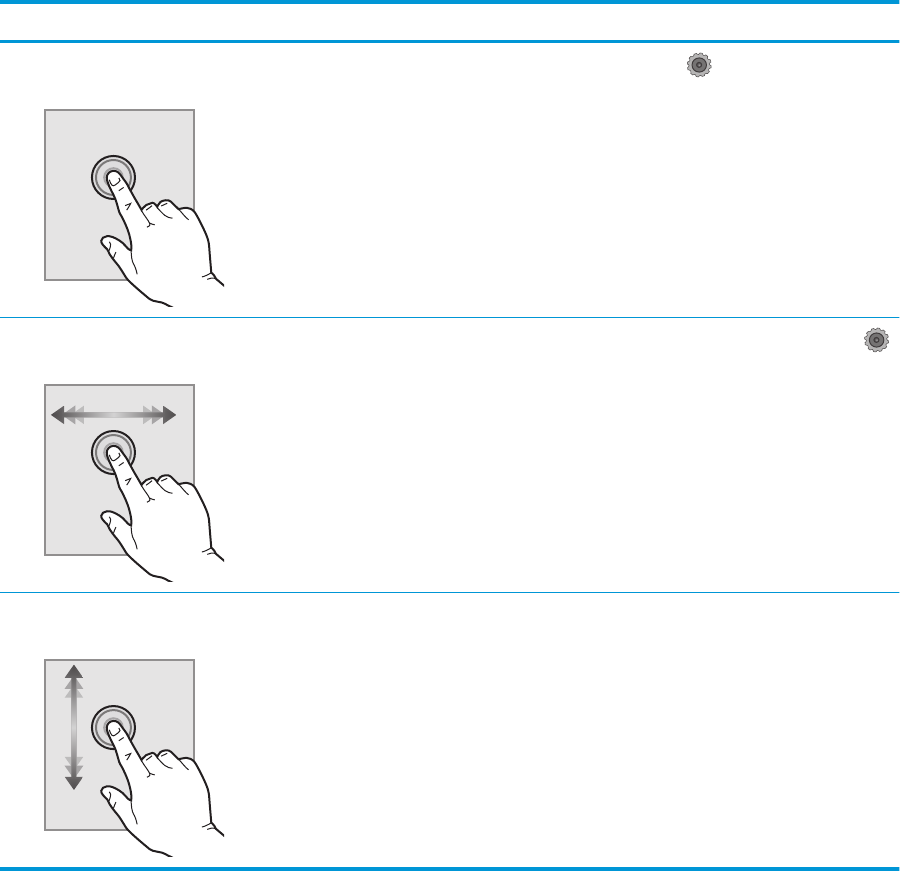
How to use the touchscreen control panel
Use the following actions to use the product touchscreen control panel.
ActionDescriptionExample
Touch
Touch an item on the screen to select that item
or open that menu. Also, when scrolling
through menus, briefly touch the screen to stop
the scrolling.
Touch the Setup
button to open the Setup
menu.
Swipe
Touch the screen and then move the finger
horizontally to scroll the screen sideways.
Swipe the Home screen to access the Setup
button.
Scroll
Touch the screen, and then, without lifting the
finger, move the finger vertically to move the
screen.
Scroll through the Setup menu.
6Chapter 1 Product overviewENWW
Product specifications
Introduction
IMPORTANT:The following specifications are correct at the time of publication, but they are subject to
change. For current information, see
www.hp.com/support/colorljM274MFP.
●
Technical specifications
●
Supported operating systems
●
Mobile printing solutions
●
Product dimensions
●
Power consumption, electrical specifications, and acoustic emissions
●
Operating-environment range
Technical specifications
Model name
Product number
M274n
M6D61A
Paper handlingSingle-sheet priority feed slot (Tray 1)
Tray 2 (150-sheet capacity)
Manual duplex printing
Connectivity10/100 Ethernet LAN connection with IPv4 and IPv6
Hi-Speed USB 2.0
Easy-access USB port
Control-panel display and inputColor touchscreen control panel
PrintPrints 18 pages per minute (ppm) on A4 and 19 ppm on letter-
size paper
Easy-access USB printing (no computer required)
Copy and Scan
NOTE:Copy and scan speeds are
subject to change. For the most
current information, go to
www.hp.com/support/
colorljM274MFP.
Copies 19 pages per minute (ppm)
Scans 26 ppm
50-page document feeder
Scan to E-mail, Scan to USB, and Scan to Network Folder
options
Supported operating systems
The following information applies to the product-specific Windows PCL 6 and OS X print drivers and to the in-
box software installation CD.
ENWWProduct specifications7
Windows: The HP Software Installer CD installs the HP PCL.6 or HP PCL 6 driver depending on the Windows
operating system along with optional software when using the full software installer.
Mac computers and OS X: Mac computers and Apple mobile devices are supported with this product. The OS
X print driver and print utility are available for download from hp.com and may also be available via Apple
Software Update. The HP installer software for OS X is not included in the in-box CD. Follow these steps to
download the OS X installer software:
1.Go to
www.hp.com/support/colorljM274MFP.
2.Select Support Options, and then under Download Options select Drivers, Software & Firmware.
3.Click the operating system version, and then click the Download button.
Operating systemDriver installedNotes
Windows® XP SP3 or later, 32-
bit
The HP PCL.6 product-specific print
driver is installed for this operating
system as part of the basic software
installation. The basic installer
installs the driver and scan
application only.
The full software installation is not supported for this
operating system.
Use UPD drivers for 64-bit operating systems.
Microsoft retired mainstream support for Windows XP in
April 2009. HP will continue to provide best-effort support
for the discontinued XP operating system.
Windows Vista®, 32-bitThe HP PCL.6 product-specific print
driver is installed for this operating
system as part of the basic software
installation. The basic installer
installs the driver only.
The full software installation is not supported for this
operating system.
Use UPD drivers for 64-bit operating systems.
Windows Server 2003 SP2 or
later, 32-bit
The HP PCL.6 product-specific print
driver is installed for this operating
system as part of the basic software
installation. The basic installer
installs the driver only.
The full software installation is not supported for this
operating system.
Use UPD drivers for 64-bit operating systems.
Microsoft retired mainstream support for Windows Server
2003 in July 2010. HP will continue to provide best-effort
support for the discontinued Server 2003 operating
system.
Windows 7 SP1 or later, 32-bit
and 64-bit
The HP PCL 6 product-specific print
driver is installed for this operating
system as part of the full software
installation.
Windows 8, 32-bit and 64-bitThe HP PCL 6 product-specific print
driver is installed for this operating
system as part of the full software
installation.
Windows 8 RT support is provided through Microsoft IN OS
Version 4, 32- bit driver.
Windows 8.1, 32-bit and 64-bitThe HP PCL 6 product-specific print
driver is installed for this operating
system as part of the full software
installation.
Windows 8.1 RT support is provided through Microsoft IN
OS Version 4, 32- bit driver.
Windows Server 2008 SP2, 32-
bit
The HP PCL.6 product-specific print
driver is installed for this operating
system as part of the basic software
installation.
Windows Server 2008 SP2, 64-
bit
The HP PCL 6 product-specific print
driver is installed for this operating
system as part of the basic software
installation.
8Chapter 1 Product overviewENWW
Operating systemDriver installedNotes
Windows Server 2008 R2, SP 1,
64-bit
The HP PCL 6 product-specific print
driver is installed for this operating
system as part of the basic software
installation.
Windows Server 2012, 64-bitThe software installer does not
support Windows Server 2012 but
the HP PCL 6 and HP PCL-6 version 4
product-specific print drivers do
support it.
Download the driver from the HP Web site
www.hp.com/
support/colorljM274MFP, and use the Windows Add Printer
tool to install it.
Windows Server 2012 R2, 64 bitThe software installer does not
support Windows Server 2012 but
the HP PCL 6 and HP PCL-6 version 4
product-specific print drivers do
support it.
Download the driver from the HP Web site
www.hp.com/
support/colorljM274MFP, and use the Windows Add Printer
tool to install it.
OS X 10.7 Lion, OS X 10.8
Mountain Lion, and OS X 10.9
Mavericks
The OS X print driver and print utility
are available for download from
hp.com and may also be available
via Apple Software Update. The HP
installer software for OS X is not
included in the in-box CD.
For OS X, download the full installer from the support Web
site for this product.
1.Go to
www.hp.com/support/colorljM274MFP.
2.Select Support Options, and then under Download
Options select Drivers, Software & Firmware.
3.Click the operating system version, and then click the
Download button.
NOTE:For a current list of supported operating systems, go to www.hp.com/support/colorljM274MFP for
HP's all-inclusive help for the product.
NOTE:For details on client and server operating systems and for HP UPD PCL6, UPD PCL 5, and UPD PS
driver support for this product, go to
www.hp.com/go/upd and click the Specifications tab.
Mobile printing solutions
The product supports the following software for mobile printing:
●
HP ePrint software
NOTE:The HP ePrint Software supports the following operating systems: Windows 7 SP 1 (32-bit and
64-bit); Windows 8 (32-bit and 64-bit); Windows 8.1 (32-bit and 64-bit); and OS X versions 10.6 Snow
Leopard, 10.7 Lion, 10.8 Mountain Lion, and 10.9 Mavericks.
●
HP ePrint via email (Requires HP Web Services to be enabled and the product to be registered with
HP Connected)
●
HP ePrint app (Available for Android, iOS, and Blackberry)
●
ePrint Enterprise app (Supported on all products with ePrint Enterprise Server Software)
●
HP All-in-One Remote app for iOS and Android devices
●
Google Cloud Print
●
AirPrint
●
Android Printing
ENWWProduct specifications9
Product dimensions
Figure 1-1 Dimensions for the M274n
1
1
3
3
2
2
Product fully closedProduct fully open
1. Height322.2 mm (12.7 in)578 mm (22.8 in)
2. Depth384 mm (15.1 in)849 mm (33.4 in)
3. Width392 mm (15.4 in)392 mm (15.4 in)
Weight (with cartridges)17.4 kg (38.4 lb)
Power consumption, electrical specifications, and acoustic emissions
See www.hp.com/support/colorljM274MFP for current information.
CAUTION:Power requirements are based on the country/region where the product is sold. Do not convert
operating voltages. This will damage the product and void the product warranty.
Operating-environment range
Table 1-1 Operating-environment specifications
EnvironmentRecommendedAllowed
Temperature17° to 27°C (62.6° to 80.6°F)15° to 30°C (59° to 86°F)
Relative humidity30% to 70% relative humidity (RH)10% to 80% RH
AltitudeNot applicable0 to 3048 m (0 to 10,000 ft)
10Chapter 1 Product overviewENWW
Product hardware setup and software installation
For basic setup instructions, see the Hardware Installation Guide that came with the product. For additional
instructions, go to HP support on the Web.
Go to
www.hp.com/support/colorljM274MFP for HP's all-inclusive help for the product. Find the following
support:
●
Install and configure
●
Learn and use
●
Solve problems
●
Download software updates
●
Join support forums
●
Find warranty and regulatory information
ENWWProduct hardware setup and software installation11
12Chapter 1 Product overviewENWW
2Paper trays
●
Load paper into the single-sheet slot (Tray 1)
●
Load paper into Tray 2
For more information:
Go to
www.hp.com/support/colorljM274MFP.
HP's all-inclusive help for the product includes the following information:
●
Install and configure
●
Learn and use
●
Solve problems
●
Download software updates
●
Join support forums
●
Find warranty and regulatory information
ENWW13
Load paper into the single-sheet slot (Tray 1)
Introduction
Use the single-sheet priority feed slot to print single-page documents, documents that require multiple
paper types, or envelopes.
●
Load paper into the single-sheet priority feed slot
●
Load an envelope in the single-sheet priority feed slot (Tray 1)
●
Tray 1 paper orientation
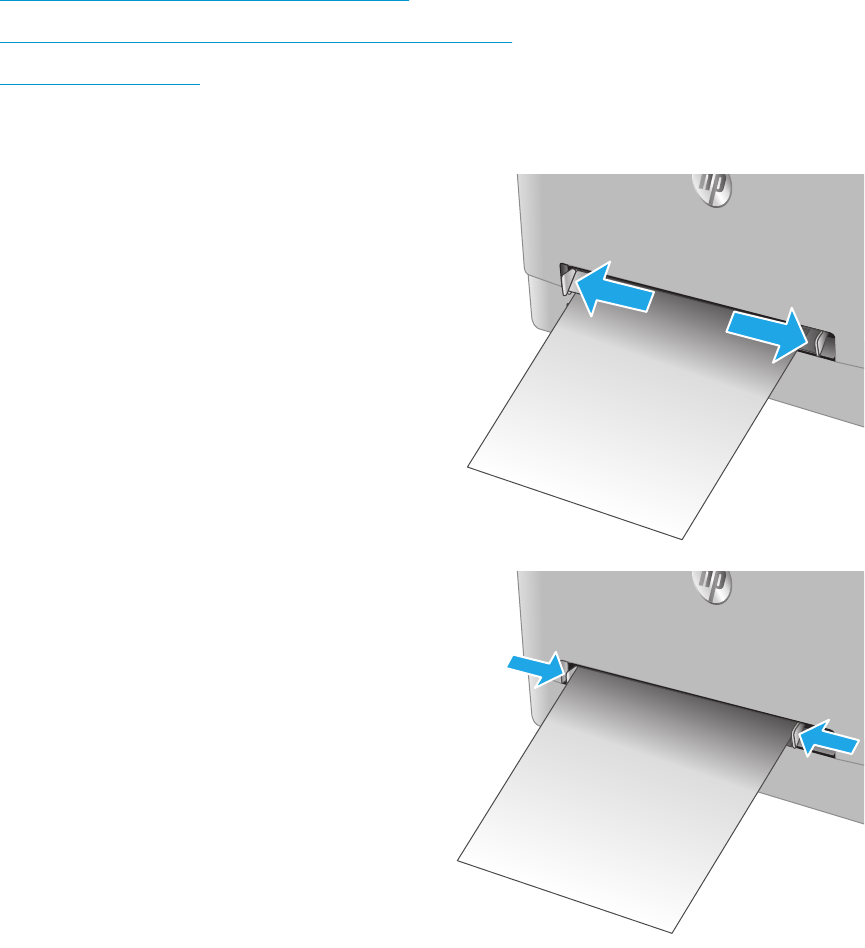
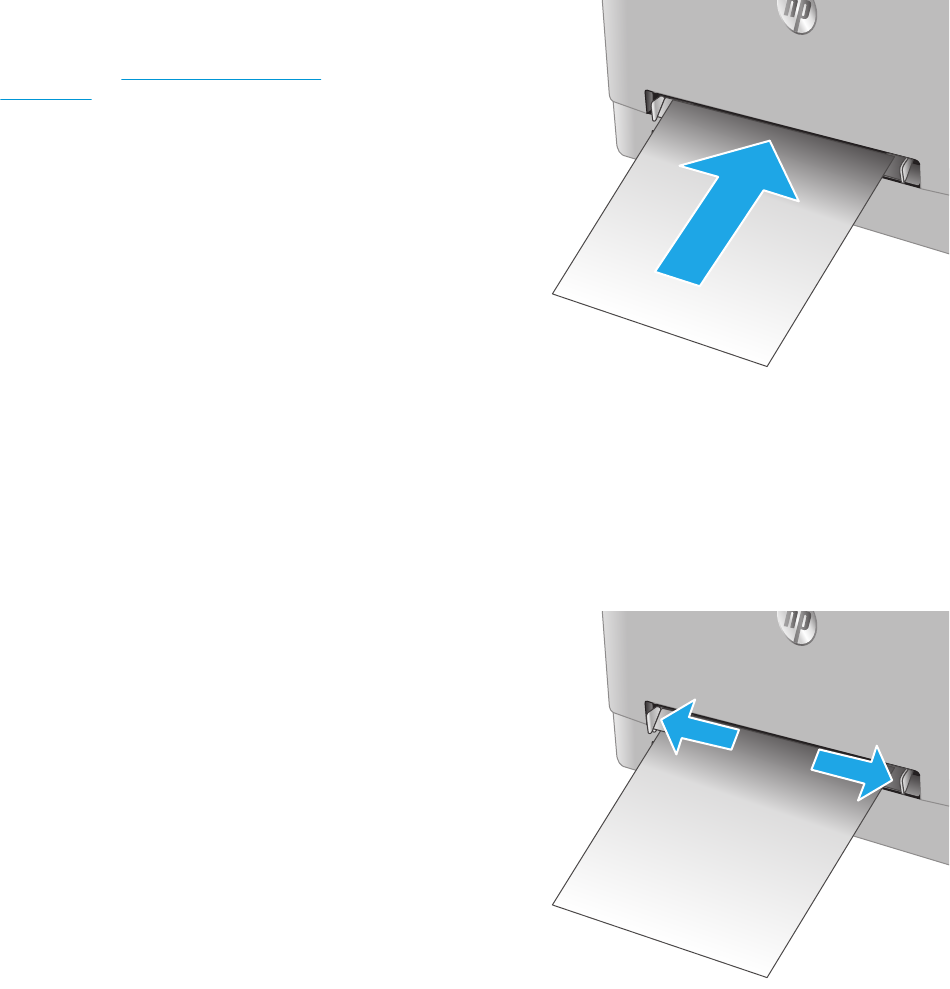
Load paper into the single-sheet priority feed slot
1.Move the paper width guides in the single-sheet
priority feed slot outward.
2.Place the top edge of the sheet at the opening,
and then adjust the side guides so that they
lightly touch the sheet, but do not bend it.
14Chapter 2 Paper traysENWW
3.Insert the single sheet into the slot and hold it.
The product will pull the sheet partially into the
paper path. For information about how to orient
the paper, see
Tray 1 paper orientation
on page 17.
NOTE:Depending on the size of the paper, you
might need to support the sheet with two hands
until the sheet advances into the product.
4.At the computer, begin the printing process from
the software application. Make sure that the
driver is set to the correct paper type and size for
the paper being printed from the single-sheet
priority feed slot.
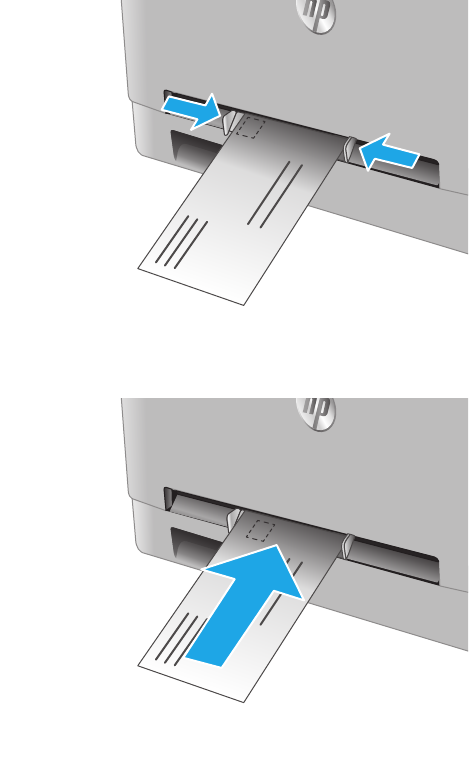
Load an envelope in the single-sheet priority feed slot (Tray 1)
1.Move the paper width guides in the single-sheet
priority feed slot outward.
ENWWLoad paper into the single-sheet slot (Tray 1)15
2.Place the right edge of the envelope, face-up, at
the opening, and then adjust the side guides so
that they lightly touch the envelope, but do not
bend it.
3.Insert the envelope into the slot and hold it. The
product will pull the envelope partially into the
paper path..
NOTE:Depending on the size of the envelope,
you might need to support it with two hands until
the envelope advances into the product.
4.At the computer, begin the printing process from
the software application. Make sure that the
driver is set to the correct paper type and size for
the envelope being printed from the single-sheet
priority feed slot.
16Chapter 2 Paper traysENWW
Tray 1 paper orientation
When using paper that requires a specific orientation, load it according to the information in the following
table.
Paper typeOutputHow to load paper
Letterhead or preprinted1-sided printingFace-up
Top edge leading into the product
123
Letterhead or preprinted2-sided printingFace-down
Top edge away from the product
123
Prepunched1-sided printing or 2-sided printingFace-up
Holes toward the left side of the product
ENWWLoad paper into the single-sheet slot (Tray 1)17
Load paper into Tray 2
Introduction
The following information describes how to load paper in Tray 2.
●
Load paper into Tray 2
●
Load envelopes in Tray 2
●
Tray 2 paper orientation
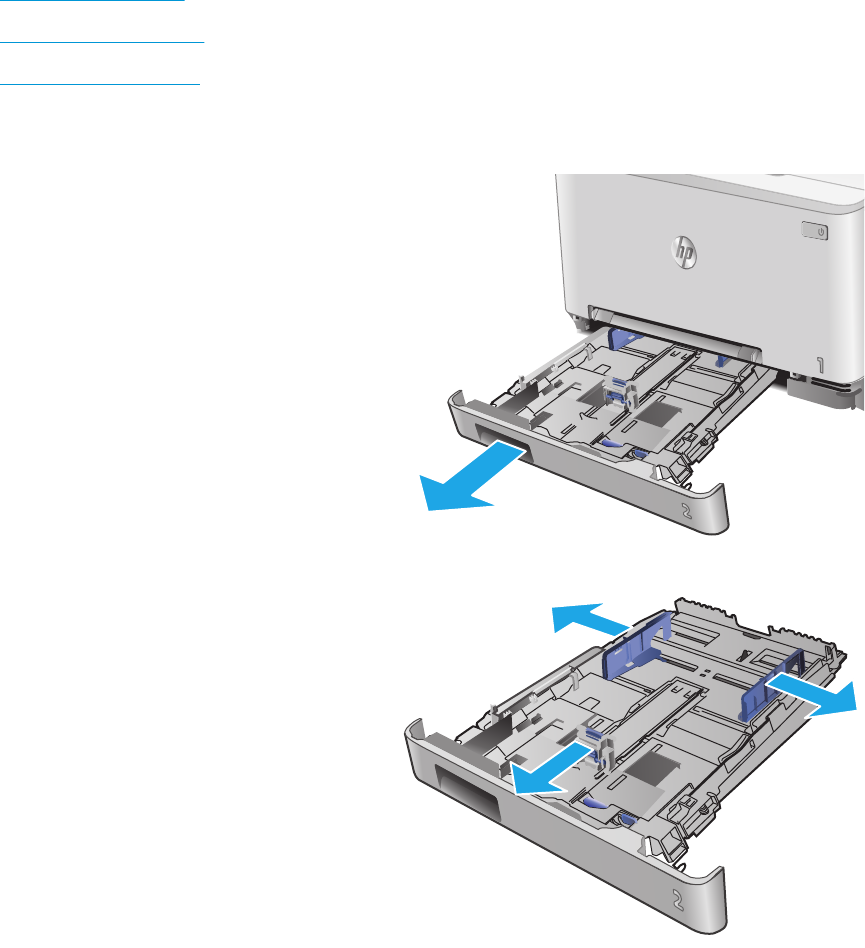
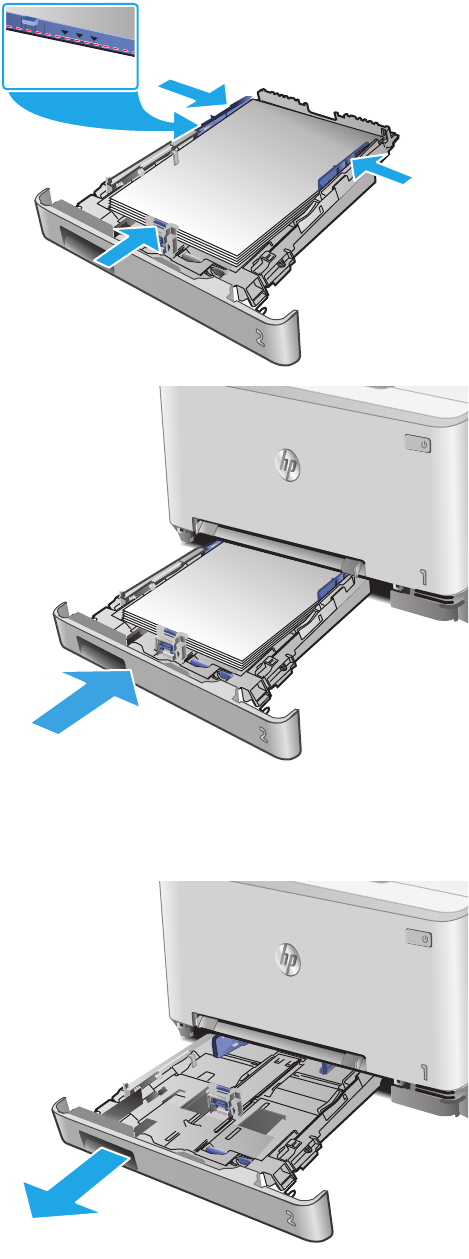
Load paper into Tray 2
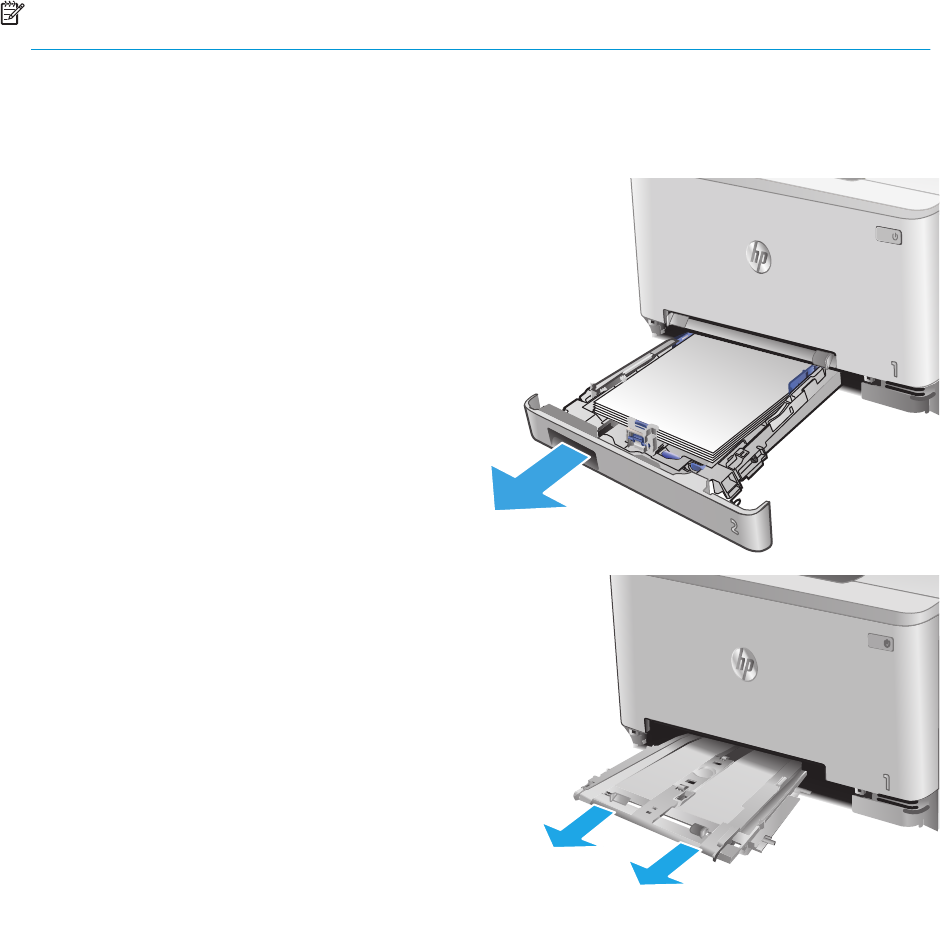
1.Open the tray.
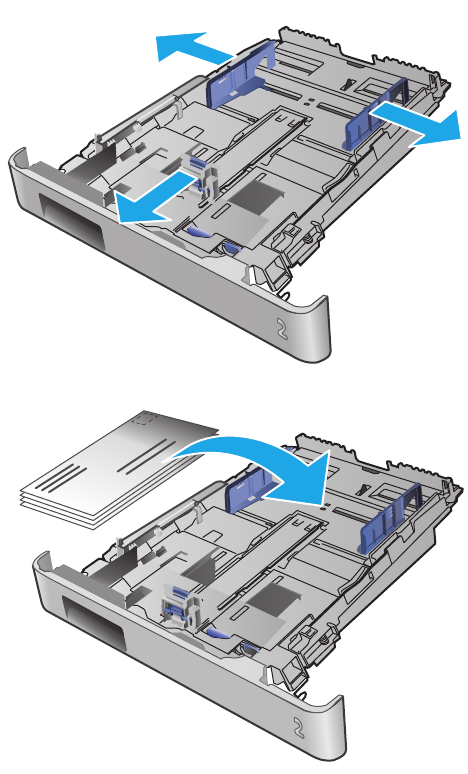
2.Adjust the paper guides by sliding the guides to
the size of the paper being used.
18Chapter 2 Paper traysENWW
3.To load legal-size paper, extend the tray front by
pressing the blue latch and pulling the front of
the tray.
NOTE:When loaded with legal-size paper,
Tray 2 extends from the front of the product
approximately 51 mm (2 in).
4.Load paper into the tray.
ENWWLoad paper into Tray 219
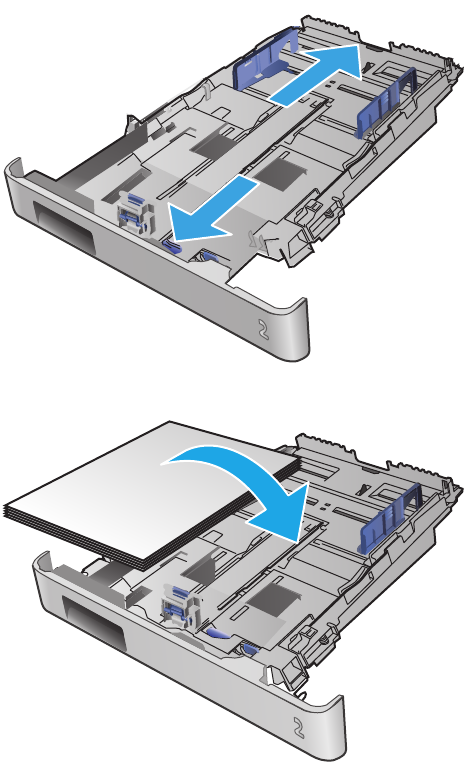
5.Make sure that the paper stack is flat at all four
corners. Slide the paper length and width guides
so that they are against the stack of paper.
NOTE:To prevent jams, do not overfill the tray.
Be sure that the top of the stack is below the tray
full indicator.
6.After making sure that the paper stack is below
the tray full indicator, close the tray.
Load envelopes in Tray 2
1.Open the tray.
20Chapter 2 Paper traysENWW
2.Adjust the paper guides by sliding the guides to
the size of the envelopes being used.
3.Load envelopes into the tray.
ENWWLoad paper into Tray 221
4.Make sure that the envelope stack is flat at all
four corners. Slide the length and width guides so
that they are against the stack.
NOTE:To prevent jams, do not overfill the tray.
Be sure that the top of the stack is below the tray
full indicator.
CAUTION:Loading more than five envelopes in
Tray 2 can result in jams.
5.After making sure that the stack is below the tray
full indicator, close the tray.
22Chapter 2 Paper traysENWW
Tray 2 paper orientation
When using paper that requires a specific orientation, load it according to the information in the following
table.
Paper typeOutputHow to load paper
Letterhead or preprinted1-sided printingFace-up
Top edge toward the product
123
Letterhead or preprinted2-sided printingFace-down
Top edge away from the product
123
Prepunched1-sided printing or 2-sided printingFace-up
Holes toward the left side of the product
ENWWLoad paper into Tray 223
24Chapter 2 Paper traysENWW
3Supplies, accessories, and parts
●
Order supplies, accessories, and parts
●
Replace the toner cartridges
For more information:
Go to
www.hp.com/support/colorljM274MFP.
HP's all-inclusive help for the product includes the following information:
●
Install and configure
●
Learn and use
●
Solve problems
●
Download software updates
●
Join support forums
●
Find warranty and regulatory information
ENWW25
Order supplies, accessories, and parts
Ordering
Order supplies and paperwww.hp.com/go/suresupply
Order genuine HP parts or accessories
www.hp.com/buy/parts
Order through service or support providersContact an HP-authorized service or support provider.
Order using the HP Embedded Web Server (EWS)To access, in a supported Web browser on the computer, enter
the product IP address or host name in the address/URL field. The
EWS contains a link to the HP SureSupply Web site, which
provides options for purchasing Original HP supplies.
Supplies and accessories
ItemDescriptionCartridge numberPart number
Supplies
HP 201A Black Original LaserJet Toner
Cartridge
Standard-capacity replacement black toner
cartridge
201ACF400A
HP 201X High Yield Black Original
LaserJet Toner Cartridge
High-capacity replacement black toner
cartridge
201XCF400X
HP 201A Cyan Original LaserJet Toner
Cartridge
Standard-capacity replacement cyan toner
cartridge
201ACF401A
HP 201X High Yield Cyan Original
LaserJet Toner Cartridge
High-capacity replacement cyan toner
cartridge
201XCF401X
HP 201A Yellow Original LaserJet
Toner Cartridge
Standard-capacity replacement yellow toner
cartridge
201ACF402A
HP 201X High Yield Yellow Original
LaserJet Toner Cartridge
High-capacity replacement yellow toner
cartridge
201XCF402X
HP 201A Magenta Original LaserJet
Toner Cartridge
Standard-capacity replacement magenta
toner cartridge
201ACF403A
HP 201X High Yield Magenta Original
LaserJet Toner Cartridge
High-capacity replacement magenta toner
cartridge
201XCF403X
Accessories
USB 2.0 printer cableA-to-B cable (2-meter standard)C6518A
Customer self-repair parts
Customer Self-Repair (CSR) parts are available for many HP LaserJet products to reduce repair time. More
information about the CSR program and benefits can be found at
www.hp.com/go/csr-support and
www.hp.com/go/csr-faq.
Genuine HP replacement parts can be ordered at
www.hp.com/buy/parts or by contacting an HP-authorized
service or support provider. When ordering, one of the following will be needed: part number, serial number
(found on back of printer), product number, or product name.
26Chapter 3 Supplies, accessories, and partsENWW
●
Parts listed as Mandatory self-replacement are to be installed by customers, unless you are willing to
pay HP service personnel to perform the repair. For these parts, on-site or return-to-depot support is
not provided under the HP product warranty.
●
Parts listed as Optional self-replacement can be installed by HP service personnel at your request for
no additional charge during the product warranty period.
ItemDescriptionSelf-replacement
options
Part number
Single-sheet priority feed slot trayReplacement tray for single-sheet priority feed
slot (Tray 1)
MandatoryRM2-5865-000
150-sheet paper input trayReplacement cassette for Tray 2MandatoryRM2-5886-000
ENWWOrder supplies, accessories, and parts27
Replace the toner cartridges
Introduction
This product indicates when the toner cartridge level is low. The actual toner cartridge life remaining can
vary. Consider having a replacement cartridge available to install when print quality is no longer acceptable.
To purchase cartridges or check cartridge compatibility for the product, go to HP SureSupply at
www.hp.com/
go/suresupply. Scroll to the bottom of the page and verify that the country/region is correct.
The product uses four colors and has a different toner cartridge for each color: yellow (Y), magenta (M), cyan
(C), and black (K). The toner cartridges are inside the front door.
ItemDescriptionCartridge numberPart number
HP 201A Black Original LaserJet Toner
Cartridge
Standard-capacity replacement black
toner cartridge
201ACF400A
HP 201X High Yield Black Original LaserJet
Toner Cartridge
High-capacity replacement black toner
cartridge
201XCF400X
HP 201A Cyan Original LaserJet Toner
Cartridge
Standard-capacity replacement cyan toner
cartridge
201ACF401A
HP 201X High Yield Cyan Original LaserJet
Toner Cartridge
High-capacity replacement cyan toner
cartridge
201XCF401X
HP 201A Yellow Original LaserJet Toner
Cartridge
Standard-capacity replacement yellow
toner cartridge
201ACF402A
HP 201X High Yield Yellow Original
LaserJet Toner Cartridge
High-capacity replacement yellow toner
cartridge
201XCF402X
HP 201A Magenta Original LaserJet Toner
Cartridge
Standard-capacity replacement magenta
toner cartridge
201ACF403A
HP 201X High Yield Magenta Original
LaserJet Toner Cartridge
High-capacity replacement magenta toner
cartridge
201XCF403X
Do not remove the toner cartridge from its package until it is time to install it.
CAUTION:To prevent damage to the toner cartridge, do not expose it to light for more than a few minutes.
If the toner cartridge must be removed from the product for an extended period of time, place the cartridge
in the original plastic packaging, or cover the cartridge with a light-weight, opaque item.
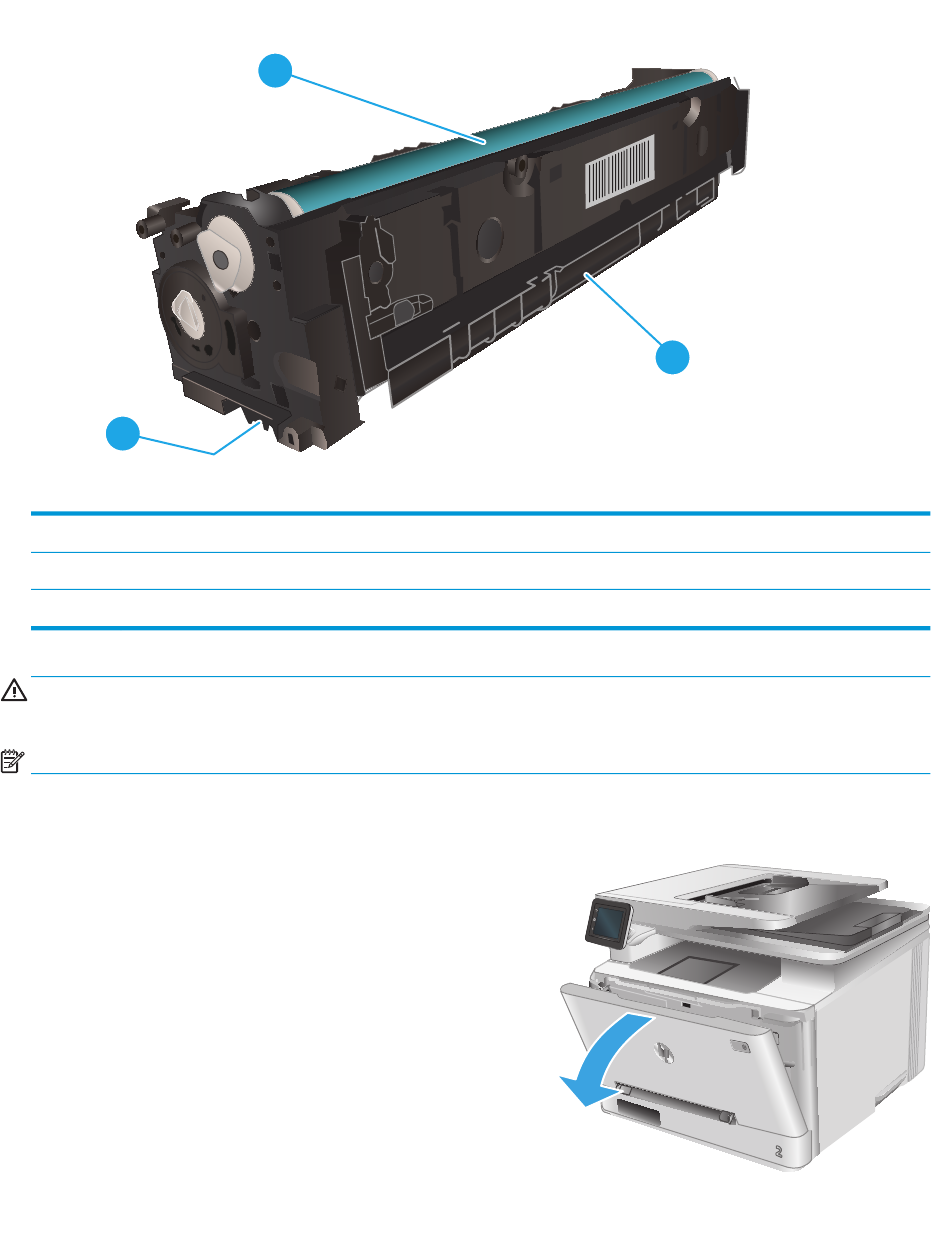
The following illustration shows the toner-cartridge components.
28Chapter 3 Supplies, accessories, and partsENWW
2
1
3
1Handle
2Imaging drum
3Memory chip
CAUTION:If toner gets on clothing, wipe it off by using a dry cloth and wash the clothes in cold water. Hot
water sets toner into fabric.
NOTE:Information about recycling used toner cartridges is in the toner cartridge box.
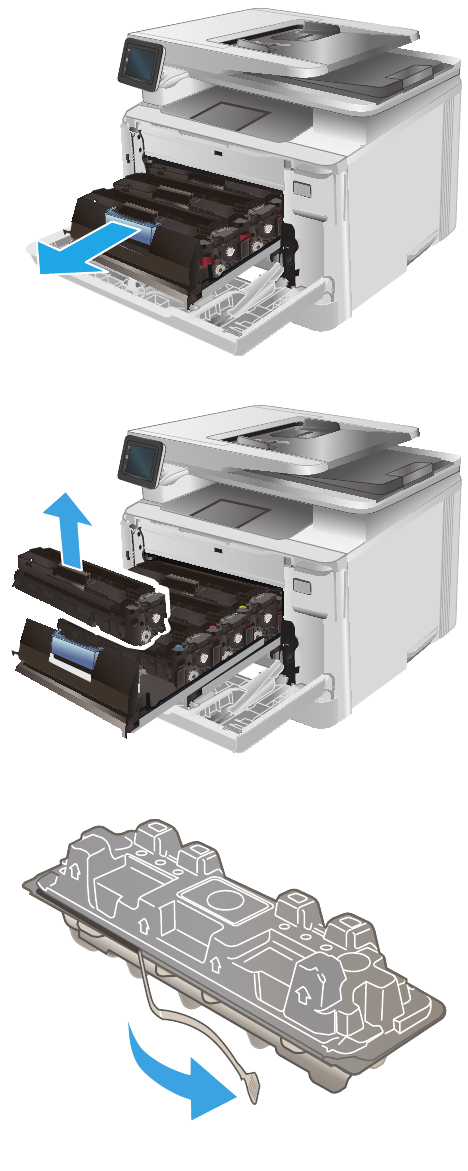
Remove and replace the toner cartridges
1.Open the front door.
ENWWReplace the toner cartridges29
2.Grasp the blue handle on the toner cartridge
drawer, and then pull out the drawer.
3.Grasp the handle on the toner cartridge, and then
pull the toner cartridge straight up to remove it.
4.Remove the new toner cartridge package from
the box, and then pull the release tab on the
packaging.
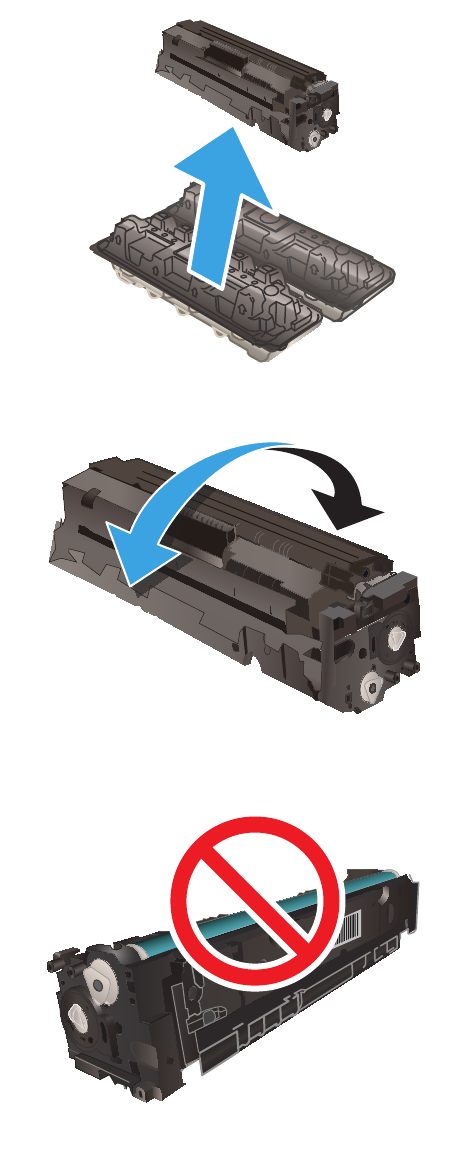
30Chapter 3 Supplies, accessories, and partsENWW
5.Remove the toner cartridge from the opened
packaging shell.
6.Gently rock the toner cartridge from front to back
to distribute the toner evenly inside the cartridge.
7.Do not touch the imaging drum on the bottom of
the toner cartridge. Fingerprints on the imaging
drum can cause print-quality problems.
ENWWReplace the toner cartridges31
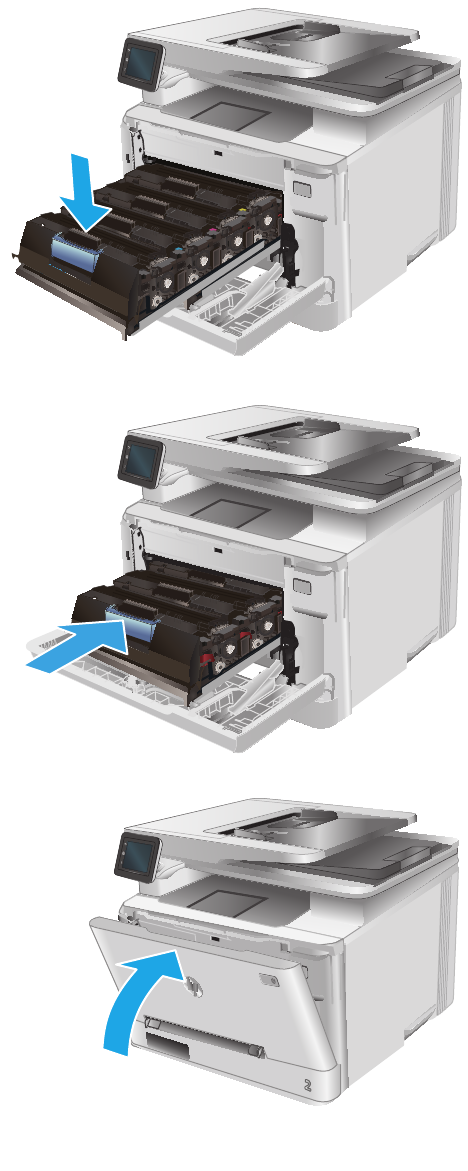
8.Insert the new toner cartridge into the drawer.
Make sure that the color chip on the cartridge
matches the color chip on the drawer.
9.Close the toner cartridge drawer.
10.Close the front door.
32Chapter 3 Supplies, accessories, and partsENWW
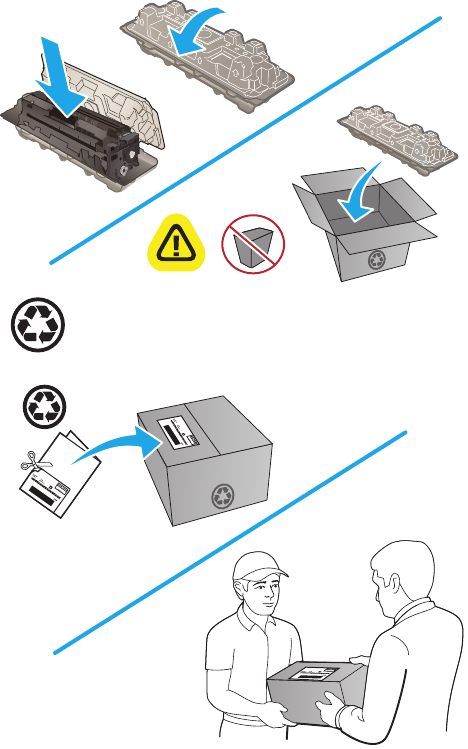
11.Place the used toner cartridge in the packaging
from the new cartridge.
http://www.hp.com/recycle
12.Use the pre-paid self-addressed label to return
the used cartridge to HP for recycling (where
available).
ENWWReplace the toner cartridges33
34Chapter 3 Supplies, accessories, and partsENWW
4Print
●
Print tasks (Windows)
●
Print tasks (OS X)
●
Mobile printing
●
Use walk-up USB printing
For more information:
Go to
www.hp.com/support/colorljM274MFP.
HP's all-inclusive help for the product includes the following information:
●
Install and configure
●
Learn and use
●
Solve problems
●
Download software updates
●
Join support forums
●
Find warranty and regulatory information
ENWW35
Print tasks (Windows)
How to print (Windows)
The following procedure describes the basic printing process for Windows.
1.From the software program, select the Print option.
2.Select the product from the list of printers. To change settings, click or tap the Properties or
Preferences button to open the print driver.
NOTE:The name of the button varies for different software programs.
NOTE:To access these features from a Windows 8 or 8.1 Start screen, select Devices, select Print,
and then select the printer.
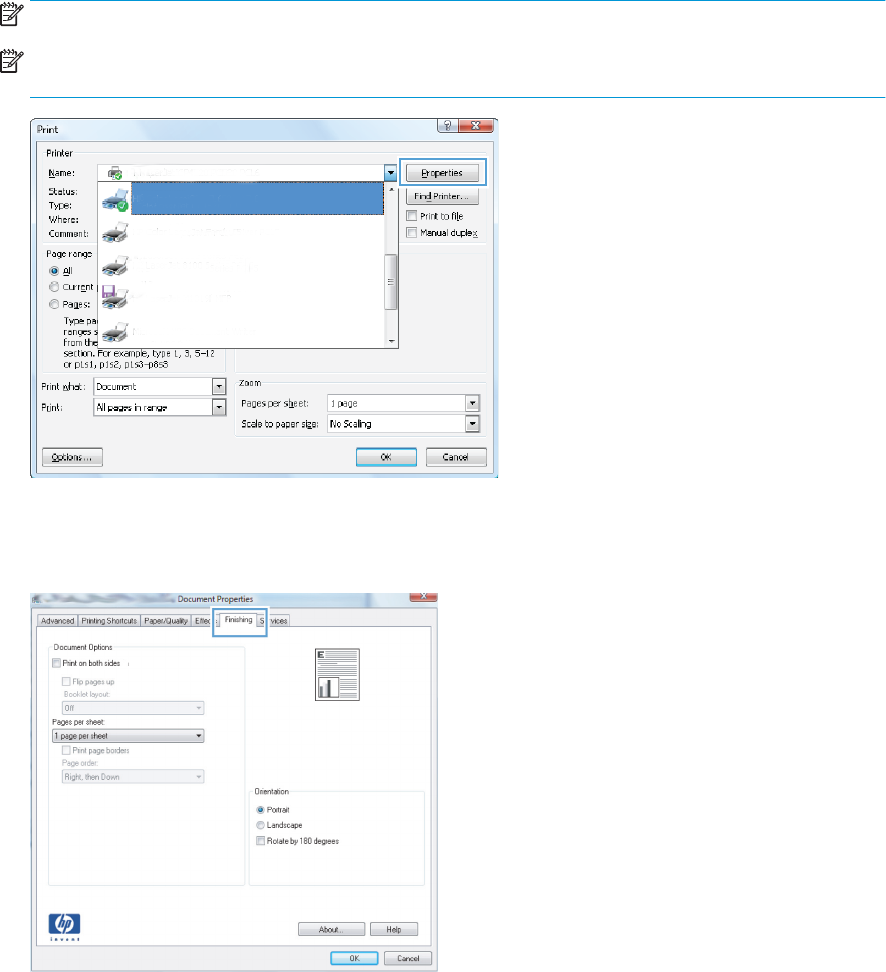
3.Click or tap the tabs in the print driver to configure the available options. For example, set the paper
orientation on the Finishing tab, and set the paper source, paper type, paper size, and quality settings
on the Paper/Quality tab.
36Chapter 4 PrintENWW
4.Click or tap the OK button to return to the Print dialog box. Select the number of copies to print from
this screen.
5.Click or tap the OK button to print the job.
Manually print on both sides (Windows)
Use this procedure for products that do not have an automatic duplexer installed or to print on paper that the
duplexer does not support.
1.From the software program, select the Print option.
2.Select the product from the list of printers, and then click or tap the Properties or Preferences button
to open the print driver.
NOTE:The name of the button varies for different software programs.
NOTE:To access these features from a Windows 8 or 8.1 Start screen, select Devices, select Print,
and then select the printer.
3.Click or tap the Finishing tab.
4.Select the Print on both sides (manually) check box. Click the OK button to print the first side of the
job.
5.Retrieve the printed stack from the output bin, and place it in Tray 1.
6.If prompted, touch the appropriate control panel button to continue.
ENWWPrint tasks (Windows)37
Print multiple pages per sheet (Windows)
1.From the software program, select the Print option.
2.Select the product from the list of printers, and then click or tap the Properties or Preferences button
to open the print driver.
NOTE:The name of the button varies for different software programs.
NOTE:To access these features from a Windows 8 or 8.1 Start screen, select Devices, select Print,
and then select the printer.
3.Click or tap the Finishing tab.
4.Select the number of pages per sheet from the Pages per sheet drop-down list.
5.Select the correct Print page borders, Page order, and Orientation options. Click the OK button to close
the Document Properties dialog box.
6.In the Print dialog box, click the OK button to print the job.
Select the paper type (Windows)
1.From the software program, select the Print option.
2.Select the product from the list of printers, and then click or tap the Properties or Preferences button
to open the print driver.
NOTE:The name of the button varies for different software programs.
NOTE:To access these features from a Windows 8 or 8.1 Start screen, select Devices, select Print,
and then select the printer.
3.Click or tap the Paper/Quality tab.
4.From the Paper type drop-down list, select the paper type that best describes the paper being used,
and then click the OK button..
5.Click the OK button to close the Document Properties dialog box. In the Print dialog box, click the OK
button to print the job.
38Chapter 4 PrintENWW
Print tasks (OS X)
How to print (OS X)
The following procedure describes the basic printing process for OS X.
1.Click the File menu, and then click the Print option.
2.Select the product.
3.Click Show Details, and then select other menus to adjust the print settings.
4.Click the Print button.
Manually print on both sides (OS X)
NOTE:This feature is available if you install the HP print driver. It might not be available if you are using
AirPrint.
1.Click the File menu, and then click the Print option.
2.Select the product.
3.Click Show Details, and then click the Manual Duplex menu.
4.Click the Manual Duplex box, and select a binding option.
5.Click the Print button.
6.Go to the product, and remove any blank paper that is in Tray 1.
7.Retrieve the printed stack from the output bin and place it with the printed-side facing down in the input
tray.
8.If prompted, touch the appropriate control panel button to continue.
Print multiple pages per sheet (OS X)
1.Click the File menu, and then click the Print option.
2.Select the product.
3.Click Show Details, and then click the Layout menu.
4.From the Pages per Sheet drop-down list, select the number of pages that you want to print on each
sheet.
5.In the Layout Direction area, select the order and placement of the pages on the sheet.
6.From the Borders menu, select the type of border to print around each page on the sheet.
7.Click the Print button.
Select the paper type (OS X)
1.Click the File menu, and then click the Print option.
2.Select the product.
ENWWPrint tasks (OS X)39
3.Click Show Details, and then click the Media & Quality menu or the Paper/Quality menu.
4.Select a type from the Media-type drop-down list.
5.Click the Print button.
40Chapter 4 PrintENWW
Mobile printing
Introduction
HP offers multiple Mobile and ePrint solutions to enable wireless printing to an HP printer from a laptop,
tablet, smartphone, or other mobile device. To see the full list and to determine the best choice, go to
Gebruikershandleiding.com neemt misbruik van zijn services uitermate serieus. U kunt hieronder aangeven waarom deze vraag ongepast is. Wij controleren de vraag en zonodig wordt deze verwijderd.
Product:
Spelregels forum
Om tot zinvolle vragen te komen hanteren wij de volgende spelregels:
lees eerst de handleiding door;
controleer of uw vraag al eerder door iemand anders is gesteld;
probeer uw vraag zo duidelijk mogelijk te stellen;
heeft u een probleem en al geprobeerd om dit op te lossen, vermeld dit erbij aub;
heeft u een oplossing gekregen van een bezoeker dan horen wij dat graag in dit forum;
wilt u een reactie geven op een vraag of antwoord, gebruik dan niet dit formulier maar klik op de knop 'reageer op deze vraag';
uw vraag wordt direct op de website gezet; vermijd daarom persoonlijke gegevens in te vullen;
Belangrijk! Als er een antwoord wordt gegeven op uw vraag, dan is het voor de gever van het antwoord nuttig om te weten als u er wel (of niet) mee geholpen bent! Wij vragen u dus ook te reageren op een antwoord.
Belangrijk! Antwoorden worden ook per e-mail naar abonnees gestuurd. Laat uw emailadres achter op deze site, zodat u op de hoogte blijft. U krijgt dan ook andere vragen en antwoorden te zien.
Abonneren
Abonneer u voor het ontvangen van emails voor uw HP Color LaserJet Pro MFP M274 bij:
nieuwe vragen en antwoorden
nieuwe handleidingen
U ontvangt een email met instructies om u voor één of beide opties in te schrijven.
Ontvang uw handleiding per email
Vul uw emailadres in en ontvang de handleiding van HP Color LaserJet Pro MFP M274 in de taal/talen: Engels als bijlage per email.
De handleiding is 5,27 mb groot.
U ontvangt de handleiding per email binnen enkele minuten. Als u geen email heeft ontvangen, dan heeft u waarschijnlijk een verkeerd emailadres ingevuld of is uw mailbox te vol. Daarnaast kan het zijn dat uw internetprovider een maximum heeft aan de grootte per email. Omdat hier een handleiding wordt meegestuurd, kan het voorkomen dat de email groter is dan toegestaan bij uw provider.
Stel vragen via chat aan uw handleiding
Stel uw vraag over deze PDF
Andere handleiding(en) van HP Color LaserJet Pro MFP M274
Uw handleiding is per email verstuurd. Controleer uw email
Als u niet binnen een kwartier uw email met handleiding ontvangen heeft, kan het zijn dat u een verkeerd emailadres heeft ingevuld of dat uw emailprovider een maximum grootte per email heeft ingesteld die kleiner is dan de grootte van de handleiding.
Er is een email naar u verstuurd om uw inschrijving definitief te maken.
Controleer uw email en volg de aanwijzingen op om uw inschrijving definitief te maken
U heeft geen emailadres opgegeven
Als u de handleiding per email wilt ontvangen, vul dan een geldig emailadres in.
Uw vraag is op deze pagina toegevoegd
Wilt u een email ontvangen bij een antwoord en/of nieuwe vragen? Vul dan hier uw emailadres in.