512101
47
Verklein
Vergroot
Pagina terug
1/334
Pagina verder
HP Color LaserJet 2820/2830/2840
User Guide
HP Color LaserJet 2820/2830/2840 all-in-one
User Guide
Copyright and License
© 2004 Copyright Hewlett-Packard
Development Company, LP
Reproduction, adaptation, or translation
without prior written permission is
prohibited, except as allowed under the
copyright laws.
The information contained in this document
is subject to change without notice.
The only warranties for HP products and
services are set forth in the express
warranty statements accompanying such
products and services. Nothing herein
should be construed as constituting an
additional warranty. HP shall not be liable
for technical or editorial errors or omissions
contained herein.
Part number Q3948-90901
Edition 1, 12/2004
FCC Requirements (United States)
This equipment has been tested and found
to comply with the limits for a Class B
digital device, pursuant to Part 15 of the
FCC rules. These limits are designed to
provide reasonable protection against
harmful interference in a residential
installation. This equipment generates,
uses, and can radiate radio frequency
energy. If not installed and used in
accordance with the instructions, it may
cause harmful interference to radio
communications. However, there is no
guarantee that interference will not occur in
a particular installation. If this equipment
does cause harmful interference to radio or
television reception, which can be
determined by turning the equipment off
and on, the user is encouraged to try to
correct the interference by one or more of
the following measures:
Reorient or relocate the receiving antenna.
Increase separation between equipment
and receiver.
Connect equipment to an outlet on a circuit
different from that to which the receiver is
located.
Consult your dealer or an experienced
radio/TV technician.
Any changes or modifications to the printer
that are not expressly approved by HP
could void the user’s authority to operate
this equipment.
Use of a shielded interface cable is
required to comply with the Class B limits
of Part 15 of FCC rules.
This equipment complies with FCC rules,
Part 68. On the back of this equipment is a
label that contains, among other
information, the FCC registration number
and ringer equivalence number (REN) for
this equipment. If requested, this
information must be provided to the
telephone company. The REN is used to
determine the quantity of devices which
may be connected to the telephone line.
Excessive RENs on the telephone line may
result in the devices not ringing in response
to an incoming call. In most, but not all,
areas, the sum of the RENs should not
exceed five (5.0). To be certain of the
number of devices that may be connected
to the line, as determined by the total
RENs, contact the telephone company to
determine the maximum REN for the
calling area.
This equipment uses the following USOC
jacks: RJ11C.
An FCC-compliant telephone cord and
modular plug is provided with this
equipment. This equipment is designed to
be connected to the telephone network or
premises wiring using a compatible
modular jack which is Part 68 compliant.
This equipment cannot be used on
telephone company-provided coin service.
Connection to Party Line Service is subject
to state tariffs. If this equipment causes
harm to the telephone network, the
telephone company will notify you in
advance that temporary discontinuance of
service may be required. If advance notice
is not practical, the telephone company will
notify the customer as soon as possible.
Also, you will be advised of your right to file
a complaint with the FCC if you believe it is
necessary. The telephone company may
make changes in its facilities, equipment,
operations, or procedures that could affect
the operation of the equipment. If this
happens, the telephone company will
provide advance notice in order for you to
make the necessary modifications in order
to maintain uninterrupted service. If trouble
is experienced with this equipment, please
see the numbers in the front of this manual
for repair and (or) warranty information. If
the trouble is causing harm to the
telephone network, the telephone company
may request you remove the equipment
from the network until the problem is
resolved. The following repairs can be
done by the customer: Replace any original
equipment that came with the device. This
includes the print cartridge, the supports for
trays and bins, the power cord, and the
telephone cord. It is recommended that the
customer install an AC surge arrestor in the
AC outlet to which this device is connected.
This is to avoid damage to the equipment
caused by local lightning strikes and other
electrical surges.
Trademark Credits
Adobe Photoshop® and PostScript are
trademarks of Adobe Systems Incorporated.
Corel® is a trademark or registered
trademark of Corel Corporation or Corel
Corporation Limited.
Microsoft®, Windows®, and Windows NT®
are U.S. registered trademarks of Microsoft
Corporation.
UNIX® is a registered trademark of The
Open Group.
ENERGY STAR® and the ENERGY STAR
logo® are U.S. registered marks of the
United States Environmental Protection
Agency. Details on the proper use of the
marks are explained in the "Guidelines for
Proper use of the ENERGY STAR® Name
and International Logo."
Service and support
Web services
For 24-hour access to information by using a modem or Internet connection
World Wide Web: Updated HP device software, product and support information, and printer
drivers in several languages can be obtained from http://www.hp.com/support/clj2800series.
(The site is in English.)
Web-based troubleshooting tools
HP Instant Support Professional Edition (ISPE) is a suite of web-based troubleshooting tools
for desktop computing and printing products. ISPE helps you quickly identify, diagnose, and
resolve computing and printing problems. The ISPE tools can be accessed from
http://instantsupport.hp.com.
Telephone support
Hewlett-Packard provides free telephone support during the warranty period. When you call,
you will be connected to a responsive team that is waiting to help you. For the telephone
number for your country/region, see the flyer that came in the box with the product, or visit
http://www.hp.com/support/callcenters. Before calling HP, have the following information
ready: product name and serial number, date of purchase, and description of the problem.
You can also find support on the Internet at http://www.hp.com. Click the support & drivers
block.
Software utilities, drivers, and electronic information
Go to http://www.hp.com/go/clj2800_software. (The site is in English, but printer drivers can
be downloaded in several languages.)
For information over the telephone, see the flyer that came in the box with the device.
HP direct ordering for accessories or supplies
Order supplies from the following websites:
United States: http://www.hp.com/sbso/product/supplies
Canada: http://www.hp.ca/catalog/supplies
Europe: http://www.hp.com/go/supplies
Asia-Pacific: http://www.hp.com/paper/
See the flyer that came in the box with the device, or see http://welcome.hp.com/country/us/
en/wwcontact.html
For more information, see
Accessories and ordering information.
To order supplies or accessories over the telephone, call the following numbers:
United States: 800-538-8787
Canada: 800-387-3154
To find the phone numbers for other countries/regions, see the flyer that came in the box
with the device.
Customer self-repair
HP's customer self-repair programs offer our North American customers the fastest service
under either warranty or contract. It enables HP to ship replacement parts directly to you (the
end user) so that you can replace them. Using this program, you can replace parts at your
own convenience.
ENWW v
HP service information
To locate HP-Authorized Dealers in the United States or Canada, call 800-243-9816 (United
States) or 800-387-3867 (Canada). Or, go to http://www.hp.com/go/cposupportguide.
For service for your HP product in other countries/regions, call the customer support number
for your country/region. See the flyer that came in the box with the device.
HP service agreements
Call: 800-HPINVENT [800-474-6836 (U.S.)] or 800-268-1221 (Canada).
Out-of-Warranty Service: 800-633-3600.
Extended Service: Call 800-HPINVENT [800-474-6836 (U.S.)] or 800-268-1221 (Canada).
Or, go to the HP Care Pack™ Services Web site at
http://www.hpexpress-services.com/10467a.
HP Toolbox
To check the device status and settings and to view troubleshooting information and online
documentation, use the HP Toolbox software. You can view the HP Toolbox when the
device is directly connected to your computer or when it is connected to a network. You must
have performed a complete software installation to use the HP Toolbox. See
Managing the
device and maintenance.
HP Toolbox is not supported for Macintosh operating systems.
Software help
The HP Scanning software included with the HP Color LaserJet 2820/2830/2840 all-in-one
contains online Help, which provides instructions for operating the software with this device.
vi ENWW
Table of contents
1 Device basics
Quick access to device information ..........................................................................................2
User guide links ..................................................................................................................2
Where to look for more information ....................................................................................2
Device configurations ................................................................................................................4
HP Color LaserJet 2820 all-in-one .....................................................................................4
HP Color LaserJet 2830 all-in-one .....................................................................................4
HP Color LaserJet 2840 all-in-one .....................................................................................5
Device features .........................................................................................................................6
Device parts ..............................................................................................................................9
Front view ...........................................................................................................................9
Back view ............................................................................................................................9
Interface ports ...................................................................................................................10
Control panel ....................................................................................................................11
2 Software
Printer drivers ..........................................................................................................................14
Software and supported operating systems .....................................................................14
Software tips .....................................................................................................................15
Software for Windows .......................................................................................................16
Software for Macintosh .....................................................................................................17
HP Toolbox .......................................................................................................................17
Embedded Web server (EWS) .........................................................................................18
Software installation .........................................................................................................18
Uninstalling the printing software ............................................................................................20
Using Add or Remove Programs to uninstall ...................................................................20
Uninstalling software for Macintosh ..................................................................................20
3 Media specifications
General guidelines ..................................................................................................................22
Supported media weights and sizes .......................................................................................23
Printing and storage environment ...........................................................................................25
4 Using the device
Loading trays ...........................................................................................................................28
Loading tray 1 ...................................................................................................................28
Loading optional tray 2 .....................................................................................................29
Loading documents to scan ..............................................................................................30
Using the device control panel ................................................................................................32
Changing the device control-panel display language ......................................................32
Changing the default media size ......................................................................................32
Using the device volume controls .....................................................................................33
ENWW vii
5 Printing
Printing from Windows ............................................................................................................38
To print from Windows ......................................................................................................38
Printing from the Macintosh OS ..............................................................................................39
To print from the Macintosh OS .......................................................................................39
Printer drivers ..........................................................................................................................40
Using the PCL printer-driver Help (Windows only) ...........................................................40
Selecting a source ............................................................................................................40
Selecting a type or size ....................................................................................................40
Printing in grayscale .........................................................................................................41
Creating and using watermarks ........................................................................................41
Printing multiple pages on one sheet of paper (N-up printing) .........................................41
Creating and using Quick Sets .........................................................................................41
Reducing or enlarging (Fit to Page) .................................................................................42
Maximizing print speed for letter-size paper ...........................................................................43
Selecting an output location ....................................................................................................44
Setting a custom paper size ....................................................................................................45
Printing on special media ........................................................................................................46
Glossy paper .....................................................................................................................46
Colored paper ...................................................................................................................46
Preprinted forms and letterhead .......................................................................................46
Envelopes .........................................................................................................................47
Heavy paper .....................................................................................................................47
HP LaserJet Tough paper ................................................................................................48
Labels ...............................................................................................................................48
Transparencies .................................................................................................................4 8
Printing on different paper for the first page ...........................................................................49
Printing on both sides (duplexing manually) ...........................................................................50
To duplex manually ..........................................................................................................50
Printing booklets ......................................................................................................................51
To print booklets ...............................................................................................................51
Canceling a print job ...............................................................................................................53
6 Printing with color
Changing the color settings ....................................................................................................56
Using color ..............................................................................................................................57
Media selection .................................................................................................................57
HP ImageREt 2400 ...........................................................................................................57
Managing color options ...........................................................................................................58
Print in Grayscale .............................................................................................................58
Automatic versus Manual color adjustment .....................................................................58
Manual color options ........................................................................................................58
Matching colors .......................................................................................................................60
7 Copy
Starting a copy job ..................................................................................................................62
Canceling a copy job ...............................................................................................................63
Adjusting the copy quality .......................................................................................................64
To adjust the copy quality for the current job ...................................................................64
To adjust the default copy quality .....................................................................................64
Adjusting the lighter/darker (contrast) setting .........................................................................65
To adjust the lighter/darker setting for the current job ......................................................65
To adjust the default lighter/darker setting .......................................................................65
Reducing or enlarging copies .................................................................................................66
viii ENWW
To reduce or enlarge copies for the current job ...............................................................67
To change the default copy size .......................................................................................68
Changing the copy-collation setting ........................................................................................69
To change the default copy-collation setting ....................................................................69
Changing the number of copies ..............................................................................................70
To change the number of copies for the current job ........................................................70
To change the default number of copies ..........................................................................70
Copying photos, two-sided originals, or books .......................................................................71
To copy a photo ................................................................................................................7 1
To copy a multiple-page stack of two-sided originals .......................................................71
To copy a book .................................................................................................................72
8 Fax
Specifying the fax settings ......................................................................................................75
To enter text from the control panel .................................................................................75
To set the time and date ...................................................................................................76
To set the fax header ........................................................................................................76
Sending faxes ..........................................................................................................................77
To adjust the resolution for the current fax job .................................................................77
To send a fax to one recipient ..........................................................................................77
To send a fax to multiple recipients ..................................................................................78
To send a fax by using a group-dial entry ........................................................................78
To send a fax to a group manually (ad hoc faxing) ..........................................................79
Using manual dial ....................................................................................................................80
To use manual dial with the automatic document feeder (ADF) ......................................80
To use manual dial with the flatbed scanner ....................................................................80
Redialing manually ..................................................................................................................81
To redial manually ............................................................................................................81
Canceling a fax job ..................................................................................................................82
To cancel the current fax job ............................................................................................82
To cancel a fax job by using the Fax Job Status ..............................................................82
Sending faxes by using the software ......................................................................................83
To send a fax from the software (Windows 2000 or XP) .................................................83
To send a fax from the software (Mac OS 10.2 or 10.3) ..................................................83
To send a fax from a third-party application, such as Microsoft Word (all
operating systems) ........................................................................................................84
Receiving faxes .......................................................................................................................85
To receive faxes when you hear fax tones .......................................................................85
Sending a fax by dialing from a telephone ..............................................................................86
To send a fax by dialing from a telephone .......................................................................86
Changing the default light/dark (contrast) setting ...................................................................87
To change the default light/dark (contrast) setting ...........................................................87
Changing the default resolution setting ..................................................................................88
To change the default resolution setting ..........................................................................88
Changing the default glass-size setting ..................................................................................89
To change the default glass-size setting ..........................................................................89
Selecting tone-dialing or pulse-dialing mode ..........................................................................90
To select tone-dialing or pulse-dialing ..............................................................................90
Changing the redial settings ...................................................................................................91
To change the redial-on-busy option ................................................................................91
To change the redial-on-no-answer option ......................................................................91
To change the redial-on-communication-error option ......................................................91
Receiving faxes to your computer ...........................................................................................92
To turn off the receive-to-PC setting from the control panel ............................................92
Setting the answer mode ........................................................................................................93
ENWW ix
To set the answer mode ...................................................................................................93
Changing ring patterns for call answering ..............................................................................94
To change ring patterns for call answering ......................................................................94
Changing the rings-to-answer setting .....................................................................................95
Using the rings-to-answer setting .....................................................................................95
To set the number of rings-to-answer ..............................................................................95
Changing autoreduction settings for incoming faxes ..............................................................96
To change autoreduction for incoming faxes ...................................................................96
Blocking or unblocking fax numbers .......................................................................................97
To block or unblock a fax number ....................................................................................97
About speed-dial entries, one-touch keys, and group-dial entries .........................................98
To program speed-dial entries and one-touch keys .........................................................98
To delete speed-dial entries and one-touch keys ............................................................99
To program speed-dial entries or one-touch keys quickly ...............................................99
To manage group-dial entries ..........................................................................................99
Using dialing characters ........................................................................................................102
To insert a pause ............................................................................................................102
Inserting a dial prefix .............................................................................................................103
To set the dial prefix .......................................................................................................103
Sending a delayed fax ...........................................................................................................104
To send a delayed fax ....................................................................................................104
Changing the detect-dial-tone setting ...................................................................................105
To change the detect-dial-tone setting ...........................................................................105
Using billing codes ................................................................................................................106
To change the billing-code setting ..................................................................................106
To use billing codes ........................................................................................................106
Reprinting a fax .....................................................................................................................107
To reprint a fax ................................................................................................................107
To change the fax reprint settings ..................................................................................107
Deleting faxes from memory .................................................................................................108
To delete faxes from memory .........................................................................................108
Using fax forwarding .............................................................................................................109
To use fax forwarding .....................................................................................................109
Making an extension telephone available to receive faxes ..................................................110
To make an extension telephone available to receive faxes .........................................110
Using fax polling ....................................................................................................................111
To poll (request a fax from) another fax machine ..........................................................111
Changing the silence-detect mode .......................................................................................112
To change the silence-detect mode ...............................................................................112
Creating stamp-received faxes .............................................................................................113
To make stamp-received faxes available .......................................................................113
Setting the fax-error-correction mode ...................................................................................114
To change the error-correction setting ...........................................................................114
Changing the V.34 setting .....................................................................................................115
To change the V.34 setting .............................................................................................115
9 Scan
Understanding scanning methods ........................................................................................118
Scanning from the device control panel (Windows) .............................................................119
Programming the device Scan to button ........................................................................119
Scanning to e-mail ..........................................................................................................119
Scanning to a folder ........................................................................................................119
Canceling a scan job .............................................................................................................121
Scanning by using HP Director (Windows) ...........................................................................122
To view HP Director ........................................................................................................122
x ENWW
Scanning from the device and HP Director (Macintosh) .......................................................123
Scanning to e-mail ..........................................................................................................123
Scanning to a file ............................................................................................................124
Scanning to a software program ....................................................................................124
Using page-by-page scanning ........................................................................................125
Scanning by using TWAIN-compliant and WIA-compliant software .....................................126
Using TWAIN-compliant and WIA-compliant software ...................................................126
Scanning a photo or a book ..................................................................................................127
Scanning a photo ............................................................................................................127
Scanning a book .............................................................................................................127
Scanning by using optical character recognition (OCR) software ........................................129
Readiris ...........................................................................................................................129
Scanner resolution and color ................................................................................................130
Resolution and color guidelines .....................................................................................130
Color ...............................................................................................................................131
10 Photo
Inserting a memory card .......................................................................................................134
Changing default settings .....................................................................................................135
Changing job settings ............................................................................................................136
Printing photos directly from the memory card .....................................................................137
Printing photos from a proof sheet ........................................................................................138
Printing an index ...................................................................................................................139
11 How do I?
Print: How do I? .....................................................................................................................142
Print on special media, such as glossy or photo paper ..................................................143
Print on both sides of the paper .....................................................................................144
Print on envelopes and custom media sizes ..................................................................144
Change the device print settings, such as volume or print quality, in HP Toolbox ........145
Print color documents from my computer in black and white only .................................146
Network: How do I? ...............................................................................................................147
Set up the device and use it on the network ..................................................................147
Set my network password ..............................................................................................149
Photo: How do I? ...................................................................................................................150
Print a particular photo from a memory card ..................................................................150
Print all the photos that are stored on a memory card ...................................................150
Enable or disable memory cards ....................................................................................150
Use a proof sheet ...........................................................................................................151
Save photos from a memory card to my computer ........................................................151
Copy: How do I? ....................................................................................................................152
Change the copy settings, such as number of copies, in HP Toolbox ...........................152
Reduce or enlarge an original ........................................................................................152
Fax: How do I? ......................................................................................................................153
Send a fax from the device .............................................................................................153
Change the fax send or receive settings, such as answer mode, in HP Toolbox ..........153
Create a fax cover page .................................................................................................154
Send a fax from my computer ........................................................................................155
Receive faxes to my computer .......................................................................................156
Set up speed dials ..........................................................................................................157
Forward received faxes to another fax number ..............................................................157
View and print previously received faxes .......................................................................158
Add or delete a contact ...................................................................................................158
Import contacts from another source ..............................................................................159
Create a new group list ...................................................................................................160
ENWW xi
Create a new group list ...................................................................................................160
Change settings, such as resolution and contrast, and optimize them for each fax ......160
Scan: How do I? ....................................................................................................................162
Scan from the device control panel ................................................................................162
Set up the Scan to button on the control panel ..............................................................162
Save a scan to a folder on my computer ........................................................................162
Send a scan to an e-mail message ................................................................................163
Add or edit e-mail addresses for scanning to e-mail ......................................................163
Add or edit folders for scanning to a folder ....................................................................163
Other: How do I? ...................................................................................................................165
Receive toner warnings from the device at my computer ..............................................165
Receive toner warning e-mail messages from the device .............................................165
Maintain the device .........................................................................................................165
View the control-panel menu items for the device .........................................................166
Replace print cartridges ..................................................................................................166
Replace the imaging drum ..............................................................................................168
Clear jams .......................................................................................................................170
Order new supplies .........................................................................................................175
12 Managing the device and maintenance
Information pages .................................................................................................................178
Demo page .....................................................................................................................178
Usage page ....................................................................................................................178
Configuration page .........................................................................................................178
Supplies Status page ......................................................................................................179
HP Toolbox ............................................................................................................................181
To view HP Toolbox .......................................................................................................181
Status tab ........................................................................................................................182
Fax tab ............................................................................................................................182
Scan to tab ......................................................................................................................182
Troubleshooting tab ........................................................................................................183
Documentation tab .........................................................................................................183
Device Settings pages ....................................................................................................184
HP Toolbox links .............................................................................................................185
Other links .......................................................................................................................185
Macintosh Configure Device (Mac OS 10.2 and 10.3) .........................................................186
To view Macintosh Configure Device .............................................................................186
Embedded Web server .........................................................................................................187
Features ..........................................................................................................................187
Fax logs and reports .............................................................................................................188
Printing the fax activity log ..............................................................................................188
Printing a fax call report ..................................................................................................188
Setting print times for the fax call report .........................................................................189
Including the first page of each fax on the fax call report ...............................................190
Printing a phone book report ..........................................................................................190
Printing the billing-code report ........................................................................................190
Printing the block-fax list .................................................................................................190
Printing all fax reports .....................................................................................................191
Cleaning the device ...............................................................................................................192
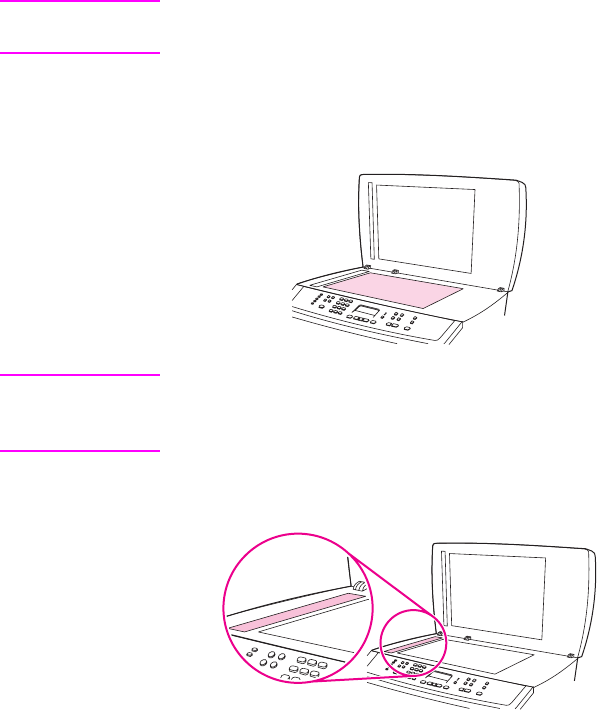
To clean the exterior .......................................................................................................192
To clean the scanner glass .............................................................................................192
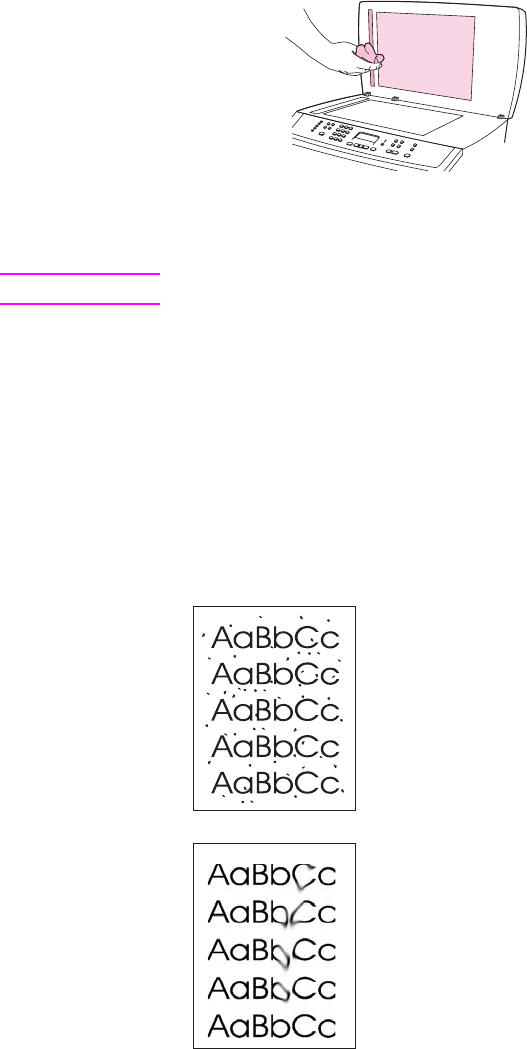
To clean the lid backing ..................................................................................................192
Cleaning the paper path .................................................................................................193
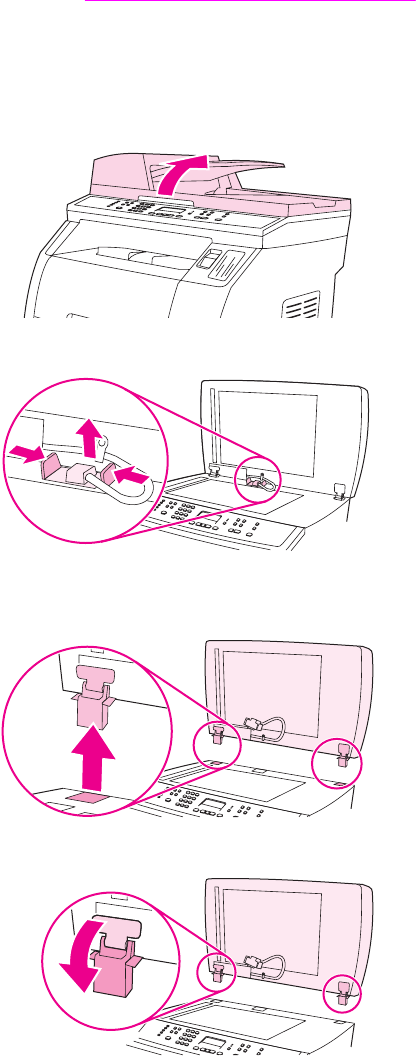
Changing the automatic document feeder (ADF) .................................................................195
To change the ADF ........................................................................................................195
xii ENWW
Changing the automatic document feeder (ADF) pickup roller assembly ............................197
To change the ADF pickup roller assembly ...................................................................197
Cleaning the automatic document feeder (ADF) pickup roller assembly .............................199
To clean the ADF pickup roller assembly .......................................................................199
13 Managing supplies
Checking status and ordering supplies .................................................................................202
To check status and order supplies by using the control panel .....................................202
To check status and order supplies by using HP Toolbox .............................................202
Storing supplies .....................................................................................................................203
Replacing and recycling supplies ..........................................................................................204
HP policy on non-HP supplies ..............................................................................................205
Resetting the printer for non-HP supplies ......................................................................205
HP fraud hotline ....................................................................................................................206
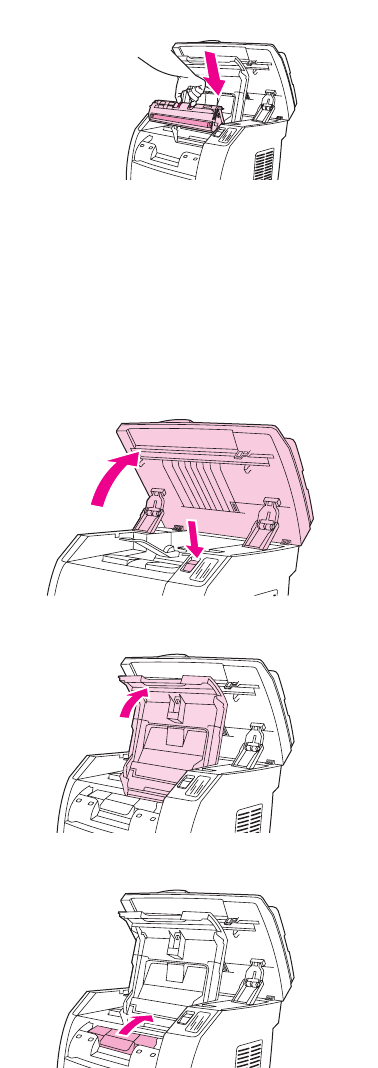
Changing a print cartridge .....................................................................................................207
To replace a print cartridge .............................................................................................207
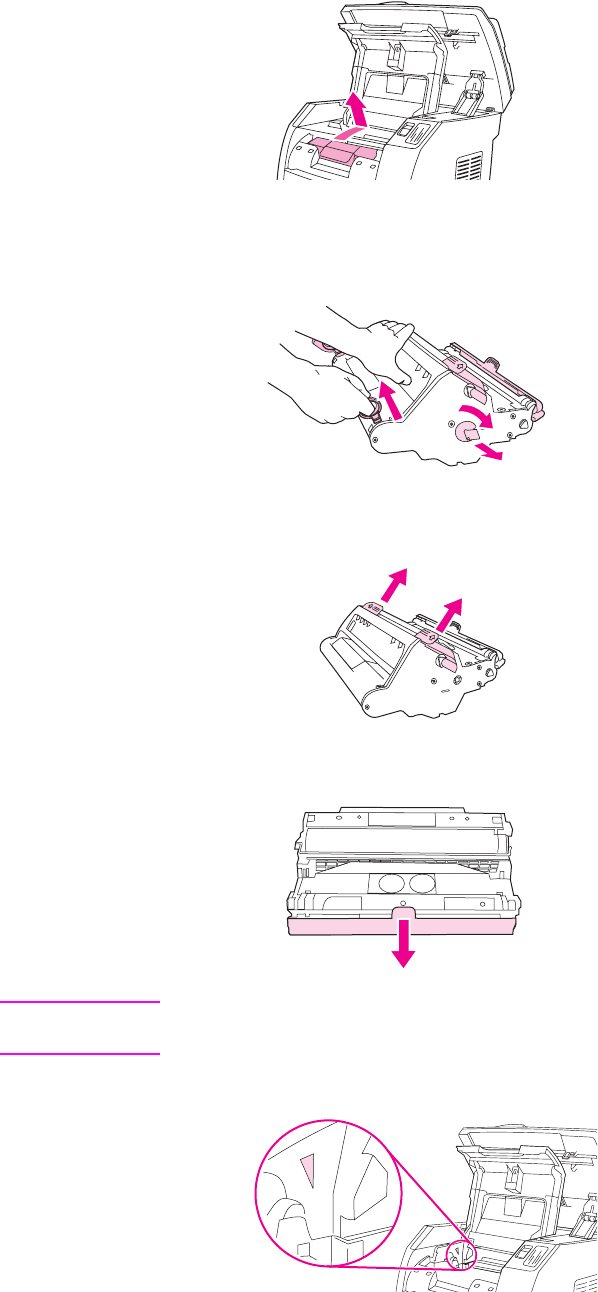
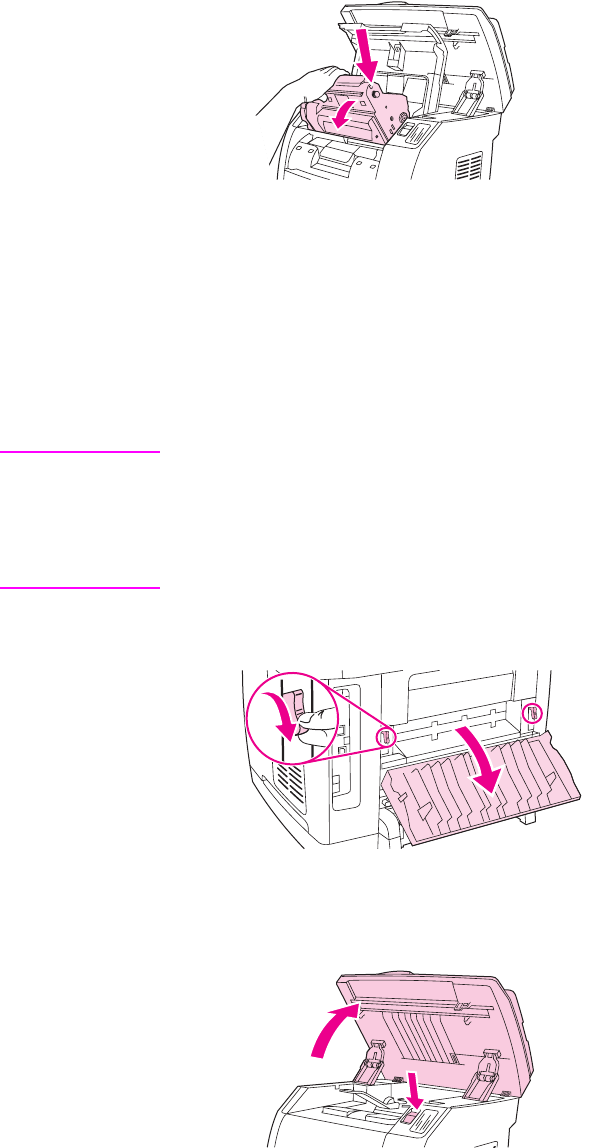
Changing the imaging drum ..................................................................................................209
To change the imaging drum ..........................................................................................209
14 Troubleshooting
Support strategy ....................................................................................................................212
Troubleshooting process .......................................................................................................213
Troubleshooting checklist ...............................................................................................213
Control panel messages .......................................................................................................217
Alert and warning messages ..........................................................................................217
Critical error messages ...................................................................................................225
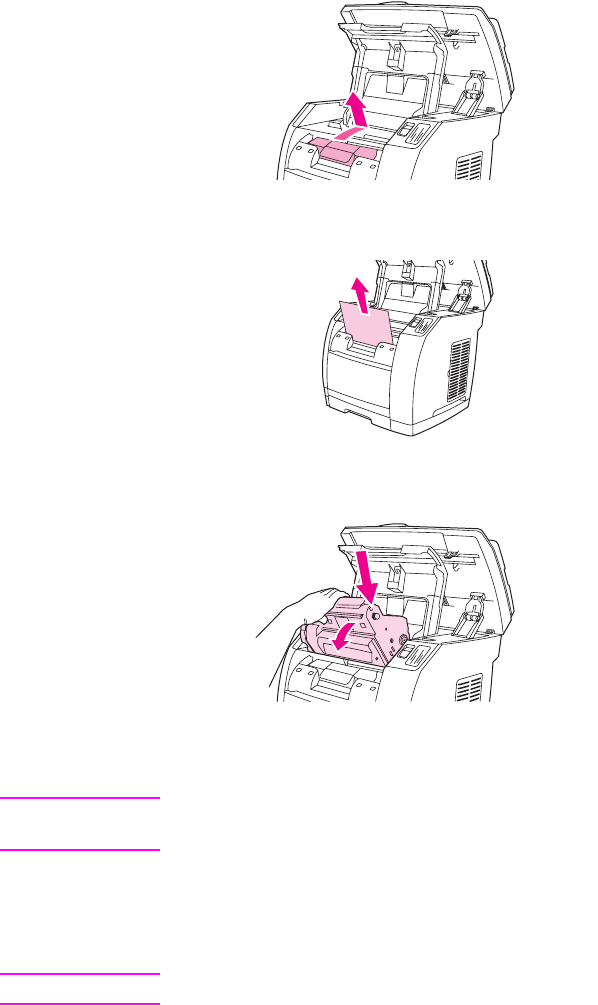
Clearing jams ........................................................................................................................228
Media jams occur in the device ......................................................................................228
Media jams occur in the automatic document feeder (ADF) ..........................................231
Print problems .......................................................................................................................234
Print quality problems .....................................................................................................234
Media-handling problems ...............................................................................................243
Performance problems ...................................................................................................245
Scan problems ......................................................................................................................247
Solving scanned image problems ..................................................................................247
Scan quality problems ....................................................................................................249
Copy problems ......................................................................................................................251
Preventing problems .......................................................................................................251
Image problems ..............................................................................................................251
Media-handling problems ...............................................................................................252
Performance problems ...................................................................................................254
Fax problems ........................................................................................................................256
Problems receiving faxes ...............................................................................................256
Problems sending faxes .................................................................................................259
Voice call problems ........................................................................................................261
Media-handling problems ...............................................................................................261
Performance problems ...................................................................................................263
Memory card problems .........................................................................................................264
Missing or wrong files .....................................................................................................264
Index page not printing ...................................................................................................264
Proof sheet not printing ..................................................................................................264
Proof sheet not scanning ................................................................................................265
Issues with photo printing ...............................................................................................265
Troubleshooting tools ............................................................................................................268
Device pages and reports ...............................................................................................268
ENWW xiii
Fax reports ......................................................................................................................268
HP Toolbox .....................................................................................................................270
Service menu ..................................................................................................................270
The device control panel display has black lines or dots, or becomes blank ................272
Appendix A Accessories and ordering information
Supplies .................................................................................................................................274
Memory .................................................................................................................................275
Cable and interface accessories ...........................................................................................276
Paper-handling accessories ..................................................................................................277
Paper and other print media .................................................................................................278
User-replaceable parts ..........................................................................................................279
Supplementary documentation .............................................................................................280
Appendix B Service and support
Hewlett-Packard limited warranty statement ........................................................................281
Print Cartridge and Imaging Drum Limited Warranty Statement ..........................................283
Color LaserJet Image Fuser Kit and Image Transfer Kit Limited Warranty Statement ........284
Availability of support and service .........................................................................................285
HP maintenance agreements ...............................................................................................285
Onsite service agreements .............................................................................................285
Appendix C Device specifications
Appendix D Regulatory information
Introduction ............................................................................................................................289
Telephone Consumer Protection Act (United States) ...........................................................290
IC CS-03 requirements .........................................................................................................291
EU statement for telecom operation .....................................................................................292
New Zealand telecom statements .........................................................................................293
Environmental Product Stewardship program ......................................................................294
Ozone production ...........................................................................................................294
Energy consumption .......................................................................................................294
HP LaserJet printing supplies .........................................................................................294
Nederlands .....................................................................................................................295
Taiwan ............................................................................................................................296
Declaration of conformity ......................................................................................................297
Declaration of conformity ......................................................................................................298
Country-/region-specific safety statements ...........................................................................299
Laser safety statement ...................................................................................................299
Canadian DOC statement ..............................................................................................299
Korean EMI statement ....................................................................................................299
Finnish laser statement ..................................................................................................300
Glossary
Index
xiv ENWW
1
Device basics
This section provides information about the following topics:
Quick access to device information
Device configurations
Device features
Device parts
ENWW 1
Quick access to device information
User guide links
Device parts
Control panel
Troubleshooting
Where to look for more information
Several references are available for use with this device. See http://www.hp.com/support/
clj2800series.
Setting up the device
Getting started guide (printed)—Provides step-by-step instructions for installing and
setting up the device. This guide comes in the box with your device.
hp color LaserJet
1550•2550 series
Animated getting started guide—Provides step-by-step instructions for installing and
setting up the device. This guide is available on the CD-ROM that came with the device.
Accessory and supplies installation guides—These guides provide step-by-step
instructions for installing the device accessories and supplies.
c9704a
Using the device
User guide—Contains detailed information for using the device and troubleshooting
problems. This guide is available on the CD-ROM that came with the device. It is also
available through the HP Toolbox software.
2 Chapter 1 Device basics ENWW
A Web-based (HTML) user guide is also available. Go to http://www.hp.com/support/
clj2800series. After connecting, select Manuals.
Online Help—Contains information about device options that are available from within the
printer drivers. To view a Help file, open the online Help through the printer driver.
ENWW Quick access to device information 3
Device configurations
The device is available in the following configurations.
HP Color LaserJet 2820 all-in-one
The HP Color LaserJet 2820 all-in-one printer, scanner, copier is a four-color laser printer
that prints letter-size pages up to 20 pages per minute (ppm) in black-and-white, A4-size
pages up to 19 ppm, and it prints letter/A4-size pages up to 4 ppm in color. It includes a
PCL 6 printer driver and has HP postscript level 3 emulation.
Trays. The device comes with a multipurpose tray (tray 1) that holds up to 125 sheets of
various print media or 10 envelopes.
Print cartridges. This model comes standard with color print cartridges (cyan, yellow,
and magenta) that can print up to 2,000 pages at 5% coverage. It comes with a black
print cartridge that can print up to 5,000 pages at 5% coverage. (A typical business letter
has 5% coverage.)
Connectivity. The device provides a Hi-Speed universal serial bus (USB) 2.0 port and a
port for connecting to a 10/100Base-T network.
Memory. The device comes standard with a 96-megabyte (MB) random access memory
(RAM).
Paper handling. The device comes with a flatbed scanner and a 50-page automatic
document feeder (ADF).
Expandability. The device has one available DIMM slot for memory expansion and
additional font support. The memory is expandable to 224 MB.
HP Color LaserJet 2830 all-in-one
The HP Color LaserJet 2830 all-in-one printer, scanner, fax, copier has the same features as
the HP Color LaserJet 2820 all-in-one, and it includes a V.34 fax modem and 4-MB flash fax
storage memory. Also, this model comes standard with high-capacity color print cartridges
that can print up to 4,000 pages at 5% coverage.
4 Chapter 1 Device basics ENWW
HP Color LaserJet 2840 all-in-one
The HP Color LaserJet 2840 all-in-one printer, scanner, fax, copier has the same features as
the HP Color LaserJet 2830 all-in-one, including high-capacity color print cartridges that can
print up to 4,000 pages at 5% coverage, and it includes a 250-sheet tray (tray 2) for standard
sizes. This model features rated memory-card slots as well.
ENWW Device configurations 5
Device features
Feature HP Color LaserJet 2820/2830/2840 all-in-one
Color printing Provides laser printing in full color by using
the four process colors: cyan, magenta,
yellow, and black (CMYK).
For more information, see
Printing with color.
Copy Provides full-color copying from letter/A4-
sized scanner glass.
Includes automatic document feeder (ADF)
that allows faster, more efficient copy jobs
with multiple-page documents.
For more information, see
Copy.
Fax The HP Color LaserJet 2830/2840 all-in-one
models include full-functionality fax
capabilities with a V.34 fax, including a
phone book, fax polling, and delayed-fax
features.
For more information, see
Fax.
Scan Provides 1200 pixels per inch (ppi), 24-bit
full-color scanning from letter/A4-sized
scanner glass.
Includes automatic document feeder (ADF)
that allows faster, more efficient scan jobs
with multiple-page documents.
For more information, see
Scan.
Fast print speed
Prints in black on letter-size paper up to
20 ppm and on A4-size paper up to 19 ppm.
Prints in color on A4/letter up to 4 ppm.
Excellent print quality
True 600 by 600 dots per inch (dpi) with
Image Ret 2400 text and graphics.
Adjustable settings to optimize print quality.
The HP UltraPrecise print cartridge has a
finer toner formulation that provides sharper
text and graphics.
Printer driver features
Fast printing performance, built-in Intellifont
and TrueType scaling technologies, and
advanced imaging capabilities are benefits
of the PCL 6 printer language.
Automatic language-switching The device automatically determines and
switches to the appropriate printer language
(such as PS or PCL 6) for the print job.
Interface connections
Hi-Speed USB 2.0 port (not supported for
Windows NT).
10/100 ethernet (RJ45) network port.
6 Chapter 1 Device basics ENWW
Feature HP Color LaserJet 2820/2830/2840 all-in-one
Networking TCP/IP
LPD
9100
Memory card slot (HP Color LaserJet 2840 all-
in-one only)
The device can read the following memory-card
types:
CompactFlash
Ultra CompactFlash
Smart Media
Memory Stick
Secure Digital
Multi Media Card
XD Card
For more information, see
Photo.
Enhanced memory and memory expansion
The device comes with 96 MB of memory
and can be expanded to 224 MB by using
the DIMM slot. Most documents can be
printed with the standard amount of memory
with the aid of Memory Enhancement
technology (MEt). MEt automatically
compresses data, virtually doubling the
device memory and accommodating more
complex printing with available memory.
Energy savings
The device automatically conserves
electricity by substantially reducing power
consumption when it is not printing.
As an ENERGY STAR® partner, Hewlett-
Packard Company has determined that this
product meets ENERGY STAR® guidelines
for energy efficiency. ENERGY STAR® is a
U.S. registered service mark of the United
States Environmental Protection Agency.
Economical printing N-up printing (printing more than one page
on a sheet) and two-sided printing using
manual duplexing saves paper. See
Printing
multiple pages on one sheet of paper (N-up
printing) and Printing on both sides
(duplexing manually).
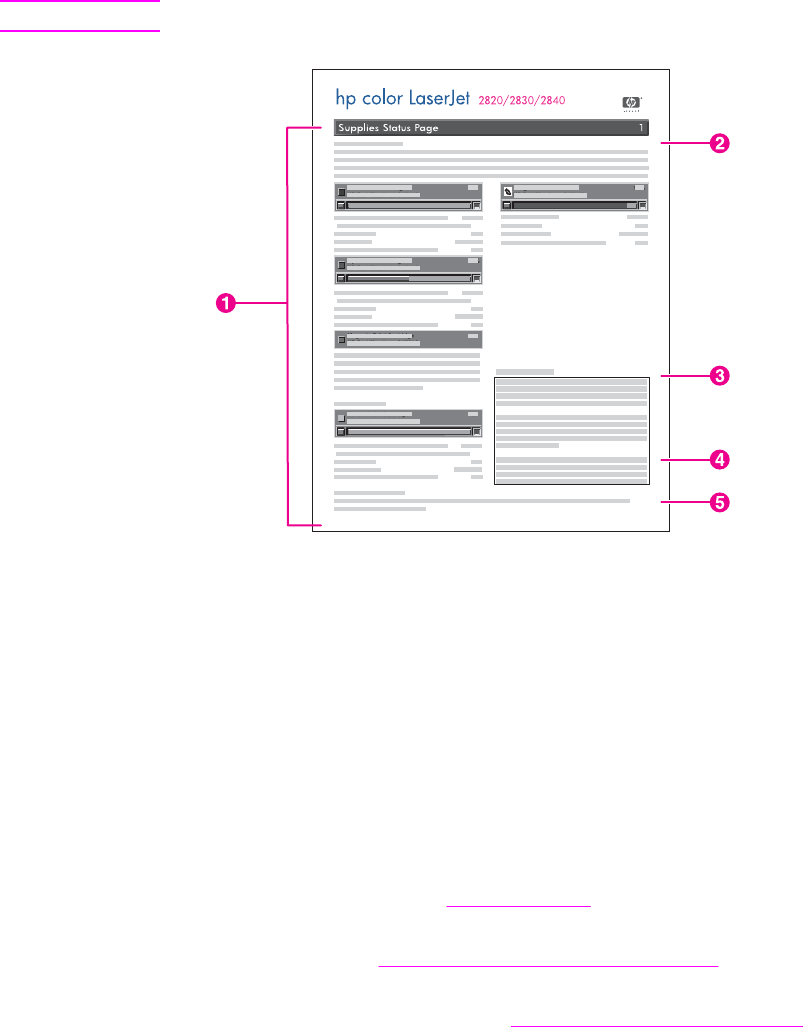
Supplies A Supplies Status page with print cartridge
and imaging drum gauges that show the
supply levels that remain. For HP supplies
only.
No-shake cartridge design.
Authentication for HP print cartridges.
Enabled supplies-ordering capability.
ENWW Device features 7
Feature HP Color LaserJet 2820/2830/2840 all-in-one
Accessibility
Online user guide that is compatible with
text screen-readers.
Print cartridges and the imaging drum can
be installed and removed by using one hand.
All doors and covers can be opened by
using one hand.
8 Chapter 1 Device basics ENWW
Device parts
Before using the device, familiarize yourself with the parts of the device.
Front view
1 power switch
2 top (face-down) output bin
3 control panel
4 scanner release button
5 memory card slots (HP Color LaserJet 2840 all-in-one only)
6 tray 1
7 tray 2 (included with the HP Color LaserJet 2840 all-in-one only)
Back view
8 DIMM door
9 fax ports (HP Color LaserJet 2830/2840 all-in-one models only)
10 Hi-Speed USB 2.0 port
11 network port
12 ADF output bin
13 ADF input tray
14 rear (face-up) output door
15 power connector
16 tray 2 paper-length adjustment control
ENWW Device parts 9
Interface ports
The device has two interface ports: a 10/100Base-T (RJ-45) network port and a Hi-Speed
USB 2.0 port. The HP Color LaserJet 2830/2840 all-in-one models also have fax ports.
1 network port
2 Hi-Speed USB 2.0 port
3 fax ports (HP Color LaserJet 2830/2840 all-in-one models only)
10 Chapter 1 Device basics ENWW
Control panel
Use the following illustrations to identify the device control-panel components for your device.
HP Color LaserJet 2820 all-in-one printer, scanner, copier
1 Alphanumeric buttons. Use the alphanumeric buttons to type data into the device control-panel
display and dial telephone numbers for faxing. For information about using alphanumeric key
characters, see
Fax.
2 Menu and cancel controls. Use these controls to select menu options, determine the device
status, and cancel the current job.
3 Copy controls. Use these controls to change commonly used default settings and to start
copying. For instructions about copying, see
Copy.
4 Scan controls. Use these controls to scan to e-mail or to a folder. For instructions about
scanning, see
Scan.
HP Color LaserJet 2830 all-in-one printer, scanner, fax, copier
1 Fax controls. Use the fax controls to change commonly used fax settings. For information about
using the fax controls, see
Fax.
2 Alphanumeric buttons. Use the alphanumeric buttons to type data into the device control-panel
display and dial telephone numbers for faxing. For information about using alphanumeric key
characters, see
Fax.
3 Menu and cancel controls. Use these controls to select menu options, determine the device
status, and cancel the current job.
4 Copy controls. Use these controls to change commonly used default settings and to start
copying. For instructions about copying, see
Copy.
5 Scan controls. Use these controls to scan to e-mail or to a folder. For instructions about
scanning, see
Scan.
HP Color LaserJet 2840 all-in-one printer, scanner, fax, copier
1 Fax controls. Use the fax controls to change commonly used fax settings. For information about
using the fax controls, see
Fax.
2 Alphanumeric buttons. Use the alphanumeric buttons to type data into the device control-panel
display and dial telephone numbers for faxing. For information about using alphanumeric key
characters, see
Fax.
3 Menu and cancel controls. Use these controls to select menu options, determine the device
status, and cancel the current job.
4 Copy controls. Use these controls to change commonly used default settings and to start
copying. For instructions about copying, see
Copy.
5 Photo and scan controls. Use these controls to print photos from a memory card, or to scan to e-
mail or to a folder. For instructions about using memory cards, see
Photo. For instructions about
scanning, see
Scan.
ENWW Device parts 11
12 Chapter 1 Device basics ENWW
2
Software
This section provides information about the following topics:
Printer drivers
Uninstalling the printing software
ENWW 13
Printer drivers
Software and supported operating systems
For easy device setup and access to the full range of device features, HP strongly
recommends that you install the software that is provided. Not all software is available in all
languages. See the getting started guide for installation instructions, and see the Readme
file for the latest software information.
The most recent drivers, additional drivers, and other software are available from the Internet
and other sources. If you do not have access to the Internet, see
Service and support.
The device supports the following operating systems:
Microsoft
®
Windows
®
98 SE, Windows 2000, Windows Millennium Edition (Me), and
Windows XP (32-bit)
Windows NT 4.0 and Windows XP (64-bit): driver only, other device software is not
available
Macintosh OS 9.2.2 and OS 10.2 and 10.3
UNIX
®
, Linux, and OS/2 (limited functionality)
Windows Server 2003 (printer driver, only from Web)
The following tables list the software that is available for your operating system. Full software
installation is available only for Windows 2000 and Windows XP systems that meet the
recommended system requirements. For more information about software installation, see
Software installation.
HP Color LaserJet 2820/2830/2840 all-in-one software
Feature Windows
2000, XP
1
Windows
98 SE, ME
Windows
NT
Macintosh
OS 9.2.2
Macintosh
OS 10.2, 10.3
UNIX®,
Linux
OS/2
Windows
Installer
PCL 6 printer
driver
PS printer
driver
Scanning
software
HP Toolbox
software
Macintosh
Installer
14 Chapter 2 Software ENWW
Feature Windows
2000, XP
1
Windows
98 SE, ME
Windows
NT
Macintosh
OS 9.2.2
Macintosh
OS 10.2, 10.3
UNIX®,
Linux
OS/2
Fax software
- HP Color
LaserJet
2830/2840 all-
in-one models
only
Storage driver
(memory
card) -
HP Color
LaserJet
2840 all-in-
one only
Device
Configuration
Utility
HP Director
HP Image
Zone
HP Document
Viewer
Macintosh
PostScript
printer
description
(PPD) and
printer dialog
extensions
(PDE)
IBM drivers
2
Model scripts
3
1
The 64-bit version of Windows XP supports printer drivers only.
2
Available on the HP website.
3
Available on the HP website. Not specific to this device.
Software tips
The following are some tips for working with the device software.
How do I gain access to the device features?
The device features are available in the printer driver. Some features such as custom paper
sizes and page orientation might also be available in the program you are using to create a
file. Change settings in the program, if possible, because changes that are made in the
program override changes that are made in the printer driver.
HP Color LaserJet 2820/2830/2840 all-in-one software (continued)
ENWW Printer drivers 15
Gain access to advanced device features through the printer driver (or the Print dialog box
for Macintosh operating systems). To open a Windows print driver, complete the following
steps:
1. On the Windows taskbar, click Start, click Settings, and then click Printers.
In Windows XP, click Start, and then click Printers and Faxes.
A dialog box opens.
2. Right-click the driver you want to open, and then select Printing Preferences.
The driver opens and allows you to make changes.
A number of device features and functions are also accessible through HP Toolbox (not
available for Macintosh). For more information about HP Toolbox, see the HP Toolbox online
Help.
The device CD-ROMs include the HP Scanning software. For more information about the
HP Scanning software, see the software online Help.
How do I get the latest printing software?
When you want to check for and install upgrades to the software, you can download drivers
from the World Wide Web or HP’s file transfer protocol (FTP) servers.
To download drivers
1. Go to http://www.hp.com. Click the support & drivers block.
2.
Type color laserjet 2800 as the product name. The Web page for the drivers
might be in English, but you can download the drivers themselves in several languages.
If you do not have Internet access, contact HP Customer Care. See
Service and support or
the flyer that came in the device box. See the Readme file for additional release information.
What other software is available?
The device CD-ROMs include the HP Scanning software. See the Readme file that is
provided on the HP Color LaserJet 2820/2830/2840 all-in-one CD-ROMs for additional
included software and for supported languages.
Software for Windows
When you install the software for Windows, you can directly connect the device to a
computer by using a USB cable, or you can connect the device to the network by using the
internal print server. See the getting started guide for installation instructions, and see the
Readme file for the latest software information.
The following software is available to all users of the device, whether you connected the
device directly to a computer by using a USB cable, or whether you connected the device to
the network by using a print server.
Printer drivers
A printer driver is a software component that provides access to device features and
provides the means for the computer to communicate with the device. For help using your
printer driver, see
Using Help.
16 Chapter 2 Software ENWW
Select a printer driver based on the way you use the device.
Use the PCL 6 printer driver to take full advantage of the device features.
Use the PostScript (PS) printer driver for compatibility with PS needs. Certain device
features are not available in this printer driver.
The device automatically switches between HP postscript level 3 emulation and PCL printer
languages depending on the driver you have selected.
Using Help
The printer driver has Help dialog boxes that can be activated from the Help button in the
printer driver, the F1 key on the computer keyboard, or the question mark symbol (?) in the
upper-right corner of the printer driver. These Help dialog boxes give detailed information
about the specific printer driver. Help for the printer driver is separate from the Help for your
program.
Software for Macintosh
For Mac 9.2.2, the Apple LaserWriter 8 driver must be installed to use the PPD file. Use the
Apple LaserWriter 8 driver that came with your Macintosh. For Mac OS 10.2 and 10.3, use
Print Center to print.
The device includes the following software for Macintosh computers.
HP Director
HP Director is a software application that is used when working with documents. When the
document is loaded into the automatic document feeder (ADF) and the computer is
connected directly to the device, HP Director appears on the computer screen to initiate
faxing, scanning, or changing settings on the device via the Macintosh Configure Device
application.
Also included is the HP all-in-one Setup Assistant, which sets up the fax and print queues.
PPDs (Mac OS 9.2.2)
PPDs, in combination with the LaserWriter driver, provide access to the printer features and
allow the computer to communicate with the device. An installation program for the PPDs is
provided on the HP Color LaserJet 2820/2830/2840 all-in-one CD-ROM for Macintosh.
PDEs (Mac OS 10.2 and 10.3)
PDEs are code plug-ins that provide access to device features, such as information about
the number of copies, two-sided printing, and quality settings. An installation program for the
PDEs and other software is provided on the HP Color LaserJet 2820/2830/2840 all-in-one
CD-ROM for Macintosh.
HP Toolbox
You must perform a complete software installation to use HP Toolbox.
HP Toolbox provides links to device status information and help information, such as this
user guide, and tools for diagnosing and solving problems. See
Managing supplies for more
information.
ENWW Printer drivers 17
Note
For Macintosh computers, HP Toolbox is not supported.
Embedded Web server (EWS)
The EWS is a Web-based interface that provides simple access to device status and device
configurations, including network configurations and Smart Printing Supplies (SPS)
functionality.
You can gain access to the EWS through the network connection to the device. Type the
device IP address in a Web browser to display the device EWS homepage in the browser.
From the homepage, you can use the tabs and left navigation menu to check the status of
the device, configure the device, or check the status of the supplies.
Supported browsers include:
Internet Explorer 5.0 or later
Netscape Navigator 4.75 or later
Opera 6.05 or later
Safari 1.2 or later
Software installation
If your computer meets the recommended minimum requirements, you have two options
when installing the software from the CD-ROMs that came with the device.
Typical installation
Note
This option is not available if your computer does not meet the minimum requirements. For
more information about the minimum requirements, see the box in which the device was
packed.
18 Chapter 2 Software ENWW
This is the recommended installation option. Select this option to install the software needed
to print and scan from your computer, plus the following programs:
HP Toolbox: This program lets you easily monitor and set up the device settings from
your computer, and it offers device Help and troubleshooting. With HP Toolbox, you
have desktop access to the device fax phone book and logs.
For more information about HP Toolbox, see the HP Toolbox online Help after you have
installed the software.
HP Image Zone: This program lets you view, manage, and edit images, it lets you load
images directly from a camera or memory card, and it helps you share those images
with others. It also includes programs for scanning and for producing creative projects,
such as brochures and flyers.
For more information about HP Image Zone, see the HP Image Zone online Help after
you have installed the software.
HP Document Viewer: This program lets you view and annotate PDF and TIFF files, and
it lets you export documents to other software programs. It also includes optical
character recognition (OCR) software that lets you scan paper documents and convert
them into electronic documents that can be edited.
For more information about HP Document Viewer, see the HP Document Viewer online
Help after you have installed the software.
Minimum installation
Windows 98 SE and Windows ME operating systems, as well as systems with insufficient
memory, must perform a minimum installation to ensure that your computer continues to
operate at optimal levels.
This procedure installs the software necessary to print and scan from your computer. You
will not be able to scan from the device, however. For the HP Color LaserJet 2840 all-in-one
printer, scanner, fax, copier, the minimum installation also allows you to view memory cards
in the device from Windows Explorer.
ENWW Printer drivers 19
Uninstalling the printing software
Uninstall software by using the following directions for your operating system.
Using Add or Remove Programs to uninstall
Use the Add or Remove Programs method in Windows to remove the device software.
This method does not require you to have the software CD.
1. Click Start, point to Settings, and click Control Panel.
In Windows XP, click Start, and then click Control Panel
2. Double-click Add or Remove Programs.
3. Scroll through the list of software programs and click HP Color LaserJet
2820/2830/2840 all-in-one.
4. Click Remove.
Uninstalling software for Macintosh
To remove the printing software from your Macintosh, open the Finder, navigate to
Applications/HP LaserJet aio/HP Uninstaller, and then run the application.
20 Chapter 2 Software ENWW
3
Media specifications
This section contains information about specifications for the quality of media, guidelines for
media usage, and guidelines for media storage.
General guidelines
Supported media weights and sizes
Printing and storage environment
ENWW 21
General guidelines
Some media might meet all of the guidelines in this manual and still not produce satisfactory
results. This problem might be the result of improper handling, unacceptable temperature
and humidity levels, or other variables over which Hewlett-Packard has no control.
Before purchasing large quantities of print media, always test a sample and make sure that
the print media meets the requirements specified in this user guide and in the HP LaserJet
Printer Family Print Media Guide, which you can view on the Web at http://www.hp.com/
support/ljpaperguide. For ordering information, see
Accessories and ordering information.
CAUTION
Using media that does not meet HP specifications can cause problems for the printer,
requiring repair. This repair is not covered by the Hewlett-Packard warranty or service
agreements.
This printer accepts a variety of media, such as cut-sheet paper (including up to 100 percent
recycled-fiber-content paper), envelopes, labels, transparencies, glossy paper, HP LaserJet
Tough paper, and custom-size paper. Properties such as weight, composition, grain, and
moisture content are important factors affecting printer performance and output quality.
Media that does not meet the guidelines outlined in this manual can cause the following
problems:
Poor print quality
Increased jams
Premature wear on the device, requiring repair
22 Chapter 3 Media specifications ENWW
Supported media weights and sizes
For optimum results, use conventional 75 to 90 g/m
2
(20 to 24 lb) photocopy paper. Verify
that the paper is of good quality and is free of cuts, nicks, tears, spots, loose particles, dust,
wrinkles, curls, and bent edges.
Note
The device supports a wide range of standard and custom sizes of print media. The capacity
of trays and bins can vary depending on media weight and thickness and environmental
conditions. Use only transparencies that are designed for use with HP color LaserJet
printers. Inkjet and monochrome transparencies are not supported for this device.
Tray 1 specifications
Media
Dimensions
1
Weight
Capacity
2
Paper Minimum: 76 by 127 mm (3
by 5 inches)
60 to 177 g/m
2
(16 to 47 lb) Up to 125 sheets of 75 g/m
2
(20 lb) paper
Maximum: 216 by 356 mm
(8.5 by 14 inches)
Glossy paper Same as the preceding
listed minimum and
maximum sizes.
75 to 120 g/m
2
(20 to 32 lb)
Maximum stack height: 12 mm
(0.47 inches)
HP Cover paper
3
203 g/m
2
(75 lb cover)
50 (typically)
Transparencies and
opaque film
Thickness: 0.10 to 0.13 mm
(3.9 to 5.1 mils)
50 (typically)
Labels
4
Thickness: up to 0.23 mm
(up to 9 mils)
50 (typically)
Envelopes
Up to 90 g/m
2
(16 to 24 lb)
Up to 10
1
The printer supports a wide range of standard and custom sizes of print media. Check the printer driver for
supported sizes.
2
Capacity can vary depending on media weight and thickness, and environmental conditions.
3
Hewlett-Packard does not guarantee results when printing with other types of heavy paper.
4
Smoothness: 100 to 250 (Sheffield).
ENWW Supported media weights and sizes 23
Optional tray 2 specifications
Media
Dimensions
1
Weight
Capacity
2
Letter 216 by 279 mm (8.5 by 11
inches)
60 to 105 g/m
2
(16 to 28 lb) 250 sheets of 75 g/m
2
(20
lb) paper
A4 210 by 297 mm (8.3 by 11.7
inches)
A5 148 by 210 mm (5.8 by 8.3
inches)
B5 (ISO) 176 by 250 mm (6.9 by 9.9
inches)
B5 (JIS) 182 by 257 mm (7.2 by 10
inches)
Executive 191 by 267 mm (7.3 by 10.5
inches)
Legal 216 by 356 mm (8.5 by 14
inches)
8.5 by 13 inches 216 by 330 mm (8.5 by 13
inches)
1
The printer supports a wide range of standard and custom sizes of print media. Check the printer driver for
supported sizes.
2
Capacity can vary depending on the media weight and thickness, and environmental conditions.
Automatic document feeder (ADF) paper sizes
Media Dimensions Weight or thickness Capacity
Minimum-size paper 127 by 127 mm (5 by
5 in)
60 to 90 g/m
2
(16 to 24
lb bond)
50 sheets (75 g/m
2
; 20
lb bond)
Maximum-size paper 216 by 381 mm (8.5
by 15 in)
60 to 90 g/m
2
(16 to 24
lb bond)
50 sheets (75 g/m
2
; 20
lb bond)
Note
Use the flatbed scanner for faxing (HP Color LaserJet 2830/2840 all-in-one models only),
copying, and scanning if the original is fragile, thin, thick, too small for the ADF, or a
photograph. Also use the flatbed scanner to employ the "fit to page" feature for copying. The
flatbed scanner provides the best fax, copy, and scan resolution.
24 Chapter 3 Media specifications ENWW
Printing and storage environment
Ideally, the printing and media-storage environment should be at or near room temperature,
and not too dry or too humid. Remember that paper absorbs and loses moisture rapidly.
Heat works with humidity to damage paper. Heat causes the moisture in paper to evaporate,
while cold causes it to condense on the sheets. Heating systems and air conditioners
remove most of the humidity from a room. As paper is opened and used, it loses moisture,
causing streaks and smudging. Humid weather or water coolers can cause the humidity to
increase in a room. As paper is opened and used it absorbs any excess moisture, causing
light print and dropouts. Also, as paper loses and gains moisture it can distort. This issue
can cause jams.
As a result, paper storage and handling are as important as the paper-making process itself.
Paper storage environmental conditions directly affect the feed operation and print quality.
Care should be taken not to purchase more paper than can be easily used in a short time
(about three months). Paper stored for long periods can experience heat and moisture
extremes, which can cause damage. Planning is important to prevent damage to a large
supply of paper.
Unopened paper in sealed reams can remain stable for several months before use. Opened
packages of paper have more potential for environmental damage, especially if they are not
wrapped with a moisture-proof barrier.
The media-storage environment should be properly maintained to ensure optimum device
performance. The required condition is 20° to 24°C (68° to 75°F), with a relative humidity of
45% to 55%. The following guidelines are helpful when evaluating the paper's storage
environment:
Print media should be stored at or near room temperature.
The air should not be too dry or too humid.
The best way to store an opened ream of paper is to rewrap it tightly in its moisture-
proof wrapping. If the device environment is subject to extremes, unwrap only the
amount of paper to be used during the day's operation to prevent unwanted moisture
changes.
Avoid storing paper and print media near heating and air conditioning vents or near
windows and doors that are frequently open.
ENWW Printing and storage environment 25
26 Chapter 3 Media specifications ENWW
4
Using the device
This section provides information about using the HP Color LaserJet 2820/2830/2840 all-in-
one.
Loading trays
Using the device control panel
ENWW 27
Loading trays
Load special print media, such as envelopes, labels, and transparencies, in tray 1 only.
Note
Because tray 2 is not included for all models, it is referred to as optional tray 2 in this
documentation.
Loading tray 1
Tray 1 (the multipurpose tray) holds up to 125 sheets of paper or other print media, or it
holds up to 10 envelopes.
CAUTION
Avoid adding print media to tray 1 while the printer is printing, or jams can occur. Do not fan
paper before loading it into trays, and avoid overloading trays.
To load tray 1
1. Open tray 1.
2. Slide out the tray extender. If the print media being loaded is longer than 23 cm (9
inches), also open the additional tray extender.
3. Slide the media-width guides slightly wider than the print media.
4. Place print media into the tray with the side to be printed upon face-up, and the top,
short edge in first.
Note
If you are manually duplexing, see Printing on both sides (duplexing manually) for loading
instructions.
28 Chapter 4 Using the device ENWW
5. Slide the media-width guides inward until they lightly touch the print media stack on both
sides without bending it. Make sure that the print media fits under the tabs on the media-
width guides.
CAUTION
Wait for the printer to finish printing before closing tray 1. Closing the tray before the printer
finishes can cause jams.
6. On the back of the printer, lower the rear output door if you are printing on special
media, such as labels, envelopes, or heavy or light paper, to prevent curl.
CAUTION
Remove each page as it exits the device to avoid a jam error message.
Loading optional tray 2
Paper includes average-weight letterhead and prepunched paper. For additional information
about letterhead and prepunched paper, see
Printing on special media.
CAUTION
Print on special print media such as labels and transparencies from tray 1 only. Printing on
special print media from optional tray 2 can cause jams. Do not fan paper before loading it
into trays, and avoid overloading trays.
To load optional tray 2
1. Pull optional tray 2 out of the printer and remove any paper.
2. Move the media-width guides to match the size of paper that you are loading. Optional
tray 2 accepts several standard paper sizes.
ENWW Loading trays 29
3. Extend the paper-length adjustment control at the rear of the tray until the arrow on the
markings on the tray points to the size that you are loading.
4. Load the paper. If this is special paper such as letterhead, load it with the side to be
printed upon face-down and the top edge toward the front of the tray.
Note
If you are duplexing manually, see Printing on both sides (duplexing manually) for loading
instructions.
5. Make sure that the stack of paper is flat in the tray at all four corners, and keep it below
the height tabs on the media-length guide in the rear of the tray. Push down on the metal
media-lift plate to lock it into place.
6. Slide the tray into the printer. If you set the rear of the tray to one of the longer sizes, the
back of the tray will protrude from the back of the printer.
Loading documents to scan
Use these instructions to load originals into your device for scanning. For the best quality
scans, use the flatbed scanner.
To load originals onto the flatbed scanner
1. Make sure that the automatic document feeder (ADF) contains no media.
2. Lift the flatbed scanner cover.
3. Place the original document face-down on the flatbed scanner with the upper-left corner
of the document at the lower-right corner of the glass.
4. Gently close the lid.
The document is ready to be scanned.
CAUTION
To prevent damaging the device, do not allow the scanner lid to fall onto the flatbed scanner
surface. Always close the scanner lid when the device is not in use.
30 Chapter 4 Using the device ENWW
To load originals into the automatic document feeder (ADF)
Note
The ADF capacity is up to 50 sheets of 75 g/m
2
(20 lb) media.
The minimum size for media in the ADF is 127 by 127 mm (5 by 5 inches). For smaller sizes,
use the flatbed scanner. The maximum size for media in the ADF is 216 by 381 mm (8.5 by
15 inches).
1. Make sure that the flatbed scanner contains no media.
2. Close the flatbed scanner cover and put the top end of the stack of originals into the
ADF input tray, with the media stack face-up and the first page to be copied on top of the
stack.
CAUTION
To prevent damaging the device, do not use an original that contains correction tape,
correction fluid, paper clips, or staples. Also, do not load photographs, small originals, or
fragile originals into the ADF.
3. Slide the stack into the ADF until it does not move any farther.
The control panel displays the message Document Loaded.
4. Adjust the media guides until they are snug against the media.
5. The document is now ready to be copied.
ENWW Loading trays 31
Using the device control panel
You can configure settings at the device control panel.
Changing the device control-panel display language
Use this procedure to print reports or to display messages on the device control-panel
display in a language other than the default for your country/region.
To change the device control-panel display language
1. Press M
ENU
.
2. Use the < or the > button to select System setup, and then press E
NTER
.
3. Use the < or the > button to select Language, and then press E
NTER
.
4. Use the < or the > button to select the language that you want.
5. Press E
NTER
to save your selection.
The device automatically restarts.
Changing the default media size
Media settings should be set to the size and type of media that you usually load in the media
input tray. The device uses these settings for copying, printing reports, printing faxes
(HP Color LaserJet 2830/2840 all-in-one models only), and determining autoreduction sizes
for incoming faxes (HP Color LaserJet 2830/2840 all-in-one models only), printing proof
sheets (HP Color LaserJet 2840 all-in-one only), and index prints (HP Color LaserJet 2840
all-in-one only).
To change the default media size
1. Press M
ENU
.
2. Use the < or the > button to select System setup, and then press E
NTER
.
3. Use the < or the > button to select Paper setup, and then press E
NTER
.
4. Use the < or the > button to select Def. paper size, and then press E
NTER
.
5. Use the < or the > button to select the paper size that you want to select.
6. Press E
NTER
to save your selection.
To change the default media type
1. Press M
ENU
.
2. Use the < or the > button to select System setup, and then press E
NTER
.
3. Use the < or the > button to select Paper setup, and then press E
NTER
.
4. Use the < or the > button to select Def. paper type, and then press E
NTER
.
5. Use the < or the > button to select the paper size that you want to select.
6. Press E
NTER
to save your selection.
32 Chapter 4 Using the device ENWW
Changing the default paper tray configuration
The default tray configurations (size and type) are set to Any, which means that any type
and any size of supported media can be printed from that tray. Configure your trays for the
size and type using the following instructions only if you regularly need to print on a specific
size and type of media.
To change the default paper tray size
1. Press M
ENU
.
2. Use the < or the > button to select System setup, and then press E
NTER
.
3. Use the < or the > button to select Paper setup, and then press E
NTER
.
4. Use the < or the > button to select Tray 1 (or optional tray 2), and then press E
NTER
.
5. Use the < or the > button to select Paper size, and then press E
NTER
.
6. Use the < or the > button to select the paper size that you want to select.
7. Press E
NTER
to save your selection.
To change the default paper tray type
1. Press M
ENU
.
2. Use the < or the > button to select System setup, and then press E
NTER
.
3. Use the < or the > button to select Paper setup, and then press E
NTER
.
4. Use the < or the > button to select Tray 1 (or optional tray 2), and then press E
NTER
.
5. Use the < or the > button to select Paper type, and then press E
NTER
.
6. Use the < or the > button to select the paper type that you want to select.
7. Press E
NTER
to save your selection.
Using the device volume controls
You can control the volume of the following sounds:
The alarm sound that the device emits when it requires attention, such as when the
device door is open.
The beeps that are emitted when you press the device control-panel buttons.
The phone line sounds for outgoing faxes (HP Color LaserJet 2830/2840 all-in-one
models only).
The ring volume for incoming faxes (HP Color LaserJet 2830/2840 all-in-one models
only).
ENWW Using the device control panel 33
To change the alarm volume
The alarm sounds when the device is presenting an alert or critical error message. The
alarm duration length is either one or three seconds, depending on the type of error.
1. Press M
ENU
.
2. Use the < or the > button to select System setup, and then press E
NTER
.
3. Use the < or the > button to select Volume settings, and then press E
NTER
.
4. Press E
NTER
to select Alarm volume.
5. Use the < or the > button to select Off, Soft, Medium, or Loud.
6. Press E
NTER
to save your selection.
Note
The factory-set default for the alarm volume is Soft.
To change the volume for the fax
This setting determines the volume of various fax sounds that occur when the device is
sending or receiving fax jobs.
1. Press V
OLUME
.
2. Use the < or the > button to select Off, Soft, Medium, or Loud.
3. Press E
NTER
to save your selection.
Note
The factory-set default is Soft.
To change the ring volume of the fax
The fax ring sounds when the device is initially sending or receiving a call. The ring duration
length depends on the local telecom ring-pattern length.
1. Press M
ENU
.
2. Use the < or the > button to select System setup, and then press E
NTER
.
3. Use the < or the > button to select Volume settings, and then press E
NTER
.
4. Press the < or the > button once to select Ring volume, and then press E
NTER
.
5. Use the < or the > button to select Off, Soft, Medium, or Loud.
6. Press E
NTER
to save your selection.
Note
The factory-set default is Soft.
34 Chapter 4 Using the device ENWW
To change the device control panel key-press volume
The key-press volume controls the sound that is made when a device control-panel button is
pressed.
1. Press M
ENU
.
2. Use the < or the > button to select System setup, and then press E
NTER
.
3. Use the < or the > button to select Volume settings, and then press E
NTER
.
4. Use the < or the > button to select Key Press volume, and then press E
NTER
.
5. Use the < or the > button to select Off, Soft, Medium, or Loud.
6. Press E
NTER
to save your selection.
Note
The factory-set default for the device control panel key-press volume is Soft.
ENWW Using the device control panel 35
36 Chapter 4 Using the device ENWW
5
Printing
This section provides information about common printing tasks.
Printing from Windows
Printing from the Macintosh OS
Printer drivers
Maximizing print speed for letter-size paper
Selecting an output location
Setting a custom paper size
Printing on special media
Printing on different paper for the first page
Printing on both sides (duplexing manually)
Printing booklets
Canceling a print job
For information about managing the printer and its settings by using the HP Toolbox, see
Managing supplies.
Note
Many of the functions that are described in this chapter also can be performed by using the
HP Toolbox. For instructions about using the HP Toolbox, see the HP Toolbox online Help.
ENWW 37
Printing from Windows
To print from Windows
1. Make sure that print media is loaded in the printer.
2. At your computer, open a document.
3. On the File menu, click Page Setup or a similar command. Make sure that the settings
are correct for this document.
4. From the File menu, click Print, Print Setup, or a similar command. The Print dialog
box opens.
5. Select this printer and change settings as necessary. Do not change any settings, such
as page size or orientation, that you set in the Page Setup dialog box.
6. If this print job is for a standard size and weight of paper, you probably do not need to
change the Source is (tray), Type is, or Size is settings, and you can go to step 8.
Otherwise, go to step 7.
7. If this print job is to be printed on a non-standard size or weight of paper, select how the
printer pulls paper.
To print by source (tray), select the tray in the Print dialog box, if possible.
To print by source (tray) when this setting is not available in the Print dialog box,
click Properties, and on the Paper tab, select the tray in the Source is field.
To print by type or size, click Properties and, on the Paper tab, select the type or
size in the Type is or Size is field. (For some paper, such as letterhead, labels,
glossy paper, or photo paper, you will set both the type and size.)
Note
Always print by type for special print media such as labels or transparencies. Use only
transparencies that are designed for use with HP color LaserJet printers. Inkjet and
monochrome transparencies are not supported for this device.
8. If you have not yet done so, click Properties. The printer driver opens.
9. On the various tabs, set any settings that you want that did not appear in the Page
Setup or Print dialog box. For more information about printer-driver settings, see the
printer driver online Help.
10. By default, the printer prints to the top output bin, which is the best location for most print
jobs, including transparencies. For labels, heavy paper, or other special print media,
lower the rear output door on the printer.
11. Select the Print command to print the job.
38 Chapter 5 Printing ENWW
Printing from the Macintosh OS
To print from the Macintosh OS
1. Make sure that paper is loaded in the printer.
2. On the File menu, click Page Setup.
3. Make sure that this printer is selected on the Format for pop-up menu.
4. Select the size of paper onto which you are printing.
5. Select the Orientation and Scale, if necessary, and click OK.
6. On the File menu, click Print.
7. Use one of the following methods to select the source (tray) from which you want to print
or select the type of media onto which you want to print. Always print by type for
special print media such as labels or transparencies.
Mac OS 9.2.2: On the General pop-up menu, select the tray or type of media from
the Paper Source pop-up menu.
Mac OS 10.2 or 10.3: On the Paper Feed pop-up menu, select the tray or type of
media.
8. Set any other settings that you want, such as watermarks.
9. By default, the printer prints to the top output bin, which is the best location for most print
jobs, including transparencies. For labels, heavy paper, or other jobs that require a
straight-through path, lower the rear output door on the printer.
10. Select the Print command to print the job.
ENWW Printing from the Macintosh OS 39
Printer drivers
Using the PCL printer-driver Help (Windows only)
When you are in the printer driver, you can use its Help, which is separate from the Help in a
program. You can activate Help for the printer driver in two ways.
Click the Help button anywhere it appears in the printer driver. The Help windows give
detailed information about the specific printer driver in use.
When you see a
(bubble icon), click it to view information about the field, option, or
button that the bubble adjoins.
Selecting a source
You can print by source (tray) or by type or size. To print by source, follow these steps. For
Macintosh operating systems, types and sizes are grouped together under the Paper
Source pop-up menu.
Windows: In the Print dialog box in your software program, select the Source (tray), if
possible. Otherwise, select a tray from the Source is field from the Paper tab in your
printer driver.
Mac OS 9.2.2: In the Print dialog box, select a tray on the Paper Source pop-up menu
on the General pop-up menu.
Mac OS 10.2 or 10.3: From the Print dialog box, select the tray or type of media on the
Paper Feed pop-up menu.
Selecting a type or size
You can print by source (tray) or by type or size. If you are printing on special print media,
such as heavy paper, it is important to print by type to achieve good results. To print by type
or size, follow these steps. For Macintosh operating systems, types and sizes are all
grouped together under the Paper Source pop-up menu.
Windows: In the printer driver, select a type in the Type is field of the Paper tab. Or,
select a size from the Size is field. For some paper, such as letterhead, you select both
a type and size.
Mac OS 9.2.2: In the Print dialog box, select a type on the Paper Source pop-up menu
on the General pull-up menu.
Mac OS 10.2 or 10.3: In the Print dialog box, select the tray or type of media on the
Paper Feed pull-up menu.
40 Chapter 5 Printing ENWW
Printing in grayscale
If you have a document that you created in color, it will automatically print in color. Or, you
can set the printer to print a color document in grayscale (black and white) only.
Windows: Select the Print In Grayscale option on the Color tab of the printer driver.
Mac OS: In the Print dialog box, select the Color Options tab, and then select the Print
Color as Gray checkbox.
Creating and using watermarks
Use the watermark options to specify that text be placed "underneath" (in the background of)
an existing document. For example, you might want to have large gray letters reading "draft"
or "confidential" placed diagonally across the first page or all pages of a document. You can
change color, position, and wording of the watermark.
Note
If you are using Windows 2000 or XP, you must have Administrator privileges to create
watermarks. You do not need Administrator privileges to add existing watermarks to
documents.
Windows: Gain access to the Watermarks options on the Effects tab in your printer
driver.
Mac OS: Gain access to the Watermark options on the watermark/overlay pull-down
menu in the Print dialog box. (Note that OS X might not support watermarks.)
Printing multiple pages on one sheet of paper (N-up printing)
N-up printing is the ability to print multiple pages on one sheet of paper. The pages will
appear decreased in size. You can specify up to nine pages per sheet, and they will be
arranged on the sheet as shown in the following figures if you use the default arrangement.
You can also choose whether a border appears around each page or not.
Windows: Gain access to Pages per Sheet on the Finishing tab in the printer driver.
Mac OS: Gain access to Pages per sheet by selecting the Layout pop-up menu in the
Print dialog box.
Creating and using Quick Sets
Use Quick Sets to save the current print-driver settings such as the page orientation, N-up
printing, or the paper source for later use. You can save up to a total of 30 Quick Sets. For
convenience, Quick Sets can be selected and saved from most printer-driver tabs.
ENWW Printer drivers 41
Note
If you are using Windows 2000, you must have Administrator privileges to save Quick Sets.
Windows: Create Quick Sets from most printer-driver tabs. Later, you can gain access to
Quick Sets on the Finishing tab in the printer driver.
Mac OS: This feature is not supported.
Reducing or enlarging (Fit to Page)
Use the Fit to Page option to scale your document to a percentage of its normal size. You
can also choose to scale your document to fit on any size of paper that the printer supports.
Windows: Gain access to Fit to Page settings on the Effects tab in the printer driver.
Mac OS: Gain access to Reduce and Enlarge (Scale) settings in the Page Setup dialog
box.
42 Chapter 5 Printing ENWW
Maximizing print speed for letter-size paper
The printer can print at 20 ppm in black on letter-size paper. When printing letter-size pages
from tray 2, this happens automatically.
For tray 1, the printer is set at the factory to print 19 ppm in black on letter-size paper. To
achieve a print speed of 20 ppm from tray 1, set the tray 1 size to letter. To set the tray 1
size, open the HP Toolbox, click the Settings tab, click Configure Device, and click Paper
Handling. Set the tray 1 size to letter.
When tray 1 is configured for letter, and a print job specifies another media size such as
envelopes, the Error light blinks until you load the correct print media into tray 1 and press
E
NTER
.
Also, to achieve a print speed of 20 ppm (19 ppm for A4), you must set the device to print in
grayscale. For more information, see
Printing in grayscale.
ENWW Maximizing print speed for letter-size paper 43
Selecting an output location
The printer comes with the top output bin and a rear output door for printing to a straight-
through paper path. Print jobs emerge from the top output bin when the rear output door is
closed. Print jobs emerge from the back of the printer when the rear output door is open.
Use the top output bin when printing most jobs, including jobs on average-weight paper,
letterhead, and transparencies. The top output bin can hold up to 125 sheets. Prevent
more than 125 sheets from accumulating in the top output bin, or jams can occur.
Use the rear output door (straight-through paper path) if problems occur when printing to
the top output bin, or when printing on such media as cardstock, envelopes, labels, or
photo paper. Remove each sheet as it exits the printer.
1 top output bin
2 rear output door
44 Chapter 5 Printing ENWW
Setting a custom paper size
Use the Custom Paper feature to set up the printer to print to sizes other than standard ones.
Windows: Try to set this setting from one of these locations, in this order: the Page
Setup dialog box in the program, the Print dialog box in the program, or the Paper tab
in the printer driver.
Mac OS 9.2.2: Gain access to Custom Paper features in the Page Setup dialog box. On
the Page Attributes pop-up menu, select Custom Page Size.
Mac OS 10.2 or 10.3: To set a custom paper size, click File, and then click Page Setup.
Click the Page Attributes menu, and select Custom Paper Size.
ENWW Setting a custom paper size 45
Printing on special media
Use these guidelines when printing on special types of media.
Note
Use the rear output door (straight-through paper path) when printing on special media.
Glossy paper
In either the software application or the driver, select Glossy as the media type, or print
from a tray that is configured for glossy paper.
Select Glossy for media weights up to 105 g/m
2
(28 lb bond). Select Heavy glossy for
media weights up to 120 g/m
2
(32 lb bond).
Because this affects all print jobs, it is important to return the printer to its original
settings once the job has printed.
Note
Hewlett-Packard recommends using HP Color LaserJet Soft Gloss paper with this printer.
HP products are designed to work together for optimum printing results. If HP Color LaserJet
Soft Gloss paper is not used with this printer, print quality may be compromised.
Use only glossy papers that are designed for use with HP Color LaserJet printers. Inkjet
glossy papers are not supported for this device.
Colored paper
Colored paper should be of the same high quality as white xerographic paper.
Pigments used must be able to withstand the printer’s fusing temperature of 190°C (374°
F) for 0.1 second without deterioration.
Do not use paper with a colored coating that was added after the paper was produced.
The printer creates colors by printing patterns of dots, overlaying and varying their
spacing to produce various colors. Varying the shade or color of the paper will affect the
shades of the printed colors.
Preprinted forms and letterhead
When printing on preprinted forms and letterhead, observe the following guidelines for best
results:
Forms and letterhead must be printed with heat-resistant inks that will not melt, vaporize,
or release hazardous emissions when subjected to the printer’s fusing temperature of
approximately 190°C (374°F) for 0.1 second.
Inks must be non-flammable and should not adversely affect any printer rollers.
Forms and letterhead should be sealed in a moisture-proof wrapping to prevent changes
during storage.
Before loading preprinted paper such as forms and letterhead, verify that the ink on the
paper is dry. During the fusing process, wet ink can come off of preprinted paper.
46 Chapter 5 Printing ENWW
When duplex printing on the HP Color LaserJet 2820/2830/2840 all-in-one, load
preprinted forms and letterhead into tray 2 first side up, top edge toward the back of the
tray. To load preprinted forms and letterhead into tray 1, load them with the first side
down, bottom edge in first.
When simplex (1-sided) printing, load preprinted forms and letterhead into tray 2 face-
down with the top edge of the page toward the device. To load preprinted forms and
letterhead into tray 1, place them in the tray with the side to be printed on facing up, and
top, short edge in first.
Envelopes
Note
Envelopes can be printed only from tray 1. Set the tray media size to the specific envelope
size.
Adhere to the following guidelines to help ensure proper printing on envelopes and to help
prevent printer jams:
Do not load more than 10 envelopes into tray 1.
The weight rating of envelopes should not exceed 90 g/m
2
(24 lb bond).
Envelopes should be flat.
Do not use envelopes with windows or clasps.
Envelopes must not be wrinkled, nicked, or otherwise damaged.
Envelopes with peel-off adhesive strips must use adhesives that can withstand the heat
and pressures of the device fusing process.
Envelopes should be loaded face-up with the top of the envelope to the left, and the
short edge feeding into the device first.
Heavy paper
Any tray will print most heavy media that does not exceed 105 g/m
2
(28 lb bond).
Use cardstock only in tray 1 (135 g/m
2
to 216 g/m
2
; 50 to 80 lb cover).
In either the software application or the printer driver, select Heavy (106 g/m
2
to 163 g/
m
2
; 28 to 43 lb bond) or Cardstock (135 g/m
2
to 216 g/m
2
; 50 to 80 lb cover) as the
media type, or print from a tray that is configured for heavy paper. Because this setting
affects all print jobs, it is important to return the printer back to its original settings after
the job has printed.
CAUTION
In general, do not use paper that is heavier than the media specification recommended for
this printer. Doing so can cause misfeeds, paper jams, reduced print quality, and excessive
mechanical wear. However, some heavier media, such as HP Cover Stock, can be safely
used.
ENWW Printing on special media 47
HP LaserJet Tough paper
When printing on HP LaserJet Tough paper, use the following guidelines:
Handle HP LaserJet Tough paper using the edges. Oils from your fingers deposited on
HP LaserJet Tough paper can cause print quality problems.
Use only HP LaserJet Tough paper with this printer. Hewlett-Packard products are
designed to work together for optimum printing results.
In either the software application or the printer driver, select Tough Paper as the media
type, or print from a tray that is configured for HP LaserJet Tough paper.
Labels
Note
In either the application or the printer driver, select Labels as the media type, or configure
tray 1 for labels.
When printing labels, use the following guidelines:
Verify that the labels’ adhesive material can tolerate temperatures of 190°C (374°F) for
0.1 second.
Verify that there is no exposed adhesive material between the labels. Exposed areas
can cause labels to peel off during printing, which can cause paper jams. Exposed
adhesive can also cause damage to printer components.
Do not re-feed a sheet of labels.
Verify that labels lie flat.
Do not use labels that are wrinkled, bubbled, or otherwise damaged.
Transparencies
When printing on transparencies, use the following guidelines:
Handle transparencies using the edges. Oils from your fingers deposited on the
transparency can cause print quality problems.
Use only overhead transparencies recommended for use in this printer. Hewlett-Packard
recommends using HP Color LaserJet Transparencies with this printer. HP products are
designed to work together for optimum printing results.
In either the software application or the printer driver, select Transparency as the media
type, or print from a tray that is configured for transparencies.
CAUTION
Use only transparencies that are designed for use with HP Color LaserJet printers. Inkjet
and monochrome transparencies are not supported for this device. Transparent media that
are not designed for color LaserJet printing will melt in the printer, causing damage to the
printer.
48 Chapter 5 Printing ENWW
Printing on different paper for the first page
Printing on different paper for the first page is useful if, for example, you are printing a letter
that uses letterhead on the first page and plain sheets for the subsequent pages. The size
for all pages of the print job must be the same in the printer driver.
Windows: Try to set this setting from one of these locations, in this order: the Page
Setup dialog box in the program, the Print dialog box in the program, or the Paper tab
in the printer driver.
Mac OS 9.2.2: On the General pop-up menu in the Print dialog box, select the First
Page from option. Then, select the source for the first page.
Mac OS 10.2 or 10.3: On the Paper Feed pop-up menu in the Print dialog box, select
the First Page from option. Then, select the source for the first page.
ENWW Printing on different paper for the first page 49
Printing on both sides (duplexing manually)
To print on both sides of the paper, you have to return to the printer and reinsert the paper
manually after the first side has printed.
CAUTION
Do not print on both sides of labels or transparencies. Damage to the printer and jams might
result.
Note
Macintosh operating systems do not support manual duplexing.
To duplex manually
1. Insert enough paper into one of the trays to accommodate the print job. If you are
loading special paper such as letterhead, load it in one of these ways.
For tray 1, load the letterhead paper face-down, and the bottom edge leading into
the printer first.
For optional tray 2, load the letterhead paper face-up, and the top edge toward the
back of the tray.
1 tray 1
2 optional tray 2
2. In the printer driver, select the Print on Both Sides option and send the job to print.
3. After the job finishes printing, remove any blank paper from tray 1. Insert the printed
stack, with the blank side up, and the top edge leading into the printer. Print the second
side from tray 1.
4. Press E
NTER
to continue printing.
50 Chapter 5 Printing ENWW
Printing booklets
Note
Printing booklets is not supported for Macintosh.
You can print booklets on letter, legal, or A4 print media.
To print booklets
1. Load the print media in the media input tray.
2. In the software program, open the device properties (printer driver).
3. On the Finishing tab, select Print on Both Sides.
Note
If the Print on Both Sides option is dimmed or unavailable, open the device properties
(printer driver). For instructions, see
Software tips. On the Device Settings tab or the
Configure tab, select the option to allow manual duplexing, and then click OK. Repeat
steps 2 and 3.
Not all device features are available for all printer drivers or operating systems. See the
device properties (driver) online Help for information about the available features for the
driver.
4. Set the number of pages per sheet to two. Select the appropriate binding option, and
click OK.
5. Print the booklet.
6. After side one has been printed, remove the remaining paper from the input tray, and set
it aside until your booklet job is complete.
7. Gather the printed pages, turn the printed side down, and straighten the stack of paper.
ENWW Printing booklets 51
8. Place the pages from side one in the input tray again. Side one should be facing down
with the top edge feeding into the device first.
9. Click OK (on the computer screen), and wait for side two to print.
10. Fold and staple the pages.
52 Chapter 5 Printing ENWW
Canceling a print job
If your print job is currently printing, you can cancel it by pressing C
ANCEL
on the device
control panel.
CAUTION
Pressing C
ANCEL
clears the job that the device is currently processing. If more than one
process is running (for example, the device is printing a document while receiving a fax),
pressing C
ANCEL
clears the process that currently appears on the device control panel.
You can also cancel a print job from a software program or a print queue.
To stop the print job immediately, remove the remaining print media from the device. After
printing stops, use one of the following options:
Device control panel: To cancel the print job, press and release C
ANCEL
on the device
control panel.
Software program: Typically, a dialog box appears briefly on the computer screen,
allowing you to cancel the print job.
Windows print queue: If a print job is waiting in a print queue (computer memory) or
print spooler, delete the job there.
Windows 98, Windows Me, or Windows 2000: Go to the Printer dialog box. Click
Start, click Settings, and then click Printers. Double-click the device icon to open
the window, select your print job, and then click Delete.
Windows XP: Click Start, and then click Printers and Faxes. Double-click the
device icon to open the window, select your print job, and then click Delete.
Desktop print queue (Macintosh): Open the print queue by double-clicking the device
icon in the Finder. Then highlight the print job and click Trash.
ENWW Canceling a print job 53
54 Chapter 5 Printing ENWW
6
Printing with color
This chapter describes how the device provides great color printing. This chapter also
describes ways to produce the best possible color prints. The following topics are covered:
Changing the color settings
Using color
Managing color options
Matching colors
ENWW 55
Changing the color settings
When you are printing in color, the printer driver is automatically set to the optimal color
settings. However, you can manually make adjustments to how the device prints in color for
text, graphics, and photographs. See
Managing color options for more information.
Windows: On the Color tab of the printer driver, click Settings.
Mac OS 9.2.2: In the Print dialog box, select either the Color Options tab or the Color
Matching tab.
Mac OS 10.2 or 10.3: In the Print dialog box, click the Color Options tab, and then click
the Show Advanced Options button.
56 Chapter 6 Printing with color ENWW
Using color
This device offers great color as soon as you set it up. It provides a combination of automatic
color features to generate excellent color results for the general user, plus sophisticated
tools for the experienced color user.
The device provides carefully designed and tested color tables to provide smooth, accurate
color rendition of all printable colors.
Media selection
For the best color and image quality, it is important to select the appropriate media type from
the software printer menu or from the printer driver. See
Media specifications for more
information.
HP ImageREt 2400
HP ImageREt 2400 is a technology that provides the best color print quality without having
to change driver settings or make tradeoffs among print quality, performance, and memory.
ImageREt 2400 uses laser printing to produce sharp images and crisp, clear text.
HP ImageREt 2400 provides emulated 2400 dpi color laser-class quality through a multiple-
level printing process. This process precisely controls color by combining up to four colors
within a single dot and by varying the amount of toner in a given area. As a result, ImageREt
2400, together with the 600 x 600 engine resolution, creates millions of smooth colors.
ENWW Using color 57
Managing color options
Setting color options to Automatic typically produces the best possible print quality for color
documents. However, in some situations, you might want to print a color document in
grayscale (black and shades of gray) or to change one of the device color options.
Windows: Print in grayscale or change the color options by using settings on the Color
tab in the printer driver.
Mac OS 9.2.2: Print in grayscale or change the color options by using the Color
Matching pop-up menu in the Print dialog box.
Mac OS 10.2, 10.3: Print in grayscale or change the color options by selecting Color
Options, and then clicking Show Advanced Options in the Print dialog box.
Print in Grayscale
Selecting the Print in Grayscale option from the printer driver prints a document in black
and shades of gray. This option is useful for printing color documents that will be
photocopied or faxed.
When Print in Grayscale is selected, the device enters monochrome mode. Printing in this
mode reduces wear on the color print cartridges.
Automatic versus Manual color adjustment
The Automatic color adjustment option optimizes the neutral gray color treatment,
halftones, and edge enhancements that are used for each element in a document. For more
information, see your printer-driver online Help.
Note
Automatic is the default setting and is recommended for printing all color documents.
Use the Manual color adjustment option to adjust the neutral gray color treatment, halftones,
and edge enhancements for text, graphics, and photographs. To gain access to the manual
color options, on the Color tab, click Manual, and then click Settings.
Manual color options
Use the manual color adjustment to adjust the Color (or Color Map) and Halftone options.
Note
Some software programs convert text or graphics to raster images. In these cases, the
Photographs setting also controls the text and graphics.
58 Chapter 6 Printing with color ENWW
Halftone options
Halftoning is the method by which the device mixes the four primary colors (cyan, magenta,
yellow, and black) in varying proportions to create millions of colors. Halftone options affect
the resolution and clarity of your color output. The two halftone options are Smooth and
Detail.
The Smooth option provides better results for large, solid-filled print areas. It also
enhances photos by smoothing out fine color gradations. Choose this option when
uniform and smooth area fills are the most important attributes.
The Detail option is useful for text and graphics that require sharp distinctions among
lines or colors, or images that contain a pattern or a high level of detail. Choose this
option when sharp edges and details are the most important attributes.
Neutral Grays
The Neutral Grays setting determines the method for creating gray colors that are used in
text, graphics, and photographs.
Black Only generates neutral colors (grays and black) by using only black toner. This
option guarantees that neutral colors do not have a color cast and generally produces
the best results for text and graphics.
4-Color generates neutral colors by combining all four colors of toner. This option
produces smoother gradients and transitions to non-neutral colors. It also produces the
darkest possible black.
RGB Color
The RGB Color option determines how colors are rendered.
Default interprets RGB color as standard red-green-blue (sRGB), which is the accepted
standard for many software companies and organizations, such as Microsoft and the
World Wide Web Consortium. The sRGB standard improves your ability to match colors
between the device, the computer monitor, and other input devices (scanners and digital
cameras) automatically, without the need to become a color expert. For more
information, see http://www.w3c.org.
Vivid instructs the device to increase the color saturation in the midtones. Less colorful
objects are rendered more colorfully. This value is recommended for printing business
graphics.
Device sets the device to print RGB data in raw device mode. To render photographs
properly when this option is selected, you must manage color in the program in which
you are working or in the operating system.
Image instructs the device to match the color reproduction of a film-based photograph.
This value is recommended for images and is used by default when printing directly from
the memory-card slot.
ENWW Managing color options 59
Matching colors
The process of matching device output color to your computer screen is quite complex
because printers and computer monitors use different methods of producing color. Monitors
display colors by light pixels using an RGB (red, green, and blue) color process, but printers
print colors using a CMYK (cyan, magenta, yellow, and black) process.
The following factors can influence your ability to match printed colors to those on your
screen:
print media
device colorants (inks or toners, for example)
printing process (inkjet, press, or laser technology, for example)
overhead lighting
programs
printer drivers
computer operating system
monitors
video cards and drivers
operating environment (very humid or very dry)
personal differences in perception of color
Keep these factors in mind when colors on your screen do not perfectly match your printed
colors. For most users, the best method for matching colors on your screen to your device is
to print sRGB colors. The device uses sRGB and automatically optimizes color output.
For more information about solving issues that are related to color output, see
Solving issues
with color documents.
60 Chapter 6 Printing with color ENWW
7
Copy
Use these instructions to perform copying tasks with the device:
Starting a copy job
Canceling a copy job
Adjusting the copy quality
Adjusting the lighter/darker (contrast) setting
Reducing or enlarging copies
Changing the copy-collation setting
Changing the number of copies
Copying photos, two-sided originals, or books
Note
Many of the functions that are described in this chapter also can be performed by using the
HP Toolbox. For instructions about using the HP Toolbox, see the HP Toolbox online Help.
ENWW 61
Starting a copy job
To make copies with the device, use the following instructions.
1. Load your original document onto the flatbed scanner face-down (one page at a time)
with the upper-left corner of the document located in the lower-right corner of the glass.
OR
Load your original document face-up into the automatic document feeder (ADF) input
tray. The ADF is recommended for copying multiple-page documents.
2. Press S
TART
B
LACK
or S
TART
C
OLOR
on the device control panel to start copying.
3. Repeat the process for each copy.
For more detailed instructions about loading originals onto the flatbed scanner or into the
ADF input tray, see
Loading documents to scan.
Note
If originals are loaded in the ADF input tray and are also on the flatbed scanner, the device
automatically scans from the ADF regardless of whether an original has been placed on the
flatbed scanner.
62 Chapter 7 Copy ENWW
Canceling a copy job
To cancel a copy job, press C
ANCEL
on the device control panel. If more than one process is
running, pressing C
ANCEL
clears the process that currently appears on the device control-
panel display.
Note
If you cancel a copy job, clear the original document from the flatbed scanner or from the
automatic document feeder (ADF).
ENWW Canceling a copy job 63
Adjusting the copy quality
The factory-set default for copy quality is Text. This setting is the best for items that contain
mostly text.
When making a copy of a photo or graphic, you can select the Photo setting to increase the
quality of your copy.
Select the Mixed setting for documents that include both text and graphics.
If you want to conserve toner, and the copy quality is not as important, select Draft.
To adjust the copy quality for the current job
1. On the device control panel, press Q
UALITY
to see the current quality setting for the copy.
2. Use the < or the > button to scroll through the quality setting options.
3. Select a setting, and then press S
TART
B
LACK
or S
TART
C
OLOR
to save the selection and
immediately start the copy job, or press E
NTER
to save the selection without starting the
job.
Note
The change in the setting remains active for about two minutes after the copy job has been
completed. During this time, Settings=Custom appears on the device control-panel display.
To adjust the default copy quality
1. On the device control panel, press M
ENU
.
2. Use the < or the > button to select Copy setup, and then press E
NTER
.
3. Press E
NTER
to select Default Quality.
4. Use the < or the > button to scroll through the choices.
5. Press E
NTER
to save the selection.
64 Chapter 7 Copy ENWW
Adjusting the lighter/darker (contrast) setting
The lighter/darker setting affects the lightness or darkness (contrast) of the copy. Use the
following procedure to change the contrast for the current copy job only.
To adjust the lighter/darker setting for the current job
1. On the device control panel, press L
IGHTER
/D
ARKER
to see the current contrast setting.
2. Use the < or the > button to adjust the setting. Move the slider to the left to make the
copy lighter than the original, or move the slider to the right to make the copy darker
than the original.
3. Press S
TART
B
LACK
or S
TART
C
OLOR
to save the selection and immediately start the copy
job, or press E
NTER
to save the selection without starting the job.
Note
The change in the setting remains active for about two minutes after the copy job has been
completed. During this time, Settings=Custom appears on the device control-panel display.
To adjust the default lighter/darker setting
Note
The default lighter/darker setting affects all copy jobs.
1. On the device control panel, press M
ENU
.
2. Use the < or the > button to select Copy setup, and then press E
NTER
.
3. Use the < or the > button to select Def. Light/Dark, and then press E
NTER
.
4. Use the < or the > button to adjust the setting. Move the slider to the left to make all of
the copies lighter than the original, or move the slider to the right to make all of the
copies darker than the original.
5. Press E
NTER
to save the selection.
ENWW Adjusting the lighter/darker (contrast) setting 65
Reducing or enlarging copies
The device can reduce copies to as little as 25% of the original or enlarge copies to as much
as 400% of the original. It can also make the following reductions or enlargements
automatically:
Original=100%
Lgl > Ltr=78%
Lgl > A4=83%
A4 > Ltr=94%
Ltr > A4=97%
Full Page=91%
Fit to page
2 pages/sheet
4 pages/sheet
Custom: 25-400%
Note
When using the Fit to page setting, copy from the flatbed scanner only.
When using the 2 pages/sheet or 4 pages/sheet setting, copy from the automatic document
feeder (ADF) only. Also, after selecting the 2 pages/sheet or 4 pages/sheet option, you
must select the page orientation (portrait or landscape).
66 Chapter 7 Copy ENWW
To reduce or enlarge copies for the current job
To reduce or enlarge copies for the current job only, use the following instructions.
1. On the device control panel, press R
EDUCE
/E
NLARGE
.
2. Select the size to which you would like to reduce or enlarge the copies in this job. You
can select one of the following sizes:
Original=100%
Lgl > Ltr=78%
Lgl > A4=83%
A4 > Ltr=94%
Ltr > A4=97%
Full Page=91%
Fit to page
2 pages/sheet
4 pages/sheet
Custom: 25-400%
If you select Custom: 25-400%, type a percentage by using the alphanumeric buttons.
If you select 2 pages/sheet or 4 pages/sheet, select the orientation (portrait or
landscape).
3. Press S
TART
B
LACK
or S
TART
C
OLOR
to save the selection and immediately start the copy
job, or press E
NTER
to save the selection without starting the job.
Note
The change in the setting remains active for about two minutes after the copy job has been
completed. During this time, Settings=Custom appears on the device control-panel display.
You must change the default media size in the media input tray to match the output size, or
part of your copy might be cut off. For instructions, see
Changing the default media size.
ENWW Reducing or enlarging copies 67
To change the default copy size
Note
The default copy size is the size to which copies are normally reduced or enlarged. If you
keep the factory default size setting of Original=100%, all copies will be the same size as
the original document.
1. Press M
ENU
.
2. Use the < or the > button to select Copy setup, and then press E
NTER
.
3. Use the < or the > button to select Def. Redu/Enlrg, and then press E
NTER
.
4. Use the < or the > button to select the option for how you normally want to reduce or
enlarge copies. You can select one of the following options:
Original=100%
Lgl > Ltr=78%
Lgl > A4=83%
A4 > Ltr=94%
Ltr > A4=97%
Full Page=91%
Fit to page
2 pages/sheet
4 pages/sheet
Custom: 25-400%
If you select Custom: 25-400%, type in the percentage of the original size that you
normally want for copies.
If you select 2 pages/sheet or 4 pages/sheet, select the orientation (portrait or
landscape).
5. Press E
NTER
to save your selection.
68 Chapter 7 Copy ENWW
Changing the copy-collation setting
You can set the device to automatically collate multiple copies into sets. For example, if you
are making two copies of three pages and the automatic collation is on, the pages print in
this order: 1,2,3,1,2,3. If automatic collation is off, the pages print in this order: 1,1,2,2,3,3.
To use the automatic collation, the original document must fit into the memory. If it does not,
the device makes only one copy and a message appears notifying you of the change. If that
happens, use one of the following methods to finish the job:
Split the job into smaller jobs that contain fewer pages.
Make only one copy of the document at a time.
Turn off the automatic collation.
The collation setting you select is in effect for all copies until you change the setting.
To change the default copy-collation setting
1. On the device control panel, press M
ENU
.
2. Use the < or the > button to select Copy setup, and then press E
NTER
.
3. Press E
NTER
to select Def. Collation.
4. Use the < or the > button to select On or Off.
5. Press E
NTER
to save your selection.
Note
The factory-set default for automatic copy collation is On.
ENWW Changing the copy-collation setting 69
Changing the number of copies
You can choose to have the default number of copies be any number from 1 to 99.
To change the number of copies for the current job
1. Use the alphanumeric buttons to type the number of copies (between 1 and 99) that you
want to make for your current job.
2. Press S
TART
B
LACK
or S
TART
C
OLOR
to begin copying your job.
Note
The change in the setting remains active for about two minutes after the copy job has been
completed. During this time, Settings=Custom appears on the device control-panel display.
To change the default number of copies
1. On the device control panel, press M
ENU
.
2. Use the < or the > button to select Copy setup, and then press E
NTER
.
3. Use the < or the > button to select Def. # of copies, and then press E
NTER
.
4. Use the alphanumeric buttons to type the number of copies (between 1 and 99) that you
want as the default.
5. Press E
NTER
to save your selection.
Note
The factory-set default for the number of copies is 1.
70 Chapter 7 Copy ENWW
Copying photos, two-sided originals, or books
To copy a photo
Note
Photos should be copied from the flatbed scanner, not from the automatic document feeder
(ADF).
1. Place the photo on the flatbed scanner with the picture-side down and the upper-left
corner of the photo in the lower-right corner of the glass.
2. Gently close the lid.
3. Press S
TART
B
LACK
or S
TART
C
OLOR
.
To copy a multiple-page stack of two-sided originals
1. Load the stack of originals to be copied into the automatic document feeder (ADF) with
the first page facing up, and with the top of the page leading into the ADF.
2. Press S
TART
B
LACK
or S
TART
C
OLOR
. The odd-numbered pages are copied and printed.
3. Remove the stack from the ADF output tray and reload the stack with the last page
facing up, and with the top of the page leading into the ADF.
4. Press S
TART
B
LACK
or S
TART
C
OLOR
. The even-numbered pages are copied and printed.
ENWW Copying photos, two-sided originals, or books 71
5. Collate the odd- and even-numbered printed copies.
To copy a book
1. Lift the lid and place the book on the flatbed scanner with the page that you want to copy
at the lower-right corner of the glass.
2. Gently close the lid.
3. Gently press down on the lid to press the book to the flatbed scanner surface.
4. Press S
TART
B
LACK
or S
TART
C
OLOR
, or use one of the other scanning methods to copy the
book. See
Understanding scanning methods for more information.
72 Chapter 7 Copy ENWW
8
Fax
Use the following instructions to perform fax tasks:
Specifying the fax settings
Sending faxes
Using manual dial
Redialing manually
Canceling a fax job
Sending faxes by using the software
Receiving faxes
Sending a fax by dialing from a telephone
Changing the default light/dark (contrast) setting
Changing the default resolution setting
Changing the default glass-size setting
Selecting tone-dialing or pulse-dialing mode
Changing the redial settings
Receiving faxes to your computer
Setting the answer mode
Changing ring patterns for call answering
Changing the rings-to-answer setting
Changing autoreduction settings for incoming faxes
Blocking or unblocking fax numbers
About speed-dial entries, one-touch keys, and group-dial entries
Using dialing characters
Inserting a dial prefix
Sending a delayed fax
Changing the detect-dial-tone setting
Using billing codes
Reprinting a fax
Deleting faxes from memory
Using fax forwarding
Making an extension telephone available to receive faxes
Using fax polling
ENWW 73
Changing the silence-detect mode
Creating stamp-received faxes
Setting the fax-error-correction mode
Changing the V.34 setting
Note
Many of the functions that are described in this chapter also can be performed by using the
HP Toolbox. For instructions about using the HP Toolbox, see the HP Toolbox online Help.
74 Chapter 8 Fax ENWW
Specifying the fax settings
Before you can begin using the device fax features, you must complete the following tasks:
Setting the time and date
Setting the fax header
Note
If you are installing the device software on your computer, you can skip the remaining
instructions in this chapter. The software installer automatically helps you to set up the fax
settings, unless you are using Microsoft Windows® 95 or Windows NT®.
In the United States and many other regions/countries, setting the time, date, and other fax
header information is a legal requirement.
To enter text from the control panel
Use the following instructions to enter information from the device control panel with the
alphanumeric buttons and the < and the > buttons:
Numbers: To enter numbers, press the numeric button for the number that you need.
Letters: To enter letters, repeatedly press the numeric button for the letter that you need
until that letter appears. (For example, if the first letter that you need is a “C,” press 2
repeatedly until a C appears in the control-panel display.)
Punctuation marks: To enter punctuation marks, repeatedly press * until the character
that you need appears in the control-panel display.
Spaces: After entering any character, press the > button twice to create a space after
that character and move the cursor to an insertion point after the space.
Errors: If you enter a character incorrectly, use the < button to erase the incorrect
character, and then enter the correct character.
Note
For more information on control-panel characters, see Using dialing characters.
ENWW Specifying the fax settings 75
To set the time and date
To set or change the time and date, use the following steps. If you need help entering any
information, see
To enter text from the control panel.
1. On the device control panel, press M
ENU
.
2. Use the < or the > button to select Time/Date,Header, and then press E
NTER
.
3. Press E
NTER
to select Time/Date.
4. Use the < or the > button to specify either the 12-hour or the 24-hour clock, and then
press E
NTER
.
5. Use the alphanumeric buttons to enter the current time.
6. Complete one of the following actions:
If you specified the 12-hour clock, use the < or the > button to move the cursor past the
fourth character. Select 1 for A.M. or 2 for P.M., and then press E
NTER
.
If you specified the 24-hour clock, press E
NTER
.
7. Use the < or the > button to specify date format, and then press E
NTER
.
8. Use the alphanumeric buttons to enter the current date.
Make sure that you use two digits to specify the month and day (for example, use “05”
for May and “01” for the first day of the month of May).
9. Press E
NTER
.
To set the fax header
To set or change the fax header information, complete the following steps. If you need help
entering any information, see
To enter text from the control panel.
1. On the device control panel, press M
ENU
.
2. Use the < or the > button to select Time/Date,Header, and then press E
NTER
.
3. Use the < or the > button to select Fax Header, and then press E
NTER
.
4. Use the alphanumeric buttons to enter your fax number, and then press E
NTER
.
5. Use the alphanumeric buttons to enter your company name, and then press E
NTER
.
Note
The maximum number of characters allowed in the fax number is 20. The maximum number
of characters allowed in the company name is 25.
76 Chapter 8 Fax ENWW
Sending faxes
This section describes how to fax a document.
To adjust the resolution for the current fax job
1. On the device control panel, press R
ESOLUTION
to show the current resolution setting.
2. Use the < or the > button to select the appropriate resolution setting.
3. Press E
NTER
to save the selection.
Note
This procedure changes the fax resolution for the current fax job. For instructions about
changing the default fax resolution, see
Changing the default resolution setting.
Note
To change the fax contrast or glass-scan size, you must change the default settings. See
Changing the default light/dark (contrast) setting or Changing the default glass-size setting.
To send a fax to one recipient
1. Dial the fax number by using one of the following methods:
Use the alphanumeric buttons on the device control panel to dial the number.
If the fax number you are calling has been assigned to a one-touch key, press that key.
If the fax number you are calling has a speed-dial entry, press P
HONE
B
OOK
, use the
alphanumeric buttons to enter the speed-dial entry, and then press E
NTER
.
Note
When dialing by using the alphanumeric buttons, include any pauses or additional numbers
that are necessary for the call, such as an area code, an access code for numbers that are
outside of a PBX system (usually a 9), or a long-distance prefix. See
Using dialing
characters for more information.
2. Load the document into the automatic document feeder (ADF) input tray or onto the
flatbed scanner.
3. Press S
TART
F
AX
.
4. If you are scanning from the flatbed scanner, press 1 to select YES when Send from
glass? 1=Yes 2=No appears, and then press E
NTER
.
5. Complete one of the following steps:
If you have more pages to scan, press 1 to select YES, and then repeat step 4 for
each page of the fax job.
If you are finished, press 2 to select NO.
When you press NO, the device automatically sends all pages.
When the last page of the fax has exited the device, you can start sending another fax,
copying, or scanning.
To fax to numbers that you use regularly, you can assign a one-touch key or speed-dial
entry. See
To program speed-dial entries and one-touch keys and To program group-dial
entries. If you have electronic phone books available, you might be able to use them to
select recipients. Electronic phone books are generated by using third-party software
programs.
ENWW Sending faxes 77
To send a fax to multiple recipients
You can send a fax to several fax numbers at once. If you want to send a fax to a group of
fax numbers that you have assigned to a group-dial entry, see
To send a fax by using a
group-dial entry. If you want to send a fax to a group of numbers (maximum of 20) that have
not been assigned a group-dial entry, see
To send a fax to a group manually (ad hoc faxing).
In the rare instance that your document does not fit into memory, complete one of the
following:
Clear saved faxes from the fax memory. For more information, see
Deleting faxes from
memory.
Divide the document into smaller sections, and then send the document as multiple fax
jobs.
To send a fax by using a group-dial entry
1. Load the document into the automatic document feeder (ADF) input tray or onto the
flatbed scanner.
2. On the device control panel, select the group by using one of the following methods:
Press the one-touch key for the group.
Press P
HONE
B
OOK
, press the group-dial entry that is assigned to the group, and then
press E
NTER
.
3. Press S
TART
F
AX
.
If you are scanning from the flatbed scanner, select YES when Send from glass?
1=Yes 2=No appears, and then press E
NTER
.
The device scans the document into memory and sends the fax to each number
specified. If a number in the group is busy or does not answer, the device redials the
number based on its redial setting. If all redial attempts fail, the device updates the fax
activity log with the error and proceeds to the next number in the group.
Note
The fax activity log feature is not supported in the software for Microsoft Windows 95 or
Windows NT, but you can print the fax activity log by using the control panel. For
instructions, see
Printing the fax activity log.
78 Chapter 8 Fax ENWW
To send a fax to a group manually (ad hoc faxing)
Use the following instructions to send a fax to a group of recipients that has not been
assigned a group-dial entry:
1. Load the document into the automatic document feeder (ADF) input tray or onto the
flatbed scanner.
2. On the device control panel, dial the first fax number by using one of the following
methods:
Use the alphanumeric buttons.
If the fax number that you are calling has been assigned a one-touch key, press that key.
If the fax number that you are calling has been assigned a speed-dial entry, press P
HONE
B
OOK
, use the alphanumeric buttons to enter the speed-dial entry, and then press E
NTER
.
Note
When dialing by using the alphanumeric buttons, include any pauses or additional numbers
that are necessary for the call, such as an area code, an access code for numbers that are
outside of a PBX system (usually a 9), or a long-distance prefix. See
Using dialing
characters for more information.
3. Press E
NTER
.
4. Complete one of the following tasks:
To continue dialing numbers, repeat steps 2 and 3.
If you are finished dialing numbers, go to the next step.
5. Press S
TART
F
AX
.
If you are scanning from the flatbed scanner, select YES when Send from glass?
1=Yes 2=No appears, and then press E
NTER
.
6. The device sends the fax to each fax number. If a number in the group is busy or does
not answer, the device redials that number based on its redial setting. If all redial
attempts fail, the device updates the fax activity log by adding the error, and then it
proceeds to the next number in the group.
Note
The fax activity log feature is not supported in the software for Microsoft Windows 95 or
Windows NT, but you can print the fax activity log by using the control panel. For
instructions, see
Printing the fax activity log.
ENWW Sending faxes 79
Using manual dial
Usually, the device dials after you press S
TART
F
AX
. At times, however, you might want the
device to dial each number as you press it. For example, if you are charging your fax call to
a calling card, you might need to dial the fax number, wait for the acceptance tone of your
telephone company, and then dial the calling card number. When dialing internationally, you
might need to dial part of the number and then listen for dial tones before continuing to dial.
To use manual dial with the automatic document feeder (ADF)
1. Load the document into the automatic document feeder (ADF) input tray or onto the
flatbed scanner.
2. On the device control panel, press S
TART
F
AX
.
3. Begin dialing. The device dials the number as you press each digit. This allows you to
wait for pauses, dial tones, international access tones, or calling card acceptance tones
before continuing to dial.
To use manual dial with the flatbed scanner
1. On the device control panel, press S
TART
F
AX
. The control-panel display shows the
following message: Send from glass? 1=Yes 2=No.
2. Press 1 to select YES. The control-panel display shows the following message: Load
page:X Press [enter], where X is the page number.
3. Scan a page into memory by placing the sheet print-side-down on the flatbed scanner
and pressing E
NTER
. After scanning the page, the device control-panel display shows the
following message: Another page? 1=Yes 2=No.
4. Complete one of the following steps:
If you have more pages to scan, press 1 to select YES, and then repeat step 3 for each
page of the fax job.
If you are finished, press 2 to select NO, and then go to the next step.
5. When finished scanning all pages into memory, begin dialing. The device dials the
number as you press each digit. This allows you to wait for pauses, dial tones,
international access tones, or calling card acceptance tones before continuing to dial.
80 Chapter 8 Fax ENWW
Redialing manually
If you want to send another document to the last fax number that was dialed, use the
following procedure to redial manually. If you are trying to resend the same document that
you sent the first time, wait until the automatic redial attempts have stopped or until you have
stopped them yourself. Otherwise, the recipient might get the fax twice: once from the
manual redial attempt and once from one of the automatic redial attempts.
Note
To stop the current redial attempt for a fax, or to cancel all pending, automatic redial
attempts for a fax, see
Canceling a fax job. To change redial settings, see Changing the
redial settings.
To redial manually
1. Load the document into the automatic document feeder (ADF) input tray or onto the
flatbed scanner.
2. On the device control panel, press R
EDIAL
/P
AUSE
.
3. Press S
TART
F
AX
. The device redials the last number that was dialed and attempts to
send the fax.
If you are scanning from the flatbed scanner, select YES when Send from glass?
1=Yes 2=No appears, and then press E
NTER
.
ENWW Redialing manually 81
Canceling a fax job
Use these instructions to cancel a single fax that is currently dialing or a fax that is being
transmitted or received.
To cancel the current fax job
Press C
ANCEL
on the control panel. Any pages that have not been transmitted are canceled.
Pressing C
ANCEL
also stops group-dial jobs.
To cancel a fax job by using the Fax Job Status
Use this procedure to cancel a fax job in the following situations:
The device is waiting to redial after encountering a busy signal, an unanswered call, or a
communication error.
The fax is scheduled to be sent at a future time.
Use the following steps to cancel a fax job by using the Fax Job Status:
1. On the device control panel, press M
ENU
.
2. Press E
NTER
to select Fax Job status.
3. Use the < or the > button to scroll through pending jobs until you reach the job that you
want to clear.
4. Press E
NTER
to select the job that you want to cancel.
5. Press E
NTER
to confirm that you want to cancel the job.
82 Chapter 8 Fax ENWW
Sending faxes by using the software
This section contains basic instructions for sending faxes by using the software that came
with the device. All other software-related topics are covered in the software Help, which can
be opened from the software-program Help menu.
Note
The fax software and HP Toolbox are not supported for Windows 98, Windows ME, or
Windows NT. The HP Toolbox software is not supported for Macintosh.
You can fax electronic documents from your computer if you meet the following requirements:
The device is connected directly to your computer or connected to your computer over a
TCP/IP network.
The device software is installed on your computer.
You are using Microsoft Windows 2000 or XP, or Mac OS 9.2.2, 10.2, or 10.3.
To send a fax from the software (Windows 2000 or XP)
The procedure to send a fax varies according to your specifications. The most typical steps
follow.
1. Click Start, click Programs (or All Programs in Windows XP), and then click
Hewlett Packard.
2. Click either HP LaserJet 2830 or HP LaserJet 2840, and then click Send fax. The fax
software appears.
3. Enter the fax number of one or more recipients.
4. Load the document in the automatic document feeder (ADF) input tray.
5. Include a cover page. (This step is optional.)
6. Click Send Now, or click Send Later and select a date and time.
Note
You can also send a fax from HP Toolbox by navigating to the Fax Tasks section and
clicking the Fax Send button.
To send a fax from the software (Mac OS 10.2 or 10.3)
1. Open the HP Toolbox and click Fax. The fax software appears.
2. Select Addressing from the Copies and Pages drop-down list.
3. Enter the fax number of one or more recipients.
4. Load the document in the automatic document feeder (ADF) input tray.
5. Include a cover page (this step is optional).
6. Click Scan Now, and then click Print.
Note
The steps for Mac OS 9.2.2 will vary.
ENWW Sending faxes by using the software 83
To send a fax from a third-party application, such as
Microsoft Word (all operating systems)
1. Open a document in a third-party program.
2. Click the File menu, and then click Print.
3. Select the fax print driver from the printer drop-down list. The fax software appears.
4. Complete one of the following:
Windows users: Complete steps 2 through 5 in
To send a fax from the software
(Windows 2000 or XP).
Mac users: Complete steps 2 through 6 in
To send a fax from the software (Mac OS
10.2 or 10.3).
84 Chapter 8 Fax ENWW
Receiving faxes
You can receive faxes to the device or to your computer. In general, incoming faxes to the
device are automatically answered. However, if you change the devices that are connected
to the same telephone line as the device, you must change how the device answers
incoming faxes. See
Setting the answer mode for instructions.
Follow the procedures in this section to manage faxes that are routed to the device.
To receive faxes when you hear fax tones
If you have a telephone line that receives both fax and telephone calls, and you hear fax
tones when you answer the telephone, you can start the receiving process in one of two
ways:
If you are close to the device, press S
TART
F
AX
on the control panel.
When you answer any telephone connected to the line (an extension telephone) and
hear fax tones, the device should begin answering the call automatically. If not, press
1-2-3 in sequence on the telephone keypad (in tone-dialing mode only), listen for fax
transmission sounds, and then hang up.
Note
In order for the second method to work, the extension telephone setting must be set to YES.
See
Making an extension telephone available to receive faxes to check or change the setting.
ENWW Receiving faxes 85
Sending a fax by dialing from a telephone
Occasionally, you might want to dial a fax number from a telephone that is connected to the
same line as the device. For example, if you are sending a fax to a person whose device is
in the manual receive mode, you can precede the fax with a voice call to let that person
know that the fax is coming.
To send a fax by dialing from a telephone
Note
The telephone must be connected to the "telephone" port (the port that is marked with a
telephone icon).
1. Load the document into the automatic document feeder (ADF) input tray.
Note
You cannot use the flatbed scanner when sending a fax by dialing from a telephone.
2. Pick up the handset of a telephone that is connected to the same line as the device. Dial
the fax number by using the telephone keypad.
3. When the recipient answers, instruct the person to start the fax machine.
4. When you hear the fax tones, press S
TART
F
AX
, wait until Connecting appears on the
control panel display, and then hang up the telephone.
86 Chapter 8 Fax ENWW
Changing the default light/dark (contrast) setting
The contrast affects the lightness and darkness of an outgoing fax as it is being sent.
To change the default light/dark (contrast) setting
The default light/dark setting is the contrast that is normally applied to items that are being
faxed. The slider is set to the middle as the default setting.
1. On the device control panel, press M
ENU
.
2. Use the < or the > button to select Fax setup, and then press E
NTER
.
3. Use the < or the > button to select Fax Send setup, and then press E
NTER
.
4. Use the < or the > button to select Def. Light/Dark, and then press E
NTER
.
5. Use the < button to move the slider to the left to make the fax lighter than the original, or
use the > button to move the slider to the right to make the fax darker than the original.
6. Press E
NTER
to save your selection.
ENWW Changing the default light/dark (contrast) setting 87
Changing the default resolution setting
Resolution, in dots per inch (dpi), affects the quality of faxed documents. It also affects the
transmission speed as a higher resolution produces a larger file, which requires more time to
transmit. The factory-set default resolution setting is Fine.
Use this procedure to change the default resolution for all fax jobs to one of the following
settings:
Standard: This setting provides the lowest quality and the fastest transmission time.
Fine: This setting provides a higher resolution quality than Standard that is usually
appropriate for text documents.
Superfine: This setting is best used for documents that mix text and images. The
transmission time is slower than Fine but faster than Photo.
Photo: This setting produces the best images, but greatly increases the transmission
time.
To change the default resolution setting
1. On the device control panel, press M
ENU
.
2. Use the < or the > button to select Fax setup, and then press E
NTER
.
3. Use the < or the > button to select Fax Send setup, and then press E
NTER
.
4. Use the < or the > button to select Def. Resolution, and then press E
NTER
.
5. Use the < or the > button to change the resolution setting.
6. Press E
NTER
to save the selection.
Note
For instructions about changing the resolution for the current fax job only, see To adjust the
resolution for the current fax job.
88 Chapter 8 Fax ENWW
Changing the default glass-size setting
This setting determines which paper size the flatbed scanner scans when you send a fax
from the scanner. The factory-set default is determined by the region/country in which you
purchased the device.
To change the default glass-size setting
1. On the device control panel, press M
ENU
.
2. Use the < or the > button to select Fax setup, and then press E
NTER
.
3. Use the < or the > button to select Fax Send setup, and then press E
NTER
.
4. Use the < or the > button to select Def. Glass Size, and then press E
NTER
.
5. Use the < or the > button to select the correct paper size setting: A4 or Letter.
6. Press E
NTER
to save your selection.
ENWW Changing the default glass-size setting 89
Selecting tone-dialing or pulse-dialing mode
Use this procedure to set the device to tone-dialing or pulse-dialing mode. The factory-set
default is Tone. Do not change this setting unless you know that your telephone line cannot
use tone dialing.
To select tone-dialing or pulse-dialing
1. On the device control panel, press M
ENU
.
2. Use the < or the > button to select Fax setup, and then press E
NTER
.
3. Use the < or the > button to select Fax Send setup, and then press E
NTER
.
4. Use the < or the > button to select Dialing Mode, and then press E
NTER
.
5. Use the < or the > button to select Tone or Pulse, and then press E
NTER
to save your
selection.
Note
The pulse-dialing option is not available in all regions/countries.
90 Chapter 8 Fax ENWW
Changing the redial settings
If the device was unable to send a fax because the receiving fax machine did not answer or
was busy, the device attempts to redial based on the redial-on-busy, redial-on-no-answer,
and redial-on-communication-error options. Use the procedures in this section to turn these
options on or off.
To change the redial-on-busy option
If this option is turned on, the device redials automatically if it receives a busy signal. The
factory-set default for the redial-on-busy option is On.
1. On the device control panel, press M
ENU
.
2. Use the < or the > button to select Fax setup, and then press E
NTER
.
3. Use the < or the > button to select Fax Send setup, and then press E
NTER
.
4. Use the < or the > button to select Redial if busy, and then press E
NTER
.
5. Use the < or the > button to select On or Off, and then press E
NTER
.
To change the redial-on-no-answer option
If this option is turned on, the device redials automatically if the receiving machine does not
answer. The factory-set default for the redial-on-no-answer option is Off.
1. On the device control panel, press M
ENU
.
2. Use the < or the > button to select Fax setup, and then press E
NTER
.
3. Use the < or the > button to select Fax Send setup, and then press E
NTER
.
4. Use the < or the > button to select Redial-no answer, and then press E
NTER
.
5. Use the < or the > button to select On or Off, and then press E
NTER
.
To change the redial-on-communication-error option
If this option is turned on, the device redials automatically if some sort of communication
error occurs. The factory-set default for the redial-on-communication-error option is On.
1. On the device control panel, press M
ENU
.
2. Use the < or the > button to select Fax setup, and then press E
NTER
.
3. Use the < or the > button to select Fax Send setup, and then press E
NTER
.
4. Use the < or the > button to select Redial Comm Err., and then press E
NTER
.
5. Use the < or the > button to select On or Off, and then press E
NTER
.
ENWW Changing the redial settings 91
Receiving faxes to your computer
To receive faxes to your computer, you must turn on the receive-to-PC setting in the
software (see the device software Help). The receive-to-PC setting can be activated only
from one computer. If for any reason that computer is no longer available, you can use the
following procedure to turn the receive-to-PC setting off from the device control panel.
To turn off the receive-to-PC setting from the control panel
1. On the device control panel, press M
ENU
.
2. Use the < or the > button to select Fax functions, and then press E
NTER
.
3. Use the < or the > button to select Stop Recv to PC, and then press E
NTER
to confirm
your selection.
After you select the Stop Recv to PC setting, any faxes that remain in the device
memory are printed.
Note
You cannot use the receive-to-PC feature if you are using Macintosh software, Windows 98,
Windows ME, or Windows NT.
92 Chapter 8 Fax ENWW
Setting the answer mode
Depending on your situation, you can set the device answer mode to Automatic or Manual.
The factory-set default is Automatic.
Automatic: In this answer mode, the device answers incoming calls after a specified
number of rings or upon recognition of special fax tones. To specify the number of rings,
see
Changing the rings-to-answer setting.
Manual: In this answer mode, the device never answers calls. You must start the fax-
receiving process yourself, either by pressing S
TART
F
AX
on the control panel or by
picking up a telephone that is connected to that line and dialing 1-2-3 (in tone-dial mode
only).
Note
Although most users leave the answer mode set to Automatic, voice callers who dial the fax
telephone number will hear fax tones if the telephone is not answered, or if they do not hang
up by the specified number of rings-to-answer. If you do not want voice callers to hear fax
tones, use the Manual setting. But remember that fax calls are not received automatically
when the mode is set to Manual.
To set the answer mode
To set or change the answer mode, complete the following steps:
1. On the device control panel, press M
ENU
.
2. Use the < or the > button to select Fax setup, and then press E
NTER
.
3. Use the < or the > button to select Fax Recv. setup, and then press E
NTER
.
4. Press E
NTER
to select Answer mode.
5. Use the < or the > button to select Automatic or Manual, and then press E
NTER
.
The control-panel display shows the answer mode setting that you specified.
ENWW Setting the answer mode 93
Changing ring patterns for call answering
Ring-pattern or distinctive-ring service is available through some local telephone companies.
The service allows you to have more than one telephone number on a single line. Each
telephone number has a unique ring pattern, so that you can answer voice calls and the
device can answer fax calls.
If you subscribe to a ring-pattern service with your telephone company, you must set the
device to answer the correct ring pattern. Not all regions/countries support unique ring
patterns. Contact your telephone company to determine if this service is available in your
region/country.
Note
If you do not have ring-pattern service and you change the ring-pattern settings to something
other than the default, All Rings, the device might not be able to receive faxes.
The settings are as follows:
All Rings: The device answers any calls that come through the telephone line.
Single: The device answers any calls that produce a single-ring pattern.
Double: The device answers any calls that produce a double-ring pattern.
Triple: The device answers any calls that produce a triple-ring pattern.
Double&Triple: The device answers any calls that produce a double-ring or triple-ring
pattern.
To change ring patterns for call answering
To change ring patterns for call answering, complete the following steps:
1. On the device control panel, press M
ENU
.
2. Use the < or the > button to select Fax setup, and then press E
NTER
.
3. Use the < or the > button to select Fax Recv. setup, and then press E
NTER
.
4. Use the < or the > button to select Answer Ring Type, and then press E
NTER
.
5. Use the < or the > button to select the ring pattern that you want, and then press E
NTER
.
6. After device installation is complete, ask someone to send a fax to you in order to verify
that the ring-pattern service is working correctly.
94 Chapter 8 Fax ENWW
Changing the rings-to-answer setting
When the answer mode is set to Automatic, the device rings-to-answer setting determines
the number of times the telephone rings before the device answers an incoming call.
If the device is connected to a line that receives both fax and voice calls (a shared line) and
that also uses an answering machine, you might need to adjust the rings-to-answer setting.
The number of rings-to-answer for the device must be greater than the rings-to-answer on
the answering machine. This allows the answering machine to answer the incoming call and
record a message if it is a voice call. When the answering machine answers the call, the
device listens to the call and automatically answers it if it detects fax tones.
The default setting for rings-to-answer is five for the U.S. and Canada, and two for other
countries/regions.
Using the rings-to-answer setting
Use the following table to determine the number of rings-to-answer to use.
Type of telephone line Recommended rings-to-answer setting
Dedicated fax line (receiving only fax calls) Set to a number of rings within the range
displayed on the control panel. (The minimum
and maximum number of rings allowed varies by
country/region.)
One line with two separate numbers and a ring-
pattern service
One or two rings. (If you have an answering
machine or computer voicemail for the other
telephone number, make sure that the device is
set to a greater number of rings than the
answering system. Also, see
Changing ring
patterns for call answering.)
Shared line (receiving both fax and voice calls)
with only an attached telephone
Five rings or more.
Shared line (receiving both fax and voice calls)
with an attached answering machine or
computer voicemail
Two rings more than the answering machine or
computer voicemail.
To set the number of rings-to-answer
To set or change the number of rings-to-answer, use the following steps:
1. On the device control panel, press M
ENU
.
2. Use the < or the > button to select Fax setup, and then press E
NTER
.
3. Use the < or the > button to select Fax Recv. setup, and then press E
NTER
.
4. Use the < or the > button to select Rings to answer, and then press E
NTER
.
5. Use the alphanumeric buttons to enter the number of rings-to-answer, and then press
E
NTER
.
ENWW Changing the rings-to-answer setting 95
Changing autoreduction settings for incoming faxes
If the fit-to-page option is turned on, the device automatically reduces long faxes up to 75
percent to fit the information on the default paper size (for example, the fax is reduced from
legal to letter size).
If the fit-to-page option is turned off, long faxes print at full size on multiple pages. The
factory-set default for incoming fax autoreduction is On.
If you have the stamp-received faxes option turned on, you might also want to turn on
autoreduction. This reduces the size of the incoming faxes slightly, and prevents the page-
stamp from forcing a fax onto two pages.
Note
Make sure that the media-size setting matches the size of the media that is loaded in the
media input tray. To change the default media size, see
Changing the default media size.
To change autoreduction for incoming faxes
1. On the device control panel, press M
ENU
.
2. Use the < or the > button to select Fax setup, and then press E
NTER
.
3. Use the < or the > button to select Fax Recv. setup, and then press E
NTER
.
4. Use the < or the > button to select Fit to page, and then press E
NTER
.
5. Use the < or the > button to select On or Off, and then press E
NTER
to save your
selection.
96 Chapter 8 Fax ENWW
Blocking or unblocking fax numbers
If you do not want to receive faxes from specific people or businesses, you can block as
many as 30 fax numbers by using the control panel. When you block a fax number and
someone from that number sends you a fax, the control-panel display indicates that the
number is blocked, the fax does not print, and the fax is not saved in memory. Faxes from
blocked fax numbers appear in the fax activity log with a “discarded” designation. You can
unblock blocked fax numbers individually or all at one time.
Note
To print a list of numbers that you have blocked, see Printing the block-fax list. To print the
fax activity log, see
Printing the fax activity log.
To block or unblock a fax number
Complete the following steps to block or unblock fax numbers by using the control panel:
1. On the device control panel, press M
ENU
.
2. Use the < or the > button to select Fax setup, and then press E
NTER
.
3. Use the < or the > button to select Fax Recv. setup, and then press E
NTER
.
4. Use the < or the > button to select Block faxes, and then press E
NTER
.
5. Do one of the following:
To block a fax number, use the < or the > button to select Add entry, and then press
E
NTER
. Enter the fax number exactly as it appears in the header (including spaces), and
then press E
NTER
. Enter a name for the blocked number, and then press E
NTER
.
To unblock a single fax number, use the < or the > button to select Delete entry, and
then press E
NTER
. Use the < or the > button to select the fax number that you want to
delete, and then press E
NTER
to confirm the deletions.
To unblock all blocked fax numbers, use the < or the > button to select Clear all, and
then press E
NTER
. Press E
NTER
again to confirm the deletions.
ENWW Blocking or unblocking fax numbers 97
Note
Speed-dial entries, one-touch keys, and group-dial entries are more easily programmed from
the software. For instructions about programming speed-dial entries, one-touch keys, and
group-dial entries by using the HP Toolbox, see the HP Toolbox online Help.
To program group-dial entries
1. Assign a speed-dial entry to each fax number that you want in the group. (For
instructions, see
To program speed-dial entries and one-touch keys.)
2. On the device control panel, press M
ENU
.
3. Use the < or the > button to select Fax setup, and then press E
NTER
.
4. Press E
NTER
to select Phone Book.
5. Use the < or the > button to select Group setup, and then press E
NTER
.
6. Use the < or the > button to select Add/Edit group, and then press E
NTER
.
7. Use the alphanumeric buttons to enter the number that you want to associate with this
group, and then press E
NTER
. Selecting 1 through 5 also associates the group with the
corresponding one-touch key.
8. Use the alphanumeric buttons to enter a name for the group, and then press E
NTER
.
9. Complete one of the following steps:
Press a one-touch key, and then press E
NTER
again to confirm the addition. Repeat this
step for each group member you want to add.
Select Phone Book, and then select the speed-dial entry for the group member you
want to add. Press E
NTER
to confirm the addition. Repeat this step for each group
member you want to add.
10. When you are finished, press E
NTER
.
11. If you have more group-dial entries to assign, press E
NTER
, and then repeat steps 1
through 10.
To delete group-dial entries
1. On the device control panel, press M
ENU
.
2. Use the < or the > button to select Fax setup, and then press E
NTER
.
3. Press E
NTER
to select Phone Book.
4. Use the < or the > button to select Group setup, and then press E
NTER
.
5. Use the < or the > button to select Delete group, and then press E
NTER
.
6. Using the alphanumeric buttons, enter the number of the group-dial that you want to
delete, and then press E
NTER
.
7. Press E
NTER
to confirm the deletion.
100 Chapter 8 Fax ENWW
To delete an individual from a group-dial entry
1. On the device control panel, press M
ENU
.
2. Use the < or the > button to select Fax setup, and then press E
NTER
.
3. Press E
NTER
to select Phone Book.
4. Use the < or the > button to select Group setup, and then press E
NTER
.
5. Use the < or the > button to select Del. # in group, and then press E
NTER
.
6. Use the < or the > button to select the individual that you want to delete from the group.
7. Press E
NTER
to confirm the deletion.
8. Complete one of the following tasks:
Repeat steps 6 and 7 to delete other individuals from the group.
Press C
ANCEL
if you are finished.
Note
Deleting a speed-dial entry also deletes that entry from any group-dial entries that included
that speed-dial entry.
To delete all phone book entries
You can delete all speed-dial entries, one-touch keys, and group-dial entries that are
programmed in the device.
CAUTION
After speed-dial entries, one-touch keys, and group-dial entries are deleted, they cannot be
recovered.
1. On the device control panel, press M
ENU
.
2. Use the < or the > button to select Fax setup, and then press E
NTER
.
3. Press E
NTER
to select Phone Book.
4. Use the < or the > button to select Delete all, and then press E
NTER
.
5. Press E
NTER
to confirm the deletion.
ENWW About speed-dial entries, one-touch keys, and group-dial entries 101
Using dialing characters
When using the control panel to enter your name in the header or to enter a name for a one-
touch key, speed-dial entry, or group-dial entry, press the appropriate alphanumeric button
repeatedly until the letter that you need appears. Then, press the > button to select that
letter and move to the next space. This table shows which letters and numbers appear on
each alphanumeric button when the default language is set to English:
button number characters
1 1
2 A B C a b c 2
3 D E F d e f 3
4 G H I g h i 4
5 J K L j k l 5
6 M N O m n o 6
7 P Q R S p q r s 7
8 T U V t u v 8
9 W X Y Z w x y z 9
0 0
* ( ) + - . / , “ * & @
# space # ,
To insert a pause
You can insert pauses into a fax number that you are dialing or programming to a one-touch
key, speed-dial entry, or group-dial entry. Pauses are often needed when dialing
internationally or connecting to an outside line.
Press # repeatedly until a comma (,) appears on the control-panel display, indicating that
the pause will occur at that point in the dialing sequence.
Press * repeatedly until W appears on the control-panel display to have the device wait
for a dial tone before dialing the rest of the telephone number.
Press * repeatedly until R appears on the control-panel display to have the device
perform a hook flash.
102 Chapter 8 Fax ENWW
Inserting a dial prefix
A dial prefix is a number or group of numbers that are automatically added to the beginning
of every fax number you enter at the control panel or from the software. The maximum
number of characters for a dial prefix is 50.
The default setting is Off. You might want to turn this setting on and enter a prefix if, for
example, you have to dial a number such as 9 to get a telephone line outside of your
company telephone system. While this setting is activated, you can dial a fax number without
the dial prefix by using manual dial. For instructions, see
Using manual dial.
To set the dial prefix
1. On the device control panel, press M
ENU
.
2. Use the < or the > button to select Fax setup, and then press E
NTER
.
3. Press the > button once to select Fax Send setup, and then press E
NTER
.
4. Use the < or the > button to select Dial Prefix, and then press E
NTER
.
5. Use the < or the > button to select On or Off, and then press E
NTER
.
6. If you selected On, use the alphanumeric buttons to enter the prefix, and then press
E
NTER
. You can use numbers, pauses, and dialing symbols.
ENWW Inserting a dial prefix 103
Sending a delayed fax
You can schedule a fax to be sent automatically at a future time to one or more people.
When you complete this procedure, the device scans the document into memory and returns
to the Ready state so that you can perform other tasks.
Note
If the device cannot transmit the fax at the scheduled time, that information is indicated on
the fax call report (if that option is turned on) or recorded in the fax activity log. The
transmittal might be halted because the fax-sending call is not answered, or because a busy
signal stops the redial attempts. (See
Setting print times for the fax call report and Printing
the fax activity log for more information.)
If you have set a fax to be sent at a future time but you need to add something to it, you can
send the additional information as another job. All faxes that are scheduled to go to the
same fax number at the same time are delivered as individual faxes.
To send a delayed fax
1. Load the document into the automatic document feeder (ADF) input tray or onto the
flatbed scanner.
2. On the device control panel, press M
ENU
.
3. Use the < or the > button until Fax functions appears, and then press E
NTER
.
4. Use the < or the > button until Send fax later appears, and then press E
NTER
.
5. Use the alphanumeric buttons to enter the start time, and then complete one of the
following tasks:
If the device is set to the 12-hour time mode, use the > button to move the cursor past
the fourth character to set A.M. or P.M. Select 1 for A.M. or select 2 for P.M., and then
press E
NTER
.
If the device is set to the 24-hour time mode, press E
NTER
.
6. Complete one of the following tasks:
Use the alphanumeric buttons to enter the date, and then press E
NTER
.
Accept the default date by pressing E
NTER
.
7. Enter the fax number, enter the speed-dial entry, or press the one-touch key. (This
feature does not support undefined (ad hoc) groups.)
8. Press E
NTER
or S
TART
F
AX
. The device scans the document into memory and sends it at
the designated time.
104 Chapter 8 Fax ENWW
Changing the detect-dial-tone setting
Normally, the device begins dialing a fax number immediately. If you are using the device on
the same line as your telephone, turn on the detect-dial-tone setting. This prevents the
device from sending a fax while someone is on the telephone.
The factory-set default for detect dial tone is On for France and Hungary, and Off for all
other regions/countries.
To change the detect-dial-tone setting
1. On the device control panel, press M
ENU
.
2. Use the < or the > button to select Fax setup, and then press E
NTER
.
3. Press > once to select Fax Send setup, and then press E
NTER
.
4. Use the < or the > button to select Detect dial tone, and then press E
NTER
.
5. Use the < or the > button to select On or Off, and then press E
NTER
.
ENWW Changing the detect-dial-tone setting 105
Using billing codes
If the billing codes feature has been turned on, the user will be asked to enter a billing code
for each fax. The billing number is credited for each fax page that is sent. This includes all
types of faxes except for poll-received, fax-forwarded, or computer-downloaded faxes. For
an undefined group or a group-dial fax, the billing number is credited for each successful fax
that is sent to each destination. To print a report that shows the total for each billing code,
see
Printing the billing-code report.
The factory-set default for the billing-code setting is Off. The billing code can be any number
from 1 through 250.
To change the billing-code setting
1. On the device control panel, press M
ENU
.
2. Use the < or the > button to select Fax setup, and then press E
NTER
.
3. Use the < or the > button to select Fax Send setup, and then press E
NTER
.
4. Use the < or the > button to select Billing codes, and then press E
NTER
.
5. Use the < or the > button to select On or Off, and then press E
NTER
.
To use billing codes
1. On the device control panel, enter the phone number manually, by one-touch key, or by
speed-dial or group-dial entry.
2. Load the original in the automatic document feeder (ADF) input tray or on the flatbed
scanner.
3. Press S
TART
F
AX
.
4. Enter the billing code, and then press S
TART
F
AX
.
The fax job is sent and recorded in the billing-code report. For information about printing the
billing-code report, see
Printing the billing-code report.
106 Chapter 8 Fax ENWW
Reprinting a fax
If you want to reprint a fax because the print cartridge was empty or if the fax was printed on
the wrong type of media, you can try to reprint it. The amount of memory that is available
determines the actual number of faxes that are stored for reprinting. The most recent fax
prints first; the oldest fax that is in storage prints last.
These faxes are stored continuously. Reprinting them does not clear them from the memory.
To clear these faxes from the memory, see
Deleting faxes from memory.
To reprint a fax
Use the following steps to reprint a fax:
Note
You do not need to use this procedure if the fax does not print because of a jam or because
the media is completely depleted. During these situations, faxes are received to memory. As
soon as you clear the jam or replenish the media, fax printing automatically resumes.
1. On the device control panel, press M
ENU
.
2. Press the > button once. Fax functions appears.
3. Press E
NTER
.
4. Use the < or the > button until Reprint last appears.
5. Press E
NTER
. The device begins reprinting the most recently printed fax.
Note
To stop the printing at any time, press C
ANCEL
.
To change the fax reprint settings
The default fax reprint setting is On. To change this setting from the device control panel,
complete the following steps:
1. On the device control panel, press M
ENU
.
2. Use the < or the > button to select Fax setup, and then press E
NTER
.
3. Use the < or the > button to select Fax Recv. setup, and then press E
NTER
.
4. Use the < or the > button to select Reprint faxes, and then press E
NTER
.
5. Use the < or the > button to select On or Off, and then press E
NTER
.
ENWW Reprinting a fax 107
Deleting faxes from memory
Use this procedure only if you are concerned that someone else has access to your device
and might try to reprint faxes from the memory.
CAUTION
In addition to clearing the reprint memory, this procedure clears any fax that is currently
being sent, unsent faxes that are pending redial, faxes that are scheduled to be sent at a
future time, and faxes that are not printed or forwarded.
To delete faxes from memory
1. On the device control panel, press M
ENU
.
2. Press the > button once to display Fax functions, and then press E
NTER
.
3. Use the < or > button to select Clear saved faxs, and then press E
NTER
.
4. Press E
NTER
to confirm the deletion.
108 Chapter 8 Fax ENWW
Using fax forwarding
You can set your device to forward incoming faxes to another fax number. When the fax
arrives at your device, it is stored in the memory. The device then dials the fax number that
you have specified and sends the fax. If the device cannot forward a fax because of an error
(for example, the number is busy) and repeated redial attempts are unsuccessful, your
device prints the fax.
If the device runs out of memory while receiving a fax, it terminates the incoming fax and
only forwards the pages and partial pages that have been stored in the memory.
When it is using the fax-forwarding feature, the device (rather than the computer) must be
receiving the faxes, and the answer mode must be set to Automatic (see
Setting the answer
mode).
To use fax forwarding
1. On the device control panel, press M
ENU
.
2. Use the < or the > button to select Fax setup, and then press E
NTER
.
3. Use the < or the > button to select Fax Recv. setup, and then press E
NTER
.
4. Use the < or the > button to select Forward fax, and then press E
NTER
.
5. Press the > button to select On or Off, and then press E
NTER
.
6. If you turn on the fax-forwarding feature, use the alphanumeric buttons to specify the fax
number where the fax is to be sent, and then press E
NTER
to save your selection.
ENWW Using fax forwarding 109
Making an extension telephone available to receive faxes
With this setting turned on, you can alert the device to pick up the incoming fax call by
pressing 1-2-3 sequentially on the telephone keypad (in tone-dial mode only). The default
setting is On. Turn this setting off only if you use pulse dialing or if you have a service from
your telephone company that also uses the 1-2-3 sequence. The telephone company
service does not work if it conflicts with the device.
To make an extension telephone available to receive faxes
1. On the device control panel, press M
ENU
.
2. Use the < or the > button to select Fax setup, and then press E
NTER
.
3. Use the < or the > button to select Fax Recv. setup, and then press E
NTER
.
4. Use the < or the > button to select Extension Phone, and then press E
NTER
.
5. Use the < or the > button to select On or Off, and then press E
NTER
to save your
selection.
110 Chapter 8 Fax ENWW
Using fax polling
If someone else has set up a fax to be polled, you can request that the fax be sent to your
device. (This is known as polling another machine).
To poll (request a fax from) another fax machine
1. On the device control panel, press M
ENU
.
2. Use the < or the > button to select Fax functions, and then press E
NTER
.
3. Use the < or the > button to select Polling receive, and then press E
NTER
.
4. Use the alphanumeric buttons to enter the number of the fax machine that you want to
request the fax from, and then press E
NTER
.
Your device dials the other fax machine and requests the fax.
ENWW Using fax polling 111
Changing the silence-detect mode
This setting controls whether or not you can receive faxes from older-model fax machines
that do not emit a fax signal during fax transmissions. At the time of this publication, these
silent-model fax machines represented very few of the fax machines in use. The default
setting is Off. The silence-detect mode setting should be changed only if you regularly
receive faxes from someone who uses an older-model fax machine.
To change the silence-detect mode
1. On the device control panel, press M
ENU
.
2. Use the < or the > button to select Fax setup, and then press E
NTER
.
3. Use the < or the > button to select Fax Recv. setup, and then press E
NTER
.
4. Use the < or the > button to select Silence Detect, and then press E
NTER
.
5. Use the < or the > button to select On or Off, and then press E
NTER
to save your
selection.
112 Chapter 8 Fax ENWW
Creating stamp-received faxes
The device prints the sender identification information at the top of each received fax. You
can also choose to have your own header information included on each received fax to
confirm the date and time that the fax was received. The factory-set default for stamp-
received faxes is Off.
Note
This option applies only to received faxes that the device prints.
To make stamp-received faxes available
1. On the device control panel, press M
ENU
.
2. Use the < or the > button to select Fax setup, and then press E
NTER
.
3. Use the < or the > button to select Fax Recv. setup, and then press E
NTER
.
4. Use the < or the > button to select Stamp faxes, and then press E
NTER
.
5. Use the < or the > button to select On or Off, and then press E
NTER
to save your
selection.
ENWW Creating stamp-received faxes 113
Setting the fax-error-correction mode
Usually, the device monitors the signals on the telephone line while it is sending or receiving
a fax. If the device detects an error during the transmission and the error-correction setting is
On, the device can request that the portion of the fax be resent. The factory-set default for
error correction is On.
You should turn off error correction only if you are having trouble sending or receiving a fax,
and you are willing to accept the errors in the transmission. Turning off the setting might be
useful when you are trying to send a fax overseas, or receive one from overseas, or if you
are using a satellite telephone connection.
To change the error-correction setting
1. On the device control panel, press M
ENU
.
2. Use the < or the > button to select Fax setup, and then press E
NTER
.
3. Use the < or the > button to select All faxes, and then press E
NTER
.
4. Use the < or the > button to select Error correction, and then press E
NTER
.
5. Use the < or the > button to select On or Off, and then press E
NTER
to save your
selection.
114 Chapter 8 Fax ENWW
Changing the V.34 setting
The V.34 setting is the modem protocol that the device uses to send faxes. It is the
worldwide standard for full-duplex modems that send and receive data across telephone
lines at up to 33,600 bits per second (bps). The factory-set default for the V.34 setting is On.
You should change the V.34 setting only if you are having trouble sending or receiving a fax
from a particular device. Turning off the setting might be useful when you are trying to send
a fax overseas, or receive one from overseas, or if you are using a satellite telephone
connection.
To change the V.34 setting
1. On the device control panel, press M
ENU
.
2. Use the < or the > button to select Fax setup, and then press E
NTER
.
3. Use the < or the > button to select All faxes, and then press E
NTER
.
4. Use the < or the > button to select V.34, and then press E
NTER
.
5. Use the < or the > button to select On or Off, and then press E
NTER
.
ENWW Changing the V.34 setting 115
116 Chapter 8 Fax ENWW
9
Scan
Use the following instructions to perform scanning tasks:
Understanding scanning methods
Scanning from the device control panel (Windows)
Canceling a scan job
Scanning by using HP Director (Windows)
Scanning from the device and HP Director (Macintosh)
Scanning by using TWAIN-compliant and WIA-compliant software
Scanning a photo or a book
Scanning by using optical character recognition (OCR) software
Scanner resolution and color
Note
Many of the functions that are described in this chapter also can be performed by using the
HP Toolbox. For instructions about using the HP Toolbox, see the HP Toolbox online Help.
ENWW 117
Understanding scanning methods
You can scan an item in the following ways.
Scan from the device: Start scanning directly from the device by using the device
control-panel scan buttons. The S
CAN
T
O
button can be programmed to scan to a folder
(Windows only) or to scan to e-mail.
Note
The HP Color LaserJet 2830 all-in-one includes separate S
CAN
TO
FOLDER
and S
CAN
TO
EMAIL
buttons, instead of one S
CAN
T
O
button.
For more information, see
Scanning from the device control panel (Windows).
Scan from HP Director (Windows): Press S
TART
S
CAN
on the device control panel to
start the HP Director software. Pressing S
TART
S
CAN
to start the HP Director software is
not supported when the device is connected to a network (direct-connect only.) You can
also start the HP Director software directly from the computer. See
Scanning by using
HP Director (Windows).
Scan from HP Director (Macintosh): Insert an original into the automatic document
feeder (ADF) input tray to open the HP Director window. You can also start the
HP Director by clicking the Dock alias (Macintosh OS 10.2 or 10.3) or desktop alias on
the computer desktop. See
Scanning from the device and HP Director (Macintosh).
Scan from TWAIN-compliant or Windows Imaging Application (WIA)-compliant
software: The device is TWAIN-compliant and WIA-compliant and works with Windows-
based and Macintosh-based programs that support TWAIN-compliant or WIA-compliant
scanning devices. The device scanning software is also TWAIN-compliant and WIA-
compliant. For more information, see
Scanning by using TWAIN-compliant and WIA-
compliant software.
Note
To learn about and use optical character recognition (OCR) software, install the Readiris
program from the software CD-ROM.
118 Chapter 9 Scan ENWW
Scanning from the device control panel (Windows)
Note
Macintosh users: For information about starting a scan from the device control panel, see
Scanning from the device and HP Director (Macintosh).
Use the following instructions to scan directly from the device control panel.
Note
For the best scan quality, place your originals onto the flatbed scanner, rather than loading
them into the automatic document feeder (ADF) input tray.
The computer that is connected to the device must be turned on.
Programming the device Scan to button
To program the device S
CAN
T
O
button, you must gain access to the device settings. Open
the HP Toolbox and click the Scan to tab. For more information, see the HP Toolbox online
Help.
Note
The HP Color LaserJet 2830 all-in-one includes separate S
CAN
TO
FOLDER
and S
CAN
TO
EMAIL
buttons, instead of one S
CAN
T
O
button.
Scanning to e-mail
To scan to e-mail by using the S
CAN
T
O
button on the device control panel, use the following
instructions.
Note
To use this feature in Windows, an e-mail recipient must be programmed in the Scan to tab.
See
Programming the device Scan to button. For Macintosh operating systems, set up this
function from the Monitor Device tab. See the HP Director online Help.
1. Load the originals that are to be scanned face-up in the automatic document feeder
(ADF) input tray. Adjust the media guides to hold the originals in place.
OR
Lift the flatbed scanner lid and load the original that is to be scanned face-down on the
flatbed scanner with the upper-left corner of the document at the lower-right corner of
the glass. Gently close the lid.
2. On the device control panel, press S
CAN
T
O
.
Note
On the HP Color LaserJet 2830 all-in-one control panel, press S
CAN
TO
EMAIL
.
3. Use the < or the > button to select an e-mail recipient.
4. Press S
TART
S
CAN
or E
NTER
. The scanned item is attached to an e-mail message, which
is then sent automatically to the e-mail recipient that you selected.
Scanning to a folder
To scan to a folder by using the S
CAN
T
O
button on the device control panel, use the
following instructions.
ENWW Scanning from the device control panel (Windows) 119
Note
To use this feature in Windows, a folder must be set up in the Scan to tab prior to use. See
Programming the device Scan to button.
1. Load the originals that are to be scanned face-up in the automatic document feeder
(ADF) input tray, with the top of the document forward, and adjust the media guides.
OR
Lift the flatbed scanner lid and load the original that is to be scanned face-down on the
flatbed scanner with the top, left corner of the document located in the lower-right corner
of the glass. Gently close the lid.
2. On the device control panel, press S
CAN
T
O
.
Note
On the HP Color LaserJet 2830 all-in-one control panel, press S
CAN
TO
FOLDER
.
3. Use the < or the > button to select a folder.
4. Press S
TART
S
CAN
or E
NTER
. The document is scanned to a file, which is then saved in
the folder that you selected in step 3.
120 Chapter 9 Scan ENWW
Canceling a scan job
To cancel a scan job, use one of the following procedures.
On the device control panel, press C
ANCEL
.
Click the Cancel button in the onscreen dialog box.
If you cancel a scan job, remove the original from the flatbed scanner or from the automatic
document feeder (ADF) input tray.
Note
These procedures vary with Macintosh operating systems.
ENWW Canceling a scan job 121
Scanning by using HP Director (Windows)
Use the HP Director software program to scan a document or photo.
To view HP Director
Double-click the HP Director icon on the Windows desktop.
OR
On the Windows taskbar, click Start, click Programs (or All Programs in Windows XP),
click HP, and then click HP Director.
For detailed instructions about scanning from HP Director, see the HP Director online Help.
122 Chapter 9 Scan ENWW
Scanning from the device and HP Director (Macintosh)
The procedures described in this section are for Macintosh OS 10.2 and 10.3. Procedures
for Macintosh OS 9.2.2 might vary.
For more information about tasks and settings described in this section, see the HP Director
online Help.
For more detailed instructions about loading original documents onto the flatbed scanner or
into the automatic document feeder (ADF) input tray, see
Loading documents to scan.
Scanning to e-mail
1. Load the originals that are to be scanned face-up in the automatic document feeder
(ADF) input tray. Adjust the media guides to hold the originals in place.
OR
Lift the flatbed scanner lid and load the original that is to be scanned face-down on the
flatbed scanner with the upper-left corner of the document at the lower-right corner of
the glass. Gently close the lid.
2. On the device control panel, press S
CAN
T
O
.
3. Use the < or the > button to select an e-mail program such as Apple Mail.
4. Press S
TART
S
CAN
. The original is scanned. The e-mail program that you selected in step
3 opens on the computer. A blank e-mail message opens with the scanned document as
an attachment.
Note
If you start the scan by clicking Scan to Email in the HP Director, the original is scanned to
the default e-mail program.
5. Enter an e-mail recipient, add text or other attachments, and then send the message.
ENWW Scanning from the device and HP Director (Macintosh) 123
Scanning to a file
1. Load the originals that are to be scanned face-up in the automatic document feeder
(ADF) input tray. Adjust the media guides to hold the originals in place.
OR
Lift the flatbed scanner lid and load the original that is to be scanned face-down on the
flatbed scanner with the upper-left corner of the document at the lower-right corner of
the glass. Gently close the lid.
2. If the device is connected directly to your computer, the HP Director opens after you
insert an item into the ADF input tray.
OR
If you are scanning from the flatbed scanner (or if the HP Director does not automatically
open), double-click the desktop alias for the HP Director.
3. In the HP Director, click HP LaserJet Scan. A preview scan of the original appears.
4. Click the Save As icon.
5. Enter a name for the file and a file type.
6. Click Save. The original is scanned and saved.
7. Click Done to close HP LaserJet Scan.
Scanning to a software program
To scan to a software program, you scan an item using the program itself. Any TWAIN-
compliant program can scan an image. If the program that you are using is not TWAIN-
compliant, you can save the scanned image to a file and then place, open, or import the file
in the software program. For more information, see
Scanning by using TWAIN-compliant and
WIA-compliant software.
124 Chapter 9 Scan ENWW
Using page-by-page scanning
Note
For best results, load originals in the automatic document feeder (ADF) input tray, not the
flatbed scanner.
1. Load the originals that are to be scanned face-up in the ADF input tray. Adjust the media
guides to hold the originals in place.
2. If the device is connected directly to your computer, the HP Director opens after you
insert an item into the automatic document feeder ADF input tray. If the HP Director
does not automatically open, double-click the desktop alias for the HP Director.
3. To open the HP LaserJet Scan dialog box, click the HP LaserJet Scan button in the
HP Director.
4. Specify an image type.
5. Click Scan.
6. After the scan process has finished, click Scan next page.
7. Repeat step 6 for each page of the original.
8. After all of the pages have been scanned, click Send Now!.
OR
Click the Save As icon to save the pages to a file.
ENWW Scanning from the device and HP Director (Macintosh) 125
Scanning by using TWAIN-compliant and WIA-compliant software
The device is TWAIN-compliant and Windows Imaging Application (WIA)-compliant. The
device works with Windows-based and Macintosh-based programs that support TWAIN-
compliant or WIA-compliant scanning devices.
Using TWAIN-compliant and WIA-compliant software
While you are in a TWAIN-enabled or WIA-enabled program, you can gain access to the
scanning feature and scan an image directly into the open program. For more information,
see the Help file or the documentation that came with your TWAIN-compliant or WIA-
compliant software program.
Scanning from a TWAIN-enabled program
Note
The Macintosh device software complies with TWAIN Version 1.9 requirements.
Generally, a software program is TWAIN-enabled if it has a command such as Acquire, File
Acquire, Scan, Import New Object, Insert from, or Scanner. If you are unsure whether
the program is compliant or you do not know what the command is called, see the software
program Help or documentation.
When scanning from a TWAIN-enabled program, the HP LaserJet Scan software program
might start automatically. If the HP LaserJet Scan program starts, you can make changes
while you are previewing the image. If the program does not start automatically, the image
goes to the TWAIN-enabled program immediately.
To scan from a TWAIN-enabled program
Start the scan from within the TWAIN-enabled program. See the software program Help or
documentation for information about the commands and steps to use.
Scanning from a WIA-enabled program (Windows XP only)
WIA is another way to scan an image directly into a software program, such as Microsoft
Word. WIA uses Microsoft software to scan, instead of HP LaserJet Scan software.
Generally, a software program is WIA-enabled if it has a command such as Picture/From
Scanner or Camera in the Insert or File menu. If you are unsure whether the program is
WIA-enabled, see the software program Help or documentation.
To scan from a WIA-enabled program
Start the scan from within the WIA-enabled program. See the software program Help or
documentation for information about the commands and steps to use.
OR
In the Cameras and Scanner folder, double-click the device icon. This opens the standard
WIA-enabled software program, which enables you to scan to a file.
126 Chapter 9 Scan ENWW
Scanning a photo or a book
Use the following procedures to scan a photo or a book.
Scanning a photo
1. Place the photo on the flatbed scanner with the picture-side down and the upper-left
corner of the photo in the lower-right corner of the glass.
2. Gently close the lid.
3. You are now ready to scan the photo by using one of the scanning methods. See
Understanding scanning methods for more information.
Scanning a book
1. Lift the lid and place the book on the flatbed scanner with the page that you want to copy
at the lower-right corner of the glass.
2. Gently close the lid.
ENWW Scanning a photo or a book 127
3. Gently press down on the lid to press the book to the flatbed scanner surface.
4. You are now ready to scan the book by using one of the scanning methods. See
Understanding scanning methods for more information.
128 Chapter 9 Scan ENWW
Scanning by using optical character recognition (OCR) software
You can use third-party OCR software to import scanned text into your preferred word-
processing program for editing.
Readiris
The device software CD-ROMs include the Readiris OCR program. If you want to use the
Readiris program, install it from the appropriate software CD-ROM, and then follow the
instructions in the online Help.
ENWW Scanning by using optical character recognition (OCR) software 129
Scanner resolution and color
If you are printing a scanned image, and the quality is not what you expected, you might
have selected a resolution or color setting in the scanner software that does not match your
needs. Resolution and color affect the following features of scanned images:
Image clarity
Texture of gradations (smooth or rough)
Scan time
File size
Scanning resolution is measured in pixels per inch (ppi). Color, grayscale, and black and
white define the number of colors possible. You can adjust the scanner hardware resolution
to up to 1200 ppi. The software can perform an enhanced resolution up to 9,600 ppi. You
can set color and grayscale at 1 bit (black and white), or at 8 bit (256 levels of gray) to 24 bit
(true color).
The resolution and color guidelines table lists simple tips that you can follow to meet your
scanning needs.
Note
Setting the resolution and color to a high value can create large files that take up disk space
and slow the scanning process. Before setting the resolution and color, determine how you
are going to use the scanned image.
Note
The best resolution for color and grayscale images is achieved by scanning from the flatbed
scanner rather than from the automatic document feeder (ADF).
Resolution and color guidelines
The following table describes the recommended resolution and color settings for different
types of scan jobs.
Intended use Recommended resolution Recommended color settings
Fax 150 ppi Black and White
E-mail 150 ppi Black and White, if the
image does not require
smooth gradation
Grayscale, if the image
requires smooth gradation
Color, if the image is in color
Edit text 300 ppi Black and White
Print (graphics or text) 600 ppi for complex graphics,
or if you want to significantly
enlarge the document
300 ppi for normal graphics
and text
150 ppi for photos
Black and White for text
and line art
Grayscale for shaded or
colored graphics and
photos
Color, if the image is in color
130 Chapter 9 Scan ENWW
Intended use Recommended resolution Recommended color settings
Display on screen 75 ppi Black and White for text
Grayscale for graphics and
photos
Color, if the image is in color
Color
You can set the color values to the following settings when scanning.
Setting Recommended use
Color Use this setting for high-quality color photos or
documents in which the color is important.
Black and White Use this setting for text documents.
Grayscale Use this setting when file size is an issue or
when you want a document or photograph to be
scanned quickly.
ENWW Scanner resolution and color 131
132 Chapter 9 Scan ENWW
10
Photo
Note
This section applies only to the HP Color LaserJet 2840 all-in-one printer, scanner, fax, copier.
Use the following instructions to perform photo-related tasks:
Inserting a memory card
Changing default settings
Changing job settings
Printing photos directly from the memory card
Printing photos from a proof sheet
Printing an index
ENWW 133
Inserting a memory card
The HP Color LaserJet 2840 all-in-one can read the following memory-card types:
CompactFlash
Memory Stick and Memory Stick PRO
MultiMedia
Secure Digital (SD)
SmartMedia
xD
Note
The HP Color LaserJet 2840 all-in-one memory card reader recognizes only files in .JPEG
file and sRGB color format when printing from the device control panel. To print other file
types, you must use the software, such as HP Image Zone, provided on the CD-ROMs that
came with the device. See the software online Help for information about how to print photos
from your computer. Windows operating system users also can use Windows Explorer to
move other file types to their computer and then print the files from the computer.
Insert the memory card into the appropriate slot on the HP Color LaserJet 2840 all-in-one.
To determine in which slot your memory card needs to be inserted, see the illustration below.
1 Accepts xD and SmartMedia memory cards.
2 Accepts MultiMedia, Memory Stick, and Memory Stick PRO memory cards.
3 Accepts CompactFlash memory cards.
4 Accepts Secure Digital memory cards.
The device reads the card, and then the device control panel displays X Photos found on
card, where X is the number of recognized .JPEG files found on the memory card.
Now you can use the HP Color LaserJet 2840 all-in-one to print photos.
Note
You can use only one memory card in the device at a time. If two or more are inserted, the
device displays an error message. For more information about memory-card messages, see
Memory card problems.
Note
The HP Color LaserJet 2840 all-in-one will recognize memory cards up to 2 GB.
134 Chapter 10 Photo ENWW
Changing default settings
The HP Color LaserJet 2840 all-in-one comes with default settings that were set at the
factory. You can change the default settings for photo printing from the device control panel.
Note
The default settings remain as selected until you change and save them again. If you want
to change the settings temporarily for a particular photo-printing job, see
Changing job settings.
1. Press M
ENU
.
2. Use the < or the > button to select Photo Setup, and then press Enter.
3. Use the < or the > button to select one of the following menu items, and then press E
NTER
.
Def. Image Size: Select this item to change the size of the image that you are
printing.
Def. # of copies: Select this item to change the number of copies that you want to
print.
Def. Output Color: Select this item to set whether you are printing in color or black
and white.
4. Use the < or the > button to change the setting, and then press E
NTER
to save the change.
ENWW Changing default settings 135
Changing job settings
1. Insert the memory card into the device.
2. Press P
HOTO
.
3. Use the < or the > button to select Print photos.
4. Use the < or the > button to select Job settings.
5. Use the < or the > button to make selections for each of the following menu items, and
then press E
NTER
.
Image Size: Change the size of the image that you are printing.
Media Size: Change the media size that you are using.
Paper type: Change the media type that you are using.
# of copies: Change the number of copies that you want to print.
Output color: Set whether you are printing in color or black-and-white.
6. Press E
NTER
to save the changes.
When you have finished changing the job settings, you can print your photos. See
Printing
photos directly from the memory card or Printing photos from a proof sheet.
Note
The settings return to their default value after the memory card has been removed. If you
want to change the settings permanently, see
Changing default settings.
136 Chapter 10 Photo ENWW
Printing photos directly from the memory card
To print photos directly from the memory card, complete the following steps:
1. Insert the memory card into the device. See
Inserting a memory card.
2. Press P
HOTO
.
3. Use the < or the > button to select Print photos.
4. Use the < or the > button to select Select photos, and then press E
NTER
.
5. Use the < or the > button to select one of the following menu items, and then press E
NTER
.
All (1-X): X represents the number of JPEG files the device detects on the card.
Selecting this option prints all of the JPEG files on the memory card. Press E
NTER
again to confirm the print job.
Custom: Selecting this option allows you to select certain photos to print. Use the
alphanumeric keys to enter photo numbers. Use the # key to insert a comma (,)
between photo numbers, or use the * key to insert a dash, (-), which allows you to
print a range of photos. For example, enter 1-9 to have the device print the nine
photos numbered 1 through 9. When you have finished entering photo numbers,
press E
NTER
. Press E
NTER
again to confirm the print job.
Note
JPEG files on the memory card are numbered in alphabetical order. If you do not know the
order of the photos on the memory card, you can print an index that shows the photo order.
For more information about printing an index, see
Printing an index.
ENWW Printing photos directly from the memory card 137
Printing photos from a proof sheet
This feature allows you to print photos from a proof sheet that allows you to preview your
images before printing them. A proof sheet can contain as many as 20 images. This feature
has been optimized and tested for use with Genuine HP Toner Supplies (variations in color
shading can impact the performance of this feature).
1. Insert the memory card into the device. See
Inserting a memory card.
2. Press P
HOTO
.
3. Use the < or the > button to select Proof sheet, and then press E
NTER
.
If more than 20 JPEG files exist on the memory card, use the < or the > button to select
one of the following menu items, and then press E
NTER
.
All (1-X): X represents the number of .JPEG files the device detects on the card.
Selecting this option prints all of the JPEG files on the memory card.
Last 20: Selecting this option prints the last 20 JPEG files from the alphabetized list
on the memory card.
Custom: Selecting this option allows you to select certain photos to print. Use the
alphanumeric keys to enter the first photo number, and then press E
NTER
. Use the
alphanumeric keys to enter the last photo number, and then press E
NTER
.
4. Press E
NTER
again to confirm the print job.
5. Under each photo that you want to print, color in the oval or bubble with a dark blue or
black pen. Also fill the bubbles to indicate the image layout and media type.
6. Place the proof sheet face-down on the flatbed scanner, with the upper-left corner of the
document located in the lower-right corner of the glass.
7. Press P
HOTO
.
8. Use the < or the > button to select Proof sheet, and then press E
NTER
.
9. Use the < or the > button to select Scan, and then press E
NTER
.
The device scans the proof sheet and prints the photos that you marked. Repeat steps 5
through 9 for each proof sheet.
Note
Photos printed with this method can be printed in color only.
Note
JPEG files on the memory card are numbered in alphabetical order. If you do not know the
order of the photos on the memory card, you can print an index that shows the photo order.
For more information about printing an index, see
Printing an index.
138 Chapter 10 Photo ENWW
Printing an index
1. Insert the memory card into the device. See Inserting a memory card.
2. Press P
HOTO
.
3. Use the < or the > button to select Index print, and then press E
NTER
.
4. Press E
NTER
again to confirm the print job.
The device prints an index that includes small preview images for each photo on the
memory card. Each index page can contain as many as 30 preview images.
ENWW Printing an index 139
140 Chapter 10 Photo ENWW
11
How do I?
Use this section to perform basic tasks with the HP Color LaserJet 2820/2830/2840 all-in-one.
Print: How do I?
Network: How do I?
Photo: How do I?
Copy: How do I?
Fax: How do I?
Scan: How do I?
Other: How do I?
ENWW 141
Print: How do I?
Use this section to answer printing questions.
142 Chapter 11 How do I? ENWW
Print on special media, such as glossy or photo paper
You can print on special media such as transparencies, labels, heavy paper, glossy paper,
photo paper, and card stock, by using the optimizing feature in the printer driver.
1. Open the straight-through output door.
2. Load the media input tray. Make sure that the top of the media is forward and the side to
be printed on (the rough side of transparencies) is facing up.
3. Adjust the media guides to fit the width of the media.
4. Open a document in a program, such as Microsoft Word.
5. Select the print command. For most programs, click the File menu, and then click Print.
The Print dialog box appears.
6. On the Print dialog box, click Properties.
7. On the Paper or Quality tab, select one of these media types:
Plain
Preprinted
Letterhead
Transparency
Prepunched
Labels
Bond
Recycled
Light <70 g/m2
Heavy paper 91-105 g/m2
Color
Glossy 75-105 g/m2
Cardstock 106-163 g/m2
Heavy Glossy 106-163 g/m2
Envelope
Tough paper
8. Print the document. Remove the media from the device as it prints to prevent it from
sticking together, and place the printed pages on a flat surface.
The media type can also be selected and configured in HP Toolbox. To configure these
media types from HP Toolbox, click Device Settings, click the System Settings tab,
and then open the Print Modes page. Make any necessary changes, and then click
Apply to save the changes.
To print a single-page cover letter on letterhead, followed by a multiple-page document,
load a single sheet of letterhead in tray 1. After the letterhead page has printed, the
device prompts you to load paper. Load paper for the rest of the document.
ENWW Print: How do I? 143
Print on both sides of the paper
To manually print on both sides of the paper, you must send the paper through the device
twice. You can print by using the media output bin or the straight-through output path.
Hewlett-Packard recommends that you use the media output bin for lightweight paper and
use the straight-through output path for any heavy media or media that curls excessively
when printed.
CAUTION
Do not print on both sides of labels or transparencies. Damage to the device and jams might
result.
1. Insert enough paper into one of the trays to accommodate the print job. If you are
loading special paper such as letterhead, load it in one of these ways.
For tray 1, load the letterhead paper with the front side down, and the bottom edge
leading into the device first.
For optional tray 2, load the letterhead paper with the front side up, and the top edge
toward the back of the tray.
1 tray 1
2 optional tray 2
2. In the printer driver, select the Print on Both Sides option and send the job to print.
3. After the job finishes printing, remove any blank paper from tray 1. Insert the printed
stack, with the blank side up, and the top edge leading into the device. Print the second
side from tray 1.
4. Press E
NTER
to continue printing.
Note
Macintosh operating systems do not support manual duplexing.
Print on envelopes and custom media sizes
To print on envelopes, complete the following steps.
1. Set tray 1 to the correct media size. See
Loading tray 1.
2. Load no more than 10 envelopes face-up with the top of the envelope to the left, and the
short edge feeding into the device first.
3. Use your computer software program to complete the printing process.
144 Chapter 11 How do I? ENWW
Note
Do not use envelopes with windows or clasps, and do not use envelopes that are wrinkled,
nicked, curled, or otherwise damaged.
To print on custom media sizes, complete the following steps.
1. Open the straight-through output door.
2. Load the media with the narrow side forward and the side to be printed on facing up.
3. Adjust the side and rear media guides to fit the media.
4. At your computer, open a document in a program, such as Microsoft Word.
5. Select the print command. For most programs, click the File menu, and then click Print.
The Print dialog box appears.
6. In the Print dialog box, click Properties.
7. On the Paper or Quality tab, select the correct media size.
Note
Software settings can override changes to the device properties.
8. Click OK.
9. Print the document.
Change the device print settings, such as volume or print
quality, in HP Toolbox
To change the default print settings in HP Toolbox, complete the following steps.
Note
The changes that you make to the print settings in HP Toolbox apply to all future print jobs.
1. Open HP Toolbox and click Device Settings.
2. Click the System Settings tab.
3. On the System Settings tab, you can modify settings that appear on the following
pages. Each page offers Help for more information.
Device Information
Paper Handling
Print Quality
Print Density
Print Modes
System Setup
Volumes
Date/Time
Service
Device Polling
Save/Restore
4. Click Apply to save the changes that you make on these pages.
Note
If you have similar settings in the printer driver, those settings take priority over the settings
that are established in HP Toolbox.
ENWW Print: How do I? 145
Print color documents from my computer in black and white
only
For users of Windows 2000 and Windows XP 32-bit operating systems, two HP Color
LaserJet 2820/2830/2840 all-in-one print drivers are installed during the installation process:
the HP Color LaserJet 28XX PCL 6 driver, and the HP CLJ28XX PCL 6 - Black_White driver,
where XX repesents 20, 30, or 40, depending on the HP Color LaserJet model that you have.
The default print driver, HP Color LaserJet 28XX PCL 6, provides you with full color printing
capability for those print jobs that you want to be printed in color. The HP CLJ28XX PCL 6 -
Black_White driver allows you to print documents in black and white instead of full color.
For those print jobs that contain color text or graphics that you do not need to print in color,
there are two options for producing black-and-white documents:
In the software program, select the HP CLJ28XX PCL 6 - Black_White print driver from
the Print dialog box, and then click OK. The monochrome driver will print color
documents only in black and white.
In the software program, select the HP Color LaserJet 28XX PCL 6 print driver, click
Properties, click the Color tab, and then select the Print in Grayscale check box. Click
OK to save the print properties, and then click OK again to print the document.
146 Chapter 11 How do I? ENWW
Network: How do I?
Use this section to answer network questions.
Set up the device and use it on the network
Hewlett-Packard recommends that you use the HP software installer on the CD-ROMs that
came with the device to set up printer drivers for the following network setups.
To configure a network port-connected device configuration (direct
mode or peer-to-peer printing)
In this configuration, the device is connected directly to the network, and all computers on
the network print directly to the device.
Note
This mode is the recommended network configuration for the device.
1. Connect the device directly to the network by inserting a network cable into the device
network port.
2. At the device, use the control panel to print a Configuration page. See
Configuration page.
3. Insert the device CD-ROM into your computer. If you have already set up your device,
click Install Software to start the software installer. If the software installer does not
start, navigate to the hpsetup.exe file on the CD-ROM and double-click the file.
4. Click Install HP Color LaserJet Software.
5. On the Welcome screen, click Next.
6. On the Installer updates screen, click Yes to search for installer updates on the Web.
7. For Windows 2000, on the Installation Options screen, choose the installation option.
Hewlett-Packard recommends a typical installation, if your system supports it.
8. On the License Agreement screen, read the license agreement, indicate that you
accept the terms, and then click Next.
9. For Windows 2000, on the HP Extended Capabilities screen, choose whether you want
extended capabilities, and then click Next.
10. On the Destination Folder screen, choose the destination folder, and then click Next.
11. On the Ready to Install screen, click Next to begin installation.
Note
If you want to change your settings, instead of clicking Next, click Back to return to previous
screens, and then change the settings.
12. On the Connection Type screen, select Through the network, and then click Next.
13. On the Identify Printer screen, identify the device either by searching or by specifying a
hardware or IP address, which is listed on the Configuration page you printed earlier. In
most cases an IP address is assigned, but you can change it if you want by clicking
Specify the printer by Address on the Identify Printer screen. Click Next.
14. Allow the installation process to complete.
ENWW Network: How do I? 147
To configure a direct-connected shared device (client server printing)
In this configuration, the device is connected to a computer through a USB cable, the
computer is connected to the network, and the device is shared with other computers on the
network.
1. Insert the device CD-ROM into your computer. If you have already set up your device,
click Install Software to start the software installer. If the software installer does not
start, navigate to the hpsetup.exe file on the CD-ROM and double-click the file.
2. Click Install HP Color LaserJet Software.
3. On the Welcome screen, click Next.
4. On the Installer updates screen, click Yes to search for installer updates on the Web.
5. For Windows 2000, on the Installation Options screen, choose the installation option.
Hewlett-Packard recommends a typical installation, if your system supports it.
6. On the License Agreement screen, read the license agreement, indicate that you
accept the terms, and then click Next.
7. For Windows 2000, on the HP Extended Capabilities screen, choose whether you want
extended capabilities, and then click Next.
8. On the Destination Folder screen, choose the destination folder, and then click Next.
9. On the Ready to Install screen, click Next to begin installation.
Note
If you want to change your settings, instead of clicking Next, click Back to return to previous
screens, and then change the settings.
10. On the Connection Type screen, select Directly to this computer, and then click Next.
11. Connect the USB cable.
12. Allow the installation process to complete.
13. On the Windows taskbar, click Start, click Settings, and then click Printers.
In Windows XP, click Start, click Control Panel, and then double-click Printers and
Faxes.
14. In the dialog box, right-click the device, and then click Sharing.
15. Select Share this printer, type the printer name if necessary, and then click OK.
To change from a direct-connected shared device to a network port-
connected device configuration
To change from a direct connection to a network configuration, complete the following steps.
1. Uninstall the printer driver for the direct connect device.
2. Install the driver as a network configuration by using the steps in
To configure a network
port-connected device configuration (direct mode or peer-to-peer printing).
148 Chapter 11 How do I? ENWW
Set my network password
Use HP Toolbox to set a network password.
1. Open HP Toolbox and click Device Settings.
2. Click the Network Settings tab.
Note
If a password has been set for the device previously, you will be prompted to type the
password. Type the password, and then click Apply.
3. Click Password.
4. In the Password box, type the password you want to set, and then in the Confirm
password box, type the same password again to confirm your choice.
5. Click Apply to save the password.
ENWW Network: How do I? 149
Photo: How do I?
Use this section to answer photo and memory card questions.
Print a particular photo from a memory card
To print a particular photo directly from the memory card, complete the following steps:
1. Insert the memory card into the device.
2. Press P
HOTO
.
3. Use the < or the > button to select Print photos.
4. Use the < or the > button to select Select photos, and then press E
NTER
.
5. Use the < or the > button to select Custom, and then press E
NTER
.
6. Use the alphanumeric keys to enter the number of the photo that you want to print, and
then press E
NTER
. Press E
NTER
again to confirm the print job.
Note
JPEG files on the memory card are numbered in alphabetical order. If you do not know the
order of the photos on the memory card, you can print an index that shows the photo order.
For more information about printing an index, see
Printing an index.
Print all the photos that are stored on a memory card
To print all of the photos on a memory card, complete the following steps:
1. Insert the memory card into the device. See
Inserting a memory card.
2. Press P
HOTO
.
3. Use the < or the > button to select Print photos.
4. Use the < or the > button to select Select photos, and then press E
NTER
.
5. Use the < or the > button to select All (1-X), and then press E
NTER
.
6. Press E
NTER
again to confirm the print job.
Enable or disable memory cards
Use HP Toolbox to enable or disable the device memory-card functionality.
Note
If you do not have access to HP Toolbox, you can enable or disable the device memory-card
functionality by using the embedded Web server. See
Embedded Web server.
1. Open HP Toolbox.
2. Click Device Settings, and then click the Print Settings tab.
3. Click Memory Card, and then select or clear the Enable memory cards check box.
Note
This setting can be protected by setting a network password. See Set my network password.
If the control panel shows Memory Cards Disabled and you cannot change the setting, it is
protected by a network password. See your network or printer administrator.
150 Chapter 11 How do I? ENWW
Use a proof sheet
This feature allows you to print photos from a proof sheet that allows you to preview your
images before printing them. A proof sheet can contain as many as 20 images. This feature
has been optimized and tested for use with Genuine HP Toner Supplies (variations in color
shading can impact the performance of this feature).
1. Insert the memory card into the device.
2. Press P
HOTO
.
3. Use the < or the > button to select Proof sheet, and then press E
NTER
.
If more than 20 JPEG files exist on the memory card, use the < or the > button to select
one of the following menu items, and then press E
NTER
.
All (1-X): X represents the number of .JPEG files the device detects on the card.
Selecting this option prints all of the JPEG files on the memory card.
Last 20: Selecting this option prints the last 20 JPEG files from the alphabetized list
on the memory card.
Custom: Selecting this option allows you to select certain photos to print. Use the
alphanumeric keys to enter the first photo number, and then press E
NTER
. Use the
alphanumeric keys to enter the last photo number, and then press E
NTER
.
4. Press E
NTER
again to confirm the print job.
5. Under each photo that you want to print, color in the oval or bubble with a dark blue or
black pen. Also fill the bubbles to indicate the image layout and media type.
6. Place the proof sheet face-down on the flatbed scanner, with the upper-left corner of the
document located in the lower-right corner of the glass.
7. Press P
HOTO
.
8. Use the < or the > button to select Proof sheet, and then press E
NTER
.
9. Use the < or the > button to select Scan, and then press E
NTER
.
The device scans the proof sheet and prints the photos that you marked. Repeat steps 5
through 9 for each proof sheet.
Note
Photos printed with this method can be printed in color only.
Save photos from a memory card to my computer
Use HP Director to transfer images from a memory card in the device to your computer.
1. Open HP Director and click Transfer Images.
2. In the dialog box that appears, complete the necessary settings, and then click Start
Transfer.
The images are transferred to your computer. For more information about HP Director, see
the HP Director online Help.
Windows operating system users who do not have HP Director installed can use Windows
Explorer to move files from the memory card to their computer.
ENWW Photo: How do I? 151
Copy: How do I?
Use this section to answer copying questions.
Change the copy settings, such as number of copies, in
HP Toolbox
Note
The changes that you make to the copy settings in HP Toolbox apply to all future copy jobs.
1. Open HP Toolbox and click Device Settings.
2. Click the Copy Settings tab.
3. On the Copying page, change any of the following settings that you want to change.
Copy quality
Contrast
Collation
Number of copies
4. Click Apply to save the changes.
Reduce or enlarge an original
Use HP Toolbox to produce reduced or enlarged copies of the original document.
1. Open HP Toolbox and click Device Settings.
2. Click the Copy Settings tab.
3. Reduce / Enlarge page.
4. Select one of the following options:
Standard sizes: This option allows you to reduce or enlarge among various
standard media sizes.
Pages per sheet: This option allows you to print more than one original on a page.
See
Printing multiple pages on one sheet of paper (N-up printing) for more
information.
Custom: This option allows you to reduce or enlarge at a precise percentage setting.
5. When you are finished making changes, click Apply.
152 Chapter 11 How do I? ENWW
Fax: How do I?
Use this section to answer fax questions.
Send a fax from the device
1. Dial the fax number by using one of the following methods:
Use the alphanumeric buttons on the device control panel to dial the number.
If the fax number you are calling has been assigned to a one-touch key, press that key.
If the fax number you are calling has a speed-dial entry, press P
HONE
B
OOK
, use the
alphanumeric buttons to enter the speed-dial entry, and then press E
NTER
.
Note
When dialing by using the alphanumeric buttons, include any pauses or additional numbers
that are necessary for the call, such as an area code, an access code for numbers that are
outside of a PBX system (usually a 9), or a long-distance prefix. See
Using dialing
characters for more information.
2. Load the document into the automatic document feeder (ADF) input tray or onto the
flatbed scanner.
If you are scanning from the flatbed scanner, select YES when Send from glass?
1=Yes 2=No appears, and then press E
NTER
.
3. Press S
TART
F
AX
.
When the last page of the fax has exited the device, you can start sending another fax,
copying, or scanning.
To fax to numbers that you use regularly, you can assign a one-touch key or speed-dial
entry. See
To program speed-dial entries and one-touch keys and To program group-dial
entries. If you have electronic phone books available, you might be able to use them to
select recipients. Electronic phone books are generated by using third-party software
programs.
Change the fax send or receive settings, such as answer
mode, in HP Toolbox
Use the Send Settings page to configure the fax send settings for the device. Use the
Receive Settings page to configure the fax receive settings for the device.
Note
The changes that you make to the send and receive settings in HP Toolbox apply to all
future fax receive jobs.
ENWW Fax: How do I? 153
To change default fax send settings
1. Open HP Toolbox and click Device Settings.
2. Click the Fax Settings tab, and then click Send Settings.
3. On the Send Settings page, you can modify these options:
Resolution
Redial
Dial Mode
Dial Prefix
Detect Dial Tone
Contrast
Billing Codes
Fax from Glass Page Size
4. Click Apply to save the changes that you make on these pages.
To change default fax receive settings
1. Open HP Toolbox and click Device Settings.
2. Click the Fax Settings tab, and then click Receive Settings.
3. On the Receive Settings page, you can modify these options:
Answer Mode
Automatic
Rings to Answer (available only if Automatic is selected)
Answer Ring Pattern (available only if Automatic is selected)
Manual
Receive Options
Extension Phone
Fit To Page
Silence Detection
Stamp Received Faxes
4. Click Apply to save the changes that you make on these pages.
Create a fax cover page
You can create a fax cover page in the HP LaserJet Send Fax software by using one of the
cover page templates that are supplied with the software.
154 Chapter 11 How do I? ENWW
To create a cover page template
1. On the Windows taskbar, click Start, click Programs (or All Programs in Windows XP),
and then click HP.
2. Click HP LaserJet 2830 or HP LaserJet 2840, and then click HP LaserJet Send Fax.
3. Click Cover Page.
4. Enter the following information about the recipient and the fax:
phone number (required)
name
company
subject
notes
5. Place the pages that you want to fax in the automatic document feeder (ADF).
6. Click Pages in Document Tray.
7. Select one of the cover page templates from the drop-down list. To view the cover page,
click Preview.
8. Click Send Now to send the fax.
To create a cover page from a program
You can create a fax cover page in a program, such as Microsoft Word, and then use the fax
cover pages for the faxes that you send.
1. Create your cover page.
2. On the File menu, click Print. The Print dialog box appears.
3. Select HP LaserJet 2830 Fax or HP LaserJet 2840 Fax from the list of devices.
4. To change the settings, click Properties in the Print dialog box, and adjust any settings.
Click OK when you are finished.
5. Click Print. The HP LaserJet Send Fax software appears.
6. If you have additional pages to fax, put them in the automatic document feeder (ADF)
and make sure that Pages in Document Tray is selected. If you do not have pages to
scan from the ADF, make sure that Pages in Document Tray is not selected.
7. Click Send Now to send the fax.
Send a fax from my computer
There are several methods that you can use to send a fax from your computer.
ENWW Fax: How do I? 155
To send a fax from HP Toolbox
1. Open HP Toolbox and click the Fax tab.
2. Click Send Fax. The HP LaserJet Send Fax software opens.
3. Enter the recipient's phone number.
4. Put the pages that you want to fax into the automatic document feeder (ADF).
Note
Faxing from the scanner glass is not supported in the HP LaserJet Send Fax software.
5. Click Pages in Document Tray.
6. Click Send Now to send the fax.
To send a fax from the HP LaserJet Send Fax software
1. On the Windows taskbar, click Start, click Programs (or All Programs in Windows XP),
and then click HP.
2. Click HP LaserJet 2830 or HP LaserJet 2840, and then click HP LaserJet Send Fax.
3. Enter the recipient's phone number.
4. Put the pages that you want to fax into the automatic document feeder (ADF).
5. Click Pages in Document Tray.
6. Click Send Now to send the fax.
To send a fax directly from another program
1. In the program, open the document you want to send as a fax.
2. On the File menu, click Print. The Print dialog box appears.
3. Select HP LaserJet 2830 Fax or HP LaserJet 2840 Fax from the list of devices.
4. To change the settings, click Properties in the Print dialog box, and adjust any settings.
Click OK when you are finished.
5. Click Print. The HP LaserJet Send Fax software appears.
6. If you have additional pages to fax, put them in the automatic document feeder (ADF)
and make sure that Pages in Document Tray is selected. If you do not have pages to
scan from the ADF, make sure that Pages in Document Tray is not selected.
7. Click Send Now to send the fax.
Receive faxes to my computer
1. Open HP Toolbox and click the Fax tab.
2. In the Fax Receive Mode section, click Receive faxes to this computer.
3. If you want to be notified when a fax is received to your computer, select Display a
message when a fax is received to this computer.
4. Click Apply.
Note
All faxes will be received to the computer until you turn off this feature. One computer at a
time can be set up to receive faxes.
156 Chapter 11 How do I? ENWW
Set up speed dials
The first several entries in the Fax Phone Book are reserved for speed-dial settings. The
number of speed dials that are listed is device-specific, and corresponds to the number of
speed-dial buttons on the device.
To set up speed dials
1. Open HP Toolbox and click the Fax tab.
2. Click Fax Phone Book.
3. In the Add the Contact Information section, type the following information:
Entry # (For speed dial entries, use only the entry numbers that have speed dial
buttons next to them.)
Contact name
Fax number
4. Click Add. The contact information appears in the Phone Book Entry List section.
To move an entry that has already been added to a different speed-dial
location
1. Open HP Toolbox and click the Fax tab.
2. Click Fax Phone Book.
3. Click the Edit link for the entry that you want to move.
4. Change the Entry # to the desired speed-dial location.
5. Click Save.
Note
You must select a speed-dial entry location that is not already occupied. If the speed-dial
entry location is occupied, you must either delete that entry, or move that entry to an empty
location first.
Forward received faxes to another fax number
1. Open HP Toolbox and click the Fax tab.
2. In the Fax Receive Mode section, click Forward received faxes to a different fax
machine.
3. In the Forward to this fax number field, enter the fax number to where you want faxes
forwarded.
4. Click Apply.
Note
All faxes sent to the device are forwarded to the other fax number until you turn off this
feature.
ENWW Fax: How do I? 157
View and print previously received faxes
1. Open HP Toolbox and click the Fax tab.
2. Click Fax Receive Log.
The Fax Receive Log page appears. This page shows all of the recent faxes that the
device has received.
Note
Only faxes that were received to this computer can be viewed, printed, or forwarded from
HP Toolbox.
3. To view a fax from the Fax Receive Log, click the View link next to the fax that you
want to view. The Fax Viewer opens the selected fax.
4. To print the fax, click Printable version.
Note
If you do not have Adobe® Acrobat® Reader installed on your computer, you need to
download Adobe Acrobat Reader to open and print the fax. Go to http://www.adobe.com to
download the software.
5. Print the fax using Adobe Acrobat Reader.
You can also print all of the received faxes that are currently stored on the device.
Note
The order in which received faxes are printed cannot be changed.
1. Open HP Toolbox and click the Fax tab.
2. On the Fax Tasks page, click Reprint Last Faxes. Your device prints all faxes that are
stored on the device, beginning with the most recently received fax. You can cancel
printing at any time by pressing Cancel on the control panel.
Add or delete a contact
Use HP Toolbox to add or delete a fax contact.
To add a contact
1. Open HP Toolbox and click the Fax tab.
2. Click Fax Phone Book.
Note
The first several entries in the Fax Phone Book are reserved for speed-dial settings. The
number of speed dials that are listed is device-specific, and corresponds to the number of
speed-dial buttons on the device.
3. In the Add the Contact Information section, type the following information:
Entry # (the next available phone book entry number should be automatically
entered)
Contact name
Fax number
4. Click Add. The contact information appears in the Phone Book Entry List section.
Note
You must select a phone book entry location that is not already occupied. If the entry
location is occupied, you must either delete that entry, or move that entry to an empty
location first.
158 Chapter 11 How do I? ENWW
To delete a contact
1. Open HP Toolbox and click the Fax tab.
2. Click Fax Phone Book.
3. Select the check box next to the phone book entry that you want to delete.
4. Click Delete. The Delete confirmation window appears.
5. Click Delete to delete the entry.
Import contacts from another source
You can import phone book data that has been exported from external e-mail programs,
such as Microsoft Outlook or Lotus Notes. For information about exporting phone book data
from other programs, see the documentation or the Help that accompanies the program.
1. Open HP Toolbox and click the Fax tab.
2. Click Fax Phone Book.
3. Click Import Phone Book. The Import information into the Fax Phone Book page
appears.
4. Select the program from which you are importing the phone book data.
5. Click Browse, and then navigate to the location on your computer where the previously
exported phone book is stored.
6. Click Continue. The Fax Phone Book - Import - Select Entries page appears.
7. Select the entries from the Import List section that you want to add, and then click Add.
OR
Click Add All to add all of the entries from the import list.
Note
Selected entries from the import list are added to the phone book only at available entry
locations, beginning with the Insert Location selected in the Phone Book section. Existing
entries in the Fax Phone Book are not moved to different locations. If the maximum number
of entries is exceeded in the Fax Phone Book, the remaining contacts are not saved in the
phone book.
8. Click Save.
Note
You must click Save for your imported entries to be added to your Fax Phone Book.
ENWW Fax: How do I? 159
Create a new group list
1. Open HP Toolbox and click the Fax tab.
2. Click Fax Phone Book.
3. Click New Group. The Fax Phone Book - Create a New Group page appears.
4. You can type a number in the Group information for the Fax Phone Book entry field.
HP Toolbox automatically enters the next available entry number from the Fax Phone
Book.
5. Type a name for your group in the Group name field.
6. Select the entries from the All individuals list that you want to add to your group, and
click Add.
OR
Click Add All to add all of the phone book entries to the group.
Note
If you add a name to the group that you do not want to include, select the name in the
Individuals in Group list, and then click Remove.
7. Click Save.
Create a new group list
1. Open HP Toolbox and click the Fax tab.
2. Click Fax Phone Book.
3. Click New Group. The Fax Phone Book - Create a New Group page appears.
4. You can type a number in the Group information for the Fax Phone Book field.
HP Toolbox automatically enters the next available entry number from the Fax Phone
Book.
5. Type a name for your group in the Group name field.
6. Select the entries from the All individuals list that you want to add to your group, and
then click Add.
OR
Click Add All to add all of the phone book entries to the group.
Note
If you add a name to the group that you do not want to include, select the name in the
Individuals in Group list, and then click Remove.
7. Click Save.
Change settings, such as resolution and contrast, and
optimize them for each fax
Some faxes might include only text, others might have graphics or photos, and still other
faxes might contain a combination of both text, graphics, and photos. You can change fax
settings for each type of fax that you send from the HP LaserJet Send Fax software or at the
control panel on the device.
For more information about optimizing faxes using the HP LaserJet Send Fax software, see
the Help that accompanies the software.
160 Chapter 11 How do I? ENWW
For more information about optimizing faxes using the device control panel, see Fax.
The following options found on the Fax tab, Send Settings page change how a fax is
optimized when it is sent:
Resolution
Standard
Fine
Super Fine
Photo
Contrast
Select a setting between Light to Dark.
ENWW Fax: How do I? 161
Scan: How do I?
Use this section to answer scanning questions.
Scan from the device control panel
1. Load the originals that are to be scanned in the automatic document feeder (ADF) and
adjust the media guides.
OR
Lift the flatbed scanner cover and load the original face-down on the glass, with the
upper-left corner of the document located in the lower-right corner of the glass. Gently
close the lid.
2. Press S
TART
S
CAN
or S
CAN
T
O
on the control panel.
Note
To use the S
CAN
T
O
button, you must have HP Toolbox installed on your computer.
Set up the Scan to button on the control panel
Use HP Toolbox to set up the device S
CAN
T
O
button.
1. Open HP Toolbox and click the Scan to tab.
2. On the Scan to E-mail or a Folder page, select Turn on scan to e-mail or a folder.
3. In the Add E-mail Addresses or a Folder section, type an e-mail address, or click
Browse to navigate to a folder for the Scan To button.
4. Click Add.
Save a scan to a folder on my computer
Note
If the device is connected to a network, you must have at least one folder set up in
HP Toolbox for this feature to work. For more information, see
Add or edit e-mail addresses
for scanning to e-mail or Scan from the device control panel.
1. Load the originals that are to be scanned in the automatic document feeder (ADF) and
adjust the media guides.
OR
Lift the flatbed scanner cover and load the original document that is to be scanned face-
down on the glass with the upper-left corner of the document located in the lower-right
corner of the glass. Gently close the lid.
2. To start scanning, press S
CAN
T
O
on the control panel.
Note
For information on changing the entries that appear in the scan to list on the device display,
see
Add or edit e-mail addresses for scanning to e-mail.
3. Use the < or the > button to select the folder to which you want to send the scan.
4. Press the S
TART
S
CAN
on the device to send the scan to the folder.
162 Chapter 11 How do I? ENWW
Send a scan to an e-mail message
Note
You must have at least one e-mail address set up in HP Toolbox for this feature to work. For
more information, see the HP Toolbox online Help.
1. Load the originals that are to be scanned in the automatic document feeder (ADF) and
adjust the media guides.
OR
Lift the flatbed scanner cover and load the original face-down on the glass, with the
upper-left corner of the document located in the lower-right corner of the glass. Gently
close the lid.
2. Press S
CAN
T
O
on the control panel.
3. Use the < or the > button to select the e-mail address to which you want to send the scan.
4. Press S
TART
S
CAN
on the device to send the scan.
Add or edit e-mail addresses for scanning to e-mail
You can configure your device to scan a document and send it to one or more e-mail
addresses or to a folder on your computer.
To add an e-mail address
1. Open HP Toolbox and click the Scan to tab.
2. On the Scan to E-mail or a Folder page, verify that Turn on Scan to E-mail or a
Folder is selected.
3. In the Add E-mail Addresses or a Folder section, select E-mail addresses, and then
enter an e-mail address. If you enter multiple e-mail addresses, separate them with
commas.
4. Type a descriptive name for the address in the Display at the device as field (for
example, type accounting). This name appears on the control-panel display when you
press S
TART
S
CAN
on the device.
5. Click Add. The address is saved and appears in the list of entries when you press S
CAN
T
O
on the device.
To edit an e-mail address
1. Open HP Toolbox and click the Scan to tab.
2. In the E-mail Addresses and Folders List, click the Edit link next to the e-mail address
that you want to change.
3. Edit the information you want to change.
4. Click Save. The information is updated and appears in the list of entries when you press
S
CAN
T
O
on the device.
Add or edit folders for scanning to a folder
You can configure your device to scan a document and send it to a folder on your computer.
ENWW Scan: How do I? 163
To add a folder
1. Open HP Toolbox and click the Scan to tab.
2. On the Scan to E-mail or a Folder page, verify that Turn on Scan to E-mail or a
Folder is selected.
3. In the Add E-mail Addresses or a Folder section, select Folder, and then click
Browse. Browse to the folder on your computer to which you want to send scans.
4. Type a descriptive name for the folder in the Display at the device as field (for
example, type soccer). This name appears on the device display when you press
S
TART
S
CAN
on the device.
5. Click Add. The folder is saved and appears in the list when you press S
CAN
T
O
on the
device.
To edit a folder
1. Open HP Toolbox and click the Scan to tab.
2. In the E-mail Addresses and Folders List, click the Edit link next to the folder that you
want to change.
3. Edit the information you want to change.
4. Click Save. The information is updated and appears in the list when you press S
CAN
T
O
on the device.
Note
If you do not want the changed information for the entry to be saved, click Cancel.
164 Chapter 11 How do I? ENWW
Other: How do I?
Use this section to answer other questions about the device.
Receive toner warnings from the device at my computer
Use HP Toolbox to set up the device so that it will issue pop-up alerts to your computer
when a print cartridge level is low.
1. Open HP Toolbox and click the Alerts tab.
2. Click the Set up Status Alerts page.
3. Select Turn on alerts, select When the HP print cartridge is low or a non-
HP cartridge is installed, and then select As a pop-up message.
4. Click Apply.
Receive toner warning e-mail messages from the device
Use HP Toolbox to set up the device so that it will issue e-mail message alerts to your
computer when a print cartridge level is low.
1. Open HP Toolbox and click the Alerts tab.
2. Click the Set up E-mail Alerts page.
3. In the Address 1field, type the e-mail address to which you want messages sent.
4. Under the Select Alert Events section Address 1 column, select Cartridge low.
Note
If you want to receive e-mail messages for other listed events, select the check boxes for
those events as well.
5. Click Apply.
Note
You must set up a simple mail transfer protocol (SMTP) server to send e-mail alerts.
Maintain the device
Use HP Toolbox to maintain your device.
Clean the paper path
Use HP Toolbox to clean the device paper path.
ENWW Other: How do I? 165
Note
This method is more thorough than the method of using the cleaning page from the device
control panel.
1. Open HP Toolbox and click the Troubleshooting tab.
2. Click the Troubleshooting Tools link.
3. In the Cleaning Page section, click Print.
The device prints a cleaning page.
4. At the device, remove all paper from tray 1, and then place the cleaning page print-side
down in tray 1.
5. In HP Toolbox, in the Cleaning Page section, click Clean.
The device sends the cleaning page through the paper path.
Restore factory-set default settings
Use HP Toolbox to reset the device to its original settings.
1. Open HP Toolbox and click Device Settings.
2. Click Service.
3. In the Resets section, click Restore.
4. Click OK to confirm the restore process, and then click OK again to return to HP Toolbox.
The device settings revert to the original factory-set settings.
View the control-panel menu items for the device
Use the device control panel to print a "menu map" that shows all of the control-panel menus
that you can navigate.
1. On the device control panel, press M
ENU
.
2. Use the < or the > button to select Reports, and then press Enter.
3. Use the < or the > button to select Menu structure, and then press Enter.
The device prints a menu map.
Replace print cartridges
1. Push the scanner-release button to open the scanner assembly.
166 Chapter 11 How do I? ENWW
2. Open the top cover.
3. Make sure that the correct print-cartridge slot is in the access position.
If the correct print-cartridge slot is not in the access position, close the top cover and
the scanner assembly, and then press R
OTATE
C
AROUSEL
until the correct print-
cartridge slot is in the correct position.
4. Pinch together the two large blue tabs on the first cartridge, and then lift the cartridge
straight up to remove it from the carousel.
5. Remove the new print cartridge from its packaging, remove the orange cover from the
print cartridge, and then pull the orange tab straight out to remove the sealing tape.
ENWW Other: How do I? 167
6. Squeeze the blue release levers on the print cartridge, holding it with the roller facing
you. Lower the cartridge straight down into the carousel until it is firmly in place.
If you need to replace another cartridge, close the top cover and the scanner
assembly, press R
OTATE
C
AROUSEL
, and then repeat steps 4 through 6.
7. Close the top cover, and then close the scanner assembly.
Replace the imaging drum
1. Push the scanner-release button to open the scanner assembly.
2. Open the top cover.
3. Grasp the imaging drum handle, and then rotate the drum until the handle is at the top.
168 Chapter 11 How do I? ENWW
4. Lift the imaging drum straight up to remove it from the device.
5. Remove the new imaging drum from its packaging.
6. Place the imaging drum on a firm surface, and then pull the orange rings to remove the
shipping pins.
7. Remove the orange shipping lock on each end of the imaging drum, and remove the two
orange shipping spacers.
8. Remove the orange cover from the imaging drum.
CAUTION
Do not touch the surface of the roller or expose the roller to light for an extended period of
time. Doing so could cause print-quality issues.
9. Align the arrows on the side of the imaging drum with the arrows inside the printer.
ENWW Other: How do I? 169
10. Lower the imaging drum into the printer, and then press it firmlyinto place.
11. Close the top cover and the scanner assembly.
Clear jams
Occasionally, paper or other print media can become jammed during a print job. Complete
the following tasks to clear media jams.
To clear a media jam inside the device
CAUTION
Media jams might result in loose toner on the page. If toner gets on your clothing, wipe the
toner off with a clean cloth, wash the items in cold water, and air dry. Using hot water or heat
from a dryer will set the toner in the fabric. If you get any toner on your hands, wash them in
cold water.
Do not use a sharp object, such as a pencil or scissors, to remove jammed media.
1. On the back of the device, open the rear-output door, and then push down the fuser
levers.
Releasing the fuser levers relieves tension on the device rollers, which makes removing
jammed pages easier.
2. Push the scanner-release button to open the scanner assembly.
170 Chapter 11 How do I? ENWW
3. Open the top cover, and then remove the image drum and set it aside.
4. With both hands, grasp the side of the media that is most visible (this includes the
middle), and carefully pull it free from the device.
5. When you have removed the jammed media, replace the image drum, and close the top
cover and the scanner assembly.
6. Return the fuser levers to their original upward position.
After clearing the media jam, you might need to turn the device off, and then turn it on again.
Note
When you add new media, remove all of the media from the input tray, straighten the stack
after adding the new media, place the stack in the tray, and then adjust the media guides..
To clear output area jams
If the media has jammed where it exits the device, complete the following steps.
CAUTION
Do not use a sharp object, such as a pencil or scissors, to remove jammed media.
1. Push the scanner-release button to open the scanner assembly, and then open the top
cover.
ENWW Other: How do I? 171
2. On the back of the device, open the rear-output door, and then push down the fuser
levers.
Releasing the fuser levers relieves tension on the device rollers, which makes removing
jammed pages easier.
3. Grasp the leading edge of the media and pull the media out through the output bin.
4. Return the fuser levers to their original upward position, and then close the rear-output
door.
5. Close the top cover and the scanner assembly.
Note
If you turned the device off before clearing the media jam, turn it on again, and then restart
your printing or copying job.
If the jam is too far into the device to remove, you might have to remove the fuser. To do so,
complete the following steps.
1. Turn off the device, and then disconnect the power cable.
2. Rotate the locks on the fuser to the unlocked position.
172 Chapter 11 How do I? ENWW
3. Grasp the fuser handles and pull them to remove the fuser from the device.
CAUTION
The parts on the internal surface of the fuser are very hot. To avoid burning yourself, do not
touch those parts.
4. Using both hands, slowly and steadily remove any print media from inside the device.
Then, carefully reinsert the fuser and secure the locks.
5. Reconnect the power cable, and then turn on the device.
To clear a media jam from the automatic document feeder (ADF)
1. Open the ADF cover.
Note
Verify that any shipping tape inside the ADF has been removed.
2. Remove the jam cleanout part. Using both hands, lift up on the two handles until the part
unsnaps. Rotate and lift out the cleanout part and set it aside.
3. Gently try to remove the page without tearing it. If you feel resistance, go to the next step.
ENWW Other: How do I? 173
4. Lifting the green lever, rotate the pick mechanism until it stays open.
5. Open the ADF lid and gently loosen the media by using both hands.
6. When the media is free, gently pull it out in the direction shown.
7. Close the lid to the flatbed scanner.
8. Lower the green lever.
9. Reinstall the cleanout part by inserting it as shown. Push down on the two tabs until the
part snaps into place. Install the cleanout part correctly, because future jamming might
occur if the cleanout part is not replaced correctly.
174 Chapter 11 How do I? ENWW
10. Close the ADF lid.
Order new supplies
You can order supplies by using HP Toolbox. To order supplies, complete the following steps.
1. Open HP Toolbox, and then, in the Other Links section, click Order Supplies.
A new browser window appears.
2. Click Continue.
The browser displays the HP ordering Web site.
3. Complete the ordering process by following the Web site instructions.
ENWW Other: How do I? 175
176 Chapter 11 How do I? ENWW
12
Managing the device and
maintenance
This device comes with several software tools that help you monitor the device, troubleshoot
problems, and maintain the device. Information about using these tools is in the following
sections:
Information pages
HP Toolbox
Macintosh Configure Device (Mac OS 10.2 and 10.3)
Embedded Web server
Fax logs and reports
Cleaning the device
Changing the automatic document feeder (ADF)
Changing the automatic document feeder (ADF) pickup roller assembly
Cleaning the automatic document feeder (ADF) pickup roller assembly
ENWW 177
Information pages
Information pages reside within the device memory. These pages help you to diagnose and
solve problems with the device.
Note
If the printer language was not correctly set during installation, you can set the language
manually so that the pages print in one of the supported languages. Change the language
by using the HP Toolbox. See
HP Toolbox.
Demo page
To print the Demo page, complete the following steps.
1. On the control panel menu, press M
ENU
until the Reports menu appears, and then press
E
NTER
.
2. Press the left arrow key or the right arrow key until Demo Page appears, and then press
E
NTER
.
You can also view this page from HP Toolbox.
Usage page
The Usage page displays usage statistics, such as the number of copies made from the
flatbed scanner or the automatic document feeder, the number of faxes sent or received
(HP Color LaserJet 2830/2840 all-in-one models only), the number of pages printed, or the
number of pages jammed in the scanner engine.
You can print a Usage page from the device or HP Toolbox. To print a usage page from the
device, complete the following steps:
1. On the device control panel, press M
ENU
.
2. Use the < or the > button to select Reports, and then press E
NTER
.
3. Use the < or the > button to select Usage page, and then press E
NTER
.
Configuration page
The Configuration page lists the current settings and properties of the device. You can print
a Configuration page from the device or HP Toolbox. To print the Configuration page from
the device, complete the following steps.
1. On the control panel menu, press M
ENU
.
2. Use the < or the > button to select Reports, and then press E
NTER
.
178 Chapter 12 Managing the device and maintenance ENWW
3. Use the < or the > button to select Config report, and then press E
NTER
.
1. Product Information. This section contains basic information about the device, such as
the product name and the serial number.
2. Memory. This section lists memory-related information, such as the total memory that is
installed.
3. Paper Settings. This section lists information about the media type for each tray and
about the type settings for all the media that the device supports.
4. Copy Settings. This section lists the device default copy settings.
5. Product Settings. This section lists information that is gathered during software
installation, including the language and the company name.
6. Installed Personalities and Options. This section contains information about optional
items that might be installed, such as a DIMM.
7. Print Settings. This section contains information about device settings that are
configured in the printer driver or in HP Toolbox.
8. Status Log. This section contains information about device errors.
A second page also prints. On that page, the Fax Settings and Imaging Settings sections
provide details about the device fax settings (HP Color LaserJet 2830/2840 all-in-one
models only) and memory card settings (HP Color LaserJet 2840 all-in-one only).
Supplies Status page
The Supplies Status page lists the remaining life of the HP print cartridges and the
HP imaging drums. It also lists the estimated pages remaining, number of pages printed, and
other supplies information. You can print a Supplies Status page from the device or the
HP Toolbox. To print from the device, complete the following steps.
1. On the control panel menu, press M
ENU
.
2. Use the < or the > button to select Reports, and then press E
NTER
ENWW Information pages 179
3. Use the < or the > button to select Supplies Status, and then press E
NTER
.
Note
Supplies information is also available through the HP Toolbox.
1. Print-cartridge area. This area contains a section for each of the print cartridges and
provides information about HP print cartridges. This information includes the part
number for each print cartridge, whether each print cartridge is low, and the life
remaining for each print cartridge expressed as a percentage, as a graphic, and as the
estimated number of pages remaining. This information might not be provided for non-
HP supplies. In some cases, if a non-HP supply is installed, an alert message appears
instead.
2. Imaging-drum area. This area contains the same information for the imaging drum that
the print-cartridge area provides for the print cartridges.
3. Warranty Note. This section contains information about how the device warranty is
affected when you use non-HP supplies. It also requests that you call the HP fraud
hotline if a supply that is being detected as a non-HP supply was sold to you as a
genuine HP supply. (See
HP fraud hotline.)
4. Ordering Information. This section contains basic information about how to order new
HP supplies. See
Checking status and ordering supplies.
5. Recycling Information. This section contains a link to the website that you can visit for
information about recycling. See
Replacing and recycling supplies.
180 Chapter 12 Managing the device and maintenance ENWW
HP Toolbox
HP Toolbox is a Web application that you can use for the following tasks:
Check the device status.
Configure the device settings.
View troubleshooting information.
View online documentation.
You can view HP Toolbox when the device is directly connected to your computer or when it
is connected to the network. You must perform a complete software installation to use
HP Toolbox.
Note
HP Toolbox is not supported for Windows 98 SE, Windows NT, and Macintosh operating
systems. To use HP Toolbox, you must have TCP/IP protocol installed on your computer.
Note
You do not have to have Internet access to open and use HP Toolbox. However, if you click
a link in the Other Links area, you must have Internet access to go to the site that is
associated with the link. See
Other links for more information.
To view HP Toolbox
1. Open HP Toolbox in one of these ways:
In the Windows system tray, double-click the HP Toolbox Device Status and Alerts
icon.
On the Windows Start menu, click Programs (or All Programs in Windows XP),
click HP, click HP Color LaserJet 2820/2830/2840, and then click HP Toolbox.
Note
After you open the URL, you can bookmark it so that you can return to it quickly in the future.
2. HP Toolbox opens in a Web browser. The HP Toolbox software contains the following
sections:
Status tab
Fax tab
Scan to tab
Troubleshooting tab
Documentation tab
Device Settings pages
HP Toolbox links
Other links
ENWW HP Toolbox 181
Status tab
The Status tab contains links to the following main pages:
Device Status. View device status information. This page indicates device conditions
such as a jam or an empty tray. After you correct a problem with the device, click
Refresh Status to update the device status.
Supplies Status. View detailed supplies status such as the estimated percent of toner
remaining in the print cartridge and the number of pages that have been printed with the
current print cartridge. This page also has links to order supplies and to find recycling
information.
Set up Status Alerts. Set up the device to send you pop-up alerts for certain events,
such as low toner levels.
Set up E-mail Alerts. Set up the device to send you e-mail alert messages for certain
events, such as low toner levels.
Device Configuration. View a detailed description of the current device configuration,
including the amount of memory installed and whether optional trays are installed.
Network Configuration. View a detailed description of the current network
configuration, including the IP address and network status.
Print Info Pages. Print the Configuration page and various other information pages that
are available for the device, such as the Supplies Status page and the Demo page.
Event Log. View a history of device errors. The most recent error is at the top of the list.
Fax tab
Use the Fax tab to perform fax tasks from your computer. The Fax tab contains links to the
following main pages:
Fax Tasks. Perform such tasks as sending a fax or clearing the fax memory, or set the
fax receive mode.
Fax Phone Book. Add, edit, or delete entries in the device phone book.
Fax Send Log. View all of the recent faxes that have been sent from the device.
Fax Receive Log. View all of the recent faxes that have been received by the device.
Fax Data Properties. Manage the space used to store faxes on your computer. These
settings apply only if you have chosen to send or receive faxes remotely from your
computer.
Fax Reports. Print any or all of the fax reports from your computer.
Detailed Fax Settings. Use links to the Fax Setup Wizard or the Fax Settings tab to
change the device fax settings.
How Do I?. View Help topics for device fax tasks.
Scan to tab
Use the Scan to tab to set up the device S
CAN
T
O
button. The S
CAN
T
O
button allows you to
scan from the device, rather than scanning from a software program on your computer.
182 Chapter 12 Managing the device and maintenance ENWW
Note
The HP Color LaserJet 2830 all-in-one printer, scanner, fax, copier has a S
CAN
TO
EMAIL
button that you can also set up with this tab.
The Scan to tab contains links to the following main pages:
Scan to E-mail or Folder. Activate or deactivate the scan-to feature. You also can add,
edit, or delete destination e-mail addresses or folders for this feature.
Scan Preferences. Change the scan preference settings for the device scan-to feature,
including scan resolution and file type.
How Do I?. View Help topics for device tasks that involve the S
CAN
T
O
or S
CAN
TO
EMAIL
(HP Color LaserJet 2830 all-in-one only).
Troubleshooting tab
The Troubleshooting tab contains links to the following main pages:
Control Panel Messages. View descriptions of device control-panel messages.
Clearing Jams. View information about locating and clearing jams.
Print Problems. View Help topics that can help you solve print problems.
Scan Problems. View Help topics that can help you solve scan problems.
Copy Problems. View Help topics that can help you solve copy problems.
Fax Problems. View Help topics that can help you solve fax problems.
Memory Card Problems. View Help topics that can help you solve memory-card
problems.
Connectivity Problems. View Help topics that can help you solve networking problems.
Troubleshooting Tools. Employ such troubleshooting tools as a cleaning page or a
color troubleshooting page to maintain the device.
Animated Demonstrations. View animated Help demonstrations for the device.
Documentation tab
The Documentation tab contains links to the following main pages:
Print: How Do I? View the How Do I? Help for print problems.
Fax: How Do I? View the How Do I? Help for fax problems.
Copy: How Do I? View the How Do I? Help for copy problems.
Scan: How Do I? View the How Do I? Help for scan problems.
Photo: How Do I? View the How Do I? Help for memory-card problems.
Network: How Do I? View the How Do I? Help for network problems.
Other: How Do I? View the How Do I? Help for other device problems.
User Guide. View information about the device usage, warranty, specifications, and
support that you are currently reading. The user guide is available in both HTML and
PDF format.
Readme. View important information about the device that is not available in the user
guide. The late-breaking readme contains last-minute information about the device (in
English only).
ENWW HP Toolbox 183
Device Settings pages
When you click the Device Settings button, HP Toolbox displays the device settings
available for your device. The Device Settings screen has the following tabs:
System Settings
Print Settings
Fax Settings
Copy Settings
Network Settings
Note
Printer driver settings can override settings that are made in HP Toolbox.
System Settings tab
The System Settings tab contains links to the following main pages:
Device Information. View information about the device, such as the device description
and a contact person.
Paper Handling. Change the device paper-handling settings, such as default paper size
and default paper type.
Print Quality. Change the device print-quality settings, such as color calibration and
grayscale printing.
Print Density. Change the device print-density settings, such as contrast and shadows.
Print Modes. Change the device mode settings for a each media type, such as
letterhead, prepunched, or glossy paper.
System Setup. Change the device system settings, such as device language and jam
recovery.
Volumes. Change the device volume settings, such as the telephone line (HP Color
LaserJet 2830/2840 all-in-one models only) and alarm volumes.
Date/Time. Change the device date and time settings.
Service. Gain access to various procedures required to maintain the device.
Device Polling. Change the device polling settings, which determine how often
HP Toolbox collects data from the device.
Save/Restore Settings. Save the current settings for the device to a file on your
computer. Use this file to load the same settings onto another device or to restore these
settings to this device at a later time.
Print Settings tab
The Print Settings tab contains links to the following main pages:
Printing. Change the default device print settings, such as number of copies and paper
orientation.
PCL6. View and change the PCL6 settings.
PostScript. View and change the PS settings.
Memory Card. View and change the default device memory-card settings (HP Color
LaserJet 2840 all-in-one only).
184 Chapter 12 Managing the device and maintenance ENWW
Fax Settings tab
The Fax Settings tab contains links to the following main pages:
General. Change such basic fax settings as the fax header and error reporting.
Fax Send. Change such fax send settings as resolution and redial.
Fax Receive. Change such fax receive settings as the answer mode and the fit-to-page
option.
Fax Setup Wizard. Start the Fax Setup Wizard to set up the device fax settings.
Copy Settings tab
The Copy Settings tab contains links to the following main pages:
Copy. Change such default copy settings as number of copies and contrast.
Reduce/Enlarge. Change the reduction-enlargement settings for the device.
Network Settings tab
The network administrator can use the Network Settings tab to control the network-related
settings for the device when it is connected to an IP-based network.
HP Toolbox links
The HP Toolbox links at the left of the screen provide links to the following options:
Select a device. Select from all of the HP Toolbox-enabled devices.
View current alerts. View the current alerts for all devices that have been set up. (You
must be printing to view the current alerts.)
Text only page. View HP Toolbox as a site map that links to text-only pages.
Other links
This section contains links that connect you to the Internet. You must have Internet access in
order to use any of these links. If you use a dial-up connection and did not connect when
you first opened HP Toolbox, you must connect before you can visit these Web sites.
Connecting might require that you close HP Toolbox and reopen it.
HP Instant Support. View the HP Instant Support Web site.
Product Registration. View the HP product registration Web site.
Order Supplies. Order device supplies at the HP Web site.
Product Support. View the support site for the HP Color LaserJet 2820/2830/2840 all-
in-one. At the site, you can search for help with a specific problem.
ENWW HP Toolbox 185
Macintosh Configure Device (Mac OS 10.2 and 10.3)
Macintosh Configure Device is a Web application that you can use for the following tasks:
Check the device status.
Configure the device settings.
Note
Macintosh Configure Device is not supported for Mac OS 9.2.2.
You can view Macintosh Configure Device when the device is directly connected to your
computer or when it is connected to the network. You must perform a complete software
installation to use Macintosh Configure Device.
Note
You do not have to have Internet access to open and use Macintosh Configure Device.
However, if you click a link in the Other Links area, you must have Internet access to go to
the site that is associated with the link.
To view Macintosh Configure Device
1. Open HP Director by clicking the HP Director icon on the Dock.
2. In HP Director, click Settings.
3. Select Config device, and then click Continue.
186 Chapter 12 Managing the device and maintenance ENWW
Embedded Web server
This device is equipped with an embedded Web server, which allows access to information
about device and network activities. A Web server provides an environment in which web
programs may run, much in the same way that an operating system, such as Windows,
provides an environment for programs to run on your computer. The output from these
programs can then be displayed by a Web browser, such as Microsoft Internet Explorer,
Safari, or Netscape Navigator.
An “embedded” Web server resides on a hardware device (such as a printer) or in firmware,
rather than as software that is loaded on a network server.
The advantage of an embedded Web server is that it provides an interface to the device that
anyone with a network-connected computer and a standard Web browser can access. There
is no special software to install or configure, but you must have a supported Web browser on
your computer. To access the embedded Web server, type the IP address for the device in
the address line of the browser. (To find the IP address, print a Configuration page. For more
information about printing a Configuration page, see
Configuration page.)
Note
For Macintosh operating systems, you can use the EWS over a USB connection.
Features
The HP embedded Web server allows you to view device and network card status and
manage printing functions from your computer. With the HP embedded Web server, you can
do the following:
view device status information
determine the remaining life on all supplies and order new ones
view and change tray configurations
view and change the device control panel menu configuration
view and print internal pages
add or customize links to other Web sites
select the language in which to display the embedded Web server pages
view and change network configuration
view support content that is device-specific and specific to the device’s current state
For a complete explanation of the features and functionality of the embedded Web server,
see the embedded Web server online Help. For more information about other Help sources,
see
Where to look for more information.
ENWW Embedded Web server 187
Fax logs and reports
Use the following instructions to print fax logs and reports:
Printing the fax activity log
The fax activity log provides a chronological history of the last 40 faxes that were received,
sent, or deleted, and any errors that occurred. A fax activity log includes the following
information:
All faxes that have been received to the device
All faxes that have been sent from the control panel
All faxes that have been sent from the HP Toolbox; and the fax software driver
All faxes that have been sent from the HP Workplace (for Macintosh-compatible
computers that are directly connected to the device)
To print the fax activity log
Use the following steps to print a fax activity log:
1. On the device control panel, press M
ENU
.
2. Use the < or the > button to select Reports, and then press E
NTER
.
3. Use the < or the > button to select Fax Activity log, and then press E
NTER
.
4. Press E
NTER
to select Print log now. The device exits the menu settings and prints the
log.
To set the fax activity log to print automatically
You can decide whether or not you want the fax log to print automatically after every 40
entries. The factory-set default is On. Use the following steps to set the fax activity log to
print automatically:
1. On the device control panel, press M
ENU
.
2. Use the < or the > button to select Reports, and then press E
NTER
.
3. Use the < or the > button to select Fax Activity log, and then press E
NTER
.
4. Press the > button once to select Auto Log Print, and then press E
NTER
.
5. Use the < or the > button to select On, and then press E
NTER
to confirm your selection.
Printing a fax call report
A fax call report is a brief report that indicates the status of the last fax that was sent or
received.
188 Chapter 12 Managing the device and maintenance ENWW
To print a fax call report
1. On the device control panel, press M
ENU
.
2. Use the < or the > button to select Reports, and then press E
NTER
.
3. Use the < or the > button to select Fax Call report, and then press E
NTER
.
4. Press E
NTER
to select Print report now. The device exits the menu settings and prints
the report.
Note
To set the fax call report to print automatically, see Setting print times for the fax call report.
Setting print times for the fax call report
You can set the device to print a fax call report after any of the following events:
Every fax error (the factory-set default)
Send fax error
Receive fax error
Every fax
Send fax only
Never
Note
If you select Never, you will have no indication that a fax failed to be transmitted unless you
print a fax activity log.
To set the print times for the fax call report
Use the following steps to set when the fax call report is printed:
1. On the device control panel, press M
ENU
.
2. Use the < or the > button to select Reports, and then press E
NTER
.
3. Use the < or the > button to select Fax Call report, and then press E
NTER
.
4. Press the > button once to select Print report, and then press E
NTER
.
5. Use the < or the > button to select the option for when you want the fax call reports to be
printed.
6. Press E
NTER
to save your selection.
The following print-time options are available:
Every error: The device prints a report each time an error occurs.
Send error: The device prints a report when an error occurs while the device is sending
a fax.
Receive error: The device prints a report when an error occurs while the device is
receiving a fax.
Every fax: The device prints a report when a fax is sent or received.
Send fax only: The device prints a report when a fax is sent.
Never: A report is never printed.
ENWW Fax logs and reports 189
Including the first page of each fax on the fax call report
If this option is turned on and the page image still exists in the device memory, the fax call
report includes a thumbnail (50-percent reduction) of the first page of the most recent fax
that was sent or received. The factory-set default for this option is On.
To include the first page of each fax on the fax call report
Use the following steps to include the first page of each fax on the fax call report:
1. On the device control panel, press M
ENU
.
2. Use the < or the > button to select Reports, and then press E
NTER
.
3. Use the < or the > button to select Fax Call report, and then press E
NTER
.
4. Use the < or the > button to select Include 1st page, and then press E
NTER
.
5. Use the < or the > button to select On or Off, and then press E
NTER
to confirm your
selection.
Printing a phone book report
A phone book report lists the fax numbers that are assigned to the one-touch buttons and
speed-dial and group-dial entries.
To print a phone book report
Use the following steps to print a one-touch, speed-dial, and group-dial report:
1. On the device control panel, press M
ENU
.
2. Use the < or the > button to select Reports, and then press E
NTER
.
3. Use the < or the > button to select PhoneBook report, and then press E
NTER
. The
device exits the menu settings and prints the report.
Printing the billing-code report
The billing-code report is a printed list of all of the fax billing codes and the total number of
faxes that have been billed to each code.
Note
After this report is printed, all billing data is deleted.
To print the billing-code report
1. On the device control panel, press M
ENU
.
2. Use the < or the > button to select Reports, and then press E
NTER
.
3. Use the < or the > button to select Billing report, and then press E
NTER
. The device
exits the menu settings and prints the report.
Printing the block-fax list
Use this procedure to print a list of the blocked fax numbers. For information about blocking
fax numbers, see
Blocking or unblocking fax numbers.
190 Chapter 12 Managing the device and maintenance ENWW
To print the block-fax list
1. On the device control panel, press M
ENU
.
2. Use the < or the > button to select Reports, and then press E
NTER
.
3. Use the < or the > button to select Block Fax list, and then press E
NTER
. The device
exits the menu settings and prints the list.
Printing all fax reports
Use this procedure to print all of the following reports at one time:
Fax activity log
One-touch, speed-dial, and group-dial report
Configuration report
Block-fax list
Billing report (if the option is turned on)
To print all fax reports
Use the following steps to print all fax reports:
1. On the device control panel, press M
ENU
.
2. Use the < or the > button to select Reports, and then press E
NTER
.
3. Use the < or the > button to select All fax reports, and then press E
NTER
. The device
exits the menu settings and prints the reports.
ENWW Fax logs and reports 191
Cleaning the device
The section contains information about cleaning the device.
To clean the exterior
Use a soft, damp, lint-free cloth to wipe dust, smudges, and stains off of the exterior of the
device.
To clean the scanner glass
Dirty glass, from fingerprints, smudges, hair, and so on, slows down performance and affects
the accuracy of special features such as fit-to-page and copy.
Note
If streaks or other defects appear only on copies produced using the automatic document
feeder (ADF), clean the scanner strip (step 3). It is not necessary to clean the scanner glass.
1. Turn off the device, unplug the power cord from the electrical socket, and raise the lid.
2. Clean the glass by using a soft cloth or sponge that has been moistened with
nonabrasive glass cleaner.
CAUTION
Do not use abrasives, acetone, benzene, ammonia, ethyl alcohol, or carbon tetrachloride on
any part of the device; these can damage the device. Do not place liquids directly on the
glass. They might seep under it and damage the device.
3. Clean the scanner strip by using a soft cloth or sponge that has been moistened with
nonabrasive glass cleaner.
4. To prevent spotting, dry the glass by using a chamois or cellulose sponge.
To clean the lid backing
Minor debris can accumulate on the white document lid backing that is located underneath
the device lid.
1. Turn off the device, unplug the power cord from the electrical socket, and raise the lid.
192 Chapter 12 Managing the device and maintenance ENWW
2. Clean the white document lid backing by using a soft cloth or sponge that has been
moistened with a mild soap and warm water. Also, clean the scanner strip next to the
ADF scanner glass.
3. Wash the backing gently to loosen debris; do not scrub the backing.
4. Dry the backing by using a chamois or soft cloth.
CAUTION
Do not use paper-based wipes because they might scratch the backing.
5. If this does not clean the backing well enough, repeat the previous steps and use
isopropyl alcohol to dampen the cloth or sponge, and then wipe the backing thoroughly
with a damp cloth to remove any residual alcohol.
Cleaning the paper path
During the printing process, paper, toner and dust particles can accumulate inside the
device. Over time, this buildup can cause print-quality problems such as toner specks or
smearing. This device has a cleaning mode that can correct and prevent these types of
problems.
ENWW Cleaning the device 193
To clean the paper path from HP Toolbox
Use HP Toolbox to clean the paper path. This is the recommended cleaning method. If you
do not have access to HP Toolbox, use the method in
To clean the paper path from the
device control panel.
1. Make sure that the device is turned on and in the Ready state.
2. Open HP Toolbox.
3. On the Troubleshooting tab, click Maintenance, click Cleaning Page and then click
Print. A page with a pattern prints from the device.
4. At the device, remove any print media that might be in tray 1.
5. Remove the page that printed and load it face-down into tray 1.
6. At the computer, click Clean.
To clean the paper path from the device control panel
If you do not have access to HP Toolbox, you can print and use a cleaning page from the
device control panel.
1. Press M
ENU
.
2. Use the < or the > button to find the Service menu.
3. Press E
NTER
.
4. Use the < or the > button to find Cleaning Mode.
5. Press E
NTER
.
6. Load plain letter or A4 paper when you are prompted.
7. Press E
NTER
again to confirm and begin the cleaning process.
A page feeds through the printer slowly. Discard the page when the process is completed.
194 Chapter 12 Managing the device and maintenance ENWW
Changing the automatic document feeder (ADF)
If the ADF is damaged or not working, you can replace it. For information about ordering
supplies, see
Accessories and ordering information.
To change the ADF
1. At the device, open the ADF cover.
2. Disconnect the connector by squeezing the tabs together and lifting upward.
3. Remove the ADF by lifting it upward and tilting it forward as the hinges nearly disconnect
from the device.
4. On the new ADF, unfold the hinges.
ENWW Changing the automatic document feeder (ADF) 195
5. Insert the hinges on the new ADF so that they are slightly tilted forward, and then push
straight down into the device.
6. Insert the connector by pushing down on it until it clicks into place.
196 Chapter 12 Managing the device and maintenance ENWW
Changing the automatic document feeder (ADF) pickup roller
assembly
To change the ADF pickup roller assembly
If your automatic document feeder (ADF) has trouble feeding paper, you can replace the
ADF pickup roller assembly. See
Accessories and ordering information to order an ADF
pickup roller assembly. To remove the existing assembly, use the following procedure:
1. Turn off the device and unplug the power cord.
2. Open the automatic document feeder (ADF) cover.
3. Press the round green button while lifting the green lever. Rotate the green lever until it
stops in the open position. The old pickup roller assembly should remain on the surface.
4. Remove the old assembly and put the new one in exactly the same place. The largest
roller goes in back, and the gear side is away from you.
ENWW Changing the automatic document feeder (ADF) pickup roller assembly 197
5. Lower the green lever with the flat green part fitting in between the rollers. Press down
on the green lever until you hear a snap.
6. To check for proper installation, lift the green lever until it remains open. The new pickup
roller assembly should be secured to the lever assembly and should not fall out.
7. Make sure that both sides of the assembly are secured by the green hooks.
8. Lower the green lever assembly and close the automatic document feeder (ADF) lid.
Note
If you are experiencing jams in the ADF, contact your local HP-authorized service provider.
See
Service and support.
9. Plug the device in, and then turn the power switch to the on position.
198 Chapter 12 Managing the device and maintenance ENWW
Cleaning the automatic document feeder (ADF) pickup roller
assembly
To clean the ADF pickup roller assembly
If your automatic document feeder (ADF) has trouble feeding paper, you can clean the ADF
pickup roller assembly. To clean the assembly, use the following procedure:
1. Turn off the device and unplug the power cord.
2. Open the automatic document feeder (ADF) cover.
3. Press the round green button while lifting the green lever. Rotate the green lever until it
stops in the open position. The pickup roller assembly should remain on the surface.
4. Remove the assembly, and then wipe the assembly with a soft, dry cloth.
5. Return the assembly to the same place in the ADF. The largest roller goes in back, and
the gear side is away from you.
ENWW Cleaning the automatic document feeder (ADF) pickup roller assembly 199
6. Lower the green lever with the flat green part fitting in between the rollers. Press down
on the green lever until you hear a snap.
7. To check for proper installation, lift the green lever until it remains open. The pickup
roller assembly should be secured to the lever assembly and should not fall out.
8. Make sure that both sides of the assembly are secured by the green hooks.
9. Lower the green lever assembly and close the ADF lid.
Note
If you are experiencing jams in the ADF, contact your local HP-authorized service provider.
See
Service and support.
10. Plug the device in, and then turn the power switch to the on position.
200 Chapter 12 Managing the device and maintenance ENWW
13
Managing supplies
This chapter contains information about these maintenance topics:
Checking status and ordering supplies
Storing supplies
Replacing and recycling supplies
HP policy on non-HP supplies
HP fraud hotline
Changing a print cartridge
Changing the imaging drum
ENWW 201
Checking status and ordering supplies
You can check the supplies status by using the printer control panel, printing a Supplies
Status page, or viewing the HP Toolbox. Hewlett-Packard recommends that you place an
order for a replacement print cartridge when you first receive the Low message for a print
cartridge. When you use a new, authentic HP print cartridge or imaging drum, you can obtain
the following types of supplies information:
amount of cartridge or drum life remaining
estimated number of pages remaining
number of pages printed
other supplies information
Note
If the printer is connected to the network, you can set the HP Toolbox to notify you by e-mail
when a print cartridge is low or the imaging drum is near the end of its useful life. If the
printer is directly connected to a computer, you can set HP Toolbox to notify you when
supplies are low.
To check status and order supplies by using the control panel
Do one of the following:
Check the device control panel, which indicates when a print cartridge or the imaging
drum is low or empty. The control panel also indicates when a non-HP print cartridge is
first installed. See
Troubleshooting tools for more information.
Print a Supplies Status page, and then check the supplies levels on the page. See
Supplies Status page for more information.
If the supplies levels are low, you can order supplies through your local HP dealer, by
telephone, or online. See
Accessories and ordering information for part numbers. See
http://www.hp.com/go/ljsupplies to order online.
To check status and order supplies by using HP Toolbox
You can configure HP Toolbox to notify you when the supplies are low. You can choose to
receive alerts by e-mail or as a pop-up message or taskbar icon. To order supplies by using
the HP Toolbox, in the Other Links area, click Order supplies. You must have Internet
access to connect to the website.
For more information, see
HP Toolbox.
202 Chapter 13 Managing supplies ENWW
Storing supplies
Follow these guidelines for storing print cartridges and the imaging drum:
Do not remove the print cartridge or imaging drum from its package until you are ready
to use it.
CAUTION
To prevent damage, do not expose the print cartridge or imaging drum to light for more than
a few minutes.
See
Environmental specifications for operating and storage temperature ranges.
Store the supply in a horizontal position.
Store the supply in a dark, dry location away from heat and magnetic sources.
ENWW Storing supplies 203
Replacing and recycling supplies
To install a new HP print cartridge or imaging drum, follow the instructions that are included
in the box that contains the new supply, or see the getting started guide.
To recycle supplies, place the used supply in the box in which the new supply arrived. Use
the enclosed return label to send the used supply to HP for recycling. For complete
information, see the recycling guide that is included with each new HP supply item. See
HP LaserJet printing supplies for more information about HP's recycling program.
204 Chapter 13 Managing supplies ENWW
HP policy on non-HP supplies
Hewlett-Packard Company cannot recommend the use of non-HP supplies, either new or
remanufactured. Because they are not HP products, HP cannot influence their design or
control their quality. Service or repairs required as a result of using a non-HP supply will not
be covered under the printer warranty.
When you insert a supply into the device, the device will inform you if the supply is not a
genuine HP supply. If you insert a genuine HP supply that has reached the low state from
another HP device, the device identifies the supply as non-HP. Simply return the supply to
the original device to reactivate the HP features and functionality.
Resetting the printer for non-HP supplies
When you install a non-HP print cartridge or imaging drum, the control panel displays the
Unauthorized message . In order to print with this supply, you must press E
NTER
the first
time you install this non-HP supply.
CAUTION
The device will not stop printing when this type of supply is empty. Printer damage could
occur if the device prints with an empty non-HP print cartridge or imaging drum. See
Hewlett-
Packard limited warranty statement and Print Cartridge and Imaging Drum Limited Warranty
Statement.
ENWW HP policy on non-HP supplies 205
HP fraud hotline
Call the HP fraud hotline if the device or HP Toolbox indicates that the print cartridge or
imaging drum is not an HP print cartridge and you think that it is genuine. HP will help
determine if the product is genuine and take steps to resolve the problem.
Your print cartridge or imaging drum might not be a genuine HP one if you notice the
following issues:
You are experiencing a large number of problems with the print cartridge or imaging
drum.
The print cartridge or imaging drum does not look like it usually does (for example, the
pull tab or the box is different).
In the United States, call toll-free: 877-219-3183.
Outside the United States, you can call collect. Dial the operator and ask to place a collect
call to this telephone number: 770-263-4745. If you do not speak English, a representative at
the HP fraud hotline who speaks your language will assist you. Or, if someone who speaks
your language is not available, a language line interpreter will connect approximately one
minute after the beginning of the call. The language line interpreter is a service that will
translate between you and the representative for the HP fraud hotline.
206 Chapter 13 Managing supplies ENWW
Changing a print cartridge
To replace a print cartridge
1. Push the scanner-release button to open the scanner assembly.
2. Open the top cover.
3. Make sure that the correct print-cartridge slot is in the access position.
If the correct print-cartridge slot is not in the access position, close the top cover and
the scanner assembly, and then press R
OTATE
C
AROUSEL
until the correct print-
cartridge slot is in the correct position.
4. Pinch together the two large blue tabs on the first cartridge, and then lift the cartridge
straight up to remove it from the carousel.
ENWW Changing a print cartridge 207
5. Remove the new print cartridge from its packaging, remove the orange cover from the
print cartridge, and then pull the orange tab straight out to remove the sealing tape.
6. Squeeze the blue release levers on the print cartridge, holding it with the roller facing
you. Lower the cartridge straight down into the carousel until it is firmly in place.
If you need to replace another cartridge, close the top cover and the scanner
assembly, press R
OTATE
C
AROUSEL
, and then repeat steps 4 through 6.
7. Close the top cover, and then close the scanner assembly.
Note
If you have replaced a black print cartridge, the device prompts you to run a cleaning page.
208 Chapter 13 Managing supplies ENWW
Changing the imaging drum
To change the imaging drum
1. Push the scanner-release button to open the scanner assembly.
2. Open the top cover.
3. Grasp the imaging drum handle, and then rotate the drum until the handle is at the top.
4. Lift the imaging drum straight up to remove it from the device.
5. Remove the new imaging drum from its packaging.
ENWW Changing the imaging drum 209
6. Place the imaging drum on a firm surface, and then pull the orange rings to remove the
shipping pins.
7. Remove the orange shipping lock on each end of the imaging drum, and remove the two
orange shipping spacers.
8. Remove the orange cover from the imaging drum.
CAUTION
Do not touch the surface of the roller or expose the roller to light for an extended period of
time. Doing so could cause print-quality issues.
9. Align the arrows on the side of the imaging drum with the arrows inside the printer.
10. Lower the imaging drum into the printer, and then press it firmlyinto place.
11. Close the top cover and the scanner assembly.
210 Chapter 13 Managing supplies ENWW
14
Troubleshooting
This troubleshooting information is organized to help you resolve printing problems. Choose
the general topic or type of problem from the following list.
Support strategy
Troubleshooting process
Control panel messages
Clearing jams
Print problems
Scan problems
Copy problems
Fax problems
Memory card problems
Troubleshooting tools
ENWW 211
Support strategy
This device has a one-year limited warranty. Warranty service and support options might
vary depending on your country/region. Please refer to the support flyer that came in your
box for contact information, or visit http://www.hp.com.
You can find additional support information in
Service and support.
212 Chapter 14 Troubleshooting ENWW
Troubleshooting process
Use the troubleshooting checklist to solve issues with the device.
Troubleshooting checklist
Follow the steps below when trying to solve a problem with the device.
Step
number
Verification step Possible problems Solutions
1 Is the power on?
When the device is
connected to a grounded
power source, the control
panel shows Hewlett
Packard with moving
cursors indicating that the
firmware code is loading,
and the print engine motor
rotates for approximately
45 to 60 seconds. When
the firmware is done
loading, Scanner bulb
warming up appears in
the control panel, and the
scan head moves back
and forth for 10-15
seconds. If you lift the
scanner lid, you will see
that the scanner bulb is lit.
Near the end of this time,
the automatic document
feeder (ADF) motor turns
on for about two seconds.
No power due to failed power source,
cable, switch, or fuse.
1. Verify that the device is plugged in.
2. Verify that the power cable is
functional and that the power
switch is on.
3. Check the power source by
plugging the device directly into
the wall or into a different outlet.
Print engine motor does not rotate. 1. Verify that the fuser shipping
locks have been removed. For
more information, see the Getting
Started Guide.
2. Verify that the fuser locks are in
the locked position. See
To clear
output area jams.
3. Verify that the print cartridges
and imaging drum are properly
installed. (See
Managing
supplies.) Look at the control-
panel messages and follow the
instructions to remove and
replace the cartridges.
4. Verify that the top cover is closed.
ADF motor does not rotate. Open the ADF cover and remove any
orange shipping tape inside the ADF.
Verify that the ADF cable is
connected correctly to the scanner.
See
Changing the automatic
document feeder (ADF).
If the ADF motor still does not rotate,
replace the ADF. See
Changing the
automatic document feeder (ADF).
Scanner bulb does not light. If the scanner bulb does not light,
contact HP Customer Care. See
Service and support or the support
flyer that came in the device box.
ENWW Troubleshooting process 213
Step
number
Verification step Possible problems Solutions
2 Does Ready appear in
the device control panel?
The control panel should
function without error
messages.
Control panel shows an error. See Control panel messages for a list
of common messages that will help
you correct the error.
If the error persists, contact
HP Customer Care. See
Service and
support or the support flyer that came
in the device box.
3 Do information pages
print?
Print a Configuration page.
See
Configuration page.
Control panel displays an error
message.
See Control panel messages for a list
of common messages that will help
you correct the error.
Media does not move smoothly
through the device paper path.
Clean the paper path. See Clean the
paper path.
Poor print quality. See Print quality problems.
If the error persists, contact
HP Customer Care. See
Service and
support or the support flyer that came
in the device box.
4 Does the device copy?
Place the Configuration
page into the ADF and
make a copy. The report
should feed smoothly
through the ADF, and
copies should print without
print-quality problems.
Make a copy from the
flatbed as well.
Poor copy quality from the ADF.
1. If the print quality from the
internal tests and the copy from
the flatbed were acceptable,
clean the ADF scanning strip.
See
To clean the scanner glass.
2. If the ADF is damaged, replace
the ADF. See
Changing the
automatic document feeder (ADF).
Media does not move smoothly
through the ADF path.
1. Clean the ADF pick roller and
ADF separation pad. See
Cleaning the automatic document
feeder (ADF) pickup roller
assembly.
2. If the problem persists, replace
the ADF pick roller. See
Changing the automatic
document feeder (ADF) pickup
roller assembly.
3. If the problem persists, replace
the ADF. See
Changing the
automatic document feeder (ADF).
Poor copy quality from the flatbed. 1. If the print quality from the
internal tests and the copy from
the ADF were acceptable, clean
the flatbed glass. See
To clean
the scanner glass.
2. If, after performing the
maintenance, the problem
persists, see
Copy problems.
If the error persists, contact HP Customer Care. See Service and support or the
support flyer that came in the device box.
214 Chapter 14 Troubleshooting ENWW
Step
number
Verification step Possible problems Solutions
5 Does the device send a
fax?
(HP Color LaserJet
2830/2840 all-in-one
models only)
Connect the telephone line
and press S
TART
F
AX
to
verify that a dial tone
exists (using a hand set, if
necessary). Attempt to
send a fax.
The telephone line is not operational or
the device is not plugged into the
telephone line.
Verify that the device is plugged into a
telephone line that you know works.
The telephone cord is faulty or is
plugged into the wrong connector.
1. Try plugging the telephone cord
into the other connector.
2. Try a new telephone cord.
The device fax settings are set
incorrectly.
Review and reset the device fax
settings. See
Specifying the fax
settings.
If the error persists, contact
HP Customer Care. See
Service and
support or the support flyer that came
in the device box.
Sent fax is incomplete or of poor quality. See Fax problems.
6 Does the device receive
a fax?
(HP Color LaserJet
2830/2840 all-in-one
models only)
Use another fax machine
to send a fax to the device.
Too many telephone devices are
plugged in, or telephone devices are
not connected in the correct order.
Make sure that the HP Color LaserJet
2830 all-in-one or HP Color LaserJet
2840 all-in-one is the only device on
the telephone line and try again to
receive the fax.
The device fax settings are set
incorrectly.
Review and reset the device fax
settings. See
Specifying the fax
settings
If the error persists, contact HP Customer Care. See Service and support or the
support flyer that came in the device box.
7 Does the device print
from the computer?
Connect the network cable
or USB cable to the device
and the computer. Use a
word-processing
application to send a print
job to the device.
Software is not installed correctly or an
error occurred during software
installation.
Uninstall and then reinstall the device
software. Verify that you are using the
correct installation procedure and the
correct port setting.
The cable is not connected correctly. Reconnect the cable.
An incorrect driver is selected. Select the proper driver.
Other devices are connected to the
USB port.
Disconnect the other devices and try
again to print.
There is a port driver problem in
Microsoft Windows.
Uninstall and then reinstall the device
software. Verify that you are using the
correct installation procedure and the
correct port setting.
If the error persists, contact HP Customer Care. See Service and support or the
support flyer that came in the device box.
ENWW Troubleshooting process 215
Step
number
Verification step Possible problems Solutions
8 Does the device scan to
the computer?
Initiate a scan from the
basic desktop software at
your computer.
The cable is not connected correctly. Reconnect the cable.
Software is not installed correctly or an
error occurred during software
installation.
Uninstall and then reinstall the device
software. Verify that you are using the
correct installation procedure and the
correct port setting.
If the error persists, turn off the device and then turn on the device.
If the error still persists, contact HP Customer Care. See
Service and support or
the support flyer that came in the device box.
9 Does the device
recognize and print from
a memory card?
Insert a memory card and
print an index page. See
Printing an index.
The device does not recognize the card. Remove the card and reinsert it into
the memory-card slot. Verify that the
card is fully inserted into the slot.
Verify that the memory-card type is a
supported type.
Verify that only one card is inserted in
the memory-card slots.
The device does not print certain
images.
Verify that the files on the memory
card are in the correct format. The
device recognizes only SRGB
format .JPEG files.
216 Chapter 14 Troubleshooting ENWW
Control panel messages
The majority of the control-panel messages are intended to guide the user through typical
operation. The control-panel messages indicate the status of the current operation, and
include a page count on the second line of the display, if appropriate. When the device is
receiving fax data, print data, or scanning commands, control-panel messages indicate this
status. In addition, alert messages, warning messages, and critical error messages indicate
situations that might require some action.
Alert and warning messages
Alert and warning messages appear temporarily and might require the user to acknowledge
the message by pressing E
NTER
to resume or by pressing C
ANCEL
to cancel the job. With
certain warnings, the job might not complete or the print quality might be affected. If the alert
or warning message is related to printing and the auto-continue feature is on, the device will
attempt to resume the printing job after the warning has appeared for 10 seconds without
acknowledgement.
Alert and warning messages
Control panel message Description Recommended action
10.000x Supply error E-label can’t be read or print cartridge is
not properly installed.
1. Reinstall print cartridge.
2. Power cycle device.
3. If the problem is not solved, replace
the cartridge.
ADF door is open The ADF lid is open or a sensor is
malfunctioning.
Make sure that the ADF lid is closed.
Remove the ADF and reinstall it.
If the message persists, turn off the
power by using the power switch, wait at
least 30 seconds, and then turn on the
power and wait for the device to initialize.
Try another power source.
If the error persists, contact
HP Customer Care. See
Service and
support or the support flyer that came in
the device box.
Canceled copy. Clear document The C
ANCEL
button was pressed to
cancel the current job while pages were
feeding from the ADF. The cancel
process does not automatically clear the
ADF.
Remove the jammed item. See Media
jams occur in the automatic document
feeder (ADF). Then, clear the items in
the ADF tray and start over.
Canceled scan. Clear document The C
ANCEL
button was pressed to
cancel the current job while pages were
feeding from the ADF. The cancel
process does not automatically clear the
ADF.
Remove the jammed item. See Media
jams occur in the automatic document
feeder (ADF). Then, clear the items in
the ADF tray and start over.
ENWW Control panel messages 217
Control panel message Description Recommended action
Canceled send. Clear document The C
ANCEL
button was pressed to
cancel the current job while pages were
feeding from the ADF tray. The cancel
process does not automatically clear the
ADF.
Remove the jammed item. See Media
jams occur in the automatic document
feeder (ADF). Then, clear the items in
the ADF tray and start over.
Card is not fully inserted The memory card has not been fully
inserted.
Verify that the memory card is inserted
completely.
Comm. error A fax communication error occurred
between the device and the sender or
receiver.
Allow the device to retry sending the fax.
Unplug the device telephone cord from
the wall, plug in a telephone, and try
making a call. Plug the device phone
cord into a jack for another phone line.
Try a different phone cord.
If the error persists, contact
HP Customer Care. See
Service and
support or the support flyer that came in
the device box.
Device error. [Enter] to cont. An internal error occurred in the device. Press E
NTER
to resume the job.
Device is busy. Try again later The device is currently in use. Wait for the device to finish the current
job.
Doc feeder jam Clear, Reload A piece of media is jammed in the ADF
tray.
Open the document release door, clear
the jam, close the document release
door, and reload the paper into the ADF
tray.
If the error persists, contact
HP Customer Care. See
Service and
support or the support flyer that came in
the device box.
Document feeder mispick. Reload Media in the ADF tray was not picked up. Remove the media from the ADF tray,
and then reload it.
If the error persists, contact
HP Customer Care. See
Service and
support or the support flyer that came in
the device box.
Engine error The device experienced an internal
communication error.
This is a warning message only. Job
output might be affected.
Fax delayed – send storage full Fax memory is full. Cancel the fax by pressing E
NTER
or
C
ANCEL
. Resend the fax. You might need
to send the fax in multiple sections if the
error occurs again.
Alert and warning messages (continued)
218 Chapter 14 Troubleshooting ENWW
Control panel message Description Recommended action
Fax is busy Canceled send The fax line to which you were sending a
fax was busy. The device has canceled
sending the fax.
Call the recipient to ensure that the fax
machine is on and ready.
Check that you are dialing the correct
fax number.
Check that the Redial if busy option is
enabled.
Check for a dial tone on the phone line
by pressing S
TART
F
AX
.
Make sure that the phone is working by
disconnecting the device, plugging in a
telephone to the phone line, and making
a voice call.
Plug the device phone cord into a jack
for another phone line, and then try
sending the fax again.
Try a different phone cord.
If the error persists, contact
HP Customer Care. See
Service and
support or the support flyer that came in
the device box.
Fax is busy Redial pending The fax line to which you were sending a
fax was busy. The device automatically
redials the busy number. See
Changing
the redial settings.
Allow the device to retry sending the fax.
Call the recipient to ensure that the fax
machine is on and ready.
Check that you are dialing the correct
fax number.
Check for a dial tone on the phone line
by pressing S
TART
F
AX
.
Make sure that the phone is working by
disconnecting the device, plugging in a
telephone to the phone line, and making
a voice call.
Plug the device phone cord into a jack
for another phone line, and try sending
the fax again.
Try a different phone cord.
If the error persists, contact
HP Customer Care. See
Service and
support or the support flyer that came in
the device box.
Fax memory full Canceling recv. During the fax transmission, the device
ran out of memory. Only the pages that
fit into memory will be printed.
Print all of the faxes and have the
sender resend the fax. Cancel all fax
jobs or clear the faxes from memory.
See
Deleting faxes from memory.
Note: Adding a memory DIMM does not
help resolve this issue.
Alert and warning messages (continued)
ENWW Control panel messages 219
Control panel message Description Recommended action
Fax memory full Canceling send During the fax job, the memory filled. All
pages of the fax have to be in memory
for a fax job to work correctly. Only the
pages that fit into memory were sent.
Print all received faxes or wait until all
pending faxes are sent.
Ask the sender to send the fax again.
Cancel all fax jobs or clear the faxes
from memory. See
Deleting faxes from
memory.
Fax recv. error An error occurred while trying to receive
a fax.
Ask the sender to resend the fax.
Try faxing back to the sender or another
fax machine.
Check for a dial tone on the phone line
by pressing S
TART
F
AX
.
Check that the telephone cord is
securely connected by unplugging and
replugging the cord.
Make sure that you are using the
telephone cord that came with the device.
Make sure that the phone is working by
disconnecting the device, plugging in a
telephone to the phone line, and making
a voice call.
Turn off error-correction mode (ECM),
and turn off V.34. Ask the sender to
resend the fax. See
Setting the fax-error-
correction mode or Changing the V.34
setting.
Connect the device to a different phone
line.
If the error persists, contact
HP Customer Care. See
Service and
support or the support flyer that came in
the device box.
Alert and warning messages (continued)
220 Chapter 14 Troubleshooting ENWW
Control panel message Description Recommended action
Fax Send error An error occurred while trying to send a
fax.
Try resending the fax.
Try faxing to another fax number.
Check for a dial tone on the phone line
by pressing S
TART
F
AX
.
Check that the telephone cord is
securely connected by unplugging and
replugging the cord.
Make sure that you are using the
telephone cord that came with the device.
Make sure that the phone is working by
disconnecting the device, plugging in a
telephone to the phone line, and making
a voice call.
Connect the device to a different phone
line.
Set the fax resolution to Standard
instead of the default of Fine. See
To
adjust the resolution for the current fax job.
If the error persists, contact
HP Customer Care. See
Service and
support or the support flyer that came in
the device box.
Fit to Page on flatbed only The copy reduce/enlarge feature (called
"Fit to Page") applies only to copies
made from the flatbed scanner.
Use the flatbed or select another
reduction/enlargement setting.
Group dial not allowed in group The speed-dial code that you typed is
programmed for a group. Adding a
group-dial to another group-dial is not
allowed.
Add one-touch buttons (programmed as
an individual speed dial) or speed-dial
codes to a group-dial.
Insert Memory Card Card is not in memory slot or is not
inserted completely.
Insert card or verify that card is inserted
completely.
Invalid date An invalid date was entered, such as
June 35.
Re-enter the date.
Invalid driver You are using the incorrect printer driver. Reselect the printer driver appropriate
for your device.
Invalid entry Invalid data or response. Correct the entry.
Invalid Memory Card The proof sheet does not match the files
on the memory card.
Remove the memory card and insert the
correct memory card.
Mem. low 1 copy Press [cancel] The device completed making one copy.
The remaining copies have been
canceled because of low device-memory.
Press C
ANCEL
to clear the error. Break
the job into smaller jobs that contain
fewer pages.
Memory Card is in backwards The memory card was inserted
backwards into the card slot.
Remove, turn, and reinsert the card.
Memory is low Try again later The device does not have enough
memory to start a new job.
Wait until the current job is finished
before starting a new job.
Alert and warning messages (continued)
ENWW Control panel messages 221
Control panel message Description Recommended action
Memory is low. Press [Enter] The device memory has been almost
completely filled.
Allow the device to finish the job, or
press E
NTER
to cancel the job.
Memory low Only 1 copy made The device does not have enough
memory to complete the collated copy
job.
Break the job into smaller jobs that
contain fewer pages.
No Dial Tone The device could not detect a dial tone. Check for a dial tone on the phone line
by pressing S
TART
F
AX
.
Unplug the telephone cord from both the
device and the wall and replug the cord.
Make sure that you are using the
telephone cord that came with the device.
Unplug the device telephone cord from
the wall, plug in a telephone, and try
making a voice call.
Plug the device phone cord into a jack
for another phone line. See
Changing
the detect-dial-tone setting.
If the error persists, contact
HP Customer Care. See
Service and
support or the support flyer that came in
the device box.
No document sent The device did not scan any pages, or it
did not receive any pages from the
computer to transmit a fax.
Try sending the fax again.
No fax answer Redial pending The receiving fax line did not answer.
The device attempts to redial after a few
minutes.
Allow the device to retry sending the fax.
Call the recipient to ensure that the fax
machine is on and ready.
Check that you are dialing the correct
fax number.
If the device continues to redial, unplug
the device telephone cord from the wall,
plug in a telephone, and try making a
voice call.
Plug the device phone cord into a jack
for another phone line.
Try a different phone cord.
If the error persists, contact
HP Customer Care. See
Service and
support or the support flyer that came in
the device box.
Alert and warning messages (continued)
222 Chapter 14 Troubleshooting ENWW
Control panel message Description Recommended action
No fax answer. Canceled send Attempts to redial a fax number failed, or
the “Redial-no answer” option was
turned off.
Call the recipient to ensure that the fax
machine is on and ready.
Check that you are dialing the correct
fax number.
Check that the redial option is enabled.
Unplug the telephone cord from both the
device and the wall and replug the cord.
Unplug the device telephone cord from
the wall, plug in a telephone, and try
making a voice call.
Plug the device phone cord into a jack
for another phone line.
If the error persists, contact
HP Customer Care. See
Service and
support or the support flyer that came in
the device box.
No fax detected The device answered the incoming call
but did not detect that a fax machine
was calling.
Allow the device to retry receiving the fax.
Try a different phone cord.
Plug the device phone cord into a jack
for another phone line.
If the error persists, contact
HP Customer Care. See
Service and
support or the support flyer that came in
the device box.
No paper pickup [Enter] to cont. The print engine has failed to pick up a
piece of media.
In tray 1, verify that the media was
inserted far enough into the tray. In
optional tray 2, verify that the paper-
length guide is in the correct position for
the media size that you are using.
Reload the media in the input tray and
press E
NTER
to continue the job.
If the error persists, contact
HP Customer Care. See
Service and
support or the support flyer that came in
the device box.
No Proof Sheet Found The proof sheet is not on the scanner, is
in the wrong position, or is face up.
Verify that the proof sheet is in the
scanner and is properly positioned, face
down in the lower right corner.
Only 1 memory card at a time More than one memory card has been
inserted.
Remove all but one memory card.
Page too complex [Enter] to cont. The device could not print the current
page because of its complexity.
Press E
NTER
to clear the message.
Allow the device to finish the job, or
press C
ANCEL
to cancel the job.
Paper jam in (area) The device has detected a jam in one of
the following areas: tray 1, optional
tray 2, the registration area, or the fuser.
Clear the jam from the area indicated on
the device control panel, and then press
E
NTER
. See Clearing jams.
Alert and warning messages (continued)
ENWW Control panel messages 223
Control panel message Description Recommended action
Photo Job Pending Second photo job was started prior to
completion of first job.
No action required. Message will cease
when first job completes.
Photos Not Found An image has been selected that has
been deleted.
The image checked on the bubble sheet
has been deleted.
Memory card has been removed from
the memory slot.
Reinsert the card and reselect the image.
Proof Sheet Flatbed Only A document is in the ADF. Remove the document from the ADF
and verify that the proof sheet is properly
positioned on the scanner.
ProofSheet Error Not Readable The proof sheet cannot be read because
the bubbles have not been completely
filled, the proof sheet is wrinkled, the
page is skewed on the scanner, or the
proof sheet is face up. This feature has
been optimized and tested for use with
Genuine HP Toner Supplies (variations
in color shading can impact the
performance of this feature).
Verify that the proof sheet bubbles are
completely filled. Verify that the proof
sheet is face down and properly
positioned in the lower right corner.
Scanner reserved for PC scan A computer is using the device to create
a scan.
Wait until the computer scan has
finished, or cancel the scan from the
computer software, or press C
ANCEL
.
Scanning error Cannot connect The device cannot transmit scan
information to a computer.
Verify that the connection cable is not
loose or damaged. Replace the cable if
necessary, and try the scan again.
Select at least one image You might not have selected any images
on the proof sheet.
Verify that you have marked the bubbles
underneath the images you want to print.
Select one image layout An image layout might not be selected
on the proof sheet.
Verify that you have marked one of the
bubbles corresponding to an image
layout.
Select one paper type A paper type might not be selected on
the proof sheet.
Verify that you have marked one of the
bubbles corresponding to a paper type.
Settings cleared The device has cleared job settings. Re-enter any appropriate job settings.
Unauthorized (color) A new supply has been installed that is
not made by HP. This message is
displayed until an HP supply is installed
or E
NTER
is pressed.
If you believe you purchased an
HP supply, please call the HP fraud
hotline at 1-877-219-3183. Service or
repairs required as a result of using non-
HP supplies is not covered under
HP warranty.
To continue printing, press E
NTER
. The
first pending job will be cancelled.
Unknown Memory Card Error There is an issue with either the memory
card or the device memory-card reader.
Reinsert the card. If the error persists,
insert a different card.
If the error persists, contact
HP Customer Care. See
Service and
support or the support flyer that came in
the device box.
Alert and warning messages (continued)
224 Chapter 14 Troubleshooting ENWW
Control panel message Description Recommended action
Unsupported Memory Card The memory card that you have inserted
is not a type that is supported.
Insert a card that is supported. See
Inserting a memory card.
Critical error messages
Critical error messages can indicate some kind of failure. Cycling the power might fix the
problem. If a critical error persists, the device might require service.
Critical error messages
Control panel message Description Recommended action
50.x Fuser Error The device has experienced an internal
hardware error.
Turn off the device, and then disconnect
the power cord. Remove the fuser (see
To clear output area jams), and then
wait at least 20 minutes. Reinstall the
fuser, turn on the device, and then wait
for the device to initialize.
CAUTION
The parts on the internal surface of the
fuser are very hot. To avoid burning
yourself, do not touch those parts.
If a surge protector is being used,
remove it. Plug the device directly into
the wall socket. Use the power switch to
turn on the device.
If the error persists, contact
HP Customer Care. See
Service and
support or the support flyer that came in
the device box.
51 Laser Error The device has experienced an internal
hardware error.
Turn off the power by using the power
switch, wait at least 30 seconds, and
then turn on the power and wait for the
device to initialize.
If a surge protector is being used,
remove it. Plug the device directly into
the wall socket. Use the power switch to
turn the device on.
If the error persists, contact
HP Customer Care. See
Service and
support or the support flyer that came in
the device box.
Alert and warning messages (continued)
ENWW Control panel messages 225
Control panel message Description Recommended action
52 Scanner Error The device has experienced an internal
hardware error.
Turn off the power by using the power
switch, wait at least 30 seconds, and
then turn on the power and wait for the
device to initialize.
If a surge protector is being used,
remove it. Plug the device directly into
the wall socket. Use the power switch to
turn the device on.
If the error persists, contact
HP Customer Care. See
Service and
support or the support flyer that came in
the device box.
54.2, 55.1, 59.16, 59.192, 59.4,
59.99 Errors
The device has experienced an internal
hardware error.
Turn off the power by using the power
switch, wait at least 30 seconds, and
then turn on the power and wait for the
device to initialize.
If a surge protector is being used,
remove it. Plug the device directly into
the wall socket. Use the power switch to
turn the device on.
If the error persists, contact
HP Customer Care. See
Service and
support or the support flyer that came in
the device box.
57 Fan Error Turn off then on The device has experienced a problem
with its internal fan.
Turn off the power by using the power
switch, wait at least 30 seconds, and
then turn on the power and wait for the
device to initialize.
If the error persists, contact
HP Customer Care. See
Service and
support or the support flyer that came in
the device box.
79 Error Turn off then on The device has experienced an internal
firmware error.
Turn off the power by using the power
switch, wait at least 30 seconds, and
then turn on the power and wait for the
device to initialize.
If you have recently installed a memory
DIMM in the device, turn off the device,
remove the memory DIMM, reinstall the
DIMM to verify that it is seated properly,
and then turn on the device.
If a surge protector is being used,
remove it. Plug the device directly into
the wall socket. Use the power switch to
turn the device on.
If the error persists, contact
HP Customer Care. See
Service and
support or the support flyer that came in
the device box.
Critical error messages (continued)
226 Chapter 14 Troubleshooting ENWW
Control panel message Description Recommended action
Engine error The device has experienced an engine
error.
Press E
NTER
to clear the message.
Turn off the power by using the power
switch, wait at least 30 seconds, and
then turn on the power and wait for the
device to initialize.
If a surge protector is being used,
remove it. Plug the device directly into
the wall socket. Use the power switch to
turn the device on.
If the error persists, contact
HP Customer Care. See
Service and
support or the support flyer that came in
the device box.
Sensor error The device has experienced an internal
sensor error.
Turn off the power by using the power
switch, wait at least 30 seconds, and
then turn on the power and wait for the
device to initialize.
If a surge protector is being used,
remove it. Plug the device directly into
the wall socket. Use the power switch to
turn the device on.
If the error persists, contact
HP Customer Care. See
Service and
support or the support flyer that came in
the device box.
Critical error messages (continued)
ENWW Control panel messages 227
Clearing jams
This section contains instructions for clearing jams from the device.
Media jams occur in the device
Occasionally, paper or other print media can become jammed during a print job. Some
causes include the following events:
The input trays are loaded improperly or overfilled, or the media guides are not set
properly.
Optional tray 2 is removed during a print job.
The top cover is opened during a print job.
Too many sheets have accumulated in an output area, or sheets are blocking an output
area.
The print media that is being used does not meet HP specifications. See
Media
specifications.
The media is damaged or has foreign objects attached to it, such as staples or paper
clips.
The environment in which the print media was stored is too humid or too dry. See
Printing and storage environment.
Tips to avoid media jams
Verify that the input tray is not overfilled. The input tray capacity varies depending on the
type of print media that you are using.
Verify that the media guides are properly adjusted.
Check that the input tray is securely in place.
Do not add print media into the input tray while the device is printing.
Use only HP-recommended media types and sizes. See
Media specifications for more
information about print media types.
Do not let print media stack up in the output bin. The print media type and the amount of
toner used affect the output bin capacity.
Check the power connection. Make sure that the power cord is firmly connected to both
the device and the power supply box. Plug the power cord into a grounded AC power
outlet.
Where to look for jams
Jams can occur in these locations:
inside the device
in output areas
in the automatic document feeder (ADF)
Find and remove the jam by using the instructions on the following pages. If the location of
the jam is not obvious, first look inside the device.
228 Chapter 14 Troubleshooting ENWW
Loose toner might remain in the device after a jam. This problem typically resolves itself after
a few sheets have been printed.
To clear a media jam inside the device
CAUTION
Media jams might result in loose toner on the page. If toner gets on your clothing, wipe the
toner off with a clean cloth, wash the items in cold water, and air dry. Using hot water or heat
from a dryer will set the toner in the fabric. If you get any toner on your hands, wash them in
cold water.
Do not use a sharp object, such as a pencil or scissors, to remove jammed media.
1. On the back of the device, open the rear-output door, and then push down the fuser
levers.
Releasing the fuser levers relieves tension on the device rollers, which makes removing
jammed pages easier.
2. Push the scanner-release button to open the scanner assembly.
3. Open the top cover, and then remove the image drum and set it aside.
4. With both hands, grasp the side of the media that is most visible (this includes the
middle), and carefully pull it free from the device.
ENWW Clearing jams 229
5. When you have removed the jammed media, replace the image drum, and close the top
cover and the scanner assembly.
6. Return the fuser levers to their original upward position.
After clearing the media jam, you might need to turn the device off, and then turn it on again.
Note
When you add new media, remove all of the media from the input tray, straighten the stack
after adding the new media, place the stack in the tray, and then adjust the media guides.
To clear output area jams
If the media has jammed where it exits the device, complete the following steps.
CAUTION
Do not use a sharp object, such as a pencil or scissors, to remove jammed media.
1. Push the scanner-release button to open the scanner assembly, and then open the top
cover.
2. On the back of the device, open the rear-output door, and then push down the fuser
levers.
Releasing the fuser levers relieves tension on the device rollers, which makes removing
jammed pages easier.
3. Grasp the leading edge of the media and pull the media out through the output bin.
4. Return the fuser levers to their original upward position, and then close the rear-output
door.
5. Close the top cover and the scanner assembly.
Note
If you turned the device off before clearing the media jam, turn it on again, and then restart
your printing or copying job.
230 Chapter 14 Troubleshooting ENWW
If the jam is too far into the device to remove, you might have to remove the fuser. To do so,
complete the following steps.
1. Turn off the device, and then disconnect the power cable.
2. Rotate the locks on the fuser to the unlocked position.
3. Grasp the fuser handles and pull them to remove the fuser from the device.
CAUTION
The parts on the internal surface of the fuser are very hot. To avoid burning yourself, do not
touch those parts.
4. Using both hands, slowly and steadily remove any print media from inside the device.
Then, carefully reinsert the fuser and secure the locks.
5. Reconnect the power cable, and then turn on the device.
Media jams occur in the automatic document feeder (ADF)
Occasionally, media becomes jammed during a copy, scan, or fax job.
You are notified of a media jam by the Doc feeder jam Clear, Reload message that
appears on the device control-panel display.
The ADF input tray is loaded incorrectly or is too full. See
To load originals into the
automatic document feeder (ADF) for more information.
The media does not meet HP specifications, such as those for size or type. See
Media
specifications for more information.
ENWW Clearing jams 231
To clear a media jam from the automatic document feeder (ADF)
1. Open the ADF cover.
Note
Verify that any shipping tape inside the ADF has been removed.
2. Remove the jam cleanout part. Using both hands, lift up on the two handles until the part
unsnaps. Rotate and lift out the cleanout part and set it aside.
3. Lifting the green lever, rotate the pick mechanism until it stays open.
4. Gently try to remove the page without tearing it. If you feel resistance, go to the next step.
5. Open the ADF lid and gently loosen the media by using both hands.
232 Chapter 14 Troubleshooting ENWW
6. When the media is free, gently pull it out in the direction shown.
7. Close the lid to the flatbed scanner.
8. Lower the green lever.
9. Reinstall the cleanout part by inserting it as shown. Push down on the two tabs until the
part snaps into place. Install the cleanout part correctly, because future jamming might
occur if the cleanout part is not replaced correctly.
10. Close the ADF lid.
ENWW Clearing jams 233
Print problems
Print quality problems
Occasionally, you might encounter problems with print quality. The information in the
following sections helps you identify and resolve these issues.
Note
If you are having copy problems, see Copy problems.
Improving print quality
Use the print-quality settings to prevent print-quality problems.
Understanding print-quality settings
Print-quality settings affect how light or dark the print is on the page and the style in which
the graphics are printed. You can also use the print-quality settings to optimize the print
quality for a specific media type.
You can change the settings in the device properties to accommodate the types of jobs that
you are printing. The following settings are available, depending on the printer driver that
you are using:
600 dpi
Custom: This setting produces the same resolution as the default setting, but you can
change the scale patterns.
Note
Changing the resolution can change the formatting of your text.
To temporarily change print-quality settings
To change the print-quality settings only for the current software program, open the
properties through the Print Setup menu in the program that you are using to print.
To change print-quality settings for all future jobs
Note
For Macintosh instructions, see Printing from the Macintosh OS for more information.
For Windows 98, Windows 2000, and Windows Me:
1. In the Windows system tray, click Start, select Settings, and then click Printers.
2. Right-click the device icon.
3. Click Properties (in Windows 2000, you can also click Printing Preferences).
4. Change the settings, and click OK.
For Windows XP:
1. In the Windows system tray, click Start, click Control Panel, and then click Printers
and Faxes.
2. Right-click the device icon.
3. Click Properties, or click Printing Preferences.
4. Change the settings, and click OK.
234 Chapter 14 Troubleshooting ENWW
Identifying and correcting print defects
Use the checklist and print-quality issues charts in this section to solve print-quality problems.
Print-quality checklist
General print-quality problems can be solved by using the following checklist:
1. Make sure that the paper or print media that you are using meets specifications. See
Media specifications. Generally, smoother paper provides better results.
2. If you are using a special print media such as labels, transparencies, glossy, or
letterhead, ensure that you have printed by type. See
Selecting a type or size.
3. Print a Configuration page and Supplies Status page at the device. See
Information pages.
Check the Supplies Status page to see if any supplies are low or empty. No
information is provided for non-HP print cartridges.
If the pages do not print correctly, the problem is with the hardware. Contact
HP Customer Care. See
Service and support or the flyer that came in the device box.
4. Print a Demo page from the HP Toolbox. If the page prints, the problem is with the
printer driver. Try printing from the other printer driver. For example, if you are using the
PCL 6 printer driver, print from the PS printer driver.
Use the Add Printer Wizard in the Printers (or Printers and Faxes in Windows XP)
dialog box to install the PS driver.
5. Try printing from a different program. If the page prints correctly, the problem is with the
program from which you were printing.
6. Restart the computer and the device and try printing again. If the problem is not
resolved, choose one of these options:
If the problem is affecting all printed pages, see
General print quality issues.
If the problem is affecting only pages printed in color, see
Solving issues with color
documents.
General print quality issues
The following examples depict letter-size paper that has passed through the device short
edge first. These examples illustrate problems that would affect all of the pages that you
print, whether you print in color or in black only. The topics that follow list the typical cause
and solution for each of these examples.
ENWW Print problems 235
Problem Cause Solution
Print is light or faded.
The media might not meet
HP specifications.
Use media that meets
HP specifications. See
Media
specifications.
One or more print cartridges
might be low. If you are using
non-HP print cartridges, no
messages appear on the
device control panel or in the
HP Toolbox.
Replace any low print
cartridges. See
Changing a
print cartridge.
If none of the print cartridges or
the imaging drum is low or
empty, remove the print
cartridges one at a time and
inspect the toner roller in each
to see if the roller is damaged.
If so, replace the print cartridge.
The imaging drum might be low. Print the Supplies Status page
to check the remaining life. See
Supplies Status page. Replace
the imaging drum if it is low.
See
Changing the imaging
drum.
If the light printing is on the left
side of the page, the carousel
might be dislocated.
Contact your local HP Call
Center or HP Authorized
Dealer for service.
Toner specks appear.
The media might not meet
HP specifications.
Use media that meets
HP specifications. See
Media
specifications.
The paper path might need
cleaning.
Clean the paper path. See
Clean the paper path, or see
the HP Toolbox online Help.
236 Chapter 14 Troubleshooting ENWW
Problem Cause Solution
Dropouts appear. A single sheet of print media
might be defective.
Try reprinting the job.
The moisture content of the
paper is uneven or the paper
has moist spots on its surface.
Try different paper, such as
high-quality paper that is
intended for color laser
printers. See
Media
specifications.
The paper lot is flawed. The
manufacturing processes can
cause some areas to reject
toner.
Try different paper, such as
high-quality paper that is
intended for color laser
printers. See
Media
specifications.
The imaging drum might be
defective.
Replace the imaging drum. See
Changing the imaging drum.
If the error persists, contact
HP Customer Care. See
Service and support or the
support flyer that came in the
device box.
Vertical streaks or bands
appear on the page.
One or more print cartridges
might be low or defective. If
you are using non-HP print
cartridges, no messages
appear on the device control
panel or in the HP Toolbox.
Replace any low print
cartridges. See
Changing a
print cartridge.
The imaging drum might be low. Replace the imaging drum. See
Changing the imaging drum.
The amount of background
toner shading becomes
unacceptable.
The media might not meet
HP specifications.
Use a different paper with a
lighter basis weight. See
Media
specifications.
Very dry (low humidity)
conditions can increase the
amount of background shading.
Check the device environment.
One or more print cartridges
might be low. If you are using
non-HP print cartridges, no
messages appear on the
device control panel or in the
HP Toolbox.
Replace any low print
cartridges. See
Changing a
print cartridge.
The imaging drum might be low. Replace the imaging drum. See
Changing the imaging drum.
ENWW Print problems 237
Problem Cause Solution
Toner smears appear on the
media.
The media might not meet
HP specifications.
Use media that meets
HP specifications. See
Media
specifications.
If toner smears appear on the
leading edge of the paper, the
media guides are dirty, or
debris has accumulated in the
print path.
Clean the media guides and
the paper path. See
Cleaning
the paper path.
The imaging drum might be low. Replace the imaging drum. See
Changing the imaging drum.
Media might be jammed in the
imaging drum.
Complete the following steps to
clear the jam:
1. Remove the imaging drum
from the device. See
Changing the imaging
drum.
2. Rotate the black dial (jam
clearance door lock),
located on the top, left-
hand side of the imaging
drum, counterclockwise.
3. Lift upward to open the
black jam clearance door
near the green handle on
the top of the imaging drum.
4. Remove the media from
inside the imaging drum.
Note
Do not touch the white sleeve
in the imaging drum when
removing the media, as
fingerprints will cause print-
quality issues. If necessary,
use a lint-free cloth to gently
wipe any fingerprints off the
white sleeve.
5. Close the jam clearance
door, and then rotate the
locking mechanism
clockwise.
6. Reinstall the imaging drum
in the device.
238 Chapter 14 Troubleshooting ENWW
Problem Cause Solution
The toner smears easily when
touched.
The device is not set to print on
the type of media on which you
want to print.
In the printer driver, select the
Paper tab and set Type is to
match the type of media on
which you are printing. Print
speed might be slower if you
are using heavy paper.
The media might not meet
HP specifications.
Use media that meets
HP specifications. See
Media
specifications.
The paper path might need
cleaning.
Clean the device. See Cleaning
the device.
Marks repeatedly appear at
even intervals on the printed
side of the page.
The device is not set to print on
the type of media on which you
want to print.
In the printer driver, select the
Paper tab and set Type is to
match the type of paper on
which you are printing. Print
speed might be slower if you
are using heavy paper.
Internal parts might have toner
on them.
The problem typically corrects
itself after a few more pages.
The paper path might need
cleaning.
Clean the device. See Cleaning
the device.
The imaging drum might be low. Replace the imaging drum. See
Changing the imaging drum.
The fuser might be damaged. Contact HP Customer Care.
See
Service and support or the
support flyer that came in the
device box.
Marks repeatedly appear at
even intervals on the unprinted
side of the page.
Internal parts might have toner
on them.
The problem typically corrects
itself after a few more pages.
The paper path might need
cleaning.
Clean the device. See Cleaning
the device.
The imaging drum might be low. Replace the imaging drum. See
Changing the imaging drum.
The fuser might be damaged. Contact HP Customer Care.
See
Service and support or the
support flyer that came in the
device box.
ENWW Print problems 239
Problem Cause Solution
The printed page contains
misformed characters.
The media might not meet
HP specifications.
Use a different paper, such as
high-quality paper that is
intended for color laser
printers. See
Media
specifications.
If characters are incorrectly
formed so that they produce a
wavy effect, the laser scanner
might need service.
Verify that the problem also
occurs on the Configuration
page. If so, contact
HP Customer Care. See
Service and support or the
support flyer that came in the
device box.
The printed page is curled or
wavy.
The device is not set to print on
the type of media on which you
want to print.
In the printer driver, select the
Paper tab and set Type is to
match the type of paper on
which you are printing. Print
speed might be slower if you
are using heavy paper.
The paper path is curling the
media.
Open the rear output door to
print to the straight-through
paper path.
The media might not meet
HP specifications.
Use a different paper, such as
high-quality paper that is
intended for color laser
printers. See
Media
specifications.
Both high temperature and
humidity can cause paper curl.
Check the device environment.
Text or graphics are skewed on
the printed page.
The media might be loaded
incorrectly.
Make sure that the paper or
other print media is loaded
correctly and that the media
guides are not too tight or too
loose against the stack. See
Loading trays.
The media might not meet
HP specifications.
Use a different paper, such as
high-quality paper that is
intended for color laser
printers. See
Media
specifications.
240 Chapter 14 Troubleshooting ENWW
Problem Cause Solution
The printed page contains
wrinkles or creases.
The media might be loaded
incorrectly.
Turn over the stack of paper in
the input tray, or try rotating the
paper 180° in the input tray.
Verify that the media is loaded
correctly and that the media
guides are not too tight or too
loose against the stack. See
Loading trays.
The media might not meet
HP specifications.
Use a different paper, such as
high-quality paper that is
intended for color laser
printers. See
Media
specifications.
The paper path is curling the
media.
Open the rear output door to
print to the straight-through
paper path.
Toner appears around the
printed characters.
The media might be loaded
incorrectly.
Turn over the stack of paper in
the tray.
If large amounts of toner have
scattered around the
characters, the paper might
have high resistivity.
Use a different paper, such as
high-quality paper that is
intended for color laser
printers. See
Media
specifications.
An image that appears at the
top of the page (in solid black)
repeats farther down the page
(in a gray field).
Software settings might affect
image printing.
In your software program,
change the tone (darkness) of
the field in which the repeated
image appears.
In your software program,
rotate the whole page 180° to
print the lighter image first.
The order of images printed
might affect printing.
Change the order in which the
images are printed. For
example, have the lighter
image at the top of the page,
and the darker image farther
down the page.
A power surge might have
affected the device.
If the defect occurs later in a
print job, turn the device off for
10 minutes, and then turn on
the device to restart the print job.
Solving issues with color documents
This section describes issues that can occur when you print in color.
ENWW Print problems 241
Problem Cause Solution
Only black is printing when the
document should be printing in
color.
Color mode is not selected in
your program or printer driver.
Select color mode instead of
grayscale mode.
The correct printer driver might
not be selected in the program.
Select the correct printer driver.
The device might not be
correctly configured.
Print a Configuration page. If
no color appears on the
Configuration page, contact
HP Customer Care. See
Service and support or the
support flyer that came in the
device box.
One or more colors are not
printing, or are inaccurate.
Sealing tape might be on the
print cartridges.
Verify that the sealing tape has
been completely removed from
the print cartridges.
The media might not meet
HP specifications.
Use a different paper, such as
high-quality paper that is
intended for color laser
printers. See
Media
specifications.
The device might be operating
in excessively humid conditions.
Verify that the device
environment is within humidity
specifications.
One or more print cartridges
might be low. If you are using
non-HP print cartridges, no
messages appear on the
device control panel or in the
HP Toolbox.
Replace any low print
cartridges. See
Changing a
print cartridge.
A color is printing inconsistently
after you load a new print
cartridge.
Another print cartridge might be
low. If you are using a non-
HP print cartridge, it might be
low or empty but you will
receive no indication.
Check the control-panel display
or HP Toolbox to see if a print
cartridge is low, and replace it if
necessary.
Print cartridges might be
incorrectly installed.
Remove the print cartridge for
the color that is printing
inconsistently and reinstall it.
242 Chapter 14 Troubleshooting ENWW
Problem Cause Solution
The colors on the printed page
do not match the colors as they
appear on the screen.
The colors on your computer
monitor might differ from the
device output.
Select Screen Match in the
Color tab of the printer driver.
The printer driver might affect
color printing.
Try printing from a different
program or one of the other
printer drivers. For example, if
you are using the PCL 6 printer
driver, try the PS printer driver.
If extremely light colors or
extremely dark colors on
screen are not printing, your
software program might
interpret extremely light colors
as white or extremely dark
colors as black.
If possible, avoid using
extremely light or extremely
dark colors.
The media might not meet
HP specifications.
Use a different paper, such as
high-quality paper that is
intended for color laser
printers. See
Media
specifications.
The finish on the printed color
page is inconsistent.
The media might be too rough. Use a smooth paper or print
media, such as a high-quality
paper that is made for color
laser printers. Generally,
smoother media produces
better the results. See
Media
specifications.
Media-handling problems
Use the information in this section when the device experiences media-handling problems.
Print-media guidelines
For best results, make sure that the paper is of good quality, and free of cuts, nicks,
tears, spots, loose particles, dust, wrinkles, voids, staples, and curled or bent edges.
For best-quality color printing, use a smooth type of paper. Generally, smoother media
produces better results. For more information, see
Media specifications.
If you are unsure what type of paper you are loading (such as bond or recycled), check
the label on the package of paper.
Do not use media that is designed for Inkjet printers only. Use media that is designed for
color LaserJet printers.
Do not use letterhead paper that is printed with low-temperature inks, such as those
used in some types of thermography.
ENWW Print problems 243
Do not use raised or embossed letterhead.
The device uses heat and pressure to fuse toner to the paper. Make sure that any
colored paper or preprinted forms use inks that are compatible with this fusing
temperature (210°C or 410°F for 0.2 second).
CAUTION
Failure to follow these guidelines could cause jams or damage to the device.
Solving print-media problems
The following problems with paper cause print quality deviations, jamming, or even damage
to the device.
Problem Cause Solution
Poor print quality or toner
adhesion
The paper is too moist, too
rough, too heavy or too
smooth, or it is embossed or
from a faulty paper lot.
Try another kind of paper,
between 100 and 250
Sheffield, 4 to 6% moisture
content.
Dropouts, jamming, or curl The paper has been stored
incorrectly.
Store paper flat in its moisture-
proof wrapping.
The paper has variability from
one side to the other.
Turn the paper over.
Excessive curl The paper is too moist, has the
wrong grain direction, or is of
short-grain construction
Open the rear output bin, or
use long-grain paper.
The paper varies from side-to-
side.
Turn the paper over.
Jamming, damage to device The paper has cutouts or
perforations.
Use paper that is free of
cutouts or perforations.
Problems with feeding The paper has ragged edges. Use high-quality paper that is
made for color laser printers.
The paper varies from side-to-
side.
Turn the paper over.
The paper is too moist, too
rough, too heavy or too
smooth, has the wrong grain
direction, or is of short-grain
construction or it is embossed
or from a faulty paper lot.
Try another kind of paper,
between 100 and 250
Sheffield, 4 to 6% moisture
content.
Open the rear output bin, or
use long-grain paper.
Print is skewed (crooked).
The media guides might be
incorrectly adjusted.
Remove all media from the
input tray, straighten the stack,
and then load the media in the
input tray again. Adjust the
media guides to the width and
length of the media that you
are using and try printing again.
244 Chapter 14 Troubleshooting ENWW
Problem Cause Solution
More than one sheet feeds at
one time.
The media tray might be
overloaded.
Remove some of the media
from the tray. See
Loading trays.
The media might be wrinkled,
folded, or damaged.
Verify that the media is not
wrinkled, folded, or damaged.
Try printing on media from a
new or different package.
Device does not pull media
from the media input tray.
The device might be in manual
feed mode.
If Manual feed appears on
the device control-panel
display, press E
NTER
to
print the job.
Verify that the device is not
in manual feed mode and
print your job again.
The pickup roller might be dirty
or damaged.
Contact HP Customer Care.
See
Service and support or the
support flyer that came in the
device box.
The paper-length adjustment
control in tray 2 (HP Color
LaserJet 2840 all-in-one only)
is set at a length that is greater
than the media size.
Adjust the paper-length
adjustment control to the
correct length.
Performance problems
Try the tips in this section if pages exit the device, but have nothing printed on them, or
when the device does not print any pages.
Problem Cause Solution
Pages print but are totally blank.
The sealing tape might still be
in the print cartridges.
Verify that the sealing tape has
been completely removed from
the print cartridges.
The document might contain
blank pages.
Check the document that you
are printing to see if content
appears on all of the pages.
The device might be
malfunctioning.
To check the device, print a
Configuration page. See
Configuration page.
Pages print very slowly.
Printing in color can slow the
print job.
If you do not need color for
your print job, set the driver to
print in grayscale. See
Printing
in grayscale.
Certain media types can slow
the print job.
Print on a different type of
media.
ENWW Print problems 245
Problem Cause Solution
Pages did not print.
The device might not be pulling
media correctly.
See Media-handling problems.
The media is jamming in the
device.
Clear the jam. See Clearing
jams.
The USB cable might be
defective or incorrectly
connected.
Disconnect the USB cable
at both ends and
reconnect it.
Try printing a job that has
printed in the past.
Try using a different USB
cable.
Other devices are running on
your computer.
The device might not share a
USB port. If you have an
external hard drive or network
switchbox that is connected to
the same port as the device,
the other device might be
interfering. To connect and use
the device, you must
disconnect the other device or
you must use two USB ports on
the computer.
246 Chapter 14 Troubleshooting ENWW
Scan problems
This section helps you identify and resolve scanning problems.
Solving scanned image problems
Use the table below to solve image-scan issues.
Problem Cause Solution
The scanned image is of poor
quality.
The original might be a second-
generation photo or picture.
To eliminate the patterns,
try reducing the size of the
image after scanning.
Print the scanned image to
see if the quality is better.
Verify that your resolution
and color settings are
correct for the type of scan
job that you are
performing. See
Scanner
resolution and color.
For best results, use the
flatbed scanner for
scanning rather than the
automatic document
feeder (ADF).
The image that appears on the
screen might not be an
accurate representation of the
quality of the scan.
Try adjusting your
computer monitor settings
to use more colors (or
levels of gray). Typically,
you make this adjustment
by opening Display in
Windows Control Panel.
Try adjusting the resolution
and color settings in the
scanner software. See
Scanner resolution and
color.
The original might have been
loaded incorrectly.
Use the media guides when
you load the originals into the
ADF. See
To load originals into
the automatic document feeder
(ADF).
The scanner might be dirty. Clean the scanner. See To
clean the scanner glass.
The graphics settings might not
be suitable for the type of scan
job that you are performing.
Try changing the graphics
settings. See
Scanner
resolution and color.
ENWW Scan problems 247
Problem Cause Solution
Part of the image did not scan. The original might have been
loaded incorrectly.
Use the media guides when
you load the originals into the
ADF. See
To load originals into
the automatic document feeder
(ADF).
A colored background might be
causing images in the
foreground to blend into the
background.
Try adjusting the settings
before you scan the original or
enhancing the image after you
scan the original. See
Scanner
resolution and color.
The original is longer than 381
mm (15 inches).
The maximum scannable
length is 381 mm (15 inches)
when you use the automatic
document feeder (ADF) input
tray. If the page exceeds the
maximum length, the scanner
stops. (Copies can be longer.)
CAUTION
Do not try to pull the original
from the ADF; you might
damage the scanner or your
original. See
Media jams occur
in the automatic document
feeder (ADF).
The original is too small. The minimum size that the
flatbed scanner supports is 25
by 25 mm (1 by 1 inches). The
minimum size that the ADF
supports is 127 by 127 mm (5
by 5 inches). The original might
be jammed. See
Media jams
occur in the automatic
document feeder (ADF).
The media size is incorrect. In Scan settings, make sure
that the input media size is
large enough for the document
that you are scanning. See
Scanner resolution and color.
248 Chapter 14 Troubleshooting ENWW
Problem Cause Solution
The scan takes too long
The resolution or color level is
set too high.
Change the resolution and
color level settings to the
correct settings for your job.
See
Scanner resolution and
color.
The software is set to scan in
color.
The system default is color,
which takes longer to scan
even when scanning a
monochrome original. If you
acquire an image through
TWAIN or WIA, you can
change the settings so that the
original scans in grayscale or
black-and-white. See the
device software Help for details.
A print job or copy job was sent
before you tried to scan.
If someone sent a print job or
copy job before you tried to
scan, the scan will start if the
scanner is not busy. However,
because the printer and
scanner share memory, the
scan might be slower.
Scan quality problems
This section provides information about improving scan quality by preventing or correcting
problems.
Preventing problems
The following are a few simple steps you can take to improve copy and scan quality.
Use the flatbed scanner, rather than the automatic document feeder (ADF) input tray, to
scan.
Use high-quality originals.
Load the media correctly. If the media is loaded incorrectly, it might skew, which causes
unclear images. See
Loading trays for instructions.
Adjust the software settings according to how you plan to use the scanned page. See
Scanner resolution and color for more information.
If your device frequently feeds more than one page at a time, the separation pad might
need to be replaced. Contact HP Customer Care. See
Service and support or the flyer
that came in the printer box.
Use or make a carrier sheet to protect your originals.
ENWW Scan problems 249
Solving scan-quality problems
Problem Cause Solution
Blank pages
The original might have been
loaded upside down.
In the automatic document
feeder (ADF), put the top end
of the stack of originals into the
ADF input tray, with the media
stack face-up and the first page
to be scanned on top of the
stack.
On the flatbed scanner, place
the original document face-
down with the upper-left corner
of the document at the lower-
right corner of the glass.
Too light or dark The resolution and color levels
may be set incorrectly.
Verify that you have the correct
resolution and color settings.
See
Scanner resolution and
color.
Unwanted lines
Ink, glue, correction fluid, or an
unwanted substance might be
on the glass.
Clean the flatbed scanner
surface. See
To clean the
scanner glass.
The ADF glass might be dirty. Clean the ADF glass. See To
clean the scanner glass.
Black dots or streaks Ink, glue, correction fluid, or an
unwanted substance might be
on the glass.
Clean the flatbed scanner
surface. See
To clean the
scanner glass.
Unclear text The resolution and color levels
may be set incorrectly.
Verify that you have the correct
resolution and color settings.
See
Scanner resolution and
color.
250 Chapter 14 Troubleshooting ENWW
Copy problems
This section helps you identify and resolve copying problems.
Preventing problems
The following are a few simple steps you can take to improve copy quality:
Copy from the flatbed scanner. This will produce a higher quality copy than copying from
the automatic document feeder (ADF).
Use quality originals.
Load the media correctly. If the media is loaded incorrectly, it might skew, causing
unclear images and problems with the OCR application. See
Loading documents to
scan for instructions.
Use or make a carrier sheet to protect your originals.
Note
Verify that the media meets HP specifications. If the media meets HP specifications,
recurring feed problems indicate the copier/separation pad is worn. Contact HP Customer
Care. See
Service and support or the flyer that came in the printer box.
Image problems
Problem Cause Solution
Images are missing or faded. One or more print cartridges
might be low.
Replace any low print
cartridges. See
Changing a
print cartridge.
The original might be of poor
quality.
If your original is too light or
damaged, the copy might not
be able to compensate, even if
you adjust the contrast. If
possible, find an original
document in better condition.
The original might have a
colored background.
Colored backgrounds might
cause images in the foreground
to blend into the background,
or the background might
appear in a different shade. If
possible, use an original
document without a colored
background.
ENWW Copy problems 251
Problem Cause Solution
Vertical white or faded stripes
appear on the copy.
The media might not meet
HP specifications.
Use media that meets
HP specifications. See
Media
specifications.
One or more print cartridges
might be low.
Replace any low print
cartridges. See
Changing a
print cartridge.
Unwanted lines appear on the
copy.
Tray 1 might not be placed
correctly.
Verify that tray 1 is in place.
The flatbed scanner or the ADF
glass might be dirty.
Clean the flatbed scanner or
the ADF glass. See
To clean
the scanner glass.
The photosensitive drum inside
the print cartridge might have
been scratched.
Install a new HP print cartridge.
See
Changing a print cartridge.
Black dots or streaks appear
on the copy.
Ink, glue, correction fluid, or an
unwanted substance might be
on the automatic document
feeder (ADF) or flatbed scanner.
Clean the device. See Cleaning
the device.
Copies are too light or dark.
The printer driver or device
software settings may be
incorrect.
Verify that the quality settings
are correct. See
Adjusting the
copy quality.
See the device software Help
for more information about
changing the settings.
Text is unclear. The printer driver or device
software settings may be
incorrect.
Verify that the quality settings
are correct. See
Adjusting the
copy quality.
See the device software Help
for more information about
changing the settings.
Media-handling problems
Problem Cause Solution
Poor print quality or toner
adhesion
The paper is too moist, too
rough, too heavy or too
smooth, or it is embossed or
from a faulty paper lot.
Try another kind of paper,
between 100 and 250
Sheffield, 4 to 6% moisture
content.
252 Chapter 14 Troubleshooting ENWW
Problem Cause Solution
Dropouts, jamming, or curl The paper has been stored
incorrectly.
Store paper flat in its moisture-
proof wrapping.
The paper has variability from
one side to the other.
Turn the paper over.
Excessive curl The paper is too moist, has the
wrong grain direction, or is of
short-grain construction
Open the rear output bin, or
use long-grain paper.
The paper varies from side-to-
side.
Turn the paper over.
Jamming, damage to device The paper has cutouts or
perforations.
Use paper that is free of
cutouts or perforations.
Problems with feeding The paper has ragged edges. Use high-quality paper that is
made for color laser printers.
The paper varies from side-to-
side.
Turn the paper over.
The paper is too moist, too
rough, too heavy or too
smooth, has the wrong grain
direction, or is of short-grain
construction or it is embossed
or from a faulty paper lot.
Try another kind of paper,
between 100 and 250
Sheffield, 4 to 6% moisture
content.
Open the rear output bin, or
use long-grain paper.
Print is skewed (crooked). The media guides might be
incorrectly adjusted.
Remove all media from the
input tray, straighten the stack,
and then load the media in the
input tray again. Adjust the
media guides to the width and
length of the media that you
are using and try printing again.
More than one sheet feeds at
one time.
The media tray might be
overloaded.
Remove some of the media
from the tray. See
Loading trays.
The media might be wrinkled,
folded, or damaged.
Verify that the media is not
wrinkled, folded, or damaged.
Try printing on media from a
new or different package.
ENWW Copy problems 253
Problem Cause Solution
Device does not pull media
from the media input tray.
The device might be in manual
feed mode.
If Manual feed appears on
the device control-panel
display, press E
NTER
to
print the job.
Verify that the device is not
in manual feed mode and
print your job again.
The pickup roller might be dirty
or damaged.
Contact HP Customer Care.
See
Service and support or the
support flyer that came in the
device box.
The paper-length adjustment
control in tray 2 (HP Color
LaserJet 2840 all-in-one only)
is set at a length that is greater
than the media size.
Adjust the paper-length
adjustment control to the
correct length.
Performance problems
Problem Cause Solution
No copy came out.
The input tray might be empty. Load media in the device. See
Loading documents to scan for
more information.
The original might have been
loaded incorrectly.
In the automatic document
feeder (ADF), load the original
with the narrow side forward
and the side to be scanned
facing up.
On the flatbed scanner, place
the original document face-
down with the upper-left corner
of the document at the lower-
right corner of the glass.
254 Chapter 14 Troubleshooting ENWW
Problem Cause Solution
Copies are blank.
The sealing tape might not
have been removed from the
print cartridges.
Remove the print cartridges
from the device, pull out the
sealing tape, and reinstall the
print cartridges.
The original might have been
loaded incorrectly.
In the ADF, load the original
with the narrow side forward
and the side to be scanned
facing up.
On the flatbed scanner, make
sure that the original document
is placed face-down with the
upper-left corner of the
document at the lower-right
corner of the glass.
The media might not meet
HP specifications.
Use media that meets
HP specifications. See
Media
specifications.
One or more print cartridges
might be low.
Replace any low print
cartridges. See
Changing a
print cartridge.
The wrong original was copied. The ADF might be loaded. Make sure that the ADF is
empty.
Copies are reduced in size.
The device software settings
might be set to reduce the
scanned image.
See the HP Toolbox Help for
more information about
changing the settings.
ENWW Copy problems 255
Fax problems
This section helps you identify and resolve fax problems.
Problems receiving faxes
Use the table in this section to solve problems that might occur when receiving faxes.
Note
You must use the fax cord that came with the device in order to ensure that the device
functions correctly.
Problem Cause Solution
The device cannot receive
faxes from an extension
telephone.
The extension-telephone
setting might be disabled.
See Making an extension
telephone available to receive
faxes for instructions about
changing this setting.
The fax cord might not be
securely connected.
Verify that the fax cord is
securely connected between
the telephone jack and the
device (or another device that
is connected to the device).
Press 1-2-3 in sequence (tone-
dial mode only), wait for three
seconds, and then hang up.
The device dialing mode might
be incorrectly set, or the
extension phone might be
incorrectly set.
Verify that the device dialing
mode is set to Tone. See
Selecting tone-dialing or pulse-
dialing mode. Verify that the
extension phone is set up for
tone dialing as well.
256 Chapter 14 Troubleshooting ENWW
Problem Cause Solution
Incoming fax calls are not
being answered by the device.
The answer mode might be set
to Manual.
If the answer mode is set to
Manual, the device does not
answer calls. You have to start
the fax-receiving process
manually. See
Setting the
answer mode for more
information.
The rings-to-answer setting
might not be set correctly.
Check the rings-to-answer
setting for your configuration.
See
Changing the rings-to-
answer setting to determine
which setting you need.
The answer-ring pattern feature
might be turned on, but you do
not have the service, or you do
have the service and the
feature is not set correctly.
Check the answer-ring pattern
feature to verify that it is set
properly. See
Changing ring
patterns for call answering.
The fax cord might not be
correctly connected, or the fax
cord is not working.
See the Getting Started Guide
to check the installation. Verify
that you are using the fax cord
that came with the device.
The device might not be able to
detect incoming fax tones
because the answering
machine is playing a voice
message.
Re-record your answering
machine message, leaving at
least two seconds of silence at
the beginning of the message.
Too many devices might be
connected to the telephone line.
You should not have more than
three devices attached to the
line. Try removing the last
device that was connected and
determine whether the device
works. If not, continue
removing devices one at a time
and retry after removing each
one.
The telephone line might not be
working.
Do one of the following:
Increase the volume on
the device, and then press
S
TART
F
AX
on the control
panel. If you hear a dial
tone, the telephone line is
working.
Disconnect the device
from the telephone jack,
and then connect a
telephone. Try to make a
telephone call to verify that
the telephone line is
working.
ENWW Fax problems 257
Problem Cause Solution
Incoming fax calls are not
being answered by the device.
A voice-messaging service
might be interfering with the
device as it attempts to answer
calls.
Do one of the following:
Disable the messaging
service.
Get a telephone line that is
dedicated to fax calls.
Set the device answer
mode to Manual. In
manual mode, you must
start the fax-receive
process yourself. See
Setting the answer mode
for more information.
Leave the device set to
automatic mode and lower
the rings-to-answer setting
for the device to a number
less than the rings-to-
answer setting for the
voice mail (see
Changing
the rings-to-answer
setting). The device will
answer all incoming calls.
The device might be out of
paper and the memory is full.
Refill the media input tray.
Press E
NTER
. The device prints
all of the faxes it has saved in
memory and then resumes
answering fax calls.
Faxes are not printing. The media input tray is empty. Load media. Any faxes that are
received while the input tray is
empty are stored in memory
and will print after the tray has
been refilled.
The receive-to-PC option might
be selected, and faxes are
being received by the computer.
Check to determine whether
the computer is receiving
faxes. See
Receiving faxes to
your computer.
Faxes are printing on two
pages instead of one.
The autoreduction setting might
not be set correctly.
Turn on the autoreduction
setting. See
Changing
autoreduction settings for
incoming faxes.
The incoming faxes might have
been sent on larger media.
Adjust the autoreduction setting
to allow larger pages to be
printed on one page. See
Changing autoreduction
settings for incoming faxes.
258 Chapter 14 Troubleshooting ENWW
Problem Cause Solution
Received faxes are too light or
are printing only on half of the
page.
The device ran out of toner
while printing a fax.
The device stores the most
recently printed faxes. (The
amount of memory that is
available determines the actual
number of faxes stored for
reprinting.) As soon as
possible, replace the print
cartridge, and then reprint the
fax. See
Reprinting a fax.
The fax that was sent was too
light.
Contact the sender and have
the sender resend the fax after
altering the settings.
Problems sending faxes
Use the information in this table to solve problems that might occur when sending faxes.
Problem Cause Solution
The document stops feeding in
the middle of faxing.
The maximum length of a page
that you can load is 381 mm
(15 inches). Faxing of a longer
page stops at 381 mm (15
inches).
Print the document on shorter
media.
If no jam exists and less than
one minute has elapsed, wait a
moment before pressing
C
ANCEL
. If a jam exists, see
Clearing jams. Then, resend
the job.
If the item is too small, it can
jam inside the automatic
document feeder (ADF).
Use the flatbed scanner. The
minimum page size for the ADF
is 127 by 127 mm (5 by 5
inches).
If a jam exists, see
Clearing
jams. Then, resend the job.
ENWW Fax problems 259
Problem Cause Solution
Faxes stop during sending. The fax machine to which you
are sending might be
malfunctioning.
Try sending to another fax
machine.
Your telephone line might not
be working.
Do one of the following:
Turn up the volume on the
device, and then press
S
TART
F
AX
on the control
panel. If you hear a dial
tone, the telephone line is
working.
Disconnect the device
from the jack in the wall,
and then connect a
telephone to the jack. Try
to make a telephone call to
verify that the telephone
line is working.
A communication error might
be interrupting the fax job.
Change the redial-on-
communication-error setting to
On (see
To change the redial-
on-communication-error option).
The device is receiving faxes
but is not sending them.
If your device is on a PBX
system, the PBX system might
be generating a dial tone that
the device cannot detect.
Disable the detect-dial-tone
setting. See
Changing the
detect-dial-tone setting.
A poor telephone connection
might exist.
Try again later.
The fax machine to which you
are sending might be
malfunctioning.
Try sending to another fax
machine.
Your telephone line might not
be working.
Do one of the following:
Turn up the volume on the
device and press S
TART
F
AX
on the control panel. If
you hear a dial tone, the
telephone line is working.
Disconnect the device
from the telephone jack
and connect a telephone.
Try to make a telephone
call to verify that the
telephone line is working.
Outgoing fax calls continue to
be dialed.
The device automatically
redials a fax number if the
redial options are set to On.
To stop the redials while the
device is dialing, press C
ANCEL
.
To cancel a pending fax job,
see
Canceling a fax job. See
Changing the redial settings to
change the redial setting.
260 Chapter 14 Troubleshooting ENWW
Problem Cause Solution
Faxes that you send are not
arriving at the receiving fax
machine.
The receiving fax machine
might be off or might have an
error condition, such as being
out of paper.
Call the recipient to verify that
the fax machine is on and
ready to receive faxes.
The originals might be
incorrectly loaded.
Verify that the original
documents are correctly loaded
into the ADF input tray or
flatbed scanner. See
Loading
trays
A fax might be in memory
because it is waiting to redial a
busy number, other jobs that
are ahead of it are waiting to be
sent, or the fax is set up for a
delayed send.
If a fax job is in memory for any
of these reasons, an entry for
the job appears in the fax log.
Print the fax activity log (see
Printing the fax activity log) and
check the Status column for
jobs that show a Pending
designation.
Faxes you send include a block
of gray shading at the end of
each page.
You might be sending a fax
from the flatbed scanner with
the glass-fax size set incorrectly.
Verify that the setting is correct.
See
Changing the default glass-
size setting.
Faxes you send have data
missing from the end of each
page.
You might be sending a fax
from the flatbed scanner with
the glass-fax size set incorrectly.
Verify that the setting is correct.
See
Changing the default glass-
size setting.
Voice call problems
Problem Cause Solution
Voice calls are not being
received by the telephone or
answering machine that is
connected to the line.
The fax cord might not be
correctly connected.
See the Getting Started Guide
to check the installation. The
device must be the first device
connected to the telephone line.
The answer mode or rings-to-
answer settings might not be
correctly set.
See Setting the answer mode
or
Changing the rings-to-
answer setting to determine
which settings you need. The
rings-to-answer must be set
higher than the answering
machine setting.
The answering machine or
telephone might not be
functioning.
Connect the telephone or
answering machine directly to
the telephone line and
determine if it works by itself.
Media-handling problems
Use the information in this table to solve problems that involve print media.
Note
For information about removing jams, see Clearing jams.
ENWW Fax problems 261
Problem Cause Solution
Print is skewed. The media input tray might be
overloaded.
Remove some of the media
from the input tray.
The media guides might be
incorrectly set, broken, or
missing.
Verify that the guides are not
adjusted too tightly or too
loosely against the paper.
Check for broken or missing
guides, and replace them if
necessary.
The media might not meet
HP specifications.
Use media that meets
HP specifications. See
Media
specifications.
Pages are curled or wrinkled. The media might not meet
HP specifications.
Use media that meets
HP specifications. See
Media
specifications.
The paper path might be
affecting the pages.
Open the straight-through
output door on the back of the
printer and use this paper path.
The media is not stored
properly.
When possible, store media in
its sealed ream at room
temperature.
The media has been in the
input tray too long.
Turn over the stack of media in
the tray or rotate the media
180° in the paper tray.
262 Chapter 14 Troubleshooting ENWW
Performance problems
Problem Cause Solution
Faxes are transmitting or being
received very slowly.
The fax might be very complex,
such as one with many graphics.
Complex faxes take longer to
be sent or received. Breaking
longer faxes into multiple jobs
and decreasing the resolution
can increase the transmission
speed.
The receiving fax machine
might have a slow modem
speed.
The device only sends the fax
at the fastest modem speed
that the receiving fax machine
can accept.
The resolution at which the fax
was sent or is being received
might be very high.
If you are receiving the fax, call
and ask the sender to lower the
resolution and resend the fax. If
you are sending the fax, lower
the resolution and resend the
fax. See
Changing the default
light/dark (contrast) setting to
change the default setting.
Your telephone line might not
be working.
Hang up and resend the fax.
Have the telephone company
check the telephone line.
You are sending a fax via an
international call.
You must allow more time to
transmit fax jobs internationally.
The fax activity logs or fax call
reports are printing at
inappropriate times.
The fax activity log or fax call
reports settings are not correct.
Print a Configuration page and
check when the reports print.
For instructions about setting
log or report printing times, see
To set the fax activity log to
print automatically or Setting
print times for the fax call report.
The device sounds are too loud
or too soft.
The volume setting might not
be adjusted correctly.
See Using the device volume
controls.
ENWW Fax problems 263
Memory card problems
This section helps you identify and resolve memory card-related problems.
Note
For help with control-panel error messages while printing from a memory card, see Control
panel messages.
Missing or wrong files
Use the table in this section to solve problems with memory-card files.
Problem Cause Solution
Device cannot detect files on
the memory card.
The memory card might be
missing or inserted incorrectly.
Verify that the memory card is
inserted correctly. See
Inserting a memory card.
The files might not be in the
correct format.
To print from the device control
panel, the files must be in the
sRGB JPEG format. To print
other formats, you must use a
software program on your
computer.
You might have inserted more
than one memory card.
Only one card slot can be
occupied for the device to
detect JPEG files. Verify that
only one card is inserted.
Index page not printing
Use the table in this section to solve problems with index-page printing.
Problem Cause Solution
The index page will not print. The memory card might have
been removed before the
device could print the page.
Reinsert the card and reprint
the index page.
You might have inserted more
than one memory card.
Only one card slot can be
occupied for the device to
detect JPEG files. Verify that
only one card is inserted.
One or more print cartridges
might be low.
Replace any low print
cartridges. See
Changing a
print cartridge.
Proof sheet not printing
Use the table in this section to solve problems with proof-sheet printing.
264 Chapter 14 Troubleshooting ENWW
Problem Cause Solution
The proof sheet will not print. The memory card might have
been removed before the
device could print the page.
Reinsert the card and reprint
the proof sheet.
You might have inserted more
than one memory card.
Only one card slot can be
occupied for the device to
detect JPEG files. Verify that
only one card is inserted.
One or more print cartridges
might be low.
Replace any low print
cartridges. See
Changing a
print cartridge.
Proof sheet not scanning
Use the table in this section to solve problems with proof-sheet scanning.
Problem Cause Solution
The proof sheet will not scan
correctly.
The flatbed scanner glass
might be dirty.
Clean the flatbed scanner
glass. See
To clean the
scanner glass.
The automatic document
feeder (ADF) might be loaded.
Remove any media from the
ADF.
The scanner might not be able
to read the photo selections.
This feature has been
optimized and tested for use
with Genuine HP Toner
Supplies (variations in color
shading can impact the
performance of this feature).
Verify that you have colored
the bubbles darkly enough for
the scanner to read.
The proof sheet might be
loaded incorrectly.
On the flatbed scanner, place
the original document face-
down with the upper-left corner
of the document at the lower-
right corner of the glass.
The device will not scan a proof
sheet from the ADF.
Issues with photo printing
Use the table in this section to solve problems with photo printing.
ENWW Memory card problems 265
Problem Cause Solution
The wrong photo printed. An incorrect memory card
might be inserted.
Verify that the correct memory
card is inserted. See
Inserting
a memory card.
You might have selected the
wrong number from the
memory card.
If you cannot remember the
number of the photo that you
wish to print, print an index
page to verify the file number.
See
Printing an index.
The photo did not print. The media input tray might be
empty.
Load media into the input tray.
The memory card might have
been removed before the
device could print the photo.
Reinsert the card and reprint
the photo.
The proof sheet is skewed. Verify that the paper guides are
positioned correctly against the
paper in the input tray. Reprint
the proof sheet. Verify that the
images on the proof sheet are
aligned properly, and then
reselect the images you want
to print.
The proof sheet is not aligned
properly on the scanner.
Realign the proof sheet face-
down on the flatbed scanner,
with the upper-left corner of the
document located in the lower-
right corner of the glass.
The photo quality is
unacceptable.
The original photo quality might
be poor.
Use a software program to
enhance photo quality, and
then print the photo from your
computer.
The default settings on the
printer might not produce the
desired quality.
Use a software program to print
the photo at the desired settings.
The photo is the wrong size. The appropriate job size might
not be available from the
device control panel.
Use a software program to
resize the photo at the desired
settings, and then print the
photo from your computer.
You might have selected an
incorrect job size.
Verify that the correct setting is
selected at the device control
panel.
Cannot edit, save, or delete
images on the memory card.
The device cannot read the
memory card.
Verify that the memory card is
properly inserted and that the
card is one that is supported.
See
Inserting a memory card.
Note
You cannot edit memory-card
files from the device control
panel. Use a software program
to edit, delete, or save images.
266 Chapter 14 Troubleshooting ENWW
Problem Cause Solution
Scanner did not read proof
sheet.
The device is using non-HP
supplies. This feature has been
optimized and tested for use
with Genuine HP Toner
Supplies (variations in color
shading can impact the
performance of this feature).
Use a software program to print
the photo from your computer.
Print photos directly from the
memory card by using the
control panel.
Install HP supplies in the
device and reprint the proof
sheet.
ENWW Memory card problems 267
Troubleshooting tools
The section describes the tools that can help you solve problems with your device.
Device pages and reports
This section describes the pages and reports that help you diagnose and solve problems
with the device.
Demo page
To print the Demo page, complete the following steps.
1. On the device control panel, press M
ENU
until the Reports menu appears, and then
press E
NTER
.
2. Use the < or the > button until Demo Page appears, and then press E
NTER
.
Configuration page
The Configuration page lists the current settings and properties of the device. You can print
a Configuration page from the device or HP Toolbox. To print the Configuration page from
the device, complete the following steps.
1. On the device control panel, press M
ENU
.
2. Use the < or the > button to select Reports, and then press E
NTER
.
3. Use the < or the > button to select Config report, and then press E
NTER
.
For more information about the Configuration page, see
Configuration page.
Supplies Status page
The Supplies Status page lists the remaining life of the HP print cartridges and the
HP imaging drums. It also lists the estimated pages remaining, number of pages printed, and
other supplies information. You can print a Supplies Status page from the device or
HP Toolbox. To print from the device, complete the following steps.
1. On the control panel menu, press M
ENU
.
2. Use the < or the > button to select Reports, and then press E
NTER
.
3. Use the < or the > button to select Supplies Status, and then press E
NTER
.
For more information about the Supplies Status page, see
Supplies Status page.
Fax reports
This section describes the fax reports that help you diagnose and solve problems with the
device.
Note
For more information about fax reports, see Fax logs and reports.
268 Chapter 14 Troubleshooting ENWW
Fax activity log
The fax activity log provides a chronological history of the last 40 faxes that were received,
sent, or deleted, and any errors that occurred.
To print the fax activity log
1. On the device control panel, press M
ENU
.
2. Use the < or the > button to select Reports, and then press E
NTER
.
3. Use the < or the > button to select Fax Activity log, and then press E
NTER
.
4. Press E
NTER
to select Print log now. The device exits the menu settings and prints the
log.
Fax call report
A fax call report is a brief report that indicates the status of the last fax that was sent or
received.
To print a fax call report
1. On the device control panel, press M
ENU
.
2. Use the < or the > button to select Reports, and then press E
NTER
.
3. Use the < or the > button to select Fax Call report, and then press E
NTER
.
4. Press E
NTER
to select Print report now. The device exits the menu settings and prints
the report.
Phone book report
A phone book report lists the fax numbers that are assigned to the one-touch buttons and
speed-dial and group-dial entries.
To print a phone book report
1. On the device control panel, press M
ENU
.
2. Use the < or the > button to select Reports, and then press E
NTER
.
3. Use the < or the > button to select PhoneBook report, and then press E
NTER
. The
device exits the menu settings and prints the report.
Billing-code report
The billing-code report is a printed list of all of the fax billing codes and the total number of
faxes that have been billed to each code.
Note
After this report is printed, all billing data is deleted.
ENWW Troubleshooting tools 269
To print a billing-code report
1. On the device control panel, press M
ENU
.
2. Use the < or the > button to select Reports, and then press E
NTER
.
3. Use the < or the > button to select Billing report, and then press E
NTER
. The device
exits the menu settings and prints the report.
HP Toolbox
HP Toolbox is a Web application that you can use for troubleshooting tasks.
To view HP Toolbox
Open HP Toolbox in one of these ways:
On the Windows desktop, double-click the HP Toolbox icon.
On the Windows Start menu, click Programs (All Programs in Windows XP), and then
click HP Toolbox.
Troubleshooting tab
HP Toolbox includes a Troubleshooting tab that contains links to the following main pages:
Control Panel Messages. View descriptions of device control-panel messages.
Clearing Jams. View information about locating and clearing jams.
Print Problems. View Help topics that can help you solve print problems.
Scan Problems. View Help topics that can help you solve scan problems.
Copy Problems. View Help topics that can help you solve copy problems.
Fax Problems. View Help topics that can help you solve fax problems.
Memory Card Problems. View Help topics that can help you solve memory-card
problems.
Connectivity Problems. View Help topics that can help you solve networking problems.
Troubleshooting Tools. Employ such troubleshooting tools as a cleaning page or a
color troubleshooting page to maintain the device.
Animated Demonstrations. View animated Help demonstrations for the device.
Note
Other tabs on HP Toolbox might be helpful in troubleshooting device problems. For
information about the other tabs on HP Toolbox, see
HP Toolbox.
Service menu
Use the control-panel Service menu to troubleshoot device problems.
Restoring the factory-set defaults
Restoring the factory-set defaults returns all of the settings to the factory defaults, and it also
clears the fax header name and phone number.
270 Chapter 14 Troubleshooting ENWW
CAUTION
This procedure clears fax numbers and names that are associated with one-touch keys and
speed-dial codes, and deletes any pages that are stored in the memory. The procedure then
automatically restarts the device.
To restore the factory-set defaults
1. On the device control panel, press M
ENU
.
2. Use the < or the > button to select Service, and then press E
NTER
.
3. Use the < or the > button to select Restore defaults, and then press E
NTER
.
The device automatically restarts.
Cleaning the paper path
The device features a special cleaning mode to clean the paper path.
Note
If you have access to HP Toolbox, HP recommends cleaning the paper path by using
HP Toolbox. See
Clean the paper path.
To clean the paper path
1. On the device control panel, press M
ENU
.
2. Use the < or the > button to select Service, and then press E
NTER
.
3. Use the < or the > button to select Cleaning Mode, and then press E
NTER
.
A page feeds through the printer slowly. Discard the page when the process is completed.
4. Load plain letter or A4 paper when you are prompted.
5. Press E
NTER
again to confirm and begin the cleaning process.
A page feeds through the printer slowly. Discard the page when the process is completed.
T.30 protocol trace
Use a T.30 protocol trace report to troubleshoot fax transmission issues.
To print a T.30 protocol trace report
Send a fax from the device or receive a fax to the device from another fax machine, and
then print a T.30 trace report after the fax prints.
1. On the device control panel, press M
ENU
.
2. Use the < or the > button to select Service, and then press E
NTER
.
3. Use the < or the > button to select Print T.30, and then press E
NTER
.
The device exits the menu settings and prints the reports.
Explanations of some of the report’s column heading follow:
Date and Time identify when the fax begins.
Type is the type of fax activity: send or receive.
ENWW Troubleshooting tools 271
Identification is the phone number to which a fax is sent.
Result explains the status of the fax:
“OK” means that the fax was successful.
“Pending” faxes are in memory or are printing.
An error code means that your device might need service. Contact HP Customer
Care. See
Service and support or the flyer that came in the printer box.
The device control panel display has black lines or dots, or
becomes blank
CAUTION
Static electricity can cause unexpected black lines or dots to appear on the device control
panel display. Do not touch the device control panel display if there is a chance that you
have collected a static electric charge (for example, by walking on carpet in a low-humidity
environment).
Was the device exposed to an electric or magnetic field?
Unexpected lines or dots might appear on the device control panel display, or the display
might become blank if the device is exposed to an electric or magnetic field. To resolve this
problem, perform the following procedure:
1. Turn the device off.
2. Remove the device from the electric or magnetic field.
3. Turn the device on again.
272 Chapter 14 Troubleshooting ENWW
A
Accessories and ordering
information
The following list of accessories was current at the time of printing. Ordering information and
availability of the accessories might change during the life of the device. For the most current
ordering information, visit the most appropriate of the following websites:
North America: http://www.hp.com/go/ordersupplies-na
Europe and Middle East: http://www.hp.com/go/ordersupplies-emea
Asia Pacific countries/regions: http://www.hp.com/go/ordersupplies-ap
Latin America: http://www.hp.com/go/ordersupplies-la
ENWW 273
Supplies
Product name Description Part number
Black print cartridge
Life of 5,000 pages at 5
percent coverage.
Q3960A
Cyan print cartridge Life of 4,000 pages at 5
percent coverage.
Q3961A
Yellow print cartridge Life of 4,000 pages at 5
percent coverage.
Q3962A
Magenta print cartridge Life of 4,000 pages at 5
percent coverage.
Q3963A
Cyan print cartridge Life of 2,000 pages at 5
percent coverage.
Q3971A
Yellow print cartridge Life of 2,000 pages at 5
percent coverage.
Q3972A
Magenta print cartridge Life of 2,000 pages at 5
percent coverage.
Q3973A
Imaging drum
Imaging drum life is 20,000
pages if printing black only;
5,000 pages if printing in color.
Typical life is 6,000 to 8,000
pages.
Q3964A
274 Appendix A Accessories and ordering information ENWW
Memory
Product name Description Part number
Memory upgrades (DIMMs) The standard 96 MB of
memory in the device can be
expanded to up to 224 MB
using the additional DIMM slot.
32 MB
C7845A
Memory upgrades (DIMMs) 64 MB C9680A
Memory upgrades (DIMMs) 128 MB C9121A
Font DIMM (100-pin) You can install an 8-MB
language font ROM in the
DIMM slot.
Visit http://www.hp.com for
DIMM availability and ordering.
ENWW Memory 275
Cable and interface accessories
Product name Description Part number
USB cable 2-meter standard USB-
compatible device connector
C6518A
276 Appendix A Accessories and ordering information ENWW
Paper-handling accessories
Product name Description Part number
Optional tray 2
250-sheet input tray for
standard sizes. Only one 250-
sheet tray can be installed.
Q3952A
ENWW Paper-handling accessories 277
Paper and other print media
Note
Inkjet paper is not recommended for this device.
Product name Description Part number
HP LaserJet paper Premium HP-brand paper for
use with HP LaserJet printers.
HPJ1124 (letter)
HP Premium Choice LaserJet
paper
HP bond paper with a weight of
120.32 g/m
2
(32 lb.)
HPU1132 (letter)
HP Cover paper HP-brand paper with a weight
of 200 g/m
2
(75-lb cover). Use
for printing postcards and
document covers.
Q2413A (letter) 100 sheets
HP Printing paper HP-brand paper for use with
HP LaserJet printers.
HPP1122 (letter)
HP Multipurpose paper HP-brand paper for a variety of
uses.
HPM1120 (letter)
HP LaserJet Tough paper Robust paper with a satin
finish. Paper will not tear and
will withstand the weather. For
documents requiring durability
and longevity.
Q1298A (letter)
HP High Gloss laser paper High-gloss finish coating on
both sides. Use for brochures,
catalogs, photographs, and
whenever a high-gloss finish is
desired.
Q2419A (letter) 200 sheets
HP Soft Gloss laser paper Satin finish coating on both
sides. 105 g/m
2
(28 lb)
Q2415A (letter) 500 sheets
HP Color LaserJet
transparencies
Use color transparencies for
full-color printing.
C2934A (letter) 50 sheets
HP Brochure Laser Paper, Matte High opacity for two-sided
printing with no show-through,
44 lb.
Q6543A (letter) 150 sheets
HP Photo and Imaging Laser
Paper, Glossy
High-contrast glossy finish, 32
lb.
Q6545A (letter) 200 sheets
HP Photo and Imaging Laser
Paper, Matte
High-contrast matte finish, 52 lb. Q6549A (letter) 100 sheets
HP Presentation Laser Paper,
Soft Gloss
Bright white for high contrast,
32 lb.
Q6541A (letter) 200 sheets
278 Appendix A Accessories and ordering information ENWW
User-replaceable parts
Product name Description Part number
Fuser
Replace when print-quality
issues remain after you have
cleaned the engine and tried all
troubleshooting measures.
(See
Cleaning the device and
Print problems.)
Contact HP Customer Care to
order parts.
Separation pad and pick-up
rollers
Replace when the device is
picking up multiple sheets or no
sheets. Trying different paper
did not resolve the problem.
Contact HP Customer Care to
order parts.
Automatic document feeder
(ADF)
Replace when the ADF is
damaged or not working
correctly.
Contact HP Customer Care to
order parts.
ENWW User-replaceable parts 279
Supplementary documentation
A printed copy of this user guide is available in the following languages.
User guides
Language Part number
English Q3948-90901
Chinese, simplified Q3948-90915
Czech Q3948-90902
Danish Q3948-90903
Dutch Q3948-90904
Finnish Q3948-90905
French Q3948-90906
German Q3948-90907
Hungarian Q3948-90908
Italian Q3948-90909
Korean Q3948-90910
Norwegian Q3948-90911
Polish Q3948-90912
Portuguese Q3948-90913
Russian Q3948-90914
Spanish, Castilian Q3948-90916
Swedish Q3948-90917
Thai Q3948-90919
Traditional Chinese Q3948-90918
Turkish Q3948-90920
280 Appendix A Accessories and ordering information ENWW
B
Service and support
Hewlett-Packard limited warranty statement
HP PRODUCT
HP Color LaserJet 2820/2830/2840 all-in-one
DURATION OF LIMITED WARRANTY
One year limited warranty
HP warrants to you, the end-user customer, that HP hardware and accessories will be free from defects in
materials and workmanship after the date of purchase, for the period specified above. If HP receives notice of
such defects during the warranty period, HP will, at its option, either repair or replace products which prove to be
defective. Replacement products may be either new or equivalent in performance to new.
HP warrants to you that HP software will not fail to execute its programming instructions after the date of
purchase, for the period specified above, due to defects in material and workmanship when properly installed and
used. If HP receives notice of such defects during the warranty period, HP will replace software which does not
execute its programming instructions due to such defects.
HP does not warrant that the operation of HP products will be uninterrupted or error free. If HP is unable, within a
reasonable time, to repair or replace any product to a condition as warranted, you will be entitled to a refund of
the purchase price upon prompt return of the product.
HP products may contain remanufactured parts equivalent to new in performance or may have been subject to
incidental use.
Warranty does not apply to defects resulting from (a) improper or inadequate maintenance or calibration, (b)
software, interfacing, parts or supplies not supplied by HP, (c) unauthorized modification or misuse, (d) operation
outside of the published environmental specifications for the product, or (e) improper site preparation or
maintenance.
TO THE EXTENT ALLOWED BY LOCAL LAW, THE ABOVE WARRANTIES ARE EXCLUSIVE AND NO OTHER
WARRANTY OR CONDITION, WHETHER WRITTEN OR ORAL, IS EXPRESSED OR IMPLIED AND HP
SPECIFICALLY DISCLAIMS ANY IMPLIED WARRANTIES OR CONDITIONS OF MERCHANTABILITY,
SATISFACTORY QUALITY, AND FITNESS FOR A PARTICULAR PURPOSE. Some countries/regions, states or
provinces do not allow limitations on the duration of an implied warranty, so the above limitation or exclusion
might not apply to you. This warranty gives you specific legal rights and you might also have other rights that vary
from country/region to country/region, state to state, or province to province. HP's limited warranty is valid in any
country/region or locality where HP has a support presence for this product and where HP has marketed this
product. The level of warranty service you receive may vary according to local standards. HP will not alter form, fit
or function of the product to make it operate in a country/region for which it was never intended to function for
legal or regulatory reasons.
TO THE EXTENT ALLOWED BY LOCAL LAW, THE REMEDIES IN THIS WARRANTY STATEMENT ARE
YOUR SOLE AND EXCLUSIVE REMEDIES. EXCEPT AS INDICATED ABOVE, IN NO EVENT WILL HP OR ITS
SUPPLIERS BE LIABLE FOR LOSS OF DATA OR FOR DIRECT, SPECIAL, INCIDENTAL, CONSEQUENTIAL
(INCLUDING LOST PROFIT OR DATA), OR OTHER DAMAGE, WHETHER BASED IN CONTRACT, TORT, OR
OTHERWISE. Some countries/regions, states or provinces do not allow the exclusion or limitation of incidental or
consequential damages, so the above limitation or exclusion may not apply to you.
ENWW Hewlett-Packard limited warranty statement 281
THE WARRANTY TERMS CONTAINED IN THIS STATEMENT, EXCEPT TO THE EXTENT LAWFULLY
PERMITTED, DO NOT EXCLUDE, RESTRICT OR MODIFY AND ARE IN ADDITION TO THE MANDATORY
STATUTORY RIGHTS APPLICABLE TO THE SALE OF THIS PRODUCT TO YOU.
282 Appendix B Service and support ENWW
Print Cartridge and Imaging Drum Limited Warranty Statement
This HP product is warranted to be free from defects in materials and workmanship.
This warranty does not apply to products that (a) have been refilled, refurbished,
remanufactured, or tampered with in any way, (b) experience problems resulting from
misuse, improper storage, or operation outside of the published environmental specifications
for the printer product, or (c) exhibit wear from ordinary use.
To obtain warranty service, please return the product to place of purchase (with a written
description of the problem and print samples) or contact HP customer support. At HP’s
option, HP will either replace products that prove to be defective or refund your purchase
price.
TO THE EXTENT ALLOWED BY LOCAL LAW, THE ABOVE WARRANT Y IS EXCLUSIVE
AND NO OTHER WARRANTY OR CONDITION, WHETHER WRITTEN OR ORAL, IS
EXPRESSED OR IMPLIED AND HP SPECIFICALLY DISCLAIMS ANY IMPLIED
WARRANTIES OR CONDITIONS OF MERCHANTABILITY, SATISFACTORY QUALITY,
AND FITNESS FOR A PARTICULAR PURPOSE.
TO THE EXTENT ALLOWED BY LOCAL LAW, IN NO EVENT WILL HP OR ITS
SUPPLIERS BE LIABLE FOR DIRECT, SPECIAL, INCIDENTAL, CONSEQUENTIAL
(INCLUDING LOST PROFIT OR DATA), OR OTHER DAMAGE, WHETHER BASED IN
CONTRACT, TORT, OR OTHERWISE.
THE WARRANTY TERMS CONTAINED IN THIS STATEMENT, EXCEPT TO THE EXTENT
LAWFULLY PERMITTED, DO NOT EXCLUDE, RESTRICT OR MODIFY AND ARE IN
ADDITION TO THE MANDATORY STATUTORY RIGHTS APPLICABLE TO THE SALE OF
THIS PRODUCT TO YOU.
ENWW Print Cartridge and Imaging Drum Limited Warranty Statement 283
Color LaserJet Image Fuser Kit and Image Transfer Kit Limited
Warranty Statement
This HP product is warranted to be free from defects in materials and workmanship until the
printer provides a low-life indicator on the control panel.
This warranty does not apply to products that (a) have been refurbished, remanufactured or
tampered with in any way, (b) experience problems resulting from misuse, improper storage,
or operation outside of the published environmental specifications for the printer product or
(c) exhibit wear from ordinary use.
To obtain warranty service, please return the product to place of purchase (with a written
description of the problem) or contact HP customer support. At HP’s option, HP will either
replace products that prove to be defective or refund your purchase price.
TO THE EXTENT ALLOWED BY LOCAL LAW, THE ABOVE WARRANTY IS EXCLUSIVE
AND NO OTHER WARRANTY OR CONDITION, WHETHER WRITTEN OR ORAL, IS
EXPRESSED OR IMPLIED AND HP SPECIFICALLY DISCLAIMS ANY IMPLIED
WARRANTIES OR CONDITIONS OF MERCHANTABILITY, SATISFACTORY QUALITY,
AND FITNESS FOR A PARTICULAR PURPOSE.
TO THE EXTENT ALLOWED BY LOCAL LAW, IN NO EVENT WILL HP OR ITS
SUPPLIERS BE LIABLE FOR DIRECT, SPECIAL, INCIDENTAL, CONSEQUENTIAL
(INCLUDING LOST PROFIT OR DATA), OR OTHER DAMAGE, WHETHER BASED IN
CONTRACT, TORT, OR OTHERWISE.
THE WARRANTY TERMS CONTAINED IN THIS STATEMENT, EXCEPT TO THE EXTENT
LAWFULLY PERMITTED, DO NOT EXCLUDE, RESTRICT OR MODIFY AND ARE IN
ADDITION TO THE MANDATORY STATUTORY RIGHTS APPLICABLE TO THE SALE OF
THIS PRODUCT TO YOU.
284 Appendix B Service and support ENWW
Availability of support and service
Around the world, HP provides a variety of service and support options for purchase.
Availability of these programs will vary depending upon your location.
HP maintenance agreements
HP has several types of maintenance agreements that meet a wide range of support needs.
Maintenance agreements are not part of the standard warranty. Support services vary by
location. Contact HP Customer Care to determine the services available to you and for more
information about maintenance agreements. In general, the device will have the following
maintenance agreements:
Onsite service agreements
To provide you with the level of support best suited to your needs, HP has on-site service
agreements with two response times:
Priority Onsite Service
This agreement provides 4-hour service response to your site for calls made during normal
HP business hours.
Next-Day Onsite Service
This agreement provides support by the next working day following a service request.
Extended coverage hours and extended travel beyond HP’s designated service zones are
available on most on-site agreements (for additional charges).
ENWW HP maintenance agreements 285
286 Appendix B Service and support ENWW
C
Device specifications
Physical specifications
Product Height Depth Width Weight
HP Color
LaserJet 2820 all-
in-one and
HP Color
LaserJet 2830 all-
in-one
523 mm
(20.6 in)
518 mm
(20.4 in)
497 mm
(19.6 in)
26.7 kg
(58.8 lbs)
HP Color
LaserJet 2840 all-
in-one with tray 2
(250-sheet)
570 mm
(22.4 in)
518 mm
(20.4 in)
497 mm
(19.6 in)
29.3 kg
(64.5 lbs)
Supplies specifications
Imaging-drum life (based on 5 percent coverage) 20,000 pages when printing only in black
5,000 pages when printing in color
6,000 to 8,000 pages is the average life
Print-cartridge life (based on 5 percent coverage) Black: 5,000 pages
Yellow, cyan, and magenta: 2,000 pages
each (HP Color LaserJet 2820 all-in-one)
Yellow, cyan, and magenta: 4,000 pages
each (HP Color LaserJet 2830 all-in-one
and HP Color LaserJet 2840 all-in-one)
Electrical specifications
Item 110-volt models 220-volt models
Power requirements 110 to 127 V (+/- 10%) 220 to 240 V (+/- 10%)
50 / 60 Hz (+/- 2 Hz) 50 / 60 Hz (+/- 2 Hz)
Power consumption (typical)
During printing (color) 224 W (average) 217 W (average)
During printing (black and
white) 400 W (average) 400 W
(average)
400 W (average) 400 W (average)
ENWW 287
Item 110-volt models 220-volt models
During standby 20 W (average) 20 W (average)
Off mode 0 W (average) 0 W (average)
Heat output
Idle 64 BTU/hr 64 BTU/hr
CAUTION
Power requirements are based on the country/region where the device is sold. Do not
convert operating voltages. This will damage the device and void the product warranty.
Environmental specifications
Recommended
1
Operating
1
Storage
1
(device and print
cartridge)
Temperature
20° to 27° C
(68° to 81° F)
15° to 32.5° C
(59° to 90.5° F)
0° to 40° C
(32° to 104° F)
Relative humidity 20 to 70 percent 10 to 80 percent 95 percent or less
1
Values are subject to change. See http://www.hp.com/support/clj2800series for current
information.
Acoustic emissions (HP Color LaserJet 2820/2830/2840 all-in-one)
Sound Power Level
Declared per ISO 9296
1
Printing (20 ppm)
L
WAd
= 6.6 Bels (A) [66 dB (A)]
SPL-Bystander Position
Declared per ISO 9296
1
Printing (20 ppm)
L
pAm
= 52 dB(A)
1
Acoustic values are subject to change. See http://www.hp.com/support/clj2800series for
current information.
Electrical specifications (continued)
288 Appendix C Device specifications ENWW
D
Regulatory information
Introduction
This section contains the following regulatory information:
Telephone Consumer Protection Act (United States)
IC CS-03 requirements
EU statement for telecom operation
New Zealand telecom statements
Environmental Product Stewardship program
Declaration of conformity (HP Color LaserJet 2820 all-in-one)
Declaration of conformity (HP Color LaserJet 2830 all-in-one and HP Color LaserJet
2840 all-in-one)
Country-/region-specific safety statements
ENWW Introduction 289
Telephone Consumer Protection Act (United States)
The Telephone Consumer Protection Act of 1991 makes it unlawful for any person to use a
computer or other electronic device, including fax machines, to send any message unless
such message clearly contains, in a margin at the top or bottom of each transmitted page or
on the first page of the transmission, the date and time it is sent and an identification of the
business, other entity, or individual sending the message and the telephone number of the
sending machine or such business, other entity, or individual. (The telephone number
provided cannot be a 900 number or any other number for which charges exceed local or
long-distance transmission charges.) In order to program this information into your facsimile,
see
Specifying the fax settings.
290 Appendix D Regulatory information ENWW
IC CS-03 requirements
Notice: The Industry Canada label identifies certified equipment. This certification means
the equipment meets certain telecommunications network protective, operational, and safety
requirements as prescribed in the appropriate Terminal Equipment Technical Requirement
document(s). The Department does not guarantee the equipment will operate to the user’s
satisfaction. Before installing this equipment, users should ensure that it is permissible for
the equipment to be connected to the facilities of the local telecommunications company.
The equipment must also be installed using an acceptable method of connection. The
customer should be aware that compliance with the above conditions may not prevent
degradation of service in some situations. Repairs to certified equipment should be
coordinated by a representative designated by the supplier. Any repairs or alterations made
by the user to this equipment, or equipment malfunctions, may give the telecommunications
company cause to request the user to disconnect the equipment. Users should ensure for
their own protection that the electrical ground connections of the power utility, telephone
lines, and internal metallic water pipe system, if present, are connected together. This
precaution can be particularly important in rural areas.
CAUTION
Users should not attempt to make such connections themselves, but should contact the
appropriate electric inspection authority, or electrician, as appropriate. The Ringer
Equivalence Number (REN) of this device is 0.7.
Notice: The Ringer Equivalence Number (REN) assigned to each terminal device provides
an indication of the maximum number of terminals allowed to be connected to a telephone
interface. The termination on an interface may consist of any combination of devices subject
only to the requirement that the sum of the Ringer Equivalence Number of all the devices
does not exceed five (5.0). The standard connecting arrangement code (telephone jack
type) for equipment with direct connections to the telephone network is CA11A.
ENWW IC CS-03 requirements 291
EU statement for telecom operation
This product is intended to be connected to the analog Public Switched Telecommunication
Networks (PSTN) of European Economic Area (EEA) countries/regions. It meets
requirements of EU R&TTE Directive 1999/5/EC (Annex II) and carries appropriate CE
conformity marking. For more details, see Declaration of Conformity issued by the
manufacturer in another section of this manual. However, due to differences between
individual national PSTNs, the product may not guarantee unconditional assurance of
successful operation on every PSTN termination point. Network compatibility depends on the
correct setting being selected by the customer in preparation of its connection to the PSTN.
Please follow the instructions provided in the user manual. If you experience network
compatibility issues, please contact your equipment supplier or Hewlett-Packard help desk in
the country/region of operation. Connecting to a PSTN termination point may be the subject
of additional requirements set out by the local PSTN operator.
292 Appendix D Regulatory information ENWW
New Zealand telecom statements
The grant of a Telepermit for any item of terminal equipment indicates only that Telecom has
accepted that the item complies with minimum conditions for connection to its network. It
indicates no endorsement of the product by Telecom, nor does it provide any sort of
warranty. Above all, it provides no assurance that any item will work correctly in all respects
with another item of Telepermitted equipment of a different make or model, nor does it imply
that any product is compatible with all of Telecom’s network services.
This equipment may not provide for the effective hand-over of a call to another device
connected to the same line.
This equipment shall not be set up to make automatic calls to the Telecom “111” Emergency
Service.
ENWW New Zealand telecom statements 293
Environmental Product Stewardship program
Ozone production
This product generates no appreciable ozone gas (O3).
Energy consumption
This product qualifies for ENERGY STAR®, which is a voluntary program established
to encourage the development of energy-efficient office products.
ENERGY STAR is a U.S. registered service mark of the U.S. Environmental Protection
Agency. As an ENERGY STAR® partner, Hewlett-Packard Company has determined that
this product meets ENERGY STAR® Guidelines for energy efficiency. For more information,
see http://www.energystar.gov.
Paper use
The manual duplex feature [two-sided printing; see
Printing on both sides (duplexing
manually) and N-up printing capability [multiple pages printed on one sheet; see Printing
multiple pages on one sheet of paper (N-up printing) can reduce paper usage and the
resulting demands on natural resources.
Plastics
Plastic parts over 25 grams are marked according to international standards that enhance
the ability to identify plastics for recycling purposes at the end of the product’s life.
HP LaserJet printing supplies
In many countries/regions, this product's printing supplies (for example, print cartridge,
imaging drum) can be returned to HP through the HP Printing Supplies Returns and
Recycling Program. An easy-to-use and free takeback program is available in over 48
countries/regions. Multi-lingual program information and instructions are included in every
new HP LaserJet print cartridge and supplies package.
HP Printing Supplies Returns and Recycling Program Information
Since 1990, the HP Printing Supplies Returns and Recycling Program has collected millions
of used HP LaserJet print cartridges that otherwise may have been discarded in the world's
landfills. The HP LaserJet print cartridges and supplies are collected and bulk shipped to our
resource and recovery partners who disassemble the cartridge. After a thorough quality
inspection, selected parts are reclaimed for use in new cartridges. Remaining materials are
separated and converted into raw materials for use by other industries to make a variety of
useful products.
U.S. returns
294 Appendix D Regulatory information ENWW
For a more environmentally responsible return of used cartridges and supplies, HP
encourages the use of bulk returns. Simply bundle two or more cartridges together and use
the single, pre-paid, pre-addressed UPS label that is supplied in the package. For more
information in the U.S., call 800-340-2445 or visit the HP Printing Supplies Returns and
Recycling Program website at: http://www.hp.com/go/recycle.
Non-U.S. returns
Non-U.S. customers should call the local HP Sales and Service Office or visit the
http://www.hp.com/go/recycle website for further information regarding availability of the
HP Printing Supplies Returns and Recycling Program.
Paper
This product is capable of using recycled papers, when the paper meets the guidelines
outlined in the HP LaserJet Printer Family Print Media Guide. Go to http://www.hp.com/
support/ljpaperguide to download this guide in PDF format. This product is suitable for the
use of recycled paper according to DIN 19309.
Material restrictions
This HP product contains mercury in the fluorescent lamp or scanner that may require
special handling at end-of-life.
This HP product contains lead in solder that may require special handling at end-of-life.
This HP product contains a battery that might require special handling at end of life.
Type: Lithium Carbon Monofluoride (solid button cell)
Weight: approx. 1 gram
Location: on formatter PC board (one battery per product)
User Removable: No
For recycling information, you can contact http://www.hp.com/go/recycle or contact your
local authorities or the Electronics Industry Alliance: http://www.eiae.org .
Nederlands
Toepassing: De batterij wordt gebruikt als reserve-energiebron voor de tijdklok (die wordt
gebruikt voor het faxgedeelte van het apparaat).
Locatie van de batterij: De batterij wordt bij de fabricage/distributie van het product op de
formatter gesoldeerd.
Voorschriften:
Richtlijn van de Europese Unie met betrekking tot batterijen: Deze batterij komt niet in
aanmerking voor de richtlijnen.
Bijzondere bepaling A45 voor UN-standaard: Deze batterij is een niet-gevaarlijk artikel.
Levensduur: De batterij is ontworpen om minstens even lang mee te gaan als het product.
Batterijfabrikanten: Rayovac, Madison, WI, USA; and Panasonic, Secaucus, NJ, USA.
ENWW Environmental Product Stewardship program 295
Het ontwerp en de specificaties kunnen zonder kennisgeving worden gewijzigd.
Taiwan
296 Appendix D Regulatory information ENWW
Declaration of conformity
Declaration of Conformity
according to ISO/IEC Guide 22 and EN 45014
Manufacturer's Name: Hewlett-Packard Company
Manufacturer's Address: 11311 Chinden Boulevard
Boise, Idaho 83714-1021, USA
declares, that the product
Product Name: HP Color LaserJet 2820 all-in-one
Regulatory Model Number
3)
:
BOISB-0408-00
Product Options: ALL
conforms to the following Product Specifications:
Safety: IEC 60950:1999 / EN60950: 2000
IEC 60825-1:1993 + A1:1996 +A2:2001 / EN 60825-1:1994 + A11:1996 + A2:2001 (Class 1 Laser/LED Product)
GB4943-1995
EMC:
CISPR 22:1998 / EN 55022:1998 - Class B
1)
EN 61000-3-2:2000
EN 61000-3-3:1995\A1:2001
EN 55024:1998\A1:2001
FCC Title 47 CFR, Part 15 Class B
2)
/ ICES-003, Issue 3 GB9254-1998
Supplementary Information:
The product herewith complies with the requirements of the EMC Directive 89/336/EEC, the Low Voltage Directive 73/23/EEC and carries the
CE-Marking accordingly.
1) The product was tested in a typical configuration with Hewlett-Packard Personal Computer Systems. Compliance testing of product to
standard with exception of Clause 9.5, which is not yet in effect.
2) This Device complies with Part 15 of the FCC Rules. Operation is subject to the following two Conditions: (1) this device may not cause
harmful interference, and (2) this device must accept any interference received, including interference that may cause undesired operation.
3) For regulatory purposes, this product is assigned a Regulatory model number. This number should not be confused with the marketing
name or the product number(s).
Boise, Idaho , USA
December 1, 2004
For regulatory topics only:
Australia Contact:
Product Regulations Manager, Hewlett-Packard Australia Ltd., 31-41 Joseph Street Blackburn, Victoria 3130, Australia
European Contact: Your Local Hewlett-Packard Sales and Service Office or Hewlett-Packard GmbH, Department HQ-TRE / Standards
Europe, Herrenberger Strasse 140 , D-71034, Böblingen (FAX: +49-7031-14-3143)
USA Contact:
Product Regulations Manager, Hewlett-Packard Company, PO Box 15, Mail Stop 160 Boise, Idaho 83707-0015,
(Phone: 208-396-6000)
ENWW Declaration of conformity 297
Declaration of conformity
Declaration of Conformity
according to ISO/IEC Guide 22 and EN 45014
Manufacturer's Name: Hewlett-Packard Company
Manufacturer's Address: 11311 Chinden Boulevard
Boise, Idaho 83714-1021, USA
declares, that the product
Product Name: HP Color LaserJet 2830 and 2840 all-in-one
Regulatory Model Number
3)
:
BOISB0408-01
Product Options: ALL
conforms to the following Product Specifications:
Safety: IEC 60950:1999 / EN60950: 2000
IEC 60825-1:1993 + A1:1996 +A2:2001 / EN 60825-1:1994 + A11:1996 + A2:2001 (Class 1 Laser/LED Product)
GB4943-1995
EMC:
CISPR 22:1998 / EN 55022:1998 - Class B
1)
EN 61000-3-2:2000
EN 61000-3-3:1995\A1:2001
EN 55024:1998\A1:2001
FCC Title 47 CFR, Part 15 Class B
2)
/ ICES-003, Issue 3 GB9254-1998
TELECOM: TBR-21:1998; EG 201 121:1998
Supplementary Information:
The product herewith complies with the requirements of the EMC Directive 89/336/EEC, the Low Voltage Directive 73/23/EEC, the R&TTE
Directive 1999/5/EC (Annex II) and carries the CE-Marking accordingly.
1) The product was tested in a typical configuration with Hewlett-Packard Personal Computer Systems. Compliance testing of product to
standard with exception of Clause 9.5, which is not yet in effect.
2) This Device complies with Part 15 of the FCC Rules. Operation is subject to the following two Conditions: (1) this device may not cause
harmful interference, and (2) this device must accept any interference received, including interference that may cause undesired operation.
3) For regulatory purposes, this product is assigned a Regulatory model number. This number should not be confused with the marketing
name or the product number(s).
Boise, Idaho , USA
December 1, 2004
For regulatory topics only:
Australia Contact:
Product Regulations Manager, Hewlett-Packard Australia Ltd., 31-41 Joseph Street Blackburn, Victoria 3130, Australia
European Contact: Your Local Hewlett-Packard Sales and Service Office or Hewlett-Packard GmbH, Department HQ-TRE / Standards
Europe, Herrenberger Strasse 140 , D-71034, Böblingen (FAX: +49-7031-14-3143)
USA Contact:
Product Regulations Manager, Hewlett-Packard Company, PO Box 15, Mail Stop 160 Boise, Idaho 83707-0015,
(Phone: 208-396-6000)
298 Appendix D Regulatory information ENWW
Country-/region-specific safety statements
Laser safety statement
The Center for Devices and Radiological Health (CDRH) of the U.S. Food and Drug
Administration has implemented regulations for laser products manufactured since August 1,
1976. Compliance is mandatory for products marketed in the United States. The printer is
certified as a "Class 1" laser product under the U.S. Department of Health and Human
Services (DHHS) Radiation Performance Standard according to the Radiation Control for
Health and Safety Act of 1968.
Since radiation emitted inside the printer is completely confined within protective housings
and external covers, the laser beam cannot escape during any phase of normal user
operation.
WARNING!
Using controls, making adjustments, or performing procedures other than those specified in
this user guide may result in exposure to hazardous radiation.
Canadian DOC statement
Complies with Canadian EMC Class B requirements.
«Conforme àla classe B des normes canadiennes de compatibilité électromagnétiques
(CEM).»
Korean EMI statement
ENWW Country-/region-specific safety statements 299
Finnish laser statement
LASERTURVALLISUUS
LUOKAN 1 LASERLAITE
KLASS 1 LASER APPARAT
HP Color LaserJet 2820/2830/2840 -laserkirjoitin on käyttäjän kannalta turvallinen luokan 1
laserlaite. Normaalissa käytössä kirjoittimen suojakotelointi estää lasersäteen pääsyn
laitteen ulkopuolelle.
Laitteen turvallisuusluokka on määritetty standardin EN60825-1 (1994) mukaisesti.
VAROITUS!
Laitteen käyttäminen muulla kuin käyttöohjeessa mainitulla tavalla saattaa altistaa käyttäjän
turvallisuusluokan 1 ylittävälle näkymättömälle lasersäteilylle.
VARNING!
Om apparaten används på annat sätt än i bruksanvisning specificerats, kan användaren
utsättas för osynlig laserstrålning, som överskrider gränsen för laserklass 1.
HUOLTO
HP Color LaserJet 2820/2830/2840 -kirjoittimen sisällä ei ole käyttäjän huollettavissa olevia
kohteita. Laitteen saa avata ja huoltaa ainoastaan sen huoltamiseen koulutettu henkilö.
Tällaiseksi huoltotoimenpiteeksi ei katsota väriainekasetin vaihtamista, paperiradan
puhdistusta tai muita käyttäjän käsikirjassa lueteltuja, käyttäjän tehtäväksi tarkoitettuja
ylläpitotoimia, jotka voidaan suorittaa ilman erikoistyökaluja.
VARO!
Mikäli kirjoittimen suojakotelo avataan, olet alttiina näkymättömälle lasersäteilylle laitteen
ollessa toiminnassa. Älä katso säteeseen.
VARNING!
Om laserprinterns skyddshölje öppnas då apparaten är i funktion, utsättas användaren för
osynlig laserstrålning. Betrakta ej strålen.
Tiedot laitteessa käytettävän laserdiodin säteilyominaisuuksista:
Aallonpituus 770-800 nm
Teho 5 mW
Luokan 3B laser
300 Appendix D Regulatory information ENWW
Glossary
ADF
Automatic document feeder. The ADF is used to automatically feed originals
into the device for copying, scanning, or faxing.
all-in-one
A designation given to HP devices that can perform several functions, such
as printing, faxing, copying, and scanning.
browser
Short for Web browser, a software program that is used to locate and open
Web pages.
collate
The process of printing a multiple-copy job in sets. When collate is selected,
the device prints an entire set before printing additional copies. Otherwise,
the device prints the specified number of copies of one page before printing
the subsequent pages.
comma (,)
A comma in a fax dial sequence indicates that the device will pause at that
point in the dialing sequence.
contrast
The difference between the dark and light areas of an image. The lower the
number value, the more closely the shades resemble each other. The higher
the number, the more the shades appear separate from each other.
dedicated line
A single telephone line that is used exclusively for either voice calls or fax
calls.
DIMM
Dual inline memory module, a small circuit board that holds memory. A
single in-line memory module (SIMM) has a 32-bit path to the memory,
whereas a DIMM has a 64-bit path.
distinctive ring
A service offered by some telephone companies in some regions/countries
that allows two or three phone numbers to be set up on the same telephone
line. Each phone number has a different ring pattern, and the fax machine
can be configured to recognize the distinctive ring of the fax number.
dots per inch (dpi)
A measurement of resolution that is used for printing. Generally, more dots
per inch result in a higher resolution, more visible detail in the image, and a
larger file size.
DSL
Digital subscriber line, a technology that enables a high-speed, direct
connection to the Internet through telephone lines.
ENWW Glossary 301
e-mail (electronic mail)
An abbreviation for electronic mail. Software that can be used to
electronically transmit items over a communications network.
fax
An abbreviation of facsimile. The electronic encoding of a printed page and
the transmission of the electronic page over a telephone line. The device
software can send items to electronic fax programs, which require a modem
and fax software.
fax functions
Fax-related tasks that are done from the control panel or software that affect
only the current job, or are done only once before returning to the Ready
state, such as clearing memory. These functions are in their own section in
the control-panel menu.
fax settings
Fax-related items that, when set or changed, continue to use the choice
made until changed again. An example would be the number of times set for
the device to redial a busy number. These settings are in their own section of
the control panel menu.
file format
The way the contents of a file are structured by a program or group of
programs.
grayscale
Shades of gray that represent light and dark portions of an image when color
images are converted to grayscale; colors are represented by various
shades of gray.
halftone
An image type that simulates grayscale by varying the number of dots.
Highly colored areas consist of a large number of dots, while lighter areas
consist of a smaller number of dots.
HP Director
A software screen that is used when working with documents. When the
document is loaded into the automatic document feeder (ADF) and the
computer is connected directly to the device, the HP Director appears on the
computer screen to initiate faxing, copying, or scanning.
HP Toolbox
The HP Toolbox is a Web page that opens in a Web browser and provides
access to the device management and troubleshooting tools, embedded
Web server, and device documentation. HP Toolbox does not support
Windows 98, Windows ME, or Macintosh operating systems.
ISDN
Integrated Services Digital Network (ISDN) is a suite of internationally
adopted standards for end-to-end digital communication over the public
telephone network.
link
A connection to a program or device that can be used to send information
from the device software to other programs, such as e-mail, electronic fax,
and OCR links.
302 Glossary ENWW
optical character recognition (OCR) software
OCR software converts an electronic image of text, such as a scanned
document, into a form that word processor, spreadsheet, and database
programs can use.
pixels per inch (ppi)
A measurement of resolution that is used for scanning. Generally, more
pixels per inch result in a higher resolution, more visible detail in the image,
and a larger file size.
printer driver
A printer driver is a program that software programs use to gain access to a
device’s features. A printer driver translates a software program’s formatting
commands (such as page breaks and font selection) into a printer language
(such as PostScript or PCL), and then sends the print file to the device.
private branch exchange (PBX)
A small telephone switching system that typically is used by large
businesses or universities to connect all telephone extensions within the
organization. A PBX also connects to the public switched telephone network
(PSTN) and may be either manual or dial, depending on the method used by
extensions to place incoming or outgoing calls. Normally, the equipment is
owned by the customer rather than leased from the telephone company.
public switched telephone network (PSTN)
The worldwide dial-up telephone network or a portion of that network. Users
are assigned unique phone numbers, which allow them to connect to the
PSTN through local telephone exchange companies. Often, this phrase is
used when referring to data or other non-telephone services carried over a
path initially established using normal telephone signaling and ordinary
switched long-distance telephone circuits.
Readiris
An optical character recognition (OCR) program that was developed by
I.R.I.S. and that is included with the device software.
resolution
The sharpness of an image, measured in dots per inch (dpi). The higher the
dpi, the greater the resolution.
shared line
A single telephone line that is used for both voice and fax calls.
surge protector
A device that protects a power supply and communications lines from
electrical surges.
TWAIN
An industry standard for scanners and software. By using a TWAIN-
compliant scanner with a TWAIN-compliant program, a scan can be initiated
from within the program.
URL
Uniform resource locator, the global address of documents and resources on
the Internet. The first part of the address indicates what protocol to use, the
second part specifies the IP address or the domain name where the
resource is located.
ENWW Glossary 303
USB
Universal serial bus (USB) is a standard that was developed by the USB
Implementers Forum, Inc., to connect computers and peripherals. USB is
designed to concurrently connect a single computer USB port to multiple
peripherals.
watermarks
A watermark adds background text to a document that is being printed. For
example, “Confidential” can be printed in the background text of a document
to indicate that the document is confidential. A selection can be made from a
set of predefined watermarks, and the font, size, angle, and style can be
changed. The printer can place the watermark on the first page only or all
pages.
WIA
Windows Imaging Architecture (WIA) is an imaging architecture that is
available in Windows Me and Windows XP. A scan can be initiated from
within these operating systems by using a WIA-compliant scanner.
304 Glossary ENWW
Index
Symbols/Numerics
250-sheet tray. See tray 2
4-Color option 59
600 dpi print-quality setting 234
A
accessibility features 8
accessories
installation guides 2
ordering v
part numbers 274
acoustic emissions 288
activity log, fax
printing 188
troubleshooting 263
ad hoc groups, sending faxes to 79
adding paper 28
ADF
jams 231
loading originals 31
locating 9
page sizes supported 259
paper specifications 24
pickup roller assembly, cleaning 199
pickup roller assembly, replacing 197
ADF, ordering 279
adhesive labels
loading 28
output path 44
specifications 23, 48
agreements, maintenance vi, 285
alarm volume, adjusting 34
alerts
setting up 182
answer mode, setting 93
answering machines
fax settings 95
troubleshooting 261
Apple LaserWriter 8 driver 17
Apple Macintosh. See Macintosh
applications, settings 15
automatic document feeder (ADF)
jams 231
loading originals 31
locating 9
page sizes supported 259
paper specifications 24
pickup roller assembly, cleaning 199
pickup roller assembly, replacing 197
autoreduction settings, fax 96
B
background, gray 237
bands, troubleshooting 237
battery specifications 295
billing codes, fax
report, printing 190
using 106
bins, output
locating 9
selecting 44
black and white printing
selecting 41
troubleshooting 242
black and white scanning 131
Black Only option 59
blank copies, troubleshooting 255
blank pages, troubleshooting 245
blank scans, troubleshooting 250
blinking lights 217
block-fax list, printing 190
blocking faxes 97
booklets, printing 51
books
copying 72
scanning 127
both sides, printing on 50
busy signals, redialing options 91
C
cables
USB, troubleshooting 246
call report, fax
printing 188
troubleshooting 263
calling cards 80
canceling
copy jobs 63
faxes 82
print jobs 53
scan jobs 121
ENWW Index 305
capacity
output bins 44
trays 23
cardstock
printing on 44
specifications 23, 47
cartridges
features 4
HP fraud hotline 206
non-HP 205
part numbers 274
recycling 204, 294
replacing 207
status page, printing 179
status, checking 202
status, viewing with HP Toolbox 182
storage specifications 288
storing 203
warranty 283
characters, troubleshooting 240
cleaning
ADF pickup roller assembly 199
exterior 192
glass 192
lid backing 192
cleaning page, printing 193
clock, setting 76
collating copies 69
color
Automatic adjustment 58
grayscale, printing as 41
HP ImageREt 2400 57
Manual adjustment options 58
matching 60
Neutral Grays setting 59
RGB settings 59
scanning settings 130
settings 56, 58
troubleshooting 241
colored paper, specifications 46
Configuration page 178
configurations, device 4
consumables. See supplies
contracts, maintenance vi, 285
contrast settings
copy 65
fax 87
control panel
about 11
key-press volume, adjusting 35
language, selecting 32
locating 9
messages, troubleshooting 217
scanning from (Macintosh) 123
scanning from (Windows) 119
text, entering 75, 102
copying
ADF, loading originals 31
books 72
canceling 63
collating 69
contrast, adjusting 65
enlarging 66
loading originals on flatbed scanner 30
number of copies 70
photos 71
quality, adjusting 64
quality, troubleshooting 251
reducing 66
size, troubleshooting 255
starting a job 62
troubleshooting 254
two-sided originals 71
covers, document
cardstock, printing on 44
paper specifications 23
using different paper for 49
creases, troubleshooting 241
crooked pages 240, 244
curled media 240
custom paper sizes 45
customer support
Instant Support Professional Edition (ISPE) v
maintenance agreements 285
telephone numbers v
websites v
D
dark copying 252
darkness, contrast settings
copy 65
fax 87
date, setting 76
declaration of conformity 297
delaying fax sending 104
deleting faxes from memory 108
Demo page, printing 178
Detail halftone option 59
Device Settings, HP Toolbox 184
dial-tone detection settings 105
dialing
from a telephone 86
internationally 102
manually 80
pauses, inserting 102
prefixes, inserting 103
redialing automatically, settings 91
redialing manually 81
tone or pulse settings 90
troubleshooting 260
different first page 49
digital cameras, color matching 60
dimensions, device 287
306 Index ENWW
DIMMs
Configuration page 179
door, locating 9
expansion slots 4
part numbers 275
distinctive-ring settings 94
documentation 2, 280
Documentation tab, HP Toolbox 183
dots per inch (dpi)
fax 77, 88
print settings 234
specifications 6
dots, troubleshooting 236
double-sided printing 50
downloading drivers v, 16
dpi (dots per inch)
fax 77, 88
print settings 234
specifications 6
drivers
downloading v, 16
help 17
included 4
Macintosh 17
operating systems supported 14
Quick Sets 41
settings 15
uninstalling 20
Windows, features 16
drum
part numbers 274
drums
HP fraud hotline 206
non-HP 205
recycling 204
replacing 168, 209
specifications 287
status, checking 202
storing 203
warranty 283
duplexing 50
E
e-mail alerts
HP Toolbox, setting up 182
e-mail, scanning to
Macintosh 123
resolution settings 130
Windows 119
electrical specifications 287
electronic faxes
receiving 92
sending 83
embedded Web server 187
energy consumption 287, 294
Energy Star compliance 7
enlarging
copies 66
printing documents 42
envelopes
output path 44
specifications 23, 47
environmental specifications
device 288
paper 25
error messages
control panel 217
critical 225
error-correction setting, fax 114
extended warranty vi, 285
extension phones, receiving faxes from 110
F
face-down output bin. See top output bin
face-up output door. See rear output door
faded print 236
fax
activity log 188
answer mode 93
autoreduction 96
billing code report, printing 190
billing codes 106
blocked list, printing 190
blocking 97
call report, printing 188
canceling 82
contrast setting 87
delaying sending 104
deleting from memory 108
detect-dial-tone settings 105
dial prefixes 103
dialing, tone or pulse 90
error-correction 114
extension phone receiving 110
forwarding 109
glass-size setting 89
group-dial entries 78, 99
header, setting 75, 76
jams, troubleshooting 261
manual dialing 80
modem, models including 4
one-touch keys 98, 99
pauses, inserting 102
phone book, printing 190
polling 111
receiving to computer 92
receiving to device 85
redial settings 91
redialing manually 81
reports, printing all 191
reports, troubleshooting 263
reprinting from memory 107
resolution 77, 88
ENWW Index 307
ring patterns 94
rings-to-answer 95
sending from a telephone 86
sending from software 83
sending to multiple recipients 78
sending to one recipient 77
silence-detect mode 112
speed-dial entries 98, 99
stamp-received 113
time/date, setting 76
troubleshooting receiving 256
troubleshooting sending 259
V.34 setting 115
volume, adjusting 33, 34
Fax Settings tab, HP Toolbox 185
Fax tab, HP Toolbox 182
features 4, 6
feeding problems, troubleshooting 245
file, scanning to
Macintosh 124
first page, different 49
Fit to Page setting
faxing 96
printing 42
flashing lights 217
flatbed scanner
cleaning 192
default glass-size, setting 89
loading 30
folder, scanning to
Windows 119
font DIMMs, part numbers 275
fonts, included 6
forwarding faxes 109
fraud hotline 206
fuser, ordering 279
grayscale
Neutral Grays setting 59
G
Getting started guide 2
glass, cleaning 192
glass-size setting 89
glossary of terms 301
glossy paper 46
gray background, troubleshooting 237
grayscale
printing in 41
scanning 131
troubleshooting 242
group-dial entries
adding 99
deleting 100
list of, printing 190
sending faxes to 78
guides, documentation 2
H
halftone options 59
header, fax 75, 76
heavy paper
printing on 44
specifications 23, 47
help
documentation 2
drivers 17
HP fraud hotline 206
HP ImageREt 2400 57
HP Instant Support Professional Edition (ISPE) v
HP LaserJet Tough paper 48
HP Printing Supplies Returns and Recycling Program
294
HP SupportPack 285
HP Toolbox
Device Settings 184
Documentation tab 183
Fax Settings tab 185
Fax tab 182
HP Toolbox links 185
Network Settings tab 185
opening 181
operating systems supported 14
Other links 185
Print Settings tab 184
Status tab 182
System Settings tab 184
toner level, checking from 202
Troubleshooting tab 183
HP-Authorized Dealers vi
humidity specifications
device environment 288
paper, storing 25
I
IBM OS/2 support 14
image quality
cleaning page, printing 193
copy, troubleshooting 251
print, troubleshooting 234, 235
scans, troubleshooting 247, 249
specifications 6
image quality, troubleshooting
light or dark print 252
imaging drums. See drums
index page, troubleshooting 264
index, photo 139
indicator lights, device control panel
error messages 217
information pages
Configuration 178
Demo 178
language, selecting 32
Supplies Status 179
ink cartridges. See print cartridges
308 Index ENWW
input trays
Configuration page 179
feeding problems, troubleshooting 245
included 4
loading 28
locating 9
paper specifications 23
part numbers 277
selecting 40
installation guides, accessories and supplies 2
Instant Support Professional Edition (ISPE) v
interface ports
cables, ordering 276
locating 9, 10
types included 6
international dialing 80, 102
J
jams
causes of 228
clearing 229
fax 261
locating 228
preventing 228
K
key-press volume, adjusting 35
L
labels
loading 28
output path 44
specifications 23, 48
languages
control-panel display, setting 32
user guides 280
languages, printer 6
laser safety statements 299
LaserJet Tough paper 48
LaserWriter 8 driver 17
letterhead
output path 44
specifications 46
letters, entering with control panel 75, 102
lid, cleaning 192
light copying 252
light print, troubleshooting 236
lightness
copy contrast 65
faded print, troubleshooting 236
fax contrast 87
lines, troubleshooting
copies 252
printed pages 237
scans 250
links, HP Toolbox 185
LINUX support 14
loading
originals in ADF 31
originals on flatbed scanner 30
tray 1 28
tray 2 29
localized user guides 280
logs, fax
activity 188
billing codes 190
block-fax list 190
call (last fax sent or received) 188
phone book 190
printing all 191
troubleshooting 263
loose toner, troubleshooting 239
M
Macintosh
printing from 39
scanning from device control panel 123
scanning from TWAIN-compliant software 126
scanning page-by-page 125
scanning to e-mail 123
scanning to file 124
software features 17
uninstalling software 20
versions supported 14
mailing labels
loading 28
output path 44
specifications 23, 48
maintenance agreements 285
Manual color options 58
manual dialing 80
manual duplexing 50
manual redialing 81
manuals 2, 280
matching, color 60
media
ADF, sizes supported 259
colored paper 46
curled, troubleshooting 240
custom-sized 45
default size, changing 32
envelopes 47
fax autoreduction settings 96
first page, different 49
glossy paper 46
heavy paper 47
HP LaserJet Tough paper 48
HP, part numbers 278
jams 228
labels 48
letterhead 46
loading trays 28
long 28
multiple pages per sheet 41
ENWW Index 309
output options 44
preprinted forms 46
selecting 22
specifications 23
transparencies 48
tray selection 40
troubleshooting 243
wrinkled 241
memory
Configuration page 179
deleting faxes 108
expansion slots 4
fax storage 4
part numbers 275
reprinting faxes 107
memory cards
printing pictures, troubleshooting 265
troubleshooting 264
memory cards, photo
inserting 134
Memory Enhancement technology (MEt) 7
mercury specifications 295
messages
control panel 217
messages, error 217
Microsoft Windows. See Windows
Microsoft Word, faxing from 84
models 4
monitors, color matching 60
multiple pages per sheet 41
multipurpose tray. See tray 1
N
N-up printing 41
Network Settings tab, HP Toolbox 185
Neutral Grays options 59
noise specifications 288
non-HP print cartridges 205
number of copies, changing 70
O
OCR software
installing 129
on-site service agreements 285
on/off switch, locating 9
one-touch keys, fax
deleting all 101
list of, printing 190
programming 98, 99
online customer support v
online help
documentation 2
drivers 17
operating environment, specifications 288
operating systems supported 14
optical character recognition software
installing 129
optional tray 2. See tray 2
options. See settings
ordering supplies and accessories v, 274
originals, loading
ADF 31
flatbed scanner 30
OS/2 support 14
output bins
locating 9
selecting 44
output quality
cleaning page, printing 193
copy, troubleshooting 251
print, troubleshooting 234, 235
scans, troubleshooting 247, 249
specifications 6
outside lines
dial prefixes 103
pauses, inserting 102
overhead transparencies
specifications 23, 48
ozone specifications 294
P
page-by-page scanning (Macintosh) 125
pages
blank 245
not printing 246
printing slowly 245
skewed 240, 244
pages per minute 4, 6
pages per sheet 41
paper
ADF, sizes supported 259
colored 46
curled, troubleshooting 240
custom-sized 45
default size, changing 32
fax autoreduction settings 96
first page, different 49
glossy 46
heavy 47
HP, part numbers 278
jams 228
loading trays 28
long 28
multiple pages per sheet 41
output options 44
preprinted 46
selecting 22
specifications 23
tough, HP LaserJet 48
tray selection 40
troubleshooting 243
wrinkled 241
310 Index ENWW
paper input trays
Configuration page 179
feeding problems, troubleshooting 245
included 4
loading 28
locating 9
paper specifications 23
part numbers 277
selecting 40
paper output bins
locating 9
selecting 44
part numbers
cables 276
media 278
memory 275
supplies 274
tray 2 277
user guides 280
user-replaceable parts 279
parts, user-replaceable 279
pauses, inserting 102
PCL drivers
features 6
operating systems supported 14
PDEs, Macintosh 17
personalities, included 6
phone book, fax
adding entries 98
deleting all entries 101
printing 190
phone lines
fax tone volume, adjusting 34
phone numbers
HP fraud hotline 206
HP Printing Supplies Returns and Recycling
Program 295
ordering supplies v
service vi
support v
phones
receiving faxes from 110
sending faxes from 86
photos
copying 71
index page, troubleshooting 264
memory cards, inserting 134
printing an index 139
printing directly from the memory card 137
printing, troubleshooting 265
proof sheet, printing from 138
scanning, troubleshooting 247
troubleshooting 264
physical specifications 287
pick-up rollers, ordering 279
pickup roller assembly, ADF 197, 199
pictures. See photos
pixels per inch (ppi)
scanning 130
platforms supported 14
polling faxes 111
ports
cables, ordering 276
locating 9, 10
types included 6
PostScript drivers 14
power
consumption 294
requirements 287
power connector, locating 9
power switch, locating 9
PPDs, Macintosh 17
ppi (pixels per inch)
scanning 130
prefixes, dial 103
preprinted paper
output path 44
specifications 46
print cartridges
features 4
HP fraud hotline 206
non-HP 205
part numbers 274
recycling 204, 294
replacing 207
status page, printing 179
status, checking 202
status, viewing with HP Toolbox 182
storage specifications 288
storing 203
warranty 283
print jobs, canceling 53
print media. See media
print quality
cleaning page, printing 193
settings 234
specifications 6
troubleshooting 234, 235
Print Settings tab, HP Toolbox 184
printer drivers
downloading v, 16
help 17
included 4
Macintosh 17
operating systems supported 14
Quick Sets 41
settings 15
uninstalling 20
Windows, features 16
printing
booklets 51
both sides 50
canceling 53
Macintosh 39
ENWW Index 311
photos, from a proof sheet 138
photos, from the memory card 137
photos, index of 139
troubleshooting 245, 246
Windows 38
problem solving. See troubleshooting
programs, settings 15
proof sheet
printing from 138
properties. See settings
protocol settings, fax 115
PS drivers 14
pulse-dialing 90
punctuation marks, entering with control panel 75, 102
Q
quality
cleaning page, printing 193
copy, troubleshooting 251
print settings 234
print, troubleshooting 234, 235
scans, troubleshooting 247, 249
specifications 6
Quick Sets 41
R
Readiris OCR software
installing 129
rear output door
locating 9
printing to 44
receiving faxes
activity log, printing 188
answer mode, setting 93
autoreduction settings 96
blocking 97
call report, printing 188
from telephone line 110
polling 111
reprinting 107
ring patterns, settings 94
rings-to-answer settings 95
silence-detect mode 112
stamp-received setting 113
to computer 92
to device 85
troubleshooting 256
recycling supplies 204, 294
redialing
automatically, settings 91
manually 81
reducing
copies 66
printed documents 42
refilled print cartridges 205
refilling paper 28
regulatory statements
declaration of conformity 297
laser safety 299
removing software 20
repair. See service
repetitive defects, troubleshooting 241
replacing
ADF pickup roller assembly 197
imaging drum 168, 209
print cartridges 207
reports, device
Configuration page 178
Demo page 178
language, selecting 32
Supplies Status page 179
reports, fax
activity log 188
billing codes 190
block-fax list 190
call (last fax sent or received) 188
phone book 190
printing all 191
troubleshooting 263
reprinting faxes 107
resizing documents
copying 66
printing 42
resolution
fax 77, 88
print settings 234
scanning 130
specifications 6
RGB color settings 59
ring patterns 94
ring tones
distinctive 94
volume, adjusting 34
rings-to-answer setting 95
roller assembly, ADF 197, 199
rollers, ordering 279
S
saving
settings 41
scaling documents
copying 66
printing 42
Scan to button, programming 119
scanner release button, locating 9
scanners, color matching 60
scanning
ADF, loading originals 31
black and white 131
blank pages, troubleshooting 250
books 127
canceling 121
color 130
312 Index ENWW
from device control panel (Macintosh) 123
from device control panel (Windows) 119
grayscale 131
HP Director (Windows) 122
loading originals on flatbed scanner 30
methods 118
page-by-page (Macintosh) 125
photos 127
proof sheet, troubleshooting 265
quality, troubleshooting 247, 249
resolution 130
speed, troubleshooting 249
to e-mail (Macintosh) 123
to e-mail (Windows) 119
to file (Macintosh) 124
to folder (Windows) 119
TWAIN-compliant software 126
WIA-compliant software 126
scatter, troubleshooting 241
screen color matching 60
sending faxes
activity log, printing 188
billing codes 106
call report, printing 188
canceling 82
delaying 104
forwarding 109
from software 83
from telephone 86
group-dial entries 78
manual dialing 80
to multiple recipients 78
to one recipient 77
troubleshooting 259
separation pad, ordering 279
serial number, product 179
service
agreements 285
HP-Authorized Dealers vi
part numbers 274
settings
changing 15
Configuration page 178
saving 41
saving to file 184
silence-detect mode 112
size, copy
reducing or enlarging 66
troubleshooting 255
size, device 287
sizes, media
custom 45
Fit to Page setting, faxing 96
Fit to Page setting, printing 42
supported 23
skewed pages 240, 244
slow speed, troubleshooting
faxing 263
scanning 249
smeared toner, troubleshooting 238
Smooth halftone option 59
software
downloading v, 16
HP Toolbox 181
Macintosh, features 17
operating systems supported 14
Readiris OCR, installing 129
receiving faxes 92
scanning from TWAIN or WIA 126
sending faxes 83
uninstalling 20
Windows, features 16
source, printing by 40
spaces, entering with control panel 75, 102
specifications
acoustic emissions 288
electrical 287
environmental 288
features 6
paper 23
physical 287
supplies 287
specks, troubleshooting 236
speed
fax, troubleshooting 263
printing, maximizing 43
scanning, troubleshooting 249
specifications 4, 6
speed-dial entries
deleting all 101
list of, printing 190
programming 98, 99
spots, troubleshooting 236
sRGB 60
status
alerts, HP Toolbox 182
Supplies Status page, printing 179
supplies, checking 202
viewing with HP Toolbox 182
Status tab, HP Toolbox 182
stopping printing 53
storing
device 288
paper 25
print cartridges 203
straight-through paper path 44
streaks, troubleshooting 237
supplies
HP fraud hotline 206
installation guides 2
non-HP 205
ordering v
recycling 204, 294
ENWW Index 313
replacing 207
specifications 287
status page 179
status, checking 202
status, viewing with HP Toolbox 182
storing 203
support
Instant Support Professional Edition (ISPE) v
maintenance agreements 285
telephone numbers v
websites v
SupportPack, HP 285
System Settings tab, HP Toolbox 184
T
technical support
Instant Support Professional Edition (ISPE) v
maintenance agreements 285
telephone numbers v
websites v
telephone lines
fax tone volume, adjusting 34
telephone numbers
HP fraud hotline 206
HP Printing Supplies Returns and Recycling
Program 295
ordering supplies v
service vi
support v
telephones
receiving faxes from 110
sending faxes from 86
temperature specifications
device environment 288
paper, storing 25
terminology 301
text, entering with control panel 75, 102
text, troubleshooting
misformed characters 240
time, setting 76
tone-dialing 90
toner
loose, troubleshooting 239
scatter, troubleshooting 241
smeared, troubleshooting 238
specks, troubleshooting 236
toner cartridges. See print cartridges
Toolbox. See HP Toolbox
top output bin
locating 9
printing to 44
tough paper, HP LaserJet 48
transparencies
loading 28
specifications 23, 48
tray 1
loading 28
locating 9
maximizing print speed 43
paper specifications 23
See also trays
tray 2
loading 29
locating 9
models including 4, 5
paper specifications 24
paper-length adjustment control 9
part number 277
size specifications 287
See also trays
trays
Configuration page 179
feeding problems, troubleshooting 245
included 4
loading 28
locating 9
paper specifications 23
part numbers 277
selecting 40
troubleshooting
ADF jams 231
ADF pickup roller assembly, cleaning 199
ADF pickup roller assembly, replacing 197
blank pages 245
blank scans 250
cleaning page 193
color 241
Configuration page, printing 178
control panel messages 217
copy quality 251
copy size 255
copying 254
curled media 240
Demo page, printing 178
dialing 260
faded print 236
fax error-correction setting 114
fax jams 261
fax reports 263
feeding problems 245
index page 264
jams 228
lines, copies 252
lines, printed pages 237
lines, scans 250
loose toner 239
memory cards 264
pages not printing 246
pages printing slowly 245
paper 243
print quality 234
printing photos 265
314 Index ENWW
receiving faxes 256
repetitive defects 241
scan quality 247, 249
sending faxes 259
skewed pages 240, 244
speed, faxing 263
text 240
toner scatter 241
toner smear 238
toner specks 236
USB cables 246
wrinkles 241
Troubleshooting tab, HP Toolbox 183
TrueType fonts, included 6
TWAIN-compliant software, scanning from 126
two-sided printing 50
types, media
selecting trays by 40
specifications 23
U
unblocking fax numbers 97
uninstalling software 20
UNIX support 14
USB port
locating 9, 10
troubleshooting 246
type included 6
User guide
part numbers 280
user guide
opening 2
user-replaceable parts 279
V
V.34 setting 115
vertical lines, troubleshooting 237
vertical white or faded stripes 252
voltage requirements 287
volume, adjusting 33
W
warranty
extended vi, 285
imaging drum 283
print cartridge 283
product 281
watermarks 41
wavy paper, troubleshooting 240
websites
customer support v
Electronics Industry Alliance 295
Energy Star 294
HP Printing Supplies Returns and Recycling
Program 295
ordering supplies v, 273
weight
device 287
paper specifications 23
white or faded stripes 252
WIA-compliant software, scanning from 126
Windows
drivers 16
printing from 38
scan by using HP Director 122
scanning from device control panel 119
scanning from TWAIN or WIA software 126
scanning to e-mail 119
scanning to folder 119
uninstalling software 20
versions supported 14
Word, faxing from 84
wrinkles, troubleshooting 241
ENWW Index 315
316 Index ENWW
© 2004 Hewlett-Packard Development Company, L.P.
www.hp.com
*Q3948-90901*
*Q3948-90901*
Q3948-90901
47

Hulp nodig? Stel uw vraag in het forum

Spelregels
1

Forum

HP-Color-LaserJet-2830
  • hoe kan ik printer opdrachten van uit de computer annuleren er staan er60 in de wacht ! Hoe kom ik hier vanaf ? Gesteld op 21-3-2015 om 13:39

    Reageer op deze vraag Misbruik melden
    • Dat doe je vanuit de computer ,
      Naar de printopdrachten en dan in het tabblad kijken waar de printopdrachten staan .
      En ga je op de printopdracht staan en met de rechter muis toets.
      klik op annuleren drukken.

      Gr. jan
      info@pcservice4you.nl
      Geantwoord op 16-4-2015 om 09:20

      Waardeer dit antwoord Misbruik melden
  • hoe kan ik dubbelzijdig printen Officejet Pro K8600 Gesteld op 10-12-2010 om 09:26

    Reageer op deze vraag Misbruik melden
  • Hoe printik autom meerdere enveloppen met teksst
    En hoe stel ik datin.
    Printer type H.P 2820.
    Bij voorbaat dank. Gesteld op 27-5-2010 om 14:01

    Reageer op deze vraag Misbruik melden
    • Hallo,

      Enveloppen kunnen alleen vanuit lade 1 worden afgedrukt.
      Stel het formaat van het afdrukmateriaal in de lade in op het specifieke formaat van de envelop. Volg de onderstaande richtlijnen voor goede afdrukresultaten op enveloppen en om papierstoringen in de printer te voorkomen:
      ? Plaats niet meer dan tien enveloppen tegelijk in lade 1.
      ? Het papier van de envelop mag niet zwaarder zijn dan 90 g/m2.
      ? Enveloppen moeten plat zijn. ? Gebruik geen enveloppen met vensters of klemmetjes.
      ? Enveloppen mogen niet gekreukeld zijn, inkepingen hebben of anderszins beschadigd zijn.
      ? Enveloppen met verwijderbare kleefstroken moeten lijm bevatten die bestand is tegen de hitte en druk van de fuser.
      ? Enveloppen moeten met de afdrukzijde omhoog en de bovenzijde van de envelop naar links worden geplaatst. De korte zijde moet eerst in de printer worden geplaatst.

      Groeten Jan

      pcservice4you.nl
      info@pcservice4you.nl Geantwoord op 29-1-2015 om 09:35

      Waardeer dit antwoord Misbruik melden

Misbruik melden

Gebruikershandleiding.com neemt misbruik van zijn services uitermate serieus. U kunt hieronder aangeven waarom deze vraag ongepast is. Wij controleren de vraag en zonodig wordt deze verwijderd.

Product:

Bijvoorbeeld antisemitische inhoud, racistische inhoud, of materiaal dat gewelddadige fysieke handelingen tot gevolg kan hebben.

Bijvoorbeeld een creditcardnummer, een persoonlijk identificatienummer, of een geheim adres. E-mailadressen en volledige namen worden niet als privégegevens beschouwd.

Spelregels forum

Om tot zinvolle vragen te komen hanteren wij de volgende spelregels:

Belangrijk! Als er een antwoord wordt gegeven op uw vraag, dan is het voor de gever van het antwoord nuttig om te weten als u er wel (of niet) mee geholpen bent! Wij vragen u dus ook te reageren op een antwoord.

Belangrijk! Antwoorden worden ook per e-mail naar abonnees gestuurd. Laat uw emailadres achter op deze site, zodat u op de hoogte blijft. U krijgt dan ook andere vragen en antwoorden te zien.

Abonneren

Abonneer u voor het ontvangen van emails voor uw HP Color LaserJet 2830 bij:


U ontvangt een email met instructies om u voor één of beide opties in te schrijven.


Ontvang uw handleiding per email

Vul uw emailadres in en ontvang de handleiding van HP Color LaserJet 2830 in de taal/talen: Engels als bijlage per email.

De handleiding is 3,13 mb groot.


U ontvangt de handleiding per email binnen enkele minuten. Als u geen email heeft ontvangen, dan heeft u waarschijnlijk een verkeerd emailadres ingevuld of is uw mailbox te vol. Daarnaast kan het zijn dat uw internetprovider een maximum heeft aan de grootte per email. Omdat hier een handleiding wordt meegestuurd, kan het voorkomen dat de email groter is dan toegestaan bij uw provider.

Stel vragen via chat aan uw handleiding

Stel uw vraag over deze PDF

Andere handleiding(en) van HP Color LaserJet 2830

HP Color LaserJet 2830 Snelstart handleiding - Nederlands - 48 pagina's

HP Color LaserJet 2830 Gebruiksaanwijzing - Nederlands - 352 pagina's

HP Color LaserJet 2830 Snelstart handleiding - Deutsch, English - 48 pagina's

HP Color LaserJet 2830 Gebruiksaanwijzing - Français - 52 pagina's

HP Color LaserJet 2830 Snelstart handleiding - Français, Italiano, Português, Espanôl - 48 pagina's


Uw handleiding is per email verstuurd. Controleer uw email

Als u niet binnen een kwartier uw email met handleiding ontvangen heeft, kan het zijn dat u een verkeerd emailadres heeft ingevuld of dat uw emailprovider een maximum grootte per email heeft ingesteld die kleiner is dan de grootte van de handleiding.

Er is een email naar u verstuurd om uw inschrijving definitief te maken.

Controleer uw email en volg de aanwijzingen op om uw inschrijving definitief te maken

U heeft geen emailadres opgegeven

Als u de handleiding per email wilt ontvangen, vul dan een geldig emailadres in.

Uw vraag is op deze pagina toegevoegd

Wilt u een email ontvangen bij een antwoord en/of nieuwe vragen? Vul dan hier uw emailadres in.


Info