505529
3
Verklein
Vergroot
Pagina terug
1/10
Pagina verder
Vorwort / Preface / Préface
Vielen Dank, dass Sie sich für dieses Ground Zero Produkt entschieden haben.
In der Plutonium Reference Line finden Sie ausschließlich selektierte High-End Produkte für
allerhöchste Klang- und Qualitätsansprüche.
Auf den folgenden Seiten wird ausführlich über die Funktionsweise der 2-Kanal Endstufe
GZPA REFERENCE 2 berichtet. Falls doch irgendwelche Unklarheiten bestehen sollten, können Sie
uns selbstverständlich kontaktieren. Die Kontaktdaten finden Sie auf der letzten Seite.
Thank you for choosing this Ground Zero Product.
The Reference Line stands for selected high-end products with outstanding sound-quality.
In this manual you will find detailed informations about the 2-Channel amplifier GZPA REFERENCE 2.
In case of open questions, feel free to contact us.
You can find the contact details on last page.
Merci pour choisir ce Produit de Ground Zero.
La Ligne Référence son des produits hauts de gamme choisis avec pour leur qualité de son
remarquable.
Dans ce manuel vous constaterez que des informations détaillées sur l'amplificateur à 2 Canaux GZPA
REFERENCE 2. En cas des questions ouvertes, n'hésitez pas à entrer en contact avec nous. Vous
pouvez trouver les coordonnées à la dernière page.
Ausstattung / Features / Signes Caractéristiques
1 Ohm Stabil Stereo (Gebrückt 2 Ohm) / 1 Ohm stable stereo (bridged 2 Ohm) / 1 Ohm stable Stereo (Technique de
Liaison 2 Ohm)
Geschirmtes Doppel Netzteil / Shielded dual power supply / Alimentation électrique double Protection
Selektierte High-End Transistoren / Selected High-End transistors /
Transistors Hauts de gamme Trier
Mundorf Mcap® Kondensatoren / Mundorf Mcap® Capacitors /
Mundorf Mcap ® Condensateurs
Variabler / Variable / Variable BIAS (Class A > AB)
Weisse LED Innenbeleuchtung / White LED illumination inside /
Illumination blanche à l'intérieur
Plexiglas Bodenplatte / Plexiglas bottom plate /
Fond en Plexiglas
Überhitzungs-, Überspannungs-, und Kurzschluss Schutz / Thermal, over current, speaker short, Speaker DC protection
/ Protection contre les surtensions , surchauffe et court-circuits
Regelbarer Tiefpass / Adjustable lowpass filter / Passe bas réglable
Regelbarer Hochpass / Adjustable highpass filter / Passe haut réglable
Bandpass-Funktion / Bandpass-feature / Bandpass-caractéristique
Bypass-Funktion / Bypass-feature / Bypass-caratéristique
Bass-Pegelfernbedienung / Bassremote / Télécommande déporter du Sub
Phaseshift 0 – 180° (nur bei Lowpassbetrieb nutzbar / only activated at lowpass-mode / Seulement activé en lowpass-
mode )
Temparaturabhängig gesteuerte Lüfter / Temperature-sensitive controlled fan /
contrôle de la Température par
Ventilateur
Einführung / Introduction / Introduction
Verstärker verhelfen Ihrer Car-Hifi Anlage zu einer hochwertigen Klangwiedergabe. Die flexiblen Anschlusskonfigurationen erlaubt es ihnen den
Anschluss verschiedenster Lautsprecherkombinationen.
Bitte beachten Sie hierzu unbedingt die in dieser Anleitung beschriebenen Anschlussmöglichkeiten.
Amplifiers provide high-performance sound reinforcement for your mobile audio equipment. It’s versatility enables compatibility with optional
Equalizer, Frequency Dividing Network Crossovers and other audio processors in a customized system. The Multi-Mode bridging capabilities allow
flexibility in hosting several different speaker configurations. To achieve optimum performance, it is highly recommend that you read this Owners
manual before the installation.
Grâce aux Amplificateurs votre installation Hi fi développera une meilleure qualité sonore. Les branchements flexibles vous permettront de
connecter différentes combinaisons de Haut Parleurs. Prière de bien suivre les instructions de branchement dans ce mode d’emploi.
Empfohlenes Kabel / Recommended cable / Cable Recommender
Stromkabel min. 2 x 20mm² / Power wire min. 2 x 20mm² / Câble d’alimentation min. 2 x 20 mm²
Massekabel min. 2 x 20mm² / Ground wire min. 2 x 20mm² / Câble de masse min. 2 x 20 mm²
Lautsprecherkabel min. 2 x 4 mm² / Speaker wire min. 2 x 4 mm² / Câble Haut-parleurs min. 2 x 4 mm²
Bitte unbedingt beachten / Attention / Attention s.v.p!
Fahrzeugbatterie vor der Installation abklemmen! (Hinweise in der Betriebsanleitung des KFZ beachten!)
Keine Löcher in den Tank, die Bremsleitung, Kabel oder andere wichtige Fahrzeugteile bohren
Kabel niemals über scharfe Kanten führen. Es ist empfehlenswert, die Stromversorgung der Endstufe mit einer
Zusatzbatterie zu puffern.
WARNUNG
Hochleistungsaudiosysteme in Fahrzeugen können den Schallpegel eines „Live“ Konzertes erzeugen. Dauerhaft
extrem lauter Musik ausgesetzt zu sein kann den Verlust des Hörvermögens oder Hörschäden zur Folge haben.
Das Hören von lauter Musik beim Auto fahren kann auch die Wahrnehmung (Warnsignale)beeinträchtigen. Im
Interesse der allgemeinen Sicherheit empfehlen wir das Musikhören beim Auto fahren mit geringer Lautstärke.
As a precaution it is advisable to disconnect the vehicle’s battery before making connection to the +12 Volts supply
wiring (see owner’s manual of your car for further information!)
Do not drill holes into the tank, the brake pipe, wires or other important parts of the vehicle.
Never pass wires over sharp angles. It is recommended to buffer the power supply of the amplifier with an
additionally battery.
WARNING
High powered audio systems in a vehicle are capable of generating „Live Concert“ high levels of sound pressure,
continued exposure to excessively high volume sound levels may cause hearing loss or damage. Also, operation
of a motor vehicle while listening to audio equipment at high volume levels may impair your ability to hear
external sound such as; horns, warning signals, or emergency vehicles, thus constituting to a potential traffic
hazard. In the interest of safety, Consumer Electronics recommends listening at lower volume levels while
driving.
Débrancher la batterie du véhicule avant l’installation !
Ne pas percer dans le réservoir, la canalisation freins ou autres pièces importantes du véhicule.
Ne jamais passer les cables d’alim sur des bords coupent, IL et recommender pour l’alimentation une Batterie
supplémentaires
Mise en garde
Le système audio de haute performance peut reproduire, dans les véhicules, une intensité sonore semblable a
un concert « LIVE ». Une durée extrême de musique peut provoquer la perte de l’audition ou une diminution de
celle ci. L’écoute de musique .à haut volume, en roulant, peut provoquer une diminution de l’attention. Dans
votre intérêt et votre sécurité, nous vous conseillons d’écouter la musique avec un volume réduit en conduisant.
Planung / Planning / Planification
Vor der Installation sollten Sie folgende Punkte berücksichtigen / Before beginning the installation, consider the
following / Avant l’installation ces quelques points sont à prendre en consideration:
a) Bitte beachten Sie bei der Wahl des Einbauortes, daß eine ausreichende Luftzirkulation zur Kühlung des Gerätes
gewährleistet ist. /
If you plan to expand your system by adding other components sometime in the future, ensure an equate space is
left, and cooling requirements are met. /
Attention au choix de l’emplacement du montage, une circulation d’air est nécessaire pour le bon fonctionnement des
appareils.
b) Wenn Ihr Radio mit Vorverstärkerausgängen (RCA) ausgerüstet ist, ist es ratsam diese zu benutzen. /
If your radio/source is equipped with Pre-Amp outputs, it is recommended to utilize them to drive the amplifier. /
Il est conseillé d’utiliser les sorties Pré-Ampli (RCA) de votre autoradio, si celui-ci en est munie.
Verkabelung / Wiring connection / Câblage
Achtung! / Attention! / Mise en Garde
mind. 2 x 20mm² Kabel sind für den Stromanschluss erforderlich / min. 2 x 20mm² wires are necessary for power connection! /
Min. 2 x 20mm² de Câble d’alimentation
- Masse / Ground: Der Masseanschluss sollte so kurz wie möglich direkt zur Fahrzeugkarosserie geführt werden(max.
1m) / Ground connection should be passed directly to the car body as short as possible (max. 1m) / : Le câble de
masse (min 20mm²) doit être le plus court possible (Max 1 m)
- +12 Volt: Die Stromversorgung sollte direkt zur Batterie geführt werden. Bitte achten Sie auf eine ordnungsgemäße
Absicherung der Installation mit einer Inline Sicherung mit max. Kabellänge zur Batterie von 30 cm. / Power
connection should be passed directly to the battery. Please pay attention on a correct fuse protection of the
installation with an Inline device with a max. wire length to the battery of 30 cm. / Le câble d’alimentation doit être
branche à la batterie du véhicule. N’oubliez pas d’ installer un fusible. (Max de 30 cm de la batterie)
- Remote turn on: Dieser Anschluss wird mit der Remotesteuerleitung des Radios verbunden und dient zum Ein-und
Ausschalten des Verstärkers. / This connection is getting connected with the remote control line of the radio. It is
used for turning on and off the amplifier. / A connecter a la Radio sur le câble REMOTE.
- Fan out : Hier können Sie den +12V Anschluss eines zusätzlichen, externen Lüfters anschliessen. / Connection for
the +12V connection of an additionally, external fan. / Connection for the +12V connection of an additionally,
external fan. / Connexion pour le +12V ,pour supporter un ventilateur externe
Warnung / Warning / Mise en garde
Bitte diese Systeme so Einbauen dass Elektroanbindungen vor Beschädigungen geschützt sind.
+12 Volt DC Elektrokabel müssen auf der Batterieseite abgesichert sein.
Bitte stellen Sie sicher, dass das Radio und andere Geräte ausgeschaltet sind, wenn Sie die Geräte anschließen.
Wenn es notwendig ist eine Geräte Sicherung zu erneuern, verwenden Sie nur eine gleichwertige Sicherung. Wenn eine vom Wert her andere
Sicherung benutzt wird, kann sie einen Schaden an dem ganzen System verursachen, welcher von der Garantie ausgeschlossen ist.
Investigate the layout of you automobile thoroughly before drilling or cutting any holes. Take care when you work near the thanks, lines, or
hydraulic lines, and electrical wiring. Don’t mount this system so that wire connections are unprotected or are subject to pinching or damage from
nearby objects.
The +12 Volt DC power wire must be fused at the battery positive terminal connection. Before making or breaking power connections at this
system power terminals, disconnect the +12 Volt wire at the battery end.
Confirm your radio / cassette player and / or other equip, mount is turned off while connecting the input jacks and speaker terminals. If you need
to replace the power fuse, replace it only with a fuse identical to that supplied with the system. Using a fuse of different type or rating may result
in damage to this system which isn’t covered by the warranty.
Montez ce système de façon à ce que les raccordements électroniques soient protégées d’éventuelles détériorations.
Les câbles électriques +12V DC coté batterie doivent être protégés et prenez garde à ce que la Radio et/ou autres appareils soient éteints lors du
branchement.
S’il est nécessaire de changer le fusible d’un appareil utilise des fusibles d’un ampérage approprié. N’utilisez pas de fusible a ampérage différente
à celui utilisé, cela pourrait provoquer des dommages que la garantie ne pourra couvrir.
Stromanschlüsse / Power connection / Connexion et réglage
Lautsprecher & RCA Anschlüsse / Speaker & RCA connection /
Connexion haut parleur & et réglage
2 Kanal / 2 Channel / 2 canaux
Lautsprecher & RCA Anschlüsse / Speaker & RCA connection /
Connexion haut parleur & et réglage
1 Kanal / 1 Channel / 1 canaux
Einstellung des GAIN > Eingangsempfindlichkeit /
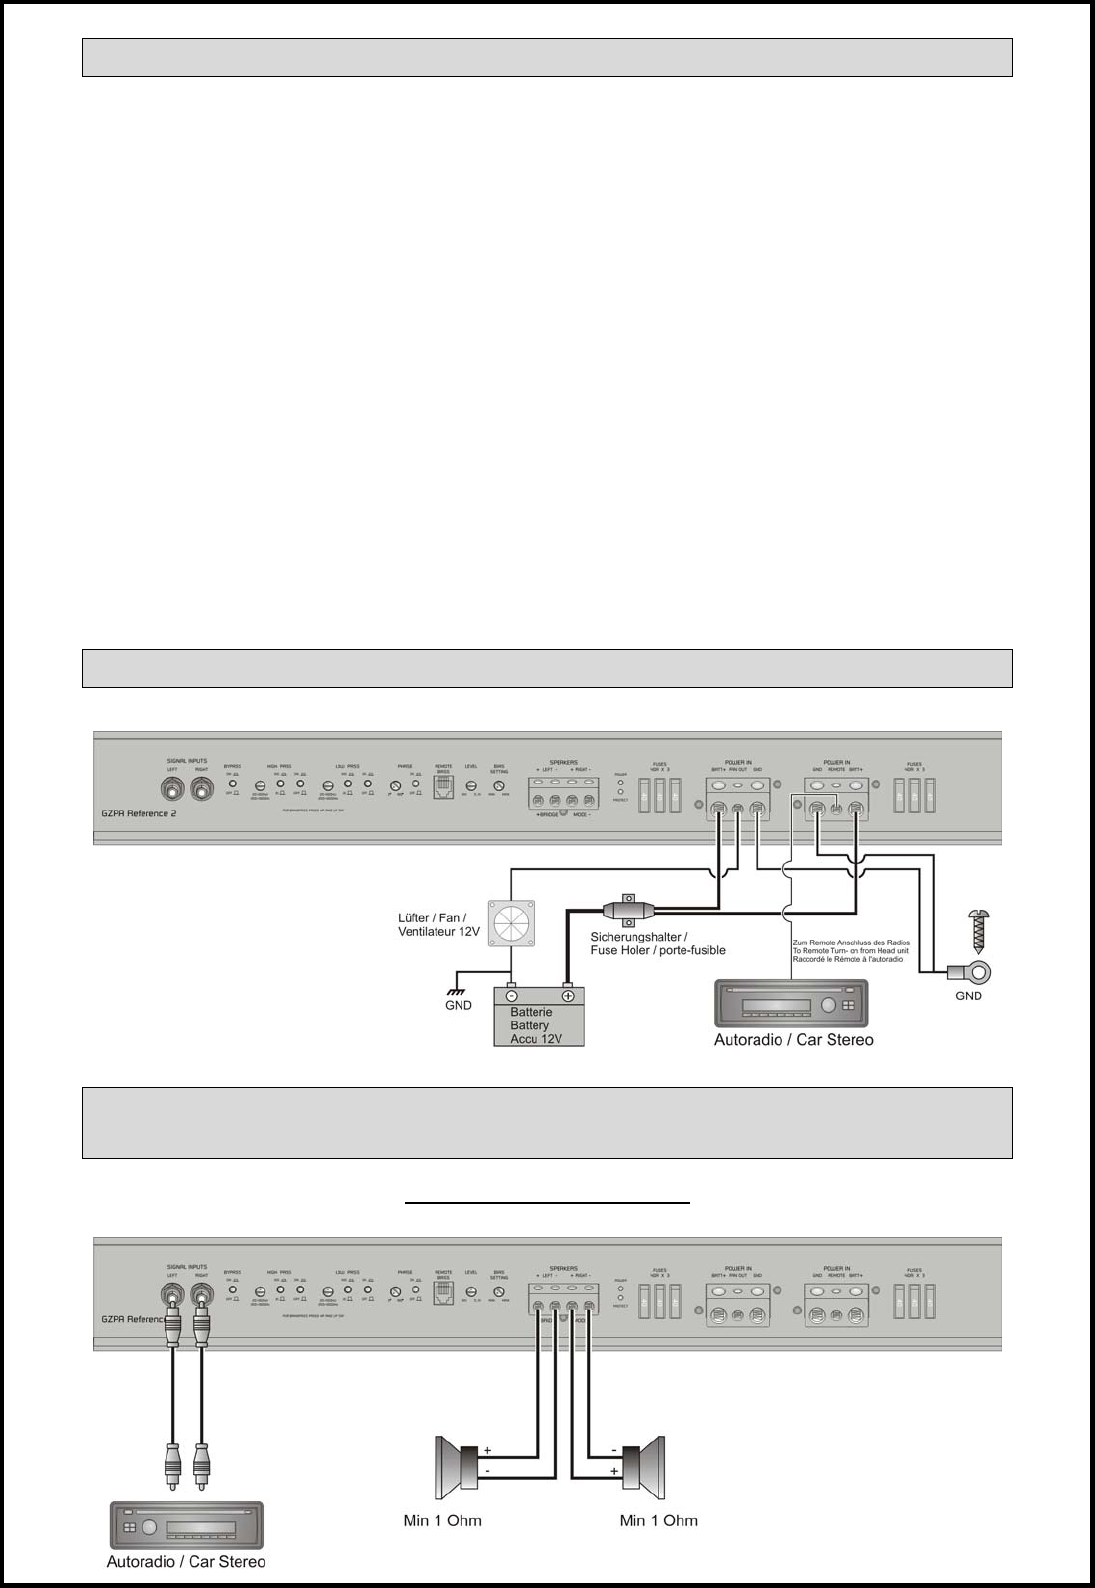
Adjusting the audio level / Régler le GAIN du Signal d’entrée
Schritt 1 Inputlevel Regler GAIN mit Linksdrehung auf MIN drehen
Schritt 2 Drehen sie jetzt die Lautstärke am Radio auf 2/3 der max. Höchstlautstärke
Schritt 3 Stellen sie jetzt am Inputlevel Regler GAIN die Lautstärke auf einen angenehmen Pegel ein.
Step 1 Turn the input Level GAIN counter- clockwise to MIN position
Step 2 Turn the auto sound system’s volume control to about two-third of its full range
Step 3 Adjust the volume to a comfortable listening level at the input level GAIN controller
Étape 1 Régulateur GAIN avec rotation sur la gauche, positionner sur MIN.
Étape 2 Augmenter le Volume de la Radio sur 2/3 du volume maximum.
Étape 3 Positionner maintenant le Régulateur GAIN sur un niveau de son agréable à entendre.
Einstellung des BIAS / Adjusting the BIAS / Régler le BIAS
Das Bias-Setting beeinflusst den Arbeitsmode des Verstärkers.
Es lässt sich von MIN > Class AB stufenlos zu MAX > Class A regeln. Im Class A Betrieb klingt der Verstärker wärmer, im
Class AB Betrieb eher knackig und direkt. Im Class A Betrieb steigt zudem auch die Stromaufnahme und die
Wärmeentwicklung. Die Ausgangsleistung ändert sich abhängig von der BIAS-Einstellung nicht
!
The BIAS-Setting controls the operation mode of the amplifier.
It is continuously adjustable from MIN > Class AB to MAX > Class A. The sound is warmer at Class A mode and more firm
and directly at Class AB mode. Please note that the current consumption and the heat build-up is higher at Class A mode.
The Powerrating will not
change dependend on BIAS-Setting.
Le CADRE(L'ARRANGEMENT) DE DÉPLACEMENT contrôle le mode d'opération de l'amplificateur.
. C'est continuellement réglable de la Classe 'AB à la Classe A. Le son est plus chaud en Classe A. En mode AB plus ferme
et directe en mode d'AB. Notez s'il vous plaît que la consommation actuelle et le développement de chaleur sont plus hauts en
mode Classe A. Le Powerrating ne changera paspendent sur le CADRE (l'ARRANGEMENT) DE DÉPLACEMENT
Bypass-Funktion / Bypass-Function / Function Bypass
Mit dem BYPASS Schalter umgehen Sie alle, auf den Klang Einfluss nehmenden Regler und Schalter. Bei ON –Stellung des
BYPASS Schalters sind alle Filter und Funktionen, bis auf BIAS SETTING und LEVEL ausgeschaltet. Dies ermöglicht maximale
PURE Sound Quality. / The BYPASS allows to switch off all the potentiometers and switches that can affect the sound quality.
If you choose the ON –position of the BYPASS switch, all the filters and functions are switched off except the BIAS SETTING
and LEVEL. / Le BYPASS permet d'éteindre tous les potentiomètres et les commutateurs qui peuvent affecter la qualité du
son. Si vous choisissez on - la position du commutateur BYPASS , tous les filtres et autres fonctions son éteinte sauf le
NIVEAU de GAIN
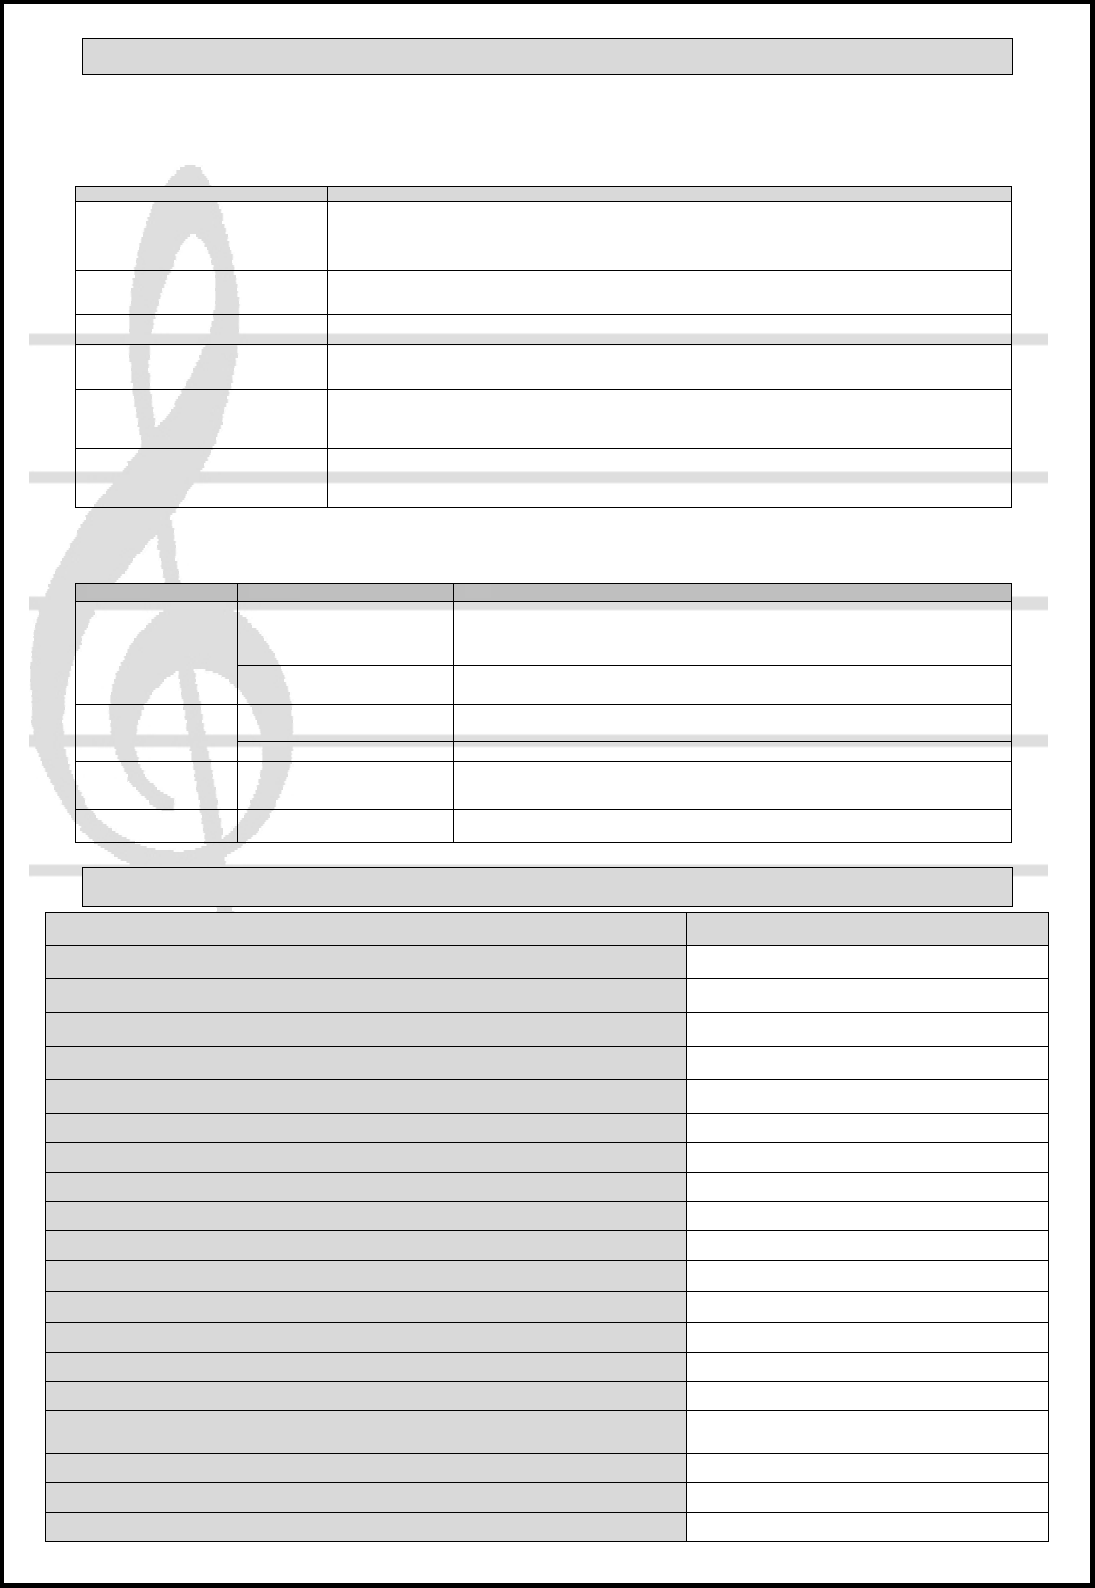
Phaseshift & Bassremote
Bitte beachten Sie, dass Phaseshift und die Bass Pegelfernbedienung nur bei eingeschaltetem Lowpass nutzbar
sind / please note that phase shift and bassremote are solely usable at lowpass-mode switched on / Notez que le
changement de phase et bassremote sont seulement utilisables en mode lowpass
Wenn irgendetwas nicht funktioniert
Dieser Verstärker hat Schutzfunktionen die Schäden durch unsachgemäße Bedienung oder Bedingungen verursacht werden. Wenn das Gerät extreme Hitzeentwicklung,
einen Kurzschluss oder eine Überladung feststellt, leuchten die Protection LEDs und das System schaltet sich ab.
Um das auftretende Problem zu prüfen sollten Sie alle Regler zurückdrehen, die Stromversorgung abklemmen und die Installation sorgfältig auf Kurzschlüsse oder falsche
Anschlüsse prüfen.
Wenn sich das Gerät aufgrund hoher Hitze abschaltet leuchten die Protection LEDs nicht. In diesem Fall lassen Sie dem Gerät einfach Zeit um abzukühlen.
Beachten Sie die folgende Tabelle, bevor Sie das Gerät ausbauen. Testen Sie immer die Lautsprecher und Verkabelung an erster Stelle.
Problem Kontrolle Hilfe
Kein Ton
Leuchtet die PWR LED ?
Sicherung Prüfen
Remote Kabel prüfen
+12Volt prüfen
Masse prüfen
Leuchtet die PROT LED ?
Kurzschluss am Lautsprecher
Gerät Überhitzt
Gerät defekt
Verstärker schaltet nicht
ein
Keine Stromzufuhr
Sicherung Prüfen
+12Volt prüfen
Masse prüfen
Keine Spannung am Remote Remote am Radio prüfen
Verstärker schaltet bei
Lautstärke ab
Lautsprecherimpedanz prüfen Prüfen Sie, ob der Widerstand am LS Terminal von 2 nicht unterschritten wird
Ton Fehlt an einem Kanal Cinch / Lautsprecherkabel prüfen Kabel /Stecker beschädigt
Trouble shooting / En cas… de non fonctionnement
This power amplifier has protection features to prevent any damages from misuse or faulty conditions. If the unit senses excessive heat, short circuited speakers or
overload, the protection indicators will light, and the system will be turned off. In order to check the occurred problem, you should turn all levels down and all power off
and carefully check the installation for wiring mistakes or short. If the amplifier shuts down due to excessive heat, the protection indicators will not light: simply allow time
for the unit to cool. Before removing your amplifier, refer to the list below and follow the suggested procedures.
Always test the speakers and their wires first.
Problem Check points
Amplifier is
not powered up
Check that there is battery power on the +12V terminal.
Check that remote terminal has at least +12V DC remote connection.
Check a good ground connection. Check all fuses.
Check the protection LED is not lit.
Protection LED illuminates
when amplifier is powered up
Check shorts on speaker wires.
Remove speaker wires and reset the amplifier. If the protection LED still comes on, then the amplifier is faulty.
Fuse blowing
Check that the minimum speaker impedance is correct.
Check short on power cable and vehicle chassis.
Overheating
Check that the minimum speaker impedance is correct.
Check speaker shorts.
Check that there is a good airflow around the amplifier.
Sound too low / Distorted
sound
Check that the input level control is set to match the output level of the unit.
Check the head unit volume.
Check speaker shorts.
Check that crossover frequencies have been properly set.
High hiss /
engine noise
in speakers
Check a good ground and for speaker shorts.
Disconnect all RCA inputs from the amplifier. If hiss/noise disappears, check it with a good RCA interconnect.
Then check the component driving the amplifier.
Cette amplificateur et équiper de protection pour éviter tous dégâts en cas de mauvaise manipulation .Si l’ampli détecte une anomalie (court-circuits – surchauffe ) l’ampli
se coupe automatiquement . Pour examiner le problèmes vérifier tous vos branchements , le temps que l’ampli refroidisse . vérifier en premier les Haut parleurs puis tous
les câbles d’alimentation . si le problèmes persiste consulter un technicien.
Problèmes Contrôle
A
ide
Pas de son
Voyant PWR allumé? Vérifier le fusible, Contrôler le Câble REMOTE, Contrôler le+12Volt et la masse
Le Voyant PROTECTION est
allumé ?
Court circuit des Haut-parleurs, ampli surchauffe ou défectueux
Amplificateur ne se
met Pas en marche
Pas d’alimentation Vérifier le + 12 volt, la masse, le fusible
Pas d’alimentation sur le REMOTE rifier le REMOTE sur l’Autoradio
Ampli se met en
PROTECTION a haut
Volume
Vérifier l’Impédance des Haut-
parleurs
Vérifier si l’Impédance sur les connecteurs des haut-parleurs n’est pas en dessous de 2
Vérifier si l’Impédance sur les connecteurs des haut-parleurs n’est pas en dessous de 1
Pas de son sur 1 canal
Vérifier câble RCA et ou câble Haut-
parleurs
Câble ou prise (RCA) défectueux
Technische Daten / Specifications / Données Technique
Model GZPA Reference 2
RMS Power @ 4 , 1% THD / 10% THD
CEA Standard CEA-2006-A
2 x 420W / 2 x 500W
RMS Power @ 2 , 1% THD / 10% THD
CEA Standard CEA-2006-A
2 x 750W / 2 x 900W
RMS Power @ 1 , 1% THD / 10% THD
CEA Standard CEA-2006-A
2 x 1150W / 2 x 1350W
RMS Power @ 4 Gebrückt
,
1% THD / 10% THD
CEA Standard CEA-2006-A
1 x 1500W / 1 x 1800W
RMS Power @ 2 Gebrückt
,
1% THD / 10% THD
CEA Standard CEA-2006-A
1 x 2300W / 1 x 2700W
Dämpfungsfaktor / Damping factor / Damping Facteur
> 250
Signal to noise Ratio / Signal to noise ratio Signal / noise Ratio
> 75 dB
Tiefpass Weiche / Lowpass crossover / Filtre passe bas réglables
20 Hz – 400 Hz / 200 Hz – 4000 Hz
Hochpass Weiche / Highpass crossover / Filtre passe haut réglable
20 Hz – 400 Hz / 200 Hz – 4000 Hz
Bandpassfilter / Filtre passe-bande
20 Hz – 4000 Hz
Phaseshift
0 – 180°
BIAS
Class AB > Class A
Frequenzgang / Frequency response / Fréquence
10 Hz – 30 KHz
Wirkungsgrad / Efficiency / Efficaciter @ 4
80 %
Betriebsspannung / Operating voltage / Tension d´emploi
10 – 16 V DC
Eingangsempfindlichkeit / Input sensitivity / Sensibilité d’entrer
100 mV – 10 V
(± 5%)
Sicherung / Fuse / Fusible
6 x 40A
Abmessungen / Dimensions B x H x L mm
236 x 67.5 x 590
Abmessungen / Dimensions B x H x L inch
9.29“ x 2.66“ x 23.23“
Zertifikat - Certificate - Certificat
GZPA Reference 2
Serialnr : _________________ Date : _________________
Technician : ____________________
Power Rating at 14.4V, 1% THD
CEA Standard CEA-2006-A
Front
4 OHM 2 OHM 1 OHM
Left
Right
Die Gewährleistung entspricht der gesetzlichen Regelung. Eine Rücksendung kann nur nach vorheriger Absprache und in der Originalverpackung erfolgen. Bitte unbedingt
einen maschinell erstellten Kaufbeleg und eine Fehlerbeschreibung beilegen. Von der Gewährleistung ausgeschlossen sind Defekte, die durch Überlastung, unsachgemäße
Behandlung oder bei Teilnahme an Wettbewerben entstanden sind.
Limited warranty - defective products must be returned in original packaging - please add a copy of the original purchasing invoice showing the purchasing date and a
detailed description of the failure. Failure caused by overload, misuse or by using the product for competition purpose are not covered by the warranty.
De garantie bepalingen van alle door ground zero geleverde producten is volgens wettelijke
bepalingen geregeld, Een retourzending kan alleen na duidelijke afspraak en in de originele
verpakking plaatsvinden.SVP een aankoopbon en een duidelijke storingsomschrijving bijvoegen.Van garantie uitgesloten zijn defecten door overbelasting, onkundig
gebruik, of door deelname aan wedstrijden (SPL) ontstaan zijn.
La garantie est conforme aux droits legaux. Un retour du produit défectueux doit être dans son
emballage d'origine sur presentation du reçu ou de la facture indiquant la description du defaut.La presente Garantie n'est pas applicable lorsque le produit a été
endommagé en raison: Mauvaise alimentation, Trop de puissance (HP,Subwoofer) Accident, Installation ou Utilisation non conforme aux normes Technique (Concours SPL
etc).
GROUND ZERO GmbH
Erlenweg 25; D - 85658 Egmating, Germany
Tel. +49 (0)8095/873 830 Fax -8310
www.ground-zero-audio.com
Wir behalten uns das Recht vor, zukünftig nötige Änderungen oder Verbesserungen an dem Produkt vorzunehmen ohne den Kunden darüber zu informieren.
We reserve the right to make needed change or improvement to the product without informing customer about this in advance.
Wij behouden ons het recht om de nodige veranderingen of verbeteringen aan het product door te voeren zonder de klant hierover te informeren.
Nous réserve le droit d'entreprendre à l'avenir nécessairement des modifications ou des
améliorations au produit sans informer le client.
3

Hulp nodig? Stel uw vraag in het forum

Spelregels

Misbruik melden

Gebruikershandleiding.com neemt misbruik van zijn services uitermate serieus. U kunt hieronder aangeven waarom deze vraag ongepast is. Wij controleren de vraag en zonodig wordt deze verwijderd.

Product:

Bijvoorbeeld antisemitische inhoud, racistische inhoud, of materiaal dat gewelddadige fysieke handelingen tot gevolg kan hebben.

Bijvoorbeeld een creditcardnummer, een persoonlijk identificatienummer, of een geheim adres. E-mailadressen en volledige namen worden niet als privégegevens beschouwd.

Spelregels forum

Om tot zinvolle vragen te komen hanteren wij de volgende spelregels:

Belangrijk! Als er een antwoord wordt gegeven op uw vraag, dan is het voor de gever van het antwoord nuttig om te weten als u er wel (of niet) mee geholpen bent! Wij vragen u dus ook te reageren op een antwoord.

Belangrijk! Antwoorden worden ook per e-mail naar abonnees gestuurd. Laat uw emailadres achter op deze site, zodat u op de hoogte blijft. U krijgt dan ook andere vragen en antwoorden te zien.

Abonneren

Abonneer u voor het ontvangen van emails voor uw Ground zero Plutonium Reference 2 bij:


U ontvangt een email met instructies om u voor één of beide opties in te schrijven.


Ontvang uw handleiding per email

Vul uw emailadres in en ontvang de handleiding van Ground zero Plutonium Reference 2 in de taal/talen: Duits, Engels, Frans als bijlage per email.

De handleiding is 0,81 mb groot.


U ontvangt de handleiding per email binnen enkele minuten. Als u geen email heeft ontvangen, dan heeft u waarschijnlijk een verkeerd emailadres ingevuld of is uw mailbox te vol. Daarnaast kan het zijn dat uw internetprovider een maximum heeft aan de grootte per email. Omdat hier een handleiding wordt meegestuurd, kan het voorkomen dat de email groter is dan toegestaan bij uw provider.

Stel vragen via chat aan uw handleiding

Stel uw vraag over deze PDF

Uw handleiding is per email verstuurd. Controleer uw email

Als u niet binnen een kwartier uw email met handleiding ontvangen heeft, kan het zijn dat u een verkeerd emailadres heeft ingevuld of dat uw emailprovider een maximum grootte per email heeft ingesteld die kleiner is dan de grootte van de handleiding.

Er is een email naar u verstuurd om uw inschrijving definitief te maken.

Controleer uw email en volg de aanwijzingen op om uw inschrijving definitief te maken

U heeft geen emailadres opgegeven

Als u de handleiding per email wilt ontvangen, vul dan een geldig emailadres in.

Uw vraag is op deze pagina toegevoegd

Wilt u een email ontvangen bij een antwoord en/of nieuwe vragen? Vul dan hier uw emailadres in.


Info