728405
27
Verklein
Vergroot
Pagina terug
1/56
Pagina verder
EN
DETAILED
INSTRUCTIONS
FOR USE OF A DRYER
www.gorenje.com
The following symbols are used throughout the manual and they have the following meanings:
Information, advice, tip, or recommendation
Warning – general danger
Warning – danger of electric shock
Warning – danger of hot surface
Warning – danger of fire
It is important that you carefully read the instructions.
Life is complicated today. Let's make at least laundry care simple!
Your new WaveActive dryer uses innovative technology and
the latest achievements in laundry care to help you simplify your
daily household chores. The WaveActive technology offers the
gentlest care for any garment, with minimum creasing. Moreover,
your new dryer is also friendly to the environment as it uses power
in the most economical way possible.
This dryer is intended solely for household use. Please do not use
it to dry clothes that are not suitable for machine drying.
3
TABLE OF CONTENTS
624905
DRYING
PROCESS,
STEP BY STEP
INTRODUCTION
TROUBLE-
SHOOTING
PREPARING
THE DRYER
BEFORE FIRST
USE
MISCELLANE-
OUS
4 SAFETY PRECAUTIONS
12 DESCRIPTION OF THE DRYER
13 Technical information
14 Control unit
16 INSTALLATION AND CONNECTION
16 Selecting the room
19 Adjusting the dryer feet
20 Draining the condensate
21 Connecting to the power mains
22 Moving and transport after installation
23 BEFORE USING THE APPLIANCE FOR THE FIRST TIME
24 DRYING PROCESS, STEP BY STEP (1 - 6)
24 Step 1: Heed the labels on the laundry
25 Step 2: Preparing for the laundry drying process
29 Step 3: Choosing the drying programme
32 Step 4: Selecting extra functions
37 Step 5: Starting the drying programme
37 Step 6: End of the drying programme
38 INTERRUPTIONS AND CHANGING THE PROGRAMME
40 MAINTENANCE & CLEANING
41 Cleaning the net filter in the door
42 Cleaning the condenser unit
43 Emptying the condensate tank
44 Cleaning the dryer
45 TROUBLESHOOTING
45 What to do ...?
46 Troubleshooting table
49 Servicing
50 TIPS FOR DRYING AND ECONOMIC USE YOUR DRYER
51 DISPOSAL
52 TYPICAL CONSUMPTION TABLE
DRYER
CLEANING AND
MAINTENANCE
4
SAFETY PRECAUTIONS
624905
Carefully read the instructions for use before using the
dryer.
Please, do not use the dryer without reading and
understanding these instructions for use first.
These instructions for use of a dryer are supplied with
different types or models of dryers. Therefore, they may
include descriptions of settings or equipment that are not
available in your dryer.
Failure to observe the instructions for use or inappropriate
use of the dryer may result in damage to the laundry or the
appliance, or injury to the user. Keep the instruction manual
handy, near the dryer.
Instructions for use are available on our website at
www.gorenje.com.
Your dryer is intended solely for household use. If the
dryer is used for professional, for-profit purpose or purpose
exceeding normal use in a household, or if the dryer is used
by a person who is not a consumer, the warranty period shall
be equal to the shortest warranty period required by relevant
legislation.
5
624905
Follow the instructions for correct installation of the Gorenje
dryer and connection to the power mains (see chapter
»INSTALLATION AND CONNECTION«).
All and any repairs or maintenance tasks on the dryer should
only be done by trained experts. Unprofessional repair may
result in an accident or major malfunction.
To avoid danger, a damaged power cord may only be
replaced by the manufacturer, a service technician, or an
authorized person.
After installation, the dryer should stand still for two
hours before it is connected to the power mains.
At least two persons are required to install the tumble dryer
on top of a washing machine.
The dryer may not be connected to the power mains using
an extension cord.
Do not connect the tumble dryer to an electrical outlet
intended for an electric shaver or a hair dryer.
Do not connect the dryer to power mains using an external
switching device such as a programme timer, or connect it
to power mains that is regularly switched on and off by the
power supply provider.
In case of a defect, only use approved spare parts by
authorized manufacturers.
6
624905
In case of incorrect dryer connection, incorrect use, or
servicing by an unauthorized person, the user shall bear the
cost of any damage as such damage shall not be covered by
warranty.
Always use the ducts or hoses supplied with the dryer.
Install the dryer in a room with adequate ventilation and a
temperature between 10°C and 25°C.
Place the dryer on a level and stable solid (concrete) base.
Do not place the dryer behind lockable or sliding door, or
door with a hinge on the opposite side of the dryer door
hinge. Install the dryer in such way that the door can always
be freely opened.
Never block the air exhaust (evacuation opening).
Do not place the dryer on a carpet with long fibres as this
may impede air circulation.
Air in the dryer environment should not contain dust
particles. The air where the dryer is installed should be
thoroughly ventilated to prevent reverse flow of gases
released from the gas appliances with open fire (e.g. a
fireplace).
Make sure the fibres do not accumulate around the dryer.
7
624905
The appliance may not be in contact with a wall or adjacent
furniture.
Do not use the dryer to dry any laundry that has not been
washed.
Laundry stained with oil, acetone, alcohol, oil derivatives,
stain removers, turpentine, wax, and wax removers should be
washed in a washing machine with hot water and detergent
before it is dried in the dryer.
Clothing that includes latex, rubber parts, shower and
bathing caps, and laundry or covers with rubber foam may
not be dried in the dryer.
Use laundry conditioners or similar products in compliance
with manufacturer's instructions.
Remove all objects such as lighters and matches from the
pockets.
If the condensate tube is blocked or clogged, then tumble
dryer operation is stopped (see chapter »PAUSING AND
CHANGING THE PROGRAMME/Full condensate tank«).
Before moving the dryer or before storing it in a non-heated
room during the winter, the condensate tank has to be
emptied.
8
624905
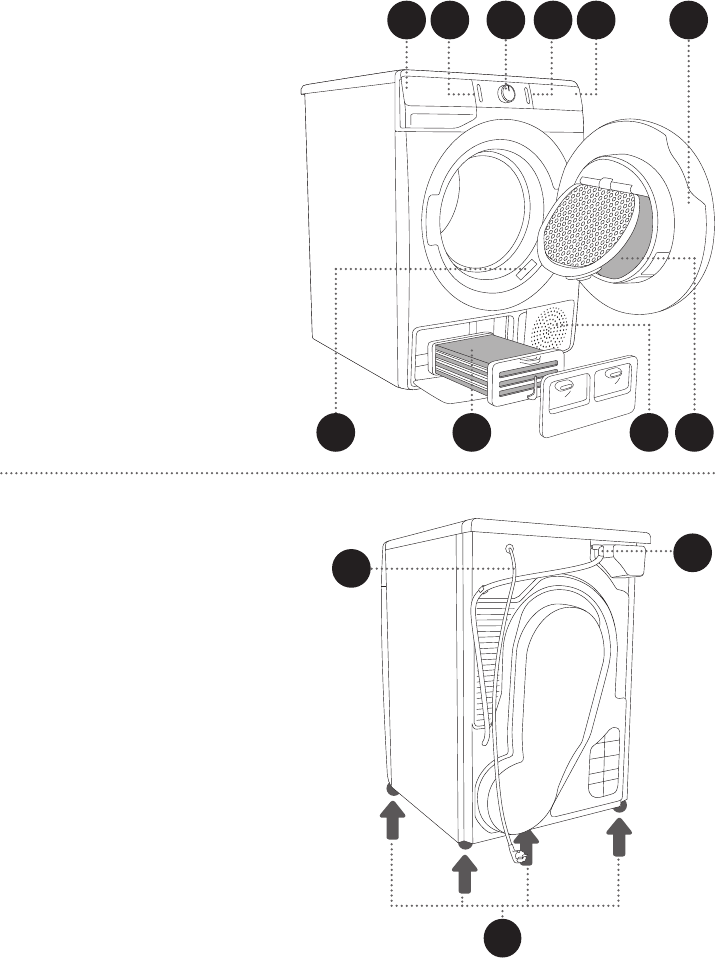
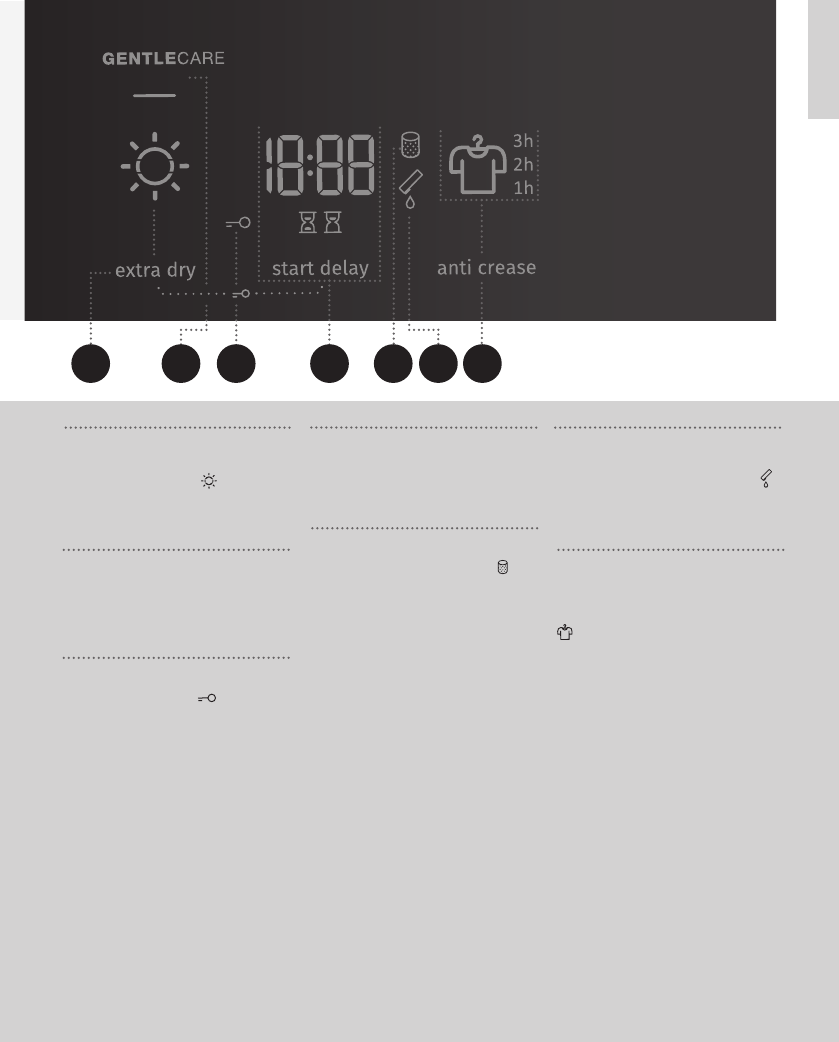
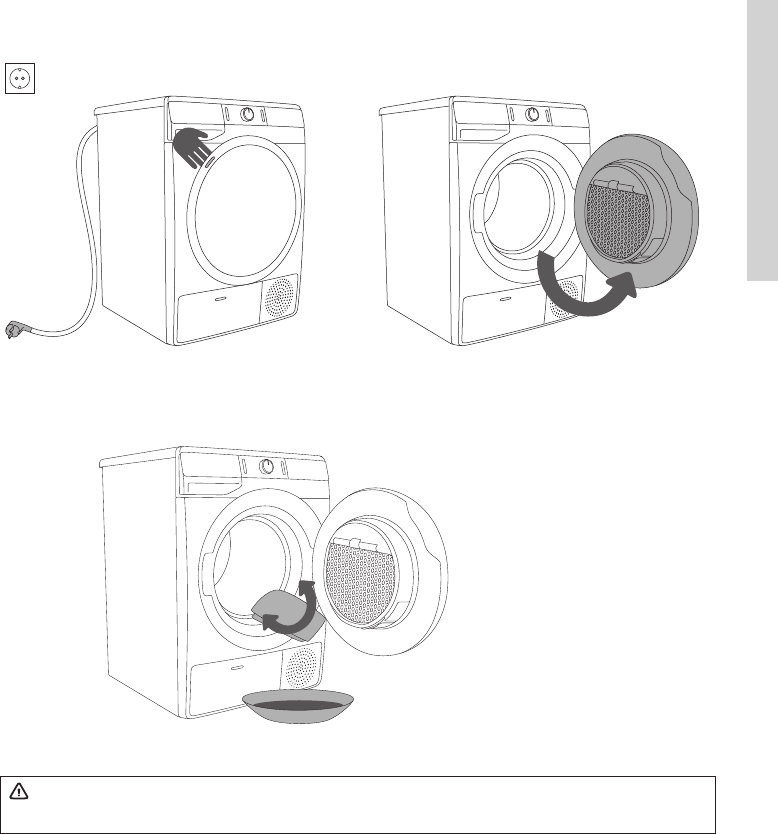
Clean the dryer filter after each drying cycle. If you have
removed the filter, replace it before the next drying cycle.
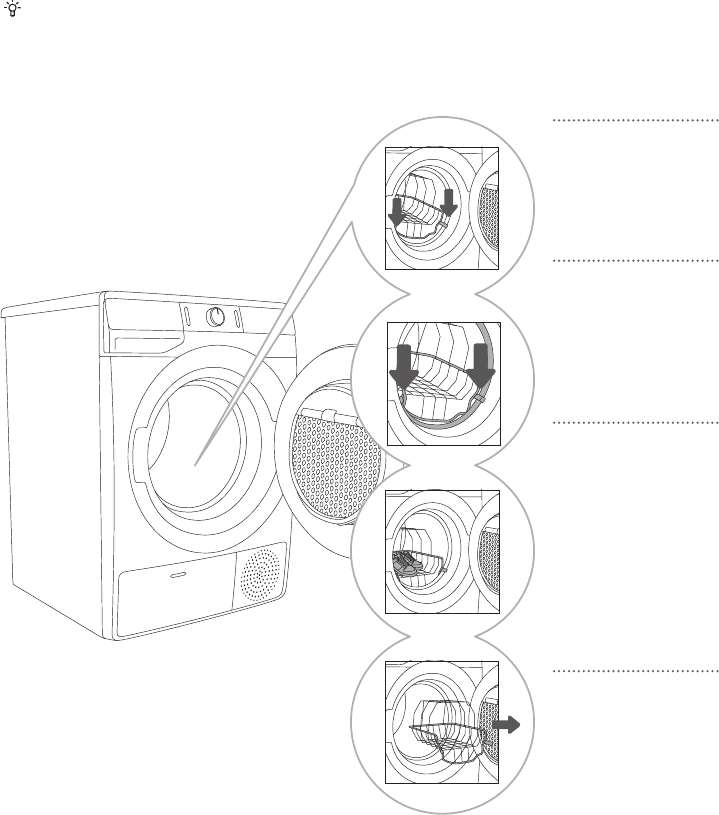
After each cleaning cycle, replace the condenser unit
into the air duct. Dryer operation without the condenser unit
or with a damaged condenser unit is hazardous and could
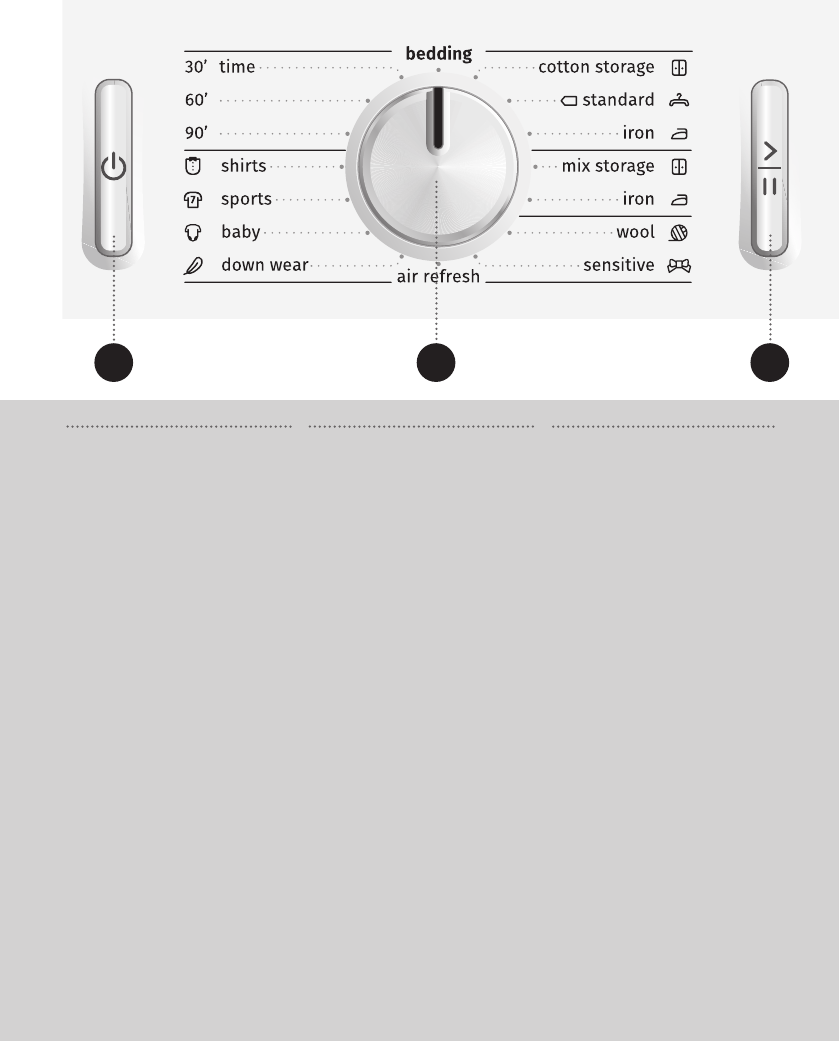
result in a fire (see chapter »DESCRIPTION OF THE DRYER
and CLEANING THE CONDENSER UNIT«).
Do not use any solvents or cleaning agents that could
damage the dryer (please observe the recommendations
and warnings provided by the manufacturers of the cleaning
agents).
Never add chemicals or fragrances into the condensate
tank (see chapter »DESCRIPTION OF THE DRYER and
EMPTYING THE CONDENSATE TANK«).
After the drying process, unplug the dryer power cord
from the power outlet.
The dryer is not intended for use by persons (including
children) with physical or mental impairments, or persons
with lacking experience and knowledge. These persons
should be instructed about the use of the dryer by a person
responsible for their safety.
The warranty does not cover consumables, minor
deviations in colour, increased noise that results from
appliance age and which does not affect the functionality of
the dryer, and aesthetic defects on components, which do
not affect the dryer's functionality and safety.
9
624905
CHILD SAFETY
Do not allow children to play with the dryer.
Prevent your children and pets from entering the dryer drum.
Before closing the dryer door and running the programme,
make sure there is nothing except laundry in the drum (e.g. if
a child climbed into the dryer drum and closed the door from
the inside).
Activate the child lock. See chapter »STEP 4: SETTING THE
EXTRA FUNCTIONS/Child lock«.
Do not let children younger than three years to come
near the tumble dryer, unless they are under constant
supervision.
The dryer is made in compliance with all relevant safety
standards.
This dryer may be used by children aged 8 years and above
and by persons with reduced physical, sensory or mental
capabilities or lack of experience and knowledge, but only
if they are supervised during the use of the appliance, if
they have been provided relevant instructions regarding
safe use of the dryer, and if they understand the hazards
of inappropriate use. Make sure children do not play with
the dryer. Children may not clean the dryer or perform any
maintenance tasks without supervision.
10
624905
DANGER OF HOT SURFACE
The back of the dryer may get very hot during operation.
Wait for the dryer to cool down completely before
touching its back side.
If you open the dryer door during the drying process, the
clothes may be very hot and there is a risk of burning.
Never stop the drying process before it is completed; if
you do interrupt the cycle for any reason, be careful when
removing the laundry from the drum as it is very hot. Quickly
remove the laundry from the drum and spread it to allow it to
cool down as quickly as possible.
11
624905
SAFETY
Only use the dryer to dry laundry that was washed with
water. Do not dry any laundry that was washed or cleaned
with flammable cleaners or substances (such as gasoline,
trichloroethylene etc.) as this may result in an explosion.
If you have cleaned your clothes with industrial cleaners or
chemical substances, do not dry them in the dryer.
The dryer is protected with an automatic switch-off system
in case of overheating. This system will switch off the dryer if
the temperature is too high.
If the net filter is clogged, the overheating automatic switch-
off system may be activated. Clean the filter, wait for the
dryer to cool down, and try running it again. If the dryer still
fails to start, call a service technician.
12
DESCRIPTION OF THE DRYER
624905
BACK
1 Power cord
2 Condensate discharge hose
3 Adjustable feet
FRONT
1 Condensate tank
2 On/off button
3 Programme selector knob
4 Start/pause button
5 Control unit
6 Door
7 Net filter
8 Air vent
9 Condenser unit
10 Rating plate
3 6
9
4 51
10 78
2
2
3
1
13
TECHNICAL INFORMATION
(DEPENDING ON THE MODEL)
TYPE: SP15/XXX MODEL: XXXXXX/X
Art.No.: XXXXXX Ser.No.: XXXXXXXX
220-240 V ~ XX Hz XX A
IPX4
MADE IN SLOVENIA
Pmax.: XXXX W XXXX W
X kg
624905
Width 600 mm
Height 850 mm
Dryer depth (a) 625 mm
Depth with door closed 653 mm
Depth with door open (b) 1134 mm
Weight XX/YY kg (depending on the model)
Rated voltage See rating plate
Fuse See rating plate
Nominal power See rating plate
Maximum load See rating plate
Rating plate
Rating plate with basic information about the dryer is fitted on the front wall of the dryer door
opening (see chapter »DESCRIPTION OF THE DRYER«).
14
CONTROL UNIT
624905
3
START/PAUSE BUTTON
Use this button to start or
stop the programme.
Upon start-up or during pause,
the button light will flash; when
the programme is started
and in progress, it will be lit
continuously.
1
ON/OFF BUTTON
Switching the dryer on and
off.
2
PROGRAMME
SELECTOR KNOB
1 2 3
15
624905
4
EXTRA DRY
Lighting of the symbol
when the function is selected
5
GENTLECARE (LOWER
TEMPERATURE)
6
CHILD LOCK symbol
lighting
Press the positions 4+7 and
hold them for 3 seconds.
7
START DELAY
Option to set a start delay
8
CLEAN THE FILTER
symbol lighting
9
EMPTY THE
CONDENSATE TANK
symbol lighting
10
ANTI CREASE
Lighting of the symbol
and anti-crease time.
7 8 96 104 5
16
10 cm
10 cm
5 cm
624905
The dryer may not be in contact with a wall or adjacent furniture. For optimum dryer operation,
we recommend observing the clearance from the walls as indicated in the figure. In case of failure
to heed the required minimum clearance, the dryer may overheat.
Vents on the back wall and the air exhaust opening on the front side of the dryer should never be
obstructed.
The room in which you will install the dryer should be sufficiently ventilated, with a temperature
between 10°C and 25°C. Dryer operation at a lower environment temperature may result in
condensate accumulation in the dryer interior. Do not place the dryer into a place where there is
danger of freezing. Frozen water in the condensate tank and pump may damage the dryer.
The dryer emits heat. Therefore, do not place it in a very small room, as the drying process may
take longer due to limited amount of available air.
Lighting in the room should be sufficient to allow reading the information on the display unit on the
control panel.
INSTALLATION AND CONNECTION
Remove all packaging. When removing the packaging, make sure not to damage the dryer with a
sharp object.
SELECTING THE ROOM
17
624905
DRYER PLACEMENT
If you also have a Gorenje dryer of corresponding (same) dimensions, it can be placed on top of the
Gorenje washing machine; in this case, vacuum feet must be used. Alternatively, the dryer can be
placed next to the washing machine (figures 1 and 3).
If your Gorenje washing machine is smaller (minimum depth 545 mm) than your Gorenje dryer, then
the dryer support has to be purchased extra (figure 2). The supplied vacuum feet must be used;
they are designed to prevent the dryer from slipping.
Additional equipment (dryer support (a) and vacuum feet (b) if they are not supplied) are available for
purchase at the service units.
The surface on which the appliance is placed should be clean and level.
Gorenje washing machine onto which you intend to place the Gorenje dryer should be able to
hold the weight of the Gorenje dryer (see chapter »DESCRIPTION OF THE DRYER/Technical
information«).
Opening the dryer door (bird's-eye view)
b
a
180°
See chapter »DESCRIPTION OF THE DRYER/
Technical information«.
a = 625 mm
b = 1134 mm
At least two persons are required to install the tumble dryer on top of a washing machine.
12 3
4X
b
a
18
624905
Do not place the dryer behind lockable or sliding door, or door with a hinge on the opposite
side of the dryer door hinge. Install the dryer in such way that the door can always be freely
opened.
Do not place the dryer on a carpet with long fibres as this may impede air circulation.
19
624905
Floor on which the dryer is placed must have a concrete base. It should be clean and dry;
otherwise, the dryer may slide. Also clean the adjustable feet.
The dryer must stand level and stable on a solid base.
Incorrect levelling of the dryer with the adjustable legs may cause vibration, appliance sliding
across the room, and loud operation. Incorrect levelling of the dryer shall not be subject to warranty.
Sometimes, unusual or louder noise may appear during appliance operation; these are mostly
the result of improper installation.
ADJUSTING THE DRYER FEET
Level the dryer in longitudinal and traverse direction by rotating the adjustable feet which allow
levelling by +/- 1 cm. Use a spirit level and spanner No. 22.
20
max 80 cm
624905
DRAINING THE CONDENSATE
The moisture from the laundry is extracted in the condenser unit and accumulated in the
condensate tank.
During the drying process, an indicator light (symbol
(9) is lit on the display unit) warns when the
condensate tank is full and needs to be emptied.
To avoid emptying the condensate tank, run the condensate discharge hose located at the back of
the appliance directly into a drain.
If you decide to run the condensate drain hose into a drain, make sure the hose is securely
fastened. This will prevent any water spillage which could result in unexpected damage.
Always use the hoses supplied with the dryer.
1
Release the hose
from the holder on
the back wall of the
dryer (left hand side,
below the top cover).
2
Run the hose into
a drain at a height
of no more than 80 cm
from the floor.
21
CONNECTING TO THE POWER MAINS
2 h
624905
After installation, the dryer should stand still for two hours before it is connected to the
power mains; this allows the dryer to stabilize.
Connect the dryer to a grounded power outlet. After installation, the wall outlet should be freely
accessible. The outlet should be fitted with an earth contact (in compliance with the relevant
regulations).
Information on your dryer is indicated on the rating plate (see chapter »DESCRIPTION OF THE
DRYER/Technical information«).
We recommend using over-voltage protection to protect the appliance in case of a
lightning strike.
The dryer may not be connected to the power mains using an extension cord.
Do not connect the tumble dryer to an electrical outlet intended for an electric shaver or a hair
dryer.
Any repair and maintenance pertaining to safety or performance should be done by trained
experts.
A damaged power cord may only be replaced by a person authorized by the manufacturer.
22
624905
MOVING AND TRANSPORT AFTER INSTALLATION
After every drying cycle, a small amount of condensed water will remain in the dryer. Switch on the
dryer and choose one of the programmes, then let the appliance operate for approximately half a
minute. This will pump out the remaining water and prevent damage to the dryer during transport.
After transport, the dryer should be left to stand still for at least two hours before it is
connected to the power mains. The appliance should be installed and connected by a trained
technician.
If the appliance was not transported in compliance with the instructions, the dryer should be left
to stand still at least two hours before it is reconnected to the power mains.
Carefully read the instructions for use before connecting the dryer. Repair or any warranty
claim resulting from incorrect connection or use of the dryer shall not be covered by the
warranty.
The belt may only be replaced by a service technician authorized by the manufacturer, who can
supply the original spare part with the code OPTIBELT EPH 1906, code 104265; OPTIBELT 8 EPH
1941, code 160165; POLY-V 7PH 1956 HUTCHINSON, code 562038; HUTCHINSON 8 PHE 1942,
šifra 270313 (depending on the model).
23
624905
Do not use any solvents or cleaning agents that could damage the dryer (please observe the
recommendations and warnings provided by the manufacturers of the cleaning agents).
BEFORE USING THE APPLIANCE
FOR THE FIRST TIME
Make sure the dryer is disconnected from the power mains; then, open the door by pulling the left
side of the door towards you (figures 1 and 2).
Before using the dryer for the first time, clean the dryer drum using a soft damp cotton cloth and
water (figure 3).
3
12
24
624905
DRYING PROCESS,
STEP BY STEP (1 - 6)
STEP 1: HEED THE LABELS ON THE LAUNDRY
Normal wash;
Sensitive laundry
Max.
washing
temp.
95°C
95
95
Max.
washing
temp.
60°C
60
60
Max.
washing
temp.
40°C
40
40
Max.
washing
temp.
30°C
30
30
Hand wash
only
Do not
wash
Bleaching Bleaching in cool water
c1
Bleaching not allowed
Dry cleaning Dry cleaning
with all agents
A
Petroleum
solvent R11,
R113
P
Dry cleaning in
kerosene, pure
alcohol, and
R113
F
Dry cleaning not
allowed
Ironing Hot ironing,
max.
200°C
Hot ironing,
max.
150°C
Hot ironing, max.
110°C
Ironing not
allowed
Drying Dry flat (place on
a flat surface)
Drip dry
Line dry
High temperature
Low temperature
Do not tumble
dry
25
624905
STEP 2: PREPARING FOR THE LAUNDRY DRYING
PROCESS
1. Sort the laundry by type and thickness of the fabric (see PROGRAMME TABLE).
2. Close the buttons and zips, tie any ribbons, and turn the pockets inside out.
3. Place very sensitive clothes in a special-purpose laundry bag.
(The special-purpose laundry bag is available as an optional accessory.)
Drying laundry made of particularly delicate fabrics that may be deformed is not
recommended. The following types of laundry may not be dried in the dryer as this may cause
your garments to deform:
leather garments and other leather products;
garments that are waxed or treated in any other way;
garments with major wooden, plastic, or metal parts;
garments with spangles;
garments with metal parts subject to rusting.
26
624905
DRYING IN A BASKET (DEPENDING ON THE MODEL)
Before the first drying cycle, remove the basket and all packaging from the drum.
Laundry may only be dried in the basket when using the timed drying programme. (The basket is
available for purchase as an optional accessory at the service centre.)
Only dry clean sports shoes or slippers that have been wrung just enough to prevent water from
dripping from them.
As the drum rotates, the laundry basket will be still. Therefore, make sure the items you are drying
in the basket are not in contact with the drum, as this could result in damage to the item and the
dryer.
1
Open the dryer
door and insert the
laundry.
2
Insert the drying
basket by
securing it to the door
gasket (as shown in
the figure).
3
The basket can be
used for drying of
sports shoes, slippers,
or any other item you
do not wish tumbled
around the dryer drum
during the drying
process (max. load:
2.5 kg).
4
After the drying
process, remove
the drying basket and
close the dryer door.
27
624905
SWITCHING ON THE DRYER
Connect the dryer to the power mains by plugging in the power cord.
Press the (1) ON/OFF button to switch on the dryer (figure 1).
With some models, the dryer drum is lit as well (figure 2).
(The light in the dryer drum is not suitable for any other use.)
The light in the dryer drum may only be replaced by the manufacturer, a service technician or an
authorized person.
12
1
27

Hulp nodig? Stel uw vraag in het forum

Spelregels

Misbruik melden

Gebruikershandleiding.com neemt misbruik van zijn services uitermate serieus. U kunt hieronder aangeven waarom deze vraag ongepast is. Wij controleren de vraag en zonodig wordt deze verwijderd.

Product:

Bijvoorbeeld antisemitische inhoud, racistische inhoud, of materiaal dat gewelddadige fysieke handelingen tot gevolg kan hebben.

Bijvoorbeeld een creditcardnummer, een persoonlijk identificatienummer, of een geheim adres. E-mailadressen en volledige namen worden niet als privégegevens beschouwd.

Spelregels forum

Om tot zinvolle vragen te komen hanteren wij de volgende spelregels:

Belangrijk! Als er een antwoord wordt gegeven op uw vraag, dan is het voor de gever van het antwoord nuttig om te weten als u er wel (of niet) mee geholpen bent! Wij vragen u dus ook te reageren op een antwoord.

Belangrijk! Antwoorden worden ook per e-mail naar abonnees gestuurd. Laat uw emailadres achter op deze site, zodat u op de hoogte blijft. U krijgt dan ook andere vragen en antwoorden te zien.

Abonneren

Abonneer u voor het ontvangen van emails voor uw Gorenje DE8B bij:


U ontvangt een email met instructies om u voor één of beide opties in te schrijven.


Ontvang uw handleiding per email

Vul uw emailadres in en ontvang de handleiding van Gorenje DE8B in de taal/talen: Engels als bijlage per email.

De handleiding is 8,73 mb groot.


U ontvangt de handleiding per email binnen enkele minuten. Als u geen email heeft ontvangen, dan heeft u waarschijnlijk een verkeerd emailadres ingevuld of is uw mailbox te vol. Daarnaast kan het zijn dat uw internetprovider een maximum heeft aan de grootte per email. Omdat hier een handleiding wordt meegestuurd, kan het voorkomen dat de email groter is dan toegestaan bij uw provider.

Stel vragen via chat aan uw handleiding

Stel uw vraag over deze PDF

Andere handleiding(en) van Gorenje DE8B

Gorenje DE8B Gebruiksaanwijzing - Deutsch - 60 pagina's


Uw handleiding is per email verstuurd. Controleer uw email

Als u niet binnen een kwartier uw email met handleiding ontvangen heeft, kan het zijn dat u een verkeerd emailadres heeft ingevuld of dat uw emailprovider een maximum grootte per email heeft ingesteld die kleiner is dan de grootte van de handleiding.

Er is een email naar u verstuurd om uw inschrijving definitief te maken.

Controleer uw email en volg de aanwijzingen op om uw inschrijving definitief te maken

U heeft geen emailadres opgegeven

Als u de handleiding per email wilt ontvangen, vul dan een geldig emailadres in.

Uw vraag is op deze pagina toegevoegd

Wilt u een email ontvangen bij een antwoord en/of nieuwe vragen? Vul dan hier uw emailadres in.


Info