561648
23
Verklein
Vergroot
Pagina terug
1/28
Pagina verder
Smart Remote
LONG-RANGE REMOTE CONTROL
FOR YOUR GOPRO.
USER GUIDE
2
To download this user guide in a different language, visit gopro.com/support.
Pour télécharger ce manuel de l’utilisateur dans une autre langue, rendez-vous sur
gopro.com/support.
Wenn Sie dieses Benutzerhandbuch in einer anderen Sprache herunterladen
chten, besuchen Sie gopro.com/support.
Per scaricare questo manuale utente in un’altra lingua, visita gopro.com/support.
Para descargar este manual de usuario en otro idioma, visite gopro.com/support.
Para baixar este manual do usuário em outro idioma, acesse gopro.com/support.
このユーザーマニュアルの版をダウンロードするには、
gopro.com/support てく
若要下載其他語言版本的使用說明書請前往gopro.com/support
如需下载本用户手册的其他语言版本,访问 gopro.com/support
이 사용자 설명서의 른 언어 버전은gopro.com/support에서 운로 드하 .
3
/ The Basics
Wrist Strap
Attachment Key Attachment Ring USB
Charging Cable
Shutter/Select Button
Remote Status Display
Status Light
Power/Mode Button
Charging Port/
Attachment Key Slot
Settings/Tag Button
4
Step 2
Position the remote along the strap
as shown.
Step 1
Thread the strap through the slots
on the back of the remote.
/ Wearing the Smart Remote
ATTACHING THE REMOTE TO THE STRAP
The attachment strap secures the remote to your wrist, backpack straps,
ski poles, bike frames and more.
To Attach the Remote to the Strap:
5
ATTACHING THE REMOTE USING THE KEY + RING
The attachment key and ring secure the remote to your lanyards, straps,
car keys, zippers and more.
To Attach the Remote Using the Key and Ring:
Step 1
Slide and hold the latch lever in
the direction of the arrow (A), then
pull the key out of the remote (B).
Step 2
Attach the ring to your lanyard,
straps, etc.
Step 3
Push the attachment key into the
key slot until it clicks.
A
B
6
/ Getting Started
The Smart Remote lets you power your GoPro on/off, start/stop recording
and change camera settings. The display, status light, Power/Mode button
[
], Shutter/Select button [ ] and Settings/Tag button* [ ] behave
in the same way as those on your camera.
The Smart Remote is waterproof to 33’ (10m). However,
wireless connectivity does not work under water, so the
remote and cameras do not remain connected if submerged.
* The Settings/Tag button is available only on HERO4 cameras.
7
CHARGING THE SMART REMOTE
We recommend charging your Smart Remote for one hour
before using it the first time. No damage occurs if it is used
before being fully charged. You can use the remote while it
is charging.
The status display shows the remote’s battery level while the
remote is powering on or charging.
Note: When the remote is searching for a camera, the battery drains faster. If you are not using the remote
during charging, be sure to turn it off to conserve battery power.
8
To Charge the Remote:
Step 2
Plug the charging cable into
the charging slot until it clicks.
Step 1
Slide and hold the latch lever in
the direction of the arrow (A), then
pull the key out of the remote (B).
A
B
9
Step 3
Connect the other end of the cable
to a computer or other USB
power source.
Note: Be sure that the computer is connected to a
power source. If the remote status display does
not indicate that the remote is charging, use a
different USB port.
The charging icon on the remote
status display shows a full battery
when charging is complete.
10
POWERING THE REMOTE ON/OFF
To Power On the Remote:
Press the Power/Mode button [
].
To Power Off the Remote and Connected Cameras:
Press and hold the Power/Mode button [
] for two seconds.
Note: If the cameras are recording, this action powers off only the remote. The cameras continue recording.
PRO TIP: You can power off the remote and leave the camera powered on.
This option is useful if you want to switch from the remote to the GoPro App
to control your camera. To use this option, press and hold the Power/Mode
button [
] and the Settings/Tag button [ ] together for two seconds.
11
REMOTE STATUS DISPLAY
The information that appears on your Smart Remote status display
depends on whether you are connected to multiple cameras.
Smart Remote Connected to One Camera:
Remote screen displays the same information as the
GoPro camera status screen. Available modes are the
same as those on the camera.
Smart Remote Connected to Multiple Cameras:
Remote screen displays the number of cameras
connected, the recording mode and the battery
status of the remote.
12
When the remote is connected to multiple cameras, these modes
are available:
Default Startup
Modes
Sets all cameras to their default
power-up modes
Video Sets all cameras to Video mode
Photo Sets all cameras to Photo mode
Burst Sets all cameras to Burst mode
Time Lapse Sets all cameras to Time Lapse mode
SMART REMOTE SOFTWARE UPDATE
When soware updates are available for the remote, you are automatically
notified when you connect the remote to a camera. Follow the on-screen
instructions to install the update.
13
You can pair the Smart Remote with any wireless-enabled GoPro camera.
The remote can control your camera from up to 600 (180m) away in optimal
conditions. You can control up to 50 GoPros at a time with the remote. Your
camera recognizes only one remote at a time.
The distance from which you can control your camera with the remote
varies and depends on factors such as terrain, weather, obstructions and
electromagnetic interference.
/ Pairing the Remote and Your GoPro
14
To Pair Your Remote and Your HERO4:
1. Ensure that both camera and remote are powered off.
2. On your camera, complete these steps:
a. Press the Power/Mode button [
] to power on your camera.
b. Press the Power/Mode button [ ] to cycle to Setup mode, and
then press the Shutter/Select button [
] to select it.
c. Press the Power/Mode button [ ] to cycle to Wireless, and then
press the Shutter/Select button [
] to select it.
d. Press the Power/Mode button [ ] to cycle to WiFi RC (or RC &
App), and then press the Shutter/Select button [
] to select it.
If the camera was never paired with a remote or the GoPro App, it
automatically begins pairing. Otherwise, cycle to New (or New RC)
and select it to begin pairing.
3. On the remote, complete these steps:
a. Power on the remote. If the remote was never paired with a
15
camera, it automatically begins pairing. Otherwise, press and
hold the Settings/Tag button for four seconds to begin pairing.
A checked box [
] appears on both screens once the devices
are paired.
b. To connect additional cameras, press the Shutter/Select button
[
] to select Yes, and then repeat the pairing process.
c. When you are finished, press the Power/Mode button [ ] to cycle
to No, and then press the Shutter/Select button [
] to select it.
PRO TIP: Aer pairing your HERO4, you can press and hold the Settings/
Tag button [
] on your camera for two seconds to turn on Wireless while
the camera is powered off. This method conserves your camera’s battery
power and is useful if you want to control your HERO4 with the remote or the
GoPro App. The Settings/Tag button [
] opens the Wireless option (RC,
App, Network) that you used most recently.
16
To Pair Your Remote and Your HERO3+ or HERO3:
1. Ensure that both camera and remote are powered off.
2. On your camera, complete these steps:
a. Press the Power/Mode button [
] to power on your camera.
b. Press the Wi-Fi On/Off button [ ] twice to turn on Wi-Fi and
access the Wi-Fi menu.
c. Press the Shutter/Select button [
] to open the Wi-Fi menu [ ].
d. Use the Power/Mode button [ ] to cycle to Wi-Fi RC, and then
press the Shutter/Select button [
].
e. Use the Power/Mode button [ ] to cycle to New, and then
press the Shutter/Select button [
]. This icon appears while
the camera searches: [
]
17
3. On the remote, complete these steps:
a. Power on the remote. If the remote was never paired with a
camera, it automatically begins pairing. Otherwise, press and
hold the Settings/Tag button for four seconds to begin pairing.
A checked box [
] appears on both screens once the devices
are paired.
b. To connect additional cameras, press the Shutter/Select button
[
] to select Yes, and then repeat the pairing process.
c. When you are finished, press the Power/Mode button [ ] to cycle
to No, and then press the Shutter/Select button [
] to select it.
18
Aer your remote and camera are paired, follow the steps below to connect
them in the future. With this procedure, your camera connects to the remote
that it connected to most recently.
To Connect the Remote and Your HERO4:
1. Power on the remote and your camera.
2. On your camera, complete these steps:
a. Press the Power/Mode button [
] to cycle to Setup mode, and
then press the Shutter/Select button [
] to select it.
b. Press the Power/Mode button [ ] to cycle to Wireless, and then
press the Shutter/Select button [
] to select it.
c. Press the Power/Mode button [ ] to cycle to WiFi RC or RC &
App, and then press the Shutter/Select button [
] to select it.
/ Connecting the Remote and Your GoPro
19
d. Press the Power/Mode button [ ] to cycle to Existing, and
then press the Shutter/Select button [
] to select it.
To Connect the Remote and Your HERO3+ or HERO3:
1. Power on the remote and your camera.
2. On your camera, complete these steps:
a. Press the Wireless button [
] twice to turn on Wireless and
open the Wireless settings.
b. Press the Shutter/Select button [
].
c. Press the Power/Mode button [ ] to cycle to Wi-Fi RC, and
then press the Shutter/Select button [
] to select it.
d. Press the Shutter/Select button [ ] to select Current.
20
/ Capturing Video and Photos
Use the remote to capture video and photos with one camera or
multiple cameras.
To Start/Stop Recording:
Press the Shutter/Select [
] button.
PRO TIP: When you connect your remote to your HERO4, you can add
HiLight Tags to your video. HiLight Tags mark specific moments to make
it easier to quickly find highlights during playback, sharing and editing.
While recording, press the Settings/Tag [
] button on the remote to
add a HiLight Tag.
21
The following features are not available when using the remote
with HERO4:
QuikCapture
Continuous photo with multiple cameras
Manually capturing photos while recording video with
multiple cameras
The following features are not available when using the remote with
HERO3+ or HERO3:
One Button mode
Continuous photo
Manually capturing photos while recording video
The Settings/Tag button [
] on the remote (to add a HiLight Tag or
enter the Settings menu)
22
/ Changing Camera Settings
You can use the Smart Remote to change your camera settings as long as
your camera is not capturing video or photo.
Note: To change camera settings, the remote must be connected to only one camera.
To Change Camera Settings for HERO4:
1. Be sure your camera and remote are powered on and connected.
2. On the remote, press the Power/Mode button [
] to cycle to the
mode whose settings you want to change.
3. Press the Settings/Tag button [
] to open the settings menu for
that mode.
4. Use the Power/Mode button [
] to cycle through the settings.
5. Press the Shutter/Select button [ ] to cycle through the options
within a setting. To select an option, highlight it and move to
another screen.
23
6. To go back or exit the settings menu, press the Settings/Tag
button [
].
To Change Camera Settings for HERO3+ and HERO3:
1. Be sure your camera and remote are powered on and connected.
2. Press the Power/Mode button [
] to cycle to Settings.
3. Press the Shutter/Select button [ ] to select Settings.
4. Press the Power/Mode button [ ] to cycle through the settings.
5. Press the Shutter/Select button [ ] to select an option.
6. To exit the settings menu, press the Power/Mode button [ ] to cycle
to EXIT, and then press the Shutter/Select button [
] to select it.
23

Hulp nodig? Stel uw vraag in het forum

Spelregels
1

Forum

GoPro-Smart-Remote
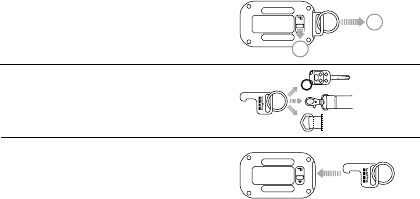
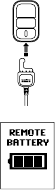
  • Hallo, ik probeer een smart remote te koppelen met de GoPro. Maar als ik kies voor "connect" en "connect new device" staat alleen de gopro app er tussen en niet de "smart remote" dus kan ik die niet kiezen om te pairen.

    Wat kan ik doen? Gesteld op 26-4-2022 om 11:49

    Reageer op deze vraag Misbruik melden
  • Goede morgen.
    Graag zou ik willen weten of er ook een handleiding is van de Smart Remote naar de Go Pro 6 Black, en dan in het Nederlands. ?
    Dank je wel. Groeten. Jo Hendrix. Gesteld op 25-7-2018 om 09:12

    Reageer op deze vraag Misbruik melden

Misbruik melden

Gebruikershandleiding.com neemt misbruik van zijn services uitermate serieus. U kunt hieronder aangeven waarom deze vraag ongepast is. Wij controleren de vraag en zonodig wordt deze verwijderd.

Product:

Bijvoorbeeld antisemitische inhoud, racistische inhoud, of materiaal dat gewelddadige fysieke handelingen tot gevolg kan hebben.

Bijvoorbeeld een creditcardnummer, een persoonlijk identificatienummer, of een geheim adres. E-mailadressen en volledige namen worden niet als privégegevens beschouwd.

Spelregels forum

Om tot zinvolle vragen te komen hanteren wij de volgende spelregels:

Belangrijk! Als er een antwoord wordt gegeven op uw vraag, dan is het voor de gever van het antwoord nuttig om te weten als u er wel (of niet) mee geholpen bent! Wij vragen u dus ook te reageren op een antwoord.

Belangrijk! Antwoorden worden ook per e-mail naar abonnees gestuurd. Laat uw emailadres achter op deze site, zodat u op de hoogte blijft. U krijgt dan ook andere vragen en antwoorden te zien.

Abonneren

Abonneer u voor het ontvangen van emails voor uw GoPro Smart Remote bij:


U ontvangt een email met instructies om u voor één of beide opties in te schrijven.


Ontvang uw handleiding per email

Vul uw emailadres in en ontvang de handleiding van GoPro Smart Remote in de taal/talen: Engels als bijlage per email.

De handleiding is 0,26 mb groot.


U ontvangt de handleiding per email binnen enkele minuten. Als u geen email heeft ontvangen, dan heeft u waarschijnlijk een verkeerd emailadres ingevuld of is uw mailbox te vol. Daarnaast kan het zijn dat uw internetprovider een maximum heeft aan de grootte per email. Omdat hier een handleiding wordt meegestuurd, kan het voorkomen dat de email groter is dan toegestaan bij uw provider.

Stel vragen via chat aan uw handleiding

Stel uw vraag over deze PDF

Andere handleiding(en) van GoPro Smart Remote

GoPro Smart Remote Gebruiksaanwijzing - Deutsch - 33 pagina's


Uw handleiding is per email verstuurd. Controleer uw email

Als u niet binnen een kwartier uw email met handleiding ontvangen heeft, kan het zijn dat u een verkeerd emailadres heeft ingevuld of dat uw emailprovider een maximum grootte per email heeft ingesteld die kleiner is dan de grootte van de handleiding.

Er is een email naar u verstuurd om uw inschrijving definitief te maken.

Controleer uw email en volg de aanwijzingen op om uw inschrijving definitief te maken

U heeft geen emailadres opgegeven

Als u de handleiding per email wilt ontvangen, vul dan een geldig emailadres in.

Uw vraag is op deze pagina toegevoegd

Wilt u een email ontvangen bij een antwoord en/of nieuwe vragen? Vul dan hier uw emailadres in.


Info