510657
277
Verklein
Vergroot
Pagina terug
1/280
Pagina verder
2
3
English
User Manual
Geneva Sound System
(Model M +CD)
4
IMPORTANT SAFETY INSTRUCTIONS
1) Read these instructions.
2) Keep these instructions.
3) Heed all warnings.
4) Follow all instructions.
5) Do not use this apparatus near water.
6) Clean only with dry cloth.
7) Do not block any ventilation openings. Install in accordance with the manufacturer’s
instructions.
8) Do not install near any heat sources such as radiators, heat registers, stoves, or
other apparatus (including amplifiers) that produce heat.
9) Only use attachments/accessories specified by the manufacturer.
5
English
10) Protect the power cord from being walked on or pinched particularly at plugs,
convenience receptacles, and the point where they exit from the apparatus.
11) Unplug this apparatus during lightning storms or when unused for long periods
of time.
12) Refer all servicing to qualified service personnel. Servicing is required when the
apparatus has been damaged in any way, such as power-supply cord or plug is dama-
ged, liquid has been spilled or objects have fallen into the apparatus, the apparatus has
been exposed to rain or moisture, does not operate normally, or has been dropped.
13) This appliance shall not be exposed to dripping or splashing water and that no
object filled with liquids such as vases shall be placed on apparatus.
Caution: Use of controls or adjustments or performance of procedures other than herein
may result in hazardous radiation exposure or other unsafe operation.
Compact Disk Drive: The compact disk (CD) drive contains a laser. The laser radiates
visible and invisible laser radiation. Do not open optical housing. Avoid direct exposure
to the beam. The compact disc player should not be adjusted or repaired by anyone
except properly qualified service personnel.
6
Class 1 laser product: This CD player is classified as a CLASS 1 LASER PRODUCT
according to EN 60825- 1:1994+A1+A2, IEC 60825-1:1993+A1+A2. The CLASS 1 LASER
PRODUCT label is located on the Back Panel of the product. This product complies
with 21 CFR Part 1040.10.
Technical details about the incorporated laser diode: Wavelength: 790 nm ± 15nm.
Max accessible radiant power (during service): 0.492 mW.
Ventilation: Do not block any ventilation openings on the back or under the Geneva
Sound System. To ensure reliable operation of the Geneva Sound System and to protect
it from overheating, put the System in a position and location that will not interfere with
its proper ventilation.For example, do not place the Geneva Sound System on a bed,
sofa, or similar surface that may block the ventilation openings. Do not put it in a built-in
position, such as in a bookcase or in a cabinet that may keep air from flowing through its
ventilation openings. Do not push objects of any kind through openings.
CLASS 1 LASER
PRODUCT
CAUTION
Visible and invisible
laser radiation when open.
Avoid exposure to beam.
7
English
Cleaning: Please note we have included a cleaning cloth with your Geneva Sound
System, in the accessory bag. To avoid making scratches to the surface, we recom-
mend that you use the cleaning cloth included. Before cleaning, please unplug this
Geneva Sound System from the AC power outlet.
Overloading: To prevent risk of fire or electric shock, avoid overloading wall outlets or
extension cords.
Open fire: Keep this Geneva Sound System a safe distance away from any open flame
such as a lit candle. No open flame sources, such as lighted candles, should be placed
on the Geneva Sound System.
Operating Temperatures: The recommended operating temperature range for the
Geneva Sound System is 41 to 104 degrees Fahrenheit (5 to 40 degrees Celsius).
Front grille panel: Never remove front grille panel because the panel is non detachable
and will void the Limited Warranty.
Avoid Hearing Damage:
Playing very loud music for an extended period of time can
result in permanent hearing loss.
The mains plug or appliance coupler is used as the disconnect device, such disconnect
device shall remain readily operable.
Label location: The product labels and safety related markings are located on the Back
Panel of the Geneva Sound System.
8
Unplugging while in operation: Do not remove the AC power cord out of the AC outlet if
music is playing or if the Geneva Sound System is turned on. The drivers can be damaged
by such an action.
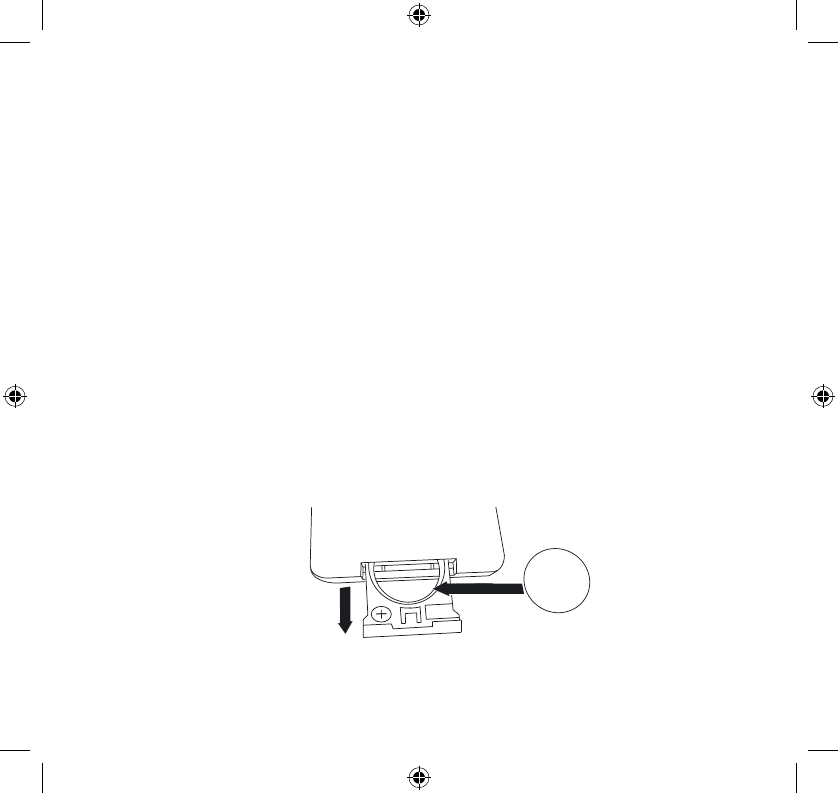
Batteries in the remote control: Keep the remote control battery away from children.
It may cause a fire or chemical burn if mishandled. Do not recharge, disassemble, heat
above 212ºF (100ºC), or incinerate. Replace only with a battery of the correct type and
model number (CR2025 lithium coin cell battery, 3 V).
CAUTION: Danger explosion if battery is incorrectly replaced. Replace only with the same
or equivalent type.
Used batteries: Please dispose of used batteries properly, following any local regulations.
Do not incinerate.
Compact Disks (CD’s):
Do not insert smaller disks than 12 cm, such as a CD mini disk,
etc., which are not supported. Also, do not insert anything else than a CD, such as coins.
Outside Antenna: If an outside antenna or cable system is connected to this product, be
sure the antenna or cable system is grounded so as to provide some protection against
voltage surges and built-up static charges. Article 810 of the National Electric Code,
ANSI/NFP No. 70 information, Section 54 of the Canadian Electrical Code, with regard to
proper grounding of the mast and supporting structure, grounding of the lead-in wire to
an antenna discharge unit, size of grounding conductors, location of antenna/discharge
unit, connection to grounding electrodes, and requirements for the grounding electrode.
Modification: Unauthorized modification of the receiver or radio remote control could
void the user’s authority to operate this equipment.
9
English
Note to CATV system installer: This reminder is provided to call the CATV system
installer’s attention to Article 820-40 of the NEC (of USA) that provides guidelines for
proper grounding. In particular, it specifies that the cable ground shall be connected to
the grounding system of the building, as close to the point of cable entry as is practical.
Removal of the Back Panel: By any unauthorized person also voids the Limited Warranty.
This product can be recycled. Products bearing this symbol must NOT be thrown away
with normal household waste. At the end of the product’s life, take it to a collection point
designated for recycling of electrical and electronic devices. Find out more about return
and collection points through your local authority.
The European Waste Electrical and Electronic Equipment (WEEE) Directive was imple
-
mented to dramatically reduce the amount of waste going to landfills, there by reducing
the environmental impact on the planet and on human health. Please act responsibly by
recycling used products. If this product is still usable, consider giving it away or selling it.
10
Contents
Chapter 1
Getting Started
Unpacking and setting up
Quick Start
Listen to your iPod
Listen to a CD
Listen to the FM radio
12
12
14
16
18
18
Chapter 2
How To...
?
General:
How to turn the Geneva Sound System on?
How to adjust Volume and Sound?
How to verify that the remote control works?
How to clean the speaker?
What is the functionality of the AIR key on the remote control?
How to change battery in the remote control?
iPod:
How to select the right iPod Dock adapter for my iPod?
How to check the software version of your iPod?
How to upgrade your iPod?
How to insert or remove a Dock Adapter
How to control the iPod using the Geneva Sound System’s remote control?
CD:
How to control the CD player using the remote control?
How to play CD’s with MP3 and other formats?
How to play MP3 CD-R/W with several Albums?
19
19
19
19
20
20
20
21
22
22
22
22
23
23
23
11
English
24
24
25
25
26
26
26
26
Chapter 3
Troubleshooting, Service and Support
Troubleshooting and Support
Service and Repair
Technical Support
Customer Service Telephone Number
Website
27
27
27
27
27
27
FM radio:
How to control the FM radio using the remote control?
How to select a FM radio station?
How to store your favorite FM radio station in a preset?
How to play a FM radio station that is stored in the presets?
How to erase or overwrite a preset?
How to connect the External FM radio antenna?
How to change FM stereo/mono settings?
Line in:
How to connect a TV, Computer, VCR, DVD player or a game console to
the Geneva Sound System using the “Line in” input?
Chapter 4
Made for iPod & Technology Partners
Made for iPod
Technology Partners
28
28
28
Chapter 5
Technical Specifications
29
12
Remote control
External antenna
External power supply
Line in cable
iPod Dock Adapter
US only
US only
EU only
UK only
x7
Antenna adapter
1. Getting Started
Step 1: Unpack all components from the shipping box. Please save the original packaging
material in case you ever need to return the System since the Limited Warranty does not
cover shipping damages.
The shipping box should contain the following System components:
EU only
US only
US only
UK only
13
English
FM
Step 2: Insert the batteries into the remote control (see page 20). There are batteries
included in the package.
Step 3: Insert the DC Power cable (the thin cable) of the external power supply into the
DC Power Plug on the Back Panel (see picture below).
Then connect the AC Power cable of the external power supply to an AC outlet.
Back Panel:
Line in Jack DC Power Plug
while dock is used, put iPod lid here FM radio antenna plug
16
Turn on the Geneva Sound System:
Press the power on/off key on the remote control.
Select source:
To switch between sources, press either iPod, CD, FM or Line In key on the remote control
to select which source to be controlled.
Listen to your iPod (more details on page 21):
Step 1. If you intend to use the System with an iPod, remove the lid on top of the cabinet
by using your finger nail or a soft tool. Do not use a knife or other sharp edged objects that
can damage the laquer. The wooden lid has a built-in magnet and can be attached to the
back panel (see page 13).
Select the right iPod Dock Adapters that fits with the iPod model you intend to dock by
following the table on page 21, or try the enclosed Dock Adapters until you find the one
that fits tightly with your iPod. Attach the Dock Adapter to the iPod Universal Dock by
pressing lightly on the top of the Dock Adapter (see picture) and it will snap in.
17
English
Step 2. Insert the iPod in the corresponding Dock Adapter in the iPod Universal Dock.
Step 3. Press the iPod key on the remote control and the LED Display under the grille
should display “iPod”. If the display does not lit up, check that the AC power cord is
correctly inserted in to functioning AC outlet.
Step 4. Press the Play key on the remote control. If you still cannot hear any sound check
that the volume is turned up by adjusting the “+” volume key.
Step 5. You can navigate your iPod using the Stop, Play/Pause, Skip/Fast Forward,
Skip/Fast Reverse keys on your remote control.
Charging: Your iPod is charging while the system is on.
19
English
2. How to...?
General:
How to turn the Geneva Sound System on?
- Pressing the FM, iPod, CD, or Line In keys on the remote control
- Pressing the on/off key on the remote control
How to turn the Geneva Sound System off?
By pressing the ON/OFF key on the remote control
. Now the system is in standby mode.
If you want the system completely disconnected from the power, you need to disconnect
the power cable.
How to adjust Volume and Sound?
1. Use the Volume, Bass and Treble keys on the remote control to adjust sound and
volume.
2. Volume: 0 means silence (no sound output), 100 means maximum output.
3. Treble and Bass: -6 means very little bass or treble, 0 means neutral , 6 means
maximum bass or treble.
4. If you turn the device off, the current values are stored. So if it is at a very high volume
when turned off, it will be at a very high volume when it is next turned on.
How to verify that the remote control works?
Every time a key is pressed on the remote control, a small red light on the LED Display
lights up quickly.
20
How to clean the speaker?
Unplug this Geneva Sound System from the AC power outlet before cleaning. Clean only
with a cleaning cloth provided in the accessory bag. To avoid making scratches to the
surface, we recommend that you use the cleaning cloth included in the accessory bag.
Cleaning:
Clean only with a cleaning cloth provide in the accessory bag. Do not use cleaning alco-
hol, or other solvent fluids to clean the surface of the Cabinet as this can both damage
the lacquer and also cause electrical failures and fire if it enters the electronics in the
Geneva Sound System!
What is the functionality of the AIR key on the remote control?
This function is not valid on this system.
How to change battery in the remote control?
1. Open the battery lid that is on the backside of the remote control.
2. Remove the existing battery and replace it with a new lithium cell, 3 V battery
(CR2025 type).
3. Inside the battery compartment there are symbols showing in which direction the
batteries should be placed. Carefully follow these directions.
Step 1
Step 2 + 3
24
FM radio:
How to control the FM radio using the remote control?
You can control the built-in FM radio using the remote control supplied with the Geneva
Sound System.
The figure on page 15 will give you an overview of the control functions.
How to select a FM radio station?
1. Press ‘FM’ on the remote control.
2. Use the << or >> keys to select a station: one click increases or decreases the
frequency.
3. The number on the LED display under the Grille indicates the current frequency in MHz
(e.g. “88.7“ on display means 88.7 MHz).
4. To scan through frequencies, hold down the << or the >> key for a few seconds and
the FM radio searches for the next station automatically. When a station has been
found, the automatic search stops. To keep scanning, repeat the action.
25
English
How to store your favorite FM radio station in a preset?
1. Select your favorite radio station using the << or >> keys on the remote control.
2. You have six presets (a preset memorizes the frequency of the station) available – these
are the following six keys on your remote control:
3. Select one of the 6 preset keys on the remote control, and hold it down until ‘store’
appears on the LED display in the Grille of the Geneva Sound System. The station has
now been stored and can be retrieved using the selected preset key.
How to play a FM radio station that is stored in the presets?
1. Press the FM key on the remote control.
2. Simply press one of the six preset keys once and the stored FM station will be
received.
ERP
TES
FM radio Presets
26
How to erase or overwrite a preset?
Stored presets do not need to be erased - just use the previous steps to store a station in
a preset.
How to connect the FM radio antenna?
The Geneva Sound System is FM ready and it has a built-in FM tuner. To get radio recep-
tion you need to connect the External Antenna that is enclosed with the accessory bag.
You find the External Antenna Connector under the Geneva Sound System on the
Back Panel.
How to change FM stereo/mono settings?
Press the „Stop“ key to change between mono and stereo.
Line in:
How to connect a TV, Computer, VCR, DVD player or a game console to the
Geneva Sound System using the “Line In” input?
Use the enclosed Line In cable to connect the Geneva Sound System to any audio device
that has an audio out connector. First connect the Line In cable to the device you want
to connect with the Geneva Sound System, and then connect the cable to the Line In
connector located on the Back Panel. Press the Line In key on the remote control and
start playing the content of the device you have connected.
Note that you cannot control any such device using the Geneva Sound System remote
control, but instead use the controls available for the connected device.
27
English
3. Troubleshooting, Service and Support
Troubleshooting and Support:
1.
2.
3.
Service and Repair:
If the product is damaged and needs repair, please contact Geneva Lab by phone or
email to be referred to an authorized service center. For repair under the Limited Warranty
Period, see terms on the web at www.genevalab.com and select support page or consult
your dealer.
Technical Support:
product
support@genevalab.com
Customer Service Te
lephone Number:
see Geneva Lab Website www.genevalab.com and select support page for your local
support number.
Website
www.geneva
lab.com
If the system does not function as expected, first carefully read this manual to ensure
that it is being correctly operated.
If the problem persists, you can access our troubleshooting database available on the
web at www.genevalab.com and select support page.
If not successful, contact our customer support:
30
35
Deutsch
Luftzufuhr: Um einen sicheren Betrieb zu gewährleisten und das Gerät vor Überhitzung
zu schützen, verdecken Sie keine Ventilationsöffnungen auf der Geräteunterseite. Stellen
Sie das Gerät daher nicht auf ein Bett, Sofa, oder einen anderen weichen Untergrund.
Stellen Sie es zudem nicht in ein Regal oder stecken Kleinteile durch die Ventilations-
öffnungen.
Reinigung: Bitte beachten Sie, dass dem Zubehörbeutel ein Staubtuch zur Reini-
gung des Gerätes beigepackt ist. Um Kratzer an der lackierten Oberfläche zu vermei-
den, empfehlen wir Ihnen, das beigepackte Putztuch zu verwenden. Bevor Sie das Gerät
reinigen, ziehen Sie den Netzstecker zu Ihrer eigenen Sicherheit.
Überlastung: Um die Feuergefahr und Belastung des Stromkreises zu minimieren, benüt-
zen Sie keine Verlängerungskabel und stark belastete Mehrfachsteckdosen.
Offenes Feuer: Stellen Sie das Gerät in einem sicheren Abstand von offenen Flammen,
wie Kerzen, auf. Stellen Sie niemals Kerzen, auch keine Teelichter, auf das Gerät.
Betriebstemperatur: Die empfohlene Raumtemperatur liegt zwischen 5-40°C.
Frontplatte: Versuchen Sie niemals die Frontplatte zu entfernen. Diese ist nicht abnehm-
bar. Sollte diese trotz allem abgelöst werden, geht jeglicher Garantieanspruch verloren.
Vermeiden Sie Gehörschäden! Immerwährendes lautes Musikhören kann zu ständigen
Hörproblemen führen. Hören Sie daher nur bei Zimmerlautstärke.
Der Netz- oder Gerätestecker wird als Trennvorrichtung verwendet; die Trennvorrich-
tung muss immer betriebsbereit sein.
37
Deutsch
Hinweis für CATV Servicetechniker: Bitte beachten Sie die Richtlinie 820-40 der NEC,
die Aussagen über eine korrekte Erdung von Antennen trifft. Insbesondere achten Sie
bitte darauf, dass das Erdkabel an das Massekabel des Hauses angeschlossen ist.
Abnahme der Rückplatte: Wenn die Abnahme der Rückplatte nicht von unserem Service-
team erfolgt, so verliert der Kunde des Gerätes jeglichen Anspruch auf Garantie.
Entsorgung von Elektrogeräten durch Benutzer in privaten Haushalten in der EU:
Dieses Symbol auf dem Produkt oder dessen Verpackung gibt an, dass das Produkt nicht
zusammen mit dem Restmüll entsorgt werden darf. Es obliegt daher Ihrer Verantwortung,
das Gerät an einer entsprechenden Stelle für die Entsorgung oder Wiederverwertung von
Elektrogeräten aller Art abzugeben. (Bsp. Wertstoffhandel) Die separate Sammlung und
das Recyceln Ihrer alten Elektrogeräte zum Zeitpunkt Ihrer Entsorgung trägt zum Schutz
der Umwelt bei und gewährleistet, dass sie auf eine Art und Weise recycelt werden, die
keine Gefährdung für die Gesundheit des Menschen und der Umwelt darstellt.
Weitere Informationen darüber, wo Sie alte Elektrogeräte zum Recyceln abgeben können,
erhalten Sie bei den örtlichen Behörden, Wertstoffhöfen oder dort, wo Sie das Gerät
erworben haben.
38
Inhalt
Kapitel 1
Kapitel 2
40
40
42
44
46
46
47
47
47
47
48
48
48
49
50
50
50
50
51
51
51
Erste Schritte
Auspacken und Aufstellen
Das Wichtigste in Kürze
iPod hören
CD hören
FM Radio hören
Wie kann ich...?
Haupteinstellungen:
Das Gerät einschalten?
Die Lautstärke & den Klang einstellen?
Die Fernbedienung auf Funktion überprüfen?
Den Lautsprecher reinigen?
Was ist die Funktion der AIR-Taste auf der Fernbedienung?
Die Batterien der Fernbedienung wechseln?
iPod:
Wie wähle ich den richtigen iPod Dock-Adapter für meinen iPod aus?
Die iPod Softwareversion meines iPod ermitteln?
Die Software updaten?
Wie wird der Dock-Adapter eingesetzt oder entfernt?
Mit der Fernbedienung meinen iPod steuern?
CD:
Mit der Fernbedienung den CD Player steuern?
Andere Formate wie MP3 und weitere Formate abspielen?
MP3 CDR / CDRW mit verschiedenen Alben abspielen?
39
Deutsch
Kapitel 3
Kapitel 4
Kapitel 5
FM Radio:
Mit der Fernbedienung das FM Radio steuern?
Einen Radiosender auswählen?
Meine Lieblingssender abspeichern?
Meine gespeicherten Lieblingssender aufrufen?
Einen gespeicherten Sender löschen bzw. überschreiben?
Eine externe Antenne anschließen?
Wie werden die FM-Stereo-/Mono-Einstellungen verändert?
Line in:
Ein Gerät, wie z. B. ein TV, Computer, VCR, DVD-Spieler, Spielkonsole
über den LINE-IN Eingang anschließen?
Fehlerbehebung, Service und Support
Fehlerbehebung
Serviceteam
Technischer Support
Customer Service Telefonnummer
Website
Made for iPod & Technologiepartner
Made for iPod
Technologiepartner
Technische Daten
52
52
53
53
54
54
54
54
55
55
55
55
55
55
56
56
56
57
40
1. Erste Schritte
Schritt 1: Bitte nehmen Sie alle Lieferteile aus der Verpackung. Um im Servicefall weitere
Beschädigungen zu vermeiden, bitten wir Sie, die Verkaufsverpackung aufzuheben.
Die Verpackung enthält folgenden Lieferumfang:
Remote control
External antenna
External power supply
Line in cable
Line in Kabel
Fernbedienung
Externe Antenne
iPod Dock Adapter
Externe Spannungsversorgung
Antennenadapter
nur EU
nur USA
nur GB
nur USA
41
Deutsch
Schritt 2: Legen Sie die im Lieferumfang enthaltenen Batterien, wie auf Seite 48 ange-
zeigt, in die Fernbedienung ein.
Schritt 3: Stecken Sie das DC-Netzkabel (dünnes Kabel) der externen Spannungsversor-
gung in die DC-Netzbuchse der Rückplatte (siehe Abbildung unten). Dann stecken Sie
das AC-Netzkabel der externen Spannungsversorgung in eine Steckdose.
Rückplatte:
FM
Line in Buchse DC Netzbuchse
FM Radio Antennenbuchse
Legen Sie die iPod-Abdeckung während
der Nutzung des Docks hierher
42
Das Wichtigste in Kürze:
Frontabdeckung
CD Player
LED Display zeigt geschaltete
Wiedergabequelle, UKW Frequenz,
CD Status, etc.
Rückplatte
iPod universal
dock
43
Deutsch
Fernbedienung:
LINE IN
iPod
AIR
CD FM
ERP
TES
VOLBASS
TREBLE
VOLBASS
TREBLE
Ein- & Ausschalten
Lautstärke
CD Player
FM Radio
CD Auswurf
Titelsprung/Suchlauf
vorwärts
Line in
FM Radio
Vorwahltasten
AIR
(nicht unterstützte
Funktion)
Stopp
Titelsprung/Suchlauf
rückwärts
Wiedergabe / Pause
iPod
Tiefen
Höhen
45
Deutsch
Schritt 2. Stecken Sie den iPod in den zugehörigen Dock-Adapter im iPod Universal-Dock.
Schritt 3. Drücken Sie an Ihrer Fernbedienung den Knopf iPod. Dies wird Ihnen mit der
Anzeige „iPod“ bestätigt. Falls das Display nicht aufleuchtet, kontrollieren Sie die Kontakte
des Netzkabels.
Schritt 4. Drücken Sie die Wiedergabetaste auf Ihrer Fernbedienung. Sollten Sie keinen
Ton vernehmen, erhöhen Sie die Lautstärke mit dem „+“ Knopf auf der Fernbedienung oder
unter der Klappe auf der Oberseite des Gerätes.
Schritt 5. Sie können durch das Menu Ihres iPod über die Fernbedienungstasten Wieder-
gabe/Pause (Play/Pause), Titelsprung/Suchlauf vorwärts (Skip/ Fast Forward), Titelsprung/
Suchlauf rückwärts (Skip/Fast Reverse) navigieren.
iPod laden: Die Batterie Ihres iPods wird geladen, wenn das System eingschaltet ist.
46
Eine CD hören (siehe auch Seite 51):
Schritt 1. Stecken Sie die CD mit der Front nach vorn in den Schlitz auf der Oberseite des
Gerätes. Dieses wird Ihnen im Display bestätigt und die Wiedergabe startet automatisch. Falls
das Display nicht aufleuchtet, kontrollieren Sie die Kontakte des Netzkabels. Sollten Sie keinen
Ton vernehmen, so erhöhen Sie die Lautstärke mit dem „+“ Knopf auf der Fernbedienung oder
unter der Klappe auf der Oberseite des Gerätes.
Schritt 2. Sie können sich durch das Titelverzeichnis der CD über die Fernbedienungstasten
Stop, Play/Pause, Skip/ Fast Forward, Skip/Fast Reverse bewegen.
Schritt 3. Um die CD wieder auszuwerfen, drücken Sie die EJECT Taste auf der Fernbedinung.
FM Radio hören (siehe auch Seite 52):
Schritt 1. Stecken Sie die externe Antenne in den Antennenanschluss an der Rückplatte.
Schritt 2. Drücken Sie an Ihrer Fernbedienung den Knopf FM bis Ihnen eine Frequenz,
beispielsweise “103,2“ am Gerätedisplay angezeigt wird. Falls das Display nicht aufleuchtet,
kontrollieren Sie die Kontakte des Netzkabels. Sollten Sie keinen Ton vernehmen, erhöhen
Sie die Lautstärke mit dem „+“ Knopf auf der Fernbedienung oder unter der Klappe auf der
Oberseite des Gerätes.
Schritt 3. Suchen Sie sich Ihren gewünschten FM Sender mit den Pfeiltasten auf der Fernbe-
dienung.
CD title
47
Deutsch
2. Wie kann ich...?
Haupteinstellungen:
Das Gerät einschalten?
- Drücken der iPod, CD, FM oder LINE IN Taste auf der Fernbedienung
- Drücken der “Ein & Ausschalten“-Taste auf der Fernbedienung
Das Gerät ausschalten?
Drücken der “Ein & Ausschalten“-Taste auf der Fernbedienung. Das Gerät ist nun im
Bereitschaftsmodus. Wenn Sie das Gerät vollständig ausschalten möchten, müssen Sie
den Netzstecker ziehen.
Die Lautstärke & den Klang einstellen?
1. Benützen Sie die Lautstärke (VOLUME), Tiefen (BASS) und Höhen (TREBLE) Taste auf
Ihrer Fernbedienung.
2. Volumen: Die Lautstärkeanzeige auf dem Display zeigt „0“ bei keiner Tonausgabe und
„100“ für die Maximallautstärke.
3. Bei Höhen und Tiefen meint „0“ keinen Bass- bzw. keine Höhenbetonung und „6“ die
maximale Bass- bzw. Höhenbetonung.
4. Wenn Sie das Gerät ausschalten, bleibt die aktuelle Lautstärkeeinstellung gespeichert.
Beachten Sie dies vor allem, wenn Sie das Gerät bei hoher Lautstärke ausschalten.
Die Fernbedienung auf Funktion überprüfen?
Jedes Mal wenn Sie eine Taste auf der Fernbedienung drücken, wird Ihnen dies am Gerä
-
tedisplay mit dem Aufblinken eines kleinen, roten Leuchtpunktes bestätigt.
48
Den Lautsprecher reinigen?
Ziehen Sie zu Ihrer eigenen Sicherheit den Netzstecker, bevor Sie das Gerät reinigen.
Benützen Sie hierfür ausschließlich weiche, trockene Tücher. Um Kratzer in der lackierten
Oberfläche zu vermeiden, empfehlen wir Ihnen, das in der Verpackung beiliegende Tuch
zu verwenden.
Achtung!
Benützen Sie keinen Alkohol oder sonstige chemische Reinigungsmittel! Diese zerstören
die Lackoberfläche und können beim Eintreten in das Gehäuse zu Defekten und Flam-
menentwicklung führen.
Was ist die Funktion der AIR-Taste auf der Fer
nbedienung?
Diese Funktion wird von diesem Gerät nicht unterstützt.
Die Batterien der Fernbedienung wechseln?
1. Öffnen Sie das Batteriefach auf der Unterseite der Fernbedienung.
2. Nehmen Sie die alten Batterien heraus und ersetzen diese mit einer neuen Lithiumio-
nen-Knopfbatterie (Typ CR2025, 3 V).
3. Im Batteriefach wird Ihnen jeweils der Plus- und Minuspol angezeigt. Legen Sie die
Batterien nach dieser Grafik in die Fernbedienung ein.
Schritt 1
Schritt 2 + 3
49
Deutsch
Geneva
Dock Adapter Nr
15
Works with
iPhone 3G; iPhone 3G-S
12
Works with
iPhone 2G
(4GB, 8GB only)
7
Made for
iPod 4th generation (4G): iPod photo (iPod with color display)
(40GB, 60GB only)
6
Made for
iPod 4th generation (4G): iPod Photo, color U2 iPod
(20GB, 30GB only)
5
Made for
iPod 4th generation (4G)
(40GB only)
4
Made for
iPod 4th generation (4G iPod), U2 iPod
(20GB only)
3
Made for
iPod Mini
(4GB, 6GB only)
*
Made for
iPod touch *
iPod nano 3rd generation (3G) *
iPod classic *
iPod nano 2nd generation (2G) *
iPod 5th Generation (video) *
iPod nano *
* Geneva Dock Adapter
Not included. All new iPod models already include the dock adapter in the original packaging.
Not supported
iPod 3rd generation (3G iPod)
* Geneva Dock Adapter
Liegt nicht bei. Alle neuen iPod-Modelle haben den Dock Adapter
bereits in der Or
iginalverpackung beigefügt.
Der iPod classic 3G wird nicht unterstützt
Wie wähle ich den richtigen iPod Adapter für meinen iPod aus?
„Geneva kann dieses Produkt mit einem oder mehreren Docking-Adaptern liefern.
Die Versionen und die Anzahl der Docking-Adapter können sich von Zeit zu Zeit ändern, da wir uns bemühen, Adapter für die neuesten
und meistverbreiteten iPhones und iPods von Apple mitzuliefern. Wenn der Adapter für den iPod oder das iPhone, das Sie mit dem
Geneva-System verwenden möchten, nicht im Paket enthalten ist, sollte er als Original-Zubehör bei Ihrem Apple-Händler erhältlich sein.“
50
iPod:
Die iPod Softwareversion meines iPod ermitteln?
Wählen Sie auf Ihrem iPod nacheinander „Settings“, „About“, “Version”. Verwenden Sie
immer die neueste Software-Version.
Die iPod Software updaten?
Gehen Sie auf folgende Internetseite: www.apple.com/ipod/download/
Wie wird der Dock-Adapter eingesetzt oder entfernt?
Mit der Fernbedienung meinen iPod steuern?
Nachdem Sie Ihren iPod mit der iPod-Buchse an der Rückplatte verbunden und das Ge
-
rät auf iPod Wiedergabe gesetzt haben, können Sie sich auf leichte Art und Weise mit der
zum Gerät gelieferten Fernbedienung durch das Menü des IPods bewegen.
Eine Übersicht der Funktionen finden Sie auf Seite 43.
51
Deutsch
CD:
Mit der Fernbedienung den CD Player steuern?
Sie können sich auf leichte Art und Weise mit der zum Gerät gelieferten Fernbedienung
durch das das Titelverzeichnis der CD bewegen.
Eine Übersicht der Funktionen finden Sie auf Seite
43.
Andere Formate wie MP3 und weitere Formate abspielen?
Das eingebaute Laufwerk spielt folgende Discs ab: CD-DA, CD-R. CD-RW, CD-ROM
(auch Multisession) und MP3 Formate. Der CD-Player gibt alle Discs wie eine normale CD
wieder.
MP3 CDR / CDRW mit verschiedenen Alben abspielen
?
Es ist möglich verschiedene MP3 Daten auf einer CD-R/W zusammengestellt zu spei-
chern. Das Gerät gibt diese Datenfolge wie in einem numerischen Titelverzeichnis wieder.
Kleine 8 cm CDs abspielen?
Nein.
52
FM Radio:
Mit der Fernbedienung das FM Radio steuern?
Sie können sich auf leichte Art und Weise mit der zum Gerät gelieferten Fernbedienung
durch die vielen Funktionen des FM Empfängers bewegen.
Eine Übersicht der Funktionen finden Sie auf Seite
43.
Einen Radiosender auswählen?
1. Drücken Sie die FM Taste auf der Fernbedienung.
2. Benützen Sie die Pfeiltasten, um auf dem Frequenzband die Sender zu finden.
3. Die Frequenz des Radiosenders wird Ihnen im Gerätedisplay in MHz
angezeigt.
(zum Beispiel: “88.7“ steht für für 88,7 MHz).
4. Um automatisch nach Sendern zu suchen, halten Sie eine der Pfeiltasten für einige
Sekunden gedrückt. Wenn das Gerät einen empfangsstarken Sender gefunden hat,
wird dieser wiedergegeben und der automatische Suchlauf gestoppt. Wenn Ihnen
der Sender nicht gefällt, so wiederholen Sie diesen Schritt.
278
Esiasetetun aseman pyyhintä tai vaihtaminen?
Taltioituja esiasetettuja asemia ei tarvitse välttämättä poistaa pyyhkimällä. Suorittamalla
edellä mainitut esiasetustoimenpiteet voit taltioida uuden aseman jollekin esiasetuspainik-
keelle, jolle on jo taltioitu jokin asema. Uusi asema korvaa tällöin aikaisemmin esiasetetun
aseman.
FM-radioantennin kytkeminen?
Geneva Sound-järjestelmässä on sisäänrakennettu FM-viritin. Radiolähetysten vastaanot-
tamiseksi laitteeseen on kytkettävä ulkoinen FM-antenni. Antenni on mukana varustelau-
kussa.
Ulkoisen FM-antenni liitäntä sijaitsee Geneva Sound-järjestelmän takapaneelissa.
Miten FM stereo/mono -asetuksia muutetaan?
Vaihda asetukseksi mono tai stereo painamalla “Pysäytä“-painiketta.
Line in:
TV-vastaanottimen, tietokoneen, kuvanauhurin, DVDsoittimen
tai pelikonsolin kytkeminen Line in-liitäntään?
Käytä mukana olevaa Line in-kaapelia Geneva Sound-järjestelmän kytkemiseksi linjata-
soisella audiolähdöllä varustettuun ulkoiseen audiolaitteeseen. Kytke Line in-kaapeli ensin
liitettäväksi haluamaasi laitteeseen ja sitten Geneva sound-järjestelmän takapaneelissa
olevaan Line in-tuloliitäntään. Paina Line in-painiketta kauko-ohjaimesta ja käynnistä
toisto kytketyllä laitteella.
Huomaa, että kaikkia ulkopuolisia laitteita ei voi ohjata Geneva Soundjärjestelmän
kauko-ohjaimella. Käytä tällaisessa tapauksessa kytketyn audiolaitteen omia säätimiä.
277

Hulp nodig? Stel uw vraag in het forum

Spelregels

Misbruik melden

Gebruikershandleiding.com neemt misbruik van zijn services uitermate serieus. U kunt hieronder aangeven waarom deze vraag ongepast is. Wij controleren de vraag en zonodig wordt deze verwijderd.

Product:

Bijvoorbeeld antisemitische inhoud, racistische inhoud, of materiaal dat gewelddadige fysieke handelingen tot gevolg kan hebben.

Bijvoorbeeld een creditcardnummer, een persoonlijk identificatienummer, of een geheim adres. E-mailadressen en volledige namen worden niet als privégegevens beschouwd.

Spelregels forum

Om tot zinvolle vragen te komen hanteren wij de volgende spelregels:

Belangrijk! Als er een antwoord wordt gegeven op uw vraag, dan is het voor de gever van het antwoord nuttig om te weten als u er wel (of niet) mee geholpen bent! Wij vragen u dus ook te reageren op een antwoord.

Belangrijk! Antwoorden worden ook per e-mail naar abonnees gestuurd. Laat uw emailadres achter op deze site, zodat u op de hoogte blijft. U krijgt dan ook andere vragen en antwoorden te zien.

Abonneren

Abonneer u voor het ontvangen van emails voor uw Geneva Model M PLUS CD bij:


U ontvangt een email met instructies om u voor één of beide opties in te schrijven.


Ontvang uw handleiding per email

Vul uw emailadres in en ontvang de handleiding van Geneva Model M PLUS CD in de taal/talen: Nederlands, Duits, Engels, Frans, Italiaans, Portugees, Spaans, Deens, Zweeds, Noors, Fins als bijlage per email.

De handleiding is 3,65 mb groot.


U ontvangt de handleiding per email binnen enkele minuten. Als u geen email heeft ontvangen, dan heeft u waarschijnlijk een verkeerd emailadres ingevuld of is uw mailbox te vol. Daarnaast kan het zijn dat uw internetprovider een maximum heeft aan de grootte per email. Omdat hier een handleiding wordt meegestuurd, kan het voorkomen dat de email groter is dan toegestaan bij uw provider.

Stel vragen via chat aan uw handleiding

Stel uw vraag over deze PDF

Uw handleiding is per email verstuurd. Controleer uw email

Als u niet binnen een kwartier uw email met handleiding ontvangen heeft, kan het zijn dat u een verkeerd emailadres heeft ingevuld of dat uw emailprovider een maximum grootte per email heeft ingesteld die kleiner is dan de grootte van de handleiding.

Er is een email naar u verstuurd om uw inschrijving definitief te maken.

Controleer uw email en volg de aanwijzingen op om uw inschrijving definitief te maken

U heeft geen emailadres opgegeven

Als u de handleiding per email wilt ontvangen, vul dan een geldig emailadres in.

Uw vraag is op deze pagina toegevoegd

Wilt u een email ontvangen bij een antwoord en/of nieuwe vragen? Vul dan hier uw emailadres in.


Info