608870
24
Verklein
Vergroot
Pagina terug
1/25
Pagina verder
USERMANUAL
DCAMGPS01
PLEASE READ THIS INSTRUCTION MANUAL CAREFULLY
BEFORE USING THIS PRODUCT.
1
INTRODUCTION
ThankyouforchoosingourdashboardcamerawithGPStracker.
Thismanualcontainsimportantsafetyandoperation
information.Pleasereadthemanualcarefullybeforethefirst
useandkeepitforfuturereference.
SAFETYINSTRUCTIONS
Donotexposethecameratowaterorotherliquids.
Keepthe camera clean.Donotstoreinhot,dirty,humid
orwetenvironment.
Pressthebuttonssoftly(donotpressthescreen).
Do not disassemble this camera. To prevent the risk of
electric shock, do not re
move the cover. No
userserviceablepartsinside.Refertoqualifiedpersonnel
forservicing.
Please unplug the USB cable from the computer when
2
thecameraisnotusedforalongperiodoftime.
Do not drop the camera and prevent hard impact. This
mayresultindamagetotheproduct.
Disconnectthecamerafromanypowersourcebefore
cleaning.Onlyuseadrysoftclothtocleanthecamera.
WHATIS IN BOX
DCAMGPS01 1piece
1. UserManual 1piece
2. SuctionmountwithGPSunit 1piece
3. USBCable 1piece
4. CarCharger 1piece

1. GETTING TO KNOW YOUR DCAM GPS 01
DEVICEOVERVIEW
3
1‐Loudspeaker
2‐LEDLight
3‐Microphone
4‐Lens
5‐Photograph
13‐LCDdisplay
14‐USBPort
15‐MemoryCardSlot
16‐BracketSocket
17‐Power/LEDLightButton
6‐Record/Play/OKButton
7‐Mic.on/off/SOSButt on
8‐UpButton(
)
9‐Menu/BackButton

10‐DownButton(
)
11‐WorkStatusLight(Blue)
12‐PowerIndicator(RED)
18‐HDMIPort
19‐Reset
4
5
2. USING THE DCAM GPS 01
BATTERY OPERATION
1. Torechargetheinternalbattery,connectthecameratoa
computerviatheincludedUSBcable,orusea5V/1A
USBpoweradaptertorechargetheunit.
2. Thebatterywillbefullyrechargedafter34hours.
NOTE: Once fully charged, the recharging icon on screen will
disappear.
INSERTING A MEMORY CARD
Thiscardashboardcameradoesnothaveinternalmemory.A
MicroSDmemorycardmustbeinsertedinthecamerafor
furtheroperation.Ifnomemorycardisinserted,thecamera
cannotrecordanyvideo.Toinsertamemorycard,followthe
nextsteps:
6
1:Turnoffthecamera.
2:InserttheMicroSDcardintothecardslot.
3:Turnthecameraon.Ifthememorycardisinstalledcorrectly,
youcanstartrecordingvideo.
INDICATOR LIGHTS
Thecamerahastwoindicatorlights.
1: When recharging, or when connected to a PC, the red
indicatorwillbeon.
2:Whenrecordingorphoto,thebluelightwillbeblinking.
CAMERA OPERATION
START UP/SHUTDOWN
PressthePowerbuttontoturnthecameraon,thescreenwill
lightupandthecameraison.
PressthePowerkeyagainforabouttwosecondstoshutdown
theca
mera.
Note:Thecamerawillshut downautomaticallywhenthe
batteryislow.
MODE SELECTION
Therearethreedifferentworkingmodesavailableforthis
camera,Photo,videoandplayback.
Display Title Description
Photomode Takestillpictures
Videomode Recordvideos
Playbackmode Recordedvideosplayback
SETTINGS
Beforetakingphotosorrecordingvideos,pressthepower
buttontoswitchontheDCAMGPS01first.PresstheMenu
buttontoenterSettings.Pressup/downbuttontoselectthe
optionandpressOKbuttontoconfirmyoursetting.
7
8
MENU FUNCTION
Date/Time Thisfunctioncanbeusedtoaddadateto
yourpicturesandvideoasyoutakethem
Setthedate
Autopower
off
Ifthecameraisnotusedforspecifictime,it
willautomaticallyturnoff.If"off"is
selected,thecamerawi ll alwaysstayon.
1min/ 3min /off
Beepsound TurnOn/Offbeepbuttonsounds:
On /off
Language Settheonscreenlanguage:English
Frequency Setcorrespondingfrequencyaccordingto
yourregion:50HZ/ 60HZ
9
TVmode
PlaybackvideotoaTVsetviaHDMIcable
(Notincluded).ChooseTVformataccordingto
yourregionNTSC/PAL
LCDoff
SelecttoturnLCDonoroff
Format FormatyourSDcardincludingprotected
files.NOTE:removingtheSDcardduring
formattingmaydamagethecard.
OK/ Cance l
Default
Setting
Factoryresettodefaultsettings:OK /
Cancel
Version Firmwareversionnumber
10
VIDEOMODE
1. Forautomaticstart,connectthecameratothecar
charger.5secondsafterthecarengineisstarted,the
camerawillautomaticallystartrecordingvideo.When
thecarengineisshutdown,thecamerawillsavethe
lastfileandautomaticallyturnsoffafter15seconds.
2. Tostartrecordingmanually
,youcanjustpressthe
Recordbutton.Pressthesamebuttonagaintostop
recording.
3. Zoomin/outbypressingUP/Downbuttons
4. Therecordingtimelengthwillbeshownonthescreen
5. PleaseuseClass10orabovememorycardforrecording
HDvideos
6. Whenloopre
cordingisdisabled,thecamerawill
automaticallystoprecordingwhenthememorycardis
full.(Whenlooprecordingisenabled,thecamerawill
alwayskeeprecording,butstartsoverwritingtheoldest
videofileswhenthecardisfull.)
MUTE & SOS FUNCTION
1. Duringrecording,press button,devicewillmutethe
microphone,pressagaintoturnthemicrophonebackon.
2. Press
buttonfor2secondstolockthecurrentvideo
segmentfrombeingoverwrittenbylooprecordings.(The
lockiconcanberemovedinplaybackmode.)
11
12
SETTINGS IN VIDEO MODE
While in video mode, press the Menu button to change your
settings.
MENU FUNCTION
Resolution
Choosethevideoresolutionfrom1080FHD
1920*1080/1080P1440*1080/720P
1280*720(30fps).
Loop
recording
Whenlooprecordingisenabled,thecamera
willalwayskeeprecording,butstarts
overwritingtheoldestvideofileswhenthe
cardisfull.Youcansetthelengthofeach
videosegment:
Off/1min./2mins/3mins/5mins/10 mins
Exposure
(EV)
Selecttheexposurevaluefrom
+2.0,+5/3,+4/3 ,+1.0,+2/3,+1/3,0.0,
1/3 , 2/3 , 1.0,4/3 ,5/3 , 2.0
13
Motion
Detection
When motion detection is on, the camera
will automatically start recording if any
movement is detected.On /Off
Record
Audio
Enable/disableaudiorecording
On /Off
Date
Stamp
Enable/disabletimestamponrecorded
videos/pictures: On /Off
GSensor Setthesensitivityofthevibrationsensorso
thatitonlygetstriggeredbyactual
impactsandcollisionsandnotwhenyou
arejustdrivingoverunlevelroads.For
example,ongraveledroadsitisbetterto
selectLOW.
Off/High/Medium/Low
WHAT’S ON SCREENIN VIDEO MODE
When recording, following icons will be displayed on the
camerascreen.
1. Videorecording
2. LoopRecording
3. Exposure
4. Date
5. Time
6. Remainingbatt ery capacity
7. Memorycardloaded
8. Videoresolution
9. Timerecorded
10.
Daytime/Nighttime
11.MICOn/Off
14
PHOTOMODE
1. TurnonthecameraandPressthe buttontoenter
photomode.
2. Takeapicturebypressingthe
button.
3. Pressupanddownbuttonstozoominorzoomout.
4. Apreviewwillbedisplayedonthescreenforonesecond.
SETTINGS IN PHOTO MODE
Whileinphotomode,entersetupmenutochangeyourphoto
settings
MENU FUNCTION
Capture
Mode
Selectsingle/multiphotoandtimeinterval:
Single/2stimer/5stimer /10s
timer
Resolution Changetheimageresolution:
15
16
12M 4000*300010M 3648*2736
8M 3264*2448 5M 2592*1944
3M 2048*15362M HD1920*1080
1.3M 1280*960 VGA 640*480
Sequence Automaticallytake5photosinarow .
Off/On
Quality Selectalowerimagequalitytoreducethe
imagesizeandsavememorycapacity.There
arethreeoptionsforchoice:Fine/
Normal/ Economy
Sharpness AdjusttheSharpness,threeoptions
available:Strong/Normal/Soft
White
balance
Adjustthewhitebalancesettingsdepending
onthesurroundingenvironmentlight
Settings: Auto/Daylight/Cloudy
/Tungsten/Fluorescent
Color Setthecoloreffecttoaddacolortonetothe
17
video:
Color/Black&white/Sepia
ISO TheISOmenuallowsyoutosetthelevelof
sensitivitythatyourcamerahastolightin
thesurroundingenvironment.
Auto/100/200/400
Exposure Settheexposurevalue:
+2.0,+5/3,+4/3,+1.0,+2/3,+1/3,0.0,
1/3 , 2/3 , 1.0,4/3 ,5/3 , 2.0
Date
Stamp
Stampdateonvideosorimagesrecordedby
theunit.Therearethreeoptions: Off/
Date/Date&Time
WHAT ON SCREENIN PHOTO MODE
WheninPhotomode,followingwillbeshownonscreen.
1. Photomode
2. Exposure
3. Whitebalance
4. ISO
5. Remaining capacity
ofbattery
6. Memorycard
7. Imagequality
8. Resolution
9. Remaining storage
space
10. Daytime/nighttime
18
PLAYBACKMODE
1: Turn on the DCAMGPS01, press and hold the icon 
andgointomenutosetthecamerainplaybackmode.
2:Whenthecameraentersplaybackmode,thelastrecorded
filewillbedisplayed.Presstheup/downbuttontobrowsethe
storedfiles.
3: Press the OK button to play the files. Meanwhile, press
up/down to FORWARD / BACKWARD (1/2, 1/
4 , 1/8 ) , press OK
buttontopause
.
SETTINGS IN PLAYBACK MODE
MENU FUNCTION
Delete
Use this function to delete asingle file or
allfiles.DeleteCurrent/DeleteAll
Protect
Usethisfunction to protectthe filesfrom
beingdeletedunwanted.
19
20
LockCurrent/UnlockCurrent/Lock
All/UnlockAll
SlideShow
Displaytimeperimageduringan
automaticslideshow
2seconds/5sesonds/8seconds
Thumbnail
Whenplaybackisstopped,anoverviewof
all saved files with miniature images is
displayed
OffOn
Volume
Turn up/down to increase or decrease
volume
CONNECTIONWITH TV
To view the videos that are recorded by the camera on a
TV/HDT V, justconnect the deviceto yourTV with HDMI cable
(not included). For playback options, please refer to the
PLAYBACKMODEsection.
21
DOWNLOADING FILES TO YOUR PC
ConnectthedevicetocomputerwiththeUSBcable.
SelectMassstorageonscreenafterconnectionandpressOK
buttonforconfirmation.
Youcanfindthecamerain“MyComputer
AllfilesarestoredintheDCIMfolder,videosarestoredinAVI
format,andthepicturesarestoredinJPGfo
rmat.Youcannow
downloadthefilestoyourPC.
IfyouselectPCcameraonscreenafterinitialUSBconnection
andpressOKbuttonforconfirmation,thedashcamcanalsobe
usedasaPCwebcam.
22
TROUBLESHOOTING
Problem Solution
CheckUSBconnection/cableCannotdownload
imagestothePC
ChooseMassStorageonscreen
Noactionafter
pressingShutter
button
1.Waituntillthecamerasaved
thelastimage/video
2.Memorycapacityrunsout.
Deletesomepicturesorvideos
fromtheSDcard.
Camerahasno
response
Presstheresetbuttonwiththin
needleandrestarttheunit.
23
FormatyourmicroSDcard,and
tryagain.CheckSDcardinPCfor
problems.
“Carderror”
messageappear
whenMicroSD
cardisloaded
Class6orabovememorycardis
requiredforuseinthiscamera.
NOTE:Ascontinualimprovementsaremadetothedesignand
specificationsofthisproduct,slightdifferencesmayoccurin
theactualproduct.
24

Hulp nodig? Stel uw vraag in het forum

Spelregels
1

Forum

Gembird-DCAM-GPS-01
  • Batterij is heel snel leeg kan die ook vervangen worden en hoe?
    Gesteld op 1-11-2023 om 12:34

    Reageer op deze vraag Misbruik melden
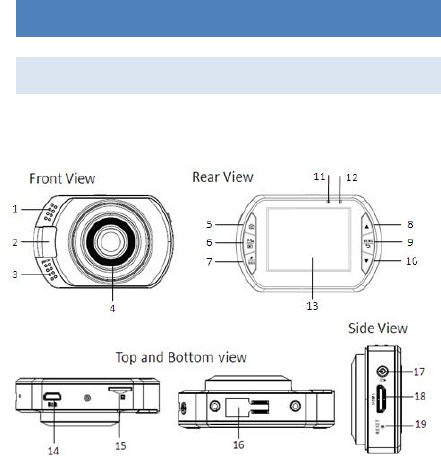
  • Hallo ik heb een gembird camera de Dcam-GPS-01 kan iemand mij vertellen hoe ik de tijd bij kan zetten hij staat nu op 2013 06 22 als ik op datum selecteer kom ik alleen maar bij aan /of uit heeft iemand een oplossing want vindt het wel belangrijk dat er de juiste datum en tijd bij mijn opnamens staat Gesteld op 21-6-2016 om 12:27

    Reageer op deze vraag Misbruik melden

Misbruik melden

Gebruikershandleiding.com neemt misbruik van zijn services uitermate serieus. U kunt hieronder aangeven waarom deze vraag ongepast is. Wij controleren de vraag en zonodig wordt deze verwijderd.

Product:

Bijvoorbeeld antisemitische inhoud, racistische inhoud, of materiaal dat gewelddadige fysieke handelingen tot gevolg kan hebben.

Bijvoorbeeld een creditcardnummer, een persoonlijk identificatienummer, of een geheim adres. E-mailadressen en volledige namen worden niet als privégegevens beschouwd.

Spelregels forum

Om tot zinvolle vragen te komen hanteren wij de volgende spelregels:

Belangrijk! Als er een antwoord wordt gegeven op uw vraag, dan is het voor de gever van het antwoord nuttig om te weten als u er wel (of niet) mee geholpen bent! Wij vragen u dus ook te reageren op een antwoord.

Belangrijk! Antwoorden worden ook per e-mail naar abonnees gestuurd. Laat uw emailadres achter op deze site, zodat u op de hoogte blijft. U krijgt dan ook andere vragen en antwoorden te zien.

Abonneren

Abonneer u voor het ontvangen van emails voor uw Gembird DCAM-GPS-01 bij:


U ontvangt een email met instructies om u voor één of beide opties in te schrijven.


Ontvang uw handleiding per email

Vul uw emailadres in en ontvang de handleiding van Gembird DCAM-GPS-01 in de taal/talen: Engels als bijlage per email.

De handleiding is 0,45 mb groot.


U ontvangt de handleiding per email binnen enkele minuten. Als u geen email heeft ontvangen, dan heeft u waarschijnlijk een verkeerd emailadres ingevuld of is uw mailbox te vol. Daarnaast kan het zijn dat uw internetprovider een maximum heeft aan de grootte per email. Omdat hier een handleiding wordt meegestuurd, kan het voorkomen dat de email groter is dan toegestaan bij uw provider.

Stel vragen via chat aan uw handleiding

Stel uw vraag over deze PDF

Andere handleiding(en) van Gembird DCAM-GPS-01

Gembird DCAM-GPS-01 Gebruiksaanwijzing - Nederlands - 25 pagina's

Gembird DCAM-GPS-01 Gebruiksaanwijzing - English - 16 pagina's


Uw handleiding is per email verstuurd. Controleer uw email

Als u niet binnen een kwartier uw email met handleiding ontvangen heeft, kan het zijn dat u een verkeerd emailadres heeft ingevuld of dat uw emailprovider een maximum grootte per email heeft ingesteld die kleiner is dan de grootte van de handleiding.

Er is een email naar u verstuurd om uw inschrijving definitief te maken.

Controleer uw email en volg de aanwijzingen op om uw inschrijving definitief te maken

U heeft geen emailadres opgegeven

Als u de handleiding per email wilt ontvangen, vul dan een geldig emailadres in.

Uw vraag is op deze pagina toegevoegd

Wilt u een email ontvangen bij een antwoord en/of nieuwe vragen? Vul dan hier uw emailadres in.


Info