Garmin®, the Garmin logo, and inReach® are trademarks of Garmin Ltd. or its subsidiaries, registered in the USA and other countries. These trademarks may not be used without the express permission of
Garmin.
El número de registro COFETEL/IFETEL puede ser revisado en el manual a través de la siguiente página de internet.
December 2016190-02165-92_0APrinted in Taiwan
INREACH® POWERED MOUNT
Installation Instructions
Important Safety Information
WARNING
See the Important Safety and Product Information guide in the
GPS device product box for product warnings and other
important information.
Installing the Device in the Mount
NOTICE
Before you place the device in the mount, ensure the metal
contacts on the device and the mount are dry. Moisture on the
contacts causes equipment damage. Use the weather cap to
keep the mount dry.
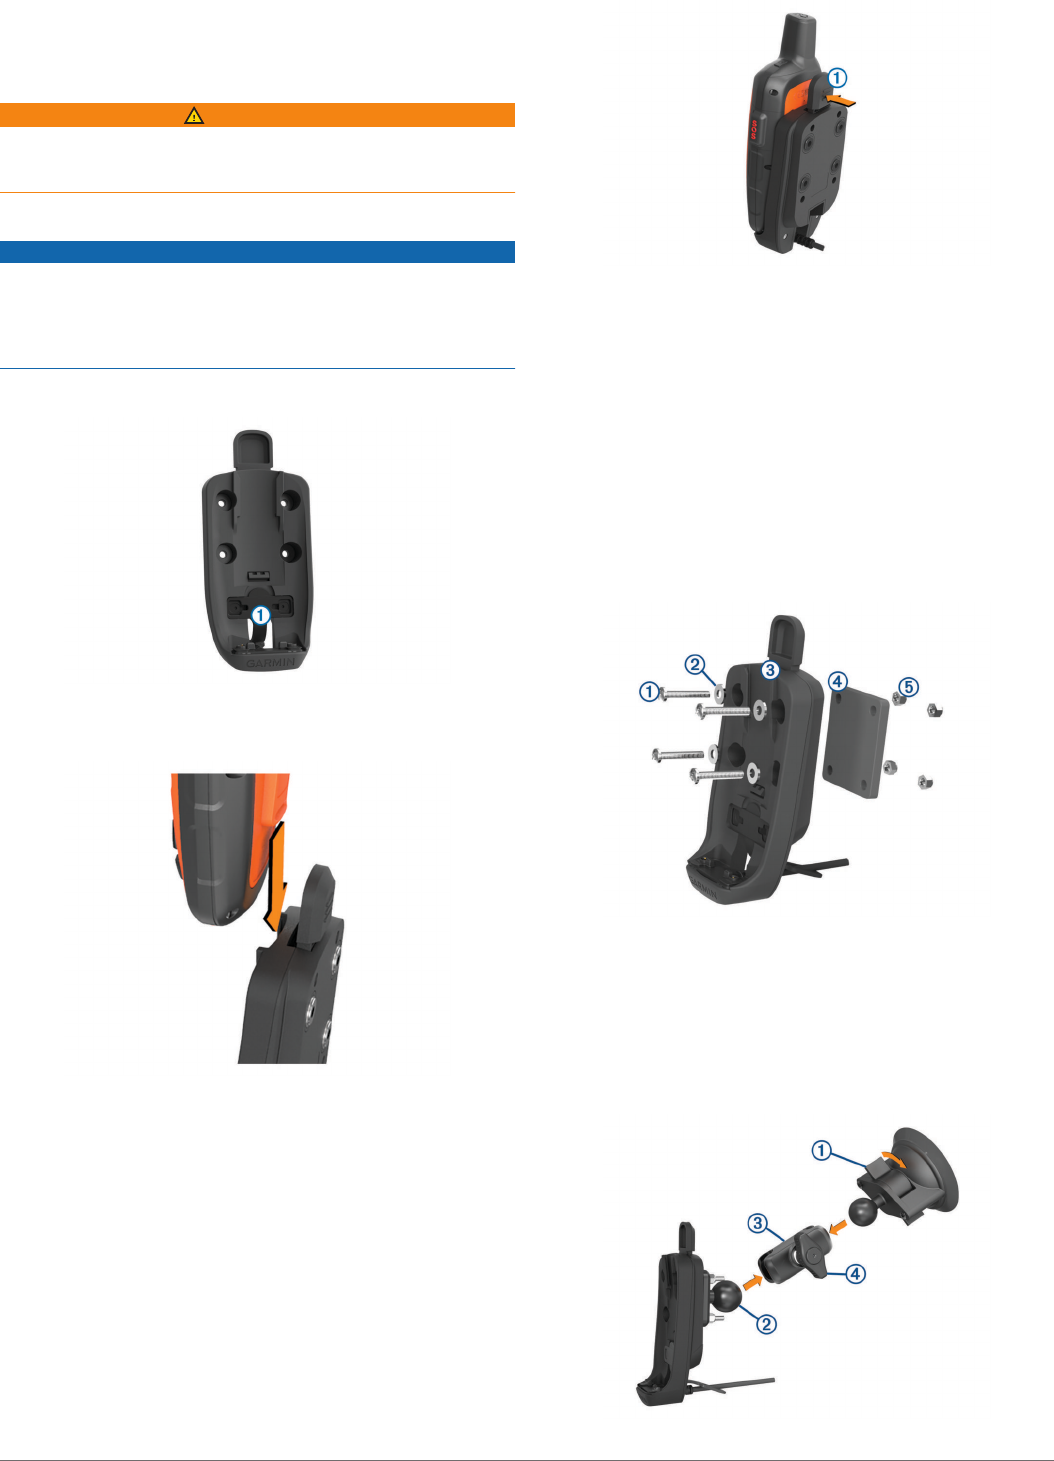
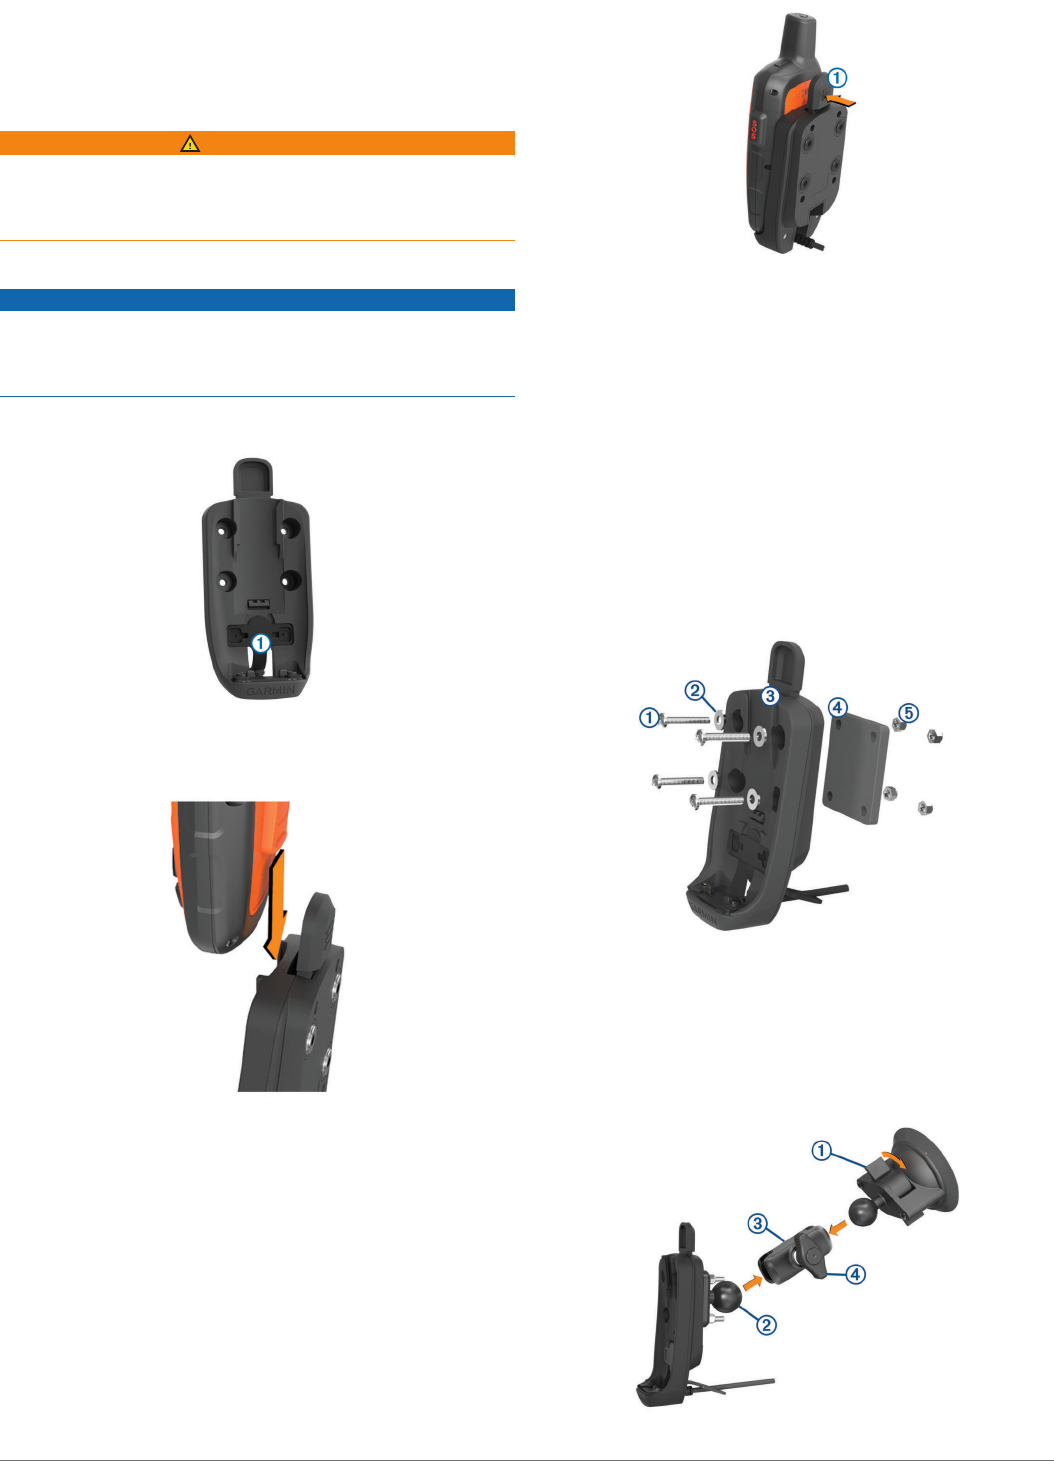
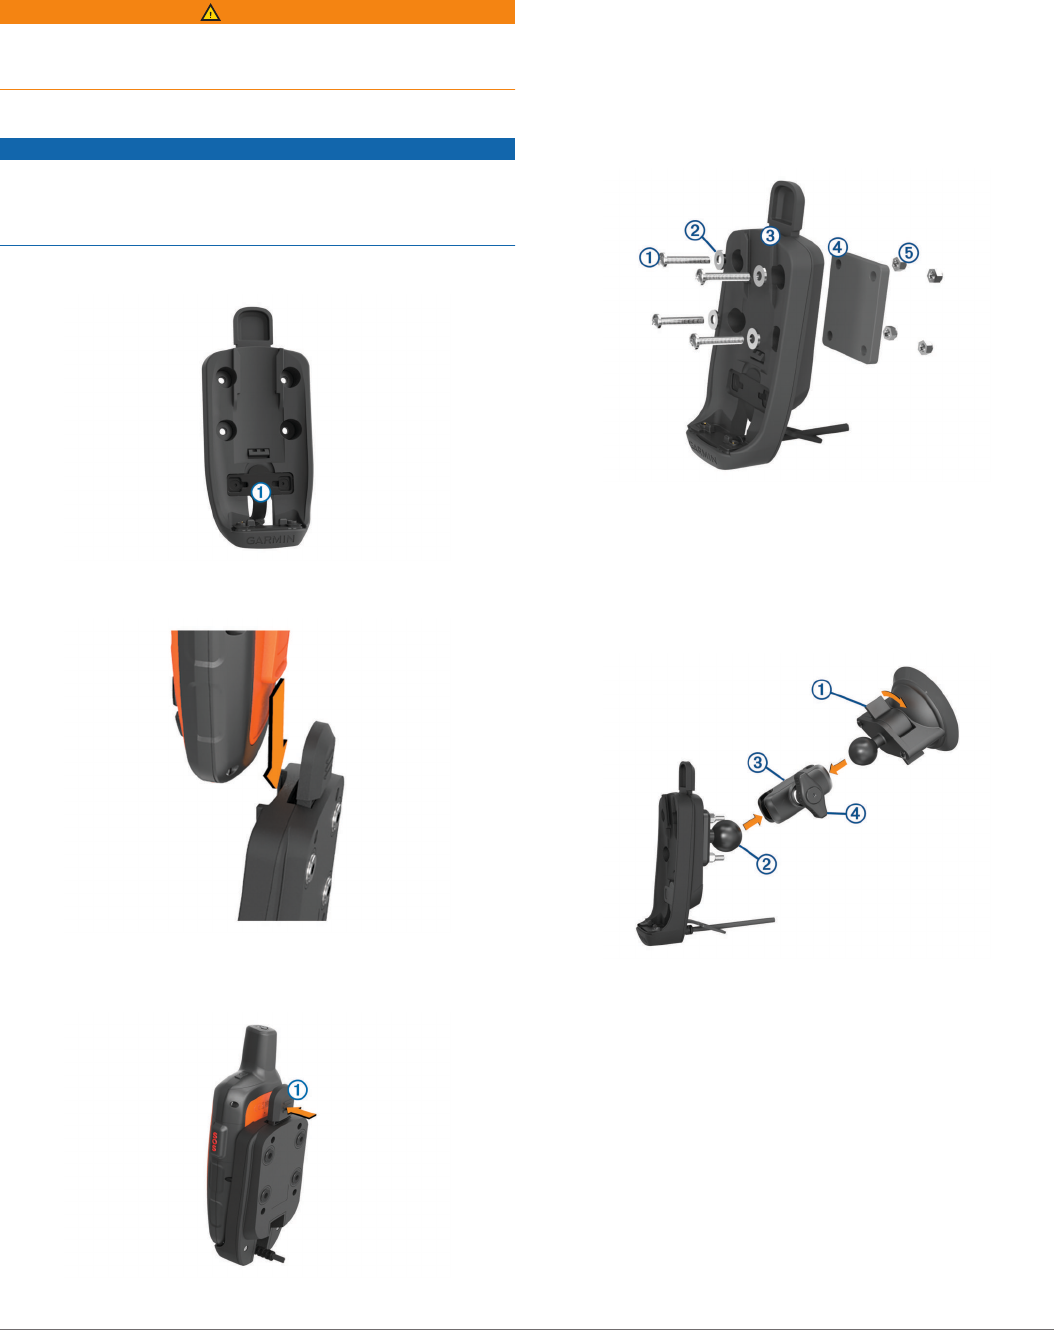
1
Place the weather cap
À
in the storage area on the mount.
2
Align the mounting spine with the notches on the mount, and
slide the device down until it snaps into place.
Removing the Device from the Mount
1
Press the tab
À
on the mount to release the device.
2
Lift the device out of the mount.
3
Place the weather cap on the metal contacts.
Connecting Power to the Mount
1
Select a mounting location based on available power sources
and an unobstructed view of your surroundings.
2
Route the USB cable, and connect it to a power source.
Attaching an AMPS Base Plate to the Mount
NOTE: The base plate is not included with all powered mounts.
1
Thread the screws
À
through the washers
Á
, mount
Â
, and
base plate
Ã
.
2
Tighten the nuts
Ä
to secure the base plate.
NOTE: The recommended torque is 1.7 to 2.25 N-m (15 to
20 lbf-in.).
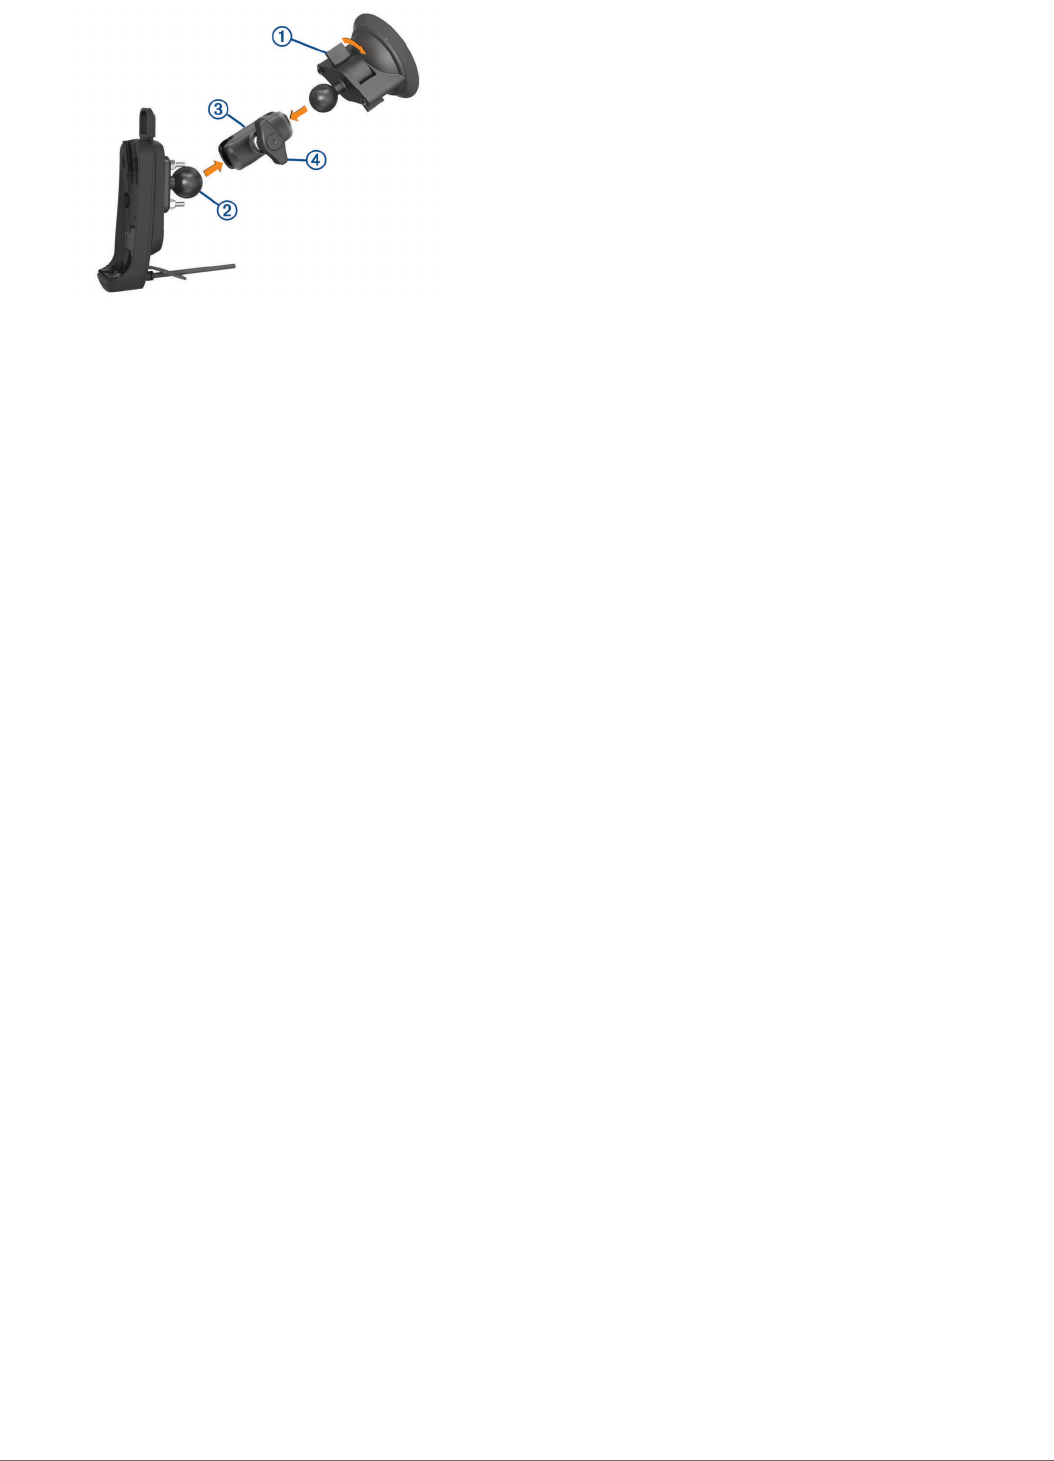
Mounting the Device in an Automobile
1
Clean and dry your windshield and the suction cup with a lint-
free cloth.
2
Press the suction cup to the windshield, and flip the lever
À
clockwise.
3
Align the ball of the suction cup mount and the ball of the
base plate
Á
with the double-socket arm
Â
.
4
Tighten the knob
Ã
slightly.
5
If necessary, adjust for better viewing and operation.
6
Tighten the knob to secure the mount.
2Installation Instructions
SUPPORT DE MONTAGE INREACH®
AVEC ALIMENTATION
Instructions d'installation
Informations importantes relatives à la
sécurité
AVERTISSEMENT
Consultez le guide Informations importantes sur le produit et la
sécurité inclus dans l'emballage du GPS pour prendre
connaissance des avertissements et autres informations sur le
produit.
Installation de l'appareil sur le support
AVIS
Avant d'installer l'appareil dans le support, assurez-vous que le
support et les contacts métalliques de l'appareil sont secs. Vous
risquez d'endommager votre équipement si les contacts sont
mouillés. Utilisez le capuchon étanche pour protéger le socle de
l'humidité.
1
Placez le capuchon étanche
À
dans l'emplacement du
support prévu à cet effet.
2
Alignez la rainure de fixation et la fente, puis faites glisser
l'appareil vers le bas jusqu'à ce qu'il soit bien en place.
Retrait de l'appareil du support
1
Appuyez sur la languette
À
située sur le support pour libérer
l'appareil.
2
Soulevez l'appareil du support.
3
Placez le capuchon étanche sur les contacts métalliques.
Raccordement du support à l'alimentation
1
Choisissez un emplacement de montage en vous assurant
de disposer d'une source d'alimentation à proximité et d'une
vue dégagée.
2
Acheminez le câble USB est branchez-le à une source
d'alimentation.
Fixation d'une base AMPS sur le support
REMARQUE : la plaquette de base n'est pas incluse avec tous
les supports de montage avec alimentation.
1
Faites passer les vis
À
dans les rondelles
Á
, le support
Â
et
la plaquette de base
Ã
.
2
Serrez les écrous
Ä
pour fixer la base.
REMARQUE : il est recommandé de serrer les écrous selon
un couple de 1,7 à 2,25 N m (de 15 à 20 lbf/po).
Montage de l'appareil dans une automobile
1
Nettoyez, puis séchez votre pare-brise et le support à
ventouse avec un chiffon non pelucheux.
Instructions d'installation3
2
Pressez la ventouse contre le pare-brise et abaissez le levier
À
dans le sens des aiguilles d'une montre.
3
Alignez la rotule du support à ventouse et la rotule de la base
Á
avec le bras muni de deux douilles
Â
.
4
Serrez légèrement la molette
Ã
.
5
Si besoin, réglez le support pour une vision et une utilisation
optimales.
6
Serrez la molette pour fixer le support.
4Instructions d'installation
INREACH®SUPPORTO ALIMENTATO
Istruzioni di installazione
Informazioni importanti sulla sicurezza
AVVERTENZA
Per avvisi sul prodotto e altre informazioni importanti, consultare
la guida Informazioni importanti sulla sicurezza e sul prodotto
inclusa nella confezione del dispositivo GPS.
Installazione del dispositivo nel supporto
AVVISO
Prima di posizionare il dispositivo nel supporto, accertarsi che i
contatti metallici sul dispositivo e sul supporto siano asciutti. I
contatti bagnati possono danneggiare l'apparecchiatura.
Utilizzare il cappuccio protettivo per mantenere asciutto il
supporto.
1
Posizionare il cappuccio protettivo
À
nell'area di appoggio
del supporto.
2
Allineare l'attacco per staffa alle scanalature sul supporto,
quindi far scorrere il dispositivo verso il basso finché non
scatta in posizione.
Rimozione del dispositivo dal supporto
1
Premere la linguetta
À
sul supporto per rimuovere il
dispositivo.
2
Estrarre il dispositivo dal supporto sollevandolo.
3
Posizionare il cappuccio protettivo sui contatti metallici.
Collegamento dell'alimentazione al supporto
1
Scegliere una posizione di installazione vicino alle fonti di
alimentazione disponibili e dove sia garantita una visuale
priva di ostacoli.
2
Passare il cavo USB e collegarlo a una fonte di
alimentazione.
Collegamento di una base AMPS al supporto
NOTA: la base non è inclusa con tutti i supporti alimentati.
1
Inserire le viti
À
nelle rondelle
Á
, nel supporto
Â
e nella
base
Ã
.
2
Serrare i dadi
Ä
per fissare la base.
NOTA: la coppia consigliata è da 1,7 a 2,25 N-m (da 15 a
20 lbf-in.).
Montaggio del dispositivo all'interno di
un'automobile
1
Pulire il parabrezza e la ventosa con un panno privo di
lanugine.
Istruzioni di installazione5
2
Premere la ventosa sul parabrezza, quindi spingere la leva
À
in senso orario.
3
Allineare la sfera del supporto a ventosa e la sfera della base
Á
al braccio con doppio alloggiamento
Â
.
4
Serrare leggermente la manopola
Ã
.
5
Se necessario, regolare per miglior visuale e utilizzo.
6
Serrare la manopola per fissare il supporto.
6Istruzioni di installazione
INREACH® HALTERUNG MIT STROM
VERSORGUNG
Installationsanweisungen
Wichtige Sicherheitsinformationen
WARNUNG
Lesen Sie alle Produktwarnungen und sonstigen wichtigen
Informationen der Anleitung "Wichtige Sicherheits- und
Produktinformationen", die dem GPS-Gerät beiliegt.
Einsetzen des Geräts in die Halterung
HINWEIS
Stellen Sie vor dem Einsetzen des Geräts in die Halterung
sicher, dass die Metallkontakte am Gerät und an der Halterung
trocken sind. Feuchtigkeit an den Kontakten führt zu Schäden.
Verwenden Sie die Schutzkappe, damit die Halterung trocken
bleibt.
1
Bringen Sie die Schutzkappe
À
am dafür vorgesehenen
Bereich der Halterung an.
2
Richten Sie die Gehäuserückseite auf die Einkerbungen an
der Halterung aus, und schieben Sie das Gerät nach unten,
bis es einrastet.
Entnehmen des Geräts aus der Halterung
1
Drücken Sie die Lasche
À
an der Halterung nach unten, um
das Gerät aus der Halterung zu lösen.
2
Nehmen Sie das Gerät aus der Halterung.
3
Setzen Sie die Schutzkappe auf die Metallkontakte auf.
Anschließen der Stromversorgung an die
Halterung
1
Ziehen Sie bei der Auswahl des Montageorts die verfügbaren
Stromquellen und eine freie Sicht der Umgebung in Betracht.
2
Verlegen Sie das USB-Kabel, und verbinden Sie es mit einer
Stromquelle.
Anbringen einer AMPSBasisplatte an der
Halterung
HINWEIS: Die Basisplatte ist nicht im Lieferumfang aller
Halterungen mit Stromversorgung enthalten.
1
Führen Sie die Schrauben
À
durch die Unterlegscheiben
Á
,
die Halterung
Â
und die Basisplatte
Ã
.
2
Ziehen Sie die Muttern
Ä
an, sodass die Basisplatte sicher
befestigt ist.
HINWEIS: Es wird ein Drehmoment von 1,7 bis 2,25 Nm (15
bis 20 lbs/Zoll) empfohlen.
Anbringen des Geräts im Auto
1
Reinigen und trocknen Sie die Windschutzscheibe und die
Saugnapfhalterung mit einem fusselfreien Tuch.
Installationsanweisungen7
2
Setzen Sie die Saugnapfhalterung auf die
Windschutzscheibe, und klappen Sie den Hebel
À
im
Uhrzeigersinn um.
3
Richten Sie die Kugel der Saugnapfhalterung und die Kugel
der Basisplatte
Á
auf das Doppelkugelgelenk
Â
aus.
4
Ziehen Sie den Feststellknopf
Ã
leicht an.
5
Passen Sie die Ausrichtung bei Bedarf an, um sie für die
Anzeige und den Betrieb zu optimieren.
6
Ziehen Sie den Feststellknopf an, sodass die Basis sicher
befestigt ist.
8Installationsanweisungen
SOPORTE CON ALIMENTACIÓN
PARA INREACH®
Instrucciones de instalación
Información importante sobre seguridad
ADVERTENCIA
Consulta la guía Información importante sobre el producto y tu
seguridad que se incluye en la caja del producto del dispositivo
GPS y en la que encontrarás advertencias e información
importante sobre el producto.
Instalar el dispositivo en el soporte
AVISO
Antes de colocar el dispositivo en el soporte, asegúrate de que
los contactos de metal del dispositivo y el soporte estén secos.
La humedad en los contactos provoca daños en el equipo. Usa
la tapa protectora para mantener el soporte seco.
1
Coloca la tapa protectora
À
en el área de almacenaje del
soporte.
2
Alinea la carcasa de montaje con las muescas del soporte y
desliza el dispositivo hacia abajo hasta que encaje en su
lugar.
Retirar el dispositivo del soporte
1
Presiona la pestaña
À
del soporte para liberar el dispositivo.
2
Levanta el dispositivo para separarlo del soporte.
3
Coloca la tapa protectora sobre los contactos metálicos.
Conectar una fuente de alimentación al
soporte
1
Selecciona la ubicación de montaje en base a las fuentes de
alimentación disponibles y asegúrate de contar con una vista
sin obstáculos del entorno.
2
Pasa el cable USB y conéctalo a una fuente de alimentación.
Conectar la placa base AMPS al soporte
NOTA: la placa base no se incluye con todos los soportes con
alimentación.
1
Introduce los tornillos
À
a través de las arandelas
Á
, el
soporte
Â
y la placa base
Ã
.
2
Aprieta las tuercas
Ä
para fijar la placa base.
NOTA: el par de apriete recomendado es de 1,7 a 2,25 N-m
(15 a 20 lbf-in).
Montar el dispositivo en un automóvil
1
Limpia y seca el parabrisas y la ventosa con un paño que no
suelte pelusa.
Instrucciones de instalación9
2
Presiona la ventosa contra el parabrisas y mueve la palanca
À
hacia la derecha.
3
Alinea la bola del soporte con ventosa y la bola de la placa
base
Á
con el brazo de doble toma
Â
.
4
Aprieta la rueda
Ã
ligeramente.
5
Realiza los ajustes necesarios para mejorar la visión y el
uso.
6
Aprieta la rueda para fijar el soporte.
10Instrucciones de instalación
MONTAGEM COM ALIMENTAÇÃO
INREACH®
Instruções de instalação
Informações importantes sobre segurança
ATENÇÃO
Consulte o guia de Informações importantes sobre segurança e
sobre o produto na caixa do produto GPS para obter mais
detalhes sobre avisos e outras informações importantes.
Instalando o dispositivo no suporte
AVISO
Antes de colocar o dispositivo no suporte, verifique se os
contatos de metal no dispositivo e no suporte estão secos. A
umidade nos contatos pode causar danos no equipamento.
Utilize uma cobertura de proteção para manter o suporte seco.
1
Coloque a cobertura de proteção
À
na área de
armazenamento do suporte.
2
Alinhe o suporte de montagem com os entalhes no suporte e
deslize o dispositivo para baixo, até encaixar no lugar.
Removendo o dispositivo do suporte
1
Pressione a aba
À
no suporte para soltar o dispositivo.
2
Levante o dispositivo do suporte.
3
Coloque a cobertura de proteção nos contatos de metal.
Ligando a alimentação ao suporte
1
Selecione um local de montagem baseando-se nas fontes de
alimentação disponíveis e em uma visão desobstruída dos
arredores.
2
Direcione o cabo USB e conecte-o a uma fonte de energia.
Prender uma placa base AMPS ao suporte
OBSERVAÇÃO: a placa base não está incluída com todas as
montagens com alimentação.
1
Rosqueie os parafusos
À
pelas arruelas
Á
, o suporte
Â
e a
placa base
Ã
.
2
Aperte as porcas
Ä
para prender a placa base.
OBSERVAÇÃO: o torque recomendado é de 1,7 a 2,25 N-m
(15 a 20 lbf-pol.).
Montando o dispositivo em um automóvel
1
Limpe e seque o para-brisas e a ventosa com um pano sem
fibras.
2
Pressione a ventosa no para-brisa e gire a alavanca
À
no
sentido horário.
3
Alinhe a esfera do suporte da ventosa e a esfera da placa
base
Á
com o braço de encaixe duplo
Â
.
4
Aperte ligeiramente o botão
Ã
.
5
Se necessário, ajuste para melhor visualização e operação.
6
Aperte o botão giratório para fixar o suporte.
Instruções de instalação11
NAPAJALNI NOSILEC ZA NAPRAVO
INREACH®
Navodila za namestitev
Pomembne varnostne informacije
OPOZORILO
Za opozorila in pomembne informacije o izdelku si oglejte
navodila Pomembne informacije o varnosti in izdelku v škatli
naprave GPS.
Namestitev naprave v nosilec
OBVESTILO
Preden napravo postavite v nosilec, se prepričajte, da so
kovinski stiki na napravi in nosilcu suhi. Vlaga na stikih lahko
poškoduje opremo. Uporabite zaščitni pokrovček, da nosilec
ostane suh.
1
Zaščitni pokrovček
À
postavite v prostor za shranjevanje na
nosilcu.
2
Hrbtni del za namestitev poravnajte z zarezama na nosilcu,
nato pa napravo pritisnite navzdol, da se zaskoči.
Odstranjevanje naprave z nosilca
1
Pritisnite jeziček
À
na nosilcu, da sprostite napravo.
2
Dvignite napravo iz nosilca.
3
Na kovinske stike namestite zaščitni pokrovček.
Priklop napajanja na nosilec
1
Mesto namestitve izberite na podlagi razpoložljivih virov
napajanja in tako, da ni oviran pogled na okolico.
2
Namestite kabel USB in ga priklopite na vir napajanja.
Namestitev osnovne plošče AMPS na
nosilec
OPOMBA: osnovna plošča ni priložena vsem napajalnim
nosilcem.
1
Vstavite vijake
À
skozi podložke
Á
, nosilec
Â
in osnovno
ploščo
Ã
.
2
Privijte matice
Ä
, da pritrdite osnovno ploščo.
OPOMBA: priporočeni moment znaša 1,7–2,25 Nm (15–
20 lbf-in.).
Namestitev naprave v avtomobil
1
Vetrobransko steklo in vakuumsko prijemalo očistite in
osušite s krpo, ki ne pušča vlaken.
2
Vakuumsko prijemalo pritisnite na vetrobransko steklo in
premaknite ročico
À
v smeri urinega kazalca.
3
Poravnajte kroglico vakuumskega nosilca in kroglico osnovne
plošče
Á
z dvojnim vtičnim krakom
Â
.
4
Rahlo privijte gumb
Ã
.
5
Po potrebi prilagodite za boljši ogled in delovanje.
Gebruikershandleiding.com neemt misbruik van zijn services uitermate serieus. U kunt hieronder aangeven waarom deze vraag ongepast is. Wij controleren de vraag en zonodig wordt deze verwijderd.
Product:
Spelregels forum
Om tot zinvolle vragen te komen hanteren wij de volgende spelregels:
lees eerst de handleiding door;
controleer of uw vraag al eerder door iemand anders is gesteld;
probeer uw vraag zo duidelijk mogelijk te stellen;
heeft u een probleem en al geprobeerd om dit op te lossen, vermeld dit erbij aub;
heeft u een oplossing gekregen van een bezoeker dan horen wij dat graag in dit forum;
wilt u een reactie geven op een vraag of antwoord, gebruik dan niet dit formulier maar klik op de knop 'reageer op deze vraag';
uw vraag wordt direct op de website gezet; vermijd daarom persoonlijke gegevens in te vullen;
Belangrijk! Als er een antwoord wordt gegeven op uw vraag, dan is het voor de gever van het antwoord nuttig om te weten als u er wel (of niet) mee geholpen bent! Wij vragen u dus ook te reageren op een antwoord.
Belangrijk! Antwoorden worden ook per e-mail naar abonnees gestuurd. Laat uw emailadres achter op deze site, zodat u op de hoogte blijft. U krijgt dan ook andere vragen en antwoorden te zien.
Abonneren
Abonneer u voor het ontvangen van emails voor uw Garmin inReach Explorer plus bij:
nieuwe vragen en antwoorden
nieuwe handleidingen
U ontvangt een email met instructies om u voor één of beide opties in te schrijven.
Ontvang uw handleiding per email
Vul uw emailadres in en ontvang de handleiding van Garmin inReach Explorer plus in de taal/talen: Alle talen als bijlage per email.
De handleiding is 1,11 mb groot.
U ontvangt de handleiding per email binnen enkele minuten. Als u geen email heeft ontvangen, dan heeft u waarschijnlijk een verkeerd emailadres ingevuld of is uw mailbox te vol. Daarnaast kan het zijn dat uw internetprovider een maximum heeft aan de grootte per email. Omdat hier een handleiding wordt meegestuurd, kan het voorkomen dat de email groter is dan toegestaan bij uw provider.
Stel vragen via chat aan uw handleiding
Stel uw vraag over deze PDF
Andere handleiding(en) van Garmin inReach Explorer plus
Uw handleiding is per email verstuurd. Controleer uw email
Als u niet binnen een kwartier uw email met handleiding ontvangen heeft, kan het zijn dat u een verkeerd emailadres heeft ingevuld of dat uw emailprovider een maximum grootte per email heeft ingesteld die kleiner is dan de grootte van de handleiding.
Er is een email naar u verstuurd om uw inschrijving definitief te maken.
Controleer uw email en volg de aanwijzingen op om uw inschrijving definitief te maken
U heeft geen emailadres opgegeven
Als u de handleiding per email wilt ontvangen, vul dan een geldig emailadres in.
Uw vraag is op deze pagina toegevoegd
Wilt u een email ontvangen bij een antwoord en/of nieuwe vragen? Vul dan hier uw emailadres in.