Pokyny na inštaláciu............................................................................................................41
zūmo
®
– upute za instalaciju............................................................................................................43
Garmin
®
, the Garmin logo, and zūmo
®
are trademarks of Garmin Ltd. or its subsidiaries, registered in the USA and other countries. These trademarks may not be used without the express permission of
Garmin.
October 2014190-01457-90_0BPrinted in Taiwan
zūmo
®
Installation Instructions
Mounting Your Device in a Motorcycle
About the Powered Mount Cables
WARNING
Garmin
®
strongly recommends having an experienced installer
with the proper knowledge of electrical systems install the
device. Incorrectly wiring the power cable can result in damage
to the vehicle or the battery and can cause bodily injury.
See the Important Safety and Product Information guide in the
product box for product warnings and other important
information.
The device must be mounted in a suitable and secure location
on your motorcycle, based on available power sources and safe
cable routing.
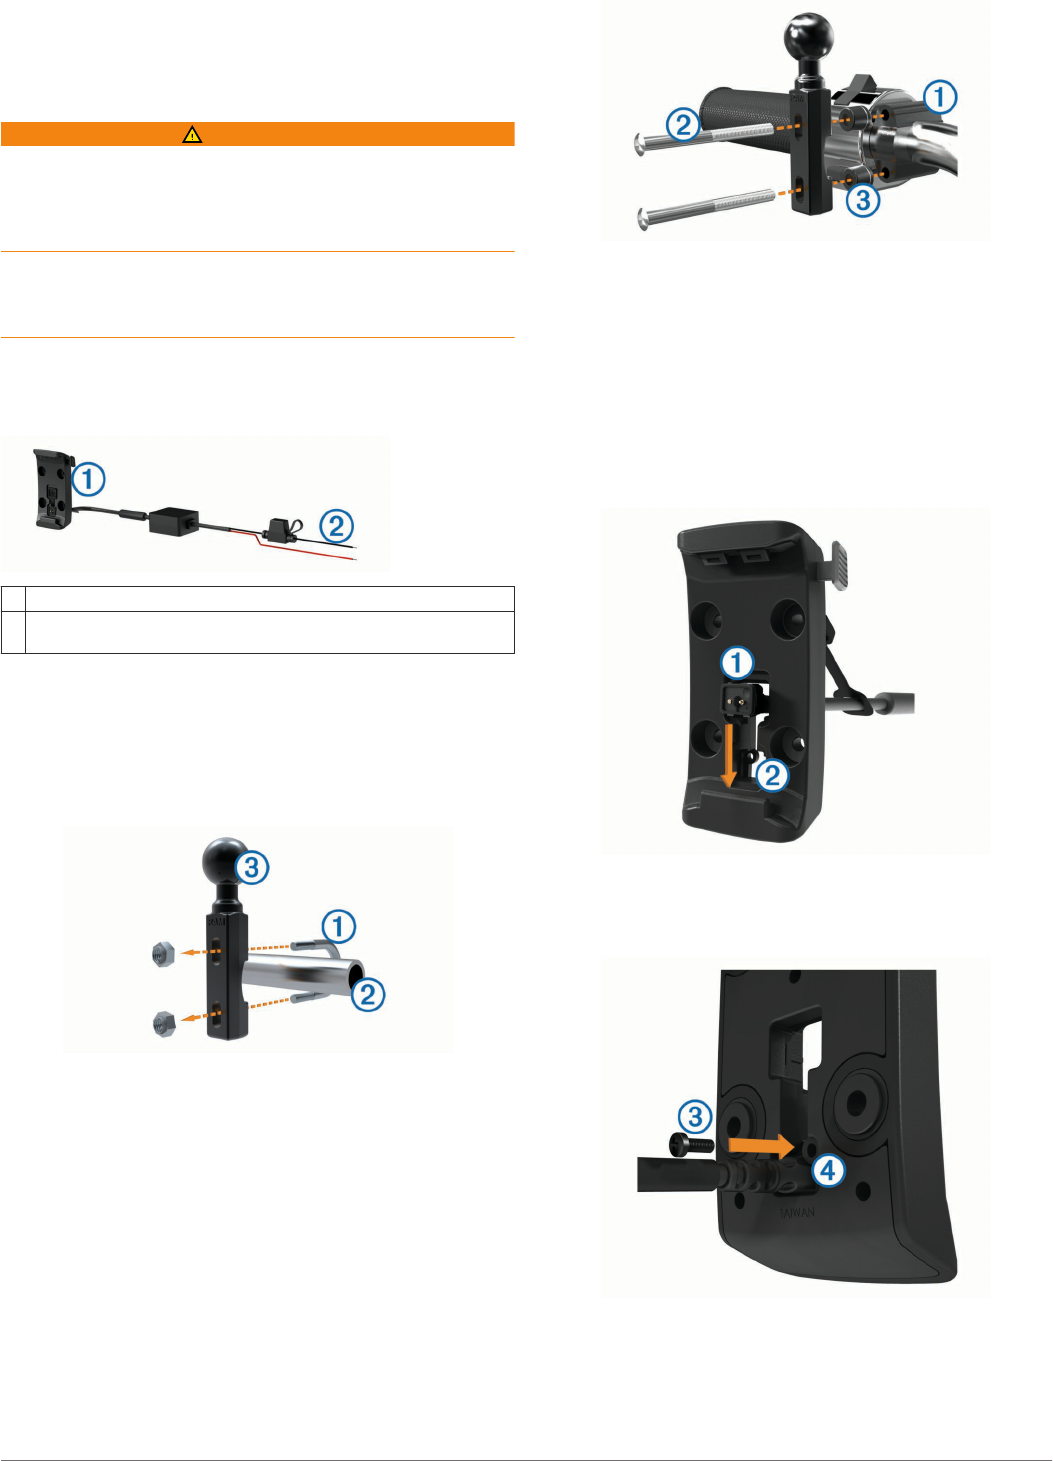
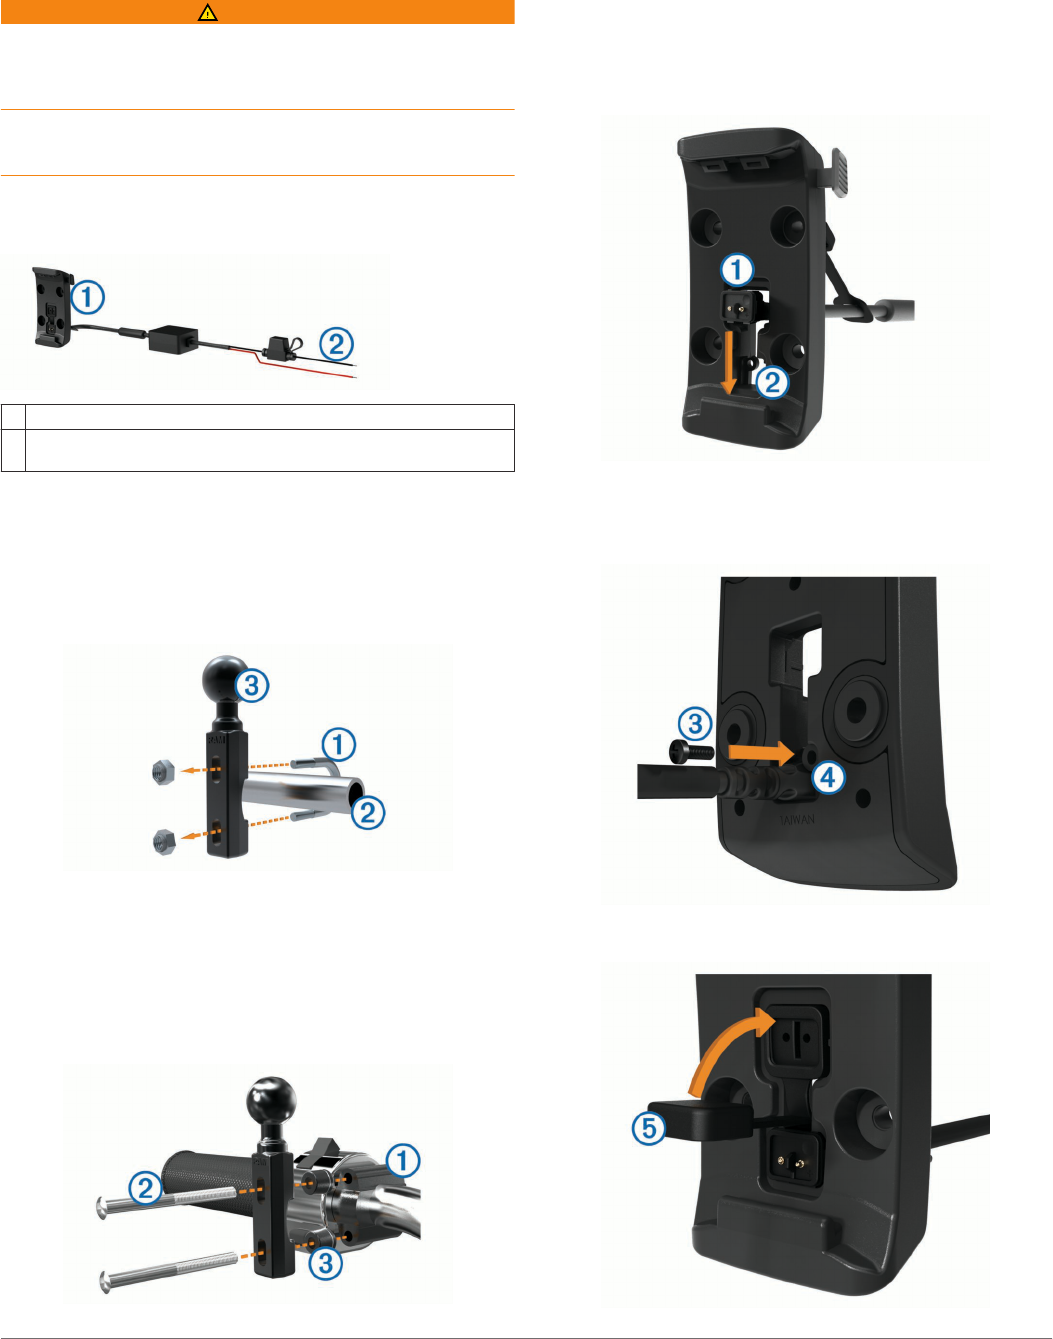
À
Motorcycle cradle
Á
Bare wires with inline fuse for power connection (to motorcycle
power)
Installing the Handlebar Base
The device includes parts for two handlebar installation
solutions. Custom mounts can require additional hardware
(http://www.ram-mount.com).
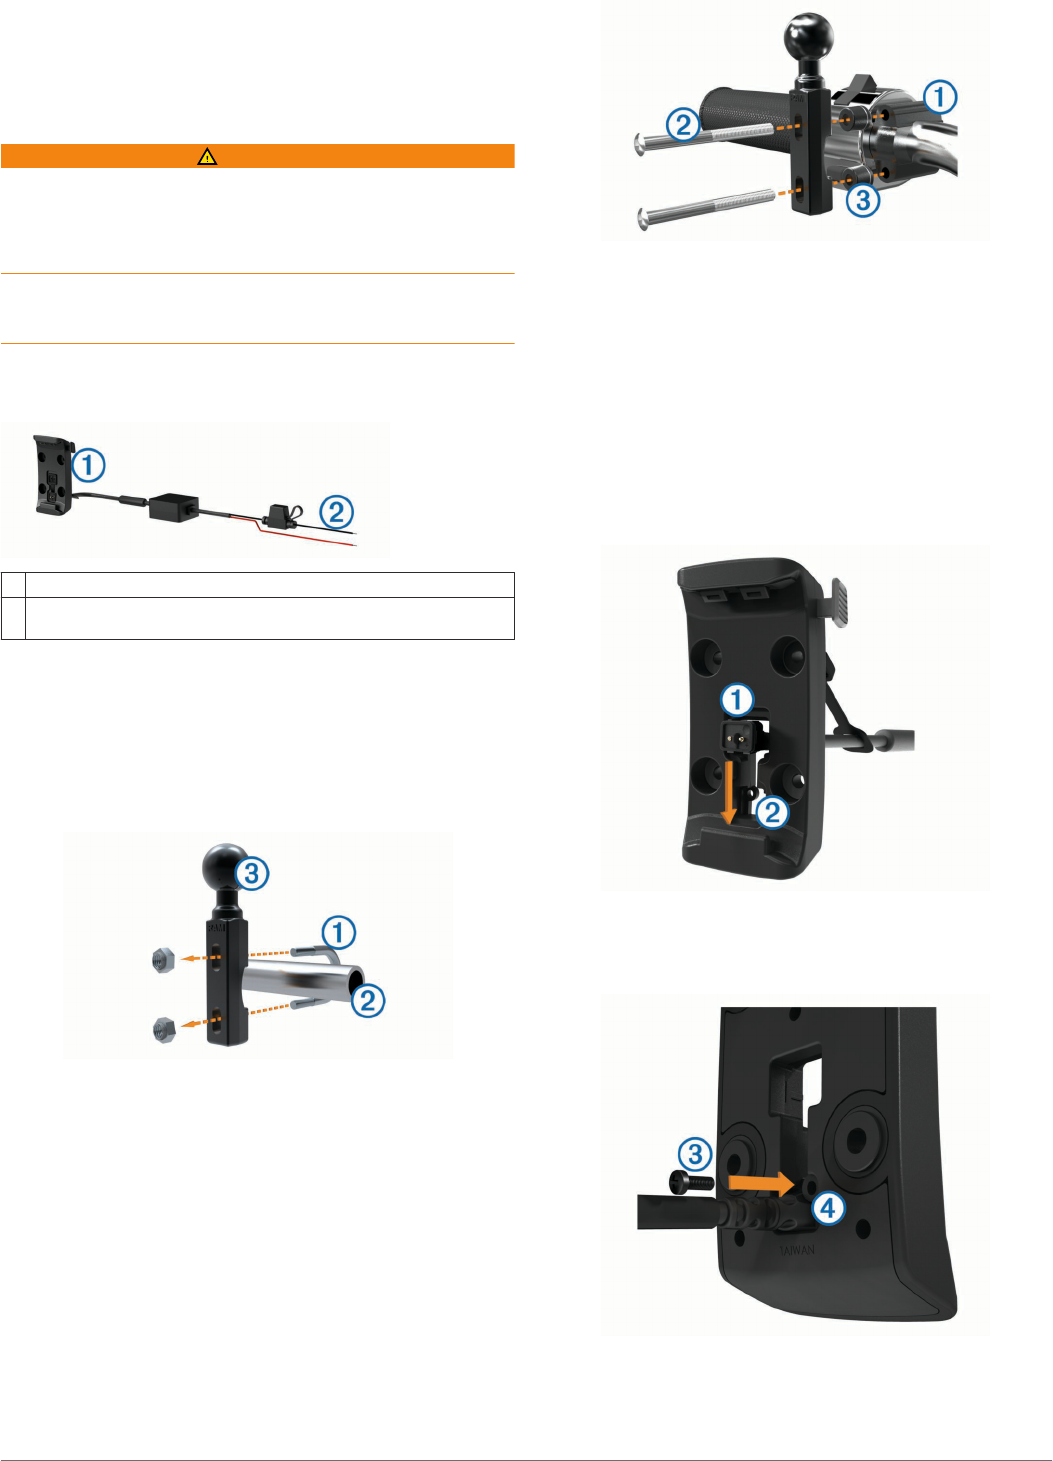
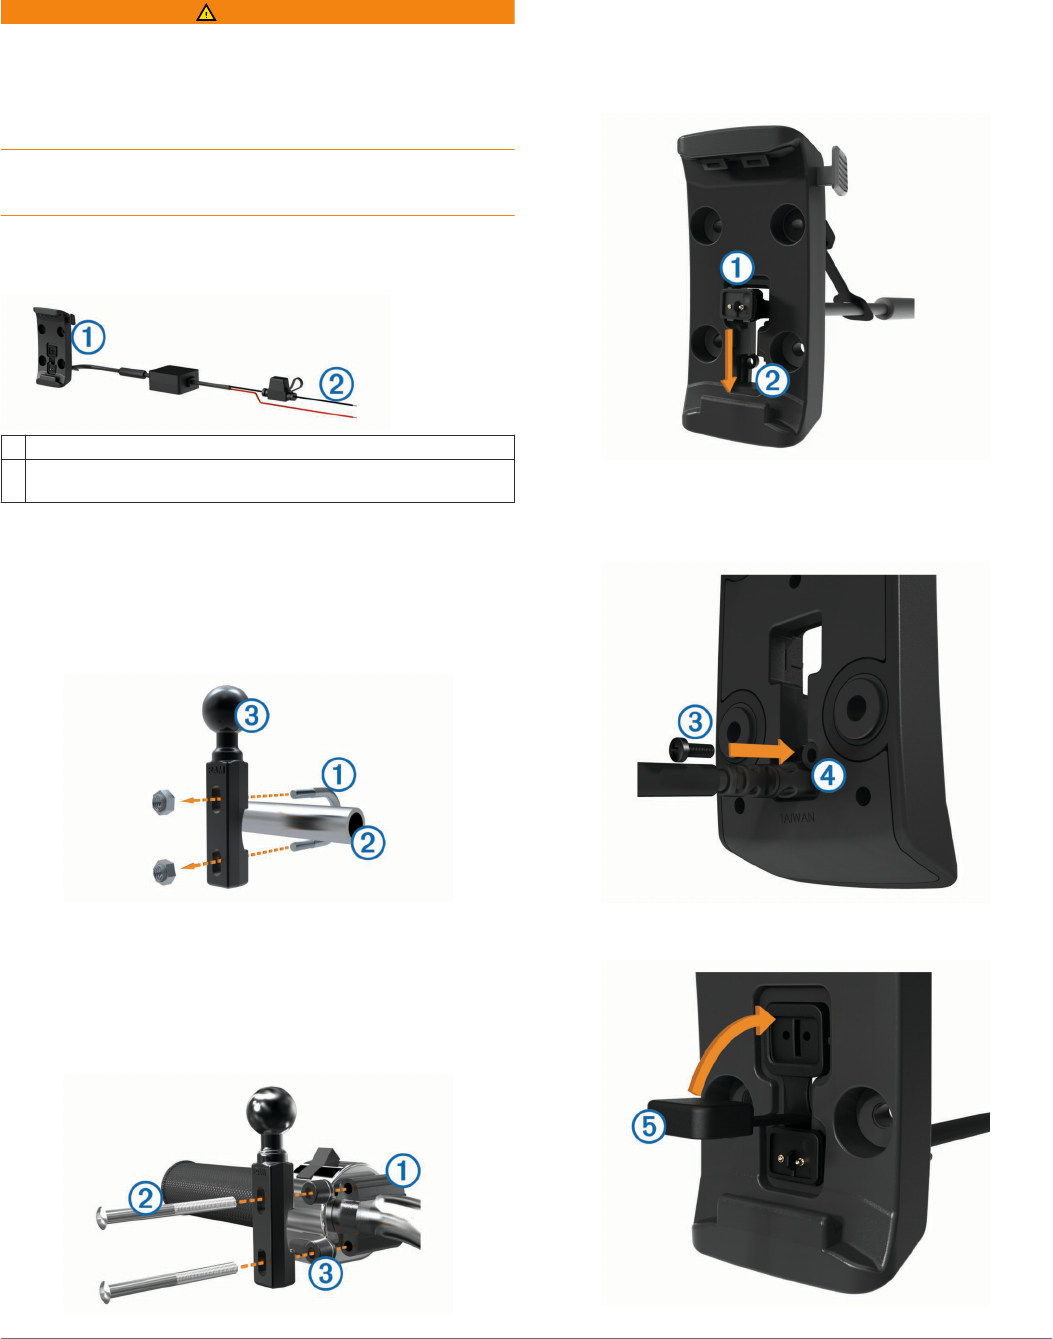
Installing the U-bolt and Handlebar Base
1
Place the U-bolt
À
around the handlebar
Á
, and thread the
ends through the handlebar base
Â
.
2
Tighten the nuts to secure the base.
NOTE: The recommended torque is 50 lbf-in. Do not exceed
torque of 80 lbf-in.
Installing the Handlebar Base to the Clutch-Clamp or Brake-
Clamp Brackets
1
Remove the two factory bolts on your clutch-clamp or brake-
clamp bracket
À
.
NOTE: Both 1/4 in. standard and M6 bolts are included.
Match the size of the factory bolts on your clutch-clamp or
brake-clamp bracket.
2
Thread the new bolts
Á
through the handlebar base, spacers
Â
, and clutch-clamp or brake-clamp bracket.
3
Tighten the bolts to secure the base.
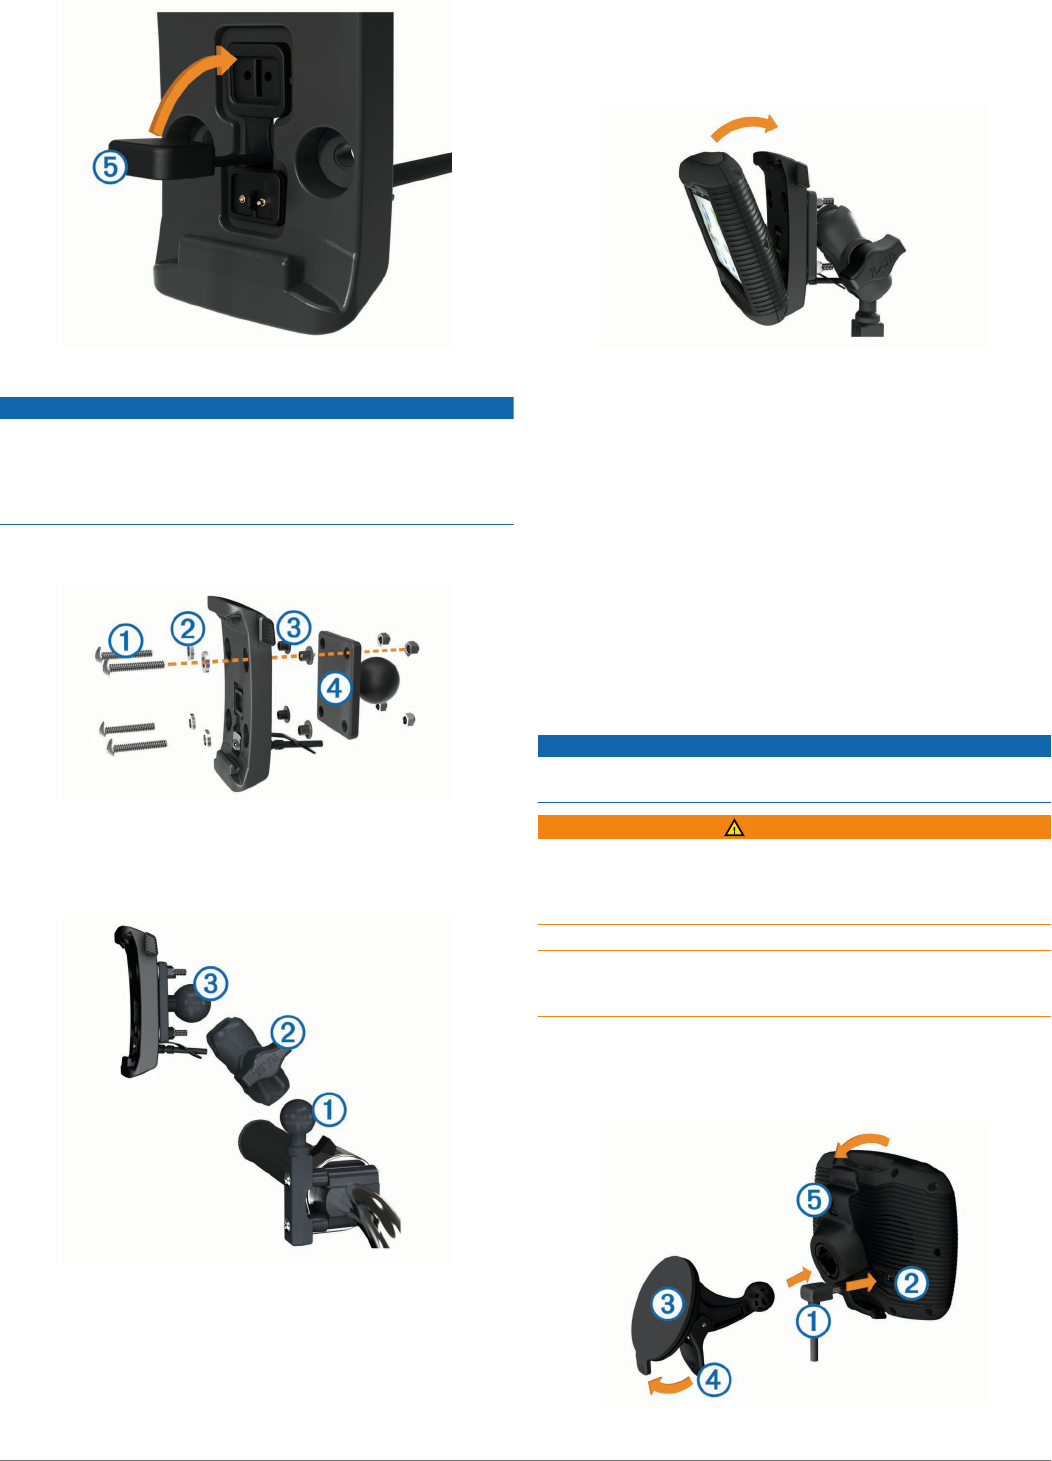
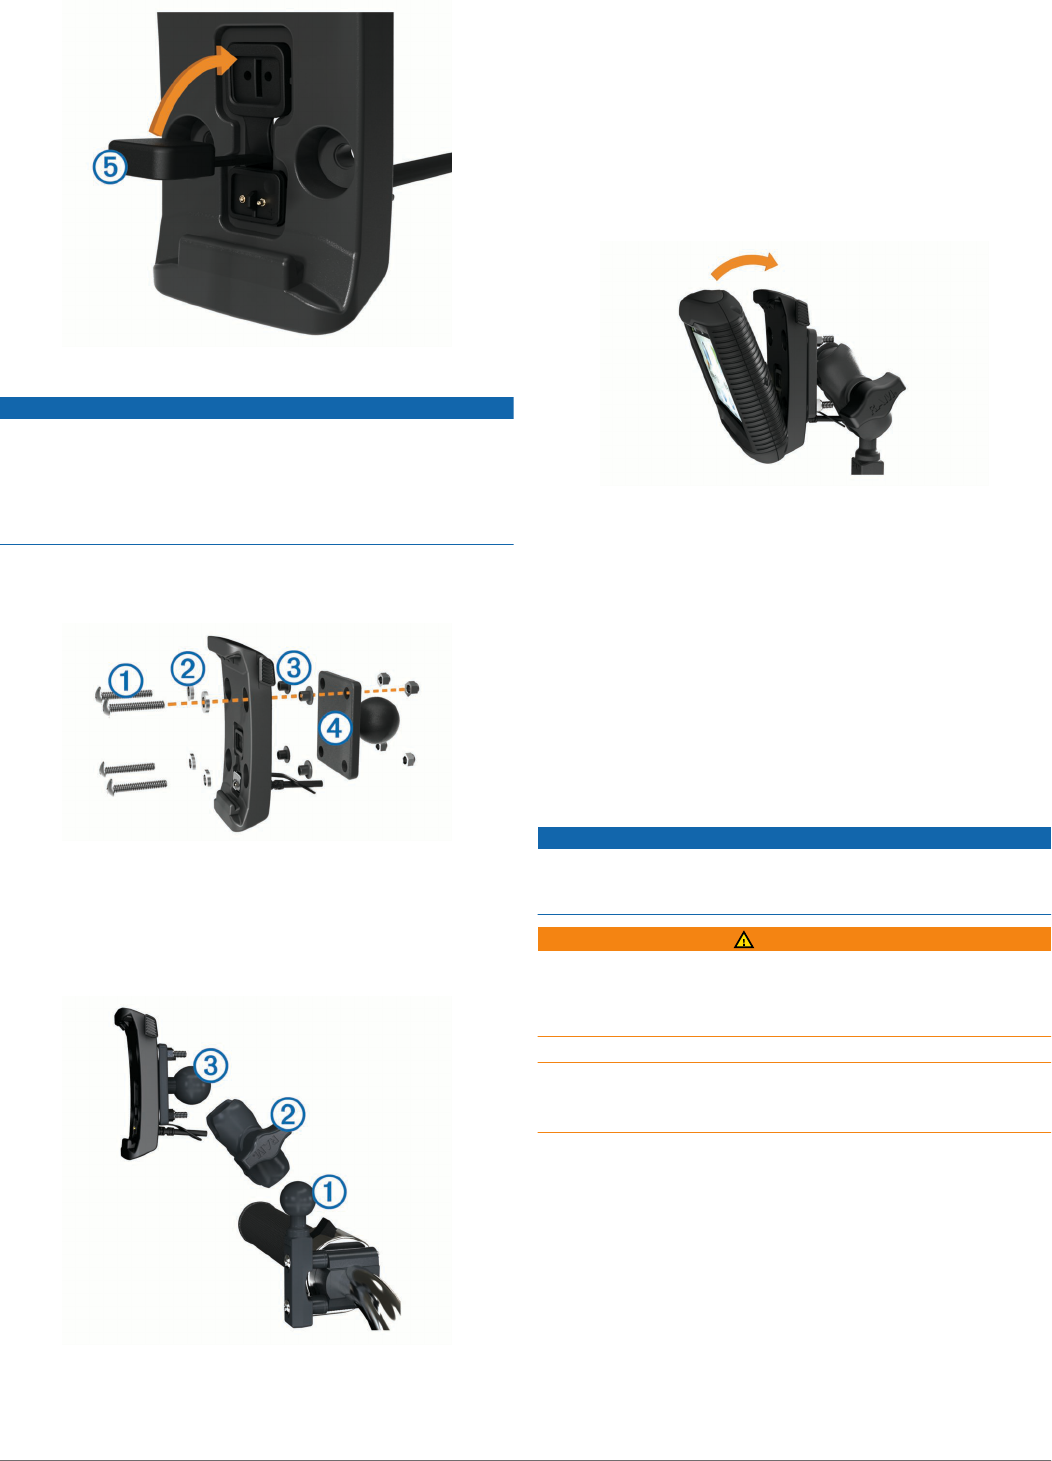
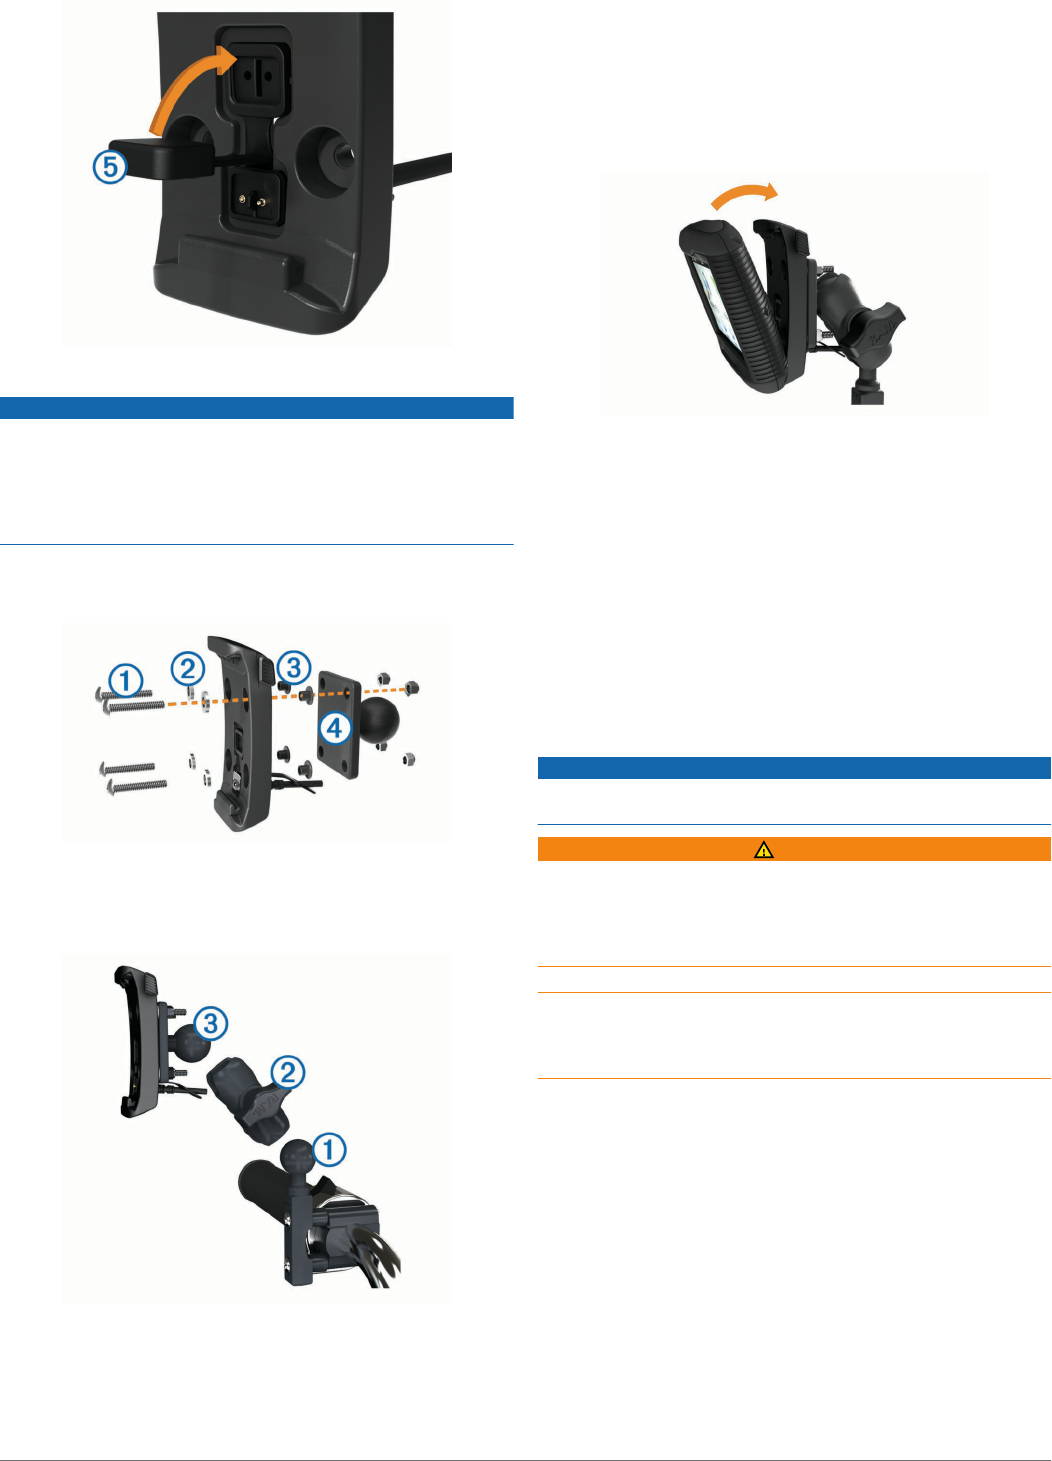
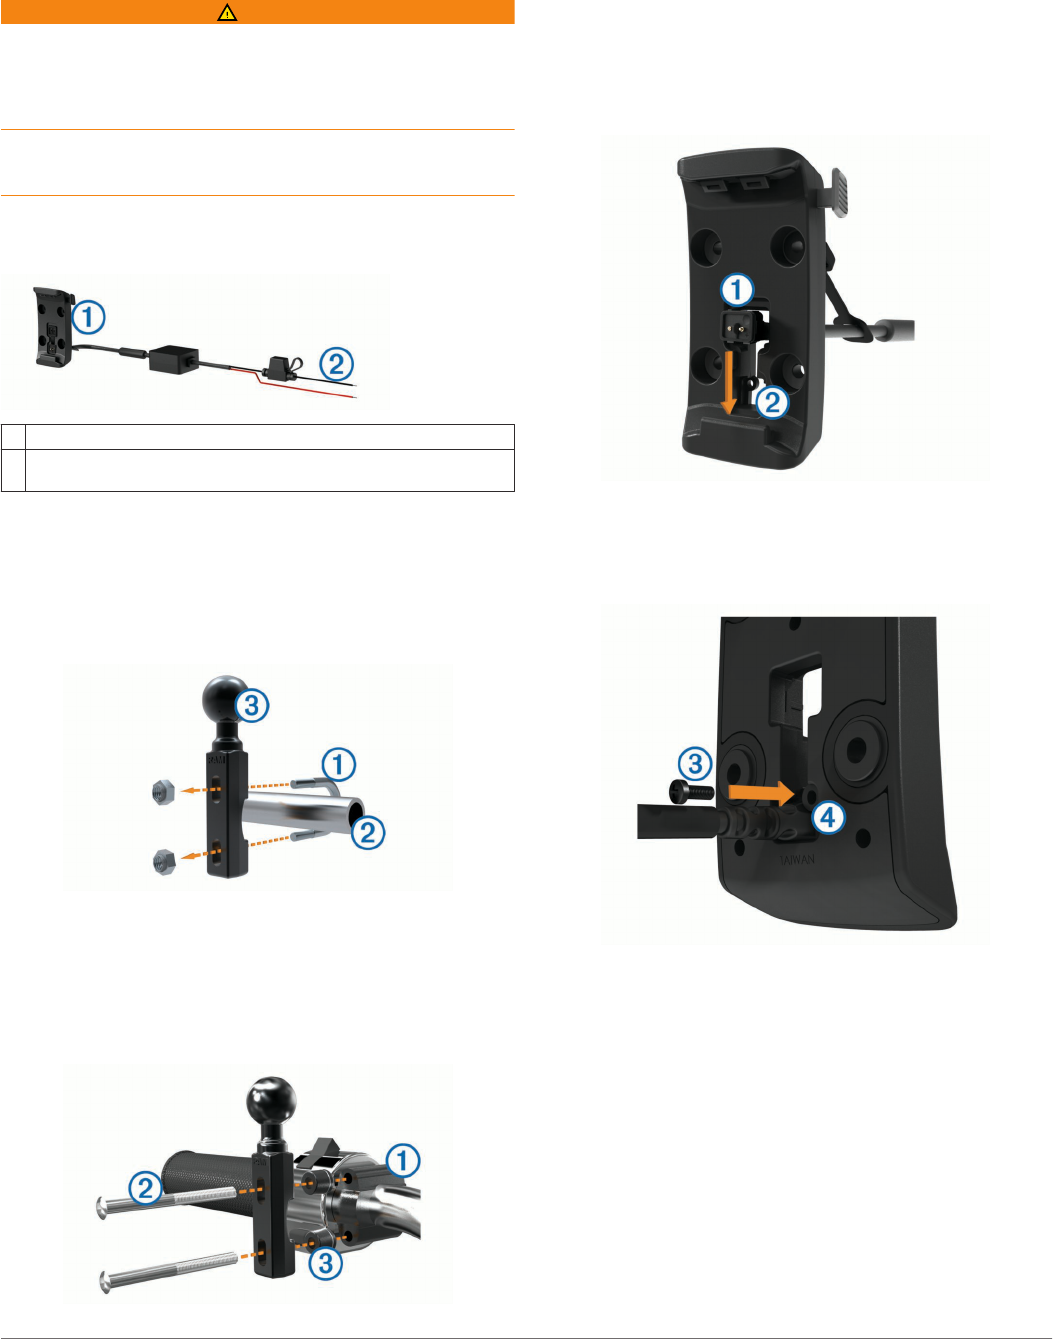
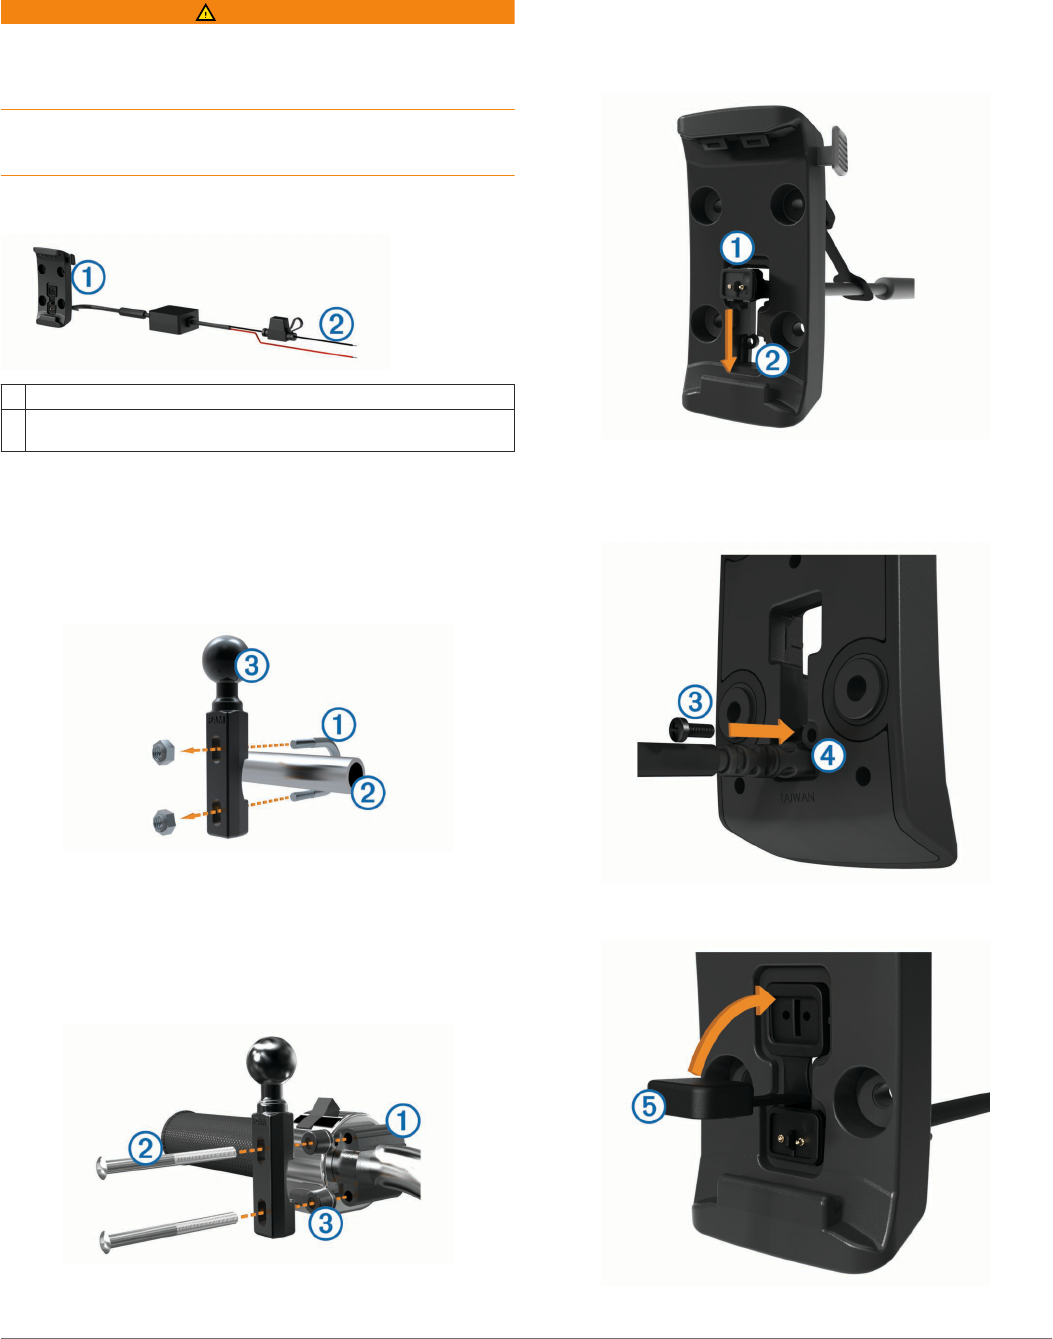
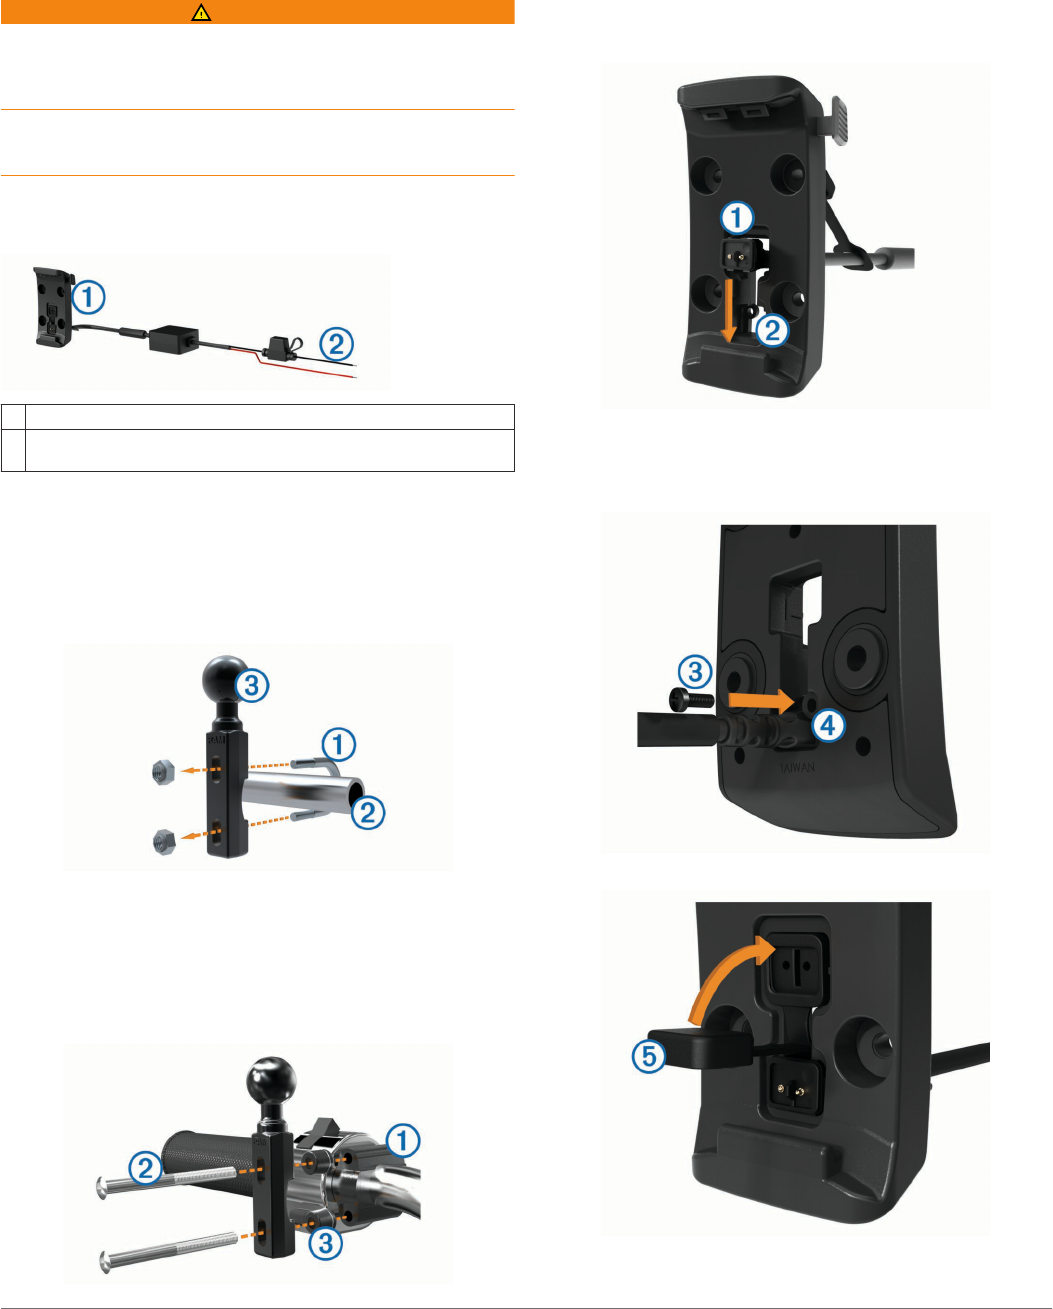
Attaching the Power Cables to the Motorcycle Mount
1
Thread the power cable connector
À
through the top of the
opening in the motorcycle mount.
2
Slide the cable down to the bottom of the opening
Á
and pull
the cable back until it is snug.
3
Screw the black screw
Â
into the back of the mount
Ã
to
hold the cable in place.
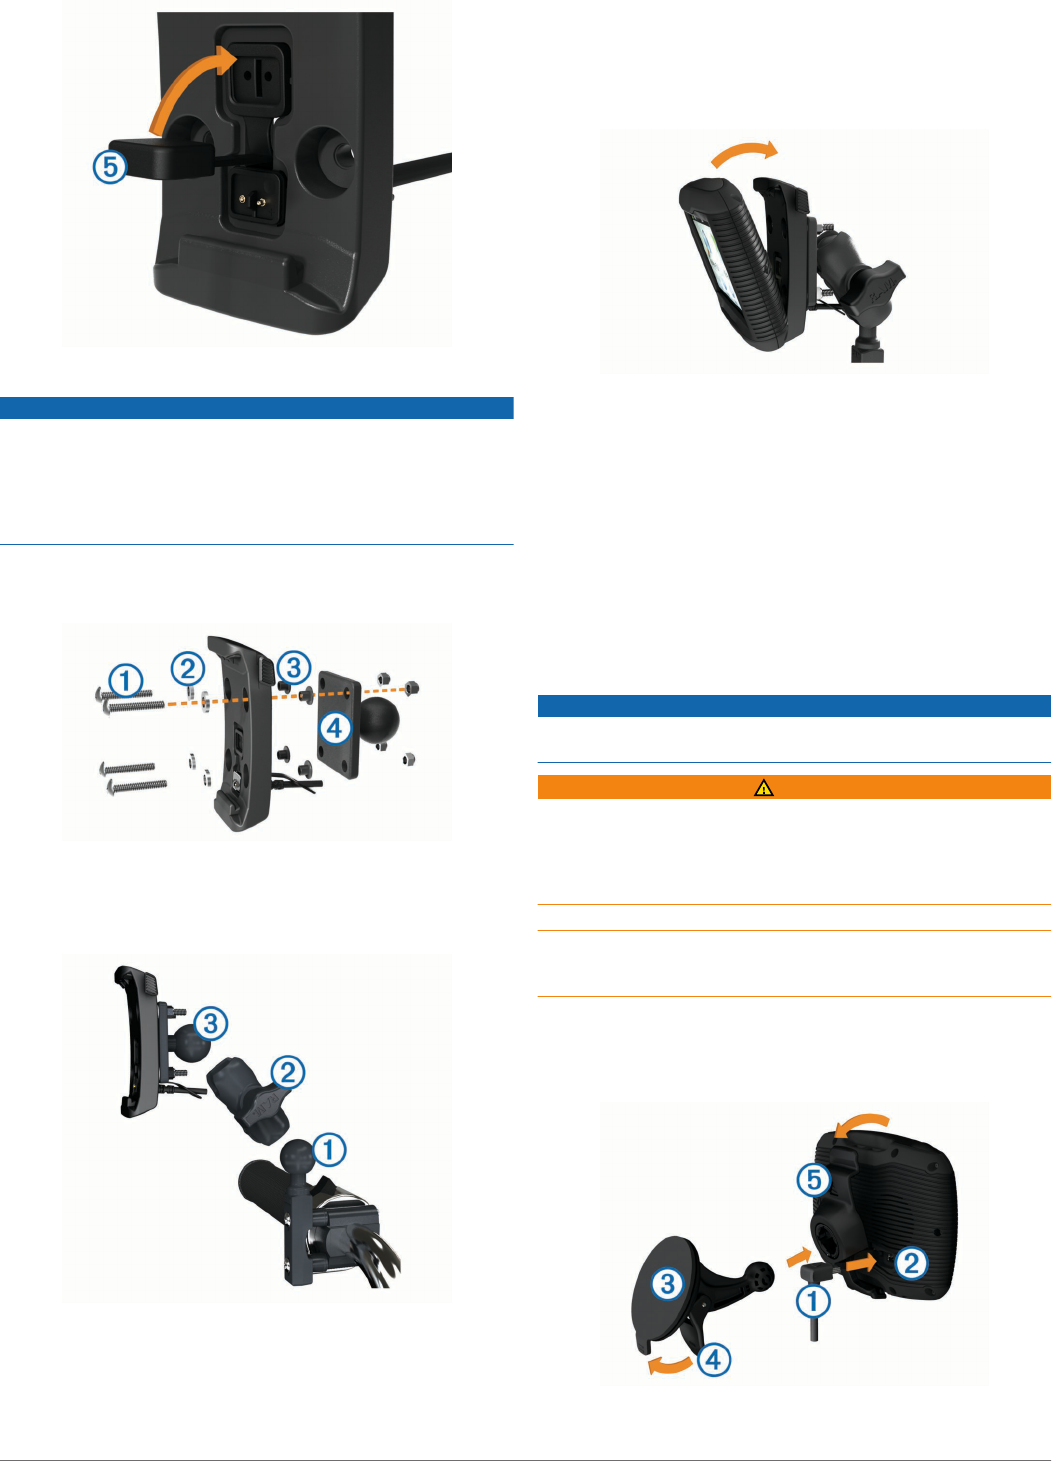
4
Thread the weather cap
Ä
through the top hole and press it
into the hole.
2
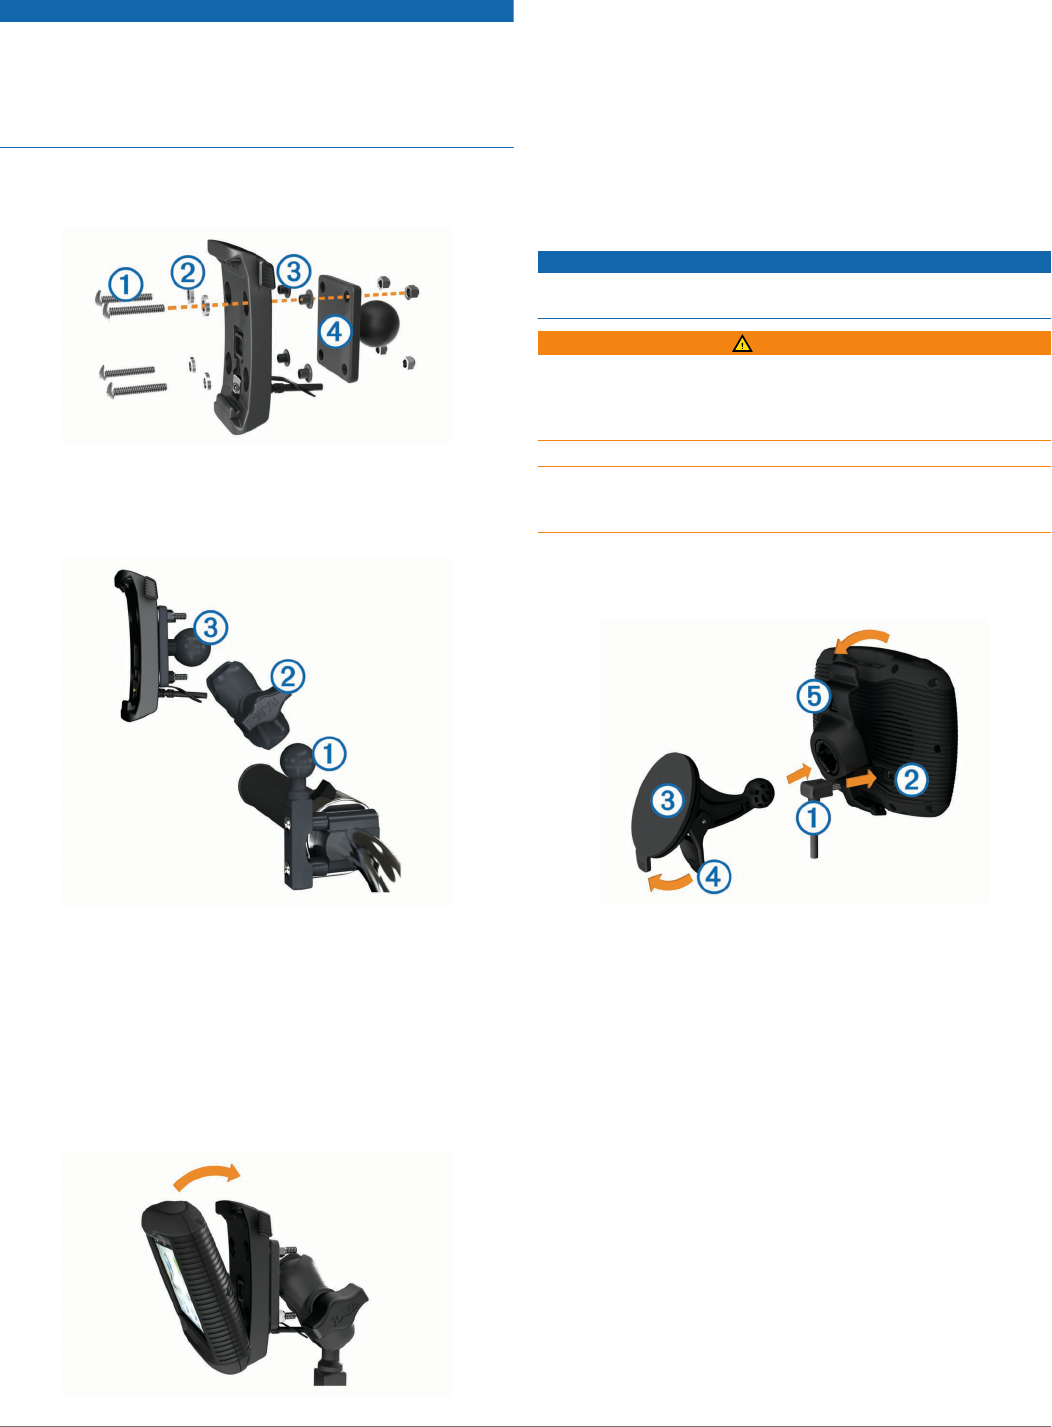
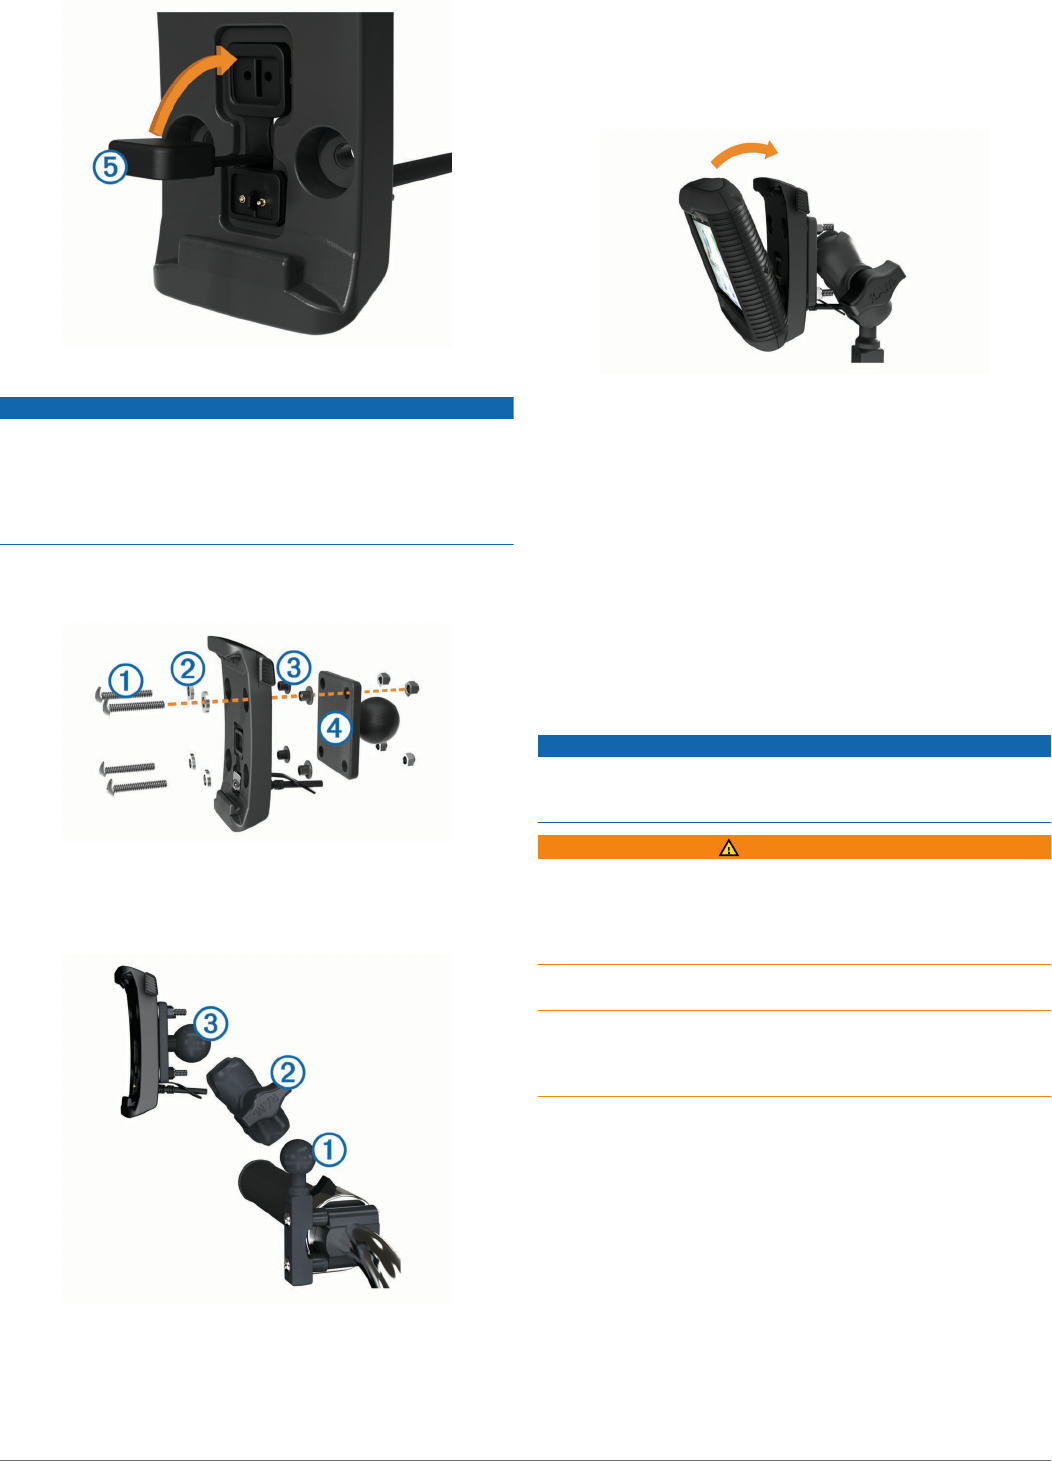
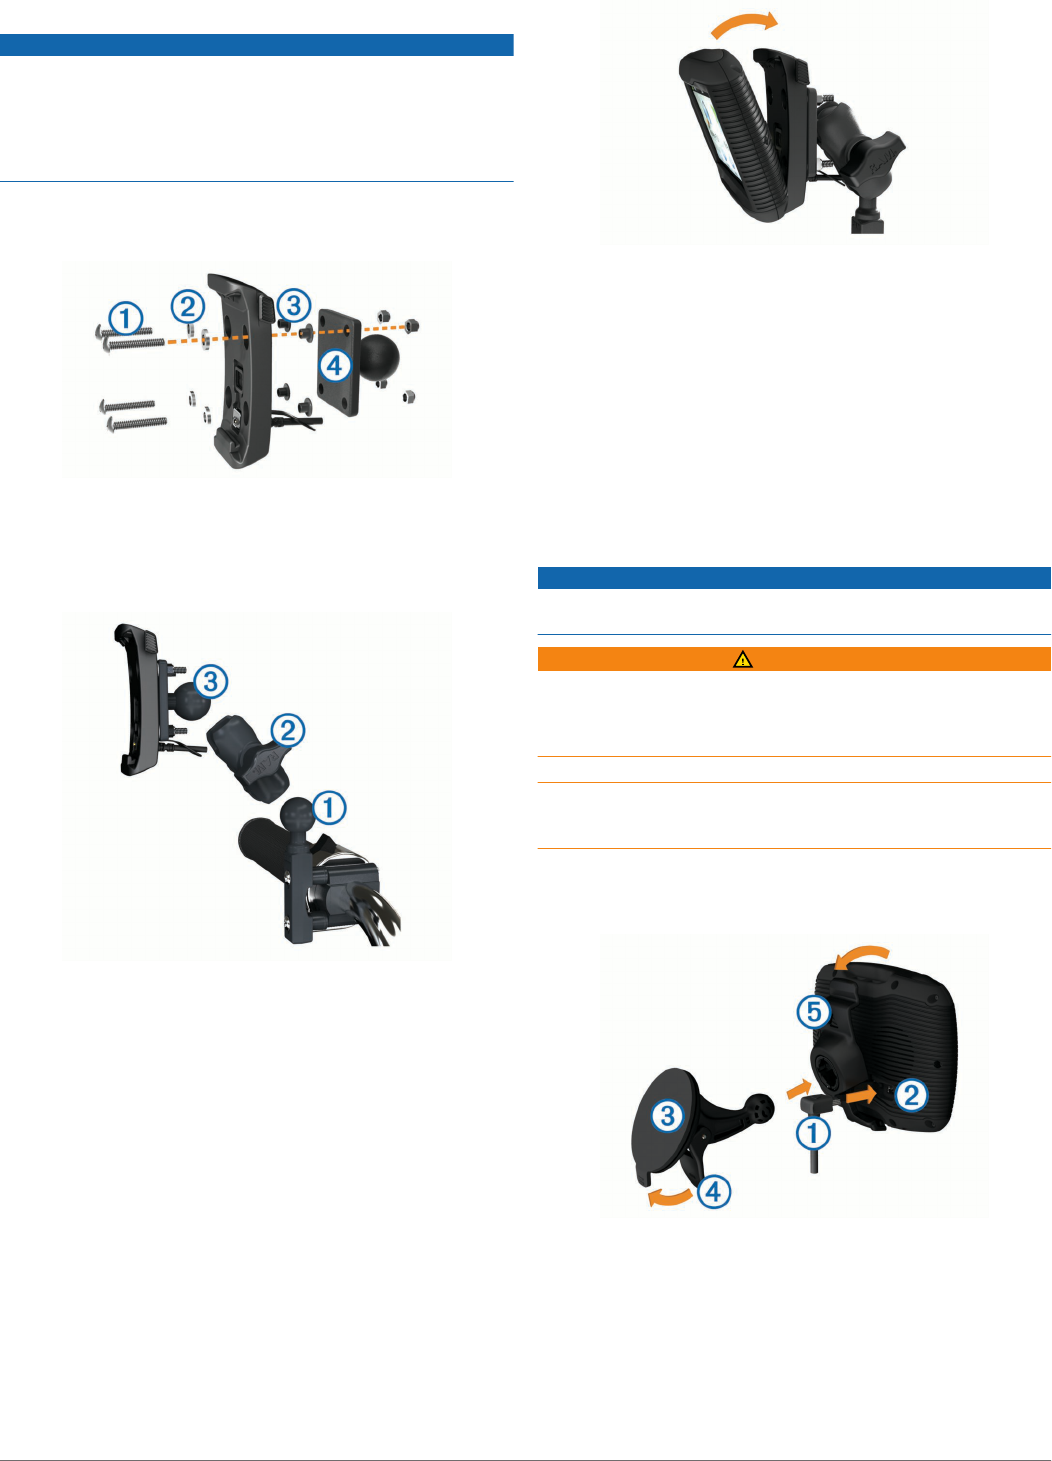
Attaching the Base Plate to the Motorcycle Mount
NOTICE
Direct, sustained contact with the base plate, or any part of the
motorcycle, may damage the mount over time. To prevent this
kind of damage, you must place the mounting spacers between
the mount and base plate, and make sure that no part of the
device or mount touches the motorcycle.
1
Thread the M4 x 20 mm panhead screws
À
through the
washers
Á
, cradle, spacers
Â
, and base plate
Ã
.
2
Tighten the nuts to secure the base plate.
Attaching the Base Plate to the Handlebar Base
1
Align the ball of the handlebar base
À
and the ball of the
base plate
Á
with the double-socket arm
Â
.
2
Insert the ball into the double-socket arm.
3
Tighten the knob slightly.
4
Adjust for optimal viewing and operation.
5
Tighten the knob to secure the mount.
6
Align the ball of the base plate attached to the cradle
Â
with
the other end of the double-socket arm.
7
Repeat steps 2–4.
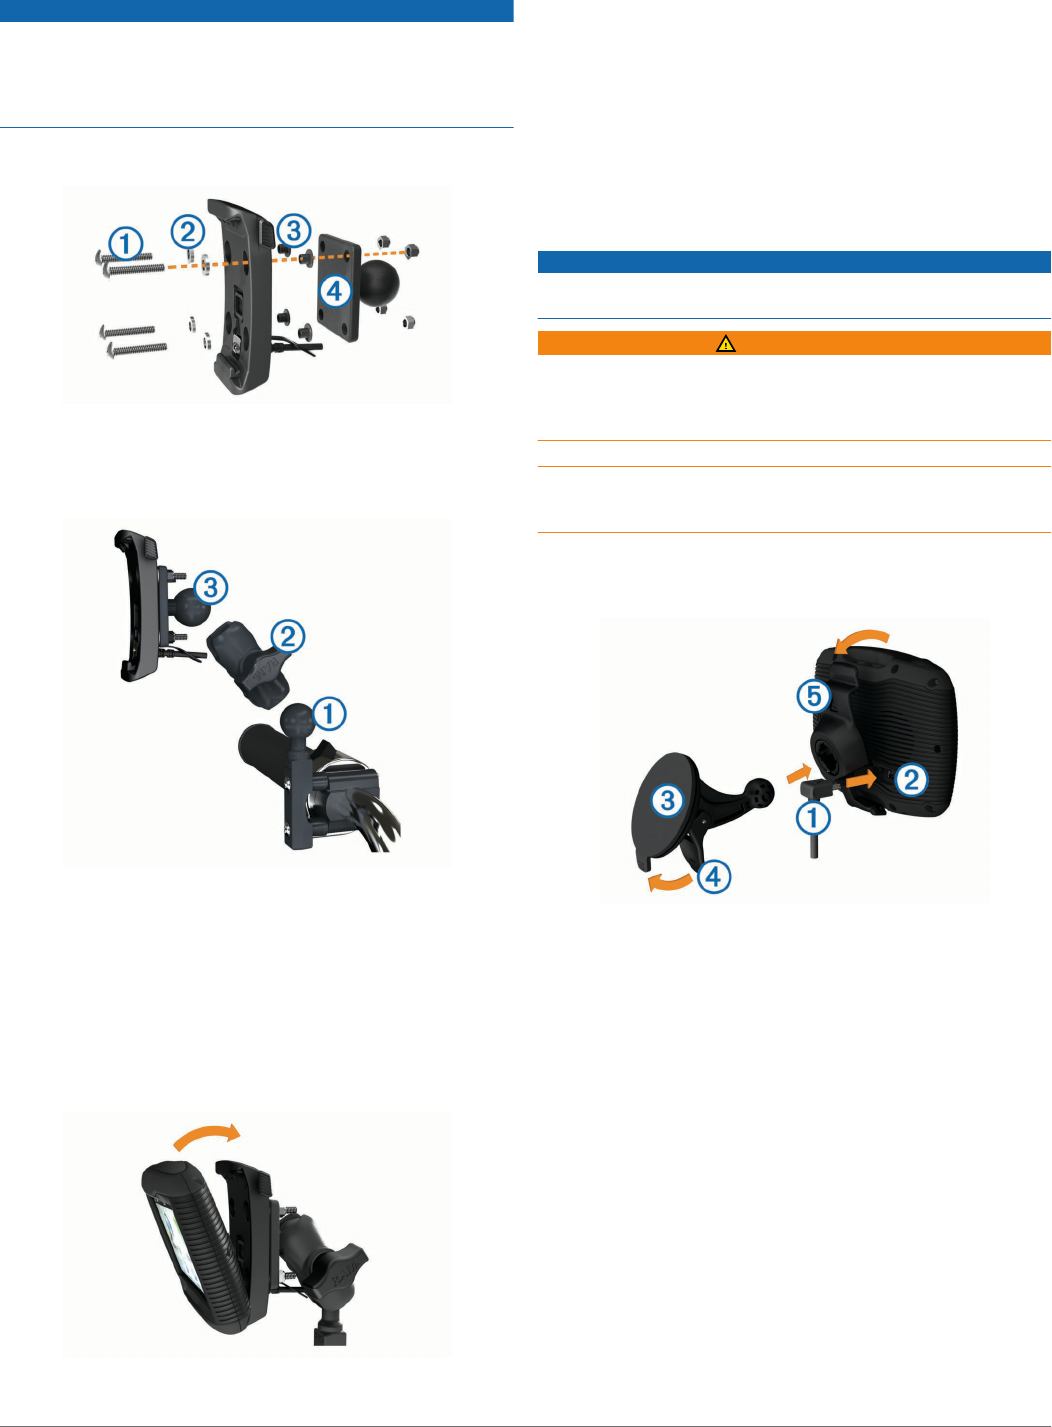
Installing Your Device in the Motorcycle Mount
1
Fit the bottom of your device into the cradle.
2
Tilt the device back until it snaps into place.
NOTE: If the latch on top of the mount stays up after you
insert the device, press it down.
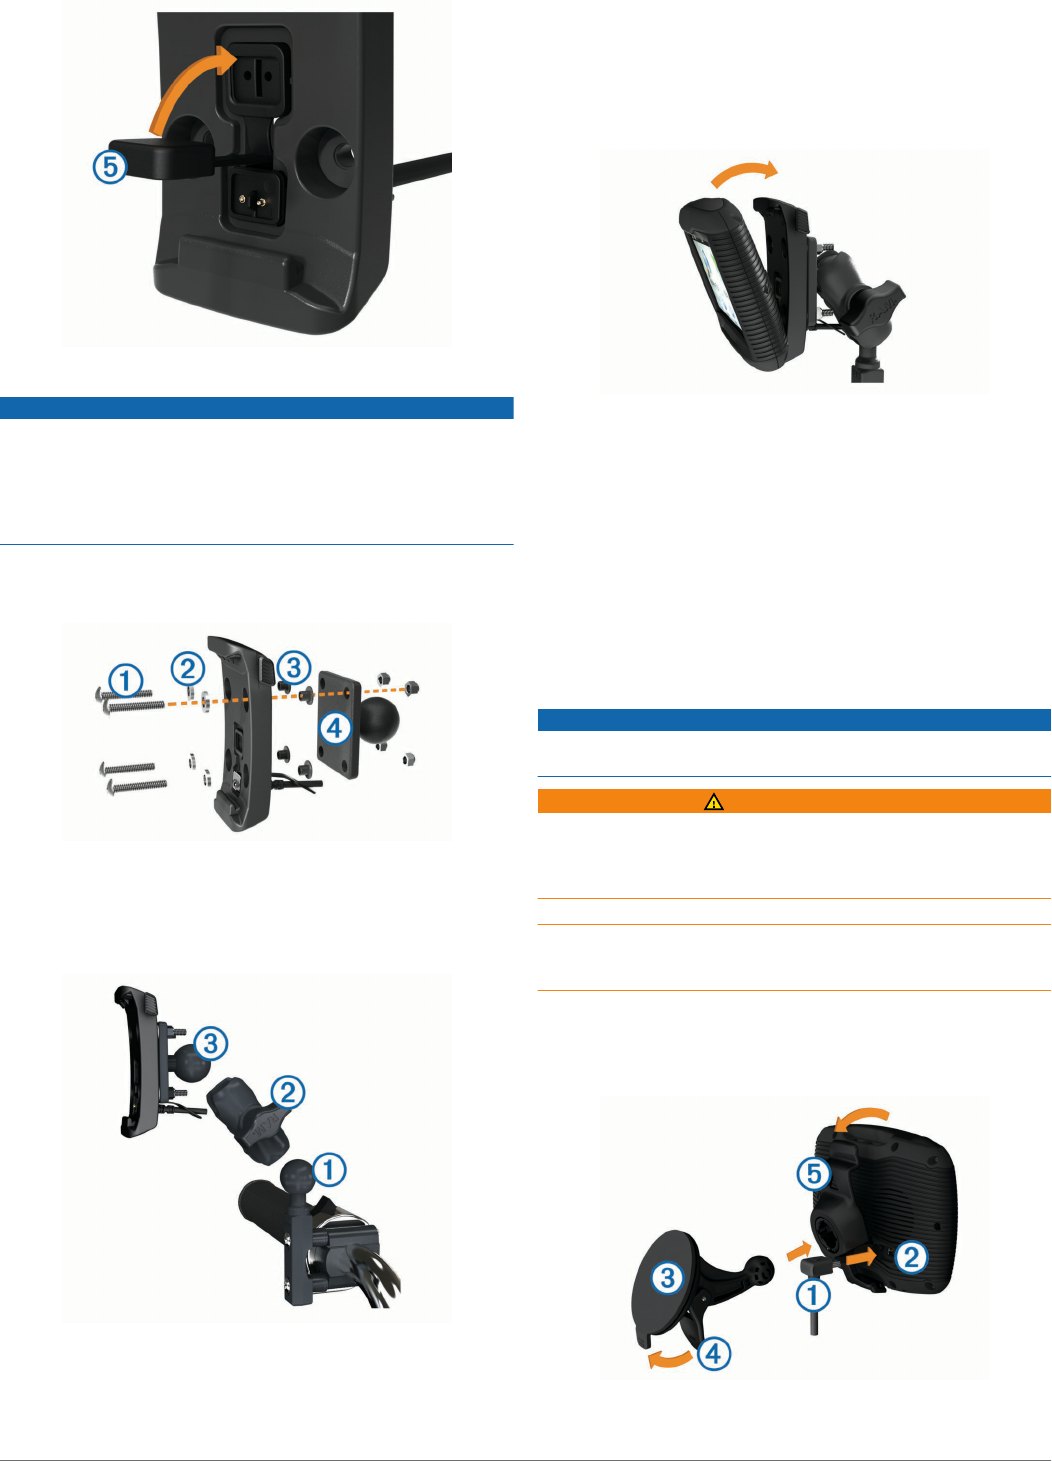
Removing Your Device from the Motorcycle
Mount
1
Press the button on the side of the mount.
2
Lift out the device.
3
On the motorcycle mount, place the weather cap on the
power connector in the center of the cable (Attaching the
Power Cables to the Motorcycle Mount).
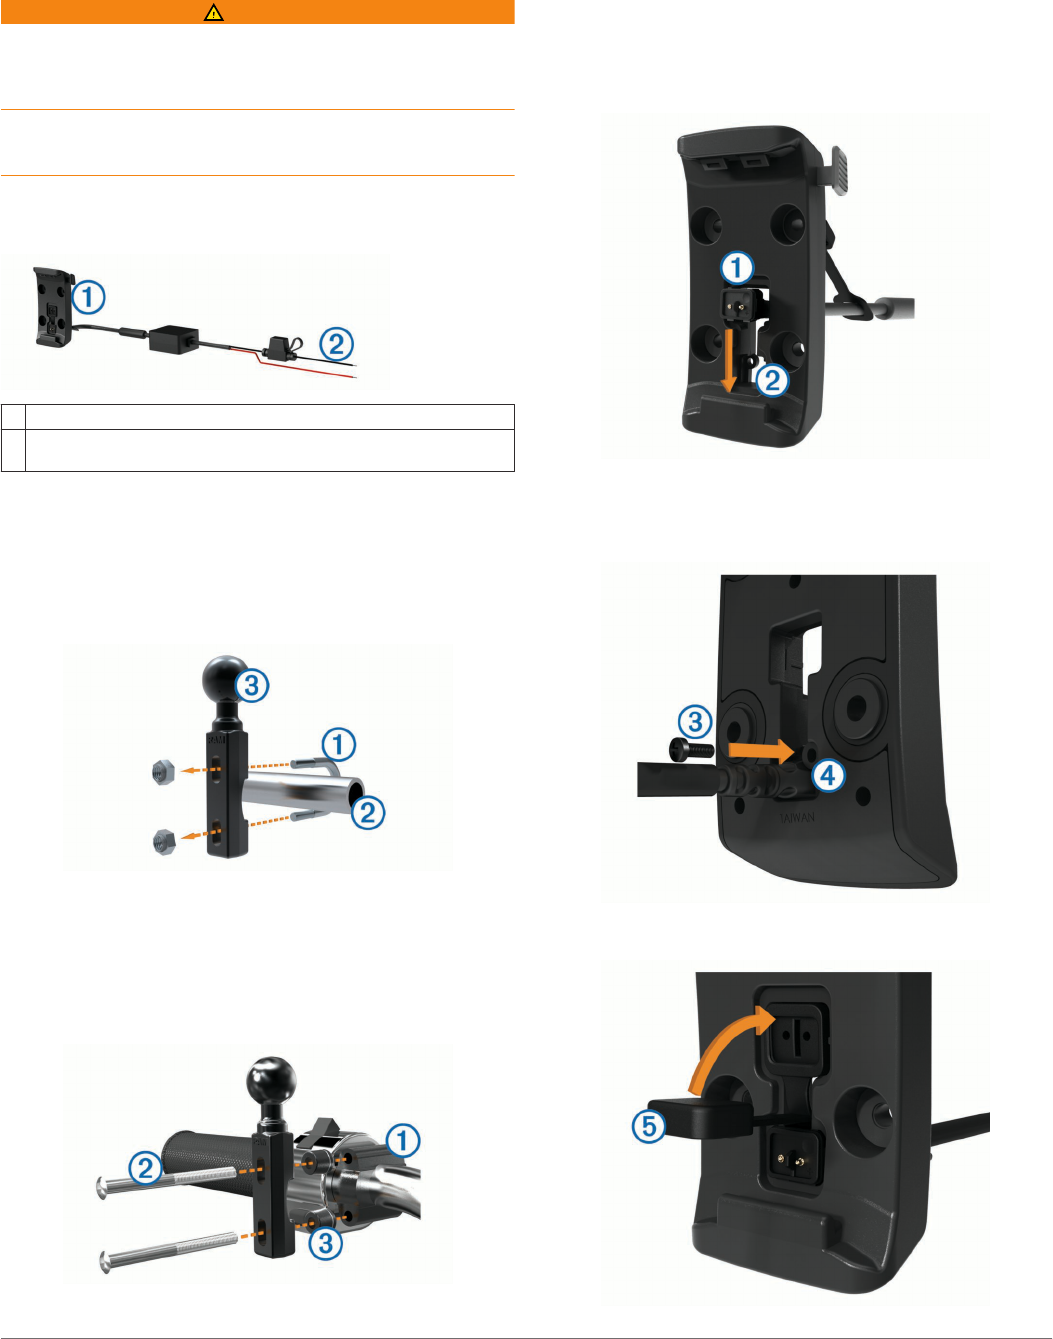
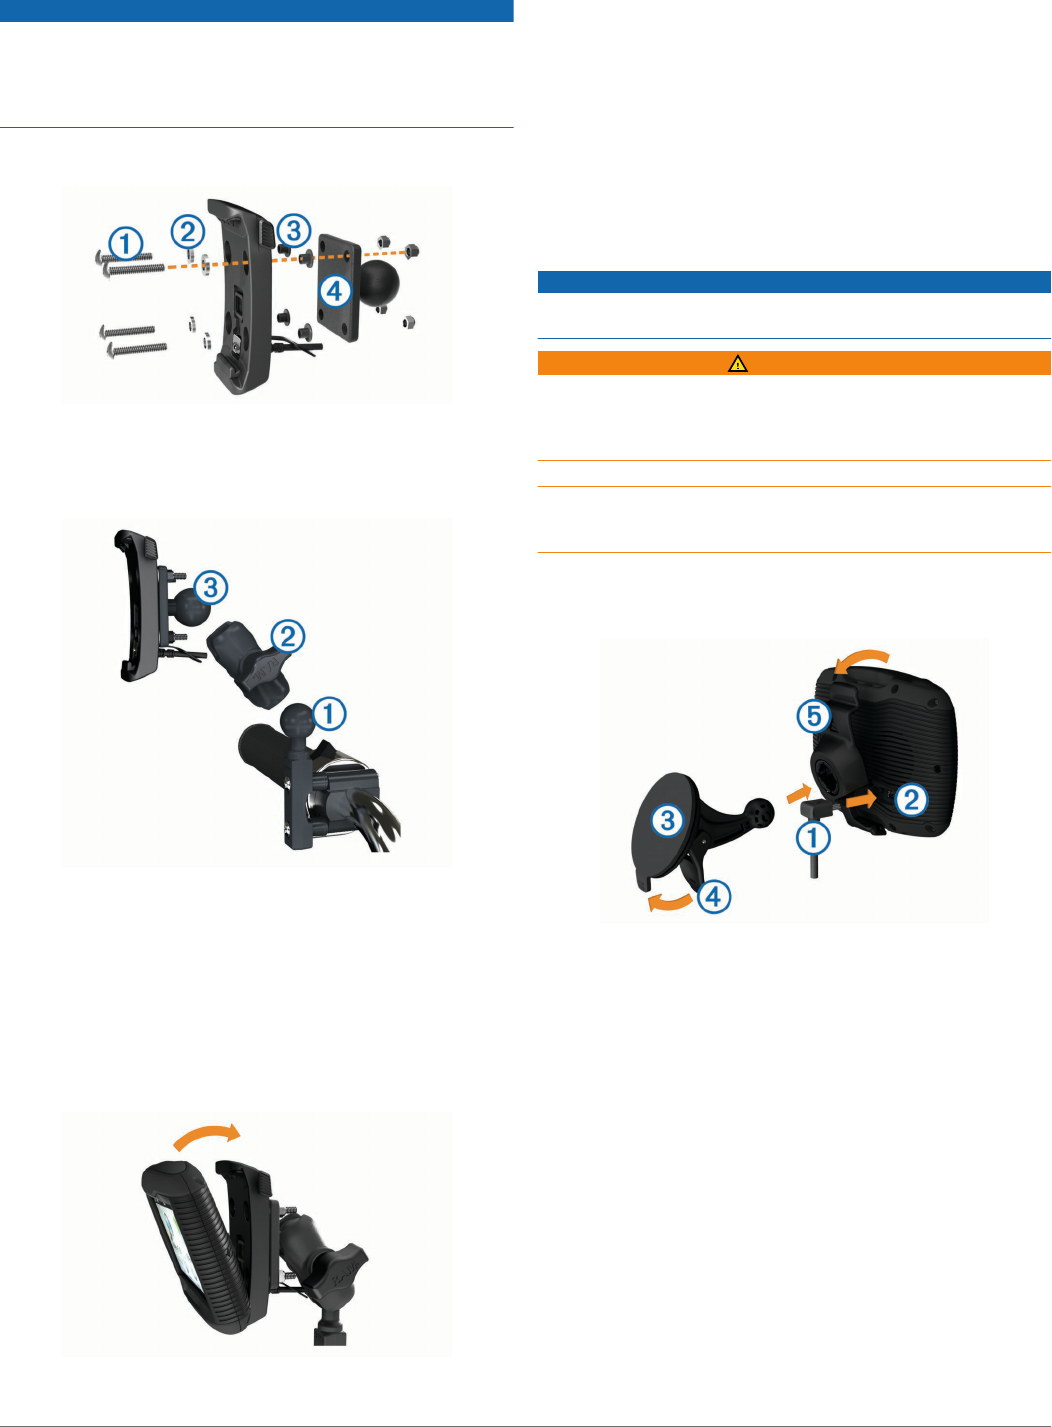
Mounting Your Device in an Automobile
NOTICE
Before mounting the device, check the local laws pertaining to
windshield mounting.
WARNING
This product contains a lithium-ion battery. To prevent the
possibility of personal injury or product damage caused by
battery exposure to extreme heat, store the device out of direct
sunlight.
Do not use the suction cup mount on a motorcycle.
See the Important Safety and Product Information guide in the
product box for product warnings and other important
information.
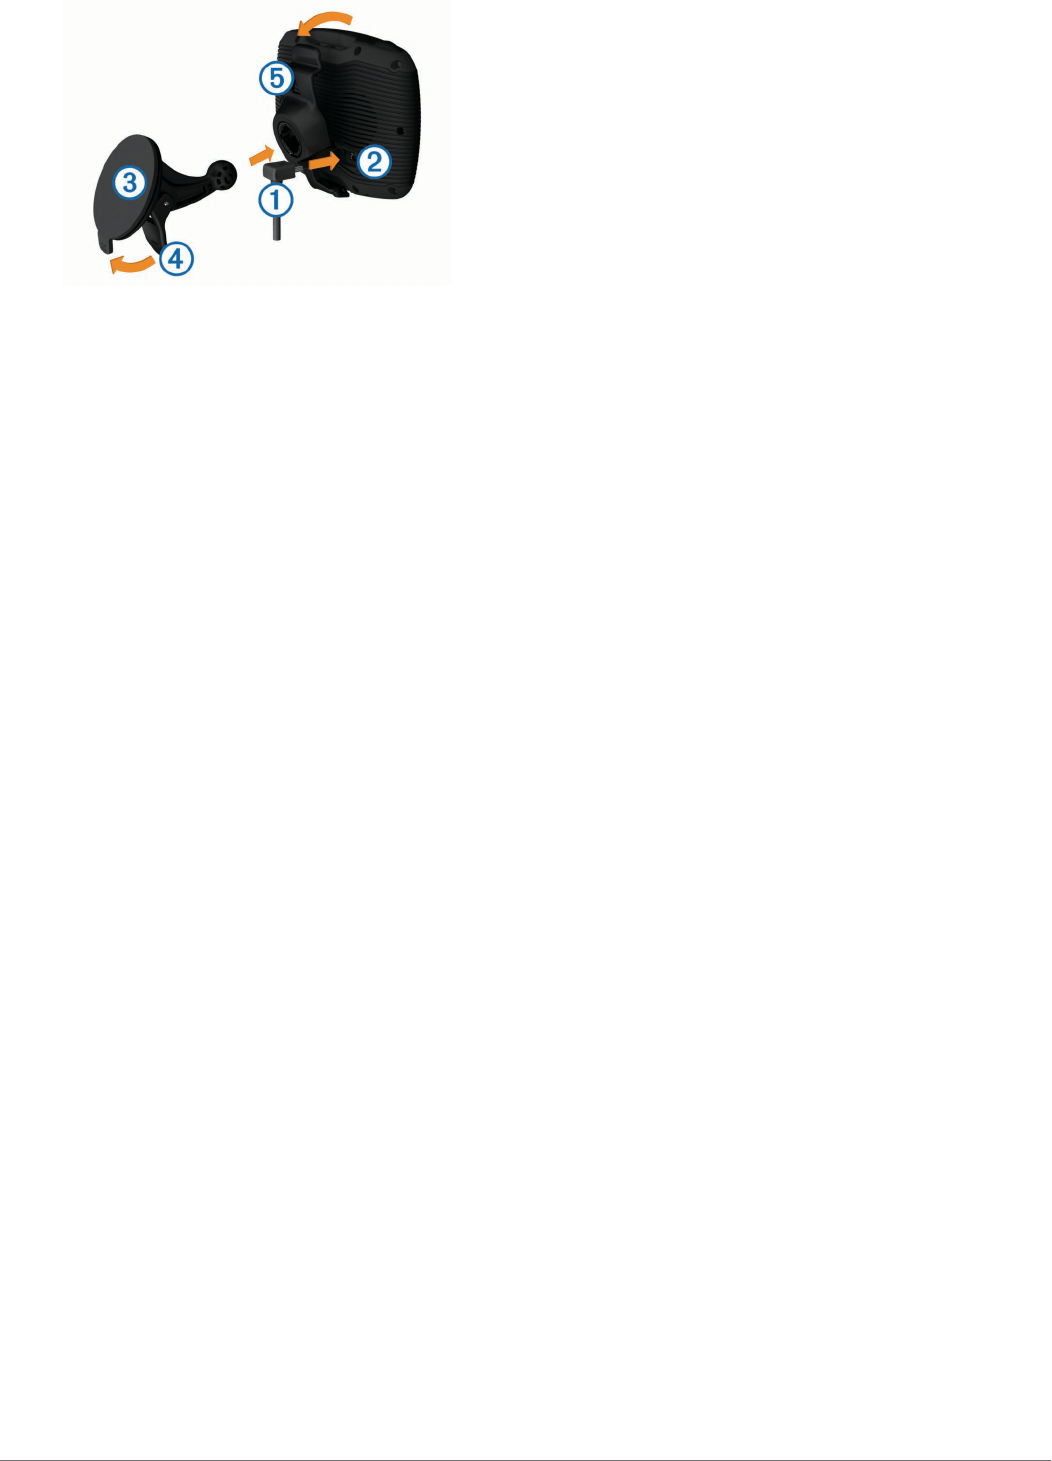
1
Pull back the weather cap on the back of the cradle.
2
Plug the automotive power cable
À
into the mini-USB
connector
Á
under the weather cap.
3
Remove the clear plastic from the suction cup.
4
Clean and dry your windshield and the suction cup with a lint-
free cloth.
5
Press the suction cup
Â
to the windshield, and flip the lever
Ã
back toward the windshield.
6
Snap the cradle
Ä
onto the suction cup arm.
7
Fit the bottom of your device into the cradle.
8
Tilt the device back until it snaps into place.
TIP: Press on the logo at the top of the device while holding
the tab at the top of the cradle.
9
Plug the other end of the automotive power cable into a
power outlet.
3
Instructions d'installation du zūmo
®
Montage de votre appareil sur une moto
A propos des câbles d'alimentation
AVERTISSEMENT
Garmin vous conseille vivement de faire installer l'appareil par
un technicien expérimenté disposant des connaissances
appropriées en matière de circuits électriques. Le raccordement
incorrect du câble d'alimentation peut endommager le véhicule
ou la batterie et entraîner des blessures corporelles.
Consultez le guide Informations importantes sur le produit et la
sécurité inclus dans l'emballage du produit pour prendre
connaissance des avertissements et autres informations
importantes sur le produit.
L'appareil doit être monté à un endroit adapté et sûr de votre
moto, en fonction des sources d'alimentation disponibles et de
l'acheminement des câbles.
À
Socle pour moto
Á
Fils nus avec fusible en ligne pour le raccordement à l'alimentation
(à la source d'alimentation de la moto)
Installation du support pour guidon
Les pièces nécessaires à l'installation de deux supports pour
guidon sont fournies avec l'appareil. Du matériel supplémentaire
peut être requis pour les montages personnalisés
(http://www.ram-mount.com).
Installation de l'arceau et du support pour guidon
1
Positionnez l'arceau
À
autour du support pour guidon
Á
et
introduisez ses extrémités dans le support pour guidon
Â
.
2
Serrez les écrous pour fixer le support.
REMARQUE : il est recommandé de serrer les écrous selon
un couple de 50 po/lb. Ne dépassez pas un couple de 80 po/
lb.
Fixation du support pour guidon au levier de frein ou
d'embrayage
1
Retirez les deux boulons d'origine du levier de frein ou
d'embrayage
À
.
REMARQUE : des boulons standard de 1/4 po et des
boulons M6 sont fournis avec le produit. Utilisez des boulons
de même taille que les boulons d'origine du levier de frein ou
d'embrayage.
2
Faites passer les nouveaux boulons
Á
à travers le support
pour guidon, les entretoises
Â
et le levier de frein ou
d'embrayage.
3
Serrez les boulons pour fixer le support.
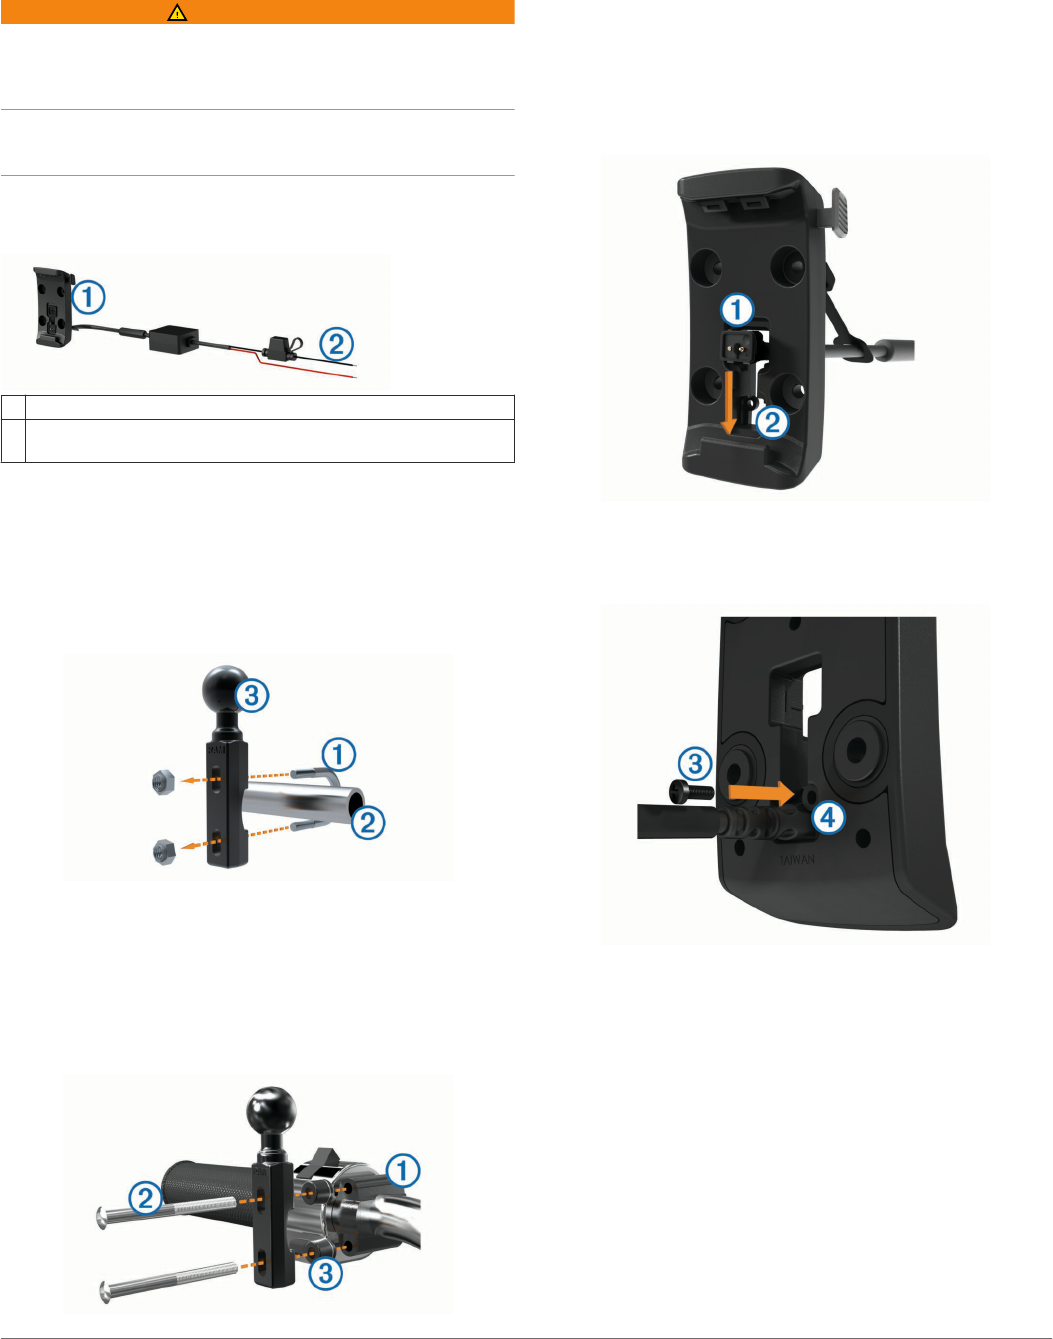
Installation des câbles d'alimentation sur le support
de montage pour moto
1
Faites passer le connecteur du câble d'alimentation
À
par le
haut de l'ouverture du support de montage pour moto.
2
Faites glisser le câble vers le bas de l'ouverture
Á
, puis tirez-
le vers l'arrière jusqu'à ce qu'il soit bien en place.
3
Fixez la vis noire
Â
au dos du support de montage
Ã
pour
maintenir le câble en place.
4
Placez le capuchon étanche
Ä
dans l'enfoncement du haut,
puis appuyez pour le mettre en place.
4
Fixation de la base au support de montage pour moto
AVIS
Tout contact direct et prolongé avec la base ou toute autre pièce
de la moto peut endommager progressivement le support de
montage. Pour éviter ce type de dommage, vous devez placer
les entretoises de montage entre le support et le socle, et veiller
à ce qu'aucune pièce de l'appareil ou du support de montage ne
touche la moto.
1
Faites passer les vis à tête cylindrique plate M4 × 20 mm
À
dans les rondelles
Á
, le socle, les entretoises
Â
et la base
Ã
.
2
Serrez les écrous pour fixer la base.
Fixation de la base au support pour guidon
1
Alignez la rotule du support pour guidon
À
et la rotule de la
base
Á
avec le bras muni de deux douilles
Â
.
2
Insérez la rotule dans le bras muni de deux douilles.
3
Serrez légèrement la molette.
4
Ajustez le support pour une vision et une utilisation
optimales.
5
Serrez la molette pour fixer le support.
6
Alignez la rotule de la base fixée au socle
Â
avec l'autre
extrémité du bras muni de deux douilles.
7
Répétez les étapes 2 à 4.
Installation de l'appareil sur le support moto
1
Ajustez la partie inférieure de l'appareil dans le socle.
2
Inclinez l'appareil vers l'arrière jusqu'à ce qu'il se mette en
place.
REMARQUE : si le clip de verrouillage situé sur la partie
supérieure du support reste levé après insertion de l'appareil,
baissez-le.
Retrait de l'appareil du support de montage
pour moto
1
Appuyez sur le bouton situé sur le côté du support.
2
Retirez l'appareil.
3
Sur le support de montage pour moto, placez le capuchon
étanche du connecteur d'alimentation au centre du câble
(Installation des câbles d'alimentation sur le support de
montage pour moto).
Montage de l'appareil dans une automobile
AVIS
Avant d'installer l'appareil, vérifiez la législation relative au
montage sur pare-brise.
AVERTISSEMENT
Ce produit contient une batterie lithium-ion. Pour éviter de vous
blesser ou d'endommager le produit en exposant la batterie à
une chaleur extrême, placez l'appareil à l'abri du soleil.
N'utilisez pas le support à ventouse sur une moto.
Consultez le guide Informations importantes sur le produit et la
sécurité inclus dans l'emballage du produit pour prendre
connaissance des avertissements et autres informations
importantes sur le produit.
1
Retirez le capuchon étanche situé à l'arrière du socle.
2
Raccordez le câble allume-cigare
À
au connecteur mini-USB
Á
situé sous le capuchon étanche.
3
Retirez le plastique transparent du support à ventouse.
5
4
Nettoyez, puis séchez votre pare-brise et le support à
ventouse avec un chiffon non pelucheux.
5
Pressez la ventouse
Â
contre le pare-brise et abaissez le
levier
Ã
vers le pare-brise.
6
Engagez le socle
Ä
dans le bras du support à ventouse.
7
Ajustez la partie inférieure de l'appareil dans le socle.
8
Inclinez l'appareil vers l'arrière jusqu'à ce qu'il se mette en
place.
ASTUCE : appuyez sur le logo situé sur la partie supérieure
de l'appareil tout en maintenant enfoncée la languette située
en haut du socle.
9
Raccordez l'autre extrémité du câble allume-cigare sur une
prise d'alimentation.
6
Istruzioni di installazione di zūmo
®
Montaggio del dispositivo su una moto
Informazioni sui cavi di alimentazione
ATTENZIONE
Garmin consiglia di far installare il dispositivo esclusivamente da
tecnici esperti e qualificati. Il collegamento errato del cavo di
alimentazione potrebbe provocare danni al prodotto o alla
batteria, nonché lesioni alla persona.
Per avvisi sul prodotto e altre informazioni importanti, consultare
la guida Informazioni importanti sulla sicurezza e sul prodotto
inclusa nella confezione.
Il dispositivo deve essere montato in una posizione adatta e
sicura della moto, in base alle fonti di alimentazione disponibili e
a un corretto instradamento dei cavi.
À
Base di appoggio moto
Á
Cavi privi di protezione con fusibile in linea per il collegamento
all'alimentazione (all'alimentazione della moto)
Installazione della base del manubrio
Il dispositivo include i componenti per due soluzioni di
installazione sul manubrio. I montaggi personalizzati possono
Gebruikershandleiding.com neemt misbruik van zijn services uitermate serieus. U kunt hieronder aangeven waarom deze vraag ongepast is. Wij controleren de vraag en zonodig wordt deze verwijderd.
Product:
Spelregels forum
Om tot zinvolle vragen te komen hanteren wij de volgende spelregels:
lees eerst de handleiding door;
controleer of uw vraag al eerder door iemand anders is gesteld;
probeer uw vraag zo duidelijk mogelijk te stellen;
heeft u een probleem en al geprobeerd om dit op te lossen, vermeld dit erbij aub;
heeft u een oplossing gekregen van een bezoeker dan horen wij dat graag in dit forum;
wilt u een reactie geven op een vraag of antwoord, gebruik dan niet dit formulier maar klik op de knop 'reageer op deze vraag';
uw vraag wordt direct op de website gezet; vermijd daarom persoonlijke gegevens in te vullen;
Belangrijk! Als er een antwoord wordt gegeven op uw vraag, dan is het voor de gever van het antwoord nuttig om te weten als u er wel (of niet) mee geholpen bent! Wij vragen u dus ook te reageren op een antwoord.
Belangrijk! Antwoorden worden ook per e-mail naar abonnees gestuurd. Laat uw emailadres achter op deze site, zodat u op de hoogte blijft. U krijgt dan ook andere vragen en antwoorden te zien.
Abonneren
Abonneer u voor het ontvangen van emails voor uw Garmin Zumo 310 bij:
nieuwe vragen en antwoorden
nieuwe handleidingen
U ontvangt een email met instructies om u voor één of beide opties in te schrijven.
Ontvang uw handleiding per email
Vul uw emailadres in en ontvang de handleiding van Garmin Zumo 310 in de taal/talen: Alle talen als bijlage per email.
De handleiding is 2,47 mb groot.
U ontvangt de handleiding per email binnen enkele minuten. Als u geen email heeft ontvangen, dan heeft u waarschijnlijk een verkeerd emailadres ingevuld of is uw mailbox te vol. Daarnaast kan het zijn dat uw internetprovider een maximum heeft aan de grootte per email. Omdat hier een handleiding wordt meegestuurd, kan het voorkomen dat de email groter is dan toegestaan bij uw provider.
Uw handleiding is per email verstuurd. Controleer uw email
Als u niet binnen een kwartier uw email met handleiding ontvangen heeft, kan het zijn dat u een verkeerd emailadres heeft ingevuld of dat uw emailprovider een maximum grootte per email heeft ingesteld die kleiner is dan de grootte van de handleiding.
Er is een email naar u verstuurd om uw inschrijving definitief te maken.
Controleer uw email en volg de aanwijzingen op om uw inschrijving definitief te maken
U heeft geen emailadres opgegeven
Als u de handleiding per email wilt ontvangen, vul dan een geldig emailadres in.
Uw vraag is op deze pagina toegevoegd
Wilt u een email ontvangen bij een antwoord en/of nieuwe vragen? Vul dan hier uw emailadres in.