All rights reserved. Except as expressly provided herein, no part of this manual may be reproduced, copied, transmitted, disseminated, downloaded or
stored in any storage medium, for any purpose without the express prior written consent of Garmin. Garmin hereby grants permission to download a
single copy of this manual onto a hard drive or other electronic storage medium to be viewed and to print one copy of this manual or of any revision
hereto, provided that such electronic or printed copy of this manual must contain the complete text of this copyright notice and provided further that any
unauthorized commercial distribution of this manual or any revision hereto is strictly prohibited.
Information in this document is subject to change without notice. Garmin reserves the right to change or improve its products and to make changes in
the content without obligation to notify any person or organization of such changes or improvements. Visit the Garmin Web site (www.garmin.com) for
current updates and supplemental information concerning the use and operation of this and other Garmin products.
Garmin
®
, StreetPilot
®
, and MapSource
®
are registered trademarks and City Navigator
™
is a trademark of Garmin Ltd. or its subsidiaries and
may not be used without the express permission of Garmin.
March 2007 Part Number 190-00475-00 Rev. D Printed in Taiwan
StreetPilot 2720 Owner’s Manual i
Preface
Contact Garmin
If you encounter any difculty while using your Garmin
®
StreetPilot
®
2720, or if you have any questions, in
the U.S.A. contact Garmin Product Support by phone at
913/397.8200 or 800/800.1020, Monday–Friday,
8 AM–5 PM Central Time. You can also go to the
Garmin Web site at http://www.garmin.com/contactUs/.
Click Technical Product Support and ll out the form.
In Europe, contact Garmin (Europe) Ltd. at
44/0870.8501241.
Serial Number
Record the serial number (8-digit number located on
the back of the unit) in case your StreetPilot 2720 needs
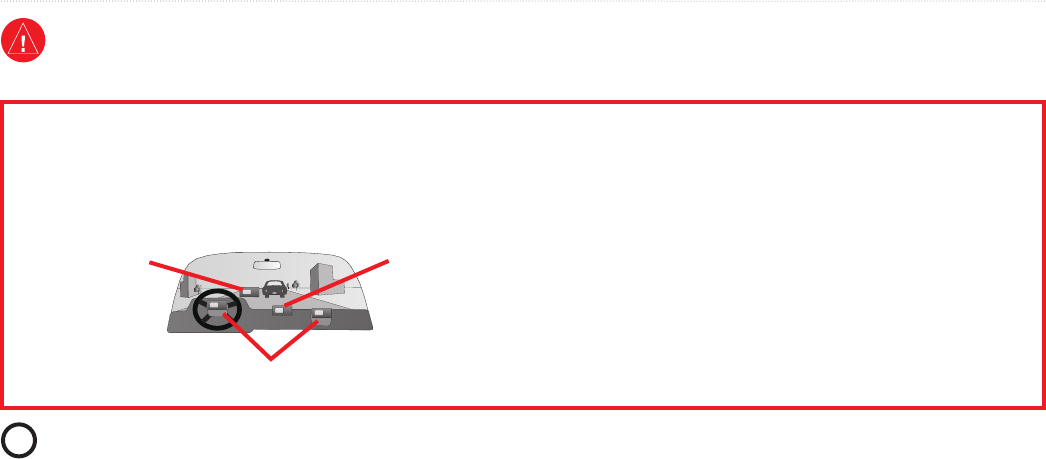
Failure to avoid the following potentially hazardous situations may
result in injury or property damage.
The unit is designed to provide you with route suggestions. It does not
reect road closures or road conditions, trafc congestion, weather
conditions, or other factors that may affect safety or timing while
driving.
Use the unit only as a navigational aid. Do not attempt to use the unit
for any purpose requiring precise measurement of direction, distance,
location, or topography. This product should not be used to determine
ground proximity for aircraft navigation.
The Global Positioning System (GPS) is operated by the United
States government, which is solely responsible for its accuracy and
maintenance. The government’s system is subject to changes which
could affect the accuracy and performance of all GPS equipment,
including the unit. Although the unit is a precision navigation device,
any navigation device can be misused or misinterpreted and, therefore,
become unsafe.
The unit has no user-serviceable parts. If you ever have a problem with
your unit, take it to an authorized Garmin dealer for repairs.
The unit is fastened shut with screws. Any attempt to open the case to
change or modify the unit in any way voids your warranty and may
result in permanent damage to the equipment.
Caution
This manual uses the term Caution to indicate a potentially hazardous situation, which, if not avoided, may result in minor injury or property damage. It
may also be used without the symbol to alert you to avoid unsafe practices.
Important Information
MAP DATA INFORMATION: One of the goals of Garmin is to provide customers with the most complete and accurate cartography that is available to
us at a reasonable cost. We use a combination of governmental and private data sources, which we identify in product literature and copyright messages
displayed to the consumer. Virtually all data sources contain inaccurate or incomplete data to some extent. In some countries, complete and accurate map
information is either not available or is prohibitively expensive.
StreetPilot 2720 Owner’s Manual 1
GettinG ready
GeTTinG ready
Looking at the StreetPilot 2720
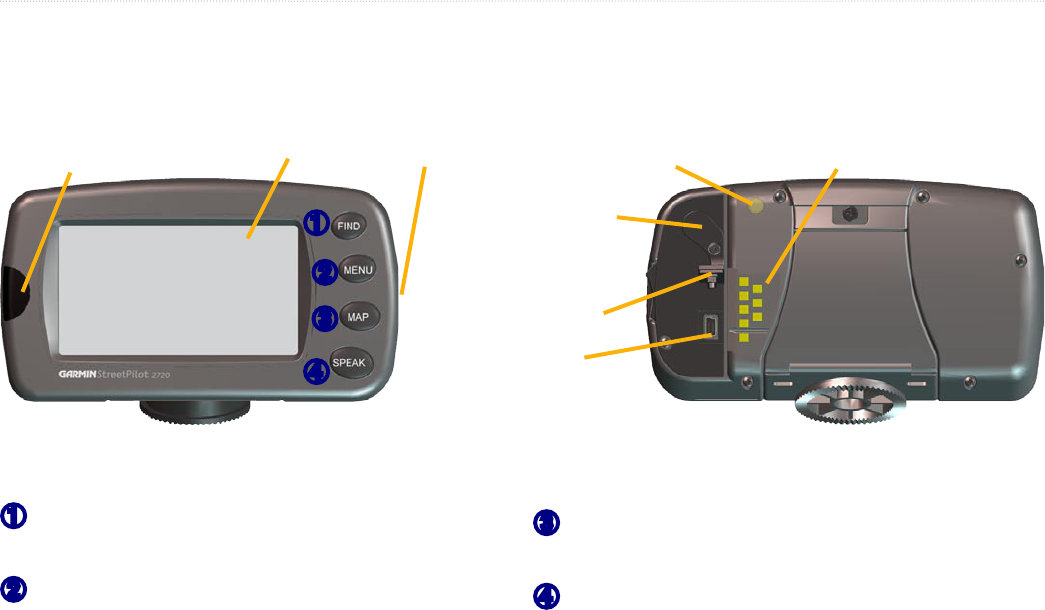
2720 Keys
➊
Find—opens the Where To? menu. Press twice to
Go Home. Press and hold to open Recent Finds.
➋
Menu—opens the Main menu. Press repeatedly to
open the Main menu, Tools menu, and Settings menu.
➌
Map—opens the Map page. Press repeatedly to open
the Map page, Trip Computer, and Turn List.
➍
Speak—announces status and voice directions.
Front
Back
➊
➋
➌
➍
IR window
(aim the remote here)
Touch screen
Light sensor
Power connector
(for 12-Volt or AC adapter)
MCX connector
(for remote
antenna)
Weather Cap
Mini-USB
connector
Power Switch
2 StreetPilot 2720 Owner’s Manual
GettinG ready
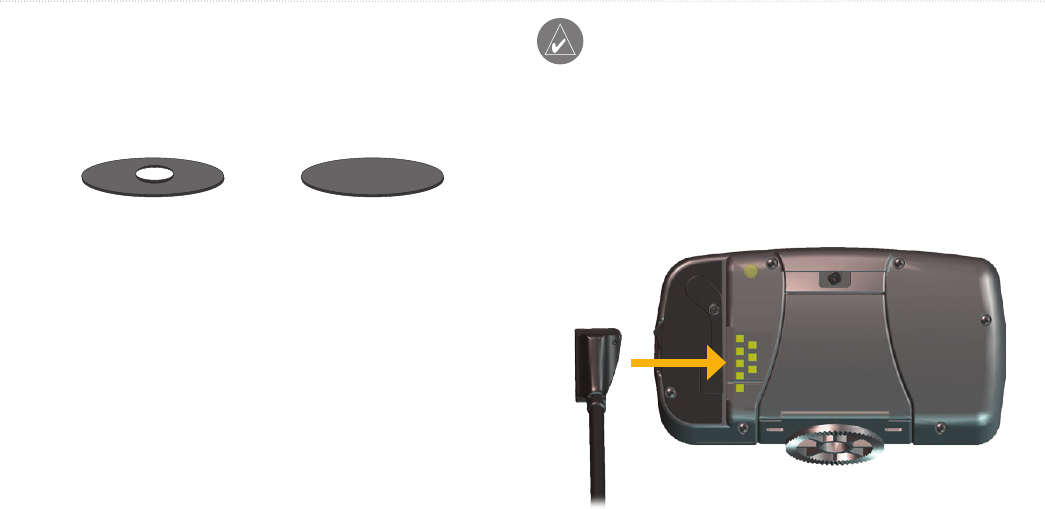
Installing the 2720 in Your Vehicle
You can use the permanent or temporary adhesive disks,
or the non-skid friction mount, to mount the StreetPilot
in your vehicle.
Temporary
adhesive disk
Permanent
adhesive disk
To attach the mounting disk to your dashboard:
1. Clean and dry the area where you want to place
the mount.
2. Remove one side of the backing from the
adhesive and place the adhesive on the bottom
of the mounting base. Remove the backing from
the bottom of the adhesive.
3. Place the mounting base so the locking lever
is facing you and then position the base on the
cleaned area. Apply pressure to adhere the base
to the dashboard.
Note: The permanent adhesive disk is extremely
difcult to remove. Only install it if you are sure
you want to leave the mount in that location.
Tomount your StreetPilot 2720:
1. Align the power plug on the vehicle adapter
to the connector and slide the plug into the
connector until fully seated.
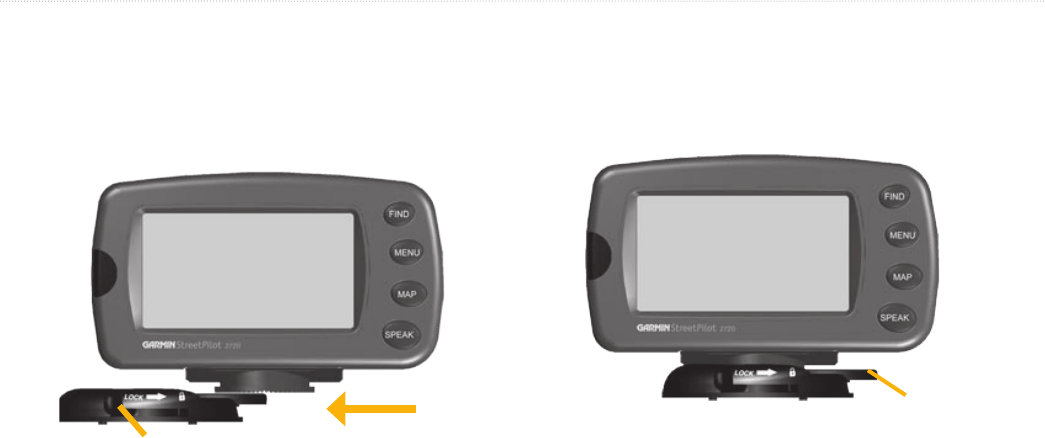
2. Slide the locking lever on the mounting base to
the left, in the unlocked position
StreetPilot 2720 Owner’s Manual 3
GettinG ready
3. Slide the bottom of the StreetPilot into the
mounting base until it clicks into place.
4. Slide the base’s locking lever to the right, in the
locked position.
Locking lever
5. Plug the power adapter into an available 12-Volt
receptacle in your vehicle.
6. Route the cable so it does not interfere with
vehicle operation.
Removing the 2720 from the Mount
1. Slide the locking lever to the left, to the unlocked
position.
2. Press the release tab down.
Release tab
3. Slide the 2720 out of the mounting base.
4 StreetPilot 2720 Owner’s Manual
GettinG ready
(Zoom) In—zooms into the map.
(Zoom) Out—zooms out of the map.
Menu—opens the Main menu. Press repeatedly
to scroll through the Main menu, the Tools
menu, and Settings menu.
Map—opens the Map page. Press repeatedly
to scroll through the Map, Trip Computer, and
Turn List.
Back—returns to the previous page and cancels
data entry.
Speak—announces the next turn or the GPS
status.
Thumb Stick—highlights options and moves the
map arrow. Press in to make a selection.
Page▲ and ▼—scrolls through lists and pages.
Vol
+
and
-
—raises and lowers the volume.
Alphanumeric Keys—enters numbers and
letters. To enter letters or numbers, press the key
repeatedly until the correct character appears.
Using the Remote Control
The remote control operates using two AAA batteries. To use the remote, aim it toward the IR window on the front
left of the StreetPilot.
MENUMAP
BACKSPEAK
IN OUT
PAGE
ZOOM
1
ABC
2
DEF
3
GHI
4
JKL
5
MNO
6
PQRS
7
TUV
8
WXYZ
9
0
VOL
StreetPilot 2720 Owner’s Manual 5
GettinG ready
Using the 2720
Here a some helpful tips for using your 2720.
• Use your nger to touch the screen and select objects.
You can also press the keys on the front of the unit or
on the remote control to operate your 2720.
• Touch the
Back button on any screen to return to the
previous screen.
• Touch
and to view all of the items in a list.
• When a keyboard appears on the screen, type the
name or numbers using your nger. To enter a space,
touch . Touch to enter numbers or special
characters. To delete the last character you entered,
touch .
• You can look at other areas of the map by touching the
map and pulling your nger across the screen. See page
17 for more information.
• To adjust the volume, touch
Volume on the Main menu.
Manual Conventions
When you are instructed to “touch” something, use your
nger to touch an item on the screen. When you are
instructed to “press” something, press a key on the front
of the unit or on the remote control.
You will see small arrows (>) used in the text. They
indicate that you should touch a series of items. For
example, if you see “touch Tools > GPS Info > GPS
Settings” you should touch the Tools button, then touch
GPS Info, and then touch GPS Settings.
6 StreetPilot 2720 Owner’s Manual
find itand Go!
find iTand Go!
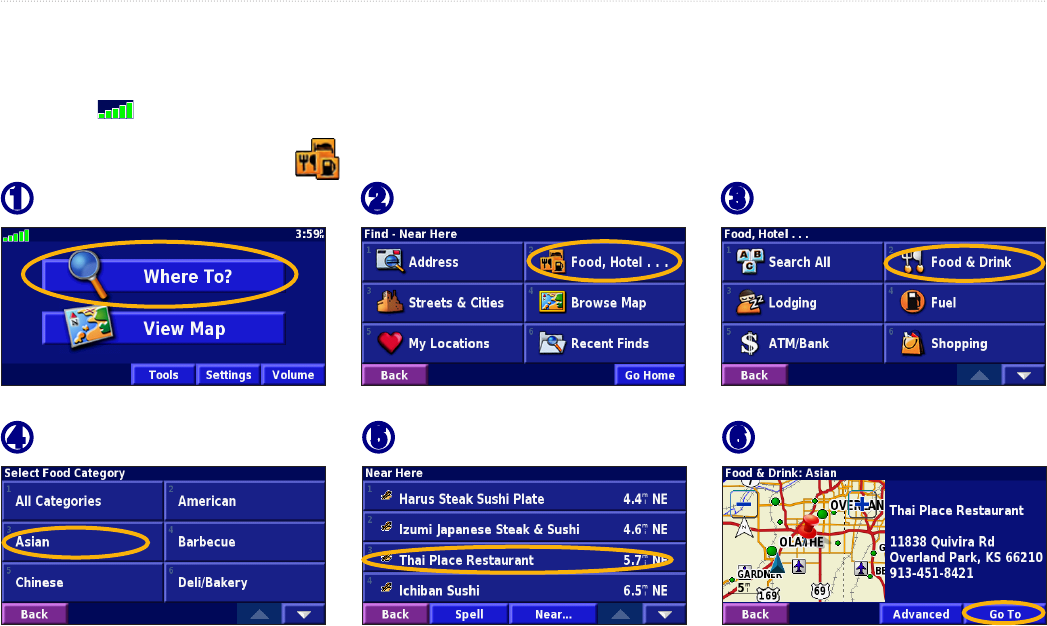
As soon as you turn on your Garmin StreetPilot 2720, it begins acquiring GPS satellite signals. The bars in the upper-
left corner indicate satellite strength. Touch the bars to view more information about the GPS signals.
Finding a Restaurant
➋
Touch Food, Hotel….
➌
Touch Food & Drink.
➊
Touch Where To?
➍
Touch a food category.
➏
Touch Go To.
➎
Touch a location.
StreetPilot 2720 Owner’s Manual 7
find itand Go!
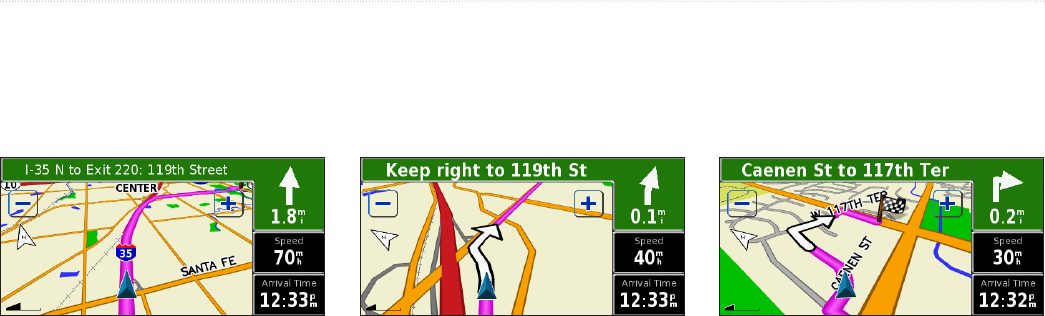
Following Your Route
Follow the route to your destination using the map and the voice prompts. As you travel, your StreetPilot guides
you to your destination with voice prompts, arrows, and directions along the top of the map. If you depart from the
original route, your StreetPilot recalculates the route and provides new route instructions.
Your route is marked
with a magenta line.
Follow the arrows.A checkered ag marks
your destination.
For more information about using the map and other tools, see pages 16–19.
Taking a Better Route
If you need to take a detour, press the Menu key and touch Detour. For more information about taking detours, see
page 23.
8 StreetPilot 2720 Owner’s Manual
Whereto?
Where To?
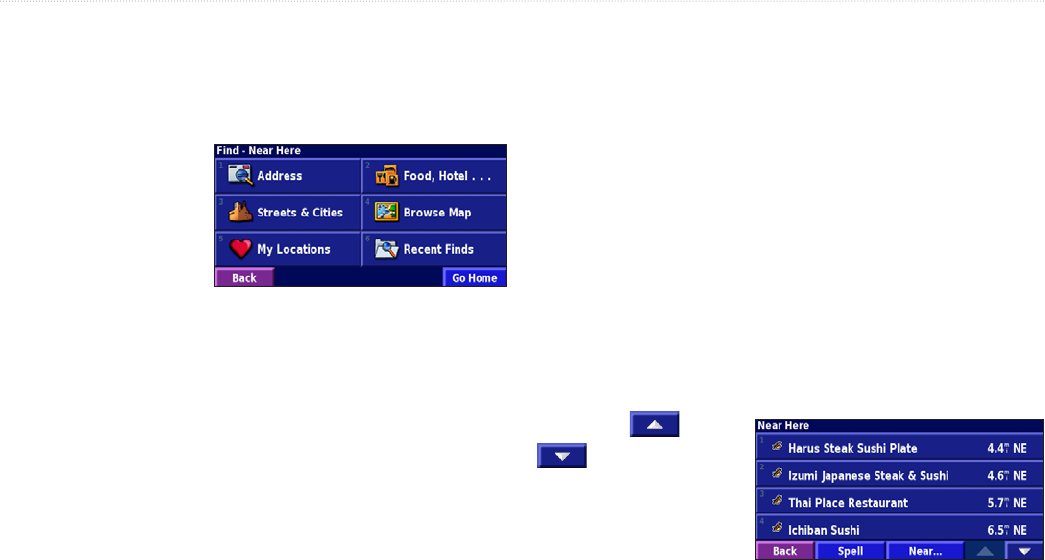
Using the Where To? Menu
The Where To? menu
(Find menu) provides
several categories to
search for locations.
Press the Find key, or
touch Where To? on
the Main menu.
Address—enter the house number and street name to
nd a specic address. See page 9.
Food, Hotel…—search for locations, such as schools,
shopping centers, and hospitals.
Streets & Cities—nd a city, street, intersection, or exit.
Browse Map—use the map to nd the location you are
looking for, which can be helpful when you know where
the location is, but do not know the name. See page 17.
My Locations—save your favorite locations in My
Locations. For example, you can save the hotel where
you will be staying while on vacation. See page 12.
Recent Finds—nd locations you have recently selected
from the search result list.
Understanding the Search Results
Your StreetPilot sorts the search results list by distance
from your current location; the closest locations are
listed rst.
Touch the and
to view all of the
results.
See page 11 to narrow
your search or search
in different areas.
Where To? menu
Search Results
StreetPilot 2720 Owner’s Manual 9
Whereto?
Finding an Address
➊
From the Main menu, touch
Where To? Touch Address.
➎
Select the street and then
select the city.
➏
Select the address, if
necessary. Touch Go To.
➋
Touch a state. Touch Search
All Cities or select a city.
➌
Enter the address number
and touch Done.
➍
Enter the street name and
touch Done.
Searching for a city, street, intersection, or exit is very similar to searching for an address.
From the Main menu, touch Where To? > Streets & Cities.
10 StreetPilot 2720 Owner’s Manual
Whereto?
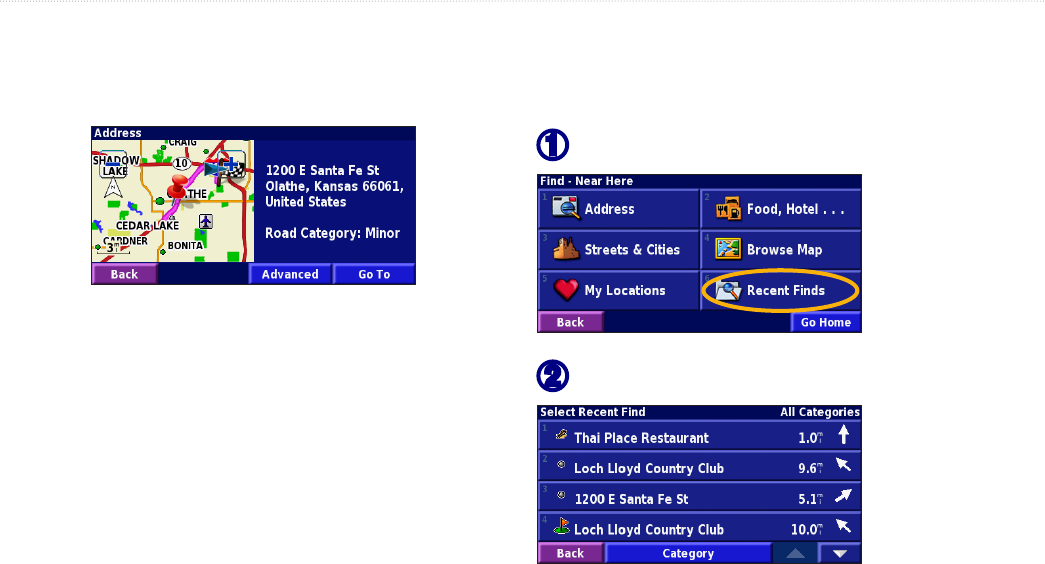
Understanding the Information Page
When you select a location from the search results list,
the location’s information page opens, as shown below.
Touch Go To to create a route to this location.
Touch Advanced to view other options for this location:
•
Insert in Current Route—add this location as the
next stop (point) in your route.
•
Add As Favorite—add this location to your
Favorites. For more information, see page 12.
•
Find Near Point—nd a different location near this
location.
•
Browse Map—view this location on the map.
Finding Recently Found Locations
Your StreetPilot stores the last 50 locations you have
found in Recent Finds.
➋
Select a location from the list.
➊
Touch Where To? > Recent Finds.
Touch Category to display recent nds of a specic
category, such as Food, Hotel….
StreetPilot 2720 Owner’s Manual 11
Whereto?
Finding Locations in a Different Area
You can search for locations in a different area, such as a
different city or near your destination.
➊
From the search results list, touch Near….
➋
Select one of the search options.
The locations near the option you selected are displayed.
Narrowing Your Search
To narrow your search, you can spell part of the name of
the location you are searching for.
➊
From the search results list, touch Spell.
➋
Enter part of the name and touch Done.
Locations containing the letters you entered are displayed.
12 StreetPilot 2720 Owner’s Manual
My Locations
Saving Locations
Any time you are viewing a location’s information page, you can save that location as a Favorite.
➊
Touch Advanced.
➋
Touch Add As Favorite.
Finding Saved Locations
From the Main menu, touch Where To?
➊
Touch My Locations.
➋
Touch Favorites.
➌
Touch a saved location.
My locaTions
Saving a Current Location
From the Main menu, touch
View Map. Touch anywhere on
the map, and then touch Save As
Favorite.
StreetPilot 2720 Owner’s Manual 13
My Locations
Setting a Home Location
➌
Touch Save Home.
➋
Select an option.
➊
Touch Where To? > Go Home.
Press the Find key twice to create a route to your Home Location. To change your Home Location, rst delete it from
your Favorites (see page 15 for more information). Then set it again using the instructions above.
Editing Saved Locations
From the Main menu, touch Tools > My Data > Favorites.
➊
Touch Edit/Review Favorites.
➋
Touch a location to edit.
➌
Touch Edit.
14 StreetPilot 2720 Owner’s Manual
My Locations
Saving Coordinates
If you know the geographic coordinates of your destination, you can use your StreetPilot to navigate to any location
using its latitude and longitude coordinates. From the Menu page, touch Where To? > My Locations > Coordinates.
Entering the Coordinates
➋
Enter the coordinates, and
touch Next.
➊
Touch Enter Position.
➌
Touch Go To.
Browsing the Map for Coordinates
➋
Touch the location on the map,
and touch Save As Favorite.
➊
Touch Browse Map.
➌
Touch Go To.
StreetPilot 2720 Owner’s Manual 15
My Locations
Deleting a Saved Location
To delete a saved location, touch Tools > My Data > Favorites.
➍
Touch Delete.
➊
Touch Delete Favorites.
➋
Touch By Selection.
➌
Touch a saved location.
Delete Options
By Selection—touch each location and delete them each individually.
By Category—select one category to delete all of the locations
assigned to that category.
Delete All—removes all saved locations from your Favorites.
16 StreetPilot 2720 Owner’s Manual
VieWinGthe MaPand UsinGthe tooLs
VieWinGThe MaPand UsinGThe Tools
Viewing the Map Page
From the Main menu, touch View Map to open the map or press the Map key. Touch an area of the map to see
additional information, as shown below. The position icon shows your current location.
Map Page while Navigating a Route
Touch the Speed or Arrival
Timeeld to open the Trip
Computer. See page 18.
While navigating a route, touch the green
text bar to open the Turn List. See page 18.
Touch to zoom out.
Touch to zoom in.
Touch the map to view and
browse a 2-D map.
StreetPilot 2720 Owner’s Manual 17
VieWinGthe MaPand UsinGthe tooLs
Browsing the Map
From the Main menu, touch View Map. You can also
touch Where to? > Browse Map. Touch and drag
anywhere on the map to browse the map (view different
parts of the map).
➋
Touch Go To or Advanced.
➊
Touch any object on the map. Touch Review.
Tips for Browsing the Map
• Touch the map and drag to view different parts of
the map.
• Use the
and icons to zoom in and out.
• Touch any object on the map. An arrow appears
pointing at the object you selected.
• Touch
Review to open the location’s information
page; for more information, see page 10.
• Touch
Save As Favorite to save the location
selected by the arrow to your Favorites.
• Touch
Back to return to the previous screen.
18 StreetPilot 2720 Owner’s Manual
VieWinGthe MaPand UsinGthe tooLs
Trip Computer
The Trip Computer indicates your current speed and
provides statistics about your trip.
To view the Trip Computer, select the
Trip Computer, select the Speed or Arrival
Time eld on the map. Or, from the Main menu, touch
Tools > Trip Computer.
Total
distance
traveled
(odometer)
Current
direction
of travel
Current speed
Distance to your nal
destination
Touch Reset Trip to reset all information on the Trip
Computer. To reset the maximum speed, touch Reset
Max.
Turn List
The Turn List provides a list of turn-by-turn instructions
for your entire route as well as arrival information.
While navigating a route, touch the green text bar on
the Map page to open the Turn List. Or, from the Main
menu, touch Tools > Turn List. The next turn on your
route is listed at the top of the list. Touch View All to see
all the turns in the route. Touch and to scroll
through the list.
Direction of this turn
Distance to this turn
Turn directions
Touch a turn to see the turn on a map (the Next Turn
page). You can also, press Speak on the remote control
to open the Next Turn page. Touch and to zoom
in and out of the turn on the map.
StreetPilot 2720 Owner’s Manual 19
VieWinGthe MaPand UsinGthe tooLs
GPS Info Page
From the map or Main menu, touch the signal strength
bars in the upper-left corner of the screen to view the
GPS Info page. Or, from the Main menu, touch Tools >
GPS Info.
Sky view
Satellite signal
strength bars
The sky view shows the satellites you are receiving. The
satellite signal strength bars indicate the strength of each
satellite signal. A solid bar indicates your StreetPilot has
a strong x on that GPS satellite, and the GPS satellite is
ready for use.
For more information about GPS, see http://www
.garmin.com/aboutGPS/.
GPS Settings
From the Main menu, touch Settings > General > GPS.
You can also access the GPS Settings by touching the
GPS Settings button on the GPS Info page.
Use Indoors
—touch Yes to turn the GPS receiver off
and use the unit indoors.
Set Position—if Use Indoors is enabled, you can select
a location on the map as your current location (position).
Touch OK after you select your location.
WAAS/EGNOS
—disable and enable WAAS/EGNOS.
Wide Area Augmentation System (WAAS) and Euro
Geostationary Navigation Overlay Service (EGNOS)
are systems of satellites and ground stations that provide
GPS signal corrections, giving you even better position
accuracy.
To learn about WAAS and EGNOS, visit http://www
.garmin.com/aboutGPS/waas.html.
20 StreetPilot 2720 Owner’s Manual
creatinGand editinG roUtes
creaTinGand ediTinG roUTes
Creating a New Saved Route
You can store up to 50 saved routes. From the Main menu, touch Tools > My Data > Routes.
➊
Touch Create New
Saved Route.
➋
Touch an option and touch
Next. Select the start point.
➌
Touch an option and touch
Next. Select the end point.
➏
Touch Finish.
➎
Select your preference and
touch Next. See page 34.
➍
To add a stop, touch Yes, then
touch Next. Select the point.
StreetPilot 2720 Owner’s Manual 21
creatinGand editinG roUtes
Editing a Saved Route
From the Main menu, touch Tools > My Data > Routes.
Rename—enter a new name for the route using the on-screen keyboard.
Edit/Review Points—add, arrange, remove, re-order, and review points
in the route. For more info, see the next page.
Change Preference—change the route calculation preference to Faster
Time, Shorter Distance, or Off Road. See page 34 for information about
the route preferences.
Delete Route
—delete this route.
➋
Touch the route to edit.
➊
Touch Edit/Review Routes.
➍
Touch the item to edit.
➌
Touch Edit.
22 StreetPilot 2720 Owner’s Manual
creatinGand editinG roUtes
Adding Multiple Destinations to a Saved Route
You can add multiple destinations (also called via points, midpoints, or stops) to your route as you create it, as
described on page 20. You can also add points to your route when you edit the route, as described below. Follow the
steps on the previous page to begin editing the route.
Auto Arrange—arranges the points
to provide the shortest route.
Remove—touch the point you want
to remove and then touch Remove.
Re-Order—touch the point you want
to move. Touch Move Up or Move
Down. Touch Done when nished.
➊
Touch Edit/Review Points.
➋
Touch Add.
➌
Touch where you to want to
add the point.
➍
Touch an option and then
select the point.
➎
Add points as necessary.
Touch Done when nished.
StreetPilot 2720 Owner’s Manual 23
creatinGand editinG roUtes
Saving the Active Route
From the Main menu, touch Tools > My Data >
Routes > Save Active Route.
Navigating a Saved Route
From the Main menu, touch Tools > My Data >
Routes > Navigate Saved Route. Touch the route
you want to navigate.
Recalculating the Route
From the Main menu, touch Tools > My Data >
Routes > Recalculate Route.
Deleting All Saved Routes
From the Main menu, touch Tools > My Data >
Routes > > Delete All Saved Routes.
Stopping Your Route
From the Main menu, touch Stop and then touch Yes.
Adding a Detour to a Route
If you need to take a detour from your current route,
open the Main menu and touch Detour.
1/2 mile, 2 miles, or 5 miles—select the distance of
the detour. For example if a road sign indicates that the
street is closed for the next 2 miles, touch 2 miles in the
list. Your StreetPilot recalculates your route for the next
two miles.
Detour by Road(s) In Route—select roads in your route
to avoid. For example, if the highway ramp is closed,
select the ramp in the list of roads. Your StreetPilot
recalculates your route to avoid that ramp.
Detour by Trafc Event on Route—if you are using
an FM Trafc Receiver, you can detour around trafc
events (incidents).
Remove All Detours—touch to remove any detours you
have entered for the route.
24 StreetPilot 2720 Owner’s Manual
creatinGand editinG roUtes
Adding Avoidances
From the Main menu, touch Settings > Navigation > > Avoidance Setup. Select the road type to avoid. Touch
to view more road types to avoid.
Creating Custom Avoids
From the Avoidance Setup menu,
touch two times and then touch
Custom Avoids.
You can enter specic areas and roads
to avoid in your routes. When you add
a new avoid road, select the beginning
point and the end point to dene the
section of the road that you want to
avoid.
When you add a new avoid area, create
a rectangular area by selecting the
diagonally opposite corners.
➌
Touch the second corner
and touch Next.
➍
Touch Finish.
➋
Touch the rst corner
and touch Next.
➊
Touch Add New Avoid Area
or Add New Avoid Road.
StreetPilot 2720 Owner’s Manual 25
UsinGthe LoGs
Adjusting the Track Log
As you travel, the StreetPilot creates a bread crumb trail
(track log) of your movement so you can see where you
have been. From the Main menu, touch Tools > My
Data > Track Log.
Recording
—turn off and on the track log recorder. It is
on by default.
Percentage Full—displays the current percentage
capacity of the track log. To clear the track log, touch
Percentage Full > Yes > OK.
Displaying the Track Log
From the Main menu, touch Settings > Map > Zoom
Level Detail > Track Log. Select a zoom setting at
which the track log is shown. Touch OK.
Your track log is now displayed as a ne dotted line on
the map.
Using the Mileage Logs
You can keep four different mileage logs of your travels.
One log is always active to record your mileage. From
the Main menu, touch Tools > My Data > Mileage Log.
Touch a log to edit it.
Name—enter a new name.
Distance
—reset the mileage log.
Active
—turn this log on or off.
UsinGThe loGs
26 StreetPilot 2720 Owner’s Manual
traffic inforMation
Traffic inforMaTion
Using a Garmin
®
FM TMC Trafc Receiver, your
StreetPilot 2720 can receive and use trafc information
broadcast over the FM radio data system. No more
changing the radio stations to hear the latest trafc
report!
When a trafc message is received, your StreetPilot
displays the incident on the map and can change your
route to avoid the trafc incident.
For more information about the FM Trafc Receiver,
visit the Garmin Web site (www.garmin.com). For
participating FM subscription providers and covered
cities, refer to http://www.garmin.com/fmtrafc.
Plug the cable from the FM Trafc Receiver into the
mini-USB connector on the back of the StreetPilot under
the weather cap.
Incidents
From the Main menu, touch Tools > Trafc. Touch an
item in the list to view the details. Touch Near… to view
trafc at a different location.
Color
code
Trafc Symbol
Signal
strength
Avoiding
When a trafc incident is on your current route, a
appears in the lower-left corner of the map showing the
total delay in minutes. To avoid the trafc, touch,
touch the incident, and then touch Detour Around.
StreetPilot 2720 Owner’s Manual 27
traffic inforMation
North
American
MeaningInternational
Road Condition
Road Construction
Road Closed
Congestion
Accident
Incident
Information
Severity Color Code
The bars to the left of the trafc symbols indicate the
severity of the trafc incident.
= Low severity; trafc is still owing.
= Medium severity; trafc is a bit congested.
= High severity; trafc is heavily congested.
From the Main menu, touch Settings > Trafc.
Subscriptions—if you have an FM Trafc Receiver
connected, touch FM Trafc Subscriptions to view
your subscriptions. Touch the subscription to display the
expiration date. See the next page for information about
adding an FM Trafc subscription.
Symbol Style—select the style of traffic symbols
you want to display on the map: North American or
International.
Audio Notication—turn on or off the audio notication
Gebruikershandleiding.com neemt misbruik van zijn services uitermate serieus. U kunt hieronder aangeven waarom deze vraag ongepast is. Wij controleren de vraag en zonodig wordt deze verwijderd.
Product:
Spelregels forum
Om tot zinvolle vragen te komen hanteren wij de volgende spelregels:
lees eerst de handleiding door;
controleer of uw vraag al eerder door iemand anders is gesteld;
probeer uw vraag zo duidelijk mogelijk te stellen;
heeft u een probleem en al geprobeerd om dit op te lossen, vermeld dit erbij aub;
heeft u een oplossing gekregen van een bezoeker dan horen wij dat graag in dit forum;
wilt u een reactie geven op een vraag of antwoord, gebruik dan niet dit formulier maar klik op de knop 'reageer op deze vraag';
uw vraag wordt direct op de website gezet; vermijd daarom persoonlijke gegevens in te vullen;
Belangrijk! Als er een antwoord wordt gegeven op uw vraag, dan is het voor de gever van het antwoord nuttig om te weten als u er wel (of niet) mee geholpen bent! Wij vragen u dus ook te reageren op een antwoord.
Belangrijk! Antwoorden worden ook per e-mail naar abonnees gestuurd. Laat uw emailadres achter op deze site, zodat u op de hoogte blijft. U krijgt dan ook andere vragen en antwoorden te zien.
Abonneren
Abonneer u voor het ontvangen van emails voor uw Garmin StreetPilot 2720 bij:
nieuwe vragen en antwoorden
nieuwe handleidingen
U ontvangt een email met instructies om u voor één of beide opties in te schrijven.
Ontvang uw handleiding per email
Vul uw emailadres in en ontvang de handleiding van Garmin StreetPilot 2720 in de taal/talen: Engels als bijlage per email.
De handleiding is 3,1 mb groot.
U ontvangt de handleiding per email binnen enkele minuten. Als u geen email heeft ontvangen, dan heeft u waarschijnlijk een verkeerd emailadres ingevuld of is uw mailbox te vol. Daarnaast kan het zijn dat uw internetprovider een maximum heeft aan de grootte per email. Omdat hier een handleiding wordt meegestuurd, kan het voorkomen dat de email groter is dan toegestaan bij uw provider.
Stel vragen via chat aan uw handleiding
Stel uw vraag over deze PDF
Uw handleiding is per email verstuurd. Controleer uw email
Als u niet binnen een kwartier uw email met handleiding ontvangen heeft, kan het zijn dat u een verkeerd emailadres heeft ingevuld of dat uw emailprovider een maximum grootte per email heeft ingesteld die kleiner is dan de grootte van de handleiding.
Er is een email naar u verstuurd om uw inschrijving definitief te maken.
Controleer uw email en volg de aanwijzingen op om uw inschrijving definitief te maken
U heeft geen emailadres opgegeven
Als u de handleiding per email wilt ontvangen, vul dan een geldig emailadres in.
Uw vraag is op deze pagina toegevoegd
Wilt u een email ontvangen bij een antwoord en/of nieuwe vragen? Vul dan hier uw emailadres in.