501899
56
Verklein
Vergroot
Pagina terug
1/70
Pagina verder
montana
600 series
owner’s manual
for use with models 600, 650, 650t
© 2011 Garmin Ltd. or its subsidiaries
All rights reserved. Under the copyright laws, this manual may not be copied, in whole or in part, without the
written consent of Garmin. Garmin reserves the right to change or improve its products and to make changes
in the content of this manual without obligation to notify any person or organization of such changes or
improvements. Go to www.garmin.com for current updates and supplemental information concerning the use
of this product.
Garmin
®
, the Garmin logo, BlueChart
®
, City Navigator
®
, and TracBack
®
are trademarks of Garmin Ltd. or its
subsidiaries, registered in the USA and other countries. ANT
, ANT+
, BaseCamp
, chirp
, HomePort
, and
Montana
are trademarks of Garmin Ltd. or its subsidiaries. These trademarks may not be used without the
express permission of Garmin.
Windows
®
is a registered trademark of Microsoft Corporation in the United States and/or other countries.
Mac
®
is a registered trademarks of Apple Computer, Inc. microSD
is a trademark of SD-3C, LLC. Other
trademarks and trade names are those of their respective owners.
Model: 01102524
Table of Contents
Montana 600 Series Owners Manual i
Table of Contents
Getting Started ������������������������1
Device Overview1
Battery Information 2
Turning the Device On or Off 4
Satellite Signals 4
Registering Your Device 5
About the Main Menu 5
Using the Touchscreen 5
Rotating the Screen 6
Turning On the Backlight 6
Adjusting the Volume 7
Proles7
Waypoints, Routes, and
Tracks ��������������������������������������8
Waypoints 8
Using Sight ‘N Go 9
Where To? Menu 10
Routes 11
Tracks 13
Adventures 15
Navigation �����������������������������16
Navigating to a Destination16
Map17
Compass 19
Elevation Plot21
Trip Computer 22
Camera and Photos ��������������23
Taking a Photo 23
Viewing Photos 23
Geocaches ����������������������������25
Downloading Geocaches25
Filtering the Geocache List 25
Navigating to a Geocache 26
Logging the Attempt26
chirp
27
Applications ��������������������������28
Using the 3D View 28
About Sharing Data 28
Setting a Proximity Alarm 29
Calculating the Size of an Area 29
Using the Calculator 29
Table of Contents
ii Montana 600 Series Owners Manual
Viewing the Calendar and
Almanacs 30
Setting an Alarm 30
Opening the Stopwatch 31
Satellite Page 31
Customizing Your Device ����32
Customizing the Main Menu and
the Application Drawer 32
Creating Shortcuts 32
Customizing Specic Pages 33
Creating a Custom Prole 34
System Settings34
Display Settings 35
Appearance Settings 36
Setting the Device Tones 37
Map Settings37
Camera Settings 38
Tracks Settings 38
Changing the Units of Measure 39
Time Settings 39
Position Format Settings 39
Heading Settings 40
Altimeter Settings 40
Geocaching Settings 41
Routing Settings 42
Marine Map Settings43
Fitness 44
Resetting Data 44
Device Information ���������������45
Updating the Software 45
Viewing Device Information 45
Specications 45
About the Batteries 46
Caring for the Device 47
Data Management 48
Appendix �������������������������������52
Optional Accessories 52
Data Field Options 54
Troubleshooting 59
Index ��������������������������������������61
Getting Started
Montana 600 Series Owners Manual 1
Getting Started
WARNING
See the Important Safety and Product
Information guide in the product
box for product warnings and other
important information.
When using your device the rst time,
you should complete these tasks to set
up the device and get to know the basic
features.
1. Install the batteries (page 2).
2. Turn on the device (page 4).
3. Register the device (page 5).
4. Acquire satellites (page 4).
5. Calibrate the compass (page 19).
6. Mark a waypoint (page 8).
7. Create a route (page 11).
8. Record a track (page 13).
9. Navigate to a destination (page 16).
Device Overview
Camera lens (650 and 650t only)
Power key
microSD
card slot (under battery
door) (page 49)
Auto mount power connector
Stereo headphone jack (page 18)
Mini-USB port (under weather cap)
Battery cover D-ring
MCX port for external GPS
antenna (under weather cap)
Getting Started
2 Montana 600 Series Owners Manual
Battery Information
WARNING
This product contains a lithium-ion
battery. To prevent the possibility of
personal injury or product damage
caused by battery exposure to extreme
heat, store the device out of direct
sunlight.
The temperature rating for the device
(page 45) may exceed the usable range
of some batteries. Alkaline batteries
can rupture at high temperatures.
notice
Alkaline batteries lose a signicant
amount of their capacity as temperature
decreases. Therefore, use lithium
batteries when operating the device in
below-freezing conditions.
The device operates on the included
lithium-ion battery pack or three AA
batteries. For tips on maximizing
battery life and other battery
information, see page 46.
Installing the Lithium-ion
Battery Pack
1. Turn the D-ring counter-clockwise,
and pull up to remove the cover.
2. Locate the battery
that came in
the product box.
3. Align the metal contacts on the
battery with the metal contacts in
the battery compartment.
Getting Started
Montana 600 Series Owners Manual 3
4. Insert the battery into the
compartment, contacts rst.
5. Gently press the battery into place.
6. Replace the battery cover, and turn
the D-ring clockwise.
Charging the Lithium-ion Battery
Pack
notice
To prevent corrosion, thoroughly
dry the mini-USB port, the weather
cap, and the surrounding area before
charging or connecting to a computer.
Before you use the device the rst
time, fully charge the battery. Charging
a depleted battery takes 4½ hours. The
device will not charge when outside
the temperature range of 32°F to 113°F
(0°C to 45°C).
1. Plug the AC charger into a standard
wall outlet.
2. Pull up the weather cap
from the
mini-USB port
.
3. Plug the small end of the AC
charger into the mini-USB port.
4. Charge the device completely.
The device may feel warm when
charging.
Removing the Lithium-ion Battery
Pack
WARNING
Do not use a sharp object to remove
batteries.
1. Remove the battery cover.
2. Pull up on the side of the battery
that is closer to the key.
Getting Started
4 Montana 600 Series Owners Manual
Installing AA Batteries
Instead of the lithium-ion battery pack,
you can use alkaline, NiMH, or lithium
batteries. This is especially useful
when you are on the trail and cannot
charge the lithium-ion battery pack.
Use NiMH or lithium batteries for best
results.
1. Turn the D-ring counter-clockwise,
and pull up to remove the cover.
2. Insert three AA batteries, observing
polarity.
3. Replace the battery cover, and turn
the D-ring clockwise.
4. Hold (page 1).
5. Select >  >  > 
 .
6. Select , , or
.
Turning the Device On or
Off
Hold (page 1).
Satellite Signals
After the device is turned on, it begins
acquiring satellite signals. The device
may need a clear view of the sky to
acquire satellite signals. When the
bars turn green, your device has
acquired satellite signals. The time and
date are set automatically based on
the GPS position. To adjust the time
settings, see page 39.
For more information about GPS, go to
www.garmin.com/aboutGPS.
Getting Started
Montana 600 Series Owners Manual 5
Registering Your Device
Go to http://my.garmin.com.
Keep the original sales receipt, or a
photocopy, in a safe place.
About the Main Menu
Status bar
Current time and date
Application icons
Application drawer containing
more application icons
Using the Touchscreen
Select to open the application
drawer.
Select to close the page and
return to the previous page.
Select to return to the previous
page.
Select to save changes and close
the page.
Select and to scroll.
Select to open a menu.
Select to search by name.
Locking the Screen
Lock the screen to prevent inadvertent
screen touches.
1. Press .
2. Select .
Getting Started
6 Montana 600 Series Owners Manual
Unlocking the Screen
1. Press .
2. Select .
Rotating the Screen
To lock the screen orientation, see
page 36.
Rotate your device to view in
horizontal (landscape) or vertical
(portrait) mode.
Turning On the Backlight
The backlight will turn off after a
period of inactivity. To change the
backlight timeout, see page 7.
Touch the screen.
Alerts and messages also activate the
backlight.
Adjusting the Backlight
Brightness
: The backlight brightness may
be limited when the remaining capacity
in the batteries is low.
Extensive use of screen backlighting
can signicantly reduce battery life.
You can adjust the backlight brightness
to maximize battery power.
1. While the device is on, press .
2. Use the backlight slider bar to
adjust the brightness level.
Getting Started
Montana 600 Series Owners Manual 7
The device may feel warm when the
backlight setting is high.
Adjusting the Backlight
Timeout
You can decrease the backlight timeout
to maximize battery power.
Select >  >  >
.
Adjusting the Volume
When you are using headphones or an
auto mount, you can adjust the volume.
1. While the device is on, press .
2. Use the volume slider bar to adjust
the volume level.
Proles
Proles are a collection of settings that
optimize your device based on how
you are using it. For example, your
settings and views can be different
when you are using the device for
geocaching and for navigating on
water.
When you are using a prole and you
change settings such as data elds or
units of measurement, the changes
are saved automatically as part of the
prole.
Selecting a Prole
1. Select > .
2. Select a prole.
Waypoints, Routes, and Tracks
8 Montana 600 Series Owners Manual
Waypoints, Routes,
and Tracks
Waypoints
Waypoints are locations you record and
store in the device.
Creating a Waypoint
You can save your current location as
a waypoint.
1. Select .
2. Select an option:
To save the waypoint without
changes, select .
To make changes to the
waypoint, select , make
changes to the waypoint, and
select .
Finding a Waypoint
1. Select  > .
2. Select a waypoint.
Editing a Waypoint
Before you can edit a waypoint, you
must create a waypoint.
1. Select > .
2. Select a waypoint.
3. Select an item to edit.
4. Enter the new information.
5. Select .
Deleting a Waypoint
1. Select >  .
2. Select a waypoint.
3. Select > .
Waypoints, Routes, and Tracks
Montana 600 Series Owners Manual 9
Increasing the Accuracy of a
Waypoint Location
Waypoint Averaging allows you to
increase the accuracy of a waypoint
location by collecting multiple samples
of the waypoint location.
1. Select > .
2. Select a waypoint.
3. Move to the location.
4. Select .
5. When the Sample Condence status
bar reaches 100%, select .
For best results, collect four to
eight samples for the waypoint,
waiting at least 90 minutes between
samples.
Projecting a Waypoint
1. Select > .
2. Point the device at an object or in
the direction of a location.
3. Select  > 
.
4. Select a unit of measure.
5. Enter the distance to the object, and
select .
6. Select .
Using Sight ‘N Go
You can point the device at an object in
the distance, lock in the direction, and
then navigate to the object.
1. Select > .
2. Point the device at an object.
3. Select  > 
.
Waypoints, Routes, and Tracks
10 Montana 600 Series Owners Manual
Where To? Menu
You can use the Where To? menu to
nd a destination to navigate to. Not all
Where To? categories are available in
all areas and maps.
Additional Maps
You can use additional maps in the
device, such as BirdsEye
satellite
imagery, BlueChart
®
g2, and City
Navigator
®
detailed maps. Detailed
maps may contain additional points of
interest, such as restaurants or marine
services. For more information, go to
http://buy.garmin.com or contact your
Garmin dealer.
Finding a Location by Name
Depending on the maps loaded on
your device, you can search for cities,
geographic points, and various points
of interest (POIs), such as restaurants,
hotels, and auto services.
1. Select .
2. Select a category.
3. Select .
4. Enter the name or part of the name.
5. Select .
Finding a Location Near
Another Location
1. Select  > > 
.
2. Select an option.
3. If necessary, select a location.
Waypoints, Routes, and Tracks
Montana 600 Series Owners Manual 11
Finding an Address
You can use optional City Navigator
®
maps to search for addresses.
1. Select  > .
2. Enter the country or state, if
necessary.
3. Enter the city or postal code.
: Not all map data provides
postal code searching.
4. Select the city.
5. Enter the house number.
6. Enter the street.
Routes
A route is a sequence of waypoints that
leads you to your nal destination.
Creating a Route
1. Select >   >
 > .
2. Select a category.
3. Select the rst point in the route.
4. Select  > .
5. Repeat steps 2–4 until the route is
complete.
6. Select to save the route.
Editing the Name of a Route
1. Select >  .
2. Select a route.
3. Select .
4. Enter the new name.
5. Select .
Waypoints, Routes, and Tracks
12 Montana 600 Series Owners Manual
Editing a Route
1. Select >  .
2. Select a route.
3. Select  .
4. Select a point.
5. Select an option:
To view the point on the map,
select .
To change the order of the point
on the route, select 
or .
To add an additional point on
the route, select .
The additional point is inserted
before the point you are editing.
To remove the point from the
route, select .
6. Select to save the route.
Viewing a Route on the Map
1. Select >  .
2. Select a route.
3. Select  .
Deleting a Route
1. Select >  .
2. Select a route.
3. Select .
Viewing the Active Route
1. While navigating a route, select
>  .
2. Select a point in the route to view
additional details.
Reversing a Route
1. Select >  .
2. Select a route.
3. Select .
Waypoints, Routes, and Tracks
Montana 600 Series Owners Manual 13
Tracks
A track is a recording of your path.
The track log contains information
about points along the recorded path,
including time, location, and elevation
for each point.
Recording Track Logs
1. Select >  >  >
.
2. Select ,  or
, .
If you select , 
, a line on the map indicates
your track.
3. Select .
4. Select an option:
To record tracks at a variable
rate that creates an optimum
representation of your tracks,
select .
To record tracks at a specied
distance, select .
To record tracks at a specied
time, select .
5. Select .
6. Complete an action:
Select an option to record tracks
more or less often.
: Using the 
interval provides the most track
detail, but lls up the device
memory quicker.
Enter a time or distance, and
select
.
As you move with the device turned
on, a track log is created.
Waypoints, Routes, and Tracks
14 Montana 600 Series Owners Manual
Saving the Current Track
The track being recorded is called the
current track.
1. Select >   >
.
2. Select what you want to save:
Select .
Select , and select
a portion.
Viewing Track Information
1. Select >  .
2. Select a track.
3. Select .
The beginning and the end of the
track are marked by ags.
4. Select the information bar on the
top of the screen.
Information about the track is
listed.
Viewing the Elevation Plot of a
Track
1. Select >  .
2. Select a track.
3. Select .
Saving a Location on a Track
1. Select >  .
2. Select a track.
3. Select .
4. Select a location on the track.
5. Select the information bar on the
top of the screen.
6. Select .
7. Select .
Changing the Track Color
1. Select >  .
2. Select a track.
3. Select .
4. Select a color.
Waypoints, Routes, and Tracks
Montana 600 Series Owners Manual 15
Archiving a Saved Track
You can archive saved tracks to save
memory space.
1. Select >  .
2. Select a saved track.
3. Select .
Clearing the Current Track
Select >  >  > 
 > .
Deleting a Track
1. Select > .
2. Select a track.
3. Select  > .
Adventures
Group related items together as an
adventure. For example, you can create
an adventure for your latest hiking trip.
The adventure could contain the track
log of the trip, photos of the trip, and
geocaches you hunted. You can use
BaseCamp to create and manage your
adventures.
Creating an Adventure
1. Select >  >  >
.
2. Select .
3. Select an item.
4. Select .
5. Repeat steps 2–4.
Reviewing and Editing an
Adventure
1. Select > .
2. Select an adventure.
3. If necessary, select .
Navigation
16 Montana 600 Series Owners Manual
Navigation
You can navigate a route, a track, to a
waypoint, to a geocache, to a photo,
or to any saved location in the device.
You can use the map or the compass to
navigate to your destination.
Navigating to a
Destination
You can navigate to a destination using
the map or compass.
1. Select .
2. Select a category.
3. Select a destination.
4. Select .
The map page opens with your
route marked with a magenta line.
5. Navigate using the map (page 17)
or compass (page 19).
Starting a TracBack
®
You can navigate back to the beginning
of a track. This can be helpful when
nding your way back to camp or the
trail head.
1. Select >   >
 > .
2. Select .
The map page opens with your
route marked with a magenta line.
3. Navigate using the map (page 17)
or compass (page 19).
Marking and Starting
Navigation to a Man Overboard
Location
You can save a man overboard (MOB)
location, and automatically start
navigation back to it.
1. Select >  >
.
Navigation
Montana 600 Series Owners Manual 17
The map page opens with your
route marked with a magenta line.
2. Navigate using the map (page 17)
or compass (page 19).
Stopping Navigation
Select  > 
.
Map
The position icon represents your
location on the map. As you travel, the
position icon moves. When you are
navigating to a destination, your route
is marked with a magenta line on the
map.
For information about customizing
the map settings, see page 37. For
information about customizing the map
dashboard and data elds, see page 33.
Browsing the Map
1. Select .
2. Select one or more options:
Drag the map to view different
areas.
Select and to zoom in and
out of the map.
Select a location on the map,
and select the information bar
at the top of the screen to view
information about the selected
location (represented by a pin).
Navigation
18 Montana 600 Series Owners Manual
Navigating a Driving Route
CAUTION
You can permanently damage your ears
and lose hearing if you listen to the
device, earbuds, or headphones at high
volume. Limit the amount of time you
listen at high volume. If you experience
ringing in your ears or mufed speech,
stop listening and have your hearing
checked.
Before you can use the map, you must
purchase and load City Navigator
maps. If you plan to use an auto mount
accessory with the device, you must
also purchase and install the mount in
your vehicle.
1. Select an option:
If you are using a mount with
the device, install the device in
the mount.
Automotive prole is selected
automatically.
If you are not using a mount
with the device, select
>
> .
2. If you are not using a mount with
the device, connect headphones or
an audio line-out cable to the stereo
headphone jack.
3. Use the map to navigate to the
destination.
4. Listen to the voice prompts.
: If nothing is connected to
the headphone jack, audio tones
will replace the voice prompts.
5. Follow the turns in the text bar
along the top of the map.
Navigation
Montana 600 Series Owners Manual 19
Compass
The device has a 3-axis compass. You
can use a bearing pointer or a course
pointer to navigate to your destination.
: When the device is in an auto
mount, the compass displays GPS
heading, not magnetic heading.
Calibrating the Compass
notice
Calibrate the electronic compass
outdoors. To improve heading
accuracy, do not stand near objects that
inuence magnetic elds, such as cars,
buildings, or overhead power lines.
You should calibrate the compass after
moving long distances, experiencing
temperature changes, or changing the
batteries.
1. Select  >
> 
 > .
2. Follow the on-screen instructions.
Navigating with the Bearing
Pointer
When navigating to a destination,
the bearing pointer points to your
destination, regardless of the direction
you are moving.
1. Begin navigation to a destination
(page 16).
2. Select .
3. Turn until points toward the
top of the compass, and continue
moving in that direction to the
destination.
Navigation
20 Montana 600 Series Owners Manual
About the Course Pointer
The course pointer is most useful if you
are navigating on water or where there
are no major obstacles in your path.
The course pointer
indicates your
relationship to a course line
leading
to the destination. The course line
to your destination is based on your
original starting point.
As you drift from the intended course
to the destination, the course deviation
indicator
(CDI) provides the
indication of drift (right or left) from
the course.
The scale
refers to the distance
between dots on the course deviation
indicator.
Navigating with the Course Pointer
Before you can navigate with the
course pointer, you must change
the pointer setting to 
(page 40).
1. Begin navigation to a destination
(page 16).
2. Select .
3. Use the course pointer to navigate
to the destination (page 20).
Navigation
Montana 600 Series Owners Manual 21
Elevation Plot
By default, the elevation plot displays
the elevation for an elapsed time.
To customize the elevation plot, see
page 40.
Select > .
Changing the Plot Type
You can change the elevation plot to
display pressure and elevation over
time or distance.
1. Select >  > >
.
2. Select an option.
Viewing Details about a Point
on the Plot
Select an individual point on the
plot.
Details about the point appear in
the upper-left corner of the plot.
Resetting the Elevation Plot
Select >  >
>
>.
Calibrating the Barometric
Altimeter
You can manually calibrate the
barometric altimeter if you know
the correct elevation or the correct
barometric pressure.
1. Go to a location where the elevation
or barometric pressure is known.
2. Select >  > >
.
3. Follow the on-screen instructions.
Navigation
22 Montana 600 Series Owners Manual
Trip Computer
The trip computer displays your current
speed, average speed, maximum
speed, trip odometer, and other helpful
statistics.
To customize the trip computer, see
page 33.
Resetting the Trip Data
For accurate information, reset the trip
information before beginning a trip.
Select >  >
>  > .
All of the trip computer values are
set to zero.
Camera and Photos
Montana 600 Series Owners Manual 23
Camera and Photos
You can take photos with the Montana
650 and 650t. When you take a
photo, the geographic location is
automatically saved in the photo
information. You can navigate to the
location like a waypoint.
Taking a Photo
1. Select > .
2. Turn the device horizontally or
vertically to change the orientation
of the photo.
3. If necessary, select orto zoom
in or out.
4. Hold to focus.
5. Release to take a photo.
Setting the Camera for Low
Light
Select >  > > 
.
Viewing Photos
You can view photos you have taken
with the camera (page 23) and photos
you have transferred to the device
(page 50).
1. Select > .
2. Select and to view all the
photos.
3. Select a photo to see a larger view
of it.
Viewing a Slideshow
1. Select > .
2. Select a photo.
3. Select > .
Camera and Photos
24 Montana 600 Series Owners Manual
Sorting Photos
1. Select > > >
.
2. Select , 
, or .
Viewing the Location of a
Photo
1. Select > .
2. Select a photo.
3. Select > .
Setting a Photo as Wallpaper
1. Select > .
2. Select a photo.
3. Select > .
Deleting a Photo
1. Select > .
2. Select a photo.
3. Select >  > .
Navigating to a Photo
1. Select > .
2. Select a photo.
3. Select >  >
.
4. Navigate using the map (page 17)
or compass (page 19).
Uploading and Downloading
Photos from Garmin Connect
1. Connect your device to a computer
(page 49).
2. Go to http://my.garmin.com.
3. If necessary, create an account.
4. Sign in.
5. Follow the on-screen directions to
upload or download photos.
Geocaches
Montana 600 Series Owners Manual 25
Geocaches
A geocache is like a hidden treasure.
Geocaching is when you hunt for
hidden treasures using GPS coordinates
posted online by those hiding the
geocache.
Downloading Geocaches
1. Connect your device to a computer
(page 49).
2. Go to www.OpenCaching.com.
3. If necessary, create an account.
4. Sign in.
5. Follow the on-screen instructions
to nd and download geocaches to
your device.
Filtering the Geocache
List
You can lter your geocache list based
on certain factors, such as the level of
difculty.
1. Select >  > 
.
2. Select items to lter.
3. Select an option:
To apply the lter to the
geocache list, select .
To save the lter, select .
Creating and Saving a
Geocache Filter
You can create and save custom lters
for geocaches based on specic factors
you select. After you set up the lter,
you can apply it in the geocaches list.
1. Select >  >  >
 > .
Geocaches
26 Montana 600 Series Owners Manual
2. Select items to lter.
3. Select an option:
To apply the lter to the
geocache list, select .
To save the lter, select .
After it is saved, the lter is
automatically named. You can
access the custom lter from the
geocaches list.
Editing a Custom Geocache
Filter
1. Select >  >  >
.
2. Select a lter.
3. Select an item to edit.
Navigating to a Geocache
1. Select > .
2. Select .
3. Select a geocache.
4. Select .
5. Navigate using the map (page 17)
or compass (page 19).
Logging the Attempt
After you have attempted to nd a
geocache, you can log your results.
1. Select >  > 
.
2. Select , , or
.
3. Select an option:
To begin navigation to a
geocache nearest you, select
.
Geocaches
Montana 600 Series Owners Manual 27
To end the logging, select .
To enter a comment about
looking for the cache or
the cache itself, select 
, enter a comment,
and select .
To rate the geocache, select
, and select an
item to rate.
chirp
A chirp is a small Garmin accessory
that you can program and leave in a
geocache. Only the owner of the chirp
can program a chirp, but anyone can
nd a chirp in a geocache. For more
information about programming a
chirp, see the chirp Owner's Manual at
www.garmin.com.
Enable chirp Searching
1. Select >  > .
2. Select 
 > .
Finding a Geocache with a
chirp
1. Select >  > 

.
2. Begin navigating to a geocache
(page 26).
When you are within 32.9 feet
(10 m) of the geocache that
contains a chirp, details about the
chirp appear.
3. If available, select  to navigate
to the next stage of the geocache.
Applications
28 Montana 600 Series Owners Manual
Applications
Using the 3D View
1. Select > .
2. Select an option:
To increase the angle of
elevation, select .
To decrease the angle of
elevation, select .
To pan the 3D map forward,
select .
To pan the 3D map backward,
select
.
To rotate the view to the left,
select .
To rotate the view to the right,
select .
About Sharing Data
Your device can send or receive data
when connected to another compatible
device. You can share waypoints,
geocaches, routes, and tracks.
Sending and Receiving Data
Wirelessly
Before you can share data wirelessly,
you must be within 10 feet (3 m) of a
compatible Garmin device.
1. Select > .
2. Select  or .
3. Follow the on-screen instructions.
Applications
Montana 600 Series Owners Manual 29
Setting a Proximity Alarm
Proximity alarms alert you when
you are within a specied range of a
particular location.
1. Select > .
2. Select .
3. Select a category.
4. Select a location.
5. Select .
6. Enter a radius.
7. Select .
When you enter a proximity alarm
area, the device will sound a tone.
Calculating the Size of an
Area
1. Select >  >
.
2. Walk around the perimeter of the
area you want to calculate.
3. Select  when nished.
Using the Calculator
The device has a standard calculator
and a scientic calculator.
1. Select > .
2. Complete an action:
Use the standard calculator.
Select > to use the
scientic calculator functions.
Select >  to calculate
degrees.
Applications
30 Montana 600 Series Owners Manual
Viewing the Calendar and
Almanacs
You can view device activity, such as
a waypoint was saved, and almanac
information for the sun and moon, and
hunting and shing.
1. Select .
2. Select an option:
To view device activity for
specic days, select .
To view the sunrise, sunset,
moonrise, and moonset
information, select 
.
To view the predicted best times
for hunting and shing, select,
.
3. If necessary, select or to
view a different month.
4. Select a day.
Setting an Alarm
If you are not currently using the
device, you can set the device to turn
on at a specic time.
1. Select > .
2. Select and to set the time.
3. Select .
4. Select an option.
The alarm sounds at the selected time.
If the device is off at the alarm time,
the device turns on and sounds the
alarm.
Starting the Countdown Timer
1. Select >  > >
.
2. Select and to set the time.
3. Select .
Applications
Montana 600 Series Owners Manual 31
Opening the Stopwatch
Select > .
Satellite Page
The satellite page shows your current
location, GPS accuracy, satellite
locations, and signal strength.
Changing the Satellite View
1. Select >  > .
2. If necessary, select  to
change the view of the satellites to
be oriented with your current track
toward the top of the screen.
3. If necessary, select 
to assign a specic color to the
satellite in the view and to the
signal strength bar of that satellite.
Turning Off GPS
Select >  > > 
.
Simulating a Location
1. Select >  > > 
.
2. Select > .
3. Select a location.
4. Select .
Customizing Your Device
32 Montana 600 Series Owners Manual
Customizing Your
Device
Customizing the Main
Menu and the Application
Drawer
Select and drag any icon on the
main menu or application drawer to
a new location.
Open the application drawer and
drag an icon up to the main menu.
To drag an icon to a new menu
page, select and drag the icon over
the left or right arrows.
Select >  to edit the
main menu and application drawer.
Creating Shortcuts
1. Select > >
.
2. Enter a name for the shortcut.
3. Select the item you want to open
with this shortcut.
Adding a Shortcut to the Menu
Before you can add a shortcut to the
main menu or application drawer, you
must create a shortcut.
1. Select > .
2. Select the shortcut.
3. Select .
4. Select  or .
Customizing Your Device
Montana 600 Series Owners Manual 33
Customizing Specic
Pages
Data elds display information about
your location or other specied data.
Dashboards are a custom grouping of
data that can be helpful to a specic or
general task, such as geocaching.
You can customize the data elds and
dashboards of the map, compass, and
trip computer.
Enabling the Map Data Fields
1. Select  > >  >
.
2. Select or 
.
Changing the Data Fields
Before you can change the map data
elds, you must enable them (page 33).
1. Open the page for which you will
change the data elds.
2. Select a data eld to customize.
3. Select a data eld type.
For data eld descriptions, see
page 54.
Customizing Dashboards
1. Open the page for which you want
to customize the dashboard.
2. Select an option:
From the map, select >
 > .
From the compass or trip
computer, select > 
.
3. Select a dashboard.
Customizing Your Device
34 Montana 600 Series Owners Manual
Creating a Custom Prole
You can customize your settings and
data elds for a particular activity or
trip.
1. Customize the settings as necessary
(pages 32–44).
2. Customize the data elds as
necessary (page 33).
3. Select >  > .
4. Select  > .
Editing a Prole Name
1. Select >  > .
2. Select a prole.
3. Select .
4. Enter the new name.
5. Select .
Deleting a Prole
1. Select >  > .
2. Select a prole.
3. Select .
System Settings
Select >  > .
—sets the GPS to 
 (Wide Area
Augmentation System/European
Geostationary Navigation Overlay
Service), or  (GPS
off). For information about WAAS,
go to www.garmin.com/aboutGPS
/waas.html.
—sets the text
language on the device.
: Changing the text language
does not change the language of
user-entered data or map data, such
as street names.
Customizing Your Device
Montana 600 Series Owners Manual 35
—sets the voice
for the vocal prompts.
—sets the format of the
serial interface:
—allows you
to use the device USB port with
most NMEA 0183-compliant
mapping programs by creating a
virtual serial port.
—Garmin
proprietary format used to
exchange waypoint, route, and
track data with a computer.
—provides
standard NMEA 0183 output
and input.
—provides simple
ASCII text output of location
and velocity information.
—Radio Technical
Commission for Maritime
Services allows the device
to accept Differential Global
Positioning System (DGPS)
information from a device
supplying RTCM data in an
SC-104 format.
—allows you to
select the type of AA battery you
are using (page 4). This setting
is disabled when the lithium-ion
battery pack is installed.
Display Settings
Select >  > .
—adjusts the
length of time before the backlight
turns off.
: To adjust the backlight
brightness, see page 6.
Customizing Your Device
36 Montana 600 Series Owners Manual
—locks the
screen orientation in portrait or
landscape mode, or allows the
screen to change orientation
automatically based on the device
orientation.
—allows you to
take screen captures on the device.
—saves battery power
and prolongs the battery life.
page 36.
Calibrating the Touchscreen
The screen does not normally require
calibration. However, if the screen does
not seem to be responding properly,
calibrate the touchscreen.
1. Select >  >  >
.
2. Follow the on-screen instructions.
Appearance Settings
Select >  > .
—sets a light background
(), a dark background (),
or automatically switches between
the two based on the sunrise time
and the sunset time for your current
location ().
—sets the
background image used in day
mode.
—sets the
background image used in night
mode.
—sets the
color for selections in day mode.
—sets the
color for selections in night mode.
—places the
controls on the left or right side of
the screen when in landscape mode.
Customizing Your Device
Montana 600 Series Owners Manual 37
Setting the Device Tones
You can customize tones for messages,
keys, turn warnings, and alarms.
1. Select >  > .
2. Select a tone for each audible type.
Map Settings
Select >  > .
—adjusts how the map
is shown on the page.
shows north at the
top of the page.
shows your current
direction of travel toward the
top of the page.
shows an
automotive perspective with the
direction of travel at the top.
—allows you to
select when to show guidance text
on the map.
—selects a dashboard to
display on the map. Each dashboard
shows different information about
your route or your location.
—sets the
zoom levels, the text size, and the
detail level of the map.
—automatically
selects the appropriate zoom
level for optimal use on your
map. When  is selected, you
must zoom in or out manually.
—selects the zoom
level for map items.
—selects the text size
for map items.
Customizing Your Device
38 Montana 600 Series Owners Manual
—selects the amount
of detail shown on the map.
Showing more detail may cause
the map to redraw more slowly.
—shows detail
relief on the map (if available)
or turns off shading.
—allows you to select
the position icon, which
represents your position on the
map.
—allows you to
enable or disable the maps currently
loaded on the device. To purchase
additional maps, see page 10.
—adjusts the speed at
which the map is drawn.
Camera Settings
Select >  > .
—changes the
resolution of the photos you will
take.
allows you to
select the storage location.
—displays
brief directions on taking a photo
with the camera.
Tracks Settings
Select >  > .
—turns track recording
on or off.
—selects a track
recording method. records the
tracks at a variable rate to create
an optimum representation of your
tracks.
Customizing Your Device
Montana 600 Series Owners Manual 39
—selects a track log
recording rate. Recording points
more frequentlycreates a more-
detailed track, but lls the track log
faster.
—selects an
automatic archive method to
organize your tracks. Tracks are
saved and cleared automatically
based on the user setting.
—changes the color of the
track line on the map.
Changing the Units of
Measure
You can customize units of measure for
distance and speed, elevation, depth,
temperature, and pressure.
1. Select >  > .
2. Select a measurement type.
3. Select a unit of measure for the
setting.
Time Settings
Select >  > .
—allows you to
select a 12-hour or a 24-hour
display time.
—allows you to select
the time zone for the device. You
can select  to set the
time zone automatically based on
your GPS position.
Position Format Settings
: Do not change the position
format or the map datum coordinate
system unless you are using a map or
chart that species a different position
format.
Select >  > .
Customizing Your Device
40 Montana 600 Series Owners Manual
—sets the position
format in which a given location
reading appears.
—sets the coordinate
system on which the map is
structured.
—shows the
coordinate system the device is
using. The default coordinate
system is WGS 84.
Heading Settings
You can customize the compass
settings.
Select >  > .
—sets the type of
directional heading on the compass.
—sets the north
reference of the compass.
—allows you
to select how the course appears.
( or )—the
direction to your destination.
()—the course
deviation indicator displays
your relationship to a course
line leading to a destination.
—switches from an
electronic compass to a GPS
compass when you are traveling
at a higher rate of speed for a set
period of time (), or turns the
compass off.
page 19.
Altimeter Settings
Select >  > .
—allows the
altimeter to self-calibrate each time
you turn the device on.
Customizing Your Device
Montana 600 Series Owners Manual 41

—allows the
barometer to measure changes
in elevation while you are
moving.
—assumes
the device is stationary at a
xed elevation. Therefore, the
barometric pressure should only
change due to weather.


records pressure data only when
the device is turned on. This
can be useful when you are
watching for pressure fronts.
—records pressure
data every 15 minutes, even
when the device is turned off.

—records
elevation changes over a period
of time.
—records
elevation changes over a
distance.
—records
barometric pressure over a
period of time.
—records
ambient pressure changes over a
period of time.
page 21.
Geocaching Settings
Select >  > .
—allows you to
display the geocache list by names
or codes.
Customizing Your Device
42 Montana 600 Series Owners Manual
—allows you
to edit the number of geocaches
found. This number automatically
increases as you log a nd
(page 26).

page 27.

—programs the
chirp accessory. See the chirp
Owner's Manual at
www.garmin.com.
page 25.
Routing Settings
The device calculates routes optimized
for the type of activity you are doing.
The routing settings available vary
based on the activity selected.
Select >  > .
—allows you to select an
activity for routing.
—available only
for some activities.
—automatically routes you
to the next point.
—allows you to select
the next point on the route.
—routes you to the
next point on the route when
you are within a specied
distance of your current point.
—(available
only for some activities) selects a
preference for calculating routes.
—locks the
position icon, which represents
your position on the map, onto the
nearest road.
—(available only
for some activities) allows you to
select the road type you want to
avoid.
Customizing Your Device
Montana 600 Series Owners Manual 43
Marine Map Settings
Select >  > .
—allows you
to select a nautical chart or a shing
chart:
—displays various map
features in different colors so
that the marine POIs are more
readable. The nautical chart
reects the drawing scheme of
paper charts.
—(requires marine
maps) displays a detailed view
of bottom contours and depth
soundings. Simplies map
presentation for optimal use
while shing.
—allows you to set the
appearance of marine navigation
aids on the map.

—alarm
sounds when you exceed a
specied drift distance while
anchored.
—alarm
sounds when you are off course
by a specied distance.

alarm sounds when you enter
water of a specic depth.
Setting up Marine Alarms
1. Select >  >  >
.
2. Select an alarm type.
3. Select .
4. Enter a distance.
5. Select .
Customizing Your Device
44 Montana 600 Series Owners Manual
Fitness
For more information on optional
tness accessories, see page 52.
Resetting Data
You can reset trip data, delete all
waypoints, clear the current track, or
restore default values.
1. Select >  > .
2. Select an item to reset.
Restoring Specic Settings to
Defaults
1. Select > .
2. Select an item to reset.
3. Select > .
Restoring Specic Page
Settings
You can restore the settings for the
map, compass, and trip computer.
1. Open the page for which you will
restore the settings.
2. Select > .
Restoring All Default Settings
You can reset all the setup values to the
original settings.
Select >  >  > 
 > .
Device Information
Montana 600 Series Owners Manual 45
Device Information
Updating the Software
Before you can update the software,
you must connect the device to your
computer (page 49).
1. Go to www.garmin.com/products/
webupdater.
2. Follow the on-screen instructions.
: Updating the software does not
erase any of your data or settings.
Viewing Device
Information
You can view the unit ID, software
version, and license agreement.
Select >  > .
Specications
Water
resistance
Fully gasketed, high
impact plastic alloy,
waterproof to IEC
60529 IPX7
Battery type Lithium-ion battery
pack (010-11654-03)
or three AA batteries
(alkaline, NiMH, or
lithium)
Battery life Lithium-ion battery
pack: up to 16 hours
AA batteries: up to 22
hours
Battery
charging
temperature
range
From 32°F to 113°F
(from 0 to 45°C)
Operating
temperature
range
From -4°F to 158°F
(from -15 to 70°C)
Device Information
46 Montana 600 Series Owners Manual
Stereo
headphone
jack
35 mm
NOTE: The device
is not intended to
be used to listen to
music
About the Batteries
WARNING
This product contains a lithium-ion
battery. To prevent the possibility of
personal injury or product damage
caused by battery exposure to extreme
heat, store the device out of direct
sunlight.
The temperature rating for the device
(page 45) may exceed the usable range
of some batteries. Alkaline batteries
can rupture at high temperatures.
Do not use a sharp object to remove
batteries.
CAUTION
Contact your local waste disposal
department to properly recycle the
batteries.
notice
Alkaline batteries lose a signicant
amount of their capacity as temperature
decreases. Therefore, use lithium
batteries when operating the device in
below-freezing conditions.
If you store a fully charged device in
a location above 131°F (55°C), the
battery will automatically discharge to
prolong the lifetime of the battery.
Maximizing Battery Life
You can do various things to increase
the battery life.
Exit the camera application when
you are not taking photos.
Device Information
Montana 600 Series Owners Manual 47
Leave the backlight off when not
needed.
Lower the backlight brightness
(page 6).
Decrease the backlight timeout
(page 7).
Enable battery save mode
(page 36).
Set the  to 
(page 38).
Long-Term Storage
When you do not plan to use the
device for several months, remove the
batteries. Stored data is not lost when
batteries are removed.
Caring for the Device
notice
Avoid chemical cleaners and solvents
which can damage plastic components.
Never use a hard or sharp object to
operate the touchscreen, or damage
may result.
Cleaning the Device
1. Dampen a clean cloth with a mild
detergent solution.
2. Wipe the device with the damp
cloth.
3. If necessary, use a soft toothbrush
to gently clean the vent holes on the
back of the device.
4. Thoroughly dry the device.
Cleaning the Screen
1. Dampen a soft, clean, lint-free cloth
with water, isopropyl alcohol, or
eyeglass lens cleaner.
2. Wipe the screen with the cloth.
3. Thoroughly dry the screen.
Device Information
48 Montana 600 Series Owners Manual
Water Immersion
notice
The device is waterproof to IEC
Standard 60529 IPX7. It can withstand
immersion in 1 meter of water for
30 minutes. However, prolonged
submersion can cause damage to the
device. After submersion, be certain to
wipe dry and air dry the device before
using or charging.
Extreme Temperatures
notice
Do not store the device where
prolonged exposure to extreme
temperatures can occur because it can
cause permanent damage.
Data Management
: The device is not compatible
with Windows
®
95, 98, Me, or NT. It is
also not compatible with Mac
®
OS 10.3
and earlier.
File Types
The device supports these le types.
Files from BaseCamp
or
HomePort
Go to www.garmin.com.
GPI custom POI les from the
Garmin POI Loader
JPEG photo les
GPX geocache les
Device Information
Montana 600 Series Owners Manual 49
Installing a microSD Card
Memory cards can be used for
additional storage. Also, some maps
are available preloaded on memory
cards. Go to http://buy.garmin.com for
more information.
1. Turn the D-ring counter-clockwise,
and pull up to remove the cover.
2. Remove the batteries or battery.
3. Slide the card holder
toward
the top edge of the device and lift
up, as instructed in the battery
compartment.
4. Place the microSD card
in the
device with the gold contacts facing
down.
5. Close the card holder.
6. Slide the card holder toward the
bottom of the device to lock it.
7. Replace the batteries (page 2).
8. Replace the battery cover, and turn
the D-ring clockwise.
Connecting the Device to a
Computer
notice
To prevent corrosion, thoroughly
dry the mini-USB port, the weather
cap, and the surrounding area before
charging or connecting to a computer.
The lithium-ion battery pack will
charge while connected to the
computer.
Device Information
50 Montana 600 Series Owners Manual
1. Connect the USB cable to a USB
port on your computer.
2. Pull up the weather cap
from the
mini-USB port
.
3. Plug the small end of the USB
cable into the mini-USB port.
Your device and memory card
(optional) appear as removable
drives in My Computer on Windows
computers and as mounted volumes on
Mac computers.
Transferring Files to Your
Computer
Before you can transfer les, you must
connect the device to your computer
(page 49).
1. Browse your computer for the le.
2. Select the le.
3. Select  > .
4. Open the “Garmin” or memory card
drive/volume.
5. Select  > .
Device Information
Montana 600 Series Owners Manual 51
Deleting Files
notice
If you do not know the purpose of
a le, do not delete it. Your device
memory contains important system
les that should not be deleted. Be
especially cautious of folders entitled
“Garmin.”
Before you can delete les, you must
connect the device to your computer
(page 49).
1. Open the “Garmin” drive or
volume.
2. If necessary, open a folder or
volume.
3. Select the les.
4. Press the  key on your
keyboard.
Disconnecting the USB Cable
1. Complete an action:
For Windows computers, click
the eject icon in your system
tray.
For Mac computers, drag the
volume icon to the Trash .
2. Disconnect the device from your
computer.
Appendix
52 Montana 600 Series Owners Manual
Appendix
Optional Accessories
Optional accessories, such as mounts,
maps, tness accessories, and
replacement parts, are available at
http://buy.garmin.com or from your
Garmin dealer.
Optional Mounts
The AMPS Rugged Mount provides a
mount and cable that provides power,
serial data (NMEA-compliant), and
audio.
The auto mounts kits contain a vehicle
power cable and either a suction cup
mount or a friction mount. When
used with City Navigator maps,
voice prompts are sounded through
the speakers on the mount. The auto
mounts are not waterproof.
Optional Maps
You can purchase additional maps,
such as BirdsEye
satellite imagery,
Garmin custom maps, Inland lakes,
Topo, BlueChart
®
g2 and City
Navigator
®
maps.
Optional Fitness Accessories
Before you can use the tness
accessory with your device, you
must install the accessory according
to the instructions included with the
accessory.
You can use optional tness accessories
including a heart rate monitor or a
cadence sensor with your device.
These accessories use ANT+
wireless
technology to send data to the device.
Appendix
Montana 600 Series Owners Manual 53
Using Optional Fitness
Accessories
1. Bring the device within range (3 m)
of the ANT+ accessory.
2. Select >  > .
3. Select  or
.
4. Select .
5. Customize your data elds to
view the heart rate or cadence data
(page 33).
Tips for Pairing ANT+ Accessories
with Your Garmin Device
Verify that the ANT+ accessory
is compatible with your Garmin
device.
Before you pair the ANT+
accessory with your Garmin device,
move 10 m (32.9 feet) away from
other ANT+ accessories.
Bring the Garmin device within
range 3 m (10 feet) of the ANT+
accessory.
After you pair the rst time, your
Garmin device automatically
recognizes the ANT+ accessory
each time it is activated. This
process occurs automatically when
you turn on the Garmin device and
only takes a few seconds when
the accessories are activated and
functioning correctly.
When paired, your Garmin device
receives data from only your
accessory, and you can go near
other accessories.
Appendix
54 Montana 600 Series Owners Manual
Data Field Options
Data Field Description
Accuracy of
GPS
The margin of
error for your exact
location For example,
your GPS location is
accurate to within +/-
365 m (12 feet)
Ambient
Pressure
The uncalibrated
environmental
pressure
Ascent -
Average
The average vertical
distance of ascent
Ascent -
Maximum
The maximum ascent
rate in feet or meters
per minute
Ascent - Total The total elevation
distance ascended
Barometer The calibrated current
pressure
Battery Level The remaining battery
power
Data Field Description
Bearing The direction from
your current location
to a destination
Cadence
(cadence
accessory
required)
Revolutions of the
crank arm or strides
per minute
Course The direction from
your starting location
to a destination
Depth The depth of the
water Requires a
connection to a NMEA
0183 depth-capable
device to acquire data
(page 52)
Descent -
Average
The average vertical
distance of descent
Descent -
Maximum
The maximum
descent rate in feet or
meters per minute
Descent - Total The total elevation
distance descended
Appendix
Montana 600 Series Owners Manual 55
Data Field Description
Distance to
Destination
The distance to your
nal destination
Distance to
Next
The remaining
distance to the next
waypoint on the route
Elevation The altitude of your
current location above
or below sea level
Elevation -
Maximum
The highest elevation
reached
Elevation -
Minimum
The lowest elevation
reached
ETA at
Destination
The estimated time
of day you will reach
your nal destination
ETA at Next The estimated time of
day you will reach the
next waypoint on the
route
Glide Ratio The ratio of horizontal
distance traveled to
the change in vertical
distance
Data Field Description
Glide Ratio to
Dest
The glide ratio
required to descend
from your current
position and elevation
to the destination
elevation
GPS Signal
Strength
The strength of the
GPS signal
Heading The direction you are
moving
**Heart Rate
(heart rate
monitor
required)
Your heart rate in
beats per minute
(bpm)
Location (lat/
lon)
Displays the current
position in the default
position format
regardless of the
selected settings
Location
(selected)
Displays the current
position in the
selected position
format
Appendix
56 Montana 600 Series Owners Manual
Data Field Description
Odometer A running tally of
distance traveled for
all trips
Off Course The distance to
the left or the right
by which you have
strayed from the
original path of travel
Pointer The data eld arrow
points in the direction
of the next waypoint
or turn
Speed The current rate of
speed at which you
are moving since last
reset
Speed -
Maximum
The maximum speed
reached since last
reset
Speed -
Moving Avg
The average speed
of the device while
moving since last
reset
Data Field Description
Speed -
Overall Avg
Your average speed
since last reset
Speed Limit The reported speed
limit for the road Not
available in all maps
and areas Always
rely on posted road
signs for actual speed
limits
Sunrise The time of sunrise
based on your GPS
position
Sunset The time of sunset
based on your GPS
position
Temperature -
Water
The temperature of
the water Requires
a connection to
a NMEA 0183
temperature-capable
device to acquire data
(page 52)
Appendix
Montana 600 Series Owners Manual 57
Data Field Description
Time of Day The current time of
day based on your
time settings (format,
time zone, and
daylight saving time)
Time to
Destination
The estimated time
needed to reach your
nal destination
Time to Next The estimated time
needed to reach the
next waypoint on the
route
To Course The direction in which
you must move to
return to the route
Trip Odometer A running tally of the
distance traveled
since the last reset
Trip Time -
Moving
A running tally of time
since the last reset
Trip Time -
Stopped
The time spent not
moving since the last
reset
Data Field Description
Trip Time -
Total
A running tally of
distance traveled
since the last reset
Turn The angle of
difference (in
degrees) between
the bearing to your
destination and your
current course L
means turn left R
means turn right
Velocity Made
Good
The speed at which
you are closing on a
destination along a
route
Vert Speed to
Dest
The measurement
of your rate of
ascent or descent
to a predetermined
altitude
Vertical Speed Your rate of altitude
gain or loss over time
Appendix
58 Montana 600 Series Owners Manual
Data Field Description
Waypoint at
Dest
The last point on
a route to your
destination
Waypoint at
Next
The next point on
your route
Appendix
Montana 600 Series Owners Manual 59
Troubleshooting
Problem Solution
The screen does not
respond How do I
reset the device?
1 Remove the batteries
2 Reinstall the batteries
NOTE: This does not erase any of your data or settings
I want to reset all the
customized settings
back to the factory
defaults
Select
> Setup > Reset > Reset All Settings
My device does not
acquire satellite
signals
1 Take your device out of buildings and parking
garages, and away from tall buildings and trees
2 Turn on the device
3 Remain stationary for several minutes
My device will not
charge
Ensure that the lithium-ion battery pack is properly
installed (page 2)
Ensure the temperature is between 32°F and 113°F
(from 0 to 45°C)
Turn down the backlight (page 6)
My battery gauge does
not seem accurate
1 Leave the device on until the battery runs out
2 Fully charge the battery without interrupting the
charge cycle (page 3)
The batteries do not
last long
To learn how to maximize the battery life, see page 46
Appendix
60 Montana 600 Series Owners Manual
Problem Solution
How do I know my
device is in USB mass
storage mode?
On the device, an image of the device connected to a
computer appears
On your computer, you should see a new removable
disk drive in My Computer on Windows computers and a
mounted volume on Mac computers
My device is
connected to the
computer, but it will not
go into mass storage
mode
You may have loaded a corrupted le
1 Disconnect the device from your computer
2 Turn off the device
3 Hold
while you connect the device to your
computer
4 Continue holding
for 30 seconds or until the device
goes into mass storage mode
I cannot see any new
removable drives in
my list of drives
If you have several network drives mapped on your
computer, Windows may have trouble assigning drive
letters to your Garmin drives See the help le for your
operating system to learn how to assign drive letters
I need replacement
parts or accessories
Go to http://buygarmincom, or contact your Garmin
dealer
I want to buy an
external GPS antenna
Go to http://buygarmincom, or contact your Garmin
dealer
Index
Montana 600 Series Owners Manual 61
Index
Symbols
3D view 28
A
AA batteries. See batteries
installing 4
selecting the type 4, 35
accessories 52, 60
tness 52, 53
acquiring satellite
signals 4, 59
active route 12
addresses 11
advanced map setup 37
adventures 15
alarms
clock 30
marine 43
proximity 29
tones for 37
almanac
hunting and shing 30
sunrise and sunset 30
altimeter
calibrating 21
plot type 41
settings 40
ANT+ accessories 52, 53
application drawer 5
customizing 32
area calculation 29
automotive mode 37
auto mounts 18, 52
auto zoom 37
B
backlight 6
timeout 7
barometer 21
BaseCamp 48
batteries 35, 45, 54. See
also lithium-ion battery
pack; See also AA
batteries
about 46
gauge 59
information 2, 46
long term storage 47
maximizing life 46
buttons, on-screen 5–6
C
calculator 29
calendar 30
calibrating
altimeter 21
compass 19
camera 1, 23
settings 38
caring for the device 47
long-term storage 47
chirp 27
City Navigator maps 18
compass 19
calibrating 19
navigating 19
restore 44
settings 40
setup options 40
connecting
to another device 28
USB cable 49
wireless
Index
62 Montana 600 Series Owners Manual
accessories 52, 53
countdown timer 30
course pointer 20
creating
routes 11
waypoints 8
customizing
data elds 17
device settings 34–44
proles 34
D
data elds 33
options 54
deleting
les 51
proles 34
routes 12
tracks 15
waypoints 8
display
backlight 6
backlight timeout 35
screen capture 35
settings 35
downloading
geocaches 25
photos 24
software 45
drawer. See application
drawer
driving routes 42
E
editing
proles 34
routes 11
waypoints 8
elevation plot 21
barometric altimeter 21
of a track 14
F
nding
addresses 11
near your location 10
shing times 30
tness options 52, 53
G
geocaches 25, 41
downloading 25
lter list 25
logging attempt 26
navigating to 26
settings 41
GPS signals 4, 31, 34, 54,
55, 59
turning off 31
H
heading settings 40
headphone jack 1, 18
HomePort 48
hunting times 30
L
language 34, 35
voice 35
lithium-ion battery pack.
See also batteries
charging 3
installing 2
removing 3
Index
Montana 600 Series Owners Manual 63
locking the screen 5
M
main menu 5
customizing 32
man overboard 16
map 17
datum 40
detail 38
information 38
restore 44
setup 38
viewing routes 12
maps, optional 52
marine settings 43
measuring area 29
microSD card slot 1
mini-USB port 1
MOB 16
moon phase 30
mounts, optional 52
N
navigating 16
driving routes 18
to a geocache 26
to a photo 24
to geocaches 26
to waypoints 8
with bearing pointer 19
with course pointer 20
north up 37
O
on-screen buttons 5
orientation, map 37
orienting the screen 6
P
photos 24
downloading 24
setting as wallpaper 24
taking 23
viewing 23
position format 39
power key 1
proles 7, 34
changing 7
creating 34
selecting 7
proximity alarms 29
R
recording tracks 13, 38
registering your device 5
resetting
all settings 59
data 44
device 59
elevation plot 21
restoring default
settings 44
road navigation 42
rotating the screen 6
routes 11–12
active route 12
avoidance 42
creating 11
deleting 12
editing 12
guidance method 42
navigating 12
settings 42
S
satellite signals 4, 31, 54,
55, 59
Index
64 Montana 600 Series Owners Manual
system settings 34
turning off GPS 31
saving
tracks 14
screen
buttons 5–6
orient 6
sharing data 28
sight n' go 9
slideshow 23
software
updating 45
version 45
specications 45
stopwatch 31
storing the device 48
sunrise and sunset
times 30, 56
system settings 34
T
text size, maps 37
time
alarms 30
data elds 57
settings 39
sunrise and sunset 30,
56
zone 39
timer 30
tones 37
Trackback 16
tracks 13–15
archiving 15
clearing current 15
deleting 15
proles 14
recording 13, 38
saving 14
setup 38
viewing 14
track up 37
transferring les 50
using USB 50
wirelessly 28
trip computer 22
restore 44
troubleshooting 59
U
unit ID 45
unlocking the screen 5, 6
updating software 45
USB cable 60
connecting 49
disconnecting 51
V
voice language 35
volume 7
W
walking routes 42
waypoints 8–9
averaging 9
creating 8
deleting 8
editing 8
navigating to 16
projecting 9
Where To? 10
Z
zoom 37
© 2011 Garmin Ltd or its subsidiaries
Garmin International, Inc
1200 East 151
st
Street, Olathe, Kansas 66062, USA
Garmin (Europe) Ltd
Liberty House, Hounsdown Business Park, Southampton, Hampshire, SO40 9LR UK
Garmin Corporation
No 68, Zhangshu 2
nd
Road, Xizhi Dist, New Taipei City, 221, Taiwan (ROC)
wwwgarmincom
April 2011 190-01330-00 RevA Printed in Taiwan
56

Hulp nodig? Stel uw vraag in het forum

Spelregels
1

Forum

Garmin-Montana-650
  • Bij montage van de garmin 650 op het fietsstuur valt hij altijd uit op wat oneffen wegen, kent iemand deze problemen en zo ja ,...is er iets aan te doen?
    Mvg. Gerrie,
    vraag gesteld op 4-6-2016
    Gesteld op 4-6-2016 om 18:25
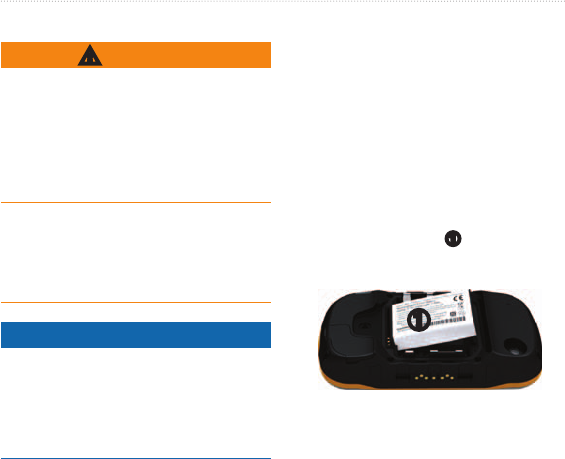
    Reageer op deze vraag Misbruik melden
  • De screentouch van mijn Garmin Montana 650 is ontregeld waardoor tikken op een icoon de foute reactie geeft. Calibreren lukt niet meer omdat ik niet op het menupunt "calibreer scherm" kan komen.
    Ook resetten lukt niet om dezelfde reden. Bestaat er een andere mogelijkheid om een harde reset uit te voeren?
    Mvrgr.
    Miel Willems Gesteld op 9-4-2016 om 16:49

    Reageer op deze vraag Misbruik melden
  • Mijn toestel start niet meer op: als ik het aanzet zie je nog loading foto's en dan valt hij weer uit. Ik heb nieuwe batterijen geprobeerd, ook op stroom aangesloten en op de PC niets helpt hem opstarten! Gesteld op 8-3-2015 om 20:38

    Reageer op deze vraag Misbruik melden
  • Mijn Garmin Montana 600 maakt geen contact meer met massaopslag. Hij herkent de usb kabel wel maar als ik dan klik op JA om d=naar massa opslag te gaan gaat het toestel uit. Gesteld op 25-6-2014 om 08:25

    Reageer op deze vraag Misbruik melden
  • er blijft een route staan en als ik hem uit wil zetten lukt dat niet Gesteld op 1-6-2014 om 11:04

    Reageer op deze vraag Misbruik melden
    • Sluit dat ding aan op je computer. Ga naar basecamp. Pak de handleiding van basecamp erbij. Lees, ga naar blz 146 en lees meer over wissen. Geantwoord op 5-7-2014 om 20:20

      Waardeer dit antwoord (2) Misbruik melden

Misbruik melden

Gebruikershandleiding.com neemt misbruik van zijn services uitermate serieus. U kunt hieronder aangeven waarom deze vraag ongepast is. Wij controleren de vraag en zonodig wordt deze verwijderd.

Product:

Bijvoorbeeld antisemitische inhoud, racistische inhoud, of materiaal dat gewelddadige fysieke handelingen tot gevolg kan hebben.

Bijvoorbeeld een creditcardnummer, een persoonlijk identificatienummer, of een geheim adres. E-mailadressen en volledige namen worden niet als privégegevens beschouwd.

Spelregels forum

Om tot zinvolle vragen te komen hanteren wij de volgende spelregels:

Belangrijk! Als er een antwoord wordt gegeven op uw vraag, dan is het voor de gever van het antwoord nuttig om te weten als u er wel (of niet) mee geholpen bent! Wij vragen u dus ook te reageren op een antwoord.

Belangrijk! Antwoorden worden ook per e-mail naar abonnees gestuurd. Laat uw emailadres achter op deze site, zodat u op de hoogte blijft. U krijgt dan ook andere vragen en antwoorden te zien.

Abonneren

Abonneer u voor het ontvangen van emails voor uw Garmin Montana 650 bij:


U ontvangt een email met instructies om u voor één of beide opties in te schrijven.


Ontvang uw handleiding per email

Vul uw emailadres in en ontvang de handleiding van Garmin Montana 650 in de taal/talen: Engels als bijlage per email.

De handleiding is 1,85 mb groot.


U ontvangt de handleiding per email binnen enkele minuten. Als u geen email heeft ontvangen, dan heeft u waarschijnlijk een verkeerd emailadres ingevuld of is uw mailbox te vol. Daarnaast kan het zijn dat uw internetprovider een maximum heeft aan de grootte per email. Omdat hier een handleiding wordt meegestuurd, kan het voorkomen dat de email groter is dan toegestaan bij uw provider.

Stel vragen via chat aan uw handleiding

Stel uw vraag over deze PDF

Andere handleiding(en) van Garmin Montana 650

Garmin Montana 650 Gebruiksaanwijzing - Nederlands - 72 pagina's

Garmin Montana 650 Gebruiksaanwijzing - Deutsch - 72 pagina's

Garmin Montana 650 Gebruiksaanwijzing - Français - 72 pagina's

Garmin Montana 650 Gebruiksaanwijzing - Espanõl - 72 pagina's


Uw handleiding is per email verstuurd. Controleer uw email

Als u niet binnen een kwartier uw email met handleiding ontvangen heeft, kan het zijn dat u een verkeerd emailadres heeft ingevuld of dat uw emailprovider een maximum grootte per email heeft ingesteld die kleiner is dan de grootte van de handleiding.

Er is een email naar u verstuurd om uw inschrijving definitief te maken.

Controleer uw email en volg de aanwijzingen op om uw inschrijving definitief te maken

U heeft geen emailadres opgegeven

Als u de handleiding per email wilt ontvangen, vul dan een geldig emailadres in.

Uw vraag is op deze pagina toegevoegd

Wilt u een email ontvangen bij een antwoord en/of nieuwe vragen? Vul dan hier uw emailadres in.


Info