


-
Als ik route download zie ik alleen de paarse lijn en kan niet zien welke kant ik op moet of soms kruisen de wegen zich... dan kan ik niet zien hoe ik de route moet vervolgen Gesteld op 6-9-2023 om 21:24
Reageer op deze vraag Misbruik melden-
Ik download eerst de route op mijn pc. Als ik de detail van de route opvraag kan je overlopen hoe je moet wandelen. Ikzelf maak dan nog verschillende waypoints aan een geef deze een alfabetisch-nummerieke naam (bv. aa01 - aa02 - ...) Op deze wijze kan ik altijd zien of ik in juiste richting wandel. Bovendien, als ik de wandeling nog eens afprint (ik ben niet de zeer goede kaartlezer) , kan ik duidelijk zien op de kaart waar ik ben. Zodra ik de track en de waypoints heb aangemaakt, download ik deze op mijn GPS60CSX. Geantwoord op 18-9-2023 om 18:02
Waardeer dit antwoord Misbruik melden
-
-
Fietsknooppunten waar staan die en hoe kan ik die instellen Gesteld op 18-10-2022 om 18:21
Reageer op deze vraag Misbruik melden -
bestaat er eenzelfde groep voor het toestel GPSmap 66s Gesteld op 16-4-2022 om 12:40
Reageer op deze vraag Misbruik melden -
Mijn Garmin GPS60CSx komt niet verder dan he hoofdmenuscherm en reageert niet op de knoppen. Gesteld op 15-4-2022 om 22:35
Reageer op deze vraag Misbruik melden-
Het toestel Garmin GPS 60 CSX heb ik in gebruik sedert 2008. Ik heb het recentelijk vervangen. Zeer veel gebruikt maar na verloop van tijd kan het niet anders dan verslijten. Ik heb nooit problemen gehad met dit toestel dan de laatste 6 maanden. Dit is waarschijnlijk niet het antwoord. Maar alles verslijt. Geantwoord op 16-4-2022 om 12:39
Waardeer dit antwoord Misbruik melden
-
-
Ik download een wandeling van mijn computer naar de GPS 60csx.
Reageer op deze vraag Misbruik melden
Voorheen waren de wandeling en de aangemaakte waypoints zichtbaar in het kaartscherm EN via tracklog scherm - optie kaart. Nu is enkel de wandeling nog zichtbaar via tracklog en optie kaart, wat onhandig werk . Dien ik ergens een aanpassing te doen - instelling te wijzigen ??? Gesteld op 21-2-2021 om 10:19 -
Het toestel toont de basiskaart niet meer. Dat is de kaart met een minimum aan detail die standaard bij het toestel geleverd wordt.
Reageer op deze vraag Misbruik melden
Ook zie ik geen teken van communicatie tussen de computer en het apparaat.
Met dank op voorhand
Jozef, Phnom Penh, Cambodia
Gesteld op 5-1-2021 om 14:01
-
alleen voor geocaching gebruiken dus niet over wegen
Reageer op deze vraag Misbruik melden
Gesteld op 7-11-2020 om 16:03 -
Ik heb een GPSMAP60 en wil de route die ik heeft gemaakt op afstandmeten.nl op mijn GPS zetten. Gesteld op 25-7-2020 om 14:57
Reageer op deze vraag Misbruik melden-
Maak op afstandmeten een gpx bestand.
Waardeer dit antwoord Misbruik melden
Die kun je op je Garmin importeren Geantwoord op 26-7-2020 om 19:47
-
-
Geachte Heer / Mevrouw,
Reageer op deze vraag Misbruik melden
Ik heb een gpsmap 60,wil ik U vragen hoe ik mij kompas de pijl terug kin krijgen.
Wat ik ook probeert ik krijg hem niet op mij kompas terug.
Ik heb alleen in Engels.
Kan jullie mij daar bij helpen.
Hatelijke dank voor uw medewerking,
Met vriendelijke groet
Cees den Boer
Gesteld op 6-2-2020 om 13:21 -
hoe installeer ik Basecamp op mijn gps 60CSx en waar kan ik info over krijgen
Reageer op deze vraag Misbruik melden
Gesteld op 20-2-2018 om 14:14-
Basecamp installeer je niet op de gps maar op de computer of laptop Geantwoord op 18-4-2021 om 16:41
Waardeer dit antwoord Misbruik melden
-
-
hoe groot mag de micro sd kaart voor mijn garmin 60 csx zijn
Reageer op deze vraag Misbruik melden
Gesteld op 7-12-2016 om 14:57-
Ik gebruik voor de ogenblik 8 GB. en heb geen enkel probleem hierbij Geantwoord op 7-12-2016 om 16:41
Waardeer dit antwoord Misbruik melden
-
-
Is er iemand die mijn GPSmap 60CSx kan repareren
Reageer op deze vraag Misbruik melden
Het aan/uit knop kan alleen met een scherp voorwerp bediend worden
Graag regio Doetinchem Gesteld op 3-2-2016 om 21:15-
Goede middag
Waardeer dit antwoord Misbruik melden
Ik kan uw gps niet repareren maar voor €125,00 mag u mijn gps 60csx overnemen
(onbeschadigd te weinig gebruikt)
Met vriendelijke groeten Joop Geantwoord op 14-12-2016 om 13:33
-
-
Geachte lezer,
Reageer op deze vraag Misbruik melden
In de vakantie is mijn Garmin 60CSx van schouderhoogte op de grond gevallen. Sinds die val kan ik niet meer 'bladeren' met de page knop. Mogelijk dat nog meer functies niet naar behoren werken maar hier ben ik nog niet achter. Kunt u mij vertellen hoe ik dit kan verhelpen? Alvast bedankt voor uw antwoord.
Met vriendelijke groet,
Gertjan Scherphof
gertjanenlucinda@gmail.com Gesteld op 12-8-2014 om 18:02-
terug naar de winkel en laten nazien Geantwoord op 9-12-2014 om 19:33
Waardeer dit antwoord (1) Misbruik melden
-
-
hoe krijg ik hem op nederlands gezet Gesteld op 24-7-2014 om 14:20
Reageer op deze vraag Misbruik melden-
klik op Instellen of reglage enfin een ikoon met engelse sleutel normaal 2de rij eerste ikoon, enter eerste ikoon systeem enter en daar zie je cierde lijn de talen, gewoon neerdelands kiezen en klaar is kees
Waardeer dit antwoord Misbruik melden
Groetjes
Bérénice Geantwoord op 25-7-2014 om 18:20
-
-
krijg steeds de melding ,na een route geladen te hebben:
Reageer op deze vraag Misbruik melden
routeberekening fout: niet genoeg geheugen beschikbaar!
Gesteld op 21-6-2014 om 23:44-
minder punten, max 500 op wikiloc kun je dat gewoonlijk kiezen anders op mapsource filterdaar kun je ook de punten verminderen Geantwoord op 25-7-2014 om 18:22
Waardeer dit antwoord (4) Misbruik melden
-
-
ik vraag me af hoe je manueel coördinaten kan invullen
Reageer op deze vraag Misbruik melden
Gesteld op 21-4-2014 om 11:37-
ga naar gebruikers handleiding.com en voer daar uw tip toestel in en u vind daar uw uitleg groetjes Geantwoord op 6-11-2015 om 20:29
Waardeer dit antwoord (1) Misbruik melden
-
-
Beste, ik zou graag een beetje info hebben over hoe ik mijn gpsmap60csx gebruik om een tochtje te fietsen.
Reageer op deze vraag Misbruik melden
Ik heb een site waar ik bestanden kan downloaden op mapsource en ze zo naar mijn gps over te dragen. Maar de meeste hebben meer trackpoints en kunnen niet volledig weergegeven worden. Verder kan ik ook een route erop zetten en fietsen??
Hartelijk dank Gesteld op 17-4-2014 om 15:45-
Hello, als je op de track in mapsource clik dan zie de eigenschappen en kun je de track ondermeer zien op de kaart op het profil ervan zien, wel als je clik op filter kunt je de punten van de track verminderen en zo volledig downloaden want de meeste gps aanvaarden slechts 500 punten
Waardeer dit antwoord (2) Misbruik melden
hoop dat het lukt voor jou
groetjes Geantwoord op 17-4-2014 om 17:06
-
-
hoe komt het dat mijn gps na opstarten onmiddelijk weer uitvalt ? Gesteld op 11-2-2014 om 22:13
Reageer op deze vraag Misbruik melden-
Ik weet het niet maar sinds vandaag doet ie van mij dat ook. Nieuwe batterijen geprobeerd maar dat hielp ook niet echt.
Waardeer dit antwoord (2) Misbruik melden
Ik heb 'm nu 6 jaar, dus misschien houdt het eens op.
Groet en Succes,
Jelle Geantwoord op 2-5-2014 om 08:38
-
-
heb da gisteren ook gehad probleem was verkeerde batterijen Geantwoord op 6-11-2015 om 20:34
Waardeer dit antwoord Misbruik melden -
beste,ik ben in het bezit van garmin 60csx,mijn kaarten draaien niet meer mee op het toestel ik wandel altijd naar beneden.weet iemand hier raad op. Gesteld op 10-2-2014 om 21:20
Reageer op deze vraag Misbruik melden-
Dit is waarschijnlijk een instelling bij de kaartinstellingen op de GPS. "Noord altijd boven" of zoiets aan/uit zetten. Geantwoord op 26-2-2014 om 13:22
Waardeer dit antwoord Misbruik melden
-
-
Ik heb het kompas opnieuw gekalibreert en sindsdien wijst het zwarte pijltje de looprichting goed aan. gr Li Geantwoord op 21-8-2014 om 19:04
Waardeer dit antwoord Misbruik melden -
Hoe kom ik te weten welke firmware op mijn GPSMap 60 Csx geïnstalleerd is ? Gesteld op 17-10-2013 om 12:19
Reageer op deze vraag Misbruik melden-
Ga naar het menu met alle icons
Waardeer dit antwoord (1) Misbruik melden
Kies voor 'Instellen'
Kies voor 'Systeem'
Druk op de knop 'Menu'
Kies voor 'Software info'
Daar staan de versies van de firmware en van de GPS software. Geantwoord op 28-1-2014 om 10:40
-
-
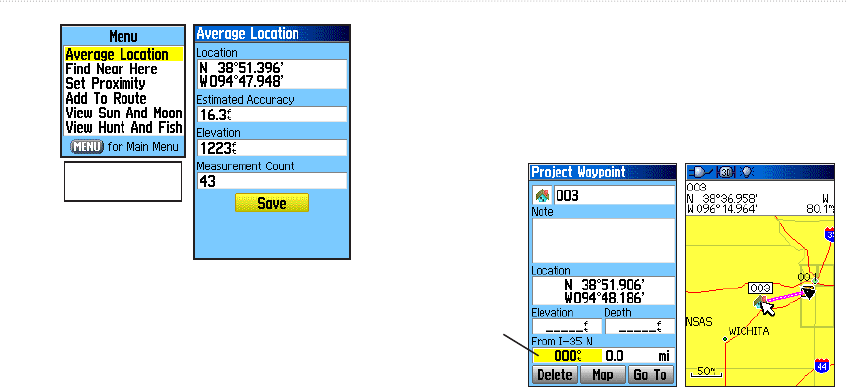
hoeveel waypoints kan ik opslaan Gesteld op 9-10-2013 om 20:19
Reageer op deze vraag Misbruik melden-
ik denk plus minus 500 Geantwoord op 6-11-2015 om 20:44
Waardeer dit antwoord Misbruik melden
-
-
Beste,
Reageer op deze vraag Misbruik melden
Kan ik met de 60CSX een gdb bestand laden?
Alvast bedankt,
Erik Gesteld op 11-9-2013 om 13:06-
GDB zijn Mapsource bestanden van garmin en die kan je altijd op je gps laden. Geantwoord op 11-9-2013 om 20:37
Waardeer dit antwoord (1) Misbruik melden
-
-
nee, de gdb gaat in Mapsource, als je hem verstuurt vanuit Mapsource naar de gps dan maakt mapsource er gpx van en dat kan de gps lezen.
Waardeer dit antwoord (1) Misbruik melden
een gps kan geen gdb lezen. Geantwoord op 28-9-2013 om 15:56 -
Ik heb een GPS map 60C hoe kan ik als ik in het veld ben coordinaten invoeren of wijzigen? Gesteld op 27-8-2013 om 16:01
Reageer op deze vraag Misbruik melden-
Druk op mark ga met de pijltjes naar het coördinaat en verander Geantwoord op 27-8-2013 om 20:58
Waardeer dit antwoord Misbruik melden
-
-
kan ik ook temperatuur aflezen? Gesteld op 8-8-2013 om 21:25
Reageer op deze vraag Misbruik melden-
nee, je kan geen temperatuur aflezen op de 60CSX Geantwoord op 10-8-2013 om 16:04
Waardeer dit antwoord Misbruik melden
-
-
wil mijn cx60 gebruiken op de fiets voor nivigeren
Reageer op deze vraag Misbruik melden
Gesteld op 6-8-2013 om 12:57-
Heel goed te gebruiken voor op de fiets Geantwoord op 6-8-2013 om 16:53
Waardeer dit antwoord Misbruik melden
-
-
Heel erg goed te gebruiken,er zijn zelfs speciale houders voor op de fiets te kunnen gebruiken Geantwoord op 13-9-2013 om 16:13
Waardeer dit antwoord (1) Misbruik melden -
aansluiten op computer
Reageer op deze vraag Misbruik melden
Gesteld op 15-7-2013 om 22:14-
Met de meegeleverde usb kabel. Mappen,waypoints,routes kunnn worden overgezet vanuit mapsourcesen naar je gps Geantwoord op 29-8-2013 om 08:51
Waardeer dit antwoord Misbruik melden
-
-
Bij het berekening van een fietsroute, groter dan 40 km geeft mijn apparaat de melding.
Reageer op deze vraag Misbruik melden
Onvoldoende geheugen. Kan dit verholpen worden en zo ja, hoe?
Fred van Dijk Gesteld op 13-7-2013 om 16:12-
mischien een grotere SD kaartje in zetten de Max is 4 GB Geantwoord op 13-7-2013 om 16:30
Waardeer dit antwoord (1) Misbruik melden
-
-
Dat ligt aan welke kaart je gebruikt en welke routeringsinstellingen je gebruikt.
Waardeer dit antwoord Misbruik melden
Simpelste manier is om een paar tussenpunten te gebruiken dan kan hij het makkelijk aan.
Heeft niks met sd kaart te maken, het gaat om het rekengeheugen.
Als je de route maakt op de computer in mapsource met dezelfde kaart geef je een paar punten onderweg in en alles werkt perfect. Geantwoord op 28-9-2013 om 15:49 -
Per ongeluk basiskaart van 60cx gewist! is dit nog te herstellen?
Reageer op deze vraag Misbruik melden
Gesteld op 2-7-2013 om 12:31-
Ik heb dezelfde vraag! Iemand die het weet? Geantwoord op 9-7-2013 om 20:43
Waardeer dit antwoord Misbruik melden
-
-
Probeer dit eens;
Waardeer dit antwoord Misbruik melden
Klik op deze LINK
succes,
frans Geantwoord op 8-5-2015 om 16:43 -
ik heb een gpsmap 60csx , deze werkt goed alleen als hij een route berekend gaat hij tot honderd procent en blijft daar steken.
Reageer op deze vraag Misbruik melden
Is hier iets aan te doen? Gesteld op 25-6-2013 om 19:43-
goedendag
Waardeer dit antwoord (1) Misbruik melden
Dat heb ik ook wel eens soms na lang wachten doet hij het wel
Mij hebben ze gezegd dat de route dan te lang is en minder punten in moet zetten Geantwoord op 13-7-2013 om 16:25
-
-
ligt aan hoe lang deze route is, anders meerdere routes maken
Waardeer dit antwoord Misbruik melden
en welke kaart er wordt gebruikt Geantwoord op 6-8-2013 om 16:52 -
of de kaart of de instellingen of beide.
Waardeer dit antwoord Misbruik melden
als de instellingen het moeilijk maken dan krijg je dit.
ALTIJD de info van de kaart lezen over hoe de gps in te stellen.
vooral een dedicated kaart gebruikt vaak trucjes om het beste resultaat te bereiken, bv een fietspad benoemen als snelweg (dan heeft de gps normaliter daar voorkeur voor op stand snel) maar als jij dan zegt "snelwegen vermijden" dan gaat het fout. Geantwoord op 28-9-2013 om 15:53 -
Ik moet mijn GARMIN 60 CSX op een nieuwe laptop installeren, waar kan ik het beste mee beginnen, heb n.l. elke keer problemen met drivers, mappen herinstalleren etc.
Reageer op deze vraag Misbruik melden
kan iemand mij hierin adviseren (helpen)
Gesteld op 25-6-2013 om 13:16-
Goede dag
Waardeer dit antwoord (1) Misbruik melden
Ik kan alleen vertellen wat ik gedaan heb met mijn nieuwe laptop.
Ik neem aan dat u ook de kaarten van Garmin heeft
U belt naar Garmin dan krijgt u een aardige mevr aan de tel,die geeft u opnieuw een ontgrendel sleutel
Dan instaleert u BaceCamp en dan ga het gewoon vanzelf.
Ik heb 2 keer een ontgrendel sleutel gevraagd nadat mijn nieuwe hp laptop het na 2 weken stuk ging en ik een nieuwe heb gehad Geantwoord op 25-6-2013 om 16:52
-
-
Ga naar de site van javawa.nl en lees het goed en komt alles te weten wat de mogelijk heden zijn veel succes Geantwoord op 27-8-2013 om 21:03
Waardeer dit antwoord Misbruik melden -
mijn man heeft de kaart Belux gewist. Hoe kan ik deze terug activeren? Gesteld op 30-5-2013 om 09:23
Reageer op deze vraag Misbruik melden-
ga naar tracks kies instellen druk op enter en dan kan je de kleur kiezen druk op enter Geantwoord op 30-5-2013 om 13:42
Waardeer dit antwoord (5) Misbruik melden
-
-
Hoe kan ik bij een gedownloade route de kleur van mijn route veranderen op mijn garmin?, de route is nu bijna gelijk aan de kleur van de weg. Gesteld op 29-5-2013 om 20:57
Reageer op deze vraag Misbruik melden-
Druk op "Find", druk twee maal op "Menu", druk op "Tracks", dan enter, selecteer dan de route waarvan je de kleur wilt veranderen en dan op enter, selecteer "kleur" , Selecteer de gewenste kleur en druk daarna verschillende keren op "Quit"totdat je weer in je startscherm bent
Waardeer dit antwoord (1) Misbruik melden
Geantwoord op 8-8-2013 om 21:57
-
-
Ik heb een route gedownload van het internet. Als ik ze oplaad in het toestel en de navigatie start komt er een rood schermpje dat zegt dat ik max 50 routepunten kan gebruiken en wil de navigatie niet starten. Hoe kan ik dit oplossen? Gesteld op 14-5-2013 om 08:12
Reageer op deze vraag Misbruik melden-
Dit kun je oplossen door je track/route door een converter te halen bijv WINGB83.
Waardeer dit antwoord (1) Misbruik melden
Daarbij kun je het aantal waypoints beneden de 50 krijgen en dan moet het lukken. Geantwoord op 28-5-2013 om 13:38
-
-
Waarschijnlijk heb je een route gevonden of getekend op GPSies. Dan moet je eerst de route vereenvoudigen en dan opnieuw downloaden op je Garmin Geantwoord op 8-8-2013 om 21:29
Waardeer dit antwoord (1) Misbruik melden -
Valt om de haverklap uit . Batterijen zijn nochtans niet leeg !!!!!!! Hoe is dit te voorkomen ???? Vertrek naar Santiago en alles is uitgetekend en nu valt mijn gps bij gebruik op de fiets stelselmatig uit. Gesteld op 6-5-2013 om 21:12
Reageer op deze vraag Misbruik melden-
Hoi. Uitvallen op de fiets komt omdat de batterijen even los trillen. Met wandelen heb je er geen last van. Wat op de fiets helpt, is het tussen het dekseltje en de batterijen een dun laagje schuim oid te plaatsen. Trilt het niet meer. Geantwoord op 4-6-2013 om 22:39
Waardeer dit antwoord Misbruik melden
-
-
soms heb je er de juiste batterijen voor nodig bv 1.5 v mn1500 of 15 v 1200 zie naar uw eerste batterijen waar je geen problemen mee had Geantwoord op 6-11-2015 om 21:06
Waardeer dit antwoord Misbruik melden -
Kan geen satelieten zien Gesteld op 11-2-2013 om 16:43
Reageer op deze vraag Misbruik melden-
Ik heb dit ook gehad.
Waardeer dit antwoord Misbruik melden
Je GPS software is waarschijnlijk 'verdwenen'.
Wanneer je de WebUpdater van Garmin download en de GPs software opnieuw installeert zou het weer satelieten moeten vinden.
Mocht hij het met de meest recente versie van de GPS software niet doen dan moet je in Google even zoeken naar 'GPSChipsetTypeG_260'. Dan vind je wat sites die een oudere versie (de 2.60) ter download aanbieden. Die gebruik ik nu zonder problemen.
Succes! Geantwoord op 28-1-2014 om 10:46
-
-
Garmin vindt geen satelieten Gesteld op 11-2-2013 om 16:28
Reageer op deze vraag Misbruik melden-
Ik heb dit ook gehad.
Waardeer dit antwoord Misbruik melden
Je GPS software is waarschijnlijk 'verdwenen'.
Wanneer je de WebUpdater van Garmin download en de GPs software opnieuw installeert zou het weer satelieten moeten vinden.
Mocht hij het met de meest recente versie van de GPS software niet doen dan moet je in Google even zoeken naar 'GPSChipsetTypeG_260'. Dan vind je wat sites die een oudere versie (de 2.60) ter download aanbieden. Die gebruik ik nu zonder problemen.
Succes! Geantwoord op 28-1-2014 om 10:46
-
-
Ik wil vanuit mijn computer de waypoints op mijn gps-toestel zetten, maar dit lukt niet. Heeft er waarschijnlijk mee te maken dat mijn kaart op Amerika staat, maar ik weet niet meer hoe ik dit moet veranderen. Gesteld op 22-1-2013 om 14:15
Reageer op deze vraag Misbruik melden-
Vanuit de kaartmodus: Druk de "menu"toets in, ga naar instellen kaart, enter, nogmaals menu waarna je kunt kiezen voor verberg kaart., Kies daar de door jou gewenste optie en sluit af met enter. Kijk of de door jou gewenste kaart er bij staat en of die getoond wordt.
Waardeer dit antwoord (4) Misbruik melden
Groetjes,
Henk Geantwoord op 11-3-2013 om 14:56
-
-
Mijn computer herkent het gps apparaat opeens niet meer.Ik heb een Garmin 60CSx.
Reageer op deze vraag Misbruik melden
Wat te doen? Gesteld op 14-1-2013 om 14:56-
Ik heb hetzelfde probleem.
Waardeer dit antwoord Misbruik melden
Andere computer geprobeerd, idem andere kabel. Harde reset uitgevoerd. Geen verbetering. Geantwoord op 27-10-2013 om 11:11
-
-
Welke grootte kan een SD kaart hebben voor dit toestel?
Reageer op deze vraag Misbruik melden
Is 4 GB een optie?
C.PetersDe standaard kaart kan geen kaartgegevens aan. Gesteld op 30-12-2012 om 15:57-
$ Gb is geen enkel probleem. Geantwoord op 11-3-2013 om 15:04
Waardeer dit antwoord (1) Misbruik melden
-
-
Bedoeld is uiteraard 4Gb Geantwoord op 11-3-2013 om 15:05
Waardeer dit antwoord (1) Misbruik melden -
zoominstelling vastzetten Gesteld op 29-12-2012 om 22:28
Reageer op deze vraag Misbruik melden-
Met PAGE naar de kaart.
Waardeer dit antwoord (1) Misbruik melden
MENU "Instellen kaart" ENTER
Met de cursorpijltjes naar het linkse ikoontje
naar cursorpijltjes naar beneden , dan zie je "Auto Zoom", ENTER
die kun je aan of uit zetten
Geantwoord op 18-2-2013 om 20:45
-
-
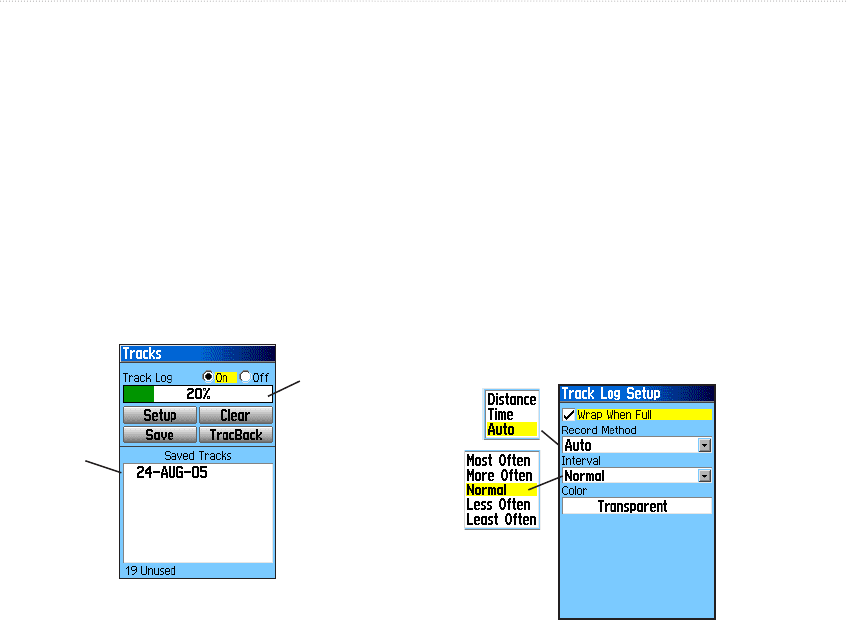
Kan ik meerdere tracks op mijn gps laten staan, en hoe doe ik dat ? (60 CSX) Gesteld op 20-12-2012 om 22:48
Reageer op deze vraag Misbruik melden-
Geen enkel probleem kunt via Page naar het hoofdmenu, vandaar naar tracks Je hebt hier de mogelijkheid om tracks te wissen, te bewaren, instellingen zoals kleur aan te passen en eventueel te trackbacken. Ook kun je een opgeslagen track een eigen naam geven.
Waardeer dit antwoord Misbruik melden
Henk Geantwoord op 11-3-2013 om 15:09
-
-
Het verschil tussen de X en Y coördinaten en de N en E coördinaten van eenzelfde punt bedraagt 57 km.
Reageer op deze vraag Misbruik melden
Als ik gebruik dan maak van de X en Y coördinaten van |Lambert kom ik nooit juist uit.
De fabrieks instellingen van mijn GPS zijn niet juist en deze kan ik zelf niet instellen.
Wie kan me helpen.
Adri
Gesteld op 11-12-2012 om 19:12-
Je kunt in de 60CSx via page naar het hoofdmenu, kies instellen, kies eenheden en hier kun je kiezen voor de door jou gewenste coördinaatvorm.
Waardeer dit antwoord Misbruik melden
Succes Henk Geantwoord op 11-3-2013 om 15:12
-
-
Het hoofdmenu van mijn Garmin 60Cx bestaat alleen nog uit: Instellen, Gevarenzone en Spellen.
Reageer op deze vraag Misbruik melden
Hoe is herstel ik mijn Hoofdmenu? Gesteld op 17-11-2012 om 11:54-
Via Page naar hoofdmenu, kies instellen en kis hier pag.volg (pagina volgorde). Kies onderin voor alles tonen of in het hoger gelegen menu <pagina toevoegen>
Waardeer dit antwoord Misbruik melden
Succes Henk
Geantwoord op 11-3-2013 om 15:17
-
-
Mijn garmin 60 CSX doet alles behalve het begin scherm namelijk het zoeken/laden van de satellieten. De balkjes verschijnen ook niet in het scherm. Iemand enig idee hoe dit te verhelpen valt, of is het einde verhaal met de gps?
Reageer op deze vraag Misbruik melden
vr. gr. Jean Gesteld op 4-9-2012 om 22:08-
doe eerst een harde reset,als dat niet helpt is er wat verkeerd met je gps software.
Waardeer dit antwoord (1) Misbruik melden
druk op menu en ga naar instellen, dan naar systeem-dan menu- software
kijk wat voor gps software je hebt, het is mogelijk dat die op 0 staat, als dat zo is kan je de software op de site van garmin downloaden.
Hoop dat dit voor je lukt, ik had hetzelfde probleem. Geantwoord op 16-9-2012 om 15:13
-
-
Ik heb ook een GPSmap 60. Zoekt satalieten, maar kan ze niet vinden. Hoe nu verder? Geantwoord op 29-1-2013 om 11:50
Waardeer dit antwoord Misbruik melden -
Ik heb dit ook gehad.
Waardeer dit antwoord Misbruik melden
Je GPS software is waarschijnlijk 'verdwenen'.
Wanneer je de WebUpdater van Garmin download en de GPs software opnieuw installeert zou het weer satelieten moeten vinden.
Mocht hij het met de meest recente versie van de GPS software niet doen dan moet je in Google even zoeken naar 'GPSChipsetTypeG_260'. Dan vind je wat sites die een oudere versie (de 2.60) ter download aanbieden. Die gebruik ik nu zonder problemen.
Succes! Geantwoord op 28-1-2014 om 10:47 -
Goede middag.
Reageer op deze vraag Misbruik melden
Een track aangemaakt door de GPS kan wel 3000 punten bevatten. Een track downloaden kan maar tot 500 tussenpunten.
Hoe kan ik dit oplossen.
Mvrg
Kees
Gesteld op 21-8-2012 om 13:16-
Verdeel in map source deze grote track in verschillende kleinere delen van maximaal 500 punten. Daarna zet je de verschillende delen op je toestel.
Waardeer dit antwoord Misbruik melden
Je kan ook de track overschrijven en veel minder punten aanmaken. Geantwoord op 25-9-2012 om 19:26
-
-
Ook als de GPSmap 60CSx op tafel ligt loopt de "odometer" door. De GPS ligt nu stil op tafel en één uur later heb ik toch 600meter gelopen.
Reageer op deze vraag Misbruik melden
Welke instelling zie ik over het hoofd?
Vriendelijk groetend
Hans Gesteld op 14-8-2012 om 20:22-
De gps blijft zijn positie noteren omdat de ontvangst onnauwkeurigheden bevat schommelt hij rond het punt waar je je bevindt. Als ik op een plaats rust zet ik de gps altijd even uit, vergeet niet hem weer aan te zetten als je verder gaat.
Waardeer dit antwoord Misbruik melden
Geantwoord op 25-9-2012 om 18:19
-
-
Met een 4 gb kaart in het apparaat valt de stroom uit van mijn 60 cx . verwijder ik het kaartje uit het slotje dan blijft mijn Garmin wel werken.
Reageer op deze vraag Misbruik melden
Iemand een oplossing ????
Gesteld op 9-8-2012 om 21:45-
Niet meer dan 2 gb gebruiken. Geantwoord op 12-9-2012 om 09:29
Waardeer dit antwoord (2) Misbruik melden
-
-
ik heb een vaarroute aangemaakt voor een zeilwedstrijd op basis van de boeien op de Grevelingen. Echter wanneer ik aangeef dat de route gevolgd moet worden geeft de GPS een andere volgorde aan dan die ik heb ingegeven.
Reageer op deze vraag Misbruik melden
Wat doe ik niet goed? Gesteld op 15-6-2012 om 11:29-
Als je de gps kalibreert dan is het probleem opgelost.
Waardeer dit antwoord Misbruik melden
Kalibreren kan als je in het menuscherm op Instellen klikt.
En dan naar Kalibratie gaan. Dan de instrukties op het scherm volgen. Geantwoord op 11-11-2012 om 19:25
-
-
Het pijltje voor plaatsaanduiding wijst in de verkeerde richting, namelijk +/- 120° gedraaid. Bij positieverandering volgt de pijl perfect maar blijft naar de verkeerde richting wijzen. Ik herkalibreerde het kompas reeds maar zonder resultaat. Iemand een oplossing???
Reageer op deze vraag Misbruik melden
dank, Frank Gesteld op 30-5-2012 om 12:33-
Je kan dit oplossen door de volgende aanpassing te doen:
Waardeer dit antwoord Misbruik melden
- Ga naar de kompas pagina
- Druk op de button 'Menu'
- Staat er in deze lijst 'Peilingswijzer'? Zet die dan op 'Koerswijzer'
Je kan controleren of je de goede instelling gebruikt door te kijken of de pijl in je kompas geen rechte lijn is maar iets gebogen randen heeft. als je het ziet begrijp je wel wat ik hiermee bedoel. Geantwoord op 28-1-2014 om 10:50
-
-
Ik heb per ongeluk mijn tracklog verwijderd en nu is de bewaarfunktie niet meer toegankelijk. Hoe krijg ik die terug? Gesteld op 13-5-2012 om 17:04
Reageer op deze vraag Misbruik melden-
Het proleem is alweer opgelost! Geantwoord op 15-5-2012 om 07:23
Waardeer dit antwoord (8) Misbruik melden
-
-
Mijn garmin 60csx valt tijdens het fietsen regelmatig uit en vooral op hobbelige wegen weet iemand hier een oplossing voor? Gesteld op 6-5-2012 om 19:39
Reageer op deze vraag Misbruik melden-
Er bestaat een speciale houder tegen schokken voor fietsen.
Waardeer dit antwoord Misbruik melden
Wekt heel goed. Geantwoord op 9-5-2012 om 16:41
-
-
Ik heb een oude 60 cx met het zelfde probleem. een stukje schuim in het dekseltje geplakt zodat de batterijen goed op hun plaats blijven en het probleem was opgelost! Geantwoord op 22-5-2012 om 14:46
Waardeer dit antwoord Misbruik melden -
Ik heb exact hetzelfde probleem. Enige wat ik merk is dat het iets beter wordt als je schakelt batterij type. Maar valt toch ook weer weg. Lijkt wel een soort beveiliging als je kijkt hoe geleidelijk het beeld wegvalt. Als het een beveiliging is dit te omzeilen? Veel klinkers en boomwortels door het asfalt hier in Drenthe! Geantwoord op 9-7-2012 om 23:27
Waardeer dit antwoord (2) Misbruik melden -
Vermoedelijk ligt je cardje eruit, dit is mij ook al overkomen.
Waardeer dit antwoord Misbruik melden
Het vergrendel klepje laat dat los.
Geantwoord op 16-8-2012 om 15:20 -
help heb de Garmin te leen van iemand die hem mooit gebruikt heeftt
Reageer op deze vraag Misbruik melden
en wil graag een gedownloade route inlezen maar kom er niet uit wie wil mij even bijstaan? Gesteld op 18-4-2012 om 19:02-
heb ook ne 660, het is een gewoon klote om route te importeren. Allen als als je op zoek moet gaan op route voor gebruiksaanwijzing. het ding is ronduit frustrerend Geantwoord op 13-5-2012 om 13:13
Waardeer dit antwoord (1) Misbruik melden
-
-
het is bij mij een dure zumo 660 overigens Geantwoord op 13-5-2012 om 13:15
Waardeer dit antwoord Misbruik melden -
Waar kan ik zien welke versie software ik op de GPS 60Cx heb?
Reageer op deze vraag Misbruik melden
Gesteld op 11-4-2012 om 22:14-
Ga naar het menu met alle icons
Waardeer dit antwoord Misbruik melden
Kies voor 'Instellen'
Kies voor 'Systeem'
Druk op de knop 'Menu'
Kies voor 'Software info'
Daar staan de versies van de firmware en van de GPS software. Geantwoord op 28-1-2014 om 10:51
-
-
mijn GARMIN CSx60 heeft een afwijking van ca. 100 mtr Gesteld op 27-2-2012 om 22:40
Reageer op deze vraag Misbruik melden-
hoe kan ik dat corrigeren? Geantwoord op 27-2-2012 om 22:40
Waardeer dit antwoord (9) Misbruik melden
-
-
misschien waas instellen? Geantwoord op 11-3-2012 om 12:21
Waardeer dit antwoord (1) Misbruik melden -
Weet iemand hoeveel geheugen op het mico sd kaartje de gps map 60csx mag zijn zodat hij alles herkent?
Reageer op deze vraag Misbruik melden
Ik heb het idee dat hij geen grote kaarten volledig herkent. Gesteld op 16-8-2011 om 14:58-
1GB SD-Card, maar deze mag niet helemaal worden volgezet. Weet niet precies hoeveel ruimte je dient over te laten sorry.
Waardeer dit antwoord (1) Misbruik melden
Deze ruimte dient onder andere voor het opslaan van de tracks... Geantwoord op 28-9-2011 om 10:27
-
-
Moet trouwens een "Micro" SD-Card zijn van max 1GB Geantwoord op 28-9-2011 om 10:29
Waardeer dit antwoord Misbruik melden -
Ik gebruik een 2Gb micro sd card en er is 748Mb gebruikt aan kaarten Topo NL en duitsland gedeeltelijk.
Waardeer dit antwoord Misbruik melden
Vrije ruimte 1,14 Gb. Geen problemen. Geantwoord op 22-6-2012 om 14:02 -
Dag gebruikers,
Reageer op deze vraag Misbruik melden
Ik heb een probleem met de 60csx, nl de oplaadbare batterijen zijn binnen 2 tot 3 uur geheel leeg.Komt dit probleem vaker voor. Hellup groet Hans Gesteld op 16-8-2011 om 08:32-
waarschijnlijk zijn de oplaadbare batterijen aan hun einde levensduur.
Waardeer dit antwoord Misbruik melden
Dat kan bij NiCad batterijen. Helemaal ontladen en dan weer opladen wil ook wel eens helpen. Bij Ni-ion treedt dit niet meer op. deze mogen tussentijds opgeladen worden. Geantwoord op 22-6-2012 om 15:03
-
-
vermoedelijk te veel aan staan Geantwoord op 6-11-2015 om 21:21
Waardeer dit antwoord Misbruik melden -
Waar kan ik zien welke versie software ik op de GPS 60Cx heb? Gesteld op 8-8-2011 om 14:53
Reageer op deze vraag Misbruik melden-
Ga naar het menu met alle icons
Waardeer dit antwoord Misbruik melden
Kies voor 'Instellen'
Kies voor 'Systeem'
Druk op de knop 'Menu'
Kies voor 'Software info'
Daar staan de versies van de firmware en van de GPS software. Geantwoord op 28-1-2014 om 10:51
-
-
Had alleen een engelstalige handleiding, vandaar.
Reageer op deze vraag Misbruik melden
Mijn dank,
Groet,
Monique de haan Gesteld op 19-7-2011 om 23:38-
Hoi Monique,hoe ben je aan de nederlandse versie gekomen?
Waardeer dit antwoord (1) Misbruik melden
Ik heb hem in het Duits en is erg lastig.
Groet Ben.Hodzelmans. Geantwoord op 25-11-2012 om 14:06
-
-
ik zocht naar een oplossing om de melding "track verdeeld" te vermijden.
Reageer op deze vraag Misbruik melden
'k heb ze echter niet gevonden.
van mijn toestel GPSmap 60CSx ben ik zeer tevreden.
mvg Jan de With Gesteld op 17-7-2011 om 15:01-
Komt door een verkeerde naamgeving. Geef de track de naam 'ACTIVE LOG 001' ipv van je vertrekpunt naar .... (nummering tot 999 mogelijk). Je kunt hierna de tarck opslaan onder bijv. "rondje ***" op je computer. Geantwoord op 21-3-2013 om 23:20
Waardeer dit antwoord Misbruik melden
-
-
Hoe download ik GPS routes van internet op mijn Garmin Gesteld op 12-7-2011 om 21:50
Reageer op deze vraag Misbruik melden-
Heel eenvoudig, ga naar wikiloc.nl en maak hier een account aan.
Waardeer dit antwoord Misbruik melden
Als je de wereldkaart in beeld hebt een plaatsnaam invullen en de omgeving hiervan komt "in beeld".
Voor wandelen of hiking zoek je naar het ikoon van een meneer met stok. Links staat tekst met daarin de naam van de wandeling waar je met de cursor op gaat staan. Als je op het ikoontje klikt krijg je een satelietbeeld van de wandeling met tekstinfo ernaast. Ergens bovenin staat een knop download, als je hierop klikt krijg je vaak een keuze, in ieder geval kiezen voor minder dan 500 punten en gpx format.
Download ( gratis) op het internet het programmaatje GPS Babel en hiermee kun je deze gpx track converteren naar
.gdb voor je Garmin device. Dit resultaat binnenhalen in mapsource en er een route van maken maakt de zaak compleet.
Nu nog overdragen naar apparaat. Succes!!!
Conny Peters Geantwoord op 20-11-2011 om 20:05
-
-
Hallo, ik heb gemerkt dat er een vrij groot aantal tracks gelogd zijn op mijn geheugenkaartje, nu vraag ik me af hoe ik deze tracklogs kan downloaden naar mijn pc. Tot mijn grote verbazing vind ik hier niets over terug in de handleiding... Hopelijk kan iemand hier me helpen !
Reageer op deze vraag Misbruik melden
Met dank bij voorbaat ! Peter Gesteld op 10-7-2011 om 19:20-
De tracks zijn over te zetten door de micro SD-kaart uit te lezen op de computer. Dit kan door de GPS via en kabel aan te sluiten op de PC of door een op de PC aangesloten kaartlezer te gebruiken. Geantwoord op 28-9-2011 om 10:38
Waardeer dit antwoord Misbruik melden
-
-
Het lukt nog niet helemaal op mijn ipad. Gesteld op 19-6-2011 om 14:25
Reageer op deze vraag Misbruik melden-
Hoe krijg ik deze handleiding in mijn 's ook van de iPad? Geantwoord op 19-6-2011 om 14:26
Waardeer dit antwoord Misbruik melden
-
-
Hoe krijg ik deze handleiding in mijn e-book van de iPad? Geantwoord op 19-6-2011 om 14:27
Waardeer dit antwoord (2) Misbruik melden -
mijn GPSmap 60Cx navigeert niet altijd. Ook laat hij de route niet altijd zien. Ik zie dan alleen een aantal groengekleurde wegen. Gesteld op 12-8-2010 om 22:01
Reageer op deze vraag Misbruik melden-
Waarschijnlijk staat er op de GPS alleen de basiskaart of een wandel/fiets kaart. Voor het navigeren over de wegen van Nederland of de rest van Europa dient een andere kaart te worden geïnstalleerd. Zelf gebruik ik hiervoor: Garmin City Navigator NT Europe
Waardeer dit antwoord Misbruik melden
Voor het wandelen gebruik ik vaak een Topografische kaart van de omgeving waar ik wens te wandelen. De Topografische kaart wordt vaak aangeduid met "Topo" Er zijn ook speciale wandelkaarten. Daarop staan dan veelal enkel de kleine wegen. Routeren op de grote wegen en het vinden van een huisadres gaat daarmee niet of mindergoed.
Om toch beide te kunnen, wandel- en de normale wegen routes maak ik gebruik van twee Micro SD kaarten van elk 1GB met de daarop geladen kaarten. De maximale grootte van de Micro SD-kaart voor deze GPSmap 60CSx is 1Gb. Door deze uit te wisselen gaat dat prima.
Geantwoord op 28-9-2011 om 10:51
-
-
Hallo, Ik heb een Garmin GPSmap 60CSx gekocht in de US maar hoe kan ik deze nu omzetten zodat hij van Engels talig naar Nederlands gaat?
Reageer op deze vraag Misbruik melden
Ik zoek me rot, maar kan helaas niets vinden, daar komt ook nog eens bij dat ik niet echt heel erg sterk ben met computers
Groet Jack
Gesteld op 5-7-2010 om 14:44-
Ik heb mijn 60CSx in Nederland gekocht. In het hoofdmenu staat bij het item "Instellen" (doorscrollen naar laatste pagina). Kies hier voor "Systeem" en verander de "Taal tekst" in Nederlands.
Waardeer dit antwoord Misbruik melden
Succes,
Hans Geantwoord op 2-8-2010 om 10:55
-
-
zit met hetzelfde probleem
Waardeer dit antwoord Misbruik melden
heb je de oplossing al gevonden
zoja, zou ikgraag willen weten hoe je dit hebt opgelost
Geantwoord op 23-10-2010 om 21:15 -
Hoi,
Waardeer dit antwoord Misbruik melden
Ook ik zit met dit probleem Garmin 60csx nieuwste versie 4.0 en dit is (althans door mij) niet meer om te zetten naar Nederlandse taal. Wie kan de oplossing aandragen, b.v.dank Geantwoord op 30-4-2011 om 19:30 -
ik zit met hetzelfde probleem, heb jij al een oplossing
Waardeer dit antwoord Misbruik melden
Graag reactie naar renevalentijn@xs4all.nl Geantwoord op 30-3-2012 om 11:03 -
is er ook een nederlandse handleiding beschikbaar voor GPSmap76CSx? Gesteld op 7-1-2010 om 21:56
Reageer op deze vraag Misbruik melden-
Ik zoek een handleiding in het nederlands voor de Garmin GPS 76.
Waardeer dit antwoord (1) Misbruik melden
Bestaat die ook??
mail: fam.neerscholten@orange.nl
Alvast bedankt Geantwoord op 2-9-2010 om 15:28
-
-
Hoi, ik heb de Nederlandstalige handleiding gedownload, maar is het ook mogelijk om mijn GARMIN 60CSx effectief ook in het Nederlands te zetten op het display.
Reageer op deze vraag Misbruik melden
Groetjes, Stefan Gesteld op 8-7-2009 om 10:38-
Ja is mogelijk Geantwoord op 31-10-2010 om 22:32
Waardeer dit antwoord (1) Misbruik melden
-
-
Mijn GPSmap 60CSx heeft enkel mogelijke taal instellingen van Engels Frans Portugees en Spaans, met een programma kan ik dit omzetten in het Nederlands maar telkens ik een update uitvoer zet hij zich terug naar het Engels, als ik het Nederlands dan terug installeer gaat hij terug naar de oudere versie en is de update verdwenen. Hoe kan ik dit oplossen om constant de Nederlandse taal te behouden?
Reageer op deze vraag Misbruik melden
Gesteld op 22-5-2009 om 23:18-
Hoi,
Waardeer dit antwoord (1) Misbruik melden
Ik zit met hetzelfde probleem.
Heb jij al een oplossing?
Geantwoord op 4-5-2011 om 13:24
-
-
Ik zit hier ook mee, wie weet hoe dat moet?? Geantwoord op 7-9-2018 om 19:47
Waardeer dit antwoord Misbruik melden -
ik kan niet eens het nederlands opnieuw installeren. verschillende keren garmin helpdesk gecontacteerd, maar nooit een afdoende oplossing gekregen. dus: hoe herinstalleer je zelfs maar opnieuw het nederlands aub ? Geantwoord op 9-9-2018 om 09:46
Waardeer dit antwoord Misbruik melden
