5. Push the OK button.
6. Use the arrow buttons and the OK button to move
through the menu structure
Settings > Lawn
Coverage > Area 1-3 > More > Test
.
7. Push the OK button.
8. Push the STOP button when the product is at the
distance you select to measure. The distance
shows in the display.
3.10.7.5 To disable or enable the Lawn Coverage
function
Disable or enable the
Lawn Coverage
function for each
area.
1. Do steps 1–3 in
To get access to the menu on
page 23
.
2. Use the arrow buttons and the OK button to move
through the menu structure
Settings > Lawn
Coverage > Area 1-3 > Disable
.
3. Push the OK button.
4. Push the BACK button.
3.10.7.6 To reset the Lawn Coverage settings
You can reset the
Lawn Coverage
settings for each area
and use the factory setting.
1. Do steps 1–3 in
To get access to the menu on
page 23
.
2. Use the arrow buttons and the OK button to move
through the menu structure
Settings > Lawn
Coverage > Area 1-3 > More > Reset
.
3. Push the OK button.
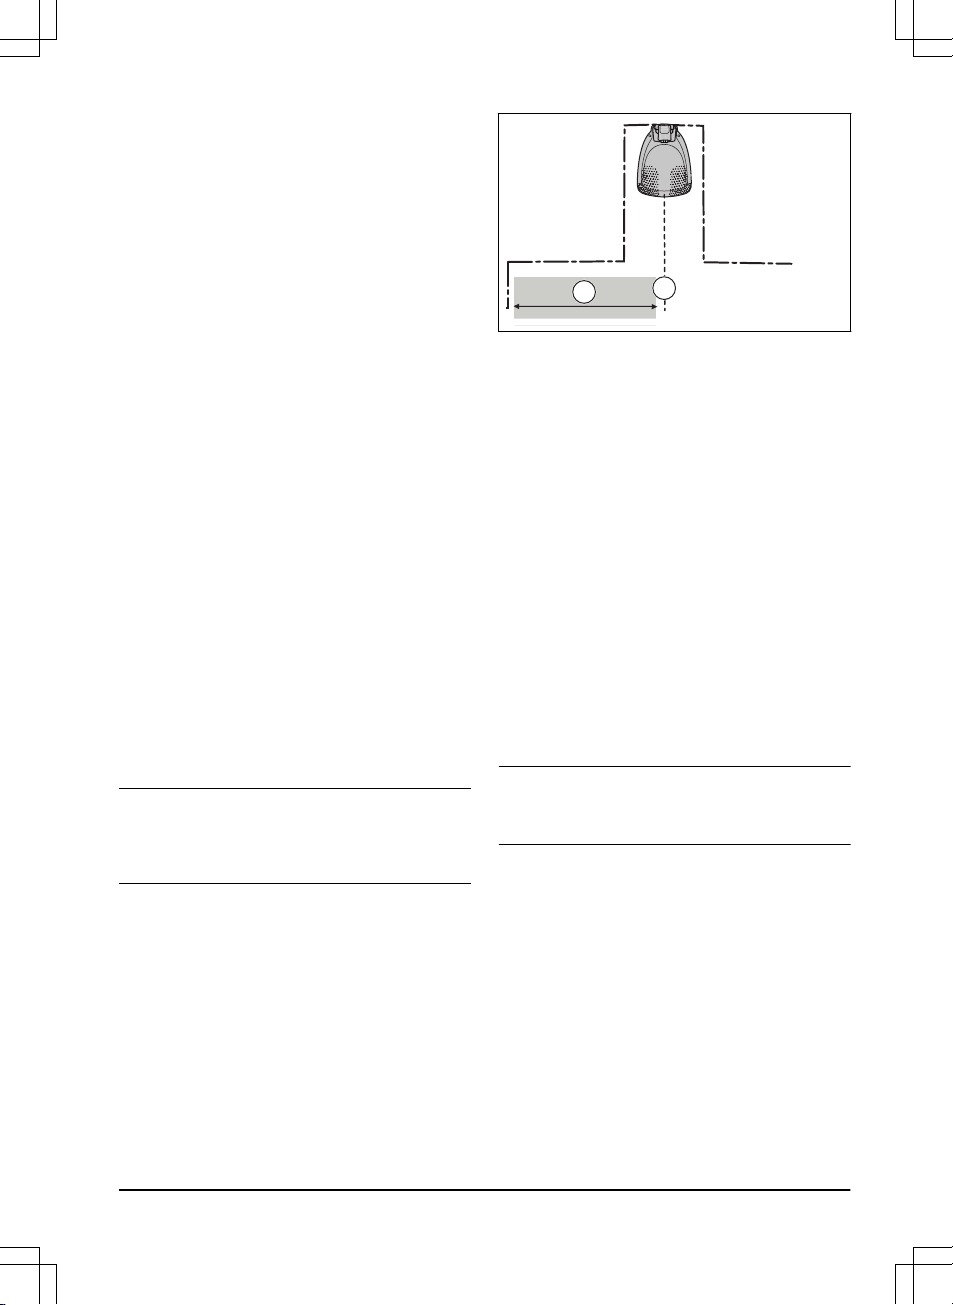
3.10.8 Starting point
This function allows you to control how far the product
drives along the guide wire from the charging station
before it starts operating. The factory setting is 60 cm / 2
ft. and the maximum distance is 300 cm / 10 ft.
Note: The product straddles the guide wire from the
charging station to the starting point. Keep as short
distance to the starting point as possible to reduce the
risk of tracks forming on the lawn.
If the charging station is placed in a limited space area,
for example between flower beds, choosing a good
starting point is important so that the guide calibration
process is optimized. Refer to
Guide calibration on page
22
.
A) Starting point
B) Minimum distance 60 cm / 2 ft (perpendicular to the
guide wire). If less distance, the calibration process is
interrupted. For the widest possible guide corridor, have
a minimum distance of 1.35 m / 4.5 ft. Refer to
Guide
calibration on page 22
.
3.10.8.1 To set the starting point
1. Do steps 1-3 in
To get access to the menu on
page 23
.
2. Use the arrow button and the OK button to move
through the menu structure
Settings > Installation
> Starting point
.
3. Use the arrow buttons to specify the distance in
cm.
4. Push the BACK button.
3.10.9 Drive Past Wire function
The front of the product always moves past the
boundary wire by a specified distance. Then the product
moves rearward and changes direction. The factory
setting is 32 cm / 12 in. You can select a distance of
20-40 cm / 8-15 in.
Note: If you change the distance for
Drive Past Wire
,
the distance will change along the boundary wire in all
parts of the work area.
3.10.9.1 To set the Drive Past Wire function
1. Do steps 1–3 in
To get access to the menu on
page 23
.
2. Use the arrow button and the OK button to move
through the menu structure
Settings > Installation
> Drive Past Wire
.
3. Use the arrow buttons to set the distance.
4. Push the BACK button.
3.10.10 ECO mode
If
ECO mode
is activated, it switches off the signal in the
boundary loop, the guide wire and the charging station,
when the product is parked or is charging.
1298 - 015 - 20.08.2021 Installation - 27