39127
42
Verklein
Vergroot
Pagina terug
1/103
Pagina verder
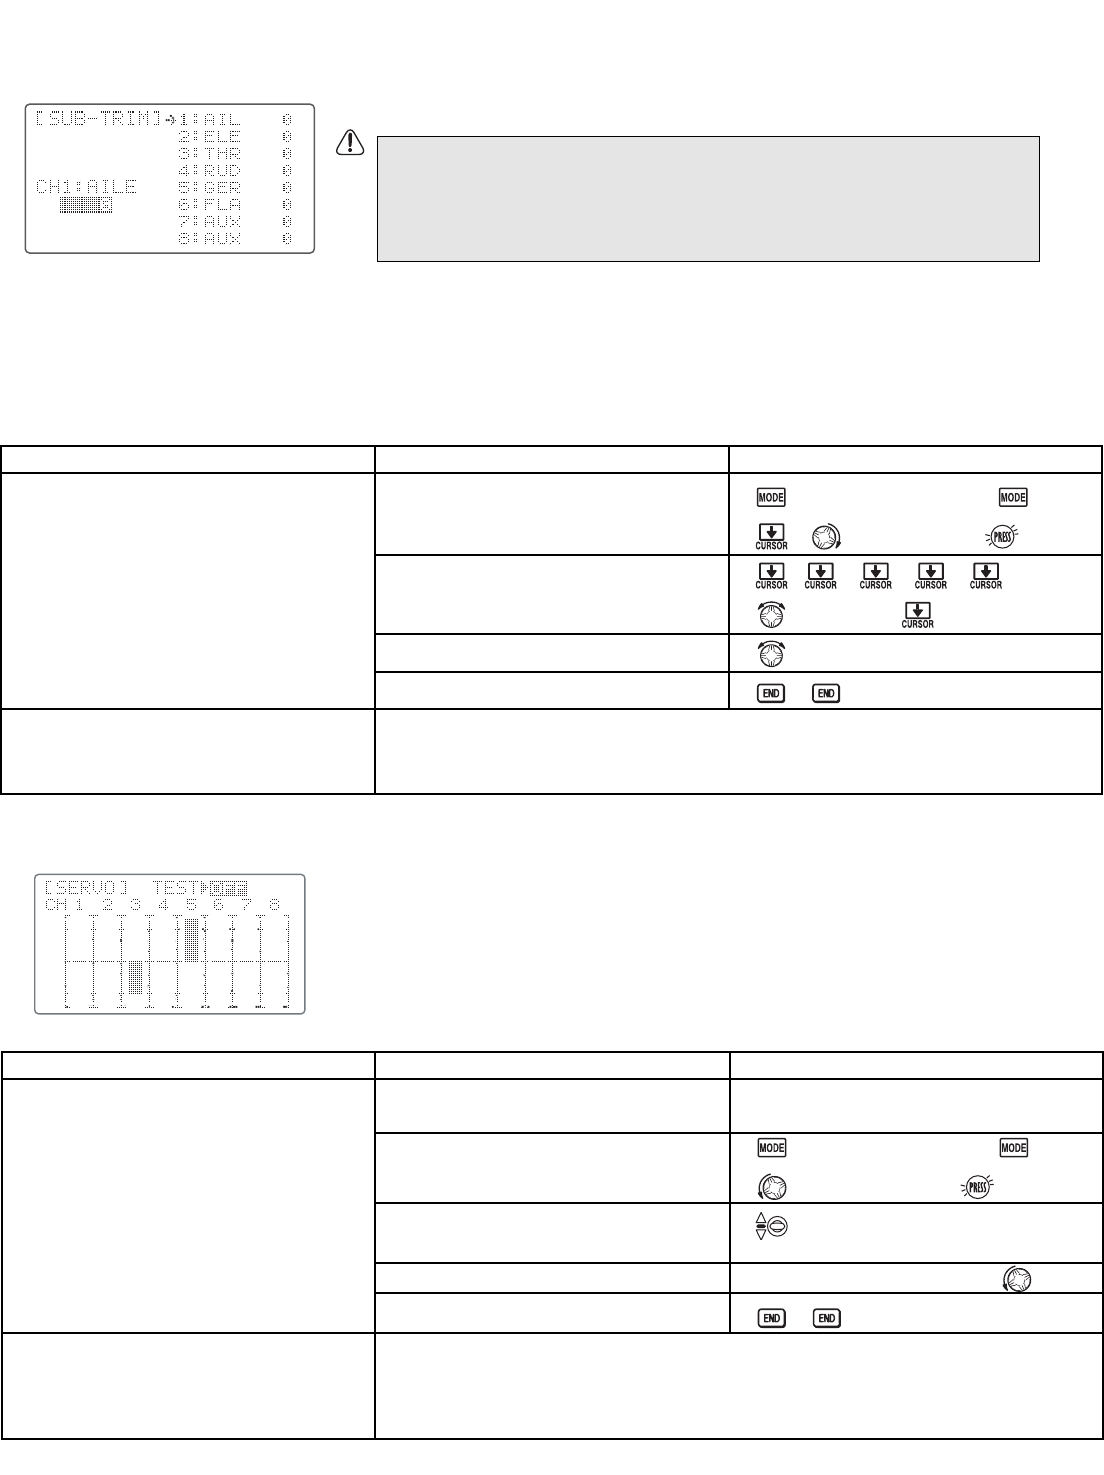
SUB-TRIM: makes small changes or corrections to the neutral position of each servo. Range is -120 to +120, with 0 setting,
the default, being no SUB-TRIM.
The recommended procedure is as follows:
measure and record the desired surface position;
zero out both the trims (TRIM RESET menu) and the SUB-TRIMs (this menu);
mount servo arms and linkages so that the control surface’s neutral is as correct as possible; and
use a small amount of SUB-TRIM to make fine corrections.
GOAL of EXAMPLE: STEPS: INPUTS:
SERVO display and cycle submenu: displays radio's output to channels 1-8.
The servo submenu includes two features:
real-time bar-graph display to demonstrate exactly what commands the transmitter is
sending to the servos. (This can be particularly handy in setting up models with
complicated mixing functions, because the results of each stick, lever, knob, switch
input and delay circuit may be immediately seen.); and
servo cycle function to help locate servo problems prior to in-flight failures.
GOAL of EXAMPLE: STEPS: INPUTS:
We recommend that you center the digital trims before making SUB-TRIM
changes, and that you try to keep all of the SUB-TRIM values as small as
possible. Otherwise, when the SUB-TRIMs are large values, the servo's
range of travel is restricted on one side.
42
Adjust the flap servo’s SUB-TRIM until
its center exactly matches the aileron
servo’s center, as they are to work
together as flaperons.
Where next?
Open BASIC menu, then open
SUB-TRIM.
Choose the channel to adjust, and
adjust until surfaces match. (Ex: flap)
Repeat for other channels.
Close.
for 1 second. (If
ADVANCE,
again.)
to SUB-TRIM.
as needed. to each channel,
as needed.
Adjust trim steps: see p. 41.
Adjust END POINTs: see p. 32.
Set up dual/triple rates and exponential (D/R,EXP): see p. 35.
View the result of reassigning channel
6 from VR(A) knob to three-position
SWITCH C.
Cycle the channel 6 servo.
Where next?
Complete desired programming function.
(Ex: in AUX-CH, move ch. 6 to S
WITCH
C)
Open the SERVO function.
Move each control to see exactly how
operating. (Ex: S
WITCH C in all positions)
Prepare all servos to be cycled and cycle.
End cycling and close.
See AUX-CH for details. (p. 39.)
for 1 second.
(If ADVANCE, again.)
1 step to SERVO.
C to center position.
Note change in position of ch. 6 servo.
Plug in servos. P
OWER ON.
Set up dual/triple rates and exponential (D/R,EXP): see p. 35.
Set up desired programmable mixes: see p. 54.
Set up dual aileron servos: see p. 44.
Set up dual elevator servos: see p. 49.
42

Hulp nodig? Stel uw vraag in het forum

Spelregels

Misbruik melden

Gebruikershandleiding.com neemt misbruik van zijn services uitermate serieus. U kunt hieronder aangeven waarom deze vraag ongepast is. Wij controleren de vraag en zonodig wordt deze verwijderd.

Product:

Bijvoorbeeld antisemitische inhoud, racistische inhoud, of materiaal dat gewelddadige fysieke handelingen tot gevolg kan hebben.

Bijvoorbeeld een creditcardnummer, een persoonlijk identificatienummer, of een geheim adres. E-mailadressen en volledige namen worden niet als privégegevens beschouwd.

Spelregels forum

Om tot zinvolle vragen te komen hanteren wij de volgende spelregels:

Belangrijk! Als er een antwoord wordt gegeven op uw vraag, dan is het voor de gever van het antwoord nuttig om te weten als u er wel (of niet) mee geholpen bent! Wij vragen u dus ook te reageren op een antwoord.

Belangrijk! Antwoorden worden ook per e-mail naar abonnees gestuurd. Laat uw emailadres achter op deze site, zodat u op de hoogte blijft. U krijgt dan ook andere vragen en antwoorden te zien.

Abonneren

Abonneer u voor het ontvangen van emails voor uw Futuba 9CHP bij:


U ontvangt een email met instructies om u voor één of beide opties in te schrijven.


Ontvang uw handleiding per email

Vul uw emailadres in en ontvang de handleiding van Futuba 9CHP in de taal/talen: Engels als bijlage per email.

De handleiding is 4,57 mb groot.


U ontvangt de handleiding per email binnen enkele minuten. Als u geen email heeft ontvangen, dan heeft u waarschijnlijk een verkeerd emailadres ingevuld of is uw mailbox te vol. Daarnaast kan het zijn dat uw internetprovider een maximum heeft aan de grootte per email. Omdat hier een handleiding wordt meegestuurd, kan het voorkomen dat de email groter is dan toegestaan bij uw provider.

Stel vragen via chat aan uw handleiding

Stel uw vraag over deze PDF

loading

Uw handleiding is per email verstuurd. Controleer uw email

Als u niet binnen een kwartier uw email met handleiding ontvangen heeft, kan het zijn dat u een verkeerd emailadres heeft ingevuld of dat uw emailprovider een maximum grootte per email heeft ingesteld die kleiner is dan de grootte van de handleiding.

Er is een email naar u verstuurd om uw inschrijving definitief te maken.

Controleer uw email en volg de aanwijzingen op om uw inschrijving definitief te maken

U heeft geen emailadres opgegeven

Als u de handleiding per email wilt ontvangen, vul dan een geldig emailadres in.

Uw vraag is op deze pagina toegevoegd

Wilt u een email ontvangen bij een antwoord en/of nieuwe vragen? Vul dan hier uw emailadres in.


Info