All rights reserved. Under the copyright laws, this manual may not be copied, in whole or in part, without the written consent of Garmin. Garmin reserves the right to change or improve its
products and to make changes in the content of this manual without obligation to notify any person or organization of such changes or improvements. Go to www.fusionentertainment.com for
current updates and supplemental information concerning the use of this product.
Garmin
®
, ANT
®
, FUSION
®
, and the Fusion logo are trademarks of Garmin Ltd. or its subsidiaries, registered in the USA and other countries. Apollo
™
, Connect IQ
™
, FUSION-Link
™
, FUSION-Link
Lite
™
, and FUSION PartyBus
™
are trademarks of Garmin Ltd. or its subsidiaries. These trademarks may not be used without the express permission of Garmin.
Apple
®
,AirPlay
®
, iPhone
®
, and iPod touch
®
are trademarks of Apple Inc., registered in the USA and other countries. App Store
SM
is a service mark of Apple Inc., registered in the USA and other
countries. Android
™
and Google Play
™
are a trademarks of Google Inc. Bluetooth
®
word mark and logos are owned by the Bluetooth SIG, Inc. and any use of such marks by Garmin is under
license. NMEA 2000
®
, and the NMEA 2000 logo are registered trademarks of the National Marine Electronics Association. SiriusXM
®
, SportsFlash
™
, TuneMix
™
, TuneStart
™
, and all related marks
and logos are trademarks of Sirius XM Radio Inc. All rights reserved. Wi‑Fi
®
is a registered mark of Wi-Fi Alliance Corporation. Other trademarks and trade names are those of their respective
owners.
Table of Contents
Getting Started1
Stereo Controls1
Selecting a Source1
Playback Controls1
Stereo Screen1
Adjusting the Backlight and Dial Brightness2
Enabling Standby Mode2
Media Player Connection2
USB Device Compatibility2
Connecting an Auxiliary Device2
Connecting to a Garmin® Watch2
Connecting an Apple Device Using AirPlay2
Connecting a UPnP Device3
Audio Control3
Adjusting the Volume3
Muting all Connected Stereos3
Adjusting the Tones3
Disabling the Loud Setting for a Zone3
Adjusting the Gain for an Auxiliary Device3
Speaker Zones3
Adjusting the Audio Settings for a Zone3
Adjusting the Subwoofer Filter3
DSP Settings4
Configuring the DSP Settings4
Bluetooth Device Playback4
Connecting a Compatible Bluetooth Device4
Bluetooth Range Information4
Selecting a Different Bluetooth Source4
Bluetooth Source Settings4
USB Device Playback4
Controlling Music Playback on a Connected Android Device,
USB Flash Drive, or Media Player4
Controlling Music Playback on a Connected Apple Device5
Radio5
Setting the Tuner Region5
Changing the Radio Station5
SiriusXM Satellite Radio5
Enabling the SiriusXM Source5
Locating the SiriusXM Radio ID5
Activating a SiriusXM Subscription5
Selecting a Category5
Using Replay Mode5
Alerts6
Adding an Artist or Song Alert6
Adding Teams for Game Alerts6
Viewing Active Alerts6
Managing Alerts6
TuneMix™ Feature6
Starting and Stopping a TuneMix Collection6
Creating and Customizing a TuneMix Collection6
SportsFlash Feature6
Adding Teams to Receive SportsFlash Alerts6
Changing SportsFlash Team Priority6
Enabling the TuneStart™ Feature7
Parental Controls7
Unlocking the Parental Controls7
Locking Channels7
Clearing All Locked Channels7
Changing the Parental Control Passcode7
SiriusXM Troubleshooting7
Clearing SiriusXM Data7
DAB Playback8
Setting the Tuner Region
8
Scanning for DAB Stations8
Changing DAB Stations8
Selecting a DAB Station from a List8
Selecting a DAB Station from a Category8
Presets8
Saving a Station as a Preset8
Selecting a Preset from a List8
Removing Presets8
FUSION PartyBus Networking8
Streaming from a FUSION PartyBus Device on the Network8
Stopping Streaming from a FUSION PartyBus Device on the
Network9
Network UPnP Playback9
General Settings9
Speaker Zone Settings9
Setting a Zone Name9
Linking Zones9
Enabling Volume Control of Zone 3 or 4 from a Connected
Amplifier
9
Disabling a Zone9
Disabling the Internal Amplifiers9
Power Options9
Network Configuration10
Setting the FUSION PartyBus Device as the DHCP
Server10
Setting the FUSION PartyBus Device as a Wireless Access
Point10
Connecting the FUSION PartyBus Device to a Wireless
Access Point10
Advanced Network Configuration10
Resetting Network Settings11
Update Options11
Additional Stereo Control Options11
FUSION-Link Remote Control App11
FUSION-Link™ Network Technology11
NMEA 2000 Remote Control and Display11
Configuring an Optional Wired Remote11
NMEA 2000 Information12
Appendix12
Registering Your Apollo RA77012
Troubleshooting12
The stereo does not respond to key presses12
The stereo keeps locking up when connected to an Apple
device
12
The stereo is not finding my connected Apple device12
My Apple AirPlay audio is interrupted by short breaks12
My Bluetooth audio is interrupted by short breaks12
The stereo does not display all song information from my
Bluetooth source12
Network Troubleshooting12
Network Status Icons12
Specifications12
Stereo Dimension Drawings13
Front Dimensions13
Side Dimensions13
Top Dimensions13
Index14
Table of Contentsi
Getting Started
WARNING
See the Important Safety and Product Information guide in the
product box for product warnings and other important
information.
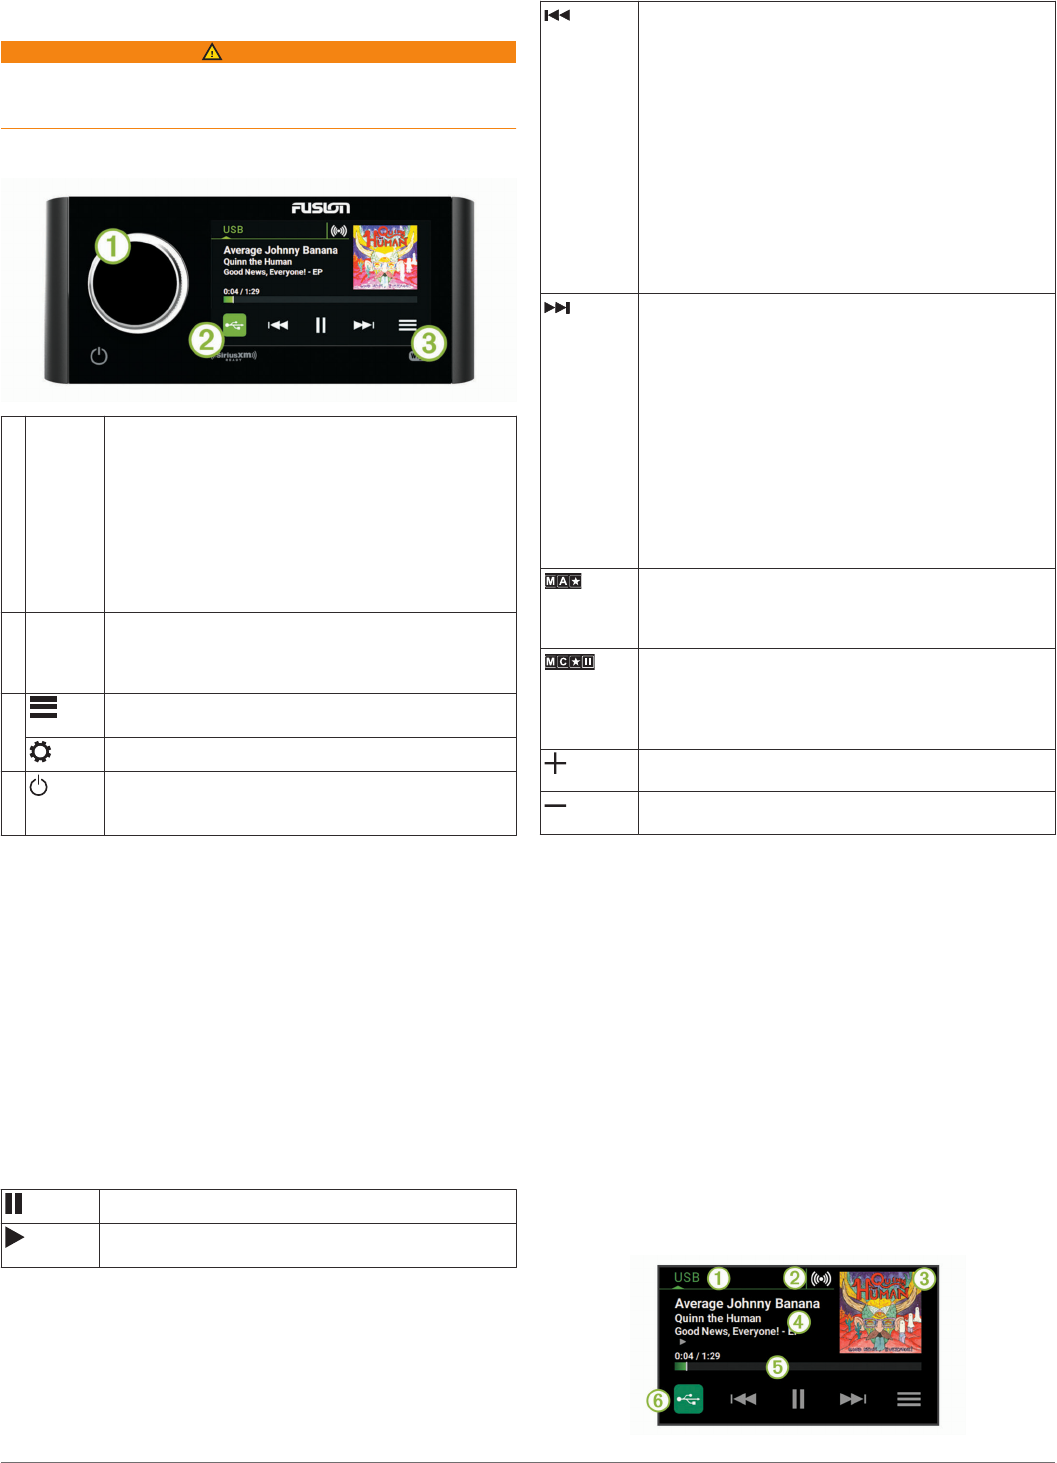
Stereo Controls
À
Dial•Turn to adjust the volume.
◦When adjusting the volume, press to switch
between zones.
◦When adjusting the volume, press and hold for at
least one second to adjust the subwoofer levels.
◦On a screen with tabs, press and hold for at least
one second to switch the tab.
•Turn to move through the menus or adjust a setting.
•When in a menu, press to select the highlighted
option.
Á
Source
Icon
•Press to change the source (Selecting a Source,
page 1).
•Hold to open the PARTYBUS menu (FUSION
PartyBus Networking, page 8).
Â
Select to open a menu for the current source.
Not available on all sources.
Select to open the stereo settings menu.
•Press to turn on the stereo.
•Press to mute the stereo.
•Press and hold to turn off the stereo.
Selecting a Source
1
Select the source icon.
The source icon is in the lower-left corner of the stereo
screen, and shows the source that is currently selected.
2
Select a source.
TIP: On the source selection screen you can turn the dial to
highlight and select a source.
Playback Controls
The on-screen playback controls may change depending on the
source selected.
NOTE: After playing media for about five seconds, the playback
controls are hidden by the gesture screen feature. You can
swipe down on the screen to view the playback controls
(Gesture Screen, page 1).
Select to pause media playback.
•Select to play media or resume media playback.
•DAB source: press to scan for DAB stations.
•Select to skip to the previous track, when using an
applicable source.
•Hold to rewind the track when using an applicable
source.
•AM, FM, or SiriusXM (in Live Mode) source:
◦Select to tune to the previous station or preset.
◦Hold for faster tuning (manual mode only).
•SiriusXM (in Replay Mode) source:
◦Select to skip to the previous track.
◦Hold to rewind the current track.
•DAB source: Select to return to the previous DAB
station in the ensemble. When you reach the beginning
of the current ensemble, the stereo automatically
changes to the last available station in the previous
ensemble.
•Select to skip to the next track, when using an
applicable source.
•Hold to fast-forward the track when using an applicable
source.
•AM, FM, or SiriusXM (in Live Mode) source:
◦Select to tune to the next station or preset.
◦Hold for faster tuning (manual mode only).
•SiriusXM (in Replay Mode) source:
◦Select to skip to the next track, if applicable.
◦Hold to fast-forward the current track, if applicable.
•DAB source: Select to advance to the next DAB station
in the ensemble. When you reach the end of the
current ensemble, the stereo automatically changes to
the first available station in the next ensemble.
(AM, FM, or
DAB
sources)
Select to cycle through the tuning modes (auto or
manual) and presets.
Press and hold to save the current station as a preset.
(SiriusXM
source)
Hold to switch between Replay Mode and Live Mode
(Using Replay Mode, page 5).
Replay Mode: press to pause and play the channel.
Live Mode: Select to cycle through the tuning modes
(manual or category) and presets.
On the Aux or OPTICAL source, select to increase the
gain for the connected source.
On the Aux or OPTICAL source, select to decrease the
gain for the connected source.
Gesture Screen
After playing media for about five seconds, a screen appears
showing track information and album art only. You can use the
touchscreen to interact with this screen.
•You can swipe left or right to change the track or preset.
•You can touch the screen for about one second to pause
playback or mute the audio, depending on the source.
•You can swipe down to return to the playback controls
screen.
NOTE: You can disable this screen in the settings (Power
Options, page 9).
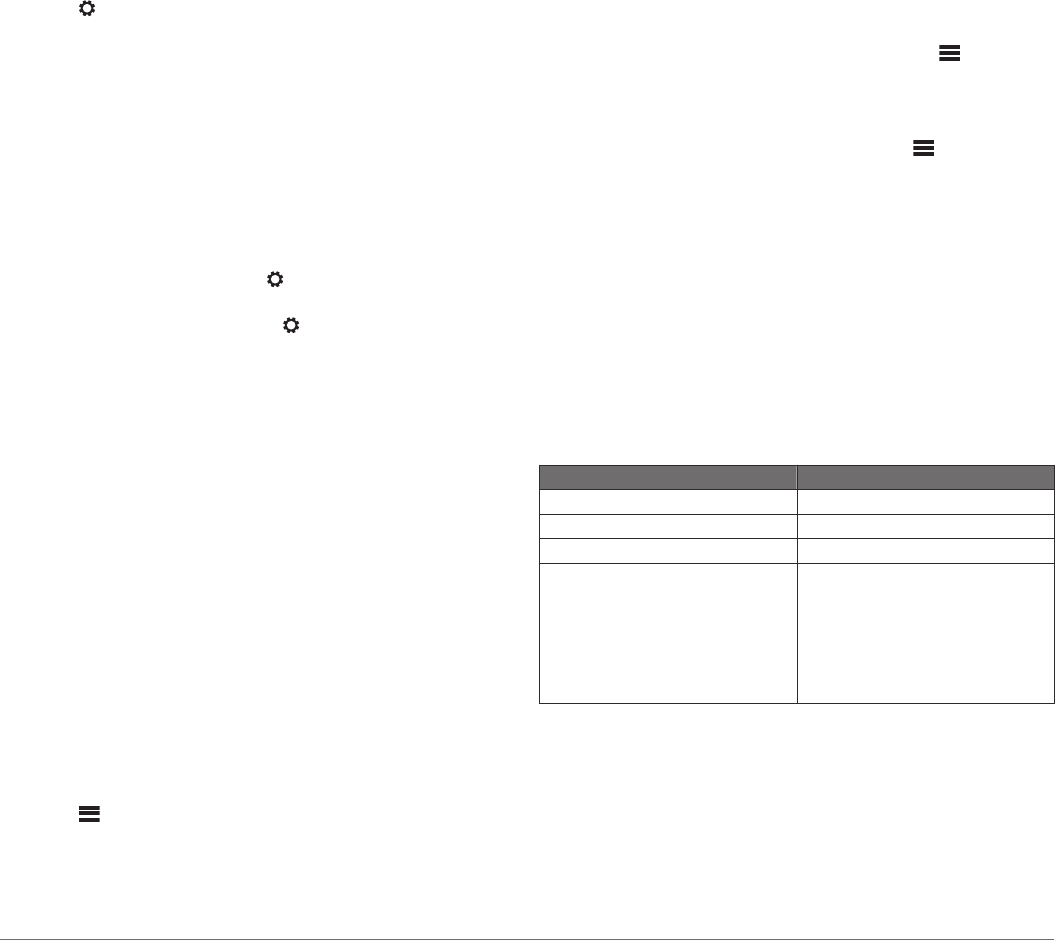
Stereo Screen
The information displayed on the stereo screen varies
depending on the source selected. The on-screen playback
controls may change depending on the source selected
(Playback Controls, page 1). This example shows the stereo
playing a track from USB device connected to the USB port.
Getting Started1
À
Source
Á
Network status (Network Status Icons, page 12)
Â
Album art (if available from a compatible source)
Ã
Track details (if available)
Ä
Elapsed time, track duration, and the current track number
out of the total number of tracks in the playlist (if available)
Å
Source icon
Select to change the source (Selecting a Source, page 1).
Adjusting the Backlight and Dial Brightness
NOTE: If you connected the dim wire on the wiring harness to
the boat's illumination wire, the backlight and dial dim
automatically when the boat lights are on. This may affect how
you adjust the brightness setting.
1
Select > > BRIGHTNESS.
2
Adjust the brightness level.
Enabling Standby Mode
You can set the stereo to enter a low-power standby mode when
you turn off the ignition or hold . When you turn on the ignition
or press again, it takes less than the typical 30 seconds to
turn on.
NOTE: When the stereo is in low-power standby mode, it
continues to draw current from the battery. The maximum
current draw in standby mode is 110 mA.
Select > > POWER OPTIONS > STANDBY MODE.
The stereo now enters standby mode when you hold .
Media Player Connection
CAUTION
Always disconnect your media player from the stereo when not
in use and do not leave it in your vessel. This helps reduce the
risk of theft and damage from extreme temperatures.
Do not remove the media player or use your stereo in a
distracting manner while operating the vessel. Check and obey
all marine laws in association with use.
The stereo accepts a variety of media players, including
smartphones and other mobile devices. You can connect a
compatible media player using a Bluetooth
®
wireless connection
or a USB connection to the USB port. The stereo can play
media from Universal Plug and Play (UPnP) devices, such as a
Network Attached Storage (NAS) device connected to the same
network. The stereo can play media from compatible Apple
®
device connected to the same network using the AirPlay
®
feature.
USB Device Compatibility
You can use a USB flash drive or the USB cable included with
your media player to connect a media player or mobile device to
the USB port.
The stereo is compatible with iAP2 Apple devices such as the
Gebruikershandleiding.com neemt misbruik van zijn services uitermate serieus. U kunt hieronder aangeven waarom deze vraag ongepast is. Wij controleren de vraag en zonodig wordt deze verwijderd.
Product:
Spelregels forum
Om tot zinvolle vragen te komen hanteren wij de volgende spelregels:
lees eerst de handleiding door;
controleer of uw vraag al eerder door iemand anders is gesteld;
probeer uw vraag zo duidelijk mogelijk te stellen;
heeft u een probleem en al geprobeerd om dit op te lossen, vermeld dit erbij aub;
heeft u een oplossing gekregen van een bezoeker dan horen wij dat graag in dit forum;
wilt u een reactie geven op een vraag of antwoord, gebruik dan niet dit formulier maar klik op de knop 'reageer op deze vraag';
uw vraag wordt direct op de website gezet; vermijd daarom persoonlijke gegevens in te vullen;
Belangrijk! Als er een antwoord wordt gegeven op uw vraag, dan is het voor de gever van het antwoord nuttig om te weten als u er wel (of niet) mee geholpen bent! Wij vragen u dus ook te reageren op een antwoord.
Belangrijk! Antwoorden worden ook per e-mail naar abonnees gestuurd. Laat uw emailadres achter op deze site, zodat u op de hoogte blijft. U krijgt dan ook andere vragen en antwoorden te zien.
Abonneren
Abonneer u voor het ontvangen van emails voor uw Fusion Apollo RA770 bij:
nieuwe vragen en antwoorden
nieuwe handleidingen
U ontvangt een email met instructies om u voor één of beide opties in te schrijven.
Ontvang uw handleiding per email
Vul uw emailadres in en ontvang de handleiding van Fusion Apollo RA770 in de taal/talen: Engels als bijlage per email.
De handleiding is 2,24 mb groot.
U ontvangt de handleiding per email binnen enkele minuten. Als u geen email heeft ontvangen, dan heeft u waarschijnlijk een verkeerd emailadres ingevuld of is uw mailbox te vol. Daarnaast kan het zijn dat uw internetprovider een maximum heeft aan de grootte per email. Omdat hier een handleiding wordt meegestuurd, kan het voorkomen dat de email groter is dan toegestaan bij uw provider.
Uw handleiding is per email verstuurd. Controleer uw email
Als u niet binnen een kwartier uw email met handleiding ontvangen heeft, kan het zijn dat u een verkeerd emailadres heeft ingevuld of dat uw emailprovider een maximum grootte per email heeft ingesteld die kleiner is dan de grootte van de handleiding.
Er is een email naar u verstuurd om uw inschrijving definitief te maken.
Controleer uw email en volg de aanwijzingen op om uw inschrijving definitief te maken
U heeft geen emailadres opgegeven
Als u de handleiding per email wilt ontvangen, vul dan een geldig emailadres in.
Uw vraag is op deze pagina toegevoegd
Wilt u een email ontvangen bij een antwoord en/of nieuwe vragen? Vul dan hier uw emailadres in.