4 5
1
2
3
4
5
6
Contents
Warning
..........................................................................
2
IMPORTANT
..................................................................
2
EC Declaration of Conformity
.........................................
3
Preface
...........................................................................
6
Accessories included
......................................................
7
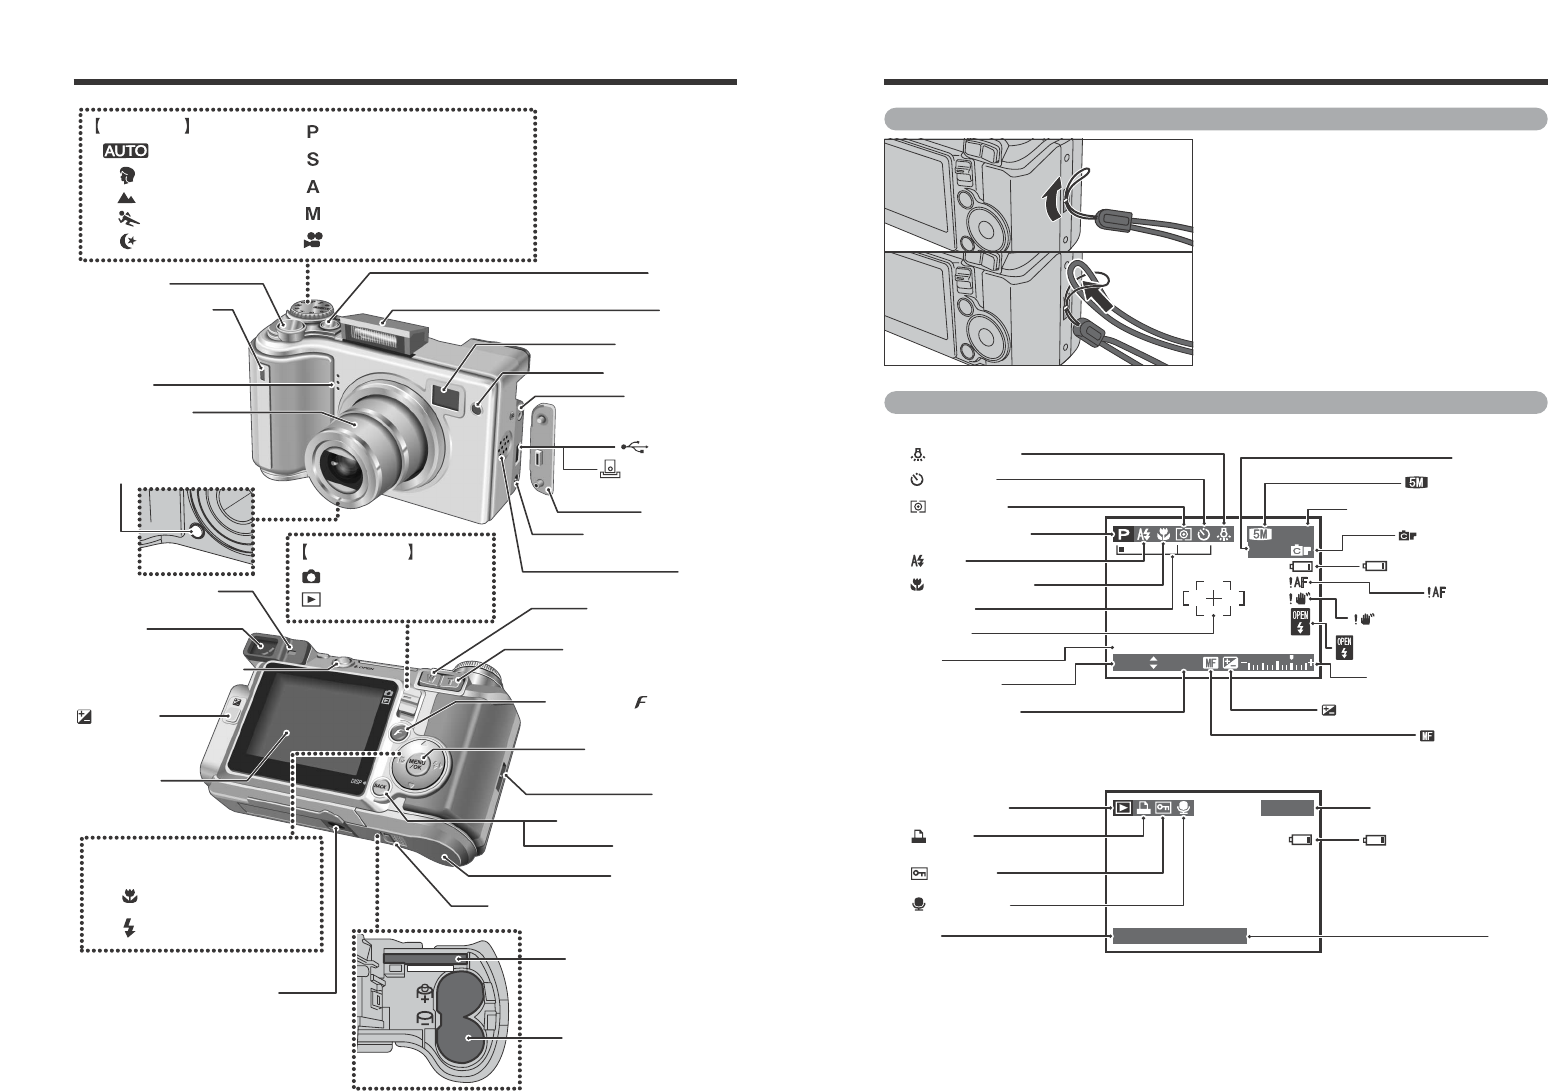
Camera parts and features
.............................................
8
Attaching the strap
.....................................................
9
Example of LCD Monitor text display
.........................
9
■ Photography mode
............................................
9
■ Playback mode
..................................................
9
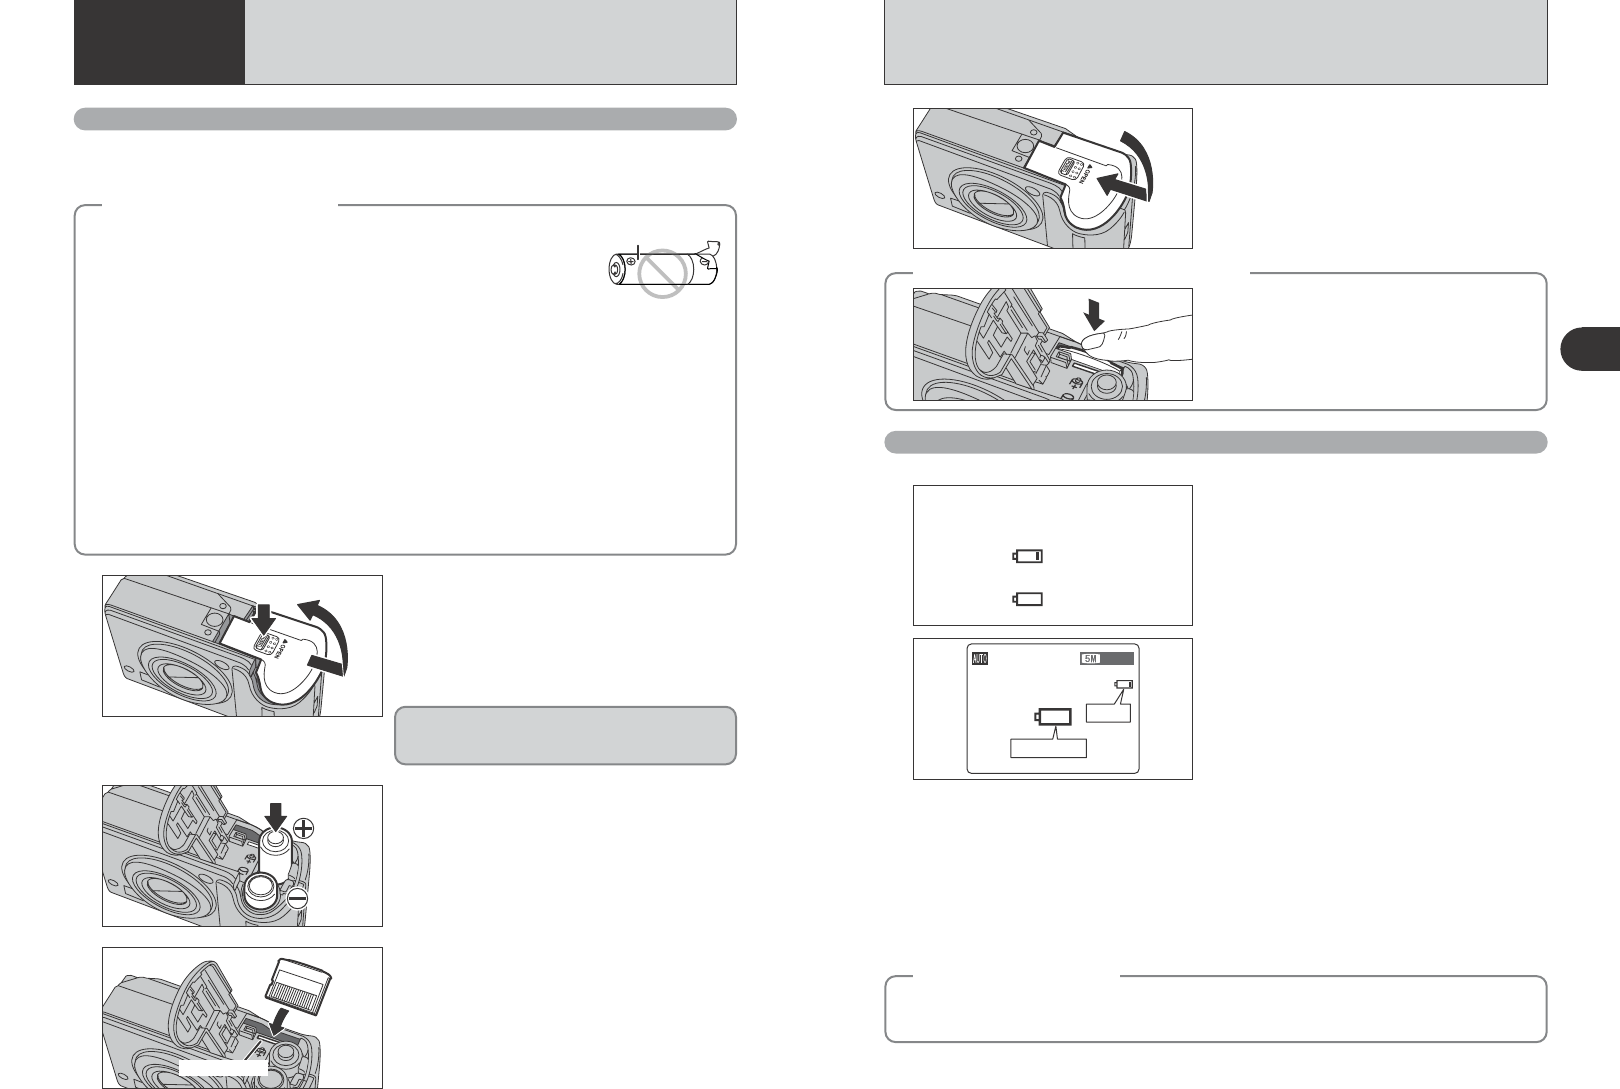
LOADING THE BATTERIES AND THE MEDIA
.............................................................................................................
10
Compatible batteries
................................................................................................................................................
10
Checking the battery charge
....................................................................................................................................
11
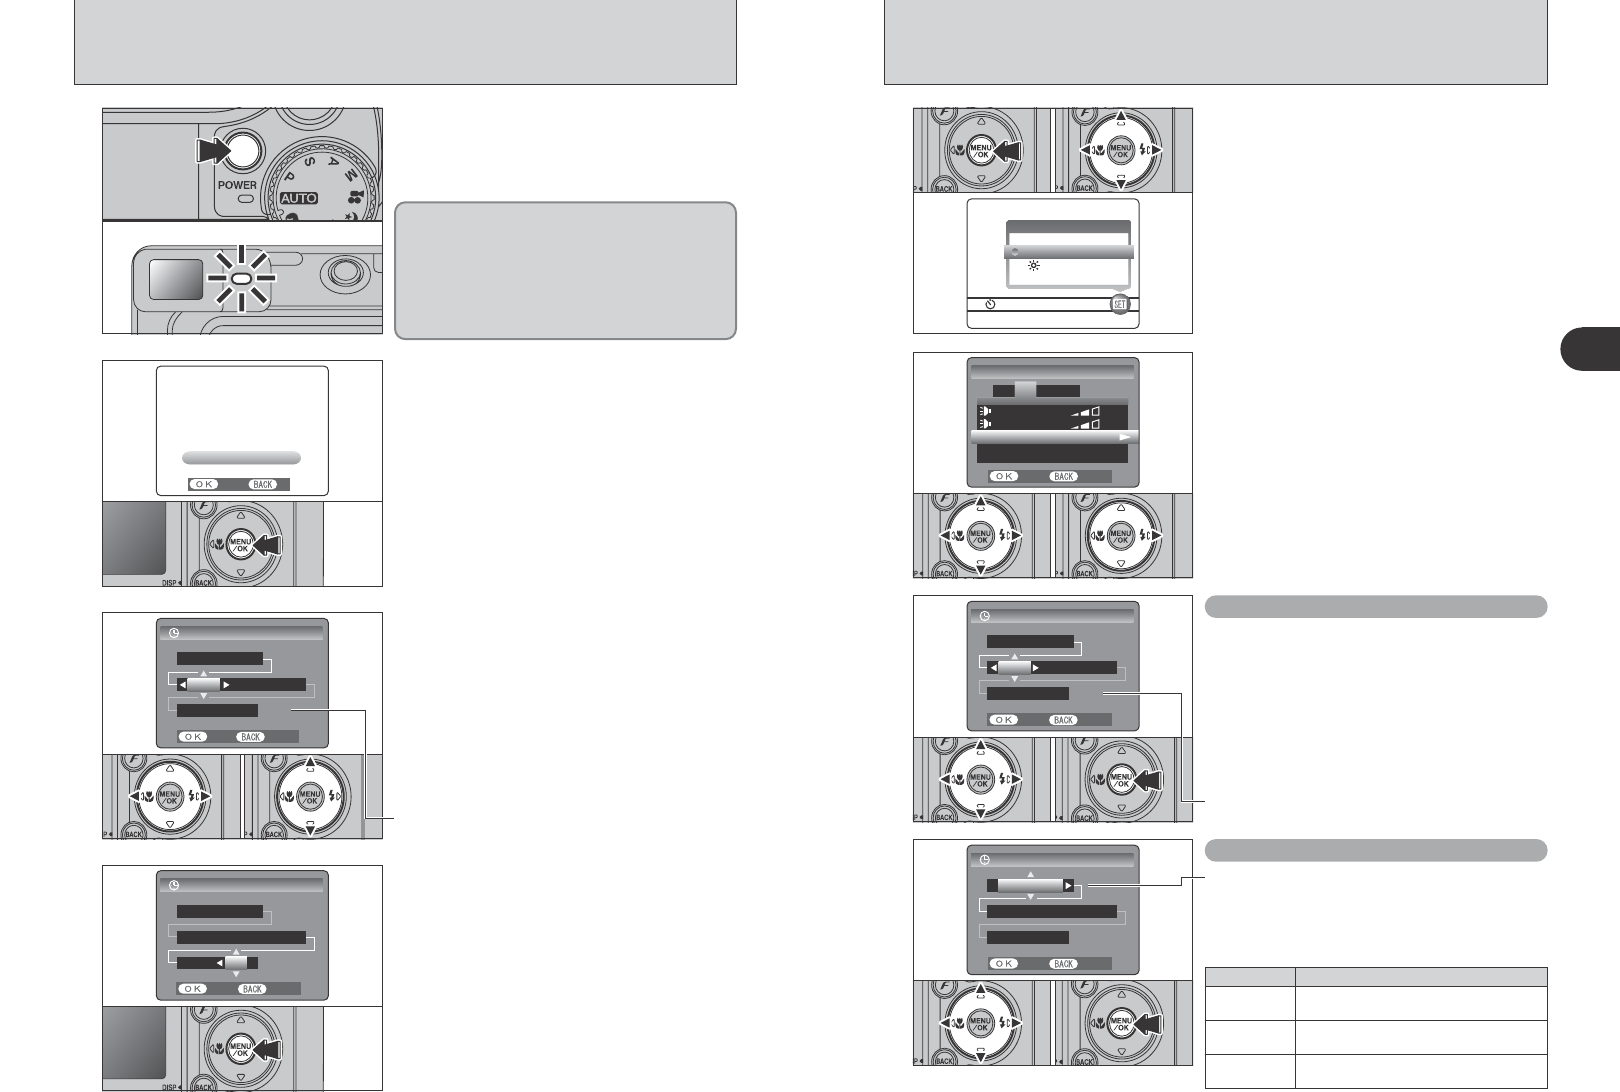
TURNING ON AND OFF / SETTING THE DATE AND TIME
.........................................................................................
12
CORRECTING THE DATE AND TIME
...........................................................................................................................
13
CHANGING THE DATE ORDER
....................................................................................................................................
13
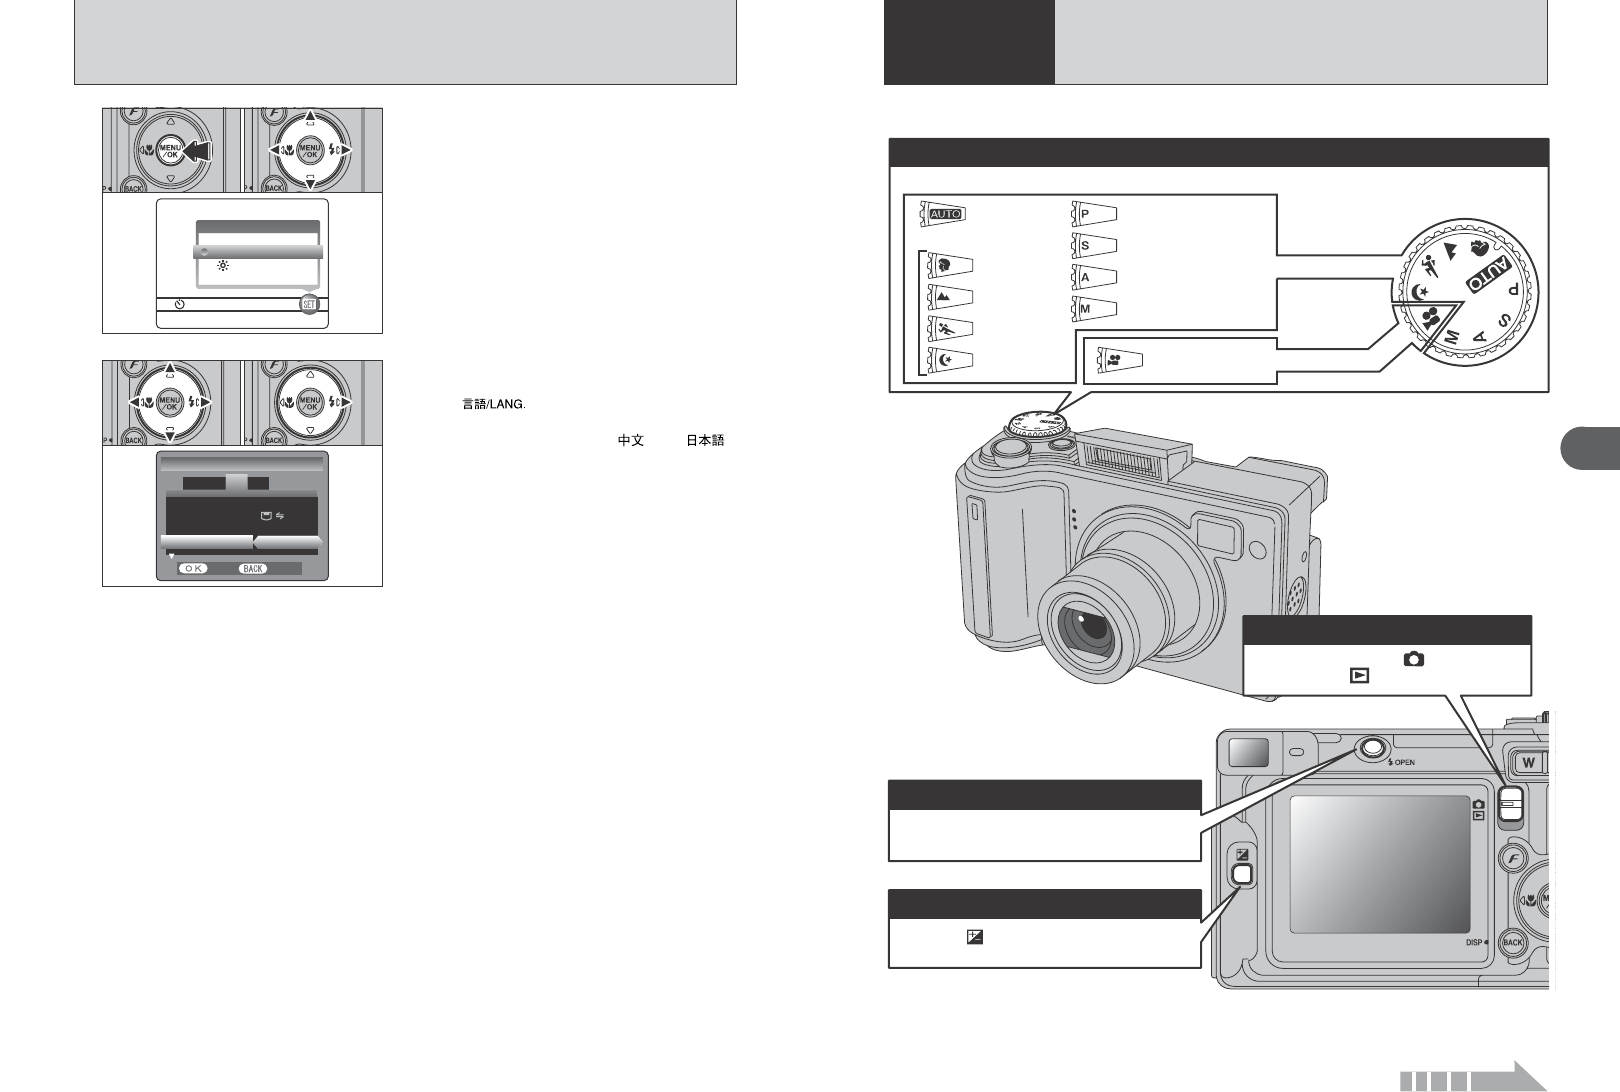
SELECTING THE LANGUAGE
......................................................................................................................................
14
1 Getting Ready
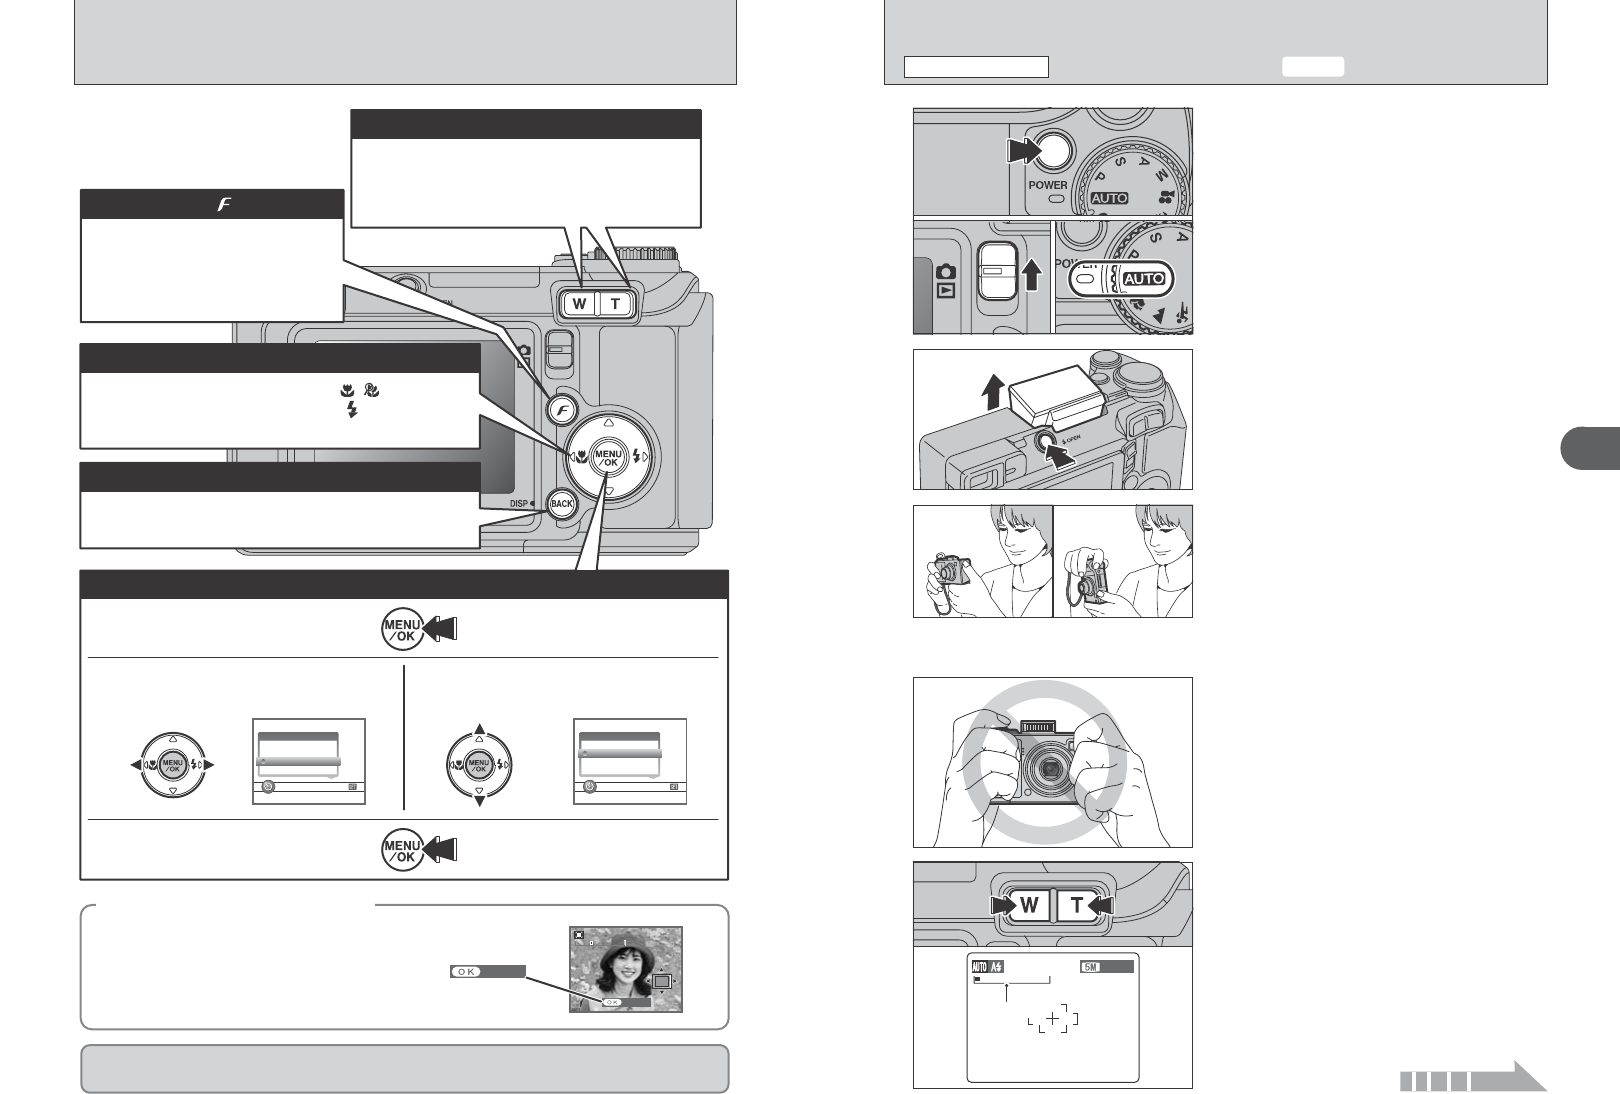
BASIC OPERATION GUIDE
...........................................................................................................................................
15
TAKING PICTURES (
B AUTO MODE)
....................................................................................................................
17
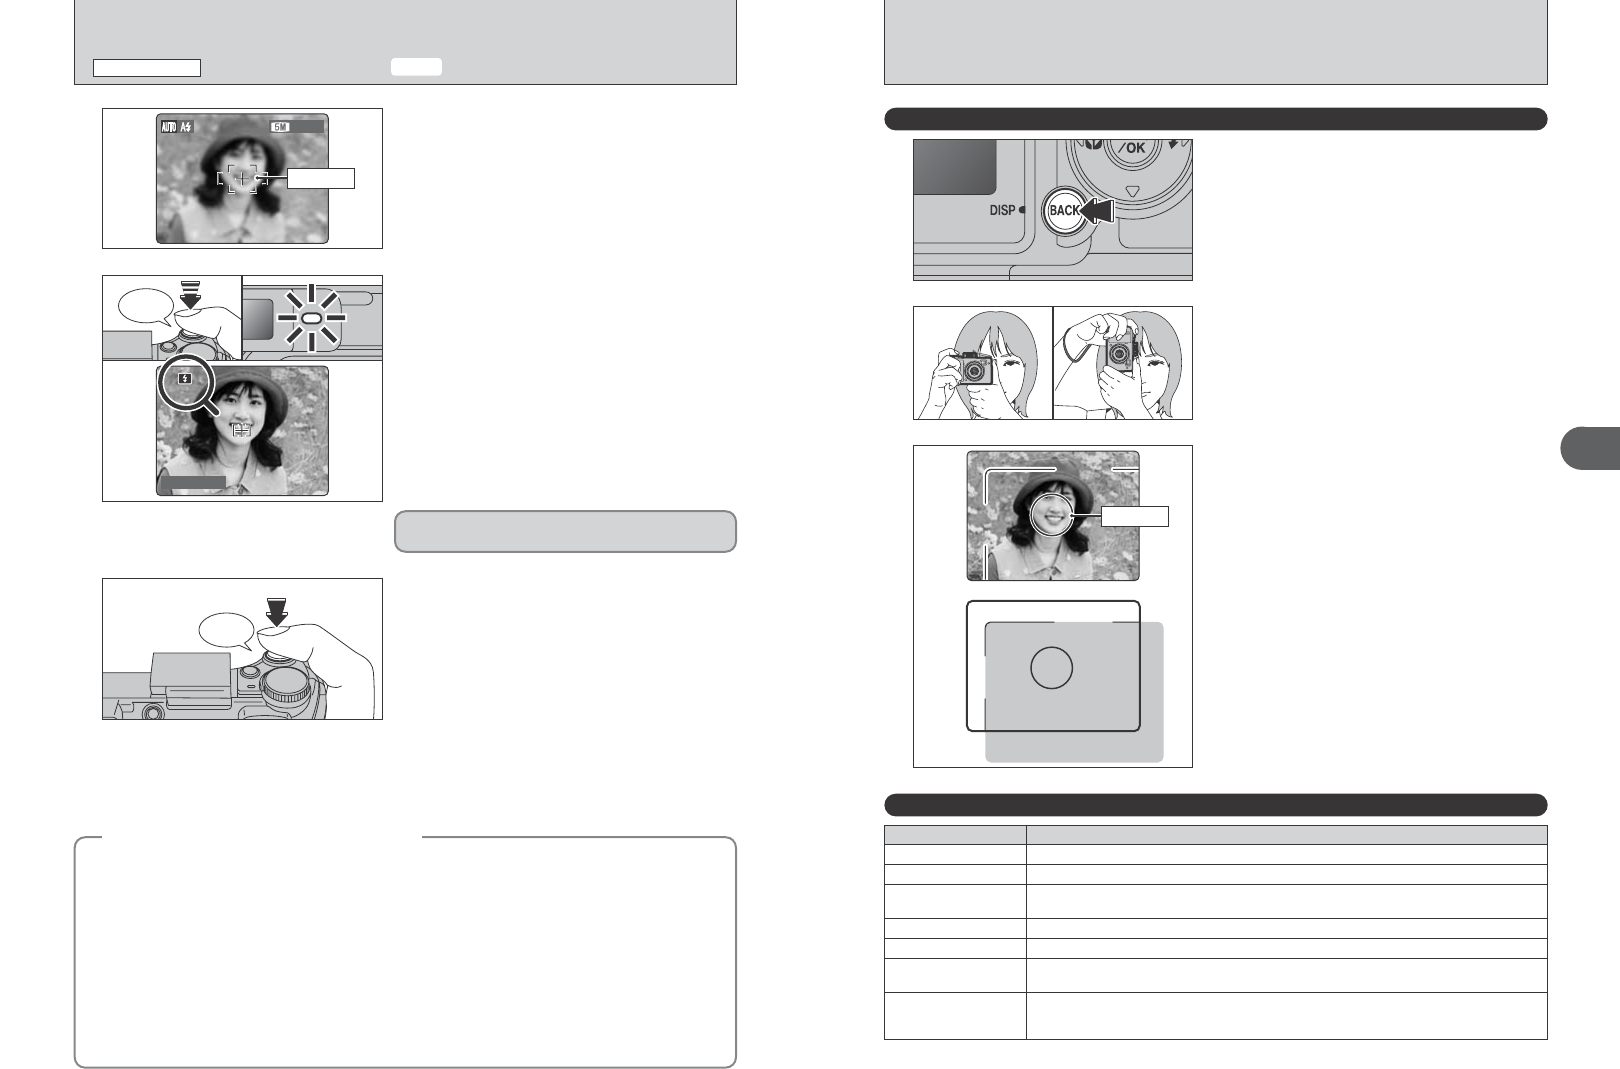
USING VIEWFINDER
..............................................................................................................................................
19
VIEWFINDER LAMP DISPLAY
................................................................................................................................
19
NUMBER OF AVAILABLE FRAMES
.......................................................................................................................
20
■ Standard number of frames per xD-Picture Card
.............................................................................................
20
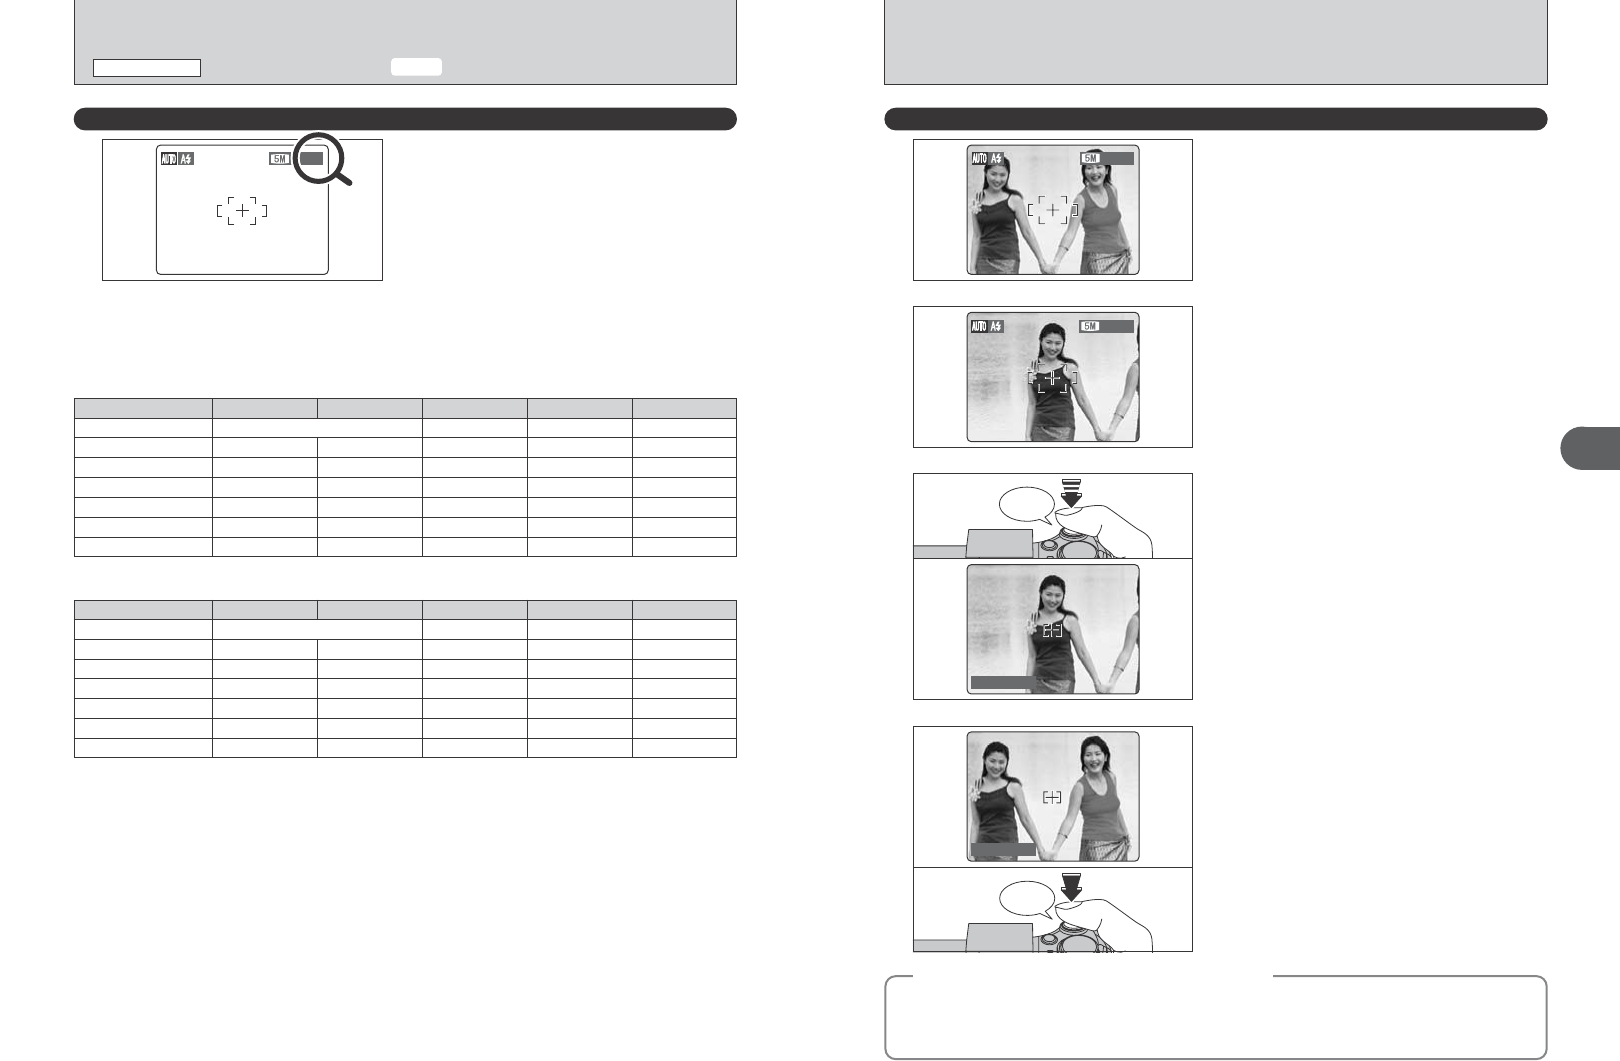
USING AF/AE LOCK
................................................................................................................................................
21
USING THE ZOOM (OPTICAL ZOOM/DIGITAL ZOOM)
........................................................................................
22
BEST FRAMING
......................................................................................................................................................
23
VIEWING THE IMAGES (
w PLAYBACK)
......................................................................................................................
24
Single-frame playback/Selecting images/Multi-frame playback
...............................................................................
24
Playback zoom
.........................................................................................................................................................
25
ERASING IMAGES (ERASE FRAME)
............................................................................................................................
26
PLAYBACK MODE
PHOTOGRAPHY MODE
2 Using the Camera
B STILL PHOTOGRAPHY
FOCUSING (DISTANCE)
...............................................................................................................................................
28
EXPOSURE (SHUTTER SPEED AND APERTURE)
.....................................................................................................
29
TAKING PICTURES — SELECTING THE CAMERA SETTINGS
..................................................................................
30
B AUTO / m PORTRAIT / , LANDSCAPE / . SPORTS / / NIGHT SCENE
.....................................................
32
PROGRAMMED AUTO
............................................................................................................................................
33
SHUTTER-PRIORITY AUTO
...................................................................................................................................
34
APERTURE-PRIORITY AUTO
................................................................................................................................
35
MANUAL
..................................................................................................................................................................
36
e MACRO (CLOSE-UP)
..............................................................................................................................................
37
d FLASH
......................................................................................................................................................................
38
x Auto flash
............................................................................................................................................................
39
b Red-eye reduction
...............................................................................................................................................
39
d Forced flash
........................................................................................................................................................
39
c Slow synchro
.......................................................................................................................................................
39
n Red-eye reduction + Slow synchro
.....................................................................................................................
39
D EXPOSURE COMPENSATION
...............................................................................................................................
41
y QUALITY MODE (NUMBER OF RECORDED PIXELS)
..........................................................................................
42
Quality settings in Photography mode
.....................................................................................................................
42
S SENSITIVITY
...........................................................................................................................................................
43
J FinePix COLOR
.......................................................................................................................................................
44
PHOTOGRAPHY MENU OPERATION
..........................................................................................................................
45
PHOTOGRAPHY MENU
................................................................................................................................................
46
* SELF-TIMER PHOTOGRAPHY
...............................................................................................................................
46
ç PHOTOMETRY
........................................................................................................................................................
47
A WHITE BALANCE
....................................................................................................................................................
47
H FOCUSING
..............................................................................................................................................................
48
AF (Auto Focus)
.......................................................................................................................................................
48
MF (Manual Focus)
..................................................................................................................................................
48
PHOTOGRAPHY MENU
p
PHOTO MODE PHOTOGRAPHY
>
<
M
N
PHOTOGRAPHY FUNCTIONS
3 Advanced Features
G SHARPNESS
...........................................................................................................................................................
49
z FLASH BRIGHTNESS ADJUSTMENT
....................................................................................................................
49
B PLAYBACK
o ERASING SINGLE / ALL FRAMES
.........................................................................................................................
50
i PROTECTING IMAGES: FRAME / SET ALL / RESET ALL
....................................................................................
52
g AUTOMATIC PLAYBACK
........................................................................................................................................
54
t RECORDING VOICE MEMOS
................................................................................................................................
55
t PLAYING BACK VOICE MEMOS
............................................................................................................................
57
■ Playing back voice memos
...................................................................................................................................
57
Y TRIMMING
...............................................................................................................................................................
58
u HOW TO SPECIFY PRINT OPTIONS (DPOF)
........................................................................................................
60
u DPOF SET FRAME
..................................................................................................................................................
61
U DPOF ALL RESET
...................................................................................................................................................
63
B MOVIE
r RECORDING MOVIES
............................................................................................................................................
64
Available recording time
...........................................................................................................................................
65
■ Recording times for xD-Picture Card
...............................................................................................................
65
y QUALITY SETTINGS IN MOVIE MODE
..................................................................................................................
66
PLAYING BACK MOVIES
...............................................................................................................................................
67
■ Playing back movies
.............................................................................................................................................
67
PLAYBACK MODE
p
PHOTO MODE MOVIE
MOVIE MODE
p
PHOTO MODE PLAYBACK
PLAYBACK MENU
fi ADJUSTING THE MONITOR BRIGHTNESS / VOLUME
........................................................................................
68
SET-UP
...........................................................................................................................................................................
69
F USING THE SET-UP SCREEN
...............................................................................................................................
69
■ SET-UP menu options
..........................................................................................................................................
70
POWER SAVE SETTING
........................................................................................................................................
71
FORMAT
..................................................................................................................................................................
71
WORLD TIME (TIME DIFFERENCE)
......................................................................................................................
72
FRAME NO.
.............................................................................................................................................................
73
4
Settings
5.1 INSTALLATION ON A Windows PC
.........................................................................................................................
74
5.2 INSTALLATION ON A Mac OS 9.2
...........................................................................................................................
76
5.3 INSTALLATION ON A Mac OS X
.............................................................................................................................
79
5 Software Installation
6.1 CAMERA CONNECTION
.........................................................................................................................................
82
6.1.1 Using the AC Power adapter (sold separately)
...............................................................................................
82
6.1.2 Connecting to a TV
.........................................................................................................................................
82
6.2 CONNECTING THE CAMERA DIRECTLY TO THE PRINTER — PictBridge FUNCTION
......................................
83
6.2.1 Specifying images for printing on the camera
.................................................................................................
83
6.2.2 Specifying images for printing without using DPOF (single-frame printing)
....................................................
84
6.3 CONNECTING TO A PC
..........................................................................................................................................
86
6.3.1 Connecting to a PC
.........................................................................................................................................
86
6.3.2 Disconnecting the camera
...............................................................................................................................
89
6.4 USING FinePixViewer
...............................................................................................................................................
90
6.4.1 Mastering FinePixViewer
................................................................................................................................
90
6.4.2 Uninstalling the software
.................................................................................................................................
90
6 Viewing Images
System Expansion Options
.........................................
92
Overview of the optional cradle
...............................
93
Accessories Guide
......................................................
94
Overview of the conversion lens / adapter ring
...........
96
Using Your Camera Correctly
.....................................
98
Power Supply and Batteries
........................................
98
Applicable Batteries
................................................
98
Notes on the Batteries
.............................................
98
Using the AA-size Ni-MH Batteries and
the Rechargeable Battery NH-10 Correctly
.............
99
AC Power Adapter
..................................................
99
Procedure for discharging rechargeable
Ni-MH batteries
.....................................................
100
Notes on the xD-Picture Card™
..............................
101
Warning Displays
......................................................
102
Troubleshooting
.........................................................
104
Specifications (FinePix E500)
...................................
106
Specifications (FinePix E510)
...................................
108
Explanation of Terms
................................................
110
Safety Notes
..............................................................
111