14
The top segment of each stereo output portion is devoted to mixing
the levels of the input channels.This may simply be a case of blending
between analogue inputs 1 and 2 (probably most common) or inputs
3 and 4 (either dry signal or SPDIF In) or it might be a custom mix of
all four input channels. If simply wanting to blend between analogue
inputs 1 and 2 then the dial labelled IN 1/2 BAL can be used. When
the dial is fully anticlockwise, the signal will just consist of analogue
input 1, and when the dial is fully clockwise, the signal will just consist
of analogue input 2.When the dial is positioned centrally, the input mix
will be an equal balance between inputs 1 and 2. (These levels are
represented by the blue lines that surround the dial.) If a blend of
inputs 3 and 4 are required then simply press the button below the
dial labelled 3/4 , which changes the dial above to now blend inputs 3
and 4 in the same way as 1 and 2. NB: Make sure this button is not
active if wanting to blend inputs 1 and 2.
If a more complex mix of all four input channels is required then one
can be created with the custom mix feature. Simply press the larger
button with the mini faders displayed on it to launch a separate
window where a custom mix can be created. When the window is
launched, the custom mix on/off button will be triggered (selecting the
custom mix option) and will illuminate. This will mean that the input
blend dial to the left (described above) will not be active. If wanting to
return to normal input blend mode then simply press the custom mix
on/off button again to deselect it.
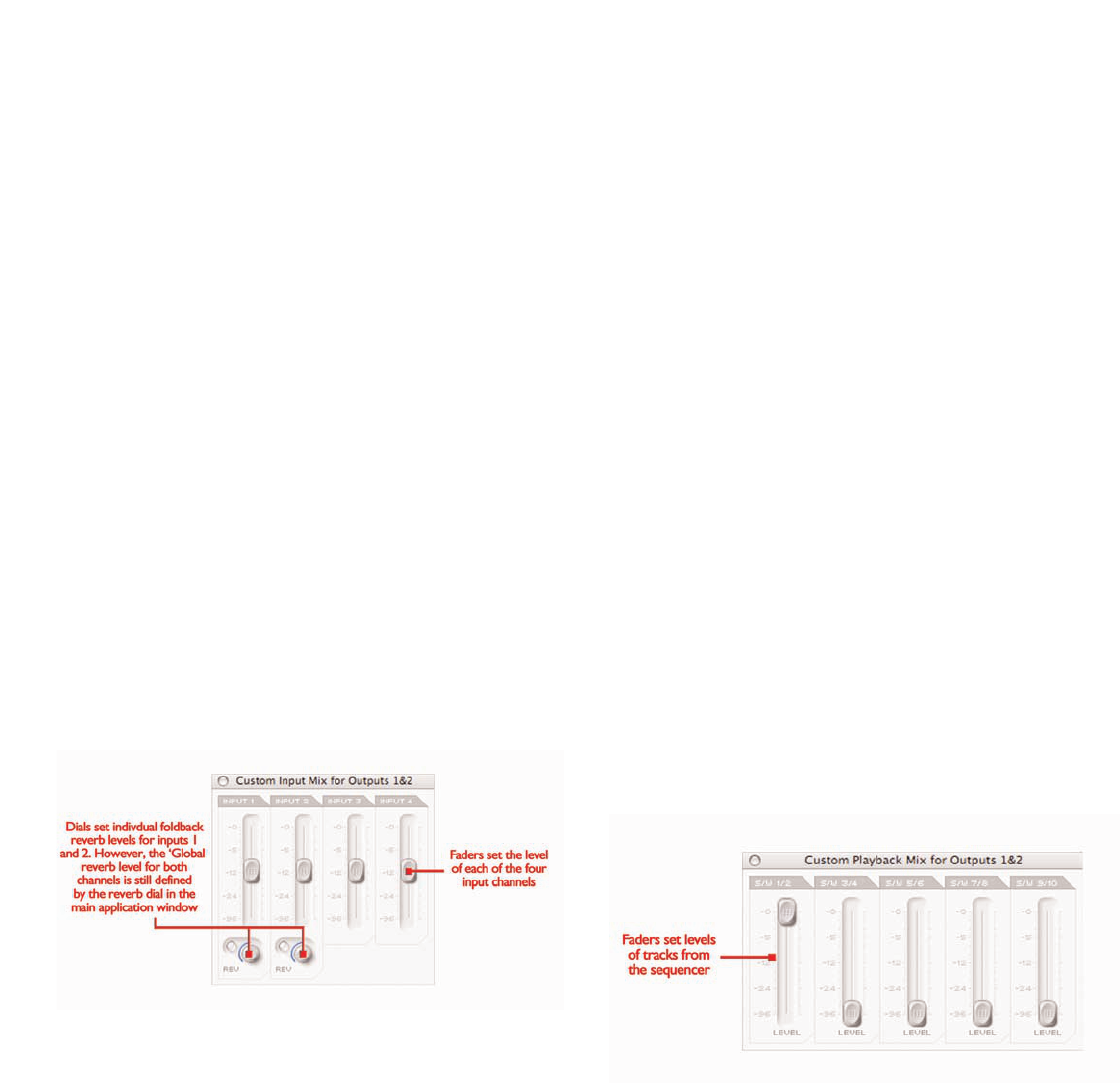
The inputs custom mix window displays all four input channel faders,
allowing a unique mix to be created for the stereo output currently
being modified. Once a mix has been set, this mix can always be seen
in reduced format on the custom mix window launch button, so the
mix can always be viewed, even when the custom mix window is
closed. If the custom mix on/off button is deactivated then this
reduced format mix will change to the mix set by the blend dial to its
left, so the currently selected mix will always be shown.Two dials and
buttons within the inputs custom mix window also allow specific
amounts of reverb to be set for input channels 1 and 2.This amount
of reverb overrides the global amount for that stereo output pair
(note the main reverb dial on the corresponding input mix section of
that stereo output channel is greyed out). Rotate the dial clockwise to
increase the amount of reverb and use the activation button to select
or deselect the reverb (reverb is active when button is illuminated).
Once a balance of the input channels has been created, the main
reverb dial can be used to add reverb to the channels 1 and/or 2 (in
different proportions if required, set in the custom mix window). Press
the button to activate the reverb (illuminated when active) and
rotate the dial clockwise to increase the amount of reverb. See
FOLDBACK REVERB section on page 15 for details on how to modify
reverb settings.
This mix of inputs now becomes the INPUT MIX for that pair of
outputs on the horizontal slider (crossfader). If just wanting to listen to
this mix, with none of the P/BACK MIX signal (tracks from sequencer),
then ensure that the slider is in the extreme left position. Moving the
slider to the right will introduce small amounts of P/BACK MIX until
the slider is in the central position, when equal amount of both signals
will be selected. Moving the slider to the right will then decrease the
INPUT MIX gradually until only the P/BACK MIX is heard when the
slider is in the extreme right position.
The P/BACK MIX will be the generic mix selected in the
BALANCING TRACKS FROM THE SEQUENCER/ RECORDING
PLATFORM section (the faders in the top right of the Main
Application window) unless the S/W custom mix button below the
slider is active, in which case it s independent of these S/W faders.The
two custom mix buttons below the slider allow a custom mix of tracks
1-10 from the sequencer/recording software to be created for that
pair of outputs, rather than using the generic mix created with the five
S/W faders.This allows the engineer to create a unique foldback mix
of the tracks coming from the sequencer for even the most fussy
artist, without having to change the mix set within the sequencer.
Pressing the large custom mix button launches the S/W custom
mix window.
This window features five faders which look identical to those in the
top right of the Main Application window, representing the levels of
S/W tracks 1-10 (outputs 1-10 coming from the recording
software/sequencer).The faders have the same gain relationship to the
software as those in the Main Application Window, meaning that if the
faders are set to 0dB (maximum) then the levels of tracks 1-10 will
equal those currently set in the recording software/sequencer. When
this custom mix window is launched the custom mix on/off button
(smaller button) will illuminate to signify that the custom mix is active.
This means that the custom mix set within this window will become
the P/BACK MIX for whatever stereo output is being modified, NOT
the mix set by the faders in the top right of the Main Application
window. If wishing to revert back to the mix set by the faders in the
Main Application window instead then simply press the smaller
custom mix on/off button to deactivate. In the same way as the inputs
custom mix button above, the currently selected playback mix will be
permanently displayed in reduced format in the custom mix window
launch button so that the mix is always visible, even when the custom
mix window is closed.
The bottom of each set of stereo output controls features a dial for
setting the level (all except 9/10 - SPDIF) and a series of smaller