795123
23
Verklein
Vergroot
Pagina terug
1/28
Pagina verder
User’s Manual Model: 1042136
Important! Please read carefully and save this document.
This user’s manual contains important information about your combination Smoke and CO Alarm’s operation.
If you are installing this alarm for use by others, you must leave this manual (or a copy of it) with the end user.
Installed On
Replace by
2
Table of Contents
Welcome 3
Parts of this Alarm 4
Understanding Your Alarm 5
Where to Install 6 - 7
Where Not to Install 8
Set-Up and Installation 9
Wireless Interconnect 10
When the Alarm Sounds 10 - 11
Using the Silence Feature 11 - 12
Weekly Testing 12
Regular Maintenance 13 - 14
Alarm End of Life 14
Ionization and Photoelectric Technology 14 - 15
Fire Safety Tips 15 - 16
What You Need to Know About CO 16 - 17
Potential Sources of CO in the Home 17 - 18
Regulatory Information 18 - 21
Special Compliance 21 - 23
General Limitations 23 - 24
Troubleshooting Guide 25
Limited Warranty 26
Copyright and Technical Specifications 27
3
Welcome
Thank you for choosing Onelink by First Alert for your safety needs. In addition to
the alarm sounds, you can receive notifications in case of an emergency to help
provide a warning of a fire or carbon monoxide leak while you are home or away.
Please take time to read this manual and make this alarm an integral part of your
family’s safety plan. Visit www.onelink.firstalert.com for additional information.
Contents
Smoke and
CO Alarm
Mounting
Bracket
Mounting
Hardware
User’s
Manual
System Requirements
Wireless Network Android or iOS Device Onelink App
Required to use a 2.4 GHz wireless
connection and a compatible
802.11 b/g/n/ac router.
HomeKit requires an iPhone®, iPad®,
or iPod touch® with iOS 10 or later,
or Android® 5 or later.
Search and download the
Onelink Home app from the
App Store or Google Play.
4
Parts of this Alarm
1. Test/Silence Button
2. Color Indicator Ring
3. Speaker
4. Battery Drawer
1
2
5. Mounting Bracket
6. Mounting Slots
7. Turn Alarm Clockwise
to Attach
8. Turn Alarm
Counterclockwise
to Remove
5
8
7
6
3
4
5
Understanding Your Alarm
LED Color
Patterns Smoke / CO Events Voice Guide
Power Up and Welcome
Power Up
First Alert welcomes you to your Onelink Smoke
and Carbon Monoxide Alarm. The Onelink App will
guide you through the simple setup process.”
Programming, Silencing & Pairing “[Location, example: “Hallway”] Location Programmed.”
Testing The testing is complete. The test is done and you are protected.”
Emergency [voice complete]
Pairing Alarm will flash blue during pairing.
Testing
Testing Smoke” [beep beep beep!]
Testing Carbon Monoxide” [beep beep beep beep!]
Evacuate, Evacuate, there’s Fire in the [Location]!
Testing Alarms... The alarm will sound and for your
protection is very loud. This may take a few seconds.”
Highest carbon monoxide level was 0 PPM.”
Emergency
Evacuate! Evacuate! There is Smoke [or Carbon
Monoxide] in the [Location!]!”
Highest carbon monoxide level was [Number] PPM.”
Malfunction
Detector error.”
Alarm has reached its End of Life. Replace Alarm in [Location].”
Low Battery Information available via mobile app.
6
Where to Install
Minimum coverage for Smoke Alarms, as recommended by the National Fire Protection Association
(NFPA), is one Smoke Alarm on every floor, in every sleeping area, and in every bedroom (See
“Regulatory Information For Smoke Alarms” for details on the NFPA recommendations). For CO Alarms,
the National Fire Protection Association (NFPA) recommends that a CO Alarm should be centrally
located outside of each separate sleeping area in the immediate vicinity of the bedrooms. For added
protection, install additional CO Alarms in each separate bedroom, and on every level of your home.
NOTE: For added protection, install an additional Smoke/CO Alarm at least 15 feet (4.6 meters)
away from the furnace or fuel burning heat source where possible. In smaller homes or in
manufactured homes where this distance cannot be maintained, install the Alarm as far away as
possible from the furnace or other fuel burning source. Installing the Alarm closer than 15 feet
(4.6 meters) will not harm the Alarm, but may increase the frequency of unwanted alarms.
In general, install combination Smoke and Carbon Monoxide Alarms:
On every level of your home, including finished attics and basements.
Inside every bedroom, especially if people sleep with the door partly or completely closed.
In the hall near every sleeping area. If your home has multiple sleeping areas, install a unit
in each. If a hall is more than 40 feet (12 meters) long, install a unit at each end.
At the top of first-to-second floor stairs.
At the bottom of the basement stairs.
For additional coverage, install Alarms in all rooms, halls, and storage areas, where
temperatures normally remain between 40˚ F and 100˚ F (4.4˚ C and 37.8˚ C).
Recommended Placement
When installing on the wall, the top edge of Smoke Alarms should be placed between 4 inches
(102 mm) and 6 inches (153 mm) from the wall/ceiling line.
When installing on the ceiling, place the alarm as close to the center as possible.
In either case, install at least 4 inches (102 mm) from where the wall and ceiling meet.
See Avoiding “Dead Air” Spaces for more information.
NOTE: For any location, make sure no door or other obstruction could keep carbon monoxide or smoke
from reaching the Alarm.
Installing Smoke/CO Alarms in Mobile Homes
For minimum security install one Smoke/CO Alarm as close to each sleeping area as possible.
For more security, put one unit in each room. Many older mobile homes (especially those built
before 1978) have little or no insulation. If your mobile home is not well insulated, or if you are
unsure of the amount of insulation, it is important to install units on inside walls only.
7
Where to Install (Continued)
SPEAKER OPENING
IN UPPER LEFT
CORNER
PLACE HERE
OR HERE
DO NOT PLACE
IN THIS AREA
4”
(102 mm)
minimum
between 4”- 6”
(102 mm - 153 mm)
from ceiling
CEILING
WALL
8
Where Not to Install
Do NOT locate this Smoke/CO Alarm:
In garages, furnace rooms, crawl spaces and unfinished attics. Avoid extremely dusty, dirty or greasy areas.
Where combustion particles are produced. Combustion particles form when something burns. Areas
to avoid include poorly ventilated kitchens, garages, and furnace rooms. Keep units at least 20 feet (6
meters) from the sources of combustion particles (stove, furnace, water heater, space heater) if possible.
In areas where a 20 foot (6 meter) distance is not possible – in modular, mobile, or smaller homes, for
example – it is recommended the Smoke Alarm be placed as far from these fuel-burning sources as
possible. The placement recommendations are intended to keep these Alarms at a reasonable distance
from a fuel-burning source, and thus reduce “unwanted” alarms. Unwanted alarms can occur if a Smoke
Alarm is placed directly next to a fuel-burning source. Ventilate these areas as much as possible.
Within 5 feet (1.5 meters) of any cooking appliance. In air streams near kitchens. Air currents
can draw cooking smoke into the smoke sensor and cause unwanted alarms.
In extremely humid areas. This Alarm should be at least 10 feet (3 meters) from a shower, sauna,
humidifier, vaporizer, dishwasher, laundry room, utility room, or other source of high humidity.
In direct sunlight.
In turbulent air, near ceiling fans or open windows. Blowing air may prevent CO/smoke from reaching
the sensors.
In areas where temperature is colder than 40˚ F (4.4˚C) or hotter than 100˚ F (37.8˚C). These areas include
non air conditioned crawl spaces, unfinished attics, uninsulated or poorly insulated ceilings, porches,
and garages.
In insect infested areas. Insects can clog the openings to sensing chamber.
Less than 12 inches (305 mm) away from fluorescent lights. Electrical “noise” can interfere with the sensor.
In “dead air” spaces. See below for additional information.
Installing Smoke/CO Alarms in Mobile Homes
Dead air” spaces may prevent smoke from reaching the Smoke/CO Alarm. To avoid dead air spaces, follow
installation recommendations below.
On ceilings, install Smoke/CO Alarms as close to the center of the ceiling as possible. If this is not possible,
install the Smoke/CO Alarm at least 4 inches (102 mm) from the wall or corner.
For wall mounting (if allowed by building codes), the top edge of Smoke/CO Alarms should be placed
between 4 inches (102 mm) and 12 inches (305 mm) from the wall/ceiling line, below typical“dead air”spaces.
On a peaked, gabled, or cathedral ceiling, install first Smoke/CO Alarm within 3 feet (0.9 meters) of the
peak of the ceiling, measured horizontally. Additional Smoke/CO Alarms maybe required depending on
the length, angle, etc. of the ceiling’s slope. Refer to NFPA 72 for details on requirements for sloped
or peaked ceilings.
9
Set-Up & Installation
Do not install this unit over an electrical junction box. Air currents around junction boxes
can prevent smoke from reaching the sensing chamber and prevent the unit from alarming.
Only AC powered units are intended for installation over junction boxes.
NOTE: Be sure to mount the product in the orientation specified in the next steps as this provides the
most stability for mounting the product to the wall or ceiling. When wall mounting, the speaker opening
is in the upper left corner. This alarm is designed to be mounted on the ceiling or wall if necessary.
Ensure the iOS software is updated to iOS 10 or later or Android 5 or later.
Step 1 Download the free Onelink app from the App Store
or Google Play and follow set-up instructions.
Speaker
Opening
Step 2 Hold the mounting bracket against the ceiling (or
wall) so the two universal mounting holes are aligned
approximately at the 9 and 3 o’clock positions.
(See image). Trace around the holes with a pencil.
Step 3 Put the unit where it won’t get covered with
dust when you drill the mounting holes.
Step 4 Using a 3/16” (5 mm) drill bit, drill a hole through
the center of the outlines you traced.
Step 5 Insert the plastic screw anchors (in the plastic
bag with screws) into the holes. Tap the screw
anchors gently with a hammer, if necessary,
until they are flush with the ceiling or wall.
Step 6 Install the screws but do not tighten completely. Attach the mounting bracket by aligning
the screws in the open portion of the universal mounting slots and rotating the bracket into
place. Tighten the screws until they are snug to secure the bracket. Do not over tighten.
Step 7 Mount alarm to mounting bracket to activate the alarm.
NOTE: After you activate the Alarm, the Color Indicator Ring will power up and the Alarm will
welcome you. To program your alarm, follow the instructions provided in the Onelink app.
!
WARNING: iOS and Android device notifications require a functional Wireless connection. For best
results, recommended to use with a 802.11 b/g/n/ac router. The notifications are only as reliable as
your Wireless network and are not a substitute for a third party emergency monitoring service.
10
Wireless Interconnect
Benefits of Wireless Interconnect
The wireless interconnect feature on this alarm allows you to connect each of your
First Alert Onelink alarms so when one alarm sounds, they all will sound.
!
WARNING: Install alarms and test to assure range and
reliability of interconnection throughout the house.
First Alert Onelink alarms can typically communicate with each other if they’re 50ft (15m) apart inside a
home. Keep in mind that some features of a home may reduce the interconnect range and reliability of
interconnection, including the number of floors, number/size of rooms, furniture, type of building material,
suspended ceilings, ductwork, large metallic appliances and metal studs. This kind of interference may be
fixed by adding more Onelink alarms that can route wireless signals around any various obstructions.
Make sure you test your Onelink alarms for proper interconnection via the weekly testing.
Wireless Frequency: This alarm supports wireless frequency of 2.4Ghz. For best results, recommended to use
with a 802.11 b/g/n/ac router.
Adding Additional Alarms: Simply follow the instructions on your Onelink app to add additional alarms to your account.
Identification of Events: If your alarm sounds, it is important to first identify the type of alarm.
When the Alarm Sounds
What To Do If The Smoke Alarm Sounds
If the unit alarms and you are not testing the unit, it is warning you of a potentially dangerous situation that
requires your immediate attention. NEVER ignore any alarm. Ignoring the alarm may result in injury or death.
If the unit alarms get everyone out of the house immediately.
What To Do In Case of a Fire
Don’t panic; stay clam. Follow your family escape plan.
Get out of the house as quickly as possible. Don’t stop to get dressed or collect anything.
Feel doors with the back of your hand before opening them. If a door is cool, open it slowly. Don’t
open a hot door. Keep doors and windows closed, unless you must escape through them.
Cover your nose and mouth with a cloth (preferably damp. Take short, shallow breaths.)
Meet at your planned meeting place outside your home, and do a head count to make sure everybody got
out safely. Call the Fire Department as soon as possible from outside. Give your address, then your name.
Never go back inside a burning building for any reason.
Contact your Fire Department for ideas on making your home safer.
11
When the Alarm Sounds (Continued)
What To Do If The CO Alarm Sounds
1. Press the Test/Silence button (On App or on unit).
2. Call your emergency services, fire department or 911.
3. Immediately move to fresh air—outdoors or by an open door or window. Do a head count to check that all persons
are accounted for. Do not re-enter the premises, or move away from the open door or window until the emergency
services responder has arrived, the premises have been aired out, and your CO Alarm remains in its normal condition.
4. After following steps 1-3, if your CO Alarm reactivates within a 24-hour period, repeat steps 1-3 and call a qualified
appliance technician to investigate for sources of CO from fuel-burning equipment and appliances, and inspect for
proper operation of this equipment. If problems are identified during this inspection have the equipment serviced
immediately. Note any combustion equipment not inspected by the technician, and consult the manufacturers’
instructions, or contact the manufacturers directly, for more information about CO safety and this equipment. Make
sure that motor vehicles are not, and have not, been operating in an attached garage or adjacent to the residence.
NOTE: A qualified appliance technician is defined as “a person, firm, corporation, or company that either in person or through a
representative, is engaged in and responsible for the installation, testing, servicing, or replacement of heating, ventilation, air conditioning
(HVAC) equipment, combustion appliances and equipment, and/or gas fireplaces or other decorative combustion equipment.
!
WARNING: Actuation of this device indicates the presence of carbon monoxide (CO) which can KILL YOU.
If alarm signal sounds (description of alarm signal, eg four beeps): (1) immediately move to fresh air outdoors or by
an open window. check that all persons are accounted for. Do not reenter the premise or move away from the open
door/window until the emergency service responders have arrived, the premises have been aired out, and your alarm
remains in its normal condition; (2) call you emergency local service (telephone number) (fire department or 911)
(ii) If “service” signal sounds (description of the trouble signal eg. one beep)
Using the Silence Feature
The Silence Feature
This feature is intended to temporarily silence the horn while you identify and correct the problem. Do not
use the Silence Feature in emergency situations. It will not correct a CO problem or extinguish a fire. The
Silence Feature can temporarily quiet an unwanted alarm for several minutes. You can silence this Smoke/
CO Alarm by pressing the Test/Silence button on the alarm cover for at least 3-5 seconds or via the
Onelink app. After the Test/Silence button is released, the Red LED stops during the silence mode.
Silence the End of Life Signal
This silence feature can temporarily quiet the End of Life warning “chirp” for up to 2 days. You can silence the End of
Life warning “chirp” by pressing the Test/Silence button or via the Onelink app. The horn will chirp, acknowledging
that the End of Life silence feature has been activated. After approximately 2 days, the End of Life “chirp” will resume.
!
WARNING: Never deactivate the unit to quiet an unwanted alarm.
Deactivating the alarm disables the unit and removes your protection.
12
Using the Silence Feature (Continued)
When the Smoke Alarm is Silenced When the CO Alarm is Silenced
The Smoke Alarm will remain silent for up to
15 minutes, then return to normal operation. The CO Alarm will remain silent for up to 4 minutes.
If the smoke has not cleared or continues to
increase, the device will go back into alarm.
After 4 minutes, if CO levels remain potentially
dangerous, the horn will start sounding again.
Weekly Testing
!
WARNING: NEVER use an open flame of any kind to test this unit. You might
accidentally damage or set fire to the unit or to your home. NEVER use vehicle
exhaust! Exhaust may cause permanent damage and voids your warranty.
!
WARNING: DO NOT stand close to the Alarm when the horn is sounding. Exposure at close
range may be harmful to your hearing. When testing, step away when horn starts sounding.
!
CAUTION: It is important to test this unit every week to make sure it is working properly.
Using the test button is the recommended way to test this Smoke/CO Alarm.
!
WARNING: Test device operation after vehicle has been in storage, before each trip,
and at least once per week during use.
You can test this Smoke/CO Alarm by pressing and holding the Test/Silence button on the Alarm cover until
Alarm Voice says “Testing” (typically 3-5 seconds).
During testing, you will see and hear the following sequence:
The Alarm Voice will say “Testing Alarms... The Alarm will sound and for your protection is very
loud.
This may take a few seconds
”. The LED chases Blue. The Alarm Voice will say “Testing
Smoke”. The Horn will sound 3 beeps. The LED chases and flashes Red. The Alarm Voice will say
Testing Carbon Monoxide”. The Horn will sound 4 beeps. The LED chases and flashes Red.
Next, the Alarm Voice will say “Testing Carbon Monoxide.” The Horn will sound 4 beeps, twice. The LED
chases and flashes Red. The Alarm Voice will say Evacuate, Evacuate, there’s Carbon Monoxide in the
[Location. Example: “Kitchen”].” The LED flashes green. The Alarm Voice will say “Highest carbon monoxide
level was 0 PPM.” The LED chases Blue. The Alarm Voice will then say “The testing is almost complete.”
After a pause, the Alarm Voice will say “The test is done, and you are protected.” The LED flashes green.
If the unit does not alarm, make sure it has been activated correctly, and test again.
If the unit still does not alarm, replace it immediately.
13
Regular Maintenance
This unit has been designed to be as maintenance-free as possible, but there are a few simple things you
must do to keep it working properly:
Test it at least once a week.
Clean the Smoke/CO Alarm at least once a month; gently vacuum the outside of the Smoke/CO
Alarm using your household vacuum’s soft brush attachment. A can of clean compressed air (sold at
computer or oce supply stores) may also be used. Follow manufacturer instructions for use. Test
the Smoke/CO Alarm. Never use water, cleaners or solvents since they may damage the unit.
If the Smoke/CO Alarm becomes contaminated by excessive dirt, dust and/or grime, and
cannot be cleaned to avoid unwanted alarms, replace the unit immediately.
Relocate the unit if it sounds frequent unwanted alarms. See “Where This Alarm Should Not Be Installed” for details.
When the battery becomes weak, the Smoke/CO alarm will “chirp” approximately once a minute (the low
battery warning). This low battery warning should last for up to 7 days, but you should replace the battery
immediately to continue your protection.
!
IMPORTANT: Actual battery service life depends on the Smoke/CO Alarm and the environment
in which it is installed. Regardless of the manufacturer’s suggested battery life, you MUST
replace the battery immediately once the unit starts “chirping” (the “low battery warning”).
Replacement Batteries
Your Smoke/CO alarm requires a 3 cell lithium metal battery. You can purchase your replacement batteries
at www.firstalertstore.com.
WARNING: Always use the exact batteries specified by this User’s manual. DO NOT use
rechargeable batteries. Install batteries correctly with regard to polarity ( + and -).
Please dispose of or recycle used batteries properly, following any local regulations. Consult your
local waste management authority or recycling organization to find an electronics recycling facility
in your area. DO NOT DISPOSE OF BATTERIES IN FIRE. BATTERIES MAY EXPLODE OR LEAK.
Keep battery out of reach of children. In the event a battery is swallowed, immediately contact your poison
control center, your physician, or the
National Battery Ingestion hotline at 202-
625-3333 as serious injury may occur.
To Replace Batteries
It is recommended that you remove the Smoke/CO Alarm
from the mounting bracket before replacing the batteries.
Step 1 Slide open the battery compartment.
Step 2 Pull out the battery, squeeze release lever
on connector and pull to release battery.
1
Release
Lever
2
14
Regular Maintenance (Continued)
To Replace Batteries (Continued)
Step 3 Connect new battery to connector ensuring that
release lever engages and insert battery into the
battery compartment.
Step 4 Close the battery compartment, and re-mount the
Alarm if you removed it from the mounting bracket.
Then test the unit by pressing the Test button
If the alarm does not test, check the battery to ensure it is properly connected and the alarm is properlymounted in the bracket.
Alarm End of Life
Permanently Deactivating the Alarm
After 10 years of operation, deactivate the Alarm by following the diagram below: Score
label on dotted line and move switch all the way to the right to DEACTIVATE mode.
NOTE: At end of life indication (chirp): unit must be put into deactivation mode to deactivate
remaining stored energy in battery. Unit will no longer function once put into this mode.
Unit will resist re-mounting. Once deactivated, replace Alarm immediately.
1.
Score label on dotted line
2.
Slide switch to the right
SINGLE AND/OR MULTIPLE STATION SMOKE & CO ALARM
MODEL NO. 1042136
SMOKE SENSITIVITY: 0.96 – 2.45 %/ft OBSC.
PHOTOELECTRIC
Replace Alarm 10 Yrs. After Installation
Installed On
Replace By
DEACTIVATE
Follow and Retain User’s
Manual: BRK Brands, Inc.
1301 Joe Battle,
El Paso, TX 79936.
Consumer Affairs:
1-833-ONELINK
(1-833-663-5465)
www.onelink.rstalert.com
www.brkelectronics.com
CONFORMS TO
UL STD 217
& UL STD 2034
3055574
W
WARNING!
Carbon monoxide cannot be seen or smelled but can kill you.
If alarm signal sounds: 1. Operate Test/Silence button.
2. Call your emergency services. (Fire Dept. or 911)
3. Immediately move to fresh air - outdoors or by an open door/window.
Alarm will not operate if batteries are dead, disconnected or
improperly installed. Refer to user's manual for complete battery
replacement list, installation, operating and safety information /
instructions. Use only batteries specied. Use of other batteries may
have a detrimental effect on product operations.
MAINTENANCE AND TESTING:
Constant use at high or low temperatures or high humidity may reduce
battery life. Test after installation, weekly, and after cleaning. Gently
vacuum monthly. Never use water, cleaners or solvents.
HOW TO ACTIVATE ALARM:
Align alarm with mounting bracket and turn clockwise. Chasing Green
LED's and Welcome Message indicate alarm is activated.
HOW TO DEACTIVATE ALARM:
To deactivate battery, score label on dotted line and move switch all
the way to the right. Once deactivated, the alarm cannot be
reactivated and must be replaced.
ALARM GUIDE:
SMOKE ALARM: Three beeps.
CO ALARM: Four beeps.
REPLACE BATTERY: One "chirp" per minute.
MALFUNCTION: Three “chirps” per minute. Replace alarm.
END OF LIFE: Five “chirps” per minute. Replace alarm.
W
IMPORTANT!
CARBON MONOXIDE SENSITIVITY:
If CO levels reach
70ppm, it must activate within 60-240 minutes. At
150ppm within 10-50 minutes. At 400ppm within 4-15
minutes. Refer to user’s manual for more information.
Contains Transmitter Modules FCC ID:
M7U-BT1IOT and FCC ID: TLZ-CU300
Contains Transmitter Modules IC:
10190A-BT1IOT and IC: 6100A-CU300
XXX-XX-XXX
M
A
D
E
I
N
M
E
X
I
C
O
N
0
4
-
3
1
2
5
-
1
6
4
6
7
2
1
SINGLE AND/OR MULTIPLE STATION SMOKE & CO ALARM
MODEL NO. 1042136
SMOKE SENSITIVITY: 0.96 – 2.45 %/ft OBSC.
PHOTOELECTRIC
Replace Alarm 10 Yrs. After Installation
Installed On
Replace By
DEACTIVATE
Follow and Retain User’s
Manual: BRK Brands, Inc.
1301 Joe Battle,
El Paso, TX 79936.
Consumer Affairs:
1-833-ONELINK
(1-833-663-5465)
www.onelink.rstalert.com
www.brkelectronics.com
CONFORMS TO
UL STD 217
& UL STD 2034
3055574
W
WARNING!
Carbon monoxide cannot be seen or smelled but can kill you.
If alarm signal sounds: 1. Operate Test/Silence button.
2. Call your emergency services. (Fire Dept. or 911)
3. Immediately move to fresh air - outdoors or by an open door/window.
Alarm will not operate if batteries are dead, disconnected or
improperly installed. Refer to user's manual for complete battery
replacement list, installation, operating and safety information /
instructions. Use only batteries specied. Use of other batteries may
have a detrimental effect on product operations.
MAINTENANCE AND TESTING:
Constant use at high or low temperatures or high humidity may reduce
battery life. Test after installation, weekly, and after cleaning. Gently
vacuum monthly. Never use water, cleaners or solvents.
HOW TO ACTIVATE ALARM:
Align alarm with mounting bracket and turn clockwise. Chasing Green
LED's and Welcome Message indicate alarm is activated.
HOW TO DEACTIVATE ALARM:
To deactivate battery, score label on dotted line and move switch all
the way to the right. Once deactivated, the alarm cannot be
reactivated and must be replaced.
ALARM GUIDE:
SMOKE ALARM: Three beeps.
CO ALARM: Four beeps.
REPLACE BATTERY: One "chirp" per minute.
MALFUNCTION: Three “chirps” per minute. Replace alarm.
END OF LIFE: Five “chirps” per minute. Replace alarm.
W
IMPORTANT!
CARBON MONOXIDE SENSITIVITY:
If CO levels reach
70ppm, it must activate within 60-240 minutes. At
150ppm within 10-50 minutes. At 400ppm within 4-15
minutes. Refer to user’s manual for more information.
Contains Transmitter Modules FCC ID:
M7U-BT1IOT and FCC ID: TLZ-CU300
Contains Transmitter Modules IC:
10190A-BT1IOT and IC: 6100A-CU300
XXX-XX-XXX
M
A
D
E
I
N
M
E
X
I
C
O
N
0
4
-
3
1
2
5
-
1
6
4
6
7
2
2
Ionization & Photoelectric Technology
This alarm uses Photoelectric technology.
All First Alert® Onelink® Smoke Alarms conform to regulatory requirements, including UL217 and are designed
to detect particles of combustion. Smoke particles of varying number and size are produced in all fires.
Ionization Technology
Ionization technology is generally more sensitive than Photoelectric technology at detecting small particles,
which tend to be produced in greater amounts by flaming fires, which consume combustible materials rapidly and
spread quickly. Sources of these fires may include paper burning in a wastebasket or a grease fire in the kitchen.
34
15
Ionization & Photoelectric Technology (Continued)
Photoelectric Technology
Photoelectric technology is generally more sensitive than ionization technology at detecting large
particles, which tend to be produced in greater amounts by smoldering fires, which may smolder for hours
before bursting into flame. Sources of these fires may include cigarettes burning in couches or bedding.
NOTE: For maximum protection, use both types of Smoke Alarms on each level and in every bedroom of your home.
Fire Safety Tips
Follow safety rules and prevent hazardous situations:
1. Use smoking materials properly. Never smoke in bed.
2. Keep matches or lighters away from children.
3. Store flammable materials in proper containers.
4. Keep electrical appliances in good condition and don’t overload electrical circuits.
5. Keep stoves, barbecue grills, fireplaces and chimneys grease-free and debris-free.
6. Never leave anything cooking on the stove unattended.
7. Keep portable heaters and open flames, like candles, away from flammable materials.
8. Don’t let rubbish accumulate.
Basic Safety Information
Keep alarms clean and test them weekly. Replace alarms immediately if they are not working
properly. Smoke alarms that do not work cannot alert you to a fire. Keep at least one working
fire extinguisher on every floor and an additional one in the kitchen. Have fire escape ladders
or other reliable means of escape from an upper floor in case stairs are blocked.
!
IMPORTANT: Dangers, Warnings and Cautions alert you to important operating instructions
or to potentially hazardous situations. Pay special attention to these items. This Smoke/CO
Alarm is approved for use in single-family residences. It is NOT designed for marine or RV use.
!
CAUTION: This combination Smoke/Carbon Monoxide Alarm has two separate alarms.
The CO Alarm is not designed to detect fire or any other gas. It will only indicate
the presence of carbon monoxide gas at the sensor. Carbon monoxide gas may be
present in other areas. The Smoke Alarm will only indicate the presence of smoke that
reaches the sensor. The Smoke Alarm is not designed to sense gas, heat or flames.
16
Fire Safety Tips (Continued)
!
WARNING: This unit will not operate without battery power. The Smoke/CO Alarm cannot work until you activate the battery
power pack. NEVER ignore any alarm. See “What To Do If Your Smoke/Co Alarm Sounds” on page 11 for more information on how
to respond to an alarm. Failure to respond can result in injury or death. The Silence Features are for your convenience only and will
not correct a problem. See “Using the Silence Feature” on page 12 for details. Always check your home for a potential problem after
any alarm. Failure to do so can result in injury or death. Test this Smoke/CO Alarm once a week. If the alarm ever fails to test correctly,
have it replaced immediately! If the alarm is not working properly, it cannot alert you to a problem. This product is intended for use in
ordinary indoor locations of family living units. It is not designed to measure CO levels in compliance with Occupational Safety and
Health Administration (OSHA) commercial or industrial standards. Individuals with medical conditions that may make them more
sensitive to carbon monoxide may consider using warning devices which provide audible and visual signals for carbon monoxide
concentrations under 30ppm. For additional information on carbon monoxide and your medical condition, contact your physician.
!
WARNING: This product is intended for use in ordinary indoor residential areas. It is not designed to measure
compliance with commercial and industrial standards.
!
CAUTION: This device is designed to protect individuals from the acute eects of carbon monoxide exposure. it will not fully
safeguard individuals with specific medical conditions. If in doubt, consult a medical practitioner.
What You Need to Know About CO
What is CO?
CO is an invisible, odorless, tasteless gas produced when fossil fuels do not burn completely, or
are exposed to heat (usually fire). Electrical appliances typically do not produce CO.
These fuels include: Wood, coal, charcoal, oil, natural gas, gasoline, kerosene, and propane.
Common appliances are often sources of CO. If they are not properly maintained, are improperly ventilated,
or malfunction, CO levels can rise quickly. CO is a real danger now that homes are more energy ecient. “Air-
tight” homes with added insulation, sealed windows, and other weatherproofing can “trap” CO inside.
Symptoms of CO Poisoning
The following symptoms may be related to CARBON MONOXIDE POISONING and should be discussed with ALL
members of the household:
Mild exposure: Headaches, running nose, sore eyes, often described as “flu”-like symptoms;
Medium Exposure: Dizziness, drowsiness, vomiting;
Extreme Exposure: Unconsciousness, brain damage, death.
Many cases of reported CARBON MONOXIDE POISONING indicate that while victims are aware they are not well, they
become so disoriented they are unable to save themselves by either exiting the building or calling for assistance.
!
IMPORTANT: This CO Alarm measures exposure to CO over time. It alarms if CO levels are extremely high in a short period of time, or if CO
levels reach a certain minimum over a long period of time. The CO Alarm generally sounds an alarm before the onset of symptoms in average,
healthy adults. Why is this important? Because you need to be warned of a potential CO problem while you can still react in time. In many
reported cases of CO exposure, victims may be aware that they are not feeling well, but become disoriented and can no longer react well enough
to exit the building or get help. Also, young children and pets may be the first aected. The average healthy adult might not feel any symptoms
when the CO Alarm sounds. However, people with cardiac or respiratory problems, infants, unborn babies, pregnant mothers, or elderly people
can be more quickly and severely aected by CO. If you experience even mild symptoms of CO poisoning, consult your doctor immediately!
17
What You Need to Know About CO (Continued)
Finding the Source of CO After an Alarm
Carbon monoxide is an odorless, invisible gas, which often makes it dicult to locate the source of
CO after an alarm. These are a few of the factors that can make it dicult to locate sources of CO:
House well ventilated before the investigator arrives.
Problem caused by “backdrafting.”
Transient CO problem caused by special circumstances.
Because CO may dissipate by the time an investigator arrives, it may be dicult to locate the source of CO.
BRK Brands, Inc. shall not be obligated to pay for any carbon monoxide investigation or service call.
Potential Sources of CO in the Home
Fuel-Burning Appliances: Like portable heater, gas or wood burning fireplace, gas kitchen range or cooktop,
gas clothes dryer.
Damaged or Insufficient Venting: Corroded or disconnected water heater vent pipe, leaking chimney pipe
or flue, or cracked heat exchanger, blocked or clogged chimney opening.
Improper Use of Appliance/Device: Operating a barbecue grill or vehicle in an enclosed area (like a garage or
screened porch).
Transient CO Problems:Transient” or on-again-o-again CO problems can be caused by outdoor
conditions and other special circumstances. The following conditions can result in transient CO situations:
1. Excessive spillage or reverse venting of fuel appliances caused by outdoor conditions such as:
Wind direction and/or velocity, including high, gusty winds. Heavy air in the vent pipes
(cold/humid air with extended periods between cycles).
Negative pressure dierential resulting from the use of exhaust fans.
Several appliances running at the same time competing for limited fresh air.
Vent pipe connections vibrating loose from clothes dryers, furnaces, or water heaters.
Obstructions in or unconventional vent pipe designs which can amplify the above situations.
2. Extended operation of unvented fuel burning devices (range, oven, fireplace).
3. Temperature inversions, which can trap exhaust close to the ground.
4. Car idling in an open or closed attached garage, or near a home.
These conditions are dangerous because they can trap exhaust in your home. Since these conditions can
come and go, they are also hard to recreate during a CO investigation.
18
Potential Sources of CO in the Home (Continued)
How Can I Protect My Family From CO Poisoning?
A CO Alarm is an excellent means of protection. It monitors the air and sounds a loud alarm
before Carbon Monoxide levels become threatening for average, healthy adults.
A CO Alarm is not a substitute for proper maintenance of home appliances.
To help prevent CO problems and reduce the risk of CO poisoning:
Clean chimneys and flues yearly. Keep them free of debris, leaves, and nests for proper air flow.
Also, have a professional check for rust and corrosion, cracks, or separations. These conditions can
prevent proper air movement and cause back-drafting. Never “cap” or cover a chimney in any way
that would block air flow.
Test and maintain all fuel-burning equipment annually. Many local gas or oil companies and HVAC
companies oer appliance inspections for a nominal fee.
Make regular visual inspections of all fuel-burning appliances. Check appliances for excessive rust and
scaling. Also check the flame on the burner and pilot lights. The flame should be blue. A yellow flame
means fuel is not being burned completely and CO may be present. Keep the blower door on the furnace
closed. Use vents or fans when they are available on all fuel-burning appliances. Make sure appliances
are vented to the outside. Do not grill or barbecue indoors, or in garages or on screen porches.
Check for exhaust back-flow from CO sources. Check the draft hood on an operating furnace for a
back-draft. Look for cracks on furnace heat exchangers.
Check the house or garage on the other side of shared wall.
Keep windows and doors open slightly. If you suspect that CO is escaping into your home, open
a window or a door. Opening windows and doors can significantly decrease CO levels.
Regulatory Information for CO Alarms
What Levels of CO Cause an Alarm?
Underwriters Laboratories Inc. Standard UL2034 requires residential CO Alarms to sound when exposed
to levels of CO and exposure times as described below. They are measured in parts per million (ppm) of
CO over time (in minutes).
UL2034 Required Alarm Points*:
If the alarm is exposed to 400 ppm of CO, IT MUST ALARM BETWEEN 4 & 15 MINUTES.
If the alarm is exposed to 150 ppm of CO, IT MUST ALARM BETWEEN 10 & 50 MINUTES.
If the alarm is exposed to 70 ppm of CO, IT MUST ALARM BETWEEN 60 & 240 MINUTES.
*Approximately 10% of COHb exposure at levels of 10% to 95% Relative Humidity (RH).
This unit is designed not to alarm when exposed to a constant level of 30 ppm for 30 days.
19
Regulatory Information for CO Alarms (Continued)
!
IMPORTANT: CO alarms are designed to alarm before there is an immediate life threat.
Since you cannot see or smell CO, never assume it’s not present. An exposure to 100
ppm of CO for 20 minutes may not aect average, healthy adults but after 4 hours the
same level may cause headaches. An exposure to 400 ppm of CO may cause headaches
in average, healthy adults after 35 minutes, but can cause death after 2 hours.
Standards
Underwriters Laboratories Inc. Single and Multiple Station carbon monoxide alarms UL2034. According to Underwriters
Laboratories Inc. UL2034, Section 1-1.2: “Carbon monoxide alarms covered by these requirements are intended to respond to
the presence of carbon monoxide from sources such as, but not limited to, exhaust from internal-combustion engines, abnormal
operation of fuel-fired appliances, and fireplaces. CO Alarms are intended to alarm at carbon monoxide levels below those
that could cause a loss of ability to react to the dangers of Carbon Monoxide exposure.” This CO Alarm monitors the air at the
Alarm, and is designed to alarm before CO levels become life threatening. This allows you precious time to leave the house
and correct the problem. This is only possible if Alarms are located, installed, and maintained as described in this manual.
Gas Detection at Typical Temperature and Humidity Ranges
The CO Alarm is not formulated to detect CO levels below 30 ppm typically. Tested for false alarm resistance to
Methane (500 ppm), Butane (300 ppm), Heptane (500 ppm), Ethyl Acetate (200 ppm), Isopropyl Alcohol (200
ppm) and Carbon Dioxide (5000 ppm). Values measure gas and vapor concentrations in parts per million.
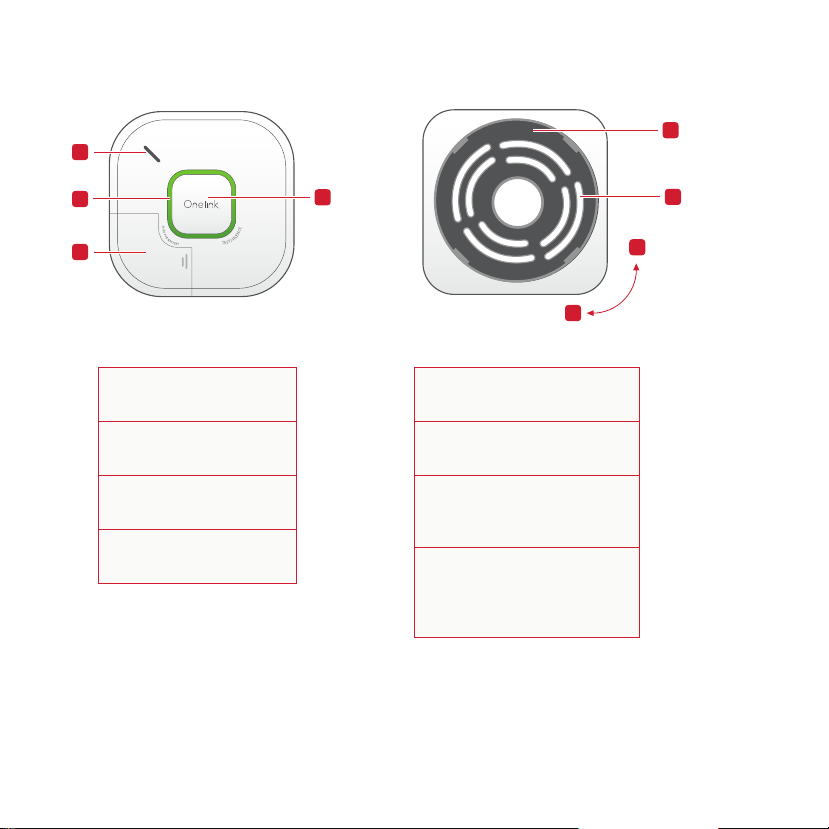
Audible Alarm
85 dB minimum at 10 feet (3 meters).
This carbon monoxide alarming device is designed to detect carbon monoxide gas from ANY source of combustion,
It is NOT designed to detect smoke, fire, or any other gases.
Regulatory Information for Smoke Alarms
Installing Smoke Alarms in Single-Family Residences
The National Fire Protection Association (NFPA), recommends one Smoke Alarm on every floor, in every sleeping area,
and in every bedroom. In new construction, the Smoke Alarms must be AC powered and interconnected. See “Agency
Placement Recommendations” for details. For additional coverage, it is recommended that you install a Smoke Alarm in
all rooms, halls, storage areas, finished attics, and basements, where temperatures normally remain between 40˚ F (4.4˚
C) and 100˚ F (37.8˚ C). Make sure no door or other obstruction could keep smoke from reaching the Smoke Alarms.
For your information, the National Fire Alarm and Signaling Code, NFPA 72, reads as follows:
Required Detection. Where required by applicable laws, codes, or standards for a specific type of
occupancy, approved single- and multiple-station smoke alarms shall be installed as follows:
In all sleeping rooms and guest rooms
Outside of each separate dwelling unit sleeping area, within 21 ft (6.4 m) of any door to a sleeping room,
the distance measured along a path of travel
20
Regulatory Information for Smoke Alarms (Continued)
On every level of a dwelling unit, including basements
On every level of a residential board and care occupancy (small facility), including basements and
excluding crawl spaces and unfinished attics
In the living area(s) of a guest suite In the living area(s) of a residential board and care occupancy
!
IMPORTANT: Specific requirements for Smoke Alarm installation vary from state to state
and from region to region. Check with your local Fire Department for current requirements in
your area. It is recommended AC or AC/DC units be interconnected for added protection.
BASEMENT
BEDROOM
GARAGE
KITCHEN
HALLWAY BEDROOM
LIVING ROOM
Smoke Alarm
One on every level and
in every bedroom
Carbon Monoxide
One on every level and
in every bedroom
Fire Extinguisher
One on every level, plus
kitchen and garage
Recommended Placement
Regulatory Information
Federal Communications Commission (FCC) Compliance Statement
NOTE: This equipment has been tested and found to comply with the limits for a Class B digital device, pursuant
to Part 15 of the FCC Rules. These limits are designed to provide reasonable protection against harmful interference
in a residential installation. This equipment generates, uses and can radiate radio frequency energy and, if not
installed and used in accordance with the instructions, may cause harmful interference to radio communications.
However, there is no guarantee that interference will not occur in a particular installation. If this equipment does
cause harmful interference to radio or television reception, which can be determined by turning the equipment
o and on, the user is encouraged to try to correct the interference by one or more of the following measures:
Reorient or relocate the receiving antenna.
Increase the separation between the equipment and receiver.
21
Regulatory Information (Continued)
Connect the equipment into an outlet on a circuit dierent from that to which the receiver is connected.
Consult the dealer or an experienced radio/TV technician for help.
!
WARNING: Changes or modifications to this unit not expressly approved by the party
responsible for compliance could void the user’s authority to operate the equipment.
This device complies with Part 15 of the FCC Rules. Operation is subject to the following two
conditions: (1) this device may not cause harmful interference, and (2) this device must accept
any interference received, including interference that may cause undesired operation.
RF Exposure Information: This equipment complies with FCC radiation exposure limits set forth for
an uncontrolled environment. In order to avoid the possibility of exceeding the FCC radio frequency
exposure limits, human proximity to the antenna shall not be less than 20cm during normal operation.
Industry Canada (IC)
Compliance Statement
This device complies with Industry Canada License-exempt RSS standard(s). Operation is subject
to the following two conditions: (1) this device may not cause interference, and (2) this device must
accept any interference, including interference that may cause undesired operation of the device.
Under Industry Canada regulations, this radio transmitter may only operate using an antenna of a type
and maximum (or lesser) gain approved for the transmitter by Industry Canada. To reduce potential
radio interference to other users, the antenna type and its gain should be so chosen that the equivalent
isotropically radiated power (e.i.r.p.) is not more than that necessary for successful communication.
22
Modular Devices FCC and Industry
Canada Compliance Statements
OEM Responsibilities to comply with FCC and Industry Canada Regulations
The BLEMOD1 Module and AW-CU300 Module have been certified for integration into products only by
OEM integrators under the following condition:
1. The transmitter module must not be co-located or operating in conjunction with any other
antenna or transmitter.
As long as the condition above is met, further transmitter testing will not be required. However, the OEM
integrator is still responsible for testing their end-product for any additional compliance requirements
required with this module installed (for example, digital device emissions, PC peripheral requirements, etc.).
!
IMPORTANT: In the event that these conditions cannot be met (for certain configurations or co-
location with another transmitter), then the FCC and Industry Canada authorizations are no longer
considered valid and the FCC ID and IC Certification Number cannot be used on the final product.
In these circumstances, the OEM integrator will be responsible for re-evaluating the end product
(including the transmitter) and obtaining a separate FCC and Industry Canada authorization.
End Product Labeling
The BLEMOD1 Module and AW-CU300 Module are labeled with their own FCC ID and IC Certification Number.
If the FCC ID and IC Certification Numbers are not visible when the module is installed inside another device,
then the outside of the device into which the module is installed must also display a label referring to the
enclosed module. In that case, the final end product must be labeled in a visible area with the following:
“Contains Transmitter Modules FCC ID: M7U-BT1IOT and FCC ID: TLZ-CU300
“Contains Transmitter Modules IC: 10190A-BT1IOT and IC: 6100A-CU300
Or
“Contains FCC ID: M7U-BT1IOT and FCC ID: TLZ-CU300” “Contains IC: 10190A-BT1IOT and IC: 6100A-CU300
The OEM of the BLEMOD1 Module and AW-CU300 Module must only use the approved
antenna(s) listed above, which have been certified with this module. The OEM integrator has
to be aware not to provide information to the end user regarding how to install or remove this
RF module or change RF related parameters in the user manual of the end product.
To comply with FCC and Industry Canada RF radiation exposure limits for general
population, the antenna(s) used for this transmitter must not be co-located or
operating in conjunction with any other antenna or transmitter.
23
Special Compliance Considerations
This Smoke Alarm is suitable for use in apartments, condominiums, townhouses, hospitals, day
care facilities, health care facilities, boarding houses, group homes and dormitories provided a
primary fire detection system already exists to meet fire detection requirements in common areas
like lobbies, hallways, or porches. Using this Smoke Alarm in common areas may not provide
sucient warning to all residents or meet local fire protection ordinances/regulations.
This Smoke Alarm alone is not a suitable substitute for complete fire detection systems in places housing many
people—like apartment buildings, condominiums, hotels, motels, dormitories, hospitals, health care facilities,
nursing homes, day care facilities, or group homes of any kind. It is not a suitable substitute for complete fire
detection systems in warehouses, industrial facilities, commercial buildings, and special-purpose non-residential
buildings which require special fire detection and alarm systems. Depending on the building codes in your
area, this Smoke Alarm may be used to provide additional protection in these facilities. In new construction,
most building codes require the use of AC or AC/DC powered Smoke Alarms only. In existing construction,
AC, AC/DC, or DC powered Smoke Alarms can be used as specified by local building codes. Refer to NFPA
72 (National Fire Alarm and Signaling Code) and NFPA 101 (Life Safety Code), local building codes, or consult
your Fire Department for detailed fire protection requirements in buildings not defined as “households”.
HUD MAP Program: Certain HUD battery powered Smoke Alarm applications, especially those that fall under
HUD 223(f) MAP (Multi-family Accelerated Processing), may require a 10 Year sealed tamper resistant battery.
General Limitations for Smoke/CO Alarms
This Smoke/CO Alarm is intended for residential use. It is not intended for use in industrial applications where
Occupational Safety and Health Administration (OSHA) requirements for Carbon Monoxide Alarms must be
met. The Smoke Alarm portion of this device is not intended to alert hearing impaired residents. Special
purpose Smoke Alarms should be installed for hearing impaired residents (CO Alarms are not yet available
for the hearing impaired).
Smoke/CO Alarms may not waken all individuals. Practice the escape plan at least twice a year, making sure
that everyone is involved – from kids to grandparents. Allow children to master fire escape planning and practice
before holding a fire drill at night when they are sleeping. If children or others do not readily waken to the sound
of the Smoke/CO Alarm, or if there are infants or family members with mobility limitations, make sure that
someone is assigned to assist them in fire drill and in the event of an emergency. It is recommended that you hold
a fire drill while family members are sleeping in order to determine their response to the sound of the Smoke/
CO Alarm while sleeping and to determine whether they may need assistance in the event of an emergency.
24
General Limitations for Smoke/CO Alarms (Continued)
Smoke/CO Alarms cannot work without power. Battery operated units cannot work if the batteries
are missing, disconnected or dead, if the wrong type of batteries are used, or if the batteries are
not installed correctly. If the AC power is cut o for any reason (open fuse or circuit breaker, failure
along a power line or at a power station, electrical fire that burns the electrical wires, etc.). If you
are concerned about the limitations of battery or AC power, install both types of units.
This Smoke/CO Alarm will not sense smoke or CO that does not reach the sensors. It will only sense
smoke or CO at the sensor. Smoke or CO may be present in other areas. Doors or other obstructions
may aect the rate at which CO or smoke reaches the sensors. If bedroom doors are usually
closed at night, we recommend you install an alarm device (Combination CO and Smoke Alarm, or
separate CO Alarms and Smoke Alarms) in each bedroom and in the hallway between them.
!
CAUTION: This device will only indicate the presence of carbon monoxide gas at the sensor.
Carbon monoxide gas may be present.
This Smoke/CO Alarm may not sense smoke or CO on another level of the home. Example: This
alarm device, installed on the second floor, may not sense smoke or CO in the basement. For this
reason, one alarm device may not give adequate early warning. Recommended minimum protection
is one alarm device in every sleeping area, every bedroom, and on every level of your home.
Some experts recommend battery powered Smoke and CO Alarms be used in conjunction with
interconnected AC powered Smoke Alarms. For details, see “About Smoke Alarms” for details.
Smoke/CO Alarms may not be heard. The alarm horn loudness meets or exceeds current UL standards
of 85 dB at 10 feet (3 meters). However, if the Smoke/CO Alarm is installed outside the bedroom, it
may not wake up a sound sleeper or one who has recently used drugs or has been drinking alcoholic
beverages. This is especially true if the door is closed or only partly open. Even persons who are awake
may not hear the alarm horn if the sound is blocked by distance or closed doors. Noise from trac,
stereo, radio, television, air conditioner, or other appliances may also prevent alert persons from hearing
the alarm horn. This Smoke/CO Alarm is not intended for people who are hearing impaired.
The Alarm may not have time to alarm before the fire itself causes damage, injury, or death, since smoke
from some fires may not reach the unit immediately. Examples of this include persons smoking in bed,
children playing with matches, or fires caused by violent explosions resulting from escaping gas.
This Smoke/CO Alarm is not a substitute for life insurance. Though this Smoke/CO Alarm warns
against increasing CO levels or the presence of smoke, BRK Brands, Inc. does not warrant or imply
in any way that they will protect lives. Homeowners and renters must still insure their lives.
This Smoke/CO Alarm has a limited life. Although this Smoke/CO Alarm and all of its parts have passed many
stringent tests and are designed to be as reliable as possible, any of these parts could fail at any time. Therefore,
you must test this device weekly. The unit should be replaced immediately if it is not operating properly.
This Smoke/CO Alarm is not foolproof. Like all other electronic devices, this Smoke/CO Alarm has
limitations. It can only detect smoke or CO that reaches the sensors. It may not give early warning
of the source of smoke or CO is in a remote part of the home, away from the alarm device.
25
Troubleshooting Guide
App FAQ
If the App... Problem... You Should...
Is unable to be downloaded or installed. You cannot download or install the app. Contact Customer Service Team.
Alarm FAQ
If the Alarm... Problem... You Should...
Light flashes yellow and Horn sounds
three “chirps” every minute. Voice:
“Detector error. Please see manual or
call customer service” every 5 hours.
Malfunction Signal. Device is not working
properly and needs to be replaced.
Units under warranty should be returned
to manufacturer for replacement. See
“Limited Warranty” for details.
Horn sounds 5 “chirps” every minute. End of Life Signal. Alarm needs to be replaced. Immediately replace and deactivate the alarm.
Does not connect to your Wireless / Bluetooth
or opportunity missed for pairing.
Alarm will not pair or you would like to
reset the device to clear all settings.
Press the test button 5 times to reset alarm and
try to pair to Wireless and Bluetooth again.
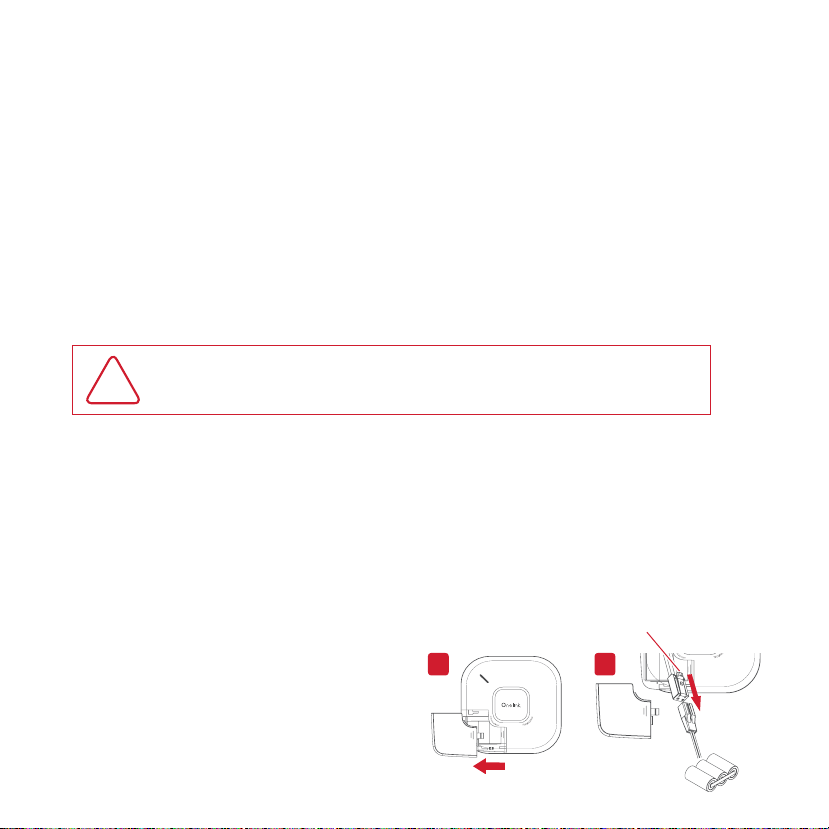
Horn sounds 1 “chirp” every minute. Low Battery. Replace battery in Alarm. Immediately replace the battery, you can order
replacement batteries at www.firstalertstore.com.
Carbon Monoxide Alarm ONLY:
CO Alarm goes back into alarm 4
minutes after you Silence it.
CO levels indicate a potentially
dangerous situation.
If you are feeling symptoms of CO poisoning,
evacuate your home and call 911 or the Fire
Department. Refer to “What To Do If the
CO Alarm Sounds” on page 11 for details.
CO Alarm sounds frequently even though no high
levels of CO are revealed in an investigation.
The CO Alarm may be improperly located. Refer
to “Where to Install” on page 6 for details.
Relocate your Alarm. If frequent alarms
continue, have home rechecked for
potential CO problems. You may be
experiencing an intermittent CO problem.
Smoke Alarm ONLY:
Smoke Alarm sounds when no smoke is visible. Unwanted alarm may be caused by non-
emergency source like cooking smoke.
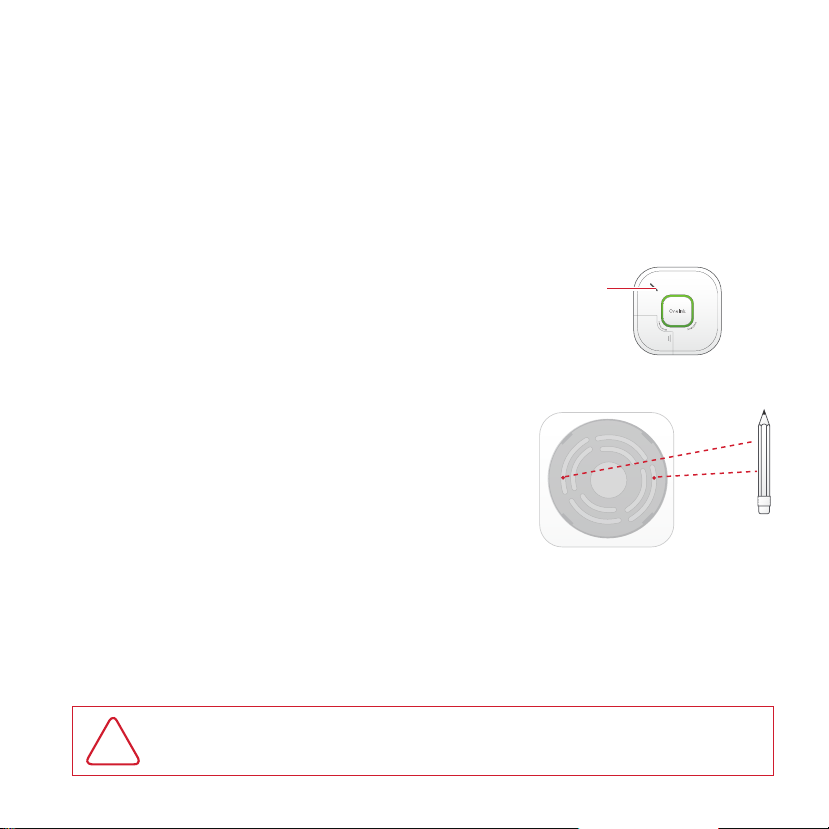
Silence alarm on App or using unit button;
clean the alarm’s cover with a soft, clean cloth.
If frequent unwanted alarms continue, relocate
your alarm. Alarm may be too close to kitchen,
cooking appliance, or steamy bathroom.
NOTE: This alarm contains new Wireless and HomeKit technology that may not be wirelessly compatible with previously branded Onelink wireless alarms.
If you have questions that cannot be answered by reading this manual, contact the Customer Service Team at onelinksupport@firstalert.com or 1 (833) ONE-LINK (1-833-663-5465)
26
Limited Warranty
BRK Brands, Inc., (BRK”) the maker of First Alert® brand products warrants that for a period of five years
from the date of purchase, this product will be free from defects in material and workmanship. BRK, at its
option, will repair or replace this product or any component of the product found to be defective during
the warranty period. Replacement will be made with a new or re-manufactured product or component.
If the product is no longer available, replacement may be made with a similar product of equal or greater
value. This is your exclusive warranty. This warranty is valid for the original retail purchaser from the date of
initial retail purchase and is not transferable. Keep the original sales receipt. Proof of purchase is required
to obtain warranty performance. BRK dealers, service centers, or retail stores selling BRK products do not
have the right to alter, modify or any way change the terms and conditions of this warranty. This warranty
does not cover normal wear of parts or damage resulting from any of the following: negligent use or misuse
of the product, use on improper voltage or current, use contrary to the operating instructions, disassembly,
repair or alteration by anyone other than BRK or an authorized service center. Further, the warranty does
not cover Acts of God, such as fire, flood, hurricanes or tornadoes. BRK shall not be liable for any incidental
or consequential damages caused by the breach of any express or implied warranty. Except to the extent
prohibited by applicable law, any implied warranty of merchantability or fitness for a particular purpose is
limited in duration to the duration of the above warranty. Some states, provinces or jurisdictions do not allow
the exclusion or limitation of incidental or consequential damages or limitations on how long an implied
warranty lasts, so the above limitations or exclusion may not apply to you. This warranty gives you specific
legal rights, and you may also have other rights that vary from state to state or province to province.
How to Obtain Warranty Service
Service: If service is required, do not return the product to your retailer. In order to obtain warranty service,
contact the Customer Service Team at onelinksupport@firstalert.com or 1 (833) ONE-LINK (1-833-663-5465).
To assist us in serving you, please have the model number and date of purchase available when calling.
For Warranty Service return to: 1301 Joe Battle, El Paso, TX 79936
Disposal: Waste electrical products should not be disposed of with regular household waste.
Please recycle where facilities exist. Check local requirements for disposal of Lithium powered
electronic devices. The Alarm should be deactivated before disposal. See page 14, “Permanently
Deactivating the Alarm”. You can also return your Alarm to us for disposal. For return address
see above. Please include a note confirming the product is being returned for disposal.
Communication distance between alarms may vary from home to home depending
on environment, construction materials and size of structure. The quantity of
alarm required will depend on these factors. See manual for details.
27
Copyright and Technical Specifications
©2018 BRK Brands, Inc. All rights reserved. Distributed by BRK Brands, Inc., Aurora, Illinois 60504.
BRK Brands, Inc. is a subsidiary of Newell Brands Inc. (NYSE:NWL). Printed in USA.
Apple HomeKit, Apple iPhone, iPad, iPad Air, and iPod touch are trademarks of Apple Inc., registered in the
U.S. and other countries. HomeKit is a trademark of Apple Inc. App Store is a service mark of Apple Inc.
The Bluetooth® word mark and logos are registered trademarks owned by Bluetooth SIG, Inc. and
any use of such marks by BRK Brands, Inc., is under license. Other trademarks and trade names
are those of their respective owners. Wi-Fi® is a registered trademark of Wi-Fi Alliance.
Controlling this HomeKit-enabled accessory automatically and away from home requires an
Apple TV with tvOS 10.0 or later or an iPad with iOS 10.0 or later set up as a home hub.
To control this HomeKit-enabled accessory, iOS 10.0 or later is recommended
©2018 BRK Brands, Inc. All rights reserved. • Distributed by BRK Brands, Inc.
BRK Brands, Inc. is a subsidiary of Newell Brands Inc. (NYSE:NWL)
3901 Liberty Street Road, Aurora, IL 60504-8122
Customer Service Team: 1 (833) ONE-LINK (1-833-663-5465)
www.onelink.firstalert.com • 10/18 • Printed in USA • M08-0542-164661
23

Hulp nodig? Stel uw vraag in het forum

Spelregels

Misbruik melden

Gebruikershandleiding.com neemt misbruik van zijn services uitermate serieus. U kunt hieronder aangeven waarom deze vraag ongepast is. Wij controleren de vraag en zonodig wordt deze verwijderd.

Product:

Bijvoorbeeld antisemitische inhoud, racistische inhoud, of materiaal dat gewelddadige fysieke handelingen tot gevolg kan hebben.

Bijvoorbeeld een creditcardnummer, een persoonlijk identificatienummer, of een geheim adres. E-mailadressen en volledige namen worden niet als privégegevens beschouwd.

Spelregels forum

Om tot zinvolle vragen te komen hanteren wij de volgende spelregels:

Belangrijk! Als er een antwoord wordt gegeven op uw vraag, dan is het voor de gever van het antwoord nuttig om te weten als u er wel (of niet) mee geholpen bent! Wij vragen u dus ook te reageren op een antwoord.

Belangrijk! Antwoorden worden ook per e-mail naar abonnees gestuurd. Laat uw emailadres achter op deze site, zodat u op de hoogte blijft. U krijgt dan ook andere vragen en antwoorden te zien.

Abonneren

Abonneer u voor het ontvangen van emails voor uw First Alert OneLink - 1042136 bij:


U ontvangt een email met instructies om u voor één of beide opties in te schrijven.


Ontvang uw handleiding per email

Vul uw emailadres in en ontvang de handleiding van First Alert OneLink - 1042136 in de taal/talen: Engels als bijlage per email.

De handleiding is 1.25 mb groot.


U ontvangt de handleiding per email binnen enkele minuten. Als u geen email heeft ontvangen, dan heeft u waarschijnlijk een verkeerd emailadres ingevuld of is uw mailbox te vol. Daarnaast kan het zijn dat uw internetprovider een maximum heeft aan de grootte per email. Omdat hier een handleiding wordt meegestuurd, kan het voorkomen dat de email groter is dan toegestaan bij uw provider.

Stel vragen via chat aan uw handleiding

Stel uw vraag over deze PDF

Uw handleiding is per email verstuurd. Controleer uw email

Als u niet binnen een kwartier uw email met handleiding ontvangen heeft, kan het zijn dat u een verkeerd emailadres heeft ingevuld of dat uw emailprovider een maximum grootte per email heeft ingesteld die kleiner is dan de grootte van de handleiding.

Er is een email naar u verstuurd om uw inschrijving definitief te maken.

Controleer uw email en volg de aanwijzingen op om uw inschrijving definitief te maken

U heeft geen emailadres opgegeven

Als u de handleiding per email wilt ontvangen, vul dan een geldig emailadres in.

Uw vraag is op deze pagina toegevoegd

Wilt u een email ontvangen bij een antwoord en/of nieuwe vragen? Vul dan hier uw emailadres in.


Info