Applied harmonizedEN 292-1, EN 292-2, EN 60335-1, EN 60335-2-15,
Standards:EN 55014, EN 61000-3, EN 61000-4, EN 60335-2-75
Certification for materials in contact with food used in FAEMA products
We hereby certify that the cleaning materials (used as specified in the manual) and the materials used in our products in contact with food, are suitable
for foodstuff or substances for personal use, and the machine is conform to the HACCP system.
Source of applied standards:Via Manzoni 17, Binasco (Mi), Italy
Date:01.10.2003
Signature:
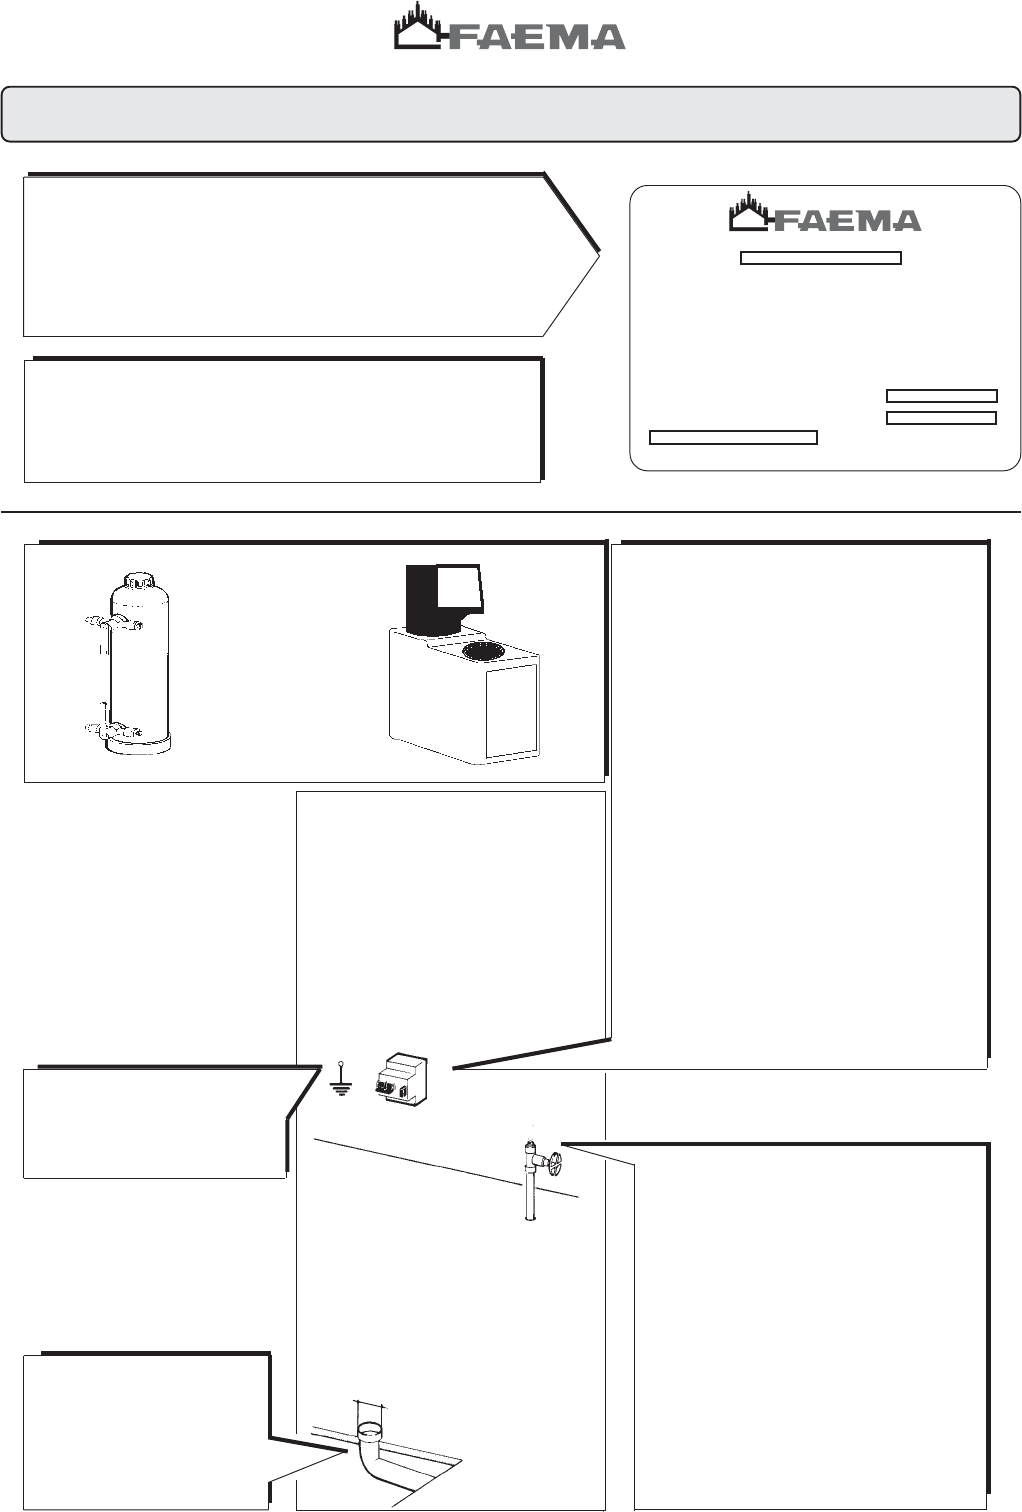
Description pressure equipment:
T
max
Service boiler2 bar133° Cwater/steam8
Capacity (L)
2 units
FluidP
max
T
max
Heat exchanger12 bar133° Cwater
0,65
2
N° Heat exchanger
2 units
FluidP
max
Capacity
(L)
Applied standard:Raccolte M, S, VSR edizione '78 e '95
EnglishEnglish
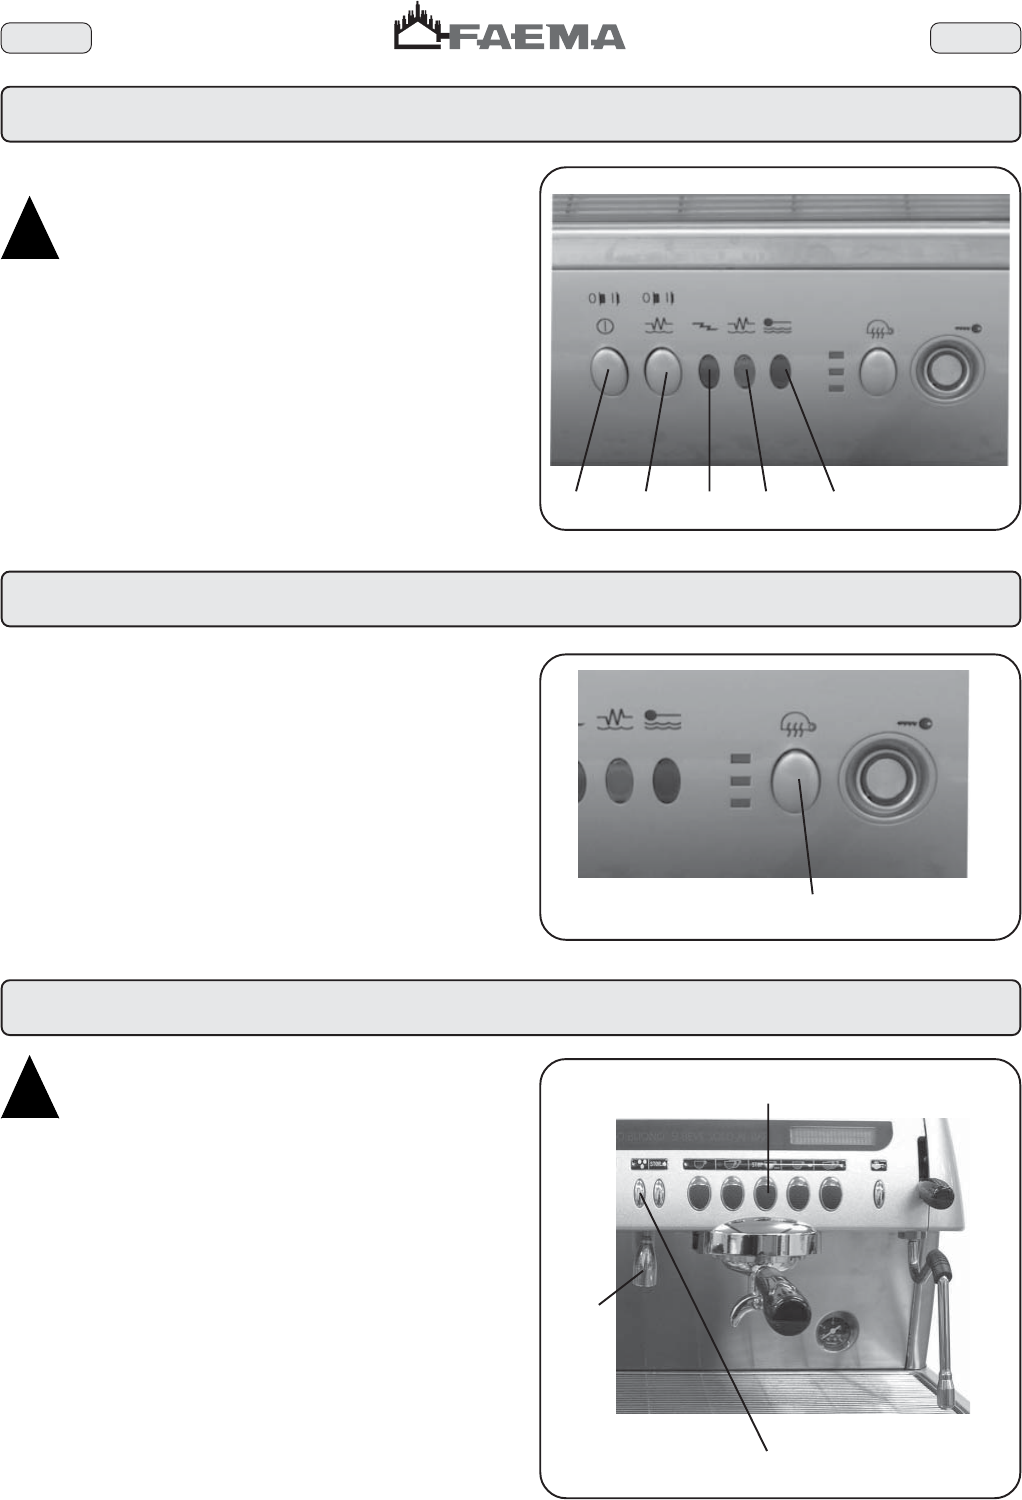
1.Switching on electric
!
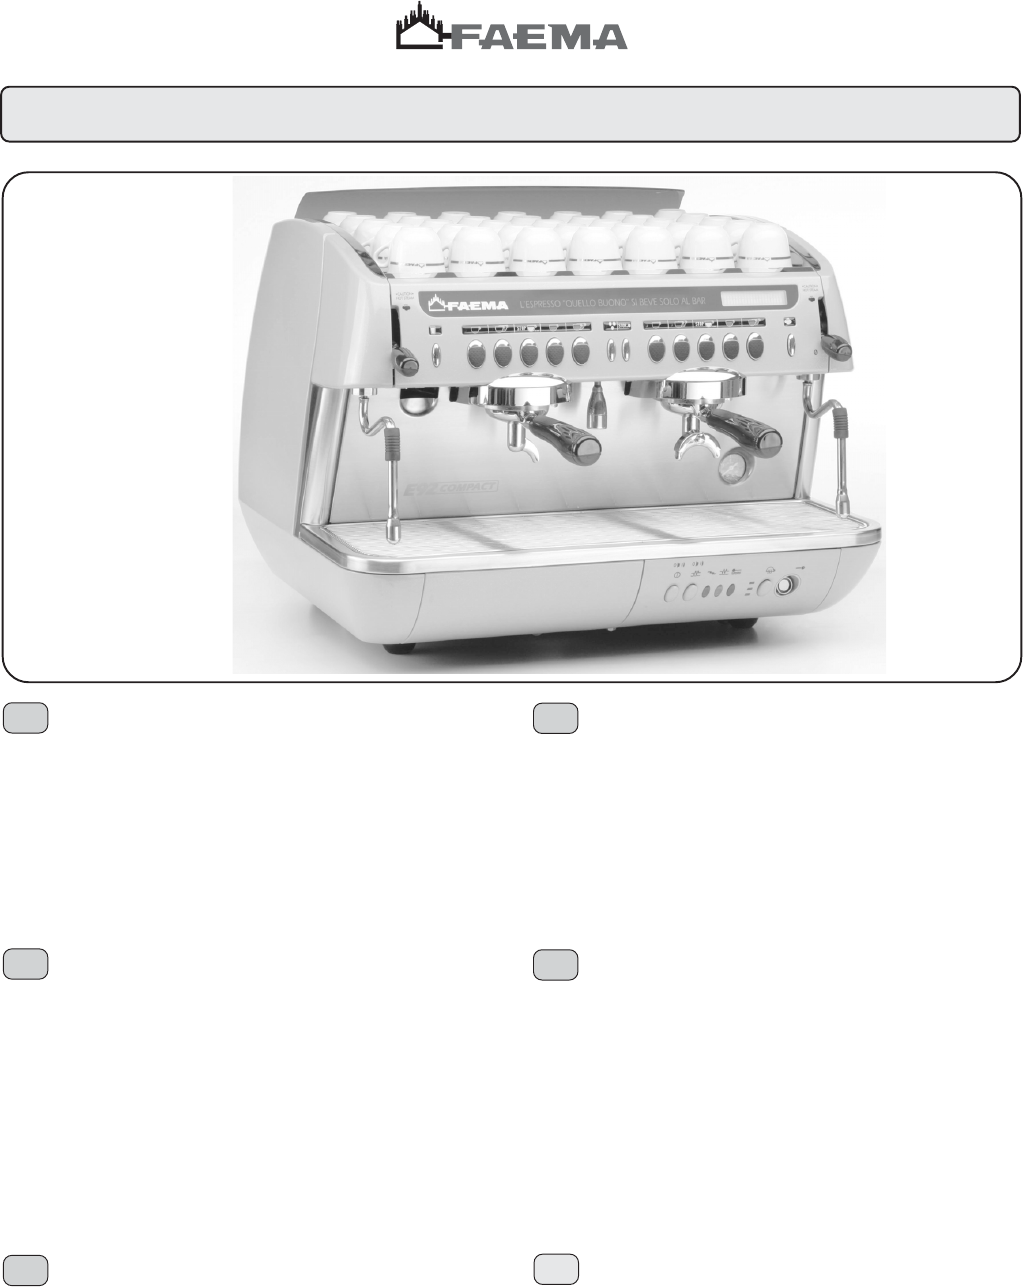
CHARACTERISTICS
- Roomy cup-heating shelf
- Choice of several heating temperatures
Arrange the cups on the shelf. Best results are obtained when NOT
MORE than three layers of cups are put on the shelf.
To change the cup-warmer power, press the key (6) a number of times.
-All LEDS on = full power
-All LEDS off = OFF
When the machine is turned off after the days operations, the selections
will remain in the machines memory.
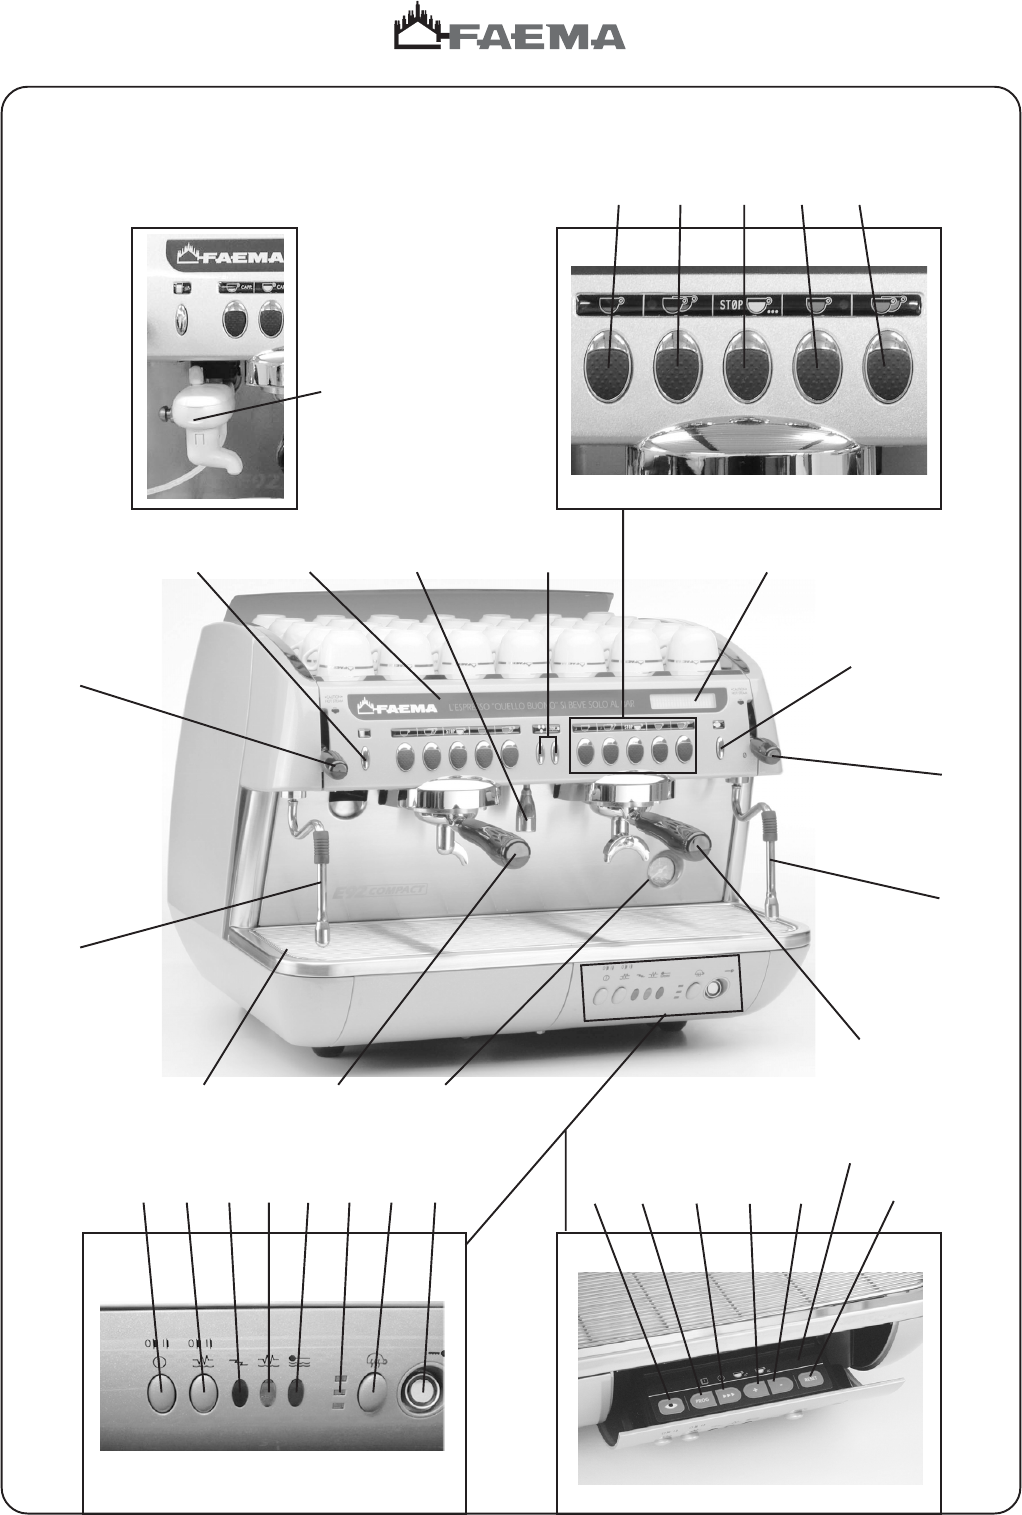
2.Cup-Warmer (where contemplated)
6
1241a3
!
Before switching on the machine, ensure the following:
The mains switch is on.
The water mains tap is open.
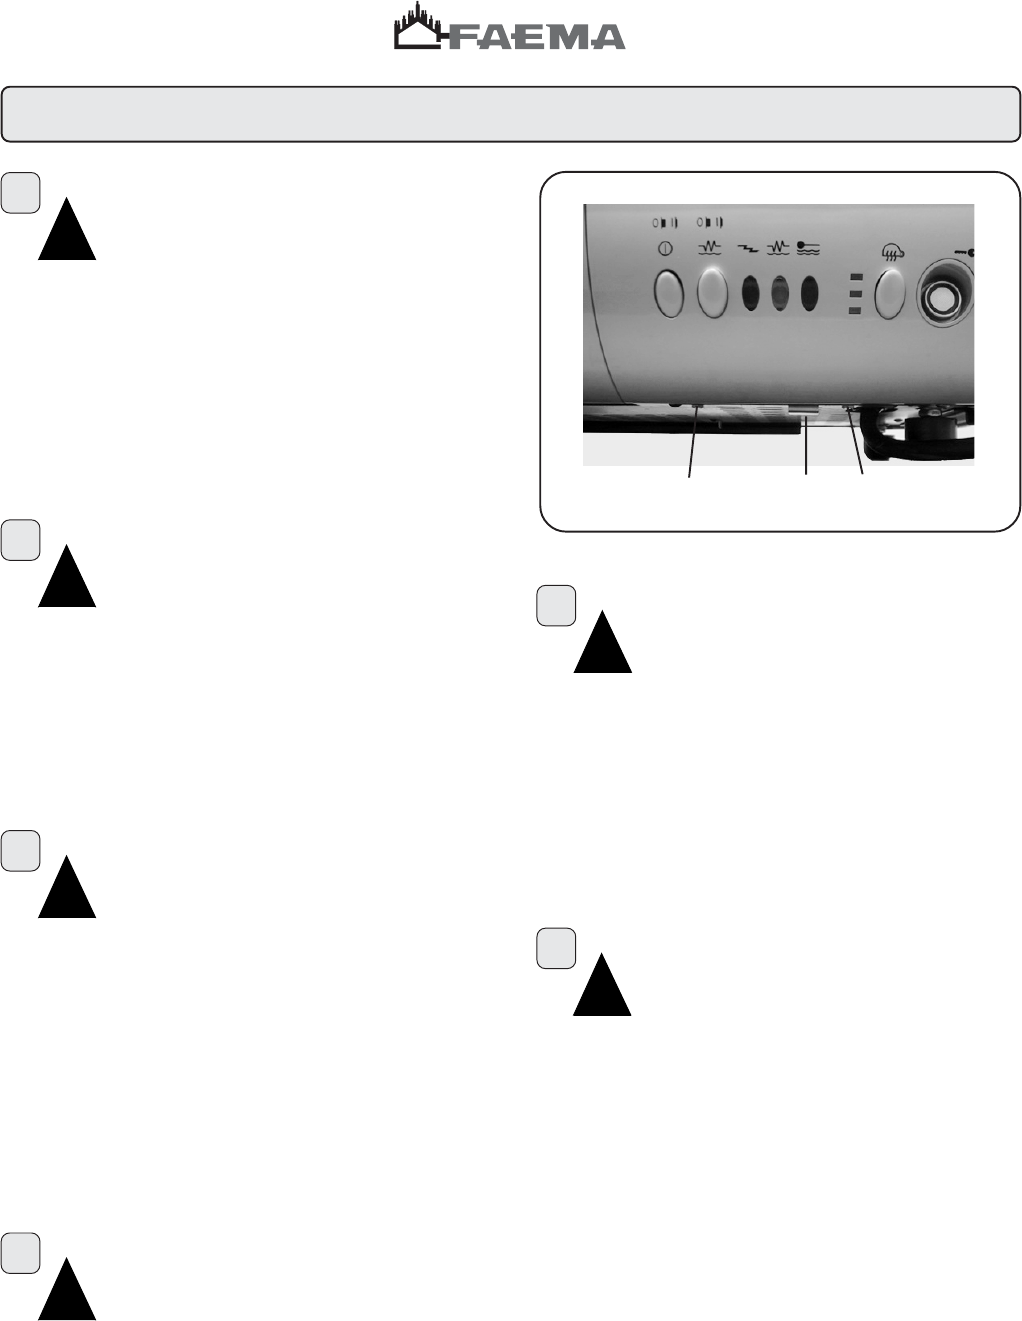
Press the master switch (1); the indicator light machine on (2) switches
on.
At the same time, the current working pressure boiler pressure 0.00
bar is displayed (14).
If the water level in the boiler is less than the minimum required, the
indicator light boiler level (4) lights up and the boiler is filled up to the
correct level (indicator light 4 switches off).
Press the master switch (1a) to position 2.
The heating element inserted indicator light (3) lights up.
The boiler is heating. Wait until the pressure reading on the display
corresponds to the required working pressure value, i.e. the indicator
light (3) switches off.
30
13a
10
Before operating the machine, perform a rinse of the internal
circuits and change the water in the boiler.
3.1 Changing the water in the internal groups circuits
Remove the filter carriers (21, 25) of the distributor groups.
Via the continuous distribution key (30), empty the water from each
group for approximately one minute. Repeat this operation twice.
3.2 Changing the water in the boiler
Ensure that the indication on the display corresponds to the working
pressure value.
Keep the hot water distributor key (13a) pressed down for approximately
5 seconds.
The following message will be displayed: water change, followed by
an audio signal. The water from the boiler will drain from the hot water
nozzle (10).
All the other keys will be deactivated.
When only steam is issued from the nozzle (10), press the hot water
distributor key (13a) again.
The machine will return to its normal functions and the boiler will be
refilled with water.
3.Initial rinse
!
EnglishEnglish
5.Forced switching-on
machine OFF
ON: press PROG
At the end of the programmed switch-on time the following message
will be displayed:
When the machine needs to be used, keep the PROG (35) key pressed
down for 10 seconds.
The machine will again be activated for use.
To return to programmed switch-off, check the position of the mains
switch (1), disable it, and then return to the previous position.
6.Drinks distribution - coffee
Remove the filter carrier (21 or 25), clean it of the used coffee grounds
and refill it with 1 or 2 doses of ground coffee, according to the filter
carrier used.
Press the coffee evenly in the filter, using the dose-grinder press.
Remove any coffee grounds from the edges of the filter.
Insert the filter carrier (21 or 25) to the group, locking it firmly in place.
Position the cup (or cups) under the spout (or spouts) of the filter carrier
(21 or 25).
Press the coffee distribution key (26, 27, 28 or 29) corresponding to the
desired dose. The corresponding led lights up, the coffee will be issued
and will stop automatically upon completion.
Press the continuous/STOP distribution button (30) for a continuous
distribution.
The distribution, both dosed and continuous, may be interrupted at any
time by pressing the continuous/STOP key (30).
26
29
28
25
30
27
4.Time/counter display
Monday 11:00
Boiler pres. 1,20 bar
Monday 11:00
Boiler pres. 1,20 bar
number of selection
press a key
Under normal working conditions, the following message will be
displayed:
N.B.: The working pressure value (set by the installing technician) is
also shown by the switching off of the boiler heating element insertion
indicator light (3).
When the PROG (32) key is pressed, the following message will be
displayed:
When the message select counters is displayed, if the select coffee,
cappuccino, hot water or milk keys are pressed, the number of times
that key has been pressed is displayed. The number of times each key
has been pressed is shown on the bottom line of the display.
N.B. To reset the various counters, access programming and follow
the procedure provided in Paragraph 5.
When the PROG (32) key is pressed, will be again displayed the
message:
When the message relative to the current day and time and the boiler
pressure value is displayed, drinks are dispensed by pressing the coffee,
cappuccino, hot water and milk selection keys.
EnglishEnglish
6.1Drinks distribution - hot water
After having positioned the appropriate container under the hot water
nozzle (32), distribution is made in two ways.
DOSED FUNCTION
Press one of the hot water distribution keys (13a). The corresponding
led will light up, hot water will be issued and will stop automatically
upon completion.
The distribution may be interrupted at any time by pressing the previously
active key again (shown by the lighted led), or the Stop button,
continuous hot water (13b).
CONTINUOUS FUNCTION
Press the hot water distribution key (13b).
Hot water will be issued continuously until the hot water key (13b) is
pressed again to stop this function.
In continuous function the progrmmed dosed in the key is not changed.
10
13b
13a
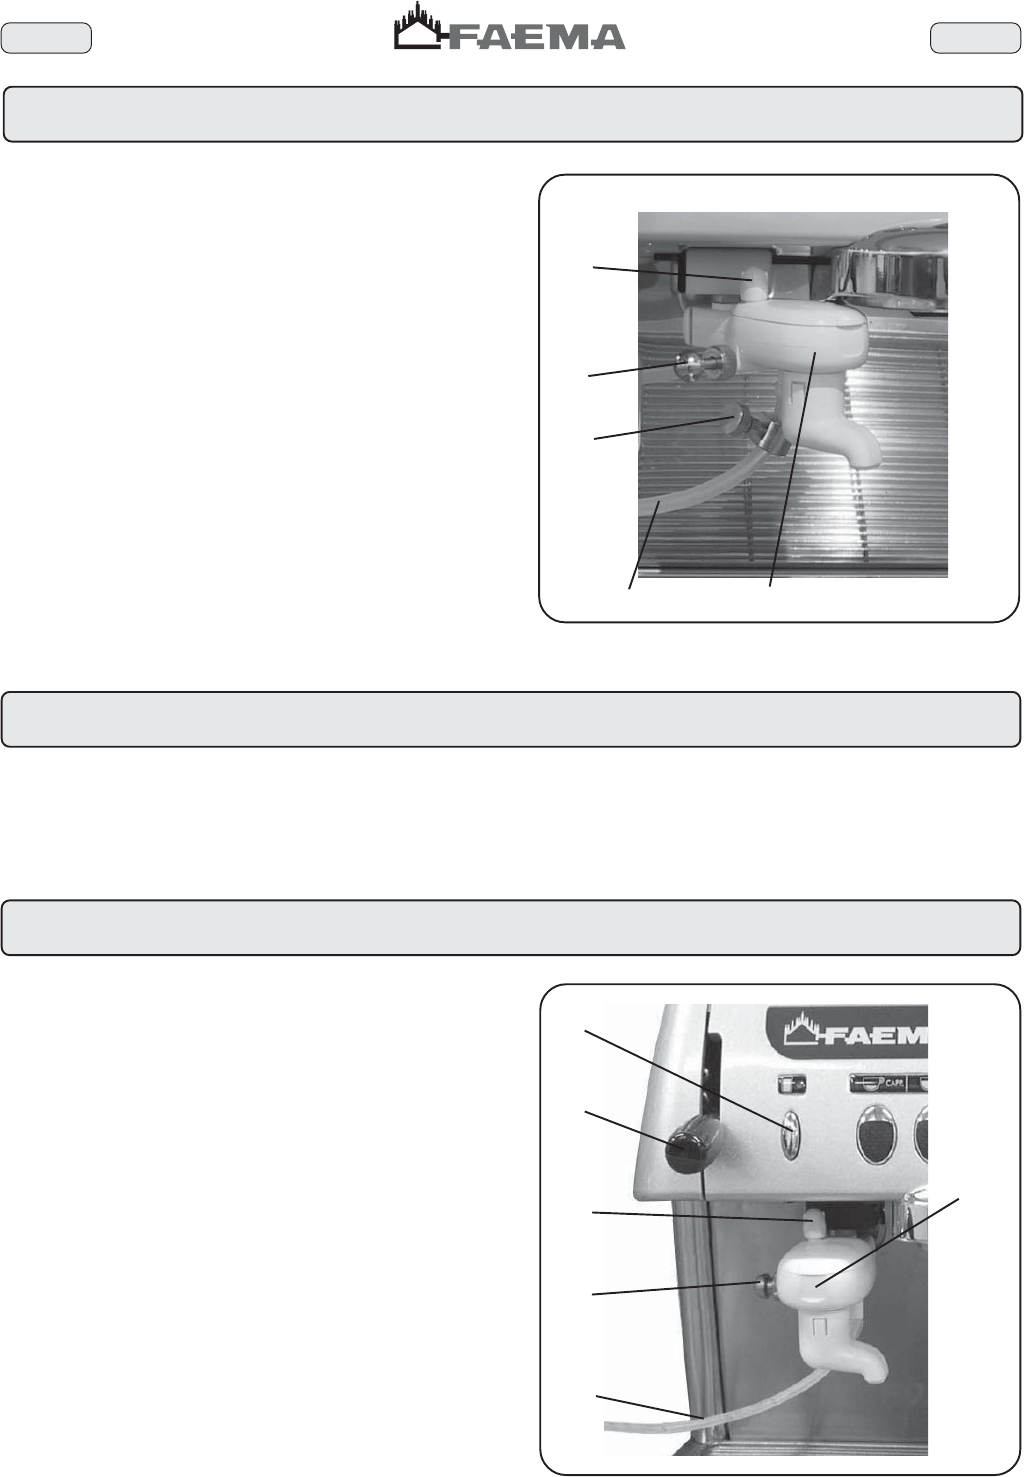
6.2Drinks distribution - milk
MILK
Milk is a biological product which is delicate and therefore easily
perishable since heat changes its structure. From the moment the
container is opened throughout the entire period of its use, milk must
therefore be maintained at a suitable temperature for its preservation.
Frigobox are suitable for this.
MILK DISTRIBUTION
Insert the tube (18d) into the milk.
After having positioned the appropriate container under the
cappuccino maker (18), press the milk distribution key (16). The led
above the selected key lights up.
The quantity of milk memorized during the programming phase will
flow into the cup and will stop automatically. The flow can be stopped
at any time by pressing the milk distribution key (16) again.
Milk can also be dispensed by the lever (17).
In paragraph, Cappuccino maker instruction describes
how to adjust the temperature of the milk and the density
of the milk froth.
When the machine is not used for a long period of time,
comply with the hygiene procedures regarding preservation
of milk.
!
18
16
18d
17
EnglishEnglish
6.3Drinks distribution - cappuccino (only if the cappuccino function is active)
Use only the filter carrier (21) with a one-way spout and the
distribution group to the left.
After having removed the filter carrier (21) from the group and emptied
it of the previous grounds, fill with a new dose of ground coffee and
press.
Insert the filter carrier into the group, locking it well in place.
Place the cappuccino maker (18) close to the filter carrier spout (21).
Position the cappuccino cup, or a suitable container in such a way
so that the coffee and milk can flow into the cup without having to
move it between the two flows.
Press one of the cappuccino distribution keys (26, 27, 28 or 29). The
led above the selected key lights up, distribution commences and
then stops automatically.
It is possible to stop the distribution at any time by pressing the
continuous/STOP key (30).
As described in Chapter 2.1, User dose - cappuccino distributor
key programming, it is possible to select whether to distribute first
the milk and then the coffee or vice versa.
Paragraph User Instructions for the Cappuccino Maker
describes how to adjust the temperature of the milk and the density
of the milk froth.
When the machine is not used for a long period of time,
comply with the hygiene procedures regarding preservation
of milk.
!
21
2928
3027
26
18
6.4Drinks distribution - steam
Completely immerse the right (9) or left (20) steam nozzle into the
container with the liquid to be heated and push the steam control lever
(11 or 17) upwards.
Wait until the liquid has reached the desired temperature, then lower
the steam command lever to stop the issue of steam.
Steam can also be dispensed via the automatic steam key (12). The
temperature of the drink can be programmed from a minimum of 50°C
to a maximum of 99°C. (See Chapter 2.5 User Dosage - Automatic
Steam Key Programming). Once the set temperature has been reached,
steam dispensing stops automatically.
Note:At the conclusion of each steam dispensing phase,
clean the inside of the steam nozzle as follows:
Turn the nozzle towards the cup tray and carefully
activate steam dispensing at least once.
9
11
12
EnglishEnglish
Cleaning the cappuccino maker
This operation must be made at the end of each working day.
9.Cleaning
Fill a container with 0,5 litre of cold water and one dose of
liquid detergent (see product instructions).
Remove the suction (18d) tube from the milk container and
immerse it in the solution.
Use command (16-17) on the machine to suck detergent in and
repeat the operation until all the detergent has been used up.
Disassemble the cappuccino maker (18):
Unscrew the knob (18b) and remove the cappuccino maker
(18).
Remove the cover.
Unscrew the ring nut of the knob (18b) and remove it.
Unscrew and remove the adjustment screw (18a).
Prepare another dose of detergent and clean each piece.
Remove any residue with a sponge.
Reassemble the cappuccino maker.
Rinse, pumping out at least one litre of cold water.
1.
2.
3.
4.
5.
18
18d
18b
18a
17
16
The machine is fitted with a series of automatic level control devices to
keep the water in the boiler at a pre-set level.
The indicator light (4) comes on when water enters the boiler.
8.Water level control of boiler
7.Cappuccino maker instruction
Insert the tube (18d) into the milk.
Place a container under the cappuccino maker (18).
Remove the knob (18b) to facilitate the circulation of air.
Completely rotate the air adjustment screw (18a) clockwise, then turn
it back by half a turn.
Completely rotate the temperature adjustment screw (18c) clockwise,
then turn it back by half a turn.
At this point, press the required key to obtain milk or cappuccino.
Adjustment of the cappuccino froth
Too much froth:
Finely rotate the air adjustment screw (18a) clockwise.
Too little froth:
Finely rotate the air adjustment screw (18a) anticlockwise.
Cappuccino temperature
If the cappuccino is too hot:
Finely rotate the temperature adjustment screw (18c) anticlockwise.
If the cappuccino is not hot enough:
Finely rotate the temperature adjustment screw (18c clockwise.
Distribution of hot unwhipped milk
Press and completely push in the knob (18b), then press the desired
milk or cappuccino distribution key.
18
18d
18c
18b
18a
EnglishEnglish
Cleaning the groups
This operation must be made on all the groups at the end
of each working day
1)Using a brush, clean the cover gasket.
2)Insert the rubber disk into the filter-holder with its filter.
3)Pour in a packet or dosing cupful of detergent powder
4)Insert the filter carrier into the group and press the selection
button. After a few seconds, press the STOP button. Repeat
this operation a few times.
5)Remove the filter-holder and clean the shower with a sponge.
6)Flush each dispenser unit with water for about 30 seconds.
First left-hand dispenser unit with cappuccino-selection panel:
1)Remove the milk-aspiration tube from the milk container and rest
it against the grille of the cup-shelf basin.
2)Press one of the selection buttons. Wait a few seconds and
press the STOP button. Repeat this operation a few times. Be
careful, steam will come out of the cappuccino-makers dispensing
spout.
Filter-holders
1)Put a liter of cold water in a suitable container and add detergent.
2)Soak the filter-holders in this solution for about 2 hours.
3)Remove the filters from the filter-holders and wash the parts in
the same detergent solution, using a small sponge.
4)Flush thoroughly with cold water.
5)Reinstall the filters in the filter-holders, making sure that filter-
retainer spring seats properly.
2
1
9.Cleaning
Steam and hot water dispensing pipes
Using a clean sponge, wash with hot water removing any organic
residue present. Rinse carefully.
To clean the inside of the steam nozzle, follow these steps:
Turn the nozzle towards the cup tray and carefully activate steam
dispensing at least once.
Grille and Drip Basin
Remove the grille from the basin, extract the grille sections and
complete the cleaning operation under running water.
Discharge Basin
At the end of the working day, pour about a liter of hot water into it
to remove any discharge residues.
Bodywork
Use a soft cloth and cleaning products WITHOUT ammonia or
abrasives, removing any organic residue present in the work area.
N.B. Do not spray liquids into the panel slots.
!
ATTENTION
When the machine has not been used for more than 8
hours, and in any case once a day, the internal
components must be washed before use, in
accordance to the following instructions:
Supply Groups
Insert the filter carriers into the groups (without coffee) and dispense
from each group for one minute.
Hot water
Dispense hot water repeatedly (using the relative command)
until at least 4 liters of water have been dispensed from the
2-group machine.
Steam
Allow the steam to flow for approximately one minute, using
the appropriate commands.
EnglishEnglish
10.Caution
The following measures are indispensable for
ensuring operational and functional safety:
-Comply with all the manufacturers instructions.
-Ensure that specialized technicians periodically
verify that the protection devices are intact and
that all the safety devices function correctly (the
first inspection should be made within 3 years
and subsequently once yearly).
!
!
Danger of burns
The areas marked with this sign become hot.
Great care should be taken when in the
vicinity of these areas.
WARNING: Hot surface
ACHTUNG: Heisse Oberfläche
ATTENTION: Surface chaude
ATTENZIONE: Superficie calda
GENERAL
Use of gas operated appliances in premises smaller than 12 m
2
is
not permitted.
If a gas heated installation is used, change the flexible tube at the
due expiry date.
The manufacturer disclaims all liability for damages to items or
persons due to improper use or due to the coffee machine being
used for reasons other than its intended use.
Never work the coffee machine with wet hands or naked feet.
Cup-warming plate
Place only coffee cups, cups and glasses to be used in conjunction
with the coffee machine on the cup-warming plate.
Ensure that the coffee cups are completely drained before placing
them on the cup-warming plate.
No other objects shall be placed on the cup-warming plate.
Danger of Burns
Do not place the hands or other parts of the body close to the coffee
distribution points, or near to the steam and hot water nozzles.
MAINTENANCE AND REPAIR
If the machine does not function correctly, switch it off, turn off the
main switch and call the service agent.
Only qualified and authorised servicing personnel should be called.
Use only original spare parts.
Maintenance activities performed by unqualified personnel may
jeopardise the safety of the machine.
If the electric cable is damaged, switch off the machine and apply to
the servicing department for a replacement.
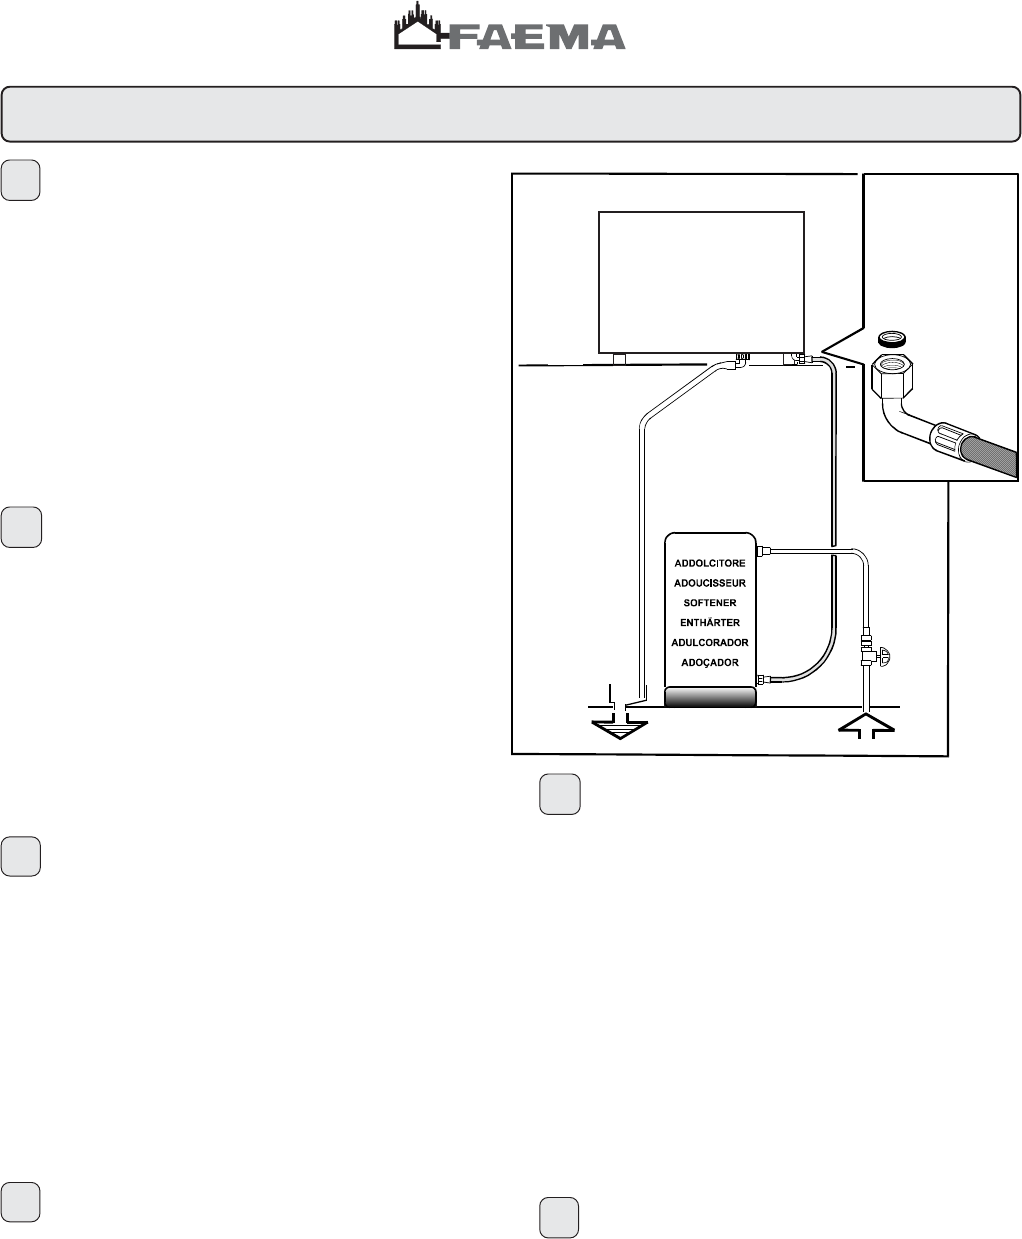
Regeneration of the Water Softener
The machine must be installed with an ionic resin water softener.
The water softener may be of different types, with different resin
capacities and different periods of validity.
The resins are regenerated by adding coarse kitchen salt or salt pastilles
to the water softener.
If the regeneration of the resins is not made at the due dates, calcareous
deposits will form which progressively decrease the machines efficiency
until its functions are completely blocked.
The regeneration due dates and method thereof may be found in the
instructions provided with the equipment.
If regeneration is performed at the due dates, the machine is maintained
in ideal working conditions.
MACHINE CLOSE-DOWN
When the machine remains unattended for
a long period of time (at night, during the
weekly closing day or during holidays) the
following operations shall be performed:
-Remove the plug or switch off the main
switch.
-Close the water tap.
-Close the gas tap.
Non-compliance with these safety measures
exonerates the manufacturer from all liability
for malfunctions or damage to persons or
items.
!
EnglishEnglish
then press >>>
clean the
milk circuit
temperature probe
open circuit E4
check water supply
E2
boiler overpressure
E1
regenerate softener
then press: >>>
Resin regeneration
The following message will be displayed:
Cleaning the milk circuit
The following two messages will be displayed alternately:
The softener resin must be regenerated. Follow the softener instructions.
Upon completion of the operation, press the key
444
(33) for a few
seconds and the message on the display will be cancelled.
N.B.: During the display of this message the machines functions are
not blocked.
The message will not be displayed when the machine is connected to
an automatic softener.
Clean the milk circuit following the procedure described in Paragraph
"Cleaning - Cleaning the Cappuccino Maker.
Upon completion, press the key
444
(33) for a few seconds and the
message will be cancelled.
The messages are displayed after 2.5 ÷ 3 hours after the last milk
dispensing, except when the milk time is set to the value "00.0".
N.B.: During the display of this message the machines functions are
not blocked.
Error E4
The following message will be displayed:
This means that the temperature sensor does not send the signals to
the electronic card. The electricity to the water heating elements in the
boiler is cut off.
In this case, switch off the machine by pressing the general switch (1)
and contact the authorized servicing department.
This means that the boiler has exceeded the maximum possible pressure
due to a malfunction in the heating apparatus. The electricity to the
water heating elements in the boiler is cut off.
In this case, switch off the machine by pressing the general switch (1)
and contact the authorized servicing department.
This means that there is no water supply to the boiler.
In this case, switch off the machine by pressing the general switch (1)
and check the position of the water supply tap.
If it is closed, open it and switch on the machine.
If the message is displayed again, contact the authorized servicing
department.
Error E1
The following message will be displayed:
Error E2
The following message will be displayed:
11.Self-diagnosis
In case of malfunction, the machine will display (25) warning messages with audio signals.
EnglishEnglish
12.Malfunctions
Direct intervention by the customer
In order to avoid unnecessary costs, ensure that the problem occurring in the machine is not included in the following table before calling the
servicing department.
DEFECT
The coffee machine does not function and
the indicator light (2) is off.
REMEDY
Check that the electricity is on.
Check the position of the main switch (12).
CAUSE
No electricity.
The coffee machine does not work but the
indicator light (2) is on.
Wrong programming of the switch-on times.Press the PROGR (32) key for a few sec-
onds to force switch-on.
Reprogram the clock (Paragraphs 3 and 4).
The coffee machine does not heat up.
Leak from edge of filter-holder (21, 25).Clean with the supplied brush.The undercup gasket is dirty with coffee resi-
due.
Wrong position of the switch (1a).Press the switch knob (1a).
Coffee flow time too short.Grind the coffee more finely.
Change the coffee
Coffee grinds too coarse.
Coffee too old.
Water leaks from under the machine.Clean the tank.Drainage tank clogged.
The coffee is warm and weak (after normal
time of brew and flow).
Air bubble in thermosyphonic circulation sys-
tem.
Press the coffee distribution button 2/3 times
to try and eliminate the air bubble.
The reading on the pressure gauge (8) of the
pump pressure is greater than 9 bars.
The pumps by-pass valve is blocked.Call the authorized servicing department.
EnglishEnglish
PROGRAMMING
1.How to access programming
2.User dose
3.Date and time setting
4.Start/end operation setting
5.Partial counters display and reset
6.Total counters display and reset
INDEX
PROGRAMMING - USER MODE
EnglishEnglish
user dose setup
press a key
user dose setup
press a key
Monday 11:00
Boiler pres. 1,20 bar
1)Place the cup (containing a previously programmed dose of coffee)
by the cappuccino maker (18).
2)Keep the distributor key pressed, as evidenced by the flashing led
(the coffee dose counter starts from zero and increases in value).
3)When the quantity of milk in the cup has reached the desired level,
release the key (the counter will indicate the rime that correspond to
the set dose).
It is also possible to vary the milk dose or set the dose using the +
(34) and - keys (35).
N.B.: If the coffee dose is set to 00.0, the key may only be used for
coffee distribution.
When the key
444
(33) is pressed, the following message is displayed
The start milk time can be increased or decreased using the + (34)
and - (35) keys.
When the 00 value is set, first milk and then coffee will be distributed
into the cup.
When the 01 value is set, the distribution of milk and coffee will be
simultaneous.
When any of the other values (max. 60) are set, the coffee will be
distributed first, and after a set period of time the milk will be distributed.
N.B.: When high values are set (above the coffee distribution times),
the milk distribution will start upon completion of the coffee distribution.
How to perform other operations
The programming of another key is made by pressing one of the other
distribution keys.
When the key
444
(33) is pressed, the message user dose (Paragraph
2) will be displayed.
When the FRAME DISPLAY (31) key is pressed, the message clock
program is displayed (See Paragraph 3).
To memorize the programming of the milk dose, follow the procedure
herebelow:
2.User dose
When one of the dose distribution keys are pressed (cappuccino, coffee,
milk or hot water), its value can be programmed.
" The Programming operations can only be performed if the
function USER PROGRAMMING is activated.
To access programming, keep the PROG (32) key pressed down until
an audio signal is issued from the machine and the following message
is displayed:
To return to the programming phase, keep the PROG (32) key pressed
down until the following message is displayed:
During the programming phase, the audio signal will be repeated every
10 seconds.
1.How to access programming
!
2.1User dose - programming the cappuccino distribution keys
PROGRAMMING THE CAPPUCCINO DISTRIBUTIN KEYS
(26, 27, 28 and 29 of the group on the left as seen by the operator)
N.B.: Valid only if the CAPPUCCINO function is activated.
When one of the cappuccino distribution keys is pressed (shown by
the flashing led), the following message will be displayed:
To perform the coffee dose programming, follow the procedure
herebelow:
1) Fill the filter carrier (21) with the correct dose of ground coffee) and
insert into the group ensuring it is correctly locked in place (do not
use previously used coffee grounds).
2) Place the cup by the filter carrier spout (21).
3) Keep the distributor key pressed, as evidenced by the flashing led
(the coffee dose counter starts from zero and increases in value).
4) When the quantity of the coffee in the cup has reached the desired
level, release the key (the counter will indicate the number of pulses
that correspond to the set dose).
It is also possible to vary the coffee doses or set the dose using the +
(34) and - keys (35).
N.B.: If the coffee dose is set to 000, the key may only be used for
milk distribution.
When the key
444
( 33) is pressed, the following message is displayed
key 03
coffee dose 200
4
key 03
milk 10.0
4
key 03
milk start 10
4
EnglishEnglish
2.5User Dose - Programming the automatic steam key
AUTOMATIC STEAM DISPENSING KEY (12) PROGRAMMING
When the automatic steam dispensing key is pressed (indicated by the
relative led), the following message is displayed:
This key is programmed by setting the temperature via the + (34) and
- (35) keys between a minimum value of 50° C and a maximum value
of 99° C. When the drink reaches the set temperature, steam dispensing
stops automatically.
How to perform other operations
When the key
444
(33) is pressed, the message user dose (paragraph
2) is displayed.
When the FRAME DISPLAY (31) key is pressed the message clock
program is displayed (see paragraph 3).
2.2 User dose - programming the coffee distribution keys
PROGRAMMING THE COFFEE DISTRIBUTION KEYS
(26, 27, 28 and 29 of group 2)
N.B.: Also valid for group 1 (group on the left as seen by the operator)
only if the CAPPUCCINO function is not activated.
When one of the coffee distribution keys is pressed (shown by the
flashing led), the following message will be displayed:
2.3User dose - Programming the milk distribution key
PROGRAMMING THE MILK DISTRIBUTION KEY (16)
N.B.: Also valid if the CAPPUCCINO function is not activated.
When the milk distribution key is pressed (shown by the flashing led),
the following message will be displayed:
2.4User dose - Programming the hot water distribution keys
PROGRAMMING THE HOT WATER DISTRIBUTION KEYS
(13a)
When one of the hot water distribution keys is pressed (shown by the
flashing led), the following message will be displayed:
To perform the programming of the coffee dose follow the procedure
herebelow:
1) Place a container by the hot water distribution nozzle (10).
To perform the programming of the coffee dose follow the procedure
described in Paragraph 2.1.
To perform the milk dose programming, follow the procedure described
in Paragraph 21.
2)Keep the distributor key pressed, as evidenced by the flashing led
(the hot water dose counter starts from zero and increases in value).
3) When the quantity of water in the container has reached the desired
level, release the key (the counter will indicate the time that
corresponds to the set dose).
It is possible to vary the set dose via the + (34) and - (35) keys (the
time of the water distribution can also be increased or decreased).
How to perform other operations
The new key is set by pressing the dispensing key.
When the key
444
(33) is pressed, the message user dose (Paragraph
2) will be displayed.
When the FRAME DISPLAY (31) key is pressed, the message clock
O Serviço de Assistência de empresa FAEMA, com a finalidade de aconselhar os Clientes na escolha dos produtos para a melhor utilização da
máquina de café, apresenta a linha:
ECO LINE - Produtos para a limpeza
A) 4991-134458 líquidopara o kit cappuccino;
B) 4991-134682 en pópara os grupos, manípulo dos filtros, chávenas de café;
C) 4991-134681 carteiraspara os grupos, manípulo dos filtros, chávenas de café;
D) 4991-134683 pastilhaspara os grupos das máquinas superautomáticas.
Para encomendar, indicar o número de código ao seu Concessionário.
FAEMA y el "SERVICE LINE"
Con el deseo de facilitar a los Srs. CLIENTES la selección de los productos para el uso correcto de la máquina de café, el servicio de asistencia
de la sociedad FAEMA les muestra la linea:
ECO LINE - Productos para la limpieza
A) 4991-134458 líquidopara los cappuccinadores;
B) 4991-134682 en polvospara los equipos, los portafiltros, las tazas de café;
C) 4991-134681 en sobrespara los equipos, los portafiltros, las tazas de café;
D) 4991-134683 en pastillaspara los equipos de las máquinas superautomáticas.
Para los pedidos, envío el número de código a su Concesionario.
FAEMA und die "SERVICE LINE"
Mit der Absicht dem Kunden bei der Produktwahl für den bestmöglichen Gebrauch der Kaffeemaschine beizustehen, weist der Kundendienst der
FAEMA Gesellschaft auf folgende Produktlinie hin:
ECO LINE - Produkte für die Säuberung
A) 4991-134458 Flüssigfür die Cappuccino-Bereiter;
B) 4991-134682 in Pulverformfür die Gruppen, die Filterhalter, die Kaffeetassen;
C) 4991-134681 Tütenfür die Gruppen, die Filterhalter, die Kaffeetassen;
D) 4991-134683 Tablettenfür die Kaffeegruppen der vollautomat Maschinen.
Für eine Bestellung bitte dem Vertreter die Katalog-Nr. angeben.
I
FAEMA e il "SERVICE LINE"
Il servizio assistenza della società FAEMA, nell'intento di essere vicino ai SIGG. Clienti nella scelta dei prodotti per il miglior utilizzo della macchina
da caffè, visualizza la linea:
ECO LINE - Prodotti per la pulizia
A) 4991-134458 liquidoper i cappuccinatori;
B) 4991-134682 in polvereper i gruppi, i portafiltri, le tazze da caffè;
C) 4991-134681 bustineper i gruppi, i portafiltri, le tazze da caffè;
D) 4991-134683 pastiglieper i gruppi nelle macchine superautomatiche.
Per ordinare trasmettete il numero di codice al Vs. Concessionario.
FAEMA and the "SERVICE LINE"
The FAEMA Company's client service, the aim of which is to assure top coffee-machine performance for its clients at all times, also makes
available its ECO LINE, a series of specific cleaning products expressly designed for this purpose.
ECO LINE - Cleaning products
A) For cappuccino makersin liquid form4991-134458;
B) For dispensers, filter-holders, coffee cupsin powder form4991-134682;
C) For dispensers, filter-holders, coffee cupsin small envelops4991-134681;
D) For superautomatic-machine dispensersin tablet form4991-134683.
Order directly from your local distributor and refer to the particular item you require by its number, as shown above.
FAEMA et la "SERVICE LINE"
La service d'assistance de la société FAEMA, dans l'intention d'être à côté de ses clients, dans le choix des produits et en vue d'une meilleure
utilisation de la machine à café, propose la ligne:
ECO LINE - Produits de nettoyage
A) 4991-134458 liquidepour les fouettes-lait;
B) 4991-134682 en poudrepour les groupes, les porte-filtre, les tasses à café;
C) 4991-134681 sachetspour les groupes, les porte-filtre, les tasses à café;
D) 4991-134683 pastillespour les groupes des machines tout-auto.
Pour commander, transmettre le numéro de code à votre concessionnaire.
Gebruikershandleiding.com neemt misbruik van zijn services uitermate serieus. U kunt hieronder aangeven waarom deze vraag ongepast is. Wij controleren de vraag en zonodig wordt deze verwijderd.
Product:
Spelregels forum
Om tot zinvolle vragen te komen hanteren wij de volgende spelregels:
lees eerst de handleiding door;
controleer of uw vraag al eerder door iemand anders is gesteld;
probeer uw vraag zo duidelijk mogelijk te stellen;
heeft u een probleem en al geprobeerd om dit op te lossen, vermeld dit erbij aub;
heeft u een oplossing gekregen van een bezoeker dan horen wij dat graag in dit forum;
wilt u een reactie geven op een vraag of antwoord, gebruik dan niet dit formulier maar klik op de knop 'reageer op deze vraag';
uw vraag wordt direct op de website gezet; vermijd daarom persoonlijke gegevens in te vullen;
Belangrijk! Als er een antwoord wordt gegeven op uw vraag, dan is het voor de gever van het antwoord nuttig om te weten als u er wel (of niet) mee geholpen bent! Wij vragen u dus ook te reageren op een antwoord.
Belangrijk! Antwoorden worden ook per e-mail naar abonnees gestuurd. Laat uw emailadres achter op deze site, zodat u op de hoogte blijft. U krijgt dan ook andere vragen en antwoorden te zien.
Abonneren
Abonneer u voor het ontvangen van emails voor uw Faema E92 bij:
nieuwe vragen en antwoorden
nieuwe handleidingen
U ontvangt een email met instructies om u voor één of beide opties in te schrijven.
Ontvang uw handleiding per email
Vul uw emailadres in en ontvang de handleiding van Faema E92 in de taal/talen: Duits, Engels, Frans, Italiaans, Portugees, Spaans als bijlage per email.
De handleiding is 3,27 mb groot.
U ontvangt de handleiding per email binnen enkele minuten. Als u geen email heeft ontvangen, dan heeft u waarschijnlijk een verkeerd emailadres ingevuld of is uw mailbox te vol. Daarnaast kan het zijn dat uw internetprovider een maximum heeft aan de grootte per email. Omdat hier een handleiding wordt meegestuurd, kan het voorkomen dat de email groter is dan toegestaan bij uw provider.
Stel vragen via chat aan uw handleiding
Stel uw vraag over deze PDF
Uw handleiding is per email verstuurd. Controleer uw email
Als u niet binnen een kwartier uw email met handleiding ontvangen heeft, kan het zijn dat u een verkeerd emailadres heeft ingevuld of dat uw emailprovider een maximum grootte per email heeft ingesteld die kleiner is dan de grootte van de handleiding.
Er is een email naar u verstuurd om uw inschrijving definitief te maken.
Controleer uw email en volg de aanwijzingen op om uw inschrijving definitief te maken
U heeft geen emailadres opgegeven
Als u de handleiding per email wilt ontvangen, vul dan een geldig emailadres in.
Uw vraag is op deze pagina toegevoegd
Wilt u een email ontvangen bij een antwoord en/of nieuwe vragen? Vul dan hier uw emailadres in.