738409
10
Verklein
Vergroot
Pagina terug
1/17
Pagina verder
INSTRUCTION
Ed : 03/17 Rev : 00
1
CONTENT
CONTENT
--------------------------------------------------------------------------------------------------------------------------------
1
IMPORTANT SAFETY PRECAUTIONS
----------------------------------------------------------------------------------2-3
TECHINICAL PARAMETERS--------------
-------------------------------------------------------------------------------------3
PRODUCT OVERVIEW --------------
---------------------------------------------------------------------------------------------3
ASSEMBLY INSTRUCTIONS
--------------------------------------------------------------------------------------------------4-6
FOLDING & UNFOLDING INSTRUCTIONS
-------------------------------------------------------------------------------6-7
GROUNDING METHODS
----------------------------------------------------------------------------------------------------------8
OPERATION GUIDE
--------------------------------------------------------------------------------------------------------------8-14
GETTING STARTED GUIDE
-----------------------------------------------------------------------------------------------------14
SAFETY EXERCISES
---------------------------------------------------------------------------------------------------------------15
WARM-UP EXERCISES
------------------------------------------------------------------------------------------------------------16
MAINTENANCE INSTRUCTIONS
---------------------------------------------------------------------------------------------17
BELT ADJUSTMENT
-----------------------------------------------------------------------------------------------------------------18
EXPLODED DRAWING
-------------------------------------------------------------------------------------------------------------19
PARTS LIST
--------------------------------------------------------------------------------------------------------------------------20-22
ERROR CODE AND SIGNIFICANCE------------------------------------------------------------------------------
22
3
Input supply voltage220V
Working temperature: 0-40
Speed range: 0.8-16KM/H Incline range: 12 levels of Motor incline
Max. user weight: 110kg Distance display range: 0.00-99.9km
Calories display range: 000-999
Time display range: 0000-9959 (min :
sec)
Heart rate range: 50-200 (time /
min)
Running surface: 420*1250mm
Product size: 1620*700*1455mm Folding size: 1620*700*250mm
T
echnical Parameters
Product Overview
4
WHEN YOU OPEN THE CARTON, YOU WILL FIND THE BELOW SPARE PARTS:
STEP 1: Take out and prepare the below parts
Main frame
1
set
D
85 Left knob
M16
(small shape in plastic)
1PC
B24
Silicon oil
1 PCS
C2
Safety key 1 pc
D
29
Allen wrench
5MM, 1 PC
D86 Right knob
M16
(large shape in steel)
1PC
B49 Water bottle 2PCs
Note: Don't tighten bolts at once while assembling in the beginning. Please tighten all the
bolts after placing required parts to the correct position.
STEP 2: Make sure fixing bracket (A20) parallels with right upright (A3R). Pull out the plug (B72),
and lift up the left/right uprights (A3L/A3R).
Assembly instruction
5
STEP 3: Push down the folding frame (A21) to confirm treadmill is in locking position.
Plug in the left/right knobs M16 (D85/86) onto left/right uprights (A3L/A3R). Then tighten the left
knob M16 (D85), and rotate the right knob M16 (D86) for over a whole round and confirm it’s
tightened.
Step 4: Lift up the console/handrail bracket (A4) and tighten the right knob M16 (D86) again onto
upright and console/handrail bracket (A4).
6
Step 5: Turn the console to the front and push both handrails down till you hear the “click” sound.
Then place on safety key (C13) and water bottle (B49).
B49
B49
Step 6: To check if the running belt runs correctly, placing treadmill in folding position and
tightening all the bolts. Then set speed under 3km/h and see if running belt runs without problem.
Step 1: Flick back the console, rotate and loose the knob M12 (D86), and pull out the knob M12
(D85) so that the knob M12 (D85) is not in locking position. Then flick back the whole handrail
bracket, and tighten two knobs M12 (D85/86) back in place.
Folding Instruction
7
Step 2: Pull up the folding frame (A21), and push both uprights (A3L/A3R) downward.
A3L
Step 3: Make sure the plug (B72) is tightened to the treadmill before lift up the whole item.
8
Step 4: Lift up and place the treadmill in flat floor surface after complete the previous steps, and
then turn the fixing bracket (A20) 90 degree inward and hold the base frame tightened.
This product must be grounded. If it should malfunction or breakdown, grounding provides
path of least resistance for electric current to reduce the risk of electric shock. This product
is equipped with a cord having an equipment-grounding conductor and a grounding plug.
The plug must be plugged into an appropriate outlet that is properly installed and grounded
in accordance with all local codes and ordinances.
DANGER Improper connection of the equipment-ground
ing conductor can result in a risk
of electric shock. Check with a qualified electrician or serviceman if you are in doubt as to
whether the product is properly grounded. Do not modify the plug provided with the
product if it will not fit the outlet, Please find a proper outlet installed by a qualified
electrician.
This product is for use on a nominal 240V circuit and has a grounding plug. Make that the product
is connected to an outlet ha
ving the same configuration as the plug. No adapter should be used
with this product.
WINDOW DISPLAY
Grounding Methods
Operation Guide
9
1.1. Console
1.2. START
Normal start after 5 seconds countdown
1.3 PROGRAM
12 pre-set programs, 3 countdown function, 1 body fat program, 3HRC programs, with Polar wireless
receiver
1.4. SAFETY LOCK FUNCTION
The window shows"---" when take away the safety lock and the treadmill will stop quickly with "didi" alarm
noise. And put the safety lock on, the computer will display for 2 seconds and the date countdown to “0
.
1.5.BUTTON FUNCTION
START/STOP
“START”--When the treadmill is not running, press this button to start, speed is “0.8”
“STOP”--When the treadmill is running, press this button to stop, then set program default and then return to
manual mode after stopped.
1.5.2 “PROGRAM” BUTTON
When the treadmill is not running, press this button can choose from program circle mode to manual mode
(P1-P12). The lowest speed for manual mode is “0.8”, and the highest speed is “
16
1.5.3 “MODE” BUTTON
When the treadmill is not running, press this button to choose countdown modes:”H-1”,”H-2”,”H-3”. H-1” is
the time countdown mode, and “H-2” is the distance countdown mode, “H-3” is the calories countdown
mode, Press the “SPEED+/-” button to adjust the data. After that, press the “START” button to start this
treadmill.
1.5.4 “SPEED +/- “BUTTON
SPEED +/– --Adjust speed when treadmill start, the increment is 0.1km/time in kilometer. Press the button
10
more than 2 seconds, and it will be up or down automatically
.
1.5.5 SPEED QUICK BUTTON
Press the speed quick button 3kn/h, 6km/h, 9km/h to adjust the speed directly when the treadmill is
running
1.5.6 “INCLINE+/-” BUTTON
INCLINE +/ --Adjust incline when treadmill start; the increment is 1 level/time. Press the button more than
2 seconds, and it will be up or down automatically.
1.5.7 INCLINE QUICK BUTTON
Press the incline quick button 3, 6, 9 to adjust the incline directly when the treadmill is running.
1.6 DISPLAY FUNCTION
1.6.1 TIME
Display the running time or countdown time.
1.6.2 SPEED
Display running speed.
1.6.3 INCLINE
Display the incline.
1.6.4 PULSE
Display pulse data or display “p”
1.6.5 DISTANCE
Display the running total distance or distance countdown.
1.6.6 CALORIES
Display the calorie or calorie countdown
1.6.7 ALL WINDOW DISPLAY DATA RAGNE
TIME0:00 – 99.59(MIN)
DISTANCE: 0.00 – 99.9(KM)
CALORIES: 0.0 – 999 (C)
SPEED: 0.8 -22 (km/h)
PULSE: 50 – 200 (BPM)
INCLINE: 0 – 15 sections
1.7 PULSE FUNCTION
11
When the treadmill is running, hold the hand pulse about 5 seconds, it will display pulse data. The
pulse data range is 50-200 times/ minute. It has heart-shaped graphics when testing pulse. This data
is only for reference, cannot be as medical data
1.8 ROGRAM EXERCISE CHART
There are 12 sections in each program
TIME
PROG
SET TIME / 12 = TOTA
L TIME IN EACH OPERA
TION
1 2 3 4 5 6 7 8 9 10
P1
SPEED
3 3 6 5 5 4 4 4 4 3
INCLINE
0 3 3 3 4 4 4 1 1 0
P2
SPEED
3 3 4 4 5 5 5 6 6 4
INCLINE
2 2 2 3 3 3 3 4 4 2
P3
SPEED
2 4 6 8 7 8 6 2 3 2
INCLINE
3 5 4 4 3 4 4 3 4 2
P4
SPEED
3 3 5 6 7 6 5 4 3 3
INCLINE
0 3 3 2 2 5 5 3 3 2
P5
SPEED
3 6 6 6 8 7 7 5 5 4
INCLINE
3 5 3 4 2 3 4 2 3 2
P6
SPEED
2 6 5 4 8 7 5 3 3 2
INCLINE
3 4 5 6 3 5 5 6 4 3
P7
SPEED
2 9 9 7 7 6 5 3 2 2
INCLINE
0 3 3 3 4 4 4 1 1 0
P8
SPEED
2 4 4 4 5 6 8 8 6 2
INCLINE
1 1 4 4 4 5 5 4 3 2
P9
SPEED
2 4 5 5 6 5 6 3 3 2
INCLINE
3 5 3 4 2 3 4 2 3 2
P10
SPEED
2 5 7 5 8 6 5 2 4 3
INCLINE
1 5 6 8 12 9 10 9 5 3
P11
SPEED
2 5 6 7 8 9 10 5 3 2
INCLINE
3 5 6 8 6 5 8 7 5 2
P12
SPEED
2 3 5 6 8 6 9 6 5 3
INCLINE
5 7 5 8 6 5 9 10 6 2
1.9 User Program
Besides the 12 pre-set programs, there are 3 user-defined programs: U1,U2 and U3. Each
user program has 10 segments. The user can set the desired speed and incline .Press
"PROGRAM" button to choose U1, U2 or U3, press "MODE" button to enter setting condition,
then set the time of the first segment. Press "SPEED+" and "SPEED-" to set speed. Press
“INCLINE+”and “INCLINE-“ to set incline. Press "MODE" button and your choice will be set.
The next workout segment will flash, go through the same setup as you complete segment
one. You must complete all 15 segments and then your user program is ready to use. Press
STOP key to return to last segment setting any time.
1.10 THREE COUNTDOWN FUNCTION
Countdown time initial setting 3000 minutessetting range 500---9900 minutes , each step 100.
Countdown calorie initial setting 50therm, setting range 10---990 termeach step 10.
12
Countdown distance initial setting 1.0kmsetting range 0.5---99.9 kmeach step 0.1
Cycle switch order is: manual, time, distance, calories
1.11 BODY TESTER
FAT
At the beginning state, press “ PROGRAM” continually to enter “FAT“ body fat testwindow display
“FAT”. Press “MODE” to enter (F1 SEX, F2 AGE, F3 HEIGHT, F4 WEIGHT). Press “SPEED+”,
“SPEED-” to set. After setting, the computer will display F5 and grasp the hand pulse, the window
will display your body quality index.
The body quality index is to test the relation between height and weight not the body scale.
The body FAT suits for any male and female to adjust the weight according together with other
body quality index. The ideal FAT should be between 20-25, if under 19, it means too thin. If
between 25 and 29, it means overweight, if over 30, it means obesity. (The data is just for reference and
can not be as medicinal data)
01 Sex 01 Male 02 Female
02 Age 10------99
03 Height 100----200
04 Weight 20-----150
05 FAT 19 Under weight
FAT = (20---25) Normal weight
FAT = (25---29) Over weight
FAT 30 Obesity
1.12 HRC Program
There are 3 HRC programs (HRC1-HRC3) in total.
The parameter data setting order is “AGE” -> “THR(HRC) data” -> “TIME”.
HRC: Detect user’s actual heart rate through wireless receiver and set different the heart rate data as goal
to adjust speed and incline during running.
It’s recommended that user uses the wireless chest belt while running HRC function.
13
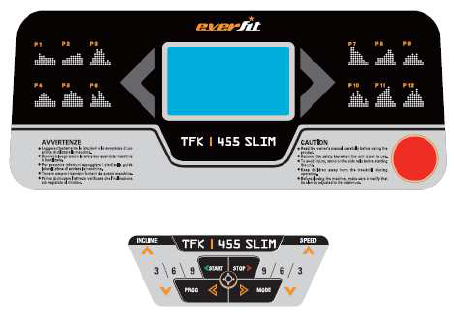
1.12.1 After turning on the power, press PROG” key to choose HRC function. HRC function is turned on
when “HRC” characters shown on the screen.
User can use “SPEED +/-“ to adjust age (data from 13 to 80) after seeing the “30” shown on the screen.
1.12.2 Press “MODE” key to enter the setting of heart rate. The standard heart rate is fixed at different data
from HRC1 to HRC3. Heart rate data can be adjusted from 50 to 200. User can use “SPEED +/-“ to adjust
the data. (It’s recommended that standard heart rate data doesn’t need to be changed for physical health
condition.) Formula is calculated as below:
HRC1 is T.H.R =(220-age)x60%,
HRC2 is T.H.R =(220-age)x70%,
HRC3 is T.H.R =(220-age)x80%.
After finishing the setting of HRC data, user can press “MODE” key to modify the time. When “TIME”
window flashes, it displays the default time as 30:00 minutes, and user can press “SPEED+/-“ to set up
time.
1.12.3 Enter “START” key to begin the workout (Remember only can press “START” key after all setting is
completed. Its suggested that user use wireless chest belt to detect the heart rate. If chest belt and hand
pulse are used at the same time, data from chest belt will show up only on the screen.
1.12.4 During the operating of HRC, speed and incline will adjust as below:
(1). If Target heart rate <THR-15,then the speed and incline will adjust automatically every 15 second, the
SPEED will increase 0.8KM/h and incline add 1 section until they reach the max. data
(2). If THR-5>Target heart rate >=THR-15,then the speed and incline will adjust automatically every 15
second, the SPEED will increase 0.4KM/h and incline add 1 section until they reach the max. data
(3). If THR+5>=Target heart rate >=THR-5,then the speed and incline will not change
(4). If THR+15>=Target heart rate >=THR+5,then the speed will adjust automatically every 15 second, the
SPEED will decrease 0.4KM/h and incline less1 section until they reach the min. data
(5). If Target heart rate >=THR+15,then the speed and incline will adjust automatically every 15 second, the
SPEED will decrease 0.8KM/h and incline less2 section until they reach the min. data
1.13 OTHERS
14
1.13.1 When the countdown mode is finished and “END” appears on screen, warning sound occurs. Then it will
be back to manual mode.
1.13.2 You can set statistics at circled mode. Ex: When time is set at 5:00 99:00 and it hits 99:00, press “+”
button, it will start from 5:00 again.
1.13.3 Countdown time, countdown calories and countdown distance, you just can set one of them at one time,
press last item to set running, the setting parameter is countdown, others display normal data.
1.13.4 Speed control: acceleration at 0.5km/s; deceleration at 0.5km/s
20
D29
C9
D45
C3
C1
A11
D31
D25
D23
B14
B3
B4
B4
B15
C4
C18
C17
C7
C13
C5
C2
D36
D47
C10
A4
C11
D52
D52
A17
A16
D19
D81
D22
D71
D71
D23
D25
D87
D10
D9
C12
D18
D21
D21
D18
A26
D96
B72
B73
D98
D99
D100
A3L
A3R
B74
B74
Exploded Drawing
21
A- Welding parts
No. Description Qty No. Description Qty
A1
Main frame 1
A16
Handrail connecting frame 2
A3L
Left upright 1 A17 Console supporting frame 1
A3R
Right upright 1
A20
Fixing bracket at folding
position
1
A4
Handrail bracket 1
A21
Folding handrail 1
A5
Incline bracket 1
A22
Supporting frame 1
A6 Filter bracket 1
A
26
Hanging frame 2
A11
Motor bracket 1
B
Plastic parts
No. Description Qty No. Description Qty
B1
Console set 1 B19 Cable organizer 1
B1-1 Overlay
1
B20 Round plug 2
B1-2 Membrane key
1
B21 Squared shape plug 4
B1-3 Console
1
B27 New cushion 6
B1-5 Tablet holder 1 B31 Rubber pad 2
B2 Console back cover 1 B32 Ova shape cushion 4
B3 Protecting foam 2 B34 EVA pad (for table holder) 1
B4 Handrail plug 2 B49 Water bottle 2
B7 Adjusting wheel 2 B54 Round cushion 2
B8 Flat foot pad 2 B55 Fixing plastic for console 3
B10 Limited cushion 2 B60L Left water bottle holder 1
B11L Left side cover 1 B60R Right water bottle holder 1
B11R Right side cover 1 B71 Plastic holding bracket 1
B13 Motor upper cover 1 B72 Fixing plug 1 1
B14 Motor lower cover 1 B73 Fixing plug 2 1
B15 Side rail 2 B74 Plastic cover A 2
B16L Left end cap 1 B75 Plastic cover B 2
B16R Right end cap 1
B18 Silicon oil 1
C
Electronic parts
No. Description Qty No. Description Qty
C1
DC motor 1 C13 Safety key 1
C2
Running belt 1 C14 Single cord 1
C3
Rear roller 1 C15 Power cable 1
C4
Front roller 1
C17
Lower cable 1
C5
Running deck 1
C18
Connecting cable 1
C7 Drive belt 1
C20
Magnetic ring 1
C8 Power switch 1
C21
Inductor 1
C9
Controller 1
C22
Filter 1
C10
Wire for left handrail
button
1
C27
Single cord 2
C11
Wire for right handrail
button
1
C12 Incline motor 1
Parts list
GARLANDO SPA
Via Regione Piemonte, 32 - Zona Industriale D1
15068 - Pozzolo Formigaro (AL) - Italy
www.evert.it - info@evert.it
10

Hulp nodig? Stel uw vraag in het forum

Spelregels

Misbruik melden

Gebruikershandleiding.com neemt misbruik van zijn services uitermate serieus. U kunt hieronder aangeven waarom deze vraag ongepast is. Wij controleren de vraag en zonodig wordt deze verwijderd.

Product:

Bijvoorbeeld antisemitische inhoud, racistische inhoud, of materiaal dat gewelddadige fysieke handelingen tot gevolg kan hebben.

Bijvoorbeeld een creditcardnummer, een persoonlijk identificatienummer, of een geheim adres. E-mailadressen en volledige namen worden niet als privégegevens beschouwd.

Spelregels forum

Om tot zinvolle vragen te komen hanteren wij de volgende spelregels:

Belangrijk! Als er een antwoord wordt gegeven op uw vraag, dan is het voor de gever van het antwoord nuttig om te weten als u er wel (of niet) mee geholpen bent! Wij vragen u dus ook te reageren op een antwoord.

Belangrijk! Antwoorden worden ook per e-mail naar abonnees gestuurd. Laat uw emailadres achter op deze site, zodat u op de hoogte blijft. U krijgt dan ook andere vragen en antwoorden te zien.

Abonneren

Abonneer u voor het ontvangen van emails voor uw Everfit TFK 455 SLIM bij:


U ontvangt een email met instructies om u voor één of beide opties in te schrijven.


Ontvang uw handleiding per email

Vul uw emailadres in en ontvang de handleiding van Everfit TFK 455 SLIM in de taal/talen: Engels als bijlage per email.

De handleiding is 3,32 mb groot.


U ontvangt de handleiding per email binnen enkele minuten. Als u geen email heeft ontvangen, dan heeft u waarschijnlijk een verkeerd emailadres ingevuld of is uw mailbox te vol. Daarnaast kan het zijn dat uw internetprovider een maximum heeft aan de grootte per email. Omdat hier een handleiding wordt meegestuurd, kan het voorkomen dat de email groter is dan toegestaan bij uw provider.

Stel vragen via chat aan uw handleiding

Stel uw vraag over deze PDF

Uw handleiding is per email verstuurd. Controleer uw email

Als u niet binnen een kwartier uw email met handleiding ontvangen heeft, kan het zijn dat u een verkeerd emailadres heeft ingevuld of dat uw emailprovider een maximum grootte per email heeft ingesteld die kleiner is dan de grootte van de handleiding.

Er is een email naar u verstuurd om uw inschrijving definitief te maken.

Controleer uw email en volg de aanwijzingen op om uw inschrijving definitief te maken

U heeft geen emailadres opgegeven

Als u de handleiding per email wilt ontvangen, vul dan een geldig emailadres in.

Uw vraag is op deze pagina toegevoegd

Wilt u een email ontvangen bij een antwoord en/of nieuwe vragen? Vul dan hier uw emailadres in.


Info