PRIOR TO THE CHIMNEY CONNECTION, TO ENSURE THE CORRECT PERFORMANCE OF THE STOVE, YOU MUST RESPECT THE FOLLOWING TYPES
OF INSTALLATION:
7.5 KW INSERTS
The chimney flue must be installed with 0.5m of pipe of Ø80mm certified to EN 1856-2.
04.4 PELLET KITCHEN
(Electronics p. 19 – 31)
IMPORTANT: THE LENGTH OF THE FLUE DUCT MUST BE OF MAX. 6 METERS WITH A DIAMETER OF 80 mm; EVERY 90° CURVE OR (T) CONNECTION
IS CONSIDERED AS 1 METER OF PIPE.
PRIOR TO THE CHIMNEY CONNECTION, TO ENSURE THE CORRECT PERFORMANCE OF THE STOVE, YOU MUST RESPECT THE FOLLOWING TYPES
OF INSTALLATION:
The pellet stove must be fitted with a 0.5 m-long pipe (Φ 80 mm) certified to EN 1856-2 standard.
The pellet stove, depending on the model you have purchased, can be installed flush or with free-standing installation. In the case of free-standing installation
respect the following distances from combustible wall, Page 10 – 11.
If you want to build the stove into other pieces of the kitchen, you can safely place the furniture close to the hob. The safety distance is given by the heads of the
screws installed in the lid. You can close the space between the lid and the hob with a high-temperature-proof silicone, Page 10 – 11.
This type of stove combines the convenience of pellets with the
proven tradition of an economic kitchen with which it is possible
to prepare meals and heat the environment at the same time.
Thanks to technology, in this case also not only is it possible to
cook but the appliance was created to provide plenty of space to
do so. In addition the pellets are easy to handle, both in terms of
power and for the precise temperature management, with no
mess or clutter. This economical ventilated pellet stove is
equipped with a frontal pellet loading system that is very easy to
use and which makes it extremely practical in everyday use. Its
wide top plate, available in steel or glass ceramic, is perfect for
cooking meals using the heat given off. The fume outlet is top or
rear. In winter, the forced ventilation facilitates rapid and uniform
heating of the entire environment while in summer it is possible
to cook without forced ventilation. Conceived to be functional, the
design was not secondary, in fact the large glass panel was intended to make the fire visible. Available in both the recessed and free-standing version.
Before installing the stove rotate the rear upstand (if any), by loosening the screws.
To install the stove with rear exhaust, it is necessary to break the semi-cut on the rear and then install the pipes.
04.5 PELLET KITCHEN WITH OVEN
(Electronics p. 19 – 31)
IMPORTANT: THE LENGTH OF THE FLUE DUCT MUST BE OF MAX. 6 METERS WITH A DIAMETER OF 80 mm; EVERY 90° CURVE OR (T)
CONNECTION IS CONSIDERED AS 1 METER OF PIPE.
PRIOR TO THE CHIMNEY CONNECTION, TO ENSURE THE CORRECT PERFORMANCE OF THE STOVE, YOU MUST RESPECT THE FOLLOWING
TYPES OF INSTALLATION:
The pellet stove with oven must be installed with 0,5 meters of pipe Φ 80mm certified according to the EN 1856-2 norm.
The pellet stove with oven can be flush mounted or it can have a free installation. Page 10 – 11.
If you want to build the stove into other pieces of the kitchen, you can safely place the furniture close to the hob. The safety distance is given by the heads of the
screws installed in the lid. You can close the space between the lid and the hob with a high-temperature-proof silicone. Page 10 – 11.
Before installing the kitchen it is necessary to rotate the rear backsplash (if present), by unscrewing the screws.
If you want to install the stove with rear outlet please break the pre-cut in the back and then install the pipes.
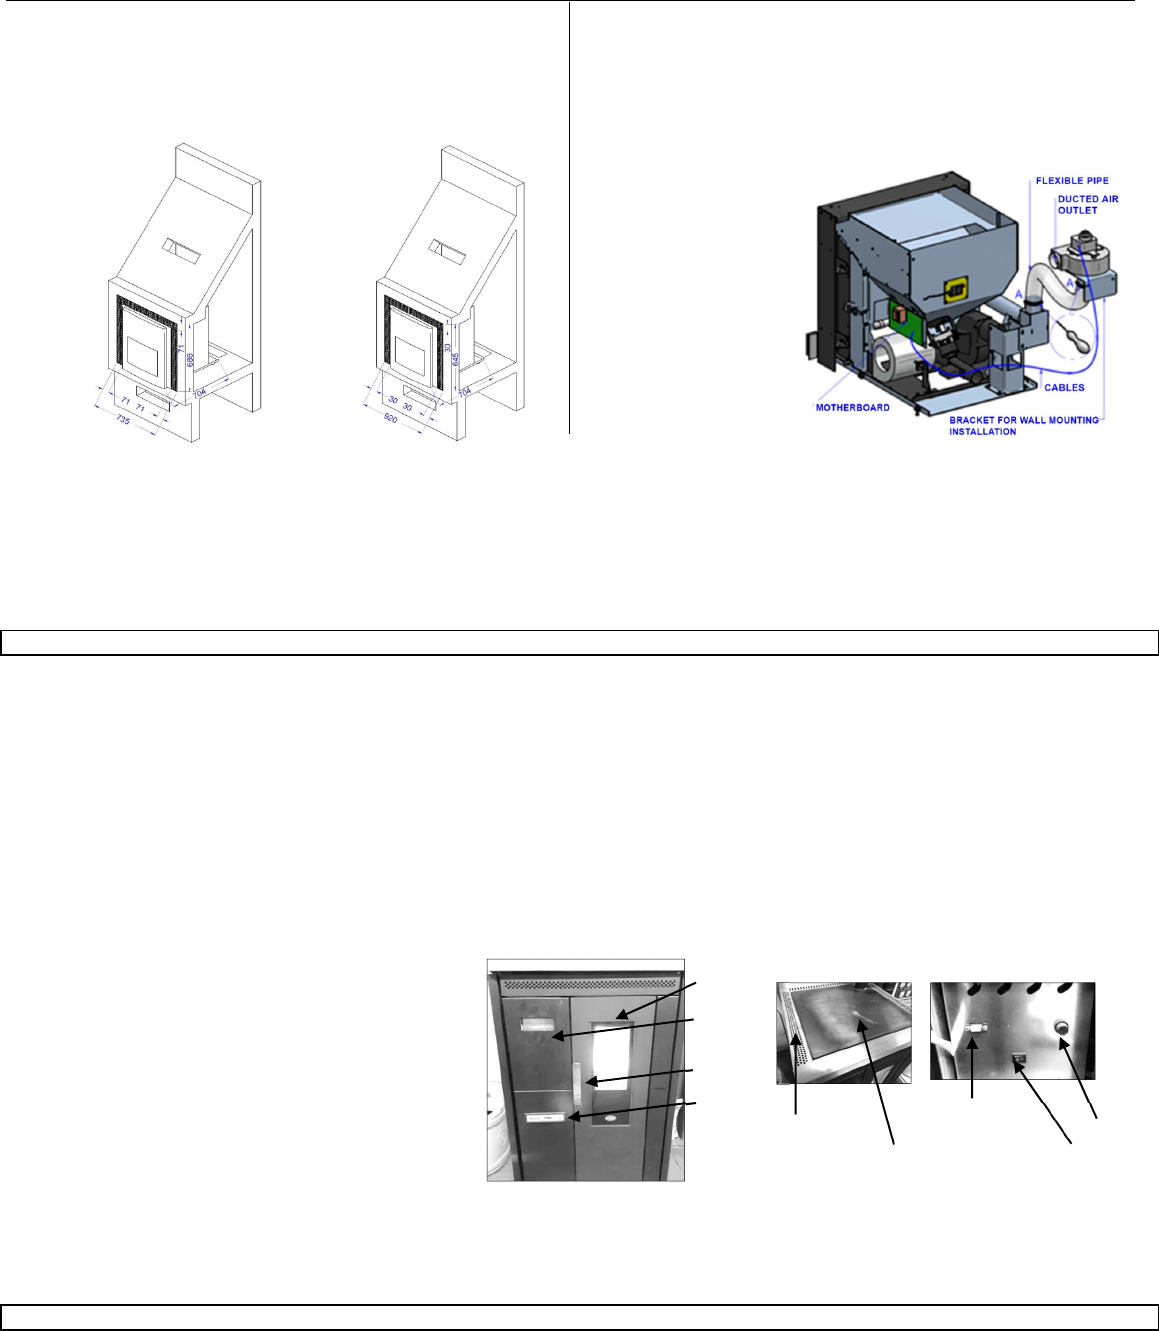
Ducting system
The devices which can be equipped with ducting systems are the 11KW
inserts, not removed for loading.
After installing the insert, fix the bracket with the second blower to the wall in a
comfortable position and if possible, not above the flexible pipe supplied with
the product. Carefully tighten the clamps and connect the blower to another
flexible pipe to channel the air into another room. The second fan setting is on
page 17.
11 KW INSERTS
Suitably isolated the beam above the insert if present. Any extraordinary
maintenance operations shall be carried out by authorised staff, with the
insert switched off, after slightly lifting its front side and pulling it out.
Pellet feeding: remove the upper drawer and fill it with pellet. This operation
can also be performed while the insert is running.
ik heb het buisje van de Pressostaat van mijn Eva Calor Erika los gehad nu weet ik niet meer of het boven of onder terug moet steken.
Gesteld op 29-11-2022 om 09:25
Gebruikershandleiding.com neemt misbruik van zijn services uitermate serieus. U kunt hieronder aangeven waarom deze vraag ongepast is. Wij controleren de vraag en zonodig wordt deze verwijderd.
Product:
Spelregels forum
Om tot zinvolle vragen te komen hanteren wij de volgende spelregels:
lees eerst de handleiding door;
controleer of uw vraag al eerder door iemand anders is gesteld;
probeer uw vraag zo duidelijk mogelijk te stellen;
heeft u een probleem en al geprobeerd om dit op te lossen, vermeld dit erbij aub;
heeft u een oplossing gekregen van een bezoeker dan horen wij dat graag in dit forum;
wilt u een reactie geven op een vraag of antwoord, gebruik dan niet dit formulier maar klik op de knop 'reageer op deze vraag';
uw vraag wordt direct op de website gezet; vermijd daarom persoonlijke gegevens in te vullen;
Belangrijk! Als er een antwoord wordt gegeven op uw vraag, dan is het voor de gever van het antwoord nuttig om te weten als u er wel (of niet) mee geholpen bent! Wij vragen u dus ook te reageren op een antwoord.
Belangrijk! Antwoorden worden ook per e-mail naar abonnees gestuurd. Laat uw emailadres achter op deze site, zodat u op de hoogte blijft. U krijgt dan ook andere vragen en antwoorden te zien.
Abonneren
Abonneer u voor het ontvangen van emails voor uw Eva Calor Erika bij:
nieuwe vragen en antwoorden
nieuwe handleidingen
U ontvangt een email met instructies om u voor één of beide opties in te schrijven.
Ontvang uw handleiding per email
Vul uw emailadres in en ontvang de handleiding van Eva Calor Erika in de taal/talen: Engels als bijlage per email.
De handleiding is 5,83 mb groot.
U ontvangt de handleiding per email binnen enkele minuten. Als u geen email heeft ontvangen, dan heeft u waarschijnlijk een verkeerd emailadres ingevuld of is uw mailbox te vol. Daarnaast kan het zijn dat uw internetprovider een maximum heeft aan de grootte per email. Omdat hier een handleiding wordt meegestuurd, kan het voorkomen dat de email groter is dan toegestaan bij uw provider.
Uw handleiding is per email verstuurd. Controleer uw email
Als u niet binnen een kwartier uw email met handleiding ontvangen heeft, kan het zijn dat u een verkeerd emailadres heeft ingevuld of dat uw emailprovider een maximum grootte per email heeft ingesteld die kleiner is dan de grootte van de handleiding.
Er is een email naar u verstuurd om uw inschrijving definitief te maken.
Controleer uw email en volg de aanwijzingen op om uw inschrijving definitief te maken
U heeft geen emailadres opgegeven
Als u de handleiding per email wilt ontvangen, vul dan een geldig emailadres in.
Uw vraag is op deze pagina toegevoegd
Wilt u een email ontvangen bij een antwoord en/of nieuwe vragen? Vul dan hier uw emailadres in.