All rights reserved. No part of this publication may be reproduced, stored in a retrieval system, or transmitted in any form or by any means, electronic, mechanical, photocopying,
recording, or otherwise, without the prior written permission of Seiko Epson Corporation. The information contained herein is designed only for use with this Epson product.
Epson is not responsible for any use of this information as applied to other products.
Neither Seiko Epson Corporation nor its affiliates shall be liable to the purchaser of this product or third parties for damages, losses, costs, or expenses incurred by purchaser or
third parties as a result of: accident, misuse, or abuse of this product or unauthorized modifications, repairs, or alterations to this product, or (excluding the U.S.) failure to strictly
comply with Seiko Epson Corporation’s operating and maintenance instructions.
Seiko Epson Corporation shall not be liable for any damages or problems arising from the use of any options or any consumable products other than those designated as
Original Epson Products or Epson Approved Products by Seiko Epson Corporation.
Trademarks
Epson is a registered trademark of Seiko Epson Corporation.
Epson Connection, Epson Store, and Extra Care are service marks; and PrivateLine, Presenters Club, and PowerLite are registered trademarks of Epson America, Inc.
Pixelworks, DNX, and the DNX logo are trademarks of Pixelworks, Inc.
General Notice: Other product names used herein are for identification purposes only and may be trademarks of their respective owners. Epson disclaims any and all rights in
◗Rear/ceiling projection using a translucent screen
(Rear/Ceiling projection)
7
Part Names and Functions
Part Names and Functions
Front/Top
Lamp cover
Open this cover when replacing the
projector's lamp.
Control panel
Remote control light-receiving area
Receives signals from the remote control.
Front adjustable foot
Raises the projector to adjust the projection
angle.
Lens cover
Slide shut when not using the projector to
protect the lens.
If you close it while projecting, the image and
sound are termporarily stopped.
Focus ring
Adjusts the image focus.
Foot release lever
Extends the front foot.
Air exhaust vent
Security lock
8
Part Names and Functions
Control Panel
[Power] button
Turns the projector power on or off.
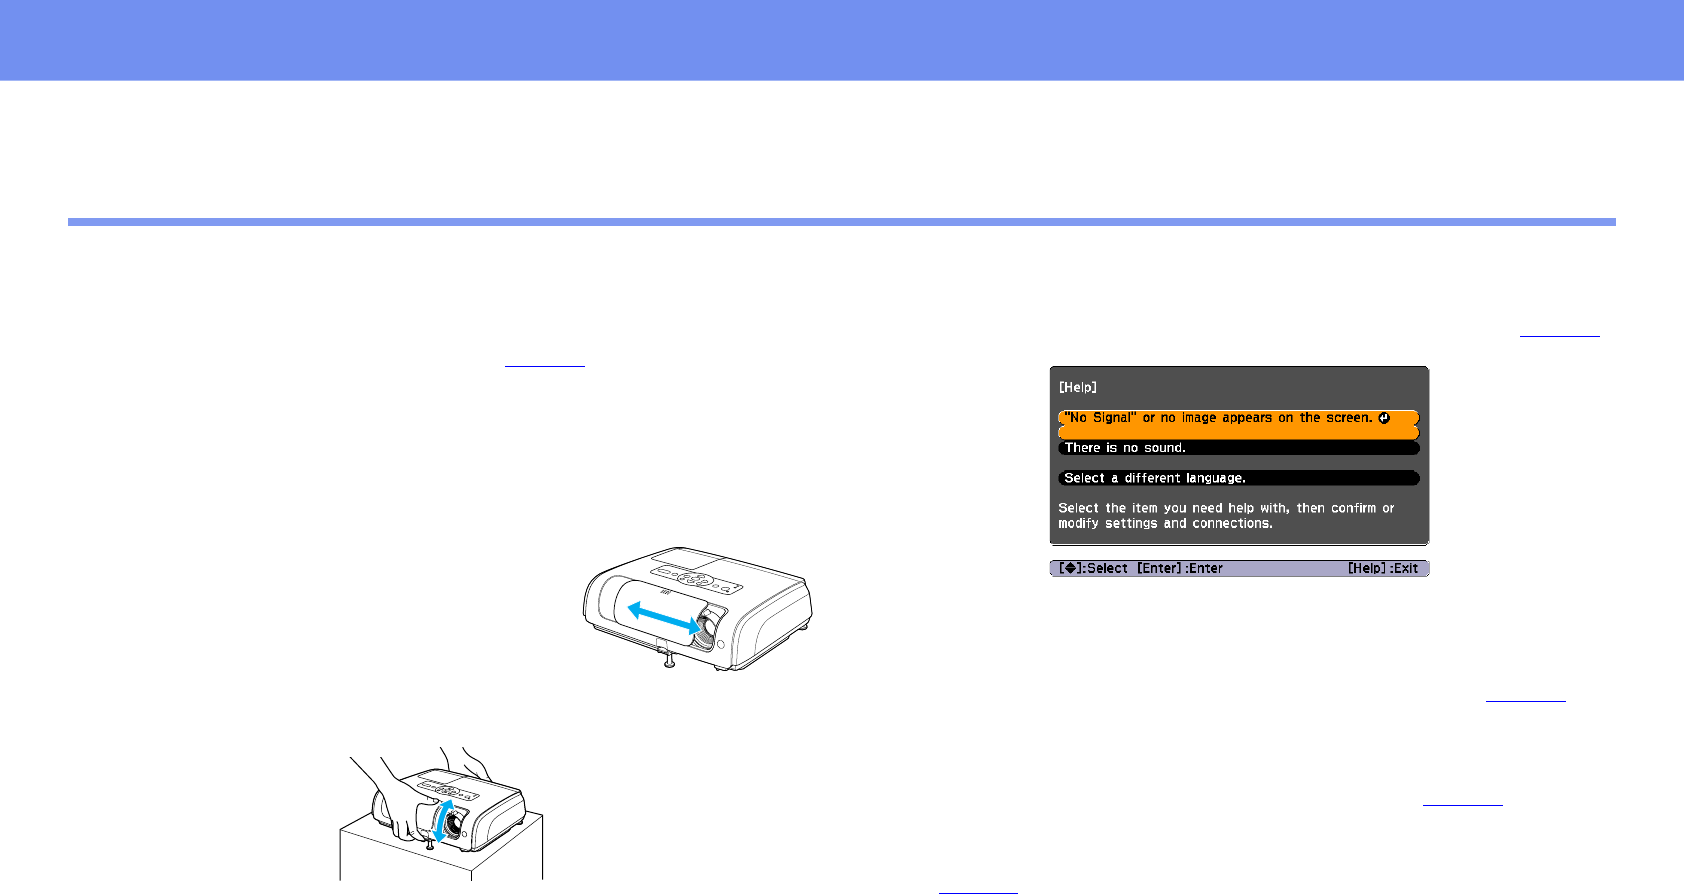
[Help] button
Displays and closes the help, which shows
solutions if a problem occurs.
[Menu] button
Displays and closes the configuration menu.
[Esc] button
Stops the current function.
Displays the previous screen
or menu while viewing a
configuration menu.
[Source Search] button
The input source is automatically searched for in the
following order, and the input image from the connected
equipment is projected.
Computer port
S-Video port
Video port
[Enter] button
Automatically adjusts analog RGB images from computers
and RGB video images to the optimum images.
If a configuration menu or help screen is displayed, it
accepts and enters the current selection.
[] [] button
Press to correct keystone distortion.
If a configuration menu or help screen is
displayed, it selects menu items and
setting values.
[Wide] [Tele] button
Adjusts the image size. If a configuration menu or help
screen is displayed, it selects menu items and setting
values.
LED indicators
The color of the
indicators and whether
they are flashing or lit
shows the state of this
projector.
9
Part Names and Functions
Rear
Remote control light-receiving area
Receives signals from the remote control.
Power inlet
Connects to the power cable.
Computer port
Inputs analog RGB video signals from a
computer and RGB video signals and
component video signals from other video
sources.
Video port
Inputs component
video signals to the
projector from other
video sources.
S-Video port
Inputs S-video signals
to the projector from
other video sources.
USB port
Connects the projector to a computer via the
USB cable when using the wireless mouse
function.
Computer images cannot be projected by using
the USB cable to connect the computer.
Monitor Out port
Outputs the projected computer's analog RGB
signals or RGB video signals to an external
monitor from the source that is connected to
the Computer port. This feature is not available
for video equipment signals.
Speaker
Rear adjustable foot
Lets you level the image.
Audio input
Input audio signals from connected external
equipment.
When you are connecting two or more pieces of
external equipment that use the same input port,
you need to disconnect one before connecting the
other, or use an audio selector.
10
Part Names and Functions
Base
Air filter (air intake vent)
This prevents dust and other foreign particles
from getting inside the projector when air is
drawn in. It should be cleaned and replaced
periodically.
Suspension bracket fixing points (3 points)
Attach the optional ceiling mount here when suspending the projector from a ceiling.
Front adjustable footFoot adjust lever
Air intake vent
Clean the air intake vent
periodically.
58
Optional Accessories and Consumables
Appendix
Optional Accessories and Consumables
You can purchase screens, carrying cases, or other accessories from an Epson authorized reseller. For product information and to find the nearest authorized
reseller, please call 800-GO-EPSON (800-463-7766) or browse our catalog of products at www.epson.com, select the product you are interested in, and click
“Where to Buy.” To purchase online, please visit the Epson Store at www.epsonstore.com (U.S. sales only). In Canada, please call 800-463-7766 for a reseller
referral. This list of optional accessories is current as of January 2005. Details of accessories are subject to change without notice.
Gebruikershandleiding.com neemt misbruik van zijn services uitermate serieus. U kunt hieronder aangeven waarom deze vraag ongepast is. Wij controleren de vraag en zonodig wordt deze verwijderd.
Product:
Spelregels forum
Om tot zinvolle vragen te komen hanteren wij de volgende spelregels:
lees eerst de handleiding door;
controleer of uw vraag al eerder door iemand anders is gesteld;
probeer uw vraag zo duidelijk mogelijk te stellen;
heeft u een probleem en al geprobeerd om dit op te lossen, vermeld dit erbij aub;
heeft u een oplossing gekregen van een bezoeker dan horen wij dat graag in dit forum;
wilt u een reactie geven op een vraag of antwoord, gebruik dan niet dit formulier maar klik op de knop 'reageer op deze vraag';
uw vraag wordt direct op de website gezet; vermijd daarom persoonlijke gegevens in te vullen;
Belangrijk! Als er een antwoord wordt gegeven op uw vraag, dan is het voor de gever van het antwoord nuttig om te weten als u er wel (of niet) mee geholpen bent! Wij vragen u dus ook te reageren op een antwoord.
Belangrijk! Antwoorden worden ook per e-mail naar abonnees gestuurd. Laat uw emailadres achter op deze site, zodat u op de hoogte blijft. U krijgt dan ook andere vragen en antwoorden te zien.
Abonneren
Abonneer u voor het ontvangen van emails voor uw Epson powerlite s4 bij:
nieuwe vragen en antwoorden
nieuwe handleidingen
U ontvangt een email met instructies om u voor één of beide opties in te schrijven.
Ontvang uw handleiding per email
Vul uw emailadres in en ontvang de handleiding van Epson powerlite s4 in de taal/talen: Engels als bijlage per email.
De handleiding is 2,01 mb groot.
U ontvangt de handleiding per email binnen enkele minuten. Als u geen email heeft ontvangen, dan heeft u waarschijnlijk een verkeerd emailadres ingevuld of is uw mailbox te vol. Daarnaast kan het zijn dat uw internetprovider een maximum heeft aan de grootte per email. Omdat hier een handleiding wordt meegestuurd, kan het voorkomen dat de email groter is dan toegestaan bij uw provider.
Stel vragen via chat aan uw handleiding
Stel uw vraag over deze PDF
Uw handleiding is per email verstuurd. Controleer uw email
Als u niet binnen een kwartier uw email met handleiding ontvangen heeft, kan het zijn dat u een verkeerd emailadres heeft ingevuld of dat uw emailprovider een maximum grootte per email heeft ingesteld die kleiner is dan de grootte van de handleiding.
Er is een email naar u verstuurd om uw inschrijving definitief te maken.
Controleer uw email en volg de aanwijzingen op om uw inschrijving definitief te maken
U heeft geen emailadres opgegeven
Als u de handleiding per email wilt ontvangen, vul dan een geldig emailadres in.
Uw vraag is op deze pagina toegevoegd
Wilt u een email ontvangen bij een antwoord en/of nieuwe vragen? Vul dan hier uw emailadres in.