681841
11
Verklein
Vergroot
Pagina terug
1/202
Pagina verder
User's Guide
NPD5633-02 EN
Copyright
No part of this publication may be reproduced, stored in a retrieval system, or transmitted in any form or by any
means, electronic, mechanical, photocopying, recording, or otherwise, without the prior written permission of
Seiko Epson Corporation. No patent liability is assumed with respect to the use of the information contained
herein. Neither is any liability assumed for damages resulting from the use of the information herein.
e
information contained herein is designed only for use with this Epson product. Epson is not responsible for any
use of this information as applied to other products.
Neither Seiko Epson Corporation nor its aliates shall be liable to the purchaser of this product or third parties for
damages, losses, costs, or expenses incurred by the purchaser or third parties as a result of accident, misuse, or
abuse of this product or unauthorized modications, repairs, or alterations to this product, or (excluding the U.S.)
failure to strictly comply with Seiko Epson Corporation's operating and maintenance instructions.
Seiko Epson Corporation and its aliates shall not be liable for any damages or problems arising from the use of
any options or any consumable products other than those designated as Original Epson Products or Epson
Approved Products by Seiko Epson Corporation.
Seiko Epson Corporation shall not be held liable for any damage resulting from electromagnetic interference that
occurs from the use of any interface cables other than those designated as Epson Approved Products by Seiko
Epson Corporation.
©Seiko Epson Corporation 2016.
e
contents of this manual and the
specications
of this product are subject to change without notice.
User's Guide
Copyright
2
Trademarks
EPSON
®
is a registered trademark, and EPSON EXCEED YOUR VISION or EXCEED YOUR VISION is a
trademark of Seiko Epson Corporation.
PRINT Image Matching™ and the PRINT Image Matching logo are trademarks of Seiko Epson Corporation.
Copyright © 2001 Seiko Epson Corporation. All rights reserved.
Epson Scan 2 soware is based in part on the work of the Independent JPEG Group.
libti
Copyright © 1988-1997 Sam
Leer
Copyright © 1991-1997 Silicon Graphics, Inc.
Permission to use, copy, modify, distribute, and sell this soware and its documentation for any purpose is
hereby granted without fee, provided that (i) the above copyright notices and this permission notice appear in
all copies of the soware and related documentation, and (ii) the names of Sam Leer and Silicon Graphics
may not be used in any advertising or publicity relating to the soware without the specic, prior written
permission of Sam Leer and Silicon Graphics.
THE SOFTWARE IS PROVIDED "AS-IS" AND WITHOUT WARRANTY OF ANY KIND, EXPRESS,
IMPLIED OR OTHERWISE, INCLUDING WITHOUT LIMITATION, ANY WARRANTY OF
MERCHANTABILITY OR FITNESS FOR A PARTICULAR PURPOSE.
IN NO EVENT SHALL SAM LEFFLER OR SILICON GRAPHICS BE LIABLE FOR ANY SPECIAL,
INCIDENTAL, INDIRECT OR CONSEQUENTIAL DAMAGES OF ANY KIND, OR ANY DAMAGES
WHATSOEVER RESULTING FROM LOSS OF USE, DATA OR PROFITS, WHETHER OR NOT ADVISED
OF THE POSSIBILITY OF DAMAGE, AND ON ANY THEORY OF LIABILITY, ARISING OUT OF OR IN
CONNECTION WITH THE USE OR PERFORMANCE OF THIS SOFTWARE.
SDXC Logo is a trademark of SD-3C, LLC.
PictBridge is a trademark.
Microso
®
, Windows
®
, and Windows Vista
®
are registered trademarks of
Microso
Corporation.
Apple, Macintosh, Mac OS, OS X, Bonjour, Safari, iPad, iPhone, iPod touch, and iTunes are trademarks of Apple
Inc., registered in the U.S. and other countries. AirPrint and the AirPrint logo are trademarks of Apple Inc.
Google Cloud Print™, Chrome™, Chrome OS™, and Android™ are trademarks of Google Inc.
Adobe and Adobe Reader are either registered trademarks or trademarks of Adobe Systems Incorporated in the
United States and/or other countries.
Intel
®
is a registered trademark of Intel Corporation.
General Notice: Other product names used herein are for identication purposes only and may be trademarks
of their respective owners. Epson disclaims any and all rights in those marks.
User's Guide
Trademarks
3
Contents
Copyright
Trademarks
About This Manual
Introduction to the Manuals...................9
Marks and Symbols.........................9
Descriptions Used in this Manual..............10
Operating System References.................10
Important Instructions
Safety Instructions.........................11
Safety Instructions for Ink................. 11
Printer Advisories and Warnings.............. 12
Advisories and Warnings for Setting Up the
Printer................................12
Advisories and Warnings for Using the Printer. . 12
Advisories and Warnings for Transporting or
Storing the Printer.......................13
Advisories and Warnings for Using the
Printer with a Wireless Connection...........13
Advisories and Warnings for Using Memory
Cards................................ 13
Advisories and Warnings for Using the LCD
Screen................................13
Protecting Your Personal Information...........14
Printer Basics
Part Names and Functions...................15
Control Panel............................ 17
Buttons...............................18
Guide to the LCD Screen..................18
Network Settings
Network Connection Types.................. 21
Ethernet Connection.....................21
Wi-Fi Connection....................... 21
Wi-Fi Direct (Simple AP) Connection.........22
Connecting to a Computer...................22
Connecting to a Smart Device................ 23
Making Wi-Fi Settings from the Printer..........23
Making Wi-Fi Settings Manually.............24
Making Wi-Fi Settings by Push Button Setup. . . . 25
Making Wi-Fi Settings by PIN Code Setup
(WPS)................................25
Making Wi-Fi Direct (Simple AP)
Connection Settings......................26
Making Advanced Network Setting...........27
Checking the Network Connection Status........28
Checking the Network Status Using Network
Icon................................. 28
Checking the Network Status from the
Control Panel.......................... 28
Printing a Network Connection Report........29
Printing a Network Status Sheet.............33
Replacing or Adding New Access Points.........34
Changing the Connection Method to a Computer. . 34
Disabling Wi-Fi from the Control Panel..........35
Disconnecting Wi-Fi Direct (Simple AP)
connection from the Control Panel.............35
Restoring the Network Settings from the
Control Panel............................ 36
Loading Paper
Paper Handling Precautions..................37
Available Paper and Capacities................38
List of Paper Types.......................39
Where to Load Paper.......................40
Loading Paper in the Paper Cassette 1.........41
Loading Paper in the Paper Cassette 2.........45
Loading Paper in the Rear Paper Feed Slot......49
Placing Originals
Placing Originals on the Scanner Glass. . . . . . . . . . 53
How to Place Various Originals................54
Placing Photos for Copying................ 54
Placing a CD/DVD for Copying Labels........54
Placing Multiple Photos for Scanning at the
Same Time.............................54
Inserting a Memory Card
Supported Memory Cards................... 56
Inserting and Removing a Memory Card.........56
Loading a CD/DVD for Printing
Printable CD/DVDs........................59
CD/DVD Handling Precautions...............59
User's Guide
Contents
4
Loading and Removing a CD/DVD.............59
Printing
Printing from the Control Panel...............61
Printing Photos by Selecting from a Memory
Card.................................61
Printing Photos from a Memory Card onto a
CD/DVD Label.........................62
Printing Photos from a Memory Card with
Handwritten Notes.......................64
Printing Lined Paper, Calendars, Original
Writing Paper, and Original Greeting Cards. . . . 65
Printing Original Envelopes................66
Printing in Various Layouts................ 68
Printing a Coloring Book..................69
DPOF Printing......................... 69
Menu Options for Printing from the Control
Panel.................................70
Printing from a Computer................... 72
Printing Basics - Windows.................72
Printing Basics - Mac OS..................74
Printing on 2-Sides.......................76
Printing Several Pages on One Sheet..........78
Printing to Fit the Paper Size................80
Printing Multiple Files Together (for
Windows Only).........................81
Printing One Image on Multiple Sheets to
Create a Poster (for Windows Only).......... 82
Printing Using Advanced Features........... 88
Printing Photos Using Epson Easy Photo Print. . 90
Printing a CD/DVD Label with Epson Print
CD..................................91
Printing from Smart Devices................. 91
Using Epson iPrint.......................91
Using AirPrint..........................93
Printing from a Digital Camera................94
Printing from a Digital Camera Connected
by USB Cable...........................94
Printing from a Digital Camera Connected
Wirelessly............................. 95
Canceling Printing.........................96
Canceling Printing - Printer Button...........96
Canceling Printing - Windows.............. 96
Canceling Printing - Mac OS............... 96
Copying
Copying Basics........................... 97
Menu Options for Copy Mode.............. 97
Copying Photos..........................100
Menu Options for Copy/Restore Photos. . . . . . 100
Copying on a CD/DVD Label................101
Menu Options for Copy to CD/DVD.........103
Scanning
Scanning Using the Control Panel.............104
Scanning to a Memory Card...............104
Scanning to the Cloud...................104
Scanning to a Computer..................105
Scanning to a Computer (WSD)............106
Menu Options for Scanning...............108
Scanning from a Computer..................108
Scanning Using Epson Scan 2..............108
Scanning from Smart Devices................114
Installing Epson iPrint...................115
Scanning Using Epson iPrint...............115
Relling Ink and Replacing
Maintenance Boxes
Checking the Status of the Remaining Ink and
the Maintenance Box......................117
Checking the Status of the Maintenance Box -
Control Panel..........................117
Checking the Status of the Remaining Ink
and the Maintenance Box - Windows.........117
Checking the Status of the Remaining Ink
and the Maintenance Box - Mac OS..........118
Ink Bottle Codes......................... 118
Ink Bottle Handling Precautions..............119
Relling the Ink Tanks.....................120
Maintenance Box Code.....................123
Maintenance Box Handling Precautions........ 123
Replacing a Maintenance Box................124
Maintaining the Printer
Checking and Cleaning the Print Head.........127
Checking and Cleaning the Print Head -
Control Panel..........................127
Checking and Cleaning the Print Head -
Windows.............................128
Checking and Cleaning the Print Head - Mac
OS..................................128
Running Power Cleaning...................128
Running Power Cleaning - Control Panel. . . . . 129
Running Power Cleaning - Windows.........129
Running Power Cleaning - Mac OS..........130
Aligning the Print Head....................130
User's Guide
Contents
5
Aligning the Print Head - Control Panel. . . . . . 130
Cleaning the Paper Path for Ink Smears.........131
Cleaning the Scanner Glass..................132
Checking the Total Number of Pages Fed
rough the Printer.......................132
Checking the Total Number of Pages Fed
rough the Printer - Control Panel.........133
Checking the Total Number of Pages Fed
rough the Printer - Windows.............133
Checking the Total Number of Pages Fed
rough the Printer - Mac OS..............133
Saving Power............................133
Saving Power - Control Panel..............134
Menu Options for Settings Mode
Menu Options for Maintenance.............. 135
Nozzle Check:.........................135
Head Cleaning:........................ 135
Power Cleaning:........................135
Print Head Alignment:...................135
Reset Ink Levels:........................135
Maintenance Box Service Life:............. 135
Menu Options for Printer Setup..............136
Paper Source Setting:....................136
CD/DVD:............................136
Stickers:..............................136
ick Paper:...........................136
Quiet Mode:.......................... 136
Screen Saver:..........................136
Auto Power On:........................136
Power O Settings:......................136
Power O Timer:.......................137
Sleep Timer:...........................137
Language:............................ 137
Menu Options for Network Settings........... 137
Menu Options for Epson Connect Services......138
Menu Options for Google Cloud Print Services. . . 139
Menu Options for File Sharing Setup...........139
Menu Options for External Device Setup........139
Menu Options for Guide Functions............140
Menu Options for Firmware Update...........140
Menu Options for Restore Default Settings...... 140
Network Service and Software
Information
Epson Connect Service.....................142
Web Cong.............................142
Running Web Cong on a Web Browser. . . . . . 143
Running Web Cong on Windows.......... 143
Running Web Cong on Mac OS............143
Windows Printer Driver....................144
Guide to Windows Printer Driver...........145
Making Operation Settings for the Windows
Printer Driver......................... 146
Mac OS Printer Driver.....................147
Guide to Mac OS Printer Driver............148
Making Operation Settings for the Mac OS
Printer Driver......................... 149
Epson Scan 2 (Scanner Driver)...............150
Epson Event Manager......................150
Epson Easy Photo Print.................... 151
Epson Print CD..........................151
EPSON Soware Updater. . . . . . . . . . . . . . . . . . . 152
Uninstalling Applications...................152
Uninstalling Applications - Windows.........152
Uninstalling Applications - Mac OS..........153
Installing Applications.....................154
Updating Applications and Firmware..........154
Updating the Printer's Firmware using the
Control Panel..........................155
Solving Problems
Checking the Printer Status..................156
Checking Messages on the LCD Screen. . . . . . . 156
Checking the Printer Status - Windows.......157
Checking the Printer Status - Mac OS........157
Removing Jammed Paper...................157
Removing Jammed Paper from the Paper
Cassette..............................158
Removing Jammed Paper from Inside the
Printer...............................159
Removing Jammed Paper from the Rear Cover. 161
Paper Does Not Feed Correctly...............162
Paper Jams............................163
Paper Feeds at a Slant....................163
Several Sheets of Paper are Fed at a Time. . . . . . 163
Paper is Ejected from the Rear Paper Feed
Slot Without Being Printed................163
CD/DVD Tray is Ejected..................163
Power and Control Panel Problems............164
Power Does Not Turn On.................164
Lights Came On and then Went Out.........164
Power Does Not Turn O.................164
Power Turns O Automatically.............164
LCD Screen Gets Dark...................165
User's Guide
Contents
6
e Auto Power On Feature does not Work. . . . 165
Cannot Print from a Computer...............165
When You Cannot Make Network Settings...... 166
Cannot Connect from Devices Even ough
Network Settings are No Problem...........166
Checking the SSID Connected to the Printer. . . 168
Checking the SSID for the Computer.........168
Suddenly the Printer Cannot Print over a
Network Connection......................169
Suddenly the Printer Cannot Print Using a USB
Connection.............................170
Cannot Print from an iPhone or iPad.......... 170
Printout Problems........................170
Printout is Scued or Color is Missing........170
Banding or Unexpected Colors Appear.......171
Colored Banding Appears at Intervals of
Approximately 2.5 cm....................171
Blurry Prints, Vertical Banding, or
Misalignment..........................172
Print Quality is Poor.....................172
Paper Is Smeared or Scued...............173
Paper is Smeared During Automatic 2-Sided
Printing..............................174
Printed Photos are Sticky.................174
Images or Photos are Printed in Unexpected
Colors...............................175
Colors Dier from What You See on the
Display..............................175
Cannot Print Without Margins.............175
Edges of the Image are Cropped During
Borderless Printing......................176
e Position, Size, or Margins of the Printout
Are Incorrect..........................176
Multiple Originals are Copied onto a Single
Sheet................................176
Printing Position of Photo Stickers is Incorrect. 177
Printing Position on a CD/DVD is Incorrect. . . 177
Printed Characters Are Incorrect or Garbled. . . 177
e
Printed Image Is Inverted..............177
Mosaic-Like Patterns in the Prints...........177
Uneven Colors, Smears, Dots, or Straight
Lines Appear in the Copied Image...........177
Moiré (Cross-Hatch) Patterns Appear in the
Copied Image......................... 178
An Image of the Reverse Side of the Original
Appears in the Copied Image..............178
e Printout Problem Could Not be Cleared. . . 178
Other Printing Problems................... 178
Printing Is Too Slow.....................178
Printing Slows Down Dramatically During
Continuous Printing.....................179
Cannot Cancel Printing from a Computer
Running Mac OS X v10.6.8................179
Cannot Start Scanning.....................180
Cannot Start Scanning when Using the
Control Panel..........................180
Scanned Image Problems...................181
Uneven Colors, Dirt, Spots, and so on Appear
when Scanning from the Scanner Glass.......181
e Image Quality Is Rough...............181
Oset
Appears in the Background of Images. . . 181
Text is Blurred.........................181
Moiré Patterns (Web-Like Shadows) Appear. . . 182
Cannot Scan the Correct Area on the
Scanner Glass..........................182
Cannot Preview inumbnail............. 182
Text is Not Recognized Correctly when
Saving as a Searchable PDF................183
Cannot Solve Problems in the Scanned Image. . 183
Other Scanning Problems...................184
Scanning Speed Is Slow...................184
Scanning Stops when Scanning to PDF/
Multi-TIFF........................... 184
Other Problems..........................185
Slight Electric Shock when Touching the
Printer...............................185
Operation Sounds Are Loud...............185
Cannot Save the Data to a Memory Card......185
Application Is Blocked by a Firewall (for
Windows Only)........................185
"?" Is Displayed on the Photo Selection Screen. . 185
A Message Prompting You to Reset the Ink
Levels is Displayed......................186
Ink Spilled............................186
Appendix
Technical Specications....................187
Printer Specications....................187
Scanner Specications...................188
Interface Specications...................189
Network Function List...................189
Wi-Fi Specications.....................190
Ethernet Specications...................191
Security Protocol.......................191
Supported ird Party Services.............191
External Storage Device Specications........191
Dimensions...........................193
Electrical Specications..................193
Environmental Specications..............194
System Requirements....................194
Regulatory Information....................195
User's Guide
Contents
7
Standards and Approvals................. 195
Restrictions on Copying..................196
Transporting the Printer....................196
Accessing a Memory Card From a Computer. . . . .199
Where to Get Help........................200
Technical Support Web Site................200
Contacting Epson Support................201
User's Guide
Contents
8
About This Manual
Introduction to the Manuals
e following manuals are supplied with your Epson printer. As well as the manuals, check the various types of
help information available from the printer itself or from the Epson soware applications.
Start Here (paper manual)
Provides you with information on setting up the printer, installing the soware, using the printer, solving
problems, and so on.
User's Guide (digital manual)
is manual. Provides overall information and instructions on using the printer, on network settings when
using the printer on a network, and on solving problems.
You can obtain the latest versions of the above manuals with the following methods.
Paper manual
Visit the Epson Europe support website at http://www.epson.eu/Support, or the Epson worldwide support
website at http://support.epson.net/.
Digital manual
Start EPSON Soware Updater on your computer. EPSON Soware Updater checks for available updates of
Epson soware applications and the digital manuals, and allows you to download the latest ones.
Related Information
&
“EPSON
Soware
Updater” on page 152
Marks and Symbols
!
Caution:
Instructions that must be followed carefully to avoid bodily injury.
c
Important:
Instructions that must be observed to avoid damage to your equipment.
Note:
Provides complementary and reference information.
&
Related Information
Links to related sections.
User's Guide
About This Manual
9
Descriptions Used in this Manual
Screenshots of the printer driver and the Epson Scan 2 (scanner driver) screens are from Windows 10 or OS X
El Capitan. e content displayed on the screens varies depending on the model and situation.
Illustrations of the printer used in this manual are examples only. Although there may be slight dierences
depending on the model, the method of operation is the same.
Some of the menu items on the LCD screen vary depending on the model and settings.
Operating System References
Windows
In this manual, terms such as "Windows 10", "Windows 8.1", "Windows 8", "Windows 7", "Windows Vista", and
"Windows XP" refer to the following operating systems. Additionally, "Windows" is used to refer to all versions.
Microso
®
Wi nd ow s
®
10 operating system
Microso
®
Wi nd ow s
®
8.1 operating system
Microso
®
Wi nd ow s
®
8 operating system
Microso
®
Wi nd ow s
®
7 operating system
Microso
®
Wi nd ow s Vis t a
®
operating system
Microso
®
Wi nd ow s
®
XP operating system
Microso
®
Wi nd ow s
®
XP Professional x64 Edition operating system
Mac OS
In this manual, "Mac OS" is used to refer to macOS Sierra, OS X El Capitan, OS X Yosemite, OS X Mavericks, OS X
Mountain Lion, Mac OS X v10.7.x, and Mac OS X v10.6.8.
User's Guide
About This Manual
10
Important Instructions
Safety Instructions
Read and follow these instructions to ensure safe use of this printer. Make sure you keep this manual for future
reference. Also, be sure to follow all warnings and instructions marked on the printer.
Some of the symbols used on your printer are to ensure safety and proper use of the printer. Visit the following
Web site to learn the meaning of the symbols.
http://support.epson.net/symbols
Use only the power cord supplied with the printer and do not use the cord with any other equipment. Use of
other cords with this printer or the use of the supplied power cord with other equipment may result in re or
electric shock.
Be sure your AC power cord meets the relevant local safety standard.
Never disassemble, modify, or attempt to repair the power cord, plug, printer unit, scanner unit, or options by
yourself, except as specically explained in the printer's manuals.
Unplug the printer and refer servicing to qualied service personnel under the following conditions:
e power cord or plug is damaged; liquid has entered the printer; the printer has been dropped or the casing
damaged; the printer does not operate normally or exhibits a distinct change in performance. Do not adjust
controls that are not covered by the operating instructions.
Place the printer near a wall outlet where the plug can be easily unplugged.
Do not place or store the printer outdoors, near excessive dirt or dust, water, heat sources, or in locations
subject to shocks, vibrations, high temperature or humidity.
Take care not to spill liquid on the printer and not to handle the printer with wet hands.
Keep the printer at least 22 cm away from cardiac pacemakers. Radio waves from this printer may adversely
aect the operation of cardiac pacemakers.
If the LCD screen is damaged, contact your dealer. If the liquid crystal solution gets on your hands, wash them
thoroughly with soap and water. If the liquid crystal solution gets into your eyes, ush them immediately with
water. If discomfort or vision problems remain aer a thorough ushing, see a doctor immediately.
Safety Instructions for Ink
Be careful not to touch any ink when you handle the ink tanks, ink tank caps, and opened ink bottles or ink
bottle caps.
If ink gets on your skin, wash the area thoroughly with soap and water.
If ink gets into your eyes, ush them immediately with water. If discomfort or vision problems continue aer
a thorough ushing, see a doctor immediately.
If ink gets into your mouth, see a doctor right away.
Do not disassemble the maintenance box; otherwise ink may get into your eyes or on your skin.
Do not shake an ink bottle too vigorously or subject it to strong impacts as this can cause ink to leak.
Keep ink bottles, the ink tank unit, and maintenance box out of the reach of children. Do not allow children to
drink from or handle the ink bottles and ink bottle cap.
User's Guide
Important Instructions
11
Printer Advisories and Warnings
Read and follow these instructions to avoid damaging the printer or your property. Make sure you keep this
manual for future reference.
Advisories and Warnings for Setting Up the Printer
Do not block or cover the vents and openings in the printer.
Use only the type of power source indicated on the printer's label.
Avoid using outlets on the same circuit as photocopiers or air control systems that regularly switch on and o.
Avoid electrical outlets controlled by wall switches or automatic timers.
Keep the entire computer system away from potential sources of electromagnetic interference, such as
loudspeakers or the base units of cordless telephones.
e power-supply cords should be placed to avoid abrasions, cuts, fraying, crimping, and kinking. Do not place
objects on top of the power-supply cords and do not allow the power-supply cords to be stepped on or run over.
Be particularly careful to keep all the power-supply cords straight at the ends and the points where they enter
and leave the transformer.
If you use an extension cord with the printer, make sure that the total ampere rating of the devices plugged into
the extension cord does not exceed the cord's ampere rating. Also, make sure that the total ampere rating of all
devices plugged into the wall outlet does not exceed the wall outlet's ampere rating.
If you plan to use the printer in Germany, the building installation must be protected by a 10 or 16 amp circuit
breaker to provide adequate short-circuit protection and over-current protection for the printer.
When connecting the printer to a computer or other device with a cable, ensure the correct orientation of the
connectors. Each connector has only one correct orientation. Inserting a connector in the wrong orientation
may damage both devices connected by the cable.
Place the printer on a
at,
stable surface that extends beyond the base of the printer in all directions.
e
printer
will not operate properly if it is tilted at an angle.
Allow space above the printer so that you can fully raise the document cover.
Leave enough space in front of the printer for the paper to be fully ejected.
Avoid places subject to rapid changes in temperature and humidity. Also, keep the printer away from direct
sunlight, strong light, or heat sources.
Advisories and Warnings for Using the Printer
Do not insert objects through the slots in the printer.
Do not put your hand inside the printer during printing.
Do not touch the white at cable and ink tubes inside the printer.
Do not use aerosol products that contain ammable gases inside or around the printer. Doing so may cause re.
Do not move the print head by hand; otherwise, you may damage the printer.
Be careful not to trap your ngers when closing the scanner unit.
Do not press too hard on the scanner glass when placing the originals.
User's Guide
Important Instructions
12
Prolonged use of the printer when the ink level is below the lower line could damage the printer. Fill the ink
tank to the upper line while the printer is not operating. To display the correct ink level estimates, reset the ink
level aer lling the tank.
Always turn the printer o using the
P
button. Do not unplug the printer or turn o the power at the outlet
until the
P
light stops ashing.
If you are not going to use the printer for a long period, be sure to unplug the power cord from the electrical
outlet.
Advisories and Warnings for Transporting or Storing the Printer
When storing or transporting the printer, avoid tilting it, placing it vertically, or turning it upside down;
otherwise ink may leak.
Before transporting the printer, make sure that the print head is in the home (far right) position.
Advisories and Warnings for Using the Printer with a Wireless
Connection
Radio waves from this printer may negatively aect the operation of medical electronic equipment, causing
them to malfunction. When using this printer inside medical facilities or near medical equipment, follow
directions from the authorized personnel representing the medical facilities, and follow all posted warnings and
directions on the medical equipment.
Radio waves from this printer may negatively aect the operation of automatically controlled devices such as
automatic doors or re alarms, and could lead to accidents due to malfunction. When using this printer near
automatically controlled devices, follow all posted warnings and directions on these devices.
Advisories and Warnings for Using Memory Cards
Do not remove a memory card or turn
o
the printer while the memory card light is
ashing.
e methods for using memory cards vary according to card type. Be sure to refer to the manual packaged with
your memory card for details.
Use only memory cards compatible with the printer.
Related Information
& “Supported Memory Card Specications” on page 191
Advisories and Warnings for Using the LCD Screen
e
LCD screen may contain a few small bright or dark spots, and because of its features it may have an uneven
brightness.
ese
are normal and do not indicate that it is damaged in any way.
Only use a dry, so cloth for cleaning. Do not use liquid or chemical cleaners.
e exterior cover of the LCD screen could break if it receives a heavy impact. Contact your dealer if the
screen's surface chips or cracks, and do not touch or attempt to remove the broken pieces.
User's Guide
Important Instructions
13
Protecting Your Personal Information
When you give the printer to someone else or dispose of it, erase all the personal information stored in the printer's
memory by selecting Settings > Restore Default Settings > All Settings on the control panel.
User's Guide
Important Instructions
14
Printer Basics
Part Names and Functions
A
Rear paper feed slot Load one sheet of paper at a time by hand.
B
Paper support Supports loaded paper.
C
Rear paper feed slot cover Prevents foreign substances from entering the printer. This cover should
usually be closed.
D
Edge guide Feeds the paper straight into the printer. Slide to the edges of the paper.
E
Control Panel Operates the printer. You can change the angle of the control panel by hand.
F
CD/DVD tray Place a CD/DVD for label printing. This should usually be stored on the
bottom of the printer.
A
Ink tank cover Open to rell the ink tank.
User's Guide
Printer Basics
15
B
Ink reservoir tanks (Ink tanks) Supplie ink to the print head.
C
Ink tank unit Contains the ink tanks.
D
Print head Ink is ejected from the print head nozzles underneath.
A
Front cover Open to load paper in the paper cassette.
B
Output tray Holds the ejected paper. Pull out manually and push it back in to store.
C
Paper cassette 1 Loads paper.
D
Paper cassette 2
E
Edge guide Feeds the paper straight into the printer. Slide to the edges of the paper.
User's Guide
Printer Basics
16
A
Document cover Blocks external light while scanning.
B
Scanner glass Place the originals.
C
Scanner unit Scans placed originals. Open to rell the ink tank or to remove jammed
paper. This unit should usually be kept closed.
D
Memory card slot Insert a memory card.
E
External interface USB port Connects an external storage device or a PictBridge capable device.
A
AC inlet Connects the power cord.
B
Maintenance box cover Remove when replacing the maintenance box. The maintenance box is a
container that collects a very small amount of surplus ink during cleaning or
printing.
C
Rear cover Remove when removing jammed paper.
D
USB port Connects a USB cable to connect with a computer.
E
LAN port Connects a LAN cable.
Control Panel
You can change the angle of the control panel.
User's Guide
Printer Basics
17
Buttons
A
Turns the printer on or o.
Do not turn o while the power light is ashing (while the printer is operating or processing
data).
Unplug the power cord when the power light is
o.
B
Displays the home screen.
C
Selects the number of pages to print.
D
Stops the current operation.
E
Displays menus such as CD/DVD label printing and copying.
F
Returns to the previous screen.
G
u
d
l
r
OK Use the
u
d
l
r
buttons to select a menu, and then press the OK button to open the selected
menu.
H
Starts an operation such as printing or copying.
Guide to the LCD Screen
Menus and messages are displayed on the LCD screen. Select a menu or setting by pressing the
u
d
l
r
buttons.
Guide to the Home Screen
e following icons and menus are displayed on the home screen.
User's Guide
Printer Basics
18
A
Icons that show the network status are displayed. You can learn the meaning of the icons in the Help menu. Enter
Help from the home screen using the
l
or
r
button, and then press the OK button. Select Icon List using the
u
or
d
button, and then press the OK button.
B
Displays the status of the maintenance box. You can learn the meaning of the icon in the Help menu.
C
Function icons and names are displayed as mode icons.
Copy Allows you to copy a document.
Print Photos Allows you to print photos on your memory card.
Scan Allows you to scan a document or a photo.
More Functions Allows you to access a variety of printing features such as copying photos, printing photos in
dierent layouts, and copying or printing on a CD/DVD.
Quiet Mode
Displays Quiet Mode setting that allows you to reduce the noise the printer makes. However,
enabling this may reduce print speed. Depending on the paper type and print quality settings
you selected, there may be no dierence in the printer's noise level. This is a shortcut to the
following menu.
Settings > Printer Setup > Quiet Mode
Settings Allows you to perform maintenance and make various settings for the printer features and
operations.
Maint. Access the menus recommended to improve the quality of your printouts. This is a shortcut to
the following menu.
Settings > Maintenance
Help Displays help information on basic operations, meaning of the icons displayed on the LCD
screen, and troubleshooting information.
Wi-Fi Setup Displays menus that allow you to set up the printer for use on a wireless network.
D
When
l
and
r
are displayed, you can scroll right or left.
E
Available buttons are displayed. In this example, you can proceed to the selected menu by pressing the OK button,
and you can select another menu by pressing the
l
or
r
button.
Related Information
& Copying Basics” on page 97
& “Printing Photos by Selecting from a Memory Card” on page 61
& “Scanning Using the Control Panel” on page 104
& Copying Photos” on page 100
& “Printing in Various Layouts” on page 68
& Printing Photos from a Memory Card onto a CD/DVD Label” on page 62
& Menu Options for Settings Mode” on page 135
& “Menu Options for Maintenance” on page 135
& Menu Options for Network Settings” on page 137
User's Guide
Printer Basics
19
Entering Characters
To enter characters and symbols for network settings from the control panel, use the
u
,
d
,
l
, and
r
buttons and
the soware keyboard on the LCD screen. Press the
u
,
d
,
l
, or
r
button to highlight a character or function
button on the keyboard, and then press the OK button to conrm. When you have nished entering characters,
highlight Done, and then press the OK button.
e displayed screen varies depending on the settings items. e following is the screen for entering the password
for your Wi-Fi network.
Icons Descriptions
AB12 Changes letters to uppercase.
ab12 Changes letters to lowercase.
Symbol Displays symbols.
l
r
Moves the cursor to the left or right.
Deletes a character to the left (backspace).
Space Enters a space to the right of the cursor.
Done Closes the software keyboard screen and displays a conrmation screen, or moves to the next screen.
User's Guide
Printer Basics
20
Network Settings
Network Connection Types
You can use the following connection methods.
Ethernet Connection
Connect the printer to a hub with an Ethernet cable.
Related Information
& Connecting to a Computer” on page 22
& “Making Advanced Network Setting” on page 27
Wi-Fi Connection
Connect the printer and the computer or smart device to the access point.
is
is the typical connection method
for home or
oce
networks where computers are connected by Wi-Fi through the access point.
User's Guide
Network Settings
21
Related Information
& Connecting to a Computer” on page 22
& Connecting to a Smart Device” on page 23
& “Making Wi-Fi Settings from the Printer” on page 23
Wi-Fi Direct (Simple AP) Connection
Use this connection method when you are not using Wi-Fi at home or at the oce, or when you want to connect
the printer and the computer or smart device directly. In this mode, the printer acts as an access point and you can
connect up to four devices to the printer without having to use a standard access point. However, devices directly
connected to the printer cannot communicate with each other through the printer.
Note:
Wi-Fi Direct (Simple AP) connection is a connection method designed to replace Ad Hoc mode.
e
printer can be connected by Wi-Fi or Ethernet, and Wi-Fi Direct (Simple AP) connection simultaneously.
However, if you start a network connection in Wi-Fi Direct (Simple AP) connection when the printer is connected
by Wi-Fi, the Wi-Fi is temporarily disconnected.
Related Information
&
“Making Wi-Fi Direct (Simple AP) Connection Settings” on page 26
Connecting to a Computer
We recommend using the installer to connect the printer to a computer. You can run the installer using one of the
following methods.
Setting up from the website
Access the following website, and then enter the product name. Go to Setup, and then start setting up.
http://epson.sn
Setting up using the soware disc (only for the models that come with a soware disc and users with computers
with disc drives.)
Insert the soware disc into the computer, and then follow the on-screen instructions.
User's Guide
Network Settings
22
Selecting the Connection Methods
Follow the on-screen instructions until the following screen is displayed, and then select the connection method of
the printer to the computer.
Select the connection type and then click Next.
Follow the on-screen instructions.
Connecting to a Smart Device
You can use the printer from a smart device when you connect the printer to the same Wi-Fi network (SSID) as the
smart device. To use the printer from a smart device, set up from the following website. Access to the website from
the smart device that you want to connect to the printer.
http://epson.sn > Setup
Note:
If you want to connect a computer and a smart device to the printer at the same time, we recommend connecting the
computer
rst.
Making Wi-Fi Settings from the Printer
You can make network settings from the printer's control panel in several ways. Choose the connection method
that matches the environment and conditions that you are using. If you know the information for the access point
such as SSID and password, you can make settings manually. If the access point supports WPS, you can make
settings by using push button setup.
Aer connecting the printer to the network, connect to the printer from the device that you want to use (computer,
smart device, tablet, and so on.)
User's Guide
Network Settings
23
Making Wi-Fi Settings Manually
You can manually set up the information necessary to connect to an access point from the printer's control panel.
To set up manually, you need the SSID and password for an access point.
Note:
If you are using an access point with its default settings, the SSID and password are on the label. If you do not know the SSID
and password, contact the person who set up the access point, or see the documentation provided with the access point.
1. Select Wi - Fi S e tu p on the home screen, and then press the OK button.
2.
Select Wi-Fi (Recommended), and then press the OK button.
3. Press the OK button.
4. Select Wi-Fi Setup Wizard, and then press the OK button.
5.
Select the SSID for the access point from printer's control panel, and then press the OK button.
Note:
If the SSID you want to connect to is not displayed on the printer's control panel, select Search Again to update the
list. If it is still not displayed, select Other Networks, and then enter the SSID directly.
If you do not know the SSID, check if it is written on the label of the access point. If you are using the access point
with its default settings, use the SSID written on the label.
6. Enter the password, and then select Done. Press the OK button.
Note:
e password is case-sensitive.
If you do not know the password, check if it is written on the label of the access point. If you are using the access point
with its default settings, use the password written on the label. e password may also be called a "Key", a
"Passphrase", and so on.
If you do not know the password for the access point, see the documentation provided with the access point, or
contact the person who set it up.
7. Check the settings, and then press the OK button.
8. Select whether or not you print a network connection report aer nishing the settings.
Note:
If you fail to connect, load papers, and then press the
button to print a network connection report.
Related Information
& Checking the Network Connection Status” on page 28
& When You Cannot Make Network Settings” on page 166
User's Guide
Network Settings
24
Making Wi-Fi Settings by Push Button Setup
You can automatically set up a Wi-Fi network by pressing a button on the access point. If the following conditions
are met, you can set up by using this method.
e access point is compatible with WPS (Wi-Fi Protected Setup).
e current Wi-Fi connection was established by pressing a button on the access point.
Note:
If you cannot nd the button or you are setting up using the soware, see the documentation provided with the access point.
1. Select Wi - Fi S e tu p on the home screen, and then press the OK button.
2. Select Wi-Fi (Recommended), and then press the OK button.
3. Press the OK button.
4. Select Push Button Setup (WPS), and then press the OK button.
5. Hold down the [WPS] button on the access point until the security light
ashes.
If you do not know where the [WPS] button is, or there are no buttons on the access point, see the
documentation provided with your access point for details.
6. Press the OK button on the printer's control panel. Follow the on-screen instruction hereaer.
Note:
If connection fails, restart the access point, move it closer to the printer, and try again. If it still does not work, print a
network connection report and check the solution.
Related Information
& Checking the Network Connection Status” on page 28
& When You Cannot Make Network Settings” on page 166
Making Wi-Fi Settings by PIN Code Setup (WPS)
You can connect to an access point by using a PIN code. You can use this method to set up if an access point is
capable of WPS (Wi-Fi Protected Setup). Use a computer to enter a PIN code into the access point.
1.
Select Settings on the home screen, and then press the OK button.
User's Guide
Network Settings
25
2. Select Network Settings and then press the OK button.
3. Select Wi - Fi S e tu p on the home screen and then press the OK button.
4.
Select PIN Code Setup (WPS) and then press the OK button.
5. Use your computer to enter the PIN code (an eight digit number) displayed on the printer's control panel into
the access point within two minutes.
Note:
See the documentation provided with your access point for details on entering a PIN code.
6. Press the OK button.
Setup is complete when the setup completion message is displayed.
Note:
If connection fails, restart the access point, move it closer to the printer, and try again. If it still does not work, print a
connection report and check the solution.
Related Information
& Checking the Network Connection Status” on page 28
& When You Cannot Make Network Settings” on page 166
Making Wi-Fi Direct (Simple AP) Connection Settings
is
method allows you to connect the printer directly to computer or smart devices without an access point.
e
printer acts as an access point.
c
Important:
When you connect from a computer or smart device to the printer using the Wi-Fi Direct (Simple AP) connection,
the printer is connected to the same Wi-Fi network (SSID) as the computer or smart device and the communication
is established between them. Since the computer or smart device is automatically connected to the other connectable
Wi-Fi network if the printer is turned o, it is not connected to the previous Wi-Fi network again if the printer is
turned on. Connect to the printer's SSID for Wi-Fi Direct (Simple AP) connection from the computer or smart
device again. If you do not want to connect every time you turn the printer on or o, we recommend using Wi-Fi
network by connecting the printer to an access point.
1. Select Wi - Fi S e tu p on the home screen, and then press the OK button.
2. Select Wi - Fi D i r e c t, and then press the OK button.
3. Press the OK button.
4. Press the OK button to start the setup.
5. Press the OK button.
6. Check the SSID and password displayed on the printer's control panel. On the network connection screen of
the computer or smart device, select the SSID shown on the printer's control panel to connect.
7. Enter the password displayed on the printer's control panel on the computer or smart device.
User's Guide
Network Settings
26
8. Aer the connection is established, press the OK button on the printer's control panel.
9. Press the OK button.
Related Information
& Checking the Network Connection Status” on page 28
& When You Cannot Make Network Settings” on page 166
Making Advanced Network Setting
You can change the network device name, TCP/IP setup, DNS server and so on. Check your network environment
before making changes.
1.
Select Settings on the home screen, and then press the OK button.
2. Select Network Settings, and then press the OK button.
3. Select Manual Network Setup, and then press the OK button.
4. Enter the device name.
You can enter the following characters. To x the device name, move the cursor on the Done, and then press
the OK button.
Character limits: 2 to 15 (you must enter at least 2 characters)
Usable characters: A to Z, a to z, 0 to 9, -.
Characters you cannot use at the top: 0 to 9, -.
Characters you cannot use at the bottom: -
Note:
If you press the OK button without entering the device name, the default device name (EPSON and the last six digits of
the device's MAC address) are set.
5. Select the method for acquiring the IP address (TCP/IP Setup).
Auto
Select when you are using an access point at home or you are allowing the IP address to be acquired
automatically by DHCP.
Manual
Select when you do not want the device's IP address to be changed. Enter the IP address, subnet mask,
default gateway, primary DNS server, and secondary DNS server according to your network environment.
Press the OK button, and go to step 7.
6. Select the method for setting the DNS server.
Auto
Select when you want to acquire the IP address automatically.
Manual
Select when you want to set a unique DNS server address to the device. Enter the addresses for the primary
DNS server and the secondary DNS server.
User's Guide
Network Settings
27
7. Select whether or not to use a proxy server.
Do Not Use
Select when you are using the printer in a home network environment.
Use
Select when you are using a proxy server in your network environment and you want to set it to the printer.
Enter the proxy server address and port number.
8. Check the settings and press the OK button.
A message is displayed on the LCD screen when the network settings are complete, and you are returned to
the home screen
aer
a short period of time.
Checking the Network Connection Status
You can check the network connection status in the following way.
Checking the Network Status Using Network Icon
You can check the network connection status using the network icon on the printer's home screen. e icon
changes depending on the connection type and strength of the radio wave. For more information, select Help >
Icon List on the printer's control panel.
Checking the Network Status from the Control Panel
You can also view other network-related information by pressing the network menus you want to check.
1. Select Settings on the home screen, and then press the OK button.
2. Select Network Settings, and then press the OK button.
3.
Select Network Status, and then press the OK button.
Displays the Wi-Fi and Wi-Fi Direct (Simple AP) connection status. You can check if the printer is connected
to the network, or how many devices are connected when the printer is connected by Wi-Fi Direct (Simple
AP) connection.
4. To check other information, press the
l
or
r
button and then press the
u
or
d
button to select the menus
that you want to check.
Wired LAN/Wi-Fi Status
Displays the network information (Obtain IP Address, Default Gateway, DNS Server Setup Mode and so
on) for Ethernet or Wi-Fi connections.
Wi-Fi Direct Status
Displays the network information (Obtain IP Address, the number of connected devices, Default Gateway
and so on) for Wi-Fi Direct (Simple AP) connections.
Epson Connect Status
Displays the registered information for Epson Connect services.
User's Guide
Network Settings
28
Google Cloud Print Status
Displays the registered information for Google Cloud Print services and the connection status.
Print Status Sheet
Make sure that papers are set to the printer, then press the
x
button to print a network status sheet.
Printing a Network Connection Report
You can print a network connection report to check the status between the printer and the access point.
1. Load papers.
2.
Select Settings on the home screen, and then press the OK button.
3. Select Network Settings, and then press the OK button.
4. Select Connection Check, and then press the OK button.
e
connection check starts.
5. Select Ye s , and then press the OK button.
6. Press the
x
button to print the network connection report.
If an error has occurred, check the network connection report, and then follow the printed solutions.
Related Information
& Messages and Solutions on the Network Connection Report” on page 30
User's Guide
Network Settings
29
Messages and Solutions on the Network Connection Report
Check the messages and error codes on the network connection report, and then follow the solutions.
a. Error code
b. Messages on the Network Environment
a. Error code
Code Solution
E-1 Make sure that the Ethernet cable is connected to the printer, a hub, or other network devices.
Make sure that the hub or other network devices are turned on.
User's Guide
Network Settings
30
Code Solution
E-2
E-3
E-7
Make sure that the access point is turned on.
Check that the computer or other devices are connected correctly to the access point.
Place the printer close to the access point. Remove any obstacles between them.
If you have entered the SSID manually, check if it is correct. Check the SSID from the Network Status part on
the network connection report.
To establish a network using push button setup, check that the access point supports WPS. If it does not
support WPS, you cannot establish a network using push button setup.
Check that only ASCII characters (alphanumeric characters and symbols) are used for the SSID. The printer
cannot display an SSID which contains any characters other than ASCII characters.
Check the SSID and password before connecting to the access point. If you are using an access point with its
default settings, the SSID and password are on the label. If you do not know the SSID and password, contact
the person who set up the access point, or see the documentation provided with the access point.
When you want to connect to an SSID generated using the tethering function on a smart device, check the
SSID and password in the documentation provided with the smart device.
If the Wi-Fi connection is suddenly disconnected, check the following. If any of these are applicable, reset the
network settings using the installer. You can run it from the following website.
http://epson.sn > Setup
Another smart device was added to the network using push button setup.
e Wi-Fi network was set up using any method other than push button setup.
E-5 Make sure the access point's security type is set to one of the following. If it is not, change the security type on
the access point, and then reset the printer's network settings.
WEP-64 bit (40 bit)
WEP-128 bit (104 bit)
WPA PSK (TKIP/AES)
*
WPA2 PSK (TKIP/AES)
*
WPA (TKIP/AES)
WPA2 (TKIP/AES)
* : WPA PSK is also known as WPA Personal. WPA2 PSK is also known as WPA2 Personal.
E-6 Check if the MAC address ltering is disabled. If it is enabled, register the printer's MAC address so that it is
not ltered. See the documentation provided with the access point for details. You can check the printer's
MAC address from the Network Status part on the network connection report.
If the access point's shared authentication is enabled on the WEP security method, make sure the
authentication key and index are correct.
E-8 Enable DHCP on the access point when the printer's Obtain IP Address is set to Auto.
If the printer's Obtain IP Address is set to Manual, the IP address you manually set is out of range (for
example: 0.0.0.0) and it is disabled. Set a valid IP address from printer's control panel or Web Cong.
User's Guide
Network Settings
31
Code Solution
E-9 Check the following.
Devices are turned on.
You can access the Internet and other computers or network devices on the same network from the devices
you want to connect to the printer.
If it still does not work after checking the above, reset the network settings using the installer. You can run it
from the following website.
http://epson.sn > Setup
E-10 Check the following.
Other devices on the network are turned on.
Network addresses (IP address, subnet mask, and default gateway) are correct if you have set the printer's
Obtain IP Address to Manual.
Reset the network address if these are incorrect. You can check the IP address, subnet mask, and default
gateway from the Network Status part on the network connection report.
When DHCP is enabled, change the printer's Obtain IP Address to Auto. If you want to set the IP address
manually, check the printer's IP address from the Network Status part on the network connection report, and
then select Manual on the network settings screen. Set the subnet mask to [255.255.255.0].
E-11 Check the following.
The default gateway address is correct when you set the printer's TCP/IP Setup to Manual.
The device that is set as the default gateway is turned on.
Set the correct default gateway address. You can check the default gateway address from the Network Status
part on the network connection report.
E-12 Check the following.
Other devices on the network are turned on.
The network addresses (IP address, subnet mask, and default gateway) are correct if you are entering them
manually.
The network addresses for other devices (subnet mask and default gateway) are the same.
The IP address does not conict with other devices.
If it still does not work after checking the above, try the following.
Make network settings on the computer that is on the same network as the printer using the installer. You
can run it from the following website.
http://epson.sn > Setup
You can register several passwords on an access point that uses the WEP security type. If several passwords
are registered, check if the rst registered password is set on the printer.
User's Guide
Network Settings
32
Code Solution
E-13 Check the following.
Network devices such as an access point, hub, and router are turned on.
The TCP/IP Setup for network devices has not been set up manually. (If the printer's TCP/IP Setup is set
automatically while the TCP/IP Setup for other network devices is performed manually, the printer's network
may dier from the network for other devices.)
If it still does not work after checking the above, try the following.
Make network settings on the computer that is on the same network as the printer using the installer. You
can run it from the following website.
http://epson.sn > Setup
You can register several passwords on an access point that uses the WEP security type. If several passwords
are registered, check if the rst registered password is set on the printer.
b. Messages on the Network Environment
Message Solution
*Multiple network names (SSID) that
match your entered network name (SSID)
have been detected. Conrm network
name (SSID).
The same SSID may be set on several access points. Check the settings on the
access points, and change the SSID.
The Wi-Fi environment needs to be
improved. Turn the wireless router o and
then turn it on. If the connection does not
improve, see the documentation for the
wireless router.
After moving the printer closer to the access point and removing any
obstacles between them, turn the access point on. If it still does not connect,
see the documentation supplied with the access point.
*No more devices can be connected.
Disconnect one of the connected devices if
you want to add another one.
You can simultaneously connect up to four computers and smart devices in
Wi-Fi Direct (Simple AP) connection. To add another computer or smart
device, disconnect one of the connected devices
rst.
Related Information
& Connecting to a Computer” on page 22
& “Web Cong” on page 142
& “Cannot Connect from Devices Even ough Network Settings are No Problem” on page 166
Printing a Network Status Sheet
You can check the detailed network information by printing it.
1.
Load papers.
2. Select Settings on the home screen, and then press the OK button.
3. Select Network Settings, and then press the OK button.
4. Select Network Status, and then press the OK button.
5. Press the
l
or
r
button, then select Print Status Sheet using the
u
or
d
button.
User's Guide
Network Settings
33
6. Press the
x
button.
e network status sheet is printed.
Replacing or Adding New Access Points
If the SSID changes due to the replacement of an access point, or an access point is added and a new network
environment is established, re-set the Wi-Fi settings.
Related Information
& “Changing the Connection Method to a Computer” on page 34
Changing the Connection Method to a Computer
Using the installer and re-set up in a
dierent
connection method.
Setting up from the website
Access the following website, and then enter the product name. Go to Setup, and then start setting up.
http://epson.sn
Setting up using the soware disc (only for the models that come with a soware disc and users with computers
with disc drives.)
Insert the
soware
disc into the computer, and then follow the on-screen instructions.
Selecting Change the Connection Methods
Follow the on-screen instructions until the following screen is displayed.
User's Guide
Network Settings
34
Select Change or re-set the connection method on the Select Soware Installation screen, and then click Next.
Disabling Wi-Fi from the Control Panel
When Wi-Fi is disabled, the Wi-Fi connection is disconnected.
1. Select Settings on the home screen.
2. Select Network Settings.
3. Select Wi - Fi S e tu p .
4. Select Disable Wi-Fi.
5.
Check the message, and then select Ye s .
Disconnecting Wi-Fi Direct (Simple AP) connection
from the Control Panel
Note:
When Wi-Fi Direct (Simple AP) connection disabled, all computers and smart devices connected to the printer in Wi-Fi
Direct (Simple AP) connection are disconnected. If you want to disconnect a specic device, disconnect from the device
instead of the printer.
1. Select Settings on the home screen.
2.
Select Network Settings.
User's Guide
Network Settings
35
3. Select Wi - Fi S e tu p .
4. Select Wi - Fi D i r e c t S e t up .
5.
Select Disable Wi-Fi Direct.
6. Check the message, and then select Ye s .
Restoring the Network Settings from the Control
Panel
You can restore all network settings to their defaults.
1. Select Settings on the home screen.
2.
Select Restore Default Settings > Network Settings.
3. Check the message, and then select Ye s .
User's Guide
Network Settings
36
Loading Paper
Paper Handling Precautions
Read the instruction sheets supplied with the paper.
Fan and align the edges of the paper before loading. Do not fan or curl photo paper. Doing so may damage the
printable side.
If the paper is curled, atten it or curl it slightly in the opposite direction before loading. Printing on curled
paper may cause paper jams and smears on the printout.
Do not use paper that is wavy, torn, cut, folded, damp, too thick, too thin, or paper that has stickers stuck to it.
Using these types of paper causes paper jams and smears on the printout.
Fan and align the edges of the envelopes before loading. When the stacked envelopes are pued up with air,
press them down to atten them before loading.
Do not use envelopes that are curled or folded. Using these envelopes causes paper jams and smears on the
printout.
Do not use envelopes with adhesive surfaces on the aps or window envelopes.
Avoid using envelopes that are too thin, as they may curl during printing.
Related Information
& “Printer Specications” on page 187
User's Guide
Loading Paper
37
Available Paper and Capacities
Epson recommends using genuine Epson paper to ensure high-quality printouts.
Genuine Epson Paper
Media Name Size Loading Capacity (Sheets) 2-Sided
Printing
*1
Borderless
Printing
*2
Paper
Cassette 1
Paper
Cassette 2
Rear
Paper
Feed Slot
Epson Bright White
Ink Jet Paper
A4
80
*3
1Auto,
Manual
Epson Ultra Glossy
Photo Paper
A4 20 1
10×15 cm (4×6 in.),
13×18 cm (5×7 in.)
20 20 1
Epson Premium
Glossy Photo Paper
A4 20 1
10×15 cm (4×6 in.),
13×18 cm (5×7 in.)
16:9 wide size
(102×181 mm)
20 20 1
Epson Premium
Semigloss Photo
Paper
A4 20 1
10×15 cm (4×6 in.) 20 20 1
Epson Photo Paper
Glossy
A4 20 1
10×15 cm (4×6 in.),
13×18 cm (5×7 in.)
20 20 1
Epson Matte Paper-
Heavyweight
A4 20 1
Epson Double-
Sided Matte Paper
A4 –11Manual
Epson Photo
Quality Ink Jet
Paper
A4 –801––
Epson Iron-On Cool
Peel Transfer
Paper
*4
A4 –11––
Epson Photo
Stickers
A6 111––
*1 The 2-sided printing feature is not available for the rear paper feed slot.
*2 Borderless printing is not available for 2-sided printing.
*3 For manual 2-sided printing, you can load up to 30 sheets for paper with one side already printed.
*4 Only printing from computer is available.
User's Guide
Loading Paper
38
Note:
e availability of paper varies by location. For the latest information on paper available in your area, contact Epson
support.
Commercially Available Paper
Media Name Size Loading Capacity (Sheets) 2-Sided
Printing
*1
Borderless
Printing
Paper
Cassette 1
Paper
Cassette 2
Rear
Paper
Feed Slot
Plain paper
*2
Letter
*3
, A4, B5
*3
–Up to the
line
indicated
by the
triangle
symbol on
the edge
guide.
*4
1Auto,
Manual
A5 1 Manual
Legal
*3
––1Manual
A6
*3
20 20 1 Manual
User Dened
*3
1
*5
1Manual
Envelope
*3
Envelope #10,
Envelope DL,
Envelope C6
–101––
*1 The 2-sided printing feature is not available for the rear paper feed slot.
*2 Use the rear paper feed slot to load pre-punched paper.
*3 Only printing from computer or smart device is available.
*4 For manual 2-sided printing, you can load up to 30 sheets for paper with one side already printed.
*5 Use the rear paper feed slot to load paper longer than A4 size.
Related Information
& “Part Names and Functions” on page 15
& “Technical Support Web Site” on page 200
List of Paper Types
To obtain optimum printing results, select the paper type that suits the paper.
Media Name Media Type
Control Panel
Printer Driver, Smart device
*2
Epson Bright White Ink Jet Paper
*1
plain papers plain papers
Epson Ultra Glossy Photo Paper
*1
Ultra Glossy Epson Ultra Glossy
User's Guide
Loading Paper
39
Media Name Media Type
Control Panel
Printer Driver, Smart device
*2
Epson Premium Glossy Photo Paper
*1
Prem. Glossy Epson Premium Glossy
Epson Premium Semigloss Photo Paper
*1
Prem. Semigloss Epson Premium Semigloss
Epson Photo Paper Glossy
*1
Glossy Photo Paper Glossy
Epson Matte Paper-Heavyweight
*1
Epson Double-Sided Matte Paper
*1
Matte Epson Matte
Epson Photo Quality Ink Jet Paper
*1
Photo Quality IJ Epson Photo Quality Ink Jet
Epson Iron-On Cool Peel Transfer Paper
plain papers
*3
plain papers
Epson Photo Stickers
*1
Photo Stickers Epson Photo Stickers
Plain paper
*1
plain papers plain papers
Envelope
Envelope
*3
Envelope
*1 These paper types are compatible with Exif Print and PRINT Image Matching when printing from the printer driver. For more
details, see the documentation provided with the Exif Print or PRINT Image Matching compatible digital camera.
*2 For smart devices, these media types can be selected when printing using Epson iPrint.
*3 Only for registering the paper information when loading the paper. Printing from the control panel is not available.
Where to Load Paper
Load paper in one of the following paper sources.
User's Guide
Loading Paper
40
A
Rear paper feed slot You can load a single sheet of all types of supported paper.
You can also load thick paper (up to 0.6 mm thick) and pre-punched
paper, which cannot be loaded in the paper cassette. However, even if the
thickness is within this range, some paper may not be fed correctly
depending on the hardness.
Load paper when a message is displayed on the control panel telling you
to load paper.
B
Paper cassette 1 You can load multiple sheets of small size photo paper.
If you load the same paper in paper cassette 1 and paper cassette 2 and
select Cassette 1>Cassette 2 as the Paper Source setting in the print
settings, the printer automatically feeds paper from paper cassette 2
when paper runs out in paper cassette 1.
C
Paper cassette 2 We recommend loading A4 size plain paper as this is used frequently.
Loading Paper in the Paper Cassette 1
1. When the output tray is ejected, check that there is no paper on the tray, and then close it by pushing it with
your hand.
2. Raise the control panel.
3. Open the front cover.
User's Guide
Loading Paper
41
4. Check that the printer is not operating, and then pull out paper cassette 1. Paper cassette 1 has an alignment
mark
that allows you to locate it easily.
c
Important:
If paper cassette 1 is too far inside the printer, turn the printer o and on again.
5. Slide the edge guides to their maximum position.
6. Slide the front edge guide to the paper size you want to use.
7.
With the printable side facing down, load paper against the front edge guide.
User's Guide
Loading Paper
42
c
Important:
Make sure the paper does not extend beyond the triangle symbol at the end of the cassette.
Do not load more than the maximum number of sheets specied for the paper. Do not load paper above the
line indicated by the triangle symbol on the edge guide.
Photo Sticker sheet
Follow the instructions supplied with the stickers to load one sheet of Photo Stickers. Do not load the
loading support sheets into this product.
8. Slide the right edge guide to the edge of the paper.
User's Guide
Loading Paper
43
9. Insert paper cassette 1. Line up the alignment marks on the printer and the tray.
10. Check the paper size and paper type settings displayed on the control panel. To use the settings, select
Conrm using the
u
or
d
button, press the OK button, and then go to step 12. To change the settings, select
Change using the
u
or
d
button, press the OK button, and then go to the next step.
Note:
When the Paper Setting Alert feature in the Guide Functions menu is enabled, a message is displayed if the
registered paper size and paper type settings
dier
from the print settings.
e
paper setting screen is not displayed if you have disabled Paper
Conguration
in the following menus. Go to
step 12. In this situation, you cannot print from an iPhone or iPad using AirPrint.
Settings > Printer Setup > Paper Source Setting > Paper
Conguration
11. On the paper size setting screen, select the paper size using the
u
or
d
button, and then press the OK button.
On the paper type setting screen, select the paper type in the same way, and then press the OK button. Check
the settings, and then press the OK button.
Note:
You can also display the paper size and paper type settings screen by selecting the paper source in the following menus.
Settings > Printer Setup > Paper Source Setting > Paper Setup
User's Guide
Loading Paper
44
12. Slide out the output tray.
Related Information
& “Paper Handling Precautions” on page 37
& “Available Paper and Capacities” on page 38
& “Menu Options for Printer Setup” on page 136
& “Menu Options for Guide Functions” on page 140
Loading Paper in the Paper Cassette 2
1. When the output tray is ejected, check that there is no paper on the tray, and then close it by pushing it with
your hand.
2. Raise the control panel.
3. Open the front cover.
User's Guide
Loading Paper
45
4. Check that the printer is not operating, and then pull out paper cassette 2.
5. Slide the edge guides to their maximum position.
6.
Slide the front edge guide to the paper size you want to use.
7. With the printable side facing down, load paper against the front edge guide.
User's Guide
Loading Paper
46
c
Important:
Make sure the paper does not extend beyond the triangle symbol at the end of the cassette.
Do not load more than the maximum number of sheets specied for the paper. For plain paper, do not load
above the line indicated by the triangle symbol on the edge guide.
Envelopes
Photo Sticker sheet
Follow the instructions supplied with the stickers to load one sheet of Photo Stickers. Do not load the
loading support sheets into this product.
User's Guide
Loading Paper
47
8. Slide the right edge guide to the edge of the paper.
9. Insert paper cassette 2.
10. Check the paper size and paper type settings displayed on the control panel. To use the settings, select
Conrm using the
u
or
d
button, press the OK button, and then go to step 12. To change the settings, select
Change using the
u
or
d
button, press the OK button, and then go to the next step.
Note:
When the Paper Setting Alert feature in the Guide Functions menu is enabled, a message is displayed if the
registered paper size and paper type settings dier from the print settings.
e paper setting screen is not displayed if you have disabled Paper Conguration in the following menu. Go to step
12. In this situation, you cannot print from an iPhone or iPad using AirPrint.
Settings > Printer Setup > Paper Source Setting > Paper Conguration
User's Guide
Loading Paper
48
11. On the paper size setting screen, select the paper size using the
u
or
d
button, and then press the OK button.
On the paper type setting screen, select the paper type in the same way, and then press the OK button. Check
the settings, and then press the OK button.
Note:
You can also display the paper size and paper type settings screen by selecting the paper source in the following menus.
Settings > Printer Setup > Paper Source Setting > Paper Setup
12. Slide out the output tray.
Related Information
& “Paper Handling Precautions” on page 37
& “Available Paper and Capacities” on page 38
& “Menu Options for Printer Setup” on page 136
& “Menu Options for Guide Functions” on page 140
Loading Paper in the Rear Paper Feed Slot
c
Important:
Do not load paper in the rear paper feed slot until the printer prompts you to do so. Doing so will result in the blank
paper being ejected.
1. Do one of the following.
When printing from the control panel: Select rear paper feed slot as the Paper Source setting, make other
print settings, and then press the
x
button.
When printing from a computer: Select rear paper feed slot as the Paper Source setting, make other print
settings, and then click Print.
2. Slide out the output tray.
User's Guide
Loading Paper
49
3. A message is displayed on the control panel telling you that the printer is preparing, and then you are
instructed to load paper. Follow the instructions below to load the paper.
4. Open the rear paper feed slot.
5. Slide out the paper support.
6.
Slide out the edge guides.
User's Guide
Loading Paper
50
7. Load a single sheet of paper at the center of the rear paper feed slot with the printable side facing up, and then
insert it approximately 5 cm into the printer.
When loading 10×15 cm (4×6 in.) size paper, align it with the paper size indicator on the paper support, and
the paper is inserted approximately 5 cm into the printer.
Envelopes
Pre-punched paper
Load a single sheet of
dened
size plain paper with binding holes at the
le
or right. Adjust the print
position of your le to avoid printing over the holes.
User's Guide
Loading Paper
51
8. Slide the edge guides to the edges of the paper.
9. Press the
x
button to start printing.
Related Information
& “Paper Handling Precautions” on page 37
& “Available Paper and Capacities” on page 38
User's Guide
Loading Paper
52
Placing Originals
Placing Originals on the Scanner Glass
c
Important:
When placing bulky originals such as books, prevent exterior light from shining directly onto the scanner glass.
1. Open the document cover.
2.
Remove any dust or stains on the scanner glass.
3. Place the original face-down and slide it to the corner mark.
Note:
A range of 1.5 mm from the edges of the scanner glass is not scanned.
4. Close the cover gently.
c
Important:
Do not apply too much force to the scanner glass or the document cover. Otherwise, they may be damaged.
User's Guide
Placing Originals
53
5. Remove the originals aer scanning.
Note:
If you leave the originals on the scanner glass for a long time, they may stick to the surface of the glass.
How to Place Various Originals
Placing Photos for Copying
You can place multiple photos at a time to make separate copies. e photos should be larger than 30×40 mm.
Place a photo 5 mm away from the corner mark of the scanner glass, and leave 5 mm between photos. You can
place photos of dierent sizes at the same time.
Maximum size: 10×15 cm (4×6 in.)
Placing a CD/DVD for Copying Labels
Place a CD/DVD in the center of the scanner glass. If the CD/DVD is not placed exactly in the center, the
positioning is automatically adjusted.
Placing Multiple Photos for Scanning at the Same Time
You can scan multiple photos at the same time and save each image in Photo Mode in Epson Scan 2 when you
select umbnail from the list at the top of the preview window. Place the photos 4.5 mm away from the
User's Guide
Placing Originals
54
horizontal and vertical edges of the scanner glass, and place them at least 20 mm apart from each other. e photos
should be larger than 15×15 mm.
User's Guide
Placing Originals
55
Inserting a Memory Card
Supported Memory Cards
miniSD
*
miniSDHC
*
microSD*
microSDHC
*
microSDXC
*
SD
SDHC
SDXC
* Attach an adapter to t the memory card slot. Otherwise, the card may get stuck.
Related Information
&
“Supported Memory Card
Specications
” on page 191
Inserting and Removing a Memory Card
1. Insert a memory card into the printer.
e printer starts reading the data and the light ashes. When reading is complete, the light stops ashing and
remains on.
User's Guide
Inserting a Memory Card
56
c
Important:
Insert a memory card straight into the printer.
e card should not be fully inserted. Do not try to force it all the way into the slot.
2. When you have nished using the memory card, make sure the light is not ashing, and then remove the card.
c
Important:
If you remove the memory card while the light is
ashing,
the data in the memory card may be lost.
Note:
If you access the memory card from a computer, you need to operate the computer to safely remove the removable
device.
User's Guide
Inserting a Memory Card
57
Related Information
& “Accessing a Memory Card From a Computer” on page 199
User's Guide
Inserting a Memory Card
58
Loading a CD/DVD for Printing
Printable CD/DVDs
You can print on a circular 12-cm CD/DVD labelled as suitable for printing, for example "printable on the label
surface" or "printable with ink jet printers."
You can also print on Blu-ray Discs™.
CD/DVD Handling Precautions
See the documentation provided with your CD/DVD for more information on handling the CD/DVD or
writing data.
Do not print on the CD/DVD before writing your data to it. If you do, ngerprints, dirt, or scratches on the
surface may cause errors while writing data.
Depending on the CD/DVD type or printing data, smearing may occur. Try making a test print on a spare CD/
DVD. Check the printed surface aer waiting for one full day.
Compared to printing on genuine Epson paper, the print density is lowered to prevent ink from smearing on the
CD/DVD. Adjust the print density as necessary.
Allow the printed CD/DVDs at least 24 hours to dry avoiding direct sunlight. Do not stack or insert the CD/
DVDs into your device until they are completely dry.
If the printed surface is sticky even aer it has dried, lower the print density.
Reprinting on the same CD/DVD may not improve the print quality.
If the CD/DVD tray or the internal transparent compartment are accidentally printed on, immediately wipe o
the ink.
Depending on the print area setting, the CD/DVD or CD/DVD tray may get dirty. Make settings to print on the
printable area.
Related Information
& “Printable Area for CD/DVD” on page 188
Loading and Removing a CD/DVD
When printing on or copying a CD/DVD, instructions are displayed on the control panel informing you when to
load the CD/DVD. Follow the on-screen instructions.
Related Information
& “Printable CD/DVDs” on page 59
& CD/DVD Handling Precautions” on page 59
& Printing Photos from a Memory Card onto a CD/DVD Label” on page 62
& “Printing a CD/DVD Label with Epson Print CD” on page 91
User's Guide
Loading a CD/DVD for Printing
59
& Copying on a CD/DVD Label” on page 101
& “Menu Options for Copy to CD/DVD” on page 103
User's Guide
Loading a CD/DVD for Printing
60
Printing
Printing from the Control Panel
Printing Photos by Selecting from a Memory Card
1. Load paper in the printer.
2. Insert a memory card into the printer.
c
Important:
Do not remove the memory card until you have
nished
printing.
Note:
Remove the memory card when printing from an external storage device such as a hard disk or USB ash memory.
If you have 1000 or more photos on your memory card, photos are automatically divided into groups containing a
maximum of 999 photos and the Select Group screen is displayed. Select a group containing the photos you want to
print.
3. Enter Print Photos from the home screen using the
l
or
r
button, and then press the OK button.
4. Select a photo using the
l
or
r
button and set the number of copies using the – or + button. When printing
more than one photo, repeat this procedure.
Note:
e following menus, that are displayed by pressing the
d
button, help you select photos easily when you have many
photos on your memory card.
Browse: Use the Browse by Date menu to sort photos by date, and then select all photos of the same date at the same
time.
Display Mode: Use the 9-up menu to display nine photos on a screen.
5. Press the
d
button to display the menu, select Print Settings using the
u
or
d
button, and then press the OK
button.
Note:
Select Crop/Zoom if you want to crop a part of a photo. Use the
u
,
d
,
l
, or
r
button to move the frame to the area
you want to crop, and then press the – or + button to change the size of the frame. Press the
button to rotate the
frame.
6. Use the
u
or
d
button to select setting items such as the paper size and the paper type, and change the
settings using the
l
or
r
button.
7. Press the
x
button.
User's Guide
Printing
61
Related Information
& “Loading Paper in the Paper Cassette 1” on page 41
& “Loading Paper in the Paper Cassette 2” on page 45
& “Loading Paper in the Rear Paper Feed Slot” on page 49
& “List of Paper Types” on page 39
& “Inserting a Memory Card” on page 56
& “Menu Options for Printing from the Control Panel” on page 70
Printing Photos from a Memory Card onto a CD/DVD Label
You can select photos stored on a memory card to print onto a CD/DVD label.
c
Important:
Before printing on the CD/DVD, see the CD/DVD handling precautions.
Do not insert the CD/DVD tray while the printer is operating.
is
may damage the printer.
Do not insert the CD/DVD tray until you are instructed to do so. Otherwise, an error occurs and the CD/DVD is
ejected.
1. Insert a memory card into the printer.
c
Important:
Do not remove the memory card until you have
nished
printing.
2. Press the button, select Print on CD/DVD using the
u
or
d
button, and then press the OK button.
3. Select the layout using the
l
or
r
button, and then press the OK button.
You can sel ec t CD/DVD 1-up, CD/DVD 4-up or CD/DVD Variety.
4. Do one of the following.
When you select CD/DVD 1-up or CD/DVD Variety, check the screen, and then press the OK button.
When you select CD/DVD 4-up, select Automatic Layout or Place Photos Manually using the
u
or
d
button, and then press the OK button.
5. Do one of the following.
When you select CD/DVD 1-up, CD/DVD Variety or Automatic Layout for CD/DVD 4-up, select the
photos you want to print using the
l
or
r
button, set the number of copies using the – or + button, and
then press the OK button.
User's Guide
Printing
62
When you select Place Photos Manually for CD/DVD 4-up, aer displaying the photo you want to print
using the
l
or
r
button, select Place this photo using the
u
or
d
button, and then press the OK button.
If you want to leave a blank space, select Leave Blank using the
u
or
d
button, and then press the OK
button.
Note:
e available number of copies is displayed at the top of the screen where you select the photos you want to print and
the number of copies. You can select photos until 0 is indicated.
Press the
d
button, and then select Crop/Zoom using the
u
or
d
button if you want to crop a part of the photo.
Use the
u
,
d
,
l
, or
r
button to move the frame to the area you want to crop, and then press the – or + button to
change the size of the frame.
6. Check the screen, and then press the OK button.
7. Set the outer diameter using the
l
or
r
button, set the inner diameter using the
u
or
d
button, and then
press the OK button.
Note:
You can set 114 to 120 mm as the outer diameter, and 18 to 46 mm as the inner diameter in 1 mm increments.
8. Select Print on a CD/DVD using the
u
or
d
button and press the OK button.
Note:
For test printing, select Te st P rint on A4 Paper using the
u
or
d
button, and then load A4 plain paper in the paper
cassette. You can check the printout image before printing on a CD/DVD label.
9. A message is displayed on the screen telling you that the printer is getting ready. You are then instructed to
load a CD/DVD. Press the
d
button to check the instructions and load a CD/DVD.
c
Important:
Press the center of the CD/DVD to securely set it on the CD/DVD tray. Otherwise, the CD/DVD may fall o
the tray.
10.
Press the OK button, a message is displayed telling you that the printer is ready, and then press the OK button.
11. Press the
x
button.
12. When printing has nished, the CD/DVD tray is ejected automatically. Remove the CD/DVD tray from the
printer, and then remove the CD/DVD.
c
Important:
Aer
printing is
nished,
make sure you remove the CD/DVD tray. If you do not remove the tray and turn the
printer on or o, or run head cleaning, the CD/DVD tray will strike the print head and may cause the printer
to malfunction.
13. Store the CD/DVD tray at the bottom of the printer.
Related Information
& CD/DVD Handling Precautions” on page 59
& “Inserting a Memory Card” on page 56
User's Guide
Printing
63
& “Loading and Removing a CD/DVD” on page 59
& “Menu Options for Printing from the Control Panel” on page 70
Printing Photos from a Memory Card with Handwritten Notes
You can print a photo on a memory card with handwritten text or drawings. is allows you to create original
cards such as New Year's cards or birthday cards.
First select a photo and print a template on plain paper. Write or draw on the template and then scan it with the
printer. You can then print the photo with your own personal notes and drawings.
1.
Insert a memory card into the printer.
c
Important:
Do not remove the memory card until you have nished printing.
2. Enter More Functions from the home screen using the
l
or
r
button, and then press the OK button.
3. Select Print Photo Greeting Card using the
u
or
d
button, and then press the OK button.
4. Select Select Photo and Print Template using
u
or
d
button, and then press the OK button.
5. Select a photo using the
l
or
r
button, and then press the OK button.
6. Select the paper type for printing a photo with handwritten notes using the
u
or
d
button, and then press the
OK button.
7. Select the layout using the
u
or
d
button, and then press the OK button.
8. Select the frame using the
u
or
d
button, and then press the OK button.
9. Load A4-size plain paper in paper cassette 2, and then pull out the output tray to print a template.
10. Press the
x
button to print a template.
11. Follow the instructions on the template to write and draw.
12. Close the output tray by hand. Load photo paper in paper cassette 1, and then pull out the output tray.
User's Guide
Printing
64
13. Select Print Greeting Cards from Template using the
u
or
d
button, and then press the OK button.
14. Check the screen, place the template on the scanner glass, and then press the OK button.
Note:
Make sure that the text on the template is completely dry before placing it on the scanner glass. If there are stains on the
scanner glass, the stains are also printed on the photo.
15. Set the number of copies using the – or + button, and then press the
x
button.
Related Information
& “Inserting a Memory Card” on page 56
& “Menu Options for Printing from the Control Panel” on page 70
& “Loading Paper in the Paper Cassette 1” on page 41
& “Loading Paper in the Paper Cassette 2” on page 45
& “List of Paper Types” on page 39
& “Placing Originals on the Scanner Glass” on page 53
Printing Lined Paper, Calendars, Original Writing Paper, and
Original Greeting Cards
You can easily print lined paper, calendars, original writing paper, and original greeting cards using the Personal
Stationery menu.
1. Load paper in the printer.
2. To print writing paper and greeting cards using a photo on your memory card, insert the memory card into
the printer.
3.
Enter More Functions from the home screen using the
l
or
r
button, and then press the OK button.
4. Select Personal Stationery using the
u
or
d
button, and then press the OK button.
User's Guide
Printing
65
5. Select a menu item using the
u
or
d
button, and then press the OK button.
Note:
When printing greeting cards, you can add an image stored in the printer instead of using a photo on your memory
card. To add an image stored in the printer, select Template Ar t.
6. Follow the on-screen instructions to print.
Related Information
& “Loading Paper in the Paper Cassette 2” on page 45
& “Loading Paper in the Rear Paper Feed Slot” on page 49
& “List of Paper Types” on page 39
& “Inserting a Memory Card” on page 56
& “Menu Options for Printing Lined Paper, Calendars, Original Writing Paper, and Original Greeting Cards” on
page 66
& “Menu Options for Printing from the Control Panel” on page 70
Menu Options for Printing Lined Paper, Calendars, Original Writing Paper,
and Original Greeting Cards
Lined Papers:
Prints some types of lined paper, graph paper, or music paper.
Writing Papers:
Prints some types of writing paper with a photo from the memory card set as the background. e
photo is printed lightly so that it can be easily written on.
Calendar:
Prints a weekly or monthly calender. Select the year and the month for the monthly calendar.
Message Card:
Prints a greeting card using images from the printer or images on the memory card.
Image Position
Select where you want to place the image on the greeting card.
Line Type
Select the type of ruled line to print on the greeting card.
Line Color
Select the color of the ruled line to print on the greeting card.
Printing Original Envelopes
You can create original envelopes by adding an image stored in the printer using the Personal Stationery menu.
You can use the same image to print greeting cards that match the envelopes.
User's Guide
Printing
66
First print a diagram of an envelope on A4 size paper, and then fold it to create an envelope.
1.
Enter More Functions from the home screen using the
l
or
r
button, and then press the OK button.
2. Select Personal Stationery using the
u
or
d
button, and then press the OK button.
3. Select Origami using the
u
or
d
button, and then press the OK button.
4.
Select Origami Envelope using the
u
or
d
button, and then press the OK button.
5. Select the image you want to print on the envelopes using the
l
or
r
button, and then press the OK button.
A screen indicating the print position of the image, and whether to print fold lines is displayed.
6. To change the image position and the fold line setting, press the
d
button to display the setting screen and
change the settings.
7. When you have nished making settings, press the
y
button to return to the setting conrmation screen, and
then press the OK button.
8.
Select the size of the envelopes using the
l
or
r
button, and then press the OK button.
9. Load A4 plain paper in the printer, and then press the OK button.
10. Pull out the output tray.
11. Set the number of copies using the – or + button, and then press the
x
button.
Related Information
& “Loading Paper in the Paper Cassette 2” on page 45
Folding Envelopes
Aer printing a diagram of an envelope, print an instruction sheet that shows you how to fold the envelope, and
then lay the instruction sheet on top of the diagram and fold them together.
1. Select Origami Envelope Instruction from the Origami menu, and then press the OK button.
User's Guide
Printing
67
2. Select the envelope size that you selected to print the envelope diagram using the
l
and
r
button, and then
press the OK button.
3. Load A4 plain paper in the printer, and then press the OK button.
4. Set the number of copies using the – or + button, and then press the
x
button.
e following instruction sheet is printed.
1
2
3
4
5
5
6
6
6
6
6
6
7
7
8
8
8
8
8
8
9
99
10 10
10
11
160mm
115mm
1
2
3
4
44
5
5
5
5
6
6
6
7
7
7
7
8
8
8
9
9
9
10
10
10
1111111111
181mm
91mm
5. Lay the instruction sheet on top of the envelope diagram, and then fold them together following the
instructions on the instruction sheet.
6.
When nished, unfold them and remove the instruction sheet, and then fold only the envelope diagram again
along its creases.
Printing in Various Layouts
You can print the photos on your memory card in various layouts such as 2-up, 4-up, and upper half.
Enter More Functions from the home screen using the
l
or
r
button, and then press the OK button. Select Photo
Layout Sheet using the
u
or
d
button, and then press the OK button. Follow the on-screen instructions to print.
Related Information
& “Menu Options for Printing from the Control Panel” on page 70
User's Guide
Printing
68
Printing a Coloring Book
You can print pictures by extracting only the outline of photos or illustrations. is allows you to create unique
coloring books.
Note:
Unless they are being used for personal use (at home or other restricted areas), you need permission from the copyright
holder when using copyright protected originals to create a coloring book.
Enter More Functions from the home screen using the
l
or
r
button, and then press the OK button. Select
Coloring Book using the
u
or
d
button, and then press the OK button. Select whether to scan an original or use
a photo on a memory card to print a coloring book, and then follow the on-screen instructions.
Related Information
&
“Menu Options for Paper and Print Settings” on page 70
DPOF Printing
is printer is compatible with DPOF (Digital Print Order Format) Ver. 1.10. DPOF is a format that stores
additional information for photos such as the date, time, user name, and printing information. DPOF-compatible
cameras allow you to set which image on a memory card to print and the number of copies. When the memory
card is inserted into the printer, the photos selected by the camera are printed.
Note:
For information on making print settings on your camera, see the documentation provided with your camera.
When you insert a memory card into the printer, a conrmation screen is displayed. Select Ye s using the
u
or
d
button, and then press the OK button to display the print start screen. Press the
x
button to start printing. If you
want to change the print settings, press the
d
button. Setting items are the same as in Print Photos mode.
Related Information
& “Printing Photos by Selecting from a Memory Card” on page 61
& “Menu Options for Printing from the Control Panel” on page 70
User's Guide
Printing
69
Menu Options for Printing from the Control Panel
Menu Options for Selecting Photos
Browse:
Browse by Date
Displays the photos on the memory card sorted by date. Select a date to display all photos saved on
that date.
Cancel Browse
Cancels sorting photos and displays all the photos.
Select Photos:
Select All Photos
Selects all the photos on the memory card and sets the number of prints.
Cancel Photo Selection
Returns the number of prints of all photos to 0 (zero).
Display Mode:
1-up
Displays one photo on a screen. Information on settings, such as zoom, is also displayed.
1-up without Information
Displays one photo on a screen. Information on settings, such as zoom, is not displayed.
9-up
Displays nine photos on a screen.
Menu Options for Paper and Print Settings
Paper Size:
Select the paper size you loaded.
Paper Type:
Select the paper type you loaded.
Paper Source:
Select the paper source that you want to use.
Borderless:
Prints without margins around the edges. e image is enlarged a little to remove borders from the
edges of the paper.
Quality:
Select the print quality. Selecting Best provides higher quality printing, but the printing speed may be
slower.
User's Guide
Printing
70
Expansion:
With borderless printing, the image is enlarged a little to remove borders from the edges of the paper.
Select how much to enlarge the image.
Date:
Select the format used to print the date on photos for photos that include the date the photos were
taken or the date they were saved. e date is not printed for some layouts.
Print Info. On Photos:
O
Prints without any information.
Camera Text
Prints text set on the digital camera. For information on the text settings, see the documentation
provided with your camera. e information can only be printed in borderless printing on 10×15
cm, 13×18 cm, or 16:9 wide size.
Landmark
Prints the name of the place or landmark where the photo was taken for digital cameras that have
the landmark feature. See the website of the manufacturer of your camera for more details. e
information can only be printed in borderless printing on 10×15 cm, 13×18 cm, or 16:9 wide size.
Fit Frame:
If the aspect ratio of the image data and the paper size is dierent, the image is automatically enlarged
or reduced so that the short sides match the short sides of the paper.
e
long side of the image is
cropped if it extends beyond the long side of the paper. is feature may not work for panorama
photos.
Bidirectional:
Prints while the print head moves to the le and to the right. If vertical or horizontal ruled lines on
your printout look blurred or misaligned, disabling this feature may solve the problem; however, doing
so may reduce print speed.
CD Density:
For CD/DVD printing. Set the density to use when printing onto a CD/DVD.
Density:
For coloring book printing. Select the level of density for the outlines on the coloring sheet.
Line Detection:
For coloring book printing. Select the sensitivity used to detect outlines in the photo.
Menu Options for Photo Adjustment and Zoom
Enhance:
Select one of the image adjustment options. Select PhotoEnhance to produce sharper images and more
vivid colors by automatically adjusting the contrast, saturation, and brightness of the original image
data. Select P. I . M . to adjust the image by using your camera's PRINT Image Matching or Exif Print
information.
User's Guide
Printing
71
Scene Detection:
Available when selecting PhotoEnhance as the Enhance setting. Improves the image quality for photos
of people, landscapes, and night scenes.
Fix Red-Eye:
Fixes red-eye in photos. Corrections are not applied to the original le, only to the printouts.
Depending on the type of photo, parts of the image other than the eyes may be corrected.
Brightness:
Adjusts the brightness of the image.
Contrast:
Adjusts the dierence between the brightness and darkness.
Sharpness:
Enhances or defocuses the outline of the image.
Saturation:
Adjusts the vividness of the image.
Filter:
Prints in sepia or monochrome.
Crop/Zoom:
Enlarges a part of the photo to be printed.
Printing from a Computer
Printing Basics - Windows
Note:
See the online help for explanations of the setting items. Right-click an item, and then click Help.
Operations
dier
depending on the application. See the application's help for details.
1.
Load paper in the printer.
2. Open the le you want to print.
3. Select Print or Print Setup from the File menu.
4. Select your printer.
User's Guide
Printing
72
5. Select Preferences or Properties to access the printer driver window.
6. Make the following settings.
Paper Source: Select the paper source in which you loaded the paper.
Document Size: Select the paper size you loaded in the printer.
Borderless: Select to print with no margins around the image.
In borderless printing, the print data is enlarged slightly more than the paper size so that no margins are
printed around the edges of the paper. Click Settings to select the amount of enlargement.
Orientation: Select the orientation you set in the application.
Paper Type: Select the type of paper you loaded.
Quality: Select the print quality.
Selecting High provides higher quality printing, but the printing speed may be slower.
Color: Select Grayscale when you want to print in black or shades of gray.
Note:
When printing on envelopes, select Landscape as the Orientation setting.
7. Click OK to close the printer driver window.
8. Click Print.
Related Information
& “Available Paper and Capacities” on page 38
& “Loading Paper in the Paper Cassette 1” on page 41
& “Loading Paper in the Paper Cassette 2” on page 45
& “Loading Paper in the Rear Paper Feed Slot” on page 49
& “Guide to Windows Printer Driver” on page 145
& “List of Paper Types” on page 39
User's Guide
Printing
73
Printing Basics - Mac OS
Note:
Explanations in the section use TextEdit as an example. Operations and screens dier depending on the application. See the
application's help for details.
1. Load paper in the printer.
2. Open the
le
you want to print.
3. Select Print from the File menu or another command to access the print dialog.
If necessary, click Show Details or
d
to expand the print window.
4. Make the following settings.
Printer: Select your printer.
Presets: Select when you want to use the registered settings.
Paper Size: Select the paper size you loaded in the printer.
When printing with no margins, select a "borderless" paper size.
Orientation: Select the orientation you set in the application.
Note:
If the above setting menus are not displayed, close the print window, select Page Setup from the File menu, and then
make settings.
When printing on envelopes, select landscape orientation.
User's Guide
Printing
74
5. Select Print Settings from the pop-up menu.
Note:
On OS X Mountain Lion or later, if the Print Settings menu is not displayed, the Epson printer driver has not been
installed correctly.
Select System Preferences from the
menu > Printers & Scanners (or Print & Scan, Print & Fax), remove the
printer, and then add the printer again. See the following to add a printer.
http://epson.sn
6.
Make the following settings.
Paper Source: Select the paper source in which you loaded the paper.
If you enable the Automatic Cassette Switching function, the printer automatically feeds paper from paper
cassette 2 when paper runs out in paper cassette 1. Load the same paper (type and size) in paper cassette 1
and paper cassette 2.
To enable the Automatic Cassette Switching function, select System Preferences from the
menu >
Printers & Scanners (or Print & Scan, Print & Fax), and then select the printer. Make settings on the
screen displayed by clicking Options & Supplies > Options (or Driver).
Media Type: Select the type of paper you loaded.
Print Quality: Select the print quality.
Selecting Fine provides higher quality printing, but the printing speed may be slower.
Expansion: Available when selecting a borderless paper size.
In borderless printing, the print data is enlarged slightly more than the paper size so that no margins are
printed around the edges of the paper. Select the amount of enlargement.
User's Guide
Printing
75
Grayscale: Select to print in black or shades of gray.
7. Click Print.
Related Information
& “Available Paper and Capacities” on page 38
& “Loading Paper in the Paper Cassette 1” on page 41
& “Loading Paper in the Paper Cassette 2” on page 45
& “Loading Paper in the Rear Paper Feed Slot” on page 49
&
“Guide to Mac OS Printer Driver” on page 148
&
“List of Paper Types” on page 39
Printing on 2-Sides
You can use either of the following methods to print on both sides of the paper.
Automatic 2-sided printing
Manual 2-sided printing (for Windows only)
When the printer has nished printing the rst side, ip the paper over to print on the other side.
You can also print a booklet that can be created by folding the printout. (For Windows only)
Note:
is feature is not available for borderless printing.
If you do not use paper that is suitable for 2-sided printing, the print quality may decline and paper jams may occur.
Depending on the paper and the data, ink may bleed through to the other side of the paper.
Related Information
& “Available Paper and Capacities” on page 38
User's Guide
Printing
76
Printing on 2-Sides - Windows
Note:
Manual 2-sided printing is available when EPSON Status Monitor 3 is enabled. If EPSON Status Monitor 3 is disabled,
access the printer driver, click Extended Settings on the Maintenance tab, and then select Enable EPSON Status
Monitor 3.
Manual 2-sided printing may not be available when the printer is accessed over a network or is used as a shared printer.
1. Load paper in the printer.
2.
Open the le you want to print.
3. Access the printer driver window.
4. Select Auto (Long-edge binding), Auto (Short-edge binding), Manual (Long-edge binding), or Manual
(Short-edge binding) from 2-Sided Printing on the Main tab.
5. Click Settings, make the appropriate settings, and then click OK.
Note:
To print a folded booklet, select Booklet.
6. Click Print Density, select the document type from Select Document Type, and then click OK.
e printer driver automatically sets the Adjustments options for that document type.
Note:
Printing may be slow depending on the combination of options selected for Select Document Type in the Print
Density Adjustment window and for Quality on the Main tab.
For manual 2-sided printing, the Print Density Adjustment setting is not available.
7. Set the other items on the Main and More Options tabs as necessary, and then click OK.
8. Click Print.
For manual 2-sided printing, when the rst side has nished printing, a pop-up window is displayed on the
computer. Follow the on-screen instructions.
Related Information
& “Loading Paper in the Paper Cassette 1” on page 41
& “Loading Paper in the Paper Cassette 2” on page 45
& “Printing Basics - Windows” on page 72
Printing on 2-Sides - Mac OS
1. Load paper in the printer.
2. Open the le you want to print.
3. Access the print dialog.
4. Select Two-sided Printing Settings from the pop-up menu.
User's Guide
Printing
77
5. Select the bindings in Two-sided Printing.
6. Select the type of original in Document Type.
Note:
Printing may be slow depending on the Document Type setting.
If you are printing high-density data such as photos or graphs, select Te x t w ith Photo or Photo as the Document
Ty pe setting. If scung occurs or the image bleeds through to the reverse side, adjust the print density and ink drying
time by clicking the arrow mark next to Adjustments.
7.
Set the other items as necessary.
8. Click Print.
Related Information
& “Loading Paper in the Paper Cassette 1” on page 41
& “Loading Paper in the Paper Cassette 2” on page 45
& “Printing Basics - Mac OS” on page 74
Printing Several Pages on One Sheet
You can print two or four pages of data on a single sheet of paper.
Printing Several Pages on One Sheet - Windows
Note:
is feature is not available for borderless printing.
1. Load paper in the printer.
2.
Open the le you want to print.
3. Access the printer driver window.
4. Select 2-Up or 4-Up as the Multi-Page setting on the Main tab.
User's Guide
Printing
78
5. Click Page Order, make the appropriate settings, and then click OK to close the window.
6. Set the other items on the Main and More Options tabs as necessary, and then click OK.
7.
Click Print.
Related Information
& “Loading Paper in the Paper Cassette 1” on page 41
& “Loading Paper in the Paper Cassette 2” on page 45
& “Loading Paper in the Rear Paper Feed Slot” on page 49
& “Printing Basics - Windows” on page 72
Printing Several Pages on One Sheet - Mac OS
1. Load paper in the printer.
2. Open the
le
you want to print.
3. Access the print dialog.
4. Select Layout from the pop-up menu.
5. Set the number of pages in Pages per Sheet, the Layout Direction (page order), and Border.
6. Set the other items as necessary.
7. Click Print.
Related Information
& “Loading Paper in the Paper Cassette 1” on page 41
& “Loading Paper in the Paper Cassette 2” on page 45
& “Loading Paper in the Rear Paper Feed Slot” on page 49
& “Printing Basics - Mac OS” on page 74
User's Guide
Printing
79
Printing to Fit the Paper Size
You can print to t the paper size you loaded in the printer.
Printing to Fit the Paper Size - Windows
Note:
is feature is not available for borderless printing.
1. Load paper in the printer.
2.
Open the le you want to print.
3. Access the printer driver window.
4. Make the following settings on the More Options tab.
Document Size: Select the paper size you set in the application.
Output Paper: Select the paper size you loaded in the printer.
Fit to Page is selected automatically.
Note:
If you want to print a reduced image at the center of the page, select Center.
5. Set the other items on the Main and More Options tabs as necessary, and then click OK.
6.
Click Print.
Related Information
& “Loading Paper in the Paper Cassette 1” on page 41
& “Loading Paper in the Paper Cassette 2” on page 45
& “Loading Paper in the Rear Paper Feed Slot” on page 49
& “Printing Basics - Windows” on page 72
Printing to Fit the Paper Size - Mac OS
1. Load paper in the printer.
User's Guide
Printing
80
2. Open the le you want to print.
3. Access the print dialog.
4.
Select the size of the paper you set in the application as the Paper Size setting.
5. Select Paper Handling from the pop-up menu.
6. Select Scale to t paper size.
7. Select the paper size you loaded in the printer as the Destination Paper Size setting.
8. Set the other items as necessary.
9. Click Print.
Related Information
& “Loading Paper in the Paper Cassette 1” on page 41
& “Loading Paper in the Paper Cassette 2” on page 45
& “Loading Paper in the Rear Paper Feed Slot” on page 49
& “Printing Basics - Mac OS” on page 74
Printing Multiple Files Together (for Windows Only)
Job Arranger Lite allows you to combine several les created by dierent applications and print them as a single
print job. You can specify the print settings for combined les, such as layout, print order, and orientation.
1. Load paper in the printer.
2.
Open the le you want to print.
3. Access the printer driver window.
4. Select Job Arranger Lite on the Main tab.
5.
Click OK to close the printer driver window.
6. Click Print.
e Job Arranger Lite window is displayed and the print job is added to the Print Project.
User's Guide
Printing
81
7. With the Job Arranger Lite window opened, open the le that you want to combine with the current le, and
then repeat steps 3 to 6.
Note:
If you close the Job Arranger Lite window, the unsaved Print Project is deleted. To print later, select Save from the
File menu.
To open a Print Project saved in Job Arranger Lite, click Job Arranger Lite on the printer driver's Maintenance
tab. Next, select Open from the File menu to select the le. e extension of the saved les is "ecl".
8. Select the Layout and Edit menus in Job Arranger Lite to edit the Print Project as necessary. See the help of
Job Arranger Lite for details.
9. Select Print from the File menu.
Related Information
& “Loading Paper in the Paper Cassette 1” on page 41
& “Loading Paper in the Paper Cassette 2” on page 45
& “Loading Paper in the Rear Paper Feed Slot” on page 49
& “Printing Basics - Windows” on page 72
Printing One Image on Multiple Sheets to Create a Poster (for
Windows Only)
is feature allows you to print one image on multiple sheets of paper. You can create a larger poster by taping
them together.
Note:
is feature is not available for borderless printing.
1. Load paper in the printer.
2. Open the le you want to print.
3.
Access the printer driver window.
4. Select 2x1 Poster, 2x2 Poster, 3x3 Poster, or 4x4 Poster from Multi-Page on the Main tab.
5. Click Settings, make the appropriate settings, and then click OK.
Note:
Print Cutting Guides allows you to print a cutting guide.
User's Guide
Printing
82
6. Set the other items on the Main and More Options tabs as necessary, and then click OK.
7. Click Print.
Related Information
&
“Loading Paper in the Paper Cassette 1” on page 41
&
“Loading Paper in the Paper Cassette 2” on page 45
& “Loading Paper in the Rear Paper Feed Slot” on page 49
& “Printing Basics - Windows” on page 72
Making Posters Using Overlapping Alignment Marks
Here is an example of how to make a poster when 2x2 Poster is selected, and Overlapping Alignment Marks is
selected in Print Cutting Guides.
User's Guide
Printing
83
1. Prepare Sheet 1 and Sheet 2. Cut o the margins of Sheet 1 along the vertical blue line through the center of
the top and bottom cross marks.
2. Place the edge of Sheet 1 on top of Sheet 2 and align the cross marks, then temporarily tape the two sheets
together from the back.
User's Guide
Printing
84
3. Cut the taped sheets in two along the vertical red line through the alignment markers (this time, the line to the
le
of the cross marks).
4. Tape the sheets together from the back.
5. Repeat steps 1 to 4 to tape Sheet 3 and Sheet 4 together.
User's Guide
Printing
85
6. Cut o the margins of Sheet 1 and Sheet 2 along the horizontal blue line through the center of the le and right
side cross marks.
7. Place the edge of Sheet 1 and Sheet 2 on top of Sheet 3 and Sheet 4 and align the cross marks, and then
temporarily tape them together from the back.
User's Guide
Printing
86
8. Cut the taped sheets in two along the horizontal red line through the alignment markers (this time, the line
above the cross marks).
9. Tape the sheets together from the back.
User's Guide
Printing
87
10. Cut o the remaining margins along the outer guide.
Printing Using Advanced Features
is section introduces a variety of additional layout and printing features available on the printer driver.
Related Information
&
“Windows Printer Driver” on page 144
&
“Mac OS Printer Driver” on page 147
Adding a Printing Preset to Print Easily
If you create your own preset of frequently used print settings on the printer driver, you can print easily by
selecting the preset from the list.
User's Guide
Printing
88
Windows
To add your own preset, set items such as the Document Size and Paper Type on the Main or More Options tab,
and then click Add/Remove Presets in Printing Presets.
Note:
To delete an added preset, click Add/Remove Presets, select the preset name you want to delete from the list, and then delete
it.
Mac OS
Access the print dialog. To add your own preset, set items such as the Paper Size and Media Type, and then save
the current settings as the preset in the Presets setting.
Note:
To delete an added preset, click Presets > Show Presets, select the preset name you want to delete from the list, and then
delete it.
Printing a Reduced or Enlarged Document
You can reduce or enlarge the size of a document by a specic percentage.
Windows
Note:
is feature is not available for borderless printing.
Set the Document Size on the More Options tab. Select Reduce/Enlarge Document, Zoom to, and then enter a
percentage.
Mac OS
Note:
Operations dier depending on the application. See the application's help for details.
Select Page Setup (or Print) from the File menu. Select the printer from Format For, select the paper size, and
then enter a percentage in Scale. Close the window, and then print following the basic printing instructions.
Adjusting the Print Color
You can adjust the colors used in the print job.
PhotoEnhance produces sharper images and more vivid colors by automatically adjusting the contrast, saturation,
and brightness of the original image data.
Note:
ese adjustments are not applied to the original data.
PhotoEnhance adjusts the color by analyzing the location of the subject.
erefore,
if you have changed the location of
the subject by reducing, enlarging, cropping, or rotating the image, the color may change unexpectedly. Selecting the
borderless setting also changes the location of the subject resulting in changes in color. If the image is out of focus, the tone
may be unnatural. If the color is changed or becomes unnatural, print in a mode other than PhotoEnhance.
Windows
Select the method of color correction from Color Correction on the More Options tab.
User's Guide
Printing
89
If you select Automatic, the colors are automatically adjusted to match the paper type and print quality settings. If
you select Custom and click Advanced, you can make your own settings.
Mac OS
Access the print dialog. Select Color Matching from the pop-up menu, and then select EPSON Color Controls.
Select Color Options from the pop-up menu, and then select one of the available options. Click the arrow next to
Advanced Settings and make the appropriate settings.
Printing a Watermark (for Windows Only)
You can print a watermark such as "Condential" on your printouts. You can also add your own watermark.
Note:
is feature is not available with borderless printing.
Click Watermark Features on the More Options tab, and then select a watermark. Click Settings to change details
such as the density and position of the watermark.
Printing a Header and Footer (for Windows Only)
You can print information such as a user name and printing date as headers or footers.
Click Watermark Features in the More Options tab, and then select Header/Footer. Click Settings and select
necessary items from the drop-down list.
Printing Photos Using Epson Easy Photo Print
Epson Easy Photo Print lets you lay out and print photos easily on various types of paper. See the application's help
for details.
Note:
By printing on genuine Epson photo paper, the ink quality is maximized and the printouts are vivid and clear.
To perform borderless printing using a commercially available application, make the following settings.
Create image data to t the paper size. If a margin setting is available in the application you are using, set the
margin to 0 mm.
Enable the borderless printing setting in the printer driver.
Related Information
& Epson Easy Photo Print” on page 151
& “Installing Applications” on page 154
User's Guide
Printing
90
Printing a CD/DVD Label with Epson Print CD
Epson Print CD lets you easily create and print an original design CD/DVD label. You can also create and print a
CD/DVD jacket.
You can set the print range for the CD/DVD to a minimum of 18 mm for the inner diameter, and a maximum of
120 mm for the outer diameter. Depending on the settings, the CD/DVD or tray may be smeared. Set within the
print range for the CD/DVD you want to print.
See the application's help for details.
Note:
When printing a CD/DVD label using a commercially available application, make the following settings.
For Windows, A4 is automatically selected as the Document Size setting when you select CD/DVD Tray as the Paper
Source setting. Select Portrait as the Orientation setting, and CD/DVD as the Paper Type setting.
For Mac OS, select A4 (CD/DVD) as the Paper Size setting. Select portrait as the printing direction, and then select
CD/DVD as the Media Type on the Print Settings menu.
On some applications, you may need to specify the tray type. Select Epson Tray Type 2. e setting name may vary
slightly depending on the application.
Related Information
& Epson Print CD” on page 151
& “Installing Applications” on page 154
Printing from Smart Devices
Using Epson iPrint
Epson iPrint is an application that allows you to print photos, documents, and web pages from a smart device such
as a smartphone or tablet. You can use local print, printing from a smart device that is connected to the same
wireless network as your printer, or remote print, printing from a remote location over the Internet. To use remote
print, register your printer in the Epson Connect service.
Related Information
& Epson Connect Service” on page 142
Installing Epson iPrint
You can install Epson iPrint on your smart device from the following URL or QR code.
User's Guide
Printing
91
http://ipr.to/a
Printing Using Epson iPrint
Start Epson iPrint from your smart device and select the item you want to use from the home screen.
e
following screens are subject to change without notice.
A
Home screen displayed when the application is started.
B
Displays information on how to setup the printer and a FAQ.
C
Displays the screen where you can select the printer and make printer settings. Once you have selected the
printer, you do not need to select it again from the next time.
D
Select what you want to print such as photos, documents, and web pages.
E
Displays the screen to make print settings such as paper size and paper type.
F
Displays the paper size. When this is displayed as a button, press it to display the paper settings currently
set on the printer.
G
Displays photos and documents you selected.
H
Starts printing.
User's Guide
Printing
92
Note:
To print from the document menu using iPhone, iPad, and iPod touch running iOS, start Epson iPrint aer transferring the
document you want to print using the
le
sharing function in iTunes.
Using AirPrint
AirPrint enables instant wireless printing from iPhone, iPad, and iPod touch with the latest version of iOS, and
Mac with the latest version of OS X.
Note:
If you disabled paper conguration messages on your product control panel, you cannot use AirPrint. See the link below to
enable the messages, if necessary.
1. Load paper in your product.
2. Set up your product for wireless printing. See the link below.
http://epson.sn
3. Connect your Apple device to the same wireless network that your product is using.
4.
Print from your device to your product.
Note:
For details, see the AirPrint page on the Apple website.
Related Information
& “Loading Paper in the Paper Cassette 1” on page 41
& “Loading Paper in the Paper Cassette 2” on page 45
User's Guide
Printing
93
Printing from a Digital Camera
Note:
You can print photos directly from a PictBridge-compatible digital camera. For more details on making operations on
your camera, see the documentation provided with your camera.
Usually digital camera settings are given priority; however, in the following situations, the printer settings are given
priority.
When the camera's print setting is set to "use printer settings"
When the Sepia or B&W option is selected in the printer's print settings.
When combining the print settings of the camera and the printer produces settings that are not available on
the printer.
You can print photos with DPOF settings directly from a camera.
Printing from a Digital Camera Connected by USB Cable
You can print photos directly from a digital camera connected by USB cable.
1. Remove a memory card from the printer.
2. Load paper in the printer.
3. Enter Settings from the home screen using the
l
or
r
button, and then press the OK button. Select External
Device Setup using the
u
or
d
button, and then press the OK button.
4. Select Print Settings or Photo Adjustments, press the OK button, and then change the settings if necessary.
Select the setting items using the
u
or
d
button and change settings using the
l
or
r
button.
5. Turn on the digital camera, and then connect to the printer using a USB cable.
Note:
Use a USB cable that is shorter than two meters.
6. Select the photos you want to print from the digital camera, make settings such as the number of copies, and
then start printing.
User's Guide
Printing
94
Related Information
& “Loading Paper in the Paper Cassette 1” on page 41
& “Loading Paper in the Paper Cassette 2” on page 45
& Menu Options for Photo Adjustment and Zoom” on page 71
& “Menu Options for Paper and Print Settings” on page 70
Printing from a Digital Camera Connected Wirelessly
You can wirelessly print photos from digital cameras that support the DPS over IP standard (from here on referred
to as PictBridge (wireless LAN)).
1. Make sure the icon that indicates that the printer is connected to a wireless network is displayed on the home
screen.
Note:
You can check the meaning of the icons on the control panel. Select Help on the home screen using the
l
or
r
button,
and then press the OK button. Select Icon List using the
u
or
d
button, and then press the OK button.
2. Load paper in the printer.
3. Select Settings from the home screen using the
l
or
r
button, and then press the OK button. Select External
Device Setup using the
u
or
d
button, and then press the OK button.
4. Select Print Settings or Photo Adjustments, press the OK button, and then change the settings if necessary.
Select the setting items using the
u
or
d
button and change settings using the
l
or
r
button.
5. Connect the digital camera to the same network as the printer.
6. Display the list of available printers on the digital camera, and then select the printer you want to connect to.
Note:
To check the printer's name, select Settings > Network Settings > Network Status from the home screen.
If your digital camera has a function that allows you to register printers, you can connect to the printer by selecting it
from the next time.
7.
Select the photos you want to print from the digital camera, make settings such as the number of copies, and
then start printing.
8. Disconnect the PictBridge (wireless LAN) connection to the printer from the digital camera.
c
Important:
When using PictBridge (wireless LAN), you cannot use other printer functions or print from other devices.
Disconnect immediately when you have nished printing.
Related Information
&
“Loading Paper in the Paper Cassette 1” on page 41
&
“Loading Paper in the Paper Cassette 2” on page 45
& Menu Options for Photo Adjustment and Zoom” on page 71
User's Guide
Printing
95
& “Menu Options for Paper and Print Settings” on page 70
Canceling Printing
Note:
In Windows, you cannot cancel a print job from the computer once it has been completely sent to the printer. In this case,
cancel the print job by using the printer's control panel.
When printing several pages from Mac OS, you cannot cancel all of the jobs by using the control panel. In this case, cancel
the print job from the computer.
If you have sent a print job from Mac OS X v10.6.8 through the network, you may not be able to cancel printing from the
computer. In this case, cancel the print job by using the printer's control panel.
Canceling Printing - Printer Button
Press the
y
button to cancel the print job in progress.
Canceling Printing - Windows
1. Access the printer driver window.
2. Select the Maintenance tab.
3. Click Print Queue.
4. Right-click on the job you want to cancel and then select Cancel.
Related Information
&
“Windows Printer Driver” on page 144
Canceling Printing - Mac OS
1. Click the printer icon in the Dock.
2. Select the job you want to cancel.
3. Cancel the job.
OS X Mountain Lion or later
Click
next to the progress meter.
Mac OS X v10.6.8 to v10.7.x
Click Delete.
User's Guide
Printing
96
Copying
Copying Basics
1. Load paper in the printer.
When loading in the rear paper feed slot, do not load paper until the printer prompts you to do so.
2. Place the originals.
3. Enter Copy from the home screen using the
l
or
r
button, and then press the OK button.
4. Set the number of copies using the – or + button.
5. Select color copy or monochrome copy using the
l
or
r
button.
6.
Select Paper and Copy Settings using the
d
button, and then press the OK button. Check the settings such as
the paper size and the paper type and change the settings if necessary. Select the setting items using the
u
or
d
button and change the settings using the
l
or
r
button.
Note:
If you want to copy by reducing or enlarging the size of a document by a specic percentage, select Custom Size as the
Reduce/Enlarge setting, and then specify a percentage using the – or + button. You can change the percentage in
increments of 5% by pressing and holding down the – or + button.
7. Press the
x
button. When printing from the rear paper feed slot, press the
x
button, and then load paper
when you are instructed to do so.
Note:
e color, size, and border of the copied image are slightly dierent from the original.
Related Information
& “Loading Paper in the Paper Cassette 1” on page 41
& “Loading Paper in the Paper Cassette 2” on page 45
& “Loading Paper in the Rear Paper Feed Slot” on page 49
& “Placing Originals on the Scanner Glass” on page 53
& Menu Options for Copy Mode” on page 97
Menu Options for Copy Mode
Note:
Available menus vary depending on the layout you selected.
The number of copies:
Enter the number of copies.
User's Guide
Copying
97
Color:
Copies the original in color.
B&W:
Copies the original in black and white (monochrome).
Density:
Increase the level of density by pressing the
r
button when the copying results are faint. Decrease the
level of density by pressing the
l
button when ink smears.
Remove Background:
Detects the paper color (background color) of the original document, and removes or lightens the
color. Depending on the darkness and vividness of the color, it may not be removed or lightened.
2-Sided Copying:
1>1-Sided
Copies one side of an original onto a single side of paper.
1>2-Sided
Copies two single-sided originals onto both sides of a single sheet of paper.
Layout:
Wit h B ord er
Copies with margins around the edges.
Borderless
Copies without margins around the edges. e image is enlarged a little to remove margins from the
edges of the paper.
A4, 2-up Copy
Copies two A4 single-sided originals onto a single sheet of A4 size paper in 2-up layout.
A4, Book/2-up
Copies two A4 facing pages of a book and so on onto a single sheet of A4 size paper in 2-up layout.
Book/2-Sided
Copies two separate pages of a book and so on onto both sides of a single sheet of paper. is
settings is only available when 1>2-Sided is selected as the 2-sided copying setting.
Reduce/Enlarge:
Enlarges or reduces the originals.
Custom Size
Species the magnication used to enlarge or reduce the original within a range of 25 to 400%.
Actual Size
Copies at 100 % magnication.
User's Guide
Copying
98
Auto Fit Page
Detects the scan area and automatically enlarges or reduces the original to t to the paper size you
selected. When there are white margins around the original, the white margins from the corner
mark of the scanner glass are detected as the scan area, but the margins at the opposite side may be
cropped.
10x15cm->A4, A4->10x15cm, and so on
Automatically enlarges or reduces the original to t to a specic paper size.
Paper Size:
Select the paper size you loaded.
Paper Type:
Select the paper type you loaded.
Paper Source:
Select the paper source that you want to use.
Document Type:
Select the type of your original.
Quality:
Select the print quality. Dra provides faster printing, but the printouts may be faint. Best provides
higher quality printing, but the printing speed may be slower.
For users in Western Europe, the dra mode is not available.
Document Orientation:
Select the orientation of your original.
Binding Margin:
Select the binding position of the copies.
Expansion:
With borderless copying, the image is enlarged a little to remove borders from the edges of the paper.
Select how much to enlarge the image.
Dry Time:
Select the drying time for 2-sided copying. Increase the level of drying time when ink smears.
User's Guide
Copying
99
Copying Photos
You can copy multiple photos at the same time. You can also restore the colors in faded photos.
Note:
e smallest size of original you can copy is 30×40 mm.
White space around the photo may not be detected.
1. Load paper in the printer.
When loading in the rear paper feed slot, do not load paper until the printer prompts you to do so.
2. Enter More Functions from the home screen using the
l
or
r
button, and then press the OK button.
3.
Select Copy/Restore Photos using the
u
or
d
button, and then press the OK button.
4. Select whether or not to restore the colors in faded photos using the
u
or
d
button, and then press the OK
button.
5. Press the
d
button to display the instructions on how to place originals, and then place the photos on the
scanner glass.
6. Press the
x
button.
e photos are scanned and displayed on the screen.
7. Select Paper and Copy Settings using the
d
button, and then press the OK button. Check the settings such as
the paper size and the paper type and change the settings if necessary. Select the setting items using the
u
or
d
button and change the settings using the
l
or
r
button.
Note:
If you want to print by enlarging part of a photo, select Crop/Zoom, and then press the OK button. Move the print area
frame using the
u
,
d
,
l
or
r
button, and then change the frame size using the or + button.
8.
Press the
x
button.
Related Information
& “Loading Paper in the Paper Cassette 1” on page 41
& “Loading Paper in the Paper Cassette 2” on page 45
& “Loading Paper in the Rear Paper Feed Slot” on page 49
&
“Placing Photos for Copying” on page 54
&
“Menu Options for Copy/Restore Photos” on page 100
Menu Options for Copy/Restore Photos
Color Restoration:
Restores the color of faded photos.
User's Guide
Copying
100
Display Mode:
1-up
Displays one photo on a screen. Information on settings, such as zoom, is also displayed.
1-up without Information
Displays one photo on a screen. Information on settings, such as zoom, is not displayed.
Paper and Copy Settings:
Paper Size
Select the paper size you loaded.
Paper Type
Select the paper type you loaded.
Paper Source
Select the paper source that you want to use.
Borderless
To copy without margins around the edges, select Borderless. e image is enlarged a little to
remove margins from the edges of the paper. To copy with margins around the edges, select Wi t h
Border.
Expansion
With borderless copying, the image is enlarged a little to remove borders from the edges of the paper.
Select how much to enlarge the image.
Photo Adjustments:
Selecting PhotoEnhance produces sharper images and more vivid colors by automatically adjusting the
contrast, saturation, and brightness of the original image data.
Filter:
Copies in monochrome.
Crop/Zoom:
Enlarges a part of the photo to be copied.
Copying on a CD/DVD Label
You can copy a disc label or a square original such as a photo onto a CD/DVD label.
c
Important:
Before printing on the CD/DVD, see the CD/DVD handling precautions.
Do not insert the CD/DVD tray while the printer is operating.
is
may damage the printer.
Do not insert the CD/DVD tray until you are instructed to do so. Otherwise, an error occurs and the CD/DVD is
ejected.
1. Press the button, select Copy to CD/DVD using
u
or
d
button, and then press the OK button.
2. Place the original following the instructions displayed on the screen, and then press the OK button.
User's Guide
Copying
101
3. Follow the on-screen instructions, set the print area by specifying the outer diameter using the
l
or
r
button,
and the inner diameter using the
u
or
d
button, and then press the OK button.
Note:
You can set 114 to 120 mm as the outer diameter, and 18 to 46 mm as the inner diameter in 1 mm increments.
4. Select Print on a CD/DVD using the
u
or
d
button, and then press the OK button.
Note:
For test printing, select Te st P rint on A4 Paper using the
u
or
d
button, and then load A4 plain paper in the printer.
You can check the printout image before printing on a CD/DVD label.
5. A message is displayed on the screen telling you that the printer is getting ready. You are then instructed to
load a CD/DVD. Press the
d
button to check the instructions and load a CD/DVD.
c
Important:
Press the center of the CD/DVD to securely set it on the CD/DVD tray. Otherwise, the CD/DVD may fall o
the tray.
6.
Press the OK button, check the
nal
screen for printing preparations, and then press the OK button.
7. Select color copy or monochrome copy using the
l
or
r
button.
8. If you want to change the settings such as copy density, select Paper and Copy Settings using the
d
button.
Select the setting items using the
u
or
d
button and change the settings using the
l
or
r
button.
9. Press the
x
button.
10. When printing has nished, the CD/DVD tray is ejected automatically. Remove the CD/DVD tray from the
printer, and then remove the CD/DVD.
c
Important:
Aer
printing is
nished,
make sure you remove the CD/DVD tray and store it at the bottom of the printer. If
you do not remove the tray and turn the printer on or o, or run head cleaning, the CD/DVD tray will strike
the print head and may cause the printer to malfunction.
11. Store the CD/DVD tray at the bottom of the printer.
Related Information
& CD/DVD Handling Precautions” on page 59
& “Placing a CD/DVD for Copying Labels” on page 54
& “Menu Options for Copy to CD/DVD” on page 103
User's Guide
Copying
102
Menu Options for Copy to CD/DVD
Outer, Inner:
Specify the print range. Up to 120 mm for the outer diameter, and a minimum of 18 mm for the inner
diameter can be specied. Depending on the setting, the CD/DVD or CD/DVD tray may get dirty. Set
the range to t the printable area of your CD/DVD.
Print on a CD/DVD, Test Print on A4 Paper:
Select whether to print on a CD/DVD or make a test print on A4 size plain paper. When you select Te s t
Print on A4 Paper, you can check the print result before printing on a CD/DVD.
Color:
Copies the original in color.
B&W:
Copies the original in black and white (monochrome).
Density:
Increase the level of density by pressing the
r
button when the copying results are faint. Decrease the
level of density by pressing the
l
button when ink smears.
Document Type:
Select the type of your original.
Quality:
Select the copy quality when printing a test on A4 size plain paper. Selecting Best provides higher
quality printing, but the printing speed may be slower.
User's Guide
Copying
103
Scanning
Scanning Using the Control Panel
Scanning to a Memory Card
You can save the scanned image to a memory card.
1. Place the originals.
2. Insert a memory card into the printer.
3. Enter Scan from the home screen using the
l
or
r
button, and then press the OK button.
4. Select Scan to Memory Card using the
l
or
r
button, and then press the OK button.
5. Check settings such as the save format, and change them if necessary. Select the setting items using the
u
or
d
button and change settings using the
l
or
r
button.
6. Press the
x
button.
Note:
e color, size, and border of the scanned image will not be exactly the same as the original.
Related Information
& “Inserting a Memory Card” on page 56
& “Placing Originals on the Scanner Glass” on page 53
& Menu Options for Scanning” on page 108
Scanning to the Cloud
You can send scanned images to could services using the Scan to Cloud feature. Before using this feature, make
settings using Epson Connect. See the following Epson Connect portal website for details.
https://www.epsonconnect.com/
http://www.epsonconnect.eu (Europe only)
1.
Make sure that you have made settings using Epson Connect.
2. Place the originals.
3.
Enter Scan from the home screen using the
l
or
r
button, and then press the OK button.
4. Select Scan to Cloud using the
l
or
r
button, and then press the OK button.
User's Guide
Scanning
104
5. Select the destination using the
u
or
d
button, and then press the OK button.
6. Check settings such as the save format, and change them if necessary. Select the setting items using the
u
or
d
button and change settings using the
l
or
r
button.
7.
Press the
x
button.
Note:
e color, size, and border of the scanned image will not be exactly the same as the original.
Related Information
& “Placing Originals on the Scanner Glass” on page 53
& Menu Options for Scanning” on page 108
Scanning to a Computer
You can save the scanned image to a computer.
c
Important:
Make sure you have installed Epson Scan 2 and Epson Event Manager on your computer before using this feature.
1.
Place the originals.
2. Enter Scan from the home screen using the
l
or
r
button, and then press the OK button.
3. Select how to save the scanned image to a computer from the following menus using the
l
or
r
button, and
then press the OK button.
Scan to Computer (JPEG): Saves the scanned image in JPEG format.
Scan to Computer (PDF): Saves the scanned image in PDF format.
Scan to Computer (Email): Starts the email client on your computer, and then automatically attaches it to
an email.
4.
Select the computer to which you want to save the scanned images.
Note:
You can change the scan settings such as the scanning size, folder to save, or save format, by using Epson Event
Manager.
When the printer is connected to a network, you can select the computer to which you want to save the scanned
image. Up to 20 computers can be displayed on the printer's control panel.
When the computer to which you want to save the scanned images is detected on the network, the initial 15
characters of the computer name are displayed on the control panel. If you set Network Scan Name
(Alphanumeric) on Epson Event Manager, it is displayed on the control panel.
5. Press the
x
button.
Note:
e color, size, and border of the scanned image will not be exactly the same as the original.
User's Guide
Scanning
105
Related Information
& “Placing Originals on the Scanner Glass” on page 53
& Epson Event Manager” on page 150
Scanning to a Computer (WSD)
Note:
is feature is only available for computers running English version of Windows 10/Windows 8.1/Windows 8/Windows 7/
Windows Vista.
If you are using Windows 7/Windows Vista, you need to setup your computer in advance using this feature.
1.
Place the originals.
2. Enter Scan from the home screen using the
l
or
r
button, and then press the OK button.
3. Select Scan to Computer (WSD) using the
l
or
r
button, and then press the OK button.
4. Select a computer.
5. Press the
x
button.
Note:
e color, size, and border of the scanned image will not be exactly the same as the original.
Related Information
& “Placing Originals on the Scanner Glass” on page 53
Setting Up a WSD Port
is
section explains how to set up a WSD port for Windows 7/Windows Vista.
Note:
For Windows 10/Windows 8.1/Windows 8, the WSD port is set up automatically.
e following is necessary to set up a WSD port.
e
printer and the computer are connected to the network.
e printer driver is installed on the computer.
1.
Turn t he printer on.
2. Click start, and then click Network on the computer.
3. Right-click the printer, and then click Install.
Click Continue when the User Account Control screen is displayed.
User's Guide
Scanning
106
Click Uninstall and start again if the Uninstall screen is displayed.
Note:
e printer name you set on the network and model name (EPSON XXXXXX (XX-XXXX)) are displayed on the
network screen. You can check the printer's name set on the network from the printer's control panel or by printing a
network status sheet.
4. Click Your device is ready to use.
5. Check the message, and then click Close.
6. Open the Devices and Printers screen.
Win dows 7
Click start > Control Panel > Hardware and Sound (or Hardware) > Devices and Printers.
User's Guide
Scanning
107
Win dows Vis ta
Click start > Control Panel > Hardware and Sound > Printers.
7. Check that an icon with the printer's name on the network is displayed.
Select the printer name when using with WSD.
Related Information
& “Printing a Network Status Sheet” on page 33
Menu Options for Scanning
e following options are available on the Scan to Memory Card menu and Scan to Cloud menu.
Format
Select the format in which to save the scanned image.
Color
Select whether to scan in color or in monochrome.
Scan Area
Select the scan area. To crop the white space around the text or image when scanning, select Auto
Cropping. To scan at the maximum area of the scanner glass, select Max Area. Select this setting and
scan again if the edges of the scanned image are cropped when A4 is selected.
Document
Select the type of your original.
Resolution
Select the scanning resolution.
Contrast
Select the contrast of the scanned image. Increase the level of contrast by pressing the
r
button and
decrease by pressing the
l
button.
Document Orientation
Select the orientation of your original.
Scanning from a Computer
Scanning Using Epson Scan 2
You can scan by using the scanner driver "Epson Scan 2". See the Epson Scan 2 help for an explanation of each
setting item.
User's Guide
Scanning
108
Related Information
& “Epson Scan 2 (Scanner Driver)” on page 150
Scanning Documents (Document Mode)
Using Document Mode in Epson Scan 2, you can scan originals using detailed settings that are suitable for text
documents.
1. Place the originals.
2. Start Epson Scan 2.
3. Select Document Mode from the Mode list.
4. Make the following settings on the Main Settings tab.
Document Size: Select the size of the original you placed.
Image Type: Select the color for saving the scanned image.
Resolution: Select the resolution.
Note:
e
Document Source setting is
xed
as Scanner Glass. You cannot change this setting.
User's Guide
Scanning
109
5. Make other scan settings if necessary.
You can preview the scanned image by clicking the Preview button. e preview window opens, and the
previewed image is displayed.
On the Advanced Settings tab, you can make detailed image adjustment settings that are suitable for text
documents, such as the following.
Unsharp Mask: You can enhance and sharpen the outlines of the image.
Descreening: You can remove moiré patterns (web-like shadows) that appear when scanning printed
papers such as a magazine.
Text Enhancement: You can make blurred letters in the original clear and sharp.
Auto Area Segmentation: You can make letters clear and images smooth when performing black and
white scanning for a document that contains images.
Note:
e items may not be available depending on other settings you made.
6. Set the le saving settings.
Image Format: Select the save format from the list.
You can make detailed settings for each save format except BITMAP and PNG. Select Options from the list
aer selecting the save format.
File Name: Conrm the save le name displayed.
You c an cha ng e s ett in gs for th e
le
name by selecting Settings from the list.
User's Guide
Scanning
110
Folder: Select the save folder for the scanned image from the list.
You can select another folder or create a new folder by selecting Select from the list.
7. Click Scan.
Related Information
&
“Placing Originals on the Scanner Glass” on page 53
Scanning Photos or Pictures (Photo Mode)
Using Photo Mode in Epson Scan 2, you can scan originals with wide variety of image adjustment features that are
suitable for photos or pictures.
1. Place the originals.
By placing multiple originals on the scanner glass, you can scan them all at the same time. Make sure there is a
gap of at least 20 mm between the originals.
2. Start Epson Scan 2.
3. Select Photo Mode from the Mode list.
4. Make the following settings on the Main Settings tab.
User's Guide
Scanning
111
Image Type: Select the color for saving the scanned image.
Resolution: Select the resolution.
Note:
e
Document Source setting is
xed
as Scanner Glass, and the Document Type setting is
xed
as
Reective
.
(Reective means originals which are not transparent, for example ordinary papers or photos.) You cannot change these
settings.
5. Click Preview.
e preview window opens, and the previewed images are displayed as thumbnails.
Note:
To preview the entire scanned area, select Normal from the list at the top of the preview widow.
User's Guide
Scanning
112
6. Conrm the preview, and make image adjustment settings on the Advanced Settings tab if necessary.
You can adjust the scanned image using detailed settings that are suitable for photos or pictures, such as the
following.
Brightness: You can adjust the brightness for the scanned image.
Contrast: You can adjust the contrast for the scanned image.
Saturation: You can adjust the saturation (color vividness) for the scanned image.
Unsharp Mask: You can enhance and sharpen the outlines of the scanned image.
Color Restoration: You can correct images that have faded to return them to their original colors.
Backlight Correction: You can lighten scanned images that are dark due to backlight.
Descreening: You can remove moiré patterns (web-like shadows) that appear when scanning printed
papers such as a magazine.
Dust Removal: You can remove dust on the scanned image.
Note:
e items may not be available depending on other settings you made.
Depending on the original, the scanned image may not be adjusted correctly.
When multiple thumbnails are created, you can adjust the image quality for each thumbnail. Depending on the
adjustment items, you can adjust the quality of scanned images all together by selecting multiple thumbnails.
User's Guide
Scanning
113
7. Set the le saving settings.
Image Format: Select the save format from the list.
You can make detailed settings for each save format except BITMAP and PNG. Select Options from the list
aer
selecting the save format.
File Name: Conrm the save le name displayed.
You c an cha ng e s ett in gs for th e
le
name by selecting Settings from the list.
Folder: Select the save folder for the scanned image from the list.
You can select another folder or create a new folder by selecting Select from the list.
8. Click Scan.
Related Information
& “Placing Originals on the Scanner Glass” on page 53
& “Placing Photos for Copying” on page 54
Scanning from Smart Devices
Epson iPrint is an application that allows you to scan photos and documents from a smart device, such as a
smartphone or tablet, that is connected to the same wireless network as your printer. You can save the scanned
data on a smart device or to Cloud services, send it by email, or print it.
User's Guide
Scanning
114
Installing Epson iPrint
You can install Epson iPrint on your smart device from the following URL or QR code.
http://ipr.to/a
Scanning Using Epson iPrint
Start Epson iPrint from your smart device and select the item you want to use from the home screen.
e
following screens are subject to change without notice.
A
Home screen displayed when the application is started.
B
Displays information on how to setup the printer and a FAQ.
C
Displays the screen where you can select the printer and make printer settings. Once you have selected the
printer, you do not need to select it again from the next time.
D
Displays the scanning screen.
E
Displays the screen where you can make scan settings such as resolution.
F
Displays scanned images.
User's Guide
Scanning
115
G
Starts scanning.
H
Displays the screen where you can save scanned data to a smart device or Cloud services.
I
Displays the screen where you can send scanned data by email.
J
Displays the screen where you can print scanned data.
User's Guide
Scanning
116
Relling Ink and Replacing Maintenance
Boxes
Checking the Status of the Remaining Ink and the
Maintenance Box
To
conrm
the actual ink remaining, visually check the ink levels in all of the printer's tanks.
c
Important:
Prolonged use of the printer when the ink level is below the lower line could damage the printer.
You can check the approximate ink levels from the computer, and the approximate service life of the maintenance
box from the control panel or the computer.
Checking the Status of the Maintenance Box - Control Panel
1. Enter Maint. from the home screen using the
l
or
r
button, and then press the OK button.
2.
Select Maintenance Box Service Life using the
u
or
d
button, and then press the OK button.
Checking the Status of the Remaining Ink and the Maintenance Box
- Windows
1.
Access the printer driver window.
2. Click EPSON Status Monitor 3 on the Maintenance tab.
Note:
If EPSON Status Monitor 3 is disabled, click Extended Settings on the Maintenance tab, and then select Enable
EPSON Status Monitor 3.
User's Guide
Relling Ink and Replacing Maintenance Boxes
117
Related Information
& “Windows Printer Driver” on page 144
Checking the Status of the Remaining Ink and the Maintenance Box
- Mac OS
1.
Select System Preferences from the
menu > Printers & Scanners (or Print & Scan, Print & Fax), and
then select the printer.
2. Click Options & Supplies > Utility > Open Printer Utility.
3. Click EPSON Status Monitor.
Ink Bottle Codes
Epson recommends the use of genuine Epson ink bottles.
e following are the codes for genuine Epson ink bottles.
BK: Black PB: Photo Black C: Cyan M: Magenta Y: Yellow
105 106 106 106 106
For Australia and New Zealand
BK: Black PB: Photo Black C: Cyan M: Magenta Y: Yellow
512 512 512 512 512
c
Important:
Epson warranty does not cover damage caused by inks other than those specied, including any genuine Epson ink
not designed for this printer or any third party ink.
Other products not manufactured by Epson may cause damage that is not covered by Epsons warranties, and under
certain circumstances, may cause erratic printer behavior.
Note:
Ink bottle codes may vary by location. For the correct codes in your area, contact Epson support.
For users in Europe, visit the following website for information on Epson's ink bottle yields.
http://www.epson.eu/pageyield
Related Information
& “Technical Support Web Site” on page 200
User's Guide
Relling Ink and Replacing Maintenance Boxes
118
Ink Bottle Handling Precautions
Read the following instructions before
relling
ink.
Handling precautions
Use ink bottles with the correct part code for this printer.
is printer requires careful handling of ink. Ink may splatter when the ink tanks are lled or relled with ink.
If ink gets on your clothes or belongings, it may not come o.
Do not shake too vigorously or squeeze the ink bottles.
Once you open an ink bottle, we recommend using it as soon as possible.
Store ink bottles at normal room temperature and keep them away from direct sunlight.
Epson recommends using the ink bottle before the date printed on the package.
Store the ink bottles in the same environment as the printer.
When storing or transporting an ink bottle, do not tilt the bottle and do not subject it to impacts or temperature
changes. Otherwise, ink may leak even if the cap on the ink bottle is tightened securely. Be sure to keep the ink
bottle upright when tightening the cap, and take precautions to prevent ink from leaking when transporting the
bottle, for example, putting the bottle in a bag.
Aer
bringing an ink bottle inside from a cold storage site, allow it to warm up at room temperature for at least
three hours before using it.
Do not open the ink bottle package until you are ready to ll the ink tank. e ink bottle is vacuum packed to
maintain its reliability. If you leave an ink bottle unpacked for a long time before using it, normal printing may
not be possible.
Prolonged use of the printer when the ink level is below the lower line could damage the printer. Fill the ink
tank to the upper line while the printer is not operating. To display the correct ink level estimates, reset the ink
level aer lling the tank.
To ensure you receive premium print quality and to help protect your print head, a variable ink safety reserve
remains in the ink tank when your printer indicates to
rell
ink.
e
yields quoted for you do not include this
reserve.
Although the ink bottles may contain recycled materials, this does not aect printer function or performance.
Specications
and appearance of the ink bottle are subject to change without prior notice for improvement.
Quoted yields may vary depending on the images that you are printing, the paper type that you are using, the
frequency of your prints and environmental conditions such as temperature.
Ink consumption
To maintain optimum print head performance, some ink is consumed from all ink tanks not only during
printing but also during maintenance operation such as print head cleaning.
When printing in monochrome or grayscale, color inks instead of black ink may be used depending on the
paper type or print quality settings. is is because a mixture of color inks is used to create black.
e ink in the ink bottles supplied with your printer is partly used during initial setup. In order to produce high
quality printouts, the print head in your printer will be fully charged with ink. is one-o process consumes a
quantity of ink and therefore these bottles may print fewer pages compared to subsequent ink bottles.
User's Guide
Relling Ink and Replacing Maintenance Boxes
119
Relling the Ink Tanks
1. Open the scanner unit with the document cover closed.
2.
Open the ink tank cover.
A message is displayed prompting you to
rell
the ink tank to the upper line. Press the OK button.
3. Open the cap of the ink tank.
User's Guide
Relling Ink and Replacing Maintenance Boxes
120
c
Important:
Make sure that the color of the ink tank matches the ink color that you want to rell.
4. While holding the ink bottle upright, turn the cap slowly to remove it.
c
Important:
Be careful not to spill any ink.
Do not touch the top of the ink bottle
aer
removing the cap; otherwise you may be smeared with ink.
5. Position the top of the ink bottle along the slot in front of the
lling
port, and then stand the bottle slowly to
insert it into the
lling
port.
c
Important:
Do not allow the top of the ink bottle to hit against any objects
aer
removing its cap; otherwise ink may spill.
User's Guide
Relling Ink and Replacing Maintenance Boxes
121
6. Insert the top of the ink bottle securely into the lling port of the tank to rell the tank with ink.
Ink pours into the tank just by holding the bottle normally without squeezing.
e
ink
ow
stops
automatically when the ink is lled to the upper line.
Note:
If the ink does not start owing into the tank, remove the ink bottle and try reinserting it.
7. When you have nished relling the ink, remove the ink bottle, and then close the cap of the ink tank securely.
c
Important:
Do not leave the ink bottle inserted; otherwise the bottle may be damaged or ink may leak.
Note:
If any ink remains in the ink bottle, tighten the cap and store the bottle upright for later use.
User's Guide
Relling Ink and Replacing Maintenance Boxes
122
8. Close the ink tank cover rmly.
9. Close the scanner unit.
10.
Select the color of the ink you relled up to the upper line using the
l
or
r
button, and then press the OK
button.
11.
Press the
x
button to reset the ink level.
12.
Conrm the message, and then press the OK button.
c
Important:
If you continue to use the printer aer resetting the ink level without relling the ink tank to the upper line,
printing may be performed without ink and this may damage the printer. Before you start printing, make sure
you visually check the ink levels in all of the ink tanks.
Related Information
& “Ink Bottle Codes” on page 118
& Ink Bottle Handling Precautions” on page 119
&
“Ink Spilled” on page 186
Maintenance Box Code
Epson recommends the use of a genuine Epson maintenance box.
e following is the code for the genuine Epson maintenance box.
T04D0
Maintenance Box Handling Precautions
Read the following instructions before replacing the maintenance box.
Do not touch the green chip on the side of the maintenance box. Doing so may prevent normal operation and
printing.
User's Guide
Relling Ink and Replacing Maintenance Boxes
123
Do not replace the maintenance box during printing; otherwise, ink may leak.
Do not remove the maintenance box and its cover except when replacing the maintenance box; otherwise ink
may leak.
Do not reuse a maintenance box which has been removed and le detached for a long period. Ink inside the box
will have solidied and no more ink can be absorbed.
Keep the maintenance box out of direct sunlight.
Do not store the maintenance box in high or freezing temperatures.
Once a maintenance box has been installed in a printer it cannot be used with other printers.
Replacing a Maintenance Box
In some print cycles a very small amount of surplus ink may be collected in the maintenance box. To prevent ink
leakage from the maintenance box, the printer is designed to stop printing when the absorbing capacity of the
maintenance box has reached its limit. Whether and how oen this is required will vary according to the number
of pages you print, the type of material that you print and the number of cleaning cycles that the printer performs.
Replace the maintenance box when you are promoted to do so. e Epson Status Monitor, your LCD, or lights on
the control panel will advise you when this part needs replacing. e need for replacement of the box does not
mean that your printer has ceased to operate in accordance with its specications. e Epson warranty does not
cover the cost of this replacement. It is a user-serviceable part.
1. Remove the new maintenance box from its package.
c
Important:
Do not touch the green chip on the side of the maintenance box. Doing so may prevent normal operation and
printing.
Note:
A transparent bag for the used maintenance box is provided with the new maintenance box.
2.
Loosen the screw with a at-head screwdriver, and then remove the cover.
User's Guide
Relling Ink and Replacing Maintenance Boxes
124
3. Remove the used maintenance box.
c
Important:
Do not touch the sections shown in the illustration. Doing so may prevent normal operation and you may get
smeared with ink.
4. Put the used maintenance box in the transparent bag that came with the new maintenance box and seal the
bag shut.
5. Insert the new maintenance box all the way into the printer. Make sure you insert the box in the correct
direction.
User's Guide
Relling Ink and Replacing Maintenance Boxes
125
6. Reattach the cover.
7. Check the message, and then press the OK button.
Related Information
& “Maintenance Box Code” on page 123
& “Maintenance Box Handling Precautions” on page 123
User's Guide
Relling Ink and Replacing Maintenance Boxes
126
Maintaining the Printer
Checking and Cleaning the Print Head
If the nozzles are clogged, the printouts become faint, there is visible banding, or unexpected colors appear. When
print quality has declined, use the nozzle check feature and check if the nozzles are clogged. If the nozzles are
clogged, clean the print head.
c
Important:
Do not open the scanner unit or turn o the printer during head cleaning. If the head cleaning is incomplete, you
may not be able to print.
Because print head cleaning uses some ink, clean the print head only if quality declines.
When ink is low, you may not be able to clean the print head. Prepare a new ink bottle.
If print quality has not improved aer repeating nozzle check and head cleaning three times, wait for at least 12
hours without printing, and then run the nozzle check again and repeat the head cleaning if necessary. We
recommend to turn o the printer. If print quality has still not improved, run Power Cleaning. If it has still not
improved, contact Epson support.
To prevent the print head from drying out, do not unplug the printer while the power is on.
Checking and Cleaning the Print Head - Control Panel
1. Load A4-size plain paper in the paper cassette.
2. Enter Maint. from the home screen using the
l
or
r
button, and then press the OK button.
3.
Select Nozzle Check using the
u
or
d
button, and then press the OK button.
4. Follow the on-screen instructions to print the nozzle check pattern.
5. Examine the printed pattern. If there are broken lines or missing segments as shown in the "NG" pattern, the
print head nozzles may be clogged. Go to the next step. If you cannot see any broken lines or missing segments
as in the following "OK" pattern, the nozzles are not clogged. Print head cleaning is not necessary. Select OK
using the
u
button.
6. Select NG using the
d
button.
User's Guide
Maintaining the Printer
127
7. Follow the on-screen instructions to clean the print head.
8. When cleaning is
nished,
select Check using the
u
or
d
button, and then follow the on-screen instructions
to print the nozzle check pattern again. Repeat cleaning and printing the pattern until all lines are printed
completely.
Related Information
& “Loading Paper in the Paper Cassette 2” on page 45
Checking and Cleaning the Print Head - Windows
1. Load A4-size plain paper in the paper cassette.
2. Access the printer driver window.
3. Click Nozzle Check on the Maintenance tab.
4. Follow the on-screen instructions.
Related Information
&
“Loading Paper in the Paper Cassette 2” on page 45
&
“Windows Printer Driver” on page 144
Checking and Cleaning the Print Head - Mac OS
1. Load A4-size plain paper in the paper cassette.
2. Select System Preferences from the
menu > Printers & Scanners (or Print & Scan, Print & Fax), and
then select the printer.
3. Click Options & Supplies > Utility > Open Printer Utility.
4. Click Nozzle Check.
5. Follow the on-screen instructions.
Related Information
& “Loading Paper in the Paper Cassette 2” on page 45
Running Power Cleaning
e Power Cleaning utility allows you to replace all of the ink inside the ink tubes. In the following situations, you
may need to use this feature to improve the print quality.
You printed or performed head cleaning when the ink levels were too low to be seen in the ink tank windows.
User's Guide
Maintaining the Printer
128
You performed the nozzle check and head cleaning several times and then waited for at least 12 hours without
printing, but print quality still did not improve.
Before running this feature, read the following instructions.
c
Important:
Make sure that there is enough ink in the ink tanks.
Visually check all ink tanks are at least a third full. Low ink levels during Power Cleaning could damage the product.
c
Important:
An interval of 12 hours is required between each Power Cleaning.
Normally, a single Power Cleaning should resolve the print quality issue within 12 hours.
erefore,
to avoid
unnecessary ink usage, you must wait 12 hours before you try it again.
c
Important:
Maintenance box replacement may be required.
Ink will be deposited to the maintenance box. If it becomes full, you must prepare and install a replacement
maintenance box to continue printing.
Note:
When the ink levels or the free space in the maintenance box are insucient for Power Cleaning, you cannot run this
feature. Even in this case, the levels and the free space for printing may remain.
Running Power Cleaning - Control Panel
Read the instructions for Power Cleaning before running this feature.
1. Turn o the printer, and then press the
P
button, OK button, and
d
button at the same time to display the
conrmation
screen.
2. Follow the on-screen instructions to run the Power Cleaning feature.
Note:
If you cannot run this feature, solve the problems that are displayed on the screen. Next, follow this procedure from step
1 to run this feature again.
3. Aer running this feature, run the nozzle check to make sure the nozzles are not clogged.
Related Information
& “Running Power Cleaning” on page 128
Running Power Cleaning - Windows
1. Access the printer driver window.
2. Click Power Cleaning on the Maintenance tab.
User's Guide
Maintaining the Printer
129
3. Follow the on-screen instructions.
Note:
If you cannot run this feature, solve the problems that are displayed on the printer's control panel. Next, follow this
procedure from step 1 to run this feature again.
Related Information
&
“Windows Printer Driver” on page 144
Running Power Cleaning - Mac OS
1.
Select System Preferences from the
menu > Printers & Scanners (or Print & Scan, Print & Fax), and
then select the printer.
2. Click Options & Supplies > Utility > Open Printer Utility.
3. Click Power Cleaning.
4. Follow the on-screen instructions.
Note:
If you cannot run this feature, solve the problems that are displayed on the printer's control panel. Next, follow this
procedure from step 1 to run this feature again.
Aligning the Print Head
If you notice a misalignment of vertical lines or blurred images, align the print head.
Aligning the Print Head - Control Panel
1. Load A4-size plain paper in the paper cassette.
2. Enter Maint. from the home screen using the
l
or
r
button, and then press the OK button.
3. Select Print Head Alignment using the
u
or
d
button, and then press the OK button.
4. Select one of the alignment menus using the
u
or
d
button, and then press the OK button.
Vertical Alignment : Select this if your printouts look blurry or vertical ruled lines appear misaligned.
Horizontal Alignment : Select this if you see horizontal banding at regular intervals.
Select Color or B&W according to the print settings.
User's Guide
Maintaining the Printer
130
5. Follow the on-screen instructions to print a pattern for alignment and align the print head.
Vertical Alignment : Find and select the number for the most solid pattern in each group using the
u
or
d
button, and then press the OK button.
Horizontal Alignment : Find and select the number for the least separated and overlapping pattern using
the
u
or
d
button, and then press the OK button.
Note:
e test pattern may vary by model.
Related Information
& “Loading Paper in the Paper Cassette 2” on page 45
Cleaning the Paper Path for Ink Smears
When the printouts are smeared or scued, clean the roller inside. You cannot use the cleaning sheet.
c
Important:
Do not use tissue paper to clean the inside of the printer.
e
print head nozzles may be clogged with lint.
1. Make sure there is no dust or stains on the scanner glass and the document cover.
2. Load A4-size plain paper in the paper cassette.
User's Guide
Maintaining the Printer
131
3. Start copying without placing an original on the scanner glass.
Note:
Repeat this procedure until the paper is not smeared with ink. If you are using the rear paper feed slot, load A4-size
plain paper aer starting to copy.
Related Information
&
“Loading Paper in the Paper Cassette 2” on page 45
& “Loading Paper in the Rear Paper Feed Slot” on page 49
& Copying Basics” on page 97
Cleaning the Scanner Glass
When the copies or scanned images are smeared or scued, clean the scanner glass.
c
Important:
Never use alcohol or thinner to clean the printer. ese chemicals can damage the printer.
1. Open the document cover.
2. Use a
so,
dry, clean cloth to clean the surface of the scanner glass.
Note:
If the glass surface is stained with grease or some other hard-to-remove material, use a small amount of glass cleaner
and a
so
cloth to remove it. Wipe
o
all remaining liquid.
Do not press the glass surface too hard.
Be careful not to scratch or damage the surface of the glass. A damaged glass surface can decrease the scan quality.
Checking the Total Number of Pages Fed Through the
Printer
You can check the total number of pages (sheets of paper and CDs/DVDs) fed through the printer.
User's Guide
Maintaining the Printer
132
Checking the Total Number of Pages Fed Through the Printer -
Control Panel
e information is printed together with the nozzle check pattern.
1. Load A4-size plain paper in the paper cassette.
2. Enter Maint. from the home screen using the
l
or
r
button, and then press the OK button.
3. Select Nozzle Check using the
u
or
d
button, and then press the OK button.
4. Follow the on-screen instructions to print the nozzle check pattern.
Related Information
& “Loading Paper in the Paper Cassette 2” on page 45
Checking the Total Number of Pages Fed Through the Printer -
Windows
1. Access the printer driver window.
2.
Click Printer and Option Information on the Maintenance tab.
Related Information
& “Windows Printer Driver” on page 144
Checking the Total Number of Pages Fed Through the Printer - Mac
OS
1. Select System Preferences from the menu > Printers & Scanners (or Print & Scan, Print & Fax), and
then select the printer.
2. Click Options & Supplies > Utility > Open Printer Utility.
3.
Click Printer and Option Information.
Saving Power
e printer enters sleep mode or turns o automatically if no operations are performed for a set period. You can
adjust the time before power management is applied. Any increase will aect the product's energy eciency. Please
consider the environment before making any change.
Depending on the location of purchase, the printer may have a feature that turns it o automatically if it is not
connected to the network for 30 minutes.
User's Guide
Maintaining the Printer
133
Saving Power - Control Panel
1. Enter Settings from the home screen using the
l
or
r
button, and then press the OK button.
2. Select Printer Setup using the
u
or
d
button, and then press the OK button.
3. Do one of the following.
Select Sleep Timer or Power O Settings > Power O If Inactive or Power O If Disconnected using the
u
or
d
button, and then press the OK button.
Select Sleep Timer or Power O Timer using the
u
or
d
button, and then press the OK button.
Note:
Your product may have the Power
O
Settings or Power
O
Ti me r feature depending on the location of purchase.
4. Select the setting using the
u
or
d
button, and then press the OK button.
User's Guide
Maintaining the Printer
134
Menu Options for Settings Mode
By selecting Settings on the home screen from the control panel, you can make printer settings or perform printer
maintenance.
Menu Options for Maintenance
Select the menus on the control panel as described below.
Settings > Maintenance
Nozzle Check:
Select this feature to check if the print head nozzles are clogged. e printer prints a nozzle check
pattern.
Head Cleaning:
Select this feature to clean clogged nozzles in the print head.
Power Cleaning:
Select this feature to replace all of the ink inside the ink tubes if you have not used the printer for a
long time and notice banding or missing colors in your printouts. More ink is consumed than in
usual cleaning. See the "Related Information" below for details on using this feature.
Print Head Alignment:
Select this feature to adjust the print head to improve print quality.
Vertical Alignment
Select this feature if your printouts look blurry or text and lines are misaligned.
Horizontal Alignment
Select this feature if horizontal banding appears at regular intervals in your printouts.
Reset Ink Levels:
Select this feature to reset the ink levels to 100% when relling the ink tank.
Maintenance Box Service Life:
Displays the approximate service life of the maintenance box. When the ! icon is displayed, the
maintenance box is nearly full. When the X icon is displayed, the maintenance box is full.
Related Information
& “Checking and Cleaning the Print Head” on page 127
& “Running Power Cleaning” on page 128
& “Aligning the Print Head” on page 130
& “Checking the Status of the Remaining Ink and the Maintenance Box” on page 117
User's Guide
Menu Options for Settings Mode
135
Menu Options for Printer Setup
Select the menus on the control panel as described below.
Settings > Printer Setup
Paper Source Setting:
Paper Setup:
Select the paper size and paper type you loaded in the paper sources.
Paper Conguration:
Select On to display the paper settings screen automatically by referring to Settings > Printer
Setup > Paper Source Setting > Paper Setup when paper is loaded in the paper source. If you
disable this feature, you cannot print from an iPhone or iPad using AirPrint
CD/DVD:
Adjusts the printing position of a CD/DVD by moving up, down, le, or right to t.
Stickers:
Adjusts the printing position of a photo sticker by moving up, down, le, or right to t.
Thick Paper:
Select On to prevent ink from smearing on your printouts, however, this may lower the print speed.
Quiet Mode:
Select On to reduce noise during printing, however, this may lower the print speed. Depending on
the paper type and print quality settings you selected, there may be no dierence in the printer's noise
level.
Screen Saver:
Select Memory Card Data to display photos as a slideshow when no operations are performed for
about three minutes.
Auto Power On:
Select On to turn on the printer automatically when it receives a print or scan job over a USB-
connection or a network connection. To start printing, you need to slide out the output tray. Also,
enabling Auto Power On increases power consumption slightly in standby status when compared to
turning the printer
o
completely.
Use the Power O Timer setting if you want the printer to automatically turn o when the job is
nished and a set time period has passed with no operations performed. is is useful when printing
from a remote location such as over the Internet.
Power
O
Settings:
Your product may have this feature or the Power
O
Timer feature depending on the location of
purchase.
User's Guide
Menu Options for Settings Mode
136
Power O If Inactive
Select this setting to turn the printer o automatically if it is not used for a specied period of
time. Any increase will aect the products energy eciency. Please consider the environment
before making any change.
Power O If Disconnected
Select this setting to turn the printer o aer 30 minutes when all network ports including the
LINE port are disconnected.
Power O Timer:
Your product may have this feature or the Power O Settings feature depending on the location of
purchase.
Select this setting to turn the printer o automatically when it is not used for a specied period of
time. You can adjust the time before power management is applied. Any increase will
aect
the
products energy eciency. Please consider the environment before making any change.
Sleep Timer:
Adjust the time period to enter a sleep mode (energy saving mode) when the printer has not
performed any operations. e LCD screen turns black when the setting time passes.
Language:
Select the language used on the LCD screen.
Related Information
& “Saving Power” on page 133
Menu Options for Network Settings
Select the menus on the control panel as described below.
Settings > Network Settings
Network Status:
Displays the network settings and connection status.
Wi-Fi Setup:
Wi -F i S et up Wi z ar d
Select a SSID, enter a password, and then connect the printer to a wireless (Wi-Fi) network.
Push Button Setup (WPS)
Connects the printer to a wireless (Wi-Fi) network by pressing a WPS push button on a wireless
router.
PIN Code Setup (WPS)
In the wireless router utility, enter the PIN code displayed on the printer's screen to connect the
printer to a wireless (Wi-Fi) network.
User's Guide
Menu Options for Settings Mode
137
Wi -F i Au to C onn e c t
Connects the printer to a wireless (Wi-Fi) network using a computer that is connected to the access
point. Insert the soware disc supplied with the printer into the computer, and then follow the on-
screen instructions. When you are prompted to operate the printer, run this menu.
Disable Wi-Fi
Disables the connection by turning o the wireless signal without deleting the network information.
To enable the connection, set up the wireless (Wi-Fi) network again.
Wi -F i Di re c t S e tu p
Connects the printer to a wireless (Wi-Fi) network without a wireless router.
Manual Network Setup:
Changes the network settings, such as the device name or TCP/IP.
Connection Check:
Checks the status of the network connection and prints the network connection report. If there are any
problems with the connection, see the report to solve the problem.
Related Information
&
“Checking the Network Connection Status” on page 28
&
“Making Wi-Fi Settings Manually” on page 24
& “Making Wi-Fi Settings by Push Button Setup” on page 25
& “Making Wi-Fi Settings by PIN Code Setup (WPS)” on page 25
& “Disconnecting Wi-Fi Direct (Simple AP) connection from the Control Panel” on page 35
Menu Options for Epson Connect Services
Select the menus on the control panel as described below.
Settings > Epson Connect Services
Register/Delete:
Register or delete the printer to or from the Epson Connect services.
For usage guides, see the following portal website.
https://www.epsonconnect.com/
http://www.epsonconnect.eu (Europe only)
Suspend/Resume:
Select whether to suspend or resume Epson Connect services.
Email Address:
Check the printer's email address that is registered to the Epson Connect services.
Status:
Check whether or not the printer is registered and connected to the Epson Connect services.
User's Guide
Menu Options for Settings Mode
138
Related Information
& Epson Connect Service” on page 142
Menu Options for Google Cloud Print Services
Select the menus on the control panel as described below.
Settings > Google Cloud Print Services
Suspend/Resume
Select whether to suspend or resume the Google Cloud Print services.
Unregister
Unregister the Google Cloud Print services.
Status
Check whether or not the printer is registered and connected to the Google Cloud Print services.
For registration and usage guides, see the following portal website.
https://www.epsonconnect.com/
http://www.epsonconnect.eu (Europe only)
Menu Options for File Sharing Setup
Select the menus on the control panel as described below.
Settings > File Sharing Setup
Select the connection method between the printer and a computer that will have write access to the memory card
inserted in the printer. Read and write access is given to the computer with the priority connection. Only read
access is given to other computers.
Related Information
& “Accessing a Memory Card From a Computer” on page 199
Menu Options for External Device Setup
Select the menus on the control panel as described below.
Settings > External Device Setup
Change the print settings to print directly from an external device such as a digital camera. See related information
for an explanation on each setting item.
User's Guide
Menu Options for Settings Mode
139
Related Information
& “Menu Options for Paper and Print Settings” on page 70
& Menu Options for Photo Adjustment and Zoom” on page 71
Menu Options for Guide Functions
Select the menus on the control panel as described below.
Settings > Guide Functions
Paper Setting Alert
Displays a warning if the paper settings (print settings) for the print job do not match the printer's
paper settings made when you loaded the paper. is setting prevents misprinting. When Paper
Conguration is disabled in the following menu, the paper setting screen is not displayed. In this
situation, you cannot print from an iPhone or iPad using AirPrint.
Settings > Printer Setup > Paper Source Setting
Menu Options for Firmware Update
Select the menus on the control panel as described below.
Settings > Firmware Update
Update:
Checks if the latest version of the rmware has been uploaded to the network server. If an update is
available, you can select whether or not to start updating.
Current Version:
Displays the current
rmware
version of your printer.
Notication:
Checks for rmware updates periodically and noties you if an update is available.
Related Information
& “Updating the Printer's Firmware using the Control Panel” on page 155
Menu Options for Restore Default Settings
Select the menus on the control panel as described below.
Settings > Restore Default Settings
Network Settings:
Resets the network settings to their defaults.
User's Guide
Menu Options for Settings Mode
140
All Except Network Settings:
Resets all settings except for network settings to their defaults.
All Settings:
Resets all settings to their defaults.
User's Guide
Menu Options for Settings Mode
141
Network Service and Software
Information
is section introduces the network services and soware products available for your printer from the Epson
website or the supplied soware disc.
Epson Connect Service
By using Epson Connect service available on the Internet, you can print from your smartphone, tablet PC, or
laptop, anytime and practically anywhere. You need to register your printer with the Epson Connect service in
advance.
e features available on the Internet are as follows.
Email Print Epson iPrint remote print Scan to Cloud Remote Print Driver
✓✓✓✓
Follow the steps below to register the printer.
1. Select Settings > Epson Connect Services > Register/Delete on the home screen to print the registration sheet.
2. Follow the instructions on the registration sheet to register the printer.
See the Epson Connect web portal for details.
https://www.epsonconnect.com/
http://www.epsonconnect.eu (Europe only)
Web Cong
Web Cong is an application that runs in a web browser, such as Internet Explorer and Safari, on a computer or
smart device. You can conrm the printer status or change the network service and printer settings. To use the
Web Cong, connect the printer and the computer or device to the same network.
Note:
e following browsers are supported.
OS Browser
Windows XP SP3 or later
Internet Explorer 8 or later, Firefox
*
, Chrome
*
Mac OS X v10.6.8 or later
Safari
*
, Firefox
*
, Chrome
*
iOS
*
Safari
*
Android 2.3 or later Default browser
Chrome OS
*
Default browser
*Use the latest version.
User's Guide
Network Service and Software Information
142
Running Web Cong on a Web Browser
1. Check the printer's IP address.
Select Settings > Network Settings > Network Status from the home screen, and then check the printer's IP
address.
2.
Launch a Web browser from a computer or smart device, and then enter the printer's IP address.
Format:
IPv4: http://the printer's IP address/
IPv6: http://[the printer's IP address]/
Examples:
IPv4: http://192.168.100.201/
IPv6: http://[2001:db8::1000:1]/
Note:
Using the smart device, you can also run Web Cong from the maintenance screen of Epson iPrint.
Related Information
& “Using Epson iPrint” on page 91
Running Web
Cong
on Windows
When connecting a computer to the printer using WSD, follow the steps below to run Web Cong.
1. Access the devices and printers screen in Windows.
Win dows 1 0
Right-click the start button or press and hold it, and then select Control Panel > Vi e w d e v i c es a n d pr i nt e rs
in Hardware and Sound.
Windows 8.1/Windows 8
Select Desktop > Settings > Control Panel > Vi e w d e v i c es a n d pr i nt e rs in Hardware and Sound (or
Hardware).
Win dows 7
Click the start button, and select Control Panel > Vi e w d e v i c es a n d pr i n te rs in Hardware and Sound.
Win dows Vis ta
Click the start button, and select Control Panel > Printers in Hardware and Sound.
2. Right-click on your printer and select Properties.
3. Select the Web Ser vice tab and click the URL.
Running Web Cong on Mac OS
1. Select System Preferences from the menu > Printers & Scanners (or Print & Scan, Print & Fax), and
then select the printer.
User's Guide
Network Service and Software Information
143
2. Click Options & Supplies> Show Printer Webpage.
Windows Printer Driver
e printer driver controls the printer according to the commands from an application. Making settings on the
printer driver provides the best printing results. You can also check the status of the printer or keep it in top
operating condition using the printer driver utility.
Note:
You can change the language of the printer driver. Select the language you want to use from the Language setting on the
Maintenance tab.
Accessing the printer driver from applications
To make settings that apply only to the application you are using, access from that application.
Select Print or Print Setup from the File menu. Select your printer, and then click Preferences or Properties.
Note:
Operations dier depending on the application. See the application's help for details.
Accessing the printer driver from the control panel
To make settings that apply to all of the applications, access from the control panel.
Wi nd ow s 1 0
Right-click the start button or press and hold it, and then select Control Panel > Vi e w d e v i c es a n d pr i nt e rs in
Hardware and Sound. Right-click on your printer, or press and hold it and then select Printing preferences.
Windows 8.1/Windows 8
Select Desktop > Settings > Control Panel > Vi e w d e v i c es a n d pr i n te r s in Hardware and Sound. Right-click
on your printer, or press and hold it and then select Printing preferences.
Wi nd ow s 7
Click the start button, and select Control Panel > Vi e w d e v i c es a n d pr i n te rs in Hardware and Sound. Right-
click on your printer and select Printing preferences.
Windows Vista
Click the start button, and select Control Panel > Printers in Hardware and Sound. Right-click on your printer
and select Select printing preferences.
Wi nd ow s X P
Click the start button, and select Control Panel > Printers and Other Hardware > Printers and Faxes. Right-
click on your printer and select Printing preferences.
Accessing the printer driver from the printer icon on the task bar
e printer icon on the desktop task bar is a shortcut icon allowing you to quickly access the printer driver.
If you click the printer icon and select Printer Settings, you can access the same printer settings window as the one
displayed from the control panel. If you double-click this icon, you can check the status of the printer.
Note:
If the printer icon is not displayed on the task bar, access the printer driver window, click Monitoring Preferences on the
Maintenance tab, and then select Register the shortcut icon to the taskbar.
User's Guide
Network Service and Software Information
144
Starting the utility
Access the printer driver window. Click the Maintenance tab.
Guide to Windows Printer Driver
Help is available in the printer driver for Windows. To view explanations of the setting items, right-click on each
item, and then click Help.
Main Tab
You can make basic settings for printing, such as paper type or paper size.
You can also make settings for printing both sides of the paper or printing multiple pages on one sheet.
User's Guide
Network Service and Software Information
145
More Options Tab
You can select additional layout and printing options such as changing the size of a printout or making color
corrections.
Maintenance Tab
You can run maintenance features such as nozzle check and print head cleaning, and by starting EPSON Status
Monitor 3, you can check printer status and error information.
Making Operation Settings for the Windows Printer Driver
You can make settings such as enabling EPSON Status Monitor 3.
User's Guide
Network Service and Software Information
146
1. Access the printer driver window.
2. Click Extended Settings on the Maintenance tab.
3. Make the appropriate settings, and then click OK.
See the online help for explanations of the setting items.
Related Information
& “Windows Printer Driver” on page 144
Mac OS Printer Driver
e
printer driver controls the printer according to the commands from an application. Making settings on the
printer driver provides the best printing results. You can also check the status of the printer or keep it in top
operating condition using the printer driver utility.
Accessing the printer driver from applications
Click Page Setup or Print on the File menu of your application. If necessary, click Show Details (or
d
) to expand
the print window.
Note:
Depending on the application being used, Page Setup may not be displayed in the File menu, and the operations for
displaying the print screen may dier. See the application's help for details.
Starting the utility
Select System Preferences from the
menu > Printers & Scanners (or Print & Scan, Print & Fax), and then
select the printer. Click Options & Supplies > Utility > Open Printer Utility.
User's Guide
Network Service and Software Information
147
Guide to Mac OS Printer Driver
Print dialog
Switch the pop-up menu on the center of the screen to show more items.
Pop-up Menu Descriptions
Print Settings You can make the basic print settings such as paper type and print quality.
Two-sided Printing
Settings
You can select a binding direction for 2-sided printing or select a document type.
Layout You can select a layout for printing several pages on one sheet or select to print a border.
Paper Handling You can reduce or enlarge the size of the print job to automatically t the paper size you
loaded.
Color Matching You can adjust the colors.
Color Options
When you select EPSON Color Controls from the Color Matching menu, you can select a
color correction method.
Note:
On OS X Mountain Lion or later, if Print Settings menu is not displayed, Epson printer driver has not been installed
correctly.
Select System Preferences from the
menu > Printers & Scanners (or Print & Scan, Print & Fax), remove the printer,
and then add the printer again. See the following to add a printer.
http://epson.sn
User's Guide
Network Service and Software Information
148
Epson Printer Utility
You can run a maintenance feature such as nozzle check and print head cleaning, and by starting EPSON Status
Monitor, you can check printer status and error information.
Making Operation Settings for the Mac OS Printer Driver
Accessing the Operation Settings Window of the Mac OS Printer Driver
Select System Preferences from the menu > Printers & Scanners (or Print & Scan, Print & Fax), and then
select the printer. Click Options & Supplies > Options (or Driver).
Operation Settings of the Mac OS Printer Driver
ick paper and envelopes: Prevents the ink from smearing when printing on thick paper. However, this may
reduce print speed.
Skip Blank Page: Avoids printing blank pages.
Quiet Mode: Reduces the noise the printer makes, however, may reduce print speed.
Automatic Cassette Switching: Automatically feeds paper from paper cassette 2 when paper run out in paper
cassette 1.
High Speed Printing: Prints when the print head moves in both directions. e print speed is faster, but the
quality may decline.
Wa rni ng
Notications
: Allows the printer driver to display warning
notications.
User's Guide
Network Service and Software Information
149
Establish bidirectional communication: Usually, this should be set to On. Select O when acquiring the printer
information is impossible because the printer is shared with Windows computers on a network or for any other
reason.
Epson Scan 2 (Scanner Driver)
Epson Scan 2 is an application for controlling scanning. You can adjust the size, resolution, brightness, contrast,
and quality of the scanned image.
Note:
You can also start Epson Scan 2 from a TWAIN-compliant scanning application.
Starting on Windows
Wi nd ow s 1 0
Click the start button, and then select EPSON > Epson Scan 2.
Windows 8.1/Windows 8
Enter the application name in the search charm, and then select the displayed icon.
Wi nd ow s 7/Wi n do w s Vi st a / Win d ow s XP
Click the start button, and then select All Programs or Programs > EPSON > Epson Scan 2> Epson Scan 2.
Starting on Mac OS
Note:
Epson Scan 2 does not support the Mac OS fast user switching feature. Turn o fast user switching.
Select Go > Applications > Epson Soware > Epson Scan 2.
Related Information
& “Installing Applications” on page 154
Epson Event Manager
Epson Event Manager is an application that allows you to manage scanning from the control panel and save images
to a computer. You can add your own settings as presets, such as the document type, the save folder location, and
the image format. See the application's help for details.
Starting on Windows
Wi nd ow s 1 0
Click the start button, and then select Epson Soware > Event Manager.
Windows 8.1/Windows 8
Enter the application name in the search charm, and then select the displayed icon.
Wi nd ow s 7/Wi n do w s Vi st a / Win d ow s XP
Click the start button, and then select All Programs or Programs > Epson Soware > Event Manager.
User's Guide
Network Service and Software Information
150
Starting on Mac OS
Select Go > Applications > Epson Soware > Event Manager.
Related Information
& “Scanning to a Computer” on page 105
& “Installing Applications” on page 154
Epson Easy Photo Print
Epson Easy Photo Print is an application that allows you to easily print photos with various layouts. You can
preview the photo image and adjust the images or position. You can also print photos with a frame. See the
application's help for details.
Note:
To use this application, the printer driver needs to be installed.
Starting on Windows
Wi nd ow s 1 0
Click the start button, and then select Epson Soware > Epson Easy Photo Print.
Windows 8.1/Windows 8
Enter the application name in the search charm, and then select the displayed icon.
Wi nd ow s 7/Wi n do w s Vi st a / Win d ow s XP
Click the start button, and then select All Programs or Programs > Epson Soware > Epson Easy Photo
Print.
Starting on Mac OS
Select Go > Applications > Epson Soware > Epson Easy Photo Print.
Related Information
& “Installing Applications” on page 154
Epson Print CD
Epson Print CD is an application that allows you to design a CD/DVD label to be printed directly onto a CD/DVD.
You can also print a CD/DVD jacket for CD/DVD case. See the application's help for details.
Note:
To use this application, the printer driver needs to be installed.
Starting on Windows
Wi nd ow s 1 0
Click the start button, and then select Epson Soware > Print CD.
Wi nd ow s 8 /Win dow s 8 . 1
Enter the application name in the search charm, and then select the displayed icon.
User's Guide
Network Service and Software Information
151
Wi nd ow s 7/Wi n do w s Vi st a / Win d ow s XP
Click the start button, and then select All Programs or Programs > Epson
Soware
> Print CD.
Starting on Mac OS
Select Go > Applications > Epson Soware > Print CD > Print CD.
Related Information
& “Installing Applications” on page 154
EPSON Software Updater
EPSON Soware Updater is an application that checks for new or updated soware on the internet and installs it.
You can also update the printer's
rmware
and manual.
Starting on Windows
Wi nd ow s 1 0
Click the start button, and then select Epson Soware > EPSON Soware Updater.
Windows 8.1/Windows 8
Enter the application name in the search charm, and then select the displayed icon.
Wi nd ow s 7/Wi n do w s Vi st a / Win d ow s XP
Click the start button, and then select All Programs (or Programs) > Epson Soware > EPSON Soware
Updater.
Note:
You can also start EPSON Soware Updater by clicking the printer icon on the task bar on the desktop, and then selecting
Soware Update.
Starting on Mac OS
Select Go > Applications > Epson Soware > EPSON Soware Updater.
Related Information
& “Installing Applications” on page 154
Uninstalling Applications
Log in to your computer as an administrator. Enter the administrator password if the computer prompts you.
Uninstalling Applications - Windows
1. Press the
P
button to turn
o
the printer.
2. Quit all running applications.
User's Guide
Network Service and Software Information
152
3. Open Control Panel:
Win dows 1 0
Right-click the start button or press and hold it, and then select Control Panel.
Windows 8.1/Windows 8
Select Desktop > Settings > Control Panel.
Windows 7/Windows Vista/Windows XP
Click the start button and select Control Panel.
4. Open Uninstall a program (or Add or Remove Programs):
Windows 10/Windows 8.1/Windows 8/Windows 7/Windows Vista
Select Uninstall a program in Programs.
Win dows X P
Click Add or Remove Programs.
5. Select the application you want to uninstall.
6. Uninstall the applications:
Windows 10/Windows 8.1/Windows 8/Windows 7/Windows Vista
Click Uninstall/Change or Uninstall.
Win dows X P
Click Change/Remove or Remove.
Note:
If the User Account Control window is displayed, click Continue.
7. Follow the on-screen instructions.
Uninstalling Applications - Mac OS
1. Download the Uninstaller using EPSON
Soware
Updater.
Once you have downloaded the Uninstaller, you do not need to download it again each time you uninstall the
application.
2. Press the
P
button to turn o the printer.
3. To uninstall the printer driver, select System Preferences from the
menu > Printers & Scanners (or Print
& Scan, Print & Fax), and then remove the printer from the enabled printers list.
4.
Quit all running applications.
5. Select Go > Applications > Epson
Soware
> Uninstaller.
User's Guide
Network Service and Software Information
153
6. Select the application you want to uninstall, and then click Uninstall.
c
Important:
e
Uninstaller removes all drivers for Epson inkjet printers on the computer. If you use multiple Epson inkjet
printers and you only want to delete some drivers, delete all of them rst, and then install the necessary printer
driver again.
Note:
If you cannot nd the application you want to uninstall in the application list, you cannot uninstall using the
Uninstaller. In this situation, select Go > Applications > Epson Soware, select the application you want to uninstall,
and then drag it to the trash icon.
Related Information
& “EPSON Soware Updater” on page 152
Installing Applications
Connect your computer to the network and install the latest version of applications from the website.
Note:
Log on to your computer as an administrator. Enter the administrator password if the computer prompts you.
When reinstalling an application, you need to uninstall it rst.
1. Quit all running applications.
2. When installing the printer driver or Epson Scan 2, disconnect the printer and the computer temporarily.
Note:
Do not connect the printer and the computer until you are instructed to do so.
3. Install the applications by following the instructions on the website below.
http://epson.sn
Note:
If you are using a Windows computer and you cannot download applications from the website, install them from the
soware disc that came with the printer.
Related Information
& “Uninstalling Applications” on page 152
Updating Applications and Firmware
You may be able to clear certain problems and improve or add functions by updating the applications and the
rmware. Make sure you use the latest version of the applications and rmware.
1. Make sure that the printer and the computer are connected, and the computer is connected to the internet.
User's Guide
Network Service and Software Information
154
2. Start EPSON Soware Updater, and update the applications or the rmware.
c
Important:
Do not turn
o
or unplug the printer until the update is complete; otherwise, the printer may malfunction.
Note:
If you cannot nd the application you want to update in the list, you cannot update using the EPSON Soware
Updater. Check for the latest versions of the applications from your local Epson website.
http://www.epson.com
Related Information
& “EPSON
Soware
Updater” on page 152
Updating the Printer's Firmware using the Control Panel
If the printer is connected to the Internet, you can update the printer's rmware using the control panel. By
updating the rmware, the printer's performance may improve, or new functions may be added. You can also set
the printer to regularly check for rmware updates and notify you if any are available.
1. Enter Settings from the home screen using the
l
or
r
button, and then press the OK button.
2. Select Firmware Update using the
u
or
d
button, and then press the OK button.
3. Select Update using the
u
or
d
button, and then press the OK button.
Note:
Select
Notication
> On to set the printer to regularly check for available
rmware
updates.
4. Check the message displayed on the screen and press the OK button.
e printer starts searching for available updates.
5. If a message is displayed on the LCD screen informing you that a rmware update is available, follow the on-
screen instructions to start the update.
c
Important:
Do not turn o or unplug the printer until the update is complete; otherwise, the printer may malfunction.
If the rmware update is not completed or is unsuccessful, the printer does not start up normally and
"Recovery Mode" is displayed on the LCD screen the next time the printer is turned on. In this situation, you
need to update the rmware again using a computer. Connect the printer to the computer with a USB cable.
While "Recovery Mode" is displayed on the printer, you cannot update the rmware over a network
connection. On the computer, access your local Epson website, and then download the latest printer
rmware. See the instructions on the website for the next steps.
Related Information
& “Technical Support Web Site” on page 200
User's Guide
Network Service and Software Information
155
Solving Problems
Checking the Printer Status
Checking Messages on the LCD Screen
If an error message is displayed on the LCD screen, follow the on-screen instructions or the solutions below to
solve the problem.
Error Messages Solutions
Printer error. Turn the power o and on again.
For details, see documentation.
If the error message is still displayed after turning the power o and on
again, contact Epson support.
Operation canceled. An error occurred while
saving.
The external storage device, such as a memory card, may be damaged.
Check if the device is available.
Paper Conguration is disabled. Some features
may not be available. For details, see your
documentation.
If Paper Conguration is disabled, you cannot use AirPrint. In addition,
messages notifying you that the paper size and type do not match are
not displayed. Keep this setting enabled unless you always use the same
size and type of paper and do not need to change the paper settings.
The printer's ink pad is nearing the end of its
service life. Please contact Epson Support.
Contact Epson or an authorised Epson service provider to replace the
ink pad*. It is not a user-serviceable part. The message will be displayed
until the ink pad is replaced.
Press the
x
button to resume printing.
The printer's ink pad is at the end of its service
life. Please contact Epson Support.
Contact Epson or an authorised Epson service provider to replace the
ink pad*. It is not a user-serviceable part.
Communication error. Check if a computer is
connected.
Connect the computer and the printer correctly. If you are connecting
over a network, see the page that describes the network connection
method from the computer.
If the error message is displayed during scanning, make sure that Epson
Scan 2 and Epson Event Manager are installed on the computer.
Combination of the IP address and the subnet
mask is invalid. See your documentation.
Enter the correct IP address or default gateway. Contact the person who
setup the network for assistance.
Update the root certicate to use cloud services. Run Web Cong, and then update the root certicate.
Recovery Mode The printer has started in recovery mode because the rmware update
failed. Follow the steps below to try to update the rmware again.
1. Connect the computer and the printer with a USB cable. (During
recovery mode, you cannot update the rmware over a network
connection.)
2. Visit your local Epson website for further instructions.
* In some print cycles a very small amount of surplus ink may be collected in the ink pad. To prevent ink leakage
from the pad, the printer is designed to stop printing when the pad has reached its limit. Whether and how oen
this is required will vary according to the number of pages you print, the type of material that you print and the
number of cleaning cycles that the printer performs. e need for replacement of the pad does not mean that your
User's Guide
Solving Problems
156
printer has ceased to operate in accordance with its specications. e printer will advise you when the pad
requires replacing and this can only be performed by an authorised Epson Service provider.
e
Epson warranty
does not cover the cost of this replacement.
Related Information
& Contacting Epson Support” on page 201
& “Supported Memory Card Specications” on page 191
& “Supported External Storage Device Specications” on page 192
& “Installing Applications” on page 154
& “Web
Cong
” on page 142
& “Updating Applications and Firmware” on page 154
Checking the Printer Status - Windows
1. Access the printer driver window.
2. Click EPSON Status Monitor 3 on the Maintenance tab.
Note:
You can also check the printer status by double-clicking the printer icon on the taskbar. If the printer icon is not
added to the taskbar, click Monitoring Preferences on the Maintenance tab, and then select Register the shortcut
icon to the taskbar.
If EPSON Status Monitor 3 is disabled, click Extended Settings on the Maintenance tab, and then select Enable
EPSON Status Monitor 3.
Related Information
& “Windows Printer Driver” on page 144
Checking the Printer Status - Mac OS
1. Select System Preferences from the menu > Printers & Scanners (or Print & Scan, Print & Fax), and
then select the printer.
2. Click Options & Supplies > Utility > Open Printer Utility.
3. Click EPSON Status Monitor.
You can check the printer status, ink levels, and error status.
Removing Jammed Paper
Check the error displayed on the control panel and follow the instructions to remove the jammed paper including
any torn pieces. Next, clear the error.
User's Guide
Solving Problems
157
c
Important:
Remove the jammed paper carefully. Removing the paper vigorously may cause damage to the printer.
When removing jammed paper, avoid tilting the printer, placing it vertically, or turning it upside down;
otherwise ink may leak.
Removing Jammed Paper from the Paper Cassette
1. Close the output tray.
2. Pull out the paper cassette.
3. Remove the jammed paper.
4. Align the edges of the paper and slide the edge guides to the edges of the paper.
User's Guide
Solving Problems
158
5. Insert the paper cassette in the printer.
Removing Jammed Paper from Inside the Printer
!
Caution:
Be careful not to trap your hand or ngers when opening or closing the scanner unit. Otherwise you may be
injured.
Never touch the buttons on the control panel while your hand is inside the printer. If the printer starts operating,
it could cause an injury. Be careful not to touch the protruding parts to avoid injury.
1. Open the scanner unit with the document cover closed.
2.
Remove the jammed paper.
User's Guide
Solving Problems
159
c
Important:
Do not touch the white at cable, translucent part, and ink tubes inside the printer. Doing so may cause a
malfunction.
3. Close the scanner unit.
User's Guide
Solving Problems
160
Removing Jammed Paper from the Rear Cover
1. Remove the rear cover.
2. Remove the jammed paper.
3. Remove jammed paper from the rear cover.
User's Guide
Solving Problems
161
4. Open the cover of the rear cover.
5. Remove the jammed paper.
6.
Close the cover of the rear cover, and then insert the rear cover in the printer.
Paper Does Not Feed Correctly
Check the following points, and then take the appropriate actions to solve the problem.
Place the printer on a at surface and operate in the recommended environmental conditions.
Use paper supported by this printer.
Follow the paper handling precautions.
Do not load more than the maximum number of sheets specied for the paper. For plain paper, do not load
above the line indicated by the triangle symbol on the edge guide.
Make sure the paper size and paper type settings match the actual paper size and paper type loaded in the
printer.
User's Guide
Solving Problems
162
Related Information
& Environmental Specications on page 194
& “Paper Handling Precautions” on page 37
& “Available Paper and Capacities” on page 38
& “List of Paper Types” on page 39
Paper Jams
Load paper in the correct direction, and slide the edge guides against the edges of the paper.
Load one sheet of paper at a time if you have loaded several sheets of paper.
Related Information
& “Removing Jammed Paper” on page 157
& “Loading Paper in the Paper Cassette 1” on page 41
& “Loading Paper in the Paper Cassette 2” on page 45
& “Loading Paper in the Rear Paper Feed Slot” on page 49
Paper Feeds at a Slant
Load paper in the correct direction, and slide the edge guides against the edges of the paper.
Related Information
& “Loading Paper in the Paper Cassette 1” on page 41
& “Loading Paper in the Paper Cassette 2” on page 45
& “Loading Paper in the Rear Paper Feed Slot” on page 49
Several Sheets of Paper are Fed at a Time
Load one sheet of paper at a time.
When several sheets of paper are fed at a time during manual 2-sided printing, remove any paper which is
loaded in the printer before you reload the paper.
Paper is Ejected from the Rear Paper Feed Slot Without Being
Printed
If you load paper before the rear paper feed slot is ready, the paper is ejected without being printed. Send the print
job rst, and then load paper when the printer prompts you to do so.
CD/DVD Tray is Ejected
Make sure the disc is properly set on the tray and reinsert the tray correctly.
User's Guide
Solving Problems
163
Do not insert the CD/DVD tray until you are instructed to do so. Otherwise, an error occurs and the tray is
ejected.
Related Information
& Printing Photos from a Memory Card onto a CD/DVD Label” on page 62
& Copying on a CD/DVD Label” on page 101
Power and Control Panel Problems
Power Does Not Turn On
Make sure the power cord is securely plugged in.
Hold down the
P
button for a little longer.
Lights Came On and then Went Out
e printer's voltage may not match the outlet rating. Turn o the printer and unplug it immediately. en check
the label on the printer.
!
Caution:
If the voltage does not match, DO NOT PLUG YOUR PRINTER BACK IN. Contact your dealer.
Power Does Not Turn
O
Hold down the
P
button for a little longer. If you still cannot turn o the printer, unplug the power cord. To
prevent the print head from drying out, turn the printer back on and turn it
o
by pressing the
P
button.
Power Turns
O
Automatically
Select Power
O
Settings in Printer Setup, and then disable the Power
O
If Inactive and Power
O
If
Disconnected settings.
Disable the Power O Timer setting in Printer Setup.
Note:
Your product may have the Power O Settings or Power O Timer feature depending on the location of purchase.
Related Information
& “Menu Options for Printer Setup” on page 136
User's Guide
Solving Problems
164
LCD Screen Gets Dark
e printer is in sleep mode. Press any button on the control panel to return the LCD screen to its former state.
The Auto Power On Feature does not Work
Make sure that the Auto Power On setting in Printer Setup has been enabled.
Make sure that the printer is properly connected with a USB cable or to a network.
Related Information
& “Menu Options for Printer Setup” on page 136
Cannot Print from a Computer
Checking the connection
Connect the USB cable securely to the printer and the computer.
If you are using a USB hub, try to connect the printer directly to the computer.
If you cannot print over a network, see the page that describes the network connection method from the
computer.
Checking the software and data
Install the printer driver.
If you are printing a large data size image, the computer may run out of memory. Print the image at a lower
resolution or a smaller size.
Checking the printer status from the computer (Windows)
Click Print Queue on the printer driver's Maintenance tab, and then check the following.
Check if there are any paused print jobs.
Cancel printing if necessary.
Make sure the printer is not oine or pending.
If the printer is oine or pending, clear the oine or pending setting from the Printer menu.
Make sure the printer is selected as the default printer from the Printer menu (there should be a check mark on
the menu item).
If the printer is not selected as the default printer, set it as the default printer.
Make sure the printer port is selected correctly in Property > Port from the Printer menu as follows.
Select "USBXXX" for a USB connection, or "EpsonNet Print Port" for a network connection.
Checking the printer status from the computer (Mac OS)
Make sure the printer status is not Pause.
Select System Preferences from the
menu > Printers & Scanners (or Print & Scan, Print & Fax), and then
double-click the printer. If the printer is paused, click Resume (or Resume Printer).
User's Guide
Solving Problems
165
Related Information
& Connecting to a Computer” on page 22
& “Installing Applications” on page 154
& Canceling Printing” on page 96
When You Cannot Make Network Settings
Turn o the devices you want to connect to the network. Wait for about 10 seconds, and then turn on the
devices in the following order; access point, computer or smart device, and then printer. Move the printer and
computer or smart device closer to the access point to help with radio wave communication, and then try to
make network settings again.
Select Settings > Network Settings > Connection Check, and then print the network connection report. If an
error has occurred, check the network connection report and then follow the printed solutions.
Related Information
&
“Printing a Network Connection Report” on page 29
&
“Cannot Connect from Devices Even ough Network Settings are No Problem” on page 166
Cannot Connect from Devices Even Though Network Settings are
No Problem
If you cannot connect from the computer or smart device to the printer even though the network connection
report does not show any problems, see the following.
When you are using multiple access points at the same time, you may not be able to use the printer from the
computer or smart device depending on the settings of the access points. Connect the computer or smart device
to the same access point as the printer.
User's Guide
Solving Problems
166
You may not be able to connect to the access point when the access point has multiple SSIDs and devices are
connected to
dierent
SSIDs on the same access point. Connect the computer or smart device to the same SSID
as the printer.
An access point that is compliant with both IEEE802.11a and IEEE802.11g has SSIDs of 2.4 GHz and 5 GHz. If
you connect the computer or smart device to a 5 GHz SSID, you cannot be able to connect to the printer
because the printer only supports communication over 2.4 GHz. Connect the computer or smart device to the
same SSID as the printer.
Most access points have a privacy separator feature that blocks the communication from unauthorized devices.
If you cannot connect to the network even if the devices and access point are connected to the same SSID,
disable the privacy separator on the access point. See the manual provided with the access point for details.
User's Guide
Solving Problems
167
Related Information
& “Checking the SSID Connected to the Printer” on page 168
& “Checking the SSID for the Computer” on page 168
Checking the SSID Connected to the Printer
Select Settings > Network Settings > Network Status. SSIDs are displayed on each Wi-Fi network and Wi-Fi
Direct network.
Checking the SSID for the Computer
Windows
Click
in the task tray on the desktop. Check the name of the connected SSID from the list displayed.
User's Guide
Solving Problems
168
Mac OS X
Click the Wi-Fi icon at the top of the computer screen. A list of SSIDs is displayed and the connected SSID is
indicated with a check mark.
Suddenly the Printer Cannot Print over a Network
Connection
When you have changed your access point or provider, try making network settings for the printer again.
Connect the computer or smart device to the same SSID as the printer.
Turn o the devices you want to connect to the network. Wait for about 10 seconds, and then turn on the
devices in the following order; access point, computer or smart device, and then printer. Move the printer and
computer or smart device closer to the access point to help with radio wave communication, and then try to
make network settings again.
In Windows, click Print Queue on the printer driver's Maintenance tab, and then check the following.
Check if there are any paused print jobs. Cancel printing if necessary.
Make sure the printer is not oine or pending. If the printer is oine or pending, clear the oine or
pending setting from the Printer menu.
Make sure the printer is selected as the default printer from the Printer menu (there should be a check mark
on the menu item).
If the printer is not selected as the default printer, set it as the default printer.
Check if the selected port is correct in Printer Properties > Port
Select Settings > Network Settings > Connection Check, and then print the network connection report. If the
report shows that the network connection failed, check the network connection report and then follow the
printed solutions.
Try accessing any website from your computer to make sure that your computer's network settings are correct.
If you cannot access any website, there is a problem on the computer. See the manual provided with your
computer for more details.
Related Information
&
“Checking the SSID Connected to the Printer” on page 168
& “Checking the SSID for the Computer” on page 168
User's Guide
Solving Problems
169
& Printing a Network Connection Report” on page 29
Suddenly the Printer Cannot Print Using a USB
Connection
Disconnect the USB cable from the computer. Right-click on the printer icon displayed on the computer, and
then select Remove Device. Next, connect the USB cable to the computer and try a test print. If printing is
possible, the setup is complete.
Re-set the USB connection following the steps in [Changing a Connection Method to a Computer] in this
manual.
Related Information
& “Changing the Connection Method to a Computer” on page 34
Cannot Print from an iPhone or iPad
Connect the iPhone or iPad to the same network (SSID) as the printer.
Enable Paper
Conguration
in the following menus.
Settings > Printer Setup > Paper Source Setting > Paper Conguration
Enable the AirPrint setting on Web Cong.
Related Information
& Connecting to a Smart Device” on page 23
& “Web Cong” on page 142
Printout Problems
Printout is Scued or Color is Missing
If you have not used the printer for a long time, the print head nozzles may be clogged and ink drops may not
be discharged. Perform a nozzle check, and then clean the print head if any of the print head nozzles are
clogged.
If you printed when the ink levels were too low to be seen in the ink tank windows,
rell
the ink tanks to the
upper lines and then use the Power Cleaning utility to replace the ink inside the ink tubes. Aer you use the
utility, perform a nozzle check to see if print quality has improved.
Related Information
& “Checking and Cleaning the Print Head” on page 127
& “Relling the Ink Tanks” on page 120
User's Guide
Solving Problems
170
& “Running Power Cleaning” on page 128
Banding or Unexpected Colors Appear
e print head nozzles may be clogged. Perform a nozzle check to check if the print head nozzles are clogged.
Clean the print head if any of the print head nozzles are clogged.
Related Information
& “Checking and Cleaning the Print Head” on page 127
Colored Banding Appears at Intervals of Approximately 2.5 cm
Select the appropriate paper type setting for the type of paper loaded in the printer.
Align the print head using the Horizontal Alignment feature.
When printing on plain paper, print using a higher quality setting.
Related Information
&
“List of Paper Types” on page 39
&
“Aligning the Print Head - Control Panel” on page 130
User's Guide
Solving Problems
171
Blurry Prints, Vertical Banding, or Misalignment
Align the print head using the Vertic al Alignment feature.
Related Information
&
“Aligning the Print Head - Control Panel” on page 130
Print Quality Does Not Improve Even After Aligning the Print Head
During bidirectional (or high speed) printing, the print head prints while moving in both directions, and vertical
lines may be misaligned. If print quality does not improve, disable the bidirectional (or high speed) setting.
Disabling this setting may slow down printing speed.
Control panel
Disable Bidirectional in the print settings.
Wi n d o w s
Clear High Speed on the printer driver’s More Options tab.
Mac OS
Select System Preferences from the
menu > Printers & Scanners (or Print & Scan, Print & Fax), and then
select the printer. Click Options & Supplies > Options (or Driver). Select O as the High Speed Printing
setting.
Related Information
& “Menu Options for Paper and Print Settings” on page 70
Print Quality is Poor
Check the following if the print quality is poor due to blurry prints, banding, missing colors, faded colors, and
misalignment in the prints.
Checking the printer
Make sure the initial ink charging is complete.
Rell
the ink tank if the ink level is below the lower line.
Perform a nozzle check, and then clean the print head if any of the print head nozzles are clogged.
Align the print head.
User's Guide
Solving Problems
172
Checking the paper
Use paper supported by this printer.
Do not print on paper that is damp, damaged, or too old.
If the paper is curled or the envelope is pued up, atten it.
Do not stack the paper immediately
aer
printing.
Dry the printouts completely before ling or displaying them. When drying the printouts, avoid direct sun light,
do not use a dryer, and do not touch the printed side of paper.
When printing images or photos, Epson recommends using genuine Epson paper rather than plain paper. Print
on the printable side of the genuine Epson paper.
Checking the print settings
Select the appropriate paper type setting for the type of paper loaded in the printer.
Print using a higher quality setting.
Checking the ink bottle
Use ink bottles with the correct part code for this printer.
Epson recommends using the ink bottle before the date printed on the package.
Try to use genuine Epson ink bottles. is product is designed to adjust colors based on the use of genuine
Epson ink bottles. e use of non-genuine ink bottles may cause print quality to decline.
Related Information
& “Available Paper and Capacities” on page 38
& “List of Paper Types” on page 39
& “Paper Handling Precautions” on page 37
&
“Checking and Cleaning the Print Head” on page 127
&
“Aligning the Print Head - Control Panel” on page 130
Paper Is Smeared or Scued
When horizontal banding appears or the top or bottom of the paper is smeared, load paper in the correct
direction and slide the edge guides to the edges of the paper.
User's Guide
Solving Problems
173
When vertical banding appears or the paper is smeared, clean the paper path.
Place the paper on a at surface to check if it is curled. If it is, atten it.
If thick paper is scued, enable the reduce scung setting. If you enable this setting, print quality may decline
or printing may slow down.
Control panel
Select Settings > Printer Setup from the home screen, and then enable ick Paper.
Wi n d o w s
Click Extended Settings on the printer driver's Maintenance tab, and then select
ick
Paper and
Envelopes.
Mac OS
Select System Preferences from the
menu > Printers & Scanners (or Print & Scan, Print & Fax), and
then select the printer. Click Options & Supplies > Options (or Driver). Select On as the ick paper and
envelopes setting.
When performing manual 2-sided printing, make sure that the ink is completely dry before reloading the paper.
Related Information
& “Loading Paper in the Paper Cassette 1” on page 41
& “Loading Paper in the Paper Cassette 2” on page 45
& “Loading Paper in the Rear Paper Feed Slot” on page 49
& “Cleaning the Paper Path for Ink Smears” on page 131
Paper is Smeared During Automatic 2-Sided Printing
When using the automatic 2-sided printing feature and printing high density data such as images and graphs, set
the print density to lower and the drying time to longer.
Related Information
& Printing on 2-Sides” on page 76
& Menu Options for Copy Mode” on page 97
Printed Photos are Sticky
You may be printing on the wrong side of the photo paper. Make sure you are printing on the printable side.
When printing on the wrong side of the photo paper, you need to clean the paper path.
User's Guide
Solving Problems
174
Related Information
& “Cleaning the Paper Path for Ink Smears” on page 131
Images or Photos are Printed in Unexpected Colors
When printing from the control panel or from the Windows printer driver, the Epson auto photo adjustment
setting is applied by default depending on the paper type. Try change the setting.
Control panel
Change the Scene Detection setting from Automatic to any other option. If changing the setting does not work,
select any other option other than PhotoEnhance as the Enhance setting.
Windows printer driver
On the More Options tab, select Custom in Color Correction, and then click Advanced. Change the Scene
Correction setting from Auto Correct to any other option. If changing the setting does not work, use any color
correction method other than PhotoEnhance in Color Management.
Related Information
& Menu Options for Photo Adjustment and Zoom” on page 71
& “Adjusting the Print Color” on page 89
Colors Dier from What You See on the Display
Display devices such as computer screens have their own display properties. If the display is unbalanced, the
image are not displayed with proper brightness and colors. Adjust the properties of the device. Next, access the
printer driver window, select Custom as the Color Correction setting on the More Options tab, and then click
Advanced. Select EPSON Standard as the Color Mode setting.
Light shining into the display has an eect on how the image is seen on the display. Avoid direct sunlight and
conrm the image where an appropriate illuminance is assured.
Colors may
dier
from what you see on smart devices such as smart phones or tablets with high-resolution
displays.
Colors on a display are not quite identical to those on paper because the display device and the printer have a
dierent process of producing colors.
Cannot Print Without Margins
Make borderless setting in the print settings. If you select a paper type that does not support borderless printing,
you cannot select Borderless. Select a paper type that supports borderless printing.
Related Information
& “Menu Options for Paper and Print Settings” on page 70
& Menu Options for Copy Mode” on page 97
& “Printing Basics - Windows” on page 72
& “Printing Basics - Mac OS” on page 74
User's Guide
Solving Problems
175
Edges of the Image are Cropped During Borderless Printing
During borderless printing, the image is slightly enlarged and the protruding area is cropped. Select a smaller
enlargement setting.
Control panel
Change the Expansion setting.
Wi n d o w s
Click Settings next to the Borderless checkbox on the printer driver's Main tab, and then change the settings.
Mac OS
Change the Expansion setting from the print dialog's Print Settings menu.
Related Information
&
“Menu Options for Paper and Print Settings” on page 70
& Menu Options for Copy Mode” on page 97
The Position, Size, or Margins of the Printout Are Incorrect
Load paper in the correct direction, and slide the edge guides against the edges of the paper.
When placing the originals on the scanner glass, align the corner of the original with the corner indicated by a
symbol on the frame of the scanner glass. If the edges of the copy are cropped o, move the original slightly
away from the corner.
When placing the originals on the scanner glass, clean the scanner glass and the document cover. If there is dust
or stains on the glass, the copy area may extend to include the dust or stains, resulting in the wrong copying
position or small images.
Select the appropriate paper size setting.
Adjust the margin setting in the application so that it falls within the printable area.
Related Information
& “Loading Paper in the Paper Cassette 1” on page 41
& “Loading Paper in the Paper Cassette 2” on page 45
& “Loading Paper in the Rear Paper Feed Slot” on page 49
& “Cleaning the Scanner Glass” on page 132
& “Printable Area” on page 187
Multiple Originals are Copied onto a Single Sheet
When you place multiple originals on the scanner glass to copy them separately, but they are copied onto a single
sheet, place the originals at least 5 mm apart. If the problem continues, place one original at a time.
Related Information
& “Placing Photos for Copying” on page 54
User's Guide
Solving Problems
176
Printing Position of Photo Stickers is Incorrect
Adjust the printing position in the Printer Setup > Stickers menu on the control panel.
Related Information
& “Menu Options for Printer Setup” on page 136
Printing Position on a CD/DVD is Incorrect
Adjust the printing position in the Printer Setup > CD/DVD menu on the control panel.
Related Information
& “Menu Options for Printer Setup” on page 136
Printed Characters Are Incorrect or Garbled
Connect the USB cable securely to the printer and the computer.
Cancel any paused print jobs.
Do not put the computer manually into the Hibernate mode or the Sleep mode while printing. Pages of garbled
text may be printed next time you start the computer.
Related Information
& Canceling Printing” on page 96
The Printed Image Is Inverted
Clear any mirror image settings in the printer driver or the application.
Wi n d o w s
Clear Mirror Image on the printer driver's More Options tab.
Mac OS
Clear Mirror Image from the print dialog's Print Settings menu.
Mosaic-Like Patterns in the Prints
When printing images or photos, print using high-resolution data. Images on websites are oen low resolution
although they look good enough on the display, and so print quality may decline.
Uneven Colors, Smears, Dots, or Straight Lines Appear in the Copied
Image
Clean the paper path.
User's Guide
Solving Problems
177
Clean the scanner glass.
Do not press too hard on the original or the document cover when you are placing the originals on the scanner
glass.
When the paper is smeared, lower the copy density setting.
Related Information
& “Cleaning the Paper Path for Ink Smears” on page 131
& “Cleaning the Scanner Glass” on page 132
& Menu Options for Copy Mode” on page 97
Moiré (Cross-Hatch) Patterns Appear in the Copied Image
Change the reduce and enlarge setting or place the original at a slightly dierent angle.
Related Information
& Menu Options for Copy Mode” on page 97
An Image of the Reverse Side of the Original Appears in the Copied
Image
For a thin original, place the original on the scanner glass and then place a piece of black paper over it.
Lower the copy density setting on the control panel.
Related Information
& Menu Options for Copy Mode” on page 97
The Printout Problem Could Not be Cleared
If you have tried all of the solutions and have not solved the problem, try uninstalling and then reinstalling the
printer driver.
Related Information
& “Uninstalling Applications” on page 152
& “Installing Applications” on page 154
Other Printing Problems
Printing Is Too Slow
Close any unnecessary applications.
User's Guide
Solving Problems
178
Lower the quality setting. High quality printing slows down the printing speed.
Enable the bidirectional (or high speed) setting. When this setting is enabled, the print head prints while
moving in both directions, and the printing speed increases.
Control panel
Enable Bidirectional in the print settings.
Wi n d o w s
Select High Speed on the printer driver's More Options tab.
Mac OS
Select System Preferences from the
menu > Printers & Scanners (or Print & Scan, Print & Fax), and
then select the printer. Click Options & Supplies > Options (or Driver). Select On as the High Speed
Printing setting.
Disable Quiet Mode.
Control panel
From the home screen, select Quiet Mode, and then disable it.
Wi n d o w s
Disable the Quiet Mode setting on the printer driver's Main tab.
Mac OS
Select System Preferences from the
menu > Printers & Scanners (or Print & Scan, Print & Fax), and
then select the printer. Click Options & Supplies > Options (or Driver). Select O as the Quiet Mode
setting.
Related Information
& “Menu Options for Paper and Print Settings” on page 70
Printing Slows Down Dramatically During Continuous Printing
Printing slows down to prevent the printer mechanism from overheating and being damaged. However, you can
continue printing. To return to normal printing speed, leave the printer idle for at least 30 minutes. Printing speed
does not return to normal if the power is o.
Cannot Cancel Printing from a Computer Running Mac OS X v10.6.8
If you want to stop printing from your computer, make the following settings.
Run Web Cong, and then select Port9100 as the Top Priority Protocol setting in AirPrint Setup. Select System
Preferences from the
menu > Printers & Scanners (or Print & Scan, Print & Fax), remove the printer, and
then add the printer again.
Related Information
& “Web
Cong
” on page 142
User's Guide
Solving Problems
179
Cannot Start Scanning
Connect the USB cable securely to the printer and the computer. If you are using a USB hub, try to connect the
printer directly to the computer.
If you scan at a high resolution over a network, a communication error may occur. Lower the resolution.
Make sure that the correct printer (scanner) is selected on Epson Scan 2.
Check whether or not the printer is recognized when using Windows
In Windows, make sure the printer (scanner) is displayed in Scanner and Camera.
e
printer (scanner) should be
displayed as "EPSON XXXXX (printer name)". If the printer (scanner) is not displayed, uninstall and then re-
install Epson Scan 2. See the following to access Scanner and Camera.
Wi nd ow s 1 0
Right-click the start button or press and hold it, select Control Panel, enter "Scanner and Camera" in the search
charm, click View scanners and cameras, and then check if the printer is displayed.
Windows 8.1/Windows 8
Select Desktop > Settings > Control Panel, enter "Scanner and Camera" in the search charm, click Show
Scanner and Camera, and then check if the printer is displayed.
Wi nd ow s 7
Click the start button and select Control Panel, enter "Scanner and Camera" in the search charm, click Vie w
scanners and cameras, and then check if the printer is displayed.
Windows Vista
Click the start button, select Control Panel > Hardware and Sound > Scanners and Cameras, and then check
if the printer is displayed.
Wi nd ow s X P
Click the start button, select Control Panel > Printers and Other Hardware > Scanner and Cameras, and then
check if the printer is displayed.
Related Information
& “Uninstalling Applications” on page 152
& “Installing Applications” on page 154
Cannot Start Scanning when Using the Control Panel
Make sure Epson Scan 2 and Epson Event Manager are installed correctly.
Check the scanning setting assigned in Epson Event Manager.
Related Information
& “Epson Scan 2 (Scanner Driver)” on page 150
& Epson Event Manager” on page 150
User's Guide
Solving Problems
180
Scanned Image Problems
Uneven Colors, Dirt, Spots, and so on Appear when Scanning from
the Scanner Glass
Clean the scanner glass.
Remove any trash or dirt that adheres to the original.
Do not press with too much force on the original or the document cover. If you press with too much force,
blurring, smudges, and spots may occur.
Related Information
& “Cleaning the Scanner Glass” on page 132
The Image Quality Is Rough
Set the Mode in Epson Scan 2 according to the original you want to scan. Scan using the settings for documents
in Document Mode, and the settings for photos in Photo Mode.
In Epson Scan 2, adjust the image using items on the Advanced Settings tab, and then scan.
If the resolution is low, try increasing the resolution and then scanning.
Related Information
& “Scanning Using Epson Scan 2” on page 108
Oset
Appears in the Background of Images
Images on the back of the original may appear in the scanned image.
In Epson Scan 2, select the Advanced Settings tab, and then adjust the Brightness.
is feature may not be available depending on the settings on the Main Settings tab > Image Type or other
settings on the Advanced Settings tab.
In Document Mode in Epson Scan 2, select the Advanced Settings tab, and then Image Option > Text
Enhancement.
When scanning from the scanner glass, place black paper or a desk pad over the original.
Related Information
& “Placing Originals on the Scanner Glass” on page 53
& “Scanning Using Epson Scan 2” on page 108
Text is Blurred
In Document Mode in Epson Scan 2, select the Advanced Settings tab, and then Image Option > Text
Enhancement.
User's Guide
Solving Problems
181
Select Document Mode as the Mode in Epson Scan 2. Scan using the settings for documents in Document
Mode.
In Document Mode in Epson Scan 2, when Image Type on the Main Settings tab is set to Black & White,
adjust reshold on the Advanced Settings tab. When you increase the reshold, the black color area
becomes larger.
If the resolution is low, try increasing the resolution and then scanning.
Related Information
& “Scanning Documents (Document Mode)” on page 109
Moiré Patterns (Web-Like Shadows) Appear
If the original is a printed document, moiré patterns (web-like shadows) may appear in the scanned image.
On the Advanced Settings tab in Epson Scan 2, set Descreening.
Change the resolution, and then scan again.
Related Information
& “Scanning Using Epson Scan 2” on page 108
Cannot Scan the Correct Area on the Scanner Glass
Make sure the original is placed correctly against the alignment marks.
If the edge of the scanned image is missing, move the original slightly away from the edge of the scanner glass.
When placing multiple originals on the scanner glass, make sure there is a gap of at least 20 mm (0.79 in.)
between the originals.
When scanning from the control panel and selecting the auto scan area cropping function, remove any trash or
dirt from the scanner glass and document cover. If there is any trash or dirt around the original, the scanning
range expands to include it.
Related Information
& “Placing Originals on the Scanner Glass” on page 53
Cannot Preview in Thumbnail
When placing multiple originals on the scanner glass, make sure there is a gap of at least 20 mm (0.79 in.)
between the originals.
User's Guide
Solving Problems
182
Check that the original is placed straight.
Depending on the original, previewing may not be performed in umbnail. In this situation, scan in Normal
preview, and then create marquees manually.
Related Information
& “Scanning Photos or Pictures (Photo Mode)” on page 111
Text is Not Recognized Correctly when Saving as a Searchable PDF
On the Image Format Options window in Epson Scan 2, check that Text L an guage is set correctly on the Tex t
tab.
Check that the original is placed straight.
Use an original with clear text. Text recognition may decline for the following types of originals.
Originals that have been copied a number of times
Originals received by fax (at low resolutions)
Originals on which the letter spacing or line spacing is too small
Originals with ruled lines or underlining over the text
Originals with hand-written text
Originals with creases or wrinkles
In Document Mode in Epson Scan 2, when Image Type on the Main Settings tab is set to Black & White,
adjust reshold on the Advanced Settings tab. When you increase the reshold, black becomes stronger.
In Document Mode in Epson Scan 2, select the Advanced Settings tab, and then Image Option > Text
Enhancement.
Related Information
& “Scanning Documents (Document Mode)” on page 109
Cannot Solve Problems in the Scanned Image
If you have tried all of the solutions and have not solved the problem, initialize the Epson Scan 2 settings using
Epson Scan 2 Utility.
Note:
Epson Scan 2 Utility is an application that comes with Epson Scan 2.
1. Start Epson Scan 2 Utility.
Win dows 1 0
Click the start button, and then select EPSON > Epson Scan 2 Utility.
Windows 8.1/Windows 8
Enter the application name in the search charm, and then select the displayed icon.
Windows 7/Windows Vista/Windows XP
Click the start button, and then select All Programs or Programs > EPSON > Epson Scan 2 > Epson Scan
2 Utility.
User's Guide
Solving Problems
183
Mac OS
Select Go > Applications > Epson
Soware
> Epson Scan 2 Utility.
2. Select the Other tab.
3.
Click Reset.
Note:
If initialization does not solve the problem, uninstall and re-install Epson Scan 2.
Related Information
& “Uninstalling Applications” on page 152
& “Installing Applications” on page 154
Other Scanning Problems
Scanning Speed Is Slow
Lower the resolution, and then scan again. When the resolution is high, scanning may take some time.
e
scanning speed may be reduced depending on the image adjustment features in Epson Scan 2.
On the Conguration screen which is displayed by clicking the
button in Epson Scan 2, if you set Quiet
Mode on the Scan tab, the scanning speed may be reduced.
Related Information
&
“Scanning Using Epson Scan 2” on page 108
& Menu Options for Scanning” on page 108
Scanning Stops when Scanning to PDF/Multi-TIFF
When scanning using Epson Scan 2, you can continuously scan up to 999 pages in PDF format and up to 200
pages in Multi-TIFF format.
When scanning large volumes, we recommend scanning in grayscale.
Increase the free space on the computer's hard disk. Scanning may stop if there is not enough free space.
Try scanning at a lower resolution. Scanning stops if the total data size reaches the limit.
Related Information
& “Scanning Using Epson Scan 2” on page 108
User's Guide
Solving Problems
184
Other Problems
Slight Electric Shock when Touching the Printer
If many peripherals are connected to the computer, you may feel a slight electric shock when touching the printer.
Install a ground wire to the computer that is connected to the printer.
Operation Sounds Are Loud
If operations sounds are too loud, enable Quiet Mode. Enabling this feature may reduce printing speed.
Control Panel
From the home screen, select Quiet Mode, and then enable it.
Wi n d o w s
Enable Quiet Mode on the Main tab in the printer driver.
Mac OS
Select System Preferences from the
menu > Printers & Scanners (or Print & Scan, Print & Fax), and then
select the printer. Click Options & Supplies > Options (or Driver). Select On as the Quiet Mode setting.
Epson Scan 2
Click the
button to open the Conguration window. Next, set the Quiet Mode on the Scan tab.
Cannot Save the Data to a Memory Card
Use a memory card which is supported by the printer.
Check that the memory card is not write protected.
Check that the memory card has enough available memory. If the available memory is low, data cannot be
saved.
Related Information
& “Supported External Storage Device Specications” on page 192
Application Is Blocked by a Firewall (for Windows Only)
Add the application to the Windows Firewall allowed program in security settings on the Control Panel.
"?" Is Displayed on the Photo Selection Screen
"?" is displayed on the LCD screen when the image le is not supported by the product.
Related Information
& “Supported Data Specications” on page 192
User's Guide
Solving Problems
185
A Message Prompting You to Reset the Ink Levels is Displayed
Rell all or the specied ink tanks, select the color that you relled on the LCD screen, and then press the
x
button to reset the ink levels.
Depending on the usage conditions, the message may be displayed when there is still ink in the tank.
Related Information
& “Relling the Ink Tanks” on page 120
Ink Spilled
If ink adheres to the area around the tank, wipe it o using a napless, clean cloth or cotton swab.
If ink spills on the desk or oor, wipe it o immediately. When ink is dried, it will be dicult to remove the
smear. To prevent the smear from spreading, blot the ink with a dry cloth, and then wipe it with a moist cloth.
If ink gets on your hands, wash them with water and soap.
User's Guide
Solving Problems
186
Appendix
Technical
Specications
Printer Specications
Print Head Nozzle Placement Black ink nozzles: 360
Photo black ink nozzles: 180
Color ink nozzles: 180 for each color
Weight of Paper
*
Plain Paper 64 to 90 g/m (17 to 24lb)
Envelopes Envelope #10, DL, C6: 75 to 90 g/m (20 to 24 lb)
* Even when the paper thickness is within this range, the paper may not feed in the printer or the print quality may decline
depending on the paper properties or quality.
Printable Area
Printable Area for Single Sheets
Print quality may decline in the shaded areas due to the printer's mechanism.
Printing with borders
A 3.0 mm (0.12 in.)
B 3.0 mm (0.12 in.)
C 41.0 mm (1.61 in.)
D 37.0 mm (1.46 in.)
Borderless printing
A 44.0 mm (1.73 in.)
B 40.0 mm (1.57 in.)
User's Guide
Appendix
187
Printable Area for Envelopes
Print quality may decline in the shaded areas due to the printer's mechanism.
A 3.0 mm (0.12 in.)
B 5.0 mm (0.20 in.)
C 18.0 mm (0.70 in.)
D 41.0 mm (1.61 in.)
Printable Area for CD/DVD
Print quality may decline in the shaded areas due to the printer's mechanism.
A 18 mm (0.71 in.)
B 43 mm (1.69 in.)
C 116 mm (4.57 in.)
D 120 mm (4.72 in.)
Scanner Specications
Scanner Type Flatbed
Photoelectric Device CIS
Maximum Document Size 216×297 mm (8.5×11.7 in.)
A4, Letter
Resolution 1200 dpi (main scan)
2400 dpi (sub scan)
Color Depth Color
48 bits per pixel internal (16 bits per pixel per color internal)
24 bits per pixel external (8 bits per pixel per color external)
Grayscale
16 bits per pixel internal
8 bits per pixel external
Black and white
16 bits per pixel internal
1 bits per pixel external
Light Source LED
User's Guide
Appendix
188
Interface Specications
For Computer Hi-Speed USB
For External USB Devices and
PictBridge
Hi-Speed USB
Network Function List
Functions Supported Remarks
Network Interfaces Ethernet -
Wi-Fi Infrastructure -
Ad hoc - -
Wi-Fi Direct (Simple AP) -
Concurrent
Connection
Ethernet and Wi-Fi Direct (Simple AP) -
Wi-Fi (Infrastructure) and Wi-Fi Direct (Simple AP) -
Panel Operation Wi-Fi Setup Wi-Fi Setup Wizard -
Push Button Setup
(WPS)
-
PIN Code Setup -
Wi-Fi Auto Connect -
Epson iPrint
Connection
--
Wi-Fi Direct Setup -
General Network Setup (device name, TCP/IP address,
DNS server, proxy server)
-
Network Connection Check -
Network Status -
Network Status Sheet Printing -
Disable Wi-Fi -
Restore the Factory Default Settings -
File Sharing Setup -
User's Guide
Appendix
189
Functions Supported Remarks
Network Printing EpsonNet Print (Windows) IPv4 -
Standard TCP/IP (Windows) IPv4, IPv6 -
WSD Printing (Windows) IPv4, IPv6 Windows Vista or
later
Bonjour Printing (Mac OS) IPv4, IPv6 -
IPP Printing (Windows, Mac
OS)
IPv4, IPv6 -
UPnP Printing IPv4 - Information
appliance
PictBridge Printing (Wi-Fi) IPv4 Digital camera
Epson Connect (Email Print) IPv4 -
AirPrint (iOS, Mac OS) IPv4, IPv6 iOS 5 or later, Mac
OS X v10.7 or later
Google Cloud Print IPv4, IPv6 -
Network Scanning Epson Scan 2 IPv4, IPv6 -
Event Manager IPv4 -
Epson Connect (Scan to
Cloud)
IPv4 -
AirPrint (Scan) IPv4, IPv6 OS X Mavericks or
later
ADF (AutoReversing) - -
Fax Send a fax IPv4 - -
Receive a fax IPv4 - -
AirPrint (Faxout) IPv4, IPv6 - -
Wi-Fi Specications
Standards
IEEE802.11b/g/n
*1*2
Frequency Range 2.4 GHz
Maximum Radio-Frequency Power
Transmitted
19.8 dBm (EIRP)
Coordination Modes
Infrastructure, Wi-Fi Direct (Simple AP)
*3
Wireless Securities
WEP (64/128bit),WPA2-PSK (AES)
*4
*1 Complies with either IEEE 802.11b/g/n or IEEE 802.11b/g depending on location of purchase.
*2 IEEE802.11n is only available for the HT20.
User's Guide
Appendix
190
*3 Not supported for IEEE 802.11b.
*4 Complies with WPA2 standards with support for WPA/WPA2 Personal.
Ethernet
Specications
Standards
IEEE802.3i (10BASE-T)
*1
IEEE802.3u (100BASE-TX)
IEEE802.3az (Energy Ecient Ethernet)
*2
Communication Mode Auto, 10Mbps Full duplex, 10Mbps Half duplex, 100Mbps
Full duplex, 100Mbps Half duplex
Connector RJ-45
*1 Use a category 5e or higher STP (Shielded twisted pair) cable to prevent risk of radio interference.
*2 The connected device should comply with IEEE802.3az standards.
Security Protocol
SSL/TLS HTTPS Server/Client, IPPS
Supported Third Party Services
AirPrint Print iOS 5 or later/Mac OS X v10.7.x or later
Scan OS X Mavericks or later
Google Cloud Print
External Storage Device Specications
Supported Memory Card Specications
Compatible Memory Cards Maximum Capacities
miniSD
*
2 GB
miniSDHC
*
32 GB
microSD
*
2 GB
microSDHC
*
32 GB
microSDXC
*
64 GB
SD 2 GB
User's Guide
Appendix
191
Compatible Memory Cards Maximum Capacities
SDHC 32 GB
SDXC 64 GB
* Attach an adapter to t the memory card slot. Otherwise, the card may get stuck.
Supported memory card voltages
3.3 V type, dual voltage (3.3 V and 5V) type (supply voltage: 3.3 V)
5 V memory cards are not supported.
Maximum supply current: 200 mA
Supported External Storage Device Specications
Compatible External Storage
Devices
Maximum Capacities
CD-R Drive
*1
DVD-R Drive
*1
Blu-ray Drive
*1
CD-ROM
*2
/CD-R: 700 MB
DVD-ROM
*2
/DVD-R: 4.7 GB
(CD-RW, DVD+R, DVD±RW, DVD-RAM, and Blu-ray Disc™ are not supported.)
MO Drive
*1
1.3 GB
HDD
*1
USB Flash Drive
2 TB (formatted in FAT, FAT32, or exFAT)
*1 We do not recommend using external USB devices that are powered by USB. Use only external USB devices with
independent AC power sources.
*2 Read only.
You cannot use the following devices:
A device that requires a dedicated driver
A device with security settings (password, encryption, and so on)
A device with a built-in USB hub
Epson cannot guarantee operations for all externally connected devices.
Supported Data Specications
File Format
JPEG with the Exif Version 2.3 standard taken by digital cameras DCF
*1
version 1.0
or 2.0
*2
compliant
Image Size Horizontal: 80 to 10200 pixels
Vertical: 80 to 10200 pixels
File Size Less than 2 GB
User's Guide
Appendix
192
Maximum Number of Files
9990
*3
*1 Design rule for Camera File system.
*2 Photo data stored in the built-in memory of a digital camera is not supported.
*3 Up to 999 les can be displayed at a time. (If the number of les exceeds 999, the les are displayed in groups.)
Note:
"?" is displayed on the LCD screen when the printer cannot recognize the image le. In this situation, if you select a multiple
image layout, blank sections will be printed.
Dimensions
Dimensions Storage
Width: 425 mm (16.7 in.)
Depth: 359 mm (14.1 in.)
Height: 161 mm (6.3in.)
Printing
Width: 425 mm (16.7 in.)
Depth: 598 mm (23.5 in.)
Height: 196 mm (7.7in.)
Weight
*
Approx. 8.0 kg (17.6 lb)
* Without the ink, power cord, and the CD/DVD tray.
Electrical
Specications
Model 100 to 240 V Model 100 to 120V Model
Rated Frequency Range 50 to 60 Hz 50 to 60 Hz
Rated Current 0.5 to 0.2 A 0.5A
Power Consumption (with USB
Connection)
Standalone copying: Approx. 16 W (ISO/
IEC24712)
Ready mode: Approx. 4.2 W
Sleep mode: Approx. 1 W
Power o: Approx. 0.2 W
Standalone copying: Approx. 16 W (ISO/
IEC24712)
Ready mode: Approx. 4.2 W
Sleep mode: Approx. 1 W
Power o: Approx. 0.1 W
Note:
Check the label on the printer for its voltage.
For European users, see the following Website for details on power consumption.
http://www.epson.eu/energy-consumption
User's Guide
Appendix
193
Environmental Specications
Operation Use the printer within the range shown in the following graph.
Temperature: 10 to 35°C (50 to 95°F)
Humidity: 20 to 80% RH (without condensation)
Storage
Temperature: -20 to 40°C (-4 to 104°F)
*
Humidity: 5 to 85% RH (without condensation)
* You can store for one month at 40°C (104°F).
Environmental Specications for Ink Bottles
Storage Temperature
-20 to 40 °C (-4 to 104 °F)
*
Freezing Temperature -15 °C (5 °F)
Ink thaws and is usable after approximately 2 hours at 25 °C (77 °F).
* You can store for one month at 40 °C (104 °F).
System Requirements
Windows 10 (32-bit, 64-bit)/Windows 8.1 (32-bit, 64-bit)/Windows 8 (32-bit, 64-bit)/Windows 7 (32-bit, 64-
bit)/Windows Vista (32-bit, 64-bit)/Windows XP SP3 or later (32-bit)/Windows XP Professional x64 Edition SP2
or later
macOS Sierra/OS X El Capitan/OS X Yosemite/OS X Mavericks/OS X Mountain Lion/Mac OS X v10.7.x/Mac
OS X v10.6.8
Note:
Mac OS may not support some applications and features.
e UNIX File System (UFS) for Mac OS is not supported.
User's Guide
Appendix
194
Regulatory Information
Standards and Approvals
Standards and Approvals for U.S. Model
Safety UL60950-1
CAN/CSA-C22.2 No.60950-1
EMC FCC Part 15 Subpart B Class B
CAN/CSA-CEI/IEC CISPR 22 Class B
is equipment contains the following wireless module.
Manufacturer: Askey Computer Corporation
Type: WLU6320-D69 (RoHS)
is product conforms to Part 15 of the FCC Rules and RSS-210 of the IC Rules. Epson cannot accept
responsibility for any failure to satisfy the protection requirements resulting from a non-recommended
modication of the product. Operation is subject to the following two conditions: (1) this device may not cause
harmful interference, and (2) this device must accept any interference received, including interference that may
cause undesired operation of the device.
To prevent radio interference to the licensed service, this device is intended to be operated indoors and away from
windows to provide maximum shielding. Equipment (or its transmit antenna) that is installed outdoors is subject
to licensing.
is equipment complies with FCC/IC radiation exposure limits set forth for an uncontrolled environment and
meets the FCC radio frequency (RF) Exposure Guidelines in Supplement C to OET65 and RSS-102 of the IC radio
frequency (RF) Exposure rules. is equipment should be installed and operated so that the radiator is kept at least
7.9 inches (20 cm) or more away from a person's body (excluding extremities: hands, wrists, feet and ankles).
Standards and Approvals for European Model
For European users
Hereby, Seiko Epson Corporation declares that the following radio equipment model is in compliance with
Directive 2014/53/EU. e full text of the EU declaration of conformity is available at the following website.
http://www.epson.eu/conformity
C495A
For use only in Ireland, UK, Austria, Germany, Liechtenstein, Switzerland, France, Belgium, Luxemburg,
Netherlands, Italy, Portugal, Spain, Denmark, Finland, Norway, Sweden, Iceland, Croatia, Cyprus, Greece,
Slovenia, Malta, Bulgaria, Czech, Estonia, Hungary, Latvia, Lithuania, Poland, Romania, and Slovakia.
Epson cannot accept responsibility for any failure to satisfy the protection requirements resulting from a non-
recommended modication of the products.
User's Guide
Appendix
195
Standards and Approvals for Australian Model
EMC AS/NZS CISPR32 Class B
Epson hereby declares that the following equipment Models are in compliance with the essential requirements and
other relevant provisions of AS/NZS4268:
C495A
Epson cannot accept responsibility for any failure to satisfy the protection requirements resulting from a non-
recommended modication of the products.
Restrictions on Copying
Observe the following restrictions to ensure the responsible and legal use of the printer.
Copying of the following items is prohibited by law:
Bank bills, coins, government-issued marketable securities, government bond securities, and municipal
securities
Unused postage stamps, pre-stamped postcards, and other ocial postal items bearing valid postage
Government-issued revenue stamps, and securities issued according to legal procedure
Exercise caution when copying the following items:
Private marketable securities (stock certicates, negotiable notes, checks, etc.), monthly passes, concession
tickets, etc.
Passports, driver’s licenses, warrants of tness, road passes, food stamps, tickets, etc.
Note:
Copying these items may also be prohibited by law.
Responsible use of copyrighted materials:
Printers can be misused by improperly copying copyrighted materials. Unless acting on the advice of a
knowledgeable attorney, be responsible and respectful by obtaining the permission of the copyright holder before
copying published material.
Transporting the Printer
When you need to transport the printer to move or for repairs, follow the steps below to pack the printer.
!
Caution:
Be careful not to trap your hand or ngers when opening or closing the scanner unit. Otherwise you may be injured.
User's Guide
Appendix
196
c
Important:
When storing or transporting the printer, avoid tilting it, placing it vertically, or turning it upside down;
otherwise ink may leak.
When storing or transporting an ink bottle, do not tilt the bottle and do not subject it to impacts or temperature
changes. Otherwise, ink may leak even if the cap on the ink bottle is tightened securely. Be sure to keep the ink
bottle upright when tightening the cap, and take precautions to prevent ink from leaking when transporting the
bottle, for example, putting the bottle in a bag.
Do not put opened ink bottles in the box with printer.
1.
Turn o the printer by pressing the
P
button.
2. Make sure the power light turns
o,
and then unplug the power cord.
c
Important:
Unplug the power cord when the power light is
o.
Otherwise, the print head does not return to the home
position causing the ink to dry, and printing may become impossible.
3. Disconnect all cables such as the power cord and USB cable.
4. Make sure there is no memory card inserted.
5. Remove all of the paper from the printer.
6. Make sure there are no originals on the printer.
User's Guide
Appendix
197
7. Open the scanner unit with the document cover closed. Secure the print head to the case with tape.
8. Make sure to install the cap onto the ink tank securely.
9. Close the Ink Tank Cover securely.
User's Guide
Appendix
198
10. Close the scanner unit.
11. Prepare to pack the printer as shown below.
12. Pack the printer in its box using the protective materials.
When you use the printer again, make sure you remove the tape securing the print head. If print quality has
declined the next time you print, clean and align the print head.
Related Information
& “Part Names and Functions” on page 15
& “Checking and Cleaning the Print Head” on page 127
&
“Aligning the Print Head” on page 130
Accessing a Memory Card From a Computer
You can write or read data on an external storage device such as a memory card that has been inserted in the
printer from a computer.
User's Guide
Appendix
199
c
Important:
Insert a memory card aer removing write protection.
If an image is saved to the memory card from a computer, the image and the number of photos are not refreshed
on the LCD screen. Remove and insert the memory card again.
When sharing an external device inserted in the printer between computers connected over USB and over a
network, write access is only allowed to the computers that are connected by the method you selected on the
printer. To write to the external storage device, enter Settings on the control panel and select File Sharing Setup
and a connection method.
Note:
It takes a while to recognize data from a computer if a large external storage device, such as 2TB HDD, is connected.
Windows
Select an external storage device in Computer or My Computer. e data on the external storage device is
displayed.
Note:
If you connected the printer to the network without the soware disc or Web Installer, map a memory card slot or USB port
as a network drive. Open Run and enter a printer name \\XXXXX or a printer's IP address \\XXX.XXX.XXX.XXX to
Open:. Right-click a device icon displayed to assign the network. e network drive appears in Computer or My Computer.
Mac OS
Select a corresponding device icon.
e
data on the external storage device is displayed.
Note:
To remove an external storage device, drag and drop the device icon to the trash icon. Otherwise, data in the shared drive
may not be displayed correctly when another external storage device is inserted.
To access an external storage device through the network, select Go > Connect to Server from the menu on the desktop.
Enter a printer name cifs://XXXXX or smb://XXXXX (Where "XXXXX" is the printer name) in the Server Address, and
then click Connect.
Related Information
&
“Inserting a Memory Card” on page 56
&
“External Storage Device Specications” on page 191
Where to Get Help
Technical Support Web Site
If you need further help, visit the Epson support website shown below. Select your country or region and go to the
support section of your local Epson website. e latest drivers, FAQs, manuals, or other downloadables are also
available from the site.
http://support.epson.net/
http://www.epson.eu/Support (Europe)
If your Epson product is not operating properly and you cannot solve the problem, contact Epson support services
for assistance.
User's Guide
Appendix
200
Contacting Epson Support
Before Contacting Epson
If your Epson product is not operating properly and you cannot solve the problem using the troubleshooting
information in your product manuals, contact Epson support services for assistance. If Epson support for your area
is not listed below, contact the dealer where you purchased your product.
Epson support will be able to help you much more quickly if you give them the following information:
Product serial number
(e
serial number label is usually on the back of the product.)
Product model
Product soware version
(Click About, Version Info, or a similar button in the product soware.)
Brand and model of your computer
Your computer operating system name and version
Names and versions of the soware applications you normally use with your product
Note:
Depending on the product, network settings may be stored in the product’s memory. Due to breakdown or repair of a
product, settings may be lost. Epson shall not be responsible for the loss of any data, for backing up or recovering settings
even during a warranty period. We recommend that you make your own backup data or take notes.
Help for Users in Europe
Check your Pan-European Warranty Document for information on how to contact Epson support.
Help for Users in Australia
Epson Australia wishes to provide you with a high level of customer service. In addition to your product manuals,
we provide the following sources for obtaining information:
Internet URL
http://www.epson.com.au
Access the Epson Australia World Wide Web pages. Worth taking your modem here for the occasional surf! e
site provides a download area for drivers, Epson contact points, new product information and technical support (e-
mail).
Epson Helpdesk
Phone: 1300-361-054
Epson Helpdesk is provided as a nal backup to make sure our clients have access to advice. Operators on the
Helpdesk can aid you in installing, conguring and operating your Epson product. Our Pre-sales Helpdesk sta
can provide literature on new Epson products and advise where the nearest dealer or service agent is located. Many
types of queries are answered here.
User's Guide
Appendix
201
We encourage you to have all the relevant information on hand when you ring. e more information you prepare,
the faster we can help solve the problem.
is
information includes your Epson product manuals, type of
computer, operating system, application programs, and any information you feel is required.
Transportation of Product
Epson recommends retaining product packaging for future transportation. Securing the ink tank with tape and
keeping the product upright is also recommended.
Help for Users in New Zealand
Epson New Zealand wishes to provide you with a high level of customer service. In addition to your product
documentation, we provide the following sources for obtaining information:
Internet URL
http://www.epson.co.nz
Access the Epson New Zealand World Wide Web pages. Worth taking your modem here for the occasional surf!
e site provides a download area for drivers, Epson contact points, new product information and technical
support (e-mail).
Epson Helpdesk
Phone: 0800 237 766
Epson Helpdesk is provided as a nal backup to make sure our clients have access to advice. Operators on the
Helpdesk can aid you in installing, conguring and operating your Epson product. Our Pre-sales Helpdesk sta
can provide literature on new Epson products and advise where the nearest dealer or service agent is located. Many
types of queries are answered here.
We encourage you to have all the relevant information on hand when you ring.
e
more information you prepare,
the faster we can help solve the problem. is information includes your Epson product documentation, type of
computer, operating system, application programs, and any information you feel is required.
Transportation of Product
Epson recommends retaining product packaging for future transportation. Securing the ink tank with tape and
keeping the product upright is also recommended.
User's Guide
Appendix
202
11

Hulp nodig? Stel uw vraag in het forum

Spelregels
1

Forum

Epson-EcoTank-ET-7750
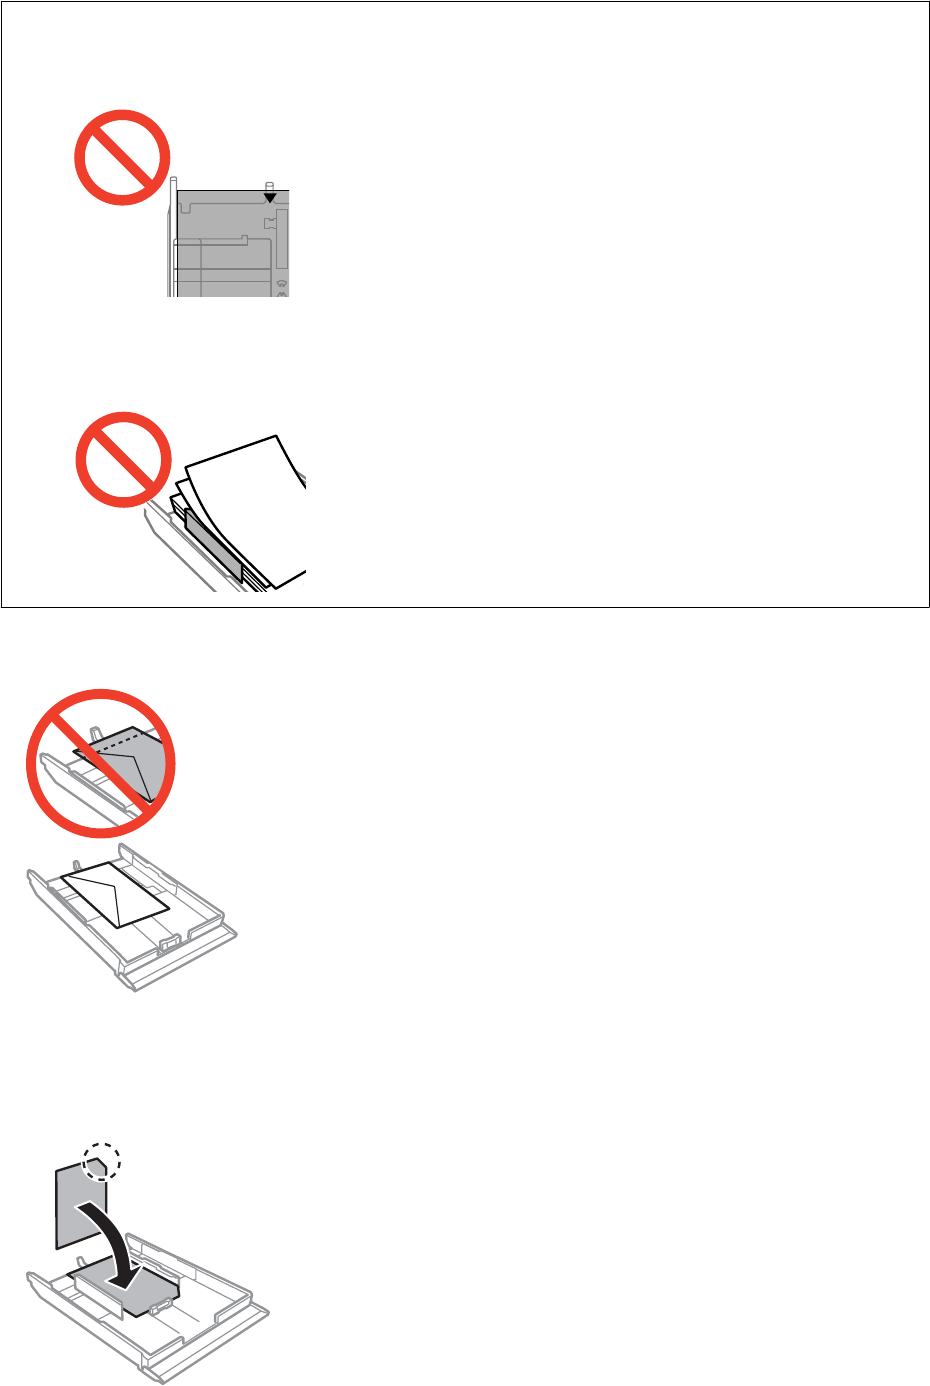
  • hij neemt het foto papier niet aan en zegt het papier is niet goed aangebracht Gesteld op 24-4-2022 om 07:00

    Reageer op deze vraag Misbruik melden
  • Hoe scan ik meerdere pagina's vanuit de papiertoevoer achteraan ? Gesteld op 2-4-2022 om 13:37

    Reageer op deze vraag Misbruik melden
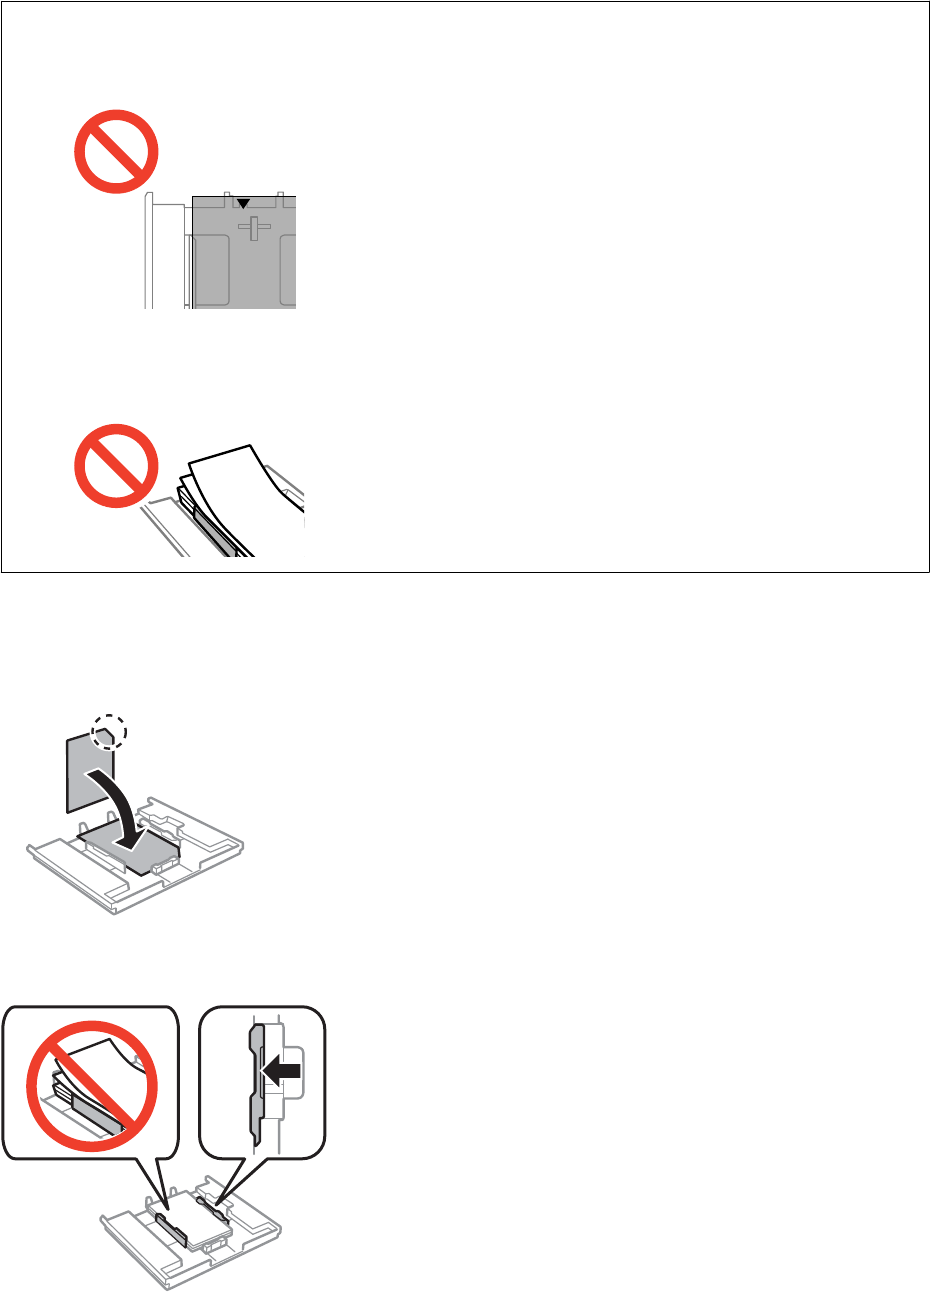
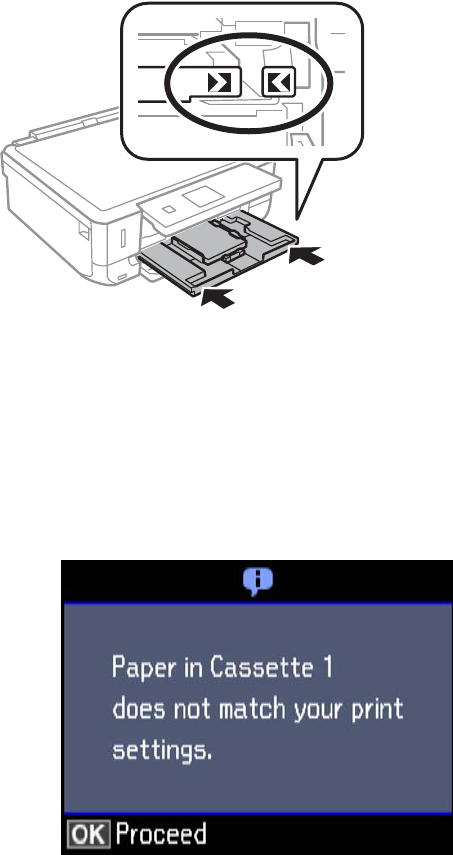
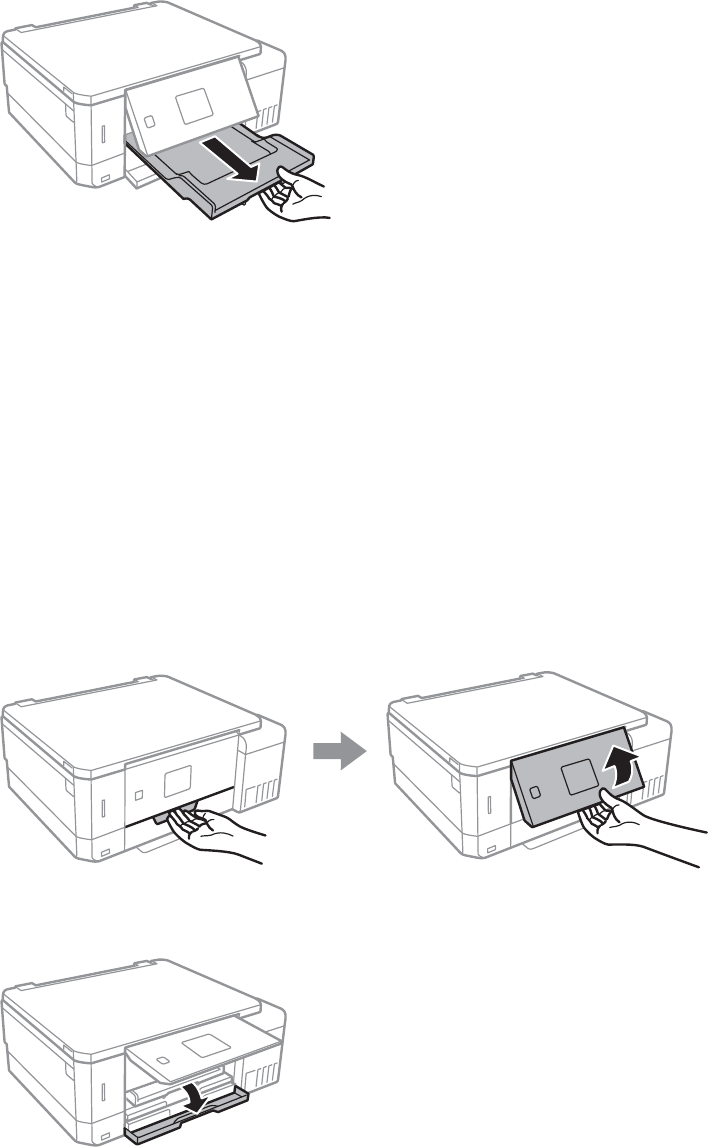
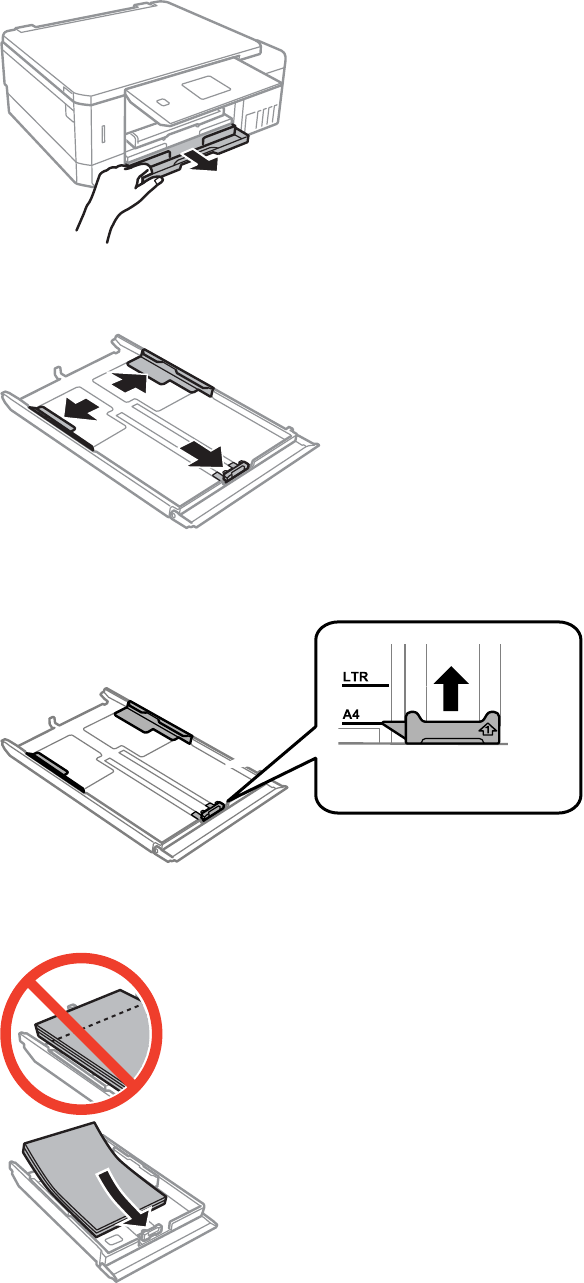
  • formaat 10 x 14,5 cm hoe in casette no 1 plaatsen?
    De printer geeft aan dat er geen papier inzit terwijl ik bovengenoemd formaat ingeladen heb....
    Gesteld op 22-3-2022 om 20:49

    Reageer op deze vraag Misbruik melden
  • Goedemorgen,
    Ik had mijn printer al een tijd niet gebruikt. Nu ben ik aan het zwart-wit printen maar er komen gekleurde afdrukken uit. Eerst in groen/zwart en na spuitkopreiniging (waar kleuren niet allemaal tevoorschijn kwamen) in blauw/zwart.
    Heeft iemand een suggestie wat te doen?
    Groeten van Barbara Gesteld op 7-6-2021 om 11:33

    Reageer op deze vraag Misbruik melden
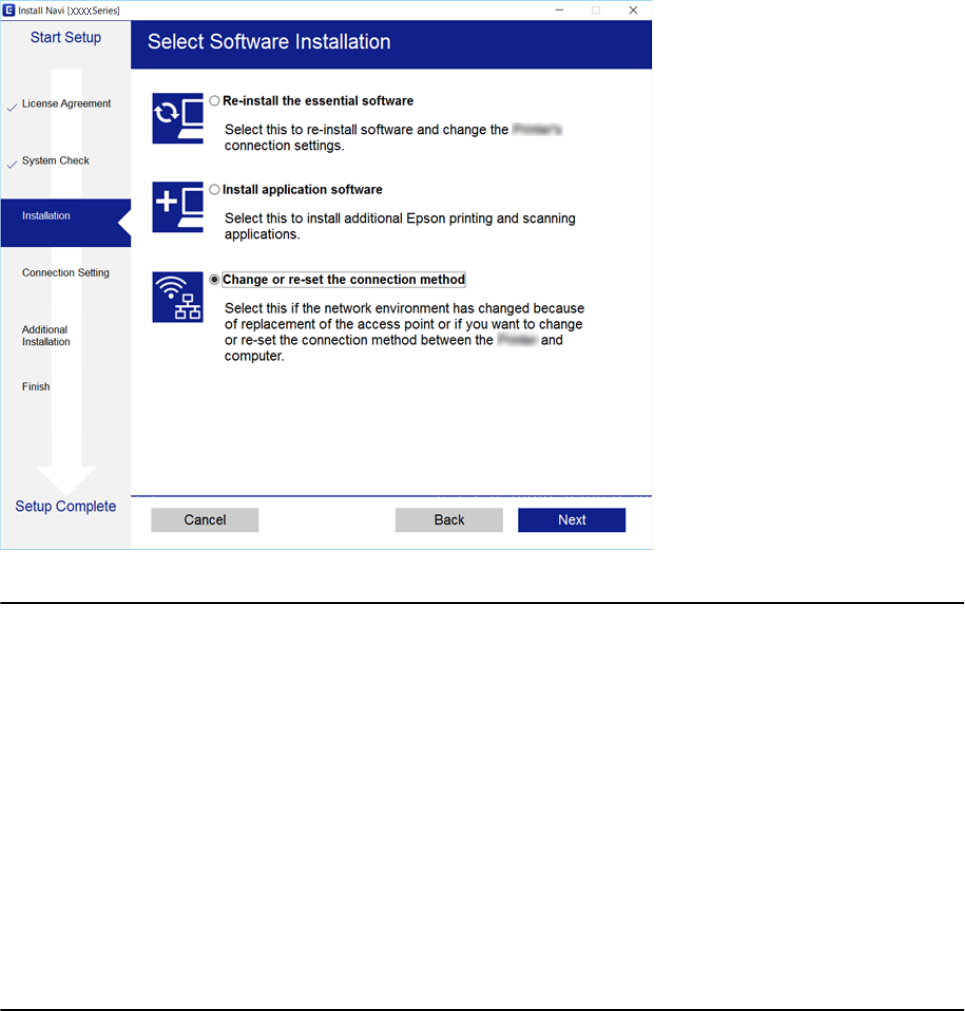
  • ik heb helaas de inkt niet als eerste erin gedaan, hoe start ik de hele installatie opnieuw van een epson ecotank et-7750? Gesteld op 6-5-2021 om 17:58

    Reageer op deze vraag Misbruik melden
  • Probleem: lichtere lijnen van enkele millimeter breed en onregelmatig over de hele afdruk voorkomend.
    Na ondertussen reeds een keer of tien in pakweg 30 dagen een normale reiniging te hebben uitgevoerd en een keer of vijf een uitlijning van de printerkop, drukt de printer even 'redelijk' af (een dag, twee dagen) om daarna te hervallen.
    Is grondige reiniging de oplossing, of is het iets anders? Grondige reiniging kan blijkbaar niet op de printer zelf ingesteld worden? Gesteld op 17-10-2020 om 12:54

    Reageer op deze vraag Misbruik melden
6
  • welke maintenance box voo 7750. waar kan ik die kopen? Gesteld op 6-8-2020 om 15:11

    Reageer op deze vraag Misbruik melden
  • Krijg me printer Epson ET-7700 niet aan de praat. Papier zit steeds vast. Krijg op displaat steeds te zien open uitvoer la. Ik ben nu 3 dagen bezig en heb er genoeg van. Gesteld op 9-7-2020 om 14:50

    Reageer op deze vraag Misbruik melden
  • Heb tijdens installatie van dit produkt verkeerde volgorde aangehouden, eerst installatie en toen inkt gevuld, nu wordt er niets geprint, hoe kan ik ervoor zorgen dat printer opnieuw de inkt inlaadt ? Gesteld op 23-5-2020 om 18:07

    Reageer op deze vraag Misbruik melden
    • Voer een grondige schoonmaak uit, zodoende wordt de inkt "vervangen". Op deze manier zal je printer de inkt vullen en zal deze weer werken. Vermoedelijk zal je het bakje aan de achterkant moeten vervangen voordat je dit kan doen, ook al is deze nog schoon en leeg. Succes
      Geantwoord op 10-10-2020 om 21:02

      Waardeer dit antwoord Misbruik melden
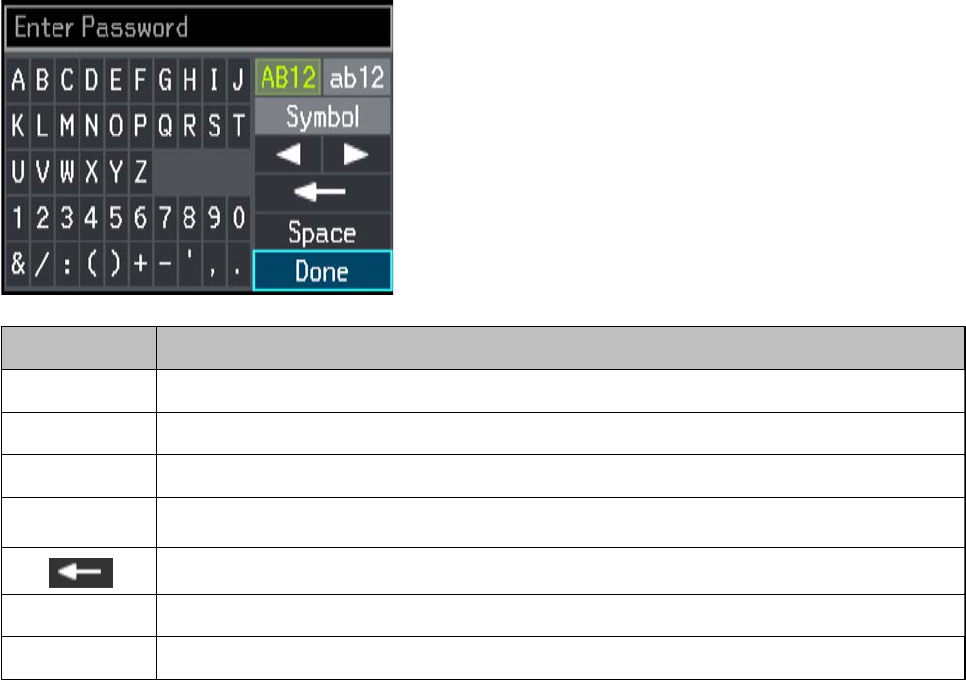
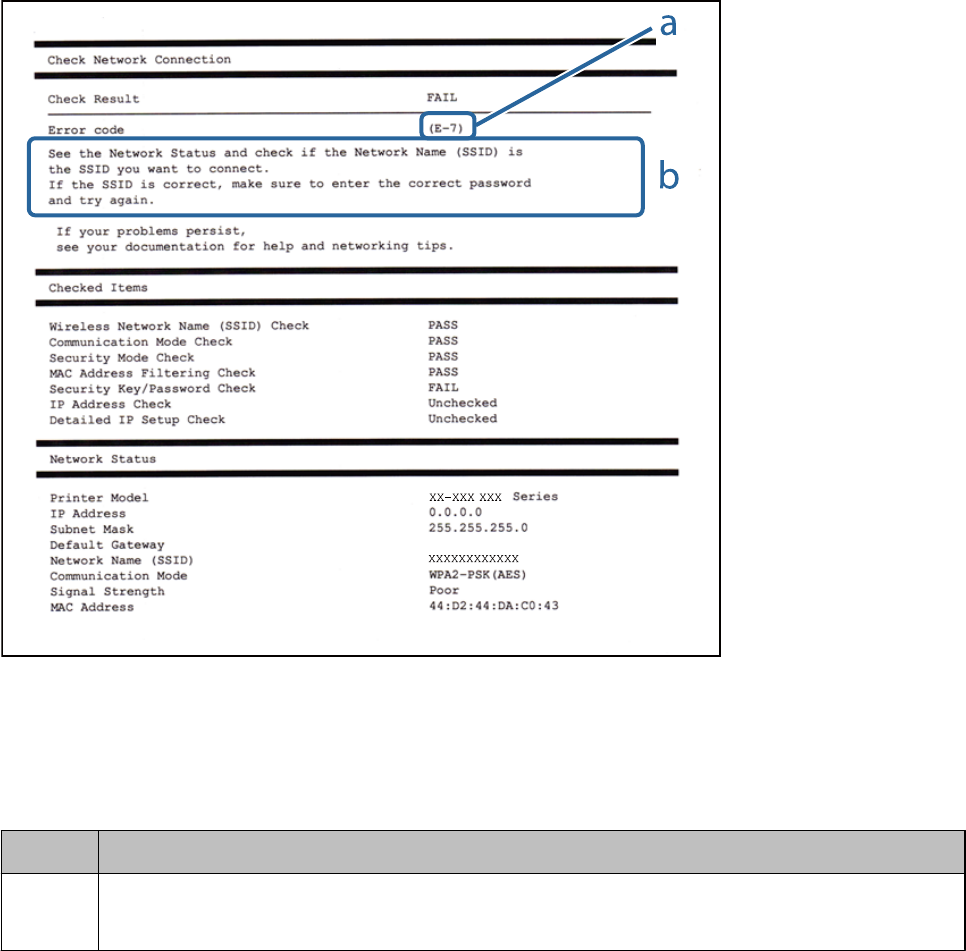
  • Beste mensen, mijn Epson ET-7750 (paar maanden oud) werkte goed via wifi, maar nu ineens niet meer. Hij ontvangt wel het wifi signaal, maar herkent het wactwoord niet als het jjuiste. Ik weet zeker dat het wachtwoord goed is ingevoerd en ook dat de wifi goed werkt, want al mijn andere apparaten in huis werken er gewoon op. Wat kan ik doen? Goede raad zeer welkom! Peter Gesteld op 25-4-2020 om 10:22

    Reageer op deze vraag Misbruik melden
  • Mijn printer (EPSON-7750) zijn status staat op pauze. Ik weet niet hoe ik deze kan wijzigen. Is dit via de computer (Mac iOS) of via het printer toestel zelf?
    Ik heb de printopdracht al verschillende malen hervat via het systheemvoorkeuren > Printers & Scanners > Hervat. Op het printerscherm toont hij dat hij de opdracht aankrijgt maar hij neemt geen papier op uit de lade. Ik heb ook al de lades opnieuw bijgevuld en ingesteld maar dit maakt allemaal geen verschil. Ook bij de wifi instellingen staat hij op het juiste netwerk. Gesteld op 23-3-2020 om 10:53

    Reageer op deze vraag Misbruik melden

Misbruik melden

Gebruikershandleiding.com neemt misbruik van zijn services uitermate serieus. U kunt hieronder aangeven waarom deze vraag ongepast is. Wij controleren de vraag en zonodig wordt deze verwijderd.

Product:

Bijvoorbeeld antisemitische inhoud, racistische inhoud, of materiaal dat gewelddadige fysieke handelingen tot gevolg kan hebben.

Bijvoorbeeld een creditcardnummer, een persoonlijk identificatienummer, of een geheim adres. E-mailadressen en volledige namen worden niet als privégegevens beschouwd.

Spelregels forum

Om tot zinvolle vragen te komen hanteren wij de volgende spelregels:

Belangrijk! Als er een antwoord wordt gegeven op uw vraag, dan is het voor de gever van het antwoord nuttig om te weten als u er wel (of niet) mee geholpen bent! Wij vragen u dus ook te reageren op een antwoord.

Belangrijk! Antwoorden worden ook per e-mail naar abonnees gestuurd. Laat uw emailadres achter op deze site, zodat u op de hoogte blijft. U krijgt dan ook andere vragen en antwoorden te zien.

Abonneren

Abonneer u voor het ontvangen van emails voor uw Epson EcoTank ET-7750 bij:


U ontvangt een email met instructies om u voor één of beide opties in te schrijven.


Ontvang uw handleiding per email

Vul uw emailadres in en ontvang de handleiding van Epson EcoTank ET-7750 in de taal/talen: Engels als bijlage per email.

De handleiding is 6,82 mb groot.


U ontvangt de handleiding per email binnen enkele minuten. Als u geen email heeft ontvangen, dan heeft u waarschijnlijk een verkeerd emailadres ingevuld of is uw mailbox te vol. Daarnaast kan het zijn dat uw internetprovider een maximum heeft aan de grootte per email. Omdat hier een handleiding wordt meegestuurd, kan het voorkomen dat de email groter is dan toegestaan bij uw provider.

Stel vragen via chat aan uw handleiding

Stel uw vraag over deze PDF

Andere handleiding(en) van Epson EcoTank ET-7750

Epson EcoTank ET-7750 Snelstart handleiding - Nederlands - 4 pagina's

Epson EcoTank ET-7750 Gebruiksaanwijzing - Nederlands - 206 pagina's

Epson EcoTank ET-7750 Snelstart handleiding - Deutsch - 4 pagina's

Epson EcoTank ET-7750 Gebruiksaanwijzing - Deutsch - 209 pagina's

Epson EcoTank ET-7750 Snelstart handleiding - English - 4 pagina's

Epson EcoTank ET-7750 Gebruiksaanwijzing - Français - 218 pagina's

Epson EcoTank ET-7750 Snelstart handleiding - Français - 4 pagina's


Uw handleiding is per email verstuurd. Controleer uw email

Als u niet binnen een kwartier uw email met handleiding ontvangen heeft, kan het zijn dat u een verkeerd emailadres heeft ingevuld of dat uw emailprovider een maximum grootte per email heeft ingesteld die kleiner is dan de grootte van de handleiding.

Er is een email naar u verstuurd om uw inschrijving definitief te maken.

Controleer uw email en volg de aanwijzingen op om uw inschrijving definitief te maken

U heeft geen emailadres opgegeven

Als u de handleiding per email wilt ontvangen, vul dan een geldig emailadres in.

Uw vraag is op deze pagina toegevoegd

Wilt u een email ontvangen bij een antwoord en/of nieuwe vragen? Vul dan hier uw emailadres in.


Info