675269
147
Verklein
Vergroot
Pagina terug
1/149
Pagina verder
User's Guide
NPD5927-02 EN
Contents
About This Manual
Introduction to the Manuals...................6
Using the Manual to Search for Information. . . . . . . 6
Marks and Symbols.........................8
Descriptions Used in this Manual...............8
Operating System References..................8
Important Instructions
Safety Instructions.........................10
Safety Instructions for Ink................. 10
Printer Advisories and Warnings.............. 11
Advisories and Warnings for Setting Up the
Printer................................11
Advisories and Warnings for Using the Printer. . 11
Advisories and Warnings for Transporting or
Storing the Printer.......................12
Advisories and Warnings for Using the
Printer with a Wireless Connection...........12
Protecting Your Personal Information...........12
Printer Basics
Part Names and Functions...................13
Control Panel............................ 15
Buttons and Functions....................15
Lights and Printer Status.................. 16
Network Settings
Network Connection Types.................. 19
Wi-Fi Connection....................... 19
Wi-Fi Direct (Simple AP) Connection.........19
Connecting to a Computer...................20
Connecting to a Smart Device................ 21
Making Wi-Fi Settings from the Printer..........21
Making Wi-Fi Settings by Push Button Setup. . . . 22
Making Wi-Fi Settings by PIN Code Setup
(WPS)................................23
Making Wi-Fi Direct (Simple AP)
Connection Settings......................24
Checking the Network Connection Status........25
Checking the Network Status Using Network
Light.................................25
Printing a Network Connection Report........25
Printing a Network Status Sheet...............31
Replacing or Adding New Wireless Routers.......31
Changing the Connection Method to a Computer. . 32
Restoring the Network Settings from the
Control Panel............................ 32
Preparing the Printer
Loading Papers........................... 34
Available Paper and Capacities..............34
Loading Paper in the Rear Paper Feed.........36
Loading Envelopes and Precautions.......... 38
Loading Long Papers.....................39
List of Paper Type....................... 39
Placing Originals on the Scanner Glass. . . . . . . . . . 39
Placing Multiple Photos for Scanning at the
Same Time.............................40
Saving Power.............................41
Saving Power - Windows.................. 41
Saving Power - Mac OS................... 42
Printing
Printing from the Printer Driver on Windows. . . . . 43
Accessing the Printer Driver................43
Printing Basics..........................43
Printing on 2-Sides.......................45
Printing Several Pages on One Sheet..........46
Printing and Stacking in Page Order (Reverse
Order Printing).........................46
Printing a Reduced or Enlarged Document.....47
Printing One Image on Multiple Sheets for
Enlargement (Creating a Poster).............48
Printing with a Header and Footer...........54
Printing a Watermark.....................55
Printing Multiple Files Together.............55
Printing Using the Color Universal Print
Feature...............................56
Adjusting the Print Color..................57
Printing to Emphasize
in
Lines............57
Printing Clear Bar Codes..................58
Canceling Printing.......................58
Menu Options for the Printer Driver..........59
Printing from the Printer Driver on Mac OS......61
Printing Basics..........................61
Printing Several Pages on One Sheet..........63
Printing and Stacking in Page Order (Reverse
Order Printing).........................63
Printing a Reduced or Enlarged Document.....64
Adjusting the Print Color..................65
User's Guide
Contents
2
Canceling Printing.......................65
Menu Options for the Printer Driver..........65
Making Operation Settings for the Mac OS
Printer Driver..........................67
Printing from Smart Devices................. 68
Using Epson iPrint.......................68
Using Epson Print Enabler.................69
Canceling the Ongoing Job...................70
Copying
Copying Basics........................... 71
Making Multiple Copies.....................71
Scanning
Scanning from the Control Panel.............. 72
Scanning from a Computer...................72
Scanning Using Epson Scan 2...............72
Scanning from Smart Devices.................79
Installing Epson iPrint....................79
Scanning Using Epson iPrint............... 79
Relling Ink
Checking the Ink Levels.....................81
Ink Bottle Codes..........................81
Ink Bottle Handling Precautions...............82
Relling the Ink Tanks......................83
Maintaining the Printer
Checking and Cleaning the Print Head..........87
Checking and Cleaning the Print Head -
Printer Buttons......................... 87
Checking and Cleaning the Print Head -
Windows..............................88
Checking and Cleaning the Print Head - Mac
OS...................................88
Running Power Cleaning....................89
Running Power Cleaning - Windows..........89
Running Power Cleaning - Mac OS...........90
Aligning the Print Head.....................90
Aligning the Print Head - Windows...........90
Aligning the Print Head - Mac OS............90
Cleaning the Paper Path.....................91
Cleaning the Paper Path for Ink Smears........91
Cleaning the Scanner Glass...................91
Checking the Total Number of Pages Fed
rough the Printer........................92
Checking the Total Number of Pages Fed
rough
the Printer - Printer Buttons.........92
Checking the Total Number of Pages Fed
rough the Printer - Windows............. 92
Checking the Total Number of Pages Fed
rough the Printer - Mac OS...............92
Network Service and Software
Information
Application for Conguring Printer Operations
(Web
Cong
).............................94
Running Web Cong on a Web Browser. . . . . . . 94
Running Web Cong on Windows........... 95
Running Web Cong on Mac OS............ 95
Application for Scanning Documents and
Images (Epson Scan 2)......................95
Adding the Network Scanner...............96
Application for Conguring Scanning
Operations from the Control Panel (Epson
Event Manager)...........................96
Application for Laying Out Photos (Epson Easy
Photo Print)..............................97
Application for Printing Web Pages (E-Web
Print)(for Windows Only)................... 98
Application for Scanning and Transferring
Images (Easy Photo Scan)....................98
Soware Update Tools (EPSON Soware
Updater)................................99
Application for Conguring Multiple Devices
(EpsonNet Cong).........................99
Installing the Latest Applications..............100
Updating Applications and Firmware.......... 101
Uninstalling Applications...................101
Uninstalling Applications - Windows.........101
Uninstalling Applications - Mac OS..........102
Printing Using a Network Service.............103
Solving Problems
Checking the Printer Status..................104
Lights and Printer Status..................104
Checking the Printer Status - Windows.......106
Checking the Printer Status - Mac OS........106
Checking the Soware Status. . . . . . . . . . . . . . . . 107
Removing Jammed Paper...................107
Removing Jammed Paper from the Rear
Paper Feed............................107
Removing Jammed Paper from Inside the
Printer...............................107
User's Guide
Contents
3
Paper Jam Error Is Not Cleared.............109
Paper Does Not Feed Correctly. . . . . . . . . . . . . . . 109
Paper Jams............................109
Paper Feeds at a Slant....................110
Several Sheets of Paper are Fed at a Time. . . . . . 110
Paper Out Error Occurs..................110
Power and Control Panel Problems............110
Power Does Not Turn On.................110
Power Does Not Turn O.................110
Power Turns O Automatically.............110
Cannot Print from a Computer...............111
Checking the Connection (USB)............111
Checking the Connection (Network).........111
Checking the
Soware
and Data............112
Checking the Printer Status from the
Computer (Windows)....................114
Checking the Printer Status from the
Computer (Mac OS).....................114
When You Cannot Make Network Settings...... 115
Cannot Connect from Devices Even
ough
Network Settings are No Problems.......... 115
When You Cannot Connect Using Wi-Fi
Direct (Simple AP) Connection............ 117
Checking the SSID Connected to the Printer. . . 118
Checking the SSID for the Computer.........119
Printout Problems........................120
Printout is Scued or Color is Missing........120
Banding or Unexpected Colors Appear.......120
Colored Banding Appears at Intervals of
Approximately 2.5 cm....................120
Blurry Prints, Vertical Banding, or
Misalignment..........................121
Print Quality is Poor.....................121
Paper Is Smeared or Scued...............122
Printed Photos are Sticky.................123
Images or Photos are Printed in Unexpected
Colors...............................123
Cannot Print Without Margins.............123
Edges of the Image are Cropped During
Borderless Printing......................124
e Position, Size, or Margins of the Printout
Are Incorrect..........................124
Printed Characters Are Incorrect or Garbled. . . 124
e
Printed Image Is Inverted..............124
Mosaic-Like Patterns in the Prints...........125
Uneven Colors, Smears, Dots, or Straight
Lines Appear in the Copied Image...........125
Moiré (Cross-Hatch) Patterns Appear in the
Copied Image......................... 125
Banding Appears on the Copied Image.......125
An Image of the Reverse Side of the Original
Appears in the Copied Image.............. 125
e Printout Problem Could Not be Cleared. . . 125
Other Printing Problems................... 126
Printing Is Too Slow.....................126
Printing or Copying Slows Down
Dramatically During Continuous Operation. . . 126
Cannot Start Scanning.....................126
Cannot Start Scanning when Using the
Control Panel..........................127
Scanned Image Problems...................127
Uneven Colors, Dirt, Spots, and so on Appear
when Scanning from the Scanner Glass.......127
e Image Quality Is Rough...............128
Oset
Appears in the Background of Images. . . 128
Text is Blurred.........................128
Moiré Patterns (Web-Like Shadows) Appear. . . 129
Cannot Scan the Correct Area on the
Scanner Glass..........................129
Cannot Preview inumbnail............. 129
Text is Not Recognized Correctly when
Saving as a Searchable PDF................130
Cannot Solve Problems in the Scanned Image. . 130
Other Scanning Problems...................131
Scanning Is Too Slow....................131
Scanning Slows Down Dramatically During
Continuous Scanning....................131
Scanning Stops when Scanning to PDF/
Multi-TIFF........................... 131
Other Problems..........................131
Slight Electric Shock when Touching the
Printer...............................131
Operation Sounds Are Loud...............132
Application Is Blocked by a Firewall (for
Windows Only)........................132
Ink Spilled............................132
Appendix
Technical Specications....................133
Printer Specications....................133
Scanner Specications...................134
Interface Specications...................134
Network Function List...................135
Wi-Fi Specications.....................135
Security Protocol.......................136
Supported ird Party Services.............136
Dimensions...........................136
Electrical Specications..................136
Environmental Specications..............137
System Requirements....................137
User's Guide
Contents
4
Regulatory Information....................138
Standards and Approvals................. 138
Restrictions on Copying..................138
Transporting and Storing the Printer...........139
Copyright.............................. 141
Trademarks.............................141
Where to Get Help........................142
Technical Support Web Site................142
Contacting Epson Support................143
User's Guide
Contents
5
About This Manual
Introduction to the Manuals
e following manuals are supplied with your Epson printer. As well as the manuals, see the help included in the
various Epson soware applications.
Start Here (paper manual)
Provides you with information on setting up the printer, installing the soware, and so on.
Quick Guide (paper manual)
Provides you with instructions to ensure the safe use of this printer, and basic information on using the printer,
solving problems, and so on.
User's Guide (digital manual)
is manual. Provides overall information and instructions on using the printer, on network settings when
using the printer on a network, and on solving problems.
You can obtain the latest versions of the above manuals with the following methods.
Paper manual
Visit the Epson Europe support website at http://www.epson.eu/Support, or the Epson worldwide support
website at http://support.epson.net/.
Digital manual
Start EPSON Soware Updater on your computer. EPSON Soware Updater checks for available updates of
Epson soware applications and the digital manuals, and allows you to download the latest ones.
Related Information
& “Soware Update Tools (EPSON Soware Updater)” on page 99
Using the Manual to Search for Information
e PDF manual allows you to search for information you are looking for by keyword, or jump directly to specic
sections using the bookmarks. You can also print only the pages you need. is section explains how to use a PDF
manual that has been opened in Adobe Reader X on your computer.
User's Guide
About This Manual
6
Searching by keyword
Click Edit > Advanced Search. Enter the keyword (text) for information you want to nd in the search window,
and then click Search. Hits are displayed as a list. Click one of the displayed hits to jump to that page.
Jumping directly from bookmarks
Click a title to jump to that page. Click + or > to view the lower level titles in that section. To return to the previous
page, perform the following operation on your keyboard.
Wi nd ow s: Hol d do wn Alt, and then press .
Mac OS: Hold down the command key, and then press .
Printing only the pages you need
You can extract and print only the pages you need. Click Print in the File menu, and then specify the pages you
want to print in Pages in Pages to Print.
To specify a series of pages, enter a hyphen between the start page and the end page.
Example: 20-25
To specify pages that are not in series, divide the pages with commas.
Example: 5, 10, 15
User's Guide
About This Manual
7
Marks and Symbols
!
Caution:
Instructions that must be followed carefully to avoid bodily injury.
c
Important:
Instructions that must be observed to avoid damage to your equipment.
Note:
Provides complementary and reference information.
&
Related Information
Links to related sections.
Descriptions Used in this Manual
Screenshots of the printer driver and the Epson Scan 2 (scanner driver) screens are from Windows 10 or macOS
High Sierra. e content displayed on the screens varies depending on the model and situation.
Illustrations of the printer used in this manual are examples only. Although there may be slight dierences
depending on the model, the method of operation is the same.
Operating System References
Windows
In this manual, terms such as "Windows 10", "Windows 8.1", "Windows 8", "Windows 7", "Windows Vista",
"Windows XP", "Windows Server 2016", "Windows Server 2012 R2", "Windows Server 2012", "Windows Server 2008
R2", "Windows Server 2008", "Windows Server 2003 R2", and "Windows Server 2003" refer to the following
operating systems. Additionally, "Windows" is used to refer to all versions.
Microso
®
Wi nd ow s
®
10 operating system
Microso
®
Wi nd ow s
®
8.1 operating system
Microso
®
Wi nd ow s
®
8 operating system
Microso
®
Wi nd ow s
®
7 operating system
Microso
®
Wi nd ow s Vi st a
®
operating system
Microso
®
Wi nd ow s
®
XP operating system
Microso
®
Wi nd ow s
®
XP Professional x64 Edition operating system
Microso
®
Wi nd ow s S e r ve r
®
2016 operating system
Microso
®
Wi nd ow s S e r ve r
®
2012 R2 operating system
Microso
®
Wi nd ow s S e r ve r
®
2012 operating system
Microso
®
Wi nd ow s S e r ve r
®
2008 R2 operating system
User's Guide
About This Manual
8
Microso
®
Wi nd ow s S e r ve r
®
2008 operating system
Microso
®
Wi nd ow s S e r ve r
®
2003 R2 operating system
Microso
®
Wi nd ow s S e r ve r
®
2003 operating system
Mac OS
In this manual, "Mac OS" is used to refer to macOS High Sierra, macOS Sierra, OS X El Capitan, OS X Yosemite,
OS X Mavericks, OS X Mountain Lion, Mac OS X v10.7.x, and Mac OS X v10.6.8.
User's Guide
About This Manual
9
Important Instructions
Safety Instructions
Read and follow these instructions to ensure safe use of this printer. Make sure you keep this manual for future
reference. Also, be sure to follow all warnings and instructions marked on the printer.
Some of the symbols used on your printer are to ensure safety and proper use of the printer. Visit the following
Web site to learn the meaning of the symbols.
http://support.epson.net/symbols
Use only the power cord supplied with the printer and do not use the cord with any other equipment. Use of
other cords with this printer or the use of the supplied power cord with other equipment may result in re or
electric shock.
Be sure your AC power cord meets the relevant local safety standard.
Never disassemble, modify, or attempt to repair the power cord, plug, printer unit, or options by yourself, except
as specically explained in the printer's manuals.
Unplug the printer and refer servicing to qualied service personnel under the following conditions:
e power cord or plug is damaged; liquid has entered the printer; the printer has been dropped or the casing
damaged; the printer does not operate normally or exhibits a distinct change in performance. Do not adjust
controls that are not covered by the operating instructions.
Place the printer near a wall outlet where the plug can be easily unplugged.
Do not place or store the printer outdoors, near excessive dirt or dust, water, heat sources, or in locations
subject to shocks, vibrations, high temperature or humidity.
Take care not to spill liquid on the printer and not to handle the printer with wet hands.
Keep the printer at least 22 cm away from cardiac pacemakers. Radio waves from this printer may adversely
aect the operation of cardiac pacemakers.
Safety Instructions for Ink
Be careful not to touch any ink when you handle the ink tanks, ink tank caps, and opened ink bottles or ink
bottle caps.
If ink gets on your skin, wash the area thoroughly with soap and water.
If ink gets into your eyes, ush them immediately with water. If discomfort or vision problems continue aer
a thorough ushing, see a doctor immediately.
If ink gets into your mouth, see a doctor right away.
Do not shake an ink bottle too vigorously or subject it to strong impacts as this can cause ink to leak.
Keep ink bottles and the ink tank unit out of the reach of children. Do not allow children to drink from or
handle the ink bottles and ink bottle cap.
User's Guide
Important Instructions
10
Printer Advisories and Warnings
Read and follow these instructions to avoid damaging the printer or your property. Make sure you keep this
manual for future reference.
Advisories and Warnings for Setting Up the Printer
Do not block or cover the vents and openings in the printer.
Use only the type of power source indicated on the printer's label.
Avoid using outlets on the same circuit as photocopiers or air control systems that regularly switch on and o.
Avoid electrical outlets controlled by wall switches or automatic timers.
Keep the entire computer system away from potential sources of electromagnetic interference, such as
loudspeakers or the base units of cordless telephones.
e power-supply cords should be placed to avoid abrasions, cuts, fraying, crimping, and kinking. Do not place
objects on top of the power-supply cords and do not allow the power-supply cords to be stepped on or run over.
Be particularly careful to keep all the power-supply cords straight at the ends and the points where they enter
and leave the transformer.
If you use an extension cord with the printer, make sure that the total ampere rating of the devices plugged into
the extension cord does not exceed the cord's ampere rating. Also, make sure that the total ampere rating of all
devices plugged into the wall outlet does not exceed the wall outlet's ampere rating.
If you plan to use the printer in Germany, the building installation must be protected by a 10 or 16 amp circuit
breaker to provide adequate short-circuit protection and over-current protection for the printer.
When connecting the printer to a computer or other device with a cable, ensure the correct orientation of the
connectors. Each connector has only one correct orientation. Inserting a connector in the wrong orientation
may damage both devices connected by the cable.
Place the printer on a
at,
stable surface that extends beyond the base of the printer in all directions.
e
printer
will not operate properly if it is tilted at an angle.
Allow space above the printer so that you can fully raise the document cover.
Leave enough space in front of the printer for the paper to be fully ejected.
Avoid places subject to rapid changes in temperature and humidity. Also, keep the printer away from direct
sunlight, strong light, or heat sources.
Advisories and Warnings for Using the Printer
Do not insert objects through the slots in the printer.
Do not put your hand inside the printer during printing.
Do not touch the white at cable and ink tubes inside the printer.
Do not use aerosol products that contain ammable gases inside or around the printer. Doing so may cause re.
Do not move the print head by hand; otherwise, you may damage the printer.
Be careful not to trap your ngers when closing the document cover.
Do not press too hard on the scanner glass when placing the originals.
User's Guide
Important Instructions
11
If any of the ink tanks are not lled up to the lower line, rell the ink soon. Prolonged use of the printer when
the ink level is below the lower line could damage the printer.
Always turn the printer
o
using the
P
button. Do not unplug the printer or turn
o
the power at the outlet
until the
P
light stops ashing.
If you are not going to use the printer for a long period, be sure to unplug the power cord from the electrical
outlet.
Advisories and Warnings for Transporting or Storing the Printer
When storing or transporting the printer, avoid tilting it, placing it vertically, or turning it upside down;
otherwise ink may leak.
Before transporting the printer, make sure that the print head is in the home (far right) position.
Advisories and Warnings for Using the Printer with a Wireless
Connection
Radio waves from this printer may negatively
aect
the operation of medical electronic equipment, causing
them to malfunction. When using this printer inside medical facilities or near medical equipment, follow
directions from the authorized personnel representing the medical facilities, and follow all posted warnings and
directions on the medical equipment.
Radio waves from this printer may negatively aect the operation of automatically controlled devices such as
automatic doors or re alarms, and could lead to accidents due to malfunction. When using this printer near
automatically controlled devices, follow all posted warnings and directions on these devices.
Protecting Your Personal Information
If you give the printer to someone else or dispose of it, restore the default network settings.
Related Information
& Buttons and Functions” on page 15
User's Guide
Important Instructions
12
Printer Basics
Part Names and Functions
A
Rear paper feed Loads paper.
B
Paper support Supports loaded paper.
C
Edge guides Feeds the paper straight into the printer. Slide to the edges of the paper.
D
Feeder guard Prevents foreign substance from entering the printer.
Usually keep this guard closed.
E
Output tray Holds the ejected paper.
A
Document cover Blocks external light while scanning.
B
Scanner glass Place the originals.
C
Control panel Allows you to operate the printer and indicates the printer's status.
User's Guide
Printer Basics
13
A
Front cover Open when removing jammed paper inside the printer.
B
Ink reservoir tank (Ink tank) Supplies ink to the print head.
C
Ink tank unit Contains the ink tanks.
D
Ink tank cover Open to rell the ink tank.
E
Print head Ink is ejected from the print head nozzles underneath.
A
AC inlet Connects the power cord.
B
USB port Connects a USB cable to connect with a computer.
User's Guide
Printer Basics
14
Control Panel
Buttons and Functions
A
Turns the printer on or o.
Unplug the power cord after checking that the power light is o.
B
When a network error occurs, pressing this button cancels the error. Hold this button down for more than ve
seconds to perform Wi-Fi auto setup using the WPS push button.
C
Prints a network connection report allowing you to determine the causes of any problems you may have using the
printer on a network. If you need more detailed network settings and connection status, hold this button down for
at least seven seconds to print a network status sheet.
D
Starts monochrome copying on A4 size plain paper. To increase the number of copies (by up to 20 copies), press
this button within one second intervals.
E
Starts color copying on A4 size plain paper. To increase the number of copies (by up to 20 copies), press this
button within one second intervals.
F
Stops the current operation.
Hold this button down for ve seconds until the
P
button ashes to run print head cleaning.
Functions of Button Combinations
Additional functions are available with
dierent
combinations of buttons.
+
Scan to Computer
Press the and buttons simultaneously to run software on a USB-connected
computer and scan as a PDF le.
+ or
Copy in Draft Mode
Press the
y
and the or buttons simultaneously to copy in draft mode.
+
PIN Code Setup (WPS)
Hold down the
and buttons simultaneously to start PIN Code Setup (WPS).
+
Wi-Fi Direct (Simple AP) Setup
Hold down the
and buttons simultaneously to start Wi-Fi Direct (Simple AP) Setup.
User's Guide
Printer Basics
15
+
Restore Default Network Settings
Turn the printer on while holding down the
button to restore the default network
settings. When the network settings are restored, the printer turns on and the network status
lights ash alternately.
+
Print Nozzle Check Pattern
Turn the printer on while holding down the
y
button to print the nozzle check pattern.
Lights and Printer Status
Lights on the control panel indicates the status of the printer.
Normal Status
: On
Light Status
The printer is connected to a wireless (Wi-Fi) network.
The printer is connected to a network in Wi-Fi Direct (Simple AP) mode.
Error Status
When an error occurs, the light turns on or ashes. Details of the error are displayed on the computer screen.
/ : On
/ : Flashing
Light Status Solutions
Wi-Fi connection error has occurred. Press the button to clear the error and try again.
Initial ink charging may not be complete. See the Start Here poster to complete initial ink
charging.
No paper is loaded or more than one sheet
has been fed at a time.
Load paper and press the
or button.
User's Guide
Printer Basics
16
Light Status Solutions
A paper jam has occurred.
Remove the paper and press the
or
button.
If the paper jam error continues after removing the
paper and turning the power o and on again, paper
may remain inside the printer. Load A4 size paper in
the rear paper feed, and then press the
or
button to remove the paper inside. Load paper
in the portrait direction.
If the error cannot be cleared, contact Epson support.
The printer was not turned o correctly.*
Because the printer was turned o while
operating, the nozzles may have dried
and clogged.
* The power was turned o with a power
strip or breaker, the plug was pulled out of
the outlet, or an electrical failure occurred.
After clearing the error by pressing the
or
button, we recommend performing a nozzle
check. Cancel any pending print jobs.
To turn o the printer, make sure you press the
P
button.
When the
B
light and the
b
light ash
simultaneously
An ink pad is nearing or at the end of its
service life.
The ink pads need to be replaced.
Contact Epson or an authorised Epson service
provider to replace the ink pad
*1
. It is not a user-
serviceable part.
When a message saying that you can continue
printing is displayed on the computer, press the
or button to continue printing. The lights
stop ashing for the time being, however, they will
continue to ash at regular intervals until the ink pad
is replaced.
When the
B
light and the
b
light ash
alternately
A borderless printing ink pad is nearing or at
the end of its service life.
The borderless printing ink pad need to be replaced.
Contact Epson or an authorised Epson service
provider to replace the ink pad
*1
. It is not a user-
serviceable part.
When a message saying that you can continue
printing is displayed on the computer, press the
or button to continue printing. The lights
stop ashing for the time being, however, they will
continue to ash at regular intervals until the ink pad
is replaced.
Borderless printing is not available, but printing with
a border is available.
The printer has started in recovery mode
because the
rmware
update failed.
Follow the steps below to try to update the rmware
again.
1. Connect the computer and the printer with a USB
cable. (During recovery mode, you cannot update the
rmware over a network connection.)
2. Visit your local Epson website for further
instructions.
User's Guide
Printer Basics
17
Light Status Solutions
A printer error has occurred. Open the front cover and remove any paper inside
the printer. Turn the power
o
and on again.
If the error continues to occur after turning the power
o and on again, contact Epson support.
*1 In some print cycles a very small amount of surplus ink may be collected in the ink pad. To prevent ink leakage
from the pad, the printer is designed to stop printing when the pad has reached its limit. Whether and how oen
this is required will vary according to the number of pages you print, the type of material that you print and the
number of cleaning cycles that the printer performs. e need for replacement of the pad does not mean that your
printer has ceased to operate in accordance with its specications. e printer will advise you when the pad
requires replacing and this can only be performed by an authorised Epson Service provider. e Epson warranty
does not cover the cost of this replacement.
Related Information
& “Removing Jammed Paper” on page 107
& Contacting Epson Support” on page 143
& “Installing the Latest Applications” on page 100
User's Guide
Printer Basics
18
Network Settings
Network Connection Types
You can use the following connection methods.
Wi-Fi Connection
Connect the printer and the computer or smart device to the wireless router. is is the typical connection method
for home or oce networks where computers are connected by Wi-Fi through the wireless router.
Related Information
&
“Connecting to a Computer” on page 20
&
“Connecting to a Smart Device” on page 21
& “Making Wi-Fi Settings from the Printer” on page 21
Wi-Fi Direct (Simple AP) Connection
Use this connection method when you are not using Wi-Fi at home or at the oce, or when you want to connect
the printer and the computer or smart device directly. In this mode, the printer acts as an wireless router and you
User's Guide
Network Settings
19
can connect the devices to the printer without having to use a standard wireless router. However, devices directly
connected to the printer cannot communicate with each other through the printer.
e printer can be connected by Wi-Fi and Wi-Fi Direct (Simple AP) connection simultaneously. However, if you
start a network connection in Wi-Fi Direct (Simple AP) connection when the printer is connected by Wi-Fi, the
Wi-Fi is temporarily disconnected.
Related Information
& “Making Wi-Fi Direct (Simple AP) Connection Settings” on page 24
Connecting to a Computer
We recommend using the installer to connect the printer to a computer. You can run the installer using one of the
following methods.
Setting up from the website
Access the following website, and then enter the product name. Go to Setup, and then start setting up.
http://epson.sn
Setting up using the soware disc (only for the models that come with a soware disc and users with Windows
computers with disc drives.)
Insert the soware disc into the computer, and then follow the on-screen instructions.
Selecting the Connection Methods
Follow the on-screen instructions until the following screen is displayed, and then select the connection method of
the printer to the computer.
User's Guide
Network Settings
20
Select the connection type and then click Next.
Follow the on-screen instructions.
Connecting to a Smart Device
You can use the printer from a smart device when you connect the printer to the same Wi-Fi network (SSID) as the
smart device. To use the printer from a smart device, set up from the following website. Access to the website from
the smart device that you want to connect to the printer.
http://epson.sn > Setup
Note:
If you want to connect a computer and a smart device to the printer at the same time, we recommend connecting the
computer
rst.
Making Wi-Fi Settings from the Printer
You can make network settings from the printer's control panel in several ways. Choose the connection method
that matches the environment and conditions that you are using.
If the wireless router supports WPS, you can make settings by using push button setup.
Aer
connecting the printer to the network, connect to the printer from the device that you want to use (computer,
smart device, tablet, and so on.)
Related Information
& “Making Wi-Fi Settings by Push Button Setup” on page 22
& “Making Wi-Fi Settings by PIN Code Setup (WPS)” on page 23
& “Making Wi-Fi Direct (Simple AP) Connection Settings” on page 24
User's Guide
Network Settings
21
Making Wi-Fi Settings by Push Button Setup
You can automatically set up a Wi-Fi network by pressing a button on the wireless router. If the following
conditions are met, you can set up by using this method.
e wireless router is compatible with WPS (Wi-Fi Protected Setup).
e current Wi-Fi connection was established by pressing a button on the wireless router.
Note:
If you cannot nd the button or you are setting up using the soware, see the documentation provided with the wireless
router.
1. Hold down the [WPS] button on the wireless router until the security light ashes.
If you do not know where the [WPS] button is, or there are no buttons on the wireless router, see the
documentation provided with your wireless router for details.
2. Press the
button on the printer until the light and the light ash alternately (approximately
ve
seconds).
e connection setting will start. When a connection is established, the
light turns on.
Note:
e printer is in a connection error status when the
light and the light ash simultaneously. Aer clearing
the printer error by pressing the
button on the printer, reboot the wireless router, place it close to the printer and try
again. If it still does not work, print a network connection report and check the solution.
Related Information
&
“Checking the Network Connection Status” on page 25
User's Guide
Network Settings
22
& Printing a Network Connection Report” on page 25
& When You Cannot Make Network Settings” on page 115
Making Wi-Fi Settings by PIN Code Setup (WPS)
You can connect to an wireless router by using a PIN code that is printed on the network status sheet. You can use
this method to set up if an wireless router is capable of WPS (Wi-Fi Protected Setup). Use a computer to enter a
PIN code into the wireless router.
1.
Load papers.
2. Hold down the
button on the printer for at least seven seconds.
e network status sheet is printed.
Note:
If you release the
button within seven seconds, a network connection report is printed. Note that PIN code
information is not printed on this report.
3. While holding down the button, press the button until the light and the light
ash
alternately.
4. Use your computer to enter the PIN code (an eight digit number) printed on [WPS-PIN Code] column of the
network status sheet into the wireless router within two minutes.
When a connection is established, the
light turns on.
Note:
See the documentation provided with your wireless router for details on entering a PIN code.
e printer is in a connection error status when the
light and the light ash simultaneously. Aer
clearing the printer error by pressing the
button on the printer, reboot the wireless router, place it close to the
printer and try again. If it still does not work, print a network connection report and check the solution.
Related Information
& “Printing a Network Status Sheet” on page 31
& Checking the Network Connection Status” on page 25
& Printing a Network Connection Report” on page 25
& When You Cannot Make Network Settings” on page 115
User's Guide
Network Settings
23
Making Wi-Fi Direct (Simple AP) Connection Settings
is method allows you to connect the printer directly to devices without a wireless router. e printer acts as a
wireless router.
1. While holding down the
button, press the button until the light and the light
ash
alternately.
Wait until the process ends.
When a connection is established, the
light turns on.
Note:
If you enable Wi-Fi Direct once, it remains enabled unless you restore the default network settings.
2. Load papers.
3. Hold down the
button on the printer for at least seven seconds.
e network status sheet is printed. You can check the SSID and Password for Wi-Fi Direct (Simple AP) on
this sheet.
Note:
If you release the
button within seven seconds, a network connection report is printed. Note that the SSID and
Password for Wi-Fi Direct (Simple AP) are not printed on this report.
4. On the computer's network connection screen or the smart device's Wi-Fi screen, select the same SSID shown
on the network status sheet to connect.
5. Enter the password printed on the network status sheet into the computer or smart device.
You ca n
conrm
the status of Wi-Fi Direct on the network status sheet.
User's Guide
Network Settings
24
Note:
When you connect from a smart device using Wi-Fi Direct connection (for Android)
When you are using an Android device and connect to the printer using Wi-Fi Direct, the
light and light ash
simultaneously on the printer.
Press the
button to allow the connection request.
Press the
button if you want to reject the connection request.
See Tips on the following website for more details.
http://epson.sn > Support
Related Information
& “Printing a Network Status Sheet” on page 31
& Checking the Network Connection Status” on page 25
& “When You Cannot Connect Using Wi-Fi Direct (Simple AP) Connection” on page 117
Checking the Network Connection Status
You can check the network connection status in the following way.
Checking the Network Status Using Network Light
You can check the network connection status using the network light on the printer’s control panel.
Related Information
& “Lights and Printer Status” on page 16
Printing a Network Connection Report
You can print a network connection report to check the status between the printer and the wireless router.
1. Load papers.
2. Press the
button.
e network connection report is printed.
Related Information
& Messages and Solutions on the Network Connection Report” on page 26
User's Guide
Network Settings
25
Messages and Solutions on the Network Connection Report
Check the messages and error codes on the network connection report, and then follow the solutions.
a. Error code
b. Messages on the Network Environment
Related Information
& “E-2, E-3, E-7” on page 27
& “E-5” on page 28
& “E-6” on page 28
& “E-8” on page 28
& “E-9” on page 29
& “E-10” on page 29
& “E-11” on page 29
& “E-12” on page 30
& “E-12” on page 30
& “Message on the Network Environment” on page 31
User's Guide
Network Settings
26
E-1
Solutions:
Make sure the Ethernet cable is securely connected to your printer and to your hub or other network device.
Make sure your hub or other network device is turned on.
If you want to connect the printer by Wi-Fi, make Wi-Fi settings for the printer again because it is disabled.
E-2, E-3, E-7
Solutions:
Make sure your wireless router is turned on.
Conrm
that your computer or device is connected correctly to the wireless router.
Turn o the wireless router. Wait for about 10 seconds, and then turn it on.
Place the printer closer to your wireless router and remove any obstacles between them.
If you have entered the SSID manually, check if it is correct. Check the SSID from the Network Status part on
the network connection report.
If an wireless router has multiple SSIDs, select the SSID that is displayed. When the SSID is using a non-
compliant frequency, the printer does not display them.
If you are using push button setup to establish a network connection, make sure your wireless router supports
WPS. You cannot use push button setup if your wireless router does not support WPS.
Makes sure your SSID uses only ASCII characters (alphanumeric characters and symbols).
e
printer cannot
display an SSID that contains non-ASCII characters.
Makes sure you know your SSID and password before connecting to the wireless router. If you are using a
wireless router with its default settings, the SSID and password are located on a label on the wireless router. If
you do not know your SSID and password, contact the person who set up the wireless router, or see the
documentation provided with the wireless router.
If you are connecting to an SSID generated from a tethering smart device, check for the SSID and password in
the documentation provided with the smart device.
If your Wi-Fi connection suddenly disconnects, check for the conditions below. If any of these conditions are
applicable, reset your network settings by downloading and running the
soware
from the following website.
http://epson.sn > Setup
Another smart device was added to the network using push button setup.
e Wi-Fi network was set up using any method other than push button setup.
Related Information
&
“Connecting to a Computer” on page 20
&
“Making Wi-Fi Settings from the Printer” on page 21
User's Guide
Network Settings
27
E-5
Solutions:
Make sure the wireless router’s security type is set to one of the following. If it is not, change the security type on
the wireless router, and then reset the printers network settings.
WEP-64 bit (40 bit)
WEP-128 bit (104 bit)
WPA PSK (TKIP/AES)
*
WPA2 PSK (TKIP/AES)
*
WPA (TKIP/AES)
WPA2 (TKIP/AES)
* WPA PSK is also known as WPA Personal. WPA2 PSK is also known as WPA2 Personal.
E-6
Solutions:
Check if MAC address
ltering
is disabled. If it is enabled, register the printer’s MAC address so that it is not
ltered. See the documentation provided with the wireless router for details. You can check the printer’s MAC
address from the Network Status part on the network connection report.
If your wireless router is using shared authentication with WEP security, make sure the authentication key and
index are correct.
If the number of connectable devices on the wireless router is less than the number of network devices that you
want to connect, make settings on the wireless router to increase the number of connectable devices. See the
documentation provided with the wireless router to make settings.
Related Information
& “Printing a Network Status Sheet” on page 31
E-8
Solutions:
Enable DHCP on the access point if the printer’s Obtain IP Address setting is set to Auto.
If the printer’s Obtain IP Address setting is set to Manual, the IP address you manually set is invalid due to out
of range (for example: 0.0.0.0). Set a valid IP address from the printer’s control panel or by using Web Cong.
Related Information
&
“Printing a Network Status Sheet” on page 31
User's Guide
Network Settings
28
E-9
Solutions:
Check the following.
Devices are turned on.
You can access the Internet and other computers or network devices on the same network from the devices you
want to connect to the printer.
If still does not connect your printer and network devices aer conrming the above, turn o the wireless router.
Wait for about 10 seconds, and then turn it on. en reset your network settings by downloading and running the
installer from the following website.
http://epson.sn > Setup
Related Information
& Connecting to a Computer” on page 20
E-10
Solutions:
Check the following.
Other devices on the network are turned on.
Network addresses (IP address, subnet mask, and default gateway) are correct if you have set the printer’s
Obtain IP Address to Manual.
Reset the network address if they are incorrect. You can check the IP address, subnet mask, and default gateway
from the Network Status part on the network connection report.
If DHCP is enabled, change the printer’s Obtain IP Address setting to Auto. If you want to set the IP address
manually, check the printer’s IP address from the Network Status part on the network connection report, and then
select Manual on the network settings screen. Set the subnet mask to [255.255.255.0].
If still does not connect your printer and network devices, turn o the wireless router. Wait for about 10 seconds,
and then turn it on.
Related Information
& “Printing a Network Status Sheet” on page 31
E-11
Solutions:
Check the following.
e
default gateway address is correct if you set the printers TCP/IP Setup setting to Manual.
e device that is set as the default gateway is turned on.
Set the correct default gateway address. You can check the default gateway address from the Network Status part
on the network connection report.
User's Guide
Network Settings
29
Related Information
& “Printing a Network Status Sheet” on page 31
E-12
Solutions:
Check the following.
Other devices on the network are turned on.
e network addresses (IP address, subnet mask, and default gateway) are correct if you are entering them
manually.
e network addresses for other devices (subnet mask and default gateway) are the same.
e
IP address does not
conict
with other devices.
If still does not connect your printer and network devices aer conrming the above, try the following.
Turn o the wireless router. Wait for about 10 seconds, and then turn it on.
Make network settings again using the installer. You can run it from the following website.
http://epson.sn > Setup
You can register several passwords on a wireless router that uses WEP security type. If several passwords are
registered, check if the rst registered password is set on the printer.
Related Information
&
“Printing a Network Status Sheet” on page 31
& Connecting to a Computer” on page 20
E-13
Solutions:
Check the following.
Network devices such as a wireless router, hub, and router are turned on.
e TCP/IP Setup for network devices has not been set up manually. (If the printer’s TCP/IP Setup is set
automatically while the TCP/IP Setup for other network devices is performed manually, the printer’s network
may
dier
from the network for other devices.)
If it still does not work
aer
checking the above, try the following.
Turn o the wireless router. Wait for about 10 seconds, and then turn it on.
Make network settings on the computer that is on the same network as the printer using the installer. You can
run it from the following website.
http://epson.sn > Setup
You can register several passwords on a wireless router that uses the WEP security type. If several passwords are
registered, check if the rst registered password is set on the printer.
User's Guide
Network Settings
30
Related Information
& “Printing a Network Status Sheet” on page 31
& Connecting to a Computer” on page 20
Message on the Network Environment
Message Solution
*Multiple network names (SSID) that
match your entered network name (SSID)
have been detected.
Conrm
network
name (SSID).
The same SSID may be set on several access points. Check the settings on the
access points, and change the SSID.
The Wi-Fi environment needs to be
improved. Turn the wireless router o and
then turn it on. If the connection does not
improve, see the documentation for the
wireless router.
After moving the printer closer to the access point and removing any
obstacles between them, turn o the access point. Wait for about 10 seconds,
and then turn it on. If it still does not connect, see the documentation
supplied with the access point.
*No more devices can be connected.
Disconnect one of the connected devices if
you want to add another one.
Computer and smart devices that can be connected simultaneously are
connected in full in the Wi-Fi Direct (Simple AP) connection. To add another
computer or smart device, disconnect one of the connected devices
rst.
You can conrm the number of wireless devices which can be connected
simultaneously and the number of connected devices by checking the
network status sheet.
The same SSID as Wi-Fi Direct exists in the
environment. Change the Wi-Fi Direct SSID
if you cannot connect a smart device to the
printer.
On the printer’s control panel, go to Wi-Fi Direct Setup screen and select the
menu to change the setting. You can change the network name following
after DIRECT-XX-. Enter within 32 characters.
Printing a Network Status Sheet
You can check the detailed network information by printing it such as the maximum number of devices you can
connect by Wi-Fi Direct (simple AP).
1. Load papers.
2. Hold down the
button on the printer's control panel for at least seven seconds.
e network status sheet is printed.
Note:
If you release the
button within seven seconds, a network connection report is printed.
Replacing or Adding New Wireless Routers
If the SSID changes due to the replacement of a wireless router, or a wireless router is added and a new network
environment is established, re-set the Wi-Fi settings.
User's Guide
Network Settings
31
Related Information
& “Changing the Connection Method to a Computer” on page 32
Changing the Connection Method to a Computer
Using the installer and re-set up in a dierent connection method.
Setting up from the website
Access the following website, and then enter the product name. Go to Setup, and then start setting up.
http://epson.sn
Setting up using the soware disc (only for the models that come with a soware disc and users with Windows
computers with disc drives.)
Insert the
soware
disc into the computer, and then follow the on-screen instructions.
Selecting Change the Connection Methods
Follow the on-screen instructions until the following screen is displayed.
Select Change or re-set the connection method on the Select Soware Installation screen, and then click Next.
Restoring the Network Settings from the Control
Panel
You can restore all network settings to their defaults.
1. Turn the printer o.
User's Guide
Network Settings
32
2. While holding down the button, press the button until the light and the light ash
alternately.
Restoration is complete when the
light and the light are o.
User's Guide
Network Settings
33
Preparing the Printer
Loading Papers
Available Paper and Capacities
Genuine Epson Paper
Epson recommends using genuine Epson paper to ensure high-quality printouts.
Note:
e availability of paper varies by location. For the latest information on paper available in your area, contact Epson
support.
Paper suitable for printing documents
Media Name Size Loading Capacity (Sheets)
*
Epson Bright White Ink Jet Paper A4 Up to the line indicated by the
triangle symbol on the edge guide.
-
* Borderless Printing
Paper suitable for printing photos
Media Name Size Loading Capacity
(Sheets)
*1
Epson Ultra Glossy Photo Paper A4, 13×18 cm (5×7 in.)
20
*2
-
10×15 cm (4×6 in.)
Epson Premium Glossy Photo Paper A4, 13×18 cm (5×7 in.)
20
*2
-
16:9 wide size (102×181 mm), 10×15 cm
(4×6 in.)
Epson Premium Semigloss Photo Paper A4
20
*2
-
10×15 cm (4×6 in.)
Epson Photo Paper Glossy A4, 13×18 cm (5×7 in.)
20
*2
-
10×15 cm (4×6 in.)
Epson Matte Paper-Heavyweight A4 20 -
Epson Photo Quality Ink Jet Paper A4 80 -
Epson Double-Sided Matte Paper A4 1 -
User's Guide
Preparing the Printer
34
*1 Borderless Printing
*2 Load one sheet of paper at a time if the paper does not feed correctly or if the printout has uneven colors or smears.
Commercially Available Paper
Plain papers
Media Name Size Loading Capacity (Sheets)
*1
Plain paper
Copy paper
Letter, A4, B5, 16K (195×270 mm ),
A5, A6, B6
Up to the line indicated by the triangle
symbol on the edge guide.
*2
-
Legal, 8.5×13 in., Indian-Legal 1 -
User Dened (mm)
54×86 to 215.9×1200
1-
*1 Borderless Printing
*2 Load one sheet of paper at a time if the paper does not feed correctly or if the printout has uneven colors or smears.
Envelopes
Media Name Size Loading Capacity
(Envelopes)
*
Envelope Envelope #10, Envelope DL, Envelope C6 10 -
* Borderless Printing
Paper Handling Precautions
Read the instruction sheets supplied with the paper.
Fan and align the edges of the paper before loading. Do not fan or curl photo paper. Doing so may damage the
printable side.
User's Guide
Preparing the Printer
35
If the paper is curled, atten it or curl it slightly in the opposite direction before loading. Printing on curled
paper may cause paper jams and smears on the printout.
Do not use paper that is wavy, torn, cut, folded, damp, too thick, too thin, or paper that has stickers stuck to it.
Using these types of paper causes paper jams and smears on the printout.
Make sure you are using long-grain paper. If you are not sure what type of paper you are using, check the paper
packaging or contact the manufacturer to conrm the paper specications.
Related Information
& “Printer Specications” on page 133
Loading Paper in the Rear Paper Feed
1. Open the feeder guard and pull out the paper support.
2. Slide the edge guides.
User's Guide
Preparing the Printer
36
Province Company Name Address Phone
E-mail
SOUTH
SULAWESI
ESC MAKASSAR Jl. Cendrawasih NO. 3A, kunjung mae,
mariso, MAKASSAR - SULSEL 90125
(+62411) 8911071
mksr-admin@epson-
indonesia.co.id
WEST
KALIMANTAN
ESC PONTIANAK Komp. A yani Sentra Bisnis G33, Jl. Ahmad
Yani - Pontianak Kalimantan Barat
(+62561) 735507 / 767049
pontianak-admin@epson-
indonesia.co.id
RIAU ESC PEKANBARU Jl. Tuanku Tambusai No.459A Pekanbaru
Riau
(+62761) 8524695
pkb-admin@epson-
indonesia.co.id
DKI JAKARTA ESS JAKARTA
SUDIRMAN
Wisma Keiai Lt. 1 Jl. Jenderal Sudirman Kav.
3 Jakarta Pusat - DKI JAKARTA 10220
(+6221) 5724335
ess@epson-indonesia.co.id
EAST JAWA ESS SURABAYA Ruko Surya Inti Jl. Jawa No 2-4 Kav. 29
Surabaya - Jawa Timur
(+6231) 5014949
esssby@epson-indonesia.co.id
BANTEN ESS SERPONG Ruko Mall WTC Matahari No. 953, Serpong-
Banten
(+6221) 53167051 / 53167052
esstag@epson-indonesia.co.id
CENTRAL
JAWA
ESS SEMARANG Komplek Ruko Metro Plaza Block C20 Jl. MT
Haryono No 970 Semarang - JAWA TENGAH
(+6224) 8313807 / 8417935
esssmg@epson-indonesia.co.id
EAST
KALIMANTAN
ESC SAMARINDA Jl. KH. Wahid Hasyim (M. Yamin) Kelurahan
Sempaja Selatan Kecamatan Samarinda
UTARA - SAMARINDA - KALTIM
(+62541) 7272904
escsmd@epson-indonesia.co.id
SOUTH
SUMATERA
ESC PALEMBANG Jl. H.M Rasyid Nawawi No. 249 Kelurahan 9
Ilir Palembang Sumatera Selatan
(+62711) 311330
escplg@epson-indonesia.co.id
EAST JAVA ESC JEMBER JL. Panglima Besar Sudirman Ruko no.1D
Jember-Jawa Timur (Depan Balai Penelitian
& Pengolahan Kakao)
(+62331) 488373 / 486468
jmr-admin@epson-indonesia.co.id
NORTH
SULAWESI
ESC MANADO Tekno Megamall Lt LG 11 TK 21, Kawasan
Megamas Boulevard, Jl Piere Tendean,
Manado - SULUT 95111
(+62431) 8890996
MND-ADMIN@EPSON-
INDONESIA.CO.ID
For other cities not listed here, call the Hot Line: 08071137766.
Help for Users in Malaysia
Contacts for information, support, and services are:
World Wide Web
http://www.epson.com.my
Information on product
specications,
drivers for download
Frequently Asked Questions (FAQ), Sales Enquiries, questions through e-mail
User's Guide
Appendix
147
147

Hulp nodig? Stel uw vraag in het forum

Spelregels
1

Forum

Epson-ET2711-Ecotank
  • Hoe kan ik mijn ET 2711 printer resetten na vervanging van de inktpads.
    MH
    Gesteld op 5-12-2024 om 11:14

    Reageer op deze vraag Misbruik melden
  • Nieuwe epson ET-281 (heeft nog garantie) stap voor stap correct geïnstalleerd. Print geen kleur. Alle reinigings procedures volgens instructie toegepast. Geen resultaat: blijft alleen zwart printen. Via klantenservice word ik niet wijzer: die geven slechts standaard opossingen, die ik alle al probeerde. Geen andere contactmogelijheid. Dit verwacht je niet van een zich zelf respecterend merk! Wie heeft een oplossing? zuercher8006(at)yahoo.de Gesteld op 5-12-2023 om 15:28

    Reageer op deze vraag Misbruik melden
  • Op welke toets moet ik drukken om een om een foto copy af te printen. Gesteld op 4-5-2022 om 10:32

    Reageer op deze vraag Misbruik melden
  • probleem : geen kleuren bij het afdrukken : volgende stappen heb ik ondernomen : configuratiescherm - hardware en geluiden - apparaten en printers - ET2710 - spuitkanaaltjes controleren - printknoppen gereinigd - na 12u. nogmaals - geen resultaat, nog steeds geen kleuren bij het afdrukken
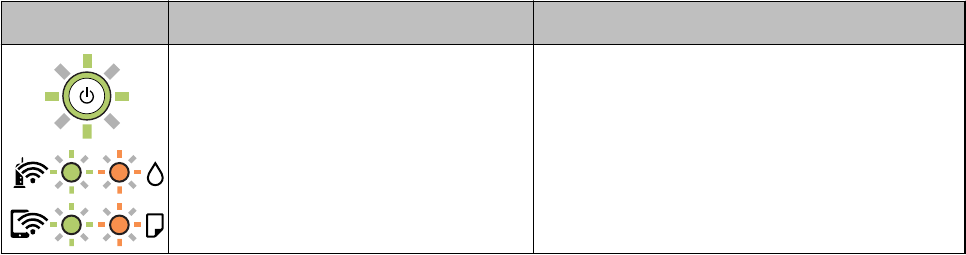
    (Volgens de aanwijzing van de afbeelding (NG) zou de printknop verstopt zijn)

    In handleiding p.89 Krachtige reiniging geprobeerd - vermelding "vervangt alle inkt in de inktbuisjes" versta ik niet, moet er dan nieuwe inkt in ? de inkt blijft tot 2025 goed, dus daar kan het niet aan liggen.
    Op p. 61 staat ook iets van krachtige reiniging, maar ik vind nergens een knop voor deze uitvoering.

    Gesteld op 8-4-2022 om 13:53

    Reageer op deze vraag Misbruik melden
  • ik heb een EPSON ET-2711 printer: Enkele weken geleden werkte de printer nog vanop de laptop en de GSM.
    Maar nu lukt de WIFI connectie niet meer; ik heb alles gedaan wat de manual zei, maar zelfs een info-papier afrdukken werkt niet meer
    Is er iemand die een oplossing weet?
    mijn emailadres is bauwensf@gmail.com Gesteld op 11-4-2020 om 16:15

    Reageer op deze vraag Misbruik melden
  • Hallo, Printer print niets in zwart wit enkel een klein beetje onleesbare tekst in rode kleur? Gesteld op 19-2-2020 om 10:49

    Reageer op deze vraag Misbruik melden
6

Misbruik melden

Gebruikershandleiding.com neemt misbruik van zijn services uitermate serieus. U kunt hieronder aangeven waarom deze vraag ongepast is. Wij controleren de vraag en zonodig wordt deze verwijderd.

Product:

Bijvoorbeeld antisemitische inhoud, racistische inhoud, of materiaal dat gewelddadige fysieke handelingen tot gevolg kan hebben.

Bijvoorbeeld een creditcardnummer, een persoonlijk identificatienummer, of een geheim adres. E-mailadressen en volledige namen worden niet als privégegevens beschouwd.

Spelregels forum

Om tot zinvolle vragen te komen hanteren wij de volgende spelregels:

Belangrijk! Als er een antwoord wordt gegeven op uw vraag, dan is het voor de gever van het antwoord nuttig om te weten als u er wel (of niet) mee geholpen bent! Wij vragen u dus ook te reageren op een antwoord.

Belangrijk! Antwoorden worden ook per e-mail naar abonnees gestuurd. Laat uw emailadres achter op deze site, zodat u op de hoogte blijft. U krijgt dan ook andere vragen en antwoorden te zien.

Abonneren

Abonneer u voor het ontvangen van emails voor uw Epson ET2711 Ecotank bij:


U ontvangt een email met instructies om u voor één of beide opties in te schrijven.


Ontvang uw handleiding per email

Vul uw emailadres in en ontvang de handleiding van Epson ET2711 Ecotank in de taal/talen: Engels als bijlage per email.

De handleiding is 4,2 mb groot.


U ontvangt de handleiding per email binnen enkele minuten. Als u geen email heeft ontvangen, dan heeft u waarschijnlijk een verkeerd emailadres ingevuld of is uw mailbox te vol. Daarnaast kan het zijn dat uw internetprovider een maximum heeft aan de grootte per email. Omdat hier een handleiding wordt meegestuurd, kan het voorkomen dat de email groter is dan toegestaan bij uw provider.

Stel vragen via chat aan uw handleiding

Stel uw vraag over deze PDF

Andere handleiding(en) van Epson ET2711 Ecotank

Epson ET2711 Ecotank Snelstart handleiding - Nederlands - 40 pagina's

Epson ET2711 Ecotank Gebruiksaanwijzing - Nederlands - 151 pagina's

Epson ET2711 Ecotank Snelstart handleiding - Deutsch - 40 pagina's

Epson ET2711 Ecotank Gebruiksaanwijzing - Deutsch - 155 pagina's

Epson ET2711 Ecotank Gebruiksaanwijzing - Français - 154 pagina's

Epson ET2711 Ecotank Snelstart handleiding - Français, Italiano, Português, Espanõl - 40 pagina's


Uw handleiding is per email verstuurd. Controleer uw email

Als u niet binnen een kwartier uw email met handleiding ontvangen heeft, kan het zijn dat u een verkeerd emailadres heeft ingevuld of dat uw emailprovider een maximum grootte per email heeft ingesteld die kleiner is dan de grootte van de handleiding.

Er is een email naar u verstuurd om uw inschrijving definitief te maken.

Controleer uw email en volg de aanwijzingen op om uw inschrijving definitief te maken

U heeft geen emailadres opgegeven

Als u de handleiding per email wilt ontvangen, vul dan een geldig emailadres in.

Uw vraag is op deze pagina toegevoegd

Wilt u een email ontvangen bij een antwoord en/of nieuwe vragen? Vul dan hier uw emailadres in.


Info