682507
29
Verklein
Vergroot
Pagina terug
1/35
Pagina verder
INSTRUCTION MANUAL
FREE ARM SEWING MACHINE
your creative assistant
- 1 -
Safety instructions
Like any other electrical device, a sewing machine
can cause serious, even life-threatening injuries.To
avoid this, and in order to work safely:
• Before initial use of your sewing machine, read
these operating instructions thoroughly.
• Keep the operating instructions in a suitable place
near the machine. When passing the appliance on
to others, always enclose the operating instructions.
• Always disconnect the power supply when leaving
the machine unattended. This will prevent the risk
of accidents if the machine is switched on
accidentally.
• First pull the power plug before changing the bulb or
performing maintenance work on the machine.
This will prevent possibly life-threatening electric
shocks.
• Do not remove the plug from the socket by pulling
on the cable. Always grip the plug and not the cable
when pulling out the power plug.
• Only use the sewing machine in dry rooms.
• In case of any visible damage on the machine, the
foot switch or the power cable: Have the damage
repaired by Customer Service before using the
sewing machine again.
• Never let children or elderly persons handle the
machine unsupervised because they may not
properly appreciate the possible dangers. Keep
electrical appliances outside the reach of children.
• Never use the machine when the ventilation
apertures are blocked. Keep the ventilation
apertures of the machine and the foot switch free
from fluff, dust and waste material.
• Don’t let children play with sewing machine.
• Never use the machines if the air went are blocked
keep the air wends free form dust, fusel and
leftovers.
• Never place anything on the foot controller.
This machine is not intended for use by persons
(including children) with reduced physical, sensory
or mental capabilities, or lack of experience and
knowledge, unless they have been given
supervision or instruction concerning use of the
appliance by a person responsible for their safety.
Children should be supervised to ensure that they
do not play with the machine.
Warning against injuries
and material damages:
According to legislation, you as the user of an
electrical appliance are responsible for
preventing possible accidents through
safety-conscious behaviour:
• Keep your work space tidy. An untidy
workplace can lead to accidents.
• Provide adequate lighting when working!
• Do not wear loose clothing or jewellery,as
these can be caught in the moving parts. You
should also wear a hair net if you have long
hair.
Avoid abnormal posture. Remain steady and in
a well-balanced position at all times.
• Be alert! Pay attention to what you are doing.
Always take a rational approach to your work.
Never work with the sewing machine if you are
unable to concentrate or if you are feeling
unwell!
If accidents occur as a result of handling the
machine with insufficient care, or failure to follow
the safety instructions in this manual, then the
manufacturer cannot accept liability.
If the supply cord that fixed with foot controller is
damaged, it must be replaced by the
manufacturer or its service agent or a similar
qualified person in order to avoid a hazard.
Please use for your sewing machine the
ZHEJIANG FOUNDER presser foot, type
KD-2902.
Power rating: 220 - 230V ~ , 50Hz
Current rating: 1.0A
Protection Class : II
- 2 -
CONTENTS
Parts diagram ........................................................................................... 3-4
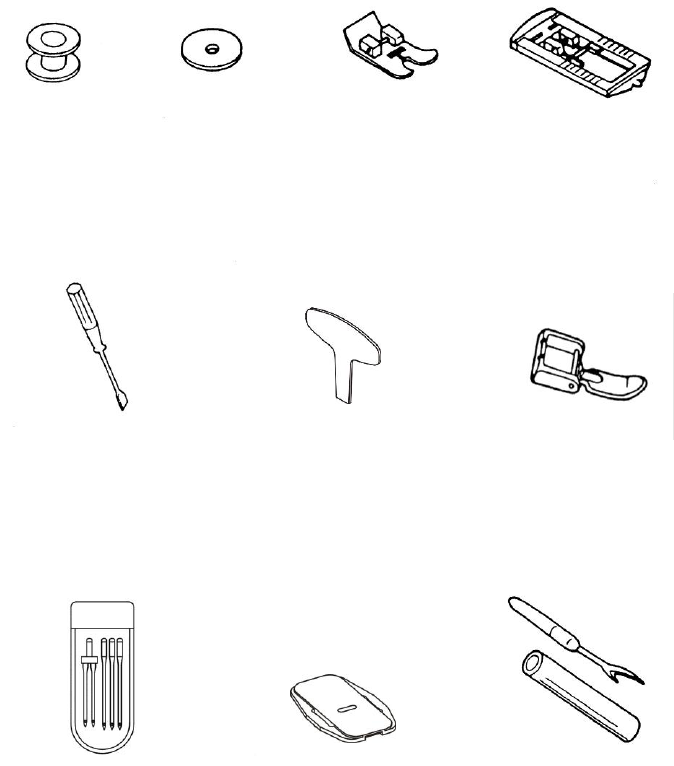
Accessories ................................................................................................. 5
Before sewing (Power supply and sewing lamp) .......................................... 6
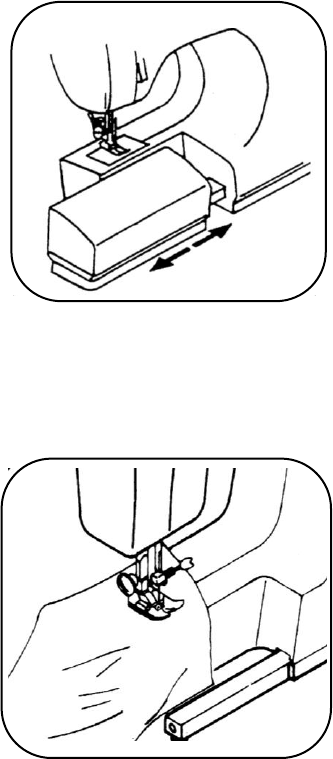
Removing extension table ........................................................................... 7
Free-arm sewing .......................................................................................... 7
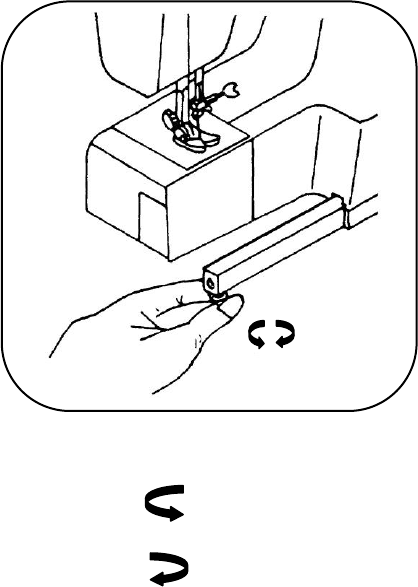
Winding the bobbin ...................................................................................... 8
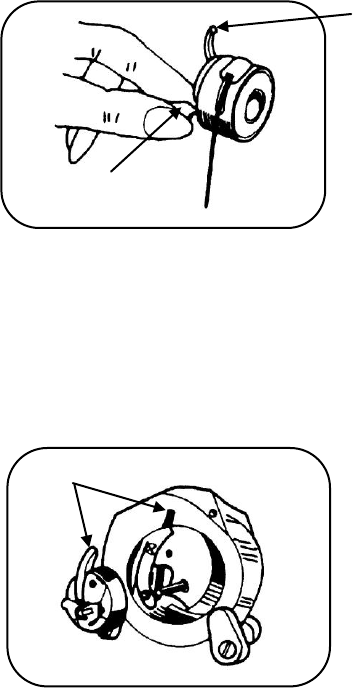
Removing bobbin case and bobbin .............................................................. 9
Inserting bobbin into bobbin case ................................................................ 9
Inserting bobbin case into shuttle race ....................................................... 10
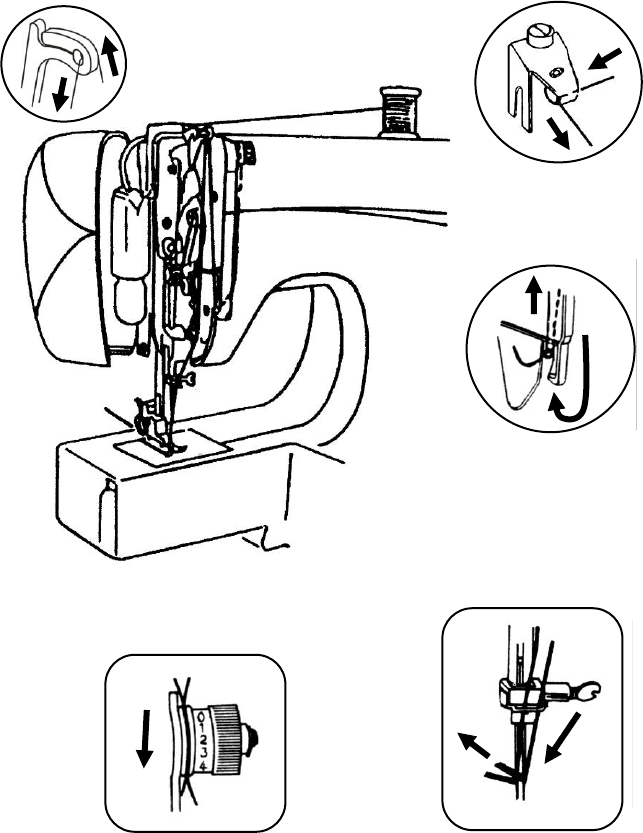
Threading upper thread & Twin needle threading ...................................... 11
Drawing up the bobbin thread .................................................................... 12
Changing sewing directions ....................................................................... 12
Levelling machine .................................................................................. 13
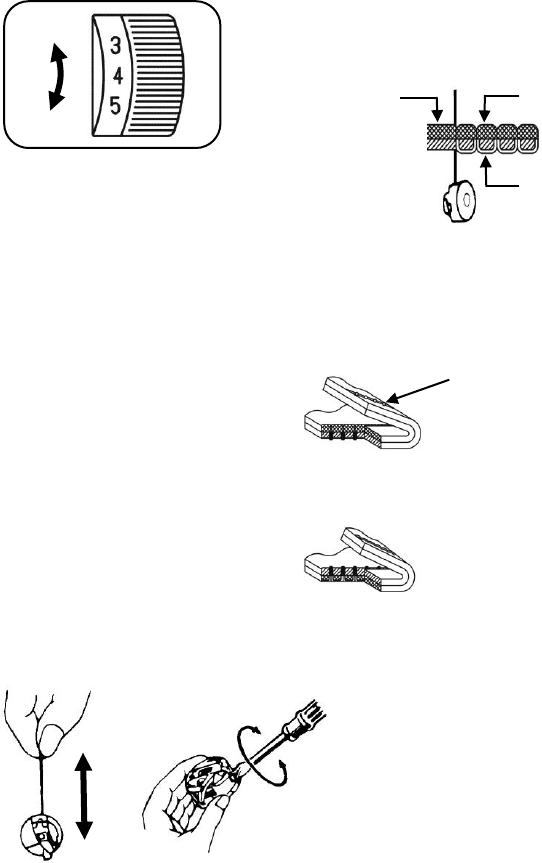
Adjusting thread tension ............................................................................ 14
Changing needle ....................................................................................... 15
Insert “darning plate“.................................................................................. 15
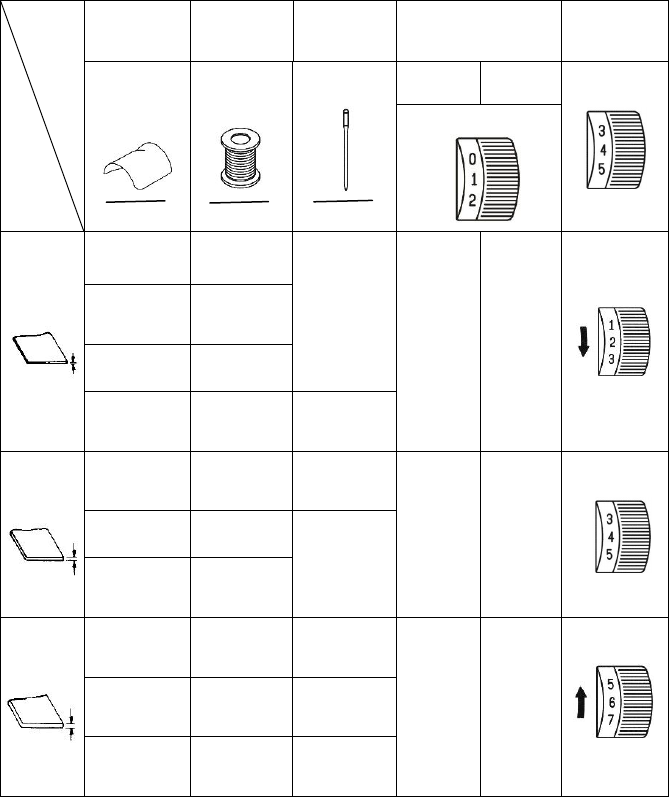
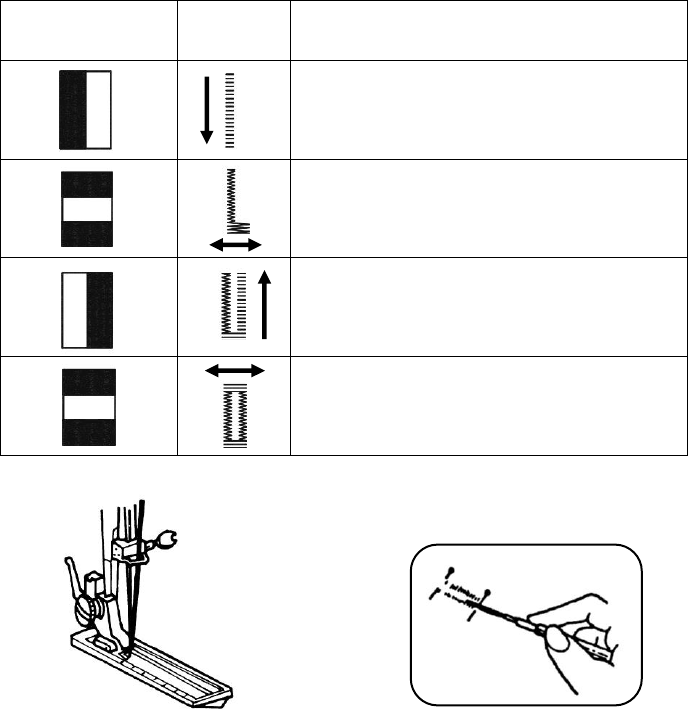
Fabric-Thread-Needle-table ....................................................................... 16
Sewing (pattern selector) and operation table ............................................ 17
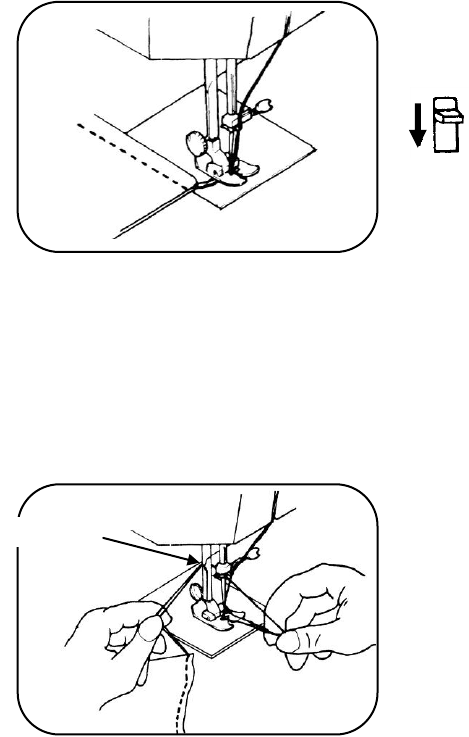
To start sewing .......................................................................................... 18
How to finish stitches ................................................................................. 19
Straight stitch ............................................................................................. 20
Zigzag sewing ............................................................................................ 20
Automatic embroidery ................................................................................ 20
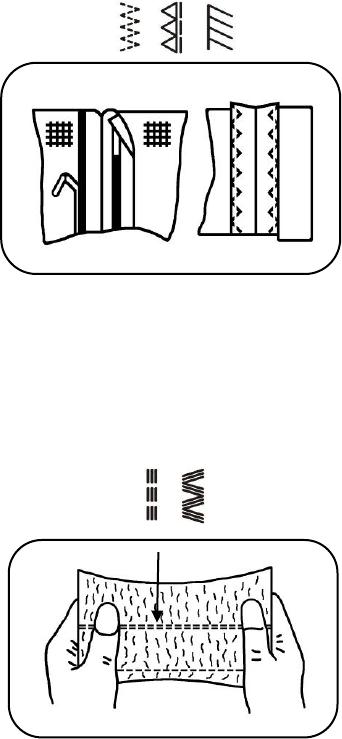
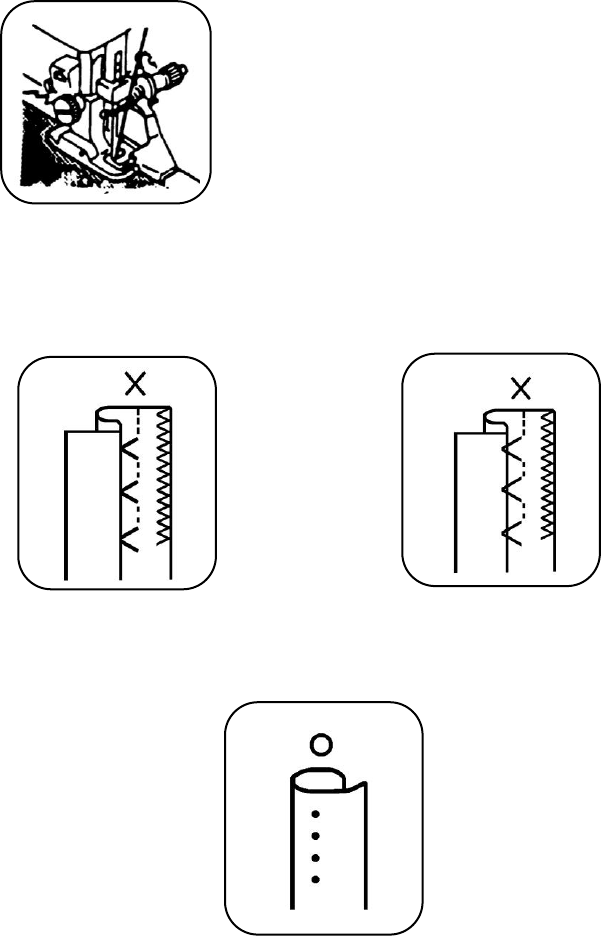
Overcasting ............................................................................................... 21
Straight and zigzag stretch stitches ........................................................... 21
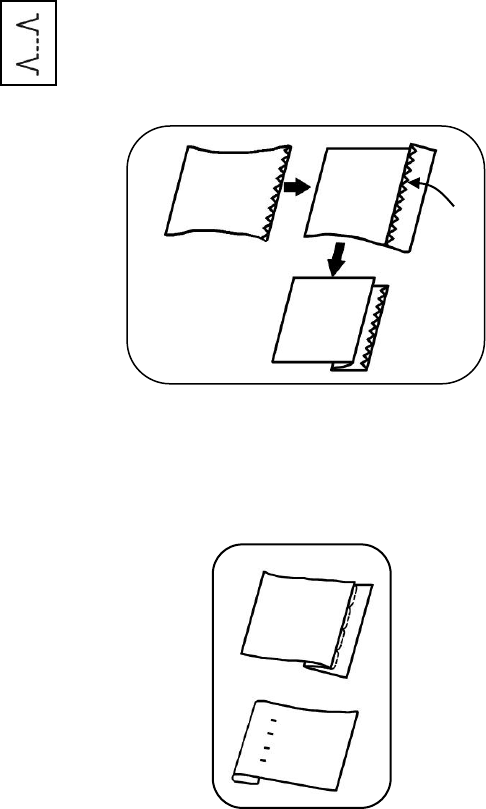
Blind stitch ............................................................................................ 22-23
Button sewing ............................................................................................ 24
Binding ...................................................................................................... 24
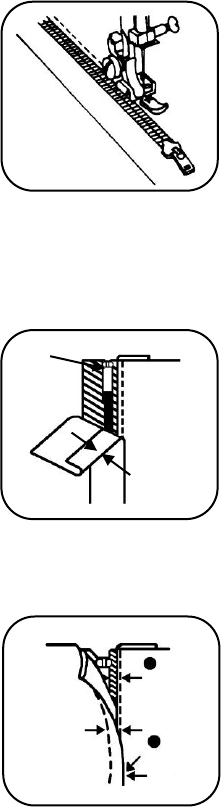
Zipper sewing ............................................................................................ 25
Buttonhole sewing ..................................................................................... 26
Hemming ................................................................................................... 27
Twin needle ............................................................................................... 28
Embroidery ................................................................................................ 28
Quilter ........................................................................................................ 29
Seam guide ............................................................................................... 29
Maintenance (Cleaning and oiling) ............................................................ 30
Checking performance problems-Troubleshooting ................................... 31
- 3 -
PARTS DIAGRAM (FRONT VIEW)
1. Thread tension dial
2. Pattern selector dial
3. Spool pins
4. Bobbin winder stopper
5. Hand wheel
6. Stitch length dial
7. Reverse button
8. Thread guide and needle clamp
9. Extension table
10. Shuttle cover
11. Presser foot
12. Face cover
13. Take up lever
3
4
5
6
7
8
10
11
1
12
13
- 4 -
REAR VIEW
1. Bobbin winder spindle
2. Upper thread guide
3. Presser foot lever
4. Thumb screw
5. Needle plate
1
3
4
5
2
- 5 -
ACCESSORIES
Needle plate
screw driver
Screw driver
Zipper foot
Needle
Buttonhole cutter
Darning plate
Bobbin
Felt
Zigzag foot
(on machine)
Buttonhole foot
- 6 -
BEFORE SEWING
1. Fit plug into the machine.
2. Insert plug into the main socket.
3. Sewing speed can be varied by the foot
control.
Warning: Please always unplug the power plug before you change the bulb or
perform maintenance work to the machine so that you prevent deadly peril
and electric shock.
Bulb replacement:
1. Open face cover in direction of arrow.
2. Remove bulb by unscrewing it
counter-clockwise.
3. Install a new bulb by screwing it in
clockwise.
4. Use a 15 watt bulb. (max)
5. Make sure the bulb is cold before
removing it.
Power supply / Power supply plug
Speed Controller
Power supply
Plug receptacle
machine plug
Sew lamp
- 7 -
REMOVING EXTENSION TABLE
Hold the left end of the table and pull it
out in direction of the arrow.
FREE-ARM SEWING
1. This sewing machine can be used as
a flat bed machine but easily converts
to a free arm machine by removing
the extension table.
2. Especially useful for sewing sleeves,
pant legs, tubular fabrics etc. more
easily.
3. To sew tubular items just slip the
sleeve or leg of pants on the free arm
as shown on the illustration.
- 8 -
5 cm thread
WINDING THE BOBBIN
1. Release coupling knob.
2. Thread as shown.
3. When bobbin is filled, re-engage
coupling knob.
Push bobbin winder spindle in direction of
the arrow. When bobbin winding is
completed, return spindle to its original
position.
When bobbin winding is incorrect, release
the screw of the upper thread guide and
adjust up or down until bobbin the
winding is balanced.
Correct
Screw
Winder spindle
- 9 -
REMOVING BOBBIN CASE AND BOBBIN
1. Raise the needle to its highest
position and open shuttle race cover.
3. Release the latch and the bobbin will fall out
easily.
INSERTING BOBBIN INTO BOBBIN CASE
1. Pull 5 cm of thread from bobbin and
insert it into bobbin case as shown.
3. Pull the thread through the slot and under the
tension spring and draw out about 10 cm of
thread.
Making sure the bobbin turns in a clockwise
direction.
2. Open the hinged latch of the bobbin
case and pull the bobbin case out of
the machine.
Schl
itz
Slot
Gle
uf
Inte
rtice
5 cm
2. Guide the end of thread into the slot.
Slot
Hinged latch
5 cm
10 cm
Tension spring
- 10 -
INSERTING BOBBIN CASE INTO SHUTTLE RACE
1. Raise the needle to its highest position. Pull the thread to the front, open the latch of
the bobbin case and hold it.
2. Holding the latch open, place bobbin case onto the center pin in the shuttle and
release latch.
Finger
Hinged latch
Insert
- 11 -
THREADING UPPER THREAD
Pass the thread from A to H as shown.
A
B
C
D
F
G
F
C
G
D
B
E
E
H
H
Twin needle threading.
- 12 -
DRAWING UP THE BOBBIN THREAD
1. Hold the upper thread with left hand, turn the
hand wheel slowly towards you until the needle
goes down and comes up. Then stop the hand
wheel when the take up lever is at its highest
position.
Lightly draw up the upper thread, by which the
lower thread will be brought up in a loop.
2. Pull out both threads and place them together
under presser foot to the rear of the machine.
3. Place fabric under presser foot from the front,
lower presser foot.
4. Start to sew.
CHANGING SEWING DIRECTIONS
1. Lower needle down into fabric and
raise presser foot, pivot the fabric
around the needle to change direction
as desired.
2. Lower the presser foot and start to sew.
- 13 -
LEVELLING MACHINE
Down
Up
- 14 -
ADJUSTING THREAD TENSION
Normal upper thread tension: 4 6
Upper thread tension may be adjusted
by turning the thread tension dial.
Lower thread tension can be
increased by turning the screw of the
bobbin case slightly to the right
(clockwise). Turning it to the left
(counter -clockwise) decreases
tension.
Correct
Bobbin thread
Fabric
Upper thread
Incorrect
Inside of fabric
Upper thread
- 15 -
CHANGING NEEDLE
1. Raise the needle bar to its highest position.
2. Loosen needle clamp screw and remove the old needle.
3. With the flat side of the needle facing away from you, insert the needle as far up as it
will go.
4. Tighten the needle clamp screw securely.
INSERT “DARNING PLATE“
Sometimes you will want to control the feeding of fabric yourself. Turn the needle bar to its
highest position and raise the presser foot over the needle plate, aligning two pins of the
darning plate with holes of needle plate. You may then determine the movement of the fabric
by yourself. See page 24 for button sewing application.
Needle clamp screw
Tighten
Face flat side away from you
Loosen
- 16 -
FABRIC-THREAD-NEEDLE-TABLE
Please pay attention to the following list as a guide for sewing different types of fabric.
Fabric
Thread
Needle
Length of Stitches
Indication of
Upper
Tension
Straight
stitch
ZZ
Stitch Length Dial
Light
Nylon
80 Cotton
70 (10)
1 - 3
1 - 4
Tricot
60 S Fiber
silk
Silk
50 Silk
Wool silk
50 S Fiber
silk
80 (12)
Medium
Gingham
60-80
Cotton
80-90
(12-14)
0.5 - 3
0.5 - 4
Thin Jersey
60 S Fiber
80 (12)
Gabardine
50 Silk
Heavy
Denim
50 Cotton
90-100
(14-16)
0.5 - 3
0.5 - 4
Jersey
50 S Fiber
80-90
(12-14)
Tweed
50 Silk
80-90
(12-14)
- 17 -
SEWING (PATTERN SELECTOR) AND OPERATION TABLE
Stitch patterns
Stitch length
Presser foot
Darning
plate
A
Straight stitch
B-E
Zigzag
F
Blind stitch
G
Blind hem
H
Three step zigzag stitch
I
Slant over edge
J
Single overlock stitch
K
Honeycomb stitch
L
Zigzag stitch
M
Straight stretch stitch
N
Automatic embroidery
O
P
Q
R-T
Buttonhole
Free-hand embroidery
Without
- 18 -
TO START SEWING
Important hints:
1. Raise the take-up lever to its highest position before starting and after stopping
sewing.
2. Hold both threads about 10 cms to the rear of the machine for the first two or three
stitches.
3. Sufficient fabric should be placed under needle before lowering the presser foot.
4. Depress foot/speed control and start to sew.
5. Test the machine stitches on a scrap of fabric you plan to use, adjusting the machine
for the length of the stitch and tension suitable to your fabric.
6. Separate the machine from the power system if you leave it unsupervised.
Attention:
1. When turning the hand wheel manually, always turn it toward you.
2. Guide the cloth gently with your hand.
3. To prevent breaking needles, always raise the needle out of the fabric when you stop
sewing.
- 19 -
HOW TO FINISH STITCHES
1. Sew to the edge of seam.
2. Push the reverse button and sew in reverse for about 3-4 cms.
3. Raise needle to its highest position.
4. Lift the presser foot and pull the fabric out of the back of the machine.
5. Cut threads as shown on the thread cutter.
Cutting thread slot
- 20 -
N
O
P
Q
STRAIGHT STITCH
1. This type of stitching is used most frequently.
2. The zigzag presser foot can be used for both straight and zigzag sewing.
3. For sewing light fabric, use a smaller stitch size. (Refer to page 16 for dial setting).
ZIGZAG SEWING
Pattern selector position
Satin stitching can be used for sewing
initials, patterns, appliqué, etc.
AUTOMATIC EMBROIDERY
These stitches have a wide range of
decorative and utility applications and are
particularly suitable for woven fabrics.
The Scallop stitch (N) is ideal for edging
collars, cuffs, tablecloths, serviettes etc. For
all the stitches, the stitch length can be
reduced to achieve a close “satin stitch” if
required.
With satin stitch a paper backing, will
improve the result.
- 21 -
OVERCASTING
Use these stitches for oversewing rough
edges.
STRAIGHT AND ZIGZAG STRETCH STITCHES
Use this stitch with knitted, tricot or other
stretchy fabrics.
The stitch enables your seam to stretch
without breaking the thread.
- 22 -
BLIND STITCH (Optional)
1. Fold fabric as shown.
2. Finish the seam as shown.
- 23 -
Adjust the width to obtain the correct seam.
Wrong: Needle is not piercing edge
to fold at all.
Correct seam.
Needle pierces the edge of fold too
much.
- 24 -
Match
BUTTON SEWING (Optional)
Utilize the button presser foot.
(Use Darning plate see page 15)
1. Place the darning plate properly.
2. Place button presser foot in position and attach it firmly.
3. Place the button between presser foot and fabric and lower the presser foot.
4. Manually turn hand wheel towards you, ensuring that the needle enters into both holes
of button without obstruction. (Increase or decrease width setting).
5. Sew about 7 stitches.
6. Pull both threads to the underside and tie them together.
BINDING
To sew fabrics edge select the multi-zigzag
stitch.
- 25 -
ZIPPER SEWING
Utilize the zipper foot.
Select straight stitch.
1. Zipper foot is designed to sew close to a raised edge,
thus preventing sewing on zipper.
2. Place zipper foot in position and attach firmly.
3. Fold the fabric about 2 cm and place the fabric
under foot.
1. To sew the left side of the zipper, set the zipper on
the right side of the needle.
2. To sew the right side of the zipper, set it on the left
side of the needle.
Sew as illustrated.
- 26 -
BUTTONHOLE SEWING
Utilise the foot of the buttonholes.
Set the stitch length dial.
Pattern selector dial
Steps
Setting
1. Set dial to “1“ position
2. Sew left side
3. Raise the needle
4. Set dial to “2“ position
5. Sew 5-6 stitches
6. Raise the needle
7. Set dial to “3“ position
8. Sew right side
9. Raise the needle
10. Set dial to “4“ position
11. Sew 5-6 stitches
12. Raise the needle
Before sewing, fit buttonhole foot as
shown.
Cut buttonhole along centre with cutter
as shown.
- 27 -
HEMMING (Optional)
1. Raise the foot and the needle to its highest position. Replace the foot with the picot foot.
2. Fold over the fabric edge by about 3 mm and place it under the foot. Secure the folded
edge with a few stitches. Slide the hem of your project into the picot foot by pulling the
threads.
3. Lower the foot and sew the hem.
4. While sewing fold the fabric to the left a little and guide it into the hemmer foot.
5. Make sure that the fabric does not move under the right half of the foot. The fabric must
be fed into the scroll of the hemmer sufficiently so that the project edge runs freely
through the groove under the foot.
Only suitable materials can be used and some practice may be necessary to achieve
the best results.
3 mm
1 mm
20 mm
- 28 -
TWIN NEEDLE
Put in the twin needle with the flat side backwards.
Thread the machine for normal sewing, leading both threads to needle and passing
their ends separately through its eye.
Sewing width should not exceed the third widest stitch width, as this will break the
needles.
ATTENTION: When using the twin needle, adjust the stitch width to maximally 3.
Adjusting the stitch width to a higher number causes the needle to break.
EMBROIDERY
(Use Darning plate see page 15)
Remove the presser foot and attach the darning plate.
Lower feed dog and move the hooped fabric slowly in the desired direction until the
fabric has been embroidered.
29

Hulp nodig? Stel uw vraag in het forum

Spelregels

Misbruik melden

Gebruikershandleiding.com neemt misbruik van zijn services uitermate serieus. U kunt hieronder aangeven waarom deze vraag ongepast is. Wij controleren de vraag en zonodig wordt deze verwijderd.

Product:

Bijvoorbeeld antisemitische inhoud, racistische inhoud, of materiaal dat gewelddadige fysieke handelingen tot gevolg kan hebben.

Bijvoorbeeld een creditcardnummer, een persoonlijk identificatienummer, of een geheim adres. E-mailadressen en volledige namen worden niet als privégegevens beschouwd.

Spelregels forum

Om tot zinvolle vragen te komen hanteren wij de volgende spelregels:

Belangrijk! Als er een antwoord wordt gegeven op uw vraag, dan is het voor de gever van het antwoord nuttig om te weten als u er wel (of niet) mee geholpen bent! Wij vragen u dus ook te reageren op een antwoord.

Belangrijk! Antwoorden worden ook per e-mail naar abonnees gestuurd. Laat uw emailadres achter op deze site, zodat u op de hoogte blijft. U krijgt dan ook andere vragen en antwoorden te zien.

Abonneren

Abonneer u voor het ontvangen van emails voor uw Empisal Dressmaker 270 bij:


U ontvangt een email met instructies om u voor één of beide opties in te schrijven.


Ontvang uw handleiding per email

Vul uw emailadres in en ontvang de handleiding van Empisal Dressmaker 270 in de taal/talen: Engels als bijlage per email.

De handleiding is 1,53 mb groot.


U ontvangt de handleiding per email binnen enkele minuten. Als u geen email heeft ontvangen, dan heeft u waarschijnlijk een verkeerd emailadres ingevuld of is uw mailbox te vol. Daarnaast kan het zijn dat uw internetprovider een maximum heeft aan de grootte per email. Omdat hier een handleiding wordt meegestuurd, kan het voorkomen dat de email groter is dan toegestaan bij uw provider.

Stel vragen via chat aan uw handleiding

Stel uw vraag over deze PDF

Uw handleiding is per email verstuurd. Controleer uw email

Als u niet binnen een kwartier uw email met handleiding ontvangen heeft, kan het zijn dat u een verkeerd emailadres heeft ingevuld of dat uw emailprovider een maximum grootte per email heeft ingesteld die kleiner is dan de grootte van de handleiding.

Er is een email naar u verstuurd om uw inschrijving definitief te maken.

Controleer uw email en volg de aanwijzingen op om uw inschrijving definitief te maken

U heeft geen emailadres opgegeven

Als u de handleiding per email wilt ontvangen, vul dan een geldig emailadres in.

Uw vraag is op deze pagina toegevoegd

Wilt u een email ontvangen bij een antwoord en/of nieuwe vragen? Vul dan hier uw emailadres in.


Info