Elementi sensibili:..............................................................................................................752(H)x582(V) pixel
Standard video:...........................................................................................................................................Pal
Numero di LED:.............................................................................................................................................30
Portata:............................................................................................................................................30m IR ON
IR CUT FILTER:............................................................................................................................................SI
Menu interno (OSD):.....................................................................................................................................SI
Consumo massimo:............................................................................................................. 600mA con IR ON
Temperatura d’utilizzo:...................................................................................................................-10÷ +50°C
Dimensioni (∅ x L):........................................................................................................................78 x 165mm
Temperatura d’immagazzinamento:...................................................................................................-20÷60°c
Peso:.....................................................................................................................................................740 gr.
Grado di protezione:..................................................................................................................................IP66
Standard video:...........................................................................................................................................Pal
Sensitivity :..............................................................................................................0.1 Lux color ÷ 0 Lux B/W
LED number:.................................................................................................................................................30
LED angle::...............................................................................................................................................± 60°
Range..............................................................................................................................................30m IR ON
IR CUT FILTER:........................................................................................................................................YES
White Balancing:...................................................................................ATW1 / ATW2 / AWC-SET / MANUAL
Back Light Compensation:.....................................................................................................OFF / BLC / HLC
Automatic Gain Control (AGC):.........................................................................OFF / LOW / MEDIUM / HIGH
Digital Noise Reduction in 2D (2DNR): .....................................................................................................YES
Digital Wide Dynamic Range (DWDR):.....................................................................................................YES
IR SMART:................................................................................................................................................YES
Nominal power supply...........................................................................................................................12 Vdc
Max. current consumption:.........................................................................................................600mA IR ON
Operating temperature range.........................................................................................................-10 to 50°C
Storage temperature range: ........................................................................................................... -20 to 60°C
Dimensions ( x D):......................................................................................................................78 x 165mm
Weight:..................................................................................................................................................740 gr.
Standard video:...........................................................................................................................................Pal
Reichweite:......................................................................................................................................30m IR ON
IR CUT FILTER:...........................................................................................................................................JA
Bewegungserkennung:................................................................................................................................. JA
Back Light Compensation:.....................................................................................................OFF / BLC / HLC
Automatic Gain Control (AGC):....................................................................AUS / LEICHT / MITTEL / HOCH
Digital Noise Reduction in 2D (2DNR): ........................................................................................................JA
Digital Wide Dynamic Range (DWDR):........................................................................................................JA
IR SMART:...................................................................................................................................................JA
Gewicht:.................................................................................................................................................740 gr.
Diese Funktion gestattet die Reparatur von einzelnen CCD-Pixeln bei schlechten Lichtverhältnissen,
Reduzierung der Helligkeit von zu hellen Pixeln.
Betätigen der Schaltfläche “ENTER”, folgende Nachricht wird angezeigt “Cover the lens then press Enter
key”. Nun das Objekt mit einem schwarzen Gegenstand abdecken, sodass kein Licht mehr von Außen
einfällt.
Sicherstellen, dass das Bild total schwarz ist und der Lichtsensor (CDS) nicht abgedeckt wurde, damit die
IR-LEDs nicht eingeschaltet wurden (wenn IR-LEDs ein sind diese rot scheinend).
Erneutes Betätigen der Schaltfläche “ENTER”, folgende Nachricht wird angezeigt “Processing now…..” und
der Kompensationsprozess startet. Nach einigen Sekunden geht das Menü in den vorherigen
Menübereich.
Sollte die Kamera nicht in den vorherigen Menübereich wechseln (weil das Bild nicht total schwarz war
oder die LEDs eingeschaltet waren), Spannung der Kamera ausschalten, wieder einschalten und den
Vorgang wiederholen.
50 DS80TC3M-001
SPECIAL – SPECIAL ADJUSTMENTS (SPEZIALEINSTELLUNGEN)
Diese Funktion gestattet die Änderungen von Funktionen von speziellen Kameraparametern.
Auswahl des Menüpunktes und die Schaltfläche OPEN betätigen um ins folgende Untermenü zu gelangen:
SPECIAL
CAM TITLE ON
MOTION OFF
PRIVACY OFF
PARK LINE OFF
IMAGE ADJ
COMM ADJ
VERSION 21 01 10
RETURN RET
Option Wert Beschreibung
CAM TITLE
ON ÷ OFF
Gestattet der Kamera einen Kameranamen mit bis zu 20 Zeichen
zu vergeben (siehe unten).
MOTION
ON ÷ OFF
Wenn aktiviert, informiert diese Bewegungsfunktion den Bediener
mit einem Symbol im Bild, das eine Bewegung erfasst wurde.
(siehe unten).
PRIVACY.
ON ÷ OFF
Gestattet die Vergabe von 8 Privatzonen im Bild (siehe unten).
PARK LINE
ON
÷
OFF
Diese Funktion steht bei dieser Kamera nicht zur Verfügung.
IMAGE ADJ /
Gestattet die Optimierung der Bildeinstellungen (siehe unten).
COMM ADJ /
Diese Funktion steht bei dieser Kamera nicht zur Verfügung.
VERSION 21 01 10
Zeigt die aktuelle Software-Version der Kamera an.
RETURN /
Option zum Verlassen des Untermenüs.
DS80TC3M-001 51
CAM TITLE (KAMERA NAME)
Diese Option gestattet die Vergabe eines Kameranamens und die Bestimmung der Position des Namens
im Bild.
Auswahl ON um ins folgende Untermenü der Namensvergabe zu gelangen.
ABCDEFGHIJKLMNO
PQRSTUVWXYZabcd
efghijklmnopqrs
tuvwxyz01234567
89 ()<>-/#*!?,.
CLR POS END
_ _ _ _ _ _ _ _ _ _ _ _ _ _ _ _ _ _ _ _ _ _
Die Menü-Taste auf der Rückseite nach links oder rechts betätigen um zum gewünschten Zeichen zu
steuern.
Die Menütaste zum Quittieren in der Mitte betätigen.
Auswahl CLR zum Löschen eines Zeichens.
Auswahl POS und betätigen der Menü-Taste, um den gewählten Namen auf dem Bild darzustellen.
Auswahl des Menüpunktes / um die Position des Namens im Bild zu bestimmen.
Die Menü-Taste auf der Rückseite betätigen um den Namen auf die gewünschte Position zu steuern.
Wurde die Position bestimmt, die Menütaste betätigen um ins vorherige Menü zu gelangen.
Das Menü mit der Schaltfläche END verlassen.
52 DS80TC3M-001
MOTION (BEWEGUNGSERKENNUNG)
Diese Funktion gestattet die Erfassung von Bewegungen im Bild. Findet im Bild eine Bewegung statt (z. B.
Öffnen einer Tür) wird dies über ein blinkendes Symbol im Bild angezeigt.
Auswahl des Bereichs, Auswahl ON mit linkem Tastendruck und durch zentrales Drücken der Menütaste
erfolgt der Zugriff auf folgendes Untermenü:
MOTION
AREA SEL. AREA1
AREA STATE ON
HEIGHT ■■■■■■█■■004
WIDTH ■■■■■█■■■004
LEFT/RIGHT ■■■█■■■■■002
TOP/BOTTOM ■■■■■■█■■002
DEGREE ■■■■█■■■■038
VIEW ON
RETURN RET
Option Wert Beschreibung
AREA SEL.
AREA1 ÷ AREA2 ÷
AREA3 ÷ AREA4
Die Bewegungserkennung kann in vier Bereiche eingeteilt
werden (siehen unten).
AREA STATE
ON ÷ OFF
Auswahl (ON) zur Aktivierung oder (OFF) zur Deaktiverung
der Bewegungserkennung des gewählten Bereichs.
HEIGHT
000 ÷ 013
Diese Funktion gestattet die Festlegung der Höhe des
Erfassungsbereichs.
WIDTH
000 ÷ 013
Diese Funktion gestattet die Festlegung der Breite des
Erfassungsbereichs.
LEFT/RIGHT
000 ÷ 013
Diese Funktion gestattet die horizontale Bewegung des
Erfassungsbereichs.
TOP/BOTTOM
000 ÷ 013
Diese Funktion gestattet die vertikale Bewegung des
Erfassungsbereichs.
DEGREE
000 ÷ 013
Gestattet die Erhöhung oder Verringerung der Sensibilität der
Bewegungserfassung.
Über die Menütaste kann der Wert zwischen 0 (hohe
Sensibilität) und 255 (niedrige Sensibilität) gewählt werden.
VIEW
ON ÷ OFF
Gestattet die Aktivierung(ON)/Deaktivierung(OFF) der
Anzeige des Erfassungsbereichs im Bild.
RETURN /
Option zum Verlassen des Untermenüs.
AREA SEL (AUSWAHL DES BEWEGUNGSBEREICHS)
Auswahl dieser Option um Zugriff auf das Untermenü zu erhalten:
In diesem Spezialbild, ist das Bild in verschiedene Sektore aufgeteilt, diese können durch den Nutzer
aktiviert werden.
Es besteht die Möglichkeit spezifische Punkte (bis zu 4) für die Bewegungserkennung in einem Bild
festzulegen.
Betätigen der Menütaste, Auswahl eines Bereichs und mit zentralem Druck auf die Menütaste bestätigen.
Um den Punkt abzuwählen die Menütaste mit einem zentralen Druck betätigen.
DS80TC3M-001 53
PRIVACY (PRIVATZONENMASKIERUNG)
Die Funktion der Privatzonemaskierung gestattet die Überblendung von bestimmten Zonen im Bild. Es
können bis zu acht Privatzonen definiert werden. Eine Privatzone wird im Bild rechteckig mit der
benutzerdefinierten Abmessung, Farbe und Transparenz dargestellt.
BEMERKUNGEN ZUR PRIVATZONE
oEs wird empfohlen bei Definierung der Privatzonen, diese leicht größer festzulegen.
oPrivatzonen können nur rechteckig sein.
Auswahl der Option zur Aktivierung (ON) der Privatzone und um folgendes Untermenü zu öffnen.
PRIVACY
AREA SEL. AREA1
AREA STATE ON
HEIGHT ■■■■■■█■■032
WIDTH ■■■■■█■■■032
LEFT/RIGHT ■■■█■■■■■020
TOP/BOTTOM ■■■■■■█■■016
COLOR ■■■■█■■■■000
RETURN RET
Option Wert Beschreibung
AREA SEL AREA1 ÷ AREA8
Gestattet die Auswahl von 8 verfügbaren Privatzonen (siehe
unten).
AREA STATE ON ÷ OFF
Gestattet die Aktivierung (ON)/Deaktivierung (OFF) der
gewünschten Privatzone.
HEIGHT 000 ÷ 010
Diese Funktion gestattet die Festlegung der Höhe der
Privatzone.
WIDTH 000 ÷ 010
Diese Funktion gestattet die Festlegung der Breite der
Privatzone.
LEFTH/RIGHT 000 ÷ 015
Diese Funktion gestattet die horizontale Bewegung der
Privatzone.
TOP/BOTTOM 000 ÷ 013
Diese Funktion gestattet die vertikale Bewegung der
Privatzone.
COLOR 000 ÷ 015
Gestattet die Auswahl einer von 15 Farben zum Füllen der
gewünschten Privatzone.
RETURN RET
Option zum Verlassen des Untermenüs.
AREA SEL (ZONENAUSWAHL)
Bei Auswahl dieser Option können bis zu 8 Zonen angezeigt werden. Es besteht die Möglichkeit die Anzahl
der Zonen und die Größe der Zonen zu definieren.
Zum Einstellen der Zonen die Menütaste nutzen.
Um das Menü zu Verlassen, die Menütaste mehrere Sekunden gedrückt halten.
54 DS80TC3M-001
IMAGE ADJ (BILDEINSTELLUNGEN)
Diese Funktion gestattet die Änderungen des Bildanzeigemodus.
Auswahl des Menüpunktes um in das folgende Untermenü zu gelangen:
IMAGE ADJ.
LENS SHAD OFF
2DNR ON
MIRROR OFF
FONT COLOR
CONTRAST ■■■■■■█■■143
SHARPNESS ■■■■█■■■■020
DISPLAY LCD
NEG.IMAGE OFF
RETURN RET
Option Wert Beschreibung
LENS SHAD
ON ÷ OFF
Gestattet eine Helligkeitskorrektur in den Bildecken.
2DNR
ON ÷ OFF
Gestattet die Aktivierung eine Filters zur Reduzierung
eines vielleicht vorhandenen Bildrauschens.
MIRROR
ON ÷ OFF
Gestattet die Spiegelung des Bildes.
FONT.COLOR /
Gestattet im OSD-Menü, die Änderung des Profils und der
Farbe.
CONTRAST
000 ÷ 255
Gestattet die Änderung des Kontrasts im Bild.
SHARPNESS
000 ÷ 031
Gestattet die Änderung der Schärfe im Bild.
DISPLAY
CRT ÷ USER ÷ LCD
Diese Option gestattet die Anpassung des Bildes an den
angeschlossenen Monitor (siehe unten).
NEG.IMAGE
ON ÷ OFF
Gestattet die Umwandlung des Bilds ins Negative.
RETURN /
Option zum Verlassen des Untermenüs.
DS80TC3M-001 55
LCD (Standard Konfiguration)
Diese Option gestattet die Anpassung des Bildes an einen angeschlossenen LCD-Monitor.
Auswahl dieser Option um in das folgende Untermenü zu gelangen:
LCD ADJUST
GAMMA 0.55
PED LEVEL ■■■■█■■■■■028
COLOR GAIN ■■■■■■■█■■199
RETURN RET
Option Wert Beschreibung
GAMMA
USER ÷ 1.00
Einstellung Gammawert (Standard = 55)
PED LEVEL
000 ÷ 063
Dieser Wert ist für eine normale Nutzung mit einem LCD-Monitor
voreingestellt.
Diesen Wert nur Ändern wenn spezielle Lichtbedingungen
herrschen oder wenn ein Monitor eingesetzt ist der nicht dem
Standard entspricht.
COLOR GAIN
000 ÷ 255
Gestattet die Änderung der Farbverstärkung durch Erhöhung oder
Verringerung der Sättigung.
RETURN RET
Option zum Verlassen des Untermenüs.
CRT
Diese Option gestattet die Anpassung des Bildes an einen angeschlossenen CRT-Monitor (Röhrenmonitor).
Auswahl dieser Option um ins folgende Untermenü zu gelangen:
CRT ADJUST
PED LEVEL ■■■■█■■■■■028
COLOR GAIN ■■■■■■■█■■192
RETURN RET
Option Wert Beschreibung
PED LEVEL
000 ÷ 063
Dieser Wert ist für eine normale Nutzung mit einem CRT-
Monitor voreingestellt.
Diesen Wert nur Ändern wenn spezielle Lichtbedingungen
herrschen oder wenn ein Monitor eingesetzt ist der nicht dem
Standard entspricht.
COLOR GAIN
000 ÷ 255
Gestattet die Änderung der Farbverstärkung durch Erhöhung
oder Verringerung der Sättigung.
RETURN RET
Option zum Verlassen des Untermenüs.
56 DS80TC3M-001
USER
Diese Option gestattet die Einstellung einer benutzerdefinierten Farbtonabweichung für das angeschlossene
Anzeigegerät.
Auswahl dieser Option um ins folgende Untermenü zu gelangen:
USER ADJ.
GAMMA 0.45
PED LEVEL ■■■■█■■■■■028
COLOR GAIN ■■■■■■■█■■176
RETURN RET
Option Wert Beschreibung
GAMMA
USER ÷ 1.00
Einstellung Gammawert
PED LEVEL
000 ÷ 063
Diesen Wert nur Ändern, wenn spezielle Lichtbedingungen
herrschen oder wenn ein Monitor eingesetzt ist der nicht dem
Standard entspricht.
COLOR GAIN
000 ÷ 255
Gestattet die Änderung der Farbverstärkung durch Erhöhung
oder Verringerung der Sättigung.
RETURN RET
Option zum Verlassen des Untermenüs.
COMM ADJ
Diese Funktion ist bei dieser Kamera nicht verfügbar.
RESET (WERKSRESET)
Bei Auswahl dieses Menüpunktes öffnet sich Untermenü, bei dem sich mit Bestätigen der Schaltfläche
YES, alle Einstellungen und Anpassungen gelöscht und die Werksparameter aufgerufen werden.
EXIT (VERLASSEN)
Auswahl dieses Menüpunktes bewirkt das Verlassen des Menüs, nach Verlassen wird nur das Videobild
angezeigt.
REINIGUNG DES GERÄTES
•Um Staub und Schmutz zu entfernen, Gerät mit einem trockenen Tuch abreiben.
•Sollte der Schmutz mit einem trockenen Tuch nicht zu entfernen sein, Gerät mit einem feuchten
Lappen und einem neutralen Reiniger abwischen.
•Um Verformungen, Beschädigungen oder Kratzer im Lack zu verhindern, keine flüchtigen
Flüssigkeiten wie Benzin, Alkohol, Lösungsmittel etc. oder chemisch behandelte Tücher zur
Reinigung des Geräts verwenden
DS80TC3M-001 57
ESPAÑOL
PRECAUCIONES
•Asegúrese de que el equipo está intacto después de sacarlo del embalaje.
•Desconecte el equipo de la tensión eléctrica antes de limpiarlo o realizar tareas de mantenimiento.
No utilice aerosoles para limpiar el equipo.
•Compruebe que la temperatura de funcionamiento se encuentra dentro del rango indicado y que el
ambiente no sea excesivamente húmedo.
•En caso de fallo o funcionamiento defectuoso, desconecte la alimentación eléctrica por medio del
interruptor general.
•El equipo sólo puede ser abierto por personal técnico cualificado.
•Para su reparación, póngase en contacto sólo con un centro de servicio técnico autorizado.
ESPECIFICACIONES TÉCNICAS
Tipo de sensor:........................................................................................................1/3" de SONY Super HAD
Objetivo:..............................................................................................................Manual Varifocal f2,8-11 mm
Elementos sensibles:.................................................................................................752 (H) x 582 (V) píxeles
Standard video:...........................................................................................................................................Pal
Relación S/N:..............................................................................................................................Más de 50 dB
Resolución:............................................................................................................................600 líneas de TV
Control de obturación:.........................................................................................................1/50 a 1/100.000 s
Número de LED:............................................................................................................................................30
Ángulo de apertura de los LED:................................................................................................................±60°
Rango............................................................................................................................30 m con IR activados
FILTRO DE IR:..............................................................................................................................................SÍ
Nombre de la cámara:...................................................................................................................................SÍ
Detección de movimiento:.............................................................................................................................SÍ
Zonas de privacidad:.......................................................................................................................................8
Viñeteo de lente:............................................................................................................................................SÍ
Balance de blancos:.............................................................................ATW1 / ATW2 / AWC-SET / MANUAL
Compensación de contraluz:.................................................................................................OFF / BLC / HLC
AGC (Control automático de ganancia): ...........................................................OFF / LOW / MEDIUM / HIGH
2DNR (Reducción digital de ruido en 2D):....................................................................................................SÍ
IR SMART:....................................................................................................................................................SÍ
Tensión nominal de la fuente de alimentación:....................................................................................12 VDC
Consumo máximo de corriente:.................................................................................600 mA con IR activados
Temperatura de funcionamiento: ............................................................................................ -10 ºC a +50 ºC
Dimensiones (∅ x L):.....................................................................................................................78 x 165mm
Temperatura de almacenamiento: .....................................................................................................-20÷60°c
Peso:.....................................................................................................................................................740 gr.
Grado de protección:.................................................................................................................................IP66
Uso:................................................................................................................................Exteriores o interiores
NOTA: Las características técnicas pueden sufrir variaciones sin previo aviso.
58 DS80TC3M-001
ACCESORIOS SUMINISTRADOS
•N°1 Cámara soporte para montaje en pared.
•1 llave Allen.
•Manual de usuario.
NOTA: Los accesorios están sujetos a modificaciones sin previo aviso.
NORMAS DE INSTALACIÓN
•Evite dirigir el objetivo hacia la luz directa del sol o fuentes de luz intensa, incluso cuando la cámara
esté apagada. El sujeto no debe estar a contraluz.
•Algunos sistemas de iluminación (por ejemplo, las luces fluorescentes de color) pueden distorsionar
los colores.
•Coloque un interruptor automático y un fusible adecuados antes de los equipos.
•Asegúrese de que los datos de la etiqueta de características se correspondan con las
especificaciones de alimentación eléctrica antes de conectar el equipo a la red eléctrica.
PRECAUCIONES DE INSTALACIÓN
•Instale el equipo en un lugar bien ventilado para evitar cualquier sobrecalentamiento.
•A pesar del grado de protección IP66 del equipo, el funcionamiento bajo ciertas condiciones (como en
paseos marítimos y puertos) puede acelerar la corrosión de las piezas externas. Además, es posible
que el funcionamiento no sea óptimo en lugares polvorientos, como canteras, minas o almacenes de
material de obra.
•Por el mismo motivo, no instale el equipo cerca de fuentes de calor (como radiadores o salidas de
aire caliente), en lugares expuestos a la luz solar directa, ambientes con excesivo polvo o zonas
sometidas a vibraciones mecánicas o choques.
•Tenga en cuenta el rango de temperaturas de funcionamiento del equipo (de -10 °C a +50 °C)
cuando elija el lugar de instalación. No instale el equipo encima de otro equipo que genere calor.
•No ponga en funcionamiento el equipo inmediatamente después de transportarlo de un lugar frío a
otro caliente o viceversa. Como norma general, espere unas tres horas para que el equipo se adapte
al nuevo ambiente (temperatura, humedad, etc.).
DS80TC3M-001 59
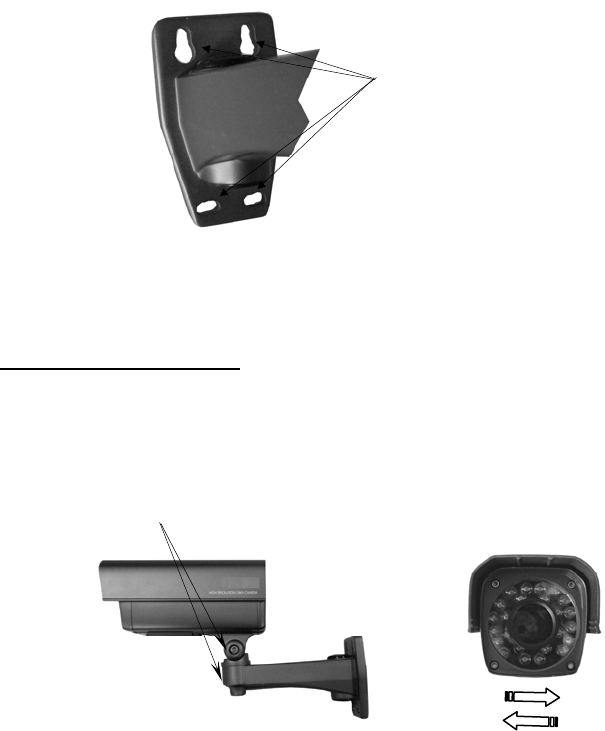
INSTALACIÓN
1. Antes de iniciar la instalación, asegúrese de que ninguno de los dispositivos que va a conectar está
alimentado.
2. Utilice la base del soporte a modo de "plantilla" para marcar la posición de los 4 orificios que se
practicarán en la superficie de soporte. Tenga en cuenta la posición de la ranura del soporte para
paso de cables (véase la siguiente imagen). Use la base como plantilla para los taladros.
3. Fije la cámara a la base mediante 4 tornillos y la llave suministrada prestando atención en pasar el
cable por la ranura prevista en el soporte para no pellizcar el cable.
4. Sitúe el soporte en una posición adecuada para tomar la imagen deseada; la cámara puede ajustarse
en los ejes HORIZONTAL y VERTICAL.
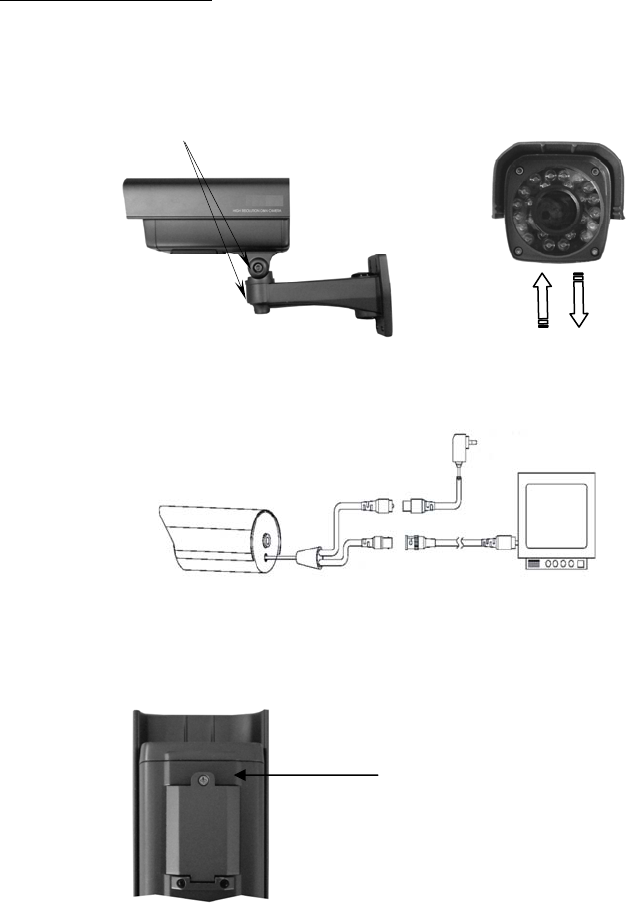
AJUSTE HORIZONTAL
Afloje el anillo del soporte y ajuste el tornillo mostrado en la figura
•ponga el soporte en posición horizontal
•dirija la cámara a la posición deseada
•cuando haya realizado el ajuste, vuelva a apretar el tornillo y el anillo bloqueando con la llave
suministrada el tornillo sin cabeza.
ORIFICIOS PARA LA FIJACIÓN
DE LA CÁMARA AL SOPORTE
TORNILLOS DEAJUSTE
60 DS80TC3M-001
Cable de alimentación
Cable de salida de vídeo
Alimentador
Entrada de vídeo
AJUSTE VERTICAL
Afloje el anillo del soporte y ajuste los tornillos mostrados en la figura.
•ponga el soporte en posición vertical
•dirija la cámara a la posición deseada
•cuando haya realizado el ajuste, vuelva a apretar los tornillos y el anillo bloqueando con la
llave suministrada el tornillo sin cabeza
NOTA: No gire la cámara reiteradamente, ya que podría dañarse el cableado interno.
5. Conecte la salida de vídeo de la cámara al equipo previsto.
6. Encienda la cámara.
7. Para acceder al botón del menú OSD y a los tornillos de ajuste, es necesario desatornillar el tornillo
de la parte inferior de la cámara.
TORNILLOS DEAJUSTE
DESATORNILLAR PARA
ACCEDER A LOS AJUSTES
DS80TC3M-001 61
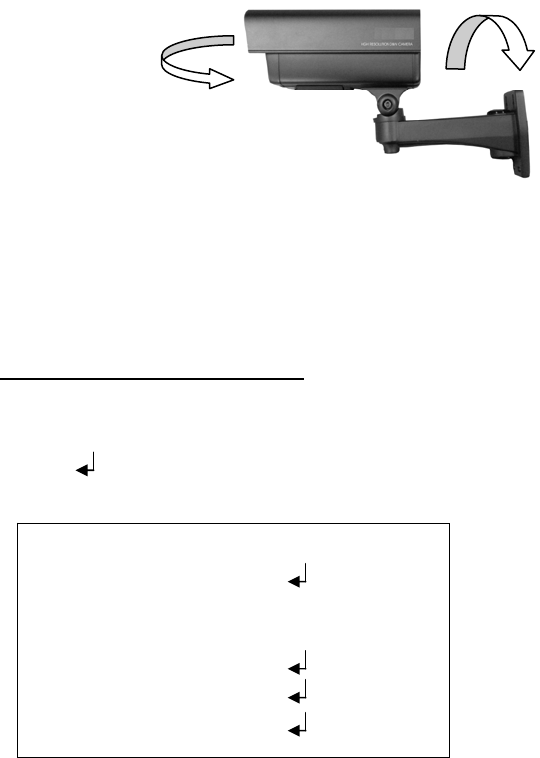
8. Realice el ajuste de la óptica para la imagen.
•Gire el anillo de ajuste (Ⓐ) en sentido horario o antihorario, para acercar o alejar el objeto.
•Gire el anillo de ajuste (Ⓑ) en sentido horario o antihorario, para enfocar el objeto.
ADVERTENCIA!
Durante las operaciones de instalación o colocación de la cámara en la dirección adecuada, procure no
girar reiteradamente la cámara, ya que podría dañarse el cableado interno.
T
N
∞
W
Posterior Ⓐ
A
nillo de ajuste de enfoque Ⓑ
A
nillo de ajuste de VARIFOCAL Ⓐ
NO!
Botón de activación
del menú OSD
Salida vídeo
auxiliar
Frontal Ⓑ
62 DS80TC3M-001
UTILIZACIÓN DEL MENÚ
La cámara 80TC3M00133 dispone de un menú de varios niveles para habilitar, deshabilitar o cambiar la
configuración de la cámara. Para acceder al botón que permite entrar en el menú principal es necesario,
con la cámara en funcionamiento, desatornillar y quitar la tapa inferior que oculta el botón de control.
NOTA: El botón de activación del menú OSD es de tipo joystick para realizar las operaciones más fácilmente.
DESCRIPCIÓN DEL SISTEMA DE MENÚS
Tras pulsar el botón central para acceder al menú, se mostrará la primera pantalla.
Puede seleccionar los elementos mostrados pulsando el botón hacia abajo. Una vez seleccionado el
elemento deseado, para cambiar el parámetro pulse el botón derecho y elija entre las opciones existentes,
que se muestran al pulsar varias veces el botón.
Al seleccionar el elemento asociado con el símbolo podrá entrar en el siguiente submenú, donde
podrá realizar otros cambios. Para salir del menú, seleccione EXIT y pulse el botón central.
Todos los cambios realizados se confirmarán automáticamente.
SETUP (VALORES POR DEFECTO)
LENS MANUAL
EXPOSURE
WHITE BAL. ATW1
BACKLIGHT OFF
DAY&NIGHT EXT
DPC
SPECIAL
RESET
EXIT
NOTA: Con los valores por defecto, la cámara usa un ajuste de brillo alto que no es adecuado para todo
tipo de instalaciones. Si fuera necesario, cambie el brillo (BRIGHTNESS) en el menú EXPOSURE (ver a
continuación).
Opción Valor Descripción
LENS DC / MANUAL/ VIDEO
Seleccionar MANUAL siempre
.
EXPOSURE /
Esta opción permite ajustar los parámetros de
exposición de la cámara. (Ver a continuación).
WHITE BAL.
ATW1 / ATW2 / AWC-SET /
MANUAL
Esta opción permite seleccionar el modo de balance
de blancos (ver a continuación).
BACKLIGHT OFF / HLC / BLC
Esta opción permite activar el modo de
compensación de contraluz. (Ver a continuación).
DAY & NIGHT EXT / AUTO / COLOR / B/W
Esta opción permite seleccionar el modo operativo
de la cámara. (Ver a continuación).
Se recomienda la opción EXT.
DPC /
Esta opción permite eliminar los píxeles defectuosos
del sensor CCD. (Ver a continuación).
SPECIAL /
Esta opción permite activar funciones especiales de
la cámara. (Ver a continuación).
RESET FACTORY / RETURN
Esta opción permite eliminar todos los cambios
realizados por el usuario; se restablecen los valores
de fábrica de la minicámara.
EXIT /
Esta opción permite salir del menú.
DS80TC3M-001 63
DESCRIPCIÓN DE LOS ELEMENTOS DEL MENÚ
LENS - ÓPTICA
La cámara se suministra con una óptica manual; seleccione MANUAL siempre.
EXPOSURE – EXPOSICIÓN
Esta función permite ajustar las opciones de la óptica de la cámara. Seleccione esta opción para entrar en
el submenú siguiente:
EXPOSURE
SHUTTER AUTO
BRIGHTNESS ■■■■■█■■■041
AGC MIDDLE
DWDR OFF
RETURN RET
SHUTTER – OBTURADOR
En SHUTTER podrá ajustar manualmente la velocidad de obturación. Si se reduce la velocidad de
obturación, disminuirá la sensibilidad del CCD, pero las escenas con mucho movimiento rápido se tomaran
mejor. Si se selecciona AUTO, la velocidad de obturación se ajustará automáticamente en función del
brillo de la imagen.
Si se selecciona MANUAL, es posible seleccionar FLK (recomendado cuando la iluminación proviene de
luces de neón o de colores) o valores comprendidos entre 1/50 y 1/100.000.
SE RECOMIENDA EL VALOR "AUTO".
BRIGHTNESS – BRILLO
Seleccione BRIGHTNESS y pulse el botón hacia la derecha o izquierda para modificar el porcentaje de
brillo.
AGC – CONTROL AUTOMÁTICO DE GANANCIA
Esta función se activa en condiciones de baja iluminación de la imagen.
Seleccione una de las siguientes opciones: HIGH (alto), MIDDLE (medio), LOW (bajo) y OFF
(desactivado).
DWDR – DIGITAL WIDE DYNAMIC RANGE
La función DWDR es la versión digital de WDR (Wide Dynamic Range): Permite un mejor balance entre
las zonas brillantes y oscuras, obteniendo una imagen más detallada. Seleccione ON para entrar en el
submenú siguiente:
DWDR
LEVEL ■■■■■█■■■058
RETURN RET
NIVEL
Seleccione esta opción y desplace el valor a la izquierda o a la derecha para reducir la diferencia de brillo
entre las zonas oscuras y brillantes.
64 DS80TC3M-001
WHITE BAL – BALANCE AUTOMÁTICO DE BLANCOS
Esta función permite seleccionar el modo de balance de blancos.
Esta opción de menú puede tener los siguientes modos: ATW1, ATW2, AWC-SET y MANUAL.
Opción Valor Descripción
ATW ATW1 / ATW2
Auto Tracking White Balance: el seguimiento automático
del Balance de blancos permite un ajuste automático en
función de las condiciones del entorno detectadas
(exterior o interior).
AWC-SET /
Puede emplearse el modo de balance de blancos si se
prefiere una configuración específica en lugar del ajuste
automático (condiciones de iluminación invariables).
Pulse el botón de menú para activar esta función.
MANUAL
MANUAL / OUTDOOR /
INDOOR
Ajuste manual de los colores rojo y azul. Seleccione un
valor entre 0 y 255. (Ver a continuación).
OUTDOOR: optimizado para instalaciones en el exterior
INDOOR: optimizado para instalaciones en interiores
Seleccione MANUAL para entrar en el siguiente submenú y ajustar manualmente el balance de blancos:
WB MANUAL
COLOR TEMP MANUAL
RED ■■■■■■█■■■045
BLUE ■■■█■■■■■■064
RETURN RET
NOTA: Se recomienda la opción ATW.
DS80TC3M-001 65
BACKLIGHT – COMPENSACIÓN DE CONTRALUZ
NOTA: Este menú sólo está activo si la cámara está en modo DÍA o en modo fijo de COLOR; no
funcionará en modo NOCHE o si está configurada en modo blanco/negro fijo (en este último caso, se
reemplazará la opción BLC del menú BACKLIGHT por “----“).
Un objeto iluminado a contraluz por una fuente de luz potente normalmente aparecerá oscuro y menos
visible que el resto de la imagen. La función BLC (Backlight Compensation) evita este problema y ofrece
una excelente compensación.
En esta opción podrá elegir entre OFF (no activo), BLC y HLC.
Si selecciona BLC, verá el siguiente submenú:
BLC
AREAL SEL AREA1
AREA STATE ON
GAIN ■■■■■■█■■■042
HEIGHT ■■■■█■■■■■004
WIDTH ■■■■■■■█■■003
LEFT/RIGHT ■■■■■█■■■■006
TOP/BOTTOM ■■■■■■■█■■005
RETURN END
Opción Valor Descripción
AREA SEL AREA1 / AREA2
Esta opción permite seleccionar una de las 2 áreas
disponibles para programar.
AREA STATE ON / OFF
Esta opción permite activar (ON) o desactivar (OFF) el área
seleccionada (es posible activar o desactivar únicamente el
área 2; el área 1 siempre está activa con BLC en ON y
desactivada con BLC en OFF).
GAIN 014 a 255
Permite cambiar el nivel de brillo del área seleccionada.
HEIGHT 000 a 010
Permite cambiar la altura del área seleccionada.
WIDTH 000 a 010
Permite cambiar el ancho del área seleccionada.
LEFTH/RIGHT 000 a 015
Permite mover horizontalmente el área seleccionada.
TOP/BOTTOM 000 a 013
Permite mover verticalmente el área seleccionada.
RETURN RET
Permite salir del submenú.
66 DS80TC3M-001
HLC – HIGH LIGHT COMPENSATION
Esta función permite invertir puntos luminosos de la imagen (como un faro). De esta manera, se
conseguirá mejorar la resolución y la escala de grises del sistema.
Seleccione HLC para entrar en el submenú siguiente:
HLC
LEVEL ■■■■■■■█■■■200
MODE ALL DAY
RETURN RET
El comando LEVEL permite seleccionar el nivel de brillo de la imagen. Asegúrese de que el valor de
LEVEL es correcto tanto de día como de noche.
Seleccione LEVEL para elegir el porcentaje deseado. Use un porcentaje bajo con escasa iluminación
alrededor de la fuente de luz (para obtener una compensación máxima); use HIGH con más iluminación
alrededor de la fuente de luz (para obtener una compensación mínima).
Seleccione MODE para decidir si la función estará activa únicamente durante el día (ALL DAY) o sólo
durante la noche (NIGHT ONLY).
DAY/NIGHT – FUNCIONAMIENTO VARIABLE DE LA CÁMARA SEGÚN LAS VARIACIONES
LUMÍNICAS DE LA ESCENA
Normalmente, la cámara captura las imágenes en color, pero en condiciones de escasa iluminación
cambiará automáticamente al modo en blanco y negro. De esta manera, se optimiza la calidad de imagen.
Seleccione DAY/NIGHT para elegir entre los siguientes valores: EXT, AUTO (automático), COLOR y B/W
(blanco y negro).
EXT – (Por defecto: opción recomendada)
Esta opción supone conmutar automáticamente entre los modos Color y Blanco y negro. El sensor CDS
sincroniza la conmutación a blanco y negro y la activación del foco de infrarrojos.
ADVERTENCIA: Los parámetros del modo Noche deben establecerse en este menú.
Incluso si la cámara va a funcionar en modo EXT, para establecer los siguientes parámetros, seleccione
primero la opción B/W y después configure la cámara en EXT.
COLOR
En este modo, las imágenes de la cámara serán siempre en modo Color y la cámara no conmutará al
modo Noche (B/W). No funcionarán las opciones del menú B/W, como por ejemplo, IR SMART.
Durante la noche, con iluminación por infrarrojos, las imágenes serán en blanco y negro.
DS80TC3M-001 67
B/W
Mediante esta opción, la cámara siempre tomará las imágenes en modo blanco y negro.
Seleccione B/W para entrar en el submenú siguiente:
D&N B&W
BURST OFF
IR SMART ON
IR LEVEL HIGH
RETURN RET
Opción Valor Descripción
BURST ON / OFF
Si selecciona ON, habrá salva de color incluso si la cámara está
en modo Blanco y negro.
IR SMART ON / OFF
Si selecciona ON, la cámara ajusta el brillo del área seleccionada
en su propio submenú. (Ver a continuación).
IR LEVEL HIGH / LOW
Función no disponible en este producto.
RETURN /
Permite salir del submenú.
IR SMART – AJUSTE DE LA ILUMINACIÓN POR INFRARROJOS
La función IR SMART, empleada con las opciones EXT y B/W, permite seleccionar un área de la imagen
en la que la cámara realizará un ajuste automático del brillo cuando hay iluminación por infrarrojos.
Seleccione ON para entrar en el submenú siguiente:
IR SMART
IR GAIN ■■■■■■█■■■122
HEIGHT ■■■█■■■■■■006
WIDTH ■■■■■■■█■■010
LEFTH/RIGHT ■■█■■■■■■■002
TOP/BOTTOM ■■■■█■■■■■007
RETURN RET
Opción Valor Descripción
IR GAIN 000 a 255
Permite cambiar el nivel de brillo del área seleccionada.
HEIGHT 000 a 010
Permite cambiar la altura del área seleccionada.
WIDTH 000 a 009
Permite cambiar el ancho del área seleccionada.
LEFTH/RIGHT 000 a 015
Permite mover horizontalmente el área seleccionada.
TOP/BOTTOM 000 a 013
Permite mover verticalmente el área seleccionada.
RETURN /
Permite salir del submenú.
68 DS80TC3M-001
AUTO
Permite que la imagen de la cámara cambie automáticamente de color a blanco y negro, sin el
funcionamiento sincronizado de un foco externo de infrarrojos. Utilizar este modo únicamente con
variaciones suaves de luz. NO SE RECOMIENDA USAR ESTA OPCIÓN.
Seleccione AUTO para entrar en el siguiente submenú (NO OPERATIVO):
D&N AUTO
D-N LEVEL ■■■■■■█■■■240
D-N DELAY 3 SEC
N-D LEVEL ■■■■■■■█■■230
N-D- DELAY 3 SEC
RETURN RET
Opción Valor Descripción
D-N LEVEL 000 a 240
Especifica el nivel de "ruido" para la conmutación de Día a Noche
D-N DELAY 1 a 30
Retardo en la conmutación de Día a Noche
N-D LEVEL 000 a 255
Especifica el nivel de "ruido" para la conmutación de Noche a Día
N-D DELAY 1 a 30
Retardo en la conmutación de Noche a Día
RETURN /
Permite salir del submenú.
DPC (Dead Pixel Compensation – Compensación de los píxeles defectuosos
)
Esta función permite reparar píxeles del sensor CCD en condiciones de escasa iluminación, lo que reduce
el brillo de los píxeles demasiado brillantes.
Pulse el botón “ENTER” y aparecerá el mensaje “Cover the lens then press Enter key”. Cubra la lente con
una tapa negra para que no pase la luz.
Asegúrese de que la imagen es totalmente negra y de que no tiene tapado el sensor CDS de iluminación
(para que no se enciendan los LEDs, ya que si se encendieran aparecerían rojos).
Pulse de nuevo el botón “ENTER” y aparecerá el mensaje “Processing now…” indicando que comenzará
la compensación. Al cabo de unos segundos, el menú volverá al nivel anterior. Si la cámara no vuelve al
menú anterior (porque no se ha tapado completamente la lente o porque los LEDs estaban encendidos),
apague y encienda la cámara antes de repetir el procedimiento.
DS80TC3M-001 69
SPECIAL– AJUSTES ESPECIALES
Esta función permite cambiar las funciones relativas a los parámetros de la cámara.
Seleccione esta opción de menú para entrar en el submenú siguiente:
SPECIAL
CAM TITLE ON
MOTION OFF
PRIVACY OFF
PARK LINE OFF
IMAGE ADJ
COMM ADJ
VERSION 21 01 10
RETURN RET
Opción Valor Descripción
CAM TITLE ON / OFF
Esta opción permite asignar un nombre a la cámara de hasta
20 caracteres. (Ver a continuación).
MOTION ON / OFF
Con esta función activada (ON), se puede mostrar al operador un
icono que indica que se ha producido movimiento dentro de la
escena (ver a continuación).
PRIVACY. ON / OFF
Si esta opción está habilitada, permite seleccionar hasta 8 zonas
privadas (ver a continuación).
PARK LINE ON / OFF
Función no disponible en esta cámara.
IMAGE ADJ /
Seleccione esta opción para entrar en el submenú donde podrá
establecer las opciones de presentación de la imagen (ver a
continuación).
COMM ADJ /
No disponible en este producto
VERSION 21 01 10
Indica la versión de software de la cámara.
RETURN /
Permite salir del submenú.
70 DS80TC3M-001
CAM TITLE – NOMBRE DE LA CÁMARA
Esta opción permite asignar un nombre a la cámara y mostrarlo en la posición preferida del monitor.
Seleccione ON para entrar en el siguiente submenú, donde podrá asignar un nombre a la cámara.
ABCDEFGHIJKLMNO
PQRSTUVWXYZabcd
efghijklmnopqrs
tuvwxyz01234567
89 ()<>-/#*!?,.
CLR POS END
_ _ _ _ _ _ _ _ _ _ _ _ _ _ _ _ _ _ _ _ _ _
Use el botón para desplazar los caracteres a la posición deseada.
Pulse el botón para confirmar.
Seleccione CLR para borrar los caracteres seleccionados.
Seleccione POS y pulse el botón para salir automáticamente del submenú y mostrar los caracteres
introducidos.
Use las flechas / para desplazar los caracteres seleccionados.
Use el botón de la cámara para desplazar los caracteres a la posición deseada.
Cuando haya seleccionado la posición, pulse de nuevo el botón para volver al menú anterior.
Gebruikershandleiding.com neemt misbruik van zijn services uitermate serieus. U kunt hieronder aangeven waarom deze vraag ongepast is. Wij controleren de vraag en zonodig wordt deze verwijderd.
Product:
Spelregels forum
Om tot zinvolle vragen te komen hanteren wij de volgende spelregels:
lees eerst de handleiding door;
controleer of uw vraag al eerder door iemand anders is gesteld;
probeer uw vraag zo duidelijk mogelijk te stellen;
heeft u een probleem en al geprobeerd om dit op te lossen, vermeld dit erbij aub;
heeft u een oplossing gekregen van een bezoeker dan horen wij dat graag in dit forum;
wilt u een reactie geven op een vraag of antwoord, gebruik dan niet dit formulier maar klik op de knop 'reageer op deze vraag';
uw vraag wordt direct op de website gezet; vermijd daarom persoonlijke gegevens in te vullen;
Belangrijk! Als er een antwoord wordt gegeven op uw vraag, dan is het voor de gever van het antwoord nuttig om te weten als u er wel (of niet) mee geholpen bent! Wij vragen u dus ook te reageren op een antwoord.
Belangrijk! Antwoorden worden ook per e-mail naar abonnees gestuurd. Laat uw emailadres achter op deze site, zodat u op de hoogte blijft. U krijgt dan ook andere vragen en antwoorden te zien.
Abonneren
Abonneer u voor het ontvangen van emails voor uw Elkron 80TC3M00133 bij:
nieuwe vragen en antwoorden
nieuwe handleidingen
U ontvangt een email met instructies om u voor één of beide opties in te schrijven.
Ontvang uw handleiding per email
Vul uw emailadres in en ontvang de handleiding van Elkron 80TC3M00133 in de taal/talen: Duits, Engels, Italiaans, Spaans als bijlage per email.
De handleiding is 0,62 mb groot.
U ontvangt de handleiding per email binnen enkele minuten. Als u geen email heeft ontvangen, dan heeft u waarschijnlijk een verkeerd emailadres ingevuld of is uw mailbox te vol. Daarnaast kan het zijn dat uw internetprovider een maximum heeft aan de grootte per email. Omdat hier een handleiding wordt meegestuurd, kan het voorkomen dat de email groter is dan toegestaan bij uw provider.
Stel vragen via chat aan uw handleiding
Stel uw vraag over deze PDF
Uw handleiding is per email verstuurd. Controleer uw email
Als u niet binnen een kwartier uw email met handleiding ontvangen heeft, kan het zijn dat u een verkeerd emailadres heeft ingevuld of dat uw emailprovider een maximum grootte per email heeft ingesteld die kleiner is dan de grootte van de handleiding.
Er is een email naar u verstuurd om uw inschrijving definitief te maken.
Controleer uw email en volg de aanwijzingen op om uw inschrijving definitief te maken
U heeft geen emailadres opgegeven
Als u de handleiding per email wilt ontvangen, vul dan een geldig emailadres in.
Uw vraag is op deze pagina toegevoegd
Wilt u een email ontvangen bij een antwoord en/of nieuwe vragen? Vul dan hier uw emailadres in.