Koppel voor ieder onderhoud eerst de afzuigkap af van het elektriciteitsnet.Koppel voor ieder onderhoud eerst de afzuigkap af van het elektriciteitsnet.
Koppel voor ieder onderhoud eerst de afzuigkap af van het elektriciteitsnet.Koppel voor ieder onderhoud eerst de afzuigkap af van het elektriciteitsnet.
Koppel voor ieder onderhoud eerst de afzuigkap af van het elektriciteitsnet.
Machinaal rMachinaal r
Machinaal rMachinaal r
Machinaal r
einigen van de metaleneinigen van de metalen
einigen van de metaleneinigen van de metalen
einigen van de metalen
vetfilters kan tot lichte verkleuringenvetfilters kan tot lichte verkleuringen
vetfilters kan tot lichte verkleuringenvetfilters kan tot lichte verkleuringen
vetfilters kan tot lichte verkleuringen
leiden, die echter geen invloed op deleiden, die echter geen invloed op de
leiden, die echter geen invloed op deleiden, die echter geen invloed op de
leiden, die echter geen invloed op de
werking hebben.werking hebben.
werking hebben.werking hebben.
werking hebben.
•De binnenkant van de kap alleen met
een warm sopje reinigen. Geen
scherpe reinigingsmiddelen, borstels
of schuurmiddelen gebruiken!
Metalen vetfiltersMetalen vetfilters
Metalen vetfiltersMetalen vetfilters
Metalen vetfilters
•De metalen vetfilters hebben de taak
om de vetdeeltjes die bij het koken
ontstaan, op te zuigen en worden
altijd, d.w.z. zowel bij gebruik als
afzuigkap als bij gebruik als
recirculatiekap, gebruikt.
De metalen vetfilters moeten elke 4
weken worden gedemonteerd en in
de afwasautomaat of met de hand
worden schoongemaakt.
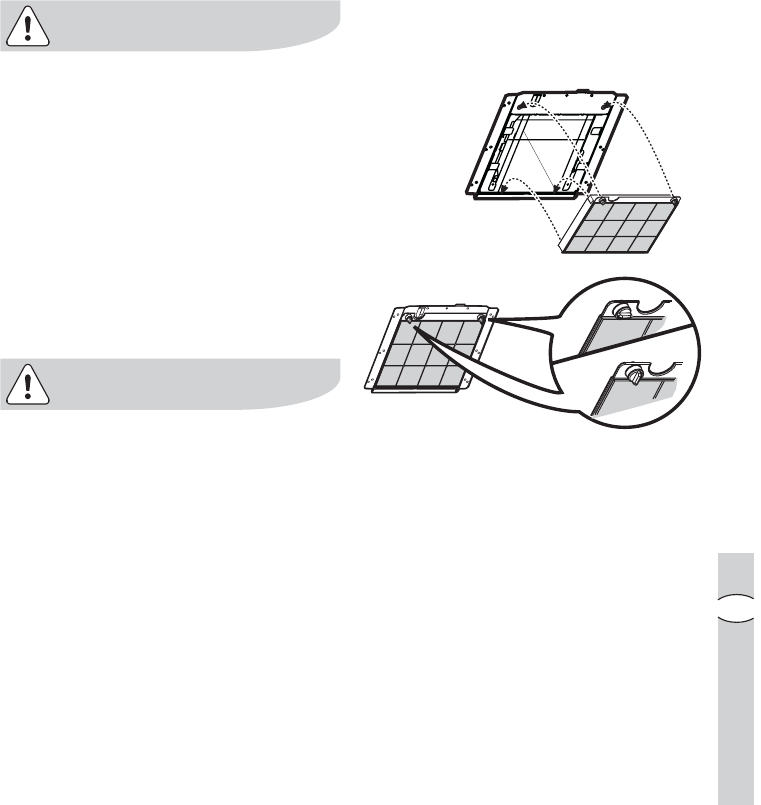
DemonterDemonter
DemonterDemonter
Demonter
en van de metalen vetfiltersen van de metalen vetfilters
en van de metalen vetfiltersen van de metalen vetfilters
en van de metalen vetfilters
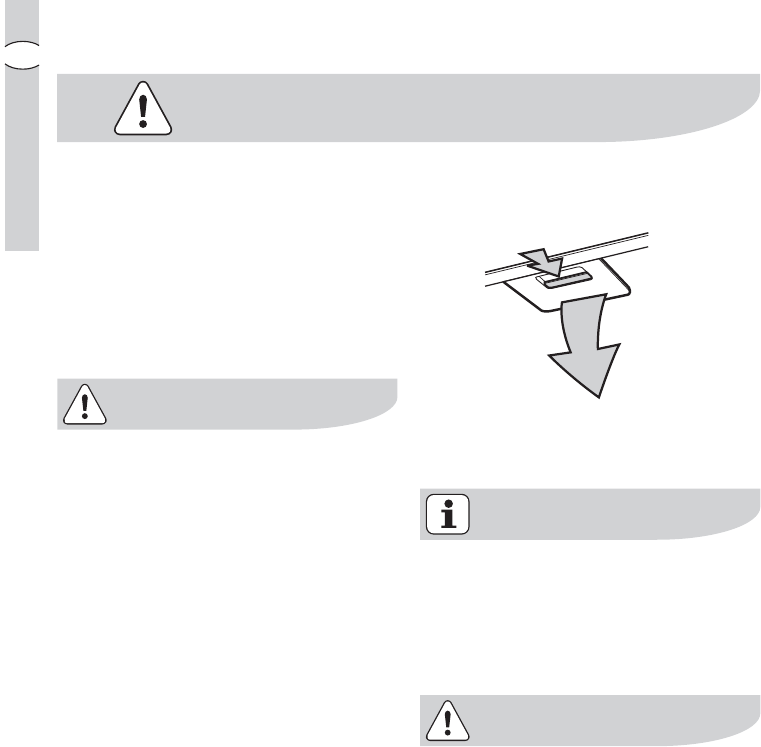
Schuif de vergrendeling van de
metalen vetfilters eerst naar achteren
en trek de cassette dan naar bene-
den.
Reinigen met de handReinigen met de hand
Reinigen met de handReinigen met de hand
Reinigen met de hand
Metaalfiltercassette ca. 1 uur in heet
water met een vetoplossend
schoonmaakmiddel weken en daarna
met heet water afspoelen. Proces
evt. herhalen. Cassette afdrogen en
weer inzetten.
AfwasautomaatAfwasautomaat
AfwasautomaatAfwasautomaat
Afwasautomaat
Metaalfiltercassette in de afwas-
automaat zetten. Sterkste pro-
gramma en hoogste temperatuur
(min. 65°C) kiezen. Proces evt.
herhalen. Cassette afdrogen en weer
inzetten.
2828
2828
28
electr electr
electr electr
electr
oluxolux
oluxolux
olux onderhoud
NL
KoolfilterKoolfilter
KoolfilterKoolfilter
Koolfilter
•Het koolfilter moet worden gebruikt,
als het apparaat als recirculatiekap
wordt gebruikt.
•Daarvoor is een origineel koolfilter
nodig (zie “Extra leverbare accessoi-
res”).
•
VV
VV
V
ervangen van het koolfilterervangen van het koolfilter
ervangen van het koolfilterervangen van het koolfilter
ervangen van het koolfilter
Bij normaal gebruik moet het kool-
filter elke 4 maanden worden vervan-
gen. Dit filter kan niet worden gewas-
sen en hergebruikt.
•
MontageMontage
MontageMontage
Montage
Plaats het koolstoffilter binnen de kap
ter afdekking van het rooster van de
motorbescherming.
Maak het filter met de 2 zijknoppen
vast.
•Om het filter
los te nemenlos te nemen
los te nemenlos te nemen
los te nemen in omge-
keerde volgorde te werk gaan.
•Bij bestelling van een nieuw filter
modelnaam en E-nr. opgeven. Deze
gegevens vindt u op het typeplaatje
aan de binnenzijde van het apparaat.
•Het koolfilter kunt u bestellen bij de
service-afdeling.
electrolux electrolux
electrolux electrolux
electrolux onderhoud
2929
2929
29
NL
AttentieAttentie
AttentieAttentie
Attentie
•Als u deze aanwijzingen m.b.t.
reiniging van het apparaat en vervan-
ging resp. reiniging van de filters niet
opvolgt, kan dat tot brand leiden.
Deze aanwijzingen beslist opvolgen!
•De fabrikant is niet aansprakelijk voor
schade aan de motor of schade t.g.v.
brand die het gevolg zijn van ondes-
kundig onderhoud of niet opvolgen
van de bovengenoemde veiligheids-
voorschriften.
VV
VV
V
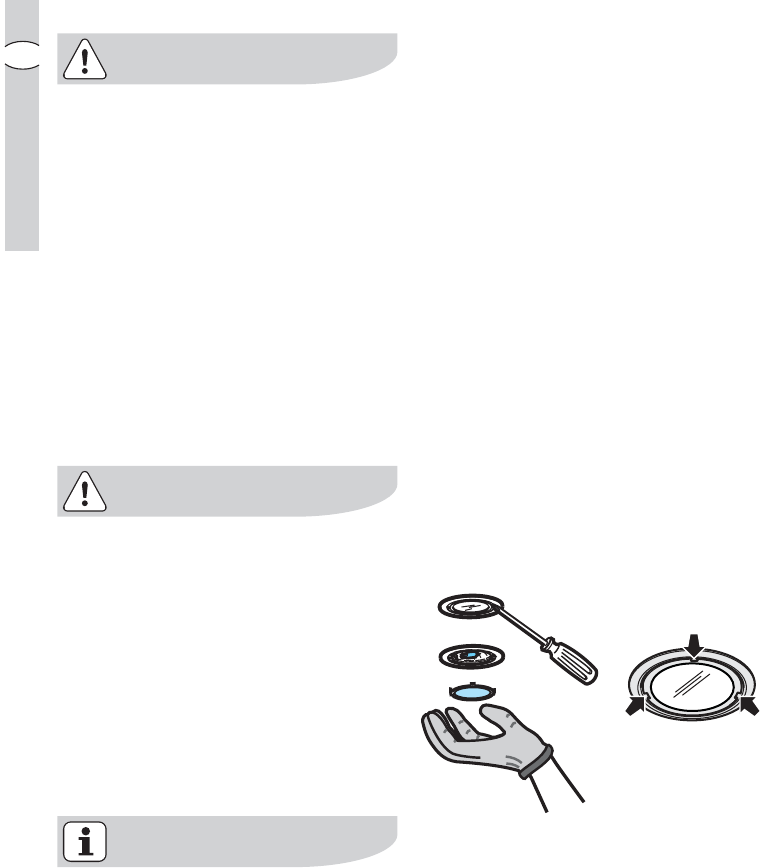
ervangen van de lamp(en)ervangen van de lamp(en)
ervangen van de lamp(en)ervangen van de lamp(en)
ervangen van de lamp(en)
••
••
•
Stekker uit het stopcontact trStekker uit het stopcontact tr
Stekker uit het stopcontact trStekker uit het stopcontact tr
Stekker uit het stopcontact tr
ekken.ekken.
ekken.ekken.
ekken.
••
••
•
De lampjes pas aanraken als zeDe lampjes pas aanraken als ze
De lampjes pas aanraken als zeDe lampjes pas aanraken als ze
De lampjes pas aanraken als ze
afgekoeld zijn.afgekoeld zijn.
afgekoeld zijn.afgekoeld zijn.
afgekoeld zijn.
•Verwijder de beschadigde lamp.
•Defecte lamp door een gelijkwaardige
lamp vervangen.
•Voordat u contact opneemt met onze
service-afdeling, omdat de gloeilamp
niet brandt, eerst controleren of de
lamp stevig vast zit.
3030
3030
30
electr electr
electr electr
electr
oluxolux
oluxolux
olux onderhoud / extra leverbare accessoires
NL
ReinigingReiniging
ReinigingReiniging
Reiniging
•Attentie: eerst de stekker uit het
stopcontact trekken.
Geen spitse voorwerpen in het
beschermrooster van de motor
steken.
•De buitenkant van het apparaat met
een mild sopje reinigen. Gebruik
geen scherpe reinigingsmiddelen,
borstels of schuurmiddel.
•Het bedieningspaneel en het vetfilter-
rooster alleen met een vochtige doek
en mild afwasmiddel reinigen.
•Maak alle plastic onderdelen schoon
met een zachte doek bevochtigd
met lauw water en een neutraal
reinigingsmiddel.
•Het is belangrijk om op tijd de filters
te vervangen resp. te reinigen. Als u
deze aanwijzingen niet opvolgt, kan
t.g.v. vetafzetting brandgevaar
ontstaan.
Extra leverbare accessoires
koolfilter koolfilter
koolfilter koolfilter
koolfilter Type 15
electrolux electrolux
electrolux electrolux
electrolux installatie
3131
3131
31
NL
Installatie
TT
TT
T
echnische gegevensechnische gegevens
echnische gegevensechnische gegevens
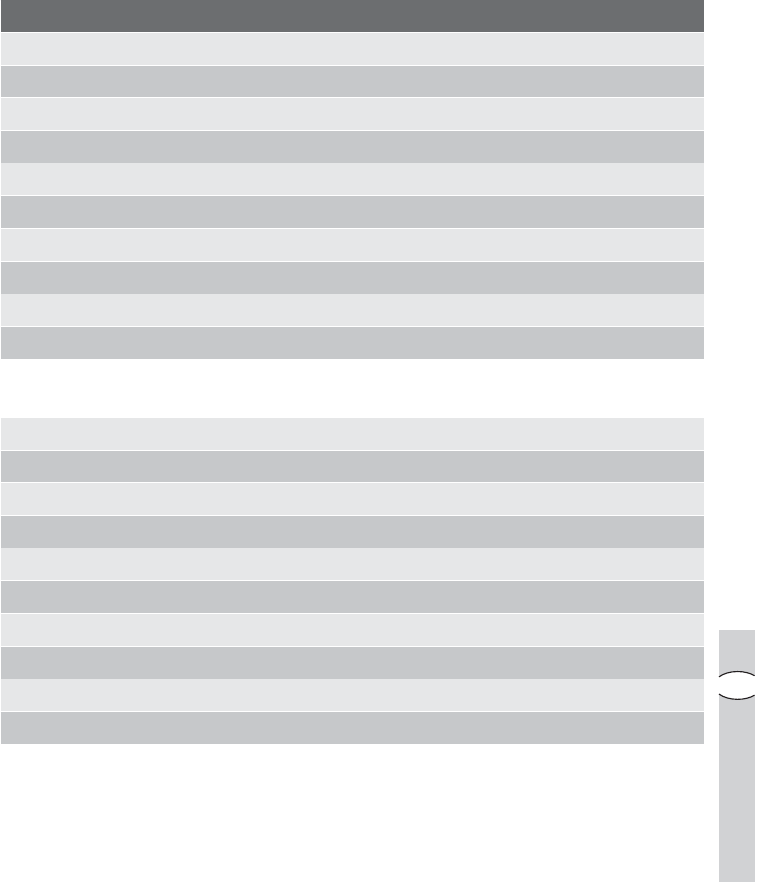
echnische gegevens
EFC 60500EFC 60500
EFC 60500EFC 60500
EFC 60500
EFC 90500EFC 90500
EFC 90500EFC 90500
EFC 90500
Afmetingen (in cm):Afmetingen (in cm):
Afmetingen (in cm):Afmetingen (in cm):
Afmetingen (in cm):
Hoogte:76,6-121,376,6-121,3
Breedte:59,889,8
Diepte:5050
TT
TT
T
otale aansluitwaarotale aansluitwaar
otale aansluitwaarotale aansluitwaar
otale aansluitwaar
de:de:
de:de:
de:
200 W200 W
200 W200 W
200 W
290 W290 W
290 W290 W
290 W
Vent.motor:170 W250 W
Verlichting:2 x 20 W (12V-G4)2 x 20 W (12V-G4)
Lengte van het aansluitsnoer:Lengte van het aansluitsnoer:
Lengte van het aansluitsnoer:Lengte van het aansluitsnoer:
Lengte van het aansluitsnoer:
150 cm150 cm
150 cm150 cm
150 cm
150 cm150 cm
150 cm150 cm
150 cm
Elektrische aansluiting:Elektrische aansluiting:
Elektrische aansluiting:Elektrische aansluiting:
Elektrische aansluiting:
220-240 V220-240 V
220-240 V220-240 V
220-240 V
220-240 V220-240 V
220-240 V220-240 V
220-240 V
TT
TT
T
oebehoroebehor
oebehoroebehor
oebehor
en/Montagemateriaalen/Montagemateriaal
en/Montagemateriaalen/Montagemateriaal
en/Montagemateriaal
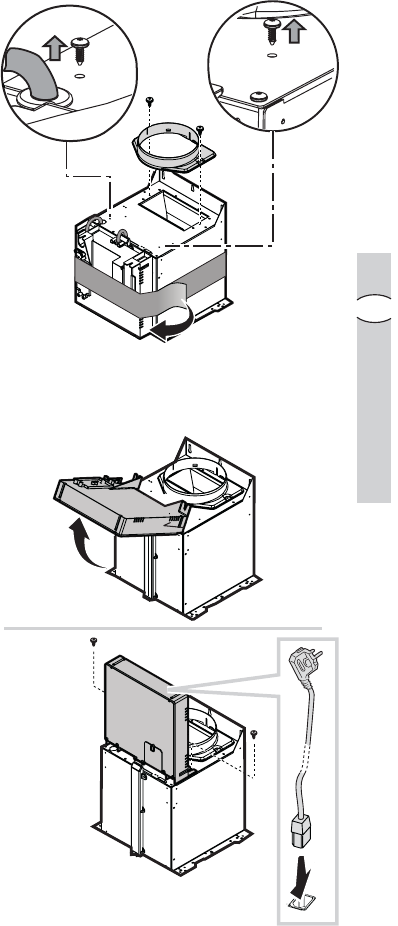
2
inzetstukken voor schroevendraaiers (om schroeven van het type torx vast te draaien)
1 verbindingsring
1 luchtgeleider
1 rookkanaalbeugel
6 pluggen Ø 8 mm (voor bevestiging aan de muur)
6 schroeven 5x45 (voor bevestiging aan de muur)
2 sluitringen
4 schroeven 2,9 x 6,5 (om het bovenste schouwdeel te bevestigen + voor
montage van de luchtgeleider).
2 schroeven 3,5 x 9,5 (om de verbindingsring te bevestigen)
1 voedingskabel
3232
3232
32
electr electr
electr electr
electr
oluxolux
oluxolux
olux installatie
NL
Elektrische aansluiting
VV
VV
V
eiligheidsaanwijzingen voor deeiligheidsaanwijzingen voor de
eiligheidsaanwijzingen voor deeiligheidsaanwijzingen voor de
eiligheidsaanwijzingen voor de
elektrelektr
elektrelektr
elektr
o-installateuro-installateur
o-installateuro-installateur
o-installateur
De netspanning moet corresponderen
met de spanning die vermeld wordt op
het etiket met eigenschappen, aan de
binnenkant van de wasemkap. Als de
wasemkap een stekker heeft, moet
deze in een stopcontact worden
gestoken dat voldoet aan de geldende
voorschriften. Heeft de kap geen
stekker (rechtstreekse verbinding met
het net) of is deze niet goed te berei-
ken, dan moet er een tweepolige
schakelaar worden geplaatst die de
volledige ontkoppeling van het net
garandeert in het geval van een over-
spanning van klasse III, in overeen-
stemming met de installatie normen.
Attentie! Attentie!
Attentie! Attentie!
Attentie! Alvorens de wasemkap weer
aan het voedingsnet aan te sluiten
controleer of deze goed functioneert,
controleer altijd of de voedingskabel
goed gemonteerd is.
electrolux electrolux
electrolux electrolux
electrolux installatie
3333
3333
33
NL
= =
Ø 8
Ø 8
5x45
Ø 8
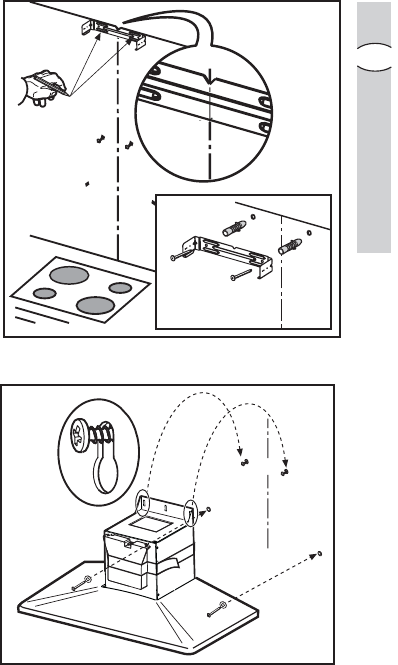
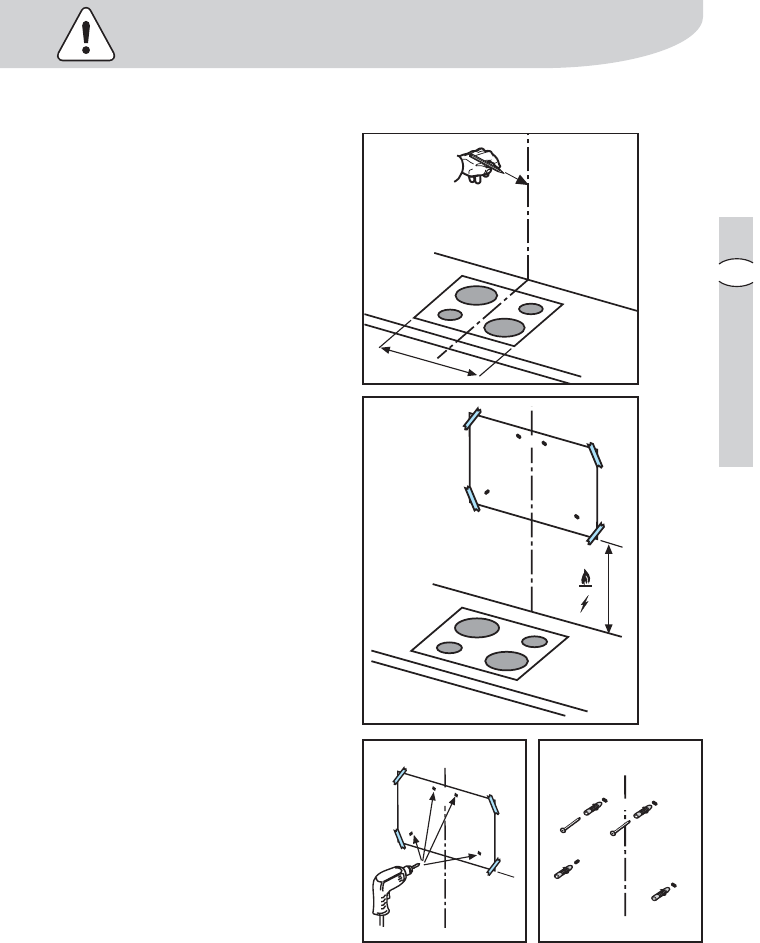
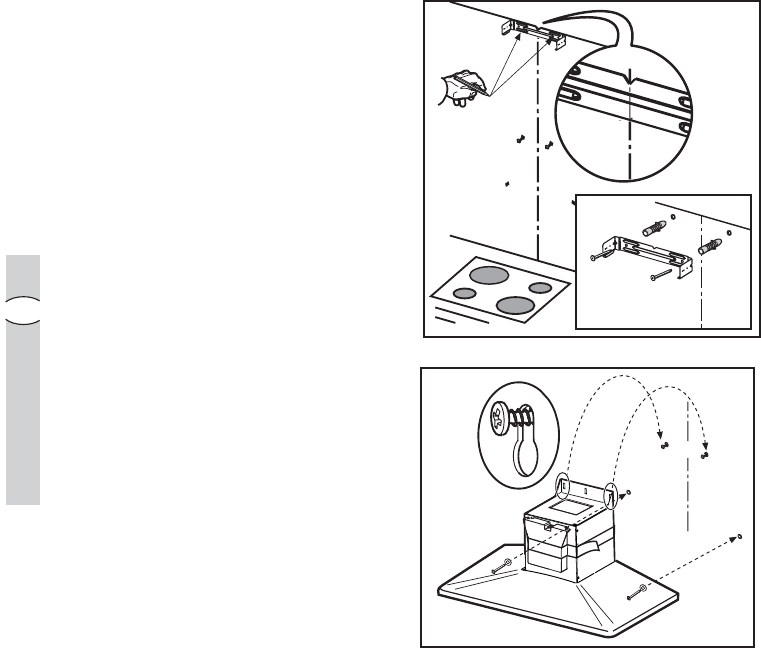
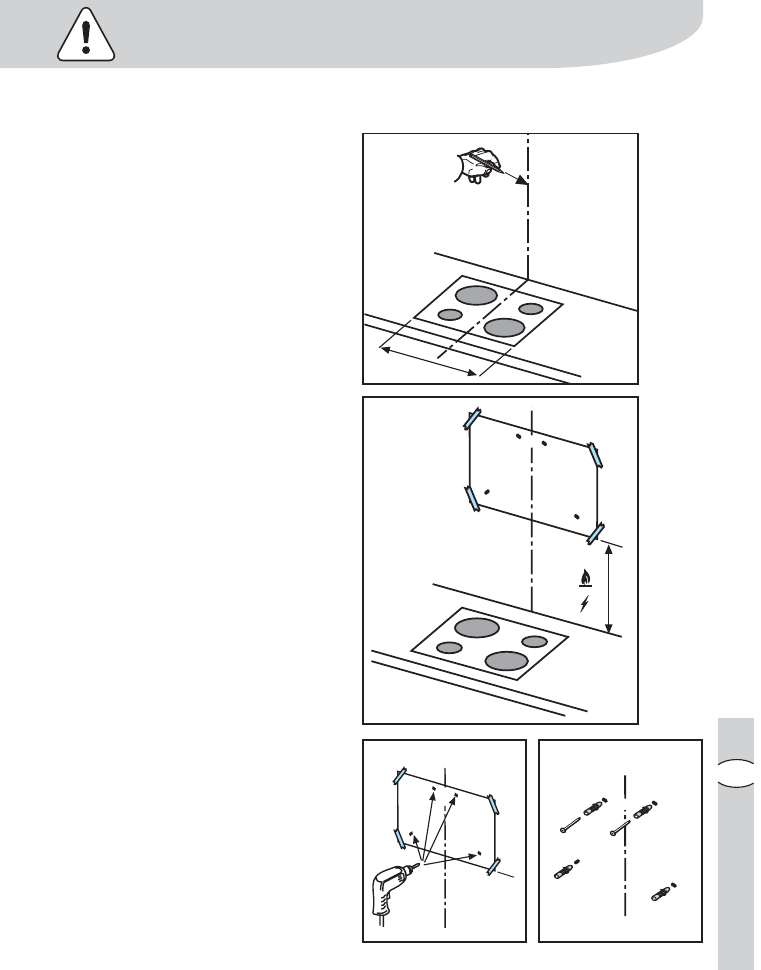
InstallatieInstallatie
InstallatieInstallatie
Installatie
VV
VV
V
óór de installatie contróór de installatie contr
óór de installatie contróór de installatie contr
óór de installatie contr
oleer of het apparaat van het elektriciteitsnet ontkoppeldoleer of het apparaat van het elektriciteitsnet ontkoppeld
oleer of het apparaat van het elektriciteitsnet ontkoppeldoleer of het apparaat van het elektriciteitsnet ontkoppeld
oleer of het apparaat van het elektriciteitsnet ontkoppeld
kitchen, it will not extract steam.kitchen, it will not extract steam.
kitchen, it will not extract steam.kitchen, it will not extract steam.
kitchen, it will not extract steam.
•The hood is supplied in recirculation
filter version (activated charcoal filter
supplied) but it can be used, remov-
ing the activated charcoal filter, in the
venting version.
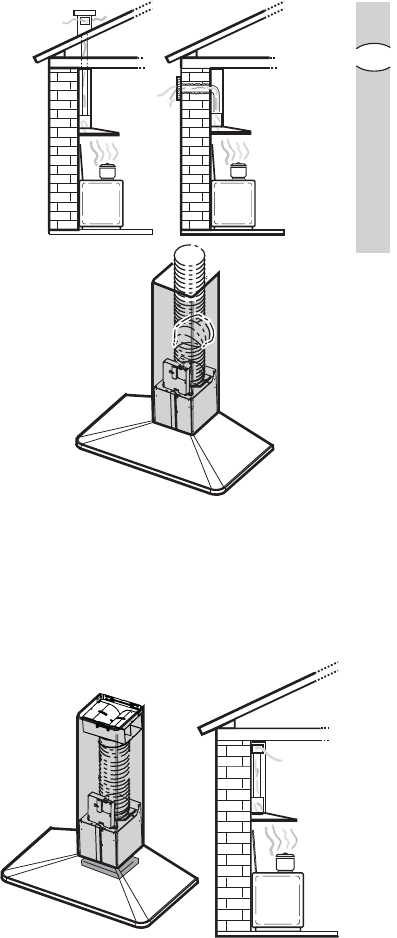
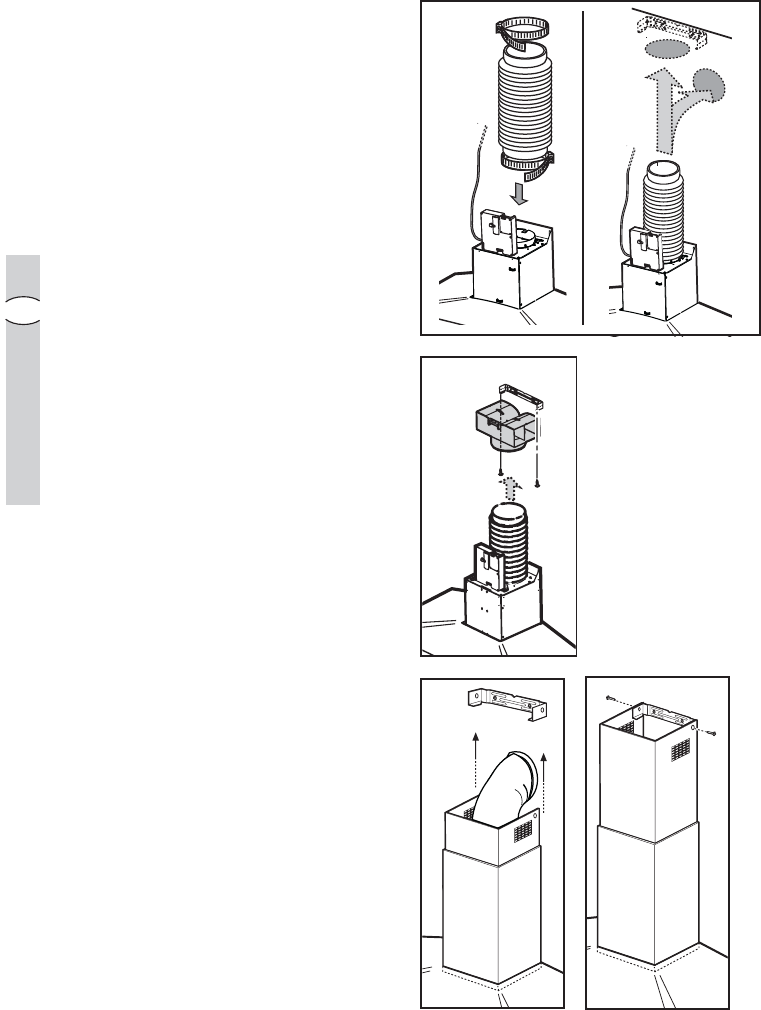
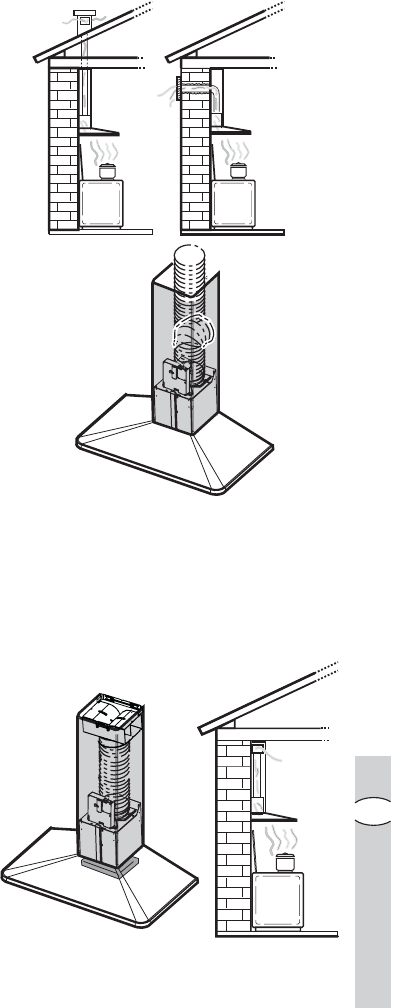
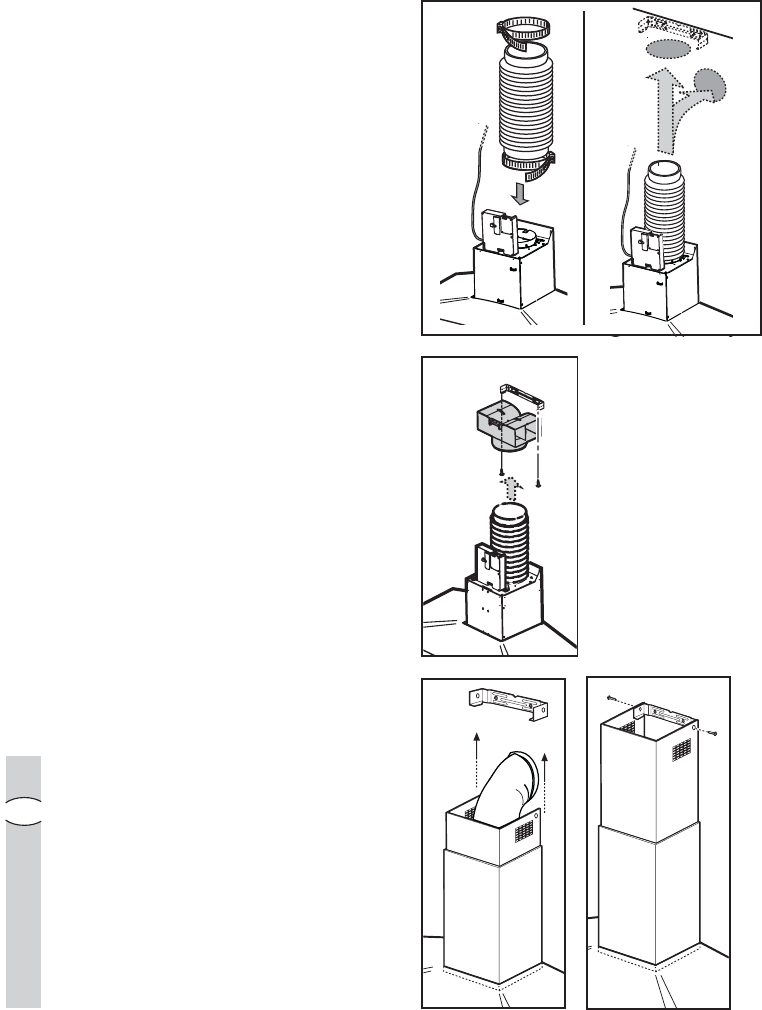
Extraction modeExtraction mode
Extraction modeExtraction mode
Extraction mode
•In this mode fumes are extracted to
the outside via a
hosehose
hosehose
hose connected to
the
coupling ringcoupling ring
coupling ringcoupling ring
coupling ring.
•In order to obtain the best perform-
ance the hose should have a diam-
eter equal to the outlet hole.
RecirRecir
RecirRecir
Recir
culation modeculation mode
culation modeculation mode
culation mode
•The air is filtered through a
charchar
charchar
char
coalcoal
coalcoal
coal
filterfilter
filterfilter
filter and returned to the kitchen.
•You will need an original charcoal
filter for the recirculation mode. (See
Special Accessories).
RecirRecir
RecirRecir
Recir
culation modeculation mode
culation modeculation mode
culation mode
Extraction modeExtraction mode
Extraction modeExtraction mode
Extraction mode
6060
6060
60
electr electr
electr electr
electr
oluxolux
oluxolux
olux control panel
GB
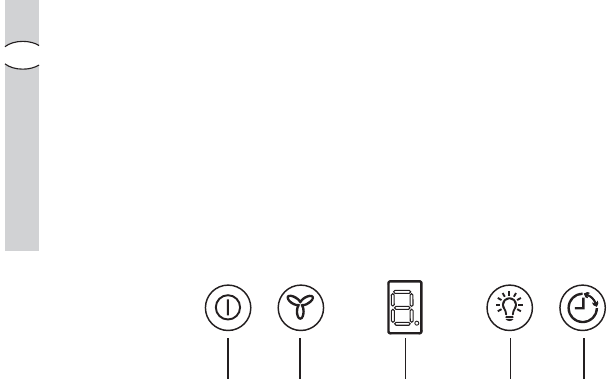
Control Panel
•Best results are obtained by using a low speed for normal conditions and a high
speed when odours are more concentrated.
Turn the hood on a few minutes before you start cooking.
The hood should be left on after cooking for about 15 minutes or until all the
odours have disappeared.
•The cooker hood is fitted with a sensor which, in the event of extreme variations
in temperature, switches the appliance on automatically until the temperature of
the environment surrounding the hood has been significantly reduced.
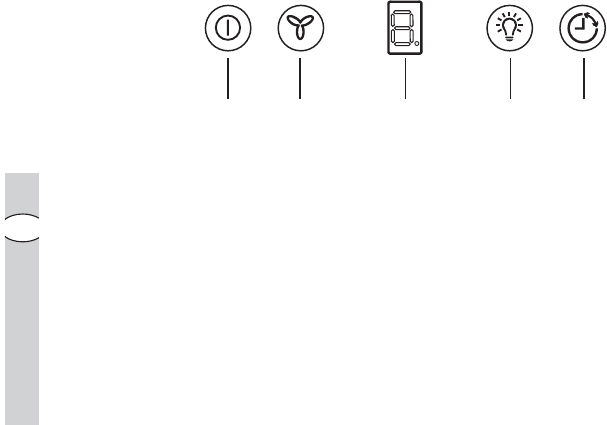
•The control switches are located on the unit’s front panel:
11
11
1
Motor ON/OFF buttonMotor ON/OFF button
Motor ON/OFF buttonMotor ON/OFF button
Motor ON/OFF button
By pressing the button, the hood starts at speed 1.
Pressing the button (OFF) while the hood is in function turns the latter off.
22
22
2
Speed incrSpeed incr
Speed incrSpeed incr
Speed incr
ease buttonease button
ease buttonease button
ease button
By pressing the button, the hood starts at speed 1.
Pressing the button (while the hood is on) modifies the motor speed:
Speed 1: Speed 1:
Speed 1: Speed 1:
Speed 1: the number "
11
11
1" appears on the display
Speed 2:Speed 2:
Speed 2:Speed 2:
Speed 2: the number "
22
22
2" appears on the display
Speed 3:Speed 3:
Speed 3:Speed 3:
Speed 3: the number "
33
33
3" appears on the display
High-speed: the number "4" appears (flashing) on the display
The high-speed function is regulated by a timer. The standard time setting is 5',
at the end of which the hood adjusts to speed 2.
Press button
22
22
2 to deactivate this function before the set time expires; the hood
will adjust to speed 1. Press button
11
11
1 to turn the hood off.
33
33
3
Lights ON/OFF buttonLights ON/OFF button
Lights ON/OFF buttonLights ON/OFF button
Lights ON/OFF button
44
44
4
Speed timer buttonSpeed timer button
Speed timer buttonSpeed timer button
Speed timer button
55
55
5
DisplayDisplay
DisplayDisplay
Display
12534
electrolux electrolux
electrolux electrolux
electrolux control panel
6161
6161
61
GB
Speed timer buttonSpeed timer button
Speed timer buttonSpeed timer button
Speed timer button
Press button "
44
44
4" to activate the speed
timer; the hood turns off once the set
time expires.
The timer functions in the following
way:
•
Speed 1Speed 1
Speed 1Speed 1
Speed 1 - 20 minutes (the number
"
11
11
1" and a small flashing LED light
appear on the display)
•
Speed 2Speed 2
Speed 2Speed 2
Speed 2 - 15 minutes (the number
"
22
22
2" and a small flashing LED light
appear on the display)
•
Speed 3Speed 3
Speed 3Speed 3
Speed 3 - 10 minutes (the number
"
33
33
3" and a small flashing LED light
appear on the display)
•
High-speedHigh-speed
High-speedHigh-speed
High-speed - 5 minutes (the number
"
44
44
4" and a small flashing LED light
appear on the display)
Press button
11
11
1 or button
4 4
4 4
4 to turn the
hood off while the speed timer is in
function; by pressing button
22
22
2, the
hood returns to the set speed.
GrGr
GrGr
Gr
ease filter indicatorease filter indicator
ease filter indicatorease filter indicator
ease filter indicator
After 80 hours of operation, the
number "
11
11
1" starts flashing on the
display.
Press and hold button
11
11
1 or 3 to reset
the indicator.
Carry out maintenance on the grease
filter according to the indications of this
manual.
Charcoal filter indicator
After 320 hours of operation, the
number "2" starts flashing on the
display.
Press and hold button
11
11
1 or
33
33
3 to reset
the indicator.
Carry out maintenance on the charcoal
filter according to the indications of this
manual.
When both filter signals appear simulta-
neously, numbers "1" and "2" will
alternately flash on the display.
Reset the indicator by performing the
above-mentioned procedure twice.
The first operation resets the grease
filter indicator, while the second opera-
tion resets the charcoal filter indicator.
The charcoal filter indicator is not active
in the standard mode.
If the hood is used in the recirculation
mode, the charcoal filter indicator must
be activated.
Perform the following steps to activatePerform the following steps to activate
Perform the following steps to activatePerform the following steps to activate
Perform the following steps to activate
the charthe char
the charthe char
the char
coal filter indicator:coal filter indicator:
coal filter indicator:coal filter indicator:
coal filter indicator:
Turn the hood off and keep buttons
2 2
2 2
2
and
33
33
3 pressed for 3".
The numbers "1" and "2" will flash for
2" once the function has been acti-
vated.
Charcoal filter indicator deactivation:
Turn the hood off and keep buttons
11
11
1
and
22
22
2 pressed for 3".
The number "1" will flash for 2" to
indicate that the function has been
deactivated.
6262
6262
62
electr electr
electr electr
electr
oluxolux
oluxolux
olux maintenance and care
GB
Maintenance and Care
••
••
•
BeforBefor
BeforBefor
Befor
e performing any maintenance operation, isolate the hood fre performing any maintenance operation, isolate the hood fr
e performing any maintenance operation, isolate the hood fre performing any maintenance operation, isolate the hood fr
e performing any maintenance operation, isolate the hood fr
om theom the
om theom the
om the
electrical supply by switching ofelectrical supply by switching of
electrical supply by switching ofelectrical supply by switching of
electrical supply by switching of
f at the connector and rf at the connector and r
f at the connector and rf at the connector and r
f at the connector and r
emoving the connectoremoving the connector
emoving the connectoremoving the connector
emoving the connector
fuse.fuse.
fuse.fuse.
fuse.
Or if the appliance has been connected thrOr if the appliance has been connected thr
Or if the appliance has been connected thrOr if the appliance has been connected thr
Or if the appliance has been connected thr
ough a plug and socket, then theough a plug and socket, then the
ough a plug and socket, then theough a plug and socket, then the
ough a plug and socket, then the
plug must be rplug must be r
plug must be rplug must be r
plug must be r
emoved fremoved fr
emoved fremoved fr
emoved fr
om the socket.om the socket.
om the socket.om the socket.
om the socket.
When washing the metal grease filter
in the dishwasher a slight
discolouration of the filter can occur,
this does not have any impact on its
performance.
•Never use corrosive, abrasive or
flammable cleaning products or
products containing bleach.
Metal grMetal gr
Metal grMetal gr
Metal gr
ease filterease filter
ease filterease filter
ease filter
•The purpose of the grease filters is to
absorb grease particles which form
during cooking and it
mustmust
mustmust
must always be
used, either in the external extraction
or internal re-circulation function.
Attention:Attention:
Attention:Attention:
Attention: the metal grease filters
must be removed and washed, either
by hand or in the dishwasher, every
four weeks.
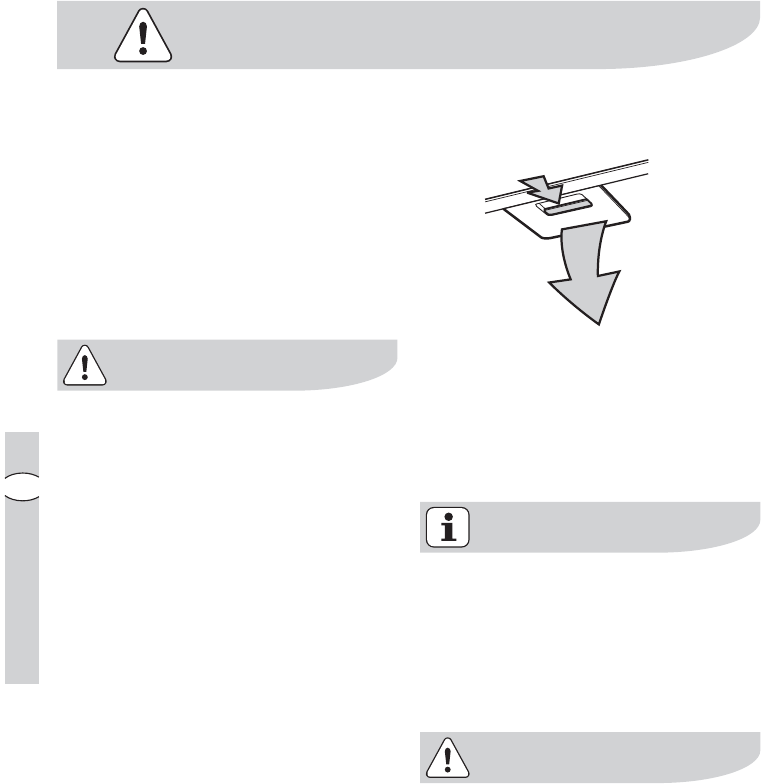
Removing the metal grRemoving the metal gr
Removing the metal grRemoving the metal gr
Removing the metal gr
ease filterease filter
ease filterease filter
ease filter
•Use the spring handle and remove
the filter downward.
Hand washingHand washing
Hand washingHand washing
Hand washing
Soak grease filters for about one hour
in hot water with a grease-loosening
cleaner, then rinse off thoroughly with
hot water. Repeat the process if
necessary. Refit the grease filters
when they are dry.
DishwasherDishwasher
DishwasherDishwasher
Dishwasher
Place grease filters in the dishwasher.
Select most powerful washing
programme and highest temperature,
at least 65°C. Repeat the process.
Refit the grease filters when they are
dry.
electrolux electrolux
electrolux electrolux
electrolux maintenance and care
6363
6363
63
GB
CharChar
CharChar
Char
coal filtercoal filter
coal filtercoal filter
coal filter
•The charcoal filter should only be
used if you want to use the hood in
recirculation mode.
•To do this you will need an original
charcoal filter (available from your
local Service Force Centre).
•
Replacing the charReplacing the char
Replacing the charReplacing the char
Replacing the char
coal filtercoal filter
coal filtercoal filter
coal filter
The charcoal filter cannot be washed
nor regenerated.
The charcoal filter should be replaced
every 4 months under normal use.
Replacement filters are available from
your local Service Force Centre.
•
FittingFitting
FittingFitting
Fitting
Position the carbon filter inside the
hood to cover the protection grill of
the motor.
Fix the filter with 2 lateral knobs.
•
TT
TT
T
o ro r
o ro r
o r
emoveemove
emoveemove
emove proceed in the reverse
order.
•Always specify the hood model
number, serial number and product
number code when ordering replace-
ment filters. This information is shown
on the rating plate located on the
inside of the unit.
•The charcoal filter can be ordered
from your local Service Force Centre.
6464
6464
64
electr electr
electr electr
electr
oluxolux
oluxolux
olux maintenance and care
GB
WW
WW
W
arar
arar
ar
ningning
ningning
ning
•Failure to observe the instructions on
cleaning the unit and changing the
filters will cause a fire hazard. You are
therefore strongly recommended to
follow these instructions.
•The manufacturer declines all respon-
sibility for any damage to the motor
or any fire damage linked to inappro-
priate maintenance or failure to
observe the above safety recommen-
dations.
Changing the light bulb(s)Changing the light bulb(s)
Changing the light bulb(s)Changing the light bulb(s)
Changing the light bulb(s)
•
Disconnect the cooker hood frDisconnect the cooker hood fr
Disconnect the cooker hood frDisconnect the cooker hood fr
Disconnect the cooker hood fr
omom
omom
om
the mains supplythe mains supply
the mains supplythe mains supply
the mains supply
..
..
.
••
••
•
Prior to touching the light bulbsPrior to touching the light bulbs
Prior to touching the light bulbsPrior to touching the light bulbs
Prior to touching the light bulbs
ensurensur
ensurensur
ensur
e they have cooled down.e they have cooled down.
e they have cooled down.e they have cooled down.
e they have cooled down.
•Remove the damaged lamp.
•Replace the old bulb with a new one
of the same type.
•If the light does not come on, make
sure the bulb has been inserted in
correctly before contacting your local
Service Force Centre.
electrolux electrolux
electrolux electrolux
electrolux maintenance and care
6565
6565
65
GB
Cleaning the hoodCleaning the hood
Cleaning the hoodCleaning the hood
Cleaning the hood
•Clean the outside of the hood using a
damp cloth and a solution of water
and mild washing up liquid.
•Never use corrosive, abrasive or
flammable cleaning products or
products containing bleach.
•Never insert pointed objects in the
motor’s protective grid.
•Only ever clean the switch panel and
filter grill using a damp cloth and mild
washing up liquid.
•Clean all the plastic parts with a soft
cloth soaked in warm water and
neutral soap.
•It is extremely important to clean the
unit and change the filters at the
recommended intervals. Failure to do
so will cause grease deposits to build
up that could constitute a fire hazard.
6666
6666
66
electr electr
electr electr
electr
oluxolux
oluxolux
olux special accessories
GB
Special accessoriesSpecial accessories
Special accessoriesSpecial accessories
Special accessories
CharChar
CharChar
Char
coal filtercoal filter
coal filtercoal filter
coal filter Type 15
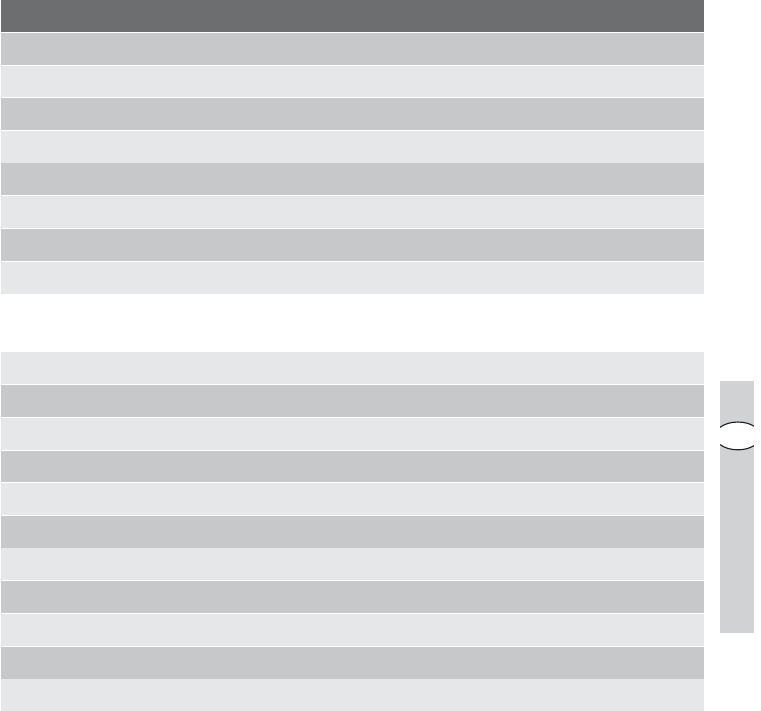
Something Not Working
If your appliance fails to work properly please carry out the following checks.
SymptomSymptom
SymptomSymptom
Symptom
The cooker hood will not start...
The cooker hood is not working
The cooker hood has switched off
during operation...
SolutionSolution
SolutionSolution
Solution
Check that: Check that:
Check that: Check that:
Check that: The hood is connected
to the electricity supply.
Check that a fan speed has been
selected.
Check that: Check that:
Check that: Check that:
Check that: The fan speed is set high
enough for the task.
The grease filters are clean.
The kitchen is adequately vented to
allow the entry of fresh air.
If set up for recirculation, check that
the charcoal filter is still effective.
If set up for extraction, check that the
ducting and outlets are not blocked.
The safety cut-out device has been
tripped. Turn off the hob and then
wait for the device to reset. If the
hood has been installed below the
heights indicated in the installation
instructions the motor will cut-out
frequently which will damage the
hood.
If after all these checks, the problem persists, contact your local Service Centre,
quoting the model number, serial number and product number code.
Please note that it will be necessary to provide proof of purchase for any in-
guarantee service calls.
In-guarantee customers should ensure that the above checks have been made as
the engineer will make a charge if the fault is not a mechanical or electrical break-
down.
electrolux electrolux
electrolux electrolux
electrolux installation
6767
6767
67
GB
Installation
TT
TT
T
echnical Detailsechnical Details
echnical Detailsechnical Details
echnical Details
EFC 60500EFC 60500
EFC 60500EFC 60500
EFC 60500
EFC 90500EFC 90500
EFC 90500EFC 90500
EFC 90500
Dimensions (in cm):Dimensions (in cm):
Dimensions (in cm):Dimensions (in cm):
Dimensions (in cm):
Height:76,6-121,376,6-121,3
Width:59,889,8
Depth:5050
Max. absorb. power:Max. absorb. power:
Max. absorb. power:Max. absorb. power:
Max. absorb. power:
200 W200 W
200 W200 W
200 W
290 W290 W
290 W290 W
290 W
Motor:170 W250 W
Lighting:2 x 20 W (12V-G4)2 x 20 W (12V-G4)
Length of the cable:Length of the cable:
Length of the cable:Length of the cable:
Length of the cable:
150 cm150 cm
150 cm150 cm
150 cm
150 cm150 cm
150 cm150 cm
150 cm
Electrical connection:Electrical connection:
Electrical connection:Electrical connection:
Electrical connection:
220-240 V220-240 V
220-240 V220-240 V
220-240 V
220-240 V220-240 V
220-240 V220-240 V
220-240 V
Fuse rating:Fuse rating:
Fuse rating:Fuse rating:
Fuse rating:
5At5At
5At5At
5At
5At5At
5At5At
5At
Mounting accessories includedMounting accessories included
Mounting accessories includedMounting accessories included
Mounting accessories included
22
22
2 screwdriver inserts (to tighten torx screws)
11
11
1 coupling ring
11
11
1 deflector
11
11
1 chimney bracket
66
66
6 Ø 8 mm dowels (for fixing the hood to the wall)
66
66
6 5 x 45 screws (for fixing the hood to the wall)
22
22
2 washers
44
44
4 screws 2,9 x 6,5 (for fixing the deflector and the chimney to the wall)
22
22
2 screws 3,5 x 9,5 (for fixing the coupling ring)
1 1
1 1
1 power supply cable
6868
6868
68
electr electr
electr electr
electr
oluxolux
oluxolux
olux installation
GB
Electrical connection
Safety warSafety war
Safety warSafety war
Safety war
nings for the electriciannings for the electrician
nings for the electriciannings for the electrician
nings for the electrician
The mains power supply must corre-
spond to the rating indicated on the
plate situated inside the hood. If
provided with a plug connect the hood
to a socket in compliance with current
regulations and positioned in an
accessible area. If it not fitted with a
plug (direct mains connection) or if the
plug is not located in an accessible
area apply a double pole switch in
accordance with standards which
assures the complete disconnection of
the mains under conditions relating to
over-current category III, in accordance
with installation instructions.
WW
WW
W
arar
arar
ar
ning! ning!
ning! ning!
ning! Before re-connecting the
hood circuit to the mains supply and
checking the efficient function, always
check that the mains cable is correctly
assembled.
electrolux electrolux
electrolux electrolux
electrolux installation
6969
6969
69
GB
= =
Ø 8
Ø 8
5x45
Ø 8
InstallationInstallation
InstallationInstallation
Installation
WW
WW
W
arar
arar
ar
ning! Do not connect the appliance to the mains until the installation is fullyning! Do not connect the appliance to the mains until the installation is fully
ning! Do not connect the appliance to the mains until the installation is fullyning! Do not connect the appliance to the mains until the installation is fully
ning! Do not connect the appliance to the mains until the installation is fully
Gebruikershandleiding.com neemt misbruik van zijn services uitermate serieus. U kunt hieronder aangeven waarom deze vraag ongepast is. Wij controleren de vraag en zonodig wordt deze verwijderd.
Product:
Spelregels forum
Om tot zinvolle vragen te komen hanteren wij de volgende spelregels:
lees eerst de handleiding door;
controleer of uw vraag al eerder door iemand anders is gesteld;
probeer uw vraag zo duidelijk mogelijk te stellen;
heeft u een probleem en al geprobeerd om dit op te lossen, vermeld dit erbij aub;
heeft u een oplossing gekregen van een bezoeker dan horen wij dat graag in dit forum;
wilt u een reactie geven op een vraag of antwoord, gebruik dan niet dit formulier maar klik op de knop 'reageer op deze vraag';
uw vraag wordt direct op de website gezet; vermijd daarom persoonlijke gegevens in te vullen;
Belangrijk! Als er een antwoord wordt gegeven op uw vraag, dan is het voor de gever van het antwoord nuttig om te weten als u er wel (of niet) mee geholpen bent! Wij vragen u dus ook te reageren op een antwoord.
Belangrijk! Antwoorden worden ook per e-mail naar abonnees gestuurd. Laat uw emailadres achter op deze site, zodat u op de hoogte blijft. U krijgt dan ook andere vragen en antwoorden te zien.
Abonneren
Abonneer u voor het ontvangen van emails voor uw Electrolux EFC 60500 bij:
nieuwe vragen en antwoorden
nieuwe handleidingen
U ontvangt een email met instructies om u voor één of beide opties in te schrijven.
Ontvang uw handleiding per email
Vul uw emailadres in en ontvang de handleiding van Electrolux EFC 60500 in de taal/talen: Nederlands, Duits, Engels, Frans als bijlage per email.
De handleiding is 2,38 mb groot.
U ontvangt de handleiding per email binnen enkele minuten. Als u geen email heeft ontvangen, dan heeft u waarschijnlijk een verkeerd emailadres ingevuld of is uw mailbox te vol. Daarnaast kan het zijn dat uw internetprovider een maximum heeft aan de grootte per email. Omdat hier een handleiding wordt meegestuurd, kan het voorkomen dat de email groter is dan toegestaan bij uw provider.
Stel vragen via chat aan uw handleiding
Stel uw vraag over deze PDF
Uw handleiding is per email verstuurd. Controleer uw email
Als u niet binnen een kwartier uw email met handleiding ontvangen heeft, kan het zijn dat u een verkeerd emailadres heeft ingevuld of dat uw emailprovider een maximum grootte per email heeft ingesteld die kleiner is dan de grootte van de handleiding.
Er is een email naar u verstuurd om uw inschrijving definitief te maken.
Controleer uw email en volg de aanwijzingen op om uw inschrijving definitief te maken
U heeft geen emailadres opgegeven
Als u de handleiding per email wilt ontvangen, vul dan een geldig emailadres in.
Uw vraag is op deze pagina toegevoegd
Wilt u een email ontvangen bij een antwoord en/of nieuwe vragen? Vul dan hier uw emailadres in.