802378
23
Verklein
Vergroot
Pagina terug
1/31
Pagina verder
UNDERWATER CAMERA
User Manual
FR : Un manuel dans votre langue est disponible sur Internet:
IT: Il manuale nella sua lingua può essere trovato su Internet:
ES: Puede encontrar un manual en su idioma en Internet:
PT: Um manual em seu idioma pode ser encontrado na Internet:
PL: Instrukcję w swoim języku możesz znaleźć na stronie:
SV: En handbok på ditt språk finns på Internet:
NL: Een handleiding in uw taal vindt u op internet:
bit.ly/3m65zBc
1
Table of content
Retaining instructions ............................................................................. 3
Explanation of safety warnings ................................................................ 3
Product introduction ............................................................................... 4
Intended use .......................................................................................... 4
Restrictions ............................................................................................ 5
Safety instructions .................................................................................. 5
Operating environment ........................................................................... 7
Using the camera .................................................................................... 8
Description of the product ...................................................................... 9
Description of the product display ......................................................... 10
First steps: Preparing the camera for first use ........................................ 12
1. Battery installation ........................................................................ 13
2. Format your memory card .............................................................. 14
Switching the camera on/off ................................................................. 15
Camera modes ...................................................................................... 15
Photo mode .......................................................................................... 17
Video mode .......................................................................................... 18
Playback mode ..................................................................................... 19
Button functions ................................................................................... 19
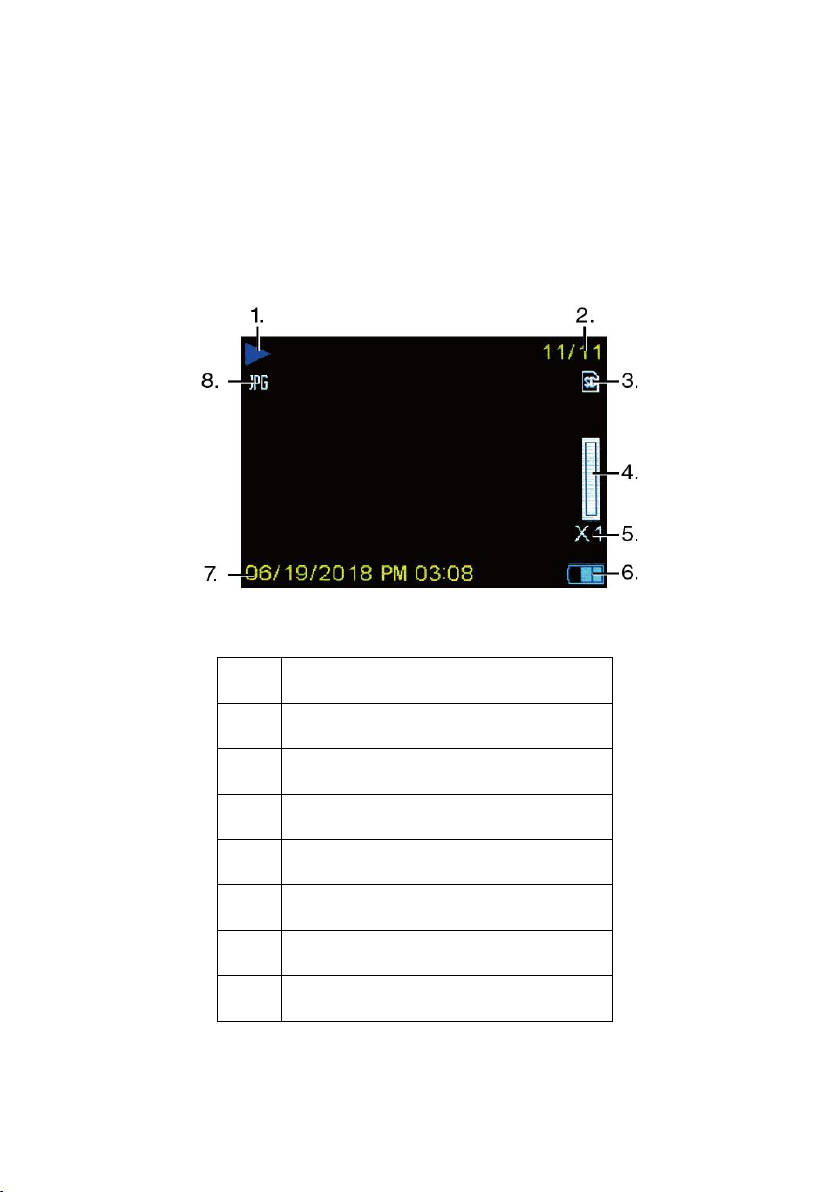
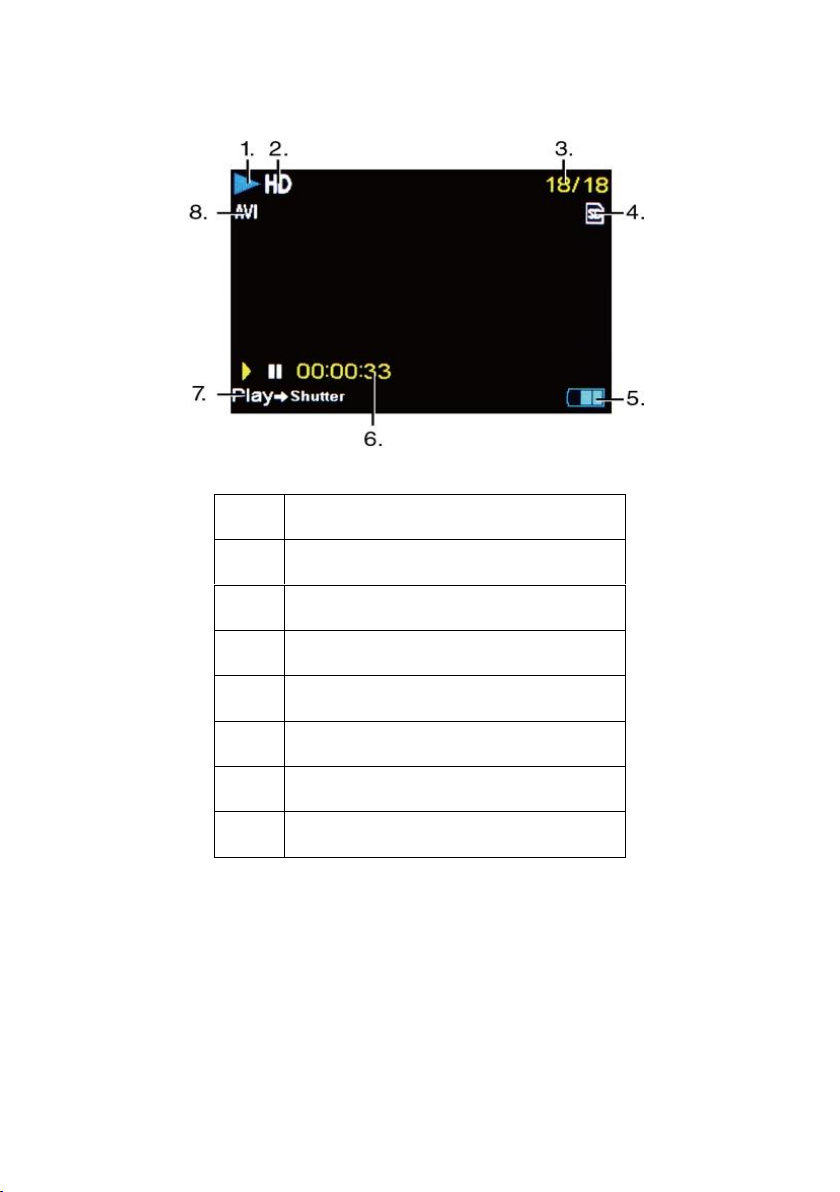
Playback mode icons ............................................................................. 21
Camera settings .................................................................................... 23
Time and date settings .......................................................................... 24
Transferring files from camera to computer ........................................... 25
Cleaning ............................................................................................... 27
Box contents ......................................................................................... 27
Technical specifications ......................................................................... 28
Disposal ............................................................................................... 29
Declaration of conformity ..................................................................... 30
2
Disclaimer
Easypix makes no representations or warranties with respect to this
manual and, to the maximum extent permitted by law, expressly
limits its liability for breach of any warranty that may be implied to
the replacement of this manual with another. Furthermore, Easypix
reserves the right to revise this publication at any time without
incurring an obligation to notify any person of the revision.
Easypix is not responsible or liable for misuse of the information that
is contained herein. If you have any suggestions for improvements or
amendments or have found errors in this publication, please notify
us.
All pertinent state, regional, and local safety regulations must be
observed when installing and using this product. For reasons of safety
and to help ensure compliance with documented system data, only
the manufacturer shall perform repairs to components.
Failure to observe this information can result in injury or equipment
damage.
Copyright © by Easypix GmbH
All rights reserved. No part of this publication may be reproduced,
distributed, or transmitted in any form or by any means, including
photocopying, recording, or other electronic or mechanical methods,
without the prior written permission of the publisher. For permission
requests, please write to the publisher below.
Easypix GmbH, Em Parkveedel 11, 50733 Köln, Germany
support@easypix.eu • www.easypix.eu
3
Retaining instructions
Read this manual and its safety instructions before using this product.
Follow all the instructions. This will avoid fire, explosions, electric
shocks or other hazards that may result in damage to property and/or
severe or fatal injuries.
The product shall only be used by persons who have fully read and
understand the contents of this user manual.
Ensure that each person who uses the product has read these
warnings and instructions and follows them.
Keep all safety information and instructions for future reference and
pass them on to subsequent users of the product.
The manufacturer is not liable for cases of material damage or
personal injury caused by incorrect handling or non-compliance with
the safety instructions.
Explanation of safety warnings
Warning indicates a hazard with a medium level of risk which, if not
avoided, could result in serious injury.
Indicates information considered important, but not hazard-related.
NOTICE
WARNING
4
Product introduction
The Aquapix W2024 ‘Splash’ is a high quality digital still and video
camera.
Waterproof to 3M and featuring a 10MP sensor, it captures photos up
to 16MP resolution and high definition 720p video.
Powered by 2x AAA batteries (not included) W2024 ‘Splash’ utilizes a
full colour 2.4” display and 8x digital zoom to ensure your photos and
videos are framed and captured as required.
Intended use
This product is intended for use anywhere photos or videos are taken.
Its 3m waterproof rating means it can also be completely submerged
and used under water.
WATERPROOF AND DUSTPROOF PERFORMANCE
The waterproof and dustproof performance described do not
guarantee that the camera will remain completely waterproof or free
from damage and trouble under all conditions.
Do not subject the camera to excessive shock, vibration or pressure
by dropping it, hitting it or placing a heavy object on it.
Failure to observe this precaution could deform the camera, cause
water to seep inside, or damage the airtight seals, resulting in camera
malfunction.
NOTICE
5
Restrictions
The product is not suitable for children under 3 years because of
choking hazard.
Contains small parts, in order to avoid swallowing, please
ensure any use by children is undertaken with adult
supervision.
The camera is suitable for use underwater to a maximum
depth of
3 metres. Do not use the camera at depths exceeding 3
metres.
Do not use your camera in hot springs, hot tubs or jacuzzis
where it can be exposed to extreme water temperature.
Safety instructions
This product is only suitable for the purpose described, the manufacturer is
not liable for damage caused by abnormal use.
Please read this instruction manual carefully before use, and ensure
the batteries are installed correctly.
WARNING
WARNING
WARNING
6
Do not leave the camera in a high or low temperature
environment for a prolonged period of time.
Keep the camera out of the reach of small children.
No special maintenance is required during use. Please contact
the seller or manufacturer if your device displays a fault.
Please dispose of the waste and residues at the end of the
service life of the product according to local laws and
regulations.
If you think this product is damaged in any way, please do not
use the product.
Do not open this product without permission.
Contains small parts, in order to avoid swallowing, please
ensure any use by children is undertaken with adult
supervision.
BATTERIES
Insert the batteries and memory card before using the camera
underwater. Take care to ensure that all flaps and covers are
closed and that no water can penetrate the camera. If this
happens, turn off the camera and do not use it underwater.
Never open the battery compartment under water. If moisture
appears on the lens during use, it may be leaking. Remove the
batteries and the memory card and return the camera to your
WARNING
WARNING
7
dealer for repair.
Please remove the batteries if the camera is not going to be
used for an extended period of time.
To avoid the risk of electric shock, do not insert the power
cord with wet hands. The battery compartment should only
be opened with clean, dry hands to also ensure that no dirt
enters the camera when inserting, changing or removing the
batteries or SD card.
In order to prevent product damage or negatively affecting
the sound or image quality, please ensure a sufficient distance
is maintained from objects that generate strong magnetic
fields or radio waves, such as electrical appliances.
In the unlikely event of overheating, smokes or unpleasant
odors coming from the unit, disconnect it immediately from
the charging cable and remove the battery to avoid a fire.
Operating environment
Do not expose the device to abnormally high or low
temperatures.
Store the device cool (at room temperature) in a dry and
dust-free location and never expose the product to high
temperatures or direct sunlight.
Always protect your camera from falls, shock and impact.
WARNING
8
Using the camera
As your camera is waterproof, it can be used under water while
playing and swimming etc.
To prevent it from sinking or getting lost in the water, you can attach
the included wrist strap to the camera before entering the water.
To prevent damage please ensure that you do not open the camera
while in the water.
After use in swimming pool water or sea or lake salt water, please
rinse it with clean tap water and wipe dry before opening the battery
compartment.
The cameras default settings are optimised for most circumstances
enabling you to take photos or videos immediately after inserting a
memory card and switching it on.
9
Description of the product
1. Battery door lock
2. Tripod connection
3. Flash
4. Lens
5. Microphone
6. Shutter button
7. Power button
8. Wrist strap tether
9. Display
10. UP / ZOOM IN (T) button
11. DOWN / ZOOM OUT (W)
button
12. RIGHT / FLASH LIGHT button
13. LEFT / PLAYBACK button
14. MODE button
15. MENU / SET button
16. Battery compartment
17. MicroSD card slot
18. USB interface
10
Description of the product display
PHOTO MODE
VIDEO MODE
11
Set by
12
First steps: Preparing the camera for first use
Opening and Closing the battery
compartment:
Always ensure the camera and your hands are
1
Mode button
2
Menu / options
3
Menu / options
4
Menu / options
5
Menu / options
6
Not adjustable
7
Micro SD confirmation
8
T/ W buttons
9
Power remaining
10
Menu / options
11
Menu / options
12
Menu / options
13
Menu / options
14
Menu / options
15
Menu / options
16
Flash button
17
Menu / options
NOTICE
13
dry.
Ensure that there is no debris inside the battery-chamber or
memory card slot.
Always ensure that the battery cover is rmly closed and the
security lock is in the lock position before using the camera.
1. Battery installation
Move the Lock/Unlock Switch on the battery cover to the
unlock position
Open the battery cover by pushing it in the direction of the
arrow
Install 2x AAA (1.5V) batteries ensuring the correct polarity -
see fig.3.
Close the battery cover and push the Lock/ unlock switch to
the Lock position.
14
Batteries and electronic equipment should be disposed of in
accordance with applicable local regulations, and you should not
throw them into household garbage to avoid irreversible pollution.
2. Format your memory card
To ensure the optimal functioning of your camera, please note the
following important information:
Before using any micro SD card in your camera for the first
time, please ensure your memory card is formatted in the
camera. This option can be found in the camera’s settings
menu. (Menu > SD > Format).
The maximum memory card capacity supported is 32GB.
Use of memory cards exceeding the maximum recommended
capacity may result in file errors.
The recording time varies depending on the resolution
selected.
Memory Card installation
(MicroSD Card of Class 4 or higher)
1. Ensure the camera is turned off
2. Open the battery / memory card cover as described above
NOTICE
NOTICE
15
3. Insert a Micro SD card into the memory card slot in the
direction
indicated near the card slot.
4. Push the Micro SD card until you hear a slight clicking sound,
which confirms the SD card is correctly installed.
5. Close the battery cover and push the Lock/ unlock switch to
the Lock position.
Switching the camera on/off
SWITCHING ON THE CAMERA
Press the Power button to power on the camera.
The TFT screen turns on with the camera in Photo Capture Mode (the
default mode).
SWITCHING OFF THE CAMERA
While the camera is on, short press the Power button to switch the
camera off.
Note: Your camera has an auto-off function. The camera will
automatically switch off when it is left idle for a period of time this
is adjustable in the ‘Auto Power Off’ menu.
Camera modes
There are 3 camera modes: Photo, Video and Playback.
The mode icon is displayed in the top-left corner of the TFT screen.
Photo mode is the default mode when the camera is switched on.
16
You can change the camera mode by pressing the Mode (M) button.
When in Photo Mode, the photo icon will display on the top-left
corner of the TFT screen.
Use this mode to capture photos. To take a picture, point your camera
as required and press the Shutter button.
The photo is automatically saved to your camera’s memory card.
To access the various menus for the Photo mode, press the Menu
button while in the Photo mode.
When in Video Mode, the Video icon will display on the top-left
corner of the TFT screen.
Use this mode to capture videos. To take a video, press the Shutter
button to start recording.
A red record indicator appears and flashes on the TFT screen while
the recording is in progress.
To stop recording, press the Shutter button again. The video is
automatically saved to your camera’s memory card.
To access the various menus for the Video mode, press the MENU
button while in the video mode.
When in Playback Mode, this icon will display on the top-left corner
of the TFT screen.
You can use the Left/ Right buttons to scroll through and view the
photos and videos that you have previously taken. You can also delete
17
or edit them as desired.
To access the various menus for the Playback mode for photos and
videos,
press the MENU button while in the Playback mode.
NOTE:
You can also press the PLAYBACK button to enter the Playback mode
directly.
Photo mode
1. After switching on, the camera will be in photo mode
and ready to take photos.
SHUTTER
Camera mode
T ZOOM IN
W ZOOM OUT
Zoom bar
MODE BUTTON
MENU/SET BUTTON
18
2. You can press the Mode button (M) to change to photo mode.
The camera mode is displayed at the top-left corner on the
TFT screen.
3. Use the T (zoom in) or W (zoom out) buttons to zoom in/ out
as required.
4. Hold the camera steady and press the Shutter button.
The photo is taken and saved to the memory card.
NOTE: When you see the “Card Full” message on the screen, the
memory card has run out of capacity.
You must therefore download and save the images stored on the card
to a computer in order to free up memory card capacity for further
use.
Alternatively you can simply insert a new memory card, ensuring it is
formatted in the camera before first use.
Video mode
1. Press the M (Mode) button to switch to video mode.
2. Use the T (zoom in) or W (zoom out) buttons to zoom in/ out.
3. Press the Shutter button to start recording.
A red recording indicator flashes on the TFT screen to confirm
recording is in progress.
4. Press the Shutter button again to stop recording.
The video recorded is automatically saved to the memory
card.
19
Playback mode
1. Press the Playback button to enter the playback mode.
The last image (photo or video) is displayed on the screen.
2. Press the Left (previous image) or Right (next image) buttons
to scroll through the all images.
3. JPG” appears under the Mode icon to indicate that the
displayed image is a photo.
AVI” appears under the Mode icon to indicate that the
displayed image is a video.
When the displayed image is a video, press the Shutter button
to start video playback. Press again the Shutter to pause the
video. Press the Left button to quit playback.
Button functions
Some buttons have one single function however other buttons have
multiple functions depending on the current operating mode.
The table below outlines the various button functions:
Button
Photo mode
Video mode
Photo playback
mode
Video playback
mode
Shutter
Take a photo
Start / Stop
recording
----
Start and pause
video playback
T (Tele)
Zoom in
Zoom in
Zoom in
----
W (Wide)
Zoom out
Zoom out
- Zoom out
- To activate
photo thumbnail
To activate
thumbnail image
view
20
view
Flash /
Right
Select the
flash option:
Force off,
Force on,
Auto, Red eye
reduction
----
- Next photo
- Shift right
Next video
Playback /
Left
----
----
- Previous photo
- Shift left
- Previous video
- Stop a video
playing
Mode
- Change
mode
- Exit menu
- Change
mode
- Exit menu
Exit playback
mode and return
to previous
mode
Exit playback
mode and return
to previous mode
Menu
- Set menu
- Confirm a settings menu option
NOTE: Button operation is disabled during the recording or playback
of a video.
21
Playback mode icons
The following status icons are displayed when reviewing photos or
playing video.
PHOTO PLAYBACK MODE
1
Camera mode
2
Current image no. / Total quantity
3
Memory card
4
Zoom bar
5
Magnification factor
6
Battery power
7
Date / time stamp
8
Current image format
22
VIDEO PLAYBACK MODE ICONS
NOTE: You can hide the icons on screen by pressing the Mode button
for 2 seconds. Short press the Mode button to make the settings
visible again.
1
Playback mode
2
Resolution
3
Current image no. / Total quantity
4
Memory card
5
Battery power
6
Playback time counter
7
7
Press shutter button to play
the video
8
8
Current file format
23
Camera settings
Each camera mode has a set of menu options specific to that mode.
To select a menu and option please use the buttons as indicated
below:
1. Press the Set button to open the menus for the current mode.
2. Press the Left or Right direction control button to scroll
through the various menus for the current mode.
3. Press the Up (T) or Down (W) direction control buttons to
highlight a menu option.
4. Press the Set button to confirm and save the highlighted
menu option.
Menu
Use direction
buttons to
select menu and
its option
Options
Menu
selected
UP
DOWN
TO THE RIGHT
TO THE LEFT
MODE-BUTTON
SET-BUTTON
Use SET-BUTTON
to confirm
Use MODE-BUTTON to go back
to previous screen
24
5. If the selected option can be remembered by the camera,
a selection icon will appear to the right of the selected menu
option.
Changes made to these options remain saved until you decide
to change them again at a later time, or restore the camera to
factory default settings.
Note: Some menu options are single-use functions that are
not stored by the camera and therefore do not display this
icon when selected.
At any time you can press the Mode button to exit the menus
and return to the previous screen
Time and date settings
1. In photo mode or video mode press the Set button to enter
the settings options.
2. Press the Left or Right button to scroll to and select the
‘Date/Time’ menu.
3. Press the Up or Down button to highlight the ‘Date Setup’
menu option, then press the Set button to select it.
The ‘Date Setup’ sub-menu will open as the image above.
4. Scroll through the window with the Right and Left buttons.
25
5. For each field in the menu, use the Up and Down buttons to
set
the date and time.
6. When you have finished setting the date and time, press the
Menu button to save your settings and return to the previous
mode.
Transferring files from camera to computer
Disconnect all other USB-powered devices from the computer.
Connecting the camera and other USB-powered devices to the same
computer simultaneously may cause a camera malfunction or
excessive power supply from the computer, which could damage
the camera or memory card.
WINDOWS:
1. Use the USB cable that came with your camera to connect
your camera to your computer.
2. Turn on the camera.
3. MSDC appears on the TFT screen.
4. A window appears with a list of options. Select “Open folder
to view files” and click OK.
5. Open the DCIM folder and the folder inside to view the media
files.
6. Select the media and copy the files from this folder into your
computer.
NOTICE
26
Alternatively, select the files and choose Copy from the Edit
menu.
Then select a folder and choose Paste from the Edit menu.
7. Do not disconnect the cable during transfer.
Doing so will cancel the current transfer of any files to your
computer.
8. When finished, ensure the camera’s connection with Windows
is properly terminated before disconnecting the cable.
MAC:
1. Use the USB cable that came with your camera to connect
your camera to your computer.
2. Turn on the camera.
3. MSDC appears on the LCD.
4. The camera’s device icon appears on the desktop.
5. Click on the device icon and open the DCIM folder and the
folder inside to view the media files.
6. Select the files and drag them to your computer. Alternatively,
select the files and choose Copy from the Finders Edit menu.
Then select a folder and choose Paste from the Edit menu.
7. Do not disconnect the cable during transfer. Doing so will
cancel the current transfer of files to your computer.
8. When finished, ensure the device icon is dragged to the bin
before disconnecting the cable.
9. Alternatively, right click and select the ‘Eject….” Option.
27
Cleaning
After use in water, turn off the camera, ensure the battery
compartment is tightly closed, and rinse the camera with
fresh water within 30 minutes.
The best cleaning method is to immerse the camera in a basin
of fresh water for 10 minutes.
When the camera is immersed in water, air bubbles may be
seen coming from the water drain holes of the camera such as
openings in the microphone or speakers. This is not a
malfunction.
Do not use soap or detergents, as they could negatively affect
the integrity of the waterproof seals on the camera.
Allow the camera to dry at room temperature after rinsing.
Box contents
Camera
Hand strap
USB cable
Manual EN/DE
Manuals in further languages are available for download at
www.easypix.info/download-manuals/download/w2024/
28
Technical specifications
*by interpolation
Waterproof
Up to 3m
Image Sensor
5MP CMOS sensor
Image Resolution
16M (4608x3456)*, 14M (4416x3312)*,
12M (4000x3000)*, 10M (3648x2736)*,
8M (3264x2448)*, 7M (3648x2048)*,
5M (2592x19444), 3M (2048x15364),
2M (31920x1080), VGA (640x480)
Video Resolution
HD 720P (1280x720), VGA (640x480),
QVGA (320x240)
File Format
JPEG (Photo), AVI (Video)
External Memory
Compatible with MicroSD Cards up to 32GB
(not included)
LCD Display
2.4” / 6.1cm Colour display
Lens
F/2.8, f=6.8mm
Zoom
8x digital zoom
Exposure
-3.0EV ~ +3.0EV
White Balance
Auto, Daylight, Cloudy, Fluorescent,
Incandescent
ISO
Auto, 100, 200, 400
Flash
Off, On, Auto, Red Eye Reduction
Self-Timer
2 sec, 5 sec,10 sec, Off
Auto Power Off
1 min, 3 min, 5 min, 10 min, Off
Microphone
Built-in
USB Interface
USB 2.0 Micro
Battery
2x AAA (1.5V) batteries required
(not included)
29
Disposal
Dispose of packaging
For disposal, separate packaging into different types. Cardboard and
board must be disposed of as paper and foil must be recycled.
Disposal of Waste Electrical and Electronic Equipment
and/or Battery by users in private households in the European
Union.
Working Temperature
0~45C
30
This symbol on the product or on the packaging indicates that this
cannot be disposed of as a household waste. You must dispose of
your waste equipment and/or battery by handling it over to the
applicable take-back scheme for the recycling of electrical and
electronic equipment and/or battery. For more information about
recycling of this equipment and/or battery, please contact your city
office, the shop where you purchased the equipment or your
household waste disposal service. The recycling of materials will help
to conserve natural resources and ensure that it is recycled in a
manner that protects human health and environment.
Declaration of conformity
We hereby declare that the CE marking
has been affixed to this product in
accordance with the essential
requirements and relevant provisions
of the European directives.
The declaration of conformity can be downloaded here:
www.easypix.info/download/pdf/doc_w2024.pdf
23

Hulp nodig? Stel uw vraag in het forum

Spelregels

Misbruik melden

Gebruikershandleiding.com neemt misbruik van zijn services uitermate serieus. U kunt hieronder aangeven waarom deze vraag ongepast is. Wij controleren de vraag en zonodig wordt deze verwijderd.

Product:

Bijvoorbeeld antisemitische inhoud, racistische inhoud, of materiaal dat gewelddadige fysieke handelingen tot gevolg kan hebben.

Bijvoorbeeld een creditcardnummer, een persoonlijk identificatienummer, of een geheim adres. E-mailadressen en volledige namen worden niet als privégegevens beschouwd.

Spelregels forum

Om tot zinvolle vragen te komen hanteren wij de volgende spelregels:

Belangrijk! Als er een antwoord wordt gegeven op uw vraag, dan is het voor de gever van het antwoord nuttig om te weten als u er wel (of niet) mee geholpen bent! Wij vragen u dus ook te reageren op een antwoord.

Belangrijk! Antwoorden worden ook per e-mail naar abonnees gestuurd. Laat uw emailadres achter op deze site, zodat u op de hoogte blijft. U krijgt dan ook andere vragen en antwoorden te zien.

Abonneren

Abonneer u voor het ontvangen van emails voor uw Easypix W2024 SPLASH bij:


U ontvangt een email met instructies om u voor één of beide opties in te schrijven.


Ontvang uw handleiding per email

Vul uw emailadres in en ontvang de handleiding van Easypix W2024 SPLASH in de taal/talen: Engels als bijlage per email.

De handleiding is 0.9 mb groot.


U ontvangt de handleiding per email binnen enkele minuten. Als u geen email heeft ontvangen, dan heeft u waarschijnlijk een verkeerd emailadres ingevuld of is uw mailbox te vol. Daarnaast kan het zijn dat uw internetprovider een maximum heeft aan de grootte per email. Omdat hier een handleiding wordt meegestuurd, kan het voorkomen dat de email groter is dan toegestaan bij uw provider.

Stel vragen via chat aan uw handleiding

Stel uw vraag over deze PDF

Andere handleiding(en) van Easypix W2024 SPLASH

Easypix W2024 SPLASH Gebruiksaanwijzing - Nederlands - 30 pagina's

Easypix W2024 SPLASH Gebruiksaanwijzing - Deutsch - 32 pagina's

Easypix W2024 SPLASH Gebruiksaanwijzing - Français - 30 pagina's

Easypix W2024 SPLASH Gebruiksaanwijzing - Italiano - 30 pagina's

Easypix W2024 SPLASH Gebruiksaanwijzing - Português - 30 pagina's

Easypix W2024 SPLASH Gebruiksaanwijzing - Espanõl - 30 pagina's


Uw handleiding is per email verstuurd. Controleer uw email

Als u niet binnen een kwartier uw email met handleiding ontvangen heeft, kan het zijn dat u een verkeerd emailadres heeft ingevuld of dat uw emailprovider een maximum grootte per email heeft ingesteld die kleiner is dan de grootte van de handleiding.

Er is een email naar u verstuurd om uw inschrijving definitief te maken.

Controleer uw email en volg de aanwijzingen op om uw inschrijving definitief te maken

U heeft geen emailadres opgegeven

Als u de handleiding per email wilt ontvangen, vul dan een geldig emailadres in.

Uw vraag is op deze pagina toegevoegd

Wilt u een email ontvangen bij een antwoord en/of nieuwe vragen? Vul dan hier uw emailadres in.


Info