583237
3
Verklein
Vergroot
Pagina terug
1/23
Pagina verder
1
Table of Contents
1 Brief Description................................................................................................................. 2
Package Contents.......................................................................................................... 2
2 Before Using Your Camera ................................................................................................ 2
Digital Still Camera Specification ................................................................................ 2
Capturing good pictures................................................................................................ 3
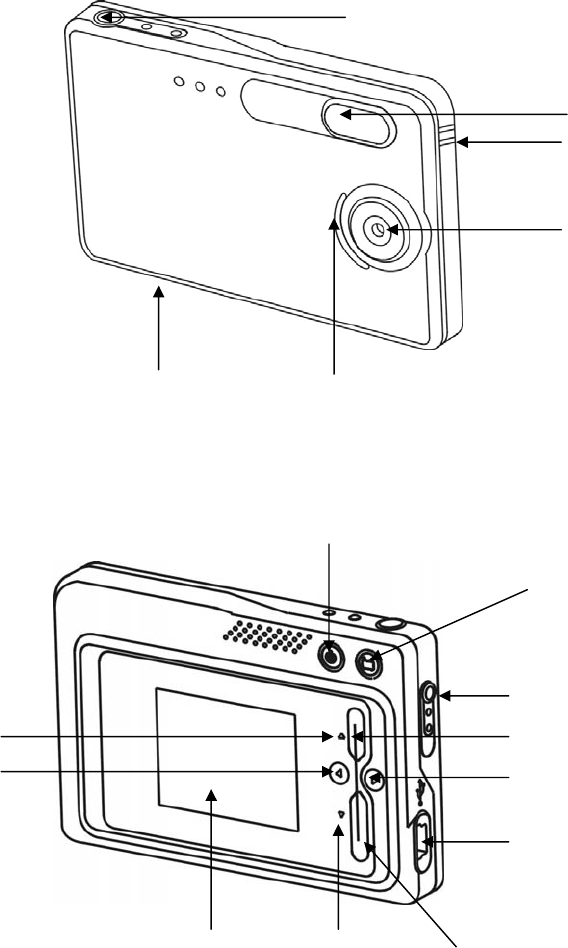
Identifying the parts...................................................................................................... 4
3 Using Your Digital Camera ................................................................................................ 5
Charging the battery...................................................................................................... 5
Lithium-polymer battery tips........................................................................................ 5
Turning on the camera.................................................................................................. 6
Turning on the LCD...................................................................................................... 6
Understanding LCD icons............................................................................................. 6
Mode selection.............................................................................................................. 6
Capture mode................................................................................................................ 7
Capture mode menus..................................................................................................... 7
Capture mode with timer on ......................................................................................... 8
Playback mode.............................................................................................................. 9
Playback mode menu.................................................................................................... 9
USB mode..................................................................................................................... 9
USB mode activity........................................................................................................ 9
Using Secure Digital (SD) memory cards .................................................................. 10
Changing resolution.................................................................................................... 10
Turning sound on/off .................................................................................................. 11
Taking pictures............................................................................................................ 11
About Autobrite® technology .................................................................................... 11
Low light lock-out....................................................................................................... 11
Deleting an image/images........................................................................................... 12
Formatting internal flash memory or SD card............................................................ 12
4 Installing the Software...................................................................................................... 13
System requirements................................................................................................... 13
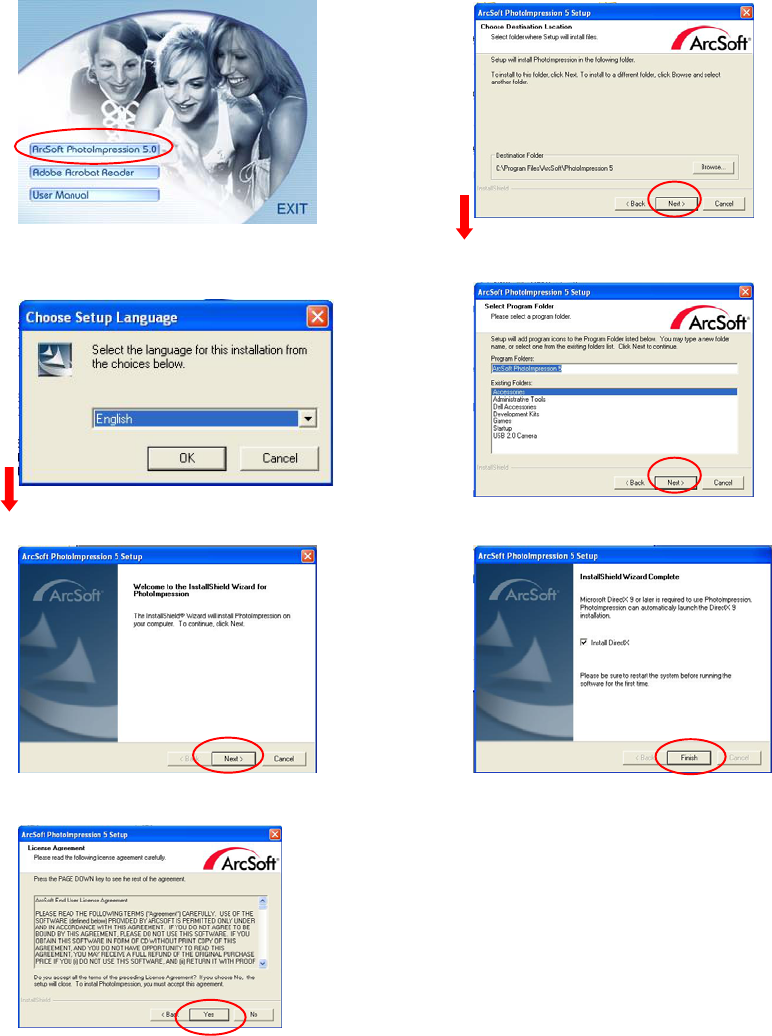
PhotoImpression 5.0 Installation ................................................................................ 14
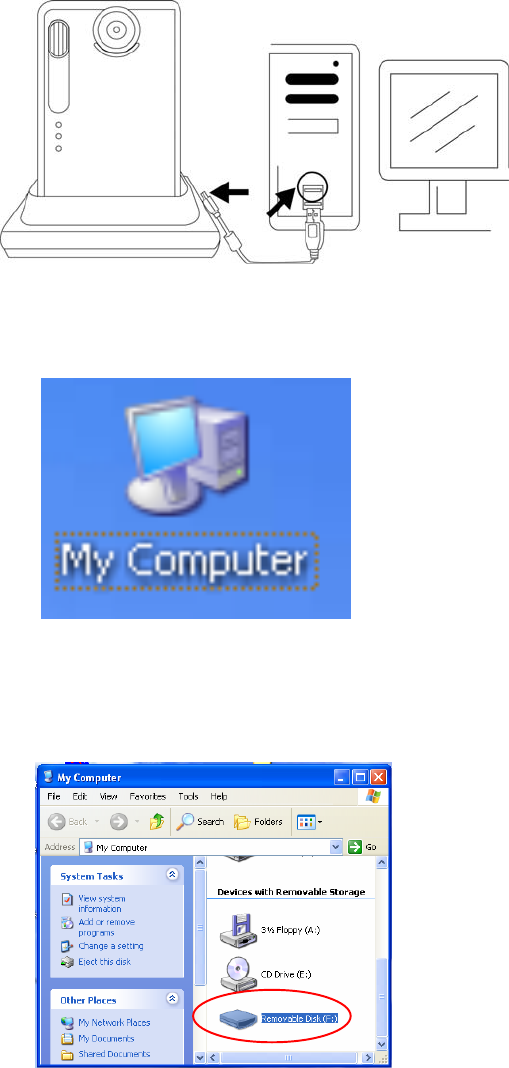
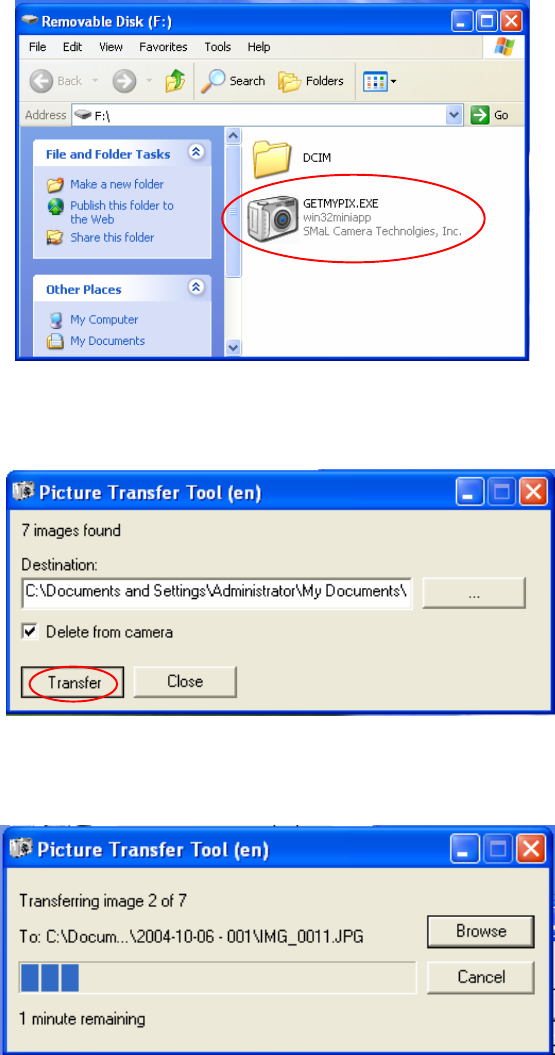
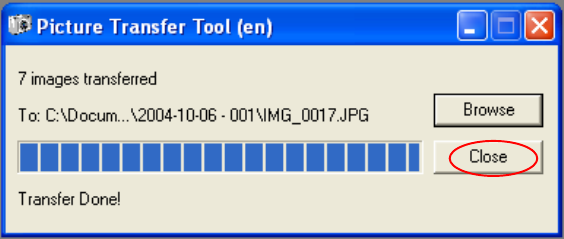
5 Connecting the Digital Camera to Your PC ..................................................................... 15
6 Troubleshooting................................................................................................................ 18
7 Safety Notes...................................................................................................................... 20
8 Trademarks ....................................................................................................................... 22
2
1 Brief Description
Your digital camera with color LCD display is similar to the size of a credit card - only 14
mm thick. The camera’s portability and convenience are enabled by its “worry free”
rechargeable battery, simple user interface, and easy image download when you connect the
camera to a PC with the supplied USB Docking Station.
Package Contents
The package contains all the items listed below:
Camera USB cable User Manual
CD-ROM Carry Bag
Neck Strap Docking Station
2 Before Using Your Camera
Before using your camera, please read the Safety Notes in section 7 and the rest of this User
Manual carefully.
Digital Still Camera Specification
Function Digital Still Camera
Image Sensor 3.1 MP CMOS (interpolation 16 Mega Pixels)
Display 1.8” Color TFT LCD
Exposure Mode Auto
Shutter Speed 1/15 second to 1/1,000 second
Lens Glass, F.L. = 8.2mm, F/3.0 (equivalent to 42mm lens on a
35mm camera)
Focus Range Fixed, 1.5m (4.9ft) to infinity
Controls Power on-off, mode selection, shutter button, LCD on-off,
menu, select, arrow up, arrow down
Flash Distance Approx. 0.8m ~ 2m
Image Resolution Settings Large: 4620 x 3465 Pixels (16 MP, Hardware interpolated)
Medium: 2000 x 1500 Pixels
Small: 1000 x 750 Pixels
White Balance Autobrite*
Built-in Storage
(16 MB Flash memory )
Large resolution: 7 images
Medium: 7 images
Small: 15 images
Memory Card Slot SD card ONLY
USB Interface USB 1.1
System Requirements 266 MHz Pentium 2 or greater with MS Windows ME,
2000, or XP
Dimensions 93 x 60 x 14 mm
Weight 74g
Battery Type Built-in Lithium-polymer battery (rechargeable)
*Autobrite is a registered trademark of SMaL Camera Technologies, Inc. of Cambridge, MA,
USA.
3
Capturing good pictures
Hold the camera steadily.
Under dimmer environment, the camera needs longer time to capture a picture.
Make sure your fingers will not block the lens and flash.
4
Identifying the parts
Front View
Back View
Flash
Lens
Red LED
Shutter Button
Capture/Playback
Modes Switch
USB Connector
U
p
Button
Strap Holder
SD Card Slot
Liquid Crystal
Display (LCD)
Down Button
Power On/Off
LCD On/Off
Blue LED
Blue LED
Menu Button
Select Button
5
3 Using Your Digital Camera
Charging the battery
Long battery life is one of the key benefits of this camera compared to other digital cameras.
On a full charge, the camera will take hundreds of images. Your camera battery has already
been charged prior to shipment. So, you should be able to take pictures without recharging it.
However, just to be safe, you may want to follow the instructions below to make sure that
your camera is fully charged.
Note: Install the provided software before initial charging of the camera.
The Lithium-polymer battery used in the camera recharges automatically when the camera is
plugged into a PC via the USB cable. When the battery is charging, the blue LED will blink.
After fully charged, the blue LED remains ON.
Lithium-polymer battery tips:
Safety note: Always observe the precautions described in Section 7.
It takes approximately 3 hours to fully charge a battery.
The battery can be charged at any time.
If power is low, the red LED blinks 5 times and then the camera turns off.
Recharge the battery immediately.
A fully charged battery allows the camera to take about 90 pictures with Flash and 440
pictures without Flash.
To ensure that your battery lasts as long as possible, switch the camera off when you are
not using it.
6
Turning on the camera
Press the Power button once to turn on the camera. Press it again to turn the camera off.
Note:
The camera has an automatic time-out feature to conserve battery life. After one minute
(or 2 minutes) the camera will time-out (turn off). When timed out, the camera will not
take a photo when you push the shutter button. Press the Power button once to turn on the
camera again.
If power is low, the red LED blinks 5 times and then the camera turns off. Recharge the
battery immediately.
Turning on the LCD
The LCD screen comes on automatically in preview mode when the power is turned on.
Press the LCD button to switch to preview mode. Press the LCD button again to turn off the
LCD.
Understanding LCD icons
LCD Description
Picture Counter: Shows remaining number of shots.
Resolutions:
: SMALL 1000 x 750 pixels
: MED 2000 x 1500 pixels
.
: LARGE 4620 x 3465 pixels
Indicates Battery Charge State
: The battery is fully charged
: The battery is about half-charged
: Out of battery: need to recharge immediately
Secure Digital card indicator
Flash indicator: Flash icon blinks while charging. Steady on when flash is set to
Automatic.
Mode selection
Your camera has three modes of operation:
Capture mode (for capturing images)
Playback mode (for reviewing and deleting images)
USB mode (for downloading images to a computer and charging the battery)
When the USB cable is connected to the camera and a computer, the camera automatically
goes to USB mode.
7
Capture mode
The blue LED will remain ON when the camera is ready to take pictures. If the blue LED
blinks, the camera is not
ready. It blinks for one second while storing an image and for five
seconds while recharging the flash.
Capture mode menus
Press the Menu button to access the menus.
Use the Up and Down arrow buttons to make selections.
Press the Select button to cycle through the options.
Press the Menu button to save your selections.
Function Menu Setting Description
AUTO Flash functions automatically in the dim condition
OFF Flash is disabled
FLASH
ON Force flash to function under any lighting condition
OFF Self-timer is off
10 S 10 seconds delay
Note: After taking the picture, self-timer function turns off
TIMER
2 S Two seconds delay
Note: After taking the picture, self-timer function turns off
LARGE Takes 4620 x 3465 Pixels image
MEDIUM Takes 2000 x 1500 Pixels image
SIZE
SMALL Takes 1000 x 750 Pixels image
ON Turns audio beeps on SOUND
OFF Turns audio beeps off
ENG Displays English menu
FRA Displays French menu
ITA Displays Italian menu
DEU Displays Deutsch menu
ESP Displays Spanish menu
Displays Japanese menu
Displays Chinese menu
NL Displays Dutch menu
LANGUAGE
POR Displays Portuguese menu
1x Takes/Displays picture in normal size
2x Takes/Displays picture in double size
ZOOM
4x Takes/Displays picture in 4 times size
1 MIN Turns camera off automatically after 1 minute of inactivity TIMEOUT
2 MIN Turns camera off automatically after 2 minutes of inactivity
HIGH Sets high brightness LCD DISPLAY
LOW Sets low brightness LCD
COUNTER RESET Resets the picture counter to zero
8
Typical capture mode menu displays
Capture mode with timer on
Note: The timer icon is in the center of the display. When the timer is on, and set to 10
seconds (for example), the front red LED begins blinking when the shutter button is pressed.
It begins counting down with 8 seconds of slow blinking (with audio beeps if the sound is on)
and 2 seconds of fast blinking (with audio beeps). After the picture is taken, there is a 1
second audio beep and the red LED remains on.
10
9
Playback mode
Use the Playback mode to review images you have captured and to review images in order to
delete them. Select Playback mode by sliding the mode switch on the right hand side of the
camera. The last picture taken is displayed first.
If the camera is empty, the display will say “No pictures on camera.” Either SD card or
internal memory will display. In order to review pictures in internal memory, the SD card
must be removed.
After a picture has been deleted, the camera will return to Playback mode.
Playback mode menu
Menu Description Selection
Delete Confirm delete of current image Select YES or NO
Delete All Confirm delete of all images Select YES or NO
Format Format the SD memory card/internal memory Select YES or NO
USB mode
Use the USB mode to download images to your computer and to recharge the camera’s
battery. The mode selection switch can be in either position (Capture or Playback).
Connect the mini USB plug to the mini USB socket on the camera and connect the larger size
USB plug to the USB socket on your computer. You will hear a low-high beep when
connecting and a high-low beep when disconnecting.
Note: All camera buttons are inactive during USB mode.
USB mode activity
Status Activity
Blinking blue LED Charging
Blue LED remains on Fully-charged
Red LED blinks 3 times Camera communicating with computer
Red LED remains on USB connected and transferring data
Fast blinking red LED When connecting camera to PC before driver
is installed. Please install driver.
Note:
Red LED blinks continuously: Need to install driver to the computer.
See Section 5 on how to download images to your computer.
10
Using Secure Digital (SD) memory cards
Note: Only Secure Digital (SD) memory cards are compatible with the camera.
To use a SD card, insert the card into the SD slot in your camera. The SD card indicator on
the LCD is shown.
It may be necessary to format the SD card if the card has been used in devices other than
your camera. To format, refer to Formatting Flash Memory or SD Card in section 3.
Note: “0” displays at lower right of the LCD display if
SD card is full, or
SD card is write-protected, or
An error writing to the card.
Changing resolution
Your 3.1MP Digital Camera offers three choices in resolution: Large, Medium and Small.
Large resolution is 4620 x 3465 pixels, Medium resolution is 2000 x1500 pixels, and Small
resolution is 1000 x 750 pixels. The higher resolution setting allows for an image to be
printed as large as 8 x 10 inches.
To change the resolution:
Turn the camera on and press the mode button.
Select Size and then select LARGE, MED or SMALL.
SD card icon is displayed
When card is inserted
Insert SD card in
the card slot
11
Turning sound on/off
Turn the camera on and press the mode button.
Select Sound and then select ON or OFF.
Taking pictures
To take pictures using your Digital Camera:
Turn the camera on.
In low light conditions, check to make sure the flash is ready. Be sure the Flash is set to
AUTO.
Use the color LCD display to capture the preferred image. The color LCD comes on
automatically in preview mode when the camera is turned on. Press the LCD button again
to view preview mode with icons.
Hold the camera still and press the shutter button.
The LCD will indicate when the picture has been successfully taken by increasing the
number on the display. If the sound feature is turned on, one short beep indicates that a
picture is taken.
About Autobrite® technology
The camera offers the benefits of a technology known as Autobrite. This technology
automatically adjusts the exposure and captures crisp details in scenes where both dim and
bright lighting conditions are present, such as glare or backlighting. Most existing digital
cameras produce washed out or silhouetted images under such conditions. We suggest you
try to avoid taking pictures pointing directly at bright objects (such as the sun), due to the
potential impact of extremely bright lighting on image quality and lens flare.
Autobrite is proprietary to SMaL Camera Technologies, Inc. of Cambridge, Massachusetts, USA.
Low light lock-out
Low light lock-out is a feature that prevents the camera from taking pictures in low light
settings when the flash is not ready. When low light lock-out is enabled the camera will give
a warning beep – even if the sound is off.
Note: To override low light lock-out, continue holding the shutter button for 1 second after
the warning beep.
12
Deleting an image/images
To delete an image or images:
Turn the camera on and slide the Capture/Playback modes switch on the right hand
side of your camera to Playback mode.
Press the Menu button and select “DELETE”.
Use the up/down arrow buttons to select “Yes” to delete the image or “No” to save
the image.
Press the Select button to confirm your selection. Two audio beeps will confirm your
selection.
To resume taking pictures slide the Capture/Playback modes switch on the right had
side of your camera to Capture mode.
To delete all the images on the camera:
Turn the camera on and switch the mode button to Playback mode.
Press the Menu button and select “DELETE ALL”.
Use the up/down arrow buttons to select “Yes” to delete the image or “No” to save
the image.
Press the Select button to confirm your selection. Two audio beeps will confirm your
selection
To resume taking pictures slide the Capture/Playback modes switch on the right had
side of your camera to Capture mode
Formatting internal flash memory or SD card
Warning: Formatting a SD card or flash memory will delete all information.
Note: If formatting a SD card, insert the card into the camera. Remove the SD card if you
are formatting the internal flash memory.
To format the internal flash memory or SD card:
Turn the camera on and switch the mode button to Playback mode.
Press the Menu button and use the up/down arrow buttons to select “FORMAT”.
Press the Select button to confirm your selection.
Use the up/down arrow buttons to select “YES” or “NO”.
Press the Select button to confirm your selection.
To resume taking pictures, slide the switch once back to Capture mode.
13
4 Installing the Software
System requirements
Windows
Windows ME, 2000, or XP
266 MHz Pentium or above
32MB RAM
200MB available Hard Drive space
CD-ROM or DVD Drive
Available USB port
14
PhotoImpression 5.0 Installation
1. Insert installation CD into your PC’s CD-ROM drive.
2. The introduction screen will appear automatically.
3. Click “ArcSoft PhotoImpression 5.0”.
7. Click “Next”.
4. Choose Setup Language. 8. Click “Next”.
5. Click “Next”. 9. Click “Finish”.
6. Click “Yes”.
Note: To find out more about PhotoImpression 5.0 or how to use it, consult online help by
clicking the “?” icon or “Help” on the pull-down menu.
15
5 Connecting the Digital Camera to Your PC
After the software has been installed on your computer, plug the camera into an available
USB port using the provided USB cable. The Windows operating system requires that you
install drivers for the camera so that the camera and computer can communicate properly.
Connect your camera to an available USB Port.
Click “My Computer”.
Removable Disk Displayed.
Click “Removable Disk”.
16
Click “GETMYPIX.EXE”
Click “Transfer” or right box to browse a destination folder to download the photos.
Photos transferring, this may take a few moments.
17
Click “Close” when “Transfer Done!” appears. The photos have been downloaded to
the specific folder.
18
6 Troubleshooting
Problem Symptom Likely Cause Solution
No power Camera will not
turn on
Battery is out of power Recharge the internal
battery (section 3)
The camera or subject
was moving when the
shot was taken
Hold the camera
firmly
The subject is too close Move away from the
subject
Image appears
blurred or dark
The lens is dirty Clean the lens with a
soft cloth
Flash has not finished
charging
Wait until the blue
LED is steady
Flash does not
go off as
expected
The flash has been
turned on
Make sure the flash is
set to “AUTO” or
“OFF”
Camera will not
focus
Subject is not in the
center of the LCD
Adjust the camera to
focus the objects
Camera is not turned on Turn on the camera
No space on the SD card
/ internal memory
Delete unwanted files
(section 3) or insert a
new SD card (section
3)
Capturing
Cannot take
pictures when
the shutter
button is
pressed
The camera has
timed out
Turn the camera on
Check the USB cable
connection
Make sure both ends
of the USB cable are
connected
PC Connection PC does not
recognize the
camera
Interference from other
USB devices
Disconnected other
USB devices
19
Check computer Connect the camera to
the PC with the USB
cable and select [My
Computer] – [Control
Panel] – [System]
[Device Manager]. In
the [Device Manager]
window delete
[Compose USB
device] or [Unknown
device] in [Other
devices]. Then
disconnect the camera
and install the
software before
reconnecting the
camera to the PC.
Camera
malfunctions
while in used
Electrostatic
discharge
interfered with
the camera
Check if the camera is
connected to the PC
Turn off the camera
and then turn it back
on. If connected to
the PC, disconnect the
camera from the USB
cord, and turn it off
then on again.
LCD The LCD does
not light up
If you turn the power off
with the LCD off, the
LCD screen is still set to
OFF the next time the
power is turned on
Press the LCD button
once to turn on the
LCD
LCD displays
“E2” when a
SD memory
card is inserted
Incompatible
file system on
SD memory
card
Format SD card Refer to Deleting an
image/Formatting
internal flash
memory or SD card
in section 3
20
7 Safety Notes
We strongly recommend that you read these Safety Notes (and associated materials) before
using your camera.
WARNING
The enclosed disk is a computer CD-ROM. Never attempt to play this disk on an ordinary
music CD player as it may produce extremely high noise levels that could damage your
hearing or your audio equipment.
The camera is a precision instrument. Never attempt to dismantle this device. There is a
serious danger of a powerful electric shock.
Do not drape the connection cord around your neck or otherwise treat the cable carelessly,
as this could result in suffocation or injury.
Do not leave the camera in locations exposed to direct sunlight, as this could cause a fire
due to magnification by the lens.
Do not bring the camera close to a flame or throw it into a fire.
Do not drop the camera or otherwise subject it to strong impact.
Do not immerse the camera in water.
Notes on Copyright
Images recorded using your digital camera system cannot be used in ways that infringe
copyright laws without the consent of the owner, unless intended only for personal use. Note
that some restrictions apply to the photographing of stage performances, entertainments and
exhibits, even when intended purely for personal use. Users are also asked to note that the
transfer of memory containing images or data protected under copyright laws is only
permissible within the restrictions imposed by those copyright laws.
Liquid Crystal
If the liquid crystal display (LCD) is damaged, take particular care with the liquid crystal
inside the panel. If any of the following situations arise, take the urgent action indicated:
If liquid crystal comes in contact your skin: Wipe the area with a cloth and then wash
thoroughly with soap and running water.
If liquid crystal gets into your eye: Flush the affected eye with clean water for at least 15
minutes and then seek medical assistance.
If liquid crystal is swallowed: Flush your mouth thoroughly with water. Drink large
quantities of water and induce vomiting. Then seek medical assistance.
21
Handling Your Digital Camera Safely
This camera contains precision electronic components. To ensure that images are recorded
correctly, do not subject the camera to impact or shock while an image is being recorded.
Places to Avoid
Do not use or store the camera in the following types of locations:
In the rain or in very humid, dirty or dusty places.
Places subject to extreme temperature rises, such as in direct sunlight or a closed car in
summer. Extremely cold places.
Places subject to strong vibration.
Places affected by smoke or steam.
Places subject to strong magnetic fields (such as near motors, transformers or magnets).
In contact with chemicals such as pesticides or next to rubber or vinyl products for long
periods of time.
Sandy places such as beaches or deserts, or places where there is wind-borne sand.
Note on Condensation
If the camera is carried suddenly from a cold location into a warm location, water droplets
may form on the inside of the camera or on the lens (condensation). When this occurs, switch
the camera off and wait an hour before using the camera.
Cleaning Your Camera
Use a blower brush to remove dust from the lens, LCD and then wipe lightly with a soft,
dry cloth.
Do not scratch hard objects against the lens, LCD as these surfaces are easily damaged.
Clean the body of the camera with a soft, dry, cloth. Do not use volatile substances such
as thinners, benzine or insecticide, as these may react with the camera body finish and
cause deformation or remove the coating.
Checked Baggage
When traveling by air, do not place your camera in the check-in baggage. Baggage handling
at airports may subject baggage to violent shocks, and the camera may be damaged internally
even when no external damage is visible.
To prevent fire or shock hazard, do not expose the camera to rain or moisture.
22
8 Trademarks
z Autobrite is a registered trademark of SMaL Camera Technologies, Inc. of Cambridge,
Massachusetts, USA.
z Microsoft and Windows are trademarks of the Microsoft Corporation of the U.S. and
other countries. Windows is an abbreviated term referring to the Microsoft Windows
Operating System.
z Pentium is trademark of Intel Corporation.
z All other company or product names are trademarks or registered trademarks of the
respective companies.
Disposal
Waste electrical and electronic products must not be disposed of with household
waste. Please refer to the retailer from whom you purchased this item for disposal
instructions.
Packaging materials should be recycled using local facilities.
3

Hulp nodig? Stel uw vraag in het forum

Spelregels

Misbruik melden

Gebruikershandleiding.com neemt misbruik van zijn services uitermate serieus. U kunt hieronder aangeven waarom deze vraag ongepast is. Wij controleren de vraag en zonodig wordt deze verwijderd.

Product:

Bijvoorbeeld antisemitische inhoud, racistische inhoud, of materiaal dat gewelddadige fysieke handelingen tot gevolg kan hebben.

Bijvoorbeeld een creditcardnummer, een persoonlijk identificatienummer, of een geheim adres. E-mailadressen en volledige namen worden niet als privégegevens beschouwd.

Spelregels forum

Om tot zinvolle vragen te komen hanteren wij de volgende spelregels:

Belangrijk! Als er een antwoord wordt gegeven op uw vraag, dan is het voor de gever van het antwoord nuttig om te weten als u er wel (of niet) mee geholpen bent! Wij vragen u dus ook te reageren op een antwoord.

Belangrijk! Antwoorden worden ook per e-mail naar abonnees gestuurd. Laat uw emailadres achter op deze site, zodat u op de hoogte blijft. U krijgt dan ook andere vragen en antwoorden te zien.

Abonneren

Abonneer u voor het ontvangen van emails voor uw Easypix V16 bij:


U ontvangt een email met instructies om u voor één of beide opties in te schrijven.


Ontvang uw handleiding per email

Vul uw emailadres in en ontvang de handleiding van Easypix V16 in de taal/talen: Engels als bijlage per email.

De handleiding is 0,79 mb groot.


U ontvangt de handleiding per email binnen enkele minuten. Als u geen email heeft ontvangen, dan heeft u waarschijnlijk een verkeerd emailadres ingevuld of is uw mailbox te vol. Daarnaast kan het zijn dat uw internetprovider een maximum heeft aan de grootte per email. Omdat hier een handleiding wordt meegestuurd, kan het voorkomen dat de email groter is dan toegestaan bij uw provider.

Stel vragen via chat aan uw handleiding

Stel uw vraag over deze PDF

Andere handleiding(en) van Easypix V16

Easypix V16 Gebruiksaanwijzing - Deutsch - 23 pagina's

Easypix V16 Gebruiksaanwijzing - English - 52 pagina's

Easypix V16 Gebruiksaanwijzing - Français - 23 pagina's

Easypix V16 Gebruiksaanwijzing - Italiano - 23 pagina's

Easypix V16 Gebruiksaanwijzing - Espanõl - 23 pagina's


Uw handleiding is per email verstuurd. Controleer uw email

Als u niet binnen een kwartier uw email met handleiding ontvangen heeft, kan het zijn dat u een verkeerd emailadres heeft ingevuld of dat uw emailprovider een maximum grootte per email heeft ingesteld die kleiner is dan de grootte van de handleiding.

Er is een email naar u verstuurd om uw inschrijving definitief te maken.

Controleer uw email en volg de aanwijzingen op om uw inschrijving definitief te maken

U heeft geen emailadres opgegeven

Als u de handleiding per email wilt ontvangen, vul dan een geldig emailadres in.

Uw vraag is op deze pagina toegevoegd

Wilt u een email ontvangen bij een antwoord en/of nieuwe vragen? Vul dan hier uw emailadres in.


Info