To set the Time watch mode
Your Communicator has a 12/24-hour Time Clock, which can be set as follows:
1. In Communication mode, enter to Menu mode by long time pressing the Menu key
until a short key-beep tone is heard. When the time Setting mode is engaged, the
Hour segment in the LCD Display will flash.
2. Press the Menu button 7 times, screen will display 12/24-hour mode setting, by
press S button to start to set, press Up or Down key to select 12 or 24H mode. To
press S button to confirm, if you choose 12H mode, screen will display AM/PM.
3. Date setting: By press Menu button 2 times, screen will display 00 01
01(year/month/date), by press S button to select year/month/date, press UP, Down
button to select date, press S button to confirm setting.
4. Time setting: by press Menu button 3 times, screen will display 12 00 00,
(hour/minute/second), by press S button to select hour/minute/second, by press UP,
Down button to adjust time , to press S button to confirm setting . when setting time,
screen will display AM or PM if time mode is 12hour mode.
5. Stopwatch setting: by press MENU button 4 times, screen will display stopwatch
mode 00 00 00, to press PTT button to start time count; time count will pause by
press PTT again; to continue time count by press MENU button again; by press UP,
DOWN button for zeroing,
6.Clock countdown setting: Press MENU button 5 times, screen display clock
countdown mode 00 00 00 (minute/second/millisecond), to press S button to select
minute/second/millisecond and press UP, DOWN button to select time then press S
button to confirm setting; by press PTT button to start countdown, press PTT again
to make countdown pause and to press PTT continue to countdown.
7.Alarm clock setting: to press MENU button 6 times, enter alarm clock mode, Screen
display OF and clock icon. Press PTT button to set alarm clock mode 12 00
00(hour/minute/second), by press S button to select hour/minute/second and by
press UP, DOWN button to adjust time, to press S button to confirm setting, then
screen will display alarm clock icon, when time is up, alarm clock will ring. Exit the
alarm clock mode by press any button.
8. Key lock setting: under the watch mode, by press menu button one time and press
S button quickly to lock all button; under the communication mode, by long time
press S button to lock all buttons except for PTT button, same operation apply to
unlock button.
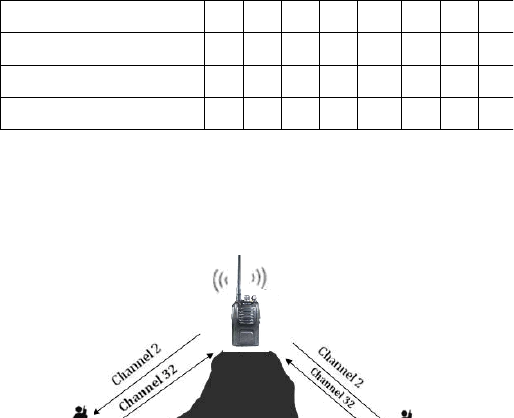
■Duplex operation via repeaters
This feature allows to use local repeater stations that are designed to automatically re-
transmit your broadcast over a large area thus giving you increased range.
For example, if you wish to access a repeater station in your area which operate on
channel 2 , you only need to set the duplex access on this channel, so if you are in
the range of a local repeater which transmits on channel 2, after setting your radio to
allow access of the repeater on that channel, you will select channel 2 as normal but