802384
27
Verklein
Vergroot
Pagina terug
1/28
Pagina verder
USER MANUAL
(Translation of the original)
FR : Un manuel dans votre langue est disponible sur Internet:
IT: Il manuale nella sua lingua può essere trovato su Internet:
ES: Puede encontrar un manual en su idioma en Internet:
PT: Um manual em seu idioma pode ser encontrado na Internet:
PL: Instrukcję w swoim języku możesz znaleźć na stronie:
SWE: En handbok på ditt språk finns på Internet:
NL: Een handleiding in uw taal vindt u op internet:
https://bit.ly/VisionPlus21
www.easypix.info/download-manuals/download/goxtreme_vision_plus
1
Table of contents
General information ....................................................................................... 3
Explanation of symbols ................................................................................... 3
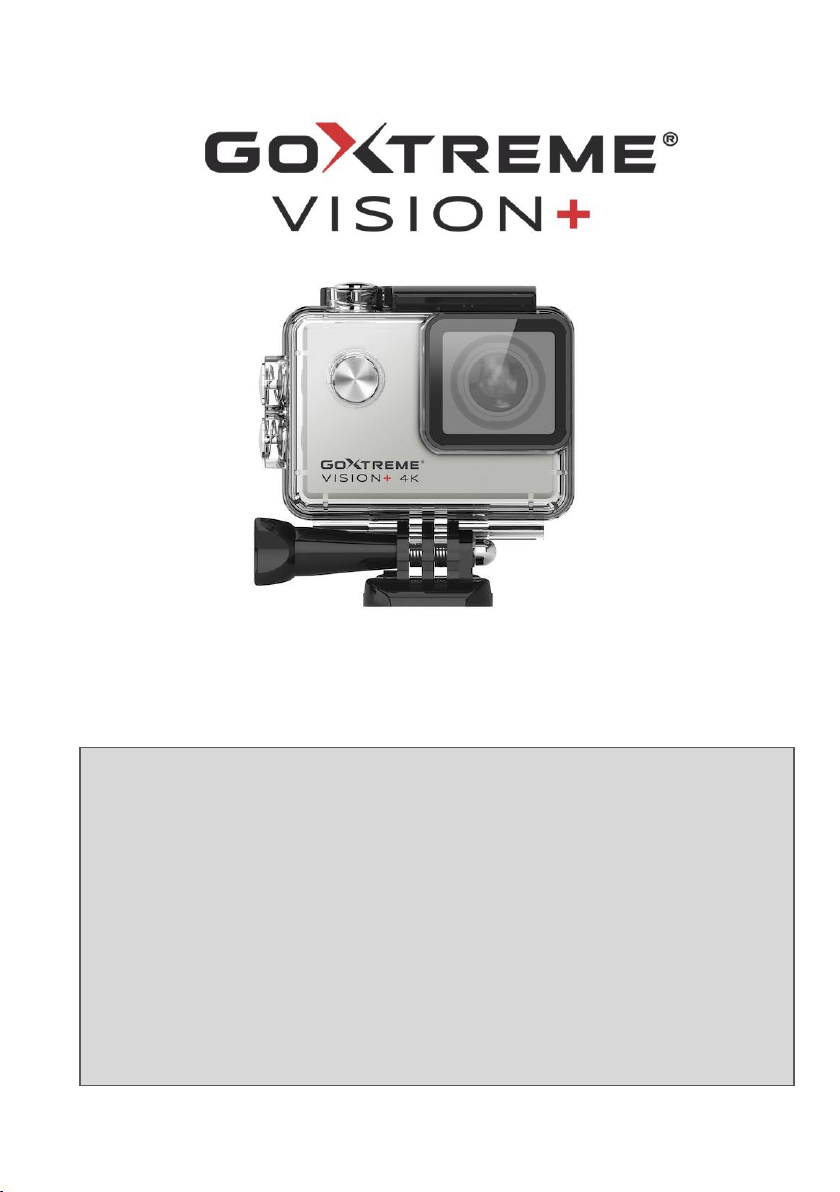
Product description ........................................................................................ 4
Intended use ................................................................................................... 4
Restrictions ..................................................................................................... 4
Safety Instructions .......................................................................................... 5
Operating environment .................................................................................. 6
Camera description ......................................................................................... 7
First use ........................................................................................................... 8
Step 1: Insert and charge the battery ..................................................... 8
Step 2: Turn on/off the camera ............................................................... 9
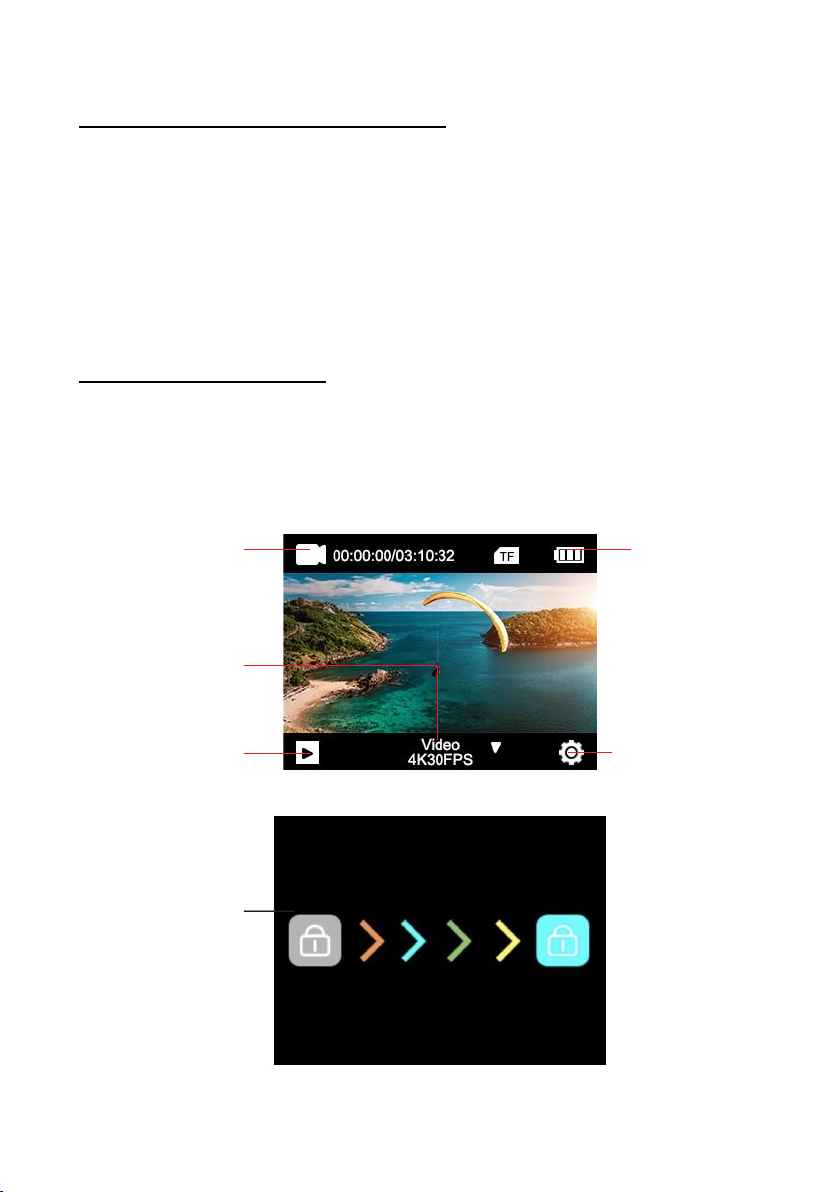
Step 3: Touch screen ............................................................................... 9
Step 4: Setting the language ................................................................. 10
Step 5: Insert and format the MicroSD card ......................................... 11
Step 6: Set date and time ...................................................................... 12
Step 7: Switching between modes ........................................................ 12
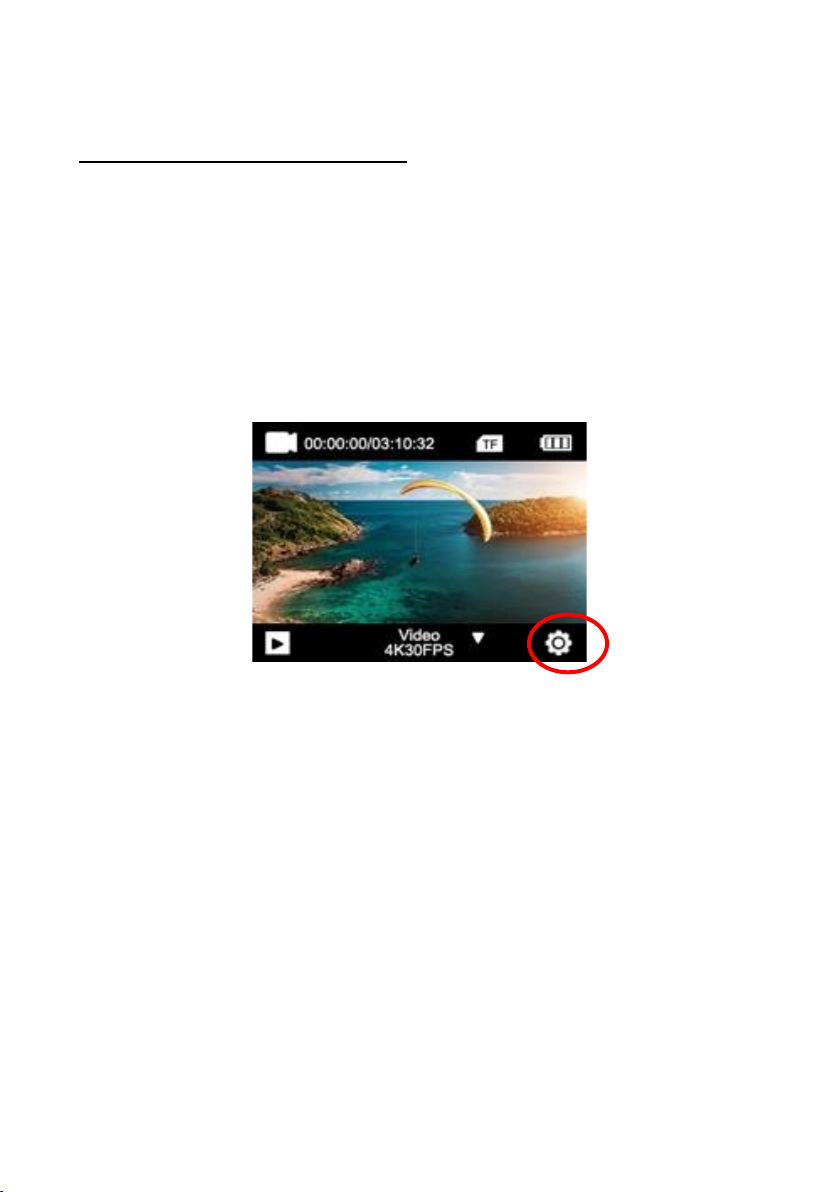
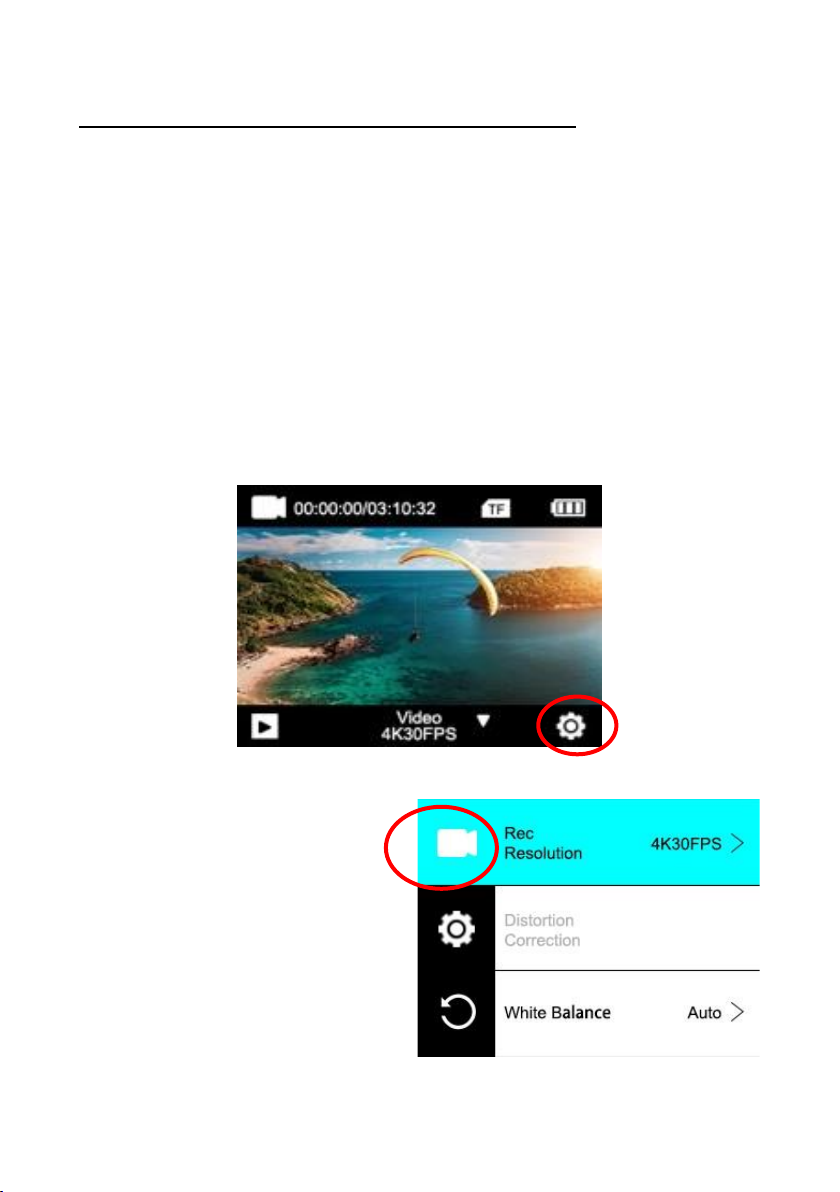
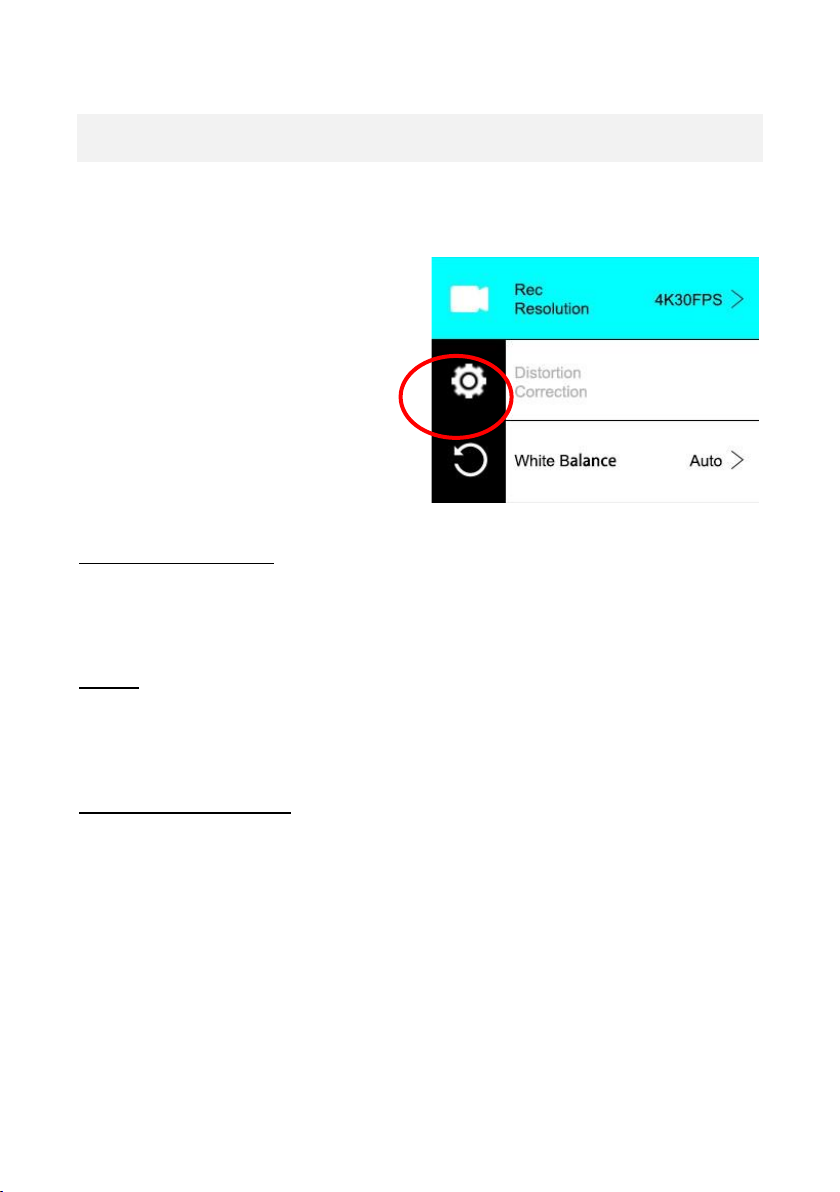
Step 8: Changing the video/photo settings ........................................... 13
Camera settings ............................................................................................ 14
Video and photo functions ........................................................................... 17
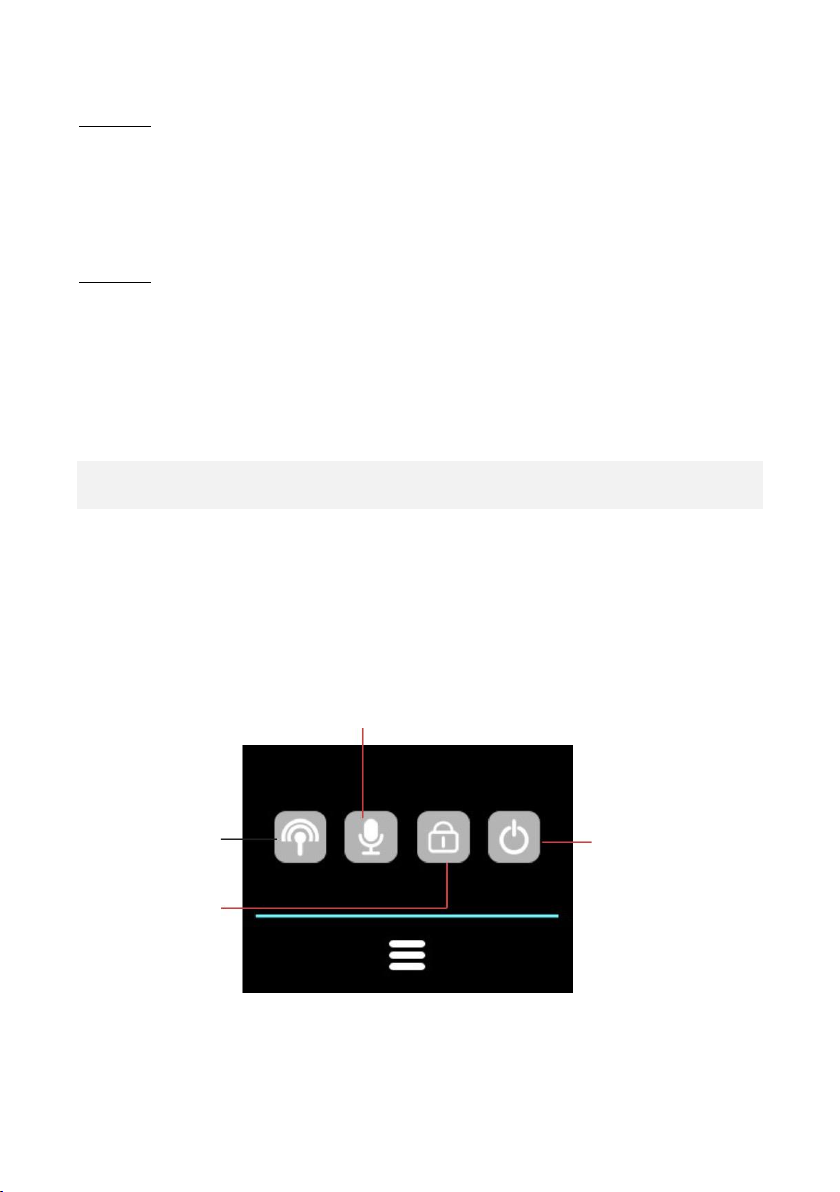
Shortcuts ....................................................................................................... 19
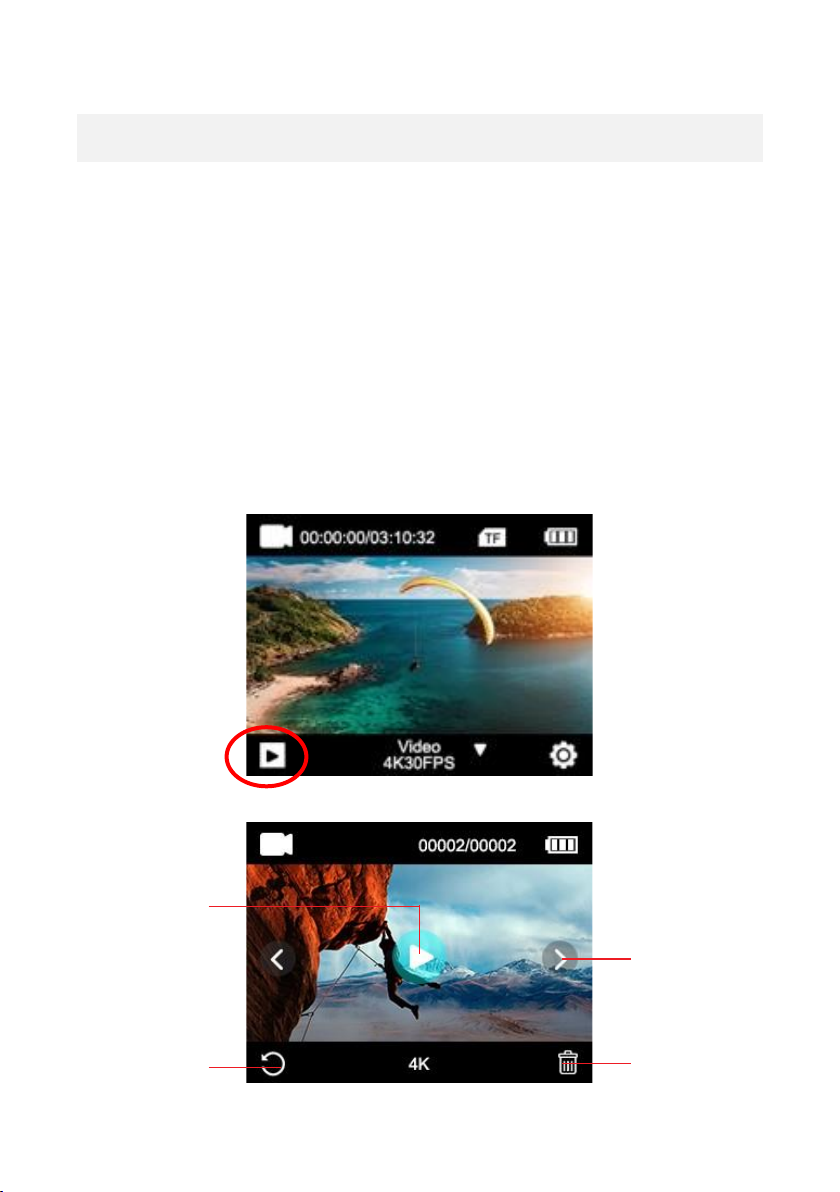
Playback mode .............................................................................................. 20
Remote control ............................................................................................. 21
Connection to the "XDV PRO" app ............................................................... 21
Technical specifications ................................................................................ 24
Box contents ................................................................................................. 25
Disposal ......................................................................................................... 26
Declaration of conformity ............................................................................. 27
2
Disclaimer
Easypix makes no representations or warranties with respect to this
manual and, to the extent permitted by law, expressly limits its
liability for breach of any warranty that may arise from replacement
of this manual by another. Furthermore, Easypix reserves the right to
revise this publication at any time without obligation to notify any
person of the revision.
Easypix is not responsible or liable for the misuse of the information
contained herein. If you have suggestions for improvement or
changes or if you have found errors in this publication, please let us
know.
All relevant state, regional and local safety regulations must be
observed when installing and using this product. For safety reasons
and to ensure compliance with the documented system data, only the
manufacturer may carry out repairs on components.
Failure to observe this information may result in personal injury or
equipment damage.
Copyright © Easypix GmbH
All rights reserved. No part of this publication may be reproduced,
distributed or transmitted in any form or by any means, including
photocopying, recording or other electronic or mechanical means,
without the prior written permission of the publisher. For permission
requests, please contact the publisher in writing.
Easypix GmbH, Em Parkveedel 11, 50733 Cologne, Germany.
support@easypix.eu - www.easypix.eu
3
General information
Please read this manual and its safety instructions before using this
product. Follow all instructions. This will prevent hazards that could
result in property damage and/or serious injury.
The product may only be used by persons who have fully read and
understood the contents of this user manual.
Make sure that each person using the product has read and follows
these warnings and instructions.
Keep all safety information and instructions for future reference and
pass them on to subsequent users of the product.
The manufacturer is not liable for damage to property or personal
injury resulting from incorrect handling or failure to observe the
safety instructions.
Explanation of symbols
"Warning" indicates a hazard with a risk which, if not avoided, may
result in injury.
"Note" indicates information that is considered important but is not
hazard-related.
WARNING
NOTE!
4
Product description
GoXtreme Vision+ is a 4K camera. The camera records videos and
photos with an ultra-wide angle of 170°. The 2"/5cm touch screen
allows you to operate the camera easily and intuitively. It is supplied
with a housing that is waterproof up to 30m, as well as a wide range
of additional brackets and accessories such as the wrist worn remote
control.
Intended use
This product is suitable for use during various sports or activities.
The supplied brackets allow the camera to be mounted in multiple
positions: on a bicycle, helmet or on the body.
Restrictions
The product is not suitable for children under 3 years of age.
Contains small parts. Risk of suffocation.
WARNING
5
The product is not waterproof.
It should only be immersed under water when securely enclosed in
the supplied housing.
Before using the product in water, make sure that all covers
and latches on the camera and underwater housing are
securely closed and sealed.
After use in salty or chlorinated water, clean the housing
under tap water and allow it to dry.
After use under water, the housing must be left open to dry in
order to prevent condensation or rust formation.
Safety Instructions
This product is only suitable for the purpose described.
The manufacturer is not liable for damage caused by improper use.
Please read these operating instructions carefully before use.
Always protect your camera from falls, bumps and shocks.
Keep a sufficient distance from objects that generate
WARNING
WARNING
WARNING
6
strong magnetic fields or radio waves to prevent them
from damaging the product or affecting the sound and
picture quality.
In the unlikely event of overheating, smoke or unpleasant
odours coming from the unit, disconnect it immediately
from the charging cable and remove the battery to avoid
fire.
Please do not disassemble the product.
Doing so will void any warranty.
Please dispose of the waste and residues at the end of the
product's life in accordance with local laws and
regulations.
Operating environment
To avoid condensation inside the housing or behind the lens,
the product should not be exposed to large differences in
temperature and humidity.
Store the product in a cool place (at room temperature) in a
dry and dust-free environment and never expose it to high
temperatures or prolonged exposure to direct sunlight.
Protect the product from falls, bumps and knocks.
7
Camera description
1. Recording / OK Button
2. Power / Mode Button
3. WiFi / Up Button
4. Down Button
5. Speaker
6. WiFi indicator
7. USB
8. MicroSD slot
9. HDMI
10. Touch screen
11. Battery compartment
8
First use
To ensure optimum performance from your camera, please follow
the steps below when using the camera for the first time:
Step 1: Insert and charge the battery
Before using the product for the first time, make sure that it is fully
charged.
Open the battery compartment cover, insert the battery and
charge it for between 5 and 6 hours.
Keep the device away from children during charging.
Ensure that the camera is turned off during charging.
If the camera switches on automatically when connected to a
power source, please turn it off to ensure the battery can be
fully charged.
Product should only be charged via the USB port of a
computer or USB power supply with a maximum output of
1050mAh.
Disconnect the USB cable connected to the product before
using it.
The battery life is up to 90 minutes under optimal conditions
and is dependent on the settings used and the outside
temperature.
NOTE!
9
Step 2: Turn on/off the camera
Press and hold the Power button for about 3 seconds to turn
on the camera.
To turn off the camera, press and hold the Power button again
for about 3 seconds.
Step 3: Touch screen
The camera's screen is a touch screen - so you can operate the
camera conveniently by touching the screen.
Mode
Playback
Battery level
STANDBY MODE:
Swipe to the right to
unlock the screen.
Settings
10
Step 4: Setting the language
By default, the camera is set to English.
To select a different language:
1. Click on the "Settings" icon on the screen and tap the
"Settings" icon again on the following screen to enter the
camera settings options.
2. In the camera settings menu, use the arrow keys or scroll your
finger to navigate down to the "Language" sub-item.
3. Tap ‚Language‘ to view the various language options.
4. Scroll down through the options and tap to select and activate
your preferred language.
5. Press the ‚back‘ icon to return to the main screen
11
Step 5: Insert and format the MicroSD card
Please make sure that your memory card is formatted in the
camera before using the card for the first time.
For best results, we recommend the use of high-quality Class
10 MicroSD cards with U3 High Speed or higher.
Ensure a U3 speed memory card is always used when
recording 4K video. Using a lower speed card may cause data
transfer speed problems due to the large file size that a 4K
video produces.
The recording time depends on the selected resolution.
A MicroSD card is not supplied with this product.
ATTENTION!
Formatting deletes all files on the card.
Format the MicroSD card:
1. Click on the "Settings" icon on the screen and select "Settings"
again.
2. In the settings menu, use the arrow keys or scroll your finger
to navigate to the "Format" sub-item.
3. Tap the "Format" button and your card will be formatted
immediately.
NOTE!
12
Step 6: Set date and time
1. Click on the "Settings" icon on the screen and select "Settings"
again.
2. In the settings menu, you can navigate to the sub-items "Time
Set" and "Date Set" using the arrow keys or by scrolling with
your finger.
3. Set the time or date by tapping each of the on screen options
and their corresponding up and down arrows.
Step 7: Switching between modes
The Power key is also the Mode key.
Press this key to switch between the different modes of operation:
Video > Photo > Video etc.
You can also switch between modes by swiping the screen with your
finger from left to right.
13
Step 8: Changing the video/photo settings
Video settings are available when in video mode.
Photo settings are available when in Photo mode.
1. When the camera is switched on, it is in video mode by
default.
Press the Mode button or swipe the screen to switch to Photo
mode.
2. To change the settings of your photo or video recordings,
tap the "Settings" icon in each mode.
3. Then scroll to the function or settings you want to change.
Video/photo settings
General settings
Back
Detailed
settings
14
Camera settings
To change operational settings of the camera, enter the General
settings menu.
IMAGE ROTATION:
If you need to mount your camera upside down, activate image
rotation to ensure that videos are recorded with the right orientation.
WI-FI:
Tap this button to enable the WiFi function.
Press the up arrow key to disable WiFi.
WI-FI INFORMATION:
WiFi Name - Displays the cameras network ID.
This is the network you should search for in the WiFi settings of your
smartphone when connecting to the camera.
WiFi Password - This is the password you need to establish the
connection between your camera and your smartphone.
Reset WiFi: If you have forgotten your WiFi password (which can
be changed in the WiFi app), you can use the "Reset WiFi" function to
reset it and restore the default WiFi settings.
General settings
15
POWER FREQUENCY:
Select the power frequency that matches the electricity supply in
your country.
An incorrect setting can cause your videos to flicker when recorded
under artificial or fluorescent light.
LED INDICATOR:
Switches the blue LED display on or off.
When this option is enabled, the LED indicator lights up when the
camera is turned on and flashes to confirm that video recording is in
progress.
SCREEN SAVER:
To prolong battery life, the screen can be turned off after a preset
time. If the screen turns off during recording, it will not affect the
recording. Simply press the shutter button to turn the screen back on.
AUTO POWER OFF:
To prolong battery life, the camera can be turned off automatically
after a preset time.
SOUND SETTINGS:
Controls the volume of the key tones.
DATE FORMAT:
Choose your preferred option for displaying the date on screen, in
recordings and photos.
Note: You can remove the time and date stamp from your videos and
recordings by selecting "Time Watermark" in the video or photo
settings.
16
FORMAT:
To ensure maximum compatibility between memory card and
camera, the memory card should always be formatted in the camera
before first use.
Touch FORMAT to perform the formatting operation.
WARNING: Formatting will delete all files stored on the card.
Ensure that all important files are backed up before formatting.
DEVICE INFO:
Displays important information about the current firmware version of
the camera.
Tap the screen to return to the settings menu.
FACTORY RESET:
Resets all camera and menu settings to the factory default settings.
17
Video and photo functions
Wipe UP on the screen and select between the different functions:
VIDEO:
Press the OK/Record button to start recording.
The video icon on the screen turns red to indicate that the camera is
recording.
Press the OK/Record key again to stop recording.
To select detailed settings (such as video resolution), press the
"Settings" icon while in video mode.
After adjusting a particular setting, press the Back icon to return.
SLO-MO:
Records a slow-motion video.
Press the “Settings” icon to select slow motion speed and other
options.
Select a function
Close
18
LOOP:
When Loop Recording is enabled, the camera records a video for the
selected period of time. After this time, the camera starts recording a
new file for the same amount of time.
Each time a new recording is started, the last recording is
automatically overwritten.
Press the "Settings" icon to set the loop recording duration.
LAPSE:
In time-lapse mode, a video recording recorded over a longer period
of time can be compressed into a video with only a few minutes
playing time. This creates a time-lapse effect.
Press the "Settings" icon to configure the settings.
PHOTO:
Press the Record button to take a photo.
The photo icon on the screen will flash red briefly to indicate that a
photo has been taken.
To make detailed settings (such as image resolution), then press the
"Settings" icon.
After adjusting a particular setting, press the Back icon to return.
AUTO:
When the Auto Shoot function is activated, the camera automatically
takes a series of photos until the shutter button is pressed to stop the
sequence.
Press the “Settings” icon to set the time interval between each photo.
19
BURST:
The Burst Photo function allows you to take multiple photos in rapid
succession with a single press of the shutter button.
Press the “Settings” icon to select the number of photos per second.
TIMER:
When the self-timer (timer) is activated, the camera automatically
takes a picture after a specified time delay.
Press the "Settings" icon to set the countdown time.
Shortcuts
Swipe the screen DOWN to display additional function options.
Tap to activate the options.
An activated setting is indicated by the icon turning blue.
WiFi on
Screen lock
Audio recording on/off
Turn off the camera
20
Playback mode
Tap the playback icon in either photo or video mode to enter
playback mode.
The counter at the top of the screen shows the total number
of files available.
Tap the left (<) and right (>) icons to navigate through the
various files.
Tap the play button to start video playback.
Tap anywhere on the screen to pause playback.
Playback mode
Play video
Back
Next file
Delete file
21
Remote control
Using the supplied remote control:
You can start a video recording or take a photo using the remote
control.
Press the Record button on the remote control to start recording.
Press the key again to stop recording.
The remote control is splashproof.
It is not suitable for use under water.
Connection to the "XDV PRO" app
1. Before using the WiFi feature, please go to the App Store or
GooglePlay and install the XDV PRO app on your smartphone
or tablet PC.
ANDROID iOS
NOTE!
22
2. Turn on the WiFi function by swiping down on the screen and
tapping the WiFi icon.
a. The camera network ID and password will be displayed as
follows:
Wi-Fi ID: GoXtreme Vision_xxxx
Wi-Fi PWD: 12345678
b. Now open the WiFi settings on your phone to select the
camera WiFi ID from the available wireless networks.
c. The password for establishing the connection is 12345678.
d. When the connection is confirmed, exit the smartphone WiFi
settings screen and open the XDV Pro app to complete the
connection.
Ensure that you have downloaded the correct app.
Please note that wireless transmission of files via the app is
not possible for videos with a resolution of more than 1080p.
Files with a resolution greater than 1080p can only be
transferred using a computer or card reader.
When you use the app for live view, only network information
is displayed on the camera screen.
When you have finished using the app, please deactivate the
WiFi function to save the battery.
NOTE!
23
Turn off the WiFi function:
Briefly press the UP button to turn off the WiFi.
The camera will return to the default home screen
If using your camera and smartphone near a WiFi router
regularly used by you, your smartphone will often connect
automatically to the router network as a priorty (as your
smartphone will have saved the router password) rather than
to the camera.
In this case please try to connect the camera to your
smartphone while maintaining a distance further away from
the router so that it does not connect to the router network.
24
Technical specifications
Video resolution
4K (30 fps)
2.7K (30 fps)
1080p (120/60/30 fps)
720p (240/120/60/30 fps)
Photo resolution
16M (interpolated)
13M (interpolated)
8M
Display
2.0"/5cm touch-screen
Sensor
12MP
Waterproof housing
Waterproof up to 30m
Microphone/Loudspeaker
Integrated
Wide angle
170°
slow motion
1080p: 4x, 2x / 720p: 8x, 4x
Time-lapse video
0.5s / 1s / 2s / 5s / 10s / 30s / 60s
Time-lapse photo
3s / 10s / 15s / 20s / 30s Photo intervals
Series pictures
3 fps, 5 fps, 10 fps
Loop recording
2min / 3min / 5min intervals
Self-timer
Off / 3s / 5s / 10s / 20s
White Balance
Car / Daylight / Cloudy / Incandescent /
Fluorescent
WiFi function
Integrated
25
WiFi frequency
2.4 GHZ
File formats
MP4, JPG
Interface
HDMI, USB 2.0 Micro
Battery
Exchangeable 1050mAh Li-Ion battery
Dimensions of the
product
60 x 41 x 30 mm
External memory
- Support of MicroSD cards up to max.
64GB
- Requirement: U3 class10 cards or
higher
- Card not included
Box contents
Camera
Waterproof housing
Second cover for the
housing (not waterproof)
Remote control
Orientation adaptors
Tripod adapter
Monopod adapter
Clip Mount
Bicycle mount
Helmet mount
Frame Mount
Battery
USB cable
Manual EN/DE
Operating instructions in other languages are available for download
at https://bit.ly/VisionPlus21 or
www.easypix.info/download-manuals/download/goxtreme_vision_plus
26
Devices marked with this symbol must not
be disposed of with household waste!
You are legally obliged to dispose of old appliances as well as
batteries and accumulators separately from household waste.
Information on collection points that accept used devices/batteries
free of charge is available from your local authority or town council.
Disposal
Disposal of packaging:
Dispose of the packaging according to its type.
Add cardboard and paperboard to the waste paper, foils and
plastic wrapping to the recyclable waste collection.
Waste electrical and electronic equipment and/or batteries
disposed of by users in private households in the European
Union:
This symbol on the product or on its packaging indicates that it
cannot be disposed of with household waste. You must dispose of your old
appliance and/or battery by handing it over to the applicable collection
system for the recycling of electrical and electronic equipment and/or
batteries. For more information on recycling this device and/or battery,
contact your local council, the shop where you purchased the device or your
household waste disposal service. Recycling materials helps to conserve
natural resources and ensures that it is recycled in a way that protects
human health and the environment.
NOTE!
27
Warning regarding the battery:
- Do not disassemble or hit the battery. Be careful not to short-circuit
the battery. Do not expose the battery to high temperatures. Do not
continue using the battery if it leaks or expands.
- Always recharge using the camera or manufacturer approved
desktop charger if available. If the battery is replaced by an incorrect
type, there is a risk of explosion.
- Keep the battery away from children.
- Batteries can explode if exposed to an open fire.
Never throw batteries into fire.
- Dispose of used batteries according to local regulations.
- Before disposing of the device, remove the battery and dispose of it
separately.
Declaration of conformity
We hereby declare that the CE marking has been affixed to this
product in accordance with the essential requirements and relevant
provisions of the European directives. The complete declaration of
conformity can be downloaded here:
www.easypix.info/download/pdf/doc_goxtreme_vision_plus.pdf
WARNING
27

Hulp nodig? Stel uw vraag in het forum

Spelregels

Misbruik melden

Gebruikershandleiding.com neemt misbruik van zijn services uitermate serieus. U kunt hieronder aangeven waarom deze vraag ongepast is. Wij controleren de vraag en zonodig wordt deze verwijderd.

Product:

Bijvoorbeeld antisemitische inhoud, racistische inhoud, of materiaal dat gewelddadige fysieke handelingen tot gevolg kan hebben.

Bijvoorbeeld een creditcardnummer, een persoonlijk identificatienummer, of een geheim adres. E-mailadressen en volledige namen worden niet als privégegevens beschouwd.

Spelregels forum

Om tot zinvolle vragen te komen hanteren wij de volgende spelregels:

Belangrijk! Als er een antwoord wordt gegeven op uw vraag, dan is het voor de gever van het antwoord nuttig om te weten als u er wel (of niet) mee geholpen bent! Wij vragen u dus ook te reageren op een antwoord.

Belangrijk! Antwoorden worden ook per e-mail naar abonnees gestuurd. Laat uw emailadres achter op deze site, zodat u op de hoogte blijft. U krijgt dan ook andere vragen en antwoorden te zien.

Abonneren

Abonneer u voor het ontvangen van emails voor uw Easypix GoXtreme Vision plus bij:


U ontvangt een email met instructies om u voor één of beide opties in te schrijven.


Ontvang uw handleiding per email

Vul uw emailadres in en ontvang de handleiding van Easypix GoXtreme Vision plus in de taal/talen: Engels als bijlage per email.

De handleiding is 0.74 mb groot.


U ontvangt de handleiding per email binnen enkele minuten. Als u geen email heeft ontvangen, dan heeft u waarschijnlijk een verkeerd emailadres ingevuld of is uw mailbox te vol. Daarnaast kan het zijn dat uw internetprovider een maximum heeft aan de grootte per email. Omdat hier een handleiding wordt meegestuurd, kan het voorkomen dat de email groter is dan toegestaan bij uw provider.

Stel vragen via chat aan uw handleiding

Stel uw vraag over deze PDF

Andere handleiding(en) van Easypix GoXtreme Vision plus

Easypix GoXtreme Vision plus Gebruiksaanwijzing - Nederlands - 28 pagina's

Easypix GoXtreme Vision plus Gebruiksaanwijzing - Deutsch - 29 pagina's

Easypix GoXtreme Vision plus Gebruiksaanwijzing - Français - 29 pagina's

Easypix GoXtreme Vision plus Gebruiksaanwijzing - Italiano - 28 pagina's

Easypix GoXtreme Vision plus Gebruiksaanwijzing - Português - 28 pagina's

Easypix GoXtreme Vision plus Gebruiksaanwijzing - Espanõl - 28 pagina's


Uw handleiding is per email verstuurd. Controleer uw email

Als u niet binnen een kwartier uw email met handleiding ontvangen heeft, kan het zijn dat u een verkeerd emailadres heeft ingevuld of dat uw emailprovider een maximum grootte per email heeft ingesteld die kleiner is dan de grootte van de handleiding.

Er is een email naar u verstuurd om uw inschrijving definitief te maken.

Controleer uw email en volg de aanwijzingen op om uw inschrijving definitief te maken

U heeft geen emailadres opgegeven

Als u de handleiding per email wilt ontvangen, vul dan een geldig emailadres in.

Uw vraag is op deze pagina toegevoegd

Wilt u een email ontvangen bij een antwoord en/of nieuwe vragen? Vul dan hier uw emailadres in.


Info