654004
27
Verklein
Vergroot
Pagina terug
1/123
Pagina verder
User Manual
iGO primo
Navigation software for the [DEVICE]
UK English
October 2012, ver. 1.0
2
Thank you for choosing the [DEVICE] as your navigator. Read the Quick Start Guide first and
start using [DEVICE] right away. This document is the detailed description of the navigation
software. You can easily discover iGO primo while you are using it; however, we still
recommend that you read this manual to fully understand the screens and features.
Easy map updates
It is easy to keep the navigation system up to date. Simply run the Toolbox application with
your product connected and download new map data.
Free Map updates
When you start using the product, you can download new maps in the next 3 years.
3
Table of contents
1 Warnings and Safety information ......................................................................... 6
2 Getting started ......................................................................................................... 7
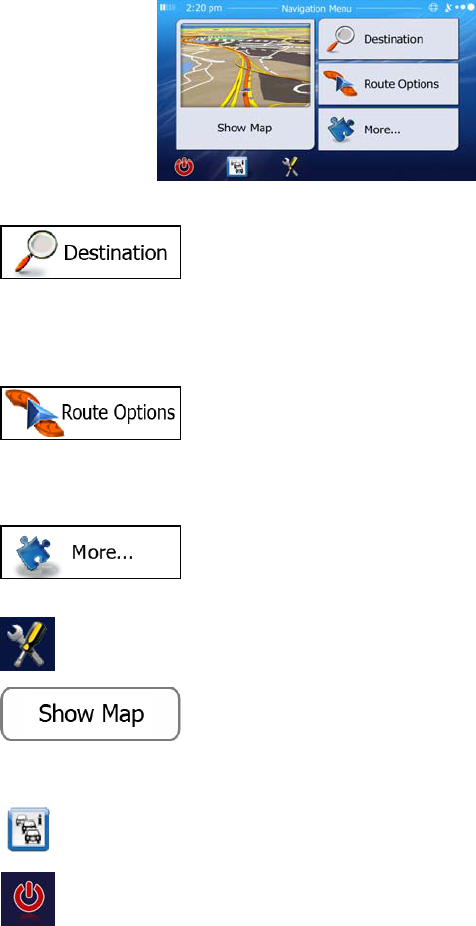
2.1 Navigation menu ............................................................................................................ 9
2.2 Buttons and other controls on the screen
..................................................................... 10
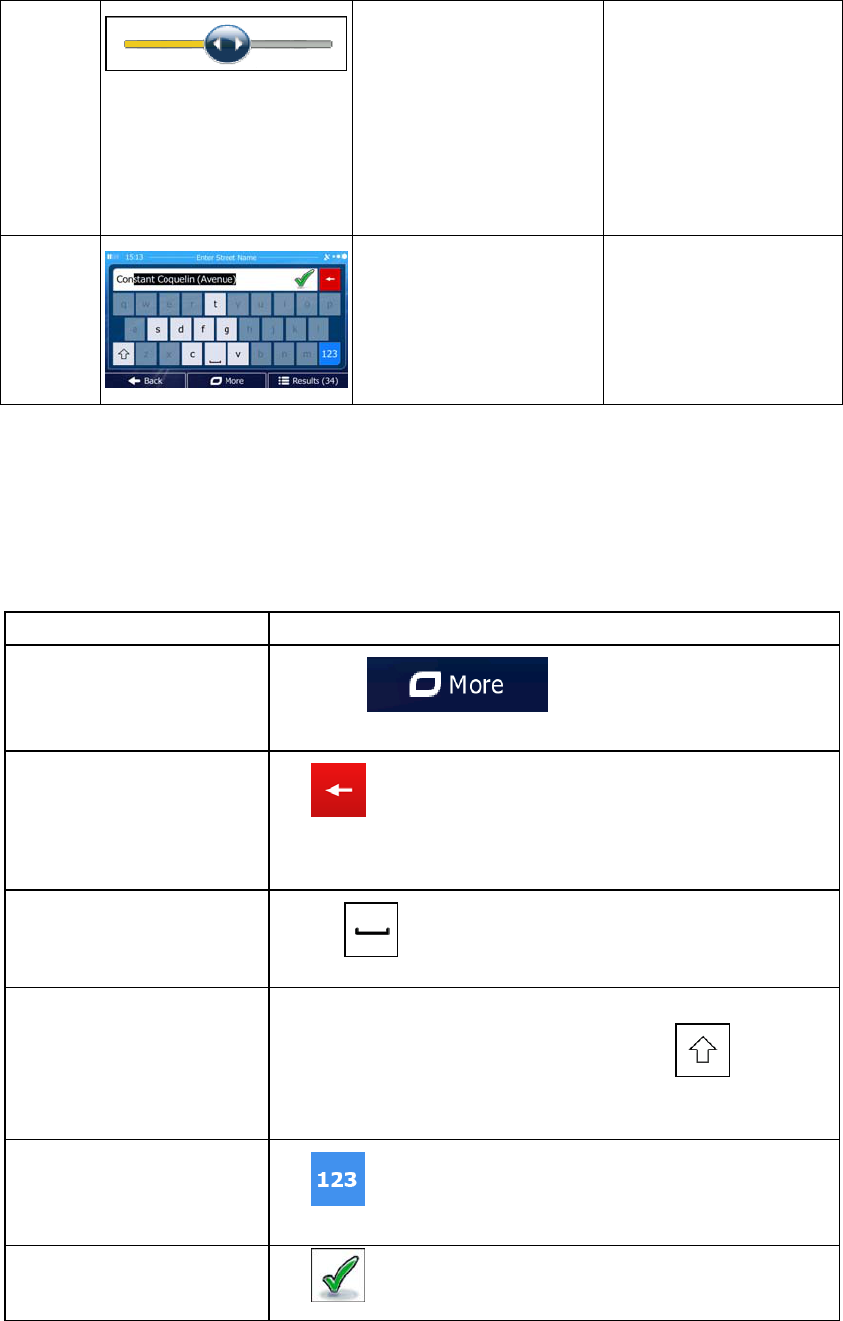
2.2.1 Using keyboards ................................................................................................................ 11
2.2.2 Beyond single screen tap ................................................................................................... 12
2.3 Map screen ................................................................................................................... 13
2.3.1 Navigating on the map ....................................................................................................... 13
2.3.2 Position markers ................................................................................................................ 15
2.3.2.1 Vehimarker and Lock-on-Road .................................................................................................. 15
2.3.2.2 Selected map location (Cursor) and selected map object .......................................................... 15
2.3.3 Objects on the map ............................................................................................................ 15
2.3.3.1 Streets and roads ....................................................................................................................... 15
2.3.3.2 Turn preview and Next street ..................................................................................................... 16
2.3.3.3 Lane information and Signposts................................................................................................. 17
2.3.3.4 Junction view ............................................................................................................................. 18
2.3.3.5 Motorway exit services .............................................................................................................. 18
2.3.3.6 3D object types........................................................................................................................... 19
2.3.3.7 Elements of the active route ....................................................................................................... 19
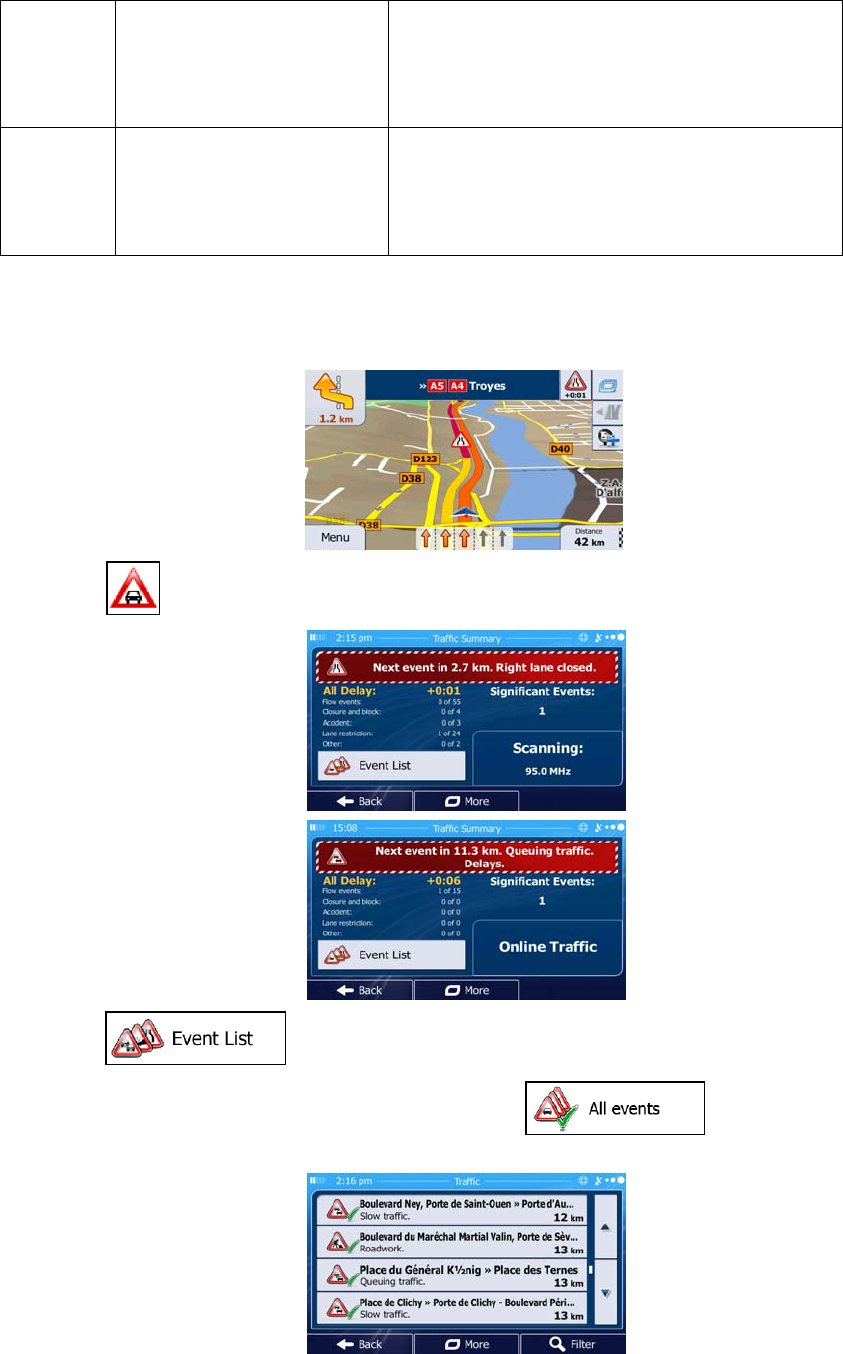
2.3.3.8 Traffic events ............................................................................................................................. 20
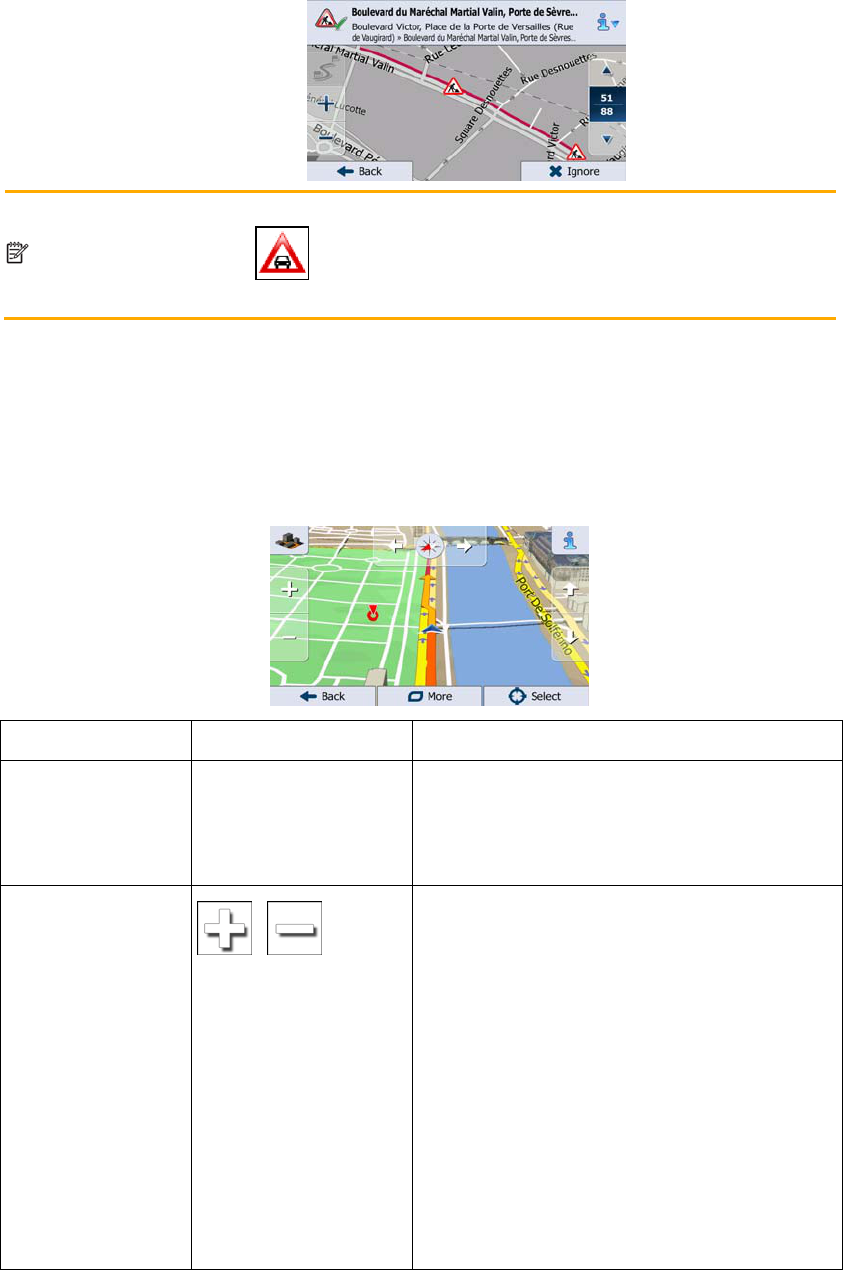
2.3.4 Manipulating the map ........................................................................................................ 21
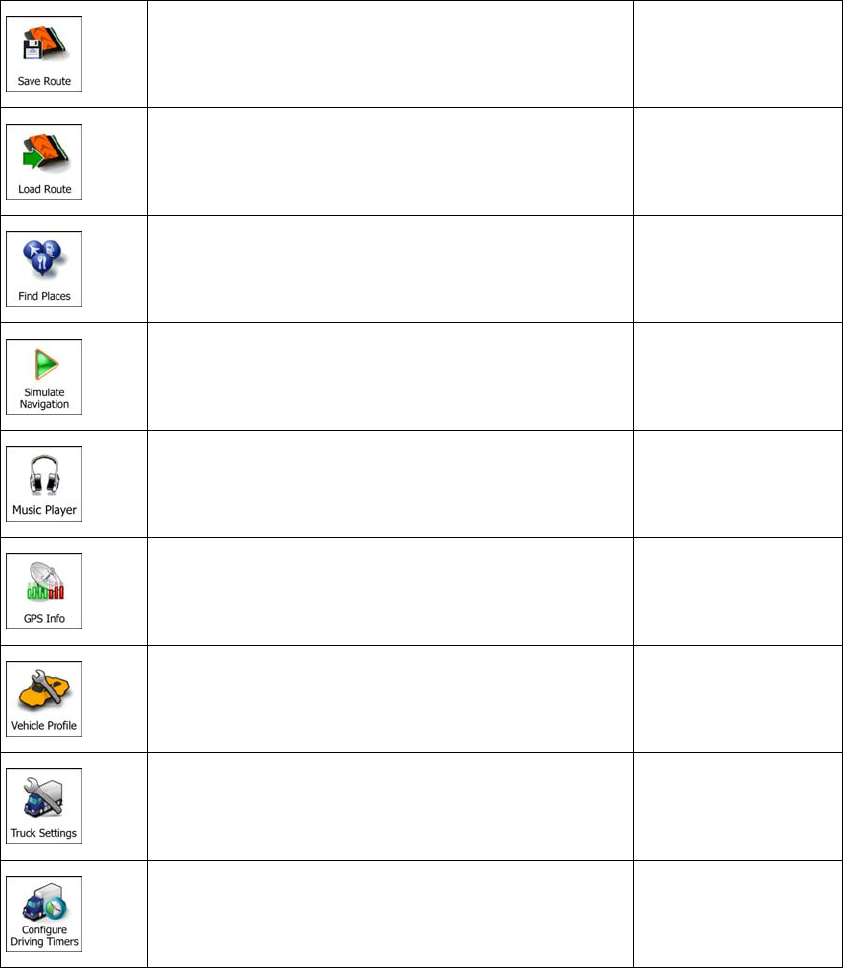
2.3.5 Quick menu ........................................................................................................................ 23
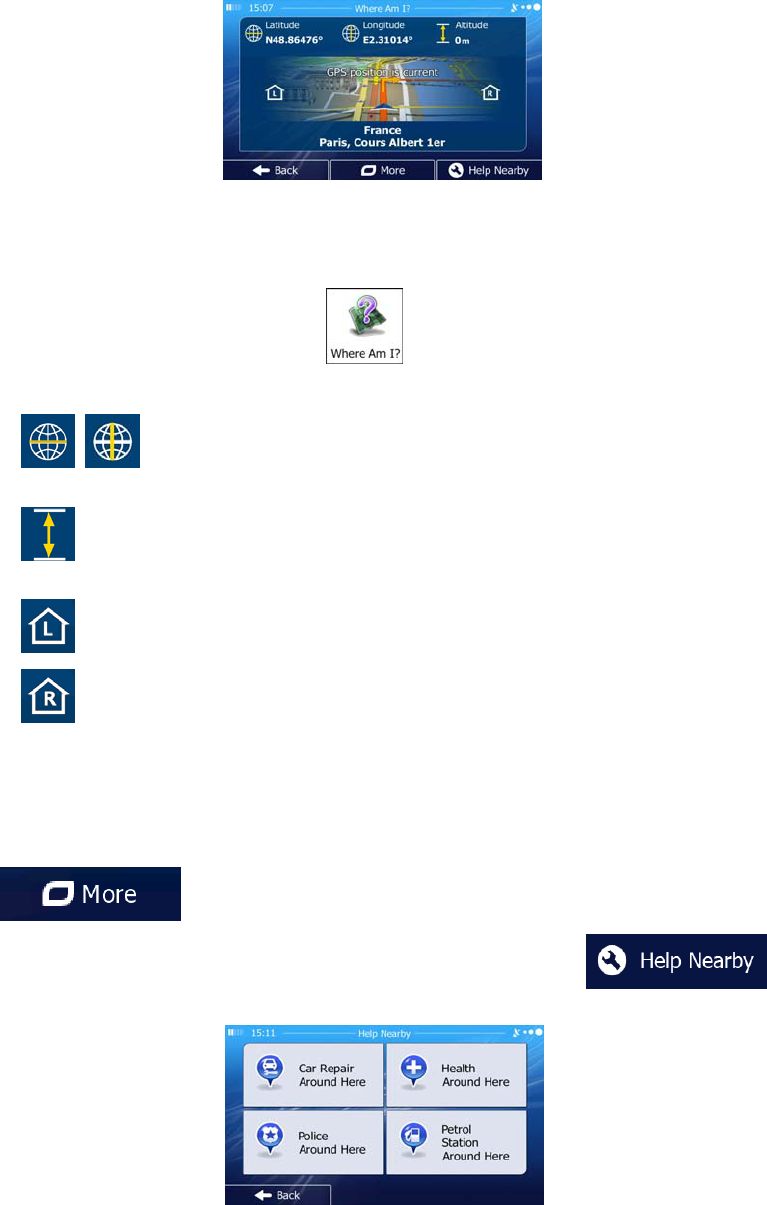
2.3.6 Checking the details of the current position (Where Am I?) ............................................. 26
3 On-road navigation ............................................................................................... 28
3.1 Selecting the destination of a route .............................................................................. 28
3.1.1 Combined Search ............................................................................................................... 28
3.1.1.1 Combined Search - Navigating to a recent destination (History) .............................................. 31
3.1.1.2 Combined Search - Navigating to a Favourite destination ........................................................ 32
3.1.1.3 Combined Search - Navigating to an address ............................................................................ 32
3.1.1.4 Search Centre - Navigating to an intersection ........................................................................... 33
3.1.1.5 Combined Search - Navigating to a Place of Interest ................................................................ 34
3.1.1.6 Combined Search - Navigating to a Place of Interest by its category ........................................ 35
3.1.2 Entering an address or a part of the address ....................................................................... 37
3.1.2.1 Entering an address ................................................................................................................... 37
3.1.2.2 Entering the midpoint of a street as the destination ................................................................... 39
3.1.2.3 Selecting an intersection as the destination ............................................................................... 41
3.1.2.4 Selecting a city/town centre as the destination........................................................................... 42
3.1.2.5 Entering an address with a postal code ..................................................................................... 43
3.1.2.6 Tips on entering addresses quickly ............................................................................................ 45
3.1.3 Selecting the destination from the Places of Interest ......................................................... 46
3.1.3.1 Quick search for a Place of Interest........................................................................................... 46
4
3.1.3.2 Searching for a Place of Interest using preset categories .......................................................... 48
3.1.3.3 Searching for a Place of Interest by category ............................................................................ 50
3.1.3.4 Searching for a Place of Interest by name ................................................................................. 52
3.1.3.5 Selecting nearby assistance from 'Where Am I?' ....................................................................... 55
3.1.4 Searching for a Place using Google Local Search ............................................................. 57
3.1.5 Selecting a map location as the destination ....................................................................... 58
3.1.6 Selecting the destination from your Favourites ................................................................. 59
3.1.7 Selecting one of the most likely destinations (Smart History) ........................................... 60
3.1.8 Selecting a recent destination from the History ................................................................. 61
3.1.9 Entering the coordinate of the destination ......................................................................... 62
3.1.10 Navigate to a location stored in a photo ........................................................................... 63
3.1.11 Building a route from the list of destinations (Create Route) .......................................... 64
3.2 Viewing the entire route on the map ............................................................................ 65
3.3 Checking route parameters and accessing route related functions ............................. 65
3.4 Modifying the route ...................................................................................................... 66
3.4.1 Selecting a new destination when already having a route: New Route, Waypoint or Final
Destination .................................................................................................................................... 66
3.4.2 Setting a new starting position for the route ...................................................................... 67
3.4.3 Editing the list of destinations (Edit Route) ....................................................................... 68
3.4.4 Pausing the active route ..................................................................................................... 69
3.4.5 Cancelling the active route ................................................................................................ 69
3.4.6 Checking route alternatives when planning the route ........................................................ 70
3.4.7 Checking route alternatives for an existing route .............................................................. 71
3.4.8 Changing the vehicle used in route planning ..................................................................... 72
3.4.9 Changing the road types used in route planning ................................................................ 73
3.5 Saving a location as a Favourite destination ............................................................... 74
3.5.1 Editing the details of a Favourite destination ..................................................................... 75
3.6 Saving a map location as an alert point....................................................................... 76
3.7 Saving the current location as an alert point ............................................................... 77
3.8 Editing an alert point ................................................................................................... 77
3.9 Watching the simulation of the route ........................................................................... 78
4 Off-road navigation ............................................................................................... 80
4.1 Selecting the destination of the route ........................................................................... 80
4.2 Navigating in off-road mode ........................................................................................ 80
5 Lorry navigation .................................................................................................... 81
5.1 Setting up vehicle parameters ...................................................................................... 81
5.2 Setting up waiting time at waypoints ........................................................................... 83
5.3 Setting up driving time alerts ....................................................................................... 84
6 Reference Guide .................................................................................................... 86
6.1 Concepts ....................................................................................................................... 86
6.1.1 Smart Zoom ....................................................................................................................... 86
5
6.1.2 Daytime and night colour themes ...................................................................................... 86
6.1.3 Tunnel view ....................................................................................................................... 86
6.1.4 Route calculation and recalculation ................................................................................... 87
6.1.5 Green routing ..................................................................................................................... 89
6.1.6 Road safety cameras and other proximity alert points ....................................................... 90
6.1.7 Speed limit warning ........................................................................................................... 91
6.1.8 Battery and GPS position quality indicators ...................................................................... 91
6.1.9 Traffic information in route planning ................................................................................ 92
6.1.9.1 Historical traffic ........................................................................................................................ 93
6.1.9.2 Real-time traffic information (TMC) .......................................................................................... 93
6.1.9.3 Online traffic information .......................................................................................................... 95
6.2 'More' menu .................................................................................................................. 96
6.3 Settings menu ............................................................................................................... 97
6.3.1 Sound and Warnings .......................................................................................................... 99
6.3.2 Customise Quick menu .................................................................................................... 102
6.3.3 Driving time management................................................................................................ 103
6.3.4 Traffic settings ................................................................................................................. 103
6.3.5 Route settings ................................................................................................................... 104
6.3.6 User profiles ..................................................................................................................... 108
6.3.7 Map settings ..................................................................................................................... 108
6.3.8 Visual guidance settings .................................................................................................. 110
6.3.9 Display settings ................................................................................................................ 111
6.3.10 Regional settings ............................................................................................................ 112
6.3.11 Trip monitor settings ...................................................................................................... 112
6.3.12 Log on to receive community content ............................................................................ 113
6.3.13 Bandwidth management ................................................................................................ 113
6.3.14 Log collection settings ................................................................................................... 114
7 Glossary ................................................................................................................ 115
8 End User Licence Agreement ............................................................................. 117
9 Copyright note ..................................................................................................... 117
6
1 Warnings and Safety information
The navigation system helps you find your way to your destination with the built-in GPS
receiver. iGO primo does not transmit your GPS position; others cannot track you.
If you accept it when first using the application, iGO primo collects usage information and
GPS logs that may be used for improving the application and the quality and coverage of
maps. The data is processed anonymously; no one will be able to track any personal
information. If you change your mind later, you can enable or disable the log collection in
Settings (page 114).
It is imp
ortant that you look at the display only when it is safe to do so. If you are the driver of
the vehicle, we recommend that you operate iGO primo before you start your journey. Plan
the route before your departure and stop if you need to change the route.
You must obey the traffic signs and follow the road geometry. If you deviate from the
recommended route, iGO primo changes the instructions accordingly.
Never place [DEVICE] where it obstructs the driver's view, where it is in the deployment zone
of an airbag or where it might cause injuries in an accident.
For more information, consult the End User Licence Agreement (page 117).
7
2 Getting started
iGO primo is optimised for in-car or pedestrian use. There is no need to use a stylus. You can
use it easily by tapping the screen buttons and the map with your fingertips.
When using the navigation software for the first time, an initial setup process starts
automatically. Do as follows:
1. Select the written language of the application interface. Later you can change it in
Regional settings (page 112).
2. Read the End User Licence Agreement. Tap
to continue.
3. You are now asked whether you allow the software to collect usage information and
GPS logs that may be used for improving the application and the quality and coverage
of maps. Tap
to allow the anonymous statistics or disable this
function. Later you can turn them on or off individually in Log collection settings (page
114).
4.
The Configuration wizard starts. Tap
to continue.
5. Select the language and speaker used for voice guidance messages. Later you can
change it in Sound and Warnings settings (page 112).
8
6. If needed, modify the time format and unit settings. Later you can change them in
Regional settings (page 112).
7. If needed, modify the default route planning options. Later you can change them in
Route settings (page 104).
8. If an Internet connection is available, the application will check your licenses for the
online services. This may take a few seconds. When finished, you will be asked to
activate these services. You can choose to activate them later or do it right away.
9. Enter the activation code. You can find it under the scratch surface on the card you
purchased or received with your device. Tap
to continue.
10. The code is now checked online and after a while you receive the activation success
message. Tap
to continue.
11. The initial setup is now complete. The Configuration wizard can be restarted later from
the Settings menu (page 97).
After the initial setup, the Navigation me
nu appears and you can start using iGO primo.
9
2.1 Navigation menu
You can reach all parts of iGO primo from the Navigation menu.
You have the following options:
Tap
to select your destination by entering an address or selecting
a place of interest, a location on the map or one of your Favourite destinations. You
can also look up your recent destinations from the Smart History, enter a coordinate or
use the location saved in a photo. When internet connection is available, Google Local
Search can be a further help to find your destination.
Tap
to display the route parameters and the route in its full length
on the map. You can also perform route-related actions such as editing or cancelling
your route, setting a start point for the route, picking route alternatives, avoiding parts
of the route, simulating navigation or adding the destination to your Favourites.
Tap
to customise the way the navigation software works, to
simulate demo routes or to run some additional applications.
Tap
to customise the way the navigation software works.
Tap
to start navigating on the map. The button itself is a miniature
live map that shows your current position, the recommended route and the surrounding
map area. Tap the button to enlarge the map to the full screen.
Tap
to open the Traffic Summary screen.
Tap
to stop navigation and exit the software.
10
2.2 Buttons and other controls on the screen
When you are using iGO primo, you usually tap buttons on the touch screen.
You only need to confirm selections or changes if the application needs to restart, it needs to
perform a major reconfiguration, or you are about to lose some of your data or settings.
Otherwise, iGO primo saves your selections and applies the new settings without confirmation
as soon as you use the controls.
Type Example Description How to use it
Button
Tap it to initiate a function,
to open a new screen, or
to set a parameter.
Tap it once.
Button
with
value
Some buttons display the
current value of a field or
setting. Tap the button to
change the value. After the
change, the new value is
shown on the button.
Tap it once.
Icon
Shows status information.
Some icons also function
as a button. Tap them
once.
List
When you need to select
from several options, they
appear in a list.
Grab the list anywhere
and slide your finger up
or down. Depending on
the speed of the sliding,
the list will scroll fast or
slow, only a bit or till the
end.
Alternatively, move
between pages with the
and buttons
and tap the value that
you want.
Radio
button
When there are only a few
choices, radio buttons may
be used instead of lists.
Only one value can be
selected.
Tap one of the buttons to
select a new value.
Switch
When there are only two
choices, a checkmark
shows whether the feature
is enabled.
Tap it to turn the switch
on or off.
11
Slider
When a feature can be set
to different values in a
range, iGO primo shows
an indicator on a gauge
that displays and sets the
value.
Drag the handle to
move the slider to
its new position.
Tap the slider
where you want
the handle to
appear; the thumb
jumps there.
Virtual
keyboard
Alphabetic and
alphanumeric keyboards
to enter text and numbers.
Each key is a touch
screen button.
2.2.1 Using keyboards
You only need to enter letters or numbers when you cannot avoid it. You can type with your
fingertips on the full-screen keyboards and you can switch between various keyboard layouts,
for example English, Greek or numerical.
Task Instruction
Switching to another
keyboard layout, for example
from an English keyboard to
a Greek keyboard
Tap the
button and select the new
keyboard layout from the list.
Correcting your entry on the
keyboard
Tap
to remove the unneeded character(s).
Tap and hold the button to delete several characters or the
entire input string.
Entering a space, for
example between a first
name and a family name or
in multi-word street names
Tap the
button at the bottom centre of the screen.
Entering upper and lower
case letters
When entering a text, the first character appears in upper case
while the rest of the text is in lower case. Tap
to enter an
upper case letter or tap twice to turn on Caps Lock. Tap again
and lower case letters return.
Entering numbers and
symbols
Tap
to switch to a keyboard offering numeric and symbol
characters.
Finalising the keyboard entry
(accepting the suggested
search result)
Tap
.
12
Task Instruction
Finalising the keyboard entry
(opening the list of search
results)
Tap
.
Finalising the keyboard entry
(saving your input)
Tap
.
Cancelling the keyboard
entry (returning to the
previous screen)
Tap
.
2.2.2 Beyond single screen tap
You usually need to tap the screen only once. However, some useful features can be
accessed with combined touch screen tapping. Those are the following:
Action Details
Tapping and holding
the screen
Tap and keep pressing the following buttons to reach extra functions:
Tap and hold
on list and menu screens: the
Map screen appears.
Tap and hold any of the
, , , , ,
and
buttons on the Map screen: you can rotate, tilt or
scale the map continuously.
Tap and hold
on keyboard screens: you can delete
several characters quickly.
Tap and hold
or in long lists: you can scroll pages
continuously.
Gestures (drag&drop)
You need to drag and drop the screen only in cases like:
Moving the handle on a slider.
Scrolling the list: grab the list anywhere and slide your finger up
or down. Depending on the speed of the sliding, the list will
scroll fast or slow, only a bit or till the end.
Moving the map in map browsing mode: grab the map, and
move it in the desired direction.
13
2.3 Map screen
2.3.1 Navigating on the map
The Map screen is the most frequently used screen of iGO primo.
A small live map is displayed on the Navigation menu, as a part of the
button.
To enlarge this small map and open the Map screen, tap
.
This map shows the current position (the Vehimarker, a blue arrow by default), the
recommended route (an orange line), and the surrounding map area.
When there is no GPS position, the Vehimarker is transparent. It shows your last known
position.
You see coloured dots circling around a satellite symbol in the top left corner. The more green
dots you see, the closer you are to get the valid GPS position.
When GPS position is available, the Vehimarker is displayed in full colour, now showing your
current position.
There are screen buttons and data fields on the screen to help you navigate. During
navigation, the screen shows route information.
The
button gives quick access to frequently used functions. You can change the
available functions in Settings.
By default, only one data field is displayed in the bottom right corner. Tap this field to see all
route data fields. Tap any of the data fields to suppress others and display only the selected
one.
14
The data fields are different when you are navigating an active route and when you have no
specified destination (the orange line is not displayed).
Default data fields when cruising without a destination (tap and hold any of the fields to
change its value):
Field Description
Shows your current speed given by the GPS receiver.
Shows the speed limit of the current road if the map contains it.
Shows the current time corrected with time zone offset. The accurate
time comes from the GPS satellites, and the time zone information
comes from the map or it can be set manually in Regional settings.
(The current time is always displayed in the top left corner of menu
screens.)
Default data fields when navigating a route (tap and hold any of the fields to change its value):
Field Description
Shows the distance you need to travel on the route before reaching
your final destination.
Shows the time needed to reach the final destination of the route
based on information available for the remaining segments of the
route.
If [DEVICE] is capable of receiving live traffic information, the
calculation takes into account traffic delays affecting your route if they
are received. However, this calculation is rarely accurate.
Historical traffic data can also be taken into account if data is
available.
Shows the estimated arrival time at the final destination of the route
based on information available for the remaining segments of the
route.
If [DEVICE] is capable of receiving live traffic information, the
calculation takes into account traffic delays affecting your route if they
are received. However, this calculation is rarely accurate.
Historical traffic data can also be taken into account if data is
available.
15
2.3.2 Position markers
2.3.2.1 Vehimarker and Lock-on-Road
When your GPS position is available, iGO primo marks your current position with the
Vehimarker. By default, this marker is a blue arrow, but you can change this icon in Settings.
The exact location of the Vehimarker depends on the vehicle type used for route calculation
and the navigation mode. Both can be set in Route settings (page 104).
If you choose pedestrian and/or off-road navigation: The Vehimarker is at your exact
GPS position. The direction of the icon shows your current heading.
In all other cases: The Vehimarker may not show your exact GPS position and
heading. If roads are near, it is aligned to the nearest road to suppress GPS position
errors, and the direction of the icon is aligned to the direction of the road.
2.3.2.2 Selected map location (Cursor) and selected map object
You can mark a map location in the following ways:
Tap the map when navigating,
Tap the map when you are asked to confirm the destination at the end of a search, or
Tap the map in Find on Map (page 58)
Whe
n a map location is selected, the Cursor appears at the selected point on the map. The
Cursor is displayed with a radiating red dot (
) to make it visible at all zoom levels.
The location of the Cursor can be used as the destination of the route, a new alert point, you
can search for Places around it, or you can save this location as one of your Favourite
destinations.
You can also select some of the objects on the map. If you tap the map at the icon of a Place
of Interest or an alert point, the object will be selected (you see a red circling border around
the object), and you can get information about this object or use it as a route point.
2.3.3 Objects on the map
2.3.3.1 Streets and roads
iGO primo shows the streets in a way that is similar to how the paper road maps show them.
Their width and colours correspond to their importance: you can easily tell a motorway from a
small street.
16
2.3.3.2 Turn preview and Next street
When navigating a route, the top section of the Map screen shows information about the next
route event (manoeuvre) and the next street or the next city/town.
There is a field in the top left corner that displays the next manoeuvre. Both the type of the
event (turn, roundabout, exiting motorway, etc.) and its distance from the current position are
displayed.
A smaller icon shows the type of the second next manoeuvre if it is near the first one.
Otherwise, only the next manoeuvre is displayed.
Most of these icons are very intuitive. The following table lists some of the frequently shown
route events. The same symbols are used in both fields:
Icon Description
Turn left.
Turn right.
Turn back.
Bear right.
Turn sharp left.
Keep left.
Continue straight in the intersection.
Go left on the roundabout, 3rd exit (next
manoeuvre).
Enter roundabout (second next manoeuvre).
17
Enter motorway.
Exit motorway.
Board ferry.
Leave ferry.
Approaching a waypoint.
Approaching the destination.
2.3.3.3 Lane information and Signposts
When navigating on multilane roads, it is important to take the appropriate lane in order to
follow the recommended route. If lane information is available in the map data, iGO primo
displays the lanes and their directions using small arrows at the bottom of the map.
Highlighted arrows represent the lanes and direction you need to take.
Where additional information is available, signposts substitute arrows. Signposts are
displayed at the top of the map. The colour and style of the signposts are similar to the real
ones you can see above road or by the roadside. They show the available destinations and
the number of the road the lane leads to.
All signposts look similar when cruising (when there is no recommended route). When
navigating a route, only the signpost that points to the lane(s) to be taken is displayed in vivid
colours; all others are darker.
If you want to hide the currently displayed signposts, tap any of them and the normal Map
screen returns until new signpost information is received.
18
2.3.3.4 Junction view
If you are approaching a motorway exit or a complex intersection and the needed information
exists, the map is replaced with a 3D view of the junction. The lanes you need to take are
displayed with arrows. At the top of the screen road signs show you additional information.
If you want to hide the currently displayed junction, tap the picture and the Map screen
returns.
There are two kinds of Junction Views:
Provider Junction Views
show a realistic view of the junction with realistic pictures of the road
signs:
Where Provider Junction Views are not available but the necessary information exists,
Generic Junction Views
show an generic view of the junction with focusing on the number and
layout of lanes only. The road signs are created from road shield, road number and
destination information received in the map data:
2.3.3.5 Motorway exit services
You may need a petrol station or a restaurant during your journey. This feature displays a
new button on the map when you are driving on motorways.
Tap this button to open a panel with the details of the next few exits or service stations.
19
Tap any of them to display the exit area on the map. You can now easily add this exit as a
waypoint to your route if needed.
If you want to display other types of Places for the exits, you can change the icons in Visual
Guidance settings (page 110).
2.3.3.6 3D object types
iGO primo supports the following 3D object types:
Type Description
3D terrain 3D terrain map data shows changes in terrain, elevations or depressions in
the land when you view the map in 2D, and use it to plot the route map in
3D when you navigate. Hills and mountains are shown in the background of
the 3D map, and illustrated by colour and shading on the 2D map.
Elevated roads
Complex intersections and vertically isolated roads (such as overpasses or
bridges) are displayed in 3D.
3D landmarks
Landmarks are 3D artistic or block representations of prominent or well-
known objects.
3D buildings
3D block representation of full city building data containing actual building
size and position on the map.
2.3.3.7 Elements of the active route
iGO primo shows the route in the following way:
Symbol Name Description
Current GPS position and
Start point
Your current position displayed on the map.
In pedestrian mode it is the exact GPS
position.
If a vehicle is selected for route calculation
and roads are near, the symbol is snapped
onto the nearest road.
Normally if GPS position is available, the route
starts from the current position. If there is no valid
GPS position, iGO primo uses the last known
position as the start point.
Waypoint (intermediate
destination)
An intermediate destination of the route before
reaching the final destination.
Destination (end point) The final destination of the route.
Route colour
The route always stands out with its colour on the
map, both in daytime and in night colour mode.
20
Streets and roads that are
excluded from the navigation
You can choose whether you want to use or
avoid certain road types (page 104). However,
whe
n iGO primo cannot avoid such roads, the
route will include them and it will show them in a
colour that is different from the route colour.
Streets and roads that are
affected by traffic events
Road segments may be affected by traffic events
received. These streets and roads are displayed
in an alternate colour, and small symbols
displayed along the route show the type of the
traffic event.
2.3.3.8 Traffic events
Road segments affected by traffic events are displayed with an alternate colour on the map,
and small symbols above the road show the nature of the event:
1. Tap
to open the Traffic Summary screen.
2. Tap
to open the list of event categories.
3. Tap the traffic category you are interested in, or tap
to see the list
of all events:
21
4. Now tap any of the list items to see its details, and to display the affected road
segment in its full length on the map:
Note!
If there are traffic events on the recommended route that the application has not
bypassed, the
icon will open the list of significant traffic events to let you
quickly check them.
2.3.4 Manipulating the map
Tap the map anywhere to browse it during navigation. The map stops following the current
position (the Vehimarker, a blue arrow by default, is not locked in a fix position on the screen
any more) and control buttons appear to help you modify the map view.
Action Button(s) Description
Moving the map
with drag&drop
No buttons
You can move the map in any direction: tap
and hold the map, and move your finger
towards the direction you want to move the
map.
Zooming in and out
,
Changes how much of the map is displayed on
the screen.
iGO primo uses high-quality vector maps that
let you examine the map at various zoom
levels, always with optimised content. It always
displays street names and other text with the
same font size, never upside-down, and you
only see the streets and objects that you need.
Map scaling has a limit in 3D map view mode.
If you zoom out further, the map switches to
2D view mode.
Tap the button once to modify the view in large
steps, or tap and hold the button to modify it
continuously and smoothly.
22
Tilting up and down
,
Changes the vertical view angle of the map in
3D mode.
Tap the button once to modify the view in large
steps, or tap and hold the button to modify it
continuously and smoothly.
Rotating left and
right
,
Changes the horizontal view angle of the map.
Tap the button once to modify the view in large
steps, or tap and hold the button to modify it
continuously and smoothly.
2D or 3D view
,
Tap this button to switch between the 3D
perspective and 2D top-down map view
modes.
Compass in 2D
map view mode
,
The direction of the compass shows North.
Tap the button to switch to North-up view, and
then tap again to rotate the map in the
previous direction.
Compass in 3D
map view mode
,
The direction of the compass shows North.
Tap the button to switch to North-up view, and
then tap again to rotate the map in the
previous direction.
Location
information
Tap this button to open a new screen with
information about the selected map point, the
Cursor.
Return to normal
navigation
Tap this button to move the map back to follow
the current GPS position. Automatic map
rotation is also re-enabled.
The map manipulation buttons disappear and
navigation continues.
Additional options
Tap this button to open a list of additional
features like saving the Cursor as a Favourite
destination, or searching for Places around the
Cursor.
Select destination
Tap this button to select the Cursor as a new
destination. The route is automatically
calculated.
23
2.3.5 Quick menu
The Quick menu is a selection of controls and functions that are frequently needed during
navigation. It can be opened directly from the Map screen by tapping
.
The menu will close after a few seconds of inactivity or if you tap
.
The menu will also close if you initiate simple controls like muting the device. In other cases
tapping a button will open a new screen with options.
Most of these functions are shortcuts. They are accessible from the menu system.
There are more functions available than the number of buttons in the menu. In Settings, you
can choose the function of each button (page 102). The following options are available:
Button Description Shortcut for
Master Volume
slider
This slider adjusts the sound volume of the device.
All sounds of the application are affected.
More / Settings /
Sound and Warnings
/
Volume / Master
slider
,
This switch mutes all sounds of the application. Tap
again to re-enable sounds.
More / Settings /
Sound and Warnings
/ Volume / Master
switch
This button opens the Combined Search function that
allows you to search addresses, Places, Favourite
and recent destinations by name in one unified
environment.
Destination (page 28)
This function lets you search for a Place by its name.
The search is carried out either along your route or
around your current location if there is no route
calculated.
Destination / Find
Places / Quick Search
(page 46)
This button opens the list of your Favourite
destinations.
Find / Favourite (page
59)
This button opens the History list. You can select one
of your previous destinations.
Find / History (page
61)
24
This button opens the route editing function.
My Route / Edit Route
This button opens the route related settings.
More / Settings /
Route Settings (page
104)
This button opens the map related settings.
More / Settings / Map
Settings (page 108)
This button opens a special screen with information
about the current position and a button to search for
nearby emergency or roadside assistance. For
details, see the next chapter.
Tap the Current
Street field on the
Map screen
This button cancels the route and stops navigation.
The button is replaced with the next one if waypoints
are given.
My Route / Cancel
Route (page 69)
This button skips the next waypoint from the route.
n/a
This button opens a 2D map scaled and positioned to
show the entire route.
My Route / Overview
(page 65)
This button opens the Visual Guidance settings
screen.
More / Settings /
Visual Guidance
(page 110)
This button opens the Traffic Summary screen.
Tap the Traffic icon in
the Navigation menu
or on the Map screen
This button lets you bypass parts of the
recommended route.
My Route /
Avoidances
This button opens the Trip Monitor screen where you
can manage your previously saved trip logs and track
logs.
More / Trip Monitor
(page 96)
This button opens the list of manoeuvres (the
itinerary).
Tap the top of the
Map screen during
navigation.
25
With this function you can save the active route for
later use.
My Route / More /
Save Route
With this function you can replace the active route
with a previously saved route.
My Route / More /
Load Route
With this function you can search for Places of
Interest in various different ways.
Find / Find Places
(page 46)
This button opens the Map screen and starts
simulating the active route.
My Route / More /
Simulate Navigation
(page 78)
This button starts the Music player application.
More / Music Player
(page 96)
This button opens the GPS Information screen with
satellite position and signal strength information.
Tap the top of the
Map screen when
there is no GPS
reception
This button opens the parameters of the selected
Vehicle profile.
More / Settings /
Route (page 104)
This button opens the Lorry settings screen.
More / Settings / Lorry
This button opens the Driving timer configuration
screen.
More / Settings / Lorry
/ Configure Driving
Timers (page 84)
26
2.3.6 Checking the details of the current position (Where Am I?)
This screen contains information about the current position (or about the last known position if
GPS reception is not available) and a button to search for useful Places nearby.
You can access this screen from the map in one of the following ways:
If the current street is displayed below the Vehimarker (the current position on the
map), tap it to open the Where Am I? screen.
Open the Quick menu and tap the
button.
Information on this screen:
, : Latitude and Longitude (coordinate of the current position in WGS84
format).
: Altitude (elevation information coming from the GPS receiver - often
inaccurate).
: House number on the left.
: House number on the right.
In the middle of the screen you can see whether the position is current, or the time left
since it was last updated.
Address details (when available) of the current position are displayed at the bottom.
You can also perform some actions on this screen:
Tap
to save the current position as a Favourite destination.
You can also search for assistance near your current position. Tap
to
open a new screen for the Quick search:
27
The following services can be searched around the current position or the last known position:
: Car repair and roadside assistance services
: Police stations
: Medical and emergency services
: Petrol stations
Tap any of the buttons, select a Place from the list, and navigate to it.
27

Hulp nodig? Stel uw vraag in het forum

Spelregels
1

Forum

Dynavin-iGO-primo-Navigation-software
  • Ik heb een Dynavin iGo primo navigatiesysteem en onlangs viel het geluid weg bij navigeren Gesteld op 25-3-2019 om 14:20

    Reageer op deze vraag Misbruik melden
    • Goedenavond. Ik heb helaas geen antwoord op uw vraag, maar bent u in het bezit van een Nederlandse handleiding, of weet u waar die verkrijgbaar is ?

      Ik hoor graag van u, bedankt

      Geantwoord op 24-6-2019 om 21:31

      Waardeer dit antwoord Misbruik melden

Misbruik melden

Gebruikershandleiding.com neemt misbruik van zijn services uitermate serieus. U kunt hieronder aangeven waarom deze vraag ongepast is. Wij controleren de vraag en zonodig wordt deze verwijderd.

Product:

Bijvoorbeeld antisemitische inhoud, racistische inhoud, of materiaal dat gewelddadige fysieke handelingen tot gevolg kan hebben.

Bijvoorbeeld een creditcardnummer, een persoonlijk identificatienummer, of een geheim adres. E-mailadressen en volledige namen worden niet als privégegevens beschouwd.

Spelregels forum

Om tot zinvolle vragen te komen hanteren wij de volgende spelregels:

Belangrijk! Als er een antwoord wordt gegeven op uw vraag, dan is het voor de gever van het antwoord nuttig om te weten als u er wel (of niet) mee geholpen bent! Wij vragen u dus ook te reageren op een antwoord.

Belangrijk! Antwoorden worden ook per e-mail naar abonnees gestuurd. Laat uw emailadres achter op deze site, zodat u op de hoogte blijft. U krijgt dan ook andere vragen en antwoorden te zien.

Abonneren

Abonneer u voor het ontvangen van emails voor uw Dynavin iGO primo Navigation software bij:


U ontvangt een email met instructies om u voor één of beide opties in te schrijven.


Ontvang uw handleiding per email

Vul uw emailadres in en ontvang de handleiding van Dynavin iGO primo Navigation software in de taal/talen: Engels als bijlage per email.

De handleiding is 2,87 mb groot.


U ontvangt de handleiding per email binnen enkele minuten. Als u geen email heeft ontvangen, dan heeft u waarschijnlijk een verkeerd emailadres ingevuld of is uw mailbox te vol. Daarnaast kan het zijn dat uw internetprovider een maximum heeft aan de grootte per email. Omdat hier een handleiding wordt meegestuurd, kan het voorkomen dat de email groter is dan toegestaan bij uw provider.

Stel vragen via chat aan uw handleiding

Stel uw vraag over deze PDF

Andere handleiding(en) van Dynavin iGO primo Navigation software

Dynavin iGO primo Navigation software Gebruiksaanwijzing - Deutsch - 121 pagina's


Uw handleiding is per email verstuurd. Controleer uw email

Als u niet binnen een kwartier uw email met handleiding ontvangen heeft, kan het zijn dat u een verkeerd emailadres heeft ingevuld of dat uw emailprovider een maximum grootte per email heeft ingesteld die kleiner is dan de grootte van de handleiding.

Er is een email naar u verstuurd om uw inschrijving definitief te maken.

Controleer uw email en volg de aanwijzingen op om uw inschrijving definitief te maken

U heeft geen emailadres opgegeven

Als u de handleiding per email wilt ontvangen, vul dan een geldig emailadres in.

Uw vraag is op deze pagina toegevoegd

Wilt u een email ontvangen bij een antwoord en/of nieuwe vragen? Vul dan hier uw emailadres in.


Info