584504
55
Verklein
Vergroot
Pagina terug
1/65
Pagina verder
Deutsch - 1 -
Sicherheitsinformationen
Ein Betrieb des TV-Geräts unter extremen
Umgebungsbedingungen kann zur Beschädigung
des Geräts führen.
VORSICHT
GEFAHR ELEKTRISCHER
SCHLÄGE! NICHT ÖFFNEN!
VORSICHT: UM DIE GEFAHR VON STROMSCHLAG ZU
REDUZIEREN, DECKEL NICHT ABNEHMEN (ODER
GEHÄUSE)
DIESES GERÄT KANN NICHT VOM NUTZER
REPARIERT WERDEN.
WENDEN SIE SICH AN QUALIFIZIERTES
SERVICEPERSONAL.
Trennen Sie das TV Gerät vom Netz bei
Gewitter, oder wenn Sie das Gerät für eine
längere Zeit nicht nutzen.
Der Netzstecker
wird verwendet, um das TV-Gerät vom Netz zu
trennen und muss daher stets gut zugänglich
sein.
Das Ausrufezeichen in einem gleichseitigen
Dreieck soll den Benutzer auf wichtige
Bedienungs-, Wartungs- und Reparaturhinweise
in den mitgelieferten Dokumenten aufmerksam
machen.
Inhalt
Sicherheitsinformationen ........................................ 1
Erste Schritte .......................................................... 3
Meldungen & Eigenschaften & Zubehör .................3
TV Eigenschaften ...................................................3
Steuertasten am TV-Gerät ......................................3
Stromversorgung anschließen ...............................4
Fernbedienung ......................................................5
Anschlüsse .............................................................6
Menü Medienbrowser ............................................. 8
Menü-Eigenschaften und -Funktionen....................9
Allgemeine Bedienung..........................................12
Verwendung der Kanalliste ...................................12
Jugendschutzeinstellungen ..................................12
Elektronischer Programmführer (EPG).................12
Softwareaktualisierung .........................................13
Tipps zur Fehlersuche und -behebung ................. 13
Typische Anzeigemodi PC-Eingang ....................14
Im USB-Modus unterstützte Dateiformate ............14
AV- und HDMI-Signalkompatibilität ......................14
Lizenzinformationen .............................................15
Hinweis zur Konformität........................................16
 ...........................................16
Deutsch - 2 -
    
dieses TV-Gerät in Übereinstimmung mit den
Installationsanweisungen sicher an der Wand
befestigt werden (wenn diese Option verfügbar ist).
    
unveränderlich blaue, grüne oder rote Punkte
erscheinen. Wir möchten ausdrücklich darauf
hinweisen, dass dies die Leistung oder
Funktionsfähigkeit Ihres Produkts aber in keiner
Weise beeinträchtigt. Achten Sie darauf, den
Bildschirm mit den Fingernägeln oder anderen
harten Gegenständen nicht zu zerkratzen.

Netzstecker aus der Steckdose. Benutzen Sie nur
ein weiches und trockenes Tuch.
Warnhinweis
Schweres oder tödliches
Verletzungsrisiko
Verletzungs-und
Schadensrisiko
* Gefahr elektrischer
Schläge.
Gefährliches Spannungsrisiko
Wichtig!
Betreiben Sie das System
korrekt
Hinweis:
Zusätzliche Hinweise markiert
Bitte lesen Sie diese Anleitung
vollständig vor der Installation oder
Inbetriebnahme.
WARNHINWEIS: Lassen Sie niemals Personen
(einschließlich Kinder) mit eingeschränkten
physischen, sensorischen oder geistigen
Fähigkeiten oder mangels Erfahrung und / oder
Kenntnisse unbeaufsichtigt elektrische Gerät
benutzen!

Abstand zu Möbeln etc. ein, um eine ausreichende
Luftzirkulation zu gewährleisten.

-löcher.
     auf geneigten
oder instabilen Flächen. Das Fernsehgerät kann
umkippen.
   
Klimabedingungen.

sein. Stellen Sie keine Gegenstände auf das
Netzkabel (weder das Gerät selbst, noch Möbel
usw.) und klemmen Sie das Kabel nicht ein.
Beschädigungen am Netzkabel/Netzstecker
können zu Bränden oder Stromschlägen führen.
Handhaben Sie das Netzkabel immer am Stecker,
trennen Sie das TV-Gerät nicht durch Ziehen des
Netzsteckers vom Netz. Berühren Sie niemals das
Netzkabel / den Netzstecker mit nassen Händen,
da dies einen Kurzschluss oder elektrischen
Schlag verursachen kann. Machen Sie niemals
Knoten in das Netzkabel, und binden Sie es nie mit
anderen Kabeln zusammen. Wenn es beschädigt
ist, muss es ersetzt werden, jedoch sollte dies nur
   
Setzen Sie den Bildschirm nicht hellem Sonnenlicht
aus. Sollte ein harter Gegenstand auf das Gerät
fallen oder Flüssigkeit in das Gerät eindringen,
müssen Sie das Gerät ausstecken und durch eine

wieder betrieben werden kann.
 direkter Sonneneinstrahlung
oder anderen Wärmequellen aus.

anderen Quellen intensiver Hitzestrahlung,
wie elektrischen Radiatoren, ausgesetzt
werden.

Kopf- oder Ohrhörern können zu Gehörschäden
führen.
     
Flammen, wie z. B. brennende Kerzen, auf
das Gerät gestellt werden.
Erste Schritte
Deutsch - 3 -
Meldungen & Eigenschaften & Zubehör
Umweltinformationen
Dieses TV-Gerät wurde so konstruiert, dass es die
Umwelt schützt und weniger Energie verbraucht.
Um den Energieverbrauch zu senken, gehen Sie
wie folgt vor:
Wenn Sie den Öko-Modus auf Ein setzen, schaltet
das Gerät in den stromsparenden Modus um. Die
   
Abschnitt "Bild" des Hauptmenüs. Ist dies nicht der
Fall, können die Einstellungen nicht geändert werden.
Wenn Sie die Option “Bild aus” ausgewählt haben
wird eine Meldung erscheinen und der Bildschirm
sich nach 3 Sekunden abschalten.
Schalten Sie das Gerät aus oder ziehen Sie den
Netzstecker, wenn das TV-Gerät nicht verwendet wird.
Dies wird auch den Energieverbrauch reduzieren.
Standby-Meldungen
Wenn das Fernsehgerät für 5 Minuten keinen
Eingangssignal empfängt (z.B. von einer Antenne
oder HDMl Quelle), wird sich das TV-Gerät in
Standby versetzen. Wenn Sie das TV-Gertät wieder
einschalten wollen drücken Sie die Ein Taste auf der
Fernbedienung. Es wird die Meldung “Standby kein
Signal” erscheinen, drücken Sie OK um fortzufahren.
Sollten Sie das TV-Gerät für vier Stunden nicht
benutzen wird es sich automatisch in den Standby
versetzen. Wenn Sie das TV-Gerät wieder anschalten
erscheint eine Meldung. Wählen Sie WEITER und
drücken Sie OK um fortzufahren.
TV Eigenschaften


(DVB-T/C)

 
Gerät.

    
Geräten





   
Stunden.








   
Windows 7.

Zubehör im Lieferumfang




Steuertasten am TV-Gerät
TV-Bedientasten & Betrieb
1. Nach oben
2. Nach unten
3. Programm/Lautstärke/AV/Standby-Schalter
Der Kontrol-Schalter ermöglicht Ihnen die Lautstärke
/ Programme / Quellen und Standby-Ein-Funktionen
des Fernsehers zu steuern.
Um die Lautstärke zu ändern: Erhöhen Sie die
Lautstärke durch Drücken der Taste nach oben.
Verringern Sie die Lautstärke durch Drücken der
Taste nach unten.
Kanal wechseln: Kanal wechseln: Blättern Sie durch
die gespeicherten Kanäle durch Drücken der Taste
nach oben oder unten
Erste Schritte
Deutsch - 4 -
Zum Ändern der Signalquelle: Drücken Sie die Mitte
der Taste zweimal, nun erscheint die Quellenliste auf
dem Bildschirm. Sie können durch die Quellenliste
blättern indem Sie das Rad nach oben oder unten
bewegen.
TV ausschalten: Drücken Sie die Mitte der Taste
nach unten und halten Sie sie für ein paar Sekunden,
der Fernseher wird in den Standby-Modus versetzt.
Legen Sie die Batterien in die Fernbedienung ein
Nehmen Sie die Abdeckung an der Rückseite
der Fernbedienung vorsichtig ab. Legen Sie zwei
Batterien vom Typ AAA ein. Achten Sie auf die richtige
Polarität der Batterien.
+
+
-
-
Stromversorgung anschließen
WICHTIG: Das Gerät ist nur für den Betrieb mit
220-240V Wechselspannung bei einer Frequenz von

Auspacken genug Zeit, sich der Raumtemperatur der
Umgebung anzupassen, bevor Sie es einstecken.
Stecken Sie das Netzkabel in eine Netzsteckdose.
Anschluss der Antenne
Schließen Sie den Antennen- oder Kabel-TV-Stecker
an die Buchse ANTENNENEINGANG (ANT) an der
Rückseite des TV-Geräts an.
Informationen über die Entsorgung von Altgeräten
und Batterien
Diese Symbole zeigen an, dass das elektrische
oder elektronische Gerät am Ende seiner
Nutzungsdauer nicht als normaler Haushaltsmüll
entsorgt werden dürfen. Wenn Sie dieses Produkt
oder Batterien entsorgen wollen, beachten Sie bitte
die Sammelsysteme und –einrichtungen für die
entsprechende Wiederverwertung.
Hinweis: Das Zeichen Pb unter dem Batteriensymbol zeigt
an,dass diese Batterie Blei enthält.
Produkte
Batterie
Technische Daten
TV-Übertragung PAL B/G D/K K
Empfangskanäle
VHF (BAND I/III) - UHF
(BAND U) - HYPERBAND
Anzahl der
voreingestellten Kanäle

Kanalanzeige Bildschirmanzeige
RF-Antenneneingang 75 Ohm (nicht geregelt)
Operating Voltage 
Audio Deutsch+Nicam Stereo
Audio Ausgangsleitung
(WRMS.) (10% THD)

Stromverbrauch 45 W
Gewicht 
Gerätemaße (mit Fuß)
(BxTxH)

Gerätemaße (ohne Fuß)
(BxTxH)

Betriebstemperaturen
und Luftfeuchtigkeit
5ºC up to 45ºC, 85%

Erste Schritte
Deutsch - 5 -
1. Standby
2. Mono/Stereo - Dual I-II / Aktuelle Sprache
3. Bildgröße
4. Taste Grün
5. Taste Rot
6. Zifferntasten
7. 
8. Cursor nach links
9. Menü Ein/Aus
10. AV / Quelle
11. Auswahl Favoritenmodus
12. Lauter
13. 
14. Stummschaltung
15. Leiser
16. Programm vorwärts / Programm weiter
17. Elektronischer Programmführer (EPG)
18. Programm weiter / Programm zurück
19. Ausschalttimer
20. Auswahl Bildmodus
21.     
Kanalliste
22. Cursor nach unten
23. 
24. 
25. Cursor nach oben
26. Vorhergehendes Programm
27. Taste Gelb
28. Taste Blau
29. Keine Funktion
30. Untertitel Ein-Aus/Untertitel (im Medienbrowser-
Modus)
HINWEIS: Die Reichweite der Fernbedienung beträgt
ca. 7 m / 23 ft.
V
V
SCREEN
LANG
SUBTITLE
MENU
RETURN
OK
SOURCE FAV
PRESETS SLEEP
?
INFO
EPG
V+
V- P-
P+
1
2
3
4
6
5
9
7 8
0
V
8
9
10
11
15
28
29
12
13
14
16
17
27
26
25
20
23
22
21
19
18
1
2
3
4
5
6
7
24
30
Fernbedienung
Erste Schritte
Deutsch - 6 -
HINWEIS: Wenn Sie ein Gerät über den seitlichen AV-Eingang anschließen, müssen Sie das mitgelieferten
Anschlusskabel nutzen. Siehe dazu die Abbildung oben. Um PC Audio nutzen zu können müssen Sie die PC / YPbPr
Audioverbindungskabel verwenden. Um PC-Audio zu nutzen, müssen Sie die Rot-Weiß-Eingänge des mitgelieferten
SIDE AV CONNECTION Kabels benutzen.Wenn ein externes Gerät über den SCART-Anschluss angeschlossen
wird, schaltet das Fernsehen automatisch in den AV-Modus. Wenn Sie gerade DTV-Kanäle empfangen oder
im Medienbrowsermodus sind, ist die Ausgabe über die Scart-Buchse nicht verfügbar.Bei Verwendung des
Wandmontage-Satzes (optional), empfehlen wir Ihnen, dass Sie vor der Montage an der Wand, alle Ihre Kabel an die
Rückseite des Fernsehers anschließen. Sie dürfen nur dann das CI-Modul einsetzen oder herausnehmen, wenn das
TV-Gerät ABGESCHALTET ist. Weitere Informationen über die Einstellungen finden Sie in der Bedienungsanleitung
des Moduls.
Anschluss Typ Kabel Gerät
Scart-
Anschluss
(
Rückseite)
VGA
Anschluss
(
Rückseite)
SIDE AV
PC/YPbPr Audio
Anschluss
(Seite)
seitlicher Audio
YPbPr oder PC Verbindungskabel
(nicht mitgeliefert)
HDMI
Anschluss
(
Rückseite)
SPDIFF
Anschluss
(
Rückseite)
SIDE AV
Seiten-AV
Audio / Video
Anschluss
(Seite)
(nicht mitgeliefert)
KOPFHÖRER
Kopfhörer
Anschluss
(Seite)
YPbPr Video
Anschluss
(
Rückseite)
PC zu YPbPr Verbindungskabel (nicht
mitgeliefert)
USB
Anschluss
(Seite)
CI
Anschluss
(Seite)
CAM
module
Anschlüsse
Erste Schritte
Deutsch - 7 -
Ein-/Ausschalten
Einschalten des TV-Geräts


Um das TV-Gerät aus dem Standby einzuschalten,
Drücken Sie die Taste “
”, P+ / P- oder eine
Zifferntaste auf der Fernbedienung.
Drücken Sie die Standby-Taste, um den Fernseher
auf Standby-Betrieb zu schalten.
TV-Gerät ausschalten
Drücken Sie die Taste “ ” auf der Fernbedienung
oder drücken Sie für ein paar Sekunden das Rad am
TV-Gerät. Das Gerät schaltet in den Standby-Modus.
Um das TV-Gerät ganz abzuschalten, ziehen Sie
den Netzstecker aus der Steckdose.
Hinweis: Wenn das TV-Gerät in den Standby-Modus
geschaltet wird, kann die LED blinken, um anzuzeigen, dass
bestimmte Funktionen wie die Standby-Suche, Download
über Antenne oder ein Timer aktiv sind. Die LED kann auch
blinken, wenn Sie das TV-Gerät aus dem Standby-Modus
einschalten.
Erste Installation
Nach dem ersten Anschalten erscheint das
"Sprachauswahl"-Menü. Wählen Sie die gewünschte
Sprache und drücken Sie OK.
Folgen Sie nun den Anweisungen auf dem Bildschirm
und die Erstinstallation zu beenden.
Wenn der Geschäftsmodus ausgewählt ist, wird die
Store-Modus-Option im Menü andere Einstellungen
zur Verfügung stehen und Ihre TV-Features werden
auf dem oberen Rand des Bildschirms dargestellt. Es
wird ein Dialogfeld zur Bestätigung angezeigt: Wählen
Sie JA, um fortzufahren.
Ist der Heimmodus gewählt stehen die Geschäftsmodus
Optionen nicht zur Verfügung. Drücken Sie OK um
fortzufahren.
Der Standard-PIN-Code kann sich je nach dem
ausgewählten Land ändern.
Wenn Sie aufgefordert werden, einen PIN-Code
für die Anzeige einer Menü-Option einzugeben,
verwenden Sie eine der folgenden Codes: 4725,
0000 oder 1234.
Antenneninstallation
Wenn Sie die Option ANTENNE im Bildschirm
Suchtyp auswählen, sucht das DTV nach digitalen
terrestrischen TV-Sendern.
HINWEIS: Sie können die Taste MENU drücken, um
abzubrechen.
Wenn alle Kanäle gespeichert sind, wird die Kanalliste
auf dem Bildschirm angezeigt. Wenn Sie die Kanäle
nach LCN (*) sortieren wollen, wählen Sie "Ja" und
drücken Sie dann OK.
Drücken Sie die Taste OK, um die Kanalliste zu
schließen und fernzusehen.
(*) LCN ist das logische Kanalnummer System,
welches verfügbare Sender laut einer erkennbaren
Kanal-Sequenz organisiert.
Kabelinstallation
Wählen Sie die Option "Aufnahme" und drücken
Sie die Taste OK. Um fortzufahren, wählen Sie bitte
JA und drücken Sie die Taste OK. Um den Vorgang
abzubrechen, wählen Sie NEIN und drücken Sie
anschließend die Taste OK. In diesem Bildschirm
können Sie die Frequenzbereiche wählen.
Geben Sie die Kanalnummer oder -Frequenz über
die Zifferntasten ein.
Hinweis: Die Erscheinung des Menüs ändert sich mit den
ausgewählten Optionen.
Medienwiedergabe über USB-Eingang
Über die USB-Eingänge am TV-Gerät können Sie eine USB-
Festplatte oder einen USB-Speicherstick an das TV-Gerät
anschließen.
WICHTIG! Sichern Sie Ihre Daten, bevor Sie das USB-
Gerät mit dem Fernseher verbinden. Der Hersteller
übernimmt keinerlei Haftung für beschädigte oder
verlorene Daten. Unter Umständen sind bestimmte
Arten von USB-Geräten (z. B. MP3-Player) oder
USB-Festplattenlaufwerke/-Speichersticks mit
diesem TV-Gerät nicht kompatibel. Das Fernsehgerät
unterstützt FAT32 oder NTFS formatierte Festplatten.
Eine Aufnahme ist nur auf einer FAT32 formatierten
Festplatte möglich.
Beim Formatieren von USB-Festplatten mit 1
TB (Terabyte) Speicher oder mehr können unter
Umständen Probleme auftreten. Stecken Sie das
Laufwerk nicht mehrmals schnell hintereinander an-
und wieder ab. Dadurch könnten physische Schäden
am USB-Player und am USB-Gerät selbst entstehen.
Ziehen Sie das USB-Gerät nicht ab, während eine
Datei wiedergegeben wird.
Erste Installation (*)
Deutsch - 8 -
Menü Medienbrowser
Sie können auf einer USB-Festplatte gespeicherte
Foto-, Musik- und Videodateien wiedergeben,
wenn Sie diese an Ihr TV-Gerät anschließen und
den Medienbrowser starten. Schließen Sie eine
USB-Festplatte an den USB-Eingang seitlich am
TV-Gerät an. Wenn Sie im Medienbrowser die Taste
MENU drücken, gelangen Sie zu den Bild, Ton und
Einstellungen Menüoptionen. Drücken Sie MENU,
um diesen Bildschirm zu verlassen.
Sie können Ihre
Einstellungen für den Medienbrowser mit dem Dialog
Einstellungen anpassen.
Endlos/Zufallswiedergabe (Taste GRÜN):
Starten Sie die Wiedergabe mit
und aktivieren Sie
Das TV-Gerät spielt die nächste
Datei und wiederholt die Liste.
Starten Sie die Wiedergabe mit
OK und aktivieren Sie
die gleiche Datei wird in
einer Endloswiedergabe
(Wiederholung) wiedergegeben.
Starten Sie die Wiedergabe mit
OK/
und aktivieren Sie
die Datei wird in einer
Zufallswiedergabe
wiedergegeben.
Deutsch - 9 -
Menü-Eigenschaften und -Funktionen
Inhalt des Bildmenüs
Modus
Sie können den Bildmodus ändern um es nach Ihren Wünschen oder
Anforderungen anzupassen. Der Bildmodus kann auf eine der folgenden Optionen
eingestellt werden. Kino, Spiel, Dynamisch und Natürlich.
Kontrast
Stellt die Kontrastwerte des Bildschirms ein.
Helligkeit Stellt die Helligkeit des Bildschirms ein.
Schärfe Stellt die Schärfe der am Bildschirm dargestellten Objekte ein.
Farbe
Stellt die Farbsättigung und damit die Farbe ein.
Energiesparmodus
Um den Energiesparmodus auf Ökö, Bild-Aus oder Deaktiviert einzustellen. (Wenn
der Modus auf Dynamisch gesetzt ist, wird der Energiesparmodus automatisch als
deaktiviert eingestellt.)
Hintergrundbeleuchtung
(optional)
Mit dieser Einstellung wird die Hintergrundbeleuchtung geregelt. Die Option
Hintergrundbeleuchtung ist nicht sichtbar, wenn der Energiesparmodus EIN ist.
Die Hintergrundbeleuchtung kann nicht aktiviert werden, wenn der VGA- oder
Medienbrowser-Modus aktiv ist oder der Bildmodus auf Spiel eingestellt ist.
Rauschunterdrückung
Wenn das Übertragungssignal schwach oder verrauscht ist, können Sie mit der
Option Rauschreduktion das Bildrauschen verringern.
Erweiterte Einstellungen
Dynamischer Kontrast:
Sie können die Kontraststärke verändern, indem Sie die Funktion Dynamischer
Kontrast verwenden.
Farbtemperatur
Stellt den gewünschten Farbtemperatur ein.
Bildzoom
Mit dieser Funktion können Sie den Bildzoom einstellen.
Hinweis: Auto (nur im Scart-Modus mit SCART PIN8 Hochspannungs- /
Niederspannungsschaltung verfügbar)
HDMI True Black
Wenn Sie von der HDMI-Quelle aus fernseh schauen, ist diese Funktion im Bild-
Einstellungs-Menü verfügbar. Sie können diese Funktion verwenden, um das Schwarz
der Bilder zu verstärken.
Filmmodus
Filme werden mit einer anderen Zahl von Einzelbildern pro Sekunde aufgenommen
als normale Fernsehprogramme. Schalten Sie diese Funktion ein, wenn Sie sich
Filme ansehen, um die Szenen mit schnellen Bewegungen besser sehen zu
können.
 Die Balance kann zwischen -5 und 5 eingestellt werden.
Farbverschiebung
Hiermit können Sie die Farbverschiebung zu Grün oder Rot korrigieren.
RGB-Gain: Hiermit können Sie die Farbe kalibrieren.
Zurücksetzen Setzt die Bildeinstellungen auf die Werksteinstellungen zurück.
Autoposition (im PC-
Modus)
Optimiert die Anzeige automatisch. Drücken Sie OK, um die Optimierung
durchzuführen.
Bildlage H (im PC-
Modus)
Mit dieser Option können Sie das Bild auf die rechte oder linke Seite des
Bildschirms verschieben.
Bildlage V (im PC-
Modus)
Mit dieser Option können Sie das Bild zum oberen oder unteren Rand des
Bildschirms verschieben.
Pixelfrequenz (im PC-
Modus)


auftreten.
Phasenlage (im PC-
Modus)

einspeisen, kann es zu einem schmutzigen oder gestörten Bild auf dem Bildschirm
kommen. In diesem Fall können Sie mit dieser Option durch mehrmalige Versuche
ein klareres Bild erhalten.
Im VGA- oder PC-Modus sind einige Optionen des Bildmenüs nicht verfügbar. Stattdessen werden die VGA-Modus-
Einstellungen im PC-Modus zu den Bildeinstellungen hinzugefügt.
Deutsch
Menü-Eigenschaften und -Funktionen
Inhalt Tonmenü
Volumen Stellt die Lautstärke ein.
Equalizer

Benutzer-Modus vorgenommen werden.
Balance
Mit dieser Einstellung wird die Balance zwischen rechtem und linkem
Lautsprecher eingestellt.
Kopfhörer Stellt die Lautstärke für den Kopfhörer ein.
Audiomodus Audiomodus auswählen. (Wenn der gewählte Kanal es unterstützt).
AVL (Automatische
Lautstärkebegrenzung)
Diese Funktion stellt den Ton so ein, dass zwischen den Programmen ein
konstanter Ausgangspegel erhalten bleibt.
Digitaler Ausgang Stellt den Audiotyp für den Digitalausgang ein.
Inhalt Menü Einstellungen
Conditional Access Hier nehmen Sie Einstellungen für die CA-Module, sofern vorhanden, vor.
Sprache Legt die Spracheinstellungen fest.
Jugendschutz
Legt die Jugendschutzeinstellungen fest.
Timer
Stellt den Schlaftimer ein, um das TV-Gerät nach einer gewissen Zeit
auszuschalten. Legt die Timer für gewählte Programme fest.
Datum/Zeit Stellt Datum und Zeit ein.
Quellen Aktiviert oder deaktiviert die gewünschten Quellen.
Andere Einstellungen: Zeigt weitere Einstellungsoptionen für das TV-Gerät an.
Menü Zeitlimit Ändert die Anzeigezeit für den Menübildschirm.
Verschlüsselte Kanäle
suchen:
Wenn diese Einstellung gesetzt ist, werden beim Suchvorgang auch die
verschlüsselten Kanäle gesucht.
Blauer Hintergrund
Aktiviert oder deaktiviert den blauen Hintergrund bei schwachem oder
fehlendem Signal.
Softwareaktualisierung Diese Funktion stellt sicher, dass Ihr TV-Gerät immer auf dem neuesten Stand ist.
Software-Version: Zeigt die aktuelle Softwareversion an.
Hörgeschädigte Aktiviert eine spezielle Funktion, die vom Sender gesendet wird.
Audio-Beschreibung
Bei der Audiobeschreibung handelt es sich um eine zusätzliche Audiospur für
blinde und sehbehinderte Konsumenten von visuellen Medien wie Filmen und
Fernsehen. Sie können diese Funktion nur verwenden, wenn der Sender die
zusätzliche Audiospur unterstützt.
Hinweis: Die Audiobeschreibung Ton-Funktion ist im Aufnahme-oder Time-Shifting-
Modus nicht verfügbar.
TV-Autoabschaltung
Hiermit können Sie die Zeit festlegen nach welcher sich das Gerät automatisch
abschaltet sollte der Fernseher nicht genutzt werden. Sie können diese Option
auch deaktivieren.
Standby-Suche (optional)
Ist die Standbysuche auf Ein eingestellt, werden verfügbare Sender gesucht,
wenn das TV-Gerät auf Standbymodus geschaltet ist. Wenn das Gerät neue

Sie die Änderungen annehmen oder verwerfen können. Die Kanalliste wird
aktualisiert und nach diesem Prozess verändert.
Deutsch - 11 -
Menü-Eigenschaften und -Funktionen
Shop-Modus
Wenn Sie den Fernseher in einem Geschäft ausstellen, können Sie diesen
Modus aktivieren. -Speichern.Während der Geschäftsmodus aktiviert ist,
sind einige Optionen nicht verfügbar.
Power Up-Modus

Installieren und Neueinstellung des Menü-Inhalts
Automatische
Kanalsuche
Zeigt die Optionen für die automatische Kanalsuche an.
Digital Antenne: Sucht und speichert DVB-T Sender.
Digitalkabel: Sucht und speichert DVB-C Sender.
Analog: Sucht und speichert analoge Sender.
Digital Antenne & Analog: Such und speichert analoge und digitale
Antennen Sender.
Digital Kabel & Analog: Sucht und speichert analoge und digitale
Kabelsender.
Manuelle Kanalsuche Diese Funktion wird zur direkten Eingabe von Sendern verwendet.
Netzwerk Kanalsuche Sucht nach den verknüpften Kanälen des Rundfunksystems.
Analoge Feineinstellung
Verwenden Sie diese Einstellung für die Feineinstellung von analogen
Kanälen aus. Diese Funktion ist nicht verfügbar, wenn keine analogen
Kanäle gespeichert sind.
Erste Installation
Löscht alle gespeicherten Kanäle und Einstellungen, setzt das TV-Gerät
auf die Werkseinstellungen zurück und beginnt die Erstinstallation.
Hinweis: Folgen Sie den Anweisungen am Bildschirm um die bezogenen Eigenschaften zu bedienen.
Deutsch - 12 -
Allgemeine Bedienung
Verwendung der Kanalliste
Das TV-Gerät sortiert alle gespeicherten Sender in der Kanalliste. Sie können mit Hilfe der Kanallistenoptionen
diese Kanalliste bearbeiten, Favoriten festlegen oder aktive Sender festlegen.
Jugendschutzeinstellungen
Um das Ansehen bestimmter Programme zu verhindern, können Kanäle und Menüs mit der Jugendschutzoption gesperrt
werden.
Um die Jugendschutz-Menüoptionen anzuzeigen, muss die PIN-Zahl eingegeben. Die werksseitig eingestellte
PIN ist 0000. Nach Eingabe der korrekten PIN wird das Menü Jugendschutzeinstellungen angezeigt.
Menüsperre: Die Einstellung Menüsperre aktiviert oder deaktiviert den Menüzugriff.
Altersbeschränkung: Ist diese Option eingestellt, bezieht sie vom Sender Altersinformationen. Ist die
entsprechende Altersstufe im Gerät deaktiviert, wird der Zugriff auf die Sendung gesperrt.
Kindersicherung: Wenn Kindersicherung aktiviert wird, kann das TV-Gerät nur über die Fernbedienung
gesteuert werden. In diesem Fall sind die Steuertasten am Bedienfeld außer Funktion gesetzt.
PIN einstellen: Legt eine neue PIN-Zahl fest.
Der Standard-PIN-Code kann sich je nach dem ausgewählten Land ändern.
Wenn Sie aufgefordert werden, einen PIN-Code für die Anzeige einer Menü-Option einzugeben, verwenden
Sie eine der folgenden Codes: 0000 oder 1234.
Elektronischer Programmführer (EPG)
Einige, aber nicht alle Kanäle senden Informationen über die laufenden sowie nachfolgenden Sendungen.
Drücken Sie die Taste EPG, um das Menü EPG aufzurufen.
Taste Rot (Vorherg. Tag): Zeigt die Programme des vorigen Tages an.
Taste Grün (Nächster Tag): Zeigt die Programme des nächsten Tages an.
Taste Gelb (Zoom): Erweitert die Programminformation.
Taste Blau (Filter): Zeigt die Filteroptionen an.
SUBTTL: Drücken Sie die Taste SUBTITLE, um das Menü Genre auswählen anzuzeigen. Mit dieser Funktion
können Sie die EPG-Datenbank nach einem bestimmten Genre durchsuchen. Die im EPG verfügbaren
Informationen werden durchsucht und die Ergebnisse, die zu Ihren Suchkriterien passen, angezeigt.
Deutsch - 13 -
INFO: Zeigt im Detail Informationen zum ausgewählten
Programm.
Zifferntasten (Springen): Mit den Zifferntasten
können Sie direkt zu den entsprechenden Kanälen
springen.
OK: Anzeigen der Programm.
Text (Suche):Zeigt das Menü “EPG-Suche” an.
SWAP (Jetzt) : Zeigt das aktuelle Programm an.
Softwareaktualisierung
Ihr TV-Gerät kann neue Software-Upgrades über TV-

1) Softwareupgrade-Suche über
Benutzerschnittstelle
       
Einstellungen und dann Weitere Einstellungen.
Wählen Sie im Menü Weitere Einstellungen die
Option Softwareupgrade und drücken Sie die Taste
OK, um das Menü Upgradeoptionen zu wählen.
2) Hintergrundsuche und
Aktualisierungsmodus
Wenn die Option Automatische Suche im Menü
Upgradeoptionen aktiviert ist, schaltet sich
        
Übertragungskanälen nach neuen Softwareupgrades.
Wird eine neue Software gefunden und erfolgreich
heruntergeladen, arbeitet das TV-Gerät ab
dem nächsten Einschaltvorgang mit der neuen
Softwareversion.
Hinweis: Wenn das TV-Gerät nach 2 Minuten noch immer
nicht gestartet hat, ziehen Sie den Netzstecker, warten Sie
10 Minuten, und stecken Sie ihn wieder ein.
Tipps zur Fehlersuche und -behebung
Das TV-Gerät schaltet sich nicht ein
Vergewissern Sie sich, dass das Netzkabel in die
Steckdose eingesteckt ist und die Batterien der
Fernbedienung noch funktionieren. Drücken Sie das
Einschaltrad am Fernsehgerät sollte der Fernseher
nicht auf die Fernbedienung reagieren.
Schlechte Bildqualität

   
verursachen.

ist.
 Die Bildqualität kann sich verschlechtern, wenn
zwei Zusatzgeräte gleichzeitig an das TV-Gerät
angeschlossen werden. Trennen Sie in diesem Fall
eines der Zusatzgeräte wieder ab.
Kein Bild

empfängt. Haben Sie die richtigen Tasten auf der
    
einmal. Stellen Sie auch sicher, dass die richtige
Eingangsquelle ausgewählt ist.


    


Kein Ton

Ton wieder einzuschalten, drücken Sie die Taste “
”, oder erhöhen Sie die Lautstärke.
  

Fernbedienung spricht nicht an

diese.
Eingangsquellen - können nicht
ausgewählt werden
     
haben Sie wahrscheinlich kein Gerät angeschlossen.
     
überprüfen Sie die AV-Kabel und deren Anschluss.
Deutsch - 14 -
AV- und HDMI-Signalkompatibilität
Quelle
Unterstützte Signale
Verfügbar
EXT
(SCART )
 O
 O
 O
 O
Seiten-AV
 O
 O
PC, YPbPr
  O
576i-576p  O



O



O



O
HDMI1
  O
  O
576i-576p  O



O



O

24Hz 25Hz

O
(X: Nicht verfügbar, O : Möglich)
Unter Umständen kann das Eingangssignal nicht korrekt auf
dem Bildschirm angezeigt werden.
Das Problem kann durch eine
Inkompatibilität in den Standards des Quellgeräts verursacht werden
(DVD, Settop-Box etc.). Wenn solche Probleme auftreten, wenden
Sie sich bitte an Ihren Händler und/oder den Hersteller des Geräts.
Typische Anzeigemodi PC-Eingang
In der folgenden Tabelle werden einige der üblichen
Video Display-Modi dargestellt. Unter Umständen

Ihr Gerät unterstützt bis zu 1920x1080.
Inhaltsverzeichnis  Frequenz
1  
2  
3  
4  56 Hz
5  
6  66 Hz
7  
8  
9  
10  
11  
Im USB-Modus unterstützte Dateiformate
Medium
Datei-
erweiterung
Format
Hinweise
Video
Audio

Film
.mpg, .mpeg MPEG1, 2
MPEG1 MPEG1, 2
1920x1080
.vob MPEG2
1920x1080
.mp4 MPEG4, H.264
.mkv H.264, MPEG1,2,4
avi MPEG4, H.264
 H.264/VP6/Sorenson
1920x1080
Kanal: 352x288 @30P
3gp MPEG4, H.264 1920x1080
Musik
.mp3 -
MPEG 1 Layer 1 /
2 (MP3)
32Kbps ~ 320Kbps(Bitrate)32K, 44.1k,
48k Hz,16K, 22.05K, 24K Hz,8K, 11.025K,
12K Hz(Abtastrate)
Foto
.jpg .jpeg Baseline JPEG -
max. B x H = 15360 x 8640 4147200
Bytes
.
Progressive JPEG
-
max. B x H = 9600 x 6400 3840000 Bytes
.bmp - -
max. B x H = 9600 x 6400 3840000
Bytes
Untertitel
.sub .srt
-
-
-
Deutsch - 15 -
Lizenzinformationen
Hergestellt unter Lizenz der Dolby Laboratories.
INHABER DER MARKENZEICHEN
“Dolby” und das Doppel-D-Symbol
sind Warenzeichen der Dolby
Laboratories.
„HDMI, das HDMI-Logo und High-Definition
Multimedia Interface sind Markenzeichen oder
eingetragene Markenzeichen der
HDMI Licensing LLC.“
Deutsch - 16 -
Hinweis zur Konformität
Das Fernsehgerät entspricht den folgenden Normen:
In Bezug auf die Konformität mit den grundlegenden
Anforderungen und den relevanten Vorschriften entspricht
   

Anforderungen für umweltgerechte Gestaltung
energieverbrauchsrelevanter Produkte (Richtlinie
  









Importiert durch: VESTEL GERMANY GmbH,
Parkring 6
D-85748 Garching b. München
Deutschland

Bildverhältnis
Dieser Begriff bezieht sich auf das Verhältnis von
Bildhöhe und -breite.
AVL
Automatische Lautstärkebegrenzung.
Helligkeit
    
Helligkeitsgrad des Gesamtbilds.
Kontrast
Damit wird der Bereich der optischen Dichte und der
Ton des Gesamtbilds eingestellt.
Component-Audioeingänge
Wird für den normalen analogen Audioanschluss
zwischen Geräten verwendet.
HDMI

liefert ein unkomprimiertes digitales Video- und
Audiosignal hoher Qualität. Dabei werden Audio-
und Videosignale über einen einzigen Anschluss
ausgegeben.
NTSC
Der in den USA verwendete Standard für Zeilen-
TV-Signale, der auch in einigen anderen Ländern
verwendet wird.
OSD
Bildschirmanzeige (On Screen Display). Informationen
wie Kanalnummer und Lautstärke, die auf dem
Bildschirm des TV-Gerätes angezeigt werden.
PAL
Europäische Norm für Zeilen-TV-Signale.
SECAM
Ein in Frankreich und einigen anderen Ländern
verwendetes Videoformat, das dem Format PAL
ähnlich ist.
Scart
Audio-/Video-Anschluss mit 21 Pins, wird
hauptsächlich bei TV-Geräten in Europa verwendet.
Schärfe
Eine Steuerung, die den Effekt einer größeren

System
   
das Übertragungssystem nicht in allen Ländern
dasselbe ist.
VGA
VGA ist ein verbreiteter Standard für die

LPCM
LPCM steht für Pulse Code Modulation und ist ein
digitales Audiosignal.
MPEG
 
handelt es sich um einen internationalen Standard für
die Kompression von bewegten Bildern. Auf einigen
DVDs sind die digitalen Audiosignale in diesem
Format komprimiert und aufgenommen.
English - 17 -
Safety Information
To operate your TV in extreme ambient conditions
may cause the damage of the device.
CAUTION
RISK OF ELECTRIC SHOCK
DO NOT OPEN
CAUTION: TO REDUCE THE RISK OF ELECTRIC SHOCK DO
NOT REMOVE COVER (OR BACK).
NO USER-SERVICEABLE PARTS INSIDE. REFER
SERVICING TO QUALIFIED SERVICE PERSONNEL.
Note : Follow the on screen instructions for operating the
related features.
If there is lightning or storms, or if the TV is not
going to be used for a while (e.g. if going away
on holiday), disconnect the TV set from the
mains. The mains plug is used to disconnect TV
set from the mains and therefore it must remain
readily operable.
The exclamation point within an equilateral
triangle is intended to alert the user to
the presence of important operating and
maintenance (servicing) instructions in the
literature accompanying the appliance.
IMPORTANT - Please read these
instructions fully before installing or
operating
WARNING: Never let people (including
children) with reduced physical, sensory or
Contents
mental capabilities or lack of experience and / or
knowledge use electrical devices unsupervised.
For ventilation purposes, leave a free space of at
least 10 cm all around the set.
Do not block ventilation holes.
Do not place the TV on sloping or unstable surfaces,
the TV may tip over.
Use this device in moderate climates.
The power cord plug should be easily accessible. Do
not place the TV, furniture, etc. on the power cord.

you an electric shock. Handle the power cord by the
plug, do not unplug the TV by pulling the power cord.
Never touch the power cord/plug with wet hands
as this could cause a short circuit or electric shock.
Never make a knot in the power cord or tie it with
other cords. When damaged it must be replaced,

Do not use this TV in a humid or damp place. Do
not expose the TV to liquids. If any liquid falls into
the cabinet unplug the TV and have it checked by

Do not expose the TV to direct sunlight or other heat
sources.
The TV should not be placed near to open

an electric heater.
Excessive sound pressure from earphones and
headphones can cause hearing loss.

as lit candles, are placed on top of the TV.
To prevent injury, this TV must be securely
attached to the wall in accordance with the
installation instructions (if the option is available).
Occasionally, a few non-active pixels may appear

Please note that this does not affect the performance
of your product. Take care not to scratch the screen

Before cleaning, unplug the TV from the wall socket.
Only use a soft, dry cloth while cleaning.
Warning
Serious injury or death risk
Risk of electric shock
Dangerous voltage risk
Caution
Injury or property damage risk
Important
Correctly the system operate
Notice
Additional notes marked
Safety Information ................................................17
Getting Started .....................................................18
 ................18
Features ...............................................................18
Control Buttons on the TV ....................................18
Connect Power .................................................... 19
Remote Control ...................................................20
Connections..........................................................21
Media Browser Menu............................................22
TV Menu Features and Functions ........................23
General TV Operation ..........................................25
Using the Channel List .........................................25
 ...............................25
Electronic Programme Guide (EPG) ....................25
Software Upgrade.................................................26
 .........................................26
PC Input Typical Display Modes ..........................27
Supported File Formats for USB Mode ................27
AV and HDMI Signal Compatibility ......................27
Getting Started
English - 18 -

Environmental Information
This television is designed to consume less energy
to help save the environment. To reduce energy
consumption, you should take the following steps:
If you set the Power Save Mode as Eco, the TV will
switch to energy-saving mode. The Power Save Mode
settings can be found In the ‘Picture’ section of the
Main Menu. Note that some picture settings will be
unavailable to be changed.
If Picture Off is selected, “Screen will be off in
3 seconds.” message will be displayed. Select
PROCEED and press OK to continue. The screen
will be off immediately.
When the TV is not in use, please switch off or
disconnect the TV from the mains plug. This will also
reduce energy consumption.

1. If the TV does not receive any input signal (e.g.
from an aerial or HDMI source) for 5 minutes, the
TV will go into standby. When you next switch-
on, the following message will be displayed:
“Standby Cause No Signal” Press OK to
continue.
2. If the TV has been left on and not been operated
for a while, the TV will go into standby. When
you next switch-on, the following message will
be displayed. “Standby Cause No Operation”
Press OK to continue.
Features
Remote controlled colour TV.
Fully integrated digital/cable TV (DVB-T/C)
HDMI inputs are for connecting a device that has
a HDMI socket.
USB input.
OSD menu system.
Scart socket for external devices (such as DVD
Players, PVR, video games, etc.)
Stereo sound system.
Teletext.
Headphone connection.
Automatic programming system.
Manual tuning.
Automatic power down after up to six hours.
Sleep timer.
Child lock.
Automatic sound mute when no transmission.
NTSC playback.
AVL (Automatic Volume Limiting).
PLL (Frequency Search).
PC input.
   
Windows 7.
Game Mode (Optional).
Accessories Included
Remote Control
Batteries: 2 x AAA
Instruction Book
Wall Mount Kit (Optional)
Control Buttons on the TV

1. Up direction
2. Down direction
3. Programme/Volume / AV / Standby-On selection
switch
The Control button allows you to control the Volume/
Programme/ Source and Standby-On functions of
the TV.
To change volume: Increase the volume by pushing
the button up. Decrease the volume by pushing the
button down.
To change channel: Press the middle of the button,
the channel information banner will appear on screen.
Scroll through the stored channels by pushing the
button up or down
To change source: Press the middle of the button
twice, the source list will appear on screen. Scroll
Getting Started
English - 19 -
through the available sources by pushing the button
up or down.
To turn the TV off: Press the middle of the button
down and hold it down for a few seconds, the TV will
turn into standby mode.
Inserting the Batteries into the Remote
Lift the cover on the back of the remote upward gently.
Install two AAA batteries. Make sure to match the +
and - ends of the batteries in the battery compartment
(observe the correct polarity) Replace the cover.
+
+
-
-
Connect Power
IMPORTANT: The TV set is designed to operate on
220-240V AC, 50 Hz socket. After unpacking, allow
the TV set to reach the ambient room temperature
before you connect the set to the mains. Plug the
power cable to the mains socket outlet.
Antenna/Cable Connection
Connect the “aerial” or “cable TV” plug to the AERIAL
INPUT (ANT) socket located on the back of the TV.

Manufactured under license from Dolby Laboratories.
TRADEMARK ACKNOWLEDGMENT
“Dolby” and the double-D symbol are
trademarks of Dolby Laboratories.

Interface are trademarks or
registered trademarks of HDMI
Licensing LLC.”
Information for Users on Disposal of Old
Equipment and Batteries
[European Union only]
These symbols indicate that equipment with these
symbols should not be disposed of as general
household waste. If you want to dispose of the product
or battery, please consider the collection systems or
facilities for appropriate recycling.
Notice: The sign Pb below the symbol for batteries indicates
that this battery contains lead.
Products
Battery

TV Broadcasting PAL B/G D/K K
Receiving Channels
VHF (BAND I/III) - UHF
(BAND U) - HYPERBAND
Number of Preset
Channels
1000
Channel Indicator On Screen Display
RF Aerial Input 75 Ohm (unbalanced)
Operating Voltage 220-240V AC, 50Hz.
Audio German+Nicam Stereo
Audio Output Power
(WRMS.) (10% THD)
2 x 2,5
Power Consumption 45 W
Weight 5,00
TV Dimensions DxLxH
(with foot)
149x 576 x 405
TV Dimensions DxLxH
(without foot)
38 x 576 x 368
Operation temperature
and operation
humidity:
5ºC up to 45ºC, 85%
humidity max
Getting Started
English - 20 -
1. Standby
2. Mono/Stereo - Dual I-II / Current language
3. Image size
4. Green button
5. Red button
6. Numeric buttons
7. Teletext - Mix
8. Cursor left
9. Menu on/off
10. AV / Source
11. Favourite mode selection
12. Volume up
13. 
14. Mute
15. Volume down
16. Programme down / Page up
17. Electronic Programme Guide (EPG)
18. Programme up / Page down
19. Sleep timer
20. Picture mode selection
21. 
22. Cursor down
23. 
24. 
25. Cursor up
26. Previous programme
27. Yellow button
28. Blue button
29. No function
30. Subtitle on-off / Subtitle (in Media Browser mode)
V
V
SCREEN
LANG
SUBTITLE
MENU
RETURN
OK
SOURCE FAV
PRESETS SLEEP
?
INFO
EPG
V+
V- P-
P+
1
2
3
4
6
5
9
7 8
0
V
8
9
10
11
15
28
29
12
13
14
16
17
27
26
25
20
23
22
21
19
18
1
2
3
4
5
6
7
24
30
Remote Control
NOTE: The Remote Control range is approximately
7m / 23ft.
Getting Started
English - 21 -
NOTE: When connecting a device via the Side AV input, you must use the supplied connection cables to
enable connection. See the illustrations above.You can use YPbPr to VGA cable (not supplied) to enable YPbPr
signal via VGA input.You cannot use VGA and YPbPr at the same time.To enable PC audio, you will need to use the
SIDE AV CONNECTION cable’s WHITE & RED inputs. If an external device is connected via the SCART socket, the
TV will automatically switch to AV mode. When receiving DTV channels (Mpeg4 H.264) or while in Media Browser
mode, output will not be available via the scart socket. When using the wall mounting kit (optional), we recommend
that you plug all your cables into the back of the TV before mounting on the wall.Insert or remove the CI module
only when the TV is SWITCHED OFF. You should refer to the module instruction manual for details of the settings.
Connector Type Cables Device
Scart
Connection
(back)
VGA
Connection
(back)
SIDE AV
PC/YPbPr
Audio
Connection
(side)
Side Audio
YPbPr or PC Connection Cable
(Not supplied)
HDMI
Connection
(back)
SPDIFF
Connection
(back)
SIDE AV
Side AV
(Audio/Video)
Connection
(side)
(Not supplied)
HEADPHONE
Headphone
Connection
(side)
YPbPr Video
Connection
(back)
PC to YPbPr Connection Cable (Not supplied)
USB
Connection
(side)
CI
Connection
(side)
CAM
module
Connections
Getting Started
English - 22 -
Switching On/Off
To Switch the TV On
Connect the power cord to the 220-240V AC, 50 Hz.
To switch on the TV from standby mode either:
Press the “
” button, P+ / P- or a numeric button on
the remote control.
Press the side function switch until the TV comes on
from standby.
To Switch the TV Off
Press the “ “ button on the remote control or press
the side function switch until the TV switches into
standby mode.
To power down the TV completely, unplug the
power cord from the mains socket.
Note: When the TV is switched to standby mode, the standby
LED can blink to indicate that features such as Standby
Search, Over Air Download or Timer is active. The LED can
also blink when you switch on the TV from standby mode.
First Time Installation
When turned on for the first time, the language
selection screen is displayed. Select the desired
language and press OK.
The First Time Installation (FTI) screen will be
displayed next. Set your preferences using the

continue.
You can activate Store mode option to be available
in “Other settings” menu and your TV’s features will

screen will be displayed. Select YES to proceed.
If Home Mode is selected, Store mode will not be
available after the First Time Installation. Press OK
button to continue.
Default PIN code can change depending on the
selected country.
If you are asked to enter a PIN code for viewing a
menu option, use one of the following codes: 4725,
0000 or 1234.
Aerial Installation
If you select AERIAL option from the Search Type
screen, the television will search for digital terrestrial
TV broadcasts.
NOTE: You can press MENU button to cancel.
After all the available stations are stored, the Channel
List will be displayed on the screen. If you like how the
channels are sorted according to the LCN (*), please
select “Yes” and than press OK.
Press MENU button to quit channel list and watch TV.
(*) LCN is the Logical Channel Number system that
organizes available broadcasts in accordance with a
recognizable channel sequence (if available).
Cable Installation
If you select CABLE option and press OK button on
the remote control. To continue, please select YES
and press OK. To cancel operation, select NO and
press OK. You can select frequency ranges from
this screen.
Enter the frequency range manually by using the
numeric button.
Note: Searching duration will change depending on the
selected search step.
Media Playback via USB Input
You can connect a 2.5” and 3.5” inch (hdd with external power
supply) external hard disk drives or USB memory stick to your
TV by using the USB inputs of the TV.
IMPORTANT! Back up your files before making
any connections to the TV. Manufacturer will not be

types of USB devices (e.g. MP3 Players) or USB hard
disk drives/memory sticks may not be compatible
with this TV.
While formatting a USB hard disk that has 1TB (Tera
Byte) or more file capacity, you can experience
problems with the formatting process. Do not
repeatedly quickly plug and unplug the drive. This
may cause physical damage to the USB player and
USB device itself. Do not pull out USB module while

Media Browser Menu

USB disk by connecting it to your TV. Connect a USB
disk to one of the USB inputs located on the side of
the TV. Pressing the MENU button while in the Media
Browser mode will access the Picture, Sound and
Settings menu options. Pressing the MENU button
again will exit from this screen.
You can set your Media
Browser preferences by using the Settings Menu.

Start playback with and
activate
TV plays next file and loop
the list.
Start playback with OK and
activate

loop (repeat).
Start playback with OK/
and
activate

First Time Installation - USB Connections
English - 23 -
TV Menu Features and Functions
Picture Menu Contents
Mode
You can change the picture mode to suit your preference or requirements. Picture
mode can be set to one of these options: Cinema, Game, Dynamic and Natural.
Contrast Sets contrast level of the screen.
Brightness
Sets the brightness value for the screen.
Sharpness Sets the sharpness value for the objects displayed on the screen.
Colour
Sets the color saturation.
Power Save Mode
To set the Power Save Mode as Eco, Picture Off and Disabled.
(When the Mode is Dynamic, Power Save mode is automatically set as disabled.)
Backlight
(Optional)
This setting controls the backlight level. The backlight function will be inactive if the
Power Save Mode is set to Eco. The backlight cannot be activated in VGA, Media
Browser mode or while the picture mode is set to Game.
Noise Reduction
If the broadcast signal is weak and the picture is noisy, use the Noise Reduction
setting to reduce the amount of noise.
Advanced Settings
Dynamic Contrast You can change the Dynamic Contrast ratio to desired value.
Colour Temp Sets the color temperature.
Picture Zoom
Sets the desired picture size from picture zoom menu.
Note: Auto (Only available in Scart mode with SCART PIN8 high voltage/low
voltage switching)
HDMI True
Black(optional)
While watching from HDMI source, this feature will be visible in the Picture Settings
menu. You can use this feature to enhance blackness in the picture
Film Mode
Films are recorded at a different number of frames per second to normal television

motion scenes clearly.
Skin Tone Skin tone can be changed between -5 and 5.
Colour Shift With this option you can adjust the color shift to green or to red.
RGB Gain

Reset Resets the picture settings to factory default settings.(Except Game Mode)
Autoposition (in
PC mode)
Automatically optimizes the display. Press OK to optimize.
H Position (in PC
mode)
This item shifts the image horizontally to the right hand side or left hand side of the
screen.
V Position (in PC
mode)
This item shifts the image vertically towards the top or bottom of the screen.
Dot Clock (in PC
mode)
Dot Clock adjustments correct the interference that appear as vertical banding
in dot intensive presentations like spreadsheets or paragraphs or text in smaller
fonts.
Phase (in PC
mode)
Depending on the resolution and scan frequency that you input to the TV set, you
may see a hazy or noisy picture on the screen. In such a case you can use this
item to get a clear picture by trial and error method.
While in VGA (PC) mode, some items in Picture menu will be unavailable. Instead, VGA mode settings will
be added to the Picture Settings while in PC mode.
English - 24 -
TV Menu Features and Functions
Sound Menu Contents
Volume Adjusts the volume level.
Equalizer
Selects the equalizer mode. Custom settings can be made only when in user
mode.
Balance This setting is used for emphasizing left or right speaker balance.
Headphone Sets headphone volume.
Sound Mode You can select a sound mode. (If the selected channel supports).
AVL (Automatic
Volume Limiting)

Digital Out Sets digital out audio type.
Settings Menu Contents
Conditional Access Controls conditional access modules when available.
Language

selected) Preferred and current settings will be available. Current settings can
be changed only if the broadcaster supports.
Parental
Enter correct password to change parental settings. You can easily adjust
menu lock, maturity lock (may change depending on the country selected) and
child lock in this menu. You can also set new pin number.
Timers
Sets sleep timer to turn off the TV after a certain time. Sets timers for selected
programmes.
Date/Time Sets date and time.
Sources Enables or disables selected source options.
Other Settings: Displays other setting options of the TV set:
Menu Timeout Changes timeout duration for menu screens.
Scan Encrypted
Channels
When this setting is on, the search process will locate the encrypted channels
as well.
Blue Background
Activates or deactivates the blue background system when the signal is weak
or absent.
Software Upgrade 
Application Version Displays application version.
Hard of Hearing Enables any special feature sent from the broadcaster.
Audio Description
Audio description refers to an additional narration track for blind and visually
impaired viewers of visual media, including television and movies. You can
use this feature, only if the broadcaster supports that additional narration
track.
Note: Audio description sound feature cannot be available in recording or time
shifting mode.
Auto TV Off
You can set the timeout value of auto off feature. When the timeout value is
reached and the TV has not been operated for a selected time, the TV will go
into standby mode.
Standby Search
(Optional)
If the Standby Search is set to On, when the TV is in standby mode, available
broadcasts will be searched. If the TV locates any new or missing broadcasts,
a menu screen will be displayed, asking you whether or not to execute these
changes. Channel list will be updated and changed after this process.
English - 25 -
TV Menu Features and Functions
Store Mode
If you are displaying the TV in a store, you can activate this mode. Whilst Store
Mode is enabled, some items in the TV menu may not be available.
Power Up Mode

Install and Retune Menu Contents
Automatic Channel
Scan (Retune)
(If available)
Displays automatic tuning options. Digital Aerial: Searches and stores aerial
DVB stations. Digital Cable: Searches and stores cable DVB stations. Analogue:


stores cable DVB and analogue stations.
Manual Channel Scan
This feature can be used for direct broadcast entry.
Network Channel
Scan
Searches for the linked channels in the broadcast system.
Analogue Fine Tune

available if no analogue channels are stored.
First Time Installation
Deletes all stored channels and settings, resets TV to factory settings.
General TV Operation
Using the Channel List
The TV sorts all stored stations in the Channel List. You can edit this channel list, set favourites or set active
stations to be listed by using the Channel List options.

To prohibit viewing of certain programmes, channels and menus can be locked by using the parental control system.
To display parental lock menu options, the PIN number should be entered. The factory default PIN number is
0000. After coding the correct PIN number, parental settings menu will be displayed.
Menu Lock: Menu lock setting enables or disables the menu access.
Maturity Lock: When set, this option gets the maturity information from the broadcast and if this maturity level
is disabled, disables access to the broadcast.
Child Lock: When Child Lock is set, the TV can only be controlled by the remote control. In this case the
control panel buttons will not work.
Set PIN
Default PIN code can change depending on the selected country.
If you are asked to enter a PIN code for viewing a menu option, use one of the following codes: 4725, 0000
or 1234.
Electronic Programme Guide (EPG)
Some, but not all channels send information about the current and next programmes. Press the EPG button
to view the EPG menu.
Red button (Prev Day): Displays the programmes of previous day.
Green button (Next day): Displays the programmes of the next day.
Yellow button (Zoom): Expands programme information.
Blue button (Filter): 
English - 26 -
SUBTTL: Press SUBTITLE button to view Select
Genre menu. Using this feature, you can search the
programme guide database in accordance with the
genre. Info available in the programme guide will
be searched and results matching your criteria will
be listed.
INFO: Displays, in detailed, information on the
programme selected.
Numeric buttons (Jump): Jumps to the preferred
channel directly via numeric buttons.
OK: Displays programme options.
Text (Search): Displays “Guide Search” menu.
SWAP (Now) : Shows the current programme.
Software Upgrade

via the Aerial/Cable signal.
Software upgrade search via user interface
Simply navigate on your main menu. Choose Settings
and select Other Settings menu. In Other Settings
menu navigate on to the Software for Upgrade item
and press OK button to check for a new software
upgrade.
3 AM search and upgrade mode
While the TV is connected to an aerial signal. If
Automatic scanning in the Upgrade Options menu
is enabled, the TV wakes up at 03:00 and searches
broadcast channels for new software upgrades. If
new software is found and downloaded successfully,
the next time the TV powers up , it will have the new
software version.
Note: If the TV fails to come on after the upgrade unplug the
TV for 2 minutes and plug in again.

Tv will not turn on
Make sure the power cord is plugged in securely to
wall outlet. The batteries in the remote control may
be exhausted. Press the Power button on the TV.
Poor picture
 Have you selected the correct TV system?
 Low signal level can cause picture distortion. Please
check antenna access.
 Check if you have entered the correct channel
frequency if you have done manual tuning.
 The picture quality may degrade when two devices
are connected to the TV at the same time. In such
a case, disconnect one of the devices.
No picture
No Picture means that your TV is not receiving a
transmission. Have you selected the correct button
on the remote control? Try once more. Also make
sure the correct input source has been selected.
Is the antenna connected properly?
Is the antenna cable damaged?
Are suitable plugs used to connect the antenna?
If you are in doubt, consult your dealer.
No sound
Has the TV been set to mute? To cancel mute, press
the “
” button, or increase the volume level.
Sound is coming from only one speaker. Is the
balance set to one extreme? See Sound Menu
section.
Remote control - does not operate
The batteries may be exhausted. Replace the
batteries.
Input sources - can not be selected
If you cannot select an input source, it is possible
that no device is connected. if not
Check the AV cables and connections if you have
tried to connect a device.
English - 27 -
AV and HDMI Signal Compatibility
Source
Supported Signals
Available
EXT
(SCART)
PAL 50/60 O
NTSC 60 O
RGB 50 O
RGB 60 O
Side AV
PAL 50/60 O
NTSC 60 O
PC/
YPbPr
480I, 480P 60Hz O
576I, 576P 50Hz O
720P 50Hz,60Hz O
1080I 50Hz,60Hz O
1080P 50Hz,60Hz O
HDMI1
480I 60Hz O
480P 60Hz O
576I, 576P 50Hz O
720P 50Hz,60Hz O
1080I 50Hz,60Hz O
1080P
24Hz, 25Hz
30Hz, 50Hz,
60Hz
O
(X: Not Available, O: Available)
In some cases a signal on the TV may not be displayed
properly. The problem may be an inconsistency with standards
from the source equipment (DVD, Set-top box, etc. ). If you
do experience such a problem please contact your dealer and
also the manufacturer of the source equipment.
PC Input Typical Display Modes
The following table is an illustration of some of the
typical video display modes. Your TV may not support
all resolutions. Your TV supports up to 1920x1080.
Index Resolution Frequency
1 1024x768 60 Hz
2 1280x768 60 Hz
3 1360x768 60 Hz
4 800x600 56 Hz
5 800x600 60 Hz
6 1024x768 66 Hz
7 1280x1024 60 Hz
8 1280x960 60 Hz
9 1400x1050 60 Hz
10 1600x1200 60 Hz
11 1920x1080 60 Hz
Supported File Formats for USB Mode
Media File Extension
Format
Remarks
Video
Audio
(Maximum resolution/Bit rate etc.)
Movie
mpg, mpeg MPEG1, MPEG2
MPEG1: 768x576 @30P
MPEG2:1920x1080 @ 30P
vob MPEG2
1920x1080 @ 30P
mp4 MPEG4, Xvid , H.264
mkv H.264, MPEG4,VC-1
avi MPEG2, MPEG4, Xvid , H.264
 H.264/VP6/Sorenson
H.264/VP6:1920x1080 @ 30P
Sorenson: 352x288 @30P
3gp MPEG4 , H.264 1920x1080 @ 30P
Music
.mp3 -
MPEG 1 Layer 1 /
2 (MP3)
32Kbps ~ 320Kbps(Bit rate)
32K, 44.1k, 48k Hz,16K, 22.05K, 24K
Hz,8K, 11.025K, 12K Hz(Sampling rate)
Photo
.jpg .jpeg Baseline JPEG - max WxH = 17000x10000 4147200bytes
.
Progressive JPEG
-
max WxH = 4000x4000 3840000bytes
.bmp - - max WxH = 5760x4096 3840000bytes
Subtitle
.sub .srt
-
-
-
Français - 28 -
Consignes de sécurité
Le fait de faire fonctionner votre téléviseur TV
dans des conditions ambiantes extrêmes peut
l’endommager.
AVERTISSEMENT
RISQUE D’ELECTROCUTION
NE PAS OUVRIR
ATTENTION: TPOUR EVITER TOUT RISQUE
D’ELECTROCUTION, NE RETIREZ PAS LE
COUVERCLE. (OU LE ARRIÈRE).
L’ENTRETIEN DES PIÈCES INTERNES EST
INTERDIT AUX UTILISATEURS. VEUILLEZ CONFIER
L’ENTRETIEN A UN PERSONNEL QUALIFIE.
Remarque:
l’écran en ce qui concerne l’activation des fonctionnalités
connexes.
Si la tempête ou les éclairs surviennent ou si la
TV ne sera pas utilisée pendant un bon bout de
temps, (si par exemple vous partez en vacances)

secteur. La prise d’alimentation est utilisée pour

et doit donc rester facilement opérable.

équilatéral a pour fonction d’alerter l’utilisateur
de la présence d’instructions importantes pour le
bon fonctionnement et l’entretien (maintenance)
dans la documentation fournie avec l’appareil.
Table des matières
 .......................................... 28
Mise en route ........................................................ 30
 .... 30
Fonctions .............................................................. 30
Boutons de commande du téléviseur ...................30
 ......................... 31
Télécommande .................................................... 32
Connexions (Connections) ...................................33
 .......................................35
Options et fonctions du menu TV .........................36
 ........................39
 ...........................39
 .............39
 ..........39
 ........................................... 39
.......................................... 39
 . 41

USB ......................................................................41
 ................ 41
Veuillez lire complètement ces
consignes avant d'installer ou
d'utiliser.
AVERTISSEMENT: Ne jamais permettre aux
personnes (y compris les enfants) souffrant
de déficiences physiques, sensorielles ou
mentales et / ou manquant de connaissances
appropriées, d’utiliser un appareil électrique
sans être encadrées par une autre personne
responsable de leur sécurité!

cm autour du poste.
 les trous de ventilation.
 de placer le téléviseur sur des pentes ou
surfaces instable, car il pourrait basculer.

  
accessible.  de placer le téléviseur ou le



      
évitez       

     
car cela pourrait causer un court-circuit ou une
     
       

      
N'utilisez pas cette TV dans un









     
écouteurs et du casque peut provoquer une perte
auditive.


placée sur le téléviseur.
     
     

Français - 29 -
    




durs.


sec.
Avertissement
  
de mort
Risque
d’électrocution.

Attention
Risque de blessure ou de

Important !

Attention
Notes supplémentaires relevées
Mise en route
Français - 30 -

Informations à caractère environnemental
Ce téléviseur est conçu pour consommer moins
    
réduire effectivement votre consommation électrique,

Eco,la
       




      
“l'écran s’éteindra dans 15 secondes”
    
POURSUIVRE    OK pour continuer.

      
      
servez pas. Cette bonne pratique vous permet aussi


1.      

       
     
“Mode veille en cas d'absence de
signal” OK pour continuer.
2. Lorsque le téléviseur est resté inactif pendant

     
“Mode veille en cas d'absence de signal”
OK pour continuer.
Fonctions













       
temps



transmission.





pour Windows 98, ME, 2000, XP, Vista.

Accessoires inclus




Boutons de commande du téléviseur

1. Direction précédente
2. Direction suivante
3.
de sélection
    

du mode veille de votre téléviseur.
Pour ajuster le volume 


Mise en route
Français - 31 -
Pour changer de chaîne   
       


      



Pour éteindre le téléviseur   
du bouton Bas et maintenez-le enfoncé pendant

en mode Veille.
Insertion des piles dans la télécommande
       
télécommande. Insérer deux piles AAA. S’assurer
que les extrémités + et – des piles correspondent
dans le compartiment de piles (respecter la bonne
polarité). replacer le couvercle de la télécommande.
+
+
-
-
Branchez le câble d'alimentation
IMPORTANT
pour fonctionner avec une prise de 220-240V AC, 50
Hz

        

secteur.
Branchement de l'antenne/Câble


de la TV.


RECONNAISSANCE DE MARQUE COMMERCIALE


Laboratories.
        

des appellations ou des
  

Informations applicables aux utilisateurs
concernant la mise au rebut de l’ancien appareil
et des piles
[Seulement Union européenne]


éliminer le poste ou les piles, veuillez considérer


Remarque: Le signe Pb qui se trouve au dessus des piles
indique
que la batterie en question concerne du plomb.
Produits
Batterie
Détails techniques
Emission TV 
Chaînes réceptives


Nombre de chaînes

1000
Indicateur de chaîne
(Channel Indicator)

Entrée d’antenne RF 
Voltage de
fonctionnement

Audio Allemand+Nicam Stéréo
PUISSANCE DE
SORTIE AUDIO
(WRMS.) (10% THD)
2 x2,5
Consommation
d’énergie
45W
Poids 5,00
TV Dimensions DxLxH
(with foot)
149 x 576 x405
TV Dimensions DxLxH
(without foot)
38x 576x 368
Humidité et
température de
fonctionnement :


Mise en route
Français - 32 -
1. Veille
2. 
3. 
4. 
5. 
6. 
7. 
8. 
9. 
10. 
11. Mode de sélection préféré
12. 
13. 
14. Muet
15. Baisser le volume
16. 
17. 
18. 
19. Minuteur de mise en veille
20. 
21. 

22. Curseur vers le bas
23. 
24. 
25. 
26. 
27. 
28. 
29. Aucune fonction
30.    

REMARQUE: Le rayon d’action est approximativement
de 7 m / 23 pieds.
V
V
SCREEN
LANG
SUBTITLE
MENU
RETURN
OK
SOURCE FAV
PRESETS SLEEP
?
INFO
EPG
V+
V- P-
P+
1
2
3
4
6
5
9
7 8
0
V
8
9
10
11
15
28
29
12
13
14
16
17
27
26
25
20
23
22
21
19
18
1
2
3
4
5
6
7
24
30
Télécommande
Mise en route
Français - 33 -
REMARQUE: Quand vous branchez un périphérique via l’entrée AV latérale, vous devez utiliser le
branchement des câbles pour activer la connexion Voir l’illustration ci-dessus Vous pouvez utiliser un câble
YPbPr à VGA (non fourni) pour activer le signal YPbPr via l’entrée du VGA. Vous ne saurez utilisez le VGA et le
YPbPr de façon interchangeable. Pour activer audio PC, vous devrez utiliser Les entrées rouges et blanches du
câble pour prise AV latérale fourni.Si un périphérique externe est branché à l’aide des prises PÉRITEL, le téléviseur
passe automatiquement en mode AV.Pendant la réception des chaînes DTV (Mpeg 4 H. 264) ou en mode Navigateur
multimédia, la sortie ne sera pas disponible à travers la prise péritel. Lorsque vous utilisez le kit de montage mural
fourni, Il est recommandé de brancher tous vos câbles à l’arrière du téléviseur avant tout montage mural.Insérez ou
effacez le module CI uniquement lorsque le téléviseur est ETEINT. Consultez le manuel d’instructions du module
pour plus d’informations sur les réglages.
Connecteur Type Câbles Appareil
Péritel
Branchement
(arrière)
VGA
Branchement
(arrière)
AV SUR

PC/YPbPr
Audio
Branchement
(côté)


HDMI
Branchement
(arrière)
SPDIFF
Branchement
(arrière)
AV SUR

AV latéral
Audio / Vidéo
Branchement
(côté)
(Non fourni)
CASQUE
Casque
Branchement
(côté)
YPbPr Video
Branchement
(arrière)

fourni)
USB
Branchement
(côté)
CI
Branchement
(côté)
CAM
module
Connexions (Connections)
Mise en route
Français - 34 -
Mise sous/hors tension
Mise sous tension du téléviseur
       

       

Presser le bouton “
 P+  P- ou un bouton
numérique sur la télécommande.

ce que la TV passe en mode de veille.

 “ de la télécommande ou

que la TV passe en mode de veille.
Pour éteindre complètement le téléviseur,
débranchez le cordon d’alimentation de la prise
secteur.
Remarque: Lorsque le téléviseur est en mode veille, le

options comme Recherche en mode veille, téléchargement
automatique ou Minuterie sont actives. La LED peut
également clignoter lorsque vous allumez le téléviseur à
partir du mode de veille.
Première installation
       

       

    

     

Vous pouvez activer le mode de mémorisation dans


       
OUI pour continuer.
Si le mode Domicile est sélectionné, le mode de
     
OK pour
continuer.
Le code PIN par défaut peut changer en fonction
du pays sélectionné.

menu, entrez l'un des codes suivants : 4725, 0000
ou 1234.
Installation de l’antenne
Si vous sélectionnez l’option ANTENNE
l’écran Type de recherche la télévision numérique

REMARQUE: Vous pouvez appuyer sur la touche MENU
pour annuler.


retrouvées vous intéressent, en fonction du LCN(*),
OK.
MENU pour quitter la liste des




Installation du câble
CÂBLE
le bouton OK de la télécommande. Pour continuer,
veuillez sélectionner OUIOK. Pour
    
sur OK    



Remarque: Le temps de recherche dépendra de la zone de
recherche sélectionnée.
Lecture de média via entrée USB
Vous pouvez connecter des disques durs externes de 2,5”
et 3,5”pouces (disques durs avec câble d'alimentation
externe) ou une carte mémoire à votre TV via les entrées
USB de votre TV.
IMPORTANT !   
   
remarquer que la responsabilité du fabricant ne



     
incompatibles avec ce téléviseur.
       
capacité de 1TO (Tera Octet), il peut arriver que

    




Installation initiale- Connections USB
Français - 35 -
Menu Navigateur média




   MENU lorsque vous êtes


MENU



Fonctionnement du mode Aléatoire/Boucle
Démarrez la lecture avec
et
activez

et boucle la liste.
Démarrez la lecture avec et
activez

boucle (répété).

et activez
    
aléatoire.
Français - 36 -
Options et fonctions du menu TV
Contenu du menu Image
Mode

Cinéma , Jeu, Dynamique et Naturel.
Contraste 
Luminosité

Netteté 
Couleur


d’énergie


Rétro éclairage
(en option)




Réduction du
bruit

réduction du bruit pour réduire l’intensité du bruit.
Paramètres avancés
Contraste
dynamique

Température de
couleur

Zoom image

Remarque: Auto (Disponible uniquement en mode Scart avec SCART PIN8
commutateur tension élevée/faible)
HDMI True Black



Mode Film



Couleur de peau 
Changer de
couleur

Gain RGB

fonctionnalité Gain RGB.
Réinitialiser

Autoposition (en
mode PC)

Position H (en
mode PC)

Position V (en
mode PC)

Fréquence pilote
(en mode PC)



Phase (en mode
PC)



En mode VGA (PC), certains éléments du menu Image seront indisponibles. Au contraire, les paramètres du
mode VGA seront ajoutés aux paramètres Image en mode PC.
Français - 37 -
Options et fonctions du menu TV
Contenu du menu Son
Volume 


être actifs que lorsque vous êtes en mode utilisateur.
Balance

droit.
Casque 
Mode Son

supporte).
AVL (Limitation
Automatique du
Volume)


Sortie Digitale 
Contenu du menu Réglages
Accès conditionnel 
Langue




Parental




Minuteries


Date/Heure 
Sources Active ou désactive les options sources sélectionnées.

Temporisation du
menu

Recherche chaînes
codées


Fond bleu

absent.
Mise à jour du logiciel 
Version de
l’application:

Malentendant 
Description Audio



Remarque: La fonctionnalité de description audio du son ne peut pas être
disponible lors de l'enregistrement ou quand on est en mode décalage temporel.
Français - 38 -
Options et fonctions du menu TV
Mise hors tension
automatique du
téléviseur



il passera en mode de veille.
Recherche en mode
Veille (en option)





processus.
Mode Magasin


Lorsque ce mode est activé, certains éléments du menu de la TV ne peuvent
pas être disponibles.
Allumer le mode

tension.
Installation et Réglage Le Contenu du Menu
Balayage de chaîne
automatique
(Nouveau réglage)
(si disponible)






Balayage de chaîne
manuel
Cette fonction peut être utilisée pour une entrée de diffusion directe.
Recherche des
chaînes réseau


(analogique)



Première installation


Français - 39 -
Fonctionnement général de la TV
Utilisation de la liste de chaînes
Le téléviseur trie toutes les stations mémorisées dans

       



Pour éviter que certains programmes soient regardés, des
chaînes et des menus peuvent être verrouillés grâce au
système de contrôle parental.
       

0000

Verrouillage Menu

Verrouillage Maturité:  

parentales et si ce niveau parental a été inactivé,

Verrouillage parental
Parental est sélectionnée, le téléviseur peut


fonctionneront pas.
Paramétrage du code PIN   
code PIN.
Le code PIN par défaut peut changer en fonction
du pays sélectionné.

menu, entrez l'un des codes suivants : 4725, 0000
ou 1234.
Guide électronique de programmes (EPG)
    
informations portant sur l’émission en cours et
EPG pour
accéder au menu EPG.
Touche rouge (Jour précédent)  

Touche verte (Jour suivant):

Touche jaune (Zoom)  

Touche bleue (Filtre) : 
SUBTTL:     SUBTITLE pour

   
      
sélectionné. Les informations disponibles dans le
      

INFO:     

Boutons numériques (Sauter)

OK :
Texte (Chercher):Guide Search

SWAP(Maintenant)
Mise à jour du logiciel


Recherche de mise à jour de logiciels à
travers l’interface utilisateur

Paramètres et sélectionnez le menu Autres
paramètres. Dans le menu Autres paramètres ,
sélectionnez l’élément Mise à jour de logiciel et
OK pour ouvrir le menu Options

3 Recherche et mode de mise à jour




       
    



Remarque: Si la TV ne s'allume pas après la mise à jour,
débranchez la pour 2 minutes avant de la débrancher.
Dépannage et astuces
La TV va s'allumer

en toute sécurité dans la prise murale. Les piles
qui se trouvent dans la télécommande peuvent
  
téléviseur.
Mauvaise qualité d’image

      
     




    
même temps. Dans un tel cas, déconnectez l’un
des appareils.
Français - 40 -
Pas d’image

   


bonne source d’entrée a été sélectionnée.


 

     
fournisseur.
Pas de son
        



        

le menu Son.
La télécommande - ne fonctionne pas

piles.
Les sources d’entrée - ne peuvent pas être
sélectionnées.
  

soit connecté.


Français - 41 -
Compatibilité des signaux AV et HDMI
Source Signaux pris en charge Disponible
EXT
SCART
 O
NTSC 60 O
RGB 50 O
RGB 60 O
AV latéral
 O
NTSC 60 O
PC/YPbPr
480I, 480P  O
576I, 576P  O
720P


O
1080I


O
1080P


O
HDMI1
480I  O
480P  O
576I, 576P  O
720P


O
1080I


O
1080P





O
(X: Non disponible, O: Disponible)
Dans certains cas, un signal sur l’écran du téléviseur peut ne pas

avec
les normes de l’équipement source (DVD,
décodeur, etc.). Si vous
rencontrez un tel problème, veuillez contacter votre fournisseur et le
fabricant de l’appareil source.

Le tableau ci-après est une illustration de quelques
    
ne peut pas prendre en charge toutes les résolutions.
Votre téléviseur prend en charge jusqu’à 1920x1080.
Index Resolution Frequency
1 1024x768 
2 1280x768 
3 1360x768 
4 800x600 
5 800x600 
6 1024x768 
7 1280x1024 
8 1280x960 
9 1400x1050 
10 1600x1200 
11 1920x1080 

Média
Extension de

Format
Remarques
Vidéo Audio
(Résolution maximale/Débit
binaire, etc.)
Film
mpg, mpeg
MPEG1, MPEG2
MPEG1 : 768x576 @30P
MPEG2 :1920x1080 @ 30P
vob MPEG2
1920x1080 @ 30P
mp4 MPEG4, Xvid , H.264
mkv H.264, MPEG4,VC-1
avi MPEG2, MPEG4, Xvid , H.264
 H.264/VP6/Sorenson
H.264/VP6:1920x1080 @ 30P
Sorenson: 352x288 @30P
3gp MPEG4, H.264 1920x1080 @ 30P
Musique
.mp3 -
MPEG 1 Layer 1 /
2 (MP3)
32Kbps ~ 320Kbps(Débit binaire)32K,
44.1k, 48k Hz,16K, 22.05K, 24K Hz,8K,
11.025K, 12K Hz(Taux d'échantillonage)
Photo
.jpg .jpeg
JPEG de base
-
max WxH = 17000x10000 4147200octets
.
JPEG Progressif
-
max WxH = 4000x4000 3840000octets
.bmp - - max WxH = 9600x6400 3840000octets
Sous-titre
.sub .srt
-
-
-
Italiano - 42 -
Note sulla sicurezza:
L’utilizzo del proprio dispositivo TV in condizioni
climatiche estreme potrebbe danneggiarlo.
ATTENZIONE!
RISCHIO DI SCOSSE
ELETTRICHE NON APRIRE
ATTENZIONE: PER RIDURRE IL RISCHIO DI SHOCK
ELETTRICO, NON RIMUOVERE IL COPERCHIO
POSTERIORE L’UTENTE NON PUÒ INTERVENIRE
SU ALCUNA PARTE INTERNA. RIVOLGERSI A
PERSONALE DI ASSISTENZA QUALIFICATO.
Nota: Attenersi alle istruzioni a video per l’uso delle relative
funzioni.
In caso di fulmini o temporali, o nel caso in cui
la TV non venga usata a lungo (ad esempio
durante le vacanze), scollegarla dalla presa di
corrente. La spina di rete si usa per scollegare
la TV dalla rete elettrica e deve quindi rimanere
facilmente raggiungibile.
Il punto esclamativo inserito in un triangolo
equilatero mette in guardia l’utente sulla
presenza di importanti istruzioni per il
funzionamento e la manutenzione (assistenza)
nella documentazione di accompagnamento
l’apparecchio.
Indice
Note sulla sicurezza: ............................................42
Per iniziare............................................................44
 ................44
 ......................................................44
Tasti di comando sulla TV .....................................44
 ....................................45
Telecomando .......................................................46
.........................................................47
Menu Browser multimediale .................................49
 .................50
Funzionamento generale ......................................53
 ......................................53
 ........... 53
Guida programmazione elettronica (Electronic
Programme Guide - EPG) ....................................53
.......................................54
Guida alla risoluzione dei problemi e
suggerimenti ......................................................... 54
 ..................55
 ......55
 ........................55
Leggere interamente queste
istruzioni prima di installare o mettere
in funzione.
AVVERTENZA: Non consentire mai a persone

o mentali o sprovvisti della dovuta esperienza e/o
conoscenza di usare il dispositivo elettrico senza
essere sorvegliati!
Per la ventilazione, lasciare uno spazio di almeno

Non bloccare le aperture di ventilazione.
Non
stabili: potrebbe scivolare.

Il cavo di alimentazione dovrebbe essere facilmente
accessibile. Non
   
cavo. Un cavo di alimentazione danneggiato può
causare incendi o provocare scosse elettriche.
Prendere il cavo per la presa, non scollegare la TV
tirando il cavo di alimentazione. Non toccare mai
il cavo/la presa con le mani bagnate: ciò potrebbe
provocare un corto circuito o una scossa elettrica.

 
 Non esporre

oggetto solido o liquido cade nel mobile, scollegare
      
prima di farla funzionare ulteriormente.
Non esporre la TV alla luce solare diretta o ad altre
sorgenti di calore.
    

intenso, come una stufa elettrica.


     
viva, come candele accese, sia posta
sulla TV.
      


istruzioni di installazione.
       
comparire sullo schermo in forma di punti fissi
blu, verdi o rossi. Notere che questo non ha
conseguenze sul funzionamento del prodotto.

le unghie o con altri oggetti rigidi.
Italiano - 43 -
Prima di pulire, staccare il ricevitore dalla presa a
parete. Usare un panno morbido e asciutto.

Rischio di gravi lesioni o morte
Rischio di shock
elettrico
Rischio di tensioni pericolose

Rischio di lesioni o danni a
propriet

 
sistema

Note aggiuntive indicate
Per iniziare
Italiano - 44 -

Informazioni per la tutela dell'ambiente
Questa televisione è progettata per consumare
minore energia e salvaguardare l’ambiente. Per
ridurre il consumo energetico, attenersi alla seguente
procedura:
Eco su On, la TV passerà

di risparmio energetico si trova nella sezione
"Immagine" del Menu Principale. In caso contrario non
sarà possibile intervenire sulle impostazioni.
Immagine Off , il messaggio
Lo schermo si spegnerà in 3 secondi.
PROCEED, quindi premere OK
per continuare. Il suono verrà azzerato.
Quando la TV non viene usata, si prega di spegnerla o
scollegarla dalla presa di corrente. In tal modo, anche
il consumo di energia verrà ridotto.

1. Nel caso in cui la TV non riceva alcun segnale
in ingresso (ad esempio da antenna o sorgente


seguente messaggio “
l’assenza di segnale”. Premere OK per
continuare.
2.      
     
riaccensione, viene visualizzato il seguente
messaggio: “
di segnale”. Premere OK per continuare.
Caratteristiche
Monitor a colori telecomandato

      



Presa scart per dispositivi esterni (video, videogiochi,
set audio, ecc.).

Televideo


Ricerca manuale

ore.
Timer spegnimento.
Blocco bambini.
   
trasmissione.


PLL (Ricerca frequenza).



Modalità Giochi (opzionale)
Accessori inclusi
Telecomando

Manuale di istruzioni
Kit di montaggio a parete (opzionale)
Tasti di comando sulla TV

1. 
2.
3.   
selezione On
     

On della TV.
Per modificare il volume  

il pulsante gi.
Per cambiare i canali: Premere la parte centrale del
pulsante, comparirà a video il banner contenente le
      
premendo il pulsante su o gi.
Per iniziare
Italiano - 45 -
  : Premere due volte
la parte centrale del pulsante, comparirà a video

premendo il pulsante su o gi
Per spegnere la TV: Premere la parte centrale del
pulsante giù e tenerla premuta per alcuni secondi; la

Installazione delle batterie nel telecomando
      
    
due batterie AAA. Verificare la corrispondenza
delle estremità + e – delle batterie nel vano batteria
(rispettare la polarità
+
+
-
-
Collegare l'alimentazione
IMPORTANTE     
funzionare a 220 V – 240 V CA, 50 Hz
      
TV raggiunga la temperatura ambiente prima di

di alimentazione alla presa della rete elettrica.
Antenna / ingresso cavo
     



RICONOSCIMENTO DEL MARCHIO

    
Laboratories.
     
Interface sono marchi di fabbrica o
   

Informazioni per gli utenti sullo smaltimento di
dispositivi e batterie usati
[solo Unione Europea]
   
       

del prodotto o della batteria, cercare i sistemi o le
strutture di raccolta disponibili per garantirne un
opportuno riciclo.
Avviso: La dicitura Pb posta al di sotto del simbolo delle
batterie indica che queste contengono piombo.
che la batteria contiene piombo.
Prodotti
Batteria

Trasmissione TV 
Canali riceventi


Numero dei canali pre-
impostati
1000
Indicatore di canale 
Ingresso antenna RF 75 Ohm (non bilanciato)
Operating Voltage 
Ingressi 
Audio Output Power
(WRMS.) (10% THD)

Consumo energetico 
Peso 5,00
TV Dimensions DxLxH
(with foot)

TV Dimensions DxLxH
(without foot)

Temperatura di
funzionamento e
umiditÃ


Per iniziare
Italiano - 46 -
1. 
2. 
3. 
4. Tasto verde
5. Tasto rosso
6. Tasti numerici
7. 
8. 
9. 
10. 
11. Modalità Preferiti
12. 
13. Info/ Rivela (in modalità Televideo)
14. Muto
15. Volume Giù
16. Programma successivo / Pagina su
17. Guida programmazione elettronica (Electronic
Programme Guide - EPG)
18. Programma precedente / Pagina giù
19. Timer spegnimento
20. 
21. 
Elenco canali
22. 
23. 
24. 
25. 
26. Programma precedente
27. Tasto giallo
28. Tasto blu
29. Nessuna funzione
30.    
Multimediale)
V
V
SCREEN
LANG
SUBTITLE
MENU
RETURN
OK
SOURCE FAV
PRESETS SLEEP
?
INFO
EPG
V+
V- P-
P+
1
2
3
4
6
5
9
7 8
0
V
8
9
10
11
15
28
29
12
13
14
16
17
27
26
25
20
23
22
21
19
18
1
2
3
4
5
6
7
24
30
Telecomando
NOTA: La distanza di funzionamento è di circa 7 m.
Per iniziare
Italiano - 47 -
Note: In fase di collegamento della TV tramite ingresso AV laterale, sarà necessario servirsi dei cavi
di connessione in dotazione per consentire il collegamento. Cfr illustrazioni qui sopra. Sarà possibile usare
un cavo da YPbPr a VGA (non in dotazione) per attivare il segnale YPbPr tramite ingresso VGA.Non è possibile
utilizzare VGA e YPbPr contemporaneamente. Per attivare l'audio da PC, sarà necessario usare gli ingressi PC/
YPBPR CONNESSIONE AUDIO BIANCO & ROSSO. Se un dispositivo esterno viene collegato tramite la presa
SCART, la TV passerà automaticamente alla modalità AV. Durante la ricezione dei canali DTV (Mpeg4 H.264) o
durante la modalità in Media Browser, l'output non sarà disponibile mediante la presa a scart. Quando viene usato
il kit di montaggio a parete (opzionale), consigliamo di collegare tutti i cavi sulla parte posteriore della TV prima di
procedere con l'installazione a parete. inserire o rimuovere il modulo CI solo quando la TV è SPENTA. Per dettagli
sulle impostazioni, consultare il manuale d'uso del modulo.
Raccordo Tipo Cavi Dispositivo
Scart
Collegamento
(indietro)
VGA
Collegamento
(indietro)
AV
LATERALE
Audio PC/YPbPr
Collegamento
(lato)


(non in dotazione)
HDMI
Collegamento
(indietro)
SPDIFF
Collegamento
(indietro)
AV
LATERALE
AV laterale
Audio + Video
Collegamento
(lato)
(non in dotazione)
CUFFIA

Collegamento
(lato)
Video YPbPr
Collegamento
(indietro)

(non in dotazione)
USB
Collegamento
(lato)
CI
Collegamento
(lato)
CAM
module
Collegamenti
Per iniziare
Italiano 
Accensione/Spegnimento
Per accendere la TV


   
possibile:
Premere il tasto "
", P+ / P- o un tasto numerico
del telecomando.


Per spegnere la TV
Premere il tasto “ ” sul telecomando oppure premere
l’interruttore sulla TV, di modo che la TV stessa passi

Per spegnere completamente la TV, scollegare il
cavo di alimentazione dalla presa di rete.
Note: Quando la TV viene messa in modalità standby, il
LED di standby potrebbe lampeggiare per indicare che
alcune funzioni, come ad esempio la Ricerca Standby, lo
Scaricamento Over Air o il Timer sono attive. Il LED lampeggia
anche quando si accende la TV dalla modalità standby.
Prima installazione
     
disponibili come Francia o Italia, Verrà come cosa
richiesto di impostare e confermare un numero PIN.
Il PIN selezionato non può essere 0000. Inserire
un numero di PIN e confermarlo inserendolo
nuovamente. Premere il tasto OK per continuare. Nel
caso in cui i due PIN corrispondano, sarà impostato
il codice PIN master.
  
numero pin per tutte menu operativo, è necessario
    
la prima installazione. Nel caso in cui sia stato
dimenticato il codice PIN impostato durante la prima
installazione, sarà necessario usare il codice PIN
master, 4725.
Quando viene accesa per la prima volta, compare
      
desiderata e premere OK.
     
la scherma della prima installazione. Impostare le
preferenze servendosi dei pulsanti di navigazione.

Nel caso in cui venga selezionata la modalità Store,
la modalità     
menu altre impostazioni e le caratteristiche della TV
verranno indicate nella parte superiore dello schermo.
Verrà visualizzata una schermata di conferma.
Premere il tasto SI per procedere.


Installazione. Premere il tasto OK per continuare.
     
del paese selezionato.
Nel caso in cui venga richiesto di inserire un codice
PIN per la visualizzazione di un'opzione menu, usare
uno dei seguenti codici: 4725, 0000 o 1234.
Installazione antenna
Tipo di ricerca viene selezionata
ANTENNA, la TV digitale ricercherà trasmissioni TV
in formato digitale terrestre.
Note: È possibile premere il tasto MENU per annullare.
      
salvate sullo schermo verrà visualizzato un Elenco
  
SI", quindi premere OK.
PremereOK   
guardare la TV.

organizza le trasmissioni disponibili con una sequenza
di canali riconoscibile (ove disponibile).
Installazione Cavo
   CABLE premere il pulsante
OK sul telecomando per continuare. Per continuare
selezionare SI e premere OK. Per annullare
l’operazione selezionare NO e premere OK
questa schermata è possibile scegliere le gamme
di frequenza.

usando i tasti numerici.
Note: Il menu varia a seconda delle opzioni selezionate.
Riproduzione multimediale trame ingresso USB
È possibile collegare una unità di disco rigida esterna oppure
uno stick di memoria USB alla TV usando gli ingressi USB
della TV.
IMPORTANTE!
    
che il produttore non è in alcun modo responsabile di
eventuali danni o perdite di dati. è possibile che alcuni


compatibili con questa TV.


     
consiglia di non collegare e scollegare rapidamente
il dispositivo. Questa operazione potrebbe causare
Prima installazione (*)
Italiano - 49 -


Menu Browser multimediale
È possibile riprodurre file fotografici, musicali e

alla TV e utilizzando la schermata del browser
  
ingressi posti al lato della TV. Premendo il pulsante
MENU mentre ci si trova in modalità Media Browser

e Impostazioni. Premere nuovamente MENU per
uscire dalla schermata.

Impostazioni, è possibile impostare le preferenze di
Browser media.


e attivare
La TV riproduce il file
successivo e mette in loop


e attivare

in loop (ripeti).

OK/
e attivare
il file verrà riprodotto in

Italiano - 50 -
Caratteristiche e funzioni del menu TV
Indice del menu Immagine
Modalit

o i propri requisiti. Immagine può essere impostata su una di queste opzioni:
Cinema,Gioco,, e Naturale.
Contrasto
Imposta i valori di luminosità e buio dello schermo.
Luminosit Imposta il valore di luminosità per lo schermo.
Nitidezza
Imposta il valore di nitidezza per gli oggetti visualizzati sullo schermo.
Colore Imposta il valore del colore, regolazione dei colori.
Modalità di
risparmio
energetico


automaticamente impostato su disattivata).
Retroilluminazione
(opzionale)
Questa impostazione controlla il livello di retroilluminazione. se la modalità di
risparmio energetico è attiva, la funzione di retroilluminazione non sarà visibile. La

modalità immagine è impostata come Gioco.
Riduzione rumore

Riduzione del rumore
Impostazioni avanzate
Contrasto
dinamico:

desiderato.
Temp. colore Imposta la tonalità del colore desiderata.
Zoom immagine

Note: Auto (Disponibile solo in modalità Scart con SCART PIN8 alta tensione/switch
bassa tensione)
Modalità Film


chiaramente le scene di movimento veloci.
Tonalità pelle: Il livello di contrasto può essere regolato tra -5 e 5.
Cambio Colore regola la tonalità del colore desiderata.
Guadagno RGB:

RGB.
Reset 
Posizionamento
automatico (in
modalità PC)

Posizionamento H
(in modalità PC)

schermo.
Posizionamento V
(in modalità PC)

schermo.
Dot Clock (in
modalità PC)


piccoli.
Fase (in modalità
PC)



Mentre ci si trova in modalità VGA (PC), alcune opzioni del menu Immagine non saranno disponibili. Invece, le
impostazioni della modalità VGA saranno aggiunte alle Impostazioni Immagine mentre ci si trova in modalità PC.
Italiano - 51 -
Caratteristiche e funzioni del menu TV
Indice menu Audio
Volume Regola il livello del volume.
Equalizzatore

essere fatte solo quando ci si trova in modalità utente.
Bilanciamento
Questa impostazione si usa per enfatizzare il bilanciamento dell’altoparlante
sinistro o destro.
 
Modalità audio

supporta).
AVL (Limitazione
Automatica del
Volume)

programmi.
Uscita digitale Imposta il tipo di audio in uscita.
Indice menu Impostazioni
Accesso condizionato 
Scegliere lingua

selezionato) preferite e le impostazioni attuali saranno disponibili. Queste

Genitori

possibile regolare con facilità il blocco menu, blocco genitori (può variare a

possibile impostare un nuovo numero di pin.
Timer
Imposta il timer di spegnimento di modo che spenga la TV dopo un
determinato intervallo di tempo. imposta i timer per i programmi selezionati.
Data/Ora Imposta la data e l’ora.
Fonte

Altre impostazioni: visualizza altre opzioni di impostazione della TV.
Timeout menu 
Scansione dei canali
criptati:
Quando questa impostazione è attiva, il processo di ricerca localizzerà anche
i canali criptati.
Sfondo blu

assente.
Aggiornamento
software

aggiornato.
Versione applicazione Visualizza la versione dell’applicazione.
Audiolesi 
Descrizione Audio
La descrizione audio fa riferimento a una traccia audio aggiuntiva per le
persone non vedenti e ipovedenti che si servono di supporti multimediali visivi,


Note: La funzione di descrizione audio non può essere disponibile in modalità
registrazione o time shifting.
Italiano - 52 -
Caratteristiche e funzioni del menu TV
Spegnimento TV
automatico


usata per il tempo selezionato, si spegner

(opzionale)


cui la TV localizzi trasmissioni nuove o mancanti, verrà visualizzato un menu a


Modalità Negozio
(opzionale)
Nel caso in cui la TV venga accesa in un negozio sarà possibile attivare


non essere impostabili.
Modalità accensione

accensione.
Installa e Sintonizza contenuti del menu
Ricerca automatica
dei canali (Retune -
Risintonizzazione)
Timer (ove
disponibile)





Ricerca manuale dei
canali
Questa funzione può essere usata per l’inserimento manuale di
trasmissioni.
Ricerca canali di rete Visualizza la versione dell’applicazione.
Sintonizzazione Fine
analogica
È possibile utilizzare questa impostazione per la sintonizzazione dei
canali automatici. Questa funzione non è disponibile se non ci sono canali
analogici salvati.
Prima installazione
Rileva tutti i canali memorizzati e le impostazioni, reimposta la TV sulle
impostazioni di fabbrica e avvia la prima installazione.
Italiano - 53 -
Funzionamento generale
Utilizzo dell'elenco canali



Per proibire la vista di alcuni problemi, i canali e i menu possono essere bloccati servendosi del sistema di controllo genitori.

in fabbrica è 0000
parentali.
Blocco menu
Blocco adulti: Quando è impostata, questa opzione riceve le informazioni per adulti dalla trasmissione e se

Blocco bambini          
solo essere controllato manualmente dal telecomando. In tal caso, i tasti del pannello frontale non
funzioneranno.
Imposta PIN

Nel caso in cui venga richiesto di inserire un codice PIN per la visualizzazione di un'opzione menu, usare
uno dei seguenti codici: 4725, 0000 o 1234.
Guida programmazione elettronica (Electronic Programme Guide - EPG)
GUIDE
per visualizzare il menu EPG.
Tasto rosso (giorno precedente) visualizza i programmi del giorno precedente.
Tasto verde (Giorno successivo): visualizza i programmi del giorno successivo.
Tasto giallo (Zoom): Espande le informazioni sul programma.
Tasto blu (Filtro): 
SUBTTL: Premere il tasto SUBTITLE        
funzione, è possibile eseguire una ricerca nel database della guida programmi conformemente al genere.

conformi ai criteri immessi.
INFO: Visualizza, nel dettaglio, le informazioni sul programma selezionato.
Tasti numerici (salta): passa direttamente al canale preferito con i tasti numerici.
OK: Visualizza le opzioni di programma.
TESTO (Ricerca): Visualizza il menu 
(ADESSO) : Visualizza il programma attuale.
Italiano - 54 -
Aggiornamento software
La TV è in grado di trovare e aggiornare il software sui
canali di trasmissione.
Ricerca aggiornamento software tramite
interfaccia utente
Basterà accedere al proprio menu principale.
Impostazioni e selezionare il menu
Altre ImpostazioniAltre Impostazioni,
accedere alla sezione Aggiornamento Software,
quindi premere il tasto OK per aprire il menu Upgrade

Ricerca di 3 AM e modalità aggiornamento
Quando la TV è collegata a un segnale antenna. Nel


ore 03:00 e ricerca canali di trasmissione per nuovi
aggiornamenti software Nel caso in cui venga trovato
e scaricato nuovo software, alla prossima accensione
la TV si aprirà con una nuova versione software.
Note: Nel caso in cui la TV non si riavvii in 2 minuti, scollegare
l’alimentazione per 10 minuti e collegare nuovamente.
Guida alla risoluzione dei problemi e suggerimenti
La TV non si accende

collegato alla presa a parete. Le batterie nel
telecomando possono essere scariche. Premere il
tasto Power sulla TV oppure
Immagine di qualità scadente

Il segnale di livello basso può provocare distorsioni
   
dell’antenna.
       
corretta nel caso in cui sia stata eseguita la
sintonizzazione manuale.
La qualità dell’immagine può risultare
scadente quando vi sono due apparecchiature
contemporaneamente collegate al televisore. In tal
caso, scollegare una delle dispositivi.
Nessuna immagine
L’assenza di immagine indica che il televisore non

 
     
ingresso corretta.


      

In caso di dubbio, contattare il rivenditore.
Nessun suono

    
    
del volume.
       
     

Telecomando - non funziona
Le batterie potrebbero essere state inserite in modo

Sorgenti di ingresso - non è stato possibile
effettuare la selezione

è possibile che non sia collegato alcun dispositivo.

di collegare un dispositivo.
Italiano - 55 -
Compatibilità segnale AV e HDMI
Fonte
Segnali supportati
Disponibile
EXT
(SCART )
 O
 O
RGB 50 O
RGB 60 O
AV laterale
 O
 O
PC,
YPbPr
  O
576i-576p  O
720P


O



O



O
HDMI1
  O
  O
576i-576p  O
720P


O



O




O
(X: Non disponibile, O: Disponibile)
In certi casi i segnali della TV LED possono non essere ricevuti
e visualizzati correttamente. Il problema può essere causato
dall’incompatibilità con gli standard dei dispositivi di ingresso
(lettore DVD, decoder digitale, ecc). Se si dovessero

problemi, contattare il rivenditore e il produttore dei dispositivi.
Modalità tipica monitor - ingresso PC
La tabella che segue illustra alcune delle modalità di
visualizzazione tipiche del video. La TV potrebbe non
supportare tutte le risoluzioni. La TV supporta una
risoluzione massima di 1920x1080.

Media 
Formato
Consigli
Video
Ingressi
(Risoluzione massima / bit rate)
Film
.mpg, .mpeg
MPEG1, 2
MPEG1 MPEG1, 2
1920x1080
.vob MPEG2
1920x1080
.mp4 MPEG4, H.264
.mkv H.264, MPEG1,2,4
.avi MPEG4, H.264
 H.264/VP6/Sorenson
1920x1080
Sorenson: MPEG1, 2
3gp MPEG4, H.264 1920x1080
Musica
.mp3 -

2 (MP3)
32Kbps ~ 320Kbps(Bit rate)32K, 44.1k,
48k Hz,16K, 22.05K, 24K Hz,8K, 11.025K,
12K Hz(Frequenza di campionamento)
Foto
.jpg .jpeg
JPEG Baseline
-

.
JPEG Progressivo
-

.bmp - - 
Sottotitoli
.sub .srt
-
-
-
Index Resolution 
1  
2  
3  
4  
5  
6  
7  
8  
9  
10  
11  
Italiano - 56 -
A
Product Fiche
B
Commercial Brand: DURABASE
C
Product No. 
D
Model No. 
E

F
Visible screen size
(diagonal, approx.) (inch/cm)
24 inches 61 cm
G
On mode average power
consumption (Watt)
25
H

(kWh/annum)
36
I

(Watt)
0,5
J
Off mode power consumption
(Watt)
0
K
 
A B CD E F
English
Product Fiche Commercial Brand Product No. Model No. Energy efficiency class
Visible screen size
(diagonal, approx.) (inch/cm)
Deutsch
Produkt-Datenblatt Markenzeichen Produkt-Nr. Modell-Nr. Energieeffizienzklasse
Sichtbare Bildschirmgröße
(diagonal,ca.) (Zoll /cm)



:




(

/

)
(

)


 
         
   
(,.) ( /c )
eština
Produktový list Znaka výrobce íslo produktu Model . Energetická tída
Viditelná velikost obrazovky
(úhlopíka,pibl.)(palc /cm)
Dansk
Produktoplysningsskema Varemærke Produktnr. Model nr. Energieffektivitetsklasse
Synlig skærmstørrelse (diagonalt,ca.)
(HK/cm)
Suomi
Tuote fiche Kaupallinen merkki Tuote nro. Malli nro. Virran tehokkuusluokka
Näkyn kuvaruudun koko
(diagonaalinen,n.) (tuumaa/cm)
Français
Fiche du produit Marque commerciale Produit Modèle N°
Classe d'efficacité énergétique
Taille d'écran visible (diagonale,approx.)
(pouces/cm)
Hrvatski
SAŽETAK PROIZVODA Trgovaka marka Br. proizvoda Br. modela Klasa energetske uinkovitosti
Vidljiva veliina ekrana
(dijagonalna,približno) (ina/cm)
Nederlands
Productfiche Commercieel merk. Productnr. Modelnr. Energie efficiëntie klasse
Zichtbare schermgrootte
(diagonaal,ca.) (inches/cm)
Español
Ficha del Producto Marca Comercial Nº de Producto de Modelo Clasificación Energética
Tamaño de pantalla visible
(diagonal,aprox.) (pulgadas/cm)
Svenska
Produktspecifikation Varumärke Produktnr. Modellnr. Energiklass
Synlig skärmstorlek
(diagonal,ungefärlig) (tum/cm)
Italiano
Scheda prodotto Marchio commerciale Numero prodotto Numero modello Classe di efficienza energetica
Dimensioni visibili dello schermo
(diagonale,circa)(pollici/cm)
Polski
KARTA PRODUKTU Marka produktu Nr produktu Nr modelu
Klasa efektywnoci energetycznej
Widoczny obraz ekranu
(przektna,około)(cali/cm)
Magyar
Termékismertet adatlap Kereskedelmi márka Termékszám Modellszám Energiahatékonysági osztály
Látható képtartomány (diagonális,kb.)
(inches/cm)
Norsk
Produktinformasjon Kommersiell merkevare Produkt nr. Modell nr. Energieffektivitet klasse
Synlig skjermstørrelse (diagonal, ca.)
(tommer/cm)
Português
Ficha do produto Marca Comercial Produto Nº Modelo Nº Classificação eficiência energética
Tamanho ecrã visível (diagonal, aprox.)
(polegadas/cm)
Român
Fi produs Marc comercial Nr. Produs Nr. Model Clasa de eficien energetic
Dimensiunea ecranului vizibil
(diagonal, aprox. ) (inch/cm)

 
          
   (
, ) (/)

 
  
       
   (
,)(/ )

     .  .    
   
(, ) (/cm)

       
   (,
) (/cm)
Srpski
Tehnike odlike Komercijalna marka Proizvod br. Model br. Klasa energetske efikasnosti
Veliina vidljivog ekrana (dijagonala,
tokom) (ina/cm)
Slovenina
Produktový list Znaka výrobcu íslo produktu Model . Energetická trieda
Viditená vekos obrazovky
(uhloprieka, zhruba) (palcov/cm)
Slovenšina
Opis izdelka Komercialna znamka Št. zdelka Št. Modela Razred energetske uinkovitosti
Vidna velikost zaslona (diagonala,
pribl.) (palcev/cm)
Ev
  ι  .  .  η ι η
  η (ιι,
.) (/cm)
Bosanski
Tehniki podaci Komercijalna marka Produkt br. Model br. Klasa energetske efikasnosti
Vidljiva veliina ekrana (diagonala,
približno.) (ina/cm)

 
 

'


'

  
(
/

)
(

,

)
  
Türkçe
Ürün fii Ticari Marka Ün No. Model No. Enerji verimlilii sınıfı
Görülen ekran boyutu (çapraz, yaklk.)
(inç/cm)
Shqip
Të dhënat e produktit Marka tregtare Nr. i produktit. Nr. i modelit. Klasa e eficiencës së energji
Madhësia e ekranit të dukshëm
(diagonal, afërsisht) (inç/cm)
Lietuvi
Gaminio etiket Gamintojas Gaminio Nr. Modelio Nr. Energetinio efektyvumo klas
Matomas ekrano dydis (strižain,
approx.) (coli/cm)
Latviešu
Produkta apraksts Marka Produkta nr. Modea nr. Energoefektivittes klase
Ekrna izmrs (pa diognli, apm
çram)
(collas/cm)
Eesti
TOOTEKIRJELDUS Tootja firma Toote nr. Mudeli nr. Energiaklass
Vaadatava ekraani suurus (diagonaal,
umbes) (tolli/cm)

    
/

)
(

,

)

(
Italiano - 57 -
G H I JK
English
On mode average
power consumption (Watt)
Annual energy consumption
(kWh/annum)
Standby power consumption
(Watt)
Off mode power consumption
(Watt)
Display resolution
(px)
Deutsch
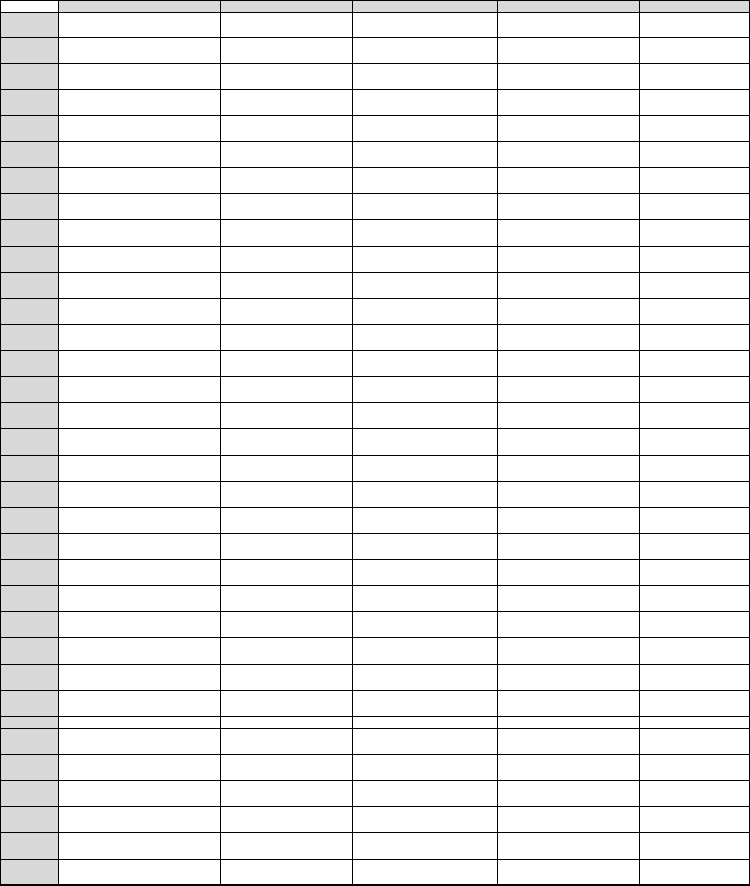
Durchschnittlicher Stromverbrauch im
eingeschaltetem Zustand (Watt)
Jährlicher Energieverbrauch
(kWh/Jahr) Standby-Stromverbrauch (Watt)
Stromverbrauch im ausgeschaltetem
Zustand (Watt) Display-Auflösung (px)

() (/) () () ()

   
  (Watt)
  
 (kWh/)
 
   (Watt)
  
  (Watt)
 
 ()
eština
Prmrná spoteba elektrické energie v
zapnutém režimu (Watt)
Roní spoteba energie
(kWh/Roní)
Spoteba elektrické energie v
pohotovostním režimu (Watt)
Spoteba elektrické energie ve
vypnutém režimu (Watt) Rozlišení displeje (px)
Dansk
Gennemsnitligt strømforbrug i tændt tilstand
(Watt) Årligt energiforbrug (kWh/Årligt) Strømforbrug (standby)(Watt) Strømforbrug i slukket tilstand (Watt) Skærmopløsning (px)
Suomi
Päällä-tilan keskimääräinen virrankulutus
(Wattia)
Vuosittainen sähkönkulutu
(kWh/Vuosittainen) Vakiovirran kulutus (Wattia) Pois-tilan virrankulutus (Wattia) ytön erottelukyky (pikselia)
Français
Consommation énergétique moyenne en
mode "marche" (Watt)
Consommation énergétique
annuelle (kWh/annuel)
Consommation d'énergie en veille
(Watt)
Consommation d'énergie en mode
"arrêt" (Watt) Résolution de l'écran (px)
Hrvatski
Prosjena potrošnja el. energije kada je
proizvod ukljuen (Watta)
Godišnja potrošnja el. Energije
(kWh/Godišnja)
Potrošnja el. energije u modu
pripravnosti (Watta)
Potrošnja el. energije kada je proizvod
iskljuen (Watta) Rezolucija zaslona (piksela)
Nederlands
Aan-modus gemiddeld stroomverbruik (Watt)
Jaarlijks
energieverbruik(kWh/Jaarlijks ) Stand-by stroomverbruik (Watt) Uit-modus stroomverbruik (Watt) Schermresolutie (px)
Español
Consumo eléctrico medio, en
funcionamiento (Vatio)
Consumo eléctrico anual
(kWh/anual) Consumo en modo en espera (Vatio)
Consumo eléctrico modo apagado
(Vatio) Resolución de pantalla (px)
Svenska
Strömkonsumtion i PÅ-läge (Watt)
Energikonsumtion per år
(kWh/Årlig) Strömkonsumtion i viloläge (Watt) Strömkonsumtion i AV-läge (Watt) Skärmupplösning (pixlar)
Italiano
Consumo di corrente medio da accesa
(Watt)
Consumo annuale di energia
(kWh/annuo)
Consumo di corrente in modalità
standby (Watt) Consumo di corrente da spenta (Watt) Risoluzione del display (px)
Polski
rednie zuycie energii w trybie włczonym
(Watów)
Roczne zuycie energii
(kWh/Roczne)
rednie zuycie energii w trybie
oczekiwania (Watów)
Zuycie energii w trybie wyłczonym
(Watów) Rozdzielczo obrazu (pikseli)
Magyar
Energiafogyasztás bekapcsolva hagyott
üzemmódban (Watt) Éves energiafogyasztás (kWh/Éves)
Energiafogyasztás standby
üzemmódban (Watt)
Energiafogyasztás kikapcsolt
üzemmódban (Watt) Képernyfelbontás (px)
Norsk
Påmodus gjennomsnittlig strømforbruk
(Watt) Årlig strømforbruk (kWh/Årlig) Hvilemodus strømforbruk (Watt) Av-modus strømforbruk (Watt) Skjermoppløsning (piksel)
Português
Consumo energia em modo médio (Watt)
Consumo annual energia
(kWh/anual) Consumo energia em stand-by (Watt)
Consumo energia em modo
alimentação (Watt) Resolução do visor (pixel)
Român
Consum electric mediu în modul pornit (Wai)
Consum anual de energie
(kWh/anual)
Consum electric în stare de repaus
(Wai) Consum electric în modul oprit (Wai) Rezoluia ecranului (pixeli)

   
 ()
  
(/)
   
()
  
 ()
 
()

   
 ()
  
(kWh/)
   
()
  
 ()
 
()

   
  
 (kWh/)    ()    ()
  
()

  
  ()
 
 (kWh/)
  
 ()
  
 ()
  
()
Srpski
Prosena potrošnja kada je ukljueni (Vati)
Godišnja potrošnja energije
(kWh/Godišnja) Potrošnja tokom mirovanja (Vati) Potrošnja kada je iskljueni (Vati) Rezolucija displeja (piks.)
Slovenina
Priemerná spotreba elektrickej energie v
zapnutom režime (Wattov)
Roná spotreba energie
(kWh/Roná)
Spotreba elektrickej energie v
pohotovostnom režime (Wattov)
Spotreba elektrickej energie vo
vypnutom režime (Wattov) Rozlíšenie displeja (pixl.)
Slovenšina
Poraba elektrine energije v povprenem
nainu (Wattov) Letna poraba energije (kWh/Letna)
Poraba energije v stanju pripravljenosti
(Wattov)
Poraba energije nainu izklopa
(Wattov) Resolucija zaslona (piks.)
Ev
  ε ευ
(Watt)
  εε
(kWh/)
 ε  
(Watt)
 ε ε
εε (Watt) υ  (ε)
Bosanski
Prosjena potrošnja kada je ukljuen (Watt)
Godišnja potrošnja energije
(kWh/Godišnja) Potrošnja tokom mirovanja (Watt) Potrošnja kada je iskljuen (Watt) Rezolucija ekrana (piks.)

(

)
(
    
(

/
"

)
  
(

)
   
(

)
    
(

)
 
Türkçe
Açık moddaki ortalama güç tüketimi (Watt) Yıllık enerji tüketimi (kWh/yıllık)
Bekleme durumunda enerji tüketimi
(Watt) Kapalı moddaki güç tüketimi (Watt) Ekran çözünürlüü (piks.)
Shqip
Konsumi mesatar i energjisë si i ndezur
(Watt)
Konsumi vjetor i energjisë
(kWh/vjetor)
Konsumi i energjisë si në gatishmëri
(Watt) Konsumi i energjisë si i fikur (Watt) Rezolucioni i ekranit (piks.)
Lietuvi
Vidutins energijos snaudos jungus (Vatai)
Metins energijos snaudos
(kWh/Metins)
Energijos snaudos budjimo režimu
(Vatai) Energijos snaudos išjungus (Vatai)
Ekrano skiriamoji geba
(pikseli)
Latviešu
Enerijas patriš aktv režm (Vati) Gada enerijas patriš (kWh/gada)
Enerijas patriš gaidšanas režm
(Vati)
Enerijas patriš izslgt stvokl
(Vati) Displeja rezolcija (pikseïiem)
Eesti
Keskmine energiakulu töörežiimil (Vatti) Aastane energiakulu (kWh/aastane) Energiakulu ooterežiimil (Vatti) Energiakulu väljalülitatud olekus (Vatti) Ekraani resolutsioon (pikslit)

()
)
(/ () () ()
Wir freuen uns, dass Sie sich für den Kauf eines Produktes unseres Hauses ent-
schieden haben, und wünschen Ihnen viel Spaß mit diesem hochwertigen
Produkt. Unsere strenge Fertigungskontrolle gewährleistet die hohe Qualität
unserer Geräte. Für den Fall, dass Sie dennoch eine berechtigte Beanstandung
haben, gewähren wir eine Garantie für die Dauer von
2 Jahren
ab Kaufdatum nach den nachfolgenden Bedingungen:
1. Diese Garantie lässt Ihre gesetzlichen Gewährleistungsansprüche als Ver-
braucher gegenüber dem Verkäufer des Gerätes unberührt. Diese Rechte
werden durch die von uns gewährte Herstellergarantie nicht eingeschränkt.
2. Die von uns gewährte Garantie hat nur Gültigkeit für den privaten Gebrauch
des Gerätes und beschränkt sich auf das Gebiet der Schweiz
3. Die Garantiedauer beträgt 2 Jahre ab Kaufdatum.
4. Unsere Garantieleistung umfasst während der Garantiedauer nach unserer
Wahl die Instandsetzung Ihres Gerätes oder den Austausch gegen ein
gleichwertiges Gerät, die bei uns anfallenden Arbeitslöhne, Materialkosten
und die Transportkosten des Gerätes innerhalb der Schweiz.
5. Zur Geltendmachung Ihrer Beanstandung setzen Sie sich bitte mit folgender
Servicenummer in Verbindung:
Es wird empfohlen die Originalverpackung aufzubewahren, um im
Garantiefalle einen sicheren Transport des Gerätes zu gewährleisten. Eine
kurze Beschreibung Ihrer Beanstandung wäre sehr hilfreich und unterstützt
die schnelle Reparatur und Rücklieferung des Gerätes.
6. Sie müssen den Kaufnachweis führen. Hierzu genügt das Original des
Kassenzettels, den Sie dem Gerät beifügen. Ohne Kaufnachweis können
wir leider keine kostenlosen Garantieleistungen erbringen. Geht uns ein
Gerät ohne Kaufnachweis zu, erhalten Sie von uns eine Kostenvoranschlag
für die Reparatur. Entscheiden Sie sich gegen eine Reparatur, so liefern wir
das Gerät an Sie zurück und berechnen Ihnen eine Pauschale für
Transport und Ausarbeitung des Kostenvoranschlags.
Herstellergarantie
Wichtiges Dokument! Bitte mit Kaufnachweis 2 Jahre aufbewahren.
CH
Wichtiges Dokument! Bitte mit Kaufnachweis 2 Jahre aufbewahren.
7. Ausgetauschte Teile verbleiben in unserem Servicezentrum und werden
nach unserem Ermessen vernichtet.
8. Die Garantie erlischt, wenn das Gerät von Ihnen oder einem nicht von uns
autorisierten Dritten geöffnet und/oder Veränderungen an dem Gerät vor-
genommen worden sind.
9. Kein Garantieanspruch besteht:
- bei unsachgemäßer Behandlung
- bei mechanischer Beschädigung des Gerätes von außen
- bei Transportschäden
- bei Verschleiß
- bei Bedienungsfehlern
- bei Aufstellung des Gerätes in Feuchträumen oder im Freien
- bei Schäden, die auf höhere Gewalt, Wasser, Blitzschlag, Überspannung
zurückzuführen sind
- bei übermäßiger Nutzung, insbesondere bei anderer als privater
Nutzung
- bei Missachtung der Bedienungsanleitung.
- wenn das Gerät keinen technischen Defekt aufweist.
- bei Pixelfehlern die innerhalb der in der ISO Norm 13406-2 festgelegten
(Pixelfehlerklasse II) Toleranzen liegen
10. Die Garantie umfasst keine weitergehende Haftung unsererseits, ins-
besondere keine Haftung für Schäden, die nicht am Gerät selbst ent-
standen sind oder die durch den Ausfall des Gerätes bis zur
Instandsetzung entstehen (z.B. Wegekosten, Handlingskosten, etc.).
Hierdurch wird jedoch unsere gesetzliche Haftung, insbesondere nach
dem Produkthaftungsgesetz, nicht eingeschränkt oder ausgeschlossen.
11. Von uns erbrachte Garantieleistungen verlängern die Garantiefrist von 2
Jahren ab Kaufdatum nicht, auch nicht hinsichtlich eventuell aus-
getauschter Komponenten.
12. Zur Validisierung Ihres Anspruches und um eine zeitnahe Bearbeitung
zu gewährleisten, senden Sie uns bitte immer den gesamten
Verpackungsinhalt inklusive aller Zubehörteile zu. (z.B. Fernbedienung,
Ständer, Wandhalterungen, A/V-Kabel usw...)
WAR_Mi_2007_2_DE
Wir wünschen Ihnen viel Spaß mit Ihrem neuen Gerät!
"This warranty card is only valid in Switzerland.”
“Deze garantiekaart is enkel beschikbaar in Zwitserland."
“Questa scheda di garanzia è valida solo in Svizzera".
“Cette garantie est valable seulement en Suisse.”
"El certificado de garantía sólo es válido en Suiza."
"Dieses Garantiezertifikat ist nur für die Schweiz gültig."
"Bu garanti kartı sadece İsviçre'de geçerlidir."
Nous vous remercions pour l'achat de ce produit de haute qualité et souhaitons
qu'il vous donne entière satisfaction. Des contrôles stricts de la production nous
permettent d'assurer la qualité exceptionnelle de nos appareils. Si vous avez
malgré tout une réclamation, votre appareil bénéficie d'une garantie pour une
durée de
2 ans
à compter de la date d'achat et sous les conditions suivantes :
1. Cette garantie ne modifie en rien les droits de garantie légaux. Ces droits ne
sont donc pas limités par la garantie que nous vous accordons en tant que
fabricant.
2. La garantie est valable uniquement pour un usage privé de l'appareil, sur le
territoire de la Suisse
3. La durée de garantie est de 2 ans à compter de la date d'achat.
4. Pendant la période de garantie, nos prestations de garantie comprennent
soit la réparation de l'appareil, soit le remplacement de l'appareil par un
appareil de même qualité. Elles comprennent également les coûts de
travail ainsi que les frais de matériaux et de transport de l'appareil sur le
territoire de la Suisse.
5. En cas de réclamation, veuillez contacter notre service après-vente au
numéro suivant :
Nous vous recommandons de conserver l'emballage d'origine afin de pro
téger l'appareil pendant le transport. Nous vous conseillons de joindre une
brève description de votre réclamation afin de nous aider à assurer une
réparation et un retour rapide de l'appareil. Il est préférable dans tous les
cas d'appeler auparavant notre service d'assistance téléphonique. La
preuve d'achat de l'appareil est indispensable. Il vous suffit pour cela de
joindre le bon de caisse original avec l'appareil. La garantie ne s'applique
pas en cas d'absence de preuve d'achat. Si vous nous envoyez un appareil
sans preuve d'achat, vous recevrez un devis pour la réparation. Si vous
décidez de ne pas faire effectuer la réparation, nous vous renverrons l'ap
pareil et vous facturerons un prix forfaitaire pour le transport et l'élaboration
du devis.
Garantie fabricant
Document important ! A conserver pendant 2 ans avec le bon d'achat.
CH
Document important ! A conserver pendant 2 ans avec le bon d'achat.
6. Les pièces remplacées restent dans notre centre de service après-vente.
Leur destruction est soumise à notre appréciation.
7. La garantie expire si l'appareil a été ouvert par vous-même ou par un tiers
non autorisé et/ou si l'appareil a été modifié.
8. La garantie est exclue dans les cas suivants :
- utilisation non conforme
- dommages mécaniques extérieurs
- dommages subis pendant le transport
- usure
- erreur d'utilisation
- utilisation dans un environnement humide ou à l'extérieur
- dommages subis suite à des influences extrêmes (dégât d'eau, foudre,
surtension)
- utilisation trop intensive, en particulier lorsque l'appareil n'est pas utilisé à
des fins privées
- non respect de la notice d'utilisation
- absence de défaut technique
- en cas de défauts de pixels tolérés par la norme ISO 13406-2 (classe II de
défauts de pixels)
9. La garantie exclut toute autre responsabilité de notre part, en particulier pour
les dommages qui ne concernent pas directement l'appareil ou qui sont
survenus entre la panne de l'appareil et sa réparation (par exemple coûts d'in
frastructure, de manutention etc.). Cependant, ceci ne limite ou n'exclut pas
notre responsabilité légale, conformément à la loi sur la responsabilité des
produits.
10. Nos interventions au titre de la garantie ne prolongent pas la durée de
garantie de 2 ans à partir de la date d'achat, ni pour l'appareil, ni pour les
pièces qui ont éventuellement été remplacées.
11. Afin de valider votre demande et d'assurer un traitement en temps et à lieu
de celle-ci, veuillez toujours nous envoyer le contenu du paquet dans son
intégralité, accessoires y compris. (par ex. télécommande, supports,
crochets muraux, câbles A/V, etc.)
Nous vous souhaitons un bon divertissement avec votre nouvel
appareil !
WAR_Mi_2007_2_FR
"This warranty card is only valid in Switzerland.”
“Deze garantiekaart is enkel beschikbaar in Zwitserland."
“Questa scheda di garanzia è valida solo in Svizzera".
“Cette garantie est valable seulement en Suisse.”
"El certificado de garantía sólo es válido en Suiza."
"Dieses Garantiezertifikat ist nur für die Schweiz gültig."
"Bu garanti kartı sadece İsviçre'de geçerlidir."
Ci congratuliamo per la Vostra decisione di acquistare un prodotto della nostra
casa e Vi auguriamo il massimo del divertimento con questo prodotto di altissima
qualità. I nostri severi controlli di produzione garantiscono la massima qualità dei
nostri apparecchi. Se ciononostante doveste presentare un reclamo legittimo,
assicuriamo una garanzia della durata di
2 anni
a partire dalla data di acquisto e conformemente alle seguenti condizioni:
1. Questa garanzia non va a modificare quanto previsto per legge riguardo i
diritti di garanzia dell'utente nei confronti del venditore dell'apparecchio. La
garanzia del produttore da noi accordata non limita questi diritti.
2. La nostra garanzia ha valore solo per l'uso privato dell'apparecchio e si limita
al territorio della Svizzera.
3. La durata della garanzia è di 2 anni a partire dalla data d'acquisto.
4. Per tutta la durata della garanzia le nostre prestazioni di garanzia com
prendono, a nostra discrezione, la riparazione dell'apparecchio o la
sostituzione con un apparecchio di ugual valore, le nostre tariffe lavorative, i
costi del materiale e le spese di trasporto dell'apparecchio all'interno della
Svizzera.
5. Per far valere il proprio reclamo, mettersi in contatto con il seguente numero
del servizio di assistenza:
Si consiglia di conservare l'imballaggio originale al fine di poter trasportare
in modo sicuro l'apparecchio nell'evenienza che venga presentato un
reclamo legittimo. Descrivendoci brevemente in che cosa consiste il Vostro
reclamo ci permettete di riparare e di restituire l'apparecchio in tempi brevi.
Si consiglia di chiamare la nostra hotline.
6. Sarà richiesta la ricevuta d'acquisto. A tale scopo è sufficiente allegare
all'apparecchio l'originale dello scontrino fiscale. Senza la ricevuta
d'acquisto, pur troppo, non possiamo fornire alcuna prestazione di garanzia
gratuita. Per eventuali apparecchi non provvisti di ricevuta d'acquisto
provvederemo a fornire un preventivo per la riparazione. Qualora il cliente
decidesse di non far riparare l'apparecchio, questo verrà restituito insieme
alla richiesta di una somma forfetaria per i costi del trasporto e
dell'elaborazione del preventivo.
Garanzia del produttore
Documento importante! Da conservare con la ricevuta di acquisto per 2 anni.
CH
Documento importante! Da conservare con la ricevuta di acquisto per 2 anni.
7. I pezzi sostituiti restano presso il nostro centro di assistenza e saranno dis-
trutti a nostra discrezione.
8. La garanzia perde di validità se l'apparecchio viene aperto dal cliente o da
terzi non autorizzati e/o se vengono apportate modifiche.
9. Non sussiste alcun diritto di garanzia nel caso di:
- utilizzo dell'apparecchio non conforme all'uso previsto
- danneggiamento dell'apparecchio dovuto ad azione meccanica esterna
- danneggiamento dovuto al trasporto
- usura
- errori di comando dell'apparecchio
- installazione dell'apparecchio in locali umidi o all'aperto
- danni dovuti a cause di forza maggiore, acqua, fulmini, sovratensione
- utilizzo eccessivo, in particolare in caso di utilizzo diverso da quello privato
- inosservanza delle istruzioni per l'uso
- assenza di difetti tecnici dell'apparecchio.
- per gli errori di pixel che sono compresi nelle tolleranze stabilite dalla norma
ISO 13406-2 . (Classe II)
10. La garanzia non prevede alcuna responsabilità da parte nostra che vada
oltre allo specificato. In particolare la garanzia non prevede alcuna
responsabilità per danni che non si sono verificati direttamente sull'ap
parecchio o che, a causa del guasto dell'apparecchio, si verificano fino al
momento della riparazione (ad es. costi di trasporto, costi di maneggio
ecc.). Ciò non limita o non esclude la nostra responsabilità giuridica, in par
ticolare quella prevista secondo la legge sulla responsabilità del prodotto.
11. Le prestazioni di garanzia da noi prestate non prolungano il periodo di
validità della garanzia, pari a 2 anni a partire dalla data d'acquisto, anche
nell'eventualità che siano stati sostituiti dei componenti.
12. Per venire incontro alle Vostre esigenze e per garantire un'elaborazione
rapida, Vi preghiamo di inviarci sempre l'intero contenuto della confezione
inclusi tutti gli accessori. (Ad es. telecomando, supporti, supporti da parete,
cavo A/V ecc.)
Buon divertimento con il Vostro nuovo apparecchio!
WAR_Mi_2007_2_IT
"This warranty card is only valid in Switzerland.”
“Deze garantiekaart is enkel beschikbaar in Zwitserland."
“Questa scheda di garanzia è valida solo in Svizzera".
“Cette garantie est valable seulement en Suisse.”
"El certificado de garantía sólo es válido en Suiza."
"Dieses Garantiezertifikat ist nur für die Schweiz gültig."
"Bu garanti kartı sadece İsviçre'de geçerlidir."
55

Hulp nodig? Stel uw vraag in het forum

Spelregels

Misbruik melden

Gebruikershandleiding.com neemt misbruik van zijn services uitermate serieus. U kunt hieronder aangeven waarom deze vraag ongepast is. Wij controleren de vraag en zonodig wordt deze verwijderd.

Product:

Bijvoorbeeld antisemitische inhoud, racistische inhoud, of materiaal dat gewelddadige fysieke handelingen tot gevolg kan hebben.

Bijvoorbeeld een creditcardnummer, een persoonlijk identificatienummer, of een geheim adres. E-mailadressen en volledige namen worden niet als privégegevens beschouwd.

Spelregels forum

Om tot zinvolle vragen te komen hanteren wij de volgende spelregels:

Belangrijk! Als er een antwoord wordt gegeven op uw vraag, dan is het voor de gever van het antwoord nuttig om te weten als u er wel (of niet) mee geholpen bent! Wij vragen u dus ook te reageren op een antwoord.

Belangrijk! Antwoorden worden ook per e-mail naar abonnees gestuurd. Laat uw emailadres achter op deze site, zodat u op de hoogte blijft. U krijgt dan ook andere vragen en antwoorden te zien.

Abonneren

Abonneer u voor het ontvangen van emails voor uw Durabase LE24F160X2 bij:


U ontvangt een email met instructies om u voor één of beide opties in te schrijven.


Ontvang uw handleiding per email

Vul uw emailadres in en ontvang de handleiding van Durabase LE24F160X2 in de taal/talen: Duits, Engels, Frans, Italiaans als bijlage per email.

De handleiding is 4,9 mb groot.


U ontvangt de handleiding per email binnen enkele minuten. Als u geen email heeft ontvangen, dan heeft u waarschijnlijk een verkeerd emailadres ingevuld of is uw mailbox te vol. Daarnaast kan het zijn dat uw internetprovider een maximum heeft aan de grootte per email. Omdat hier een handleiding wordt meegestuurd, kan het voorkomen dat de email groter is dan toegestaan bij uw provider.

Stel vragen via chat aan uw handleiding

Stel uw vraag over deze PDF

Uw handleiding is per email verstuurd. Controleer uw email

Als u niet binnen een kwartier uw email met handleiding ontvangen heeft, kan het zijn dat u een verkeerd emailadres heeft ingevuld of dat uw emailprovider een maximum grootte per email heeft ingesteld die kleiner is dan de grootte van de handleiding.

Er is een email naar u verstuurd om uw inschrijving definitief te maken.

Controleer uw email en volg de aanwijzingen op om uw inschrijving definitief te maken

U heeft geen emailadres opgegeven

Als u de handleiding per email wilt ontvangen, vul dan een geldig emailadres in.

Uw vraag is op deze pagina toegevoegd

Wilt u een email ontvangen bij een antwoord en/of nieuwe vragen? Vul dan hier uw emailadres in.


Info