41
DO360A
www.domo-elektro.be
DE
O N /O F F
T E M P
S H O R T
C U T
TIM ER
O N
TIM ER
O F F
M O D E
FAN
L E D
SLEEP
F O L L O W
S W I N G
M E
„F
Achten Sie darauf
Drücken
Drücken
Zimmertemperatur kann somit nicht kontrolliert werden.
FAN „FAN“-
Mit dieser
5 5 6 6
MODE display
Displays the curr ent
mode, including:
AUT O
COOL
DR Y
HEA T
F AN
T ransmission Indicator
Lights up when r emote sends
signal to unit
ON/OFF display
Appears when the unit is tur ned on,
and disappears when it is tur ned of f
TIMER ON display
Displays when TIMER
ON is set
TIMER OFF display
Displays when TIMER
OFF is set
SLEEP display
Battery display
SILENT display
ECO display
Displays when
SLEEP function
is activated
FOLLOW ME
display
Indicates that
the FOLLOW ME
function is on
F AN SPEED display
Displays selected F AN SPEED:
HIGH, MED,
or LOW
This display is blank when
set to AUT O speed.
T emperatur e/T imer display
Displays the set temperatur e by default, or timer setting
when using TIMER ON/OFF functions
o O O
T emperatur e range: 17-30 C(62 F-86 F)
T imer setting range: 0-24 hours
This display is blank when operating in F AN mode.
1 . P r e s s t h e M O D E b u t t o n t o s e l e c t
C O O L m o d e .
2. S et y our d esired t emperat ure using
t h e T e m p o r T e m p b u t t o n .
3 . P r e s s t h e FA N b u t t o n t o s e l e c t t h e
f a n s p e e d : A U T O , L O W, M E D , o r
H I G H .
4 . P r e s s t h e ON /OFF b u t t o n t o s t a r t t h e
u n i t .
I n A U T O m ode, t he unit w ill aut omat ically
s e l e c t t h e C O O L , FA N , H E A T o r D R Y m o d e
based on t he set t emperat ure.
1 . P r e s s t h e M O D E b u t t o n t o s e l e c t A u t o m o d e .
2. S et y our desired t emperat ure using t he
T e m p o r T e m p b u t t o n .
3 . P r e s s t h e ON /OFF b u t t o n t o s t a r t t h e u n i t .
,
N O T E : FA N S P E E D c a n t b e s e t i n A u t o m o d e .
SETTING TEMPERA TURE
A UT O oper a tion
T he operat ing t emperat ure range f or unit s is
O O O
17-30 C(62 F -86 F ). Y ou can incr ease or
O O
decrease t he set t meperat ure in 1 C(1 F )
increment s.
COOL oper a tion
1
3
2
1
3
2
4
Not available for this unit
Not available for
this unit
Not available for
this unit
Low battery
detection
R emote LED Scr een Indica tor s Ho w T o Use T he Basic Functions
ON /OFF
ON /OFF
TEMP
T E M P
S H O R T
C U T
S H O R T
C U T
TIME R
O N
TIME R
O N
TIME R
O F F
TIME R
O F F
M O D E
M O D E
FA N
FA N
S L E E P
S L E E P
LED
L E D
F O L L O W
ION
SWIN G M E
F O L L O W
ION
SWIN G M E
– med
5 5 6 6
MODE display
Displays the curr ent
mode, including:
AUT O
COOL
DR Y
HEA T
F AN
T ransmission Indicator
Lights up when r emote sends
signal to unit
ON/OFF display
Appears when the unit is tur ned on,
and disappears when it is tur ned of f
TIMER ON display
Displays when TIMER
ON is set
TIMER OFF display
Displays when TIMER
OFF is set
SLEEP display
Battery display
SILENT display
ECO display
Displays when
SLEEP function
is activated
FOLLOW ME
display
Indicates that
the FOLLOW ME
function is on
F AN SPEED display
Displays selected F AN SPEED:
HIGH, MED,
or LOW
This display is blank when
set to AUT O speed.
T emperatur e/T imer display
Displays the set temperatur e by default, or timer setting
when using TIMER ON/OFF functions
o O O
T emperatur e range: 17-30 C(62 F-86 F)
T imer setting range: 0-24 hours
This display is blank when operating in F AN mode.
1 . P r e s s t h e M O D E b u t t o n t o s e l e c t
C O O L m o d e .
2. S et y our d esired t emperat ure using
t h e T e m p o r T e m p b u t t o n .
3 . P r e s s t h e FA N b u t t o n t o s e l e c t t h e
f a n s p e e d : A U T O , L O W, M E D , o r
H I G H .
4 . P r e s s t h e ON /OFF b u t t o n t o s t a r t t h e
u n i t .
I n A U T O m ode, t he unit w ill aut omat ically
s e l e c t t h e C O O L , FA N , H E A T o r D R Y m o d e
based on t he set t emperat ure.
1 . P r e s s t h e M O D E b u t t o n t o s e l e c t A u t o m o d e .
2. S et y our desired t emperat ure using t he
T e m p o r T e m p b u t t o n .
3 . P r e s s t h e ON /OFF b u t t o n t o s t a r t t h e u n i t .
,
N O T E : FA N S P E E D c a n t b e s e t i n A u t o m o d e .
SETTING TEMPERA TURE
A UT O oper a tion
T he operat ing t emperat ure range f or unit s is
O O O
17-30 C(62 F -86 F ). Y ou can incr ease or
O O
decrease t he set t meperat ure in 1 C(1 F )
increment s.
COOL oper a tion
1
3
2
1
3
2
4
Not available for this unit
Not available for
this unit
Not available for
this unit
Low battery
detection
R emote LED Scr een Indica tor s Ho w T o Use T he Basic Functions
ON /OFF
ON /OFF
TEMP
T E M P
S H O R T
C U T
S H O R T
C U T
TIME R
O N
TIME R
O N
TIME R
O F F
TIME R
O F F
M O D E
M O D E
FA N
FA N
S L E E P
S L E E P
LED
L E D
F O L L O W
ION
SWIN G M E
F O L L O W
ION
SWIN G M E
5 5 6 6
MODE display
Displays the curr ent
mode, including:
AUT O
COOL
DR Y
HEA T
F AN
T ransmission Indicator
Lights up when r emote sends
signal to unit
ON/OFF display
Appears when the unit is tur ned on,
and disappears when it is tur ned of f
TIMER ON display
Displays when TIMER
ON is set
TIMER OFF display
Displays when TIMER
OFF is set
SLEEP display
Battery display
SILENT display
ECO display
Displays when
SLEEP function
is activated
FOLLOW ME
display
Indicates that
the FOLLOW ME
function is on
F AN SPEED display
Displays selected F AN SPEED:
HIGH, MED,
or LOW
This display is blank when
set to AUT O speed.
T emperatur e/T imer display
Displays the set temperatur e by default, or timer setting
when using TIMER ON/OFF functions
o O O
T emperatur e range: 17-30 C(62 F-86 F)
T imer setting range: 0-24 hours
This display is blank when operating in F AN mode.
1 . P r e s s t h e M O D E b u t t o n t o s e l e c t
C O O L m o d e .
2. S et y our d esired t emperat ure using
t h e T e m p o r T e m p b u t t o n .
3 . P r e s s t h e FA N b u t t o n t o s e l e c t t h e
f a n s p e e d : A U T O , L O W, M E D , o r
H I G H .
4 . P r e s s t h e ON /OFF b u t t o n t o s t a r t t h e
u n i t .
I n A U T O m ode, t he unit w ill aut omat ically
s e l e c t t h e C O O L , FA N , H E A T o r D R Y m o d e
based on t he set t emperat ure.
1 . P r e s s t h e M O D E b u t t o n t o s e l e c t A u t o m o d e .
2. S et y our d esired t emperat ure using t he
T e m p o r T e m p b u t t o n .
3 . P r e s s t h e ON /OFF b u t t o n t o s t a r t t h e u n i t .
,
N O T E : FA N S P E E D c a n t b e s e t i n A u t o m o d e .
SETTING TEMPERA TURE
A UT O oper a tion
T he operat ing t emperat ure range f or u nit s is
O O O
17-30 C(62 F -86 F ). Y ou can incr ease or
O O
decrease t he set t meperat ure in 1 C(1 F )
increment s.
COOL oper a tion
1
3
2
1
3
2
4
Not available for this unit
Not available for
this unit
Not available for
this unit
Low battery
detection
R emote LED Scr een Indica tor s Ho w T o Use T he Basic Functions
ON /OFF
ON /OFF
TEMP
T E M P
S H O R T
C U T
S H O R T
C U T
TIME R
O N
T I M E R
O N
TIME R
O F F
T I M E R
O F F
M O D E
M O D E
FA N
FA N
S L E E P
S L E E P
LED
L E D
F O L L O W
ION
SWIN G M E
F O L L O W
ION
SWIN G M E
– high
5 5 6 6
MODE display
Displays the curr ent
mode, including:
AUT O
COOL
DR Y
HEA T
F AN
T ransmission Indicator
Lights up when r emote sends
signal to unit
ON/OFF display
Appears when the unit is tur ned on,
and disappears when it is tur ned of f
TIMER ON display
Displays when TIMER
ON is set
TIMER OFF display
Displays when TIMER
OFF is set
SLEEP display
Battery display
SILENT display
ECO display
Displays when
SLEEP function
is activated
FOLLOW ME
display
Indicates that
the FOLLOW ME
function is on
F AN SPEED display
Displays selected F AN SPEED:
HIGH, MED,
or LOW
This display is blank when
set to AUT O speed.
T emperatur e/T imer display
Displays the set temperatur e by default, or timer setting
when using TIMER ON/OFF functions
o O O
T emperatur e range: 17-30 C(62 F-86 F)
T imer setting range: 0-24 hours
This display is blank when operating in F AN mode.
1 . P r e s s t h e M O D E b u t t o n t o s e l e c t
C O O L m o d e .
2. S et y our d esired t emperat ure using
t h e T e m p o r T e m p b u t t o n .
3 . P r e s s t h e FA N b u t t o n t o s e l e c t t h e
f a n s p e e d : A U T O , L O W, M E D , o r
H I G H .
4 . P r e s s t h e ON /OFF b u t t o n t o s t a r t t h e
u n i t .
I n A U T O m ode, t he unit w ill aut omat ically
s e l e c t t h e C O O L , FA N , H E A T o r D R Y m o d e
based on t he set t emperat ure.
1 . P r e s s t h e M O D E b u t t o n t o s e l e c t A u t o m o d e .
2. S et y our desired t emperat ure using t he
T e m p o r T e m p b u t t o n .
3 . P r e s s t h e ON /OFF b u t t o n t o s t a r t t h e u n i t .
,
N O T E : FA N S P E E D c a n t b e s e t i n A u t o m o d e .
SETTING TEMPERA TURE
A UT O oper a tion
T he operat ing t emperat ure range f or unit s is
O O O
17-30 C(62 F -86 F ). Y ou can incr ease or
O O
decrease t he set t meperat ure in 1 C(1 F )
increment s.
COOL oper a tion
1
3
2
1
3
2
4
Not available for this unit
Not available for
this unit
Not available for
this unit
Low battery
detection
R emote LED Scr een Indica tor s Ho w T o Use T he Basic Functions
ON /OFF
ON /OFF
TEMP
T E M P
S H O R T
C U T
S H O R T
C U T
TIME R
O N
TIME R
O N
TIME R
O F F
TIME R
O F F
M O D E
M O D E
FA N
FA N
S L E E P
S L E E P
LED
L E D
F O L L O W
ION
SWIN G M E
F O L L O W
ION
SWIN G M E
SHORT
CUT T
eventuell auch noch die SLEEP
mit den zuvor festgelegten Einstellungen.
TIMER
ON „
Diese
Jeder
Einschaltung zu annullieren halten Sie die
Display 0.0 erscheint.
Achten Sie darauf
Drücken
Einstellung der „
die „
sek. bevor die eingestellte
TIMER
OFF „
T
9 9
10 10
NOTE:
" 0.0h "
When setting the TIMER ON or
TIMER OFF functions, up to 10 hours,
the time will increase in 30 minute
increments with each press. After 10
hours and up to 24, it will increase i n 1
hour increments. The timer will revert to
zero after 24 hours.
Y ou can turn off either function by
setting its timer to .
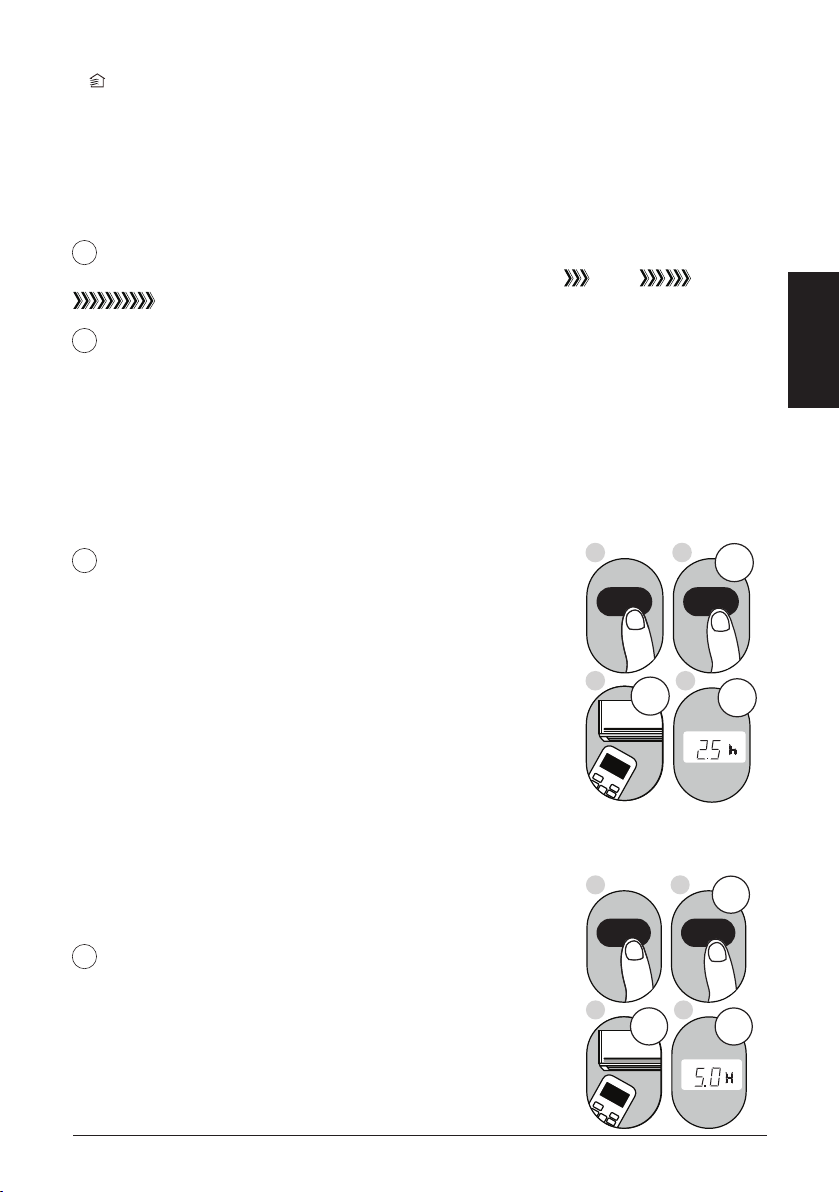
2. Press the TIMER ON button repeatedly
t o s e t the time when you want the unit to
turn on.
3. W ait 2 seconds, then the TIMER O N
function will be activated. The digital
display on your remote control will then
return to the temperature display.
2. Press the TIMER OFF button repeatedly
t o s e t the time when you want the unit to
turn off.
3. W ait 2 seconds, then the TIMER OFF
function will be activated. The digital
display on your remote control will then
return to the temperature display.
Example: Setting unit to turn on after 2.5
hours.
Example: Setting unit to turn off after 5
hours.
2
ON/OFF
MODE
FAN
SHORT
CUT
TIMER ON
TIMER OF
F
TEMP
S
LE EP
1
x5
1
3
2
4
TIMER OFF function
The TIMER OFF function allows you to
set a period of time after which the unit
will automatically turn off, such as when
you wake up.
1.
This number indicates the
amount of time after the current time
that you want the unit to turn on.
For example, if you set TIMER ON for
2 hours, will appear on the
screen, and the unit will turn on after
2 hours.
Press the TIMER ON button. By
default, the last time period that you
s e t a n d an "h" (indicating hours)will
appear on the display .
Note:
" 2. 0h "
1.
This number indicates the
amount of time after the current time
that you want the unit to turn off.
For example, if you set TIMER OFF for
2 hours, will appear on the
screen, and the unit will turn of f after
2 hours.
Press the TIMER OFF button. By
default, the last time period that you
s e t a n d an "h" (indicating hours)will
appear on the display .
Note:
" 2. 0h "
2 sec
x10
ON/OF F
MODE
F A N
SHOR T
CUT
TIMER ON
TIMER OF
F
TEMP
S
L EEP
1 sec
1
3
2
4
TIMER ON function
The TIMER ON function allows you to set
a period of time after which the unit will
automatically turn on, such as when you
come home from work.
Y our air conditioning unit has two
timer-related functions:
TIMER ON - sets the amount of timer after
which the unit will automatically turn on.
TIMER OFF - sets the amount of time after
which the unit will automatically turn off.
TIMER ON TIMER ON
TIM E R O F F TIM E R O F F
Continue to press
TIMER ON or
TIMER OFF until
desired time is
reached.
Setting the TIMER function
ON /OFF
T E M P
S H O R T
C U T
TIME R
O N
TIME R
O F F
M O D E
FA N
SLEE P L E D
T i m e r o n
F O L L O W
S W I N G
ION
M E
9 9
10 10
NOTE:
" 0.0h "
When setting the TIMER ON or
TIMER OFF functions, up to 10 hours,
the time will increase in 30 minute
increments with each press. After 10
hours and up to 24, it will increase i n 1
hour increments. The timer will revert to
zero after 24 hours.
Y ou can turn off either function by
setting its timer to .
2. Press the TIMER ON button repeatedly
t o s e t the time when you want the unit to
turn on.
3. W ait 2 seconds, then the TIMER O N
function will be activated. The digital
display on your remote control will then
return to the temperature display.
2. Press the TIMER OFF button repeatedly
t o s e t the time when you want the unit to
turn off.
3. W ait 2 seconds, then the TIMER OFF
function will be activated. The digital
display on your remote control will then
return to the temperature display.
Example: Setting unit to turn on after 2.5
hours.
Example: Setting unit to turn off after 5
hours.
2 sec
O N / O F F
M O D E
F A N
SHOR T
CUT
TIMER ON
TIMER OF
F
TEMP
S
L E EP
1 sec
x5
1
3
2
4
TIMER OFF function
The TIMER OFF function allows you to
set a period of time after which the unit
will automatically turn off, such as when
you wake up.
1.
This number indicates the
amount of time after the current time
that you want the unit to turn on.
For example, if you set TIMER ON for
2 hours, will appear on the
screen, and the unit will turn on after
2 hours.
Press the TIMER ON button. By
default, the last time period that you
s e t a n d an "h" (indicating hours)will
appear on the display .
Note:
" 2. 0h "
1.
This number indicates the
amount of time after the current time
that you want the unit to turn off.
For example, if you set TIMER OFF for
2 hours, will appear on the
screen, and the unit will turn of f after
2 hours.
Press the TIMER OFF button. By
default, the last time period that you
s e t a n d an "h" (indicating hours)will
appear on the display .
Note:
" 2. 0h "
2
x10
ON/OFF
MODE
FAN
SHORT
CUT
TIMER ON
TIMER OF
F
TEMP
S
LEEP
1
1
3
2
4
TIMER ON function
The TIMER ON function allows you to set
a period of time after which the unit will
automatically turn on, such as when you
come home from work.
Y our air conditioning unit has two
timer-related functions:
TIMER ON - sets the amount of timer after
which the unit will automatically turn on.
TIMER OFF - sets the amount of time after
which the unit will automatically turn off.
TIMER ON TIMER ON
TIMER O TIMER O
Continue to press
TIMER ON or
TIMER OFF until
desired time is
reached.
Setting the TIMER function
ON /OFF
T E M P
S H O R T
C U T
TIME R
O N
TIME R
O F F
M O D E
FA N
SLEE P L E D
T i m e r o n
F O L L O W
S W I N G
ION
M E