Libero.book Seite 51 Montag, 12. März 2012 6:29 18
52
1Vue d’ensemble
1Vue d’ensemble
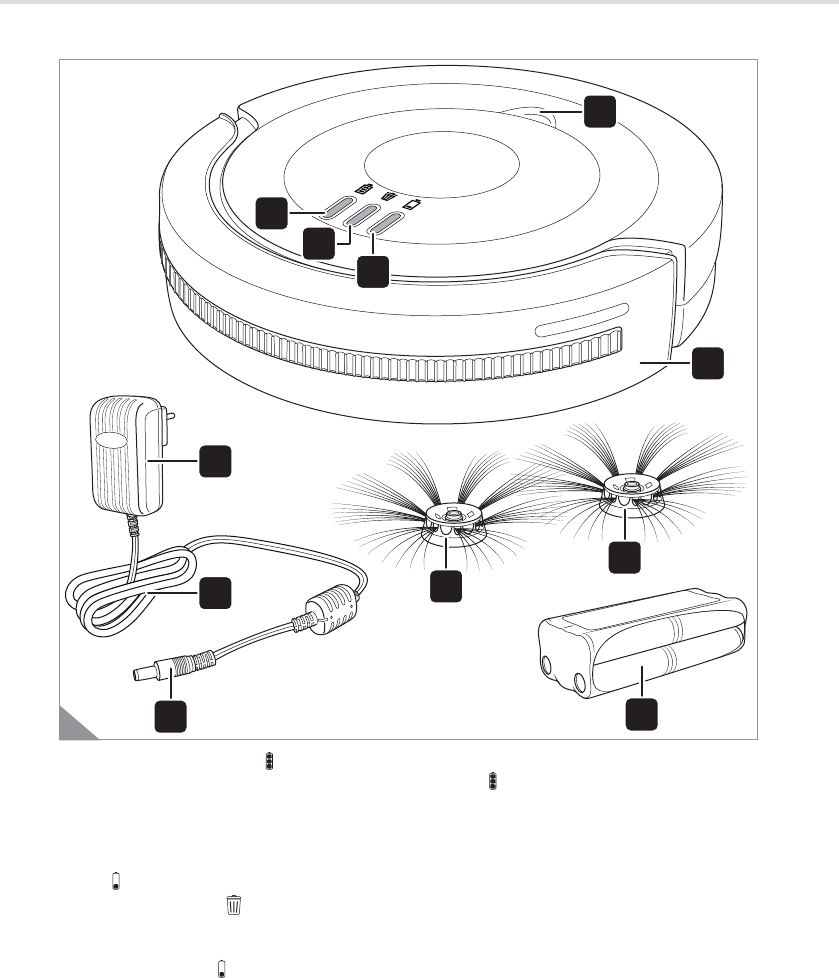
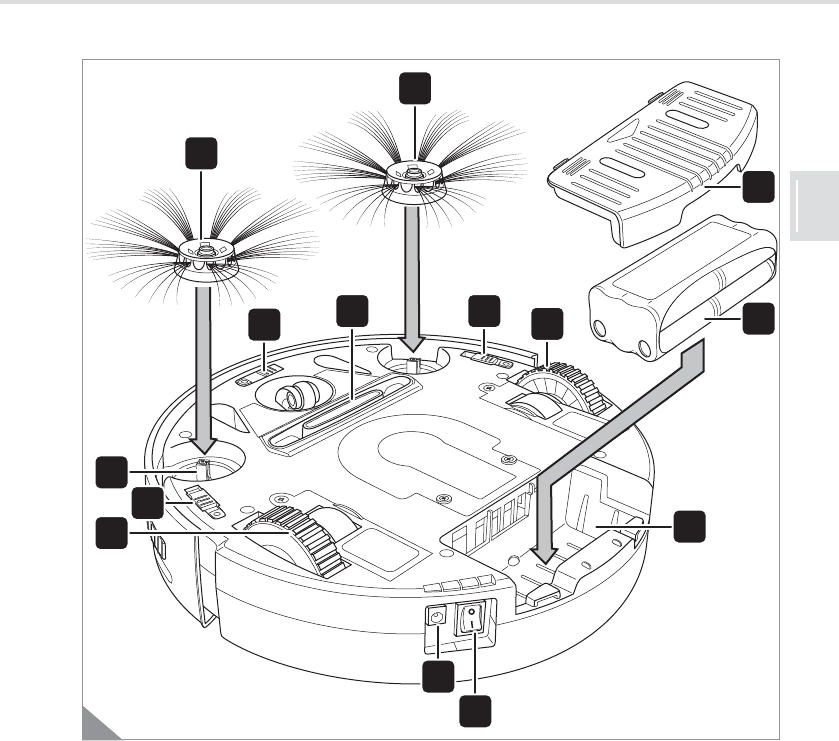
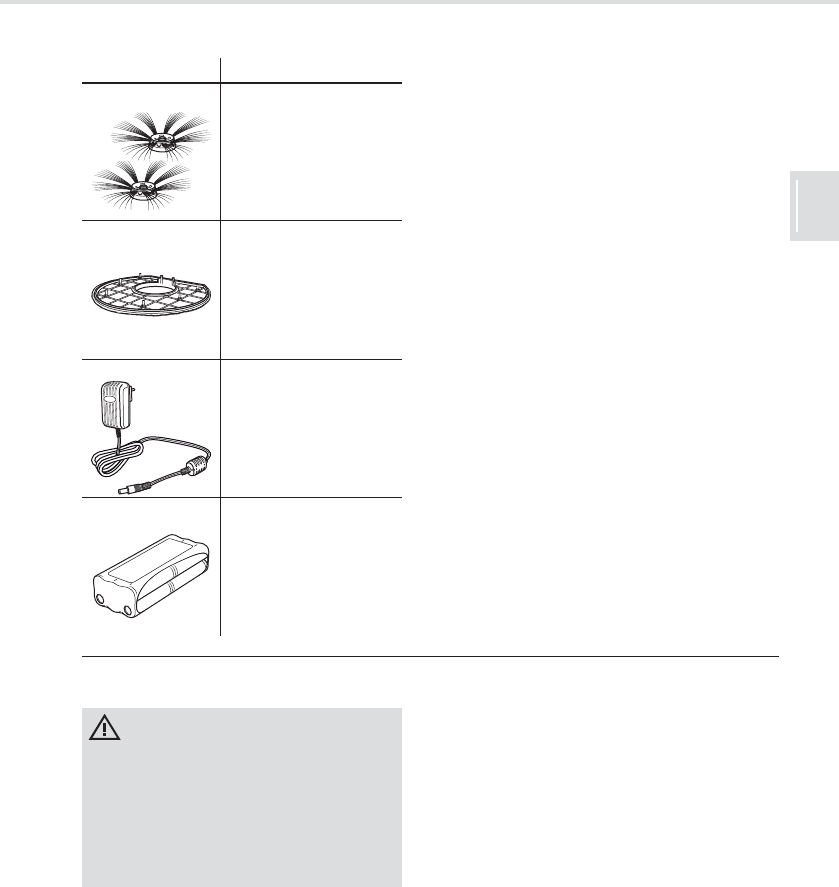
1.1Étendue de la fourniture
1Voyant lumineux de contrôle de charge
«»:
-bleu, clignote quand la batterie de piles
est en cours de charge
-bleu, reste allumé quand la batterie de
piles est entièrement chargée
-clignote en alternance avec «»
2Indicateur de nettoyage «»:
-rouge, s'allume quand le bac à pous-
sières doit être vidé
3Voyant de la batterie «»:
-rouge, s'allume quand la batterie doit
être rechargée ou si l'aspirateur n'est
plus en contact avec le sol
-clignote en alternance avec «»
4Poignée pour défaire le couvercle du com-
partiment du bac à poussières
5Bande anticollision
6Brosses latérales circulaires
7Prise d'alimentation
8Cordon d'alimentation
9Bloc d'alimentation
10Batterie de piles
Non illustrée : notice d'utilisation
5
4
9
7
8
10
1
2
3
6
6
1
Libero.book Seite 52 Montag, 12. März 2012 6:29 18
53
1Vue d’ensemble
FR
1.2Face inférieure de l'aspirateur
1Brosses latérales circulaires
2Logement des brosses latérales circu-
laires
3Coulisse de réglage de la sensibilité des
capteurs
4Roues motrices caoutchoutées
5Suceur
6Douille de rechargement sur l'appareil
7Interrupteur marche-arrêt
8Compartiment de la batterie
9Batterie de piles
10Couvercle du compartiment de la batterie
1
1
10
9
8
6
7
2
3
3
3
5
4
4
2
Libero.book Seite 53 Montag, 12. März 2012 6:29 18
54
1Vue d’ensemble
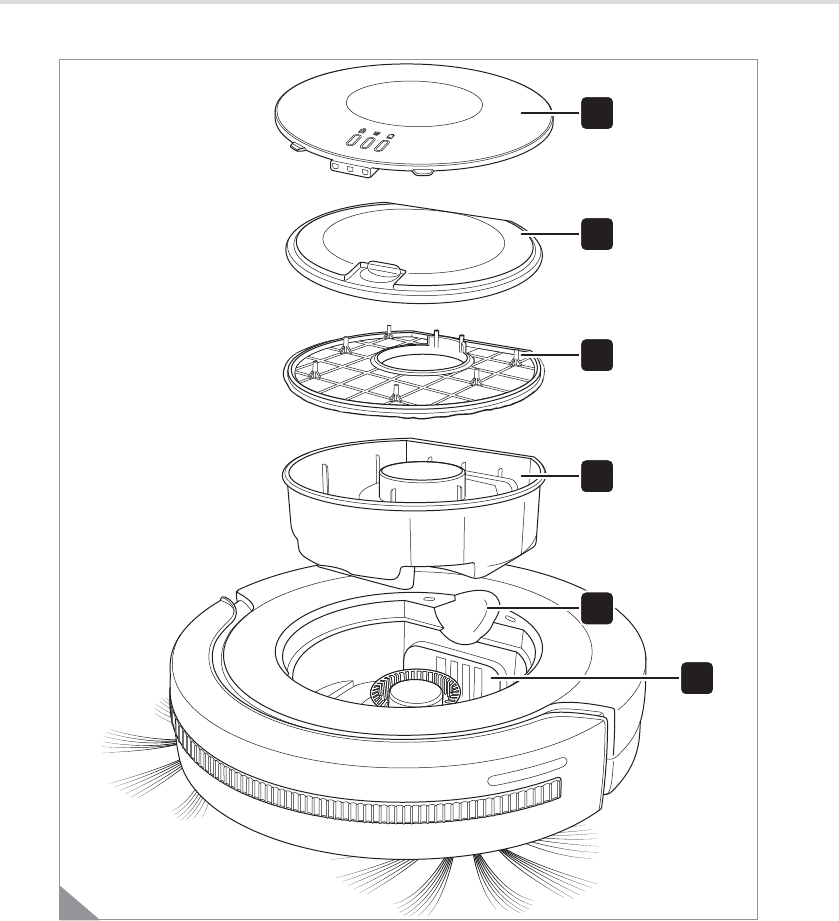
1.3Vue éclatée de l'intérieur de l'aspirateur
1Couvercle du compartiment du bac à
poussières
2Couvercle du bac à poussières
3Filtre
4Bac à poussières
5Poignée pour défaire le couvercle du com-
partiment du bac à poussières
6Compartiment du bac à poussières
1
2
3
4
5
6
3
Libero.book Seite 54 Montag, 12. März 2012 6:29 18
55
2Mode de fonctionnement
FR
2Mode de fonctionnement
2.1Principe de fonctionnement
En achetant l'aspirateur robot «Libero»,
vous avez fait l'acquisition d'un aspirateur ro-
bot entièrement automatique.
Votre aspirateur robot alterne trois modes de
nettoyage pendant son cycle de fonctionne-
ment :
Mode « Aléatoire » (Fig. 4/A, Fig. 5/B)
Mode « Spirale » (Fig. 4/B)
Mode « Long des murs » (Fig. 5/A)
Si l'aspirateur n'est pas arrêté à la fin du mode
«Long des murs», il recommence un cycle
de fonctionnement en mode « Aléatoire ».
Cette séquence de fonctionnement permet de
nettoyer en passant sur des pistes chevau-
chantes sans oublier aucune zone, à condi-
tion cependant que la pièce ne soit pas trop
grande et que l'aspirateur ne rencontre pas
d'obstacle trop tôt quand il est en mode
« Spirale ».
Si l'aspirateur rencontre un obstacle, la bande
anticollision l'enregistre et modifie la direction
du déplacement. Si l'aspirateur rencontre un
obstacle quand il est en mode «Spirale», il
passe automatiquement en mode « Long des
murs ».
2.2Protection antichute
Grâce à 3 capteurs, votre aspirateur robot dé-
tecte automatiquement les vides où il y a
risque de chute (Fig. 6). Il change alors la di-
rection de son déplacement et poursuit le net-
toyage dans la direction opposée.
Ainsi, les surfaces situées en contrebas,
comme les marches d'escalier par exemple,
sont détectées et ne seront pas nettoyées.
Vous pouvez régler la sensibilité des cap-
teurs, ZChapitre 6.1, "Réglage de la sensibi-
lité des capteurs".
A
B
4
A
B
5
6
Libero.book Seite 55 Montag, 12. März 2012 6:29 18
56
3Consignes de sécurité
3Consignes de sécurité
3.1Mode d'emploi
Veuillez lire intégralement ce mode d'emploi
avant de vous servir de l'appareil.
Conservez précieusement ce mode d'emploi.
Remettez toujours le mode d'emploi à toute
personne se servant de l'appareil.
Le non respect de ce mode d'emploi peut
entraîner des blessures graves ou endom-
mager irréparablement l'appareil.
Nous déclinons toute responsabilité pour des
dommages résultant du non respect de ce
mode d'emploi.
3.2Groupes particuliers de personnes
Ces appareils peuvent être utilisés par
des enfants d'au moins 8 ans et par des per-
sonnes aux capacités physiques, sensorielles
ou mentales réduites ou disposant de peu
d'expérience et/ou de connaissances. Toutes
ces personnes doivent cependant avoir été
rendues attentives à une utilisation sûre de
cet appareil et des dangers qu'implique son
utilisation. L'appareil lui-même n'est pas un
jouet. Les enfants ne doivent pas jouer avec
cet appareil.
Le nettoyage et l'entretien de l'appareil ne
doivent pas être exécutés par des enfants si
ceux-ci ne sont pas sous surveillance.
Toutefois, pour des raisons de sécurité, le
fabricant conseille instamment de ne pas lais-
ser les enfants, indépendamment de leur âge,
manipuler l'appareil. Les enfants, quelque soit
leur âge, ne peuvent pas percevoir ni com-
prendre les dangers qui résultent de l'emploi
de cet appareil. Rangez l'appareil hors de por-
tée des personnes répondant à ces critères.
Les enfants ne doivent pas se mettre de-
bout ni s'asseoir sur l'appareil.
Le matériel d'emballage ne doit pas être
employé comme jouet. Il existe un risque
d'asphyxie.
3.3Alimentation électrique
L'appareil est chargé avec du courant élec-
trique. Il y a donc toujours un risque d'électro-
cution. Respectez par conséquent les points
ci-dessous :
Ne touchez jamais le bloc d'alimentation
avec des mains mouillées. Ne plongez jamais
l'appareil ni le bloc d'alimentation dans de
l'eau ou tout autre liquide et conservez-les à
l'abri de la pluie et de l'humidité.
Pour débrancher le bloc d'alimentation, ti-
rez toujours sur la fiche. Ne tirez jamais sur le
cordon du bloc d'alimentation. Ne transportez
pas le bloc d'alimentation par son cordon d'ali-
mentation.
Assurez-vous que le cordon d'alimenta-
tion n'est pas plié, coincé, écrasé ni en
contact avec une source de chaleur.
Ne chargez l'appareil que si la tension du
bloc d'alimentation correspond bien à celle de
la prise murale.
Vérifiez si le cordon du bloc d'alimentation
est endommagé avant de vous servir du bloc
d'alimentation.
Vérifiez que le cordon est bien débranché
de la prise avant de nettoyer ou d'entretenir
l'appareil.
AVERTISSEMENT:
Nous attirons votre attention sur les dan-
gers pouvant mettre en péril votre santé et
vous informons sur les éventuels risques de
blessures.
ATTENTION:
Nous vous rendons attentifs aux risques
pour l'appareil ou pour tout autre objet.
REMARQUE:
Les astuces et les informations sont bien
mises en évidence.
Libero.book Seite 56 Montag, 12. März 2012 6:29 18
57
3Consignes de sécurité
FR
3.4Batterie fournie
En cas d'utilisation inappropriée des piles re-
chargeables, il existe un risque de blessures
et d'explosion.
S'il s'avère nécessaire de remplacer la
batterie de piles, contactez votre revendeur
agréé ou le service après-vente de Royal Ap-
pliance. Ne remplacez jamais la batterie de
piles vous-même. Ne remplacez pas la batte-
rie de piles par d'autres piles ou batteries.
Vérifiez que le cordon est bien débranché
de la prise murale avant de poser ou d'enlever
la batterie de piles.
Ne court-circuitez jamais la batterie en
touchant les deux pôles simultanément, et
surtout pas avec des objets conduisant le
courant électrique.
Ne démontez jamais la batterie de piles,
ne l'exposez jamais à des températures éle-
vées. Du liquide peut s'écouler de la batterie
en cas de manipulation incorrecte. Évitez tout
contact avec ce liquide.
Utilisez pour charger la batterie le bloc
d'alimentation fourni à la livraison, à l'exclu-
sion de tout autre. Ne rechargez en aucun cas
la batterie avec un autre bloc d'alimentation.
Utilisez le bloc d'alimentation fourni à la livrai-
son uniquement pour charger la batterie de
cet appareil.
Éliminez la batterie de piles en fin de pé-
riode d'utilisation en respectant l'environne-
ment et conformément aux instructions,
ZChapitre 9.4, "Dépose de la batterie".
3.5Utilisation conforme à la destination
Cet appareil est réservé strictement à un
usage domestique. Le nettoyage sera réalisé
au mieux dans de petites pièces ou dans des
locaux fermés. L'utilisation de l'appareil à titre
professionnel est interdite.
L'appareil est réservé au nettoyage de
sols durs plats et normalement sales. Il peut
aussi être utilisé sur une moquette à poils
courts si les brosses latérales ne sont pas
montées.
Toute autre utilisation est considérée
comme non conforme et est interdite.
Cette interdiction concerne en particu-
lier :
-L'emploi, l'entreposage ou le recharge-
ment de l'appareil à l'extérieur.
-Le placement d'objets sur l'appareil.
-La modification ou la réparation de l'ap-
pareil ou de son dispositif de recharge-
ment, dans la mesure où elles seraient
effectuées par vous-même.
-L'insertion d'objets dans les ouvertures
de l'appareil autres que ceux décrits
dans ce mode d'emploi.
-L'utilisation à proximité de matières ex-
plosives ou facilement inflammables.
Il est interdit de se servir de cet appareil:
-pour aspirer directement sur des être
humains, des animaux, des plantes, des
cheveux, des doigts, d'autres parties du
corps ou des habits portés par des per-
sonnes. Ils risquent d'être aspirés et de
causer des blessures.
- pour aspirer de l'eau ou tout autre li-
quide. Toute humidité à l'intérieur de l'ap-
pareil peut provoquer un court-circuit.
-pour aspirer du toner (imprimante laser,
photocopieur, etc.). Risque d'explosion.
-pour aspirer des cendres incandes-
centes, des cigarettes ou allumettes
non éteintes. Risque d'incendie.
-pour aspirer des objets pointus tels que
des éclats de verre, des clous, etc. L'ap-
pareil pourrait être endommagé.
-pour aspirer des gravats de chantier, de
plâtre, de ciment, de fines poussières de
perçage, de produits de maquillage, etc.
Cela peut endommager l'appareil.
Emploi également interdit ...
-... sur des tapis à poils longs.
-... sur sols humides.
-... sans avoir mis en place correctement
le filtre, le bac à poussières et le cou-
vercle.
Libero.book Seite 57 Montag, 12. März 2012 6:29 18
58
4Déballage et montage
4Déballage et montage
4.1Déballage
1.Déballez l'appareil ainsi que les acces-
soires.
2.Vérifiez si le contenu est bien complet et
ne présente aucun dommage (Fig. 1).
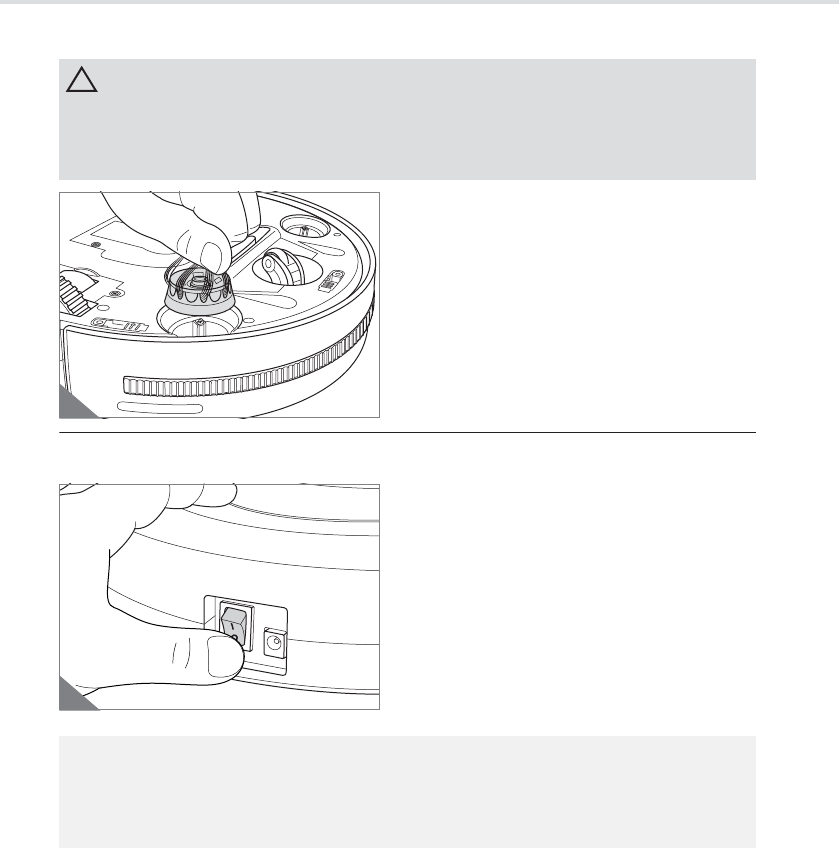
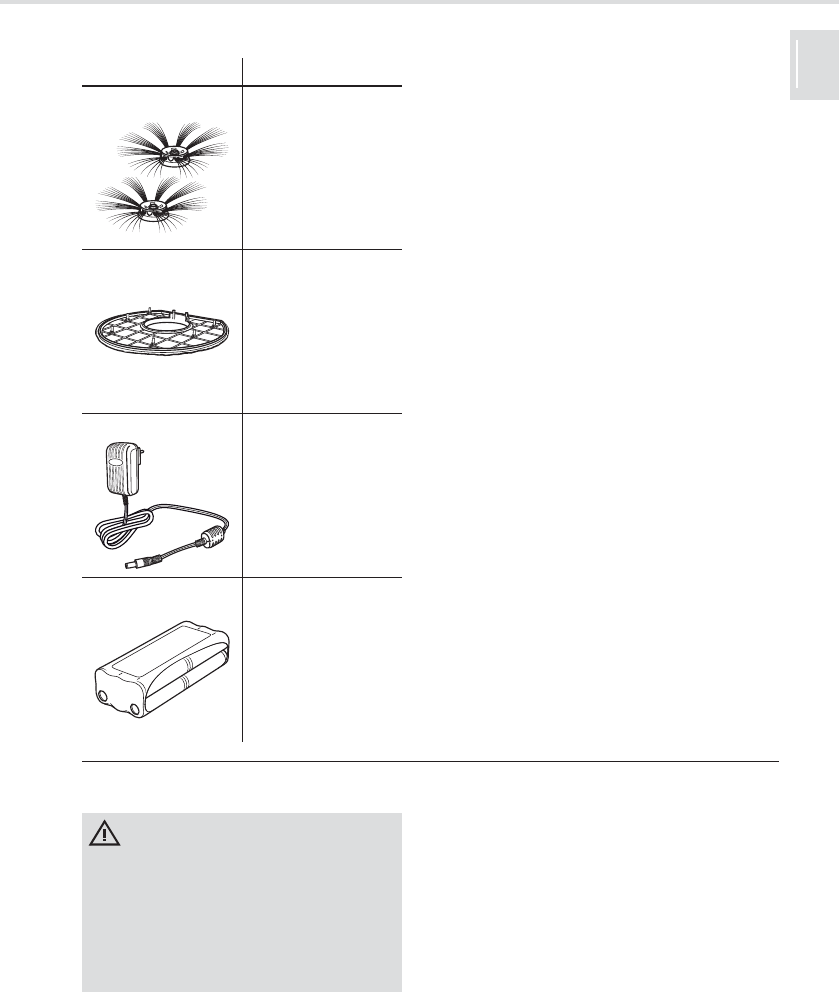
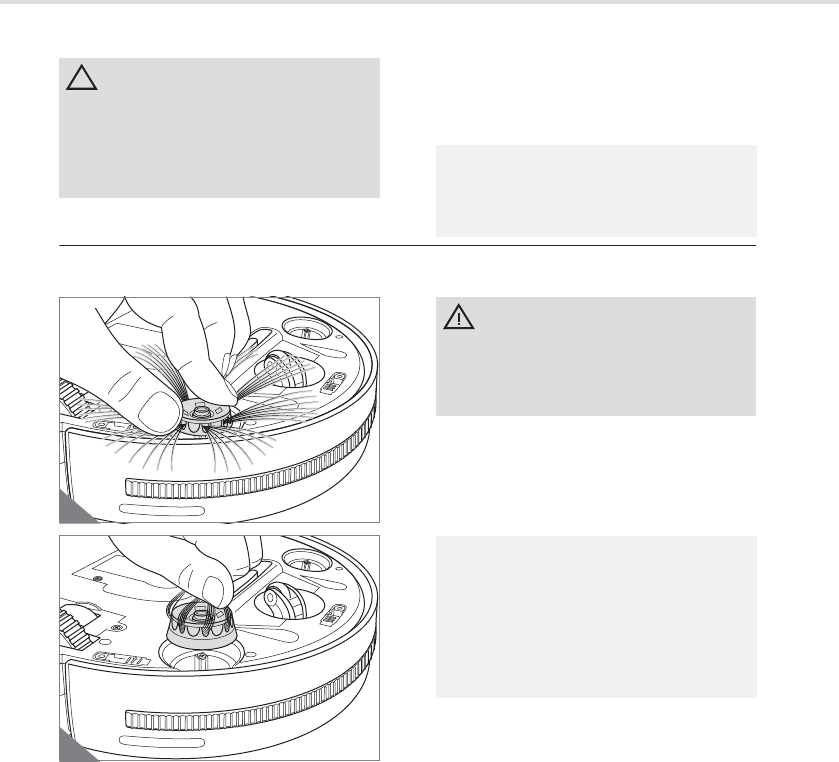
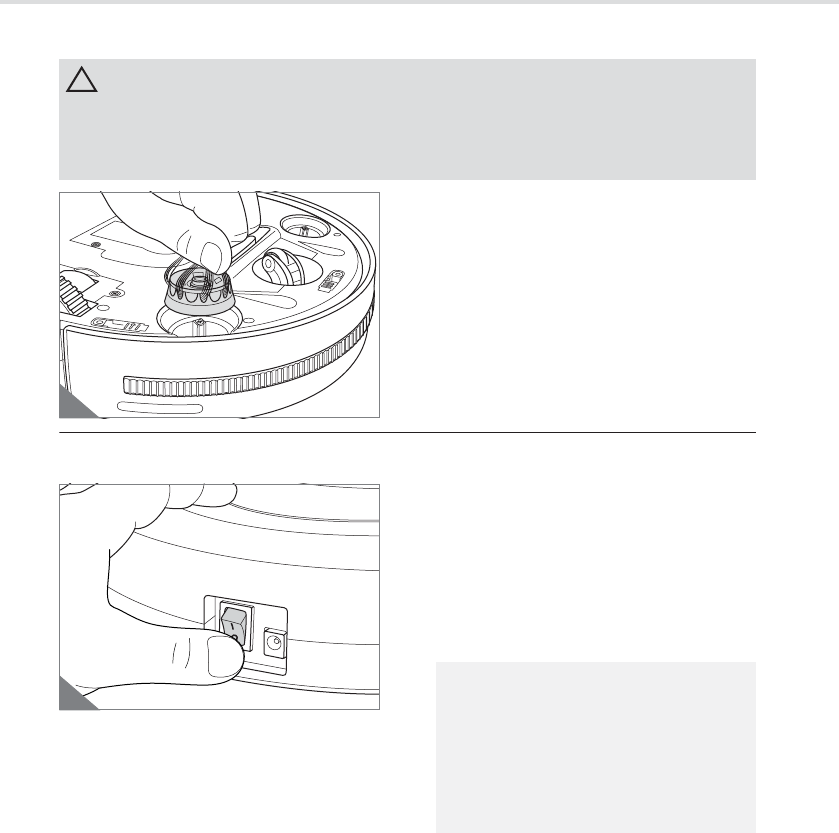
4.2Montage des brosses latérales circulaires
1.Vérifiez que l'appareil est bien arrêté (in-
terrupteur marche-arrêt en position «0 »).
2.Montez les brosses latérales circulaires
l'une après l'autre en procédant comme le
montre l'illustration (Fig. 7).
ATTENTION:
Conservez l'emballage pour l'entreposage
de l'appareil ou pour expédier celui-ci de
manière sûre. Expédiez l'appareil unique-
ment dans son emballage d'origine afin
d'éviter tout dommage.
REMARQUE:
Si vous constatez des défauts ou des dom-
mages dus au transport, contactez immé-
diatement votre revendeur.
7
8
AVERTISSEMENT:
Risque de blessures ! Vérifiez que l'appareil
est bien arrêté (interrupteur marche-arrêt
en position «0») avant de monter les
brosses latérales circulaires.
REMARQUE:
Si vous souhaitez enlevez les brosses laté-
rales, par exemple pour nettoyer des tapis
à poils courts, procédez comme suit :
1.Prenez la brosse latérale circulaire
comme le montre l'illustration (Fig. 8).
2.Tirez la brosse vers le haut (Fig. 8).
Libero.book Seite 58 Montag, 12. März 2012 6:29 18
59
4Déballage et montage
FR
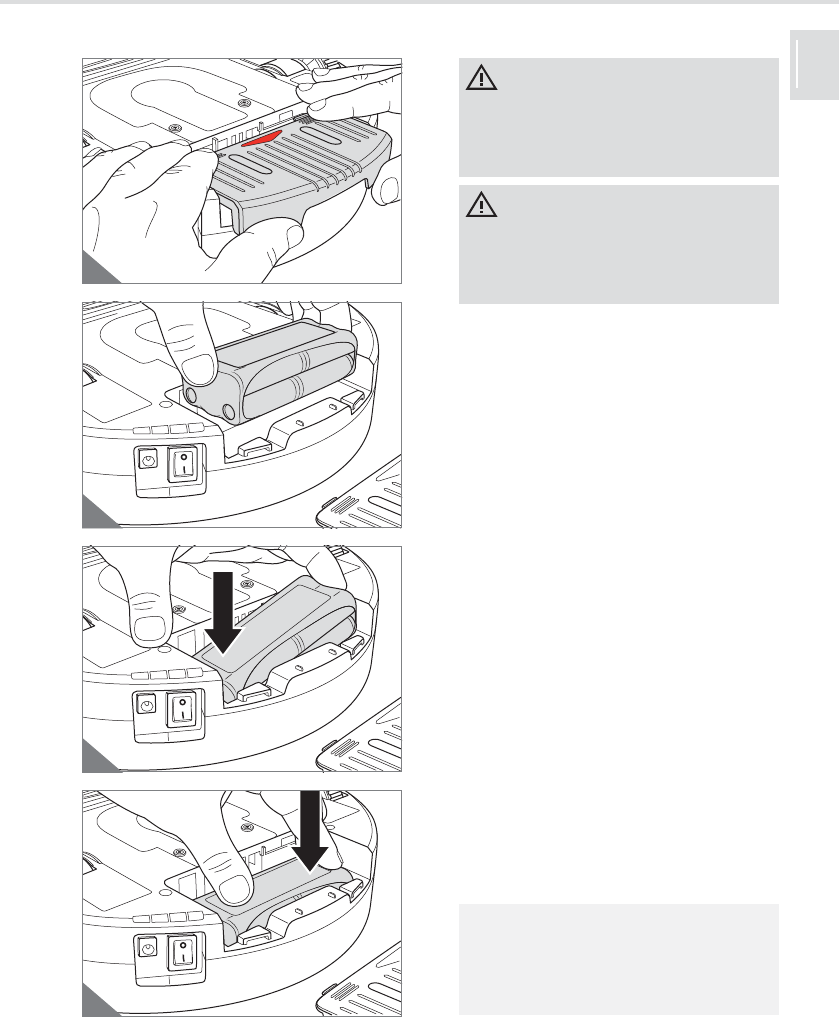
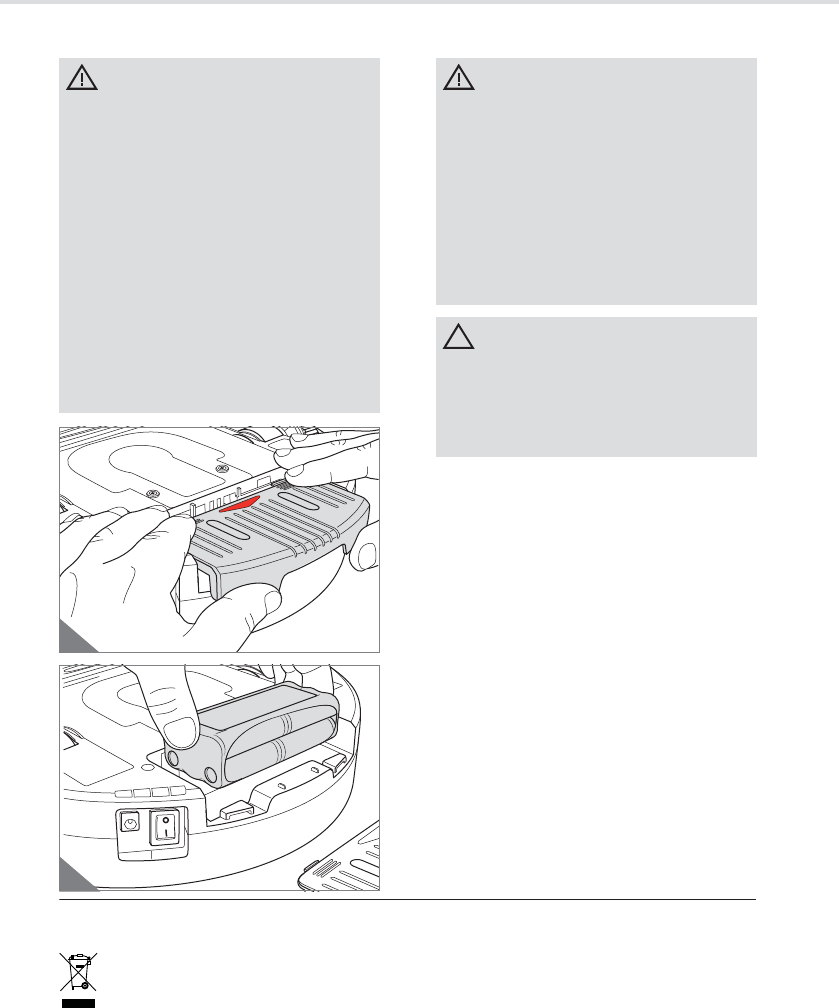
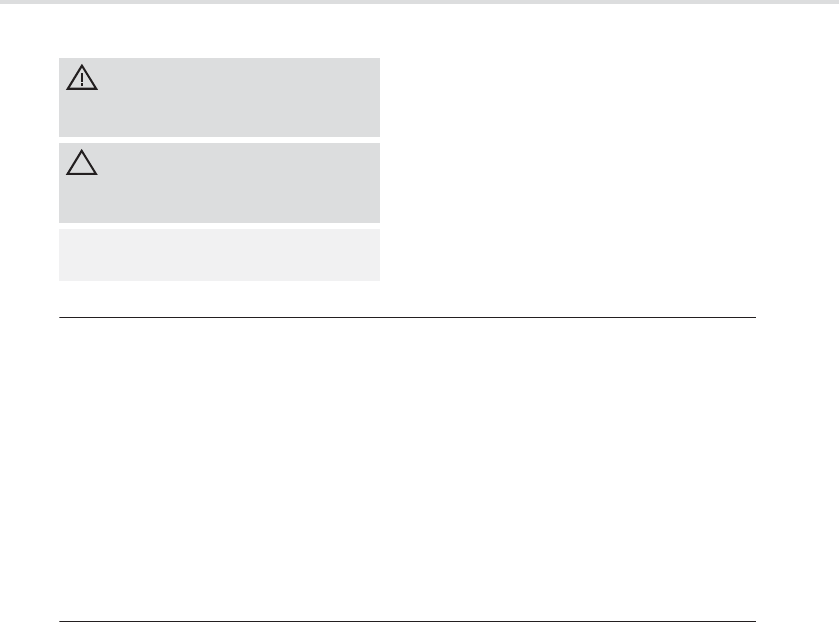
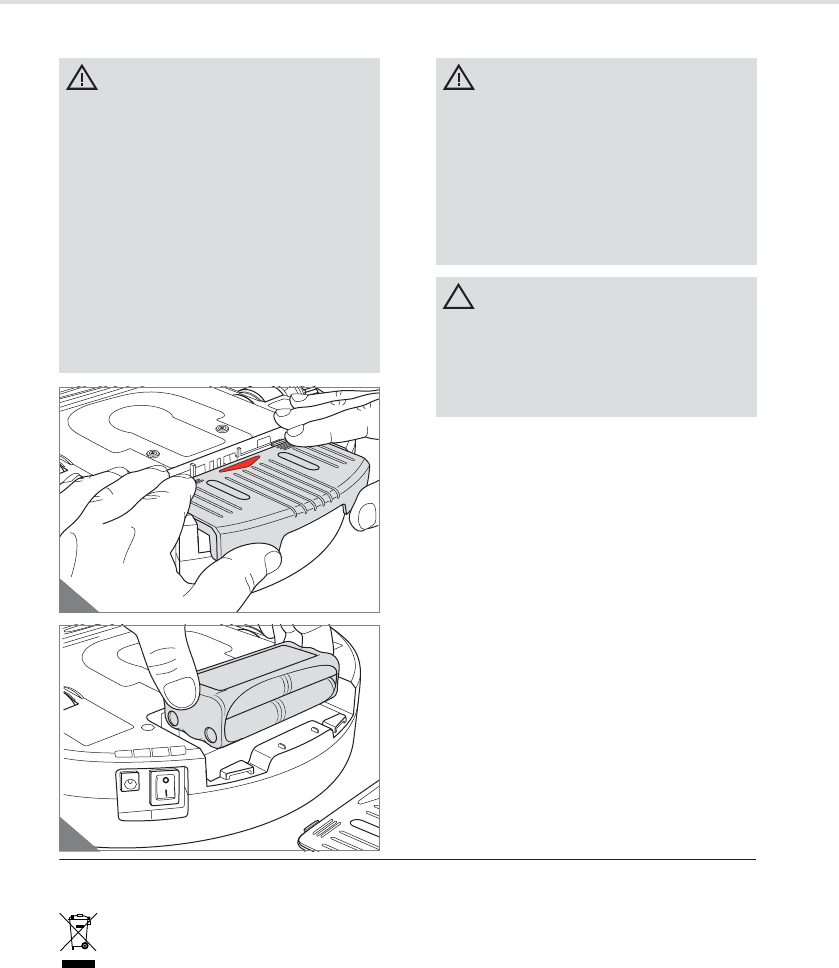
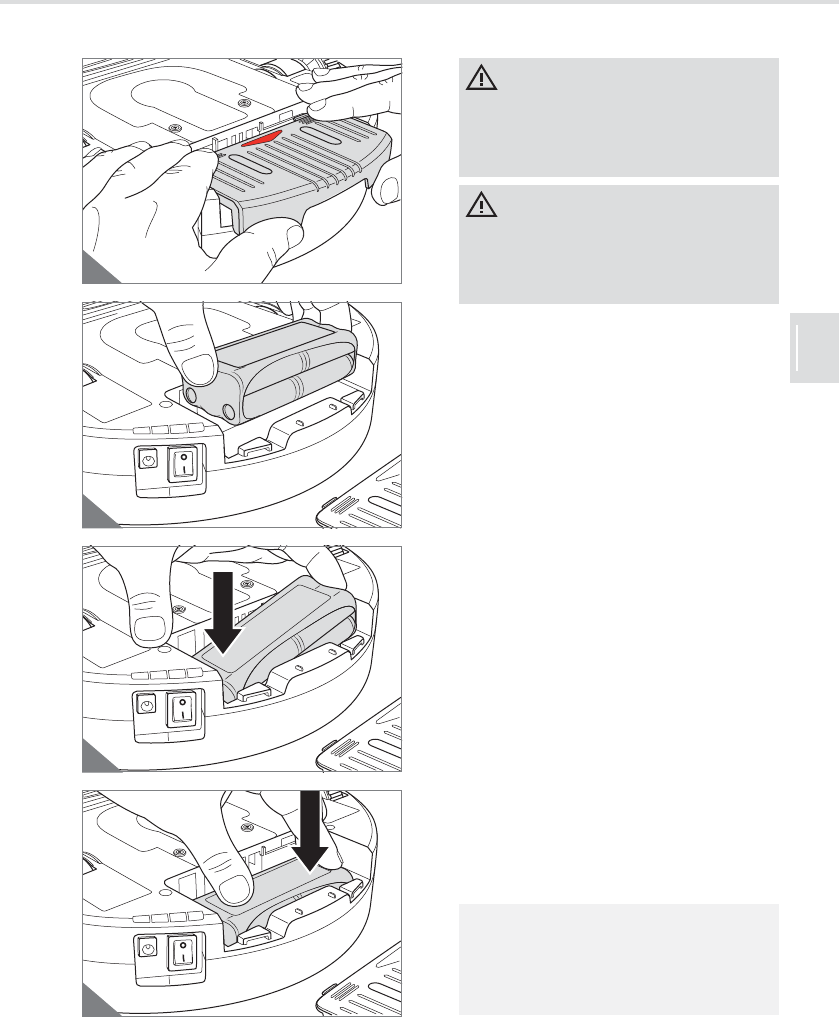
4.3Mettre en place la batterie
1.Vérifiez que l'appareil est bien arrêté (in-
terrupteur marche-arrêt en position «0 »).
2.Ouvrez le couvercle du compartiment de
la batterie (Fig. 9, « OPEN »).
3.Posez dans le compartiment la batterie de
piles fournie. Respectez ce faisant ce qui
suit :
-L'autocollant portant l'inscription
« This sideup » doit être tourné vers le
haut (Fig. 10).
-Les contacts dans le compartiment de la
batterie doivent s'engager dans les évi-
dements de l'isolation de la batterie de
piles (Fig. 10).
-Pour ce faire, introduisez la batterie
dans le compartiment d'abord du côté
des contacts (Fig. 11).
-Laissez suffisamment de place du côté
des contacts pour ne pas les écraser
(Fig. 11).
-Poussez ensuite le côté opposé de la
batterie dans le compartiment (Fig. 12).
-La batterie doit être posée bien à plat au
fond du compartiment (Fig. 12).
4.Reposez le couvercle sur le compartiment
de la batterie (Fig. 9) avant de le pousser
dans sa console. Le couvercle se met en
place en faisant un déclic audible.
OPEN
9
This side up
10
11
12
AVERTISSEMENT:
Risque de blessures si la batterie n'est pas
d'origine ! Utilisez uniquement la batterie de
piles fournie ou une batterie d'origine ache-
tée chez nous, à l'exclusion de toute autre.
AVERTISSEMENT:
Risque de blessures ! Vérifiez que l'appareil
est bien arrêté (interrupteur marche-arrêt
en position «0 ») avant de mettre en place
la batterie de piles.
REMARQUE:
La batterie de piles est déchargée à sa livrai-
son. Par conséquent, procédez comme il est
décrit sous ZChapitre 5, "Charger la batte-
rie de piles dans l'appareil".
Libero.book Seite 59 Montag, 12. März 2012 6:29 18
60
5Charger la batterie de piles dans l'appareil
5Charger la batterie de piles dans l'appareil
Avant de pouvoir utiliser l'appareil, vous de-
vez charger sa batterie de piles. Pour ce
faire :
1.Vérifiez que l'appareil est bien arrêté (in-
terrupteur marche-arrêt en position «0»).
2.Vérifiez que la batterie de piles a été cor-
rectement mise en place, ZChapitre 4.3,
"Mettre en place la batterie".
3.Branchez l'adaptateur du bloc d'alimenta-
tion dans la douille sur le côté (Fig. 13).
4.Branchez le bloc d'alimentation dans une
prise murale dont la tension électrique
correspond à celle indiquée sur la plaque
signalétique du bloc d'alimentation
(Fig. 14).
-Le voyant témoin de rechargement
«» bleu clignote.
5.Chargez la batterie durant environ 4
heures jusqu'à ce que le voyant «»
bleu s'allume et reste allumé (Fig. 14).
6.Lorsque le voyant bleu «» s'allume et
reste allumé, débranchez le cordon du
bloc d'alimentation d'abord de la prise puis
ensuite de l'appareil.
AVERTISSEMENT:
Un rechargement non conforme peut cau-
ser des blessures ! Utilisez pour charger la
batterie le bloc d'alimentation fourni à la
livraison, à l'exclusion de tout autre.
REMARQUE:
Vérifiez que l'appareil est bien arrêté (inter-
rupteur marche-arrêt en position «0»)
avant de brancher le bloc d'alimentation
pour charger. L'appareil peut aussi être
rechargé s'il est allumé, mais il devra être
éteint puis rallumé avant utilisation. Sinon,
l'appareil ne se mettra pas en marche.
13
14
4 h
15
REMARQUE:
Votre appareil est équipé d'une minuterie
de charge. Un cycle de charge dure environ
4 heures. Le cycle de charge s'arrête auto-
matiquement au bout de 4 heures. Si vous
débranchez l'appareil du secteur, puis le
rebranchez au secteur, le cycle de charge
recommence à zéro. Il faut donc attendre
que le voyant de charge («») bleu soit
allumé avant de débrancher l'appareil du
secteur. Des cycles de charge et décharge
complets sont un gage d'une plus grande
longévité de la batterie de piles.
REMARQUE:
Rechargez l'appareil à nouveau dès que le
témoin rouge de la batterie «» sur
l'appareil s'allume ou si vous n'avez pas uti-
lisé l'appareil durant une période prolongée.
Chaque cycle de rechargement dure égale-
ment 4 heures.
Libero.book Seite 60 Montag, 12. März 2012 6:29 18
61
6Avant chaque utilisation
FR
6Avant chaque utilisation
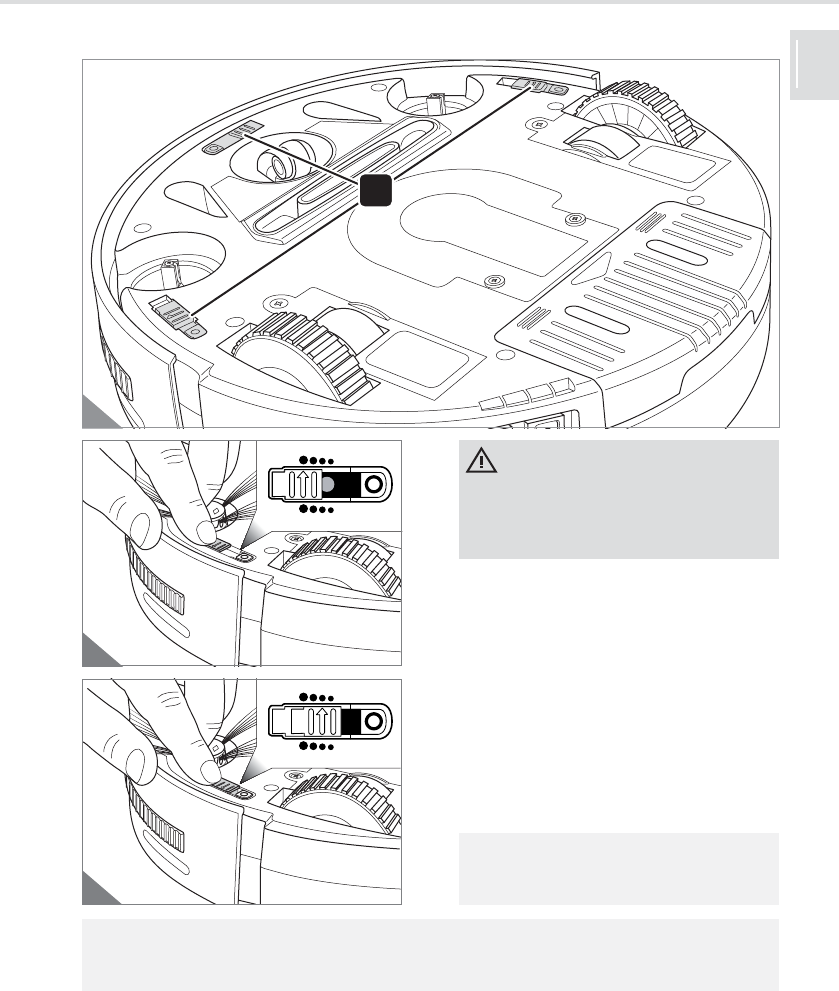
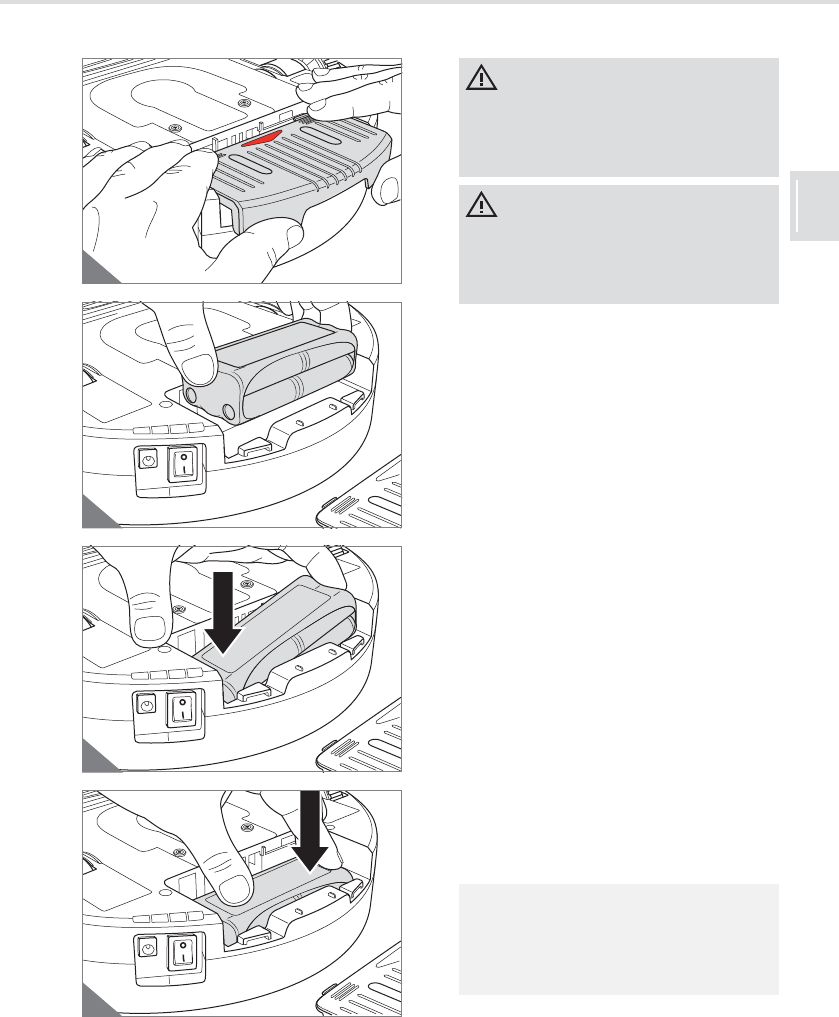
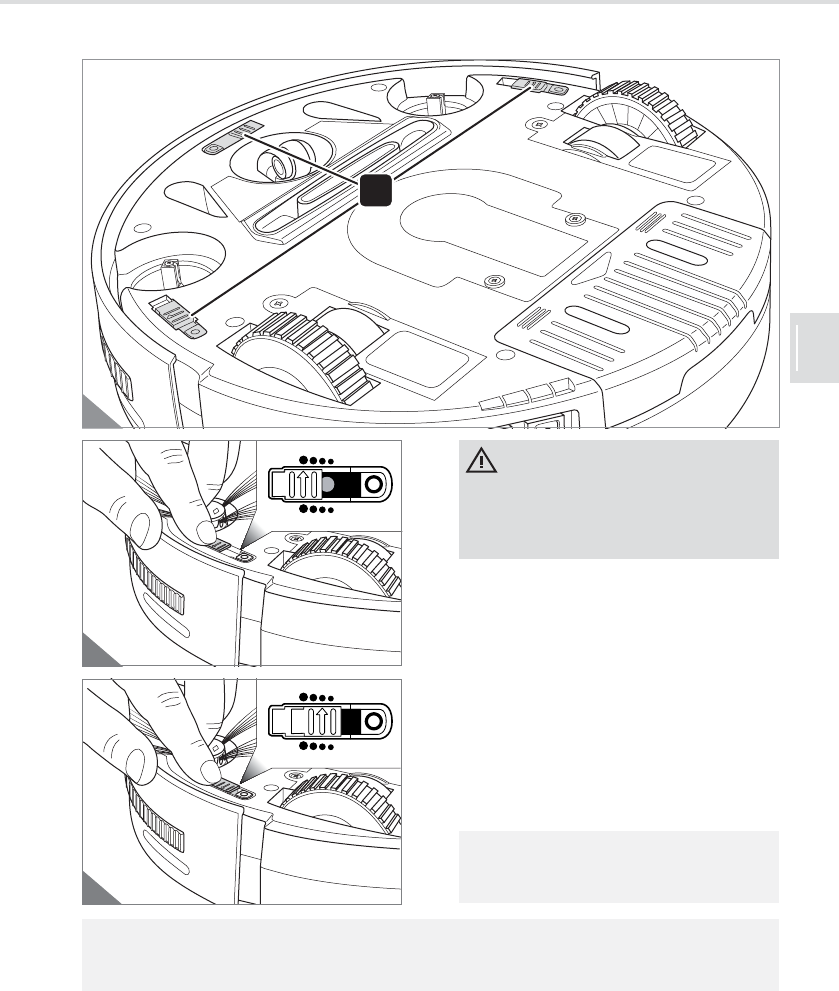
6.1Réglage de la sensibilité des capteurs
1.Vérifiez que l'appareil est bien arrêté (in-
terrupteur marche-arrêt en position «0 »).
2.Poussez la coulisse pour régler la sensibi-
lité des trois capteurs antichute (Fig. 18) :
-Position 0 sur sol clair avec marche de
faible hauteur
-Position 1 sur sol clair avec hauteur de
marche un peu plus grande
-Position 2 sur sol foncé avec hauteur de
marche encore plus grande
-Position 3 sur sol foncé avec grande
hauteur de marche
1
16
3 2 1 0
3 2 1 0
17
3 2 1 0
3 2 1 0
18
AVERTISSEMENT:
Risque de blessures ! Vérifiez que l'appareil
est bien arrêté (interrupteur marche-arrêt
en position «0») avant de monter les
brosses latérales circulaires.
REMARQUE:
Les coulisses des trois capteurs doivent
être réglées de manière identique.
REMARQUE:
Si votre aspirateur robot ne cesse de reculer sur un sol foncé, choisissez le réglage «1»
(Fig. 18).
Libero.book Seite 61 Montag, 12. März 2012 6:29 18
62
6Avant chaque utilisation
6.2Préparez la pièce
AVERTISSEMENT:
Veillez à ce qu'il n'y ait pas d'enfants ni
d'animaux domestiques dans la pièce qui
doit être nettoyée et qu'ils n'y aient pas
accès.
ATTENTION:
Votre aspirateur est équipé d'un puissant
moteur. Ne sous-estimez pas la force dont
il est doté. Mettez en lieu sûr les objets fra-
giles et ceux qui pourraient tomber ou se
renverser si l'appareil les touche.
ATTENTION:
Retirez du revêtement de sol les objets à
arêtes tranchantes ou pointus qui pour-
raient rayer les surfaces s'ils se retrouvent
sous les brosses de l'appareil.
REMARQUE:
Cet aspirateur robot ne peut aspirer qu'une
quantité limitée de poussières. Il ne rem-
place pas un aspirateur classique. Nettoyez
les zones particulièrement sales avec un
aspirateur classique. Utilisez votre aspira-
teur robot régulièrement pour qu'il n'y ait
pas une trop grande accumulation de pous-
sières.
REMARQUE:
Cet aspirateur robot aspire d'autant plus
efficacement qu'il rencontre peu d'obstacles
et que le revêtement de sol ne change
guère. Il peut donc s'avérer avantageux de
libérer la pièce des obstacles éventuels,
tels des câbles, tapis ou autres, avant de
l'utiliser. Prenez des mesures adéquates
pour empêcher l'aspirateur robot de quitter
la pièce prématurément.
Libero.book Seite 62 Montag, 12. März 2012 6:29 18
63
7Utilisation de l'appareil
FR
7Utilisation de l'appareil
7.1Nettoyage des sols durs
1.Posez l'appareil au milieu de la pièce qui
doit être nettoyée.
2.Allumez l'aspirateur robot par l'intermé-
diaire de son interrupteur marche-arrêt
(Fig. 19).
Les deux LED extérieures se mettent à cli-
gnoter en alternance.
Au bout d'environ 8 secondes, l'appareil
commence à se déplacer en mode
« Aléatoire » (Fig. 20/A).
Au bout d'environ 3 minutes, l'appareil se
met en mode « Spirale» en décrivant des
cercles de plus en plus larges (Fig.20/B).
Si l'appareil rencontre un obstacle quand
il est dans ce mode, il se met instantané-
ment en mode «Long des murs»
(Fig.21/A). Dans ce mode, l'appareil
longe le bord des murs de la pièce qu'il
nettoie pendant environ 3 minutes.
Ensuite, il recommence un nouveau cycle
de nettoyage (Fig. 21/B).
Si l'appareil se bloque contre un obstacle,
poussez-le légèrement de la main.
Vous pouvez éteindre l'appareil à tout mo-
ment.
Quand la puissance de la batterie dimi-
nue, le témoin rouge «» s'allume et
l'appareil s'arrête peu après.
-Dans ce cas, l'aspirateur robot émet un
bip sonore toutes les 60 secondes pour
vous permettre de le retrouver. Si la bat-
terie est complètement vide, il n'y a pas
de bip sonore.
-Dans ce cas, éteignez l'appareil pour re-
charger la batterie comme décrit,
ZChapitre 5, "Charger la batterie de
piles dans l'appareil".
AVERTISSEMENT:
Risque de blessures! Vous pouvez évi-
demment laisser l'appareil fonctionner sans
surveillance, mais soyez en tout temps vigi-
lant pour ne pas marcher sur l'appareil, ce
qui entraînerait un risque de chute.
19
A
B
20
A
B
21
ATTENTION:
Même si votre aspirateur robot sait détecter
les vides, il est fortement déconseillé de
l'utiliser sur des meubles ou des objets
semblables. Il n'est pas conçu pour ce type
d'utilisation.
Libero.book Seite 63 Montag, 12. März 2012 6:29 18
64
7Utilisation de l'appareil
7.2Nettoyage des moquettes à poils courts
1.Vérifiez que l'appareil est bien arrêté (in-
terrupteur marche-arrêt en position «0 »).
2.Retirez les deux brosses latérales circu-
laires (Fig. 22).
3.L'appareil est maintenant prêt pour aspirer
une moquette à poils courts. Procédez en-
suite comme il est décrit sous ZChapitre
7.1, "Nettoyage des sols durs".
7.3Arrêt de l'appareil
Procédez comme suit pour éteindre l'appareil:
1.Pour éteindre l'appareil, appuyez sur le
bouton marche-arrêt (Fig.23)(position
«0»).
-Les LED s'éteignent.
2.Si vous ne voulez plus utiliser l'appareil,
videz le bac à poussières, ZChapitre 8.2,
"Vidage du bac à poussières".
ATTENTION:
Avant de pouvoir utiliser l'appareil pour aspirer des moquettes à poils courts, il faut le préparer
comme il est décrit ci-après. Sinon, l'appareil ne pourra pas avancer sur la moquette. Évitez d'uti-
liser l'appareil sur des moquettes à poils longs, sous peine d'endommager les moteurs pour
cause de surcharge.
22
23
REMARQUE:
Si vous soulevez l'appareil alors qu'il est en
marche, les moteurs s'arrêtent automati-
quement au bout de 8secondes sans
contact avec le sol. Cependant, l'appareil
n'est pas éteint (la LED bleue reste allu-
mée), il reprend son cycle de fonctionne-
ment dès qu'il est reposé sur le sol.
Libero.book Seite 64 Montag, 12. März 2012 6:29 18
65
8Après utilisation
FR
8Après utilisation
8.1Transport et rangement
Portez toujours l'appareil avec précaution,
de préférence à deux mains.
Rangez l'appareil dans son emballage
d'origine, dans un endroit toujours frais et sec,
hors de portée des enfants.
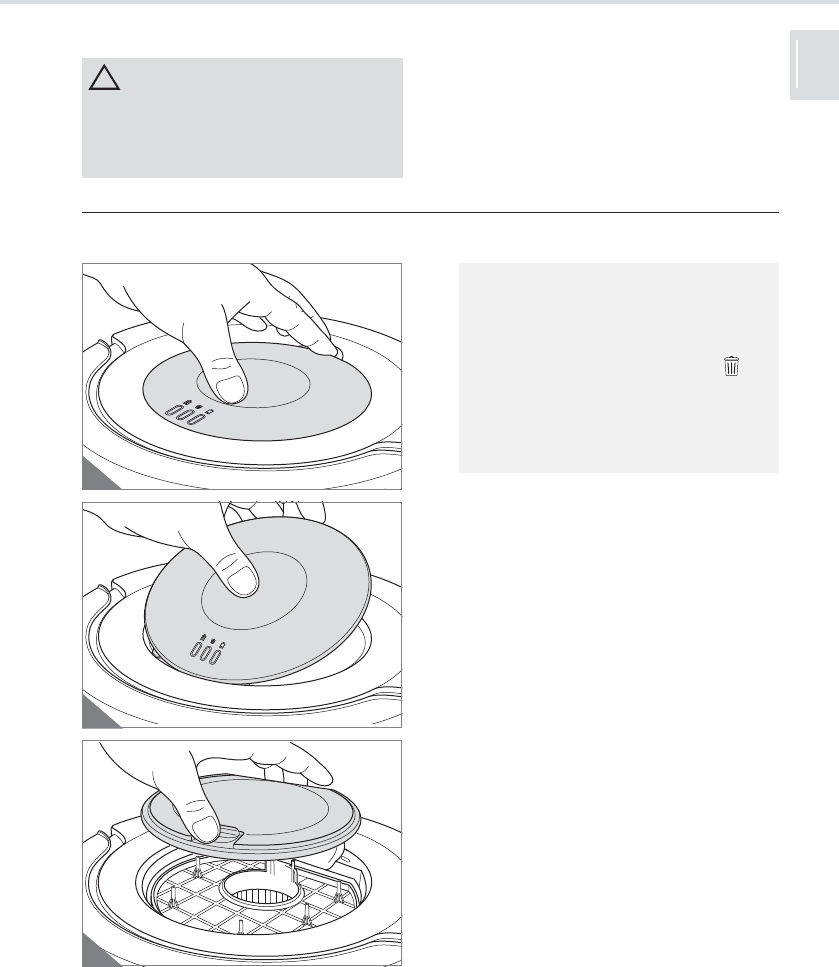
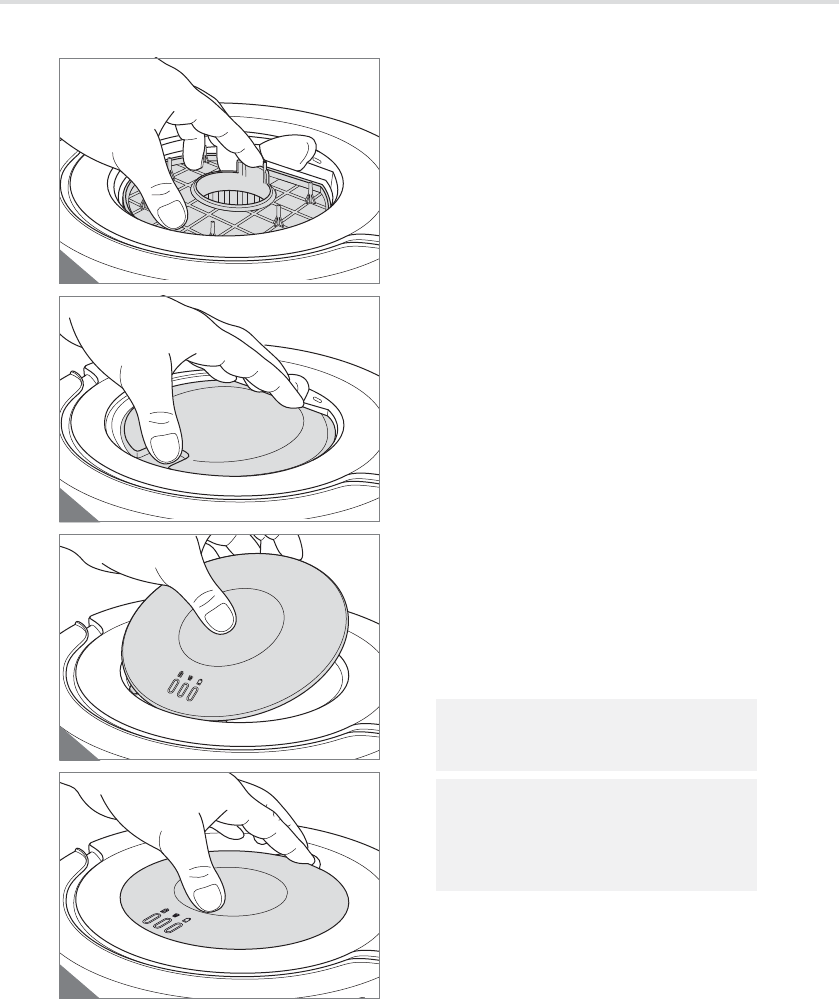
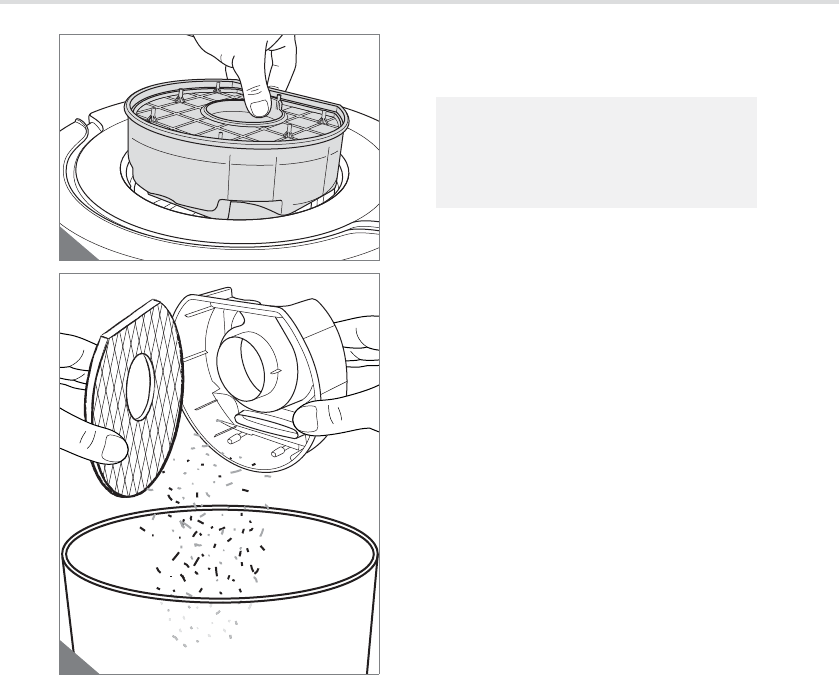
8.2Vidage du bac à poussières
Procédez comme suit pour vider le bac à
poussières :
1.Vérifiez que l'appareil est bien arrêté (in-
terrupteur marche-arrêt en position «0 »).
2.Mettez la main dans la poignée comme le
montre l'illustration pour déverrouiller le
couvercle du compartiment du bac à
poussières (Fig. 24).
3.Enlevez le couvercle du compartiment du
bac à poussières (Fig. 25).
4.Enlevez le couvercle du bac à poussières
(Fig. 26).
ATTENTION:
Ne posez jamais l'appareil à proximité
immédiate d'une source de chaleur (par
exemple un chauffage ou un four). Évitez
de l'exposer directement aux rayons du
soleil. La chaleur peut endommager l'appa-
reil.
24
25
26
REMARQUE:
Videz le bac à poussières si possible après
chaque utilisation. Videz le bac à pous-
sières au plus tard
quand le témoin de nettoyage rouge
«» s'allume,
une fois par mois,
avant une longue période d'inutilisation,
avant son expédition.
Libero.book Seite 65 Montag, 12. März 2012 6:29 18
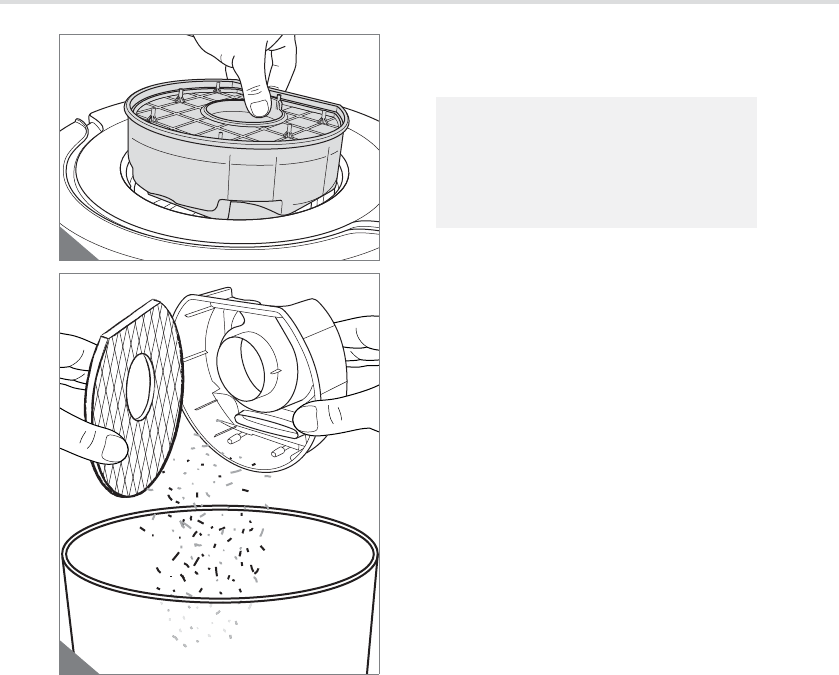
66
8Après utilisation
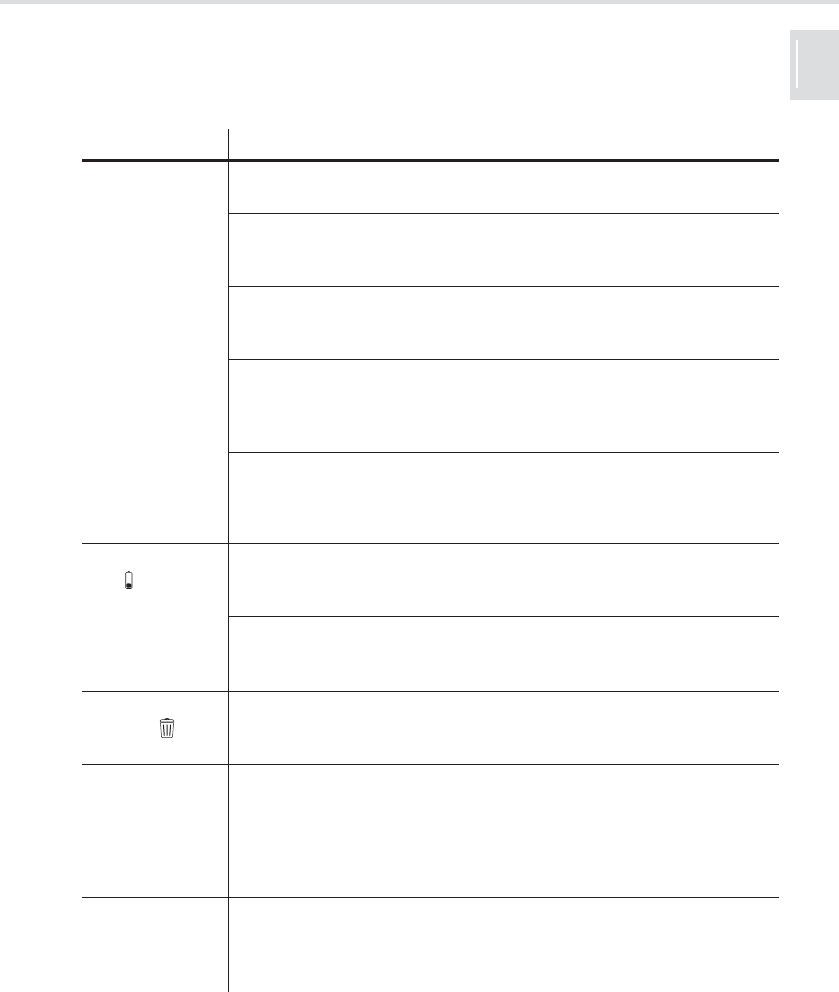
5.Sortez doucement de l'appareil le bac à
poussières sur lequel repose le filtre
(Fig. 27).
6.Tenez au dessus d'une poubelle le bac à
poussières avec le filtre posé dessus.
7.Maintenant seulement, séparez le bac à
poussières du filtre (Fig. 28).
8.Tapotez légèrement les deux parties
(Fig.28) et enlevez les dépôts plus impor-
tants à la main.
9.S'il n'est pas possible de vider complète-
ment le bac à poussières et de nettoyer le
filtre, procédez comme il est décrit sous
ZChapitre 8.3, "Nettoyage du bac à pous-
sières et du filtre".
27
28
REMARQUE:
Veillez à bien tenir le bac à poussières et le
filtre (Fig.27). Si vous tenez seulement le
filtre, vous risquez de faire tomber le bac à
poussières et de renverser toute la saleté.
Libero.book Seite 66 Montag, 12. März 2012 6:29 18
67
8Après utilisation
FR
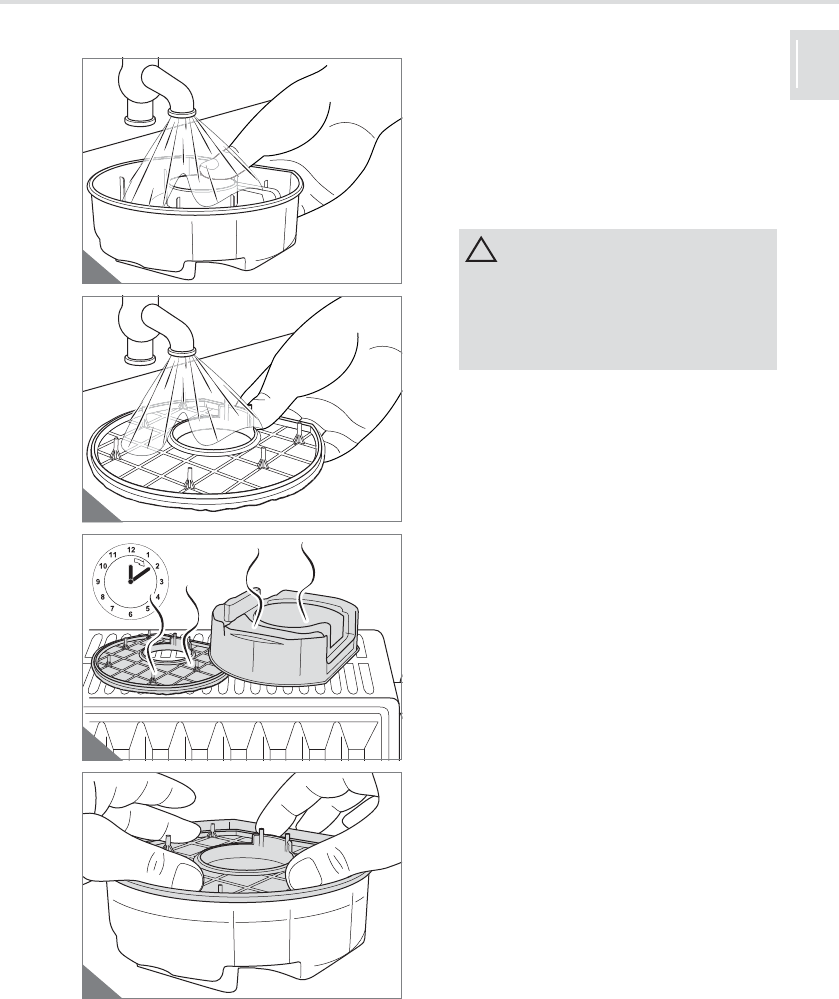
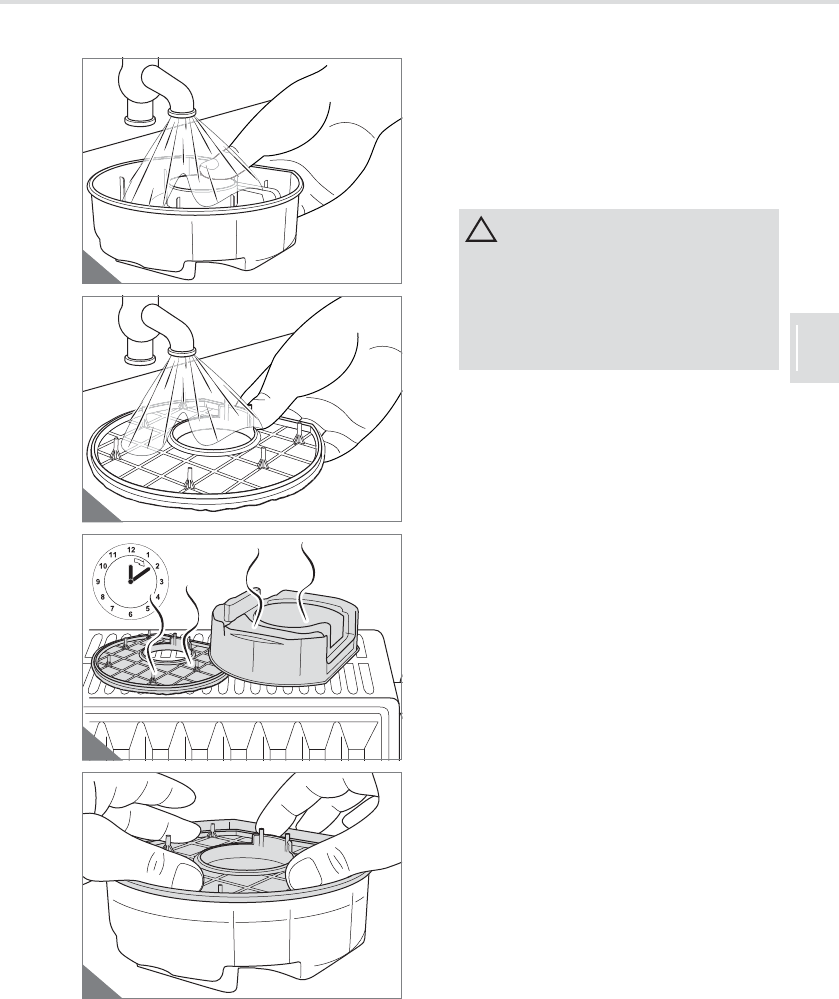
8.3Nettoyage du bac à poussières et du filtre
S'il n'est pas possible de vider complètement
le bac à poussières (ZChapitre 8.2, "Vidage
du bac à poussières") ou si les dépôts sur le
filtre ne s'enlèvent pas à la main :
1.Enlevez et videz le bac à poussières
comme il est décrit sous ZChapitre 8.2,
"Vidage du bac à poussières".
2.Rincez soigneusement le bac à pous-
sières sous l'eau courante froide ou tiède
(Fig.29) jusqu'à ce qu'il soit débarrassé
de toute saleté.
3.Rincez soigneusement le filtre sous l'eau
courante froide ou tiède (Fig.30) jusqu'à
ce qu'il soit débarrassé de toute saleté.
4.Laissez sécher ces deux éléments à tem-
pérature ambiante durant au moins 24
heures (Fig.31) jusqu'à ce qu'ils soient
complètement secs.
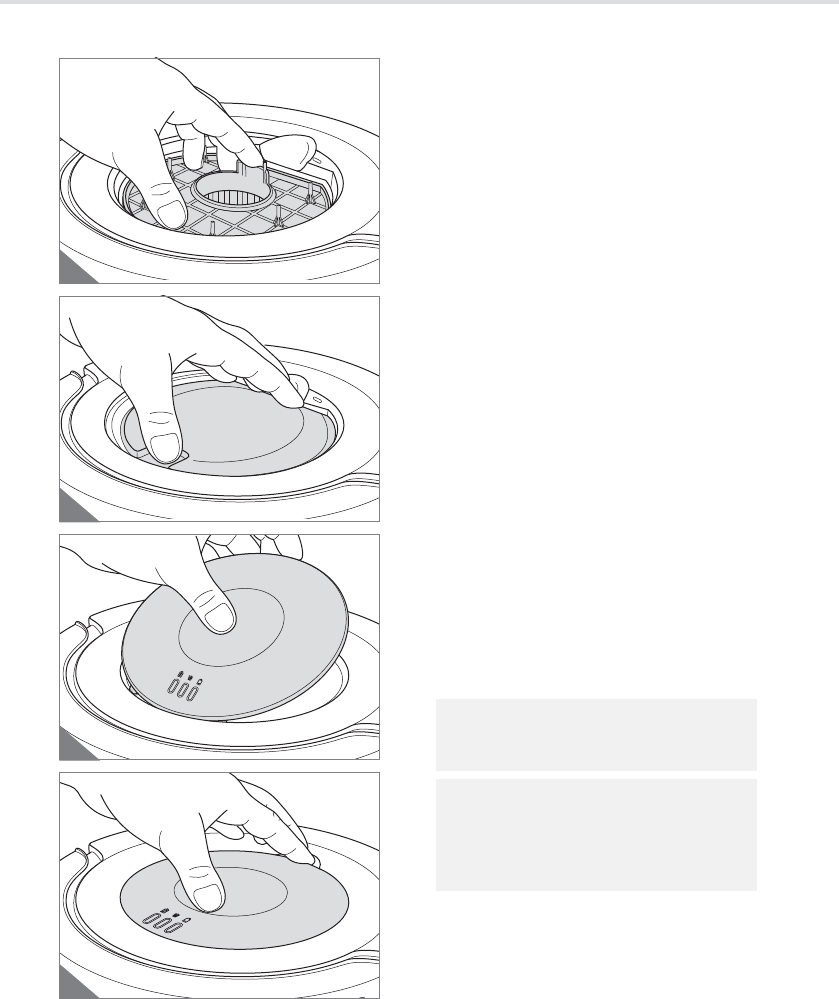
5.Reposez le filtre dans le bac à poussières
en veillant à ce que la grille en plastique
du filtre soit visible (Fig. 32). Appuyez fer-
mement sur le filtre.
6.Procédez ensuite comme il est décrit sous
ZChapitre 8.4, "Mise en place du bac à
poussières et du filtre".
29
30
24 h
31
32
ATTENTION:
Le bac à poussières et le filtre sont
lavables, mais ne peuvent cependant pas
être lavés dans un lave-vaisselle ni une
machine à laver. Par ailleurs, n'utilisez
aucun produit de nettoyage ni de brosse à
poils durs.
Libero.book Seite 67 Montag, 12. März 2012 6:29 18
68
8Après utilisation
8.4Mise en place du bac à poussières et du filtre
Pour ré-utiliser le bac à poussières avec le
filtre, procédez de la manière suivante :
1.Vérifiez que l'appareil est bien arrêté (in-
terrupteur marche-arrêt en position «0 »).
2.Remettez en place dans le compartiment
le bac à poussières avec le filtre posé des-
sus (Fig. 33).
3.Reposez le couvercle du bac à poussières
(Fig.34) qui s'engage en faisant un déclic.
4.Posez le couvercle du compartiment du
bac à poussières en insérant d'abord les
trois taquets du couvercle dans les trois
fentes du compartiment (Fig. 35).
5.Appuyez ensuite sur l'arrière du couvercle
du compartiment (Fig.36). Vous entendez
le couvercle se mettre en place avec un
déclic.
33
34
35
36
REMARQUE:
L'appareil ne peut être mis en marche que
si le couvercle est correctement posé.
REMARQUE:
Si vous avez enlevé le couvercle alors que
l'appareil était encore allumé, vous devez
éteindre puis rallumer l'appareil. L'appareil
peut maintenant fonctionner.
Libero.book Seite 68 Montag, 12. März 2012 6:29 18
69
9Dépannage
FR
9Dépannage
9.1Si l'appareil ne fonctionne pas comme il devrait
Vérifiez, en vous aidant du tableau ci-dessous, si vous pouvez remédier vous-même à l'anomalie.
Si vous ne pouvez pas remédier vous-même à l'anomalie au moyen de ce tableau, adressez-vous
à notre assistance technique (ZPage 70) pour nous exposer le problème.
ProblèmeCause possible / solutions
Impossible de
mettre en marche
l'appareil.
La batterie a été mal posée.
Posez la batterie correctement, ZChapitre 4.3, "Mettre en place la batterie".
La batterie est complètement vide.
Dans ce cas, éteignez l'appareil en mettant l'interrupteur marche-arrêt sur
«0», puis rechargez la batterie comme décrit, ZChapitre 5, "Charger la bat-
terie de piles dans l'appareil".
L'appareil est resté allumé durant le cycle de rechargement (position « I »).
Mettez l'interrupteur marche-arrêt sur « 0» pour éteindre l'appareil, puis sur
« I » pour le rallumer. L'appareil peut maintenant fonctionner.
Le couvercle du compartiment du bac à poussières a été enlevé alors que
l'appareil était encore allumé.
Mettez l'interrupteur marche-arrêt sur « 0» pour éteindre l'appareil, puis sur
« I » pour le rallumer. L'appareil peut maintenant fonctionner.
Le couvercle du compartiment du bac à poussières est mal posé. Dans ce
cas, éteignez l'appareil en mettant l'interrupteur marche-arrêt sur «0 », puis
reposez correctement le couvercle du compartiment comme décrit,
ZChapitre 8.4, "Mise en place du bac à poussières et du filtre".
Le témoin rouge
de la batterie
«» s'allume.
La puissance de la batterie est trop faible.
Dans ce cas, éteignez l'appareil en mettant l'interrupteur marche-arrêt sur
«0», puis rechargez la batterie comme décrit, ZChapitre 5, "Charger la bat-
terie de piles dans l'appareil".
L'appareil a perdu le contact avec le sol.
Posez l'appareil sur le sol. Il recommence de nettoyer.
Le témoin de net-
toyage rouge
«» s'allume.
Le sac à poussières est plein ou le filtre encrassé.
Dans ce cas, éteignez l'appareil en mettant l'interrupteur marche-arrêt sur
« 0 », puis procédez comme décrit sous ZChapitre 8, "Après utilisation".
L'appareil dé-
marre, mais
marche seule-
ment à reculons.
La coulisse de réglage de la sensibilité des capteurs antichute est réglée
pour un sol clair alors que l'appareil est posé sur un sol foncé.
Poussez la coulisse pour corriger le réglage de la sensibilité des trois cap-
teurs antichute, ZChapitre 6.1, "Réglage de la sensibilité des capteurs".
L'appareil nettoie
la pièce en partie
seulement.
Suivant la taille de la pièce, l'appareil n'a pas forcément atteint toutes les
zones à nettoyer au bout de son cycle à trois modes.
Faites remarcher l'appareil jusqu'à ce que toutes les zones de la pièce aient
été nettoyées.
Libero.book Seite 69 Montag, 12. März 2012 6:29 18
70
9Dépannage
Bien qu'il ait
champ libre, l'ap-
pareil ne se dé-
place pas tout
droit en mode
« Aléatoire ».
Il est probable qu'une des roues ne tourne pas librement en raison de salis-
sures.
Enlevez les salissures entravant la rotation de la roue. Employez pour cela
si nécessaire et avec prudence des ciseaux ou une pincette.
La brosse circu-
laire ne tourne
plus.
Il est probable que cette brosse circulaire ne tourne pas librement en raison
de salissures.
Démontez la brosse circulaire (ZChapitre 4.2, "Montage des brosses laté-
rales circulaires") pour la débarrasser et débarrasser son logement des sa-
lissures. Employez pour cela si nécessaire et avec prudence des ciseaux ou
une pincette.
L'appareil s'est
bloqué.
Poussez-le légèrement de la main.
L'appareil s'arrête
de lui-même.
La puissance de la batterie est trop faible.
Dans ce cas, éteignez l'appareil en mettant l'interrupteur marche-arrêt sur
«0», puis rechargez la batterie comme décrit, ZChapitre 5, "Charger la bat-
terie de piles dans l'appareil".
Impossible de re-
charger l'appareil.
Le bloc d'alimentation n'est pas correctement branché.
Contrôlez si la fiche ou/et le bloc d'alimentation sont correctement branchés
(ZChapitre 5, "Charger la batterie de piles dans l'appareil").
La durée de fonc-
tionnement se ré-
duit toujours da-
vantage.
Il est probable que les roues ne tournent pas librement en raison de salis-
sures. Cela accroît la consommation de courant électrique.
Enlevez les salissures entravant la rotation des roues. Employez pour cela
si nécessaire et avec prudence des ciseaux ou une pincette.
ProblèmeCause possible / solutions
REMARQUE:
Si vous ne pouvez pas remédier vous-même à l'anomalie au moyen de ce tableau, adressez-
vous à notre assistance technique (ZPage 170, "International Service") pour nous exposer le
problème. Notre personnel S.A.V. est spécialement formé pour répondre à vos attentes et peut,
avec votre collaboration, cerner la cause du problème pour le résoudre. Vous vous épargnez
ainsi les désagréments résultant d'un éventuel renvoi et votre aspirateur robot est rapidement à
nouveau opérationnel.
Libero.book Seite 70 Montag, 12. März 2012 6:29 18
71
9Dépannage
FR
9.2Commande de pièces de rechange et accessoires
Vous pouvez commander ultérieurement les
pièces de rechange et les accessoires. Vous
pouvez les acheter auprès de :
ZPage 170, "International Service"
9.3Si l'appareil est défectueux
Si l'appareil est tombé ou a été endommagé
de quelque autre manière et s'il présente des
signes évidents de dommages, remettez l'ap-
pareil défectueux à un commerçant spécialisé
ou au service après-vente de Royal Appliance
afin qu'il puisse être réparé. Expédiez l'appa-
reil défectueux avec bac à poussières vidé à
l'adresse mentionnée à la ZPage 170, "Inter-
national Service".
Numéro d'articleDescription
0606001 1 kit de brosses laté-
rales circulaires
(composé de deux
brosses circulaires)
0606002 1 filtre
0606003 1 bloc d'alimentation
0606004 1 batterie de piles
AVERTISSEMENT:
Risque de blessures! N'utilisez et ne
rechargez jamais un appareil défectueux !
Si l'appareil ou son cordon d'alimentation
est endommagé, faites-le remplacer par le
fabricant, son service après-vente ou toute
personne ayant des compétences simi-
laires, ceci afin d'éviter tout danger.
Libero.book Seite 71 Montag, 12. März 2012 6:29 18
72
9Dépannage
9.4Dépose de la batterie
1.Utilisez l'appareil jusqu'à ce que la batterie
soit entièrement déchargée et que le mo-
teur s'arrête.
2.Appuyez sur le bouton marche-arrêt pour
éteindre l'appareil (position « 0 »).
3.Ouvrez le couvercle du compartiment de
la batterie (Fig. 37).
4.Retirez la batterie de piles, (Fig. 38).
-Si vous voulez remplacer une batterie
usagée par une nouvelle batterie d'ori-
gine, ZChapitre 9.2, "Commande de
pièces de rechange et accessoires".
-Procédez comme décrit sous
ZChapitre 4.3, "Mettre en place la bat-
terie" pour poser une nouvelle batterie
de piles.
- Rapportez la batterie usagée séparé-
ment à un point de collecte communal.
9.5Élimination de l'appareil et de la batterie
Ne pas jeter l'appareil ni sa batterie de
piles avec les ordures ménagères !
Rapportez l'appareil et la batterie, après
l'avoir retirée, aux points de collecte chargés
de leur élimination.
AVERTISSEMENT:
Il existe un risque de blessures en cas de
manipulation non conforme de la batterie !
Vérifiez que le cordon est débranché de
la prise murale avant de commencer à dé-
poser la batterie de piles.
Ne court-circuitez jamais la batterie en
touchant les deux pôles simultanément,et
surtout pas avec des objets conduisant le
courant électrique.
Ne démontez jamais la batterie de piles,
ne l'exposez jamais à des températures éle-
vées.
Du liquide peut s'écouler de la batterie
en cas de manipulation incorrecte. Évitez
tout contact avec ce liquide.
OPEN
37
This side up
38
AVERTISSEMENT:
Il y a un risque de blessures en cas de rem-
placement inapproprié de la batterie !
S'il s'avère nécessaire de remplacer la
batterie de piles, contactez votre revendeur
agréé ou le service après-vente de Royal
Appliance.
Ne remplacez jamais vous-même la bat-
terie. Ne remplacez en aucun cas la batterie
par d'autres piles ou batteries.
ATTENTION:
Prenez garde de ne pas polluer
l'environnement! La batterie de piles ne
doit pas être jetée avec les ordures ména-
gères. Rapportez l'appareil et la batterie,
après l'avoir retirée, aux points de collecte
chargés de leur élimination.
Libero.book Seite 72 Montag, 12. März 2012 6:29 18
73
10Garantie
FR
10Garantie
10.1Conditions de garantie
Nous assurons une garantie de 24 mois sur
votre appareil à compter de la date d'achat.
Pendant la garantie, nous nous réservons le
droit de réparer ou de remplacer l'appareil ou
ses accessoires gratuitement (des acces-
soires endommagés n'impliquent pas forcé-
ment le remplacement de l'appareil) afin de
remédier à tout défaut lié au matériel ou à la
fabrication. Tout dommage résultant d'une uti-
lisation non conforme (emploi d'une tension
ou d'un courant erroné, branchement à une
prise non adaptée ou lorsque l'appareil est
cassé, etc.) est exclu de la garantie, de même
que l'usure et les défauts liés à l'usage normal
de l'appareil qui n'influencent pas le bon fonc-
tionnement de l'appareil.
En cas d'intervention d'une personne ou d'un
service non habilité ou lors de l'utilisation de
pièces détachées ne provenant pas de Royal
Appliance, les droits de garantie deviennent
caducs. Les pièces sujettes à usure sont ex-
clues de la garantie et leur remplacement est
payant ! La garantie s'applique uniquement
lorsque la date d'achat, le tampon du reven-
deur et sa signature figurent sur le bon de ga-
rantie ou si une copie de la facture sont joints
à l'appareil. Les prestations de garantie n'im-
pliquent en aucune façon le prolongement de
la durée de garantie ni un droit à une nouvelle
garantie !
10.2En cas de recours à la garantie
En cas de recours à la garantie, expédiez l'ap-
pareil après avoir pris soin de vider le bac à
poussières et en décrivant brièvement en ca-
ractères d'imprimerie l'anomalie. Mentionnez
«Zur Garantie» («Appareil sous garantie »)
sur l'étiquette d'envoi.
N'oubliez pas d'y joindre le bon de garantie
ainsi qu'une copie du ticket de caisse ou de la
facture et envoyez le tout à l'adresse
suivante :
ZPage 170, "International Service"
Libero.book Seite 73 Montag, 12. März 2012 6:29 18
170
International Service
D
International Service
Kundenservice:
Royal Appliance International GmbH
Abt. Kundenservice
Jagenbergstraße 19
41468 Neuss
DEUTSCHLAND
Tel.: +49 (0) 180 - 501 50 50*
Fax: +49 (0) 2131 - 60 90 60 95
Hotline Ersatzteile: 01805 15 85 08*
E-Mail: Ersatzteilshop@dirtdevil.de
www.dirtdevil.de
servicecenter@dirtdevil.de
*0,14 €/Minute aus dem deutschen Festnetz
(deutscher Mobilfunkhöchstpreis 0,42 €/Minute)
Zubehör & Ersatzteile:
Service-Versand
Ina Riedmüller
Frankenstraße 34
89233 Neu-Ulm
DEUTSCHLAND
Tel.: +49 (0) 1805 - 15 85 08*
Fax: +49 (0) 7307 - 41 56
Riedmueller.service@t-online.de
*0,14 €/Minute aus dem deutschen Festnetz
(deutscher Mobilfunkhöchstpreis 0,42 €/Minute)
Zubehör & Ersatzteile:
Service Center Feuerbach KG
Corneliusstr. 75
40215 Düsseldorf
DEUTSCHLAND
Tel.: +49 (0) 1805 - 15 85 08*
Fax: +49 (0) 211 - 37 04 97
dirtdevil-service@t-online.de
www.dirtdevil-service.de
*0,14 €/Minute aus dem deutschen Festnetz
(deutscher Mobilfunkhöchstpreis 0,42 €/Minute)
Zmugg Elektronik Service
und Vertriebges. M.b.H.
Fabriksgasse 27
8020 Graz
ÖSTERREICH
Tel. +43 - 316 - 77 21 20
Fax +43 - 316 - 77 21 20 10
Tel. Ersatzteile: +43 - 316 - 77 21 20 14
Fax Ersatzteile: +43 - 316 - 77 21 20 15
zmuggelektronik@utanet.at
Z.E.S. Goes B.V.
T.a.v. afd. Service
Pearyweg 1
4462 GT Goes
NEDERLAND
Tel: +31 - 113 - 24 07 00
Fax: +31 - 113 - 24 07 50
dirtdevil@zesgoes.nl
Bluepoint-Service SAGL
Via Cantonale 14
6917 Barbengo
SWITZERLAND
Tel. +41 (0)91 980 49 73
E-Mail: info@bluepoint-service.ch
www.bluepoint-service.ch
Reparaciones y recambios:
SAT EIXAMPLE
Calabria, 277/279
08029 - Barcelona
Tel.: 93 430 69 50
sateixample@hotmail.com
Recambios online:
www.recambiosyaccesoriosonline.es
pedidos@recambiosyaccesoriosonline.es
Reparaciones y recambios:
ELECTRONICA LATINA, S.L.
Paseo Virgen del Puerto 13,
28005 Madrid
Tel.: 91 366 52 02
Tel.: 91 366 52 03
eleclatina@hotmail.es
Reparaciones y recambios:
M.J. TORIBIO
Calle Tahona, 4,
28223 - Pozuelo de Alarcón -
Madrid
Tel.: 91 715 60 52
mjtoribio@telepolis.com
OPM France Nant’Est entreprise
33 rue du bois Briand
44316 Nantes cdx 3
FRANCE
Tel. +33 - 2 - 40 49 64 25
Fax +33 - 2 - 40 93 96 22
www.opm-france.com
RICAMBI ELETTRODOMESTICI
Corso L. Zanussi, 11
33080 Porcia (PN)
ITALIA
tel: 0434/550833
info@elettrodomesticiricambi.com
Z.E.S. Goes B.V.
T.a.v. afd. Service
Pearyweg 1
4462 GT Goes
NEDERLAND
Tel: +31 - 113 - 24 07 00
Fax: +31 - 113 - 24 07 50
dirtdevil@zesgoes.nl
DE
DE
DE
AT
BE
CH
ES
ES
ES
FR
IT
NL
Libero.book Seite 170 Montag, 12. März 2012 6:29 18
NUR GÜLTIG MIT RECHNUNGSKOPIE!
VALID ONLY INCLUDING A COPY OF THE PURCHASE SLIP!
VALABLE UNIQUEMENT AVEC UNE COPIE DE LA FACTURE!
ALLEEN GELDIG MET KOPIE VAN DE REKENING!
¡VÁLIDO SÓLO CON COPIA DE FACTURA!
VALIDO SOLO SE CORREDATO DA UNA COPIA DELLA FATTURA!
SADECE FATURA SURET LE GEÇERLDR!
DE
GB
FR
NL
ES
IT
TR
Fehlerbeschreibung • Description of the malfunction • Description du problème
Omschrijving van de fout • Descripción del fallo • Descrizione del difetto • Hata tanÕmÕ
:
Bitte diesen Abschnitt ausschneiden und dem Gerät beilegen. • Please detach this part and send it in with the appliance.
Veuillez détacher cette partie et la joindre à l'appareil. • Dit deel a.u.b. uitknippen en bij het apparaat leggen.
Por favor, recorte este resguardo y añádelo al aparato. • Per cortesia ritagliare questa sezione e allegarla all'apparecchio.
Lütfen bu bölümü kesin ve cihazn yanna ekleyin.
Garantiekarte
•
Warranty Card
•
Card de garantie
•
Garantiekaart
Certificado de garantía
•
Tagliando di garanzia
•
Garanti KartÕ
Name • Name •Nom • Naam • Nombres y apellidos • Nome • sim
Straße und Hausnummer • Street and house number • Rue et numéro de maison • Straat en huisnummer • Calle y número • Via e numero civico • Sokak ve ev no
PLZ und Ort • Zip code and town • Numéro postal et lieu • Postcode en plaats • C.P. y ciudad • CAP e località • Posta kodu ve yer
Telefon mit Vorwahl • Phone number with area code • Téléphone avec indicatif • Telefoon met kengetal • Teléfono con prefijo • Telefono con prefisso • ehirleraras kodla telefon
Libero.book Seite 171 Montag, 12. März 2012 6:29 18
Royal Appliance International GmbH
Jagenbergstraße 19
41468 Neuss
Germany
servicecenter@dirtdevil.de
www.dirtdevil.de
+49 (0) 1805 - 10 90 19*
+49 (0) 2131 - 60 90 60 95
* 0,14 €/Minute aus dem deutschen Festnetz, deutscher Mobilfunkhöchstpreis 0,42 €/Minute;
Die Gebühren für Telefonate aus dem Ausland (also außerhalb von Deutschland) richten sich nach den Preisen
der jeweiligen ausländischen Anbieter und der jeweils aktuellen Tarife.
* € 0.14 per minute from German landlines, maximum German mobile phone tariff € 0.42 per minute.
The cost of calls from abroad—outside Germany—depend upon the current prices of the respective foreign
telephone company.
*0,14 € par minute depuis le réseau fixe allemand, 0,42 € par minute au maximum depuis le réseau mobile alle-
mand;
Les coûts des appels depuis l'étranger (donc hors de l'Allemagne) dépendent des prix fixés par les opérateurs
étrangers et des tarifs actuellement en vigueur.
* 0,14 €/minuut vanuit het Duitse vaste telefoonnet, vanuit het Duitse mobiele netwerk max. 0,42 €/minuut;
De kosten voor telefoongesprekken vanuit het buitenland (dus buiten Duitsland) richten zich naar de prijzen van
de betreffende buitenlandse aanbieders en de betreffende actuele tarieven.
* 0,14 €/minuto desde la red fija alemana, precio máximo alemán para telefonía móvil 0,42 €/minuto;
Las tasas para las llamadas telefónicas desde el extranjero (fuera de Alemania) se orientan a los precios de cada
servidor extranjero y a las correspondientes tarifas actuales.
* 0,14 €/minuto da rete fissa tedesca, prezzo massimo per la telefonia mobile tedesca 0,42 €/minuto;
Le tariffe delle chiamate dall'estero (ovvero da fuori Germania) dipendono dai prezzi degli operatori telefonici
stranieri e dalle tariffe di volta in volta in vigore.
* Almanya'da sabit hatlardan 0,14 €/dakika; Alman mobil telefon azami fiyat 0,42 €/dakika;
Yurtdndan (yani Almanya dndan) yaplan aramalarn ücretleri ilgili yurtd operatörün fiyatlarna ve her
defasnda güncel tarifelerine göre belirlenir.
DE
GB
FR
NL
ES
IT
TR
Libero.book Seite 172 Montag, 12. März 2012 6:29 18
Gebruikershandleiding.com neemt misbruik van zijn services uitermate serieus. U kunt hieronder aangeven waarom deze vraag ongepast is. Wij controleren de vraag en zonodig wordt deze verwijderd.
Product:
Spelregels forum
Om tot zinvolle vragen te komen hanteren wij de volgende spelregels:
lees eerst de handleiding door;
controleer of uw vraag al eerder door iemand anders is gesteld;
probeer uw vraag zo duidelijk mogelijk te stellen;
heeft u een probleem en al geprobeerd om dit op te lossen, vermeld dit erbij aub;
heeft u een oplossing gekregen van een bezoeker dan horen wij dat graag in dit forum;
wilt u een reactie geven op een vraag of antwoord, gebruik dan niet dit formulier maar klik op de knop 'reageer op deze vraag';
uw vraag wordt direct op de website gezet; vermijd daarom persoonlijke gegevens in te vullen;
Belangrijk! Als er een antwoord wordt gegeven op uw vraag, dan is het voor de gever van het antwoord nuttig om te weten als u er wel (of niet) mee geholpen bent! Wij vragen u dus ook te reageren op een antwoord.
Belangrijk! Antwoorden worden ook per e-mail naar abonnees gestuurd. Laat uw emailadres achter op deze site, zodat u op de hoogte blijft. U krijgt dan ook andere vragen en antwoorden te zien.
Abonneren
Abonneer u voor het ontvangen van emails voor uw Dirt Devil M 606 Libero bij:
nieuwe vragen en antwoorden
nieuwe handleidingen
U ontvangt een email met instructies om u voor één of beide opties in te schrijven.
Ontvang uw handleiding per email
Vul uw emailadres in en ontvang de handleiding van Dirt Devil M 606 Libero in de taal/talen: Duits, Engels, Frans als bijlage per email.
De handleiding is 3,76 mb groot.
U ontvangt de handleiding per email binnen enkele minuten. Als u geen email heeft ontvangen, dan heeft u waarschijnlijk een verkeerd emailadres ingevuld of is uw mailbox te vol. Daarnaast kan het zijn dat uw internetprovider een maximum heeft aan de grootte per email. Omdat hier een handleiding wordt meegestuurd, kan het voorkomen dat de email groter is dan toegestaan bij uw provider.
Stel vragen via chat aan uw handleiding
Stel uw vraag over deze PDF
Andere handleiding(en) van Dirt Devil M 606 Libero
Uw handleiding is per email verstuurd. Controleer uw email
Als u niet binnen een kwartier uw email met handleiding ontvangen heeft, kan het zijn dat u een verkeerd emailadres heeft ingevuld of dat uw emailprovider een maximum grootte per email heeft ingesteld die kleiner is dan de grootte van de handleiding.
Er is een email naar u verstuurd om uw inschrijving definitief te maken.
Controleer uw email en volg de aanwijzingen op om uw inschrijving definitief te maken
U heeft geen emailadres opgegeven
Als u de handleiding per email wilt ontvangen, vul dan een geldig emailadres in.
Uw vraag is op deze pagina toegevoegd
Wilt u een email ontvangen bij een antwoord en/of nieuwe vragen? Vul dan hier uw emailadres in.