583777
37
Verklein
Vergroot
Pagina terug
1/38
Pagina verder
3000
OOwwnneerrss GGuuiiddee
®
1
© 2005 directed electronics, all rights reserved
limited lifetime consumer
warranty . . . . . . . . . . . . . . . . . . . . .i
trademarks and copyrights . . . . .ii
table of contents . . . . . . . . . . . . .1
what is included . . . . . . . . . . . . . .2
important information . . . . . . . . .2
your warranty . . . . . . . . . . . . .3
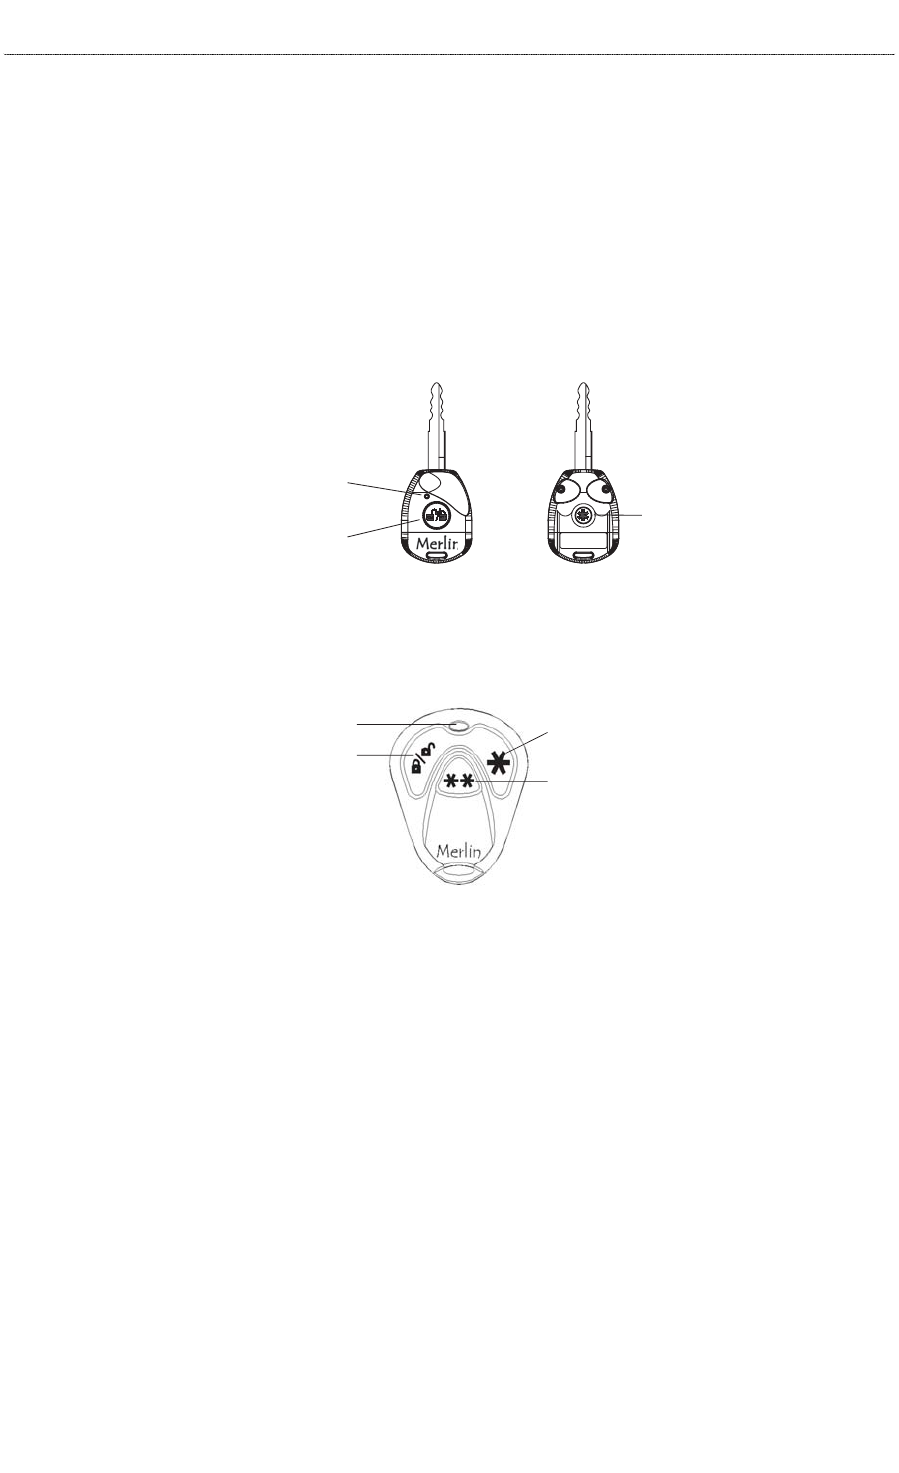
remote configurations . . . . . . . . .4
standard configuration for
in-key 2-button remote . . . . . .5
standard configuration for
3-button remote . . . . . . . . . . .5
using your system . . . . . . . . . . . . .6
arming . . . . . . . . . . . . . . . . . . .6
disarming . . . . . . . . . . . . . . . . .8
disarming without a remote . . .8
auto-immobilisation . . . . . . . . .9
remote siren silencing . . . . . . .9
remote chirp muting
(3-button remote only) . . . . . .10
remote sensor disable . . . . . .11
remote start sensor bypass . . .11
auxiliary channel bypass . . . . .12
valet mode . . . . . . . . . . . . . . .12
remote valet mode . . . . . . . . .13
instant auto-arming bypass . .14
nuisance prevention® circuitry 14
multiple event total recall . . . .15
battery back-up siren . . . . . . . . .15
diagnostics . . . . . . . . . . . . . . . . . .16
arming diagnostics . . . . . . . . .16
disarming diagnostics . . . . . . .17
arm/disarm diagnostic chart . .17
table of zones . . . . . . . . . . . .18
high frequency . . . . . . . . . . . . . .19
rapid resume logic . . . . . . . . . . .19
power saver mode . . . . . . . . . . .20
system sensors and adjustments 20
programming options . . . . . . . .21
manual programming
instructions . . . . . . . . . . . . . .22
user selectable features . . . . .24
user selectable features
descriptions - column one . . .24
user selectable features
descriptions - column two . . .26
user selectable features
descriptions - column three . .27
pin programming . . . . . . . . . .29
glossary of terms . . . . . . . . . . . . .31
security & convenience
expansions . . . . . . . . . . . . . . . . . .32
quick reference guide . . . . . . . .33
table of contents
2
© 2005 directed electronics, all rights reserved
what is included
z
One control module/siren with built-in Tilt sensor and 24 pin
main wiring harness (attached)
z
One Mini-Blue status LED
z
One 2-button Valet switch
z
One in-key 2-button remote
z
One 3-button remote
z
Two Merlin decal’s
z
This Owner’s Guide
z
Warranty Card
important information
Congratulations on the purchase of your state-of-the-art motorcycle
security system. It has been designed to provide years of trouble-free
operation. This system must be installed by an authorised dealer.
Installation of this product by anyone other than an authorised dealer
voids the warranty. As verification of authorization, all authorised deal-
ers are provided with preprinted dealer certificates.
In order to maximize the use of this system, please review this owner's
guide carefully prior to using your system. You can print additional or
replacement copies of this owner’s guide by accessing the Directed
website at www.directed.com.
nnoottee::
Your system MUST be installed by an Authorised dealer in accor-
dance with the instructions we supply them. The Merlin 3000 system
is designed to be installed on any 12-volt, negative ground motorcy-
cle or moped.
3
© 2005 directed electronics, all rights reserved
system maintenance
The system requires no specific maintenance. The batteries in your
remotes will last approximately one year under normal use. Your 3-but-
ton remote is powered by a miniature 3V lithium battery (CR2032). Your
in-key 2-button remote is powered by a 12V miniature battery (type
27A).
your warranty
It is necessary to retain your sales receipt, which reflects that the prod-
uct was installed by an authorised dealer. For full details regarding your
warranty coverage, please refer to the consumer warranty section of
this guide.
nnoottee::
Other than the remote controls, this system has no user-service-
able parts. Your authorized dealer can correct any system wiring prob-
lems and, if needed, can return any malfunctioning component to
Directed Electronics for repair/replacement under the terms of the
Limited Lifetime Warranty printed at the beginning of this guide.
4
© 2005 directed electronics, all rights reserved
remote configurations
The 3000 system has an in-key 2-button remote control and a 3-button
remote control. Two additional Merlin remote controls can be added.
3-BUTTON REMOTE CONTROL
A
RM/DISARM/PANIC
LED
SILENT ARM/DISARM
ACCESSORY
FRONT REAR
LED
A
RM/DISARM/PANIC
ACCESSORY
IN-KEY 2-BUTTON REMOTE CONTROL
5
© 2005 directed electronics, all rights reserved
remote functions
This system uses computer-based code learning to learn the remote
buttons. This makes it possible to assign any remote button to any sys-
tem function. The remotes initially come programmed with standard
configuration. The buttons in all of the instructions in this manual cor-
respond to a standard configuration remote.
standard configuration for in-key 2-button remote
Button
The arming, disarming, and panic functions are controlled by this button.
Button
An optional accessory convenience or expansion function that you have
added to your system can be activated by pressing this button.
and Buttons
When pressed together, these buttons disable the on-board control
module tilt sensor and any optionally installed sensors.
standard configuration for 3-button remote
Button
The arming, disarming, and panic functions are controlled by this button.
6
© 2005 directed electronics, all rights reserved
Button
An optional accessory convenience or expansion function that you have
added to your system can be activated by pressing this button.
Button
Silent arm and disarm is controlled by this button.
and Buttons
When pressed together, these buttons disable the on-board control
module tilt sensor and any optionally installed sensors.
and Buttons
Remotely enters or exits Valet.
using your system
The buttons used in the instructions in this manual correspond to the
standard remote configuration. If your remote has been custom con-
figured, the icons on your remote buttons may not correspond to the
indicated functions.
arming
You can activate, or arm, the system by pressing on your remote
for one second. When the system arms, you will hear one short siren
sound, or chirp, and see the parking lights flash once. The LED will illu-
minate steadily.
CCuutt aalloonngg ddootttteedd lliinnee aanndd ffoolldd ffoorr aa qquuiicckk aanndd eeaassyy rreeffeerreennccee ttoo kkeeeepp iinn yyoouurr ppuurrssee oorr wwaalllleett..
system disarm
To disarm the system without a transmitter, turn the
key to the ON position and enter your PIN code.
valet mode entry
To enter Valet Mode without a transmitter, turn the
key to the ON position and enter your PIN code.
Continue to hold on the Valet switch for five
seconds.
pin code entry
On the Valet switch, press the number of times
corresponding to the first digit of your PIN, then
press once. Press to enter a zero. Repeat this
for each digit of your PIN code.
There is a space provided below to note your pin
code for future reference.
37

Hulp nodig? Stel uw vraag in het forum

Spelregels

Misbruik melden

Gebruikershandleiding.com neemt misbruik van zijn services uitermate serieus. U kunt hieronder aangeven waarom deze vraag ongepast is. Wij controleren de vraag en zonodig wordt deze verwijderd.

Product:

Bijvoorbeeld antisemitische inhoud, racistische inhoud, of materiaal dat gewelddadige fysieke handelingen tot gevolg kan hebben.

Bijvoorbeeld een creditcardnummer, een persoonlijk identificatienummer, of een geheim adres. E-mailadressen en volledige namen worden niet als privégegevens beschouwd.

Spelregels forum

Om tot zinvolle vragen te komen hanteren wij de volgende spelregels:

Belangrijk! Als er een antwoord wordt gegeven op uw vraag, dan is het voor de gever van het antwoord nuttig om te weten als u er wel (of niet) mee geholpen bent! Wij vragen u dus ook te reageren op een antwoord.

Belangrijk! Antwoorden worden ook per e-mail naar abonnees gestuurd. Laat uw emailadres achter op deze site, zodat u op de hoogte blijft. U krijgt dan ook andere vragen en antwoorden te zien.

Abonneren

Abonneer u voor het ontvangen van emails voor uw Directed Electronics Merlin 3000 bij:


U ontvangt een email met instructies om u voor één of beide opties in te schrijven.


Ontvang uw handleiding per email

Vul uw emailadres in en ontvang de handleiding van Directed Electronics Merlin 3000 in de taal/talen: Engels als bijlage per email.

De handleiding is 0,32 mb groot.


U ontvangt de handleiding per email binnen enkele minuten. Als u geen email heeft ontvangen, dan heeft u waarschijnlijk een verkeerd emailadres ingevuld of is uw mailbox te vol. Daarnaast kan het zijn dat uw internetprovider een maximum heeft aan de grootte per email. Omdat hier een handleiding wordt meegestuurd, kan het voorkomen dat de email groter is dan toegestaan bij uw provider.

Stel vragen via chat aan uw handleiding

Stel uw vraag over deze PDF

Uw handleiding is per email verstuurd. Controleer uw email

Als u niet binnen een kwartier uw email met handleiding ontvangen heeft, kan het zijn dat u een verkeerd emailadres heeft ingevuld of dat uw emailprovider een maximum grootte per email heeft ingesteld die kleiner is dan de grootte van de handleiding.

Er is een email naar u verstuurd om uw inschrijving definitief te maken.

Controleer uw email en volg de aanwijzingen op om uw inschrijving definitief te maken

U heeft geen emailadres opgegeven

Als u de handleiding per email wilt ontvangen, vul dan een geldig emailadres in.

Uw vraag is op deze pagina toegevoegd

Wilt u een email ontvangen bij een antwoord en/of nieuwe vragen? Vul dan hier uw emailadres in.


Info