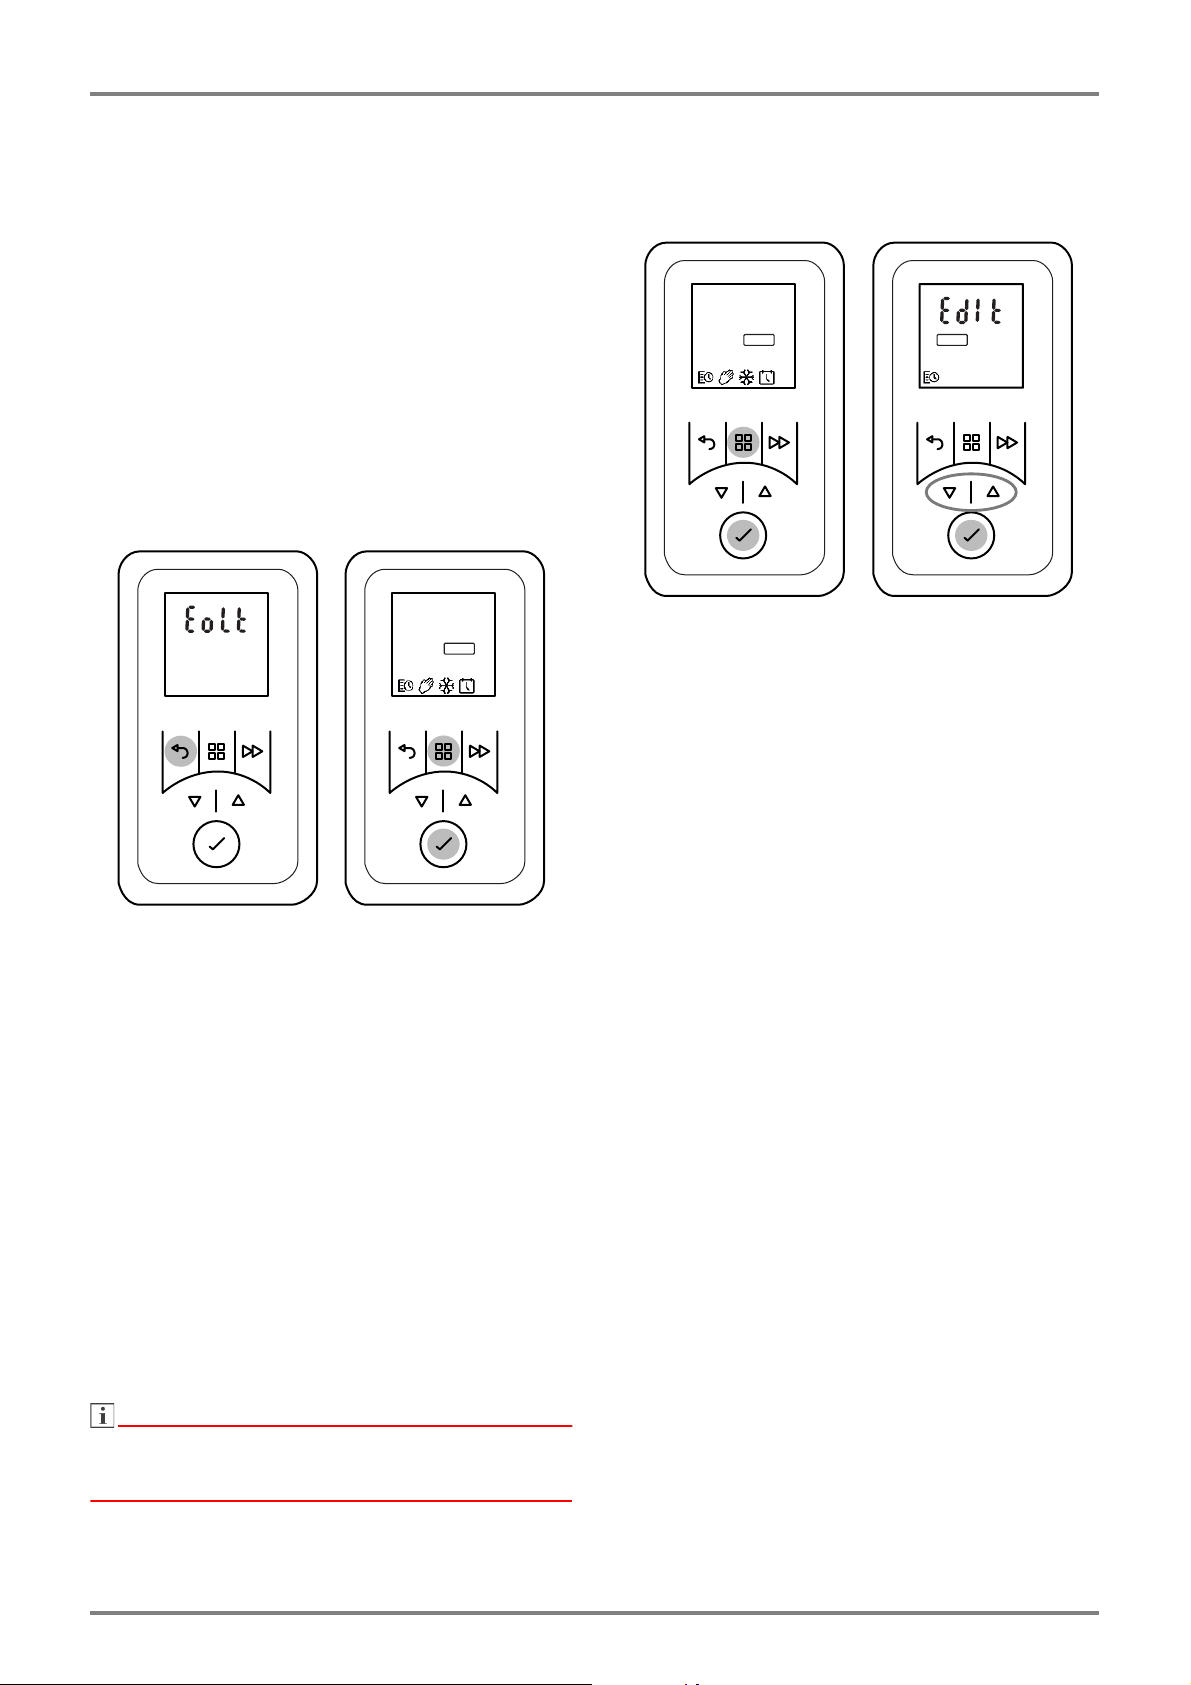
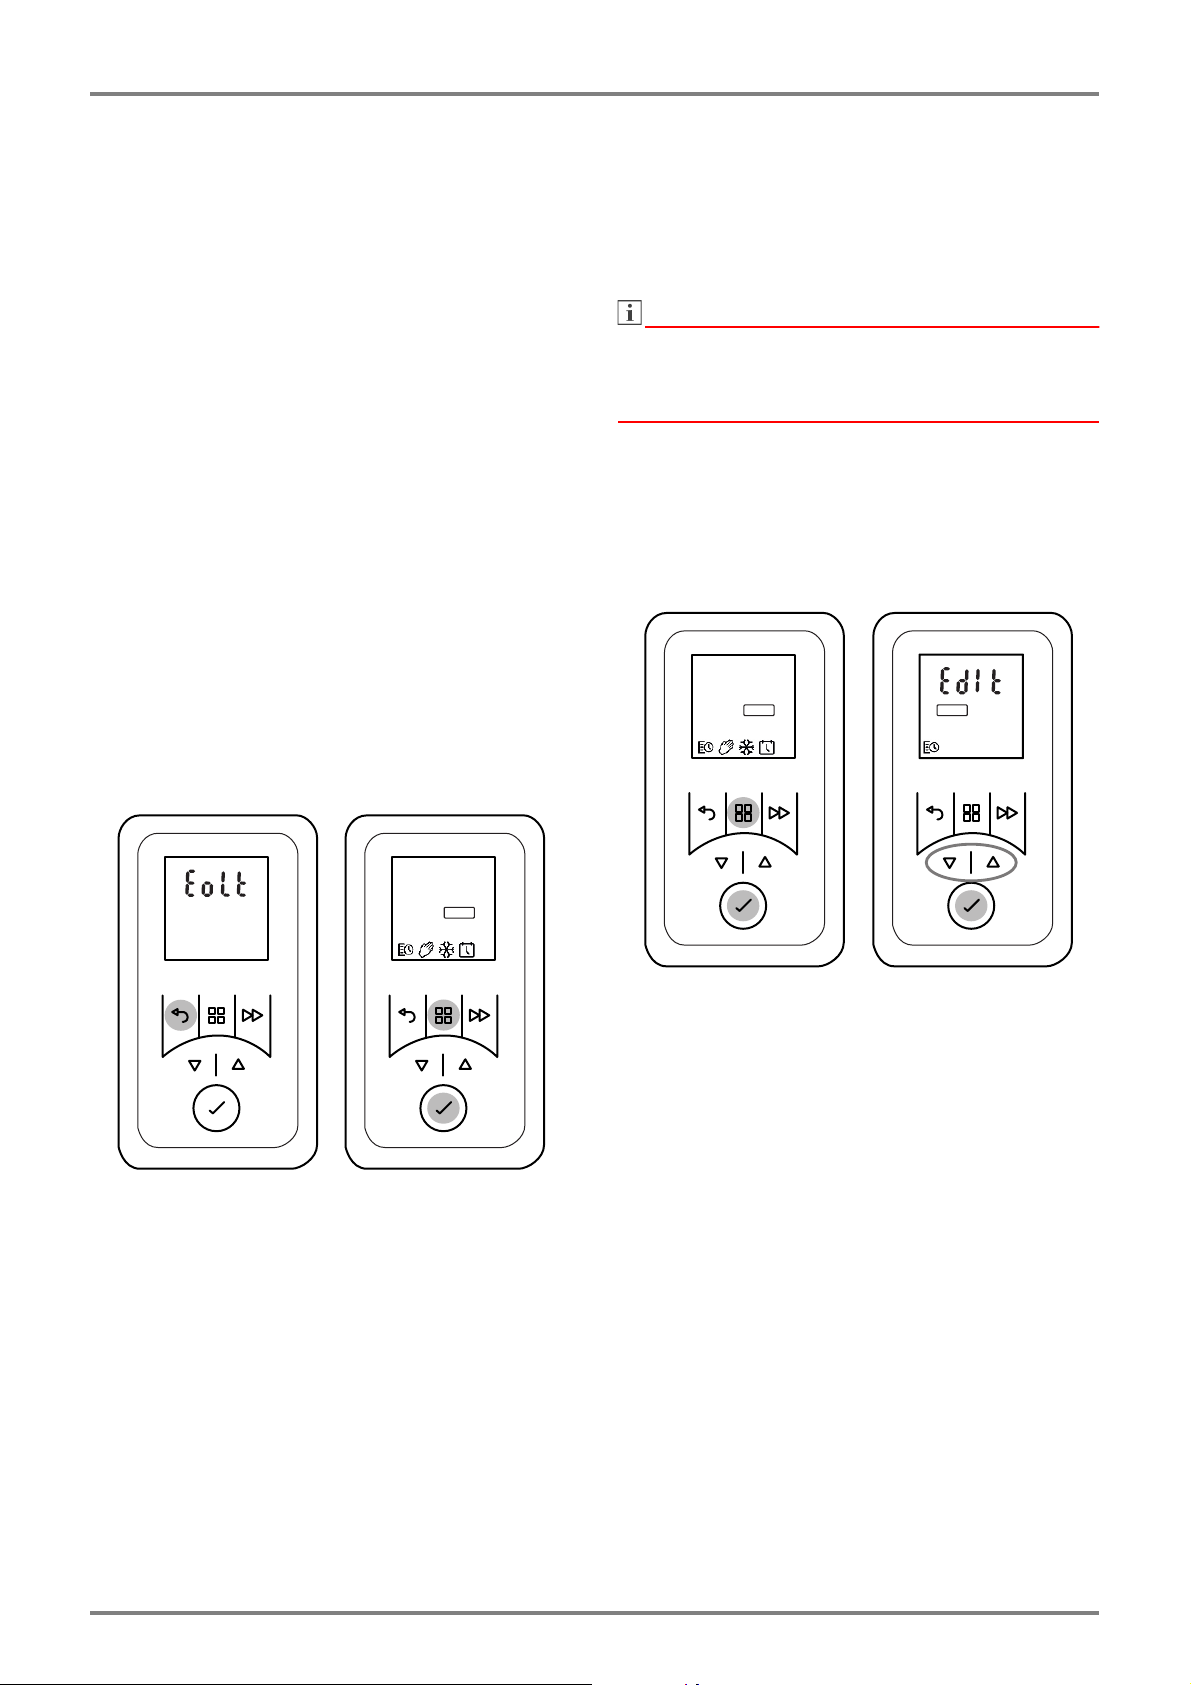
Hold down the BACK key until the display Eolt ap-
pears. The heating device is in standby mode.
To return to the previous operating status, briefly
press the BACK key.
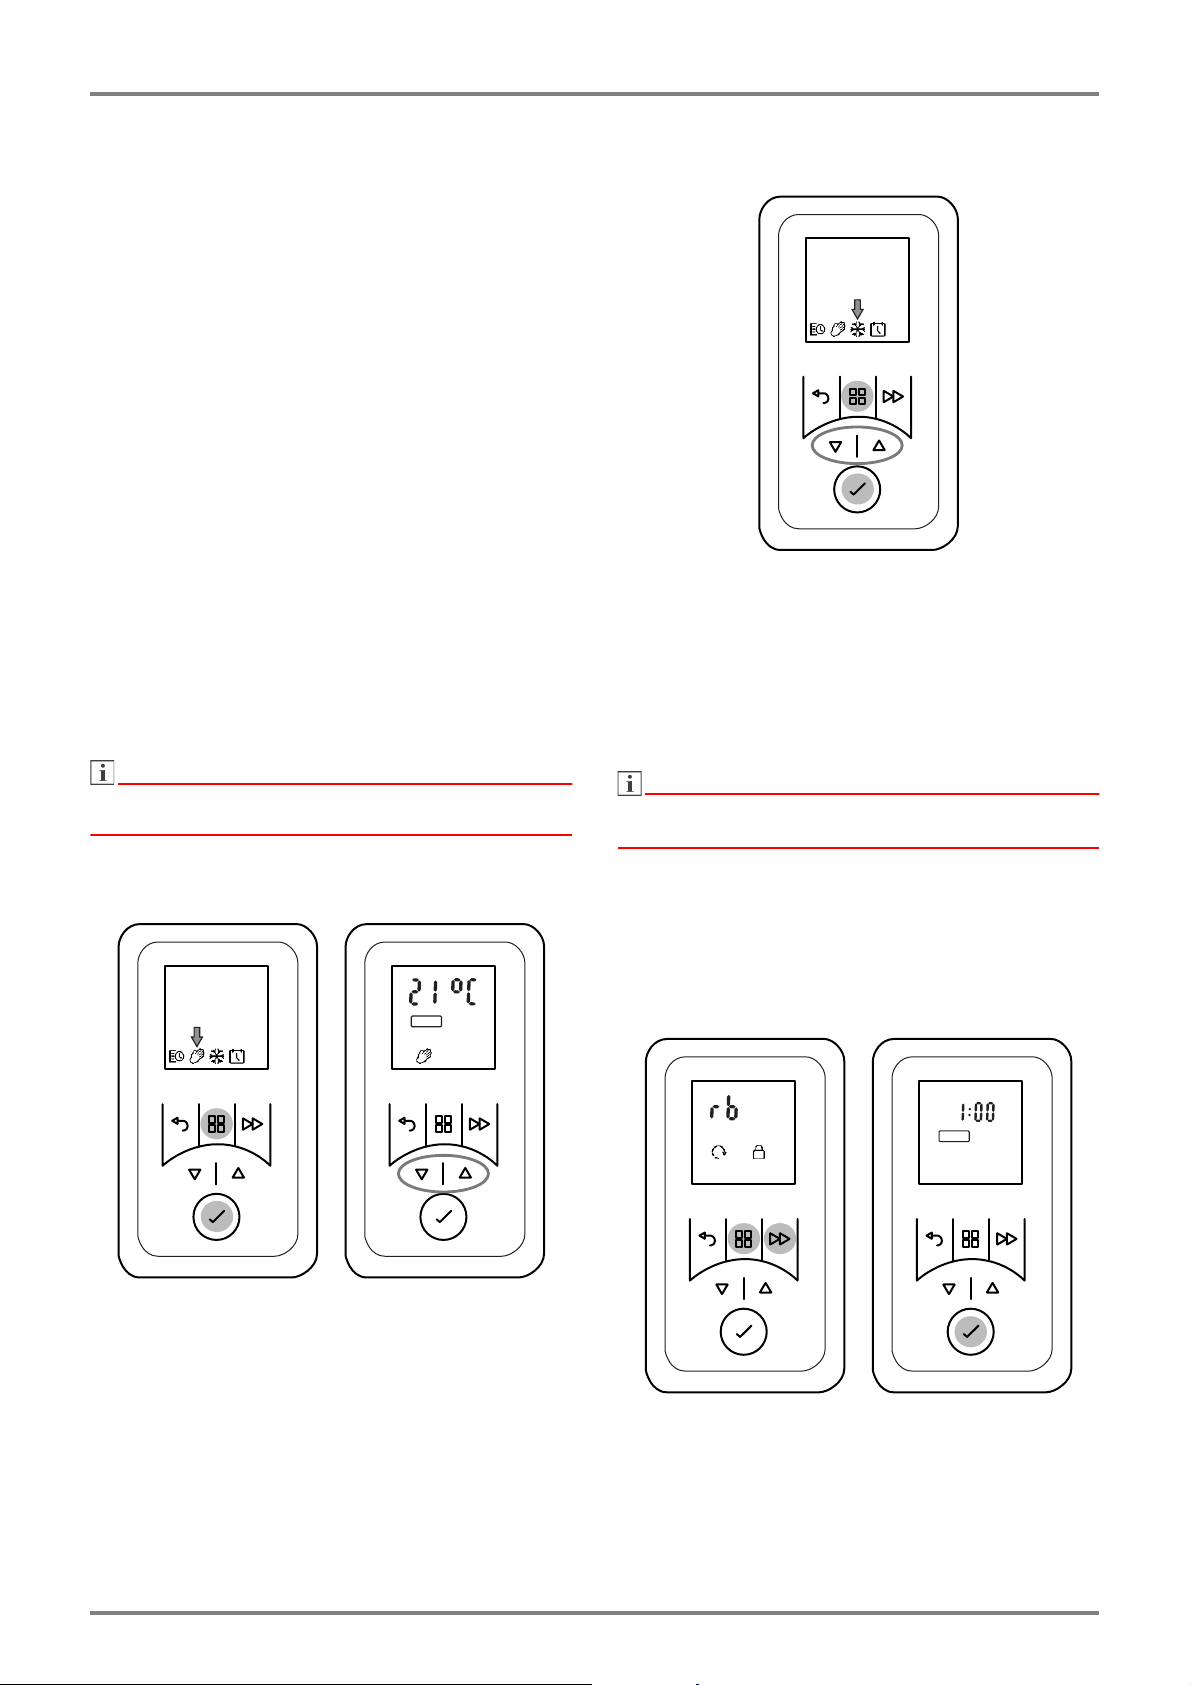
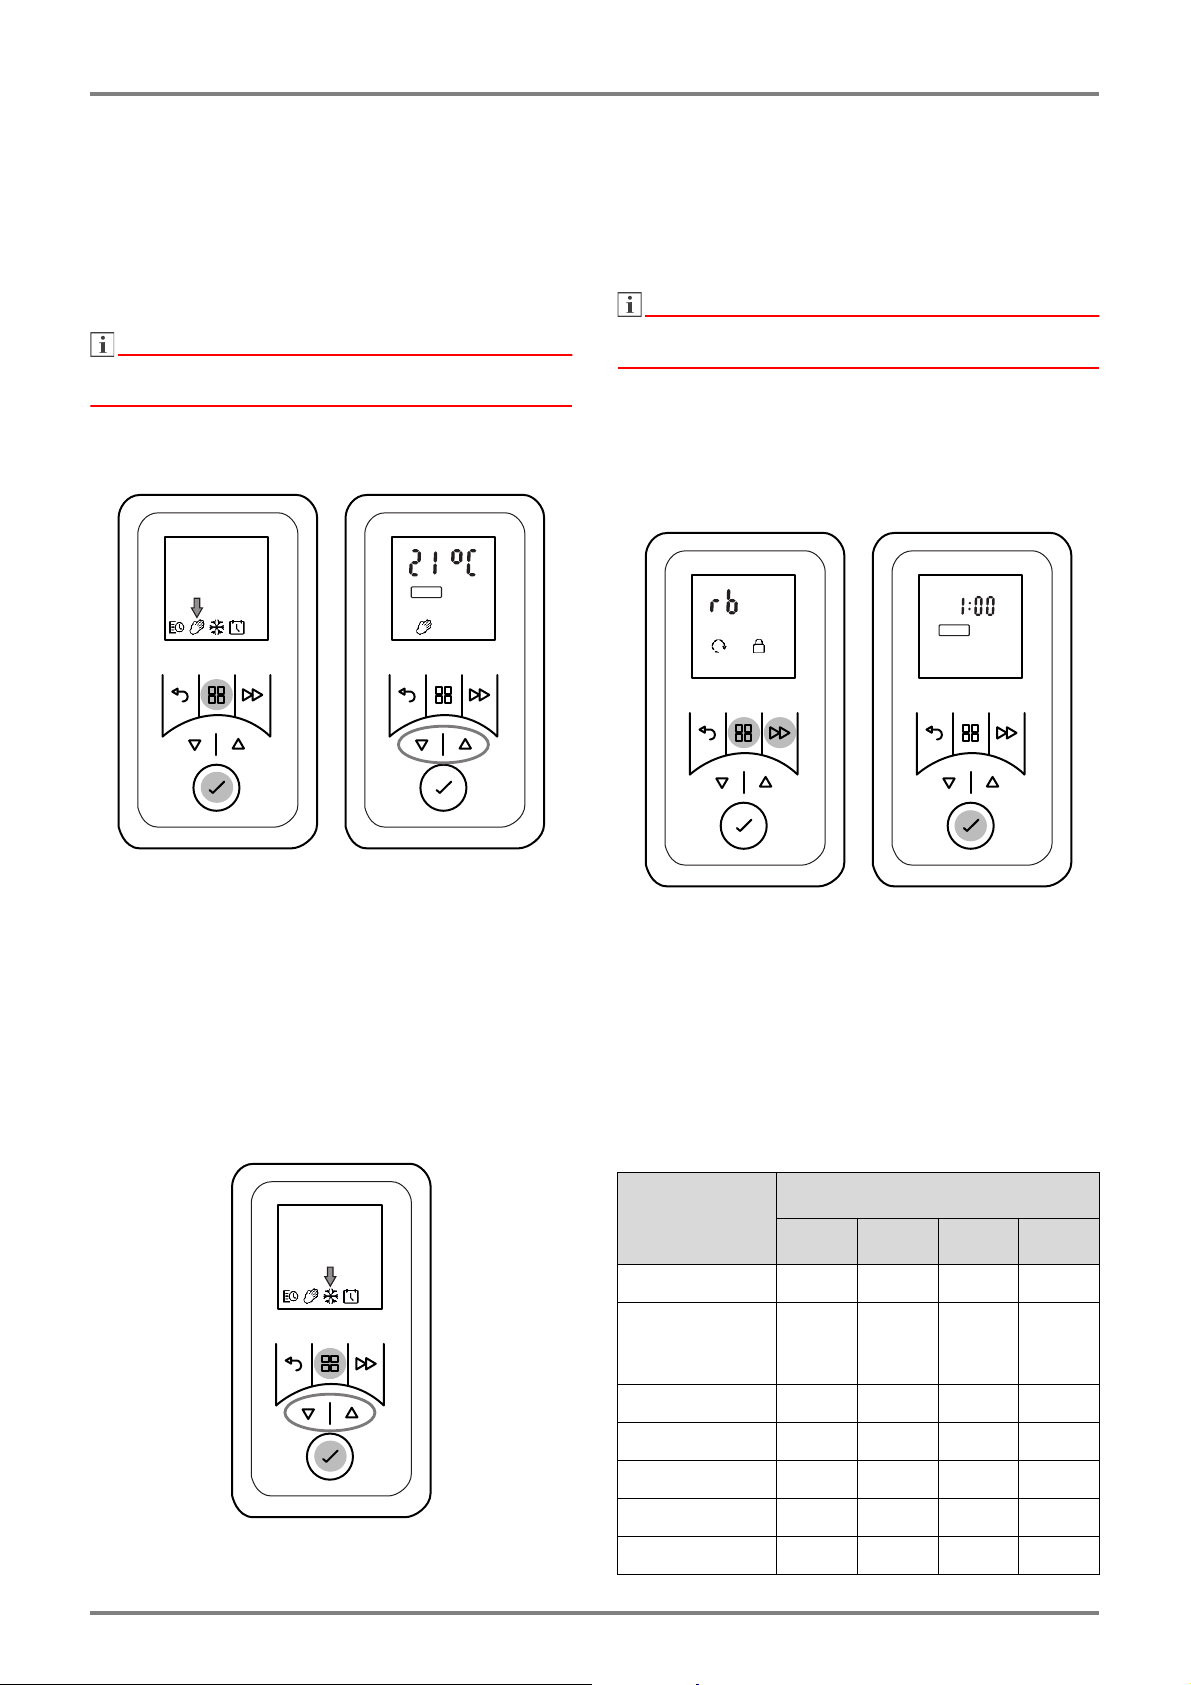
9.2 Switching heating operation on/off
Switching heating operation on
Press the MAIN MENU key. The TIMER symbol
flashes.
Press
or
to select the required operating mode.
The symbol flashes.
Confirm with the ENTER key.
Switching heating operation off
Press the MAIN MENU key. The TIMER symbol
flashes.
Press
or
to select the OFF symbol. The OFF
symbol flashes.
Confirm with the ENTER key.
NOTE
NOTE
Heating operation Off does not mean that the device is
completely disconnected from the power supply. To
disconnect the device from the electricity network,
please pull out the plug.
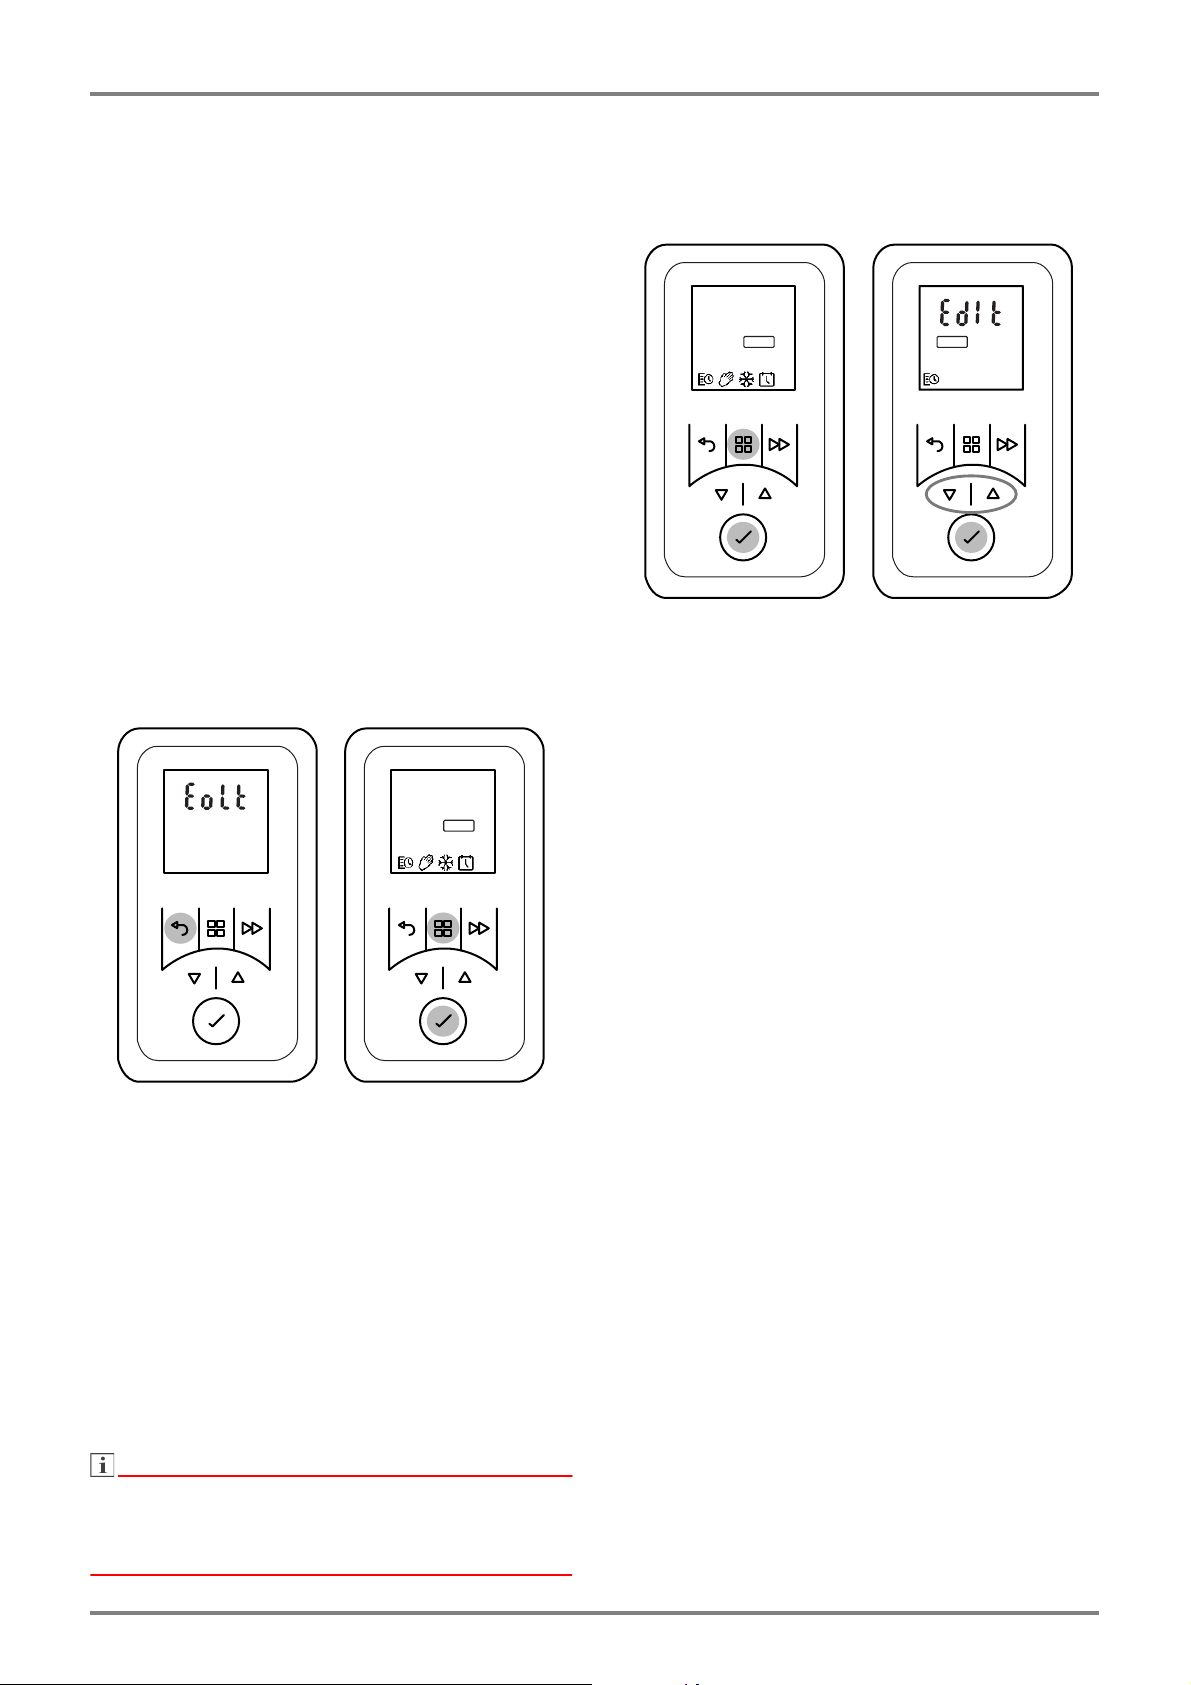
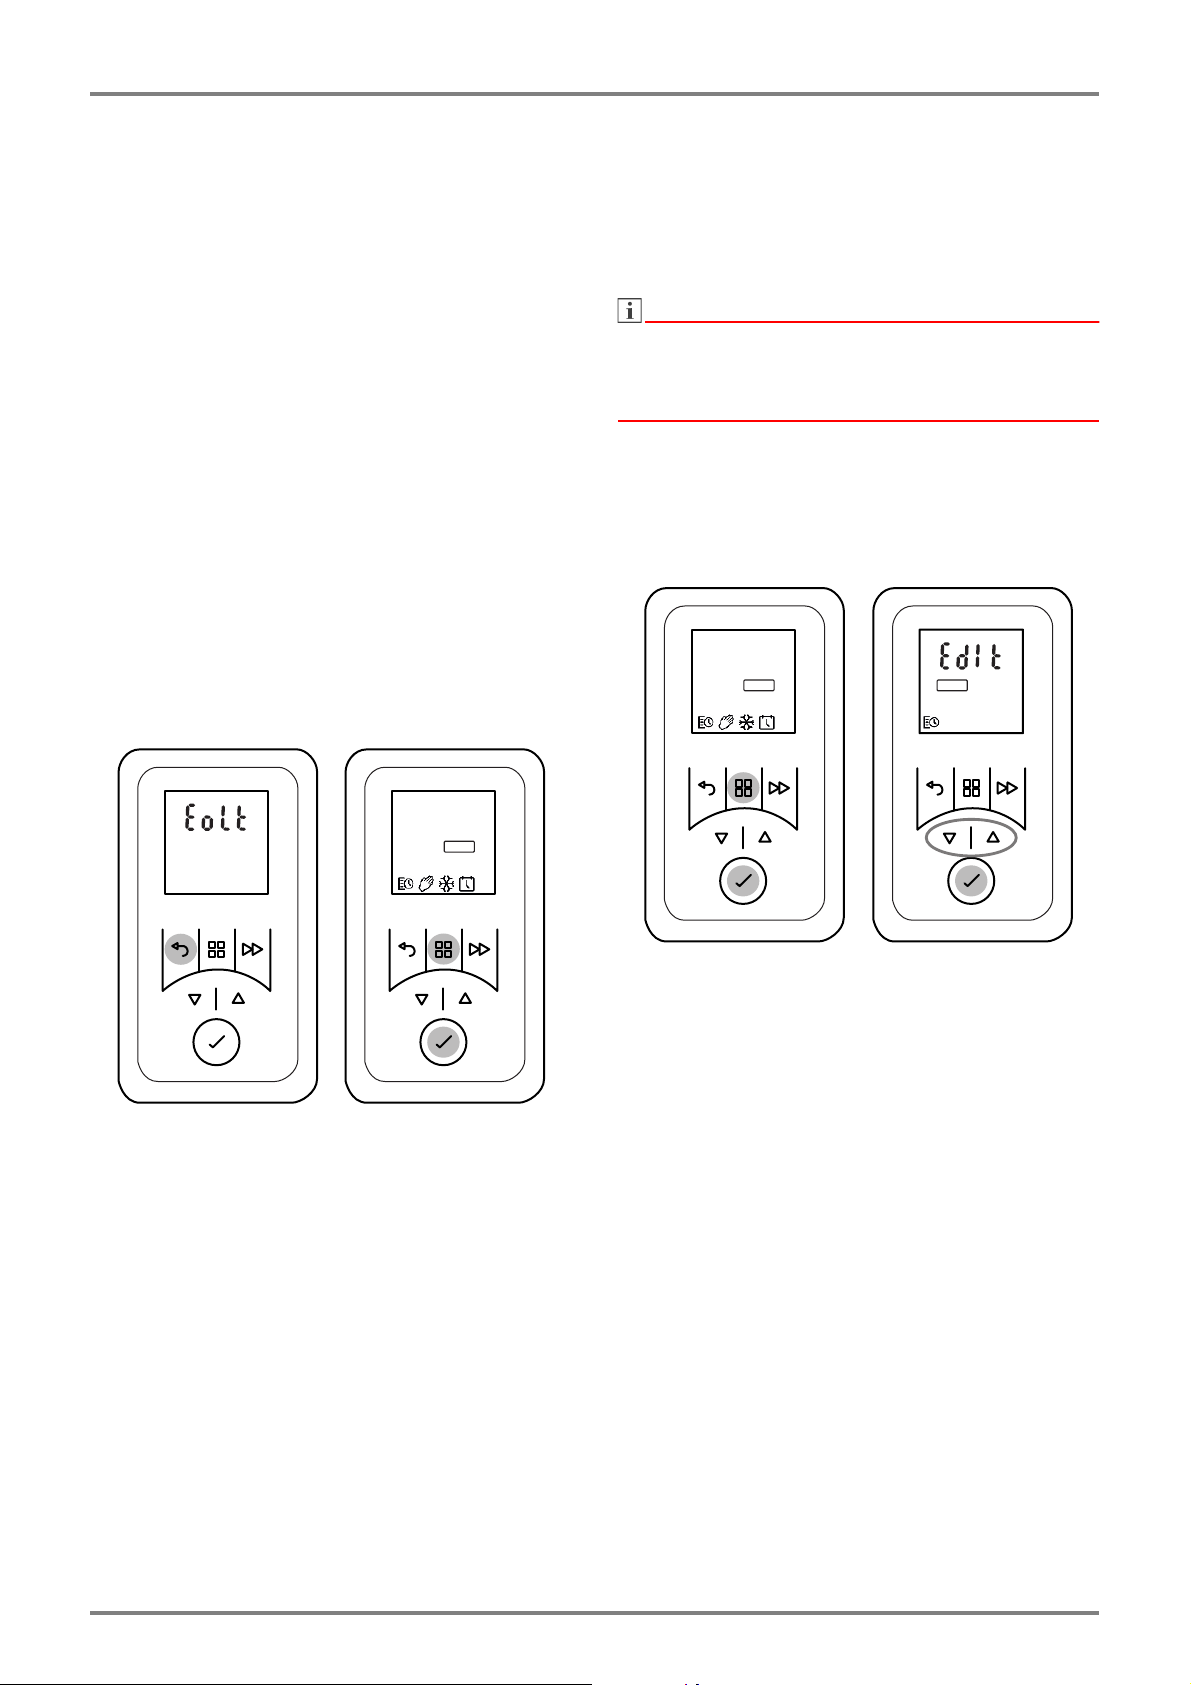
9.3 Timer week program
The timer is pre-programmed at the factory. Four time
blocks, which can be adapted individually for each
weekday, are available per day.
To change these profiles, carry out the following steps:
Press the MENU key. The TIMER symbol flashes.
Press the ENTER key. The ON symbol flashes.
Press
or
to select the EdIt display. EdIt dis-
play flashes.
Press the ENTER key. The weekday flashes.
Use
or
to select the day.
1 = Monday5 = Friday
2 = Tuesday6 = Saturday
3 = Wednesday7 = Sunday
4 = Thursday
Press the ENTER key. P1 (Program 1) flashes.
Press the ENTER key. Switch-on time flashes.
Use
or
to set the hours and minutes. Confirm
every position specified with the ENTER key.
Room temperature flashes.
Use
or
to set the temperature. Press the
ENTER key. Switch-off time flashes.
Use
or
to set the hours and minutes. Confirm
every position specified with the ENTER key. P2
(Program 2) flashes.
The programs P2, P3 and P4 can be set in the
same way.
To copy the newly set programs P1 - P4 to other
days, hold down the ADVANCE key. COPY display
flashes briefly.
The day values selected are copied.
Press
or
to select a new weekday. The week-
day flashes.
Hold down the ENTER key. PStE display flashes
briefly. The day values copied are assigned to the
new weekday.
Then press the MAIN MENU key.
OFF
OFFON
EN-51907/Dwww.dimplex.de/en
EnglishH 260E, H 260E eco
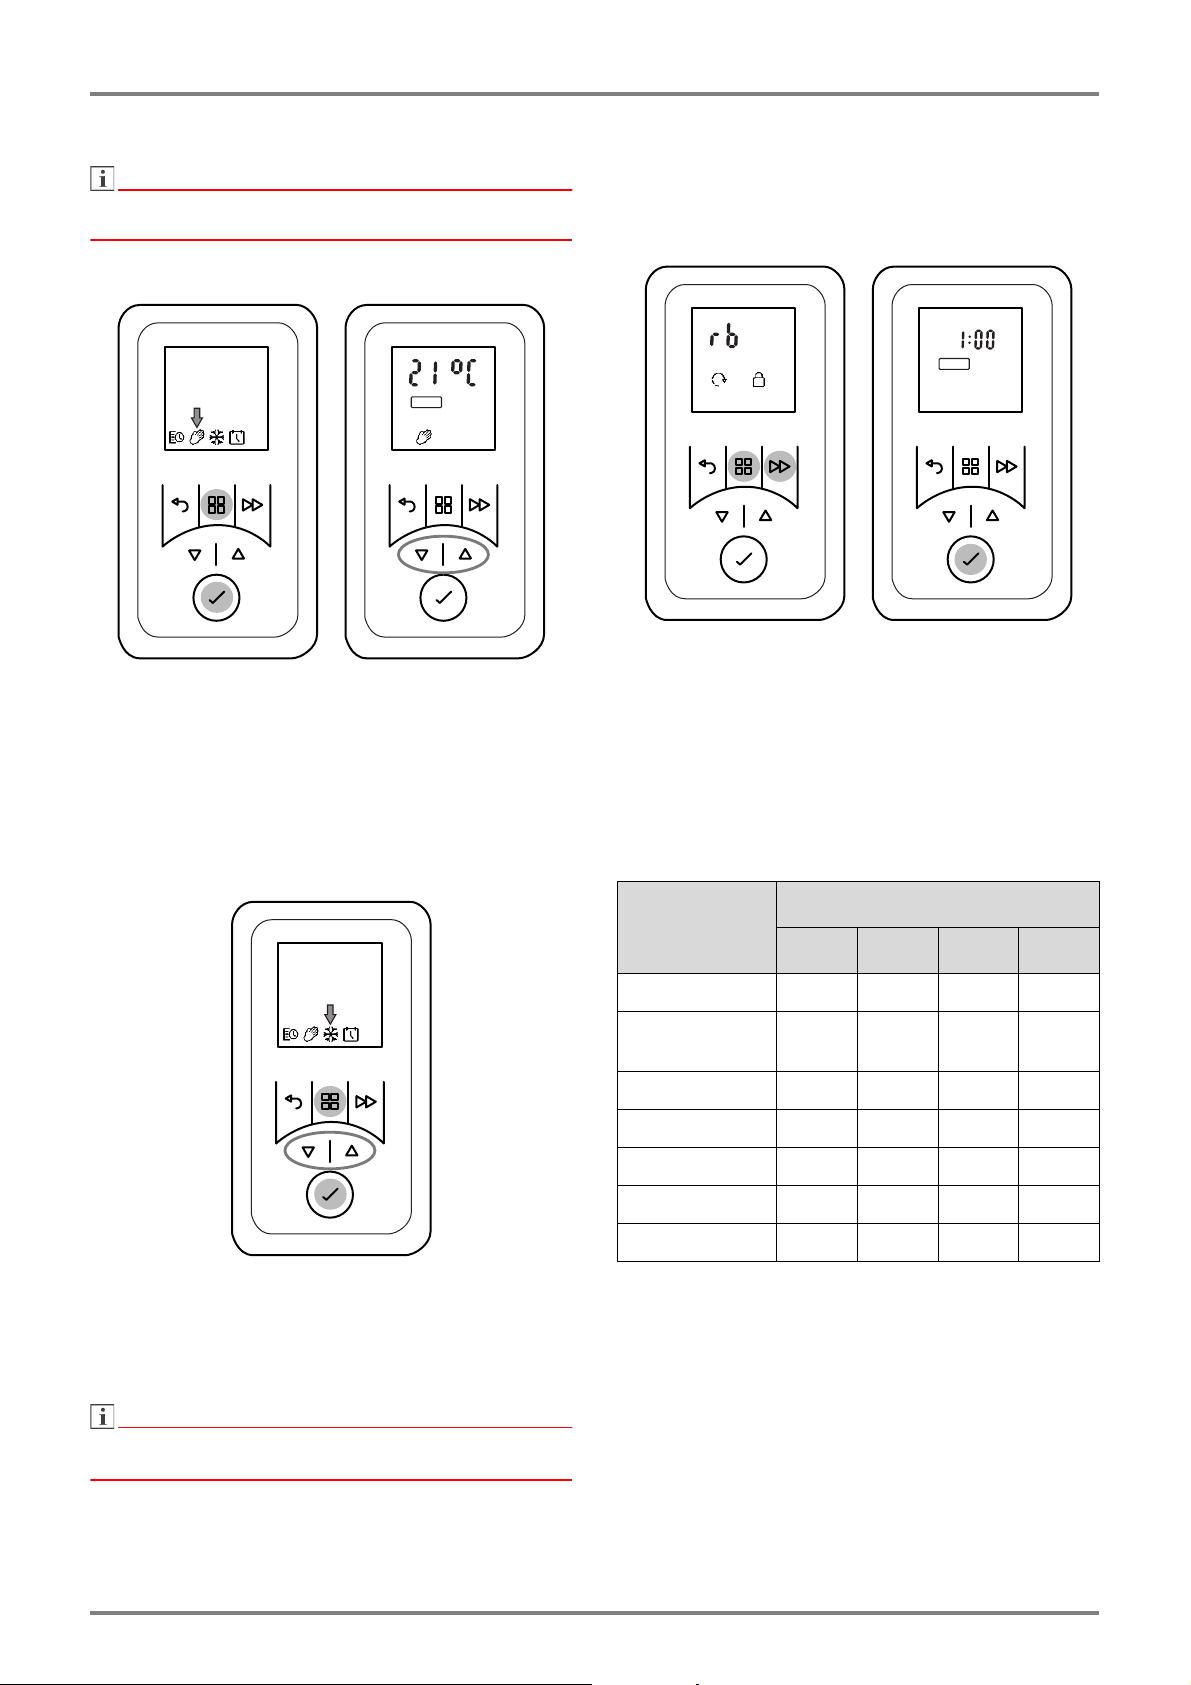
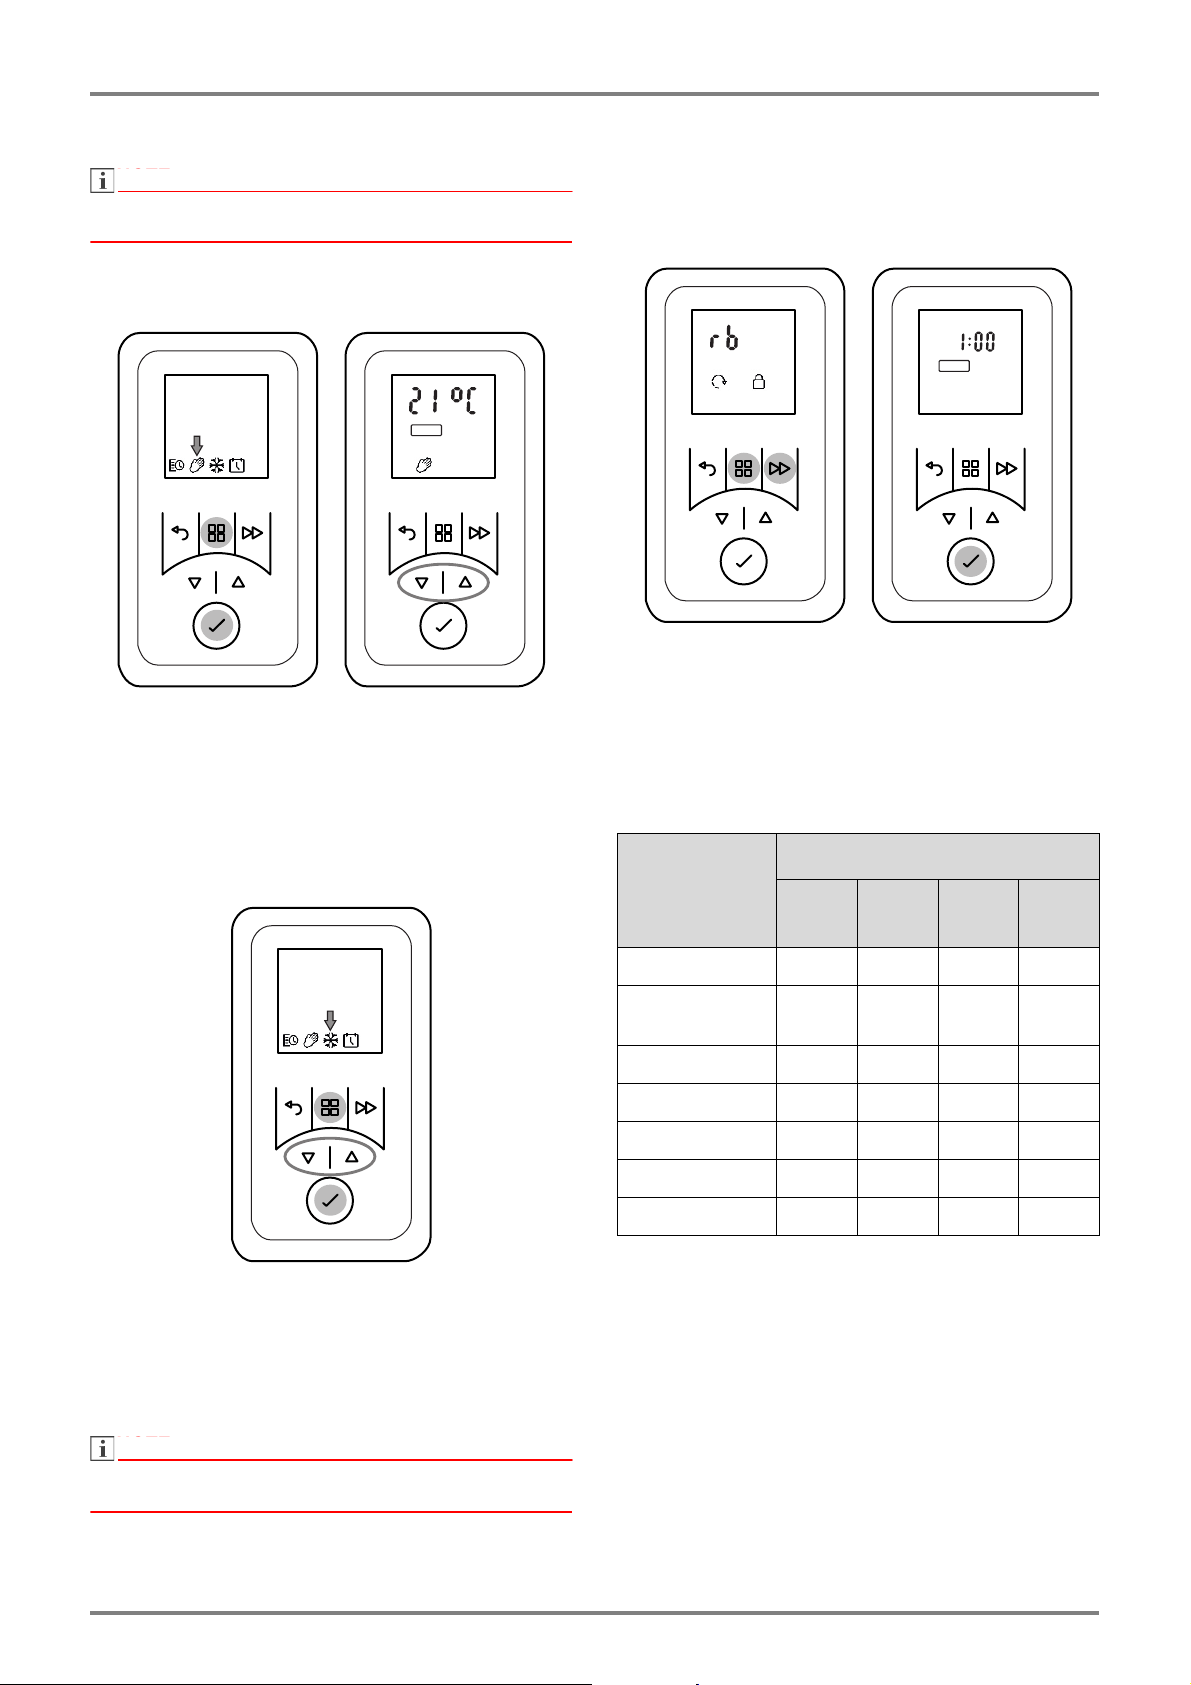
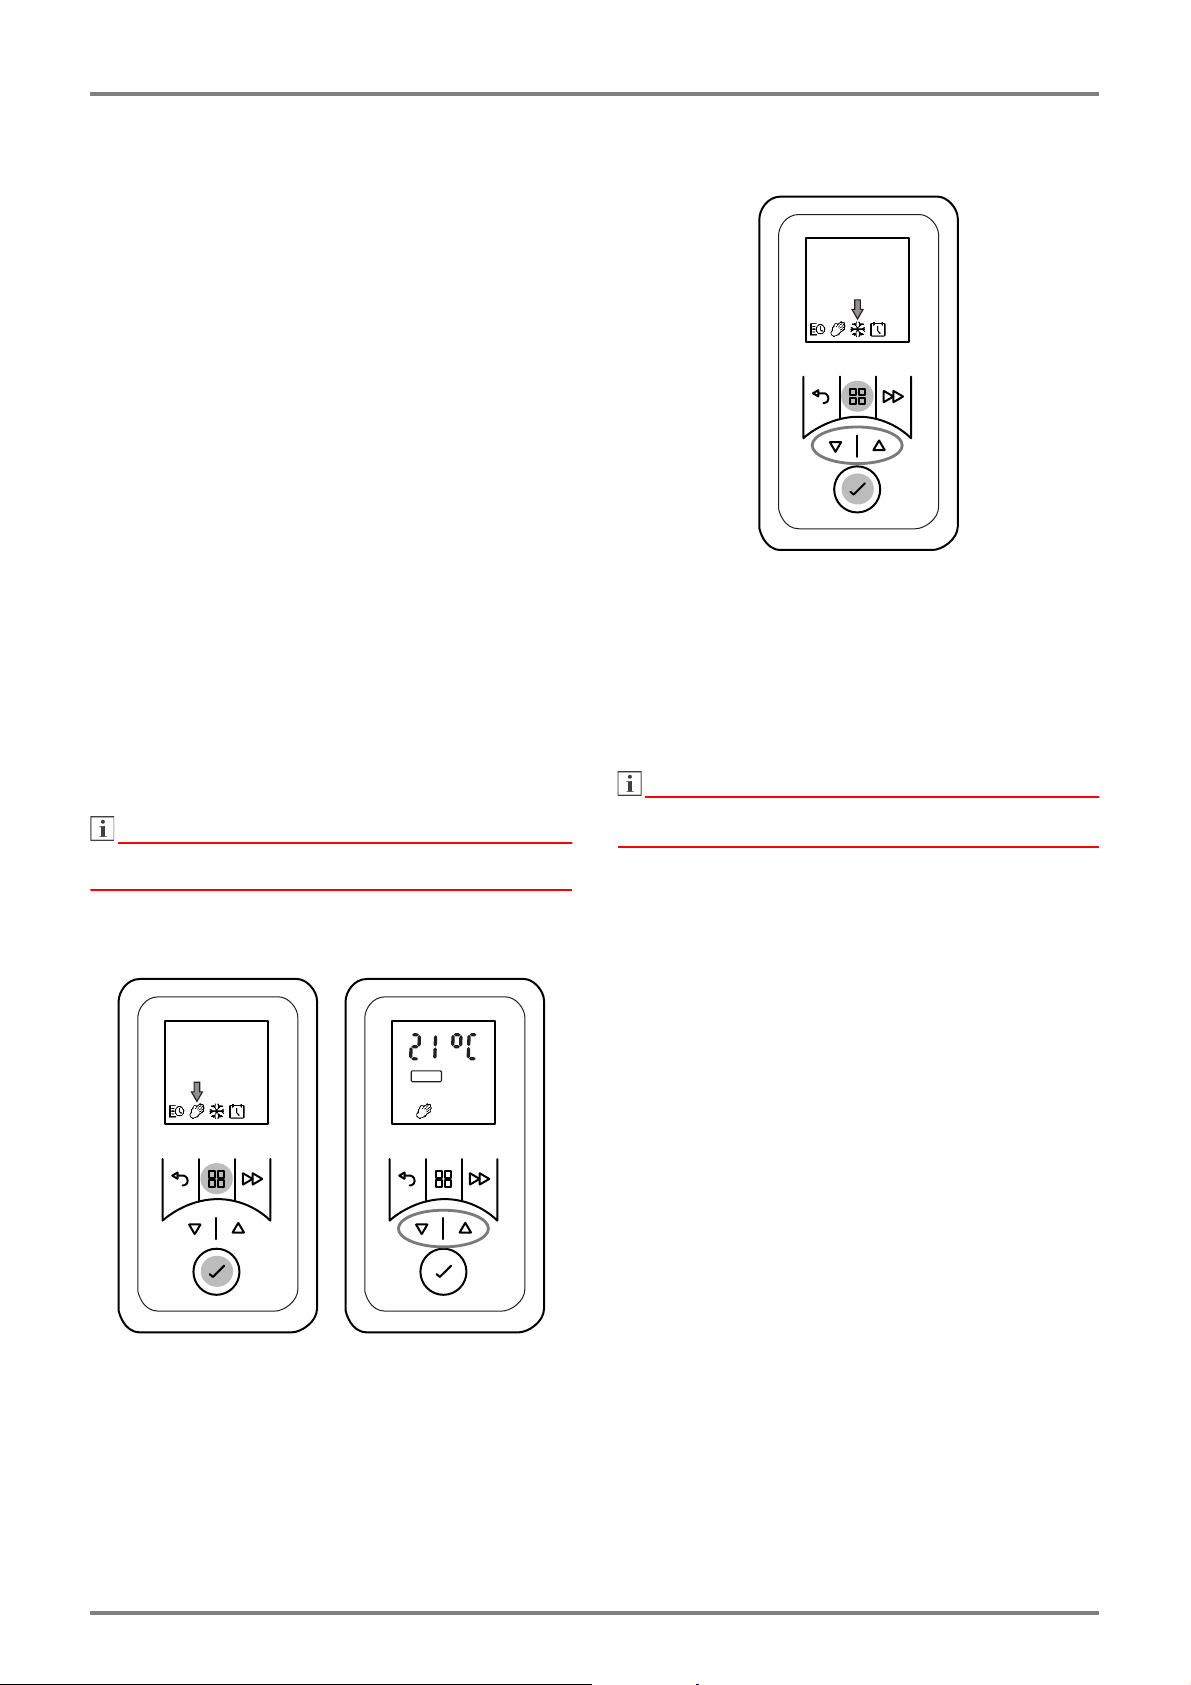
9.4 Manual operation
NOTE
NOTE
The timer week program is deactivated in manual
operation.
The room temperature specification takes place manu-
ally.
Press the MENU key. The TIMER symbol flashes.
Press
or
to select the MANUAL symbol. The
MANUAL symbol flashes. Press the ENTER key.
Use
or
to set the room temperature.
9.5 Frost protection
Specified frost protection temperature of 7° C.
Press the MENU key. The TIMER symbol flashes.
Press
or
to select the FROST symbol. The
FROST symbol flashes. Press the ENTER key.
FROST symbol and temperature 7° C are dis-
played.
NOTE
NOTE
The pre-set temperature value of 7° C can be changed
with
or
.
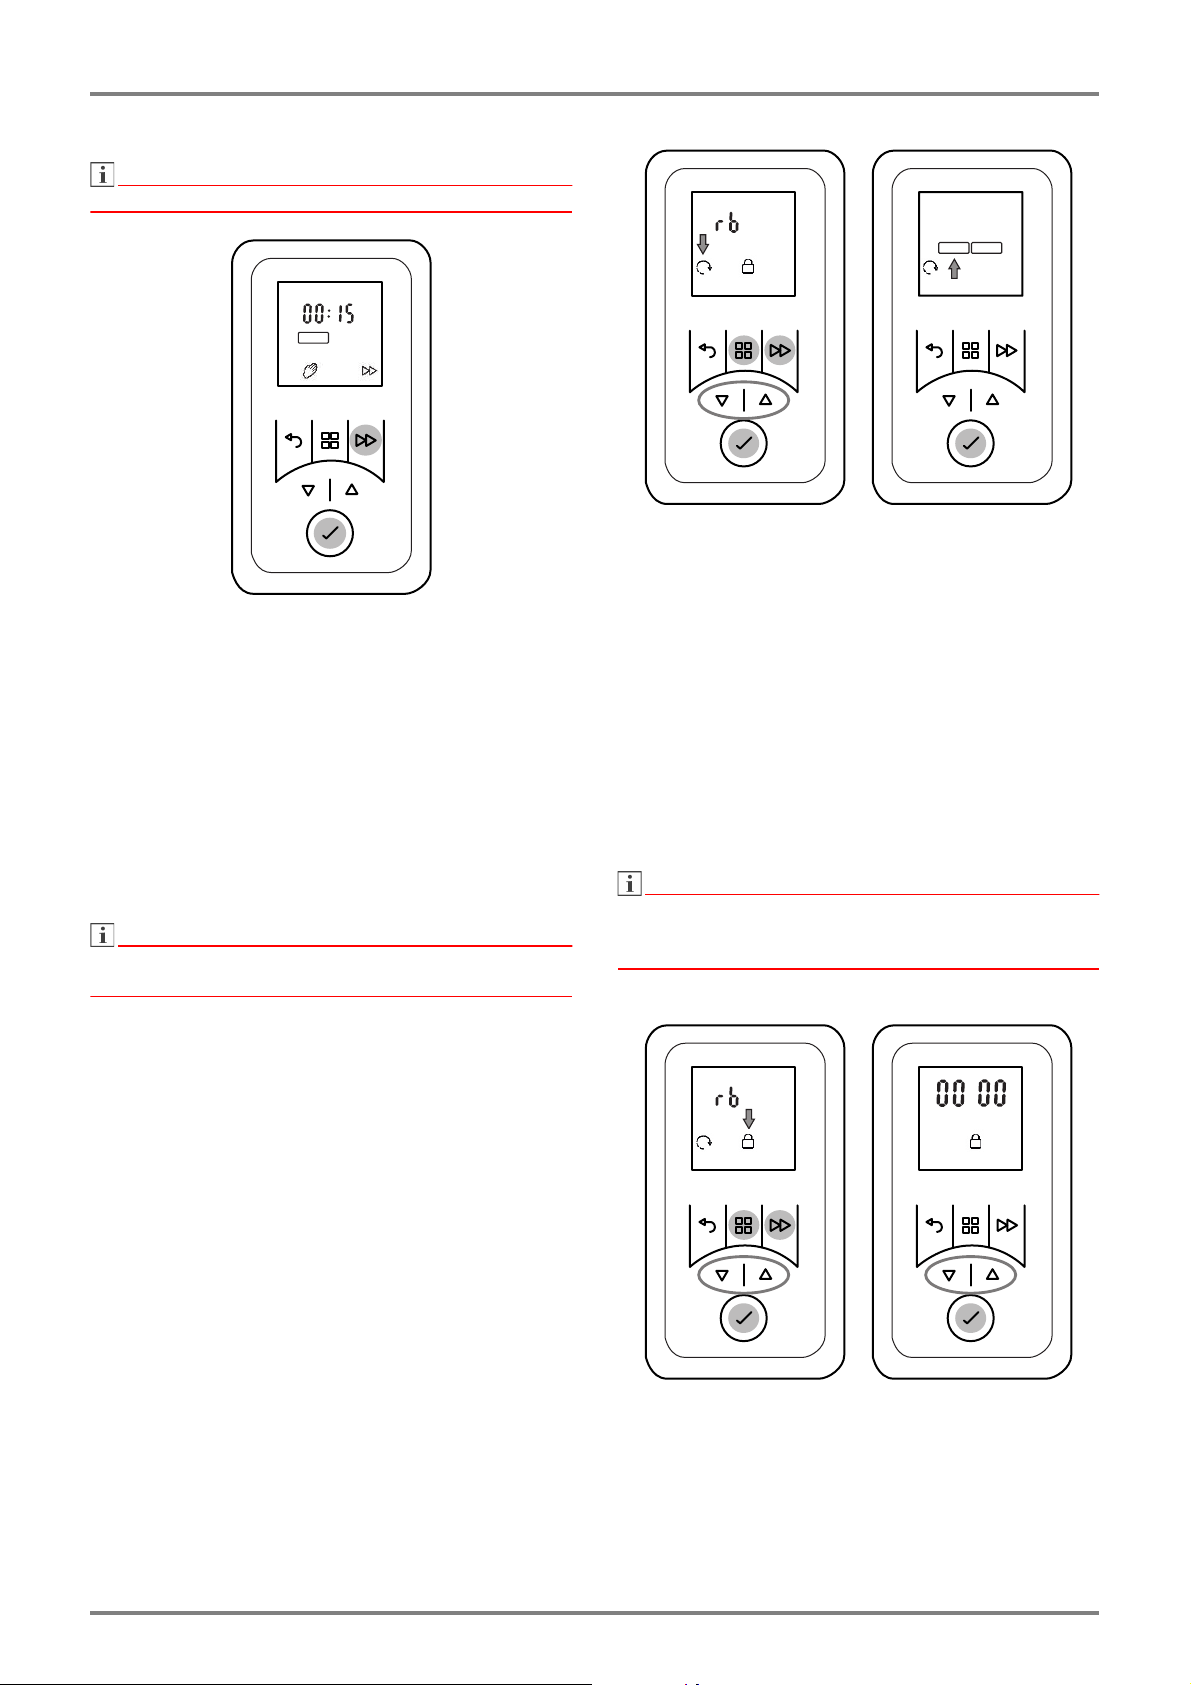
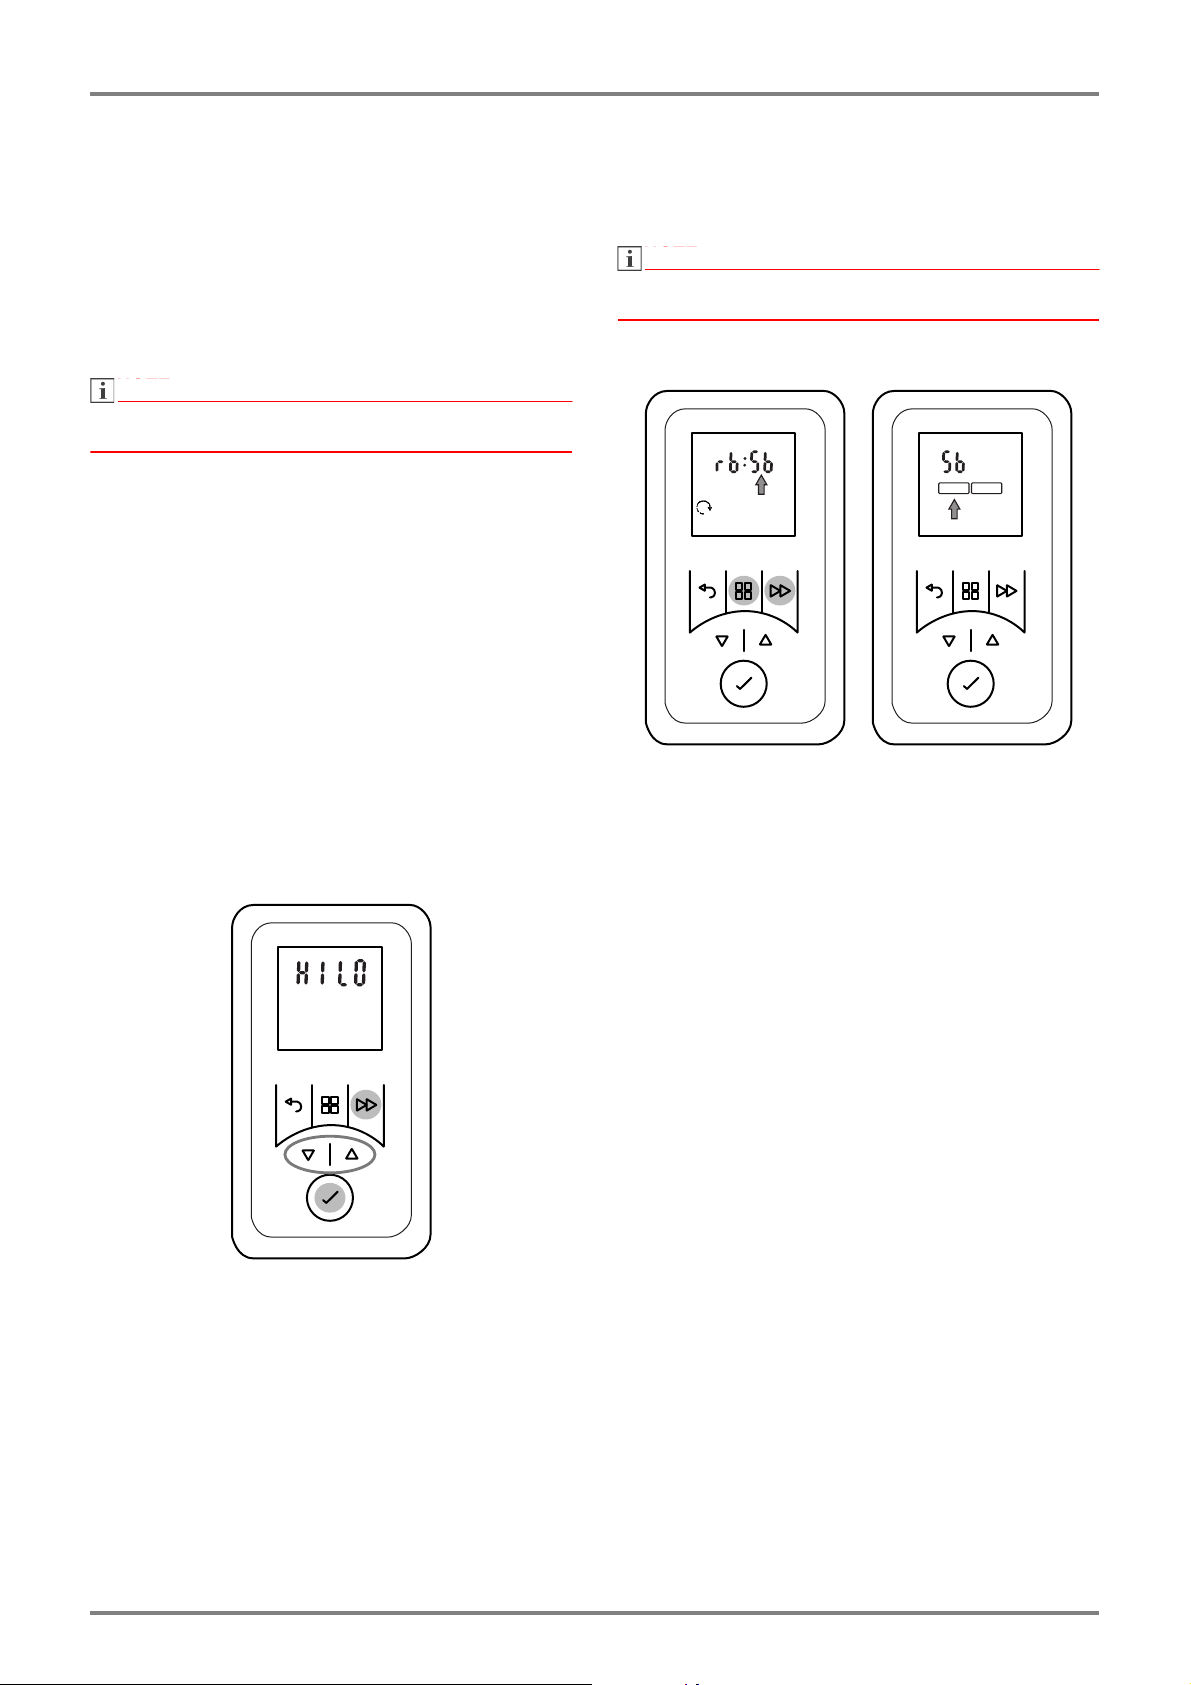
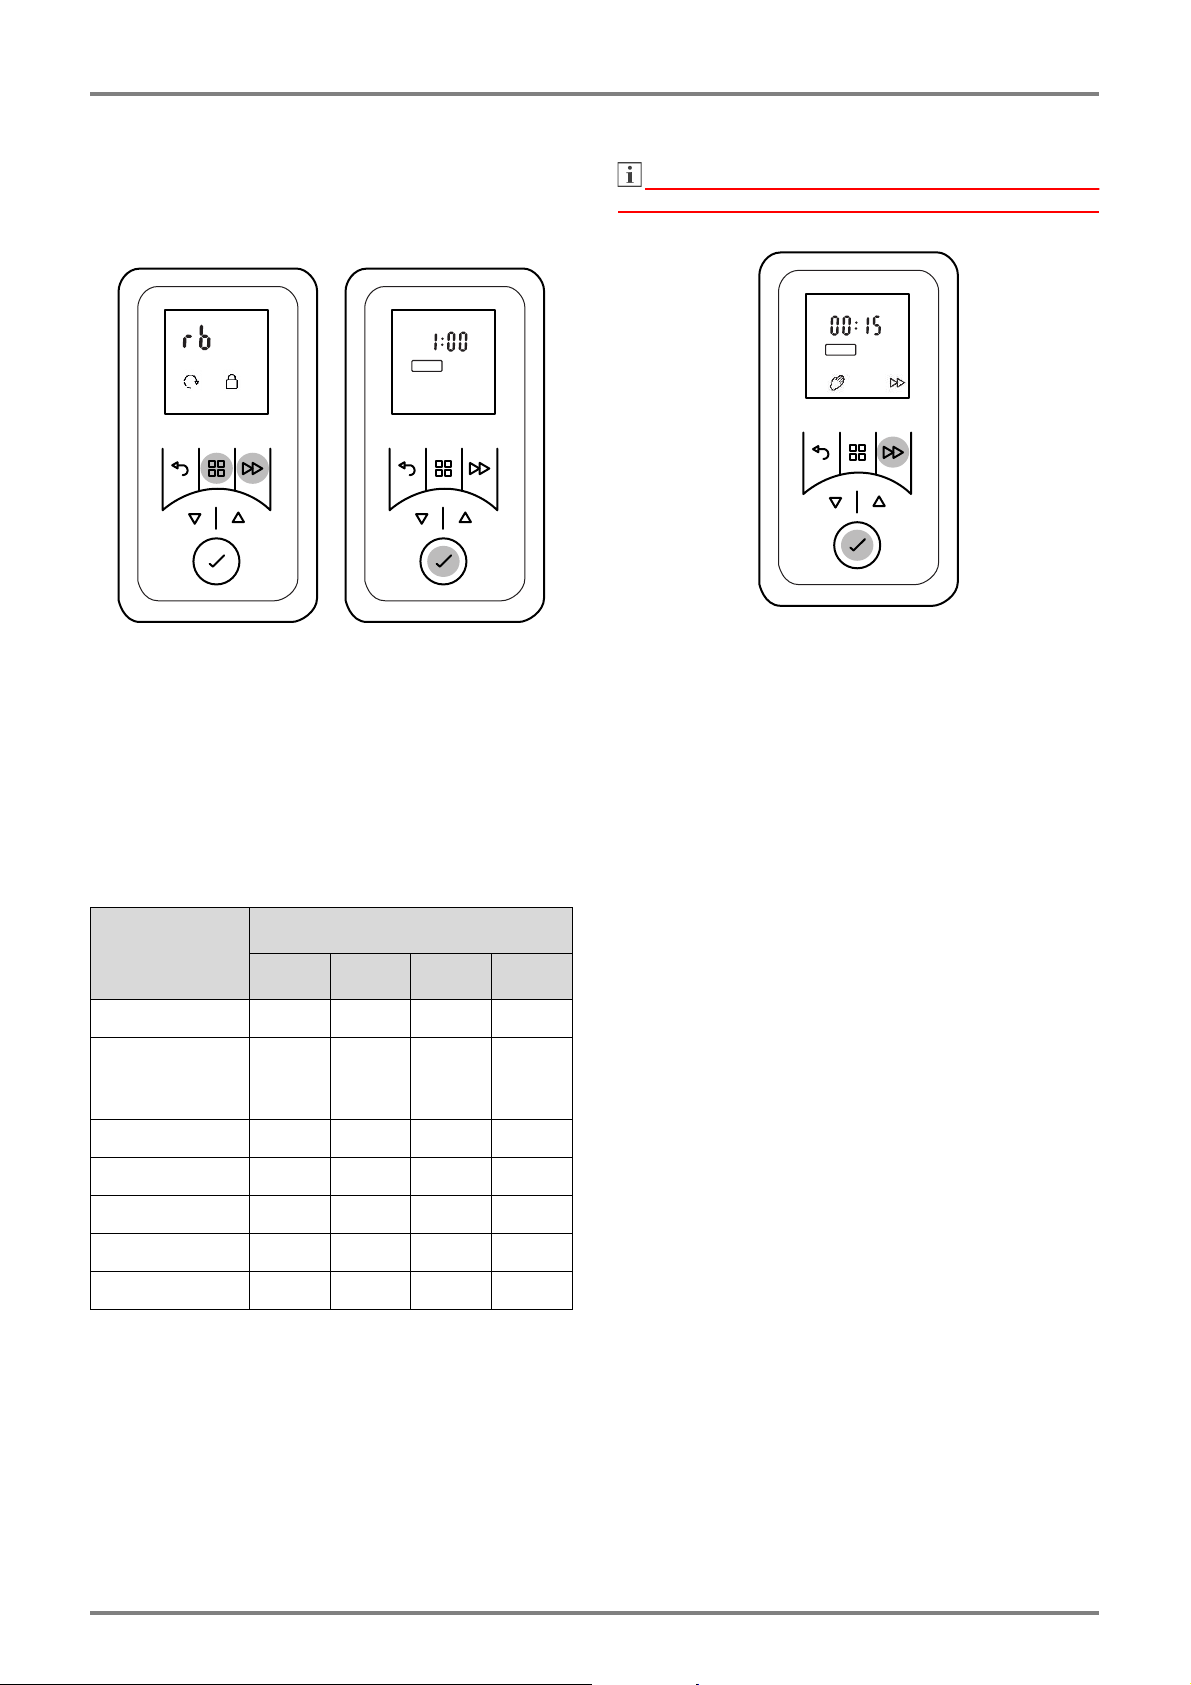
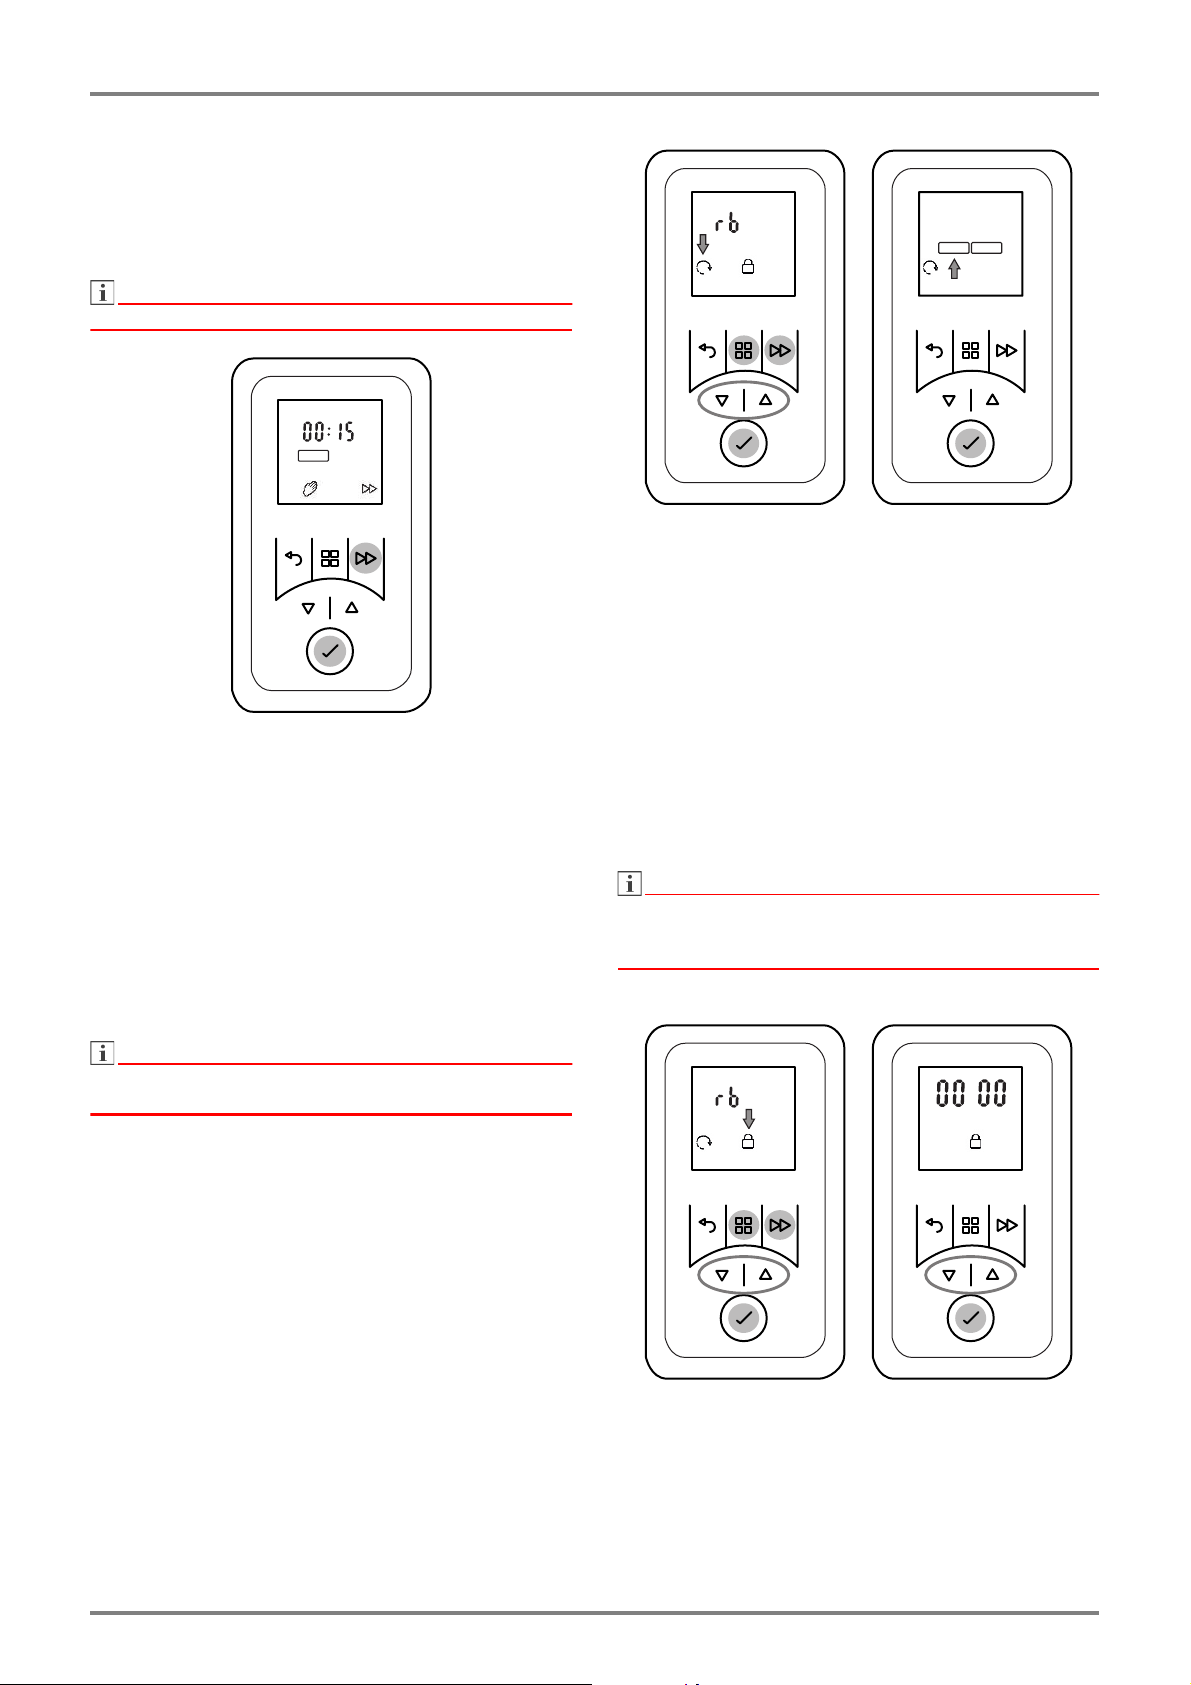
9.6 Run-back timer
The run-back timer can be used to activate a one-off,
time-limited heating program.
Basic settings
Hold down the MENU and ADVANCE keys until the
rb display flashes.
Press the ENTER key. ON/OFF display flashes.
Press
or
to select the ON display. Press the
ENTER key. Maximal run-back time flashes.
Use
or
to set the maximal run-back time.
Press the ENTER key. Room temperature flashes.
Where necessary, change the room temperature
with
or
. Confirm with the ENTER key.
ON
Maximal run-
back time
Press the ADVANCE key:
1 time2
times
3
times
4
times
30 minutes00:15 00:2000:2500:30
01:00 h
(factory)00:1500:3000:4501:00
01:30 h00:1500:3001:0001:30
02:00 h00:3001:0001:3002:00
04:00 h01:0002:0003:0004:00
06:00 h01:3003:0004:3006:00
08:00 h02:0004:0006:0008:00
ON
www.dimplex.de/en1907/DEN-6
H 260E, H 260E ecoEnglish
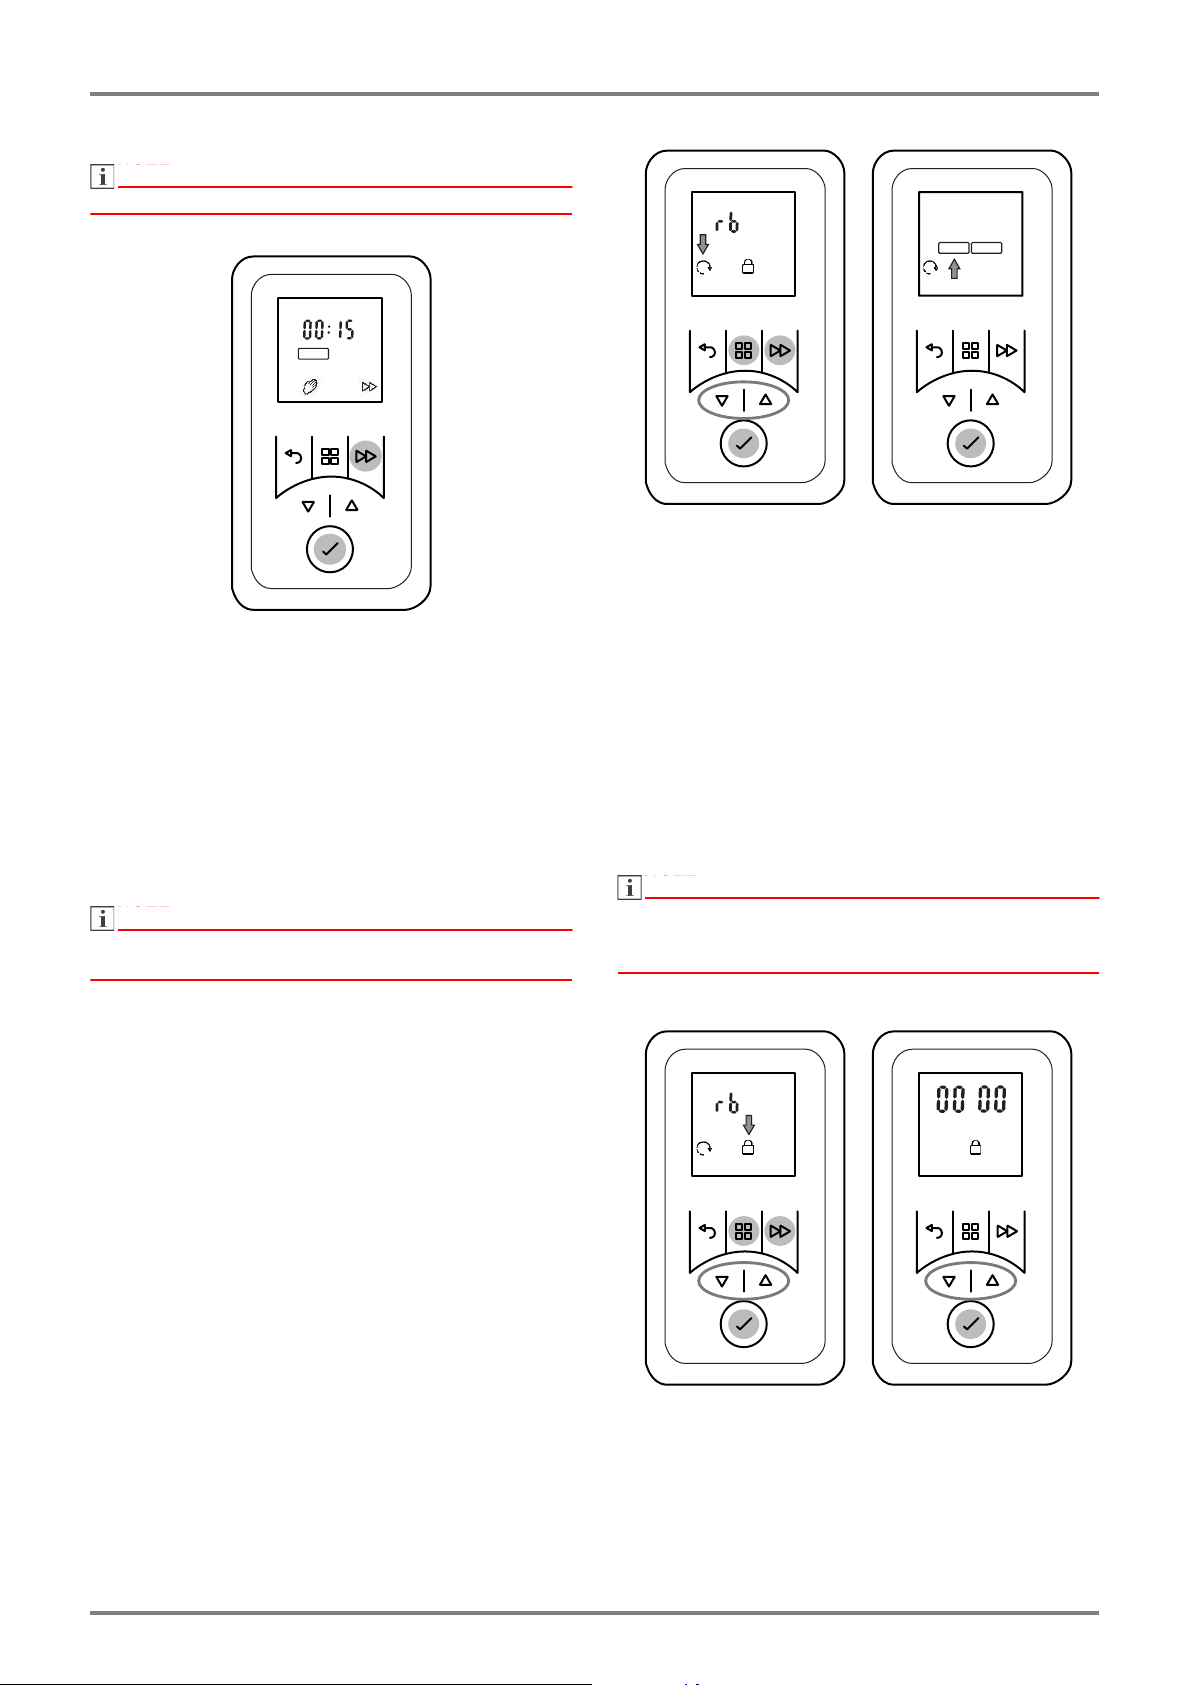
Run-back timer On
NOTE
NOTE
Not possible if operating mode TIMER is selected.
Press the ADVANCE key. Run-back time flashes.
The run-back time can be changed by pressing the
ADVANCE key several times.
Press the ENTER key. Run-back timer = ON.
Run-back timer Off
Press the ADVANCE key several times until the
OFF display flashes.
Press the ENTER key. Run-back timer = OFF.
9.7 Adaptive start-up
NOTE
NOTE
This function is executed only when the operating
mode TIMER is selected.
This function guarantees that the set room temperature
is achieved exactly at the start of the switch-on time.
Example:
In the timer menu, a set room temperature of 22° C is
specified for 07:00. The current room temperature is
17° C. The heating device switches on early so that the
specified room temperature of 22° C is reached by
07:00.
Hold down the MENU and ADVANCE keys until the
rb display flashes.
Press
or
to select the ADAPTIVE START
symbol. The symbol flashes.
Press the ENTER key.
Press
or
to select ON or OFF to switch the
function on or off.
10. Options
10.1 Blocking keys
Key functions are blocked using a freely selectable
four-digit numerical code.
NOTE
NOTE
The function of the run-back timer and switching to the
next programme item in timer mode is also possible
with active key lock.
ON
ONOFF
EN-71907/Dwww.dimplex.de/en
EnglishH 260E, H 260E eco
Specifying unlock code
Hold down the MENU and ADVANCE keys until the
rb display flashes.
Press
or
to select the BLOCKED symbol.
The symbol flashes.
Press the ENTER key. The number display flashes.
Press
or
to specify the number for the unlock
code. Confirm every position specified with the
ENTER key.
NOTE
NOTE
If the specified lock code is not available, the block can
be cleared by entering the number 4115.
Unlocking keys
Press any button. The four-digit numerical code
0000 is displayed.
Press
or
to enter the number for the unlock
code. Confirm every position specified with the
ENTER key.
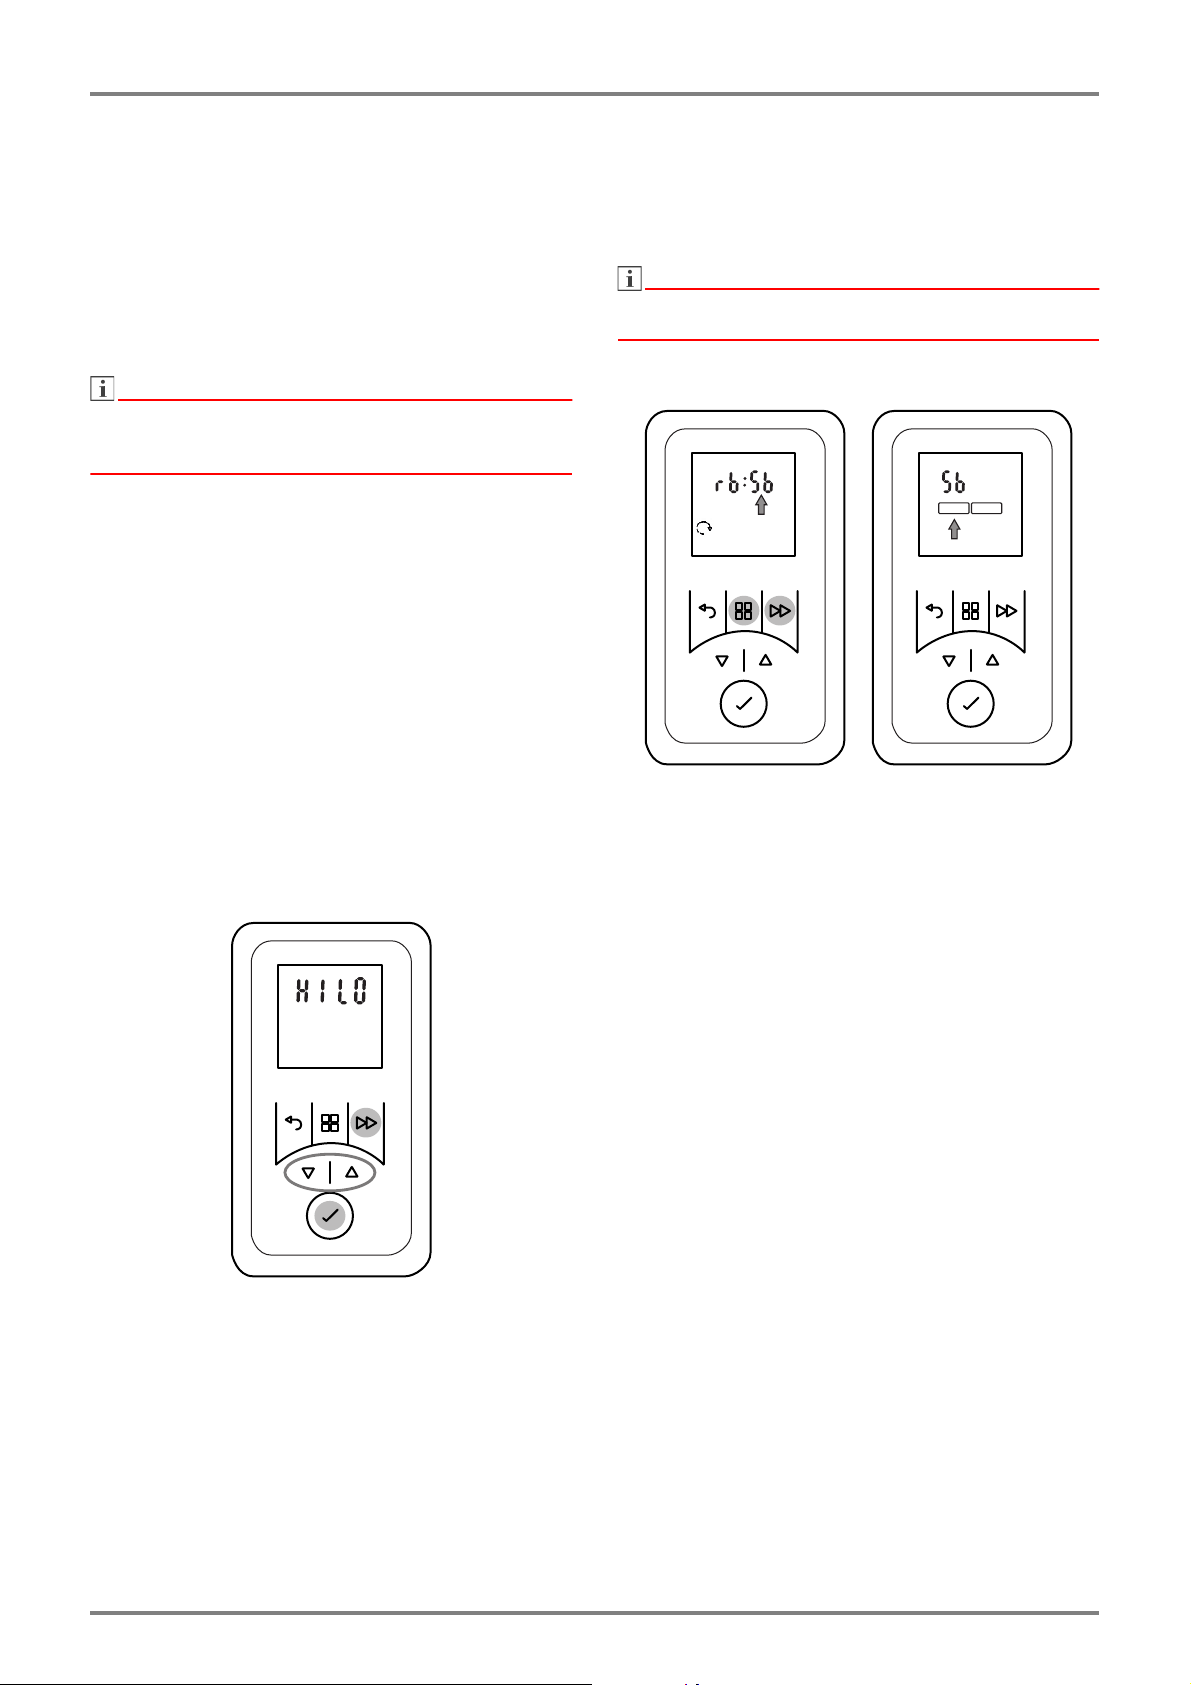
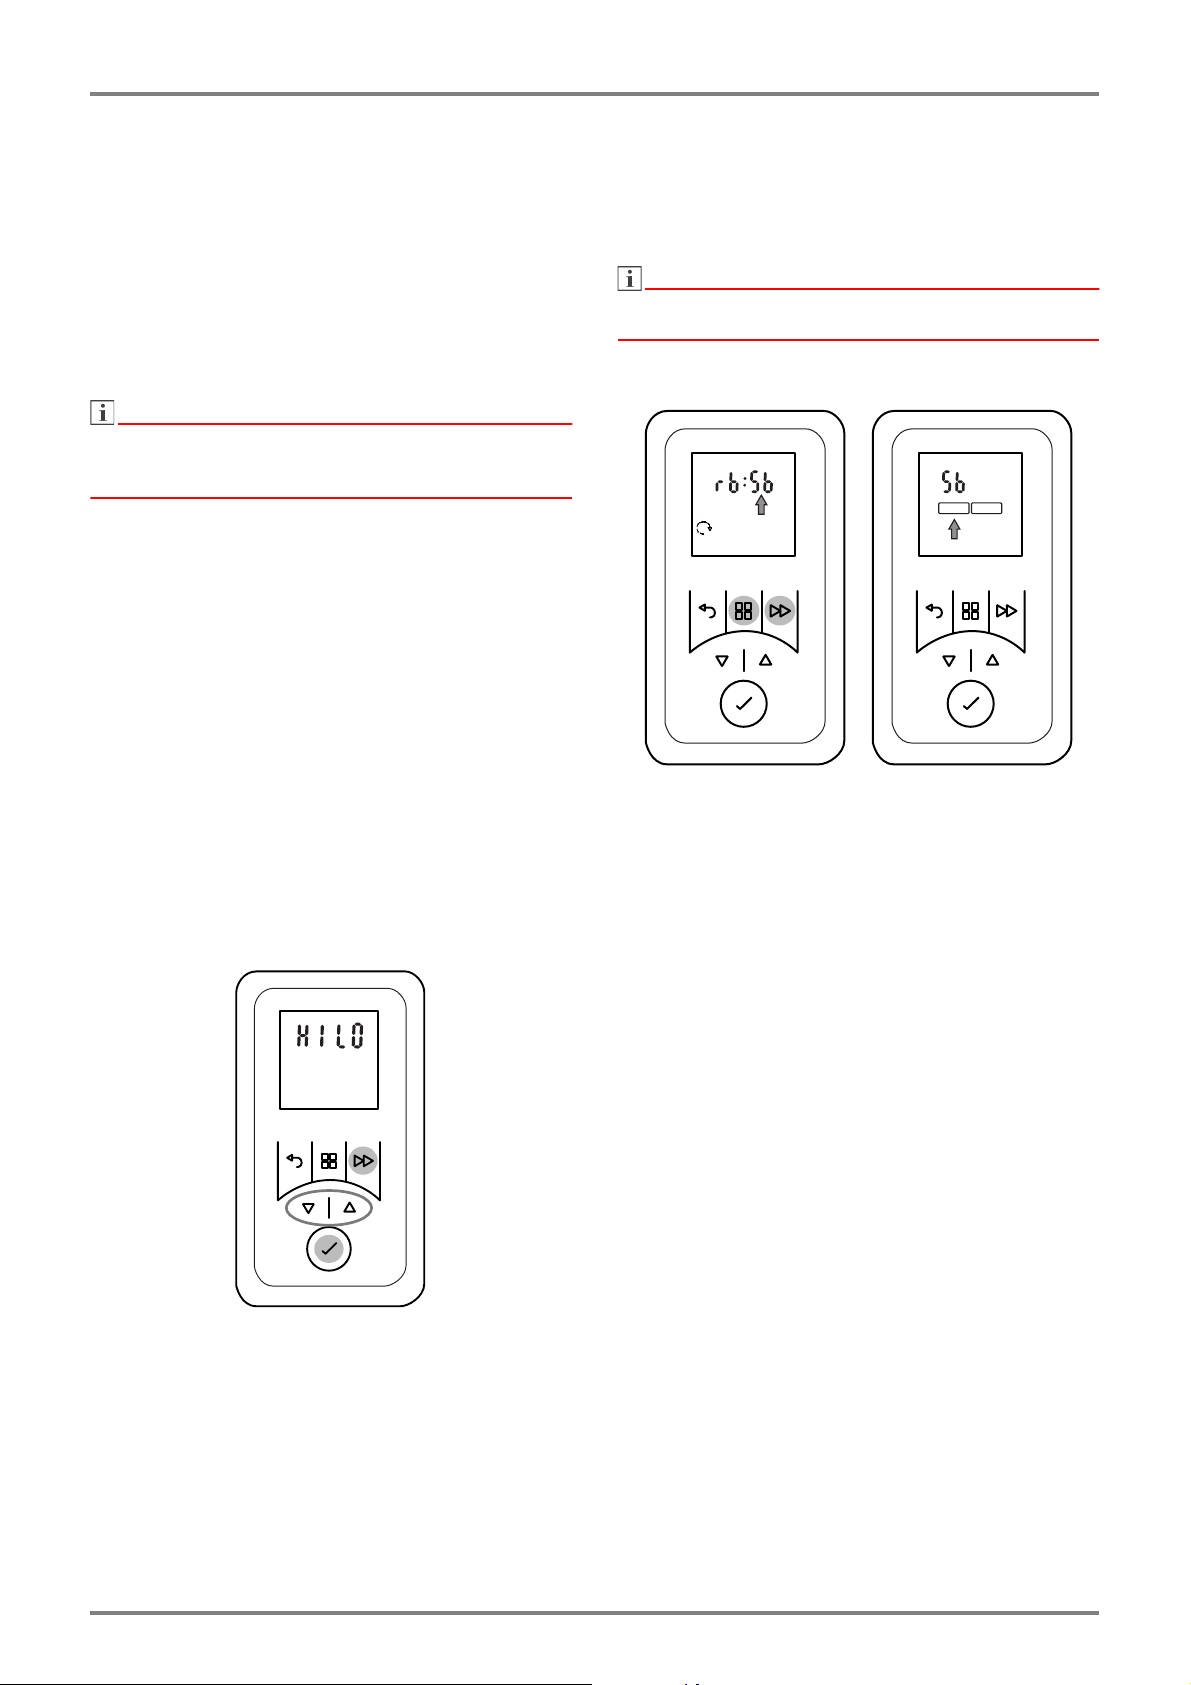
10.2 Reducing heat output, cold air mode
Model H 260E
The maximal heat output of 2 kW can be reduced to 1
kW. Alternatively, the device can be operated as a cold
air fan.
Model H 260E eco
The device can be alternatively operated as a cold air
fan.
Hold down the ADVANCE key until the HILO dis-
play appears.
Press
or
to select HI or LO or FAN. The dis-
play means:
HI = normal operation, full fan speed.
LO = fan speed reduction, heat reduction to 1 kW
on model H 260E.
FAN = cold air mode (no heat output).
Confirm selected setting with ENTER.
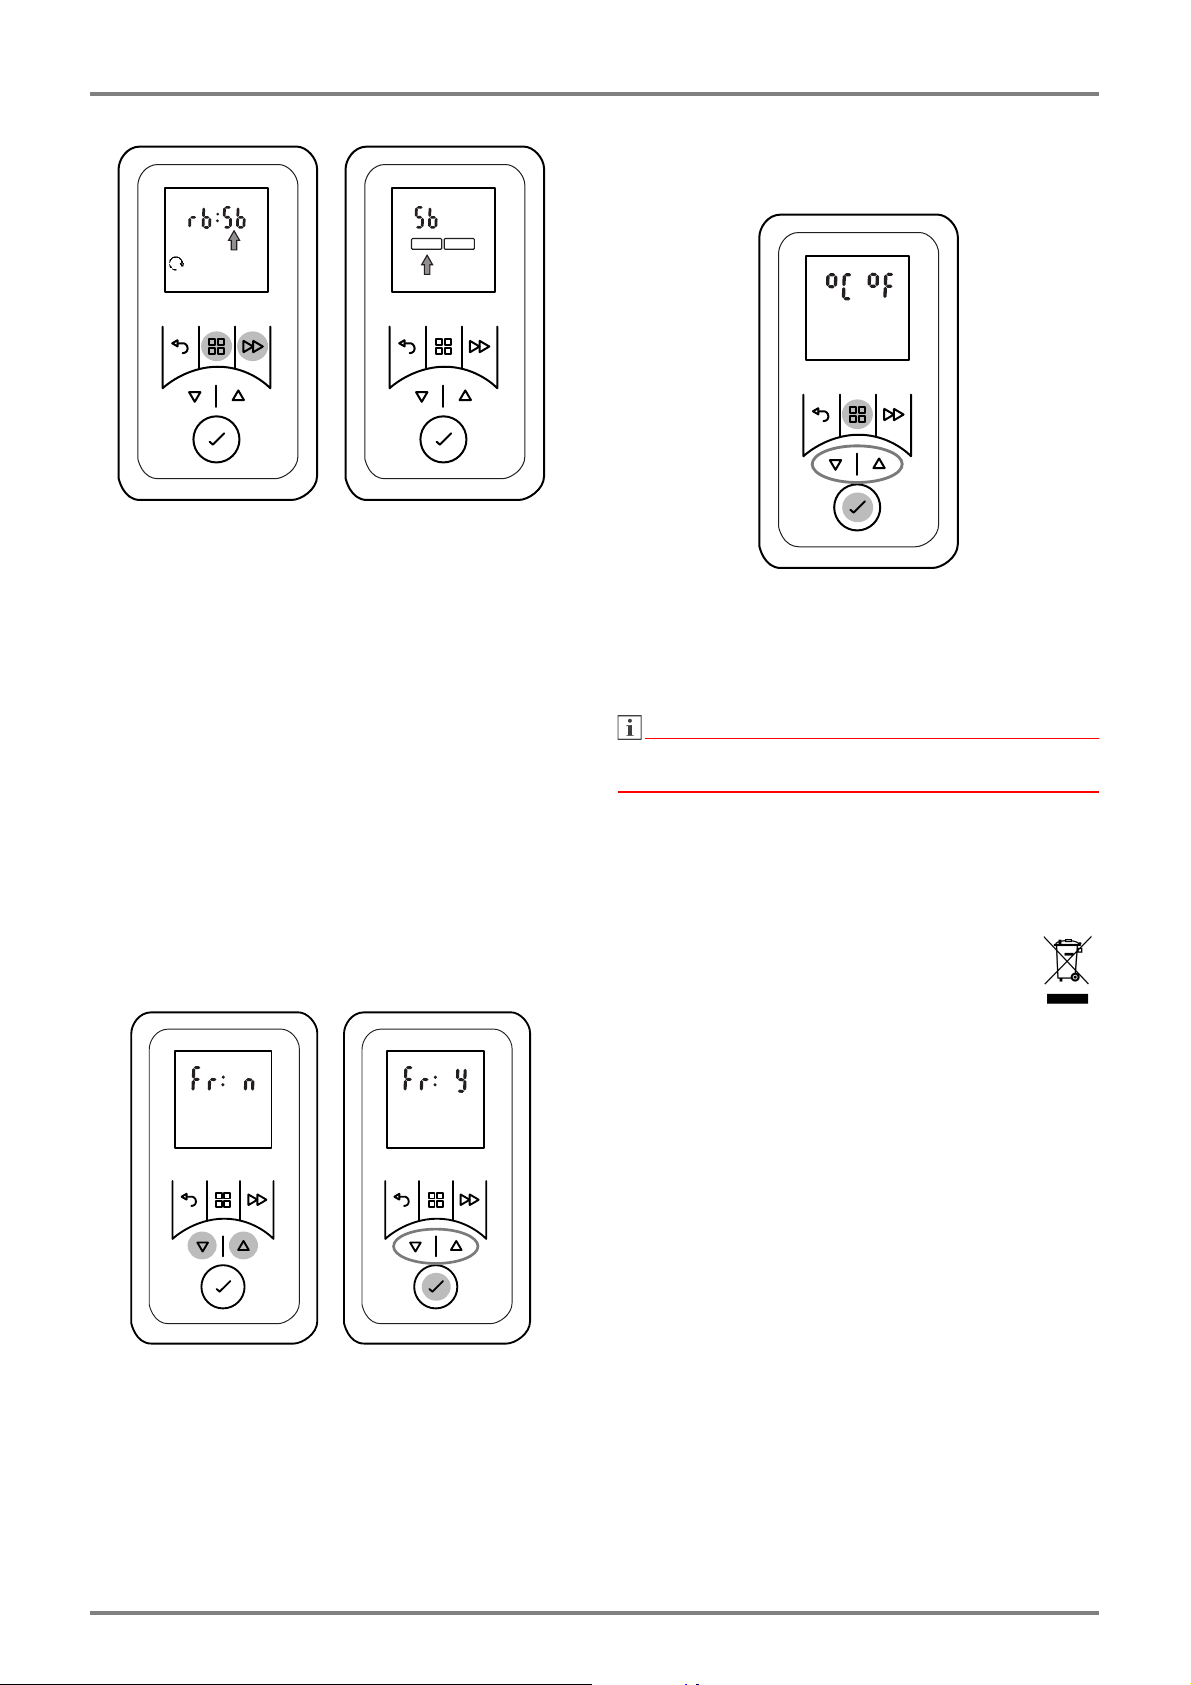
10.3 Minimum room temperature
This function can be used to ensure that a minimum
room temperature is specified even during OFF times,
for example in timer mode (week program).
NOTE
NOTE
The specification also applies to the runback timer
function. Frost protection mode has priority.
Hold down the MENU and ADVANCE keys until the
rb display flashes.
Press
. The Sb display flashes.
Press the ENTER key. The ON symbol flashes.
Press the ENTER key. The minimum room temper-
ature (factory setting 16° C) flashes.
Use
or
to set the minimum room temperature
and confirm with ENTER.
Press the BACK key to return to the standard dis-
play.
ONOFF
www.dimplex.de/en1907/DEN-8
H 260E, H 260E ecoEnglish
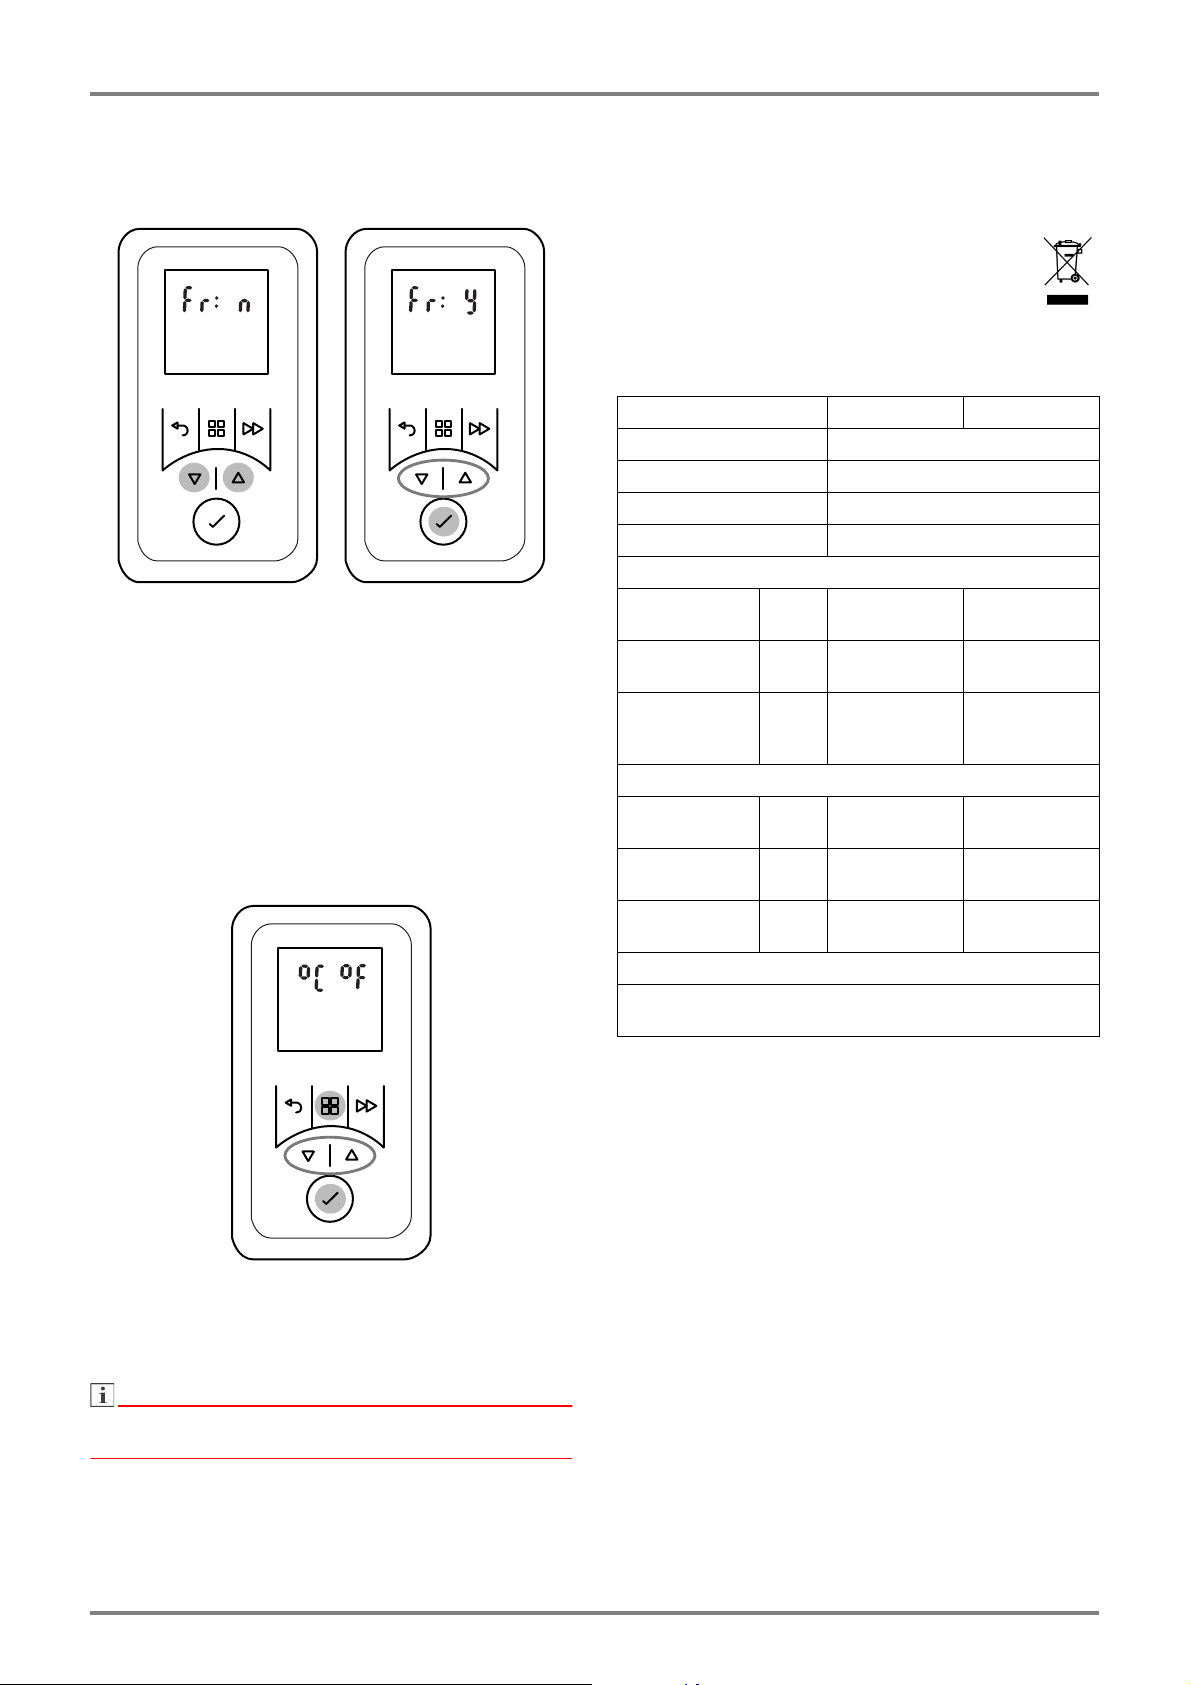
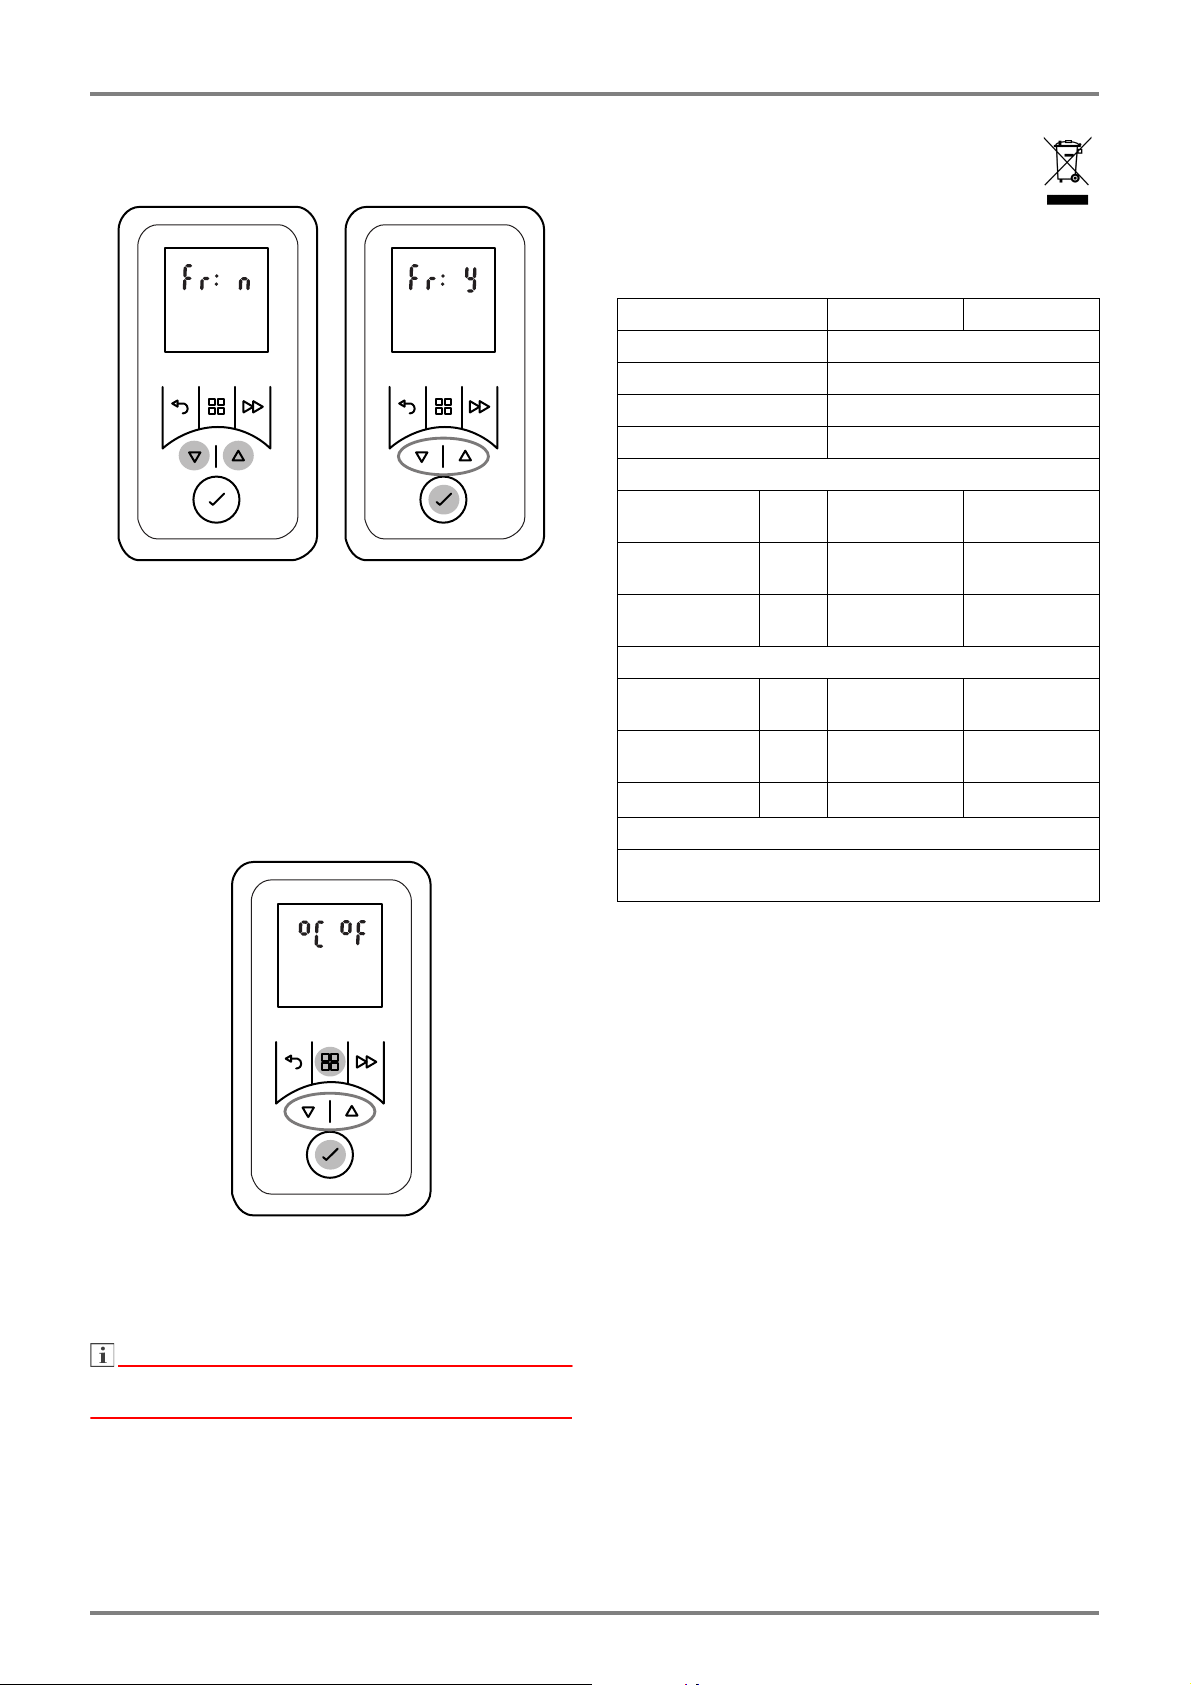
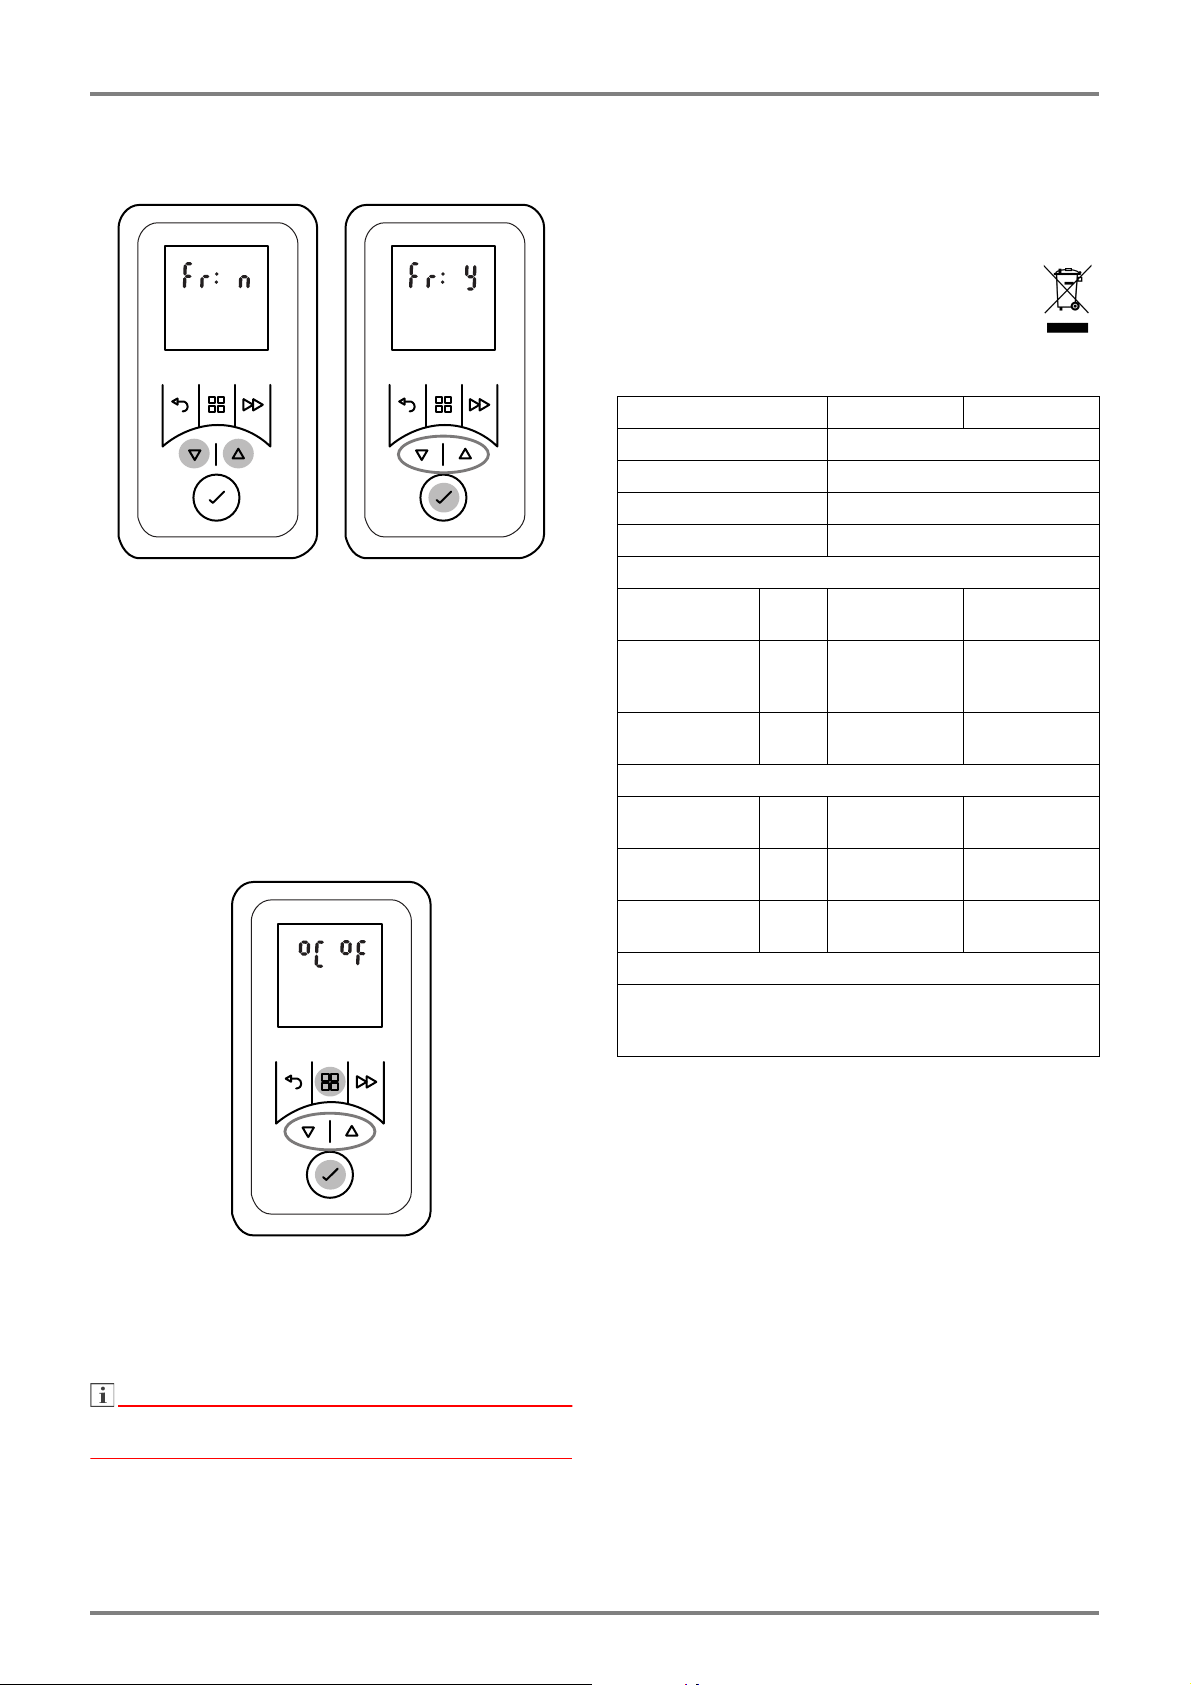
10.4 Reset to factory settings
Resets all settings made by the user to the pre-set fac-
tory settings.
Hold down
and
until the Fr n display ap-
pears.
Press
or
to select the Y display. The symbol
flashes.
Press the ENTER key. All values are reset to the
factory settings. Time display appears.
Set the time and date.
10.5 Temperature unit
Display can be set to degrees Celsius and degrees
Fahrenheit.
Hold down the MENU key until ° C display flashes.
Press
or
to select ° C or ° F.
Confirm with the ENTER key.
NOTE
NOTE
The temperature unit ° C is customary in most
European countries.
11. Warranty
This product is supplied with a two-year warranty
according to our terms of guarantee.
12. Note on disposal
Do not dispose of the unit with general
household waste. The device must be taken to
a local waste disposal plant.
13. Technical data
Glen Dimplex Deutschland GmbHTel.: +49 9221 709 545
Am Goldenen Feld 18Fax.: +49 9221 709 924545
D - 95326 KulmbachE-mail: service@gdts.one
Model referenceH 260EH 260E eco
Nominal voltage1/N/PE, 230 V~, 50 Hz
Degree of protectionIP24
Dimensions (W x H x D)300 x 405 x 120 mm
Weight3.2 kg
Heat output
Nominal heat out-
put
P
nom
2.0 kW1.0 kW
Minimum heat
output (indicative)
P
min
1.0 kW1.0 kW
Maximum contin-
uous heat output
P
max, C
2.0 kW1.0 kW
Auxiliary electricity consumption
At nominal heat
output
el
max
0.0 W0.0 W
At minimum heat
output
el
min
0.0 W0.0 W
In standby modeel
SB
0.5 W0.5 W
Type of control
Electronic room temperature controller with week program,
adaptive control of the heating start and operating time limit
FR-11907/Dwww.dimplex.de/fr
FrançaisH 260E, H 260E eco
1. Remarques à l’attention de l’utilisateur
REMARQUE
Cher client,
Conservez précieusement ces instructions et remet-
tez-les le cas échéant au prochain propriétaire de l'ap-
pareil.
ATTENTION !
Les enfants âgés de plus de 8ans ainsi que
les personnes dont les facultés physiques,
sensorielles et mentales sont réduites ou qui
ne disposent pas de l’expérience ou de
connaissances suffisantes sont autorisées à
utiliser l’appareil sous la surveillance d’une
personne expérimentée et si elles ont été in-
formées des règles de sécurité à l’utilisation
de l’appareil et ont compris les risques
encourus! Ne laissez pas les enfants jouer
avec l'appareil. Ne laissez pas les enfants
procéder sans surveillance au nettoyage et à
l’entretien par l’utilisateur de l’appareil!
ATTENTION !
Maintenir les enfants de moins de 3ans éloi-
gnés de l’appareil ou rester très attentif à
leurs mouvements. Les enfants âgés de 3 à
8ans sont autorisés à allumer et à éteindre
l’appareil sous la surveillance d’un adulte ou
s’ils ont été informés des règles de sécurité
liées à l’utilisation de l’appareil et ont compris
les risques encourus – à condition que l’appa-
reil soit placé ou installé dans un lieu d’utilisa-
tion réputé normal!
ATTENTION !
Les enfants âgés de 3 à 8ans ne sont pas au-
torisés à allumer l’appareil, à le nettoyer ni à
en effectuer la maintenance.
ATTENTION !
Le symbole ci-contre est apposé
sur l’appareil; il signifie que l’appa-
reil de chauffage ne doit pas être
recouvert!
ATTENTION !
Certaines pièces de l’appareil peuvent deve-
nir très chaudes et causer des brûlures. Des
précautions particulières doivent être prises
en présence d’enfants ou de personnes vul-
nérables.
ATTENTION !
Ne jamais faire fonctionner l’appareil de
chauffage dans des pièces dans lesquelles
sont utilisées des substances inflammables
(p. ex. solvants).
ATTENTION !
Installer l'appareil de manière à ce qu'il ne
puisse pas être accessible à toute personne
se trouvant dans la baignoire ou sous la
douche.
ATTENTION !
Si le câble secteur est endommagé, il doit être
remplacé par le fabricant, son SAV ou toute
personne qualifiée comparable, afin de préve-
nir tout risque de danger!
ATTENTION !
Pour éviter tout risque provoqué par une réini-
tialisation involontaire du limiteur de sur-
charge, l'appareil ne doit pas être alimenté
par un dispositif de commutation externe
comme une minuterie p.ex. ou raccordé à un
circuit électrique régulièrement activé et dé-
sactivé !
ATTENTION !
Selon la taille de la chambre, la demande de
chaleur et le réglage du thermostat, les
chambres peuvent être chauffés par un
chauffage silencieux. Cela peut être dange-
reux pour les personnes qui ne sont pas en
mesure de quitter la salle en cas de tempéra-
ture plus!
REMARQUE
L'appareil est destiné uniquement au réchauffement de
l'air ambiant de pièces fermées.
www.dimplex.de/fr1907/DFR-2
H 260E, H 260E ecoFrançais
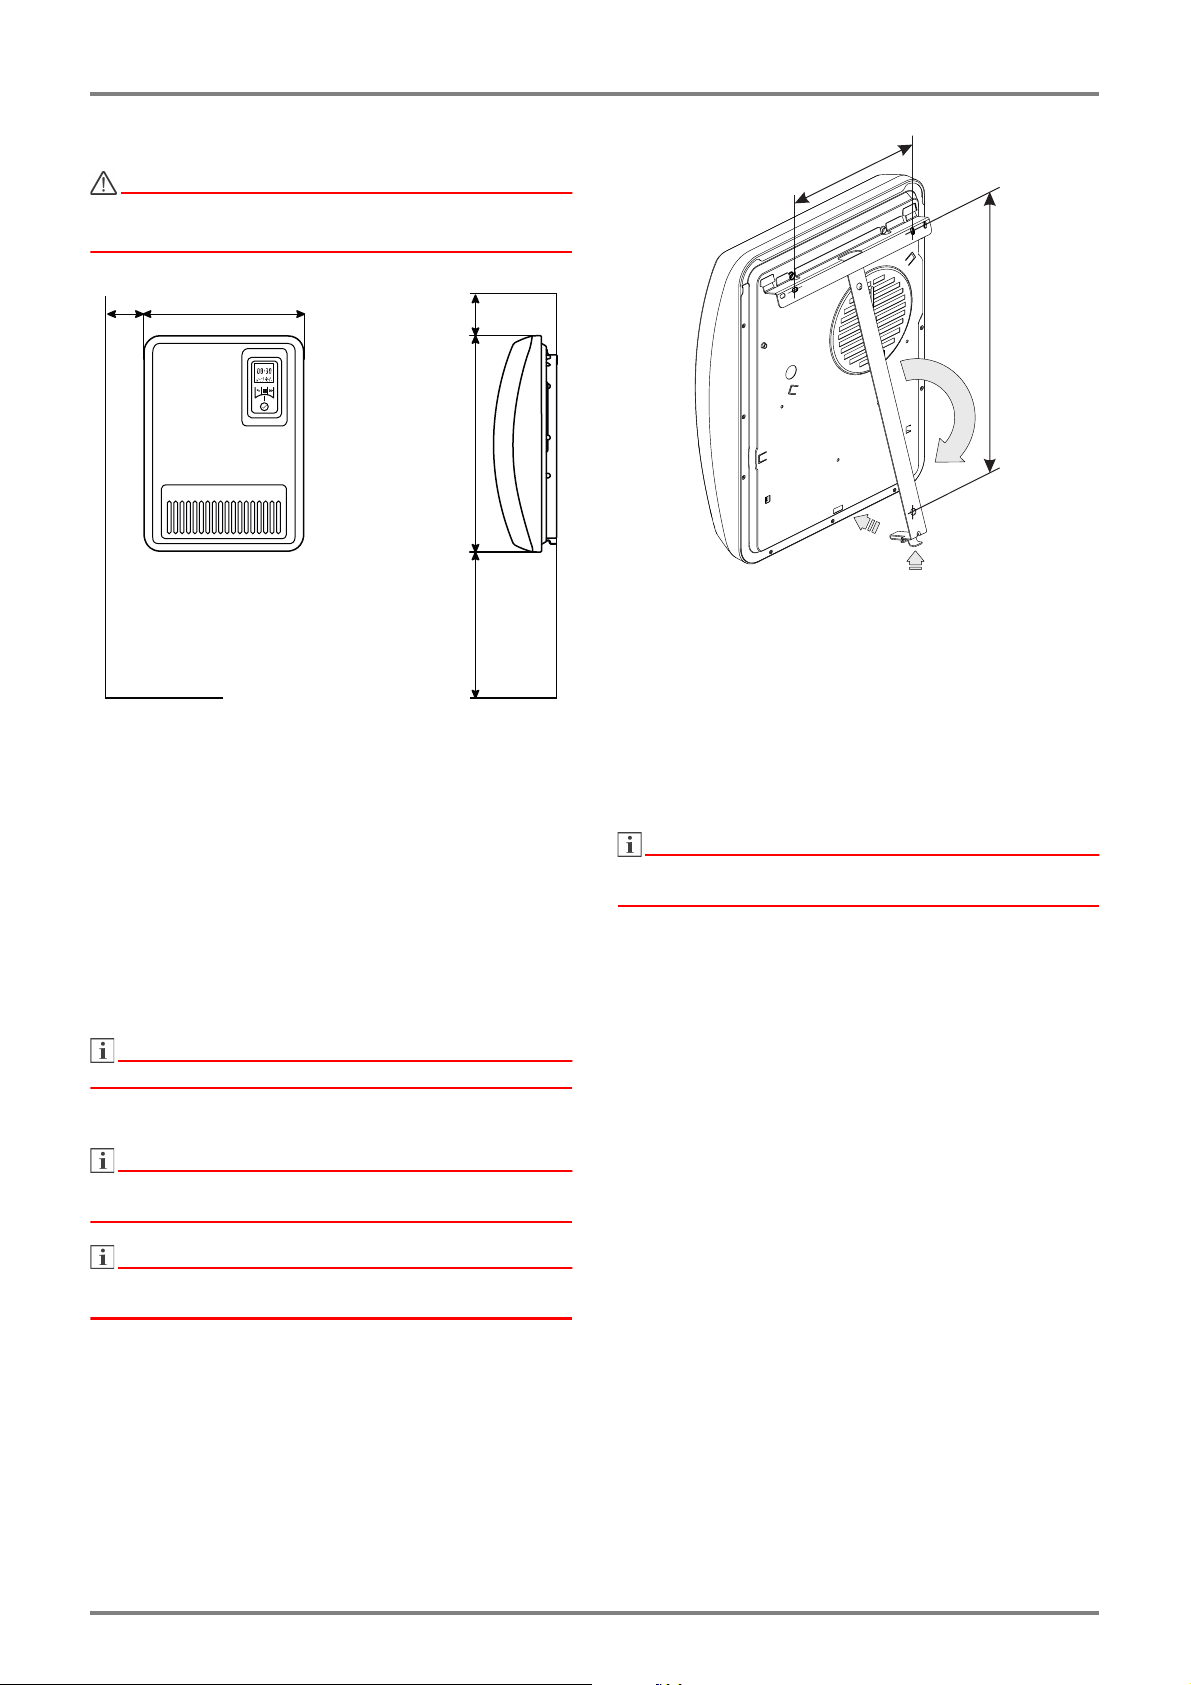
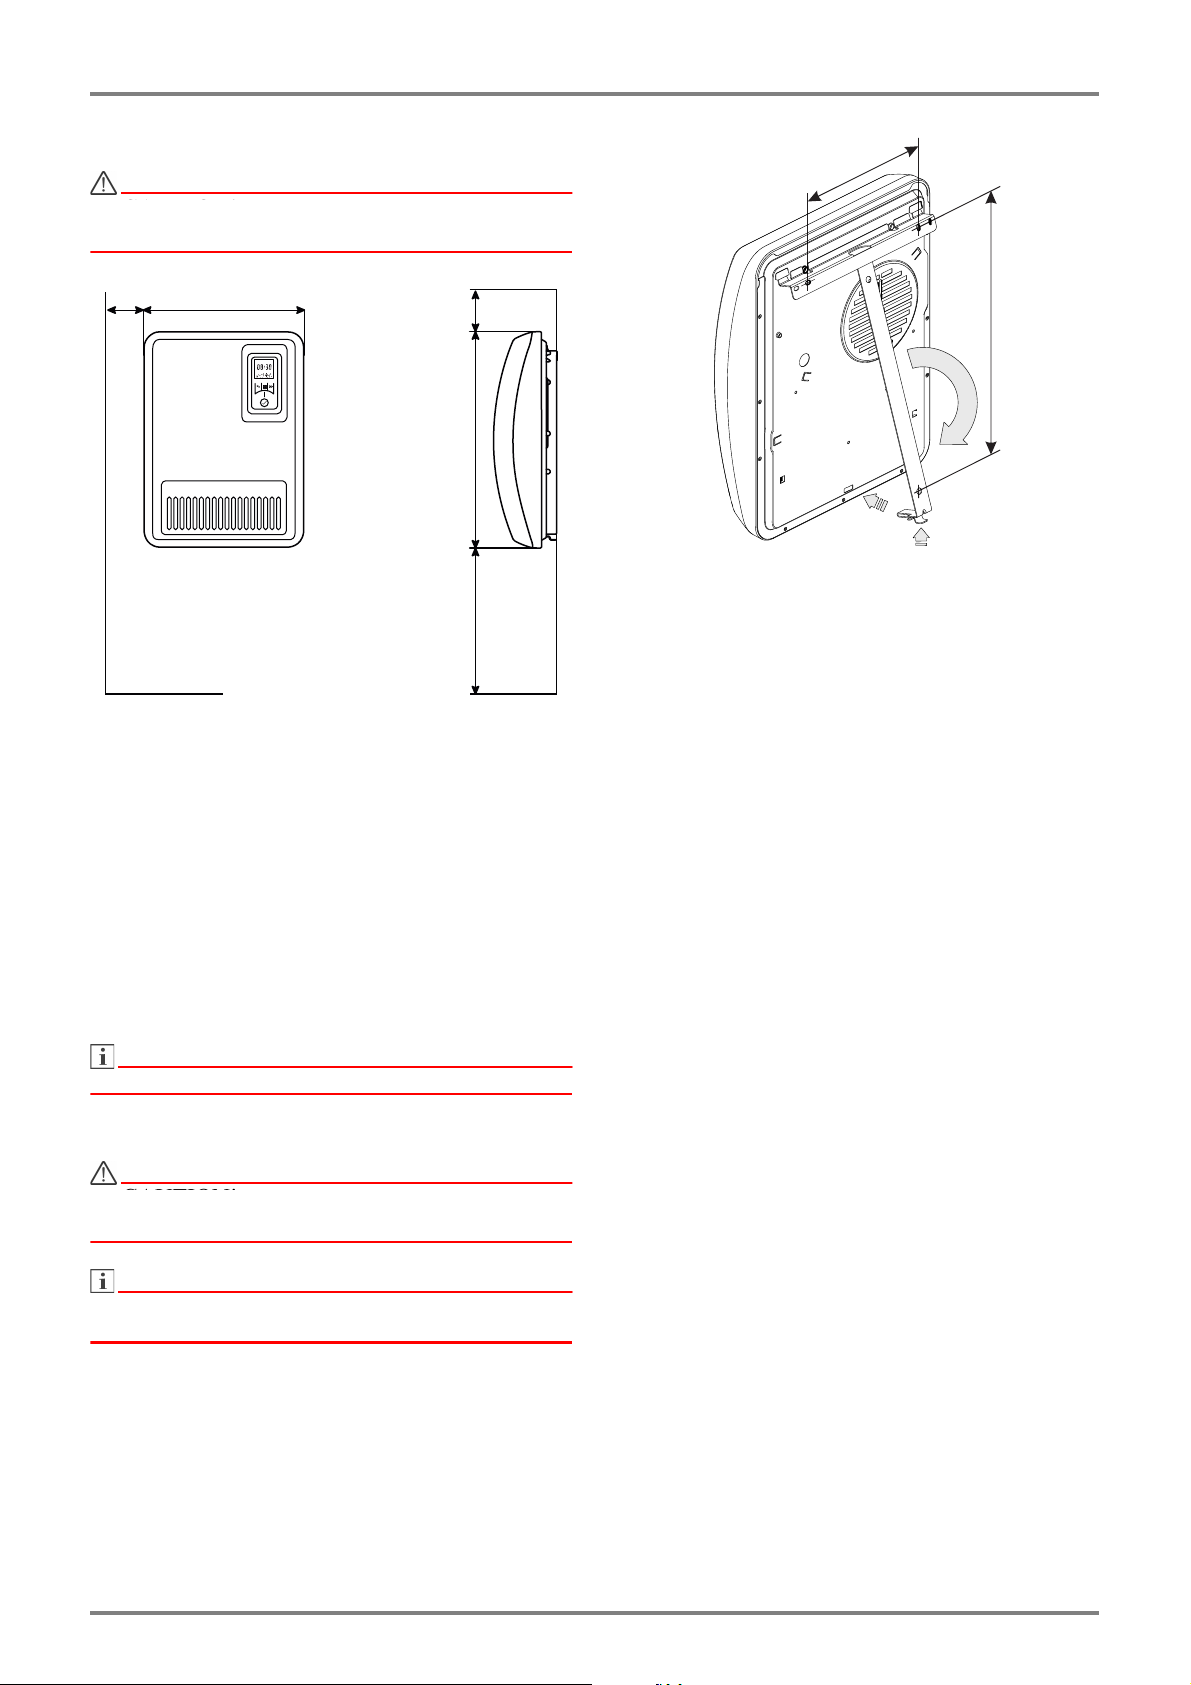
2. Montage, installation, distances minimales
ATTENTION !
Ne pas installer l’appareil sous une prise
murale!
Respecter les distances minimales prescrites.
Respecter en outre une distance de 750mm minimum
par rapport à la face avant de l'appareil.
L’appareil de chauffage doit être installé à l’horizontale
sur un mur vertical (comme représenté sur l’image).
Toutes les dimensions sont exprimées en mm.
Lors du montage, il convient de respecter scrupuleuse-
ment les prescriptions d’installation en vigueur concer-
nant la zone de protection.
La prise de courant ou de raccordement secteur doit
être accessible après le montage.
Veiller à ce que l’air puisse entrer et sortir librement de
l’appareil de chauffage
.
REMARQUE
Il est permis de monter l'appareil sur une paroi en bois.
Montage mural
REMARQUE
Utiliser impérativement la fixation murale d’origine qui
se trouve au dos de l’appareil!
REMARQUE
Veiller à ne pas percer les câbles électriques ni les
tuyauteries qui se trouvent dans le mur.
Appuyez sur la languette de la partie inférieure du
support mural (A) pour dégager ce dernier de l'ap-
pareil.
Dans le mur, percez des trous pour fixer le support
et insérez les chevilles.
Positionnez le support mural et vissez-le ferme-
ment au mur.
Accrochez l'appareil au support mural.
Faites pivoter l'appareil vers le bas et enclenchez-
le (B).
3. Branchements électriques
La tension indiquée sur la plaque signalétique doit cor-
respondre à la tension du réseau.
Le câble ne doit pas être en contact avec la jaquette.
Pour l'alimentation électrique de l'appareil, il est
recommandé de mettre en place un circuit électrique
dédié.
Introduire la fiche dans la prise de courant. La fiche doit
toujours être accessible en cas de danger.
REMARQUE
L'appareil doit être raccordé uniquement à une prise à
contacts de protection.
4. Limiteur de surcharge
L’appareil de chauffage est équipé d’un limiteur de sur-
charge pour votre sécurité. Si la circulation de l'air est
gênée (p. ex. par des rideaux ou un encombrement de
la grille d'aération), l’appareil se met automatiquement
à l’arrêt. L’indication Err35 apparaît sur l‘écran.
Dans ce cas, il convient de couper pendant quelques
minutes l’alimentation électrique de l’appareil de
chauffage (débrancher le connecteur, déconnecter le
fusible) afin que l’appareil puisse refroidir
suffisamment.
Avant la remise en marche de l’appareil, éliminer les
causes du déclenchement du limiteur de surcharge.
5. Nettoyage
Avant de procéder au nettoyage, mettre l'appareil hors
tension et le laisser refroidir. La surface extérieure de
l’appareil peut être nettoyée avec un linge doux et
humide. Pour le nettoyage, ne pas utiliser de poudre à
récurer ni d’encaustique qui pourraient endommager
les surfaces. Les dépôts de poussière dans l’appareil
peuvent être éliminés de l’extérieur à l’aide d’un
aspirateur.
2503001000405280
190
308BA
FR-31907/Dwww.dimplex.de/fr
FrançaisH 260E, H 260E eco
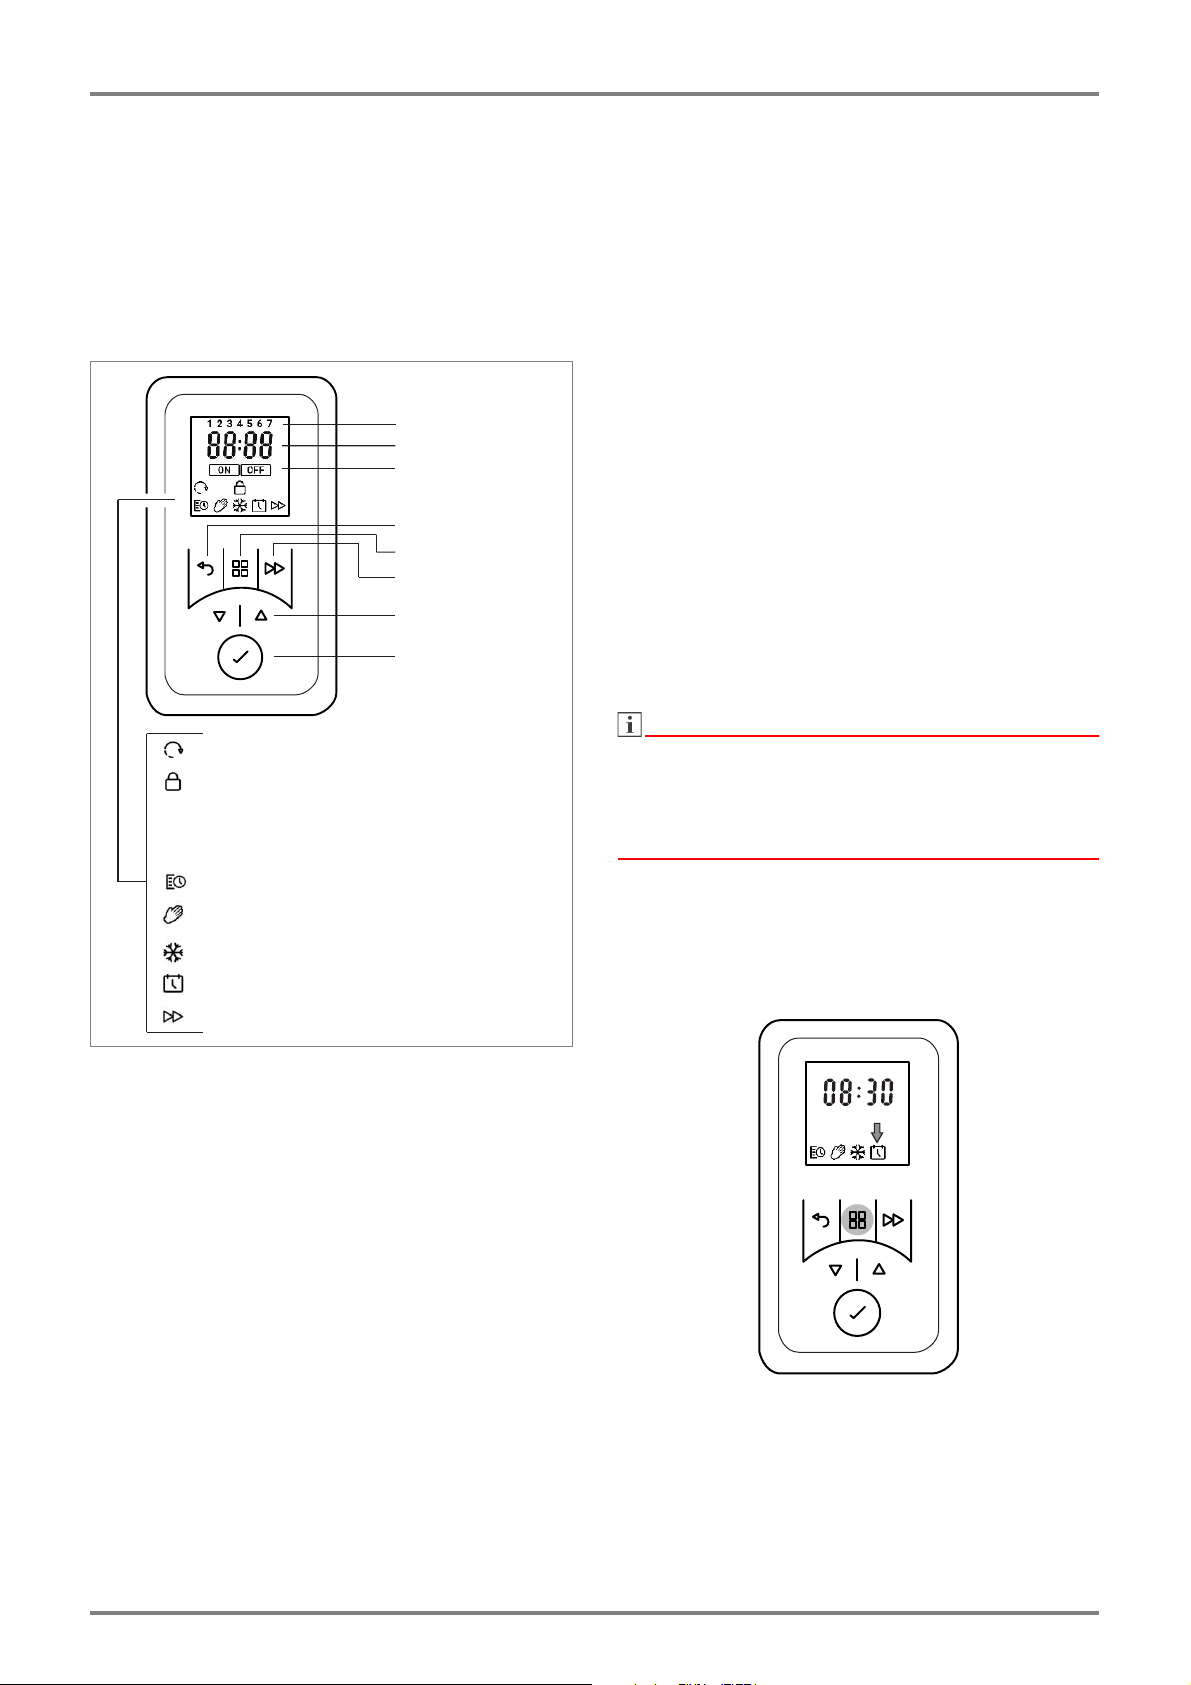
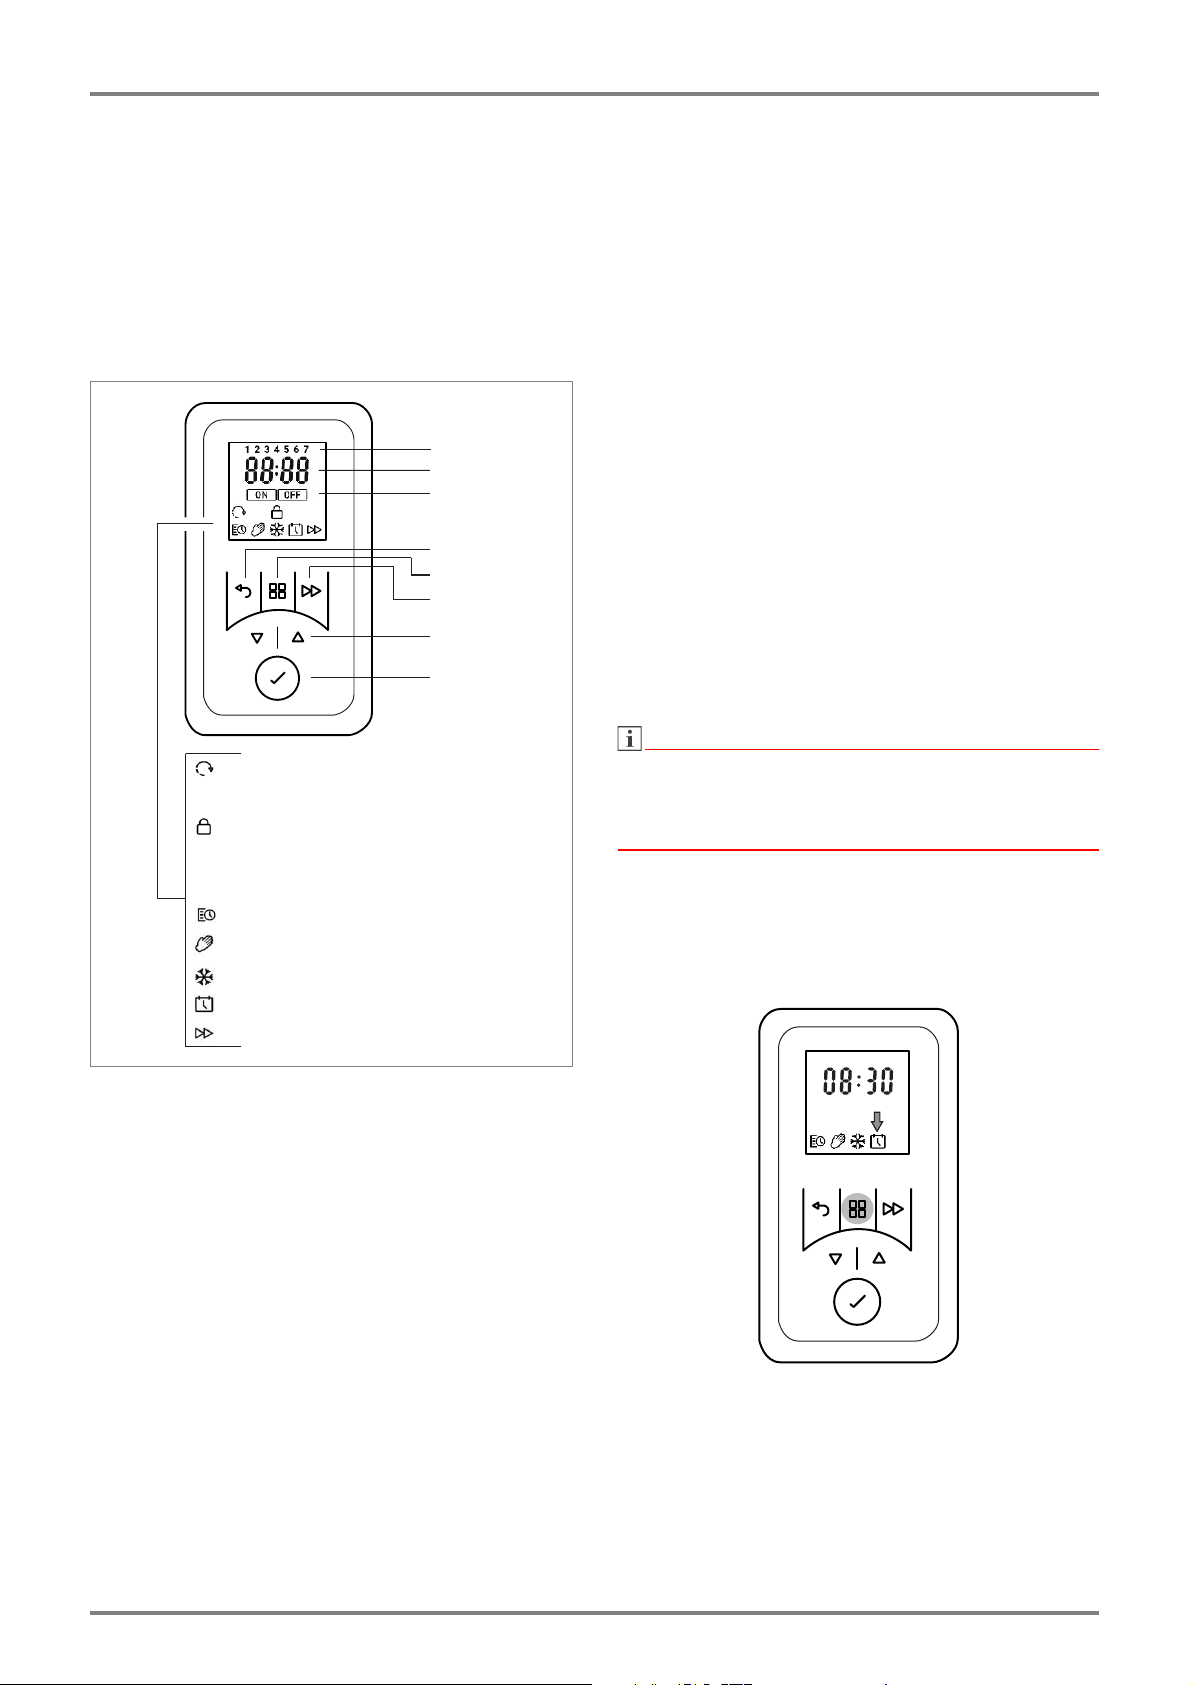
6. Description du régulateur
6.1 Unité de commande
L’appareil de chauffage est équipé d’un régulateur
électronique réglable, qui se compose d’un écran et de
six touches tactiles. L’unité de commande se trouve
sur la face supérieure, à droite. Tous les réglages
peuvent être réalisés à l'aide des six touches de l’inter-
face de commande.
Les fonctions et valeurs réglées sont affichées à
l’écran.
6.2 Fonctions des touches
MENU PRINCIPAL
Réglage de la date et de l’heure
Programmation hebdomadaire de la minuterie
Mode manuel
Mode protection antigel
RETOUR
Retour au point de programmation précédent
Touches
Elles servent à naviguer dans le menu et à modifier les
valeurs de réglages.
ENTER
Enregistrement des réglages.
AVANCE
Fonctions spéciales comme le passage au point de
programmation suivant en mode minuterie ou l'activa-
tion du
minuteur décompteur.
6.3 Écran
L’écran s’allume en cas d’actionnement d’une touche.
Si aucune modification n’est effectuée pendant un cer-
tain temps, l’affichage s’éteint. Si aucune touche n’est
actionnée, l’affichage bascule à nouveau sur le menu
principal au bout de 30secondes.
La toucheENTER permet d’afficher le numéro PIN à
4chiffres de l’appareil.
7. Modes de fonctionnement
7.1 Programmation hebdomadaire de la
minuterie
Il est possible de régler jusqu’à quatre programmes de
chauffage maximum (Activé/Désactivé) par jour de la
semaine. Une température ambiante peut être attri-
buée à chaque programme de chauffage.
Le symbole MINUTERIE s’affiche à l’écran.
7.2 Mode manuel
Réglage manuel de la température ambiante.
Le symbole MANUEL s’affiche à l’écran.
7.3 Protection antigel
Réglage d’une température antigel de 7°C.
Le symbole GEL s’affiche à l’écran.
REMARQUE
La température ambiante peut être modifiée à l’aide
des touches
ou
pour tous les modes de fonction-
nement.
Dans le cas du programme de minuterie, cette modifi-
cation est uniquement appliquée au programme ho-
raire actuel.
8. Mise en service
8.1 Réglage de l’heure et de la date
La commande comprend une horloge en temps réel
avec fonction calendrier.
Démarrage adaptatifBloquéAudioConnexionMinuterieManuelProtection antigelHeure/dateAvanceJour de la semaineHeureMarche/ArrêtRetourMenuAvanceTouches de réglageTouche Enter
www.dimplex.de/fr1907/DFR-4
H 260E, H 260E ecoFrançais
La date et l’heure se règlent en réalisant les étapes
suivantes:
Appuyer sur la touche MENU.
Sélectionner le symbole DATE & HEURE à l’aide
des touches
ou
. Le symbole clignote.
Appuyer sur la touche ENTER. L’affichage des
heures clignote.
Régler les heures et les minutes à l’aide des
touches
ou
. Confirmer chaque réglage avec
la touche ENTER.
L’heure est enregistrée et l’affichage dAY clignote
un court instant.
Régler le jour à l’aide des touches
ou
.
Confirmer chaque réglage avec la touche ENTER.
L’affichage 1- 12 clignote un court instant.
Régler le mois à l’aide des touches
ou
.
Confirmer chaque réglage avec la touche ENTER.
L’affichage YEAr clignote un court instant.
Régler l’année à l’aide des touches
ou
.
Confirmer chaque réglage avec la touche ENTER.
L’affichage dSt (heure d’été) ON clignote.
Recommandation: confirmer l'affichage ON avec
la touche ENTER. Ceci permet un passage auto-
matique à l’heure d’été/hiver.
9. Utilisation
9.1 Mode veille (état d’attente)
Maintenir enfoncée la touche RETOUR jusqu’à ce
que l’affichage Eolt apparaisse. L’appareil de
chauffage est en mode veille.
Pour revenir à l’état de fonctionnement précédent,
appuyer brièvement sur la touche RETOUR.
9.2 Allumer/éteindre le mode chauffage
Allumer le mode chauffage
Appuyer sur la touche MENU PRINCIPAL. Le sym-
bole MINUTERIE clignote.
Sélectionner le mode de fonctionnement souhaité à
l’aide des touches
ou
. Le symbole clignote.
Confirmer avec la touche ENTER.
Éteindre le mode chauffage
Appuyer sur la touche MENU PRINCIPAL. Le sym-
bole MINUTERIE clignote.
Sélectionner le symbole OFF à l’aide des touches
ou
. Le symbole OFF clignote.
Confirmer avec la touche ENTER.
REMARQUE
La désactivation du mode chauffage ne signifie pas
que l’appareil est entièrement coupé de l’alimentation
électrique. Pour couper l’appareil du secteur, veuillez
le débrancher.
9.3 Programmation hebdomadaire de la
minuterie
La minuterie est préprogrammée en usine. Quatre
plages horaires sont disponibles par jour. Elles
peuvent être adaptées en fonction des besoins indivi-
duels pour chaque jour de la semaine.
Ces profils peuvent être modifiés en réalisant les
étapes suivantes:
Appuyer sur la touche MENU. Le symbole MINU-
TERIE clignote.
Appuyer sur la touche ENTER. Le symbole ON cli-
gnote.
Sélectionner l'affichage EdIt à l’aide des touches
ou
. L’affichage EdIt clignote.
Appuyer sur la touche ENTER. Le jour de la se-
maine clignote.
Sélectionner le jour à l’aide des touches
ou
.
1 = Lundi5 = Vendredi
2 = Mardi6 = Samedi
3 = Mercredi7 = Dimanche
4 = Jeudi
Appuyer sur la touche ENTER. P1 (programme 1)
clignote.
Appuyer sur la touche ENTER. L’heure de mise en
marche clignote.
OFF
OFFON
FR-51907/Dwww.dimplex.de/fr
FrançaisH 260E, H 260E eco
Régler les heures et les minutes à l’aide des
touches
ou
. Confirmer chaque réglage avec
la touche ENTER. La température ambiante cli-
gnote.
Régler la température à l’aide des touches
ou
. Appuyer sur la touche ENTER. L’heure de mise
à l’arrêt clignote.
Régler les heures et les minutes à l’aide des
touches
ou
. Confirmer chaque réglage avec
la touche ENTER. P2 (programme 2) clignote.
Les programmes P2, P3 et P4 peuvent être réglés
de la même manière.
Pour copier les programmes P1 à P4 réglés et les
appliquer à d’autres jours, maintenir enfoncée la
touche AVANCE. L’affichage COPY clignote un
court instant.
Les valeurs de jour définies sont copiées.
Sélectionner un nouveau jour de la semaine à
l’aide des touches
ou
. Le jour de la semaine
clignote.
Maintenir enfoncée la touche ENTER. L’affichage
PStE clignote un court instant. Les valeurs de jour
copiées sont attribuées au nouveau jour de la se-
maine.
Appuyer ensuite sur la touche MENU PRINCIPAL.
9.4 Mode manuel
REMARQUE
Dans le mode manuel, la programmation hebdoma-
daire de la minuterie est désactivée.
Le réglage de la température ambiante s’effectue ma-
nuellement.
Appuyer sur la touche MENU. Le symbole MINU-
TERIE clignote.
Sélectionner le symbole MANUEL à l’aide des
touches
ou
. Le symbole MANUEL clignote.
Appuyer sur la touche ENTER.
Si nécessaire, régler la température ambiante à
l’aide des touches
ou
.
9.5 Protection antigel
Réglage d’une température antigel de 7°C.
Appuyer sur la touche MENU. Le symbole MINU-
TERIE clignote.
Sélectionner le symbole GEL à l’aide des touches
ou
. Le symbole GEL clignote. Appuyer sur la
touche ENTER.
Affichage du symbole GEL et de la température de
7°C.
REMARQUE
Pour modifier la valeur de température de 7°C prédéfi-
nie, utiliser les touches
ou
.
ON
www.dimplex.de/fr1907/DFR-6
H 260E, H 260E ecoFrançais
9.6 Minuteur décompteur
Le minuteur décompteur permet d'exécuter un pro-
gramme de chauffage individuel limité dans le temps.
Réglage de base
Maintenir enfoncées les touches MENU et
AVANCE jusqu’à ce que l’affichage rb clignote.
Appuyer sur la touche ENTER. L’affichage ON/
OFF clignote.
Sélectionner l'affichage ON à l’aide des touches
ou
. Appuyer sur la touche ENTER. La durée
maximale de décompte clignote.
Si nécessaire, adapter la durée de décompte à
l’aide des touches
ou
.
Appuyer sur la touche ENTER. La température am-
biante clignote.
Si nécessaire, modifier la température ambiante à
l’aide des touches
ou
. Confirmer avec la
touche ENTER.
Activation du minuteur décompteur
REMARQUE
Impossible si le mode MINUTERIE a été sélectionné.
Appuyer sur la touche AVANCE. La durée de dé-
compte clignote.
Pour modifier la durée de décompte, appuyer plu-
sieurs fois sur la touche Avance.
Appuyer sur la touche ENTER. Minuteur décomp-
teur = ACTIVÉ.
Désactivation du minuteur décompteur
Appuyer plusieurs fois sur la touche AVANCE
jusqu’à ce que l’affichage OFF clignote.
Appuyer sur la touche ENTER. Minuteur décomp-
teur = DÉSACTIVÉ.
Durée maximale
de décompte
Appuyer sur la touche AVANCE:
1fois2fois3fois4fois
30min00:15 00:2000:2500:30
01:00h
(configuration
usine)
00:1500:3000:4501:00
01:30h00:1500:3001:0001:30
02:00h00:3001:0001:3002:00
04:00h01:0002:0003:0004:00
06:00h01:3003:0004:3006:00
08:00h02:0004:0006:0008:00
ON
ON
FR-71907/Dwww.dimplex.de/fr
FrançaisH 260E, H 260E eco
9.7 Démarrage adaptatif
REMARQUE
Cette fonction est uniquement possible en mode MI-
NUTERIE.
Cette fonction garantit que la température ambiante
définie sera atteinte exactement à l’heure souhaitée.
Exemple:
Le menu de la minuterie prévoit une température am-
biante de consigne de 22°C à 7heures. La tempéra-
ture ambiante actuelle est de 17°C. L’appareil de
chauffage se met en marche suffisamment à l’avance
pour que la température ambiante prescrite de 22°C
soit atteinte à 7heures.
Maintenir enfoncées les touches MENU et
AVANCE jusqu’à ce que l’affichage rb clignote.
Sélectionner le symbole DÉMARRAGE ADAPTA-
TIF à l’aide des touches
ou
. Le symbole cli-
gnote.
Appuyer sur la touche ENTER.
Sélectionner ON ou OFF à l’aide des touches
ou
pour activer ou désactiver la fonction.
10. Options
10.1 Bloquer le clavier
Les fonctions des touches sont désactivées au moyen
d’un numéro de code à quatre chiffres défini par l’utili-
sateur.
REMARQUE
L’utilisation de la fonction de minuteur décompteur
ainsi que le passage au point de programmation sui-
vant en mode minuterie restent possibles pendant l’ac-
tivation du blocage du clavier.
Définir un code de déblocage
Maintenir enfoncées les touches MENU et
AVANCE jusqu’à ce que l’affichage rb clignote.
Sélectionner le symbole BLOQUÉ à l’aide des
touches
ou
. Le symbole clignote.
Appuyer sur la touche ENTER. L’affichage de nu-
méro clignote.
Définir un numéro de code de déblocage à l’aide
des touches
ou
. Confirmer chaque réglage
avec la touche ENTER.
REMARQUE
Si le code de blocage défini n’est pas disponible, il est
possible de désactiver le blocage par saisie du numéro
4115.
Débloquer le clavier
Appuyer sur une touche quelconque. Le numéro de
code à quatre chiffres 0000 s'affiche.
Saisir le numéro de code de déblocage à l’aide des
touches
ou
. Confirmer chaque réglage avec
la touche ENTER.
ONOFF
www.dimplex.de/fr1907/DFR-8
H 260E, H 260E ecoFrançais
10.2 Réduire la puissance thermique, mode air
froid
Modèle H 260E
La puissance thermique maximale de 2kW peut être
réduite à 1kW. Il est également possible d’utiliser l’ap-
pareil comme ventilateur d’air froid.
Modèle H 260E eco
Il est également possible d’utiliser l’appareil comme
ventilateur d’air froid.
Maintenir enfoncée la touche AVANCE jusqu’à ce
que l’affichage HILO apparaisse.
Sélectionner HI, LO ou FAN à l’aide des touches
ou
. Signification de l'affichage:
HI = mode de fonctionnement normal, vitesse de
ventilateur intégrale
LO = vitesse de ventilateur réduite; la puissance
thermique est réduite à 1kW dans le cas du mo-
dèle H260E,
FAN = mode air froid (sans émission de chaleur).
Confirmer le réglage sélectionné avec ENTER.
10.3 Température ambiante minimale
Cette fonction permet de garantir qu’une température
ambiante minimale sera également utilisée comme va-
leur prescrite pendant les périodes d’arrêt, par
exemple en cas d’utilisation du mode minuterie (pro-
grammation hebdomadaire).
REMARQUE
Cette valeur prescrite s’applique également à la fonc-
tion de minuteur décompteur.
La protection antigel est prioritaire.
Maintenir enfoncées les touches MENU et
AVANCE jusqu’à ce que l’affichage rb clignote.
Appuyer sur la touche
. L’affichage Sb clignote.
Appuyer sur la touche ENTER. Le symbole ON cli-
gnote.
Appuyer sur la touche ENTER. La température am-
biante minimale (réglée en usine sur 16°C) cli-
gnote.
Régler la température ambiante minimale à l’aide
des touches
ou
et confirmer avec ENTER.
Appuyer sur la touche RETOUR pour revenir à l’af-
fichage standard.
ONOFF
FR-91907/Dwww.dimplex.de/fr
FrançaisH 260E, H 260E eco
10.4 Retour aux réglages d’usine
Annule tous les réglages effectués par l’utilisateur et
rétablit les réglages usine.
Maintenir enfoncées les touches
et
jusqu’à
ce que l’affichage Frn apparaisse.
Sélectionner l’affichage Y à l’aide des touches
ou
. Le symbole clignote.
Appuyer sur la touche ENTER. Tous les réglages
usine des valeurs sont rétablis. L’affichage de
l’heure apparaît.
Régler l’heure et la date.
10.5 Unité de température
Sélection possible entre degré Celsius et degré
Fahrenheit.
Maintenir enfoncée la touche MENU jusqu’à ce que
l’affichage °C clignote.
Sélectionner le symbole °C ou °F à l’aide des
touches
ou
.
Confirmer avec la touche ENTER.
REMARQUE
L’unité de température °C est habituellement utilisée
dans la plupart des pays européens.
11. Garantie
Conformément aux conditions de garantie, nous
accordons 2 ans de garantie sur ce produit.
12. Remarque sur l’élimination de l’appareil
Ne pas éliminer l'appareil avec les ordures
ménagères, mais le déposer dans une
déchetterie locale.
13. Caractéristiques techniques
Glen Dimplex Deutschland GmbHTél.: +49 9221 709 545
Am Goldenen Feld 18Fax.: +49 9221 709 924545
D - 95326 KulmbachE-mail: service@gdts.one
ModèleH 260EH 260E eco
Tension nominale1/N/PE, 230 V~, 50 Hz
Indice de protectionIP24
Dimensions montage
(l x h x p)
300 x 405 x 120 mm
Poids3,2 kg
Puissance thermique
Puissance ther-
mique nominale
P
nom
2,0 kW1,0 kW
Puissance ther-
mique minimale
(indicative)
P
min
1,0 kW1,0 kW
Puissance ther-
mique maximale
continue
P
max, C
2,0 kW1,0 kW
Consommation d‘électricité auxiliaire
À la puissance ther-
mique nominale
el
max
0,0 W0,0 W
À la puissance ther-
mique minimale
el
min
0,0 W0,0 W
En mode veilleel
SB
0,5 W0,5 W
Type de contrôle
Régulateur de température ambiante électronique avec program-
mation hebdomadaire, régulateur adaptatif du démarrage du
chauffage et limitation de la durée de fonctionnement
www.dimplex.de/it1907/DIT-1
H 260E, H 260E ecoItaliano
1. Note per l'utente
AVVERTENZA
Gentile cliente,
La invitiamo a conservare con cura le istruzioni e a
consegnarle eventualmente al successivo proprietario.
ATTENZIONE!
L'apparecchio può essere usato dai bambini a
partire dagli 8 anni di età e anche dalle per-
sone con ridotte capacità fisiche, mentali o
sensoriali oppure con scarsa conoscenza ed
esperienza, purché siano sotto la sorve-
glianza di un adulto o sia stato insegnato loro
a usare l'apparecchio in modo sicuro ed essi
capiscano i pericoli che ne derivano! I bambini
non devono giocare con l'apparecchio. Non
far eseguire gli interventi di pulizia e di manu-
tenzione a cura dell'utente ai bambini senza la
presenza di un adulto!
ATTENZIONE!
Tenere lontano i bambini di età inferiore ai 3
anni, a meno che non siano costantemente
sorvegliati da un adulto. I bambini a partire dai
3 anni e di età inferiore agli 8 anni possono
accendere e spegnere l'apparecchio sotto la
sorveglianza di un adulto o se è stato inse-
gnato loro a usare l'apparecchio in modo si-
curo ed essi abbiano compreso i pericoli che
ne derivano, purché l'apparecchio si trovi
nella sua normale posizione di utilizzo!
ATTENZIONE!
I bambini a partire dai 3 anni e di età inferiore
agli 8 anni non devono accendere l’apparec-
chio né tantomeno pulirlo o eseguirne la ma-
nutenzione!
ATTENZIONE!
Il simbolo a fianco è applicato
sull'apparecchio da riscaldamento
e indica che quest'ultimo non deve
essere coperto!
ATTENZIONE!
Alcuni componenti dell'apparecchio possono
diventare molto caldi e provocare ustioni. Pre-
stare particolare attenzione se ci sono bam-
bini o soggetti vulnerabili nelle vicinanze!
ATTENZIONE!
Non è consentito l'utilizzo dell'apparecchio di
riscaldamento in ambienti in cui si impieghino
prodotti infiammabili (p.es. solventi).
ATTENZIONE!
L'apparecchio deve essere installato in modo
tale da non poter essere toccato da una per-
sona che si trova nella vasca da bagno o sotto
la doccia!
ATTENZIONE!
In caso di danneggiamento del cavo di rete,
quest'ultimo deve essere sostituito dal produt-
tore, da un suo rappresentante del servizio
clienti o da una persona con qualifica equiva-
lente, per escludere qualsiasi fonte di peri-
colo!
ATTENZIONE!
Per evitare pericoli dovuti a un ripristino acci-
dentale della protezione antisurriscalda-
mento, l'apparecchio non deve essere ali-
mentato tramite un dispositivo di
commutazione esterno (ad es. un timer) né
collegato a un circuito elettrico regolarmente
inserito e disinserito!
ATTENZIONE!
A seconda della dimensione della stanza, del
fabbisogno di calore e dell’impostazione del
termostato, si corre il rischio di surriscalda-
mento in ambienti non sottoposti a controllo del
riscaldamento
.
Ciò può comportare pericoli per
le persone che non sono in grado di abbando-
nare la stanza in caso di temperature elevate.
AVVERTENZA
L'apparecchio può essere utilizzato solo per il riscalda-
mento dell'aria ambiente all'interno di ambienti chiusi.
IT-21907/Dwww.dimplex.de/it
ItalianoH 260E, H 260E eco
2. Montaggio, installazione, distanze minime
ATTENZIONE!
Non installare l’apparecchio sotto una presa a
muro!
Le distanze minime devono essere rispettate.
Inoltre occorre calcolare una distanza di 750 mm dal
lato anteriore dell'apparecchio.
L'apparecchio da riscaldamento deve essere installato
in orizzontale su una parete verticale, come mostrato in
figura. Tutte le misure si intendono in mm.
Durante il montaggio, rispettare l’area protetta come in-
dicato nelle norme di installazione attuali.
La presa e la spina elettrica dell'apparecchio devono
essere accessibili dopo il montaggio.
Assicurarsi che l'aria possa entrare nell'apparecchio e
uscirne senza ostacoli
.
AVVERTENZA
È consentito il montaggio su pareti in legno.
Montaggio a parete
AVVERTENZA
Utilizzare il supporto a parete originale in dotazione
nella parte posteriore dell'apparecchio.
AVVERTENZA
Durante la foratura, prestare attenzione alla possibile
presenza di tubazioni o cavi elettrici nel muro!
Sbloccare il supporto a parete in basso (A) e stac-
carlo dall'apparecchio.
Praticare dei fori di fissaggio per il supporto a pa-
rete e inserire i tasselli.
Allineare il supporto a parete e avvitarlo salda-
mente alla parete.
Appendere l'apparecchio al supporto a parete.
Girare l'apparecchio di riscaldamento verso il
basso e farlo scattare in sede (B)
3. Allacciamento elettrico
L'indicazione della tensione sulla targhetta dati deve
coincidere con la tensione di rete.
La linea non deve toccare la custodia.
Si consiglia di predisporre un circuito elettrico apposito
per l'alimentazione di corrente.
Inserire la spina nella presa di corrente. La spina deve
rimanere sempre accessibile per i casi di emergenza.
AVVERTENZA
L'apparecchio deve essere collegato solo a una presa
di corrente con contatto di terra.
4. Protezione antisurriscaldamento
Per la sicurezza dell'utente, l'apparecchio da riscalda-
mento è munito di una protezione da surriscaldamento.
In caso di interruzioni nella circolazione dell'aria (do-
vute p.es. alla chiusura o alla copertura della griglia di
ventilazione), l'apparecchio si spegne automatica-
mente. Sul display viene visualizzato l'indicatore Err35.
In questo caso si consiglia di interrompere la corrente
di alimentazione dell'apparecchio da riscaldamento per
alcuni minuti (staccando la spina, disinserendo il fusi-
bile), per dare modo all’apparecchio di raffreddarsi a
sufficienza.
Prima di rimettere in funzione l'apparecchio, eliminare
le cause che hanno fatto scattare la protezione antisur-
riscaldamento.
5. Pulizia
Per la pulizia occorre scollegare l'apparecchio dalla
rete elettrica e lasciarlo raffreddare. L'esterno può es-
sere pulito strofinando con un panno morbido e inumi-
dito. Non utilizzare polveri abrasive o lucido per mobili
per evitare di danneggiare la superficie. I depositi di
polvere nell'apparecchio possono essere rimossi
dall'esterno con un aspirapolvere.
2503001000405280
190
308BA
www.dimplex.de/it1907/DIT-3
H 260E, H 260E ecoItaliano
6. Descrizione del regolatore
6.1 Unità di comando
L'apparecchio da riscaldamento è dotato di un regola-
tore elettronico regolabile costituito da un display e sei
tasti touchscreen. L’unità di comando si trova in alto a
destra. Tutte le impostazioni possono essere effettuate
usando i sei tasti presenti nell’interfaccia utente.
Sul display vengono visualizzati le funzioni e i valori im-
postati.
6.2 Funzioni dei tasti
MENU PRINCIPALE
Impostazione di data e ora
Timer con programma settimanale
Modalità manuale
Modalità di protezione antigelo
INDIETRO
Ritorna al punto del programma precedente
Tasti
Per navigare attraverso il menu e modificare i valori im-
postati.
ENTER
Salvataggio delle impostazioni.
AVANZATA
Funzioni speciali come passare al punto del pro-
gramma successivo nell’esercizio Timer o attivare il
timer alla rovescia.
6.3 Display
Premendo un tasto qualsiasi, il display si illumina. Se
non vengono effettuate modifiche per lungo tempo, il
display si spegne. Se non viene premuto nessun tasto,
l'indicatore, dopo 30 secondi, torna al menu principale.
Premendo il tasto ENTER viene visualizzato il PIN a 4
cifre dell’apparecchio.
7. Modalità d'esercizio
7.1 Timer con programma settimanale
Fino a quattro programmi di riscaldamento (On/Off) im-
postabili per ogni giorno della settimana. Per ciascun
programma di riscaldamento è possibile indicare una
temperatura ambiente prestabilita.
Sul display compare il simbolo TIMER.
7.2 Modalità manuale
Impostazione manuale della temperatura ambiente.
Sul display compare il simbolo di una MANO.
7.3 Protezione antigelo
Impostazione di una temperatura antigelo pari a 7 °C.
Sul display compare il simbolo del GHIACCIO.
AVVERTENZA
Per tutte le modalità d'esercizio è possibile modificare
il valore della temperatura ambiente agendo sui tasti
o . Nel programma Timer tale modifica verrà appli-
cata solamente per il programma orario attualmente
impostato.
8. Avviamento
8.1 Impostazione di data e ora
Il comando dispone di un orologio in tempo reale con
funzione calendario.
Per impostare data e ora, procedere nel seguente
modo:
Premere il tasto MENU.
Con l’aiuto dei tasti
o selezionare il simbolo
DATA e ORA. Il simbolo lampeggerà.
Avvio con adattamento della temperaturaBlocco tastiAudioCollegamentoTimerManualeProtezione antigeloData/OraAvanzataGiorno della settimanaOraOn/OffIndietroMenuAvanzataTasti di regolazioneTasto Enter
IT-41907/Dwww.dimplex.de/it
ItalianoH 260E, H 260E eco
Premere il tasto ENTER. L’indicatore delle ore ini-
zierà a lampeggiare.
Impostare le ore e i minuti aiutandosi con i tasti
o
. Confermare il valore impostato premendo
ogni volta il tasto ENTER.
L’ora è stata memorizzata e inizierà a lampeggiare
brevemente l’indicatore dAY.
Impostare il giorno aiutandosi con i tasti o .
Confermare il valore impostato premendo ogni
volta il tasto ENTER. L’indicatore 1-12 inizierà a
lampeggiare brevemente.
Impostare il mese aiutandosi con i tasti o .
Confermare il valore impostato premendo ogni
volta il tasto ENTER. L’indicatore YEAr inizierà a
lampeggiare brevemente.
Impostare l’anno aiutandosi con i tasti o .
Confermare il valore impostato premendo ogni
volta il tasto ENTER. L’indicatore dSt (ora legale)
ON inizierà a lampeggiare.
Consiglio: confermare l’indicatore ON con il tasto
ENTER. In questo modo si passerà automatica-
mente all’ora legale o all’ora solare.
9. Comando
9.1 Modalità stand-by (attesa)
Tenere premuto il tasto INDIETRO finché non com-
pare l’indicatore Eolt. L’apparecchio da riscalda-
mento è in modalità stand-by.
Per tornare allo stato d’esercizio precedente, pre-
mere il tasto INDIETRO per pochi secondi.
9.2 Attivazione/disattivazione dell’esercizio
di riscaldamento
Attivazione dell’esercizio di riscaldamento
Premere il tasto MENU PRINCIPALE. Il simbolo
TIMER inizierà a lampeggiare.
Con l’aiuto dei tasti
o
selezionare la modalità
d’esercizio desiderata. Il simbolo lampeggerà.
Confermare con il tasto ENTER.
Disattivazione dell’esercizio di riscaldamento
Premere il tasto MENU PRINCIPALE. Il simbolo
TIMER inizierà a lampeggiare.
Con l’aiuto dei tasti
o
selezionare il simbolo
OFF. Il simbolo OFF inizierà a lampeggiare.
Confermare con il tasto ENTER.
AVVERTENZA
Anche se l’esercizio di riscaldamento viene disattivato,
l’apparecchio rimane comunque collegato alla corrente
di alimentazione. Per scollegare l’apparecchio dalla
rete, staccare semplicemente la spina.
9.3 Timer con programma settimanale
Il timer è già programmato di default. Sono disponibili
quattro blocchi orari per giorno, che possono essere
adattati individualmente per ogni giorno della setti-
mana.
Per modificare i vari profili, procedere nel seguente
modo:
Premere il tasto MENU. Il simbolo TIMER inizierà a
lampeggiare.
Premere il tasto ENTER. Il simbolo ON inizierà a
lampeggiare.
Con l’aiuto dei tasti
o
selezionare l’indicatore
EdIt. L’indicatore EdIt inizierà a lampeggiare.
Premere il tasto ENTER. Il giorno della settimana
inizierà a lampeggiare.
Selezionare il giorno aiutandosi con i tasti o .
1 = lunedì5 = venerdì
2 = martedì6 = sabato
3 = mercoledì7 = domenica
4 = giovedì
Premere il tasto ENTER. P1 (Programma 1) ini-
zierà a lampeggiare.
Premere il tasto ENTER. L’orario di attivazione ini-
zierà a lampeggiare.
Impostare le ore e i minuti aiutandosi con i tasti
o
. Confermare il valore impostato premendo
ogni volta il tasto ENTER. La temperatura am-
biente inizierà a lampeggiare.
OFF
OFFON
www.dimplex.de/it1907/DIT-5
H 260E, H 260E ecoItaliano
Impostare la temperatura aiutandosi con i tasti o
. Premere il tasto ENTER. L’orario di spegni-
mento inizierà a lampeggiare.
Impostare le ore e i minuti aiutandosi con i tasti
o
. Confermare il valore impostato premendo
ogni volta il tasto ENTER. P2 (Programma 2) ini-
zierà a lampeggiare.
Impostare i programmi P2, P3 e P4 seguendo i
passaggi descritti sopra.
Per copiare i programmi P1 - P4 appena impostati
negli altri giorni, tenere premuto il tasto AVAN-
ZATA. L’indicatore COPY inizierà a lampeggiare
brevemente.
I valori impostati per quel determinato giorno ven-
gono copiati.
Con l’aiuto dei tasti
o
selezionare un nuovo
giorno della settimana. Il giorno della settimana ini-
zierà a lampeggiare.
Tenere premuto il tasto ENTER. L’indicatore PStE
inizierà a lampeggiare brevemente. I valori prece-
dentemente copiati vengono assegnati al nuovo
giorno della settimana.
Premere infine il tasto MENU PRINCIPALE.
9.4 Modalità manuale
AVVERTENZA
Nella modalità manuale, il timer con programma setti-
manale viene disattivato.
La temperatura ambiente viene impostata manual-
mente.
Premere il tasto MENU. Il simbolo TIMER inizierà a
lampeggiare.
Con l’aiuto dei tasti
o selezionare il simbolo
della MANO. Il simbolo della MANO inizierà a lam-
peggiare. Premere il tasto ENTER.
Se necessario, impostare la temperatura ambiente
usando i tasti
o
.
9.5 Protezione antigelo
Impostazione di una temperatura antigelo pari a 7 °C.
Premere il tasto MENU. Il simbolo TIMER inizierà a
lampeggiare.
Con l’aiuto dei tasti
o selezionare il simbolo
del GHIACCIO. Il simbolo del GHIACCIO inizierà a
lampeggiare. Premere il tasto ENTER.
Verranno visualizzati il simbolo del GHIACCIO e la
temperatura di 7 °C.
AVVERTENZA
È possibile modificare il valore della temperatura impo-
stato di default (7° C) usando i tasti
o
.
9.6 Timer alla rovescia
Il timer alla rovescia permette di eseguire un pro-
gramma di riscaldamento per una sola volta e per un
periodo di tempo limitato.
Impostazione di base
Tenere premuti i tasti MENU e AVANZATA finché
non inizia a lampeggiare l’indicatore rb.
Premere il tasto ENTER. L’indicatore ON/OFF ini-
zierà a lampeggiare.
ON
ON
IT-61907/Dwww.dimplex.de/it
ItalianoH 260E, H 260E eco
Con l’aiuto dei tasti
o
selezionare l’indicatore
ON. Premere il tasto ENTER. Inizierà a lampeg-
giare il tempo di inversione massimo.
Se necessario, modificare il tempo di inversione
usando i tasti
o
.
Premere il tasto ENTER. La temperatura ambiente
inizierà a lampeggiare.
Se necessario, modificare la temperatura ambiente
usando i tasti o
. Confermare con il tasto EN-
TER.
Timer alla rovescia ON
AVVERTENZA
Non attivabile se è impostata la modalità d’esercizio TI-
MER.
Premere il tasto AVANZATA. Il tempo di inversione
inizierà a lampeggiare.
È possibile modificare il tempo di inversione pre-
mendo più volte il tasto AVANZATA.
Premere il tasto ENTER. Il timer alla rovescia è at-
tivato.
Timer alla rovescia OFF
Premere più volte il tasto AVANZATA finché l’indi-
catore OFF non inizierà a lampeggiare.
Premere il tasto ENTER. Il timer alla rovescia è di-
sattivato.
9.7 Avvio con adattamento della temperatura
AVVERTENZA
Questa funzione viene eseguita solo se è impostata la
modalità d’esercizio TIMER.
Questa funzione consente all’apparecchio di raggiun-
gere la temperatura ambiente impostata all’orario di at-
tivazione previsto.
Esempio:
Nel menu del timer è preimpostata una temperatura
ambiente nominale di 22 °C per le ore 07:00, mentre la
temperatura ambiente attuale è di 17 °C. L’apparec-
chio da riscaldamento si accenderà quindi prima
dell’orario previsto in modo da raggiungere la tempera-
tura ambiente prestabilita di 22 °C esattamente alle ore
07:00.
Tenere premuti i tasti MENU e AVANZATA finché
non inizia a lampeggiare l’indicatore rb.
Con l’aiuto dei tasti
o selezionare il simbolo
AVVIO CON ADATTAMENTO DELLA TEMPERA-
TURA. Il simbolo lampeggerà.
Premere il tasto ENTER.
Con l’aiuto dei tasti
o , selezionare ON oppure
OFF per attivare o disattivare la funzione.
Tempo di
inversione
massimo
Premere il tasto AVANZATA:
1 volta2 volte3 volte4 volte
30 min00:15 00:2000:2500:30
01:00 h
(default)00:1500:3000:4501:00
01:30 h00:1500:3001:0001:30
02:00 h00:3001:0001:3002:00
04:00 h01:0002:0003:0004:00
06:00 h01:3003:0004:3006:00
08:00 h02:0004:0006:0008:00
ON
ONOFF
www.dimplex.de/it1907/DIT-7
H 260E, H 260E ecoItaliano
10. Opzioni
10.1 Blocco tasti
Le funzioni dei tasti vengono bloccate tramite un co-
dice numerico a quattro cifre impostato dall’utente.
AVVERTENZA
Le funzioni quali il timer alla rovescia e il passaggio al
punto del programma successivo nell’esercizio Timer
rimangono attive anche con il blocco tasti attivato.
Impostazione del codice di sblocco
Tenere premuti i tasti MENU e AVANZATA finché
non inizia a lampeggiare l’indicatore rb.
Con l’aiuto dei tasti
o
selezionare il simbolo
BLOCCO TASTI. Il simbolo lampeggerà.
Premere il tasto ENTER. Inizierà a lampeggiare
l’indicatore con il numero.
Con l’aiuto dei tasti
o
impostare il numero per
il codice di sblocco. Confermare il valore impostato
premendo ogni volta il tasto ENTER.
AVVERTENZA
Se il codice di blocco impostato non dovesse essere di-
sponibile, è possibile annullare l’interdizione immet-
tendo il codice 4115.
Sblocco tasti
Premere un tasto qualsiasi. Verrà visualizzato il co-
dice numerico a quattro cifre 0000.
Con l’aiuto dei tasti
o
immettere il numero del
codice di sblocco. Confermare il valore impostato
premendo ogni volta il tasto ENTER.
10.2 Riduzione della resa termica, modalità
aria fredda
Modello H 260E
È possibile ridurre la resa termica massima di 2 kW
portandola a 1 kW. In alternativa, l’apparecchio può es-
sere utilizzato come ventilatore ad aria fredda.
Modello H 260E eco
L’apparecchio può essere utilizzato in via opzionale
come ventilatore ad aria fredda.
Tenere premuto il tasto AVANZATA finché non
compare l’indicatore HILO.
Con l’aiuto dei tasti
o
selezionare HI, LO op-
pure FAN. Significato degli indicatori:
HI = esercizio normale, ventilatore con numero di
giri completo;
LO = ventilatore con numero di giri ridotto (nel mo-
dello H 260E la resa termica viene ridotta a 1 kW);
FAN = modalità aria fredda (senza emissione di ca-
lore).
Confermare l’impostazione selezionata premendo
il tasto ENTER.
10.3 Temperatura ambiente minima
Grazie a questa funzione è possibile impostare una
temperatura ambiente minima da applicare ad esem-
pio all’esercizio Timer (programma settimanale), anche
durante gli orari in cui l’apparecchio è spento.
AVVERTENZA
L’impostazione vale anche per la funzione Timer alla
rovescia. La modalità di protezione antigelo ha comun-
que la priorità.
IT-81907/Dwww.dimplex.de/it
ItalianoH 260E, H 260E eco
Tenere premuti i tasti MENU e AVANZATA finché
non inizia a lampeggiare l’indicatore rb.
Premere il tasto
. L’indicatore Sb inizierà a lam-
peggiare.
Premere il tasto ENTER. Il simbolo ON inizierà a
lampeggiare.
Premere il tasto ENTER. La temperatura ambiente
minima (16 °C come da impostazione di fabbrica)
inizierà a lampeggiare.
Impostare la temperatura ambiente minima con
l’aiuto dei tasti
o e confermare con ENTER.
Premere il tasto INDIETRO per tornare alla visua-
lizzazione standard.
10.4 Ripristino delle impostazioni di fabbrica
Questa funzione consente di resettare tutte le imposta-
zioni effettuate dall’utente ripristinando le impostazioni
di fabbrica iniziali.
Tenere premuti i tasti
e
finché non compare
l’indicatore Fr n.
Con l’aiuto dei tasti
o selezionare l’indicatore
Y. Il simbolo lampeggerà.
Premere il tasto ENTER. Tutti i valori verranno ri-
portati alle impostazioni di fabbrica. Comparirà l’in-
dicatore dell’ora.
Impostare la data e l’ora.
10.5 Unità di misura della temperatura
Permette di scegliere se visualizzare la temperatura in
gradi Celsius o Fahrenheit.
Tenere premuto il tasto MENU finché non compare
l’indicatore °C.
Con l’aiuto dei tasti
o
selezionare °C oppure °F.
Confermare con il tasto ENTER.
AVVERTENZA
La maggior parte dei Paesi europei utilizza il °C come
unità di misura della temperatura.
11. Garanzia
Questo prodotto è garantito 2 anni secondo le condi-
zioni di garanzia.
12. Nota per lo smaltimento
L'apparecchio non deve essere smaltito nei ri-
fiuti domestici generici, ma deve essere confe-
rito a un centro di smaltimento locale.
ONOFF
www.dimplex.de/it1907/DIT-9
H 260E, H 260E ecoItaliano
13. Dati tecnici
Glen Dimplex Deutschland GmbHTel.: +49 9221 709 545
Am Goldenen Feld 18Fax: +49 9221 709 924545
D - 95326 KulmbachE-mail: service@gdts.one
ModelloH 260EH 260E eco
Tensione nominale1/N/PE, 230 V~, 50 Hz
Tipo di protezioneIP24
Dimensioni apparecchio
(La x A x P)
300 x 405 x 120 mm
Peso3,2 kg
Potenza termica
Potenza termica
nominale
P
nom
2,0 kW1,0 kW
Potenza termica
minima (indica-
tiva)
P
min
1,0 kW1,0 kW
Massima potenza
termica continua
P
max, C
2,0 kW1,0 kW
Consumo ausiliario di energia elettrica
Alla potenza ter-
mica nominale
el
max
0,0 W0,0 W
Alla potenza ter-
mica minima
el
min
0,0 W0,0 W
In modo stand-byel
SB
0,5 W0,5 W
Tipo di controllo
Regolatore temperatura ambiente elettronico con programma set-
timanale, regolazione dell’attivazione del riscaldamento con adat-
tamento della temperatura e limitazione del tempo di
funzionamento
NL-11907/Dwww.dimplex.de/nl
NederlandsH 260E, H 260E eco
1. Opmerkingen voor de gebruiker
OPMERKING
Geachte klant,
Bewaar deze aanwijzing zorgvuldig en geef deze door
aan eventuele volgende eigenaars.
ATTENTIE!
Dit toestel kan worden gebruikt door kinderen
van 8 jaar en ouder en door personen met
verminderde fysieke, sensorische of mentale
vermogens of gebrek aan ervaring en kennis,
als zij onder toezicht staan of zijn geïnstru-
eerd in het veilige gebruik van het toestel en
de gevaren begrijpen die eruit voortvloeien!
Kinderen mogen niet met het toestel spelen.
Reiniging en gebruikersonderhoud mogen
niet worden uitgevoerd door kinderen die niet
onder toezicht staan!
ATTENTIE!
Kinderen jonger dan 3 jaar moeten bij het toe-
stel vandaan worden gehouden, tenzij zij
voortdurend in de gaten worden gehouden.
Kinderen tussen 3 en 8 jaar mogen het toestel
in- en uitschakelen als ze onder toezicht
staan of geïnstrueerd zijn in het veilige ge-
bruik van het toestel en de gevaren hebben
begrepen die eruit voortvloeien, mits het toe-
stel in zijn normale gebruiksstand is geplaatst
of geïnstalleerd!
ATTENTIE!
Kinderen tussen 3 en 8 jaar mogen het toestel
niet inschakelen, het toestel niet reinigen of
het onderhoud uitvoeren!
ATTENTIE!
Het verwarmingstoestel is voorzien
van nevenstaand symbool, dat be-
tekent dat het verwarmingstoestel
niet mag worden afgedekt!
ATTENTIE!
Sommige delen van het toestel kunnen zeer
heet worden en brandwonden veroorzaken.
Bijzondere voorzichtigheid is vereist bij kinde-
ren of personen die bescherming behoeven!
ATTENTIE!
In ruimtes waar brandgevaarlijke stoffen ge-
bruikt worden (bijv. oplosmiddelen), mag het
verwarmingstoestel niet gebruikt worden.
ATTENTIE!
Het toestel moet zodanig worden geïnstal-
leerd dat het niet kan worden aangeraakt door
een persoon die zich in bad of onder de dou-
che bevindt!
ATTENTIE!
Wanneer de netkabel is beschadigd, moet het
door de fabrikant of diens klantenservice of
een vergelijkbaar gekwalificeerde persoon
worden vervangen om bronnen van gevaar te
elimineren!
ATTENTIE!
Om het gevaar voor onbedoeld resetten van
de oververhittingsbeveiliging te voorkomen
mag het apparaat niet via een externe scha-
kelinrichting, bijvoorbeeld een tijdschakelklok
worden gevoed of zijn verbonden met een
stroomkring die regelmatig wordt in- en uitge-
schakeld!
ATTENTIE!
Afhankelijk van de afmetingen van de ruimte,
de warmtebehoefte en de thermostaatinstel-
ling kunnen ruimtes bij ongecontroleerd ge-
bruik oververhit raken. Dit kan tot gevaar lei-
den voor personen die niet in staat zijn de
ruimte bij een te hoge temperatuur te verla-
ten.
OPMERKING
Het toestel mag alleen worden gebruikt voor het ver-
warmen van de ruimtelucht binnen gesloten ruimtes.
www.dimplex.de/nl1907/DNL-2
H 260E, H 260E ecoNederlands
2. Montage, installatie, minimumafstanden
ATTENTIE!
Het toestel niet onder een wandcontactdoos
installeren!
De minimumafstanden moeten in acht genomen wor-
den.
Bovendien dient aan de voorkant van het toestel een
afstand van 750 mm te worden voorzien.
Het verwarmingstoestel moet horizontaal tegen een
verticale muur in de juiste positie geplaatst, zoals in de
afbeelding weergegeven, geïnstalleerd worden. Alle
afmetingen in mm.
Bij de montage moet de veiligheidszone conform de
actuele installatievoorschriften te allen tijde in acht wor-
den genomen.
Het stopcontact moet na montage toegankelijk zijn.
Erop letten dat de lucht aan het toestel ongehinderd
naar binnen en buiten kan stromen.
OPMERKING
Montage op houten wanden is toegestaan.
Wandmontage
OPMERKING
De meegeleverde originele wandhouder aan de ach-
terkant van het toestel moet worden gebruikt.
OPMERKING
Bij het boren letten op elektrische of andere leidingen
die door de muur lopen!
Wandhouder aan de onderkant ontgrendelen (A)
en van het toestel verwijderen.
Boor montagegaten voor de wandhouder en druk
de pluggen erin.
De wandhouder horizontaal in de juiste positie
plaatsen en aan de muur vastschroeven.
Toestel in de wandhouder hangen.
Het verwarmingstoestel naar beneden zwenken en
vastklikken (B).
3. Elektrische aansluiting
De op het typeplaatje aangegeven spanning moet met
de netspanning overeenstemmen.
De leiding mag niet tegen de behuizing liggen.
Het is raadzaam voor de stroomvoorziening een eigen
stroomkring te reserveren.
Stekker in stopcontact steken. Stekker moet voor
noodgevallen altijd toegankelijk zijn.
OPMERKING
Het toestel mag alleen op een geaard stopcontact wor-
den aangesloten.
4. Oververhittingsbeveiliging
Voor uw veiligheid is het verwarmingstoestel voorzien
van een oververhittingsbeveiliging. Als de luchtcircula-
tie wordt verstoord (bijv. door bedekken of afsluiten van
het luchtrooster), dan wordt het toestel automatisch uit-
geschakeld. Op het display verschijnt de indicatie
Err35.
In dat geval moet de stroomvoorziening van het verwar-
mingstoestel enkele minuten worden onderbroken (stek-
ker uit het stopcontact trekken, zekering uitschakelen),
zodat het toestel voldoende kan afkoelen.
Vóór het opnieuw in bedrijf stellen van het toestel de oor-
zaken voor het reageren van de oververhittingsbeveili-
ging verhelpen.
5. Reiniging
Om het toestel te reinigen moet de stroomvoorziening
ervan zijn onderbroken en moet het toestel zijn afge-
koeld. De buitenkant kan worden gereinigd door deze
af te vegen met een zachte, vochtige lap. Gebruik geen
schuurmiddel of meubelwas; dit zou het oppervlak kun-
nen beschadigen. Ophopingen van stof in het toestel
kunnen aan de buitenkant met een stofzuiger worden
verwijderd.
2503001000405280
190
308BA
NL-31907/Dwww.dimplex.de/nl
NederlandsH 260E, H 260E eco
6. Beschrijving van de regelaar
6.1 Bedieningseenheid
Het verwarmingstoestel is uitgerust met een instelbare
elektronische regelaar die bestaat uit een display en
zes touchscreentoetsen. De bedieningseenheid be-
vindt zich rechts op de bovenkant. Alle instellingen
kunnen worden ingesteld met behulp van de zes toet-
sen op de bedieningsinterface.
Op het display worden de ingestelde functies en waar-
den weergegeven.
6.2 Toetsfuncties
HOOFDMENU
Instelling datum en tijd
Timer weekprogramma
Handmatige modus
Vorstbeveiligingsmodus
TERUG
Terugkeer naar het vorige programmapunt
Toetsen
Worden gebruikt om door het menu te navigeren en in-
stelwaarden te wijzigen.
ENTER
Opslaan van de instellingen.
VOORUIT
Speciale functies zoals naar het volgende programma-
punt in de timermodus gaan of activeren van de
retourtimer.
6.3 Display
Bij het drukken op een toets licht het display op. Als er
langere tijd niets verandert, verdwijnt de weergave. Als
er geen toets wordt bediend, keert de weergave na 30
seconden terug naar het hoofdmenu.
Door het indrukken van de ENTER-toets wordt de 4-cij-
ferige toestel-PIN weergegeven.
7. Bedrijfsmodi
7.1 Timer weekprogramma
Maximaal vier verwarmingsprogramma's (Aan/Uit)
voor iedere weekdag instelbaar. Voor ieder verwar-
mingsprogramma kan een kamertemperatuur worden
vastgelegd.
Symbool TIMER wordt op het display weergegeven.
7.2 Handmatige modus
Handmatig instellen van de kamertemperatuur.
Symbool HAND wordt op het display weergegeven.
7.3 Vorstbeveiliging
Vastleggen van een vorstbeveiligingstemperatuur van
7 °C.
Symbool FROST wordt op het display weergegeven.
OPMERKING
In alle bedrijfsmodi kan de kamertemperatuur worden
gewijzigd met de toets
of
.
In het timerprogramma wordt deze wijziging alleen
voor het actuele tijdprogramma uitgevoerd.
8. Inbedrijfstelling
8.1 Instellen van de datum en de tijd
De besturing bevat een realtimeklok met kalenderfunc-
tie.
Voor het instellen van datum en tijd de volgende stap-
Gebruikershandleiding.com neemt misbruik van zijn services uitermate serieus. U kunt hieronder aangeven waarom deze vraag ongepast is. Wij controleren de vraag en zonodig wordt deze verwijderd.
Product:
Spelregels forum
Om tot zinvolle vragen te komen hanteren wij de volgende spelregels:
lees eerst de handleiding door;
controleer of uw vraag al eerder door iemand anders is gesteld;
probeer uw vraag zo duidelijk mogelijk te stellen;
heeft u een probleem en al geprobeerd om dit op te lossen, vermeld dit erbij aub;
heeft u een oplossing gekregen van een bezoeker dan horen wij dat graag in dit forum;
wilt u een reactie geven op een vraag of antwoord, gebruik dan niet dit formulier maar klik op de knop 'reageer op deze vraag';
uw vraag wordt direct op de website gezet; vermijd daarom persoonlijke gegevens in te vullen;
Belangrijk! Als er een antwoord wordt gegeven op uw vraag, dan is het voor de gever van het antwoord nuttig om te weten als u er wel (of niet) mee geholpen bent! Wij vragen u dus ook te reageren op een antwoord.
Belangrijk! Antwoorden worden ook per e-mail naar abonnees gestuurd. Laat uw emailadres achter op deze site, zodat u op de hoogte blijft. U krijgt dan ook andere vragen en antwoorden te zien.
Abonneren
Abonneer u voor het ontvangen van emails voor uw Dimplex H260E eco bij:
nieuwe vragen en antwoorden
nieuwe handleidingen
U ontvangt een email met instructies om u voor één of beide opties in te schrijven.
Ontvang uw handleiding per email
Vul uw emailadres in en ontvang de handleiding van Dimplex H260E eco in de taal/talen: Nederlands, Duits, Engels, Frans, Italiaans als bijlage per email.
De handleiding is 1.46 mb groot.
U ontvangt de handleiding per email binnen enkele minuten. Als u geen email heeft ontvangen, dan heeft u waarschijnlijk een verkeerd emailadres ingevuld of is uw mailbox te vol. Daarnaast kan het zijn dat uw internetprovider een maximum heeft aan de grootte per email. Omdat hier een handleiding wordt meegestuurd, kan het voorkomen dat de email groter is dan toegestaan bij uw provider.
Stel vragen via chat aan uw handleiding
Stel uw vraag over deze PDF
Uw handleiding is per email verstuurd. Controleer uw email
Als u niet binnen een kwartier uw email met handleiding ontvangen heeft, kan het zijn dat u een verkeerd emailadres heeft ingevuld of dat uw emailprovider een maximum grootte per email heeft ingesteld die kleiner is dan de grootte van de handleiding.
Er is een email naar u verstuurd om uw inschrijving definitief te maken.
Controleer uw email en volg de aanwijzingen op om uw inschrijving definitief te maken
U heeft geen emailadres opgegeven
Als u de handleiding per email wilt ontvangen, vul dan een geldig emailadres in.
Uw vraag is op deze pagina toegevoegd
Wilt u een email ontvangen bij een antwoord en/of nieuwe vragen? Vul dan hier uw emailadres in.