The product complies with the European Safety Standards EN60335-2-30 and the European Standard Electromagnetic Compatibility (EMC) EN55014, EN60555-2
and EN60555-3. These cover the essential requirements of EEC Directives 2006/95/EC and 2004/108/EC
EN : This product is only suitable for well insulated rooms or occasional use. DE : Dieses Produkt ist nur für gut isolierte Bereiche oder gelegentliche
Verwendung geeignet. FR : Ce produit convient uniquement à des endroits bien isolés ou pour un usage occasionnel. IT : Questo prodotto è
adatto solo per spazi ben isolati o per uso occasionale. ES : Este producto sólo es adecuado para espacios bien aislados o un uso ocasional. NL :
Dit product is uitsluitend geschikt voor goed geïsoleerde ruimten of voor sporadisch gebruik. PL : Produkt ten jest odpowiedni wyłącznie do dobrze
odizolowanych miejsc lub do okazjonalnego użytku. NO : Dette produktet egner seg kun for godt isolerte rom eller sporadisk bruk. RO : Acest
produs este adecvat exclusiv spaţiilor bine ventilate sau utilizării ocazionale. CZ : Tento výrobek je vhodný pouze do dobře izolovaných prostor
nebo k příležitostnému použití. DK : Dette produkt er kun egnet til velisolerede rum eller lejlighedsvis brug. PT : Este produto somente é adequado
para espaços bem isolados ou uso ocasional. SE : Denna produkt är endast avsedd för välisolerade utrymmen eller tillfällig användning. FI : Tämä
tuote soveltuu ainoastaan hyvin eristettyihin tiloihin tai satunnaiseen käyttöön. SK : Tento výrobok je vhodný len pre dobre izolované priestory alebo
na občasné použitie. SI : Ta izdelek je primeren le za dobro izolirane prostore ali za občasno uporabo. HR : Ovaj proizvod je pogodan samo za
dobro izolirane prostore ili povremenu upotrebu. HU : Ez a termék csak jól szigetelt terekhez vagy eseti használatra alkalmas. SV : Denna produkt är
endast lämplig för användning i väl isolerade utrymmen eller enstaka användning.
ENDENLFRROIT
PL
ES
A B C D E
1
2
3
A
C
G
E
B
D
F
H
585mm
680mm
229mm
45
67
Important Safety Advice
When using electrical appliances, basic
precautions should be followed to
reduce the risk of re, electric shock, and
injury to persons, including the following:
If the appliance is damaged, check
immediately with the supplier before
installation and operation.
Do not use this appliance in the
immediate surroundings of a bath,
shower or swimming pool.
Do not use outdoors.
This appliance must not be located
immediately above or below a fixed
socket outlet or connection box.
WARNING: The appliance carries
the Warning Symbol indicating that
it must not be covered or has a Do
not cover label. Do not cover or
obstruct in any way the heat outlet
grille located above the ame window
on the appliance Overheating will result
if the appliance is accidentally covered.
Do not place material or garments on the
appliance, or obstruct the air circulation
around the appliance, for instance by
curtains or furniture, as this could cause
overheating and a re risk.
In the event of a fault unplug the heater.
Unplug the appliance when not required
for long periods. The supply cord must
be placed on the right hand side of
the heater away from the heat outlet
underneath the appliance.
This appliance can be used by children
aged from 8 years and above and
persons with reduced physical, sensory or
mental capabilities or lack of experience
and knowledge if they have been given
supervision or instruction concerning
use of the appliance in a safe way
and understand the hazards involved.
Children shall not play with the appliance.
Cleaning and user maintenance shall not
be made by Children without supervision.
Children of less than 3 years should
be kept away unless continuously
supervised. Children aged from 3 years
and less than 8 years shall only switch
on/off the appliance provided that it has
been placed or installed in its intended
normal operating position and they have
been given supervision or instruction
concerning use of the appliance in a
safe way and understanding the hazards
involved. Children aged from 3 years
and less than 8 years shall not plug in,
regulate and clean the appliance or
perform user maintenance.
The appliance must be positioned so that
the plug is accessible.
Although this appliance complies with
safety standards, we do not recommend
its use on deep pile carpets or on long
hair type of rugs.
If the supply cord is damaged it must be
IMPORTANT: THESE INSTRUCTIONS SHOULD BE READ CAREFULLY AND RETAINED FOR FUTURE REFERENCE
replaced by the manufacturer or service
agent or similarly qualified person in
order to avoid a hazard.
CAUTION: In order to avoid a hazard due
to inadvertent resetting of the thermal
cut-out, this appliance must not be
supplied through an external switching
device, such as a timer, or connected
to a circuit that is regularly switched on
and off by the utility.
CAUTION - Some parts of this product
can become very hot and cause burns.
Particular attention has to be given
where children and vulnerable people
are present.
Technical Information
Model No: DF2608-EUE, DF2608-INT, DF2608-AU, DF3020-
EUE, DF3020-INT
Heat Output230V240V
Nominal Heat OutputP
Nom
1.9-2.0kW
Minimum Heat OutputP
min
0.9-1.0kW
Maximum Continuous Heat Output P
max,c
1.9-2.0kW
Auxiliary Electricity Consumption
In Standby modeel
SB
0.41-0.42W
with electronic room temperature control
General
Unpack the heater carefully and retain the packaging for
possible future use, in the event of moving or returning the
re to your supplier.
The re incorporates a ame effect, which can be used
with or without heating, so that the comforting effect may
be enjoyed at any time of the year. Using the ame effect
on its own only requires little electricity.
Before connecting the heater check that the supply
voltage is the same as that stated on the heater.
Please note: Used in an environment where background
noise is very low, it may be possible to hear a sound which
is related to the operation of the ame effect.This is normal
and should not be a cause for concern.
Electrical Connection
WARNING: THIS APPLIANCE MUST BE EARTHED
This heater must be used on an AC ~ supply only and the
voltage marked on the heater must correspond to the
supply voltage.
Before switching on, please read the safety warnings and
operating instructions.
EN
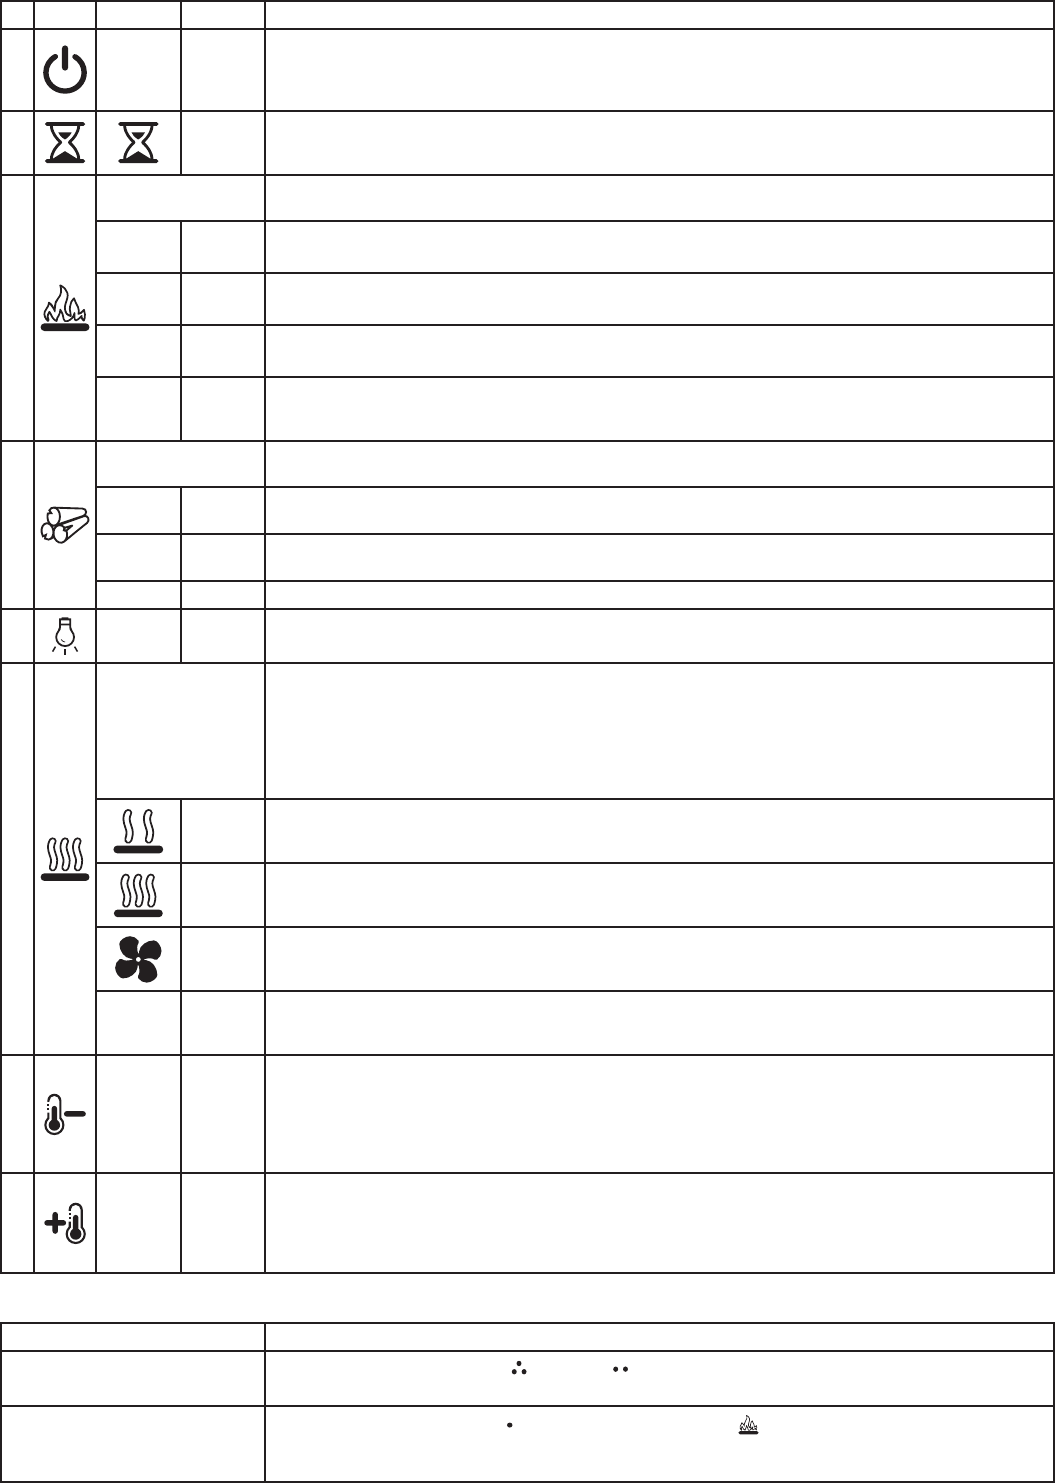
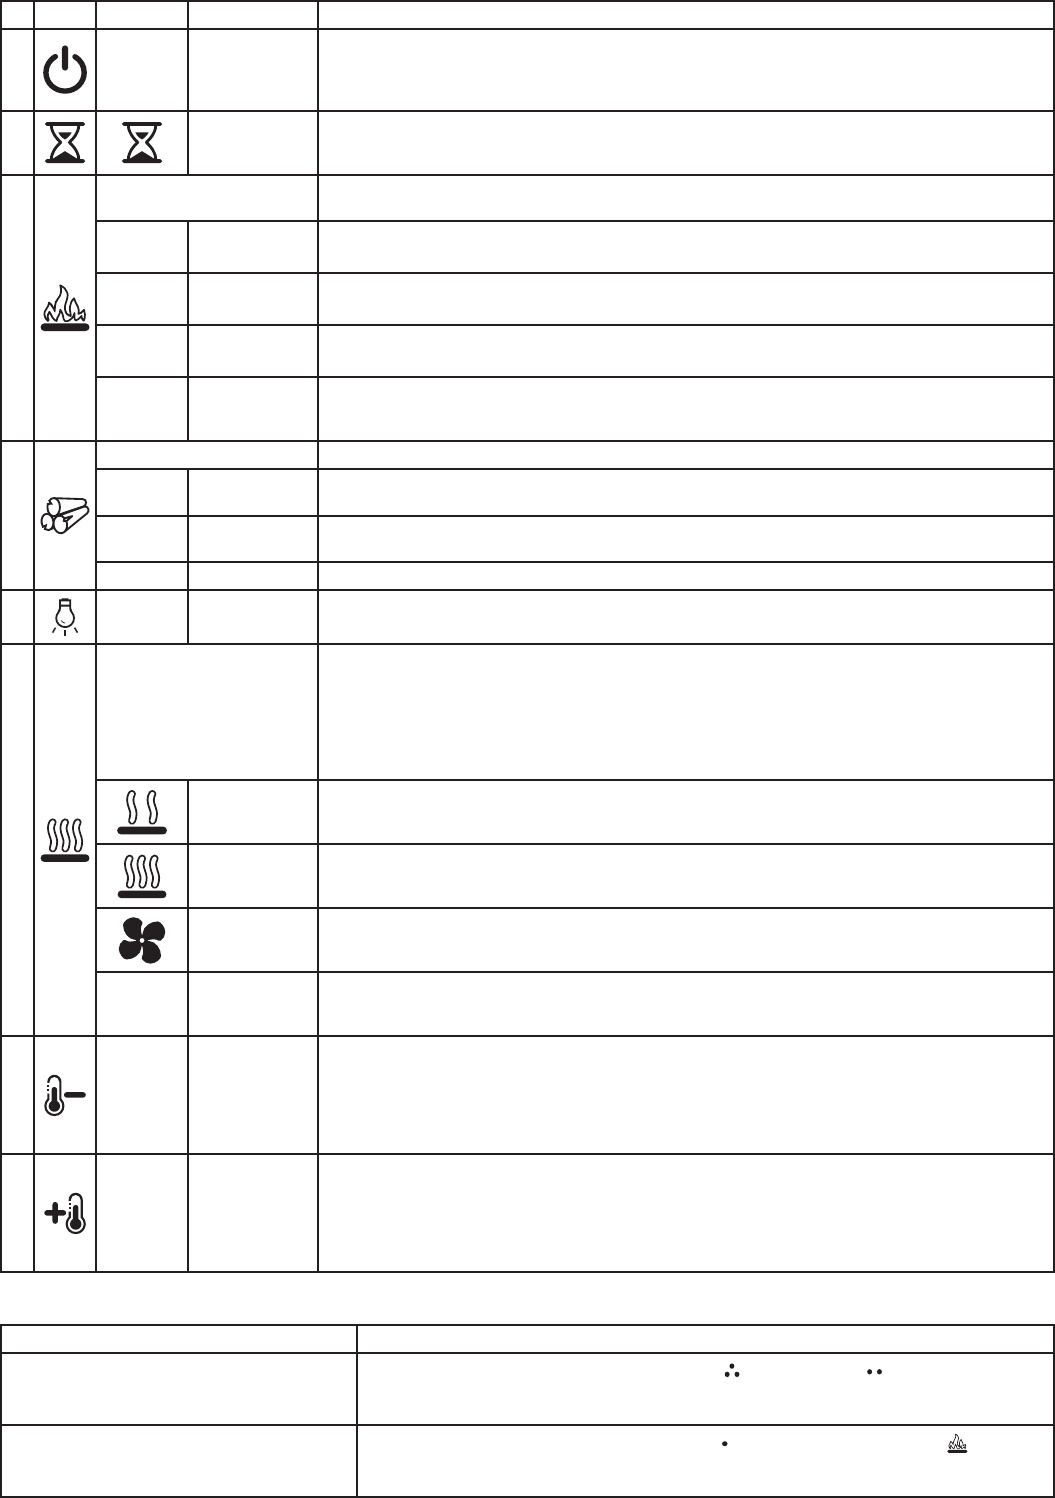
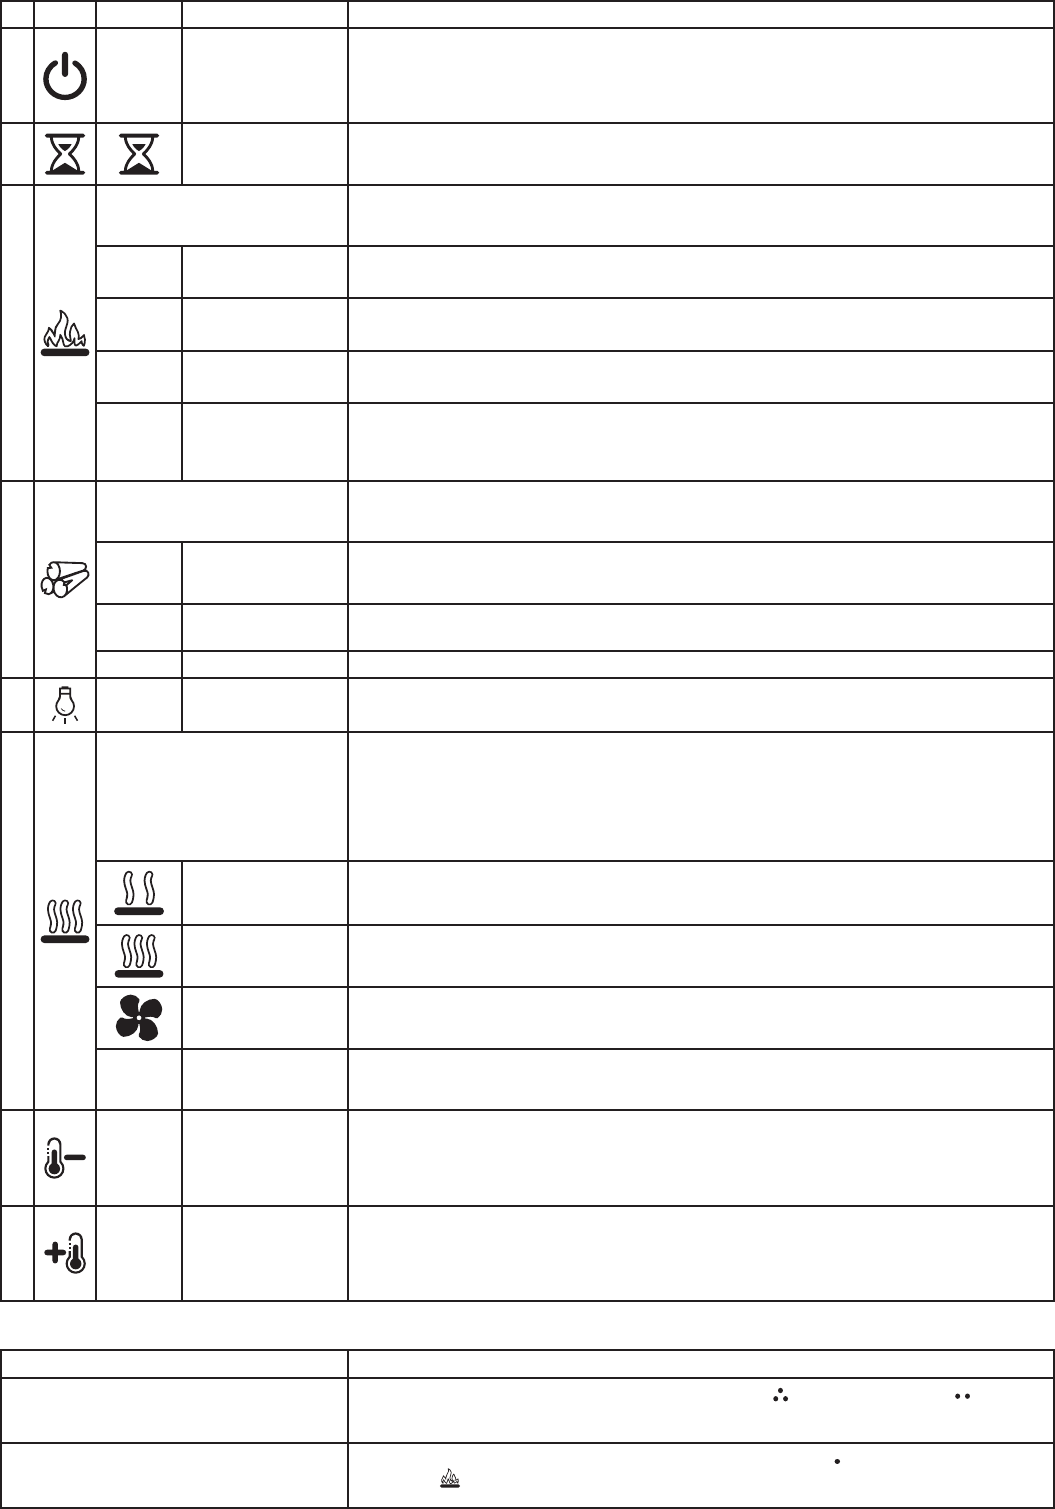
Controls: See Fig. 3
IconDisplayFunctionDescription
A-
Power /
Standby
Press once to turn the product ‘ON’.
Press a second time to put the product into ‘STANDBY’
(When returning from ‘STANDBY’ mode the product will return to previous settings unless the product
has been plugged out, in which case it will reset to factory settings)
B
Sleep
Timer
Press multiple times to change the ‘SLEEP TIMER’ in 0.5 hr increments from 0.5 hr to 8.0 hr before turning
off. The remaining time on the ‘SLEEP TIMER’ displays. (This icon is Green in Colour)
C
Flame Effect
‘FLAME EFFECT’ button cycles the unit sequentially through the 4 setting, LOW FLAME, HIGH FLAME,
DEMO MODE and OFF.
f1
Low
Flame
This setting will run the ame effect at a low brightness level. (The display will show F1)
f2
High
Flame
This setting will run the ame effect at a high brightness level. (The display will show F2)
fp
Demo
Mode
This setting will slowly pulse the ame effect between low and high brightness. (The display will show
FP)
-Off
This will turn the ame effect off. If the heater is running, the display will activate and remain active to
read the set temperature and show if the product is on LOW HEAT/ HIGH HEAT/COOL BLOW.
D
Log Effect
‘LOG EFFECT’ button cycles the unit sequentially through the 3 setting, ‘PULSING LOGS, STATIC LOGS
and OFF.
Lp
Pulsing
Logs
This setting will make the logs pulse. (The display will show FP)
LS
Static
Logs
This setting will make the logs stay lit. (The display will show FS)
-OffThis setting will turn the logs off.
E-On / Off
This button cycles the top light ‘On’ and ‘Off’.
F
Heat
‘HEAT’ button cycles the unit sequentially through the 4 settings: LOW HEAT, HIGH HEAT, COOL BLOW
and OFF. The heat setting will be indicated by an icon in the oating display see Fig.1.
When the ame effect is ‘ON’ the oating display will turn off after 5 seconds, however if the heater is
being used independently of the ame effect. The low heat or high heat icon will appear continuously
in the oating display.
Low Heat
This setting will run the heater at ‘LOW HEAT’ this setting will be indicated by the ‘LOW HEAT’ icon
and the letters ‘LO’ appearing in the display.
(This icon is Orange in Colour)
High
Heat
This icon in the oating display indicates ‘HIGH HEAT’ this setting will be indicated by the ‘HIGH HEAT’
icon and the letters ‘HI’ appearing in the display.
(This icon is Red in Colour)
Cool
Blow
This icon in the oating display indicates ‘COOL BLOW’ this setting will be indicated by the ‘COOL
BLOW’ icon and the letters ‘CB’ appearing in the display.
(This icon is Blue in Colour)
-Off
This switches the heater and blower ‘OFF’, no icon will be displayed in the oating display. Note the
blower will run for 10-20 seconds after being turned off this is to ensure the product cools down safely.
G-
Temp
Down
Press multiple times to lower the heater temperature in 1°C increments. The lowest temperature that
can be set 5°C.
Note: Once you stop at your desired temperature this will flash 3 times, then the display will show the
room temperature as detected by the product. If the set temperature is lower than the detected
room temperature the heater will not activate.
H-Temp Up
Press multiple times to increase the heater temperature in 1°C increments. The highest temperature
that can be set 37°C.
Note: Once you stop at your desired temperature this will flash 3 times, then the display will show the
room temperature as detected by the product. If the set temperature is lower than the detected
room temperature the heater will not activate.
User Modes:
Mode Name /DescriptionAction (Actions cannot be input by remote control)
Change Celsius (° C) to Fahrenheit (° F)
Press both 3 Dot Button () and 2 Dot ( ) on the unit and hold until beep is heard
and display flashes. (To revert back to Celsius repeat this action)
Disable/Enable Heat Options
Hold both 1 Dot Button ( ) and Flame Button (), on the unit, for 2 seconds, when
the heater has been disabled the display will read “--” and beep. To enable heat
repeat this action.
New Wall Construction
1. Select a suitable location that is not susceptible to
moisture and is away from drapes, furniture and high
trafc.
2. Place the replace in the desired location to see how
it will look in the room.
3. Mark the desired location on the oor.
4. Use studs to frame an opening of 680 mm wide X 585
mm high X 229 mm deep.(DF2608) Use studs to frame an
opening of 775 mm wide X 654mm high X 298 mm deep.
(DF3020)
Option #1
The power cord can be run from behind the trim and
along the wall to an outlet near the replace.
Option #2
A new outlet can be installed inside the framing
construction. Plug the replace into a 10-13Amp/230-
240 Volt outlet. If the cord does not reach you may use
a 3-core type extension cord rated for a minimum of
10 Amps.
Existing Fireplace
1. Seal all drafts and vents with a non-brous insulation
material to prevent any chimney debris from falling onto
the replace. Do not install into an existing replace that
is prone to dampness.
2. Cap the top of the chimney ue to prevent rain from
entering.
3. Plan your electric power supply.
4. The power cord can run along the front of the hearth
to an outlet near the replace.
Thermal Safety Cut-out
The built-in overheat cut-out, switches off the appliance
automatically in the event of a fault! Should this occur
switch off the appliance or disconnect the mains plug
from the socket.
Remove any obstructions which may have caused the
overheating. After a short cooling down phase, the
appliance is ready for use again! If the fault should occur
again, contact your local dealer!
WARNING: In order to avoid a hazard due to inadvertent
resetting of the thermal cut-out, this appliance must not be
supplied through an external switching device, such as a
timer, or connected to a circuit that is regularly switched
on and off by the utility.
Maintenance
WARNING: ALWAYS DISCONNECT FROM THE POWER
SUPPLY BEFORE ATTEMPTING ANY MAINTENANCE.
Light Emitting Diode
This re is tted with LED (Light Emitting Diode) lamps. These
LED lamps are maintenance-free and should not require
replacing during the life of the product.
Remote Control - See Fig. 3
The maximum range of use is ~ 5metres.
NOTE: It takes time for the receiver to respond to the
transmitter.
NOTE: The receiver for the remote control is located in
the display, aim the remote control in this direction when
inputting commands.
Do not press the buttons more than once within two
seconds for correct operation.
Battery Information - See Fig. 3
1. To activate the remote control remove the clear battery
isolation strip at the base of the remote control, which
is used to ensure your remote control reaches you fully
charged.
2. To replace the remote control battery, turn over the
remote control, and follow the diagram embossed on the
remote control
3. Only use CR2025 or CR2032 size of batteries.
Installing Front Glass- See Fig. 5, 6 & 7
NOTE: The outer glass is shipped separate to the rebox.
1. Remove the three screws holding the side trim as shown
in Fig. 5. and remove the metal trim.
2. Unpack the glass, ensure it is free from dust and nger
marks and slide in to position as shown in Fig. 6.
3. Position the metal trim removed in step 1, and secure
with the three screws as per Fig. 7
Fitting- See Fig. 4
IMPORTANT: If not using a Dimplex mantel, the replace
must be installed in an enclosure with the following
MINIMUM dimensions(Figure 4).
1. Select a suitable location that is not susceptible to
moisture and is at least 1 meter away from drapes,
furniture and high trafc.
2. Store the replace in a safe, dry and dust free location.
3. Clearance for air circulation beneath the replace
is provided by two spacers. DO NOT INSTALL FIREPLACE
DIRECTLY ON CARPET OR SIMILAR SURFACES WHICH MAY
RESTRICT AIR CIRCULATION. If installing the replace in
a carpeted area, place a one-piece, solid at surface
under the replace. Ensure that all feet rest securely on
this surface!
4. In some jurisdictions this appliance is supplied without
a plug this is to comply with the local regulations. In such
instances this appliance must be installed by a suitably
qualified installer and the means for disconnection must
be incorporated in the fixed wiring in accordance with
the local wiring rules.
Cleaning
WARNING: ALWAYS DISCONNECT FROM THE POWER SUPPLY
BEFORE CLEANING THE HEATER.
For general cleaning use a soft clean duster – never use
abrasive cleaners. The glass viewing screen should be
cleaned carefully with a soft cloth.
DO NOT use proprietary glass cleaners.
To remove any accumulation of dust or uff the soft brush
attachment of a vacuum cleaner should occasionally be
used to clean the outlet grille of the fan heater.
WARNING: do not operate the product without the grille
and outer glass in position as this may effect the operation
of the heater.
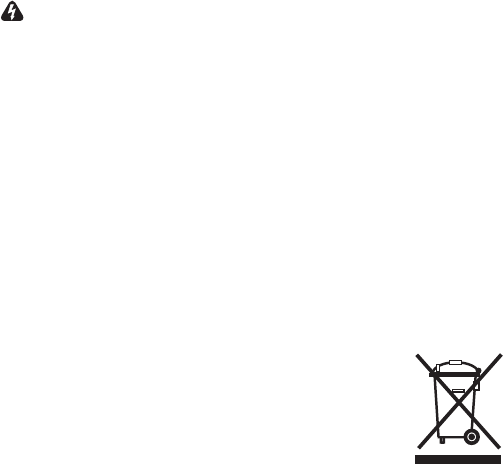
Recycling
For electrical products sold within the European
Community. At the end of the electrical
products useful life it should not be disposed
of with household waste. Please recycle where
facilities exist. Check with your Local Authority
or retailer for recycling advice in your country.
After Sales Service
Should you require after sales service or should you need
to purchase any spares, please contact the retailer from
whom the appliance was purchased or contact the service
number relevant to your country on the warranty card.
Please do not return a faulty product to us in the rst instance
as this may result in loss or damage and delay in providing
you with a satisfactory service. Please retain your receipt
as proof of purchase.
Belangrijke veiligheidsmededeling
Bij gebruik van elektrische apparaten
dienen basisvoorzorgmaatregelen in acht
genomen te worden om het risico op brand,
elektrische schokken en verwondingen bij
personen te voorkomen, inclusief:
Neem als het apparaat beschadigd is voor
installatie en gebruik direct contact op met
de leverancier.
Dit apparaat niet in de directe omgeving van
een bad, douche of zwembad gebruiken.
Niet buiten gebruiken.
Het apparaat niet rechtstreeks boven of
onder een vast stopcontact of aansluitdoos
plaatsen.
WAARSCHUWING: Het apparaat heeft
het Waarschuwingssymbool waarop wordt
aangegeven dat hij niet afgedekt mag
worden of heeft een Niet afdekken
label. Het warmte-uitlaatrooster
boven het vlamvenster van het
apparaat niet afdekken of op enige manier
blokkeren. Er ontstaat oververhitting als het
apparaat per ongeluk wordt afgedekt. Geen
materiaal of kleding op het apparaat leggen
of de luchtcirculatie om het apparaat
verhinderen door bijvoorbeeld gordijnen
of meubels aangezien dit tot oververhitting
kan leiden en tot brandgevaar kan leiden.
In het geval van een fout stekker van de
verwarming uit het stopcontact halen.
Haal de stekker van het apparaat uit het
stopcontact als deze langere tijd niet nodig
is. Het snoer moet aan de rechterkant van de
verwarming geplaatst worden, uit de buurt
van de warmte-uitlaat onder het apparaat.
Dit apparaat kan worden bediend door
kinderen van 8 jaar en ouder en door
personen met verminderde fysieke,
zintuiglijke of geestelijke capaciteiten of
gebrek aan ervaring en kennis als zij onder
supervisie staan of instructies krijgen ten
aanzien van het veilige gebruik van het
apparaat en begrijpen welke gevaren zich
kunnen voordoen. Kinderen mogen niet
met het apparaat spelen. De reiniging en
het gebruikersonderhoud van het apparaat
mag niet zonder toezicht door kinderen
worden uitgevoerd.
Kinderen van 3 jaar of jonger moeten uit
te buurt gehouden worden behalve bij
constante supervisie. Kinderen vanaf 3 jaar
maar jonger dan 8 jaar mogen het apparaat
alleen aan/uit zetten op voorwaarde dat
deze in de normale functioneringspositie is
geplaatst of geïnstalleerd en ze begeleiding
of instructie hebben gekregen ten aanzien
van het veilige gebruik van het apparaat
en de betreffende gevaren begrijpen.
Kinderen ouder dan 3 en jonger dan 8 jaar
mogen de stekker van het apparaat niet
in het stopcontact steken, hem instellen en
reinigen of onderhoudswerkzaamheden
uitvoeren.
Het apparaat moet zodanig gepositioneerd
worden dat de stekker bereikbaar is.
BELANGRIJK: DEZE INSTRUCTIES DIENEN ZORGVULDIG DOORGELEZEN EN BEWAARD TE WORDEN VOOR TOEKOMSTIG GEBRUIK
Gebruikershandleiding.com neemt misbruik van zijn services uitermate serieus. U kunt hieronder aangeven waarom deze vraag ongepast is. Wij controleren de vraag en zonodig wordt deze verwijderd.
Product:
Spelregels forum
Om tot zinvolle vragen te komen hanteren wij de volgende spelregels:
lees eerst de handleiding door;
controleer of uw vraag al eerder door iemand anders is gesteld;
probeer uw vraag zo duidelijk mogelijk te stellen;
heeft u een probleem en al geprobeerd om dit op te lossen, vermeld dit erbij aub;
heeft u een oplossing gekregen van een bezoeker dan horen wij dat graag in dit forum;
wilt u een reactie geven op een vraag of antwoord, gebruik dan niet dit formulier maar klik op de knop 'reageer op deze vraag';
uw vraag wordt direct op de website gezet; vermijd daarom persoonlijke gegevens in te vullen;
Belangrijk! Als er een antwoord wordt gegeven op uw vraag, dan is het voor de gever van het antwoord nuttig om te weten als u er wel (of niet) mee geholpen bent! Wij vragen u dus ook te reageren op een antwoord.
Belangrijk! Antwoorden worden ook per e-mail naar abonnees gestuurd. Laat uw emailadres achter op deze site, zodat u op de hoogte blijft. U krijgt dan ook andere vragen en antwoorden te zien.
Abonneren
Abonneer u voor het ontvangen van emails voor uw Dimplex Firebox DF 2608 Opti-flame bij:
nieuwe vragen en antwoorden
nieuwe handleidingen
U ontvangt een email met instructies om u voor één of beide opties in te schrijven.
Ontvang uw handleiding per email
Vul uw emailadres in en ontvang de handleiding van Dimplex Firebox DF 2608 Opti-flame in de taal/talen: Nederlands, Duits, Engels, Frans, Italiaans, Spaans, Pools als bijlage per email.
De handleiding is 1,16 mb groot.
U ontvangt de handleiding per email binnen enkele minuten. Als u geen email heeft ontvangen, dan heeft u waarschijnlijk een verkeerd emailadres ingevuld of is uw mailbox te vol. Daarnaast kan het zijn dat uw internetprovider een maximum heeft aan de grootte per email. Omdat hier een handleiding wordt meegestuurd, kan het voorkomen dat de email groter is dan toegestaan bij uw provider.
Stel vragen via chat aan uw handleiding
Stel uw vraag over deze PDF
Uw handleiding is per email verstuurd. Controleer uw email
Als u niet binnen een kwartier uw email met handleiding ontvangen heeft, kan het zijn dat u een verkeerd emailadres heeft ingevuld of dat uw emailprovider een maximum grootte per email heeft ingesteld die kleiner is dan de grootte van de handleiding.
Er is een email naar u verstuurd om uw inschrijving definitief te maken.
Controleer uw email en volg de aanwijzingen op om uw inschrijving definitief te maken
U heeft geen emailadres opgegeven
Als u de handleiding per email wilt ontvangen, vul dan een geldig emailadres in.
Uw vraag is op deze pagina toegevoegd
Wilt u een email ontvangen bij een antwoord en/of nieuwe vragen? Vul dan hier uw emailadres in.