• Positioner: Press [Vol ] to select between “Off/DiSEqC1.2/USALS”.
Notice:When you select “DiSEqC1.2 or USALS”, “DiSEqC1.0” and “DiSEqC1.1”
items will be disabled.
• Polarity: Press [Vol ] to switch between “Auto/H/V ”.
• Toneburst: Press [Vol ] to switch this function “On” or “Off”.
3. DiSEqC1.0 4Port: Use [Vol ] to switch the options of DiSEqC1.0. Between Disable/
LNB1/LNB2/LNB3/LNB4.
4. TP Index: Us [Vol ] to select the desired transponder or press [OK] to open the TP
list to select directly with [CH ], press [OK] again to display the TP number where
the channel can be found.
5. FTA Only:Press [Vol ]to select to scan only free channels or even scrambled
channels. If you select “Yes” it will scan free channels only.
6. Scan Channel: Press [Vol ] to select to scan TV + radio channels, or just TV channels
or just radio channels.
7. Scan Mode: You can select “Auto Scan”, “Preset Scan” or “NIT Search” to blind scan
preset transponders or network transponders of the selected satellite.
8. Search: Press [OK] to start scanning. In the lower part of the window the progress of
scanning and the found channels are displayed.
3. CHANNEL
25DVB-S Receiver
GB
3.7 SAVE THE PROGRAM LIST AND SETTINGS
1. Enter the password. The default password is “0000”.
2. After entering the password correct a safety question will show up where you have to
confirm first.
3. Select „OK“ and press the [OK]button to save the actual program list as backup
program list. Select “Cancel” to cancel the operation and confirm with [OK].
After selecting the installation menu you can
see the window like beside.
In “Installation” menu;
1. Press [CH▲/▼]to select menu items
among Single Search, Multi Search, TP
Scan, Satellite List, TP List, Satellite Guide
and Unicable Configuration.
2. Press [OK] to enter the selected item.
4.1 SINGLE SEARCH
After selecting “Single Search” you will see a
window like beside:
1. In the “Satellite” item press [Vol ] to
select the satellite which you want to scan
or press [OK] to open the “satellite list” to
select directly with [CH ], press [OK]
to confirm it.
2. LNB Configuration:Press[OK]to enter
LNB configuration, you will see a window
like beside:
•LNB Type: Press[Vol ] to switch
among “Standard”, “User” and “Univer-
sal” mode.
For Example: If you use a Dual LNB, then
you should select “User” option in “LNB
3. CHANNEL
4. INSTALLATION
24
Installation-Guide
GB
After modification select “OK” of button bar and press [OK] on the RCU to rename the
favorite group name and leave the edit mode. Press [EXIT] on the RCU to exit the edit
mode without saving the favorite group name.
3.5 DELETE ALL
To delete all channels:
1. Enter the password. The default password
is “0000”.
2. After entering the password correct a
safety question will show up where you
have to confirm first
3. Select “OK” to delete all channels or “Can-
cel” to cancel the operation and confirm
with [OK].
4. In step 1 and step 2, pressing [MENU] will exit the function directly without saving.
? Frequently Asked Question
Q: IF I incautiously delete all channels, what should I do?
A: there are two ways to restore:
•To research all channels in the “Installation” menu.
•Use “Factory Default” function to restore all channels in the “Tools” menu.
3.6 RESET THE PROGRAM LIST AND SETTINGS
Go to: Menu/Others/Factory Setting
1. Enter the password. The default password is “0000”.
2. After entering the password correct a safety question will show up where you have to
confirm first.
3. Select “OK” to delete all channels or “Cancel” to cancel the operation and confirm with
[OK].
4. In step 1 and step 2, pressing [MENU] will exit the function directly without saving.
3. CHANNEL
23DVB-S Receiver
GB
3.3 CHANNEL SETUP
When you enter the “Channel Setup” menu
you will see a screen like beside:
1. Startup Channel: Press [OK]to enter
“Startup Channel” menu to see the screen
like showed beside:
•If you set of “Boot on Channel” to “On” you
can edit the following two items. If the set-
ting is “Off” the box always starts with the
channel that was running when the box
has been switched off.
•On the “Mode” item you can select either
“TV channel” or “Radio channel”.
•On “Startup Channel” item you can open
the channel list by pressing [OK]. Then
you can select the channel of you choice.
Press [OK] again to confirm.
2. Channel Play type: Use [CH▲/▼] to select,
press [OK]to enter “Channel Play Type”
menu. Here you can select the “playing
channels” as “All”, “Free” or “Scrambled”
with [Vol◄/►].
3. If you select “Free” then all scrambled
channels will be skipped when you change
channels with [Vol◄/►].
4. Press [EXIT] to leave the “Channel Setup”
menu.
3.4 FAVORITE GROUP LIST NAME
When you enter “Favorite group list name”
menu with 32 favorite group will be displayed,
press [OK]on the RCU to rename favorite
group. Use [CH▲/▼]/ [Vol◄/►]to select
character, press [OK] to confirm it.
3. CHANNEL
22
Installation-Guide
GB
Press [GREEN] button to open the create
channel window.
1. Press [OK] on the “Satellite” item to
display the satellite list. You can
select the satellite for which you
want to create a new channel.
2. With marked “TP Index” item press
[OK] to display TP list, use [CH▲/▼]
to select for which you want to
create a new channel. Press [OK] to
display the TP number where the channel can be found. The next three items will
show the related parameters.
3. Highlight the “Name” item and press [OK] to display the button pad and edit the
new channel’s name. In “Video PID”, “Audio PID” and “PCR PID” items you can
enter the numbers directly to set these parameters of the new channel.
4. After modification select “Save” and press [OK] to save the new channel and
leave the edit mode. Select “Exit” and press [OK] to exit the edit mode without
saving the new channel.
3.1.5 FIND
1. Press [BLUE]button to open the “Find”
window like showed beside. Press [CH▲/▼]
/ [Vol◄/►] to select the leading character
of the channel name and press [OK] to
confirm it.
2. After entering the character(s) highlight
“OK” in the window and press [OK] on the
RCU.
3. Press [EXIT] button to close the find window
and brings you back to the channel list.
3.2 RADIO CHANNEL LIST
Basically the operation of “Radio Channel List” is same as “TV Channel List”, except that in
the small channel window the radio Logo will be displayed.
3. CHANNEL
21DVB-S Receiver
GB
3.1.4.2 SKIP
In channel edit menu, press [GREEN] button to place a skip icon behind the name of the
highlighted channel. Marked channels will be skipped when you change channels in TV
mode after you confirm to save the changes when you leave this menu.
3.1.4.3 LOCK
In channel edit menu, press [YELLOW] button to place a lock icon behind the name of the
highlighted channel. Marked channels will be locked and displayed only after password has
been entered if you confirm to save the changes when you leave this menu.
3.1.4.4 EDIT
Pressing the [BLUE] button in the TV channel
list edit menu will open another window where
you can choose between edit the actual chan-
nel and create a new channel.
•Edit
Press [RED] button to edit the channel.
1. Selecting the name item with [OK] will dis-
play a button pad to show youhow to edit
the channel name.
2. On the “Video PID”, “Audio PID” and “PCR
PID” items you can inputnumbers to modify
the item’s value.
3. After modification select “Save” and press
[OK] button to save the modified values and
exit “Edit” mode. Or select “Exit” and press
[OK] to leave edit mode without saving the
modifications.
•Create
3. CHANNEL
20
Installation-Guide
GB
3.1.3 SORT
Press [GREEN]to open the sort window.
Press [CH▲/▼] to select and [OK] to confirm
your choice.
The ways of sorting are:
•Default: Sort channel factory default.
•FTA/CAS: Sort channel by free and
scrambled sequence. Free channels will
be listed first and scrambled channels be-
hind in the channel list.
•Lock: Unlocked channels are listed first
end locked channels at the end.
•Name(A-Z): Sorting in Alphabetical order, ignoring “$” symbol.
•Name(Z-A): Sorting in Alphabetical order, ignoring “$” symbol.
3.1.4 EDIT
After pressing the [YELLOW]button a win-
dow for entering the password will open. The
default password is “0000”.
You can delete, skip, lock and edit the channel.
Press [MENU] to leave the channel editing.
The system will ask you to confirm the saving
of the changes you made.
3.1.4.1 DELETE
In channel edit menu press [RED] button will open another window where you can choose
between delete one channel and delete all channel.
•Del One:
Press [RED] button to mark a channel for deleting. Marked channel will be deleted after
you confirm to save the changes when you leave this menu.
•Del All:
a) Press [GREEN] button to show a deleting icon behind all channel name.
b) Press [MENU] button you will be asked “Are you sure to save?”. Select [OK] to delete
all channel. Select “Cancel” to cancel the operation.
3. CHANNEL
19DVB-S Receiver
GB
3.1.1 FAVORITE
1. Press [FAV] to open the favorite window.
2. You can select between 32 favorite groups
with [CH▲/▼].Press [OK]to assign the
channel to a favorite group, press [EXIT] to
exit favorite group.
3. Press [OK] again to remove the channel
from the marked favorite group.
4. Press [MENU] button you will be asked
“Are you sure to save?”. Select “Yes” to
save the marked favorite group. Select
“No” to cancel the operation.
5. To return to the TV channel list. The channels of favorite groups are indicated with a
favorite icon behind the name.
3.1.2 MOVE
Pressing the [RED] button in the TV channel
list will open another window where you can
choose between move the actual channel and
swap the actual channel to the desired posi-
tion, press [OK] to confirm it.
a) Move
1. Press [RED]button to show a moving
icon behind the channel name.
2. Move the channel to the desired
position with [CH▲/▼]. Press [OK]to
confirm the position.
b) Swap
1. Press [GREEN] button to show a moving icon behind the channel name.
2. Move the channel to the desired position with [CH▲/▼]. Press [OK], then the selected
channel will exchange the postions with the channel name on this position immediately.
3. CHANNEL
18
Installation-Guide
GB
Press [MENU] in the TV/radio mode to enter
the main menu.
1. Press [CH▲/▼] to select the channel item.
2. Press [OK] to enter the selected item.
In the channel menu:
Press [CH▲/▼]to select the wanted menu
item among TV Channel List, Radio Channel
List, Channel setup, Favorite group list name
and Delete All.
Press [OK] to enter the selected item.
3.1 TV CHANNEL LIST
If you enter the channel list menu a window
like the one below will open.
1. You can move the highlighted channel with
[CH▲/▼]and press [OK]to preview the
highlighted program in the preview window.
2. Press [PGUP/PGDN] on the RCU to jump
between the channels by pages.
3. Press[Vol◄/►]to switch satellite of the
program group.
4. Press [MENU] or [EXIT] buttons to enter
TV playing mode.
5. The color buttons offer further functions to
manage the channel list.
3. CHANNEL
17DVB-S Receiver
GB
2.31 ►II
When you play a current or recorded program, press [►II] will stop the program, press
[►II] again will play the program continually, And Timeshift is started by this key.
2.32 ►I◄
Press [►I◄] button when you play a marked program, the screen will record to the an mark
point.
2.33 I◄◄/►►I
Press [I◄◄/►►I] button when you play a marked program, the screen will jump to the next
mark point.
1. Jump Step Value: “1 Mins / 3 Mins / 5 Mins / 10 Mins / 15 Mins” jump.
2. Jump Step Value: Record the an mark point.
2.34 LNB Short
When LNB is short, it will notify user on screen “LNB Short!” Please check your cables and
connections for shorts. When the short is removed the warning message will disappear.
2. BASIC OPERATIONS
16
Installation-Guide
GB
2.26 T.S.
In TV mode, press [T.S.] button you will be asked to “Do you want to time shift?” menu.
2.27 GOTO
When you play the recorded channels, press [GOTO] button, the “Jump to” message box
will pop up, input the Time and press [OK], then the receiver will back to the input time
point and play the program from that point continually. (If the input time is more than the
recorded time, the picture will back to last picture, please noted.)
2.28 ■
When you play a recorded program, press [■]
button will stop the recorded channel playing
and back to the Record Management menu.
When you are recording a program, press [■]
button you will be asked to “Do you want to
stop record?” menu.
2.29 ●
In TV mode, press [●] button you will be asked
to “Do you want to record?” menu.
2.30 ◄◄/►►
When you play a recorded channel, Press [◄◄] button to back the program fast and Press
[►►] to fast forward the program.
Selection: 2x, 4x, 8x speed.
2. BASIC OPERATIONS
15DVB-S Receiver
GB
3. In “x2
~
x16” image, using [CH /VOL ] keys to move the image center area you
want to see.
4. In zoom mode, press [Exit] to close “Zoom” window.
2.22 SUBT
In “Subtitle Display”Menu. Subtitle: Press [VOL◄/►] to select “standard” or “Off”. Press
[VOL◄/►] to select languages. If the current channel has Subtitle Information, it will be
displayed if this function is “On”. If this function is “Off” Subtitles won’t be displayed.
2.23 TTX
1. Press [TTX] button in TV mode to open the
teletext page. This service is depending on
the support of the channel provider.
2. If the channel does not support teletext
information, it will show “No Teletext Data”
on the screen.
2.24 PAUSE
1. In playing mode, press [PAUSE], the picture will be paused, but the sound of the channel
will still continues.
2. Press [PAUSE] again, the screen’s picture will skip over to the current playing picture,
and the sound of the channel will corresponding playing.
2.25 A-B
In recorded mode, during your watching,
press [A-B] button to set up a starting point
A, then set another point B by press[A-B]
button again after a while, then it will start to
playback from A to B and repeat the programs
between this two points if no any interruption.
2. BASIC OPERATIONS
14
Installation-Guide
GB
2.18 PIP (Picture in Picture)
In TV mode, press [PIP] button allows you to
watch two channels from the same trans-
ponder at the same time.
1. Swap: press red [SWAP] button to exchange
the two watching channels in big picture
size and smaller picture size.
2. Move: press green [MOVE] button to move
the smaller size picture to the desired
position.
3. List: press yellow [LIST] to show all the
available channels of smaller picture.
4. Size: press blue [SIZE] button to zoom-in or
zoom out the smaller picture.
2.19 PVR LIST
In TV mode, press [PVR LIST] button to access directly to the “Record List” menu.
2.20 AUDIO
1. In TV mode, press the [AUDIO]button to
open the Audio Mode window.
2. Select the item you want to adjust with
[CH ]and change the value with
[Vol ].
2.21 ZOOM
1. The[ZOOM]key allows you to magnify a
certain area on the images and the current
screen will show
2. Press [ZOOM] key again, the image will
enlarge rotate as x1, x2, x4, x6, x8, x12,
x16.
2. BASIC OPERATIONS
13DVB-S Receiver
GB
2.14 EXIT
Press [EXIT] button to exit the current menu.
2.15 CH▲/▼
In TV/Radio mode press [CH ] to change channel.
2.16 V◄/►
In TV/Radio mode, press [Vol ], to adjust volume.
2.17 OK
1. In TV mode press [OK] button to open the
Channel List window.
2. Press the [RED] exchange screen.
3. Press [GREEN] button to sort the chan-
nels by free and scrambled channels. Free
channel are listed first and scrambled
channels last
4. Press [YELLOW] button to open the SAT
list. After selecting a satellite the channel
list will be reduced to the channels of this
satellite.
5. Press [FAV] button to open FAV list. After
selecting a Favorite Group the channel
list will be reduced to the channels of this
group.
6. Press[BLUE]button to open the Find
window. You can use this feature to find
channel by their names.
7. Press [OK]to change and display the
marked channel.
2. BASIC OPERATIONS
12
Installation-Guide
GB
2.11 EPG
The STB supports Electronic Program Guides
(EPG) to give you information about the actual
programs of certain channels like event name,
subtitle, description, start and finish time. This
feature is depending on the service of the
channel provider.
Press (EPG) to open the EPG window.
1. You can move the highlighted channel with
[CH▲/▼]and preview the highlighted
program in the preview window. with
[Vol◄/►]and display the event’s detailed
description.
2. Press the [INFO] button in the EPG menu to
display the detailed information of the
actual event in the selected channel.
3. To close the EPG menu press
[EXIT/MENU].
4. Press the [RED] button in the EPG menu to
program a timer with the actual events
data.
5. Press the [GREEN/YELLOW]to select
date.
2.12 FAV +/-
1. In full screen, press [FAV +/-] keys can switch the favorite channels in current satellite
channels list directly.
2. The sequence of the switch favorite channels is following the sequence that in the
current satellite channel list, not follow the sequence in the favorite group.
2.13 MENU
Press [MENU] button to enter or exit the current menu.
2. BASIC OPERATIONS
11DVB-S Receiver
GB
3. Press [CH▲/▼ / Vol◄/►] to change the
marked channel among the preview
programs.
4. With [OK] you return to full screen mode in
the marked channel.
2.8 FAV
1. In TV mode press the[FAV]button to
display the Favorite Group window on the
screen as the picture beside shows.
2. In the Favorite Group window you can
select the desired favorite channel with
[CH ] and confirm it with[OK]to
switch to it. In bigger groups you can
navigate with [PGUP/ PGDN].
3. With [Vol
]you can select different
Favorite Groups.
4. Press [EXIT] to close the Favorite Group window.
? Frequently Asked Question
Q: Why the screen displays “No Favorite Channel” after pressing the [Favorite] button?
A: No channels have been assigned to a Favorite Group yet. You can do this in the
channel menu.
2.9 PGUP / PGDN
In TV mode, press [PGUP/PGDN] to switch directly between satellites.
2.10 Back
Pressing the [BACK] button allows you to toggle between the actual and the last selected
channel.
2. BASIC OPERATIONS
10
Installation-Guide
GB
2.3 TV/Radio
In TV mode, press [TV/Radio] to switch to Radio mode. In Radio mode press [TV/Radio]
again to switch back to TV mode.
2.4 Mute
1. Press the [Mute] button to mute the sound. On the screen an icon will be displayed to
indicate the muted sound.
2. Press the [Mute] button again to restore the sound.
2.5 Channel Number
In TV mode you can enter the channel number directly with your remote control unit and
confirm the number with the OK button to change to the desired channel.
2.6 INFO
•InTVmode,press [INFO] button can open
information screen, in the window shows
the parameters of current channel.
•Twodynamicbarsatthebottomofthe
window reflect the signal intensity and
signal quality of the current channel.
2.7 MULTI-PIC (0)
In TV mode, press[0]to enter the “MULTI”
menu.
1. Press [CH▲/▼] to switch multi picture.
2. In “MULTI” menu, you can choose channels’
preview window (static), starting from the
current channel. Only the marked preview
program is continuously playing.
2. BASIC OPERATIONS
9DVB-S Receiver
GB
2.1 Switch on STB
Switch the [Device’s Main Power] switch on.
When the STB is first used it will display “Quick Setup” window. you will set Language, First
Audio, Second Audio, LNB Power, Antenna Setup and Multi Search.
? Frequently Asked Question
Q: The power of my STB is on and it is running in TV mode but the TV screen shows
nothing:
A: Make sure the TV set has been set to the correct video input (not the TV channels). For
example, if you have connected the unit to the video1 input of the TV set then you need
to select the corresponding input of the TV. Mostly it is done with the AV button of the
TVs remote control unit.
Q: My STB is running in TV mode but the TV screen shows nothing except one ball and
“No Signal”.
A: That means the channel you selected has no signal. This can be caused by several rea-
sons:
1. The channel you selected is not from the satellite to which your dish is pointing. Se-
lect another channel.
2. The signal of current TV channel is too weak. You can try to change to other channels
with a stronger signal. If the problems still exist, please consult your local dealer or
installer for technical service.
3. You selected the wrong LNB type in the installation menu or your DiSEqC switch
configuration is not correct.
2.2 Standby Mode
1. Press [Power] button to switch from TV/radio mode to standby mode
2. In standby mode press [Power] button again to switch back to TV/radio mode. The last
active channel will be showed.
3. To switch off the STB complete press the main power button.
2. BASIC OPERATIONS
8
Installation-Guide
GB
1. REMOTE CONTROL & PANEL DESCRIPTION
1.3 Remote Control
7DVB-S Receiver
GB
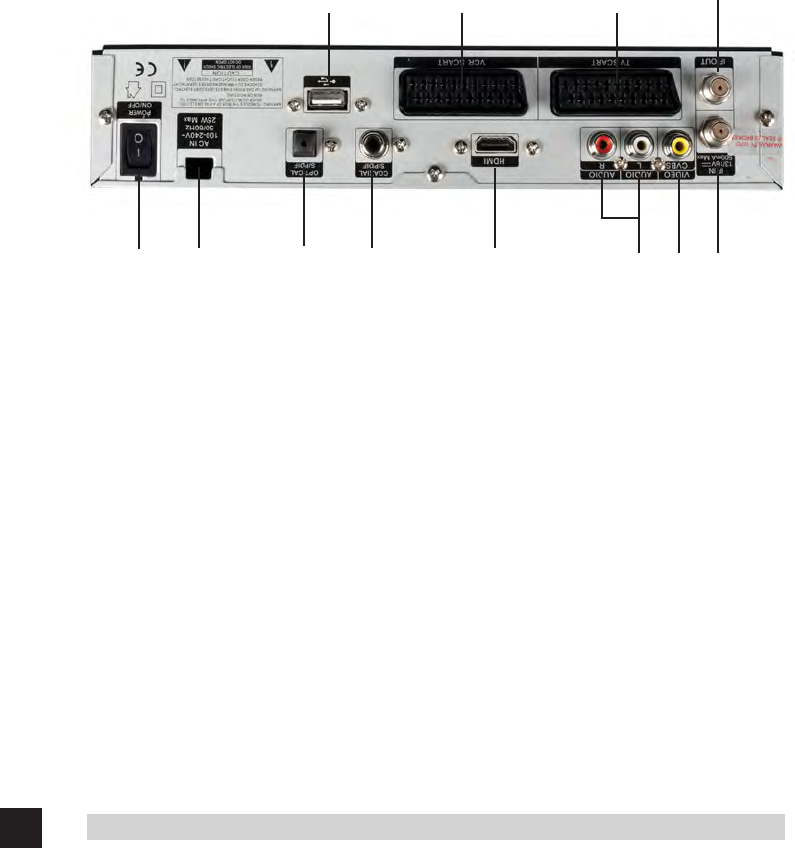
1.2 Rear Panel Description
1. POWER ON/OFF: Allows to completely switch off the receiver.
2. AC IN: Mains input cable.
3. IF IN: Satellite input.
4. IF OUT: Satellite output for cascading to other devices.
Note: The operation of another receiver at the same time is only possible with limited
channel selection.
5. S/PDIF: Optical output for digital audio (AC3).
6. S/PDIF: Coaxial output for digital audio (AC3).
7. HDMI: HDMI output for the connection to a TV set.
8. USB: To connect with the USB disk.
9. AUDIO: HiFi outputs for stereo set.
10. VIDEO: CVBS video output for TV AV in.
11. TV SCART: Output SCART for the connection to a TV set.
12. VCR SCART: Output SCART for the connection to a VCR set.
1. REMOTE CONTROL & PANEL DESCRIPTION
1
4
2310
11128
9567
6
Installation-Guide
GB
1.1 Front Panel Description
1. POWER: Is used to switch between the working mode and the standby mode.
2. Display (4-Digit/7-Segment): Displays the received channel number while operating.
3. Remote Sensor: Detects the infrared signals from the remote control unit.
4. MENU: To enter into the main menu and exit all menus.
5. VOL+/-: To change volume to move cursor, change numbers in the menu or to
change the choice.
6. OK: To select an item in the menu and confirm it or pop up channel list when no
menu.
7. CH+/-: To change channels or for navigating and changing values in menus.
8. POWER LED: Lights ON in red when in Standby mode.
1. REMOTE CONTROL & PANEL DESCRIPTION
2
14657
38
5DVB-S Receiver
GB
3.5 Delete All ........................................................................................................................................... 24
3.6 Reset the programlist and settings ..................................................................................... 24
4.1 Single Search .................................................................................................................................. 25
4.2 Multi Search ..................................................................................................................................... 27
4.4 Satellite List ...................................................................................................................................... 30
4.5 TP List ................................................................................................................................................. 31
5. SYSTEM SETUP ........................................................................................................... 33
5.1 Language ........................................................................................................................................... 33
5.2 TV System ......................................................................................................................................... 34
5.3 Time & Timer Setting .................................................................................................................. 35
5.6 Power setting .................................................................................................................................. 38
5,7 Switch the position of the remote control ......................................................................... 39
6.1 Information ...................................................................................................................................... 40
6.4.2 Backup To USB ............................................................................................................. 41
6.4.3 OTA Upgrade ................................................................................................................. 42
7. MEDIA MANAGEMENT ............................................................................................ 42
7.1 Media List ......................................................................................................................................... 42
7.1.1 All ........................................................................................................................................ 43
7.1.2 Music ................................................................................................................................ 46
2.5 Channel Number .......................................................................................................................... 10
2.6 Info ...................................................................................................................................................... 10
2.10 Back ................................................................................................................................................ 11
2.13 Menu ............................................................................................................................................... 12
2.17 OK .................................................................................................................................................... 13
2.18 PIP (Picture in Picture) ............................................................................................................. 14
2.19 PVR List ......................................................................................................................................... 14
2.26 T.S. ................................................................................................................................................... 16
2.34 LNB Short ...................................................................................................................................... 17
Gebruikershandleiding.com neemt misbruik van zijn services uitermate serieus. U kunt hieronder aangeven waarom deze vraag ongepast is. Wij controleren de vraag en zonodig wordt deze verwijderd.
Product:
Spelregels forum
Om tot zinvolle vragen te komen hanteren wij de volgende spelregels:
lees eerst de handleiding door;
controleer of uw vraag al eerder door iemand anders is gesteld;
probeer uw vraag zo duidelijk mogelijk te stellen;
heeft u een probleem en al geprobeerd om dit op te lossen, vermeld dit erbij aub;
heeft u een oplossing gekregen van een bezoeker dan horen wij dat graag in dit forum;
wilt u een reactie geven op een vraag of antwoord, gebruik dan niet dit formulier maar klik op de knop 'reageer op deze vraag';
uw vraag wordt direct op de website gezet; vermijd daarom persoonlijke gegevens in te vullen;
Belangrijk! Als er een antwoord wordt gegeven op uw vraag, dan is het voor de gever van het antwoord nuttig om te weten als u er wel (of niet) mee geholpen bent! Wij vragen u dus ook te reageren op een antwoord.
Belangrijk! Antwoorden worden ook per e-mail naar abonnees gestuurd. Laat uw emailadres achter op deze site, zodat u op de hoogte blijft. U krijgt dan ook andere vragen en antwoorden te zien.
Abonneren
Abonneer u voor het ontvangen van emails voor uw Digitalbox IMPERIAL DB 2 max bij:
nieuwe vragen en antwoorden
nieuwe handleidingen
U ontvangt een email met instructies om u voor één of beide opties in te schrijven.
Ontvang uw handleiding per email
Vul uw emailadres in en ontvang de handleiding van Digitalbox IMPERIAL DB 2 max in de taal/talen: Duits als bijlage per email.
De handleiding is 2,24 mb groot.
U ontvangt de handleiding per email binnen enkele minuten. Als u geen email heeft ontvangen, dan heeft u waarschijnlijk een verkeerd emailadres ingevuld of is uw mailbox te vol. Daarnaast kan het zijn dat uw internetprovider een maximum heeft aan de grootte per email. Omdat hier een handleiding wordt meegestuurd, kan het voorkomen dat de email groter is dan toegestaan bij uw provider.
Stel vragen via chat aan uw handleiding
Stel uw vraag over deze PDF
Uw handleiding is per email verstuurd. Controleer uw email
Als u niet binnen een kwartier uw email met handleiding ontvangen heeft, kan het zijn dat u een verkeerd emailadres heeft ingevuld of dat uw emailprovider een maximum grootte per email heeft ingesteld die kleiner is dan de grootte van de handleiding.
Er is een email naar u verstuurd om uw inschrijving definitief te maken.
Controleer uw email en volg de aanwijzingen op om uw inschrijving definitief te maken
U heeft geen emailadres opgegeven
Als u de handleiding per email wilt ontvangen, vul dan een geldig emailadres in.
Uw vraag is op deze pagina toegevoegd
Wilt u een email ontvangen bij een antwoord en/of nieuwe vragen? Vul dan hier uw emailadres in.