615550
10
Verklein
Vergroot
Pagina terug
1/16
Pagina verder
Wild Camera
DENVER WCT-3004
Instruction Manual
WWW.DENVER-ELECTRONICS.COM
ENG
ENG-1
Table of Contents
1. Instructions .................................................................................................... 3
1.1 General Description ................................................................................ 3
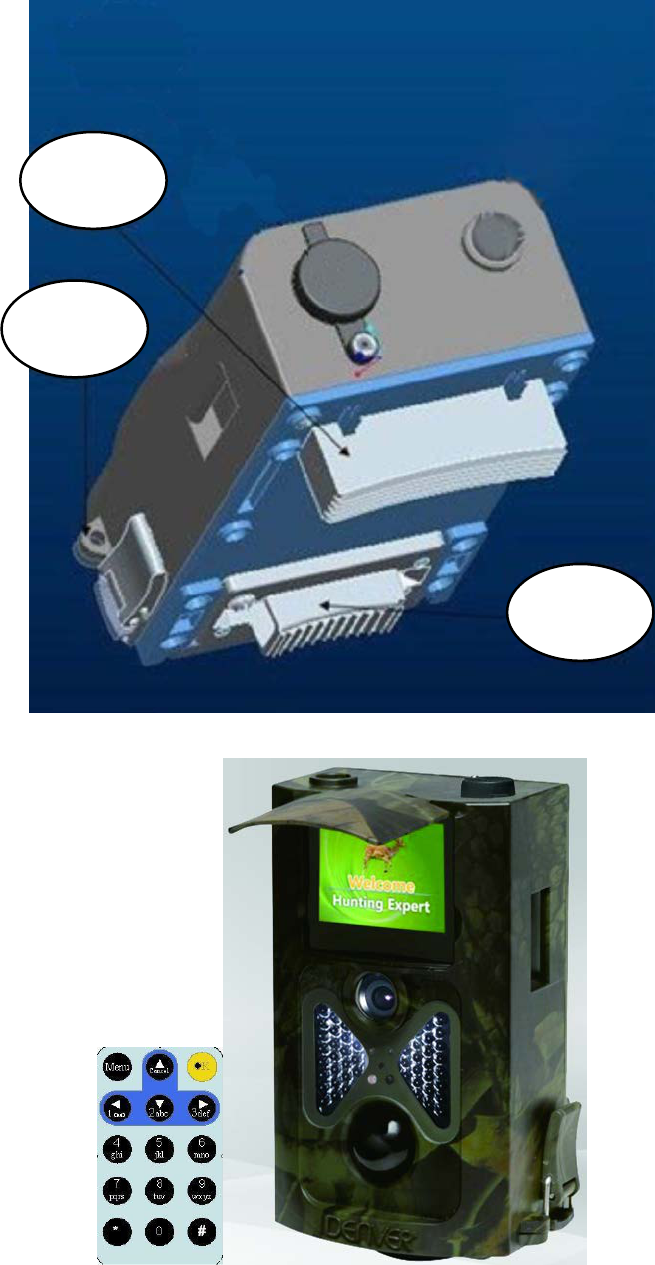
1.2 Camera Body Interface ........................................................................... 3
1.3 Camera components and features ......................................................... 3
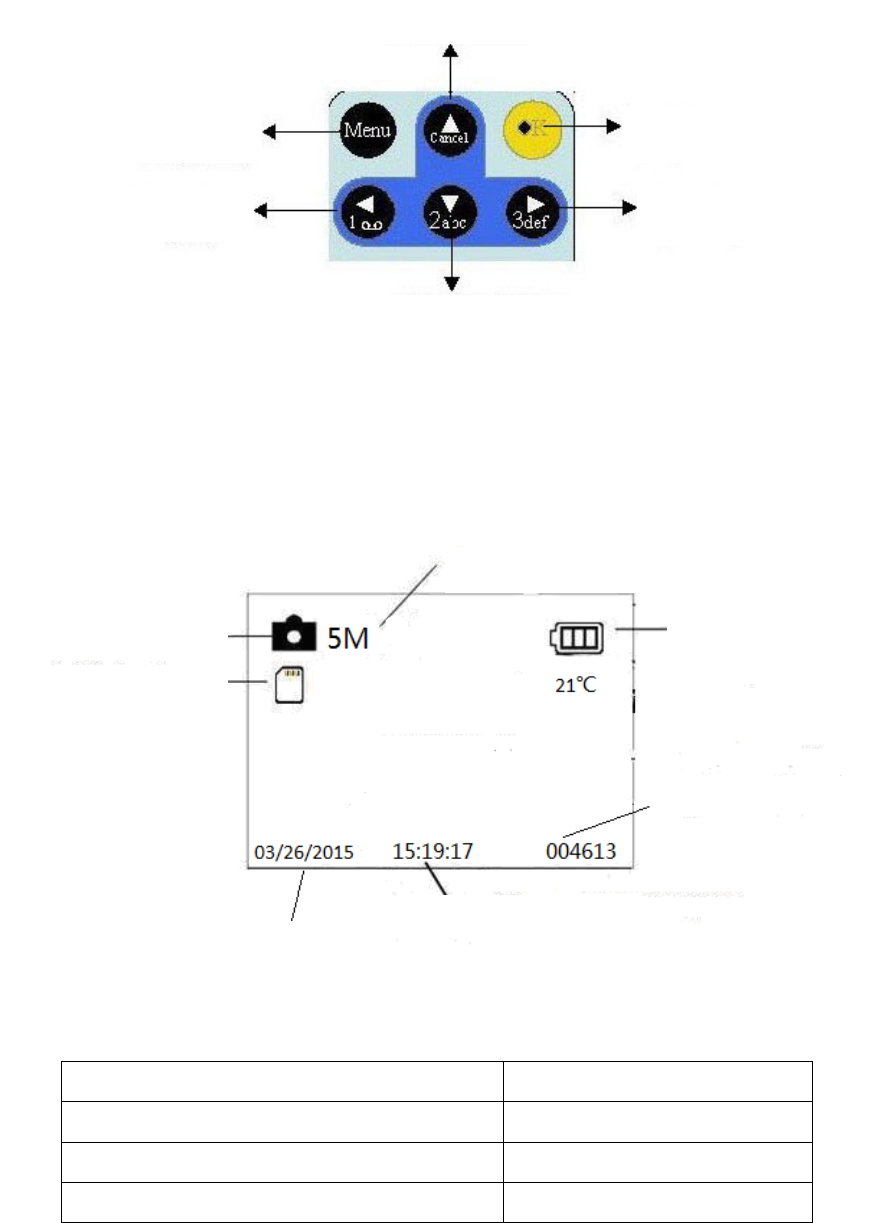
1.4 Remote Control ...................................................................................... 4
1.4.1 Navigating .................................................................................... 4
1.5 Shooting Information Display .................................................................. 5
1.6 Supported Format ................................................................................... 5
2. Cautions ........................................................................................................ 5
3. Easy Operation .............................................................................................. 6
3.1 Power Supply ......................................................................................... 6
3.2 Insert the SD-card .................................................................................. 7
3.3 Power on and Enter into the ON Mode ................................................... 7
3.4 Enter into the TEST Mode ...................................................................... 7
3.4.1 Custom Settings ........................................................................... 7
3.4.2 Manual Capturing ......................................................................... 7
3.4.3 View Images or Videos ................................................................ 7
3.5 Power Off ................................................................................................ 7
4. Advanced Operations .................................................................................... 8
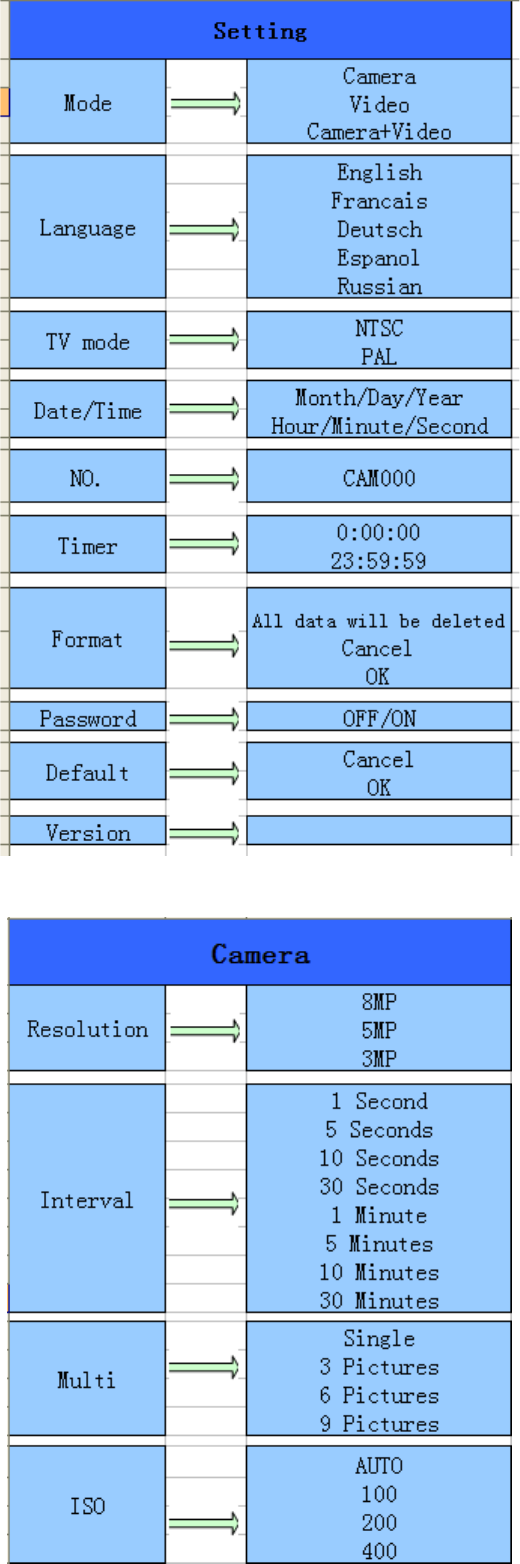
4.1 Settings Menu ......................................................................................... 8
4.1.1 System Setting ............................................................................. 9
4.1.2 Camera Setting ............................................................................ 9
4.1.3 Video Setting .............................................................................. 10
4.1.4 Default ....................................................................................... 10
4.1.5 General Settings ........................................................................ 10
4.1.6 Set Camera Mode ...................................................................... 10
4.1.7 Format SD-Card ......................................................................... 11
4.1.8 Set Photo Size ........................................................................... 11
4.1.9 Set Video Size ........................................................................... 11
4.1.10 Set Date and Time ..................................................................... 11
4.1.11 Set Multi ..................................................................................... 12
4.1.12 Set ISO ...................................................................................... 12
4.1.13 Set Video Length ....................................................................... 12
4.1.14 Set Video Sound ........................................................................ 12
4.1.15 Set Interval ................................................................................. 12
4.1.16 Set Timer ................................................................................... 13
4.1.17 Enter Password .......................................................................... 13
4.2 Playback ............................................................................................... 13
4.2.1 Viewing Photo or Video .............................................................. 13
4.2.2 Delete Photo or Video ................................................................ 13
4.3 File Numbering ..................................................................................... 14
4.4 Firmware Upgrade ................................................................................ 14
Appendix: Technical Specifications .................................................................. 15
Appendix: Parts List ........................................................................................ 15
ENG-2
1. Instructions
1.1 General Description
This digital trail camera is a surveillance camera working automatically. It can be
triggered at once by any movement of human (or animals) in a certain region of
interested (ROI) monitored by a high sensitive Passive Infrared (PIR) motion
sensor, and then automatically captures high quality pictures (up to 12M pixels) or
records FHD video clips (WVGA or QVGA).
At sunrise the unit begins to take color photos and video until there is insufficient
light (dusk) when it begins to take infrared (monochrome) photos and video.
It is easy to use, there is a 2.0 inch colorful LCD display on camera. It is resistant
against water and snow for outside uses.
1.2 Camera Body Interface
The camera has the following I/O interfaces: USB connector, SD-card slot, TV
output.
Take a few moments to familiarize yourself following the camera controls and
displays. It is helpful to bookmark this section and refer to it as you read through
the rest of the manual.
1.3 Camera components and features
1) Bottom Cover
2) SD-Card Slot
3) USB Connector
4) TV Out connector
5) PIR
6) Infrared Flash
7) Lens
8) 2 inch color LCD Display
9) Sound recorder
10) Lock
11) Power switch
12) Battery Depot
13) Portable remote control
ENG-3
1.4 Remote Control
The remote control is an input device of the camera and is primarily used for
customer settings and password input. This is an infrared type wireless remote
control. The maximum remote distance is 9 meters. There are fifteen buttons on
the remote control. (Note: Remote control is inside of the camera.)
1.4.1 Navigating
Press UP or DOWN to select or highlight the menu item, while press LEFT or
RIGHT to select the option of each item and press OK to make selection.
Tilt
Adjuster
Security
Lock
Security
Lock
ENG-4
1.5 Shooting Information Display
When the camera is turned on (the power switch is slid to TEST position), the
shooting information will be displayed in the monitor.
1.6 Supported Format
Item Format
Photo JPG
Video AVI
File Format FAT32
Here are some important notices. You don’t need to concern about the file system
format of the camera unless you have problems with reading the SD-card by your
other equipment. If this happened, please format the SD-card in the camera or in
a computer at first and then reinsert the card into your camera to make a try.
2. Cautions
The working voltage of the camera is 6.0V. The camera is supplied by four or eight
AA batteries.
Please unlock the write-protect before inserting the SD-card.
Please insert the SD-card when the power switch is at OFF position before testing
the camera.
Please do not insert or take out the SD-card when the power switch is at ON
position.
Select Item (UP)
Selection
(OK)
Select Option
(RIGHT)
Select Option
(Left)
Select Item (DOWN)
3. Image Size
4. Battery Level
2. Camera Mode
1. SD Card
7. Picture Space
5. Date (M:D:Y)
6. Time (H:M:S)
ENG-5
It is recommended to format the SD-card by the camera when used at the first
time.
The camera will be in USB mode when connected to a USB port of a computer. In
this case, the SD-card functions as a removable disk.
Please ensure sufficient power when having firmware upgrade, otherwise the
upgrade process could be interrupted incorrectly. If any fault occurs after improper
upgrading process, the camera may stop function properly.
3. Easy Operation
3.1 Power Supply
To supply power for the camera, four or eight AA size batteries are needed.
Open the bottom cover. Confirm that the power switch is at the OFF (Right)
position, pull out the battery depot. Load the fully charged batteries into the depot
according the polarities sign shown below. Push back the battery compartment to
the battery chamber.
The following batteries with 1.5V output can be used:
1. High-density and high-performance alkaline batteries (Recommended)
2. Rechargeable NiMH batteries
There are four battery slots. Slot 1 and 2 form one group (“1” will mark on depot),
while slot 3 and 4 form the other group (“2” will mark on depot) where each group
can supply the power individually.
When in Test Mode, camera will be automatically shut down to save power if
without any operation within 3 minutes; it could be waked up by any movement
detection.
When in low-battery state, camera will be also automatically shut down. Please
change the batteries in time.
Slot 1
Slot 2
Slot 3
Slot 4
ENG-6
3.2 Insert the SD-card
Insert SD-card into the card slot with marked side upwards.
Please note that the SD-card can only be plugged in one direction. Make sure that
the write-protect switch of the SD-card is on the “write” position.
3.3 Power on and Enter into the ON Mode
Before switching on, please pay attention to the following:
1. Avoid temperature and motion disturbances that could be construed as
animals or humans such as trees that are exposed to direct sunlight for much
of the day or any other heat source. These may cause false triggers.
2. The height from ground for placing the camera should 1 meter with the object.
For example for deer waste height is good size appropriately. In general, one
to two meters are preferred.
Slide the power switch to the ON position to power on the camera and enter into
the ON mode.
After switching on the camera, the motion indication LED (red) will blink for about
15s. The 15s is a buffering time before automatic capturing photos or videos, e.g.
for closing and locking the bottom cover, fixing the camera on a tree and walk
away.
In ON mode, the camera will take pictures or videos automatically according to
the default settings or previous custom settings. The camera has the sound
recording function, so the sound will be embedded in the video clip while
capturing a video.
3.4 Enter into the TEST Mode
Slide the power switch to the TEST position to enter into the TEST mode. There
are some functions in TEST mode: Custom settings, manual capture, preview.
3.4.1 Custom Settings
Press the MENU switch to enter into menu setting. The camera can be taken over
control to manually customize the camera settings which display on the camera or
external TV monitor. The detailed operations will be described in “Advanced
Operations” chapter.
3.4.2 Manual Capturing
You can press OK to manually capture photos or recording video.
3.4.3 View Images or Videos
There are two ways to view the captured images or videos:
1. LCD screen on camera.
2. TV monitors which connects to camera with TV cable.
Turn right the select switch to view images, the latest image will be shown in the
LCD screen on camera or TV monitor. Press UP to view the previous image and
press DOWN for the next. The detailed operations like deleting images or videos
will be described in “Advanced Operations” chapter.
3.5 Power Off
Slide the power switch to OFF position to power off the camera. Please note that
even in the OFF mode, the camera still consumes certain power at µA level.
Therefore, please remove the battery if the camera will not be used for a long
time.
ENG-7
4. Advanced Operations
From the basic operations of the camera in previous chapter, we know that the
camera has three basic operation modes:
1. OFF mode: Power switch is at OFF position (Right).
2. ON mode: Power switch is at ON position (Left).
3. TEST mode: Power switch is at TEST position (Middle).
In the above three modes, the OFF mode is the specified safe mode when
replacing the SD-card or batteries and transporting the camera.
This chapter explains the advanced operations for customizing the camera
settings. The settings can only be customized in TEST mode and the remote
control is needed.
4.1 Settings Menu
To view the camera settings menu, press MENU in the TEST mode (called
settings menu in this chapter).The settings menu will be shown on the LCD on
camera or the external TV monitor.
ENG-8
4.1.1 System Setting
4.1.2 Camera Setting
ENG-9
4.1.3 Video Setting
4.1.4 Default
Default Settings are listed as below:
Setting Default Items
Mode Camera Camera, Video, Camera&Video
Resolution
(Camera)
5mp 8M P, 5M P, 3MP Interpolated
Interval 1 Seconds 5-30 Seconds,1-30 Minute
Multi Single Single,3,6,9 Pictures
ISO auto 100,200,400
Resolution
(Video)
1080P 1080P,720P,WVGA,QVGA
Video Length 10s 10s,30s,60s,90s
Date/Time Same as last time
YY/MM/DD,MM/DD/YY,DD/MM/YY
Adjust
Language English
English, French, Germany, Spanish
and Russian
Timer 0 0 0 to 23 59 59 Adjust
Format Internal Memory Internal Memory, SD Card
TV Mode NTSC NTSC,PAL
ID CAM000 0-Z , Adjust
Password Off Off, On
4.1.5 General Settings
The operating steps are suitable for following menu items: Camera Mode, Photo
resolution, Video Resolution, Multi, Video Length, Interval, and Timer.
4.1.6 Set Camera Mode
There are three camera modes: Camera, Video and Camera + Video. The way to
set the camera mode is via setting menu.
The following shows how to set camera mode to Video, provided that the previous
option is Photo:
a) Press MENU to display the setting menu.
b) Press DOWN to select Mode.
ENG-10
c) Press RIGHT to select Video.
d) Press ok the select switch to save the current setting.
Press MENU to cancel setting and return to info display.
4.1.7 Format SD-Card
The system will delete all images or videos stored in the SD-card after formatting,
make sure that you have made a backup of important data.
a) Press MENU to display the setting menu.
b) Press RIGHT to select System setting.
c) Press DOWN to select Format.
d) Press RIGHT to select SD Card.
e) Press down the select switch to choose Enter to enter into submenu.
f) Press down to select OK. OK will be highlighted.
g) Press OK to start formatting the SD-card. During formatting, the display screen
will show a message “Please Wait” as below.
Press MENU to cancel setting and return to info display.
4.1.8 Set Photo Size
This parameter has three values: 8MP, 5MP and 3MP. The default one is 5 mega
pixels. The following shows how to set pixel size as 5M Pixel:
a) Press MENU to display the setting menu.
b) Press DOWN to select Resolution.
c) Press OK to select Pixel.
d) Press down the select 5 M P, press OK to save the current setting, then press
menu to return to info display.
4.1.9 Set Video Size
This parameter also has four values: 1080P, 720P, WVGA, QVGA.
The default value is 1080P, the following shows how to set 720P video size as
provided that the previous option is at WVGA:
a) Press MENU and RIGHT to display video setting.
b) Press DOWN to select Resolution.
c) Press OK, then down to select WVGA.
d) Press OK to save the current setting, then press menu to return to info display.
4.1.10 Set Date and Time
You can change the date and time of the device when necessary, e.g., after every
battery change. The date format is year/month/day, the time format is hour:
minute: second. The valid value for year is between 2010 and 2050.
Provided that the date and time are needed to be set to November 15th, 2011 and
half past ten, the steps are as following:
a) Press MENU to display the setting menu.
b) Press right twice to enter into setup
c) Press DOWN till to select Date/Time.
Please Wait!
ENG-11
d) Press OK to Display Date/Time Interface, Press UP and DOWN to change the
digit. Press LEFT and RIGHT to slide to next item
e) Press OK to save all current setting, then press MENU to return to info display.
4.1.11 Set Multi
This Item affects the number of pictures per each triggering in the camera or
camera+video mode. It has four options: “Single”, “3 Pictures” “6 Pictures” and “9
Pictures”. Its default setting is “Single”. The following shows how to set photo multi
to 3 Pictures, provided that the previous option is 1 Photo:
a) Press MENU to display the setting menu.
b) Press DOWN until to select Multi.
c) Press DOWN and OK to select 3 pictures.
d) Press OK switch to save the current setting, then press MENU to return to info
display.
4.1.12 Set ISO
This menu could only help you get a better photo at night, there are 4 values:
auto,100,200,400.
a) Press MENU to display the setting menu.
b) Press DOWN until to select ISO
c) Press OK and DOWN switch to save the current setting, then press MENU to
return to info display.
4.1.13 Set Video Length
The following shows how to set video length to 30 Seconds, provided that the
previous value is 10 Seconds:
a) Press MENU to display the setting menu.
b) Press RIGHT and DOWN to select Video Length.
c) Press OK switch to save the current setting, then press MENU to return to info
display.
4.1.14 Set Video Sound
The following shows how to turn off the sound of the video:
a) Press MENU to display the setting menu.
b) Press RIGHT and DOWN to select ON.
c) Press OK switch to save the current setting, then press MENU to return to info
display.
4.1.15 Set Interval
This parameter means that how long taking picture/video will be disabled after
each trigger in ON mode. During this time the PIR of the device will works all the
time. The minimum interval is 1 seconds. The maximum interval is 30 minutes.
The default value is 1 seconds.
The following shows how to set PIR Triggering Interval Time as 1 minute provided
that previous option is 1 second.
a) Press MENU to display the setting menu.
b) Press DOWN until to select Interval.
c) Press OK to enter in to the interval setting.
d) Press DOWN until to select 1 minute.
ENG-12
e) Press OK switch to save the current setting, then press MENU to return to info
display.
4.1.16 Set Timer
This parameter defines a certain camera working time in a day. In the rest of the
time the device is shut off. The effective value of the hour ranges from 0 to 23
while the minute ranges from 0 to 59.
Provided that the camera should work from eight a.m. to five p.m., the steps are
as follows:
a) Press MENU to display the setting menu.
b) Press RIGHT and DOWN until to select Timer.
c) Press OK to select item, press UP or DOWN to change the value until the start
time changes to 8 and the stop time changes to 17.
d) Press OK switch to save the current setting, then press MENU to return to info
display.
4.1.17 Enter Password
If the password setting is selected as On, after switching on the camera, the LCD
screen on camera will prompt to enter password. The default password is off. It
can be changed where the steps are as following:
a) Press MENU to display the setting menu.
b) Press DOWN to select Password.
c) Press Up to select On, then press Right to select 4 numbers as password.
d) Press OK to save the current setting, then press MENU to return to info
display.
e) The LCD screen will prompt to enter password next time you switch on the
camera.
Press MENU to cancel setting and return to previous menu.
4.2 Playback
In playback mode, images or videos can be viewed, deleted. The images and
videos can be viewed on: LCD screen on camera and TV monitor which connect
to camera with TV cable. For simplicity, operations with PC won’t be introduced
here.
4.2.1 Viewing Photo or Video
a) Switch to TEST mode and enter into info display.
b) Press right the select switch to view the latest picture (or video) in LCD screen
on camera, TV monitor or Image viewer with TV-in connector.
c) Press Left to start playing the video when viewing.
d) Press Left again to stop playing the video.
e) Press UP to view the previous picture (or video) and DOWN for the next.
f) Press down the select switch to return to info display.
When viewing images, the total number of all images in the SD-card and the index
of the displaying image will be shown respectively.
4.2.2 Delete Photo or Video
The operations are as following:
a) Press Right to display Photos and Videos.
ENG-13
b) Press Menu to select Delete.
c) Press right to select delete current or delete all.
d) Press OK, Cancel and OK are prompted.
e) Press OK to delete the image or video.
Press cancel to cancel, then press MENU and press down the select switch to
return to info display.
Please note that after deleting a picture or a video file, the deleted files can’t be
restored! Furthermore, in order to delete all the images and video clips in the
SD-card, it is suggested to format the SD-card
4.3 File Numbering
Images and videos are separately saved in the pre-named folder (104MEDIA).
File numbering continues by adding one to the last number for each new image or
video. The saving name is like PTDC0001.JPB or PTDC0001.AVI. Through the
suffix you can distinguish whether the file is an image(with suffix.jpg)or a
video(with suffix.avi).
4.4 Firmware Upgrade
This camera is equipped with an automatic upgrade function for you. Upgrading is
needed only when an improved firmware is available. The operations are as
following:
1. Unzip the update file.
2. Copy the FW18NA.bin to SD card.
3. Insert the SD card into the camera.
4. Power on the camera (Test Mode).
5. The camera will read it and update itself automatically. When updating the
camera, its screen is black.
6. The screen will light on after being finished.
7. Plug out the SD card, then insert it into pc, delete the FW18NA.bin in the SD
card (If you don't do this, the camera will enter update mode when power on
again).
8. Insert the SD card into the camera for its working.
ENG-14
Appendix
: Technical Specifications
Image Sensor 3 Mega Pixels Color CMOS
Memory
SD Card to 32 GB
Lens
F=3.1; FOV=120 °
Size
145 mm * 80 mm * 55 mm
IR Filter
Full Automatic IR Filter
TFT Display Screen 2.0 inch
LED Black Invisible 940 nm
PIR Distance
High/Normal/Low
PIR Sensor Sight Angle
120 Degrees
PIR Sensing Distance
65 ft(day)
Number of IR LED
48 LEDs
Max Night Vision Lighting Distance
65 ft/20 meters
Trigger Speed
1.0 second
Triggering Interval: 1 second ~ 30 mins (default 1 sec)
Selectable Image Resolution: 8MP/5MP/3MP
Multiple Photo on one detection 1/3/6/9
Video Resolution 1080P/720P/VGA
File Format
JPEG/AVI
Date Time Imprint
Yes
Exposure:
Auto
Password Security
4 digital PIN code
Periodic shot
1 Second~24 Hours
Stand-by current
0.2 mA
Stand-by time 3 Months
Interface
TV out (NTSC/PAL); USB; SD Card
Holder; 6V DC External
Fix Method
Belt, Tripod Nail
Operation Temperature
-10 ~+70°C/-22~+158°F
Power Supply
8×AA battery or 4
×
AA battery
Camera Socket
Yes
Water proof IP54
Security authentication
CE, FCC, RoHS, REACH
Appendix
: Parts List
Part Name Quantity
Digital Camera 1
Wireless controller 1
USB Cable 1
TV cable 1
QSG 1
Please note, that this is not an error with the Camera:
Heavy rain, fog and drizzle (in the dark) will give white photos without motive
ENG-15
ALL RIGHTS RESERVED, COPYRIGHT DENVER ELECTRONICS A/S
Electric and electronic equipment contains materials, components and substances that
can be hazardous to your health and the environment, if the waste material (discarded
electric and electronic equipment) is not handled correctly.
Electric and electronic equipment is marked with the crossed out trash can symbol, seen
below. This symbol signifies that electric and electronic equipment should not be
disposed of with other household waste, but should be disposed of separately.
All cities have established collection points, where electric and electronic equipment can
either be submitted free of charge at recycling stations and other collection sites, or be
collected from the households. Additional information is available at the technical
department of your city.
Please fill the blank with the model number of this player for future reference
Imported by:
DENVER ELECTRONICS A/S
Stavneagervej 22
DK-8250 Egaa
Denmark
www.facebook.com/denverelectronics
ENG-16
10

Hulp nodig? Stel uw vraag in het forum

Spelregels
1

Forum

Denver-WCT-3004

Misbruik melden

Gebruikershandleiding.com neemt misbruik van zijn services uitermate serieus. U kunt hieronder aangeven waarom deze vraag ongepast is. Wij controleren de vraag en zonodig wordt deze verwijderd.

Product:

Bijvoorbeeld antisemitische inhoud, racistische inhoud, of materiaal dat gewelddadige fysieke handelingen tot gevolg kan hebben.

Bijvoorbeeld een creditcardnummer, een persoonlijk identificatienummer, of een geheim adres. E-mailadressen en volledige namen worden niet als privégegevens beschouwd.

Spelregels forum

Om tot zinvolle vragen te komen hanteren wij de volgende spelregels:

Belangrijk! Als er een antwoord wordt gegeven op uw vraag, dan is het voor de gever van het antwoord nuttig om te weten als u er wel (of niet) mee geholpen bent! Wij vragen u dus ook te reageren op een antwoord.

Belangrijk! Antwoorden worden ook per e-mail naar abonnees gestuurd. Laat uw emailadres achter op deze site, zodat u op de hoogte blijft. U krijgt dan ook andere vragen en antwoorden te zien.

Abonneren

Abonneer u voor het ontvangen van emails voor uw Denver WCT-3004 bij:


U ontvangt een email met instructies om u voor één of beide opties in te schrijven.


Ontvang uw handleiding per email

Vul uw emailadres in en ontvang de handleiding van Denver WCT-3004 in de taal/talen: Engels als bijlage per email.

De handleiding is 0,56 mb groot.


U ontvangt de handleiding per email binnen enkele minuten. Als u geen email heeft ontvangen, dan heeft u waarschijnlijk een verkeerd emailadres ingevuld of is uw mailbox te vol. Daarnaast kan het zijn dat uw internetprovider een maximum heeft aan de grootte per email. Omdat hier een handleiding wordt meegestuurd, kan het voorkomen dat de email groter is dan toegestaan bij uw provider.

Stel vragen via chat aan uw handleiding

Stel uw vraag over deze PDF

Andere handleiding(en) van Denver WCT-3004

Denver WCT-3004 Snelstart handleiding - Nederlands - 2 pagina's

Denver WCT-3004 Gebruiksaanwijzing - Deutsch - 19 pagina's

Denver WCT-3004 Snelstart handleiding - Français - 2 pagina's


Uw handleiding is per email verstuurd. Controleer uw email

Als u niet binnen een kwartier uw email met handleiding ontvangen heeft, kan het zijn dat u een verkeerd emailadres heeft ingevuld of dat uw emailprovider een maximum grootte per email heeft ingesteld die kleiner is dan de grootte van de handleiding.

Er is een email naar u verstuurd om uw inschrijving definitief te maken.

Controleer uw email en volg de aanwijzingen op om uw inschrijving definitief te maken

U heeft geen emailadres opgegeven

Als u de handleiding per email wilt ontvangen, vul dan een geldig emailadres in.

Uw vraag is op deze pagina toegevoegd

Wilt u een email ontvangen bij een antwoord en/of nieuwe vragen? Vul dan hier uw emailadres in.


Info