(3) Names and Functions of Remote Control Unit Buttons
2 Button not explained here function in the same way as the corresponding buttons on the main unit.
q
POWER ON/POWER OFF buttons
• Press this to switch the power between on
and standby.
w
HDMI/DVI SELECT/FORMAT buttons
• Use these to select to use HDMI terminal or
DVI terminal, and the format of video signals
(480P/576P,720P,1080i).
e
Number buttons
• Use these to input numbers.
Use the +10 button to input numbers of 10 or
over.
Example: To input 25
r
This button does not function.
t
ANGLE button
• Press this to switch the angle.
y
TOP MENU button
• The top menu stored on the disc is displayed.
u
Cursor buttons/ENTER button
• Use the • and ª cursor buttons to select in
the vertical direction.
Use the
0 and 1 cursor buttons to select in
the horizontal direction.
Press the ENTER button to select the item
selected with the cursor buttons.
i
MENU button
• The DVD menu stored on the disc is
displayed.
o
STOP button (2)
!0
STILL/PAUSE button (3)
!1
SKIP buttons
!2
REPEAT button
• Press this to play tracks repeatedly.
!3
A-B repeat button (A-B)
• Use this to repeat sections between two
specific points.
!4
RANDOM button
• Press this to play the tracks on the video or
music CD in random order.
!5
MARKER button
• Press this to mark places you want to see
again.
!6
SETUP button
• Press this to display the default setting
screen.
!7
PICTURE ADJUST button
• Press this to adjust the picture quality to suit
your tastes.
!8
OPEN/CLOSE button
!9
NTSC/PAL button
• Use this to switch the set’s video output
format (NTSC/PAL).
@0
SUPER AUDIO CD SETUP button
@1
PROGRAM/DIRECT button
• Press this to switch between the normal play,
programmed play.
@2
CLEAR button
• Press this to clear numbers that you have
input.
@3
CALL button
• Press this to check the program contents.
@4
SEARCH MODE button
• Press this to change the search mode to
search for groups or titles, tracks or chapters
when selecting sections of discs directly
using the number buttons.
@5
AUDIO button
• For DVDs, press this to switch the audio
language. For video CDs, press this to switch
the channel between “STEREO”, “MONO
LEFT” and “MONO RIGHT”.
@6
SUBTITLE button
• Press this to switch the DVD’s subtitle
language.
@7
DISPLAY button
• Press this to display the ON-SCREEN.
@8
RETURN button
• Press this to return to the previous menu
screen.
@9
PLAY button (1)
#0
SLOW/SEARCH buttons
#1
PAGE –/PAGE + buttons
• Use these to selected the desired still picture
on DVD audio discs containing browseable
still pictures.
#2
ZOOM button
• Press this to enlarge the image.
NOTES:
• Be sure to turn on the power before opening and
closing the disc tray.
• Do not strike on the button with a pencil, etc.
7
LOADING DISCS
2 Set discs in the disc tray with the labeled (printed)
side facing up.
Inner disc
guide
(8 cm disc)
Outer disc guide
(12 cm disc)
Disc tray
NOTE:
• Do not move the DVD-2910 while a disc is playing.
Doing so may scratch the disc.
(1)
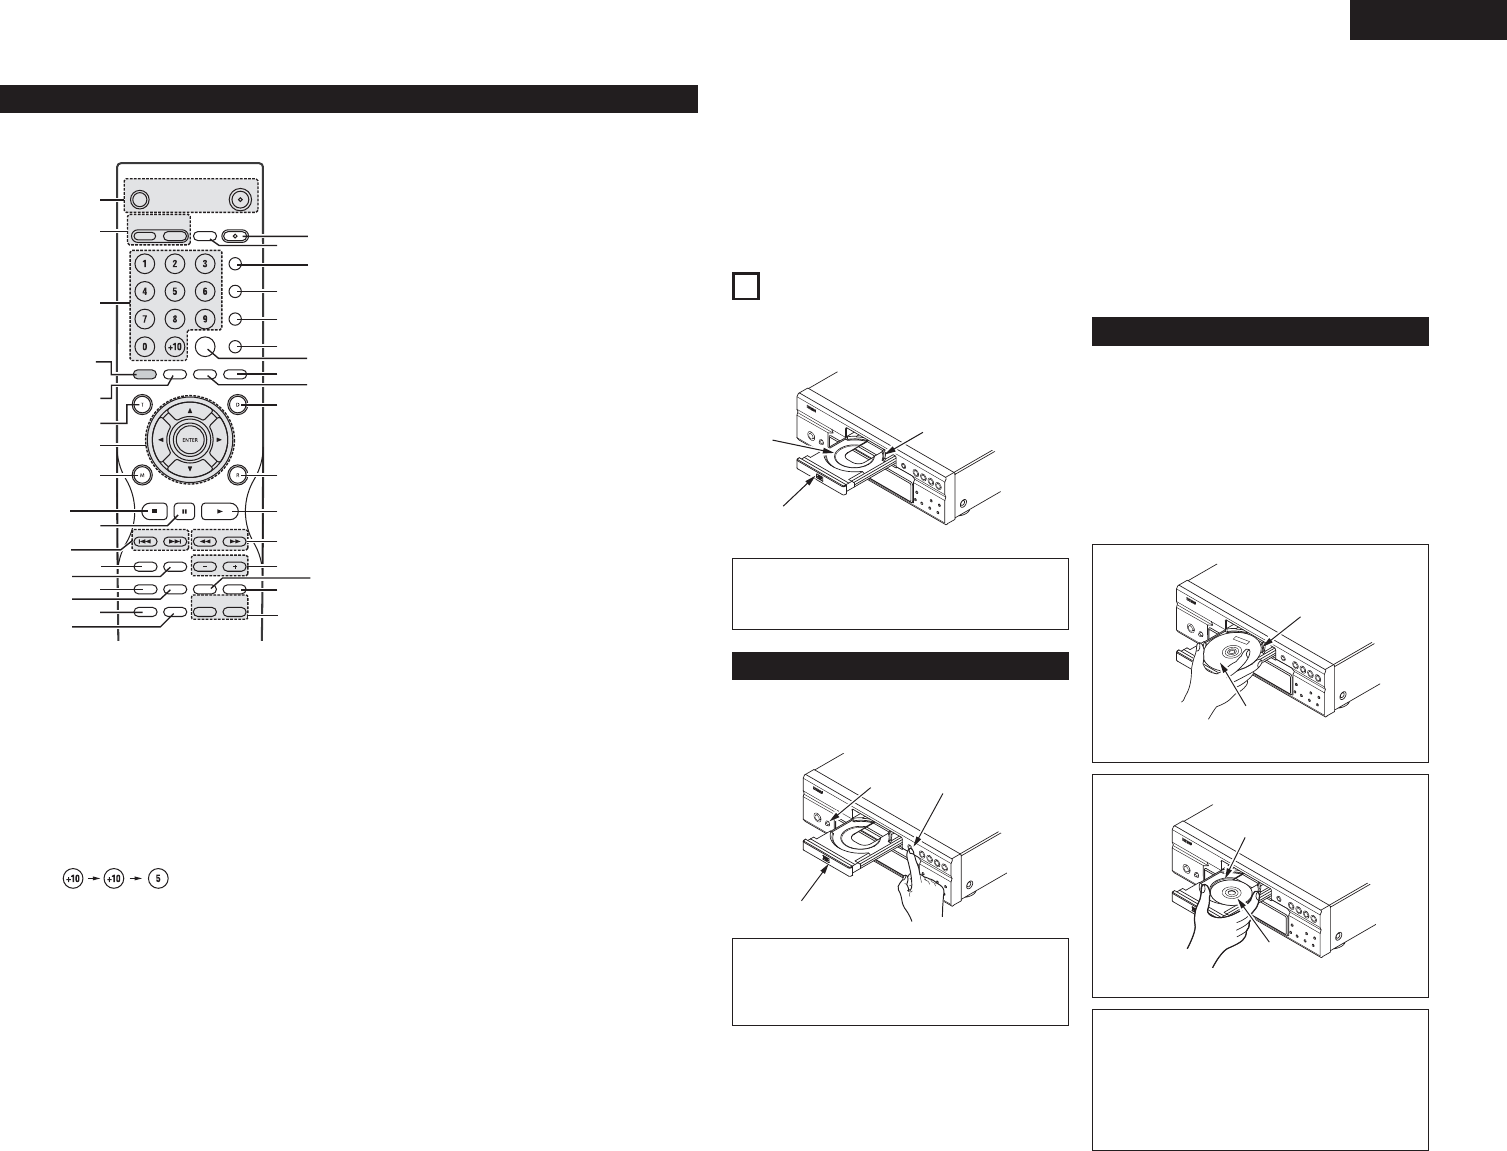
Opening and Closing the Disc Tray
q Turn on the power.
w Press the OPEN/CLOSE button.
Disc tray
Power switch
OPEN/CLOSE
button
(2) Loading Discs
Figure 1
Outer disc guide
12 cm disc
Figure 2
Inner disc guide
8 cm disc
NOTES:
• If a foreign object is caught in the disc tray during
closing, simply press the OPEN/CLOSE button
again and the tray will open.
• Do not press the disc tray in by hand when the
power is off. Doing so will damage it.
• Do not place foreign objects in the disc tray.
Doing so will damage it.
• Pick up the disc carefully so as not to touch the
signal surface and hold it with the labeled side
facing up.
• With the disc tray fully open, set the disc in the disc
tray.
• Set 12 cm discs in the outer disc guide (Figure 1), 8
cm discs in the inner disc guide (Figure 2).
• Press the OPEN/CLOSE button.
The disc is automatically loaded.
• The disc tray can also be closed automatically to load
the disc by pressing the PLAY button.
#3
DIMMER button
• Use this to adjust the brightness of the main
unit’s display.
Can be switched in 4 steps, from all off to
always on.
#4
PURE DIRECT MEMORY/SELECT buttons
• Use these to make and select that various
setting to achieve higher quality sound.