10
ENGLISH
2 channel
PCM
2CH
2 channel
PCM
2 channel
PCM
X
2 channel
PCM
X
Multi LPCM
MULTI
(NORMAL)
Dolby digital
DTS
X
2 channel
PCM
X
LPCM or P.PCM
(without CPPM)
Video CD
Audio
recording
format
Dolby digital
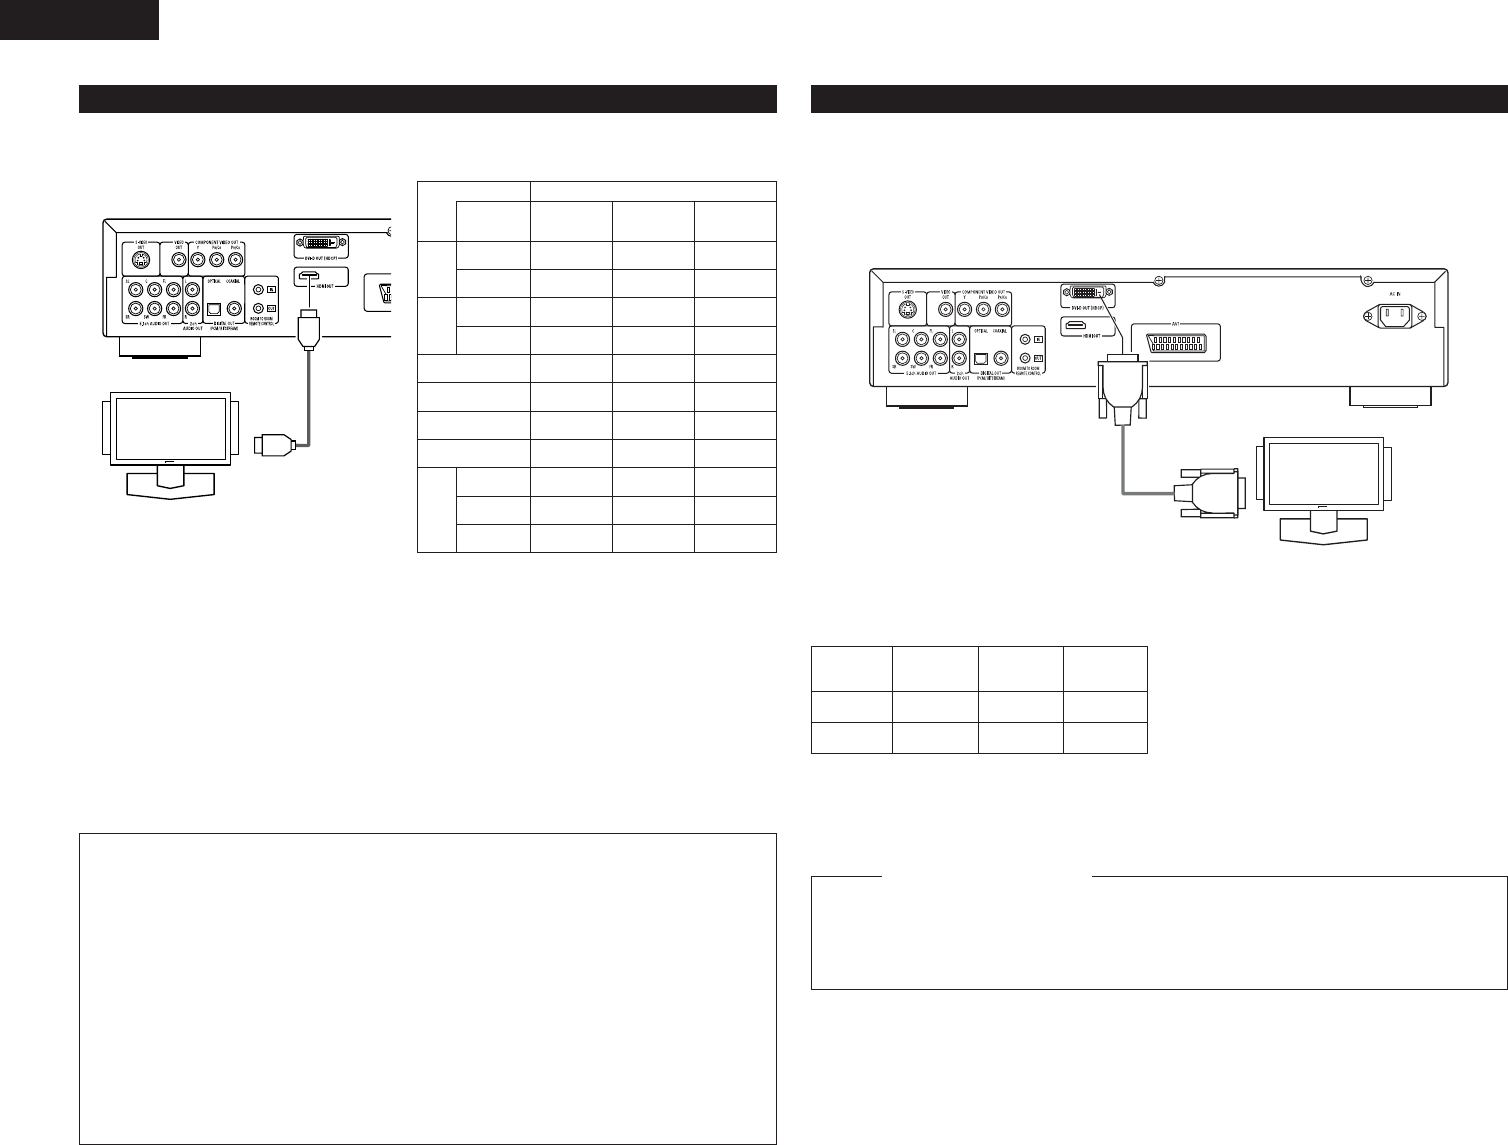
(8) HDMI connections
DVD
Video
Setting of HDMI
DVD
Audio
✽ The multi-channel/stereo area sound of Super Audio
CD is not output.
✽ The video and audio signals cannot be output when
playing DVD AUDIO with CPPM.
Monitor equipped with
HDMI input connectors
HDMI cable
(commercially available)
HDMI Input
connector
DVD-2910
DTS
LPCM or P.PCM
(with CPPM)
MULTI
(LPCM)
Multi PCM
Multi PCM
X
Multi PCM
2 channel
PCM
2 channel
PCM
2 channel
PCM
CD
2 channel
PCM
2 channel
PCM
2 channel
PCM
MP3 CD
2 channel
PCM
2 channel
PCM
2 channel
PCM
WMA CD
2 channel
PCM
Super
Audio
CD
Multi area X
XXStereo area X
2 channel
PCM
2 channel
PCM
CD layer
2 channel
PCM
Connection Examples for HDMI AUDIO SETUP
HDMI-supported monitor or projector, etc. (2-channel support or no audio support)
• 2CH ..........................Use this connection when you would like to enjoy the multi-channel audio output from
an analog audio output connector.
HDMI-supported monitor/AV amplifier, etc. (Supports DTS and Dolby Digital decoders)
• MULTI (NORMAL) ...Use this connection when you would like to enjoy the multi-channel audio output from
an HDMI connector and you wish to have a DTS, Dolby Digital, or other decoder
connected to do the processing. (Speaker and other settings are not required.)
HDMI-supported monitor (Supports audio input for 2 or more channels)
• MULTI (LPCM) .........Use this connection when you would like to enjoy the multi-channel output from an
HDMI connector and the connection point does not support a DTS, Dolby Digital, or
other decoder. (Speaker settings are permitted.)
NOTES:
• HDMI audio output settings permit the selection
of either 2 channels or multi-channels. A down-
mixed audio signal is only output from the analog
connectors (Left/Right and Front Left/Front
Right) of the DVD-2910. To output multi-channel
sound from the analog audio output connectors,
set HDMI to OFF, or select “2CH”.
•When the HDMI audio setting is set to multi-
channel, the “AUDIO CHANNEL”, “DIGITAL
OUTPUT”, “LPCM (44.1kHz/48kHz)”, “SOURCE
DIRECT” and “BASS ENHANCER” under
“AUDIO SETUP”.
• The HDMI video and audio output are both
turned off if the video output is set to “OFF” or
if “ALL OFF” is set. Also note that it will not be
possible to select the setting of digital output
when selecting “MULTI (NORMAL)” at “HDMI
AUDIO SETUP”. (See Pages 17, 18.)
• When selecting MULTI (NORMAL) or MULTI
(LPCM), the DVD-2910 speaker settings under
“AUDIO SETUP”become invalid.
•
When playing a Super Audio CD with an HDMI
connection, audio cannot be transferred beyond
the CD layer. Make an analog connection for this.
• Among the devices that support HDMI, some
devices can control other devices via the HDMI
connector; however, the DVD-2910 cannot be
controlled by another device vice the HDMI
connector.
• When using display equipment that is not
supported by the HDCP (content protection
function), the image will not be output properly.
(See the compatibility table.)
•
The audio signals from the HDMI connector
(including the sampling frequency and bit length)
may be limited by the equipment that is connected.
A simple 1-cable connection (using a commercially available cable) with a device having an HDMI (High-
Definition Multimedia Interface) connector allows digital transfer of the digital images of DVD video and other
sources, DVD video, and the multi-channel sound of DVD audio.
(9) DVI connections
Connection with equipment that has a DVI (Digital Visual Interface)-D connector permits the transfer of digital
images.
✽ When using display equipment that is not supported by the HDCP (content protection function), the image
will not be output properly. (See the compatibility table.)
✽ Make an audio connection also because an audio signal will not be output from the DVI-D connector.
✽ Commercially-available DVI cables are available in 24-pin and 29-pin types. The DVD-2910 supports the 24-pin
DVI-D cable, but the 29-pin DVI cable cannot be connected.
Monitor equipped with DVI input connectors
24P DVI-D cable
(commercially available)
DVI-D Input
connector
NOTE:
HDMI and DVI connectors.
• The table below indicates the compatibility of connections between the HDMI/DVI-D output connector of the
DVD-2910 and monitors that support HDMI/DVI-D.
Monitor with
HDMI
™
Video/Audio*1
™
(Only Video)
Monitor with
DVI-D (HDCP
compatible)
™
(Only Video)*2
™
(Only Video)
HDMI output
terminal
DVI-D output
terminal
Monitor with
DVI-D (HDCP
incompatible)
x
x
*1 Among the monitors that support HDMI, some
do not support audio output (for example,
projectors). In connections with equipment such
as this, audio signals are not output from the
HDMI output connector. Use analog audio
outputs connectors to provide the audio output at
“DIGITAL INTERFACE SETUP” under “SETUP”,
set “HDMI AUDIO SETUP” to “2CH”.
*2 When the set’s HDMI connector is connected to
a DVI-D compatible monitor (HDCP compatible)
with an HDMI-DVI converter cable (commercially
available), the signals are output in digital RGB,
regardless of the “HDMI/DVI SELECT” setting.
To play the digital images and sounds of DVD video or DVD audio via an HDMI/DVI-D connection, it
is necessary that both the player and monitor (or AV amplifier) support a copyright protection
system called HDCP (High-bandwidth Digital Content Protection System). HDCP is copy protection
technology that comprises data encryption and authentication of the partner equipment. The DVD-
2910 supports HDCP. Please see the user’s manual of your monitor (or AV amplifier) for information
about this.
Copyright Protection System
DVD-2910