First select the language when prompted. Then simply follow the
instructions displayed on the TV screen to set up the speakers etc.
0
Easy to use Graphical User Interface
This unit is equipped with a Graphical User Interface for improved
operability.
0
Compatible with the “Denon 500 Series Remote” app
The “Denon 500 Series Remote”
z
application allows you to wireless
control the AVR from an iPhone, iPad, Android smartphone or tablet
when paired and connected via Bluetooth. Basic functions include:
Power ON/OFF, volume, mute, and source selection.
z
Download the appropriate “Denon 500 Series Remote” for your iOS or Android
devices. In order to use “Denon 500 Series Remote”, your iOS or Android device
needs to be paired with this unit in advance.
ContentsConnectionsPlaybackSettingsTipsAppendix
9
Front panelDisplayRear panelRemoteIndex
Part names and functions
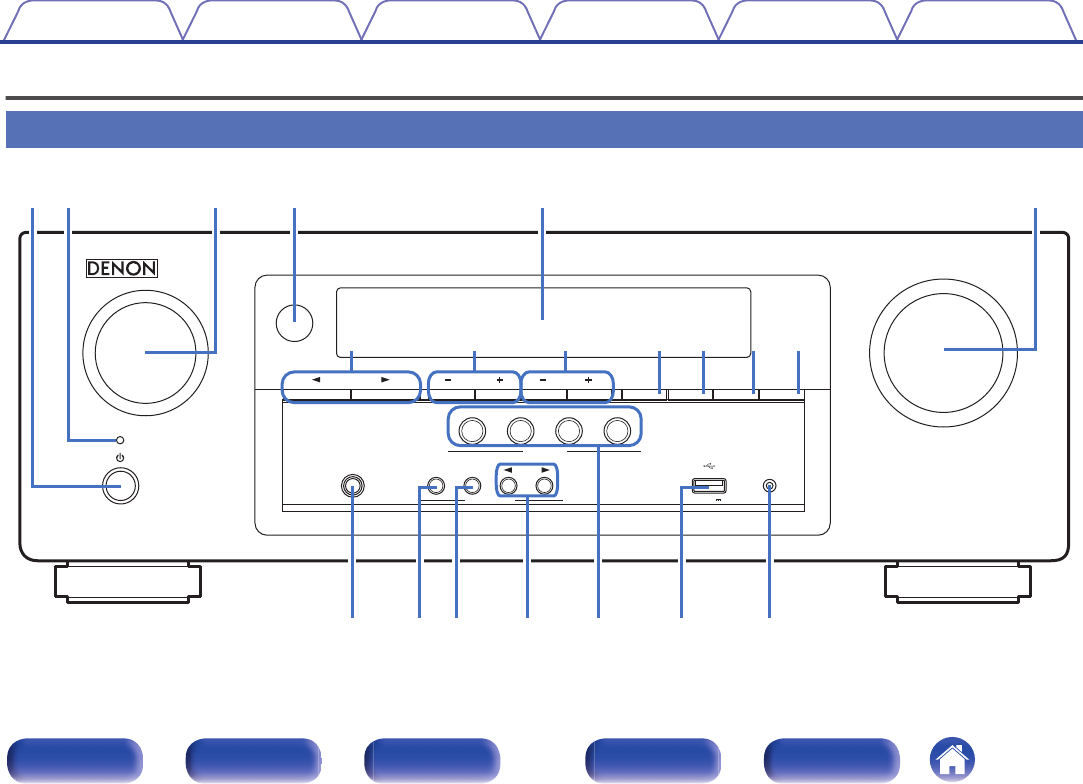
Front panel
.
MASTER VOLUME
SOURCE SELECT
TUNE
TUNER
PRESET CH
SOUND MODE
SETUP MICPHONES
5V/1A
CBL/SAT
3
1
QUICK SELECT
GAME
ON / OFF
BASS /
TREBLE
TONE CONTROL
2
DVD/Blu-ray
4
Bluetooth
ADJUST
AV SURROUND RECEIVER
AVR-S510BT
MODESLEEPDIMMERSTATUS
re
Q2Q1Q0uQ3oi
tqwy
W
0
Q
8
Q
7
Q
9
Q
5
Q
6
Q
4
ContentsConnectionsPlaybackSettingsTipsAppendix
10
Front panelDisplayRear panelRemoteIndex
.
MASTER VOLUME
SOURCE SELECT
TUNE
TUNER
PRESET CH
SOUND MODE
SETUP MICPHONES
5V/1A
CBL/SAT
3
1
QUICK SELECT
GAME
ON / OFF
BASS /
TREBLE
TONE CONTROL
2
DVD/Blu-ray
4
Bluetooth
ADJUST
AV SURROUND RECEIVERAVR-S510BT
MODESLEEPDIMMERSTATUS
trqwey
uQ0Q1Q2Q3io
A
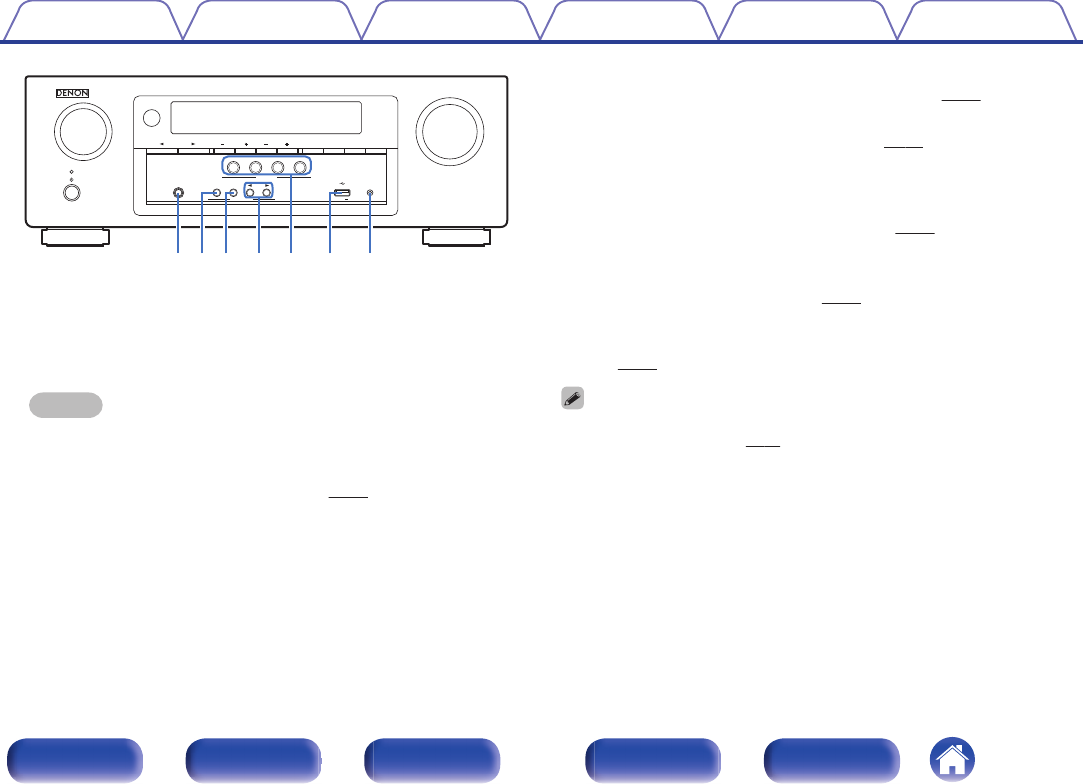
Power operation button (X)
Used to turn the power on/off (standby). (v p. 37)
B
Power indicator
This is lit as follows according to the power status:
0
Green: Power on
0
Off: Normal standby
0
Red:
0
When “HDMI PassThrough” is set to “On”
(v
p. 74)
0
When “BluetoothStandby” is set to “On” (v p. 89)
C
SOURCE SELECT knob
This selects the input source. (v
p. 37)
D
Remote control sensor
This receives signals from the remote control unit. (v p. 6)
E
Display
This displays various pieces of information.
(v
p. 13)
F
MASTER VOLUME knob
This adjusts the volume level.
(v p. 38)
G
SOUND MODE buttons (01)
These select the sound mode. (v p. 55)
H
Tuner preset channel buttons
(TUNER PRESET CH +, –)
These select preset broadcast stations. (v
p. 48)
I
Tuning buttons (TUNE +, –)
Select either FM broadcast or AM broadcast. (v p. 46)
J
Tuning mode select button (MODE)
This switches the tuning mode. (v
p. 46)
K
SLEEP button
This sets the sleep timer.
(v p. 61)
L
DIMMER button
Each press of this switches the brightness of the display. (v p. 89)
M
STATUS button
Each press of this switches the status information that is shown on the
display.
ContentsConnectionsPlaybackSettingsTipsAppendix
11
Front panelDisplayRear panelRemoteIndex
.
MASTER VOLUME
SOURCE SELECT
TUNE
TUNER
PRESET CH
SOUND MODE
SETUP MICPHONES
5V/1A
CBL/SAT
3
1
QUICK SELECT
GAME
ON / OFF
BASS /
TREBLE
TONE CONTROL
2
DVD/Blu-ray
4
Bluetooth
ADJUST
AV SURROUND RECEIVERAVR-S510BT
MODESLEEPDIMMERSTATUS
W
0
Q
8
Q
7
Q
9
Q
5
Q
6
Q
4
N
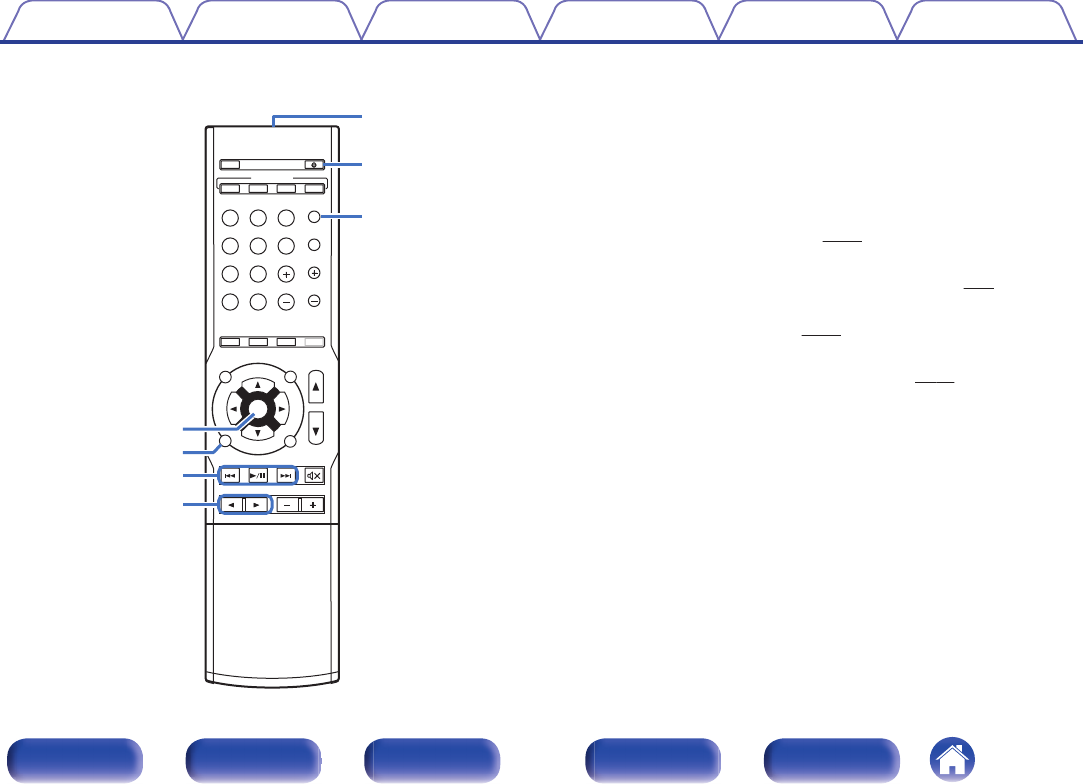
Headphones jack (PHONES)
This is used to connect headphones.
When the headphones are plugged into this jack, audio will no longer
be output from the connected speakers or from the SUBWOOFER
connectors.
NOTE
0
To prevent hearing loss, do not raise the volume level excessively when using
headphones.
O
TONE CONTROL ON/OFF button
Set the tone control function to on/off.
(v
p. 52)
P
BASS/TREBLE button
Selects the range for which to adjust the tone. (v
p. 52)
Q
Tone adjustment buttons (ADJUST01)
Adjusts the tonal quality of the sound.
(v
p. 52)
R
QUICK SELECT buttons
With a single press of any of these buttons, you can call up various
settings you’ve registered to each button such as the input source,
volume level and sound mode settings.
(v
p. 62)
S
USB port (T)
This is used to connect USB storages (such as USB memory devices)
and the USB cable supplied.
(v
p. 32)
T
SETUP MIC jack
This is used to connect the supplied Sound calibration microphone.
(v
p. 81)
0
BASS/TREBLE button and ADJUST 01 buttons can be operated when the
“Tone” setting is “On”.
(v
p. 52)
ContentsConnectionsPlaybackSettingsTipsAppendix
12
Front panelDisplayRear panelRemoteIndex
Display
.
yutreqw
io
A
Input mode indicators
These light according to the audio input mode settings of each input
source. (v p. 77)
B
Decoder indicators
These light when Dolby or DTS signals are input or when the Dolby or
DTS decoder is running.
C
Tuner reception mode indicators
These light up according to the reception conditions when the input
source is set to “Tuner”.
TUNED: Lights up when the broadcast is properly tuned in.
STEREO: Lights up when receiving FM stereo broadcasts.
D
Sleep timer indicator
This lights when the sleep mode is selected. (v p. 60)
E
Circle indicator
This is displayed when the input source is “USB” when you are playing
back music.
F
Volume indicator
G
MUTE indicator
This blinks while the sound is muted.
(v
p. 38)
H
Information display
The input source name, sound mode, setting values and other
information are displayed here.
I
Input signal indicators
The respective indicator will light corresponding to the input signal.
(v p. 77)
ContentsConnectionsPlaybackSettingsTipsAppendix
13
Front panelDisplayRear panelRemoteIndex
Rear panel
.
rewq
iytu
ContentsConnectionsPlaybackSettingsTipsAppendix
14
Front panelDisplayRear panelRemoteIndex
.
rewq
i
ytu
A
Video connectors (VIDEO)
Used to connect devices equipped with video connectors.
(v p. 29)
B
Digital audio connectors (DIGITAL AUDIO)
Used to connect devices equipped with digital audio connectors.
0
“Connection 1 : TV equipped with an HDMI connector” (v p. 26)
0
“Connection 2 : TV equipped without an HDMI
connector” (v
p. 27)
0
“Connecting a set-top box (Satellite tuner/cable TV)” (v p. 29)
C
HDMI connectors
Used to connect devices equipped with HDMI connectors.
0
“Connection 1 : TV equipped with an HDMI connector” (v
p. 26)
0
“Connecting a set-top box (Satellite tuner/cable TV)” (v p. 29)
0
“Connecting a DVD player or Blu-ray Disc player” (v
p. 30)
0
“Connecting a video camcorder or game console” (v p. 31)
D
Power cord (v p. 35)
E
Analog audio connectors (AUDIO)
Used to connect devices equipped with analog audio connectors.
(v p. 29)
F
FM/AM antenna terminals (ANTENNA)
Used to connect FM antennas and AM loop antennas. (v p. 33)
G
PRE OUT connectors
Used to connect a subwoofer with a built-in amplifier.
(v
p. 23)
H
Speaker terminals (SPEAKERS)
Used to connect speakers. (v
p. 22)
ContentsConnectionsPlaybackSettingsTipsAppendix
15
Front panelDisplayRear panelRemoteIndex
Remote control unit
A
ECO Mode button
This switches to ECO Mode.
(v
p. 87)
B
QUICK SELECT buttons (1 – 4)
These call up settings registered to each button, such as input source,
volume level and sound mode settings.
(v
p. 62)
C
Input source select buttons
These select the input source. (v
p. 37)
D
Channel level button (CH LEVEL)
Adjusting the volume of the speakers.
(v
p. 59)
E
RESTORER button
Expands the low and high frequency components of compressed audio
content such as MP3 files to enable richer audio playback.
(v
p. 71)
F
Information button (INFO)
This displays the status information on the TV screen.
(v
p. 91)
G
Cursor buttons (uiop)
These select items.
MUTE
MUTE
T
V AUDIO
V AUDIO
CH
CH LE
VEL
VEL
RESTORER
RESTORER
SL
EEP
EEP
SE
ARCH
ARCH
QUICK
QUICK SEL
ECT
ECT
POWER
POWER
MODE
MODE
AM
AM
MEMORY
MEMORY
CHANNEL
CHANNEL
IN
INFO
OPTION
OPTION
BACK
BACK
SOUND MODE
SOUND MODE
AUDIO DE
AUDIO DEL
AY
AY
TUNE
TUNE
SET
UP
UP
VOLUME
VOLUME
FM
FM
CB
CBL/SAT
Blu-ray
Blu-ray
GAME
GAME
Bluetooth
Bluetooth
USB
USB
ME
MED
IA
IA
PLAY
ER
ER
DVD
DVD
/
Blu-ray
Blu-ray
ECO
ECO
2134
ENTER
ENTER
e
u
y
r
t
w
q
Q2
ContentsConnectionsPlaybackSettingsTipsAppendix
16
Front panelDisplayRear panelRemoteIndex
H
ENTER button
This determines the selection.
I
BACK button
This returns to the previous screen.
J
System buttons
These perform playback related operations.
K
SOUND MODE buttons (01)
These select the sound mode.
(v
p. 55)
L
Remote control signal transmitter
This transmits signals from the remote control unit. (v
p. 6)
M
POWER button (X)
This turns the power on/off.
(v
p. 37)
N
Preset memory button (MEMORY)
The current broadcast station that is preset. (v
p. 48)
MUTE
MUTE
T
V AUDIO
V AUDIO
CH
CH LE
VEL
VEL
RESTORER
RESTORER
SL
EEP
EEP
SE
ARCH
ARCH
QUICK
QUICK SEL
ECT
ECT
POWER
POWER
MODE
MODE
AM
AM
MEMORY
MEMORY
CHANNEL
CHANNEL
IN
INFO
OPTION
OPTION
BACK
BACK
SOUND MODE
SOUND MODE
AUDIO DE
AUDIO DEL
AY
AY
TUNE
TUNE
SET
UP
UP
VOLUME
VOLUME
FM
FM
CB
CBL/SAT
Blu-ray
Blu-ray
GAME
GAME
Bluetooth
Bluetooth
USB
USB
ME
MED
IA
IA
PLAY
ER
ER
DVD
DVD
/
Blu-ray
Blu-ray
ECO
ECO
2134
ENTER
ENTER
i
o
Q2
Q4
Q3
Q0
Q1
ContentsConnectionsPlaybackSettingsTipsAppendix
17
Front panelDisplayRear panelRemoteIndex
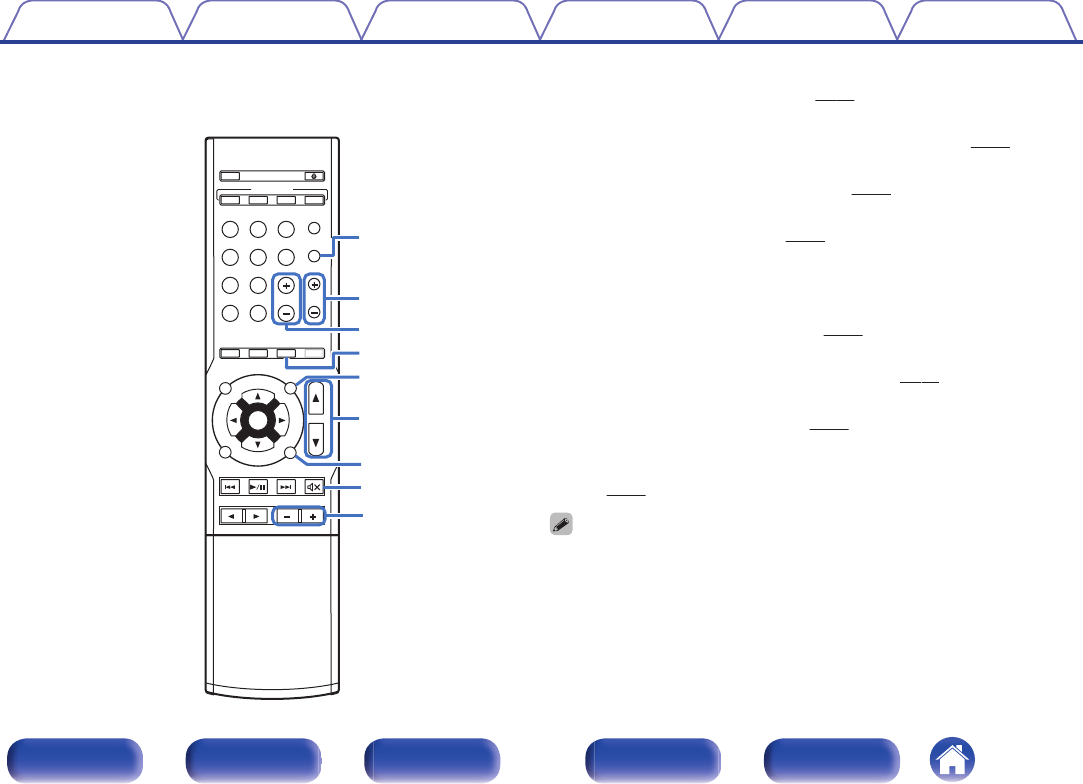
O
Tuning mode select button (MODE)
This switches the tune mode. (v p. 46)
P
Tuning buttons (TUNE +, –)
These select either FM broadcast or AM broadcast.
(v
p. 46)
Q
Channel buttons (CHANNEL +, –)
These select preset radio stations.
(v p. 48)
R
SLEEP button
This sets the sleep timer.
(v
p. 60)
S
OPTION button
This displays the option menu on the TV screen.
T
VOLUME buttons (df)
These adjust the volume level.
(v
p. 38)
U
SETUP button
This displays the menu on the TV screen.
(v
p. 67)
V
MUTE button (:)
This mutes the output audio. (v
p. 38)
W
AUDIO DELAY buttons (+, –)
Compensates for incorrect timing between video and audio.
(v p. 72)
0
The SEARCH button on this unit cannot be used.
MUTE
MUTE
T
V AUDIO
V AUDIO
CH
CH LE
VEL
VEL
RESTORER
RESTORER
SL
EEP
EEP
SE
ARCH
ARCH
QUICK
QUICK SEL
ECT
ECT
POWER
POWER
MODE
MODE
AM
AM
MEMORY
MEMORY
CHANNEL
CHANNEL
IN
INFO
OPTION
OPTION
BACK
BACK
SOUND MODE
SOUND MODE
AUDIO DE
AUDIO DEL
AY
AY
TUNE
TUNE
SET
UP
UP
VOLUME
VOLUME
FM
FM
CB
CBL/SAT
Blu-ray
Blu-ray
GAME
GAME
Bluetooth
Bluetooth
USB
USB
ME
MED
IA
IA
PLAY
ER
ER
DVD
DVD
/
Blu-ray
Blu-ray
ECO
ECO
2134
ENTER
ENTER
Q7
Q8
Q6
Q5
W3
W0
Q9
W2
W1
ContentsConnectionsPlaybackSettingsTipsAppendix
18
Front panelDisplayRear panelRemoteIndex
o
Contents
Connecting speakers20
Connecting a TV25
Connecting a playback device28
Connecting a USB memory device to the USB port32
Connecting an FM/AM antenna33
Connecting the power cord35
NOTE
0
Do not plug in the power cord until all connections have been completed.
However, when the “Setup Assistant”is running, follow the instructions in the
“Setup Assistant” (page
7
in the separate “Quick Start Guide”) screen for making
connections. (During “Setup Assistant” operation, the input/output connectors do
not conduct current.)
0
Do not bundle power cords together with connection cables. Doing so can result in
noise.
o
Cables used for connections
Provide necessary cables according to the devices you want to
connect.
Speaker cable
.
Subwoofer cable
.
HDMI cable
.
Video cable
.
Coaxial digital cable
.
Optical cable
.
Audio cable
.
R
L
R
L
ContentsConnectionsPlaybackSettingsTipsAppendix
Connections
19
Front panelDisplayRear panelRemoteIndex
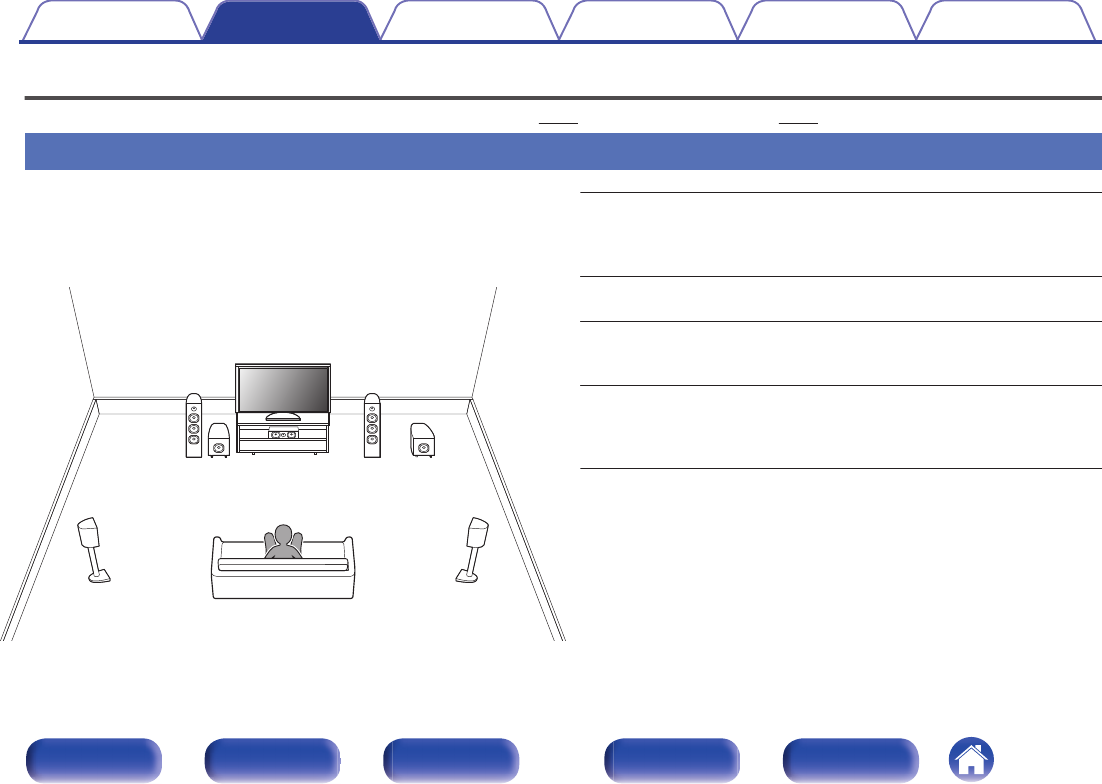
Connecting speakers
Install speakers and connect them to this unit. (“Speaker installation” (v p. 20), “Speaker connection” (v p. 22))
Speaker installation
Determine the speaker system depending on the number of speakers you
are using and install each speaker and subwoofer in the room.
Speaker installation is explained using this example of a typical
installation.
.
FL
SW1
C
SL
FR
SR
SW2
FL/FR
(Front speaker left/
right):
Place the FRONT left and right speakers an
equal distance from the main listening position.
The distance between each speaker and your TV
should also be the same.
C
(Center speaker):
Place the CENTER speaker in between the front
speakers and above or below your TV.
SL/SR
(Surround speaker left/
right):
Place the SURROUND left and right speakers an
equal distance to the left and right sides of the
main listening position.
SW 1/2
(Subwoofer) :
Place the SUBWOOFER at a convenient location
near the front speakers. If you have two
subwoofers, place them asymmetrically across
the front of your room.
ContentsConnectionsPlaybackSettingsTipsAppendix
20
Front panelDisplayRear panelRemoteIndex
0
Use the illustration below as a guide for how high each speaker should be
installed. The height does not need to be exactly the same.
.
GViewed from the sideH
Surround
speaker
Front speaker
o
When 5.1-channel speakers are installed
.
z1
z2
FL
SW
C
SL
FR
SR
z
1:22° - 30°
z
2:120°
ContentsConnectionsPlaybackSettingsTipsAppendix
21
Front panelDisplayRear panelRemoteIndex
Speaker connection
Here we connect the speakers in the room to this unit.
This section explains how to connect them using typical examples.
NOTE
0
Disconnect this unit’s power plug from the power outlet before connecting the
speakers. Also, turn off the subwoofer.
0
Connect so that the speaker cable core wires do not protrude from the speaker
terminal. The protection circuit may be activated if the core wires touch the rear
panel or if the + and - sides touch each other. (“Protection circuit” (v p. 118))
0
Never touch the speaker terminals while the power cord is connected. Doing so
could result in electric shock. When the “Setup Assistant” (page
7
in the separate
“Quick Start Guide”) is running, follow the instructions in the “Setup Assistant”
screen for making connections. (Power is not supplied to the speaker terminals
while the “Setup Assistant” is running.)
0
Use speakers with an impedance of 6 – 16 Ω/ohms.
o
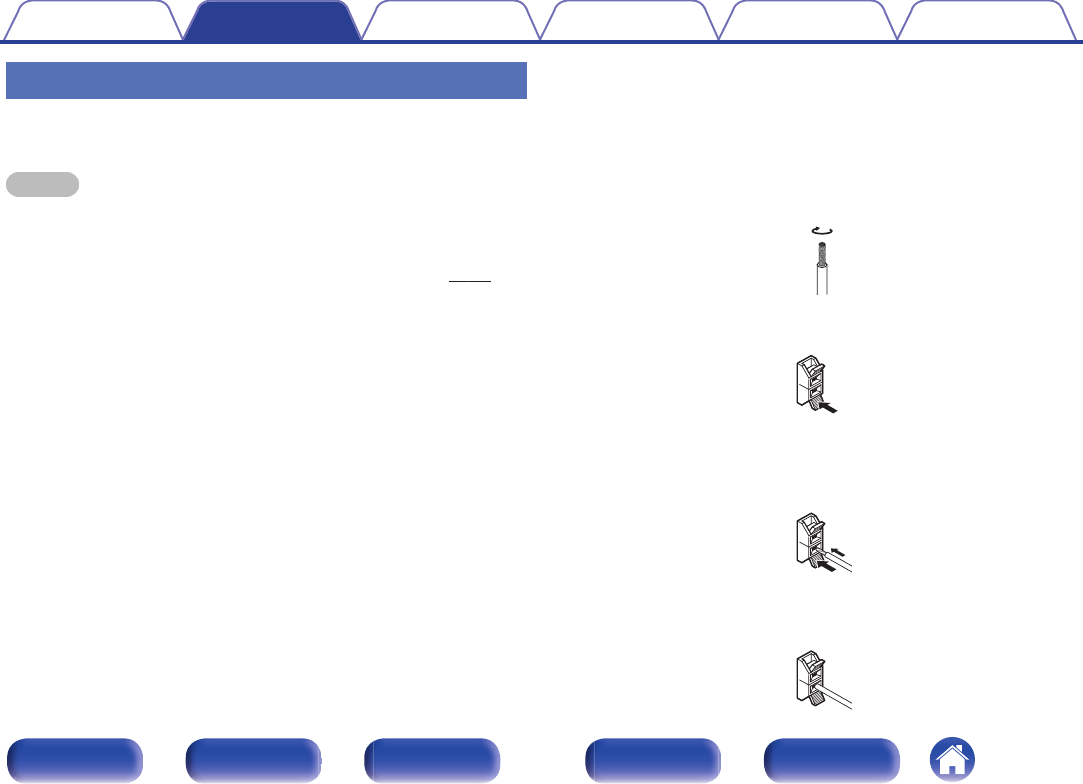
Connecting the speaker cables
Carefully check the left (L) and right (R) channels and + (red) and –
(black) polarities on the speakers being connected to this unit, and be
sure to connect the channels and polarities correctly.
1
Peel off about 3/8 inch (10 mm) of sheathing from the
tip of the speaker cable, then either twist the core wire
tightly or terminate it.
.
2
Press the lever on the speaker terminal.
.
3
Holding the lever on the speaker terminal, insert the
core wire of the speaker cable all the way into the
speaker terminal.
.
4
Release your finger from the lever on the speaker
terminal.
.
ContentsConnectionsPlaybackSettingsTipsAppendix
22
Front panelDisplayRear panelRemoteIndex
o
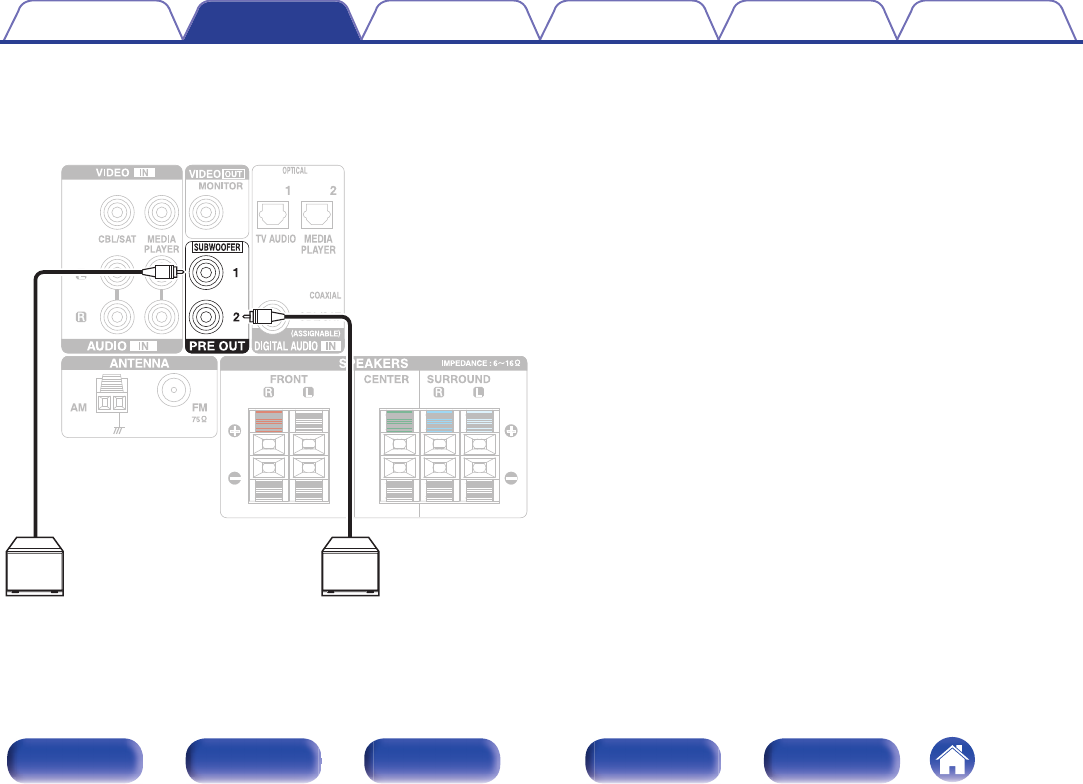
Connecting the subwoofer
Use a subwoofer cable to connect the subwoofer. Two subwoofers can
be connected to this unit.
The same signal is output from the respective subwoofer terminals.
.
SW1SW2
ContentsConnectionsPlaybackSettingsTipsAppendix
23
Front panelDisplayRear panelRemoteIndex
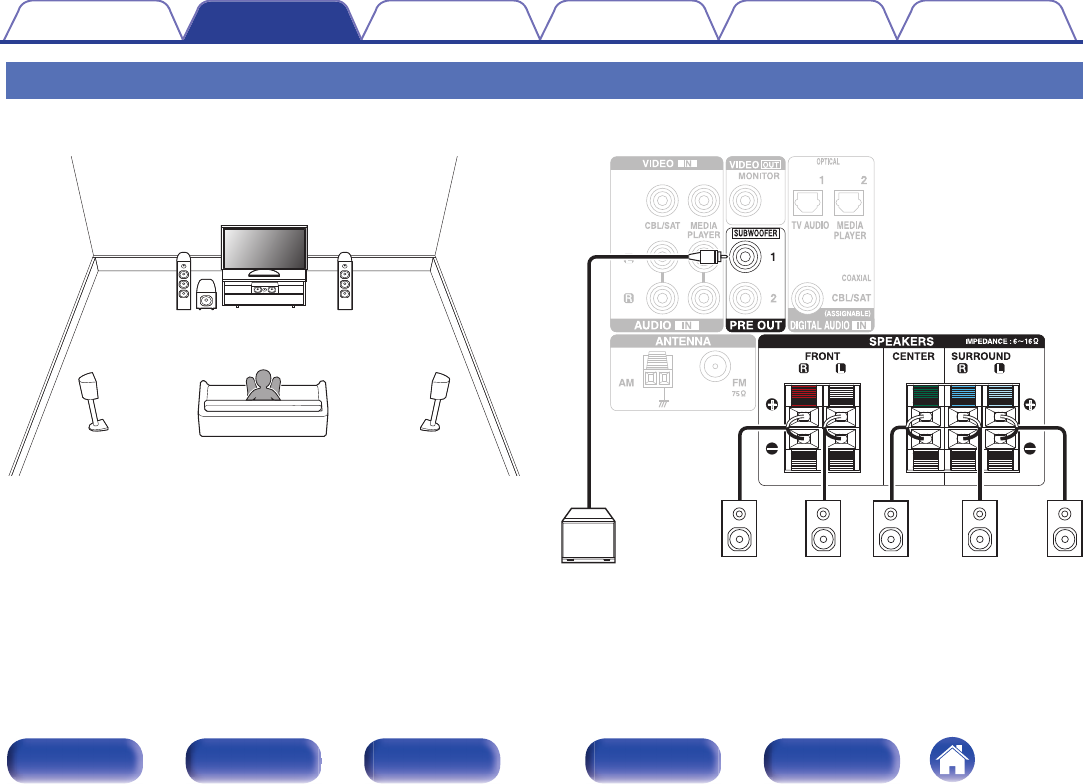
Standard speaker configuration and connection
This serves as a basic 5.1-channel surround system.
Sound modes such as Dolby Pro Logic g
are supported.
.
FL
SWC
SL
FR
SR
.
SW
SLFLFRCSR
ContentsConnectionsPlaybackSettingsTipsAppendix
24
Front panelDisplayRear panelRemoteIndex
Connecting a TV
Connect a TV to this unit so that the input video is output to the TV. You can also enjoy audio from the TV on this unit.
How to connect a TV depends on the connectors and functions equipped on the TV.
.
Is the TV equipped with an HDMI connector?
No
Yes
“Connection 1 : TV equipped with an HDMI connector” (v p. 26)
“Connection 2 : TV equipped without an HDMI
connector” (v p. 27)
ContentsConnectionsPlaybackSettingsTipsAppendix
25
Front panelDisplayRear panelRemoteIndex
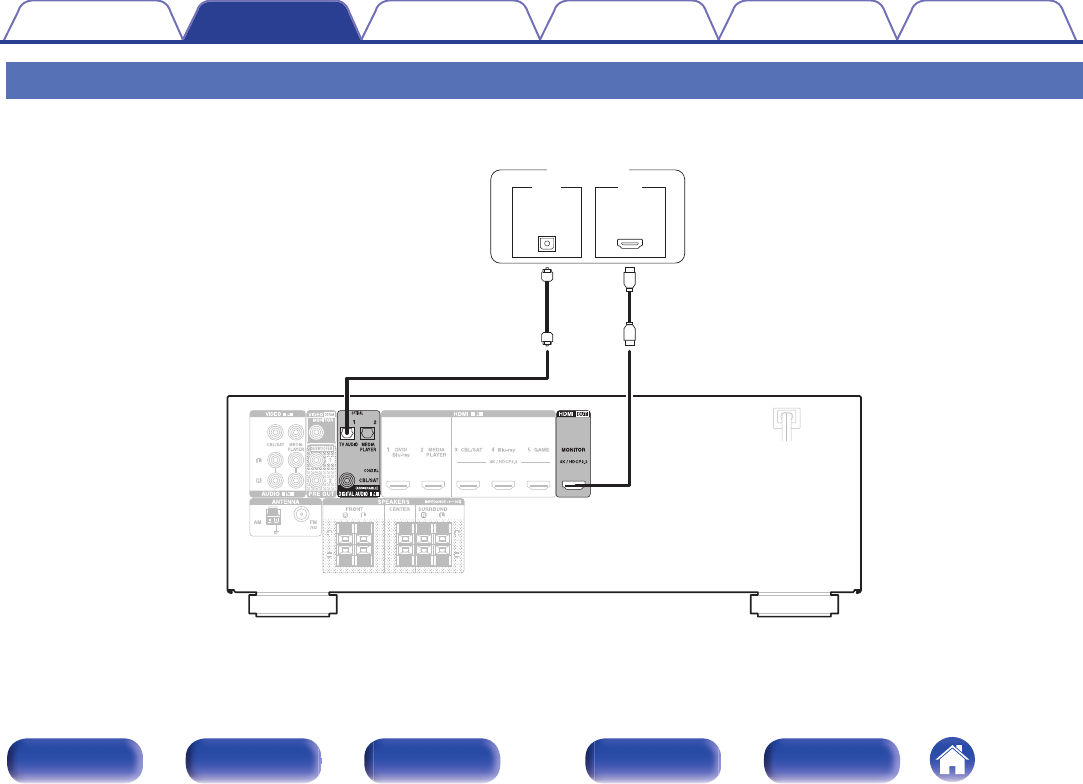
Connection 1 : TV equipped with an HDMI connector
Use an HDMI cable to connect the TV to this unit.
To listen to audio from TV on this unit, use an optical cable to connect the TV to this unit.
.
IN
IN
HDMI
OUT
OPTICAL
OUT
TV
ContentsConnectionsPlaybackSettingsTipsAppendix
26
Front panelDisplayRear panelRemoteIndex
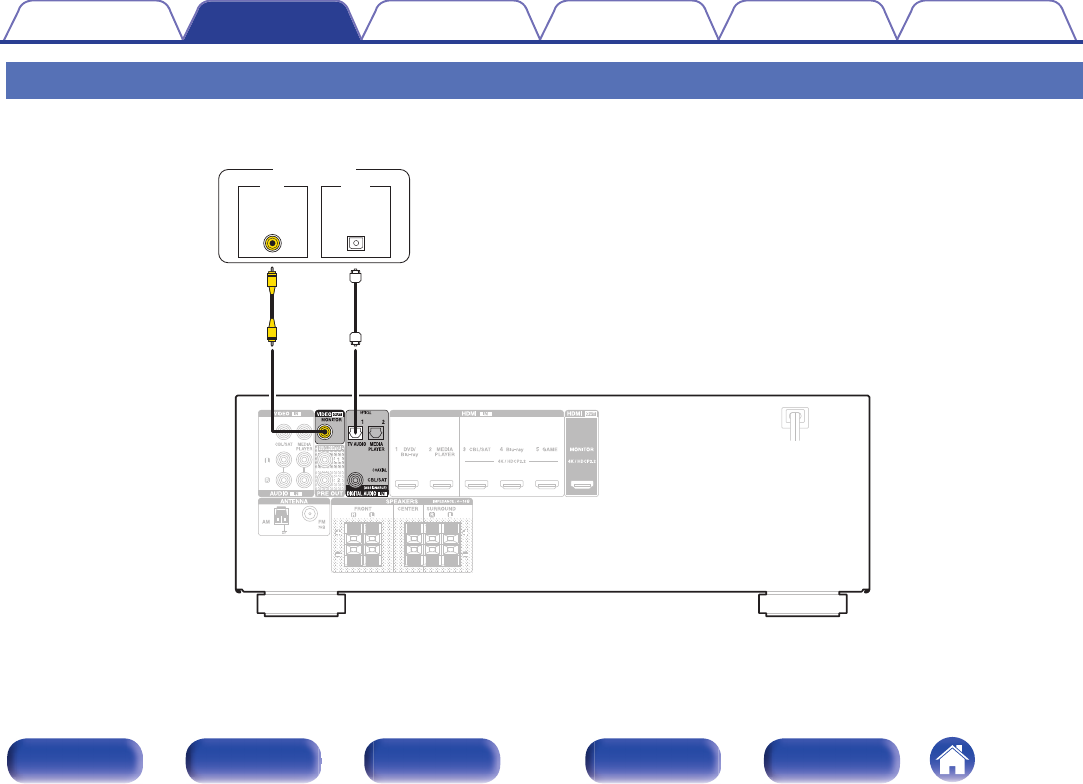
Connection 2 : TV equipped without an HDMI connector
Use a video cable to connect the TV to this unit.
To listen to audio from TV on this unit, use an optical cable to connect the TV to this unit.
.
OUT
OPTICAL
OUT
IN
IN
VIDEO
TV
ContentsConnectionsPlaybackSettingsTipsAppendix
27
Front panelDisplayRear panelRemoteIndex
Connecting a playback device
This unit is equipped with two types of video input connectors (HDMI and composite video) and three types of audio input connectors (HDMI, digital audio
and audio).
Select input connectors on this unit according to the connectors equipped on the device you want to connect.
If the device connected to this unit is equipped with an HDMI connector, it is recommended to use HDMI connections.
In the HDMI connection, audio and video signals can be transmitted through a single HDMI cable.
0
“Connecting a set-top box (Satellite tuner/cable TV)” (v p. 29)
0
“Connecting a DVD player or Blu-ray Disc player” (v
p. 30)
0
“Connecting a video camcorder or game console” (v p. 31)
0
Connect devices to this unit as indicated by the input sources printed on the audio/video input connectors of this unit.
0
The source that is assigned to the HDMI IN, DIGITAL AUDIO IN, VIDEO IN and AUDIO IN connectors can be changed. See “Input Assign” on how to change the input source
assigned to the input connectors.
(v
p. 76)
0
To play back audio signals that are input to this unit on a TV connected via HDMI, set “HDMI Audio Out” to “TV”.
(v
p. 74)
0
To enjoy content that is copyright protected by HDCP 2.2, use a playback device and TV compatible with HDCP 2.2 only.
0
To enjoy 4K content or content that is copyright protected by HDCP 2.2, connect the device to the HDMI 3, HDMI 4 or HDMI 5 input connector.
ContentsConnectionsPlaybackSettingsTipsAppendix
28
Front panelDisplayRear panelRemoteIndex
Connecting a set-top box (Satellite tuner/cable TV)
This explanation uses the connection with a satellite tuner/cable TV STB as an example.
Select the input connectors on this unit to match the connectors on the device that you want to connect to.
.
R
L
R
L
OUT
HDMI
OUT
COAXIAL
AUDIO
AUDIO
RL
OUT
OUT
VIDEO
VIDEO
or
Satellite tuner/
Cable TV
Satellite tuner/Cable TV
(HDMI incompatible device)
ContentsConnectionsPlaybackSettingsTipsAppendix
29
Front panelDisplayRear panelRemoteIndex
Connecting a DVD player or Blu-ray Disc player
This explanation uses the connection with a DVD player or Blu-ray Disc player as an example.
When connecting a 4K / HDCP 2.2 compatible player, connect to either the HDMI 3, HDMI 4 or HDMI 5 input connector.
.
OUT
HDMI
DVD player/
Blu-ray Disc player
ContentsConnectionsPlaybackSettingsTipsAppendix
30
Front panelDisplayRear panelRemoteIndex
Connecting a video camcorder or game console
This explanation uses the connection with a video camcorders as an example.
Connect a playback device to this unit, such as a video camcorder or game console.
.
OUT
HDMI
Video
camcorder
ContentsConnectionsPlaybackSettingsTipsAppendix
31
Front panelDisplayRear panelRemoteIndex
Connecting a USB memory device to the USB port
For operating instructions see “Playing a USB memory device” (v p. 39).
.
MASTER VOLUME
TUNE
TUNER
RESET CH
SETUP MIC
5V/1A
CBL/SAT
3
1
QUICK SELECT
GAME
BASS /
TREBLE
TONE CONTROL
2
DVD/Blu-ray
4
Bluetooth
ADJUST
AV SURROUND RECEIVER
AVR-S510BT
MODESLEEPDIMMERSTATUS
USB memory
device
0
Denon does not guarantee that all USB memory devices will operate or receive power. When using a portable USB hard disk drive (HDD) which came with an AC adapter,
use that device’s supplied AC adapter.
NOTE
0
USB memory devices will not work via a USB hub.
0
It is not possible to use this unit by connecting the unit’s USB port to a PC via a USB cable.
0
Do not use an extension cable when connecting a USB memory device. This may cause radio interference with other devices.
ContentsConnectionsPlaybackSettingsTipsAppendix
32
Front panelDisplayRear panelRemoteIndex
Connecting an FM/AM antenna
Connect the antenna, tune in to a broadcast and then move the antenna to
the location where there is least noise. Then use tape, etc. to fix the
antenna in this location. (
“Listening to FM/AM broadcasts” (v
p. 45))
0
If you are unable to receive a good broadcast signal, we recommend installing an
outdoor antenna. For details, inquire at the retail store where you purchased the
unit.
NOTE
0
Do not connect two FM antennas simultaneously.
0
Make sure the AM loop antenna lead terminals do not touch metal parts of the
panel.
.
wqe
AM loop antenna
(supplied)
FM indoor antenna
(supplied)
White
Black
ContentsConnectionsPlaybackSettingsTipsAppendix
33
Front panelDisplayRear panelRemoteIndex
o
Using the AM loop antenna
Suspending on a wall
Suspend directly on a wall without assembling.
.
Nail, tack, etc.
Standing alone
Use the procedure shown above to assemble.
When assembling, refer to “AM loop antenna assembly”.
.
o
AM loop antenna assembly
1
Put the stand section through the bottom of the loop
antenna from the rear and bend it forward.
2
Insert the projecting part into the square hole in the
stand.
.
Projecting part
Square hole
Stand
Loop antenna
ContentsConnectionsPlaybackSettingsTipsAppendix
34
Front panelDisplayRear panelRemoteIndex
Connecting the power cord
After completing all the connections, insert the power plug into the power outlet.
.
Power cord
(AC 120 V, 60 Hz)
To household power outlet
ContentsConnectionsPlaybackSettingsTipsAppendix
35
Front panelDisplayRear panelRemoteIndex
o
Contents
Basic operation
Turning the power on37
Selecting the input source37
Adjusting the volume38
Turning off the sound temporarily (Muting)38
Selecting a sound mode55
Playback a device
Playing a DVD player/Blu-ray Disc player38
Playing a USB memory device39
Playing a Bluetooth device43
Listening to FM/AM broadcasts45
Convenience functions
Convenience functions50
Adjusting the volume of each channel to match the input source (Ch
Level Adjust)59
Sleep timer function60
Quick select plus function62
ContentsConnectionsPlaybackSettingsTipsAppendix
Playback
36
Front panelDisplayRear panelRemoteIndex
Basic operation
.
CH
CH LE
VEL
VEL
RESTORER
RESTORER
SL
EEP
EEP
SE
ARCH
ARCH
QUICK
QUICK SEL
ECT
ECT
CHANNEL
CHANNEL
IN
INFO
OPTION
OPTION
BACK
BACK
SOUND MODE
SOUND MODE
AUDIO DE
AUDIO DEL
AY
AY
TUNE
TUNE
SET
UP
UP
ECO
ECO
2134
ENTER
ENTER
POWER
POWER
VOLUME
VOLUME
MUTE
MUTE
T
V AUDIO
V AUDIO
MODE
MODE
AM
AM
MEMORY
MEMORY
FM
FM
CB
CBL/SAT
Blu-ray
Blu-ray
GAME
GAME
Bluetooth
Bluetooth
USB
USB
ME
MED
IA
IA
PLAY
ER
ER
DVD
DVD
/
Blu-ray
Blu-ray
POWER
VOLUME
MUTE
X
df
:
Input source
select buttons
Turning the power on
1
Press POWERX to turn on power to the unit.
0
You can press the input source select button when the unit is in standby mode to
turn on the power.
0
You can also switch the power to standby by pressing X on the main unit.
Selecting the input source
1
Press the input source select button to be played back.
The desired input source can be selected directly.
0
You can also select the input source by turning SOURCE SELECT on the main
unit.
ContentsConnectionsPlaybackSettingsTipsAppendix
37
Front panelDisplayRear panelRemoteIndex
Adjusting the volume
1
Use VOLUMEdf to adjust the volume.
0
The variable range differs according to the input signal and channel level setting.
0
You can also adjust the master volume by turning MASTER VOLUME on the main
unit.
Turning off the sound temporarily
(Muting)
1
Press MUTE:.
0
MUTE indicator on the display flashes.
0
:
appears on the TV screen.
0
The sound is reduced to the level set at “Mute Level” in the menu.
(v
p. 72)
0
To cancel mute, either adjust the sound volume or press MUTE: again.
Playback a DVD player/Blu-ray Disc
player
The following describes the procedure for playing DVD player/Blu-ray Disc
player.
1
Prepare for playback.
A
Turn on the power of the TV, subwoofer and player.
B
Change the TV input to the input of this unit.
2
Press POWERX
to turn on power to the unit.
3
Press DVD/Blu-ray (4K not supported) or Blu-ray (4K
supported) to switch the input source of the player to
be played back.
4
Play the DVD player or Blu-ray Disc player.
o
Surround playback (v
p. 55)
ContentsConnectionsPlaybackSettingsTipsAppendix
38
Front panelDisplayRear panelRemoteIndex
Playing a USB memory device
.
T
V AUDIO
V AUDIO
CH
CH LE
VEL
VEL
RESTORER
RESTORER
SL
EEP
EEP
SE
ARCH
ARCH
QUICK
QUICK SEL
ECT
ECT
POWER
POWER
MODE
MODE
AM
AM
MEMORY
MEMORY
CHANNEL
CHANNEL
IN
INFO
OPTION
OPTION
BACK
BACK
SOUND MODE
SOUND MODE
AUDIO DE
AUDIO DEL
AY
AY
TUNE
TUNE
SET
UP
UP
VOLUME
VOLUME
FM
FM
CB
CBL/SAT
Blu-ray
Blu-ray
GAME
GAME
Bluetooth
Bluetooth
ME
MED
IA
IA
PLAY
ER
ER
DVD
DVD
/
Blu-ray
Blu-ray
ECO
ECO
2134
MUTE
MUTE
USB
USB
ENTER
ENTER
1
/
3
8
9
USB
ui
p
ENTER
OPTION
BACK
0
Playing back music files stored on a USB memory device.
0
Only USB memory devices conforming to mass storage class standards
can be played on this unit.
0
This unit is compatible with USB memory devices in “FAT16” or
“FAT32” format.
0
The audio format types and specifications supported by this unit for
playback are as follows.
See “Playback a USB memory device” for details.
(v
p. 108)
0
WMA
0
MP3
0
WAV
0
MPEG-4 AAC
0
FLAC
ContentsConnectionsPlaybackSettingsTipsAppendix
39
Front panelDisplayRear panelRemoteIndex
Playing files stored on USB memory
devices
1
Connect the USB memory device to the USB port.
(v
p. 32)
2
Press USB to switch the input source to “USB”.
.
Folder
Music
USB[1/2]
Option
OPTION
3
Use uip to select the file to be played, then press
ENTER.
Playback starts.
Operation buttonsFunction
1/3
Playback / Pause
89
Skip to previous track / Skip to next track
(Press and hold) Fast-reverse / Fast-
forward
ENTER
Playback / Pause
(Press and hold) Stop
ui
Skip to previous track / Skip to next track
(Press and hold) Fast-reverse / Fast-
forward
NOTE
0
Note that Denon will accept no responsibility whatsoever for any problems arising with
the data on a USB memory device when using this unit in conjunction with the USB
memory device.
o
Operations accessible through the option
menu
0
“Performing repeat playback (Repeat)” (v
p. 51)
0
“Performing random playback (Random)” (v p. 51)
0
“Adjusting the tone (Tone)” (v
p. 52)
0
“Displaying your desired video during audio playback (Video
Select)” (v p. 54)
ContentsConnectionsPlaybackSettingsTipsAppendix
40
Front panelDisplayRear panelRemoteIndex
Listening to music on a Bluetooth device
.
OPTION
OPTION
BACK
BACK
T
V AUDIO
V AUDIO
CH
CH LE
VEL
VEL
RESTORER
RESTORER
SL
EEP
EEP
SE
ARCH
ARCH
QUICK
QUICK SEL
ECT
ECT
POWER
POWER
MODE
MODE
AM
AM
MEMORY
MEMORY
CHANNEL
CHANNEL
IN
INFO
SOUND MODE
SOUND MODE
AUDIO DE
AUDIO DEL
AY
AY
TUNE
TUNE
SET
UP
UP
VOLUME
VOLUME
FM
FM
CB
CBL/SAT
Blu-ray
Blu-ray
GAME
GAME
Bluetooth
Bluetooth
USB
USB
ME
MED
IA
IA
PLAY
ER
ER
DVD
DVD
/
Blu-ray
Blu-ray
ECO
ECO
2134
MUTE
MUTE
ENTER
ENTER
1
/
3
8
9
ui
ENTER
OPTION
BACK
Bluetooth
Music files stored on Bluetooth devices such as smartphones, digital
music players, etc. can be enjoyed on this unit by pairing and connecting
this unit with the Bluetooth device.
Communication is possible up to a range of about 32.8 ft/10 m.
NOTE
0
To play back music from a Bluetooth device, the Bluetooth device needs to
support the A2DP profile.
ContentsConnectionsPlaybackSettingsTipsAppendix
41
Front panelDisplayRear panelRemoteIndex
Pairing with a Bluetooth device
In order to enjoy music from a Bluetooth device on this unit, the Bluetooth
device must first be paired with this unit.
Once the Bluetooth device has been paired, it does not need to be paired
again.
1
Press Bluetooth to switch the input source to
“Bluetooth”.
.
Bluetooth
Device
Pairing
OPTION
When using for the first time, the unit will go into the pairing mode
automatically and “Pairing Mode” will appear on the display of the
unit.
2
Activate the Bluetooth settings on your mobile device.
3
Select this unit when its name appears in the list of
devices displayed on the screen of the Bluetooth
device.
Connect to the Bluetooth device while “Pairing Mode” is being
displayed on the display of the unit.
Perform the connection with the Bluetooth device close to the unit
(about 3.3 ft/1 m).
4
When a number appears on the display of this unit,
check that it is the same number as that shown on the
screen of the Bluetooth device and then select “Pair”
for both the Bluetooth device and the unit.
At the end of the pairing, the device name appears on the display of
this unit.
5
See “Pairing with the Pairing Mode” (v p. 44) to pair
Bluetooth devices from the 2nd device onward.
0
Enter “0000” when the password is requested on the screen of the Bluetooth
device.
ContentsConnectionsPlaybackSettingsTipsAppendix
42
Front panelDisplayRear panelRemoteIndex
Playing a Bluetooth device
Check the following before you play back music.
0
The Bluetooth function of the Bluetooth device must be turned on
0
Pairing must be completed
1
Press Bluetooth to switch the input source to
“Bluetooth”.
The unit will automatically connect to the most recently used
Bluetooth device.
2
Start playing the Bluetooth device.
0
The Bluetooth device can also be operated with the remote
control of this unit.
Operation buttonsFunction
1/3
Playback / Pause
89
Skip to previous track / Skip to next track
(Press and hold) Fast-reverse / Fast-
forward
ENTER
Playback / Pause
(Press and hold) Stop
ui
Skip to previous track / Skip to next track
(Press and hold) Fast-reverse / Fast-
forward
0
When the power of this unit is turned on, the input source will be automatically
switched to “Bluetooth” if a Bluetooth device is connected.
0
English letters, numbers and certain symbols are displayed. Incompatible
characters are displayed as “.” (period).
NOTE
0
To operate the Bluetooth device with the remote control of this unit, the Bluetooth
device needs to support the AVRCP profile.
0
The remote control of this unit is not guaranteed to work with all Bluetooth devices.
0
Depending on the type of Bluetooth device, this unit outputs audio that is coupled
to the volume setting on the Bluetooth device.
ContentsConnectionsPlaybackSettingsTipsAppendix
43
Front panelDisplayRear panelRemoteIndex
o
Operations accessible through the option
menu
0
“Pairing with the Pairing Mode” (v p. 44)
0
“Performing repeat playback (Repeat)” (v
p. 51)
0
“Performing random playback (Random)” (v p. 51)
0
“Adjusting the tone (Tone)” (v p. 52)
0
“Displaying your desired video during audio playback (Video
Select)” (v
p. 54)
Pairing with the Pairing Mode
Pair a Bluetooth device with this unit.
1
Activate the Bluetooth settings on your mobile device.
2
Press OPTION when the input source is “Bluetooth”.
The option menu screen is displayed.
3
Use ui
to select “Pairing Mode”, then press ENTER.
The device will go into the pairing mode.
4
Select this unit when its name appears in the list of
devices displayed on the screen of the Bluetooth
device.
5
When a number appears on the display of this unit,
check that it is the same number as that shown on the
screen of the Bluetooth device and then select “Pair”
for both the Bluetooth device and the unit.
At the end of the pairing, the device name appears on the display of
this unit.
0
Enter “0000” when the password is requested on the screen of the Bluetooth
device.
0
Press and hold the Bluetooth button on the remote control for at least 3 seconds to
go into pairing mode.
ContentsConnectionsPlaybackSettingsTipsAppendix
44
Front panelDisplayRear panelRemoteIndex
Listening to FM/AM broadcasts
.
T
V AUDIO
V AUDIO
CH
CH LE
VEL
VEL
RESTORER
RESTORER
SL
EEP
EEP
SE
ARCH
ARCH
QUICK
QUICK SEL
ECT
ECT
POWER
POWER
MEMORY
MEMORY
IN
INFO
OPTION
OPTION
BACK
BACK
SOUND MODE
SOUND MODE
AUDIO DE
AUDIO DEL
AY
AY
TUNE
TUNE
SET
UP
UP
VOLUME
VOLUME
CB
CBL/SAT
Blu-ray
Blu-ray
GAME
GAME
Bluetooth
Bluetooth
USB
USB
ME
MED
IA
IA
PLAY
ER
ER
DVD
DVD
/
Blu-ray
Blu-ray
ECO
ECO
2134
MUTE
MUTE
AM
AM
FM
FM
MODE
MODE
CHANNEL
CHANNEL
ENTER
ENTER
MEMORY
MODE
TUNE +, –
AM
CHANNEL +, –
FM
You can use the built-in tuner of this unit to listen to FM broadcasts and
AM broadcasts.
Make sure the FM antenna and AM loop antenna are connected to this
unit first.
ContentsConnectionsPlaybackSettingsTipsAppendix
45
Front panelDisplayRear panelRemoteIndex
Listening to FM/AM broadcasts
1
Connect the antenna. (“Connecting an FM/AM
antenna” (v
p. 33))
2
Use FM or AM to switch the input source to “FM” or
“AM”.
GTV screenH
.
01
Tuner
FM 92.1MHz
TunePreset
-
+
TUNE
Option
OPTION
AUTO
CH+/-
.
01 FM 92.10MHz
GDisplay of this unitH
3
Press MODE to select the tune mode, then press
ENTER.
AUTO
(Default)
:
Automatically search for and tune to a
receivable radio station.
MANUAL:
Manually change the frequency one
step at a time each time the button is
pressed.
4
Press TUNE + or TUNE - to select the station you want
listen to.
Scanning is performed until it finds an available radio station. When
it finds a radio station, it stops the scan automatically and tunes in.
0
In “AUTO” mode, you cannot tune in to radio stations if the reception is not good.
If this is the case, then use the “MANUAL” mode to tune in.
0
You can also scan the broadcast station by pressing TUNE + or TUNE - on the
unit.
Operation buttonsFunction
MEMORYRegister presets
MODESwitching tune mode
TUNE +, -Selects the radio station (up/down)
CHANNEL +, -Selects preset radio stations
ContentsConnectionsPlaybackSettingsTipsAppendix
46
Front panelDisplayRear panelRemoteIndex
o
Operations accessible through the option
menu
0
“Tuning in to stations and presetting them automatically (Auto
Preset)” (v
p. 47)
0
“Skipping preset broadcast stations (Preset Skip)” (v p. 49)
0
“Adjusting the tone (Tone)” (v
p. 52)
0
“Displaying your desired video during audio playback (Video
Select)” (v p. 54)
Tuning in to stations and presetting
them automatically (Auto Preset)
A maximum of 56 radio stations can be automatically preset.
1
Press OPTION when the input source is “FM”.
The option menu screen is displayed.
2
Use ui to select “Auto Preset”, then press ENTER.
The unit starts to tune in to radio stations automatically and preset
them.
0
When presetting is completed, “Completed” is displayed for about
5 seconds and the option menu screen turns off.
0
The preset memory is overwritten.
ContentsConnectionsPlaybackSettingsTipsAppendix
47
Front panelDisplayRear panelRemoteIndex
Presetting the current broadcast
station (Preset Memory)
Your favorite broadcast stations can be preset so that you can tune them
RestorerExpands the low and high frequency components of compressed audio content such as
MP3 files to enable richer audio playback.
71
Audio DelayCompensates for incorrect timing between video and audio.
72
VolumeMake volume settings.72
Room EQSet whether to use the equalizer or not.73
.
Video
HDMI Audio OutSelect HDMI audio output device.74
HDMI PassThroughSelects how this unit will pass HDMI signals to the HDMI output in standby power mode.74
Pass SourceSets the HDMI connector that inputs HDMI signals when in standby.75
ContentsConnectionsPlaybackSettingsTipsAppendix
Settings
64
Front panelDisplayRear panelRemoteIndex
Setting itemsDetailed itemsDescriptionPage
.
Inputs
Input AssignChanges input connector assignment.76
Source LevelAdjusts the playback level of the audio input.76
Input SelectSets the audio input mode and decode mode.77
.
Speakers
Auto SetupThe acoustic characteristics of the connected speakers and listening room are
measured and the optimum settings are made automatically.
78
Manual SetupSets up the speakers manually or changes the “Auto Setup” settings.
83
ContentsConnectionsPlaybackSettingsTipsAppendix
65
Front panelDisplayRear panelRemoteIndex
Setting itemsDetailed itemsDescriptionPage
.
General
LanguageChanges the language of the display on the TV screen.
87
ECOConfigures the ECO Mode and Auto Standby energy-saving functions.87
BluetoothStandbySets whether or not to turn the unit’s power on when a Bluetooth device is operated.89
Front DisplayMakes settings related to the display on this unit.89
FirmwareUpdate the firmware of this unit.90
Setup LockProtects settings from inadvertent changes.90
.
Setup Assistant
Begin Setup...Performs basic installation/connections/settings from the beginning according to the
guidance indicated on the TV screen.
Page 7 of
the separate
manual
“Quick Start
Guide”
ContentsConnectionsPlaybackSettingsTipsAppendix
66
Front panelDisplayRear panelRemoteIndex
.
BACK
BACKSET
UP
UP
ENTER
ENTER
T
V AUDIO
V AUDIO
CH
CH LE
VEL
VEL
RESTORER
RESTORER
SL
EEP
EEP
SE
ARCH
ARCH
QUICK
QUICK SEL
ECT
ECT
POWER
POWER
MODE
MODE
AM
AM
MEMORY
MEMORY
CHANNEL
CHANNEL
IN
INFO
OPTION
OPTION
SOUND MODE
SOUND MODE
AUDIO DE
AUDIO DEL
AY
AY
TUNE
TUNE
VOLUME
VOLUME
FM
FM
CB
CBL/SAT
Blu-ray
Blu-ray
GAME
GAME
Bluetooth
Bluetooth
USB
USB
ME
MED
IA
IA
PLAY
ER
ER
DVD
DVD
/
Blu-ray
Blu-ray
ECO
ECO
2134
MUTE
MUTE
uio
p
ENTER
BACK
SETUP
Menu operations
1
Press SETUP.
The menu is displayed on the TV screen.
2
Use ui
to select the menu to be set or operated, then
press ENTER.
3
Use op
to change to desired setting.
4
Press ENTER to enter the setting.
0
To return to the previous item, press BACK.
0
Exiting the menu, press SETUP while the menu is displayed. The
menu display disappears.
ContentsConnectionsPlaybackSettingsTipsAppendix
67
Front panelDisplayRear panelRemoteIndex
Audio
Make audio-related settings.
Surr.Parameter
You can adjust the surround audio sound field effects to match your
preferences.
The items (parameters) that can be adjusted depend on the signal being
input and the currently set sound mode. For details on the adjustable
parameters, see “Sound modes and surround parameters” (v p. 112).
0
Some setting items cannot be set while playback is stopped. Make the settings
during playback.
0
“Surr.Parameter” settings are stored for each sound mode.
o
Mode
Set the sound mode according to the input signal.
n
Dolby PLg
Mode
Cinema :
Switches to the sound mode suitable for
enjoying movies and TV programs.
Music :
Switches to the sound mode suitable for
enjoying music.
Game :
Switches to the sound mode suitable for
enjoying games.
Pro Logic :Dolby Pro Logic playback mode.
n
DTS Neo: 6 mode
Cinema :
Switches to the sound mode suitable for
enjoying movies and TV programs.
Music :
Switches to the sound mode suitable for
enjoying music.
0
“Music” mode is also effective for video sources that contain a lot of stereo
music.
ContentsConnectionsPlaybackSettingsTipsAppendix
68
Front panelDisplayRear panelRemoteIndex
o
Dynamic Comp.
Compress dynamic range (difference between loud and soft sounds).
Auto:
Automatic dynamic range compression
on/off control according to source.
Low / Medium / High:These set the compression level.
Off:
Dynamic range compression is always
off.
0
“Auto” can only be set when Dolby TrueHD signals are input.
o
Low Frequency
Adjust the low frequency effects level (LFE).
-10 dB – 0 dB (Default : 0 dB)
0
For proper playback of the different sources, we recommend setting to the
values below.
0
Dolby Digital sources : 0 dB
0
DTS movie sources : 0 dB
0
DTS music sources: -10 dB
o
Center Image
Distributes the dialogue output from the center channel to the front left
and right channels and widens the sound image in the front.
0.0 – 1.0 (Default : 0.3)
0
You can set this when the sound mode is DTS Neo:6 in the “Music” mode.
0
The smaller the value, the more dialogue is concentrated on the center
channel. The larger the value, the more dialogue is distributed to front left and
right channels, and the more the sound image widens in the front.
ContentsConnectionsPlaybackSettingsTipsAppendix
69
Front panelDisplayRear panelRemoteIndex
o
Panorama
The front sound field is expanded further towards the back to create a
seamlessly inclusive sound impression.
On:Use “Panorama”.
Off
(Default):
Do not use “Panorama”.
0
You can set this when the sound mode is Dolby PLg in the “Music” mode.
o
Dimension
Shift sound image center to front or rear to adjust playback balance.
0 – 6 (Default : 3)
0
You can set this when the sound mode is Dolby PLg in the “Music” mode.
0
As you set a smaller number, the surround sound field shifts backward; as you
set a larger number, the surround sound field shifts forward.
o
Center Width
Distributes the dialogue output from the center channel to left and right
channels and widens the sound image in the front.
0 – 7 (Default : 3)
0
You can set this when the sound mode is Dolby PLg in the “Music” mode.
0
The smaller the value, the more dialogue is concentrated on the center
channel. The larger the value, the more dialogue is distributed to front left and
right channels, and the more the sound image widens in the front.
ContentsConnectionsPlaybackSettingsTipsAppendix
70
Front panelDisplayRear panelRemoteIndex
Room EQ
Set whether to use the equalizer or not.
On:Use “Room EQ”.
Off
(Default):
Do no use “Room EQ”.
0
Speakers for which “Room EQ” can be set differ according to the sound mode.
ContentsConnectionsPlaybackSettingsTipsAppendix
73
Front panelDisplayRear panelRemoteIndex
Video
Make video-related settings.
HDMI Audio Out
Select HDMI audio output device.
AVR
(Default):
Play back through speakers connected to
the unit.
TV:Play back through TV connected to the unit.
HDMI PassThrough
Selects how this unit will transmit HDMI signals to the HDMI output in
standby power mode.
On
(Default):
Transmits the selected HDMI input through
the AV receiver’s HDMI output when this
unit is in standby power mode.
Off:
No HDMI signals are transmitted through
this unit’s HDMI output in standby power
mode.
NOTE
0
When “HDMI PassThrough” is set to “On”, the unit consumes more standby power.
If you are not using this unit for an extended period, it is recommended that you
unplug the power cord from the power outlet.
ContentsConnectionsPlaybackSettingsTipsAppendix
74
Front panelDisplayRear panelRemoteIndex
Speakers
The acoustic characteristics of the connected speakers and listening room are measured and the optimum settings are made automatically. This is called
“Auto Setup”.
You do not have to perform “Auto Setup” when you have already performed “Speaker Setup” in “Setup Assistant”.
To set up the speakers manually, use “Manual Setup” on the menu.
(v
p. 83)
Auto Setup
To perform measurement, place the Sound calibration microphone in the
main listening position.
.
FLSWCFR
SRSL
Surround speaker (R)
Surround speaker (L)
Subwoofer
Center speaker
Front speaker (R)
Front speaker (L)
Main listening position
o
About the main listening position
The main listening position is the position where listeners would
normally sit or where one would normally sit alone within the listening
environment. Before starting “Auto Setup”, place the Sound calibration
microphone in the main listening position.
ContentsConnectionsPlaybackSettingsTipsAppendix
78
Front panelDisplayRear panelRemoteIndex
NOTE
0
Make the room as quiet as possible. Background noise can disrupt the room
measurements. Close windows and turn off the power on electronic devices
(radios, air conditioners, fluorescent lights, etc.). The measurements could be
affected by the sounds emitted by such devices.
0
During the measurement process, place cell phones outside the listening room.
Cell phone signals could disrupt the measurements.
0
Do not stand between the speakers and Sound calibration microphone or allow
obstacles in the path while the measurements are being made. Also, install the
Sound calibration microphone at least 20 inches (50 cm) away from the wall.
Failure to do so will result in inaccurate readings.
0
During the measurement process, audible test tones will come from the speakers
and subwoofer(s), but this is part of normal operation. If there is background noise
in the room, these test signals will increase in volume.
0
Measurement cannot be performed when headphones are connected. Unplug the
headphones before performing “Auto Setup”.
ContentsConnectionsPlaybackSettingsTipsAppendix
79
Front panelDisplayRear panelRemoteIndex
Procedure for speaker settings (Auto
Setup)
.
Finish
Measurement
Preparation
1
Mount the Sound calibration microphone on a tripod
and place it in the main listening position.
When installing the Sound calibration microphone, point the tip of
the microphone toward the ceiling and adjust the height to match the
height of the ears of a listener in a seated position.
2
If using a subwoofer capable of the following
adjustments, set up the subwoofer as shown below.
n
When using a subwoofer with a direct mode
Set the direct mode to “On” and disable the volume adjustment
and crossover frequency setting.
n
When using a subwoofer without a direct mode
Make the following settings:
0
Volume : 12 o’clock position
0
Crossover frequency : Maximum/Highest Frequency
0
Low pass filter : Off
0
Standby mode : Off
ContentsConnectionsPlaybackSettingsTipsAppendix
80
Front panelDisplayRear panelRemoteIndex
3
Connect the Sound calibration microphone to the
SETUP MIC jack of this unit.
.
When the Sound calibration microphone is
connected, the following screen is displayed.
.
Auto Setup
Your AVR can automatically measure the
acoustics of your room and the optimize
your speakers.
Start
4
Select “Start”, then press ENTER.
5
Select “Next”, then press ENTER.
6
Select “Begin Test”, then press ENTER.
0
Measurement requires several minutes.
NOTE
0
If “Caution!” is displayed on TV screen:
0
Go to
“Error messages” (v
p. 82). Check any related items,
and perform the necessary procedures.
n
To cancel Auto Setup
A
Press BACK to display the popup screen.
B
Press o to select “Yes”, then press ENTER.
7
Unplug the Setup and measurement microphone from
the unit’s SETUP MIC jack.
Do not change the speaker connection or subwoofer volume after
“Auto Setup”. If these are changed, run “Auto Setup” again in order
to configure the optimum equalizer settings.
ContentsConnectionsPlaybackSettingsTipsAppendix
81
Front panelDisplayRear panelRemoteIndex
Error messages
An error message is displayed if “Auto Setup” could not be completed due to speaker placement, the measurement environment, etc. If an error message
is displayed, perform the necessary measures. Be sure to turn off the power before checking speaker connections.
ExamplesError detailsMeasures
Front L: None
0
The displayed speaker could not be detected.
0
Check the connections of the displayed speaker.
ContentsConnectionsPlaybackSettingsTipsAppendix
82
Front panelDisplayRear panelRemoteIndex
Manual Setup
Perform when setting the speakers manually or when changing settings
made in “Auto Setup”.
0
This unit can be used without changing “Manual Setup” settings. Please
set if necessary.
Speaker Config.
Select whether or not speakers are present, playback capacity for low
bass frequencies and speaker size.
o
Front
Set the front speaker size.
Large:
Use a large speaker that can adequately
play back very low bass frequencies.
Small
(Default):
Use a small speaker that has inadequate
playback capacity for very low bass
frequencies.
0
When “Subwoofer” is set to “No”, “Front” is automatically set to “Large”.
0
When “Front” is set to “Small”, “Center” and “Surround” can not be set to
“Large”.
ContentsConnectionsPlaybackSettingsTipsAppendix
83
Front panelDisplayRear panelRemoteIndex
o
Center
Set the presence and size of the center speaker.
Large:
Use a large speaker that can adequately
play back very low bass frequencies.
Small
(Default):
Use a small speaker that has inadequate
playback capacity for very low bass
frequencies.
None:
Select when a center speaker is not
connected.
o
Subwoofer
Set the presence of a subwoofer.
Yes
(Default):
Use a subwoofer.
No:
Select when a subwoofer is not
connected.
o
Surround
Set the presence and size of the surround speakers.
Large:
Use a large speaker that can adequately
play back very low bass frequencies.
Small
(Default):
Use a small speaker that has inadequate
playback capacity for very low bass
frequencies.
None:
Select when the surround speakers are
not connected.
Distances
Set distance from listening position to speakers.
Measure beforehand the distance from the listening position to each
speaker.
o
Step
Set the unit of distance.
1 ft / 0.1 ft(Default : 1 ft)
o
Set Defaults
The “Distances” settings are returned to the default settings.
o
Set the distance
0.0 ft – 60.0 ft
0
The speakers that can be selected differ depending on the “Speaker Config.”
settings. (v p. 83)
0
Default settings :
Front L / Front R / Center / Subwoofer:12.0 ft
Surround L / Surround R:10.0 ft
0
Set the difference in the distance between the speakers to less than 20.0 ft.
ContentsConnectionsPlaybackSettingsTipsAppendix
84
Front panelDisplayRear panelRemoteIndex
Bass
Set subwoofer and LFE signal range playback.
o
LPF for LFE
Set LFE signal playback range. Set this when you want to change the
playback frequency (low pass filter point) of the subwoofer.
80 Hz/90 Hz/100 Hz/110 Hz/120 Hz/150 Hz/
200 Hz/250 Hz (Default: 100 Hz)
o
Subwoofer Mode
Select low range signals to be reproduced by subwoofer.
LFE:
The low range signal of the channel set to
“Small” speaker size is added to the LFE
signal output from the subwoofer.
LFE+Main
(Default):
The low range signal of all channels is
added to the LFE signal output from the
subwoofer.
0
“Subwoofer Mode” can be set when “Speaker Config.” - “Subwoofer” is set to
other than “No”. (v p. 84)
0
Play music or a movie source and select the mode offering the strongest bass.
0
If “Speaker Config.” - “Front” and Center are set to “Large”, and “Subwoofer
Mode” is set to “LFE”, no sound may be output from the subwoofers,
depending on the input signal or selected sound mode.
(v
p. 84) Select
“LFE+Main” if you want the bass signals to always be produced from the
subwoofer.
ContentsConnectionsPlaybackSettingsTipsAppendix
86
Front panelDisplayRear panelRemoteIndex
General
Make various other settings.
Language
Set the language for display the menu on the TV screen.
English/Français/Español(Default : English)
0
“Language” can also be set up by the following operation. However, the menu
screen is not displayed. Watch the display while configuring the settings.
1.Press and hold the main unit’s TUNER PRESET CH +, TUNER PRESET CH -
and TUNE - for at least 3 seconds.
“V.Format:< NTSC>” appears on the display.
2.Press the main unit’s TUNE +.
“Lang.:<ENGLISH >” appears on the display.
3.Use the main unit’s TUNER PRESET CH + or TUNE - and set the language.
4.Press TUNER PRESET CH - to enter the setting.
ECO
Configure the settings of the ECO Mode and auto standby mode.
o
ECO Mode
This mode can reduce the power consumption when the power of the
unit is on.
On:Reduce the power consumption.
Auto:
The power consumption is automatically
reduced to match the volume.
Off
(Default):
Do not reduce the power consumption.
0
When you want to output audio at a high volume level, it is recommended to
set “ECO Mode” to “Off”.
0
Eco mode can also be switched by pressing ECO on the remote control unit.
ContentsConnectionsPlaybackSettingsTipsAppendix
87
Front panelDisplayRear panelRemoteIndex
o
Pow.On Default
Set the mode to ECO when the power is on.
Last
(Default):
The ECO Mode will be set to the previous
setting before the power was switched
off.
On:
When power is turned on, the mode will
always be switched to the “ECO Mode” in
“On”.
Auto:
When power is turned on, the mode will
always be switched to the “ECO Mode” in
“Auto”.
Off:
When power is turned on, the mode will
always be switched to the “ECO Mode” in
“Off”.
o
Auto Standby
Set so the unit power automatically switches to standby.
Sets the time for switching to auto standby when there are no audio or
video signals input into this unit.
Before the unit enters standby mode, “Auto Standby” is displayed on
the unit display and the menu screen.
60 min:
The unit goes into standby after 60 minutes.
30 min:
The unit goes into standby after 30 minutes.
15 min:
The unit goes into standby after 15 minutes.
Off
(Default):
The unit does not go into standby
automatically.
ContentsConnectionsPlaybackSettingsTipsAppendix
88
Front panelDisplayRear panelRemoteIndex
o
BluetoothStandby
Set whether or not to turn the unit’s power on when a Bluetooth device
is operated.
On
(Default):
Turns the Bluetooth standby function on.
Off:Turns the Bluetooth standby function off.
0
When the “BluetoothStandby” setting is “On” and the connection operation is
performed on a Bluetooth device when this unit is in the standby state, this
unit’s power automatically switches on. In order to use this operation, the
device needs to be paired with this unit in advance.
NOTE
0
When using the “Denon 500 Series Remote”, use with the “BluetoothStandby”
setting set to “On”.
Front Display
Adjust the display brightness of this unit.
o
Dimmer
Bright
(Default):
Normal display brightness.
Dim:Reduced display brightness.
Dark:Very low display brightness.
Off:Turns the display off.
0
When the display brightness is set to “Off”, the display turns off as in the
standby state.
0
You can also adjust the display by pressing DIMMER on the main unit.
ContentsConnectionsPlaybackSettingsTipsAppendix
89
Front panelDisplayRear panelRemoteIndex
Firmware
When new firmware is supplied, update this unit using the USB port.
Use a USB memory device to update the firmware.
o
Update Start
Start the firmware update.
To update the firmware, connect the USB memory device to the USB
port on this unit.
Setup Lock
Protect settings from inadvertent changes.
o
Lock
On:Turn protection on.
Off
(Default):
Turn protection off.
0
Perform the following operations to set “Lock” to “Off”.
1.Press and hold SETUP for more than 3 seconds.
“Setup Lock:0On1” appears on the display.
2.
Use op
to select “Off”, then press ENTER.
NOTE
0
When “Lock” is set to “On”, no setting items are displayed except for “Setup
Lock”.
ContentsConnectionsPlaybackSettingsTipsAppendix
90
Front panelDisplayRear panelRemoteIndex
Checking the information
.
BACK
BACKSET
UP
UP
ENTER
ENTER
T
V AUDIO
V AUDIO
CH
CH LE
VEL
VEL
RESTORER
RESTORER
SL
EEP
EEP
SE
ARCH
ARCH
QUICK
QUICK SEL
ECT
ECT
POWER
POWER
MODE
MODE
AM
AM
MEMORY
MEMORY
CHANNEL
CHANNEL
IN
INFO
OPTION
OPTION
SOUND MODE
SOUND MODE
AUDIO DE
AUDIO DEL
AY
AY
TUNE
TUNE
VOLUME
VOLUME
FM
FM
CB
CBL/SAT
Blu-ray
Blu-ray
GAME
GAME
Bluetooth
Bluetooth
USB
USB
ME
MED
IA
IA
PLAY
ER
ER
DVD
DVD
/
Blu-ray
Blu-ray
ECO
ECO
2134
MUTE
MUTE
INFO
Information on the main unit’s various settings (Status) and on input
signals (Audio Input Signal) is shown on the display.
1
Press INFO.
The information screen is displayed.
0
Press INFO to display current input source name, volume, sound mode, and other
information at the bottom of the screen.
.
SOURCE
SOUND
SOURCE
ROOM EQ
Digital
Multi Ch Stereo
Bluetooth
Off
40.0
NOTE
0
The status display screen cannot be displayed when playing the following video
signals.
0
Computer resolution video
0
Video with an aspect ratio other than 16:9 or 4:3
0
4K video
ContentsConnectionsPlaybackSettingsTipsAppendix
91
Front panelDisplayRear panelRemoteIndex
o
Contents
Tips
I want the volume not to become too loud by mistake93
I want to keep the volume at the same level when I turn the power on93
I want to have the subwoofer always output audio93
I want to set the optimized listening environment after changing the
configuration/position of the speakers or changing a speaker to a new
one93
I want to combine a desired video with the current music93
Troubleshooting
Power does not turn on / Power is turned off95
Operations cannot be performed through the remote control unit96
Display on this unit shows nothing96
No sound comes out97
Desired sound does not come out98
Sound is interrupted or noise occurs100
No video is shown on the TV101
The menu screen is not displayed on the TV102
USB memory devices cannot be played back103
File names on the USB memory device are not displayed properly104
Bluetooth cannot be played back104
ContentsConnectionsPlaybackSettingsTipsAppendix
Tips
92
Front panelDisplayRear panelRemoteIndex
Tips
I want the volume not to become too loud by mistake
0
Set the volume upper limit for “Limit” in the menu beforehand. This prevents children or others from increasing the volume too much by mistake.
(v
p. 72)
I want to keep the volume at the same level when I turn the power on
0
By default, the volume setting when power was previously set to standby on this unit is applied at next power on with no change. To use a fixed volume
level, set the volume level at power on for “Power On Level” in the menu.
(v
p. 72)
I want to have the subwoofer always output audio
0
Depending on the input signals and sound mode, the subwoofer may not output audio. When “Subwoofer Mode” in the menu is set to “LFE+Main”, you
can have the subwoofer always output audio.
(v
p. 86)
I want to set the optimized listening environment after changing the configuration/position of the speakers or changing a speaker to a new
one.
0
Perform “Auto Setup”. This automatically makes the optimized speaker settings for the new listening environment.
(v
p. 78)
I want to combine a desired video with the current music
0
Set “Video Select” in the option menu to “On”. You can combine the current music with your desired video source from a Set-top Box or DVD, etc. while
listening to music from Tuner. (v
p. 54)
ContentsConnectionsPlaybackSettingsTipsAppendix
93
Front panelDisplayRear panelRemoteIndex
Troubleshooting
If a problem should arise, first check the following:
1.Are the connections correct?
2.
Is the set being operated as described in the owner’s manual?
3.Are the other devices operating properly?
If this unit does not operate properly, check the corresponding symptoms in this section.
If the symptoms do not match any of those described here, consult your dealer as it could be due to a fault in this unit. In this case, disconnect the power
immediately and contact the store where you purchased this unit.
ContentsConnectionsPlaybackSettingsTipsAppendix
94
Front panelDisplayRear panelRemoteIndex
o
Power does not turn on / Power is turned off
SymptomCause / SolutionPage
Power does not turn on.
0
Check whether the power plug is correctly inserted into the power outlet.35
Power automatically turns
off.
0
The sleep timer is set. Turn on the power again.60
0
“Auto Standby” is set. “Auto Standby” is triggered when there is no operation for a set amount of time. To
disable “Auto Standby”, set “Auto Standby” on the menu to “Off”.
88
Power turns off and the
power indicator flashes in
red approx. every 2
seconds.
0
The protection circuit has been activated due to a rise in temperature within this unit. Turn the power off,
wait about an hour until this unit cools down sufficiently, and then turn the power on again.
118
0
Please re-install this unit in a place having good ventilation.-
Power turns off and the
power indicator flashes in
red approx. every 0.5
seconds.
0
Check the speaker connections. The protection circuit may have been activated because speaker cable
core wires came in contact with each other or a core wire was disconnected from the connector and
came in contact with the rear panel of this unit. After unplugging the power cord, take corrective action
such as firmly re-twisting the core wire or taking care of the connector, and then reconnect the wire.
22
0
Turn down the volume and turn on the power again.
37
0
This unit’s amplifier circuit has failed. Unplug the power cord and contact our customer service center.-
ContentsConnectionsPlaybackSettingsTipsAppendix
95
Front panelDisplayRear panelRemoteIndex
o
Operations cannot be performed through the remote control unit
SymptomCause / SolutionPage
Operations cannot be
performed through the
remote control unit.
0
Batteries are worn out. Replace with new batteries.6
0
Operate the remote control unit within a distance of about 23 ft/7 m from this unit and at an angle of within
30°.
6
0
Remove any obstacle between this unit and the remote control unit.-
0
Insert the batteries in the proper direction, checking the q and w marks.
6
0
The set’s remote control sensor is exposed to strong light (direct sunlight, inverter type fluorescent bulb
light, etc.). Move the set to a place in which the remote control sensor will not be exposed to strong light.
-
0
When using a 3D video device, the remote control unit of this unit may not function due to effects of
infrared communications between units (such as TV and glasses for 3D viewing). In this case, adjust the
direction of units with the 3D communications function and their distance to ensure they do not affect
operations from the remote control unit of this unit.
-
o
Display on this unit shows nothing
SymptomCause / SolutionPage
Display is off.
0
Press the DIMMER button on this unit or remote control unit to set the display brightness to a setting other
than “Off”.
89
ContentsConnectionsPlaybackSettingsTipsAppendix
96
Front panelDisplayRear panelRemoteIndex
o
No sound comes out
SymptomCause / SolutionPage
No sound comes out of
speakers.
0
Check the connections for all devices.22
0
Insert connection cables all the way in.-
0
Check that input connectors and output connectors are not reversely connected.-
0
Check cables for damage.-
0
Check that speaker cables are properly connected.Check that cable core wires come in contact with the
metal part on speaker terminals.
22
0
Securely tighten the speaker terminals. Check speaker terminals for looseness.22
0
Check that a proper input source is selected.
37
0
Adjust the volume.38
0
Cancel the mute mode.38
0
Check the digital audio input connector setting.
76
0
Check the digital audio output setting on the connected device. On some devices, the digital audio output
is set to off by default.
-
0
When a headphone is plugged into the PHONES jack on the main unit, sound is not output from the
speaker terminal and SUBWOOFER connector.
12
No sound comes out when
using the DVI-D
connection.
0
When this unit is connected to a device equipped with a DVI-D connector, no sound is output. Make a
separate audio connection.
-
ContentsConnectionsPlaybackSettingsTipsAppendix
97
Front panelDisplayRear panelRemoteIndex
o
Desired sound does not come out
SymptomCause / SolutionPage
The volume does not
increase.
0
The maximum volume is set too low. Set the maximum volume using “Limit” on the menu.72
0
Appropriate volume correction processing is performed according to the input audio format and settings,
so the volume may not reach the upper limit.
-
No sound comes out with
the HDMI connection.
0
Check the connection of the HDMI connectors.
26
0
When outputting HDMI audio from the speakers, set “HDMI Audio Out” on the menu to “AVR”. To output
from the TV, set “TV”.
74
No sound comes out of a
specific speaker.
0
Check that speaker cables are properly connected.22
0
Check that a selection other than “None” is set for the “Speaker Config.” setting in menu.
83
0
When the sound mode is “Stereo” and “Virtual”, audio is only output from the front speakers and
subwoofer.
-
No sound is produced from
subwoofer.
0
Check the subwoofer connections.23
0
Turn on the subwoofer’s power.-
0
Set “Speaker Config.” - “Subwoofer” on the menu to “Yes”.
83
0
When “Speaker Config.” - “Front” in the menu is set to “Large”, depending on the input signal and the
sound mode, no sound may be output from the subwoofer.
83
0
When no subwoofer audio signal (LFE) is included in the input signals, no sound may be output from the
subwoofer.
86
0
You can make the subwoofer always output sound by setting the “Subwoofer Mode” to “LFE+Main”.86
DTS sound is not output.
0
Check that the digital audio output setting on the connected device is set to “DTS”.-
0
Set “Decode Mode” on the menu to “Auto” or “DTS”.
77
Dolby TrueHD, DTS-HD,
Dolby Digital Plus audio is
not output.
0
Make HDMI connections.29
0
Check the digital audio output setting on the connected device. On some devices, “PCM” is set by default.
-
Dolby PLg mode or DTS
Neo:6 mode cannot be
selected.
0
It cannot be selected when “None” is set for “Speaker Config.” - “Center” and “Surround”.
84
0
Dolby PLg
or DTS Neo:6 cannot be selected when using headphones.
-
ContentsConnectionsPlaybackSettingsTipsAppendix
98
Front panelDisplayRear panelRemoteIndex
SymptomCause / SolutionPage
“Restorer” cannot be
selected.
0
Check that an analog signal or PCM signal (Sample Rate = 44.1/48 kHz) is input. For playback of
multichannel signals such as Dolby Digital or DTS surround, “Restorer” cannot be used.
71
0
Switch to a sound mode other than “Direct”.55
ContentsConnectionsPlaybackSettingsTipsAppendix
99
Front panelDisplayRear panelRemoteIndex
o
Sound is interrupted or noise occurs
SymptomCause / SolutionPage
During playback from the
USB memory device,
sound is occasionally
interrupted.
0
When the transfer speed of the USB memory device is slow, sound may occasionally be interrupted.-
Noise often occurs in
FM/AM broadcasting.
0
Change the antenna orientation or position.33
0
Use an outdoor antenna.
33
0
Separate the antenna from other connection cables.33
The sounds appear to be
distorted.
0
Lower the volume.38
0
Set “Off” to the ECO Mode. When “On” or “Auto” is in the ECO Mode, the audio may by distorted when
the playback volume is high.
87
ContentsConnectionsPlaybackSettingsTipsAppendix
100
Front panelDisplayRear panelRemoteIndex
o
No video is shown on the TV
SymptomCause / SolutionPage
No picture appears.
0
Check the connections for all devices.
26
0
Insert connection cables all the way in.
-
0
Check that input connectors and output connectors are not reversely connected.
-
0
Check cables for damage.
-
0
Match the input settings to the input connector of the TV connected to this unit.
76
0
Check that the proper input source is selected.
37
0
Check the video input connector setting.
76
0
Check that the resolution of the player corresponds to that of the TV.
-
0
Check whether the TV is compatible with copyright protection (HDCP). If connected to a device not
compatible with HDCP, video will not be output correctly.
107
0
To enjoy content that is copyright protected by HDCP 2.2, use a playback device and TV compatible with
HDCP 2.2 only.
-
0
To enjoy 4K content or content that is copyright protected by HDCP 2.2, connect the device to the HDMI
3, HDMI 4 or HDMI 5 input connector.
-
No video is shown on the
TV with the DVI-D
connection.
0
With the DVI-D connection, on some device combinations, devices may not function properly due to the
copy guard copyright protection (HDCP).
107
While the menu is being
displayed, no video is
shown on the TV.
0
The video being played will not appear in the background of the menu when the menu is operated during
playback of the following video signals.
- Some images of 3D video content
- Some images of 4K Resolution
- Computer resolution images (example: VGA)
- Video with an aspect ratio other than 16:9 or 4:3
-
ContentsConnectionsPlaybackSettingsTipsAppendix
101
Front panelDisplayRear panelRemoteIndex
o
The menu screen is not displayed on the TV
SymptomCause / SolutionPage
The menu screen or status
information screen is not
displayed on the TV.
0
The menu screen is only displayed on this unit and a TV connected with an HDMI cable. If this unit is
connected to a TV using a different video output connector, operate while watching the display on this
unit.
-
0
When a 2D video is converted to a 3D video on the TV, the menu screen or status information screen is
not properly displayed.
-
ContentsConnectionsPlaybackSettingsTipsAppendix
102
Front panelDisplayRear panelRemoteIndex
o
USB memory devices cannot be played back
SymptomCause / SolutionPage
“No connection” is
displayed.
0
This unit cannot recognize the USB memory device. Disconnect and reconnect the USB memory device.32
0
Mass storage class compatible USB memory devices are supported.-
0
This unit does not support a connection through a USB hub. Connect the USB memory device directly to
the USB port.
-
0
The USB memory device must be formatted to FAT16 or FAT32.-
0
Not all USB memory devices are guaranteed to work. Some USB memory devices are not recognized.
When using a type of portable hard disc drive compatible with the USB connection that requires power
from an AC adapter, use the AC adapter that came with the drive.
-
Files on the USB memory
device are not displayed.
0
Files of a type not supported by this unit are not displayed.
39
0
This unit is able to display files within a maximum of 16 folder layers and up to 999 files (folders). Modify
the folder structure of the USB memory device.
-
0
When multiple partitions exist on the USB memory device, only files on the first partition are displayed.-
iOS devices are not
recognized.
0
The USB port of this unit does not support playback from iOS devices. Connect by Bluetooth.-
Files on a USB memory
device cannot be played.
0
Files are created in a format that is not supported by this unit. Check the formats supported by this unit.
108
0
You are attempting to play a file that is copyright protected. Files that are copyright protected cannot be
played on this unit.
-
0
FLAC 96kHz/24bit uncompressed and low compressive file cannot be played back on this unit. Check the
formats supported by this unit.
-
ContentsConnectionsPlaybackSettingsTipsAppendix
103
Front panelDisplayRear panelRemoteIndex
o
File names on the USB memory device are not displayed properly
SymptomCause / SolutionPage
The file names are not
displayed properly (“...”,
etc.).
0
Characters that cannot be displayed have been used. On this unit, characters that cannot be displayed
are replaced with a “. (period)”.
-
o
Bluetooth cannot be played back
SymptomCause / SolutionPage
Bluetooth devices cannot
be connected to this unit.
0
The Bluetooth function in the Bluetooth device has not been enabled. See the Owner’s Manual of the
Bluetooth device to enable the Bluetooth function.
-
0
Bring the Bluetooth device near to this unit.-
0
The Bluetooth device cannot connect with this unit if it is not compatible with the A2DP profile.-
0
Turn the power of the Bluetooth device off and on again, and then try again.-
The sound is cut off.
0
Bring the Bluetooth device near to this unit.-
0
Remove obstructions between the Bluetooth device and this unit.-
0
To prevent electromagnetic interference, locate this unit away from microwave ovens, wireless LAN
devices and other Bluetooth devices.
-
0
Reconnect the Bluetooth device.-
ContentsConnectionsPlaybackSettingsTipsAppendix
104
Front panelDisplayRear panelRemoteIndex
Resetting factory settings
Perform this procedure if the display is abnormal or if operations cannot be performed.
Various settings are reset to the factory default values. Make settings again.
.
X
SOUND MODE
TUNER PRESET CH +
1
Turn off the power using X.
2
Press X
while simultaneously pressing SOUND
MODE1 and TUNER PRESET CH +.
3
Release the two buttons when the display starts
flashing at intervals of about 1 second.
ContentsConnectionsPlaybackSettingsTipsAppendix
105
Front panelDisplayRear panelRemoteIndex
About HDMI
HDMI is an abbreviation of High-Definition Multimedia Interface, which is
an AV digital interface that can be connected to a TV or amplifier.
With the HDMI connection, high definition video and high quality audio
formats adopted by Blu-ray Disc players (Dolby Digital Plus, Dolby
TrueHD, DTS-HD, DTS-HD Master Audio) can be transmitted, which is not
possible with the analog video transmission.
Furthermore, in the HDMI connection, audio and video signals can be
transmitted through a single HDMI cable, while in conventional
connections it is necessary to provide audio and video cables separately
for connection between devices. This allows you to simplify the wiring
configuration that tends to be quite complex in a home theater system.
This unit supports the following HDMI functions.
0
Deep Color
An imaging technology supported by HDMI. Unlike RGB or YCbCr,
which uses 8 bits (256 shades) per color, it can use 10 bits (1024
shades), 12 bits (4096 shades), or 16 bits (65536 shades) to produce
colors in higher definition.
Both devices linked via HDMI must support Deep Color.
0
“x.v.Color”
This function lets HDTVs display colors more accurately. It enables
display with natural, vivid colors.
“x.v.Color” is trademark of Sony Corporation.
0
3D
This unit supports input and output of 3D (3 dimensional) video signals
of HDMI. To play back 3D video, you need a TV and player that
provide support for the HDMI 3D function and a pair of 3D glasses.
0
4K
This unit supports input and output of 4K (3840 x 2160 pixels) video
signals of HDMI.
0
Content Type
It automatically makes settings suitable for the video output type
(content information).
0
Adobe RGB color, Adobe YCC601 color
The color space defined by Adobe Systems Inc. Because it is a wider
color space than RGB, it can produce more vivid and natural images.
0
sYCC601 color
Each of these color spaces defines a palette of available colors that is
larger than the traditional RGB color model.
0
HDMI Pass Through
Even when the power to this unit is set to standby, signals input from
the HDMI input connector are output to a TV or other device that is
connected to the HDMI output connector.
ContentsConnectionsPlaybackSettingsTipsAppendix
Appendix
106
Front panelDisplayRear panelRemoteIndex
o
Supported audio formats
2-channel Linear PCM2-channel, 32 kHz – 192 kHz, 16/20/24 bit
Multi-channel Linear
PCM
7.1-channel, 32 kHz – 192 kHz, 16/20/24 bit
Bitstream
Dolby Digital/DTS/Dolby TrueHD/
Dolby Digital Plus/DTS-HD Master Audio/
DTS-HD High Resolution Audio/DTS Express
o
Supported video signals
0
480i
0
480p
0
576i
0
576p
0
720p 60/50Hz
0
1080i 60/50Hz
0
1080p 60/50/24Hz
0
4K 60/50/30/25/24 Hz
Copyright protection system
In order to play back digital video and audio such as BD video or DVD
video via HDMI connection, both this unit and the TV or player must to
support the copyright protection system known as HDCP (High-
bandwidth Digital Content Protection System). HDCP is copyright
protection technology comprised of data encryption and authentication of
the connected AV devices. This unit supports HDCP.
0
If a device that does not support HDCP is connected, video and audio
are not output correctly. Read the owner’s manual of your television or
player for more information.
0
When connecting this unit to a device that is compatible with the Deep Color and
4K functions, use a “High Speed HDMI cable with Ethernet” that bears the HDMI
logo.
ContentsConnectionsPlaybackSettingsTipsAppendix
107
Front panelDisplayRear panelRemoteIndex
Playing back a USB memory devices
0
This unit is compatible with MP3 ID3-Tag (Ver. 2) standard.
0
This unit can show the artwork that was embedded by using MP3 ID3-Tag Ver. 2.3 or 2.4.
0
This unit is compatible with WMA META tags.
0
If the image size (pixels) of an album artwork exceeds 500 × 500 (WMA/MP3/WAV/FLAC) or 349 × 349 (MPEG-4 AAC), then music may not be played
back properly.
o
Compatible formats
Sampling frequencyBit rate
Extension
WMA32/44.1/48 kHz
48 – 192
kbps
.wma
MP332/44.1/48 kHz
32 – 320
kbps
.mp3
WAV32/44.1/48 kHz–.wav
MPEG-4 AAC
z
32/44.1/48 kHz
48 – 320
kbps
.aac/.m4a
FLAC32/44.1/48/88.2/96 kHz–.flac
z
Only files that are not protected by copyright can be played on this unit.
Content downloaded from pay sites on the Internet are copyright protected. Also,
files encoded in WMA format when ripped from a CD, etc. on a computer may be
copyright protected, depending on the computer’s settings.
ContentsConnectionsPlaybackSettingsTipsAppendix
108
Front panelDisplayRear panelRemoteIndex
o
Maximum number of playable files and folder
The limits on the number of folders and files that can be displayed by
this unit are as follows.
Media
Item
USB memory device
Memory capacityFAT16 : 2 GB, FAT32 : 2 TB
Number of folder directory levels
z
1
16 levels
Number of folders99
Number of files
z
2
999
z1
The limited number includes the root folder.
z2
The allowable number of files may differ according to the USB memory device
capacity and the file size.
Playing back a Bluetooth device
This unit supports the following Bluetooth profile.
0
A2DP (Advanced Audio Distribution Profile):
When a Bluetooth device that supports this standard is connected,
monaural and stereo sound data can be streamed at a high quality.
0
AVRCP (Audio/Video Remote Control Profile):
When a Bluetooth device that supports this standard is connected, the
Bluetooth device can be operated from this unit.
o
About Bluetooth communications
Radio waves broadcast from this unit may interfere with the operation
of medical devices. Make sure you turn off the power of this unit and
Bluetooth device in the following locations as radio wave interference
may cause malfunctions.
0
Hospitals, trains, aircraft, petrol kiosks and places where flammable
gases are generated
0
Near automatic doors and fire alarms
ContentsConnectionsPlaybackSettingsTipsAppendix
109
Front panelDisplayRear panelRemoteIndex
Personal memory plus function
The most recently used settings (input mode, HDMI output mode, sound
mode, tone control, channel level, Restorer and audio delay, etc.) are
saved for each input source.
0
“Surr.Parameter” and “Tone” settings are stored for each sound mode.
Last function memory
This function stores the settings which were made before going into the
standby mode.
ContentsConnectionsPlaybackSettingsTipsAppendix
110
Front panelDisplayRear panelRemoteIndex
Sound modes and channel output
S This indicates the audio output channels or surround parameters that can be set.
D This indicates the audio output channels. The output channels depend on the settings of “Speaker Config.”.
(v
p. 83)
.
Sound mode
Channel output
Front L/RCenterSurround L/RSubwoofer
Direct (2-channel)
SDz
Direct (Multi-channel)
SDDD
Stereo
SD
Multi Ch In
SDDD
Dolby Pro Logic gSDDD
DTS Neo:6
SDDD
Dolby Digital
SDDD
Dolby Digital Plus
SDDD
Dolby TrueHD
SDDD
DTS Surround
SDDD
DTS 96/24
SDDD
DTS-HD
SDDD
DTS Express
SDDD
Multi Ch Stereo
SDDD
Virtual
SD
zAudio is output when “Subwoofer Mode” in the menu is set to “LFE+Main”.
(v
p. 86)
ContentsConnectionsPlaybackSettingsTipsAppendix
111
Front panelDisplayRear panelRemoteIndex
Explanation of terms
o
Dolby
Dolby Digital
Dolby Digital is a multi-channel digital signal format developed by Dolby
Laboratories.
A total of 5.1-channels are played: 3 front channels (“FL”, “FR” and “C”), 2
surround channels (“SL” and “SR”) and the “LFE” channel for low
frequency effects.
Because of this, there is no crosstalk between channels and a realistic
sound field with a “three-dimensional” feeling (sense of distance,
movement and positioning) is achieved. This delivers a thrilling surround
sound experience in the home.
Dolby Digital Plus
Dolby Digital Plus is an improved Dolby Digital signal format that is
compatible with up to 7.1-channels of discrete digital sound and also
improves sound quality thanks to extra data bit rate performance. It is
upwardly compatible with conventional Dolby Digital, so it offers greater
flexibility in response to the source signal and the conditions of the
playback device.
Dolby Pro Logicg
Dolby Pro Logicg is a matrix decoding technology developed by Dolby
Laboratories.
Regular music such as that on CDs is encoded into 5-channels to achieve
an excellent surround effect.
The surround channel signals are converted into stereo and full band
signals (with a frequency response of 20 Hz to 20 kHz or greater) to create
a “three-dimensional” sound image offering a rich sense of presence for all
stereo sources.
Dolby TrueHD
Dolby TrueHD is a high definition audio technology developed by Dolby
Laboratories, using lossless coding technology to faithfully reproduce the
sound of the studio master.
This format provides the facility to support up to 8 audio channels with a
sampling frequency of 96 kHz/24 bit resolution and up to 6 audio channels
with a sampling frequency of 192 kHz/24 bit resolution.
ContentsConnectionsPlaybackSettingsTipsAppendix
114
Front panelDisplayRear panelRemoteIndex
o
DTS
DTS
This is an abbreviation of Digital Theater System, which is a digital audio
system developed by DTS. DTS delivers a powerful and dynamic
surround sound experience, and is found in the world’s finest movie
theaters and screening rooms.
DTS 96/24
DTS 96/24 is a digital audio format enabling high sound quality playback in
5.1-channels with a sampling frequency of 96 kHz and 24 bit quantization
on DVD-Video.
DTS Digital Surround
DTS™ Digital Surround is the standard digital surround format of DTS,
Inc., compatible with a sampling frequency of 44.1 or 48 kHz and up to
5.1-channels of digital discrete surround sound.
DTS-HD
This audio technology provides higher sound quality and enhanced
functionality than the conventional DTS and is adopted as an optional
audio for Blu-ray Disc.
This technology supports multi-channel, high data transfer speed, high
sampling frequency, and lossless audio playback. Maximum 7.1-channels
are supported in Blu-ray Disc.
DTS-HD High Resolution Audio
DTS-HD High Resolution Audio is an improved version of the conventional
DTS, DTS-ES and DTS 96/24 signals formats, compatible with sampling
frequencies of 96 or 48 kHz and up to 7.1-channels of discrete digital
sound. High data bit rate performance provides high quality sound. This
format is fully compatible with conventional products, including
conventional DTS digital surround 5.1-channel data.
DTS-HD Master Audio
DTS-HD Master Audio is a lossless audio format created by Digital
Theater System (DTS). This format provides the facility to support up to 8
audio channels with a sampling frequency of 96 kHz/24 bit resolution and
up to 6 audio channels with a sampling frequency of 192 kHz/24 bit
resolution. It is fully compatible with conventional products, including
conventional DTS digital surround 5.1-channel data.
DTS Neo:6™ Surround
DTS Neo:6™ is a matrix decoding technology for achieving 6.1-channel
surround playback with 2-channel sources. It includes “DTS Neo:6
Cinema” suite for playing movies and “DTS Neo:6 Music” suited for
playing music.
ContentsConnectionsPlaybackSettingsTipsAppendix
115
Front panelDisplayRear panelRemoteIndex
o
Audio
FLAC (Free Lossless Audio Codec)
FLAC stands for Free lossless Audio Codec, and is a lossless free audio
file format. Lossless means that the audio is compressed without any loss
Gebruikershandleiding.com neemt misbruik van zijn services uitermate serieus. U kunt hieronder aangeven waarom deze vraag ongepast is. Wij controleren de vraag en zonodig wordt deze verwijderd.
Product:
Spelregels forum
Om tot zinvolle vragen te komen hanteren wij de volgende spelregels:
lees eerst de handleiding door;
controleer of uw vraag al eerder door iemand anders is gesteld;
probeer uw vraag zo duidelijk mogelijk te stellen;
heeft u een probleem en al geprobeerd om dit op te lossen, vermeld dit erbij aub;
heeft u een oplossing gekregen van een bezoeker dan horen wij dat graag in dit forum;
wilt u een reactie geven op een vraag of antwoord, gebruik dan niet dit formulier maar klik op de knop 'reageer op deze vraag';
uw vraag wordt direct op de website gezet; vermijd daarom persoonlijke gegevens in te vullen;
Belangrijk! Als er een antwoord wordt gegeven op uw vraag, dan is het voor de gever van het antwoord nuttig om te weten als u er wel (of niet) mee geholpen bent! Wij vragen u dus ook te reageren op een antwoord.
Belangrijk! Antwoorden worden ook per e-mail naar abonnees gestuurd. Laat uw emailadres achter op deze site, zodat u op de hoogte blijft. U krijgt dan ook andere vragen en antwoorden te zien.
Abonneren
Abonneer u voor het ontvangen van emails voor uw Denon AVR-S510BT bij:
nieuwe vragen en antwoorden
nieuwe handleidingen
U ontvangt een email met instructies om u voor één of beide opties in te schrijven.
Ontvang uw handleiding per email
Vul uw emailadres in en ontvang de handleiding van Denon AVR-S510BT in de taal/talen: Engels als bijlage per email.
De handleiding is 4,05 mb groot.
U ontvangt de handleiding per email binnen enkele minuten. Als u geen email heeft ontvangen, dan heeft u waarschijnlijk een verkeerd emailadres ingevuld of is uw mailbox te vol. Daarnaast kan het zijn dat uw internetprovider een maximum heeft aan de grootte per email. Omdat hier een handleiding wordt meegestuurd, kan het voorkomen dat de email groter is dan toegestaan bij uw provider.
Uw handleiding is per email verstuurd. Controleer uw email
Als u niet binnen een kwartier uw email met handleiding ontvangen heeft, kan het zijn dat u een verkeerd emailadres heeft ingevuld of dat uw emailprovider een maximum grootte per email heeft ingesteld die kleiner is dan de grootte van de handleiding.
Er is een email naar u verstuurd om uw inschrijving definitief te maken.
Controleer uw email en volg de aanwijzingen op om uw inschrijving definitief te maken
U heeft geen emailadres opgegeven
Als u de handleiding per email wilt ontvangen, vul dan een geldig emailadres in.
Uw vraag is op deze pagina toegevoegd
Wilt u een email ontvangen bij een antwoord en/of nieuwe vragen? Vul dan hier uw emailadres in.