378310
1
Verklein
Vergroot
Pagina terug
1/25
Pagina verder
TOASTER
BROODROOSTER
TOSTADOR
TORRADEIRA
ºƒÀ°∞¡π∂ƒ∞
TOASTER
BRÖDROST
BRØDRISTER
LEIVÄNPAAHDIN
TOSTER
KENYÉRPIRÍTÓ
TOUSTOVAĺ
ííééëëííÖÖêêÄÄ
Instructions for use
Mode d’emploi
Gebrauchsanweisung
Istruzioni per l’uso
Gebruiksaanwijzing
Instrucciones para el uso
Instruções de uso
œ‰Á„flÂÚ xÒÛÁÚ
Bruksanvisning
Bruksanvisning
Brugsanvisning
Käyttöohje
Instrukcja obs∏ugi
Használati utasítás
Návod k pouÏití
àÌÒÚÛ͈ËË ÔÓ ˝ÍÒÔÎÛ‡Ú‡ˆËË
°¨ßºä¤ã
ÝäÌ³úß©·
int 7-08-2002 14:33 Pagina 1
ELECTRICAL REQUIREMENTS (UK ONLY)
Before using this appliance ensure that the voltage indicated on the product corre-
sponds with the main voltage in your home, if you are in any doubt about your sup-
ply contact your local electricity company.
The flexible mains lead is supplied connected to
a B.S. 1363 fused plug having a fuse of 13 amp
capacity.Should this plug not fit the socket outlets in
your home, it should be cut off and replaced with
a suitable plug, following the procedure outlined
below.
Note: Such a plug cannot be used for any other
appliance and should therefore be properly dis-
posed of, (having removed the fuse) and not left
where children might find it and plug it into a sup-
ply socket - with the obvious consequent danger.
N.B. We recommend the use of good quality
plugs and wall sockets that can be switched off
when the machine is not in use.
IMPORTANT: the wires in the mains lead fitted
to this appliance are coloured in accordance
with the following code:
As the colours of the wires in the mains lead of
this appliance may not correspond with the
coloured markings identifying the terminals in
your plug, proceed as follows:
The wire which is coloured green and yellow
must be connected to the terminal in the plug
which is marked with the letter E or by the earth
symbol or coloured green or green and yel-
low.
The wire which is coloured blue must be con-
nected to the terminal which is marked with the
letter
N or coloured black.
The wire which is coloured brown must be con-
nected to the terminal which is marked with the
letter
L or coloured red.
When wiring the plug, ensure that all strands of
wire are securely retained in each terminal. Do
not forget to tighten the mains lead clamp on the
plug. If your electricity supply point has only two
pin socket outlets, or if you are in doubt, consult
a qualified electrician.
Should the mains lead ever require replacement,
it is essential that this operation be carried out by
a qualified electrician and should only be
replaced with a flexible cord of the same size.
If the plug is a moulded-on type the fuse cover must
be refitted. If the fuse cover is lost, the plug must not
be used until a replacement cover is obtained. The
colour of the correct replacement fuse cover is that of
the coloured insert in the base of the fuse recess or
elsewhere on the plug. Always state this colour when
ordering a replacement fuse cover.
Only 13amp replacement fuses which are ASTA
approved to B.S. 1362 should be fitted.
This appliance conforms to the Norms EN
55014 regarding the suppression of radio inter-
ference.
GREEN AND YELLOW
BLUE
BROWN
EARTH
NEUTRAL
LIVE
WARNING - THIS APPLIANCE MUST BE EARTHED
Green and Yellow to
Earth
Blue to
Neutral
13 amp
Fuse
Brown to
Live
Cord Clamp
int 7-08-2002 14:33 Pagina 2
1
2
A
E
F
B
C
D
G
H
I
L
M
int 7-08-2002 14:33 Pagina 3
4
GB
IMPORTANT WARNINGS
- The appliance is exclusively for the use for
which it has been expressly manufactured.
Any other use is to be considered inappro-
priate and therefore dangerous. The manu-
facturer cannot be held responsible for even-
tual damage caused by inappropriate,
improper or irresponsible use and/or for
repairs made to the product by unauthorised
personnel.
- After having removed the appliance from the
packaging, make sure that the product is
complete and in perfect condition.
- The plastic bag in which the appliance was
packaged should be kept out of reach of chil-
dren as it poses a suffocation hazard.
In order to remove the dust that may have
accumulated on the appliance, simply dust it
off with a soft cloth.
- Before inserting the plug into the electrical
outlet, make certain:
- the voltage of the outlet corresponds to the
value indicated on the information label,
attached to the appliance.
- the electrical outlet has sufficient grounding
capacity:
the manufacturer declines any
responsibility for the lack of observation
of this norm.
- In the case of incompatibility between the
outlet and the plug of the appliance, have it
replaced by a qualified technician. The use
of adapters, multiple socket units and/or
extension cords is not recommended.
Whenever it may be necessary to use such
equipment, it is advisable to use only simple
or multiple adapters or extension cords which
comply with the current safety standards, and
make sure not to exceed the voltage limit of
the adapter or extension cord.
- When the appliance is plugged into the electri-
cal outlet, and moreover, while it is turned on,
never place hands into the bread toasting slots
(H).
- Never allow the appliance to be used by chil-
dren or used without adult supervision.
- Do not touch the appliance with wet or damp
hands.
- The metal sides of the toaster and the areas
surrounding the bread slots (H) become very
hot during use: control the appliance tou-
ching only the plastic dials and handles.
-Bread is a foodstuff which may catch fire. Do
not use this appliance under or next to cur-
tains or other combustible material.
- Do not cover the appliance while it is in use.
- Do not use the appliance with bare or wet feet.
- Unplug the appliance from the electrical
outlet when it is not in use.
- Do not leave the appliance on when not
being used as this may be potentially dange-
rous.
- Do not unplug the appliance from the outlet
by pulling on the cord.
- Do not leave the appliance exposed to the
elements, (rain, direct sunlight, frost, etc.).
- Before doing any cleaning or operation,
unplug the appliance from the electrical
outlet. Do not immerse the appliance, the
plug, or the electrical cord in water.
-In case of break down or improper functio-
ning of the appliance, turn off the appliance
without tampering with it. For necessary
repairs and for the substitution of the electri-
cal cord, consult the technical service centre
authorised by the manufacturer.
This appliance conforms to the Directive
89/336/CEE relative to electromagnetic compa-
tibility.
The materials and the objects destined for contact
with food products are in compliance with the
regulations of the EEC directive 89/109.
READ THE FOLLOWING INTSTRUCTIONS CAREFULLY BEFORE USING THIS APPLIANCE
int 7-08-2002 14:33 Pagina 4
5
DESCRIPTION OF APPLIANCE
A) ON lever
B) Browning viewer
C) Browning control dial
D) Defrost button + light
E) Stop/clear button
F) Heating button + light
G) Crumb collection tray
H) Bread toasting slots
I) Removable “Warming Rack”
USE OF THE COMMANDS
Make sure that the lever (A) is raised and the
dial (
C) is set for a medium toasting level.
Connect the appliance to the electrical outlet.
In order to eliminate the “new” smell at the
first use, operate the appliance without any
food inside for at least 5 minutes. Aerate
the room during this operation.
Insert the slices of bread into the bread toa-
sting slots (
H) and lower the lever (A) until it
is all the way down.
Note: If the appliance is not connected to the
electrical outlet, the lever will not go all the
way down.
•When the toasting is finished, the lever
returns to the up position, raising the toasted
bread slices at the same time.
If the bread is not sufficiently toasted, select a
darker degree of toasting by turning the dial (
C).
If it is too dark, select a lesser degree of toasting.
The toasting can be interrupted at any time by
simply pressing the stop/clear button (
E).
Defrost function
You may toast slices of frozen bread by pressing
the defrost button immediately after having lowe-
red the lever (
A); the cooking cycle will be
lengthened in order to achieve the desired toa-
sting level. The red warning light will remain
lighted while the defrost function is in use.
Reheat function
Press down control lever (A) and press the reheat
button (
F). The reheat light will remain on whilst
the reheat function is in use. Please note that this
is a fixed reheat time which cannot be adjusted
by the browning control.
"WARMING RACK" device (I)
Use this device to heat croissants.
Fasten the grill to the appliance by first inser-
ting the hooks L and then clicking in the hooks
M, as shown in the Figure on page 3.
Rest the croissant on the grill.
•Turn the browning control dial (C) to the
desired position.
•Press down the control lever (A) until it clicks
into place.
If the croissant is not warm enough, next time
select a darker level of toasting.
SUGGESTIONS
Never use the appliance when it is empty
(when there is no bread inserted).
Do not use very thin or broken slices of bread.
Do not insert other foods that may drip
during the cooking process. In addition to
making the cleaning procedure more difficult,
these may cause fires. It is also very impor-
tant to clean the crumb collection tray of any
drippings before each use.
Do not insert (by force) foods that are too big
for the slots.
Do not insert forks or other utensils into the
toaster in order to remove bread,
in so far
as it may damage the resistance coils of the
appliance. Remove the plug from the outlet
and turn the appliance over, gently shaking it
to remove the lodged item.
CLEANING AND MAINTENANCE
Any cleaning and/or maintenance operation
must be done after having removed the plug
from the electrical outlet.
Let the appliance cool down before procee-
ding with its cleaning.
The external part of the appliance must be
cleaned with soft cloth. Do not use abrasive
detergents which could ruin the surface.
DO NOT IMMERSE IN WATER.
After each use, remove the plug from the elec-
trical outlet and empty the crumb collection tray
which is situated under the appliance.
If a toast slice should become lodged in the
toaster, unplug the appliance, turn it upside
down, and shake the toaster gently.
NEVER TOUCH ANY PART OF THE TOASTER
WITH SHARP UTENSILS, ESPECIALLY INSIDE
THE BREAD TOASTING SLOTS.
int 7-08-2002 14:33 Pagina 5
6
F
LIRE ATTENTIVEMENT LES INSTRUCTIONS CONTENUES DANS CE MODE D’EMPLOI AVANT D’UTILISER L’APPAREI
L.
AVERTISSEMENTS IMPORTANTS
- Cet appareil ne doit être destiné qu’à l’usage
pour lequel il a été expressément conçu. Tout
autre usage doit être considéré comme impro-
pre et par conséquent dangereux. Le con-
structeur décline toute responsabilité pour les
éventuels dommages dérivant d’une utilisa-
tion impropre, erronée et illogique et/ou de
réparations effectuées par un personnel non
qualifié.
-Après avoir enlevé l’emballage, contrôler que
l’appareil est intact. En cas de doute, ne pas
utiliser l’appareil et s’adresser exclusivement
à un personnel qualifié.
- Ne pas laisser le sachet en plastique conte-
nant le produit à la portée des enfants étant
donné qu’il peut représenter pour eux une
source de danger.
Pour enlever la poussière qui s’est éventuelle-
ment accumulée sur l'appareil, il suffit d’utili-
ser un chiffon doux.
-Avant de brancher la fiche à la prise de cou-
rant, vérifier que :
- le voltage indiqué sur la plaquette signalé-
tique de l’appareil correspond bien à celui
de votre installation électrique ;
- la prise de courant est munie d’une mise à
la terre efficace;
le fabricant décline toute
responsabilité pour les dommages déri-
vant du non respect de cette norme.
- En cas d’incompatibilité entre la prise de cou-
rant et la fiche de l’appareil, la prise doit être
remplacée par une prise de type approprié,
par un personnel qualifié. Il est déconseillé
d’utiliser des adaptateurs, des prises multiples
et/ou des rallonges. Si leur utilisation s’avère
absolument nécessaire, utiliser exclusivement
des adaptateurs simples ou multiples ainsi
que des rallonges conformes aux normes de
sécurité en vigueur, en veillant à ne pas
dépasser la puissance maximale indiquée sur
l’adaptateur et/ou sur la rallonge.
- Lorsque l'appareil est branché au réseau d’ali-
mentation et en particulier lorsqu’il est en mar-
che, ne jamais introduire les mains dans les
ouvertures de chargement (H).
- Ne pas permettre aux enfants d’utiliser l'ap-
pareil sans surveillance.
- Ne pas toucher l’appareil avec les mains
mouillées ou humides.
- Pendant le fonctionnement les parties métalli-
ques et les zones qui entourent les ouvertures
de chargement (H) sont chaudes : utiliser uni-
quement les boutons et les poignées en plasti-
que pour intervenir sur l'appareil.
- Le pain est un aliment qui peut prendre feu.
Par conséquent, ne pas utiliser cet appareil en
dessous ou à proximité de rideaux ou autres
matériaux combustibles.
-Ne pas couvrir l'appareil lorsqu’il est en mar-
che.
- Ne pas utiliser l’appareil en ayant les pieds nus
ou mouillés.
- Débrancher la fiche de la prise de courant
lorsque l'appareil n’est pas utilisé.
-Ne pas laisser l’appareil branché inutilement
étant donné qu’il peut représenter une source
de danger.
-Ne pas débrancher la fiche de la prise de
courant en tirant sur le cordon d’alimentation.
-Ne pas laisser l’appareil exposé aux agents
atmosphériques (pluie, soleil, gel, etc.).
-Avant d’effectuer toute opération de nettoya-
ge ou d’entretien, débrancher l'appareil du
réseau d’alimentation électrique en enlevant
la fiche de la prise. Ne jamais plonger l'ap-
pareil, le cordon d’alimentation ou la fiche
dans l'eau.
- En cas de panne et/ou mauvais fonctionne-
ment, éteindre l'appareil et ne pas essayer
d’intervenir personnellement. Pour toute répa-
ration et pour le remplacement du cordon
d’alimentation, s’adresser exclusivement aux
centres de service après-vente agréés par le
fabricant.
Conserver soigneusement ce mode d’emploi
pour toutes autres consultations futures.
Cet appareil est conforme à la Directive
89/336/CEE concernant la compatibilité électro-
magnétique.
Les matériaux et les objets destinés au contact
avec des produits alimentaires sont conformes
aux prescriptions de la directive CEE 89/109.
int 7-08-2002 14:33 Pagina 6
DESCRIPTION DE L’APPAREIL
A) Levier de mise en marche
B) Indicateur degré de grillage
C) Bouton de réglage du degré de grillage
D) Touche décongélation + témoin
E) Touche "arrêt/annulation"
F) Touche de réchauffage + témoin
G) Tiroir ramasse-miettes
H) Ouvertures de chargement
I) Dispositif "Grille de réchauffement" amovible
UTILISATION DES COMMANDES
•S’assurer que le levier (A) est soulevé et que le
bouton (C) est réglé sur le degré de grillage
moyen.
Brancher la fiche de l’appareil à une prise de
courant.
Pour éliminer l’odeur typique de
“nouvel appareil” lors de la première mise
en service, faire fonctionner l’appareil sans
aliments pendant au moins 5 minutes. Aérer
la pièce pendant cette opération.
Introduire les tranches de pain dans les ouver-
tures de chargement et abaisser le levier (A)
jusqu'à son point de blocage.
Remarque : si l'appareil n’est pas connecté au
réseau d’alimentation, le levier ne reste pas
en position de blocage.
Quand le grillage est terminé, le levier remon-
te en faisant monter également les tranches
de pain. Dans le cas de tranches de pain de
petites dimensions, pour faciliter l’extraction,
soulever le levier (A) vers le haut jusqu'à la
butée d’arrêt.
Si le pain n’est pas suffisamment doré, sélec-
tionner un degré supérieur de grillage en tour-
nant le bouton ( C). Tandis que si le pain est
trop grillé, sélectionner un degré inférieur de
grillage.
•Le grillage peut être interrompu à tout
moment en appuyant tout simplement sur le
touche arrêt/annulation (E).
Fonction Defrost (décongélation)
Vous pouvez faire griller des tranches de pain
congelées en appuyant sur la touche Defrost tout
de suite après avoir abaissé le levier (
A) ; le cycle
de cuisson sera prolongé de manière à atteindre
le grillage souhaité. Le voyant lumineux rouge
reste allumé tant que la fonction Defrost est active.
Fonction réchauffage
Pousser à fond le levier de commande (A) et
enfoncer la touche de réchauffage (F). Le témoin
réchauffage restera allumé durant l'utilisation de
cette fonction. Ne pas oublier que le temps de
réchauffage est fixe et ne peut être modifié par le
réglage du degré de grillage.
Dispositif "WARMING RACK" (I)
Utiliser ce dispositif pour le réchauffage des crois-
sants.
Fixer la grille à l'appareil en enfilant d'abord
les crochets L et en bloquant ensuite les cro-
chets M comme illustré sur la figure p. 3.
Placer le croissant sur la grille.
• Tourner le bouton de réglage du degré de
grillage (F) sur la position désirée (1= moins
grillé, + = plus grillé).
Baisser le levier de mise en fonction (D)
jusqu'à ce qu'il se bloque.
Si le croissant n'est pas suffisamment chaud,
la fois suivante sélectionner un degré de gril-
lage plus élevé.
CONSEILS PRATIQUES
•Ne pas faire fonctionner l'appareil vide (c’est-
à-dire sans tranches de pain).
Ne pas utiliser des tranches de pain trop fines
ou cassées.
•Ne pas introduire dans l'appareil des ali-
ments qui peuvent dégouliner pendant la cuis-
son. Ce type d’aliments rend non seulement
difficile le nettoyage de l'appareil mais risque
aussi de provoquer des incendies. Il est
important, en outre, de nettoyer le tiroir
ramasse-miettes afin d’éliminer tous résidus
d’aliment avant chaque utilisation.
•Ne pas introduire des aliments trop grands en
les insérant avec force dans l'appareil.
Ne pas introduire de fourchettes ou d’autres
ustensiles à l’intérieur du toaster pour
extraire le pain,
étant donné que cela pour-
rait endommager les résistances de l'appa-
reil. En pareil cas, débrancher la fiche de la
prise de courant, retourner l'appareil et le
secouer légèrement.
NETTOYAGE ET ENTRETIEN
•Avant d’effectuer toute opération de nettoya-
ge et d’entretien, débrancher la fiche de la
prise de courant.
7
int 7-08-2002 14:33 Pagina 7
Laisser l'appareil refroidir avant de procéder
à son nettoyage.
Nettoyer la partie extérieure de l’appareil
avec un linge doux. Ne jamais utiliser de
détergents abrasifs qui pourraient endomma-
ger la surface du toaster.
NE JAMAIS PLONGER L'APPAREIL DANS
L'EAU.
Après chaque utilisation, débrancher la fiche
de la prise de courant et vider le tiroir ramas-
se-miettes qui se trouve à la base de l'appa-
reil.
Si des toasts restent coincés dans l'appareil,
débrancher la fiche, retourner et secouer
légèrement le toaster.
NE JAMAIS TOUCHER AUCUNE PARTIE DU
TOASTER AVEC DES USTENSILES COU-
PANTS, SURTOUT À L’INTÉRIEUR DES
OUVERTURES DE CHARGEMENT.
8
int 7-08-2002 14:33 Pagina 8
9
D
LESEN SIE DIESE GEBRAUCHSANWEISUNG VOR DER ERSTEN INBETRIEBSZETZUNG
WICHTIGE HINWEISE
- Dieses Gerät darf ausschließlich für den
ausdrücklich konzipierten Zweck verwendet
werden. Jede zweckentfremdete Verwendung
kann gefährlich sein. Der Hersteller kann für
Schäden, die durch zweckentfremdete, falsche
bzw. unsachgemäße Verwendung bzw. durch
nichtfachmännisch ausgeführte Reparaturen
verursacht werden, nicht haftbar gemacht wer-
den.
- Prüfen Sie das Gerät nach dem Auspacken auf
seine Unversehrtheit. Verwenden Sie das Gerät
im Zweifelsfall auf gar keinen Fall und wenden
Sie sich im Bedarfsfall ausschließlich an
Fachleute.
- Lassen Sie den Plastikbeutel nicht in der
Reichweite von Kindern, da dies eine poten-
tielle Gefahrenquelle darstellt.
Entfernen Sie den sich auf dem Gerät even-
tuell angesammelten Staub einfach mit einem
weichen Tuch.
- Bevor Sie den Netzstecker an der Steckdose
anschließen prüfen Sie ob:
- die Netzspannung mit dem auf dem Typen-
/Leistungsschild des Gerätes angegebenen
Wert übereinstimmt;
- die Steckdose vorschriftsmäßig geeerdet
ist. Der Hersteller übernimmt keinerlei
Haftung,
wenn diese Vorschrift nicht ein-
gehalten werden sollte.
- Sollte der Gerätestecker für Ihre Steckdose
ungeeignet sein, lassen Sie ihn von einem
Fachmann gegen einen passenden
Netzstecker auswechseln. Die Verwendung
von Adaptern, Mehrfachsteckdosen
und/oder Verlängerungskabeln wird nicht
empfohlen. Sollte deren Einsatz unvermeidli-
ch sein, verwenden Sie ausschließlich
Einfach- oder Vielfachadapter und
Verlängerungskabel, die mit den gelten
Sicherheitsvorschriften übereinstimmen und
achten Sie gleichzeitig darauf, daß die auf
dem Adapter und/oder dem
Verlängerungskabel eingravierten
Leistungsgrenzen nicht überschritten werden.
- Ist das Gerät am Versorgungsnetz angeschlossen
und vor allen Dingen dann, wenn es in Betrieb ist,
die Hände nicht in die Toasteinführschlitze (H)
bringen.
-Vermeiden Sie, daß das Gerät von Kindern
bedient oder unbeaufsichtigt betrieben wird.
- Berühren Sie das Gerät nicht mit feuchten
bzw. nassen Händen.
-Während dem Betrieb sind die Metallwände
und der Bereich rund um die
Toasteinführschlitze (H) heiß: Berühren Sie
das Gerät ausschließlich an den
Drehknöpfen und Handgriffen aus Plastik.
-Brot ist ein Lebensmittel, das Feuer fangen
kann. Verwenden Sie das Gerät daher nicht
unter oder in der Nähe von Vorhängen bzw.
anderen entflammbaren Materialien.
-Decken Sie das Gerät während dem Betrieb
nicht ab.
-Verwenden Sie das Gerät nicht, wenn Sie bar-
fuß sind oder nasse Füße haben.
- Ziehen Sie den Netzstecker aus der
Steckdose, wenn Sie das Gerät nicht verwen-
den.
- Lassen Sie das Gerät nicht unnötig eingeschal-
tet, da dies eine potentielle Gefahrenquelle
darstellt.
- Ziehen Sie nicht direkt an der
Versorgungsleitung, um den Netzstecker aus
der Steckdose zu ziehen.
- Setzen Sie das Gerät keinen
Witterungseinflüssen aus (Regen, Sonne, Frost
usw.)
- Bevor Sie mit Reinigungs- bzw.
Wartungsarbeiten beginnen, ziehen Sie stets
den Netstecker des Gerätes aus der
Steckdose.Tauchen Sie weder das Gerät, noch
die Versorgungsleitung bzw. den Netzstecker
ins Wasser.
- Bei Beschädigungen und/oder
Betriebsstörungen des Gerätes schalten Sie es
sofort aus und versuchen Sie nicht, es selbst
zu reparieren. Für eventuelle Reparaturen
und zum Austausch des Versorgungskabels
wenden Sie sich ausschließlich an eine vom
Hersteller autorisierte technische
Kundendienststelle.
- Bewahren Sie diese Gebrauchsanweisung
zum späteren Nachlesen sorgfältig auf.
Dieses Gerät entspricht hinsichtlich der elektro-
magnetischen Kompatibilität der Richtlinie
89/336/EU.
Die mit Nahrungsmittel in Berührung kommen-
den Materialien und Geräteteile entsprechen den
Vorschriften der EU-Richtlinie 89/109.
int 7-08-2002 14:33 Pagina 9
GERÄTEBESCHREIBUNG
A) Einschalthebe
B) Sichtanzeige Bräunungsgrad
C) Einstell-Drehknopf Bräunungsgrad
D) Auftautaste + Kontrolllampe
E) Schalter Stop/Löschen
F) Aufwärmtaste + Kontrolllampe
G) Krümelblech
H) Toasteinführschlitze
I) Abnehmbare Vorrichtung “Warming Rack”
VERWENDUNG DER BETRIEBSCHALTER
•Vergewissern Sie sich, daß der Hebel (A) in
gehobener Stellung und der Drehknopf (C)
auf den mittleren Bräunungsgrad eingestellt
ist.
Schließen Sie das Gerät an der Steckdose an.
Um bei der ersten Inbetriebnahme den Geruch
des “Neuen” zu beseitigen, lassen Sie das
Gerät mindestens 5 Minuten ohne Lebensmittel
arbeiten. Lüften Sie den Raum während die-
sem Vorgang.
Führen Sie die Brotscheiben in die
Einführschlitze ein und drücken Sie den Hebel
(A) bis zum Einrasten nach unten.
Hinweis: Ist das Gerät nicht am
Versorgungsnetz angeschlossen, kann der
Hebel nicht gelöst werden.
Nach beendetem Toastvorgang, kehrt der
Hebel in seine Ausgangsstellung zurück und
bringt gleichzeitig die Brotscheiben mit nach
oben. Um das Herausnehmen kleinerer
Brotscheiben zu erleichtern, drücken Sie den
Hebel (A) bis zum äußersten Anschlag nach
oben.
Ist der Toast nicht ausreichend gebräunt, wäh-
len Sie einen höheren Bräunungsgrad, indem
Sie den Drehknopf (C) drehen). Ist der Toast
hingegen zu dunkel gebräunt, wählen Sie
einen niedrigeren Bräunungsgrad.
Der Toastvorgang kann jederzeit gestoppt wer-
den, indem Sie die Taste Stop (E) drücken.
Defrost-Funktion (Auftauen)
Sie können tiefgefrorene Brotscheiben toasten,
indem Sie sofort nach dem Herabdrücken des
Hebels (
A) die Taste “Defrost” betätigen. Die
Garzeit wird verlängert, um den gewünschten
Bräunungsgrad zu erzielen. Die rote
Kontrollampe bleibt so lange eingeschaltet, wie
die Defrost-Funktion in Betrieb ist
Benutzung der Aufwärmtaste
Schieben Sie die Einschalttaste (A) nach unten
und drücken Sie die Aufwärmtaste (F). Die
Aufwärmkontrollampe leuchtet während der
gesamten Dauer dieser Funktion auf. Die
Aufwärmzeit ist vorgegeben und läßt sich nicht
über den Bräunungsregler verändern.
Vorrichtung "WARMING RACK" (I)
Verwenden sie diese Vorrichtung zum
Aufwärmen von Brioche.
Um den Aufsatz am Gerät zu befestigen, sind
zunächst die Haken L einzustecken und dann
die Haken M, wie auf der Abbildung auf Seite
3 gezeigt, zu blockieren.
Legen Sie die Brioche auf den Rost.
Drehen sie den Bräunungsregler (C) bis zur
gewünschten Bräunungsstufe.
Drücken Sie die Einschalttaste (A) nach unten,
bis sie einrastet.
Falls die Brioche nicht warm genug ist, ist
beim nächsten Mal eine höhere
Bräunungsstufe zu wählen.
HINWEISE
Betreiben Sie das Gerät nicht leer (d.h. ohne
Brotscheiben).
•Verwenden Sie keine besonders dünnen oder
gebrochenen Brotscheiben.
Führen Sie keine Nahrungsmittel ein, die
während dem Garvorgang tropfen könnten.
Dies würde nicht nur die Reinigungsarbeiten
erschweren, sondern könnte auch eine
Brandursache darstellen. Reinigen Sie außer-
dem das Krümelblech vor jedem Gebrauch
von eventuellen Tropfrückständen.
Führen Sie keine zu großen Lebensmittel ein
(unter Kraftaufwand).
Verwenden Sie zum Herausziehen von Brot
aus dem Toasterinneren keine Gabeln oder
anderen Werkzeuge,
da diese die
Heizelemente des Gerätes beschädigen könn-
ten. Ziehen Sie den Netzstecker, drehen Sie
das Gerät auf den Kopf und schütteln Sie es
leicht.
10
int 7-08-2002 14:33 Pagina 10
REINIGUNG - PFLEGE
Ziehen Sie vor Beginn einer jeden
Reinigungs- bzw. Wartungsarbeit stets den
Netzstecker aus der Steckdose.
Lassen sie das Gerät abkühlen, bevor Sie mit
der Reinigung beginnen.
Reinigen Sie das Gerätegehäuse mit einem
weichen Tuch. Verwenden Sie keine
Scheuermittel, denn sie könnten die
Oberfläche beschädigen.
•TAUCHEN SIE DAS GERÄT NICHT INS
WASSER.
Ziehen Sie nach jedem Gebrauch den
Netzstecker und entleeren Sie das
Krümelblech, das sich am Geräteboden befin-
det.
Sollte sich ein Toast verklemmt haben, ziehen
Sie den Netzstecker, drehen das Gerät auf
den Kopf und schütteln es leicht.
BERÜHREN SIE KEINE TEILE DES TOASTERS
MIT SPITZEN BZW. SCHARFEN
WERKZEUGEN, INSBESONDERE NICHT DIE
INNENSEITEN DER EINFÜHRSCHLITZE.
11
int 7-08-2002 14:33 Pagina 11
12
AVVERTENZE IMPORTANTI
-L’apparecchio dovrà essere destinato esclusi-
vamente all’uso per il quale è stato espressa-
mente concepito. Ogni altro uso è da consi-
derarsi improprio e quindi pericoloso. Il
costruttore non potrà essere ritenuto respon-
sabile di eventuali danni derivanti da uso
improprio, erroneo e irresponsabile e/o da
riparazioni effettuate da personale non qua-
lificato.
- Dopo aver tolto l’imballaggio, assicurarsi
dell’integrità del prodotto. In caso di dubbio,
non utilizzare l’apparecchio e rivolgersi
esclusivamente a personale qualificato.
Per rimuovere le polveri che potrebbero
essersi accumulate, è sufficiente spolverare
l’apparecchio con un panno morbido.
- Prima di inserire la spina nella presa di cor-
rente, verificare che:
- la tensione di rete corrisponda al valore
indicato nella targa dati, posta sotto l’ap-
parecchio.
-la presa di corrente sia dotata di una suffi-
ciente messa a terra:
la casa costruttrice
declina ogni responsabilità derivante
dalla mancata osservazione di questa
norma.
- In caso di incompatibilità tra la presa e la
spina dell’apparecchio, fare sostituire la
presa con altra di tipo adeguato da persona-
le qualificato. É sconsigliabile l’uso di adatta-
tori, prese multiple, e/o prolunghe. Qualora
il loro uso si rendesse necessario, utilizzare
esclusivamente adattatori semplici o multipli e
prolunghe conformi alle vigenti norme di
sicurezza, facendo attenzione a non supera-
re il limite di potenza marcato sull’adattatore
e/o prolunga.
- Il sacchetto di plastica contenente il prodotto
non deve essere lasciato alla portata dei
bambini in quanto potenziale fonte di perico-
lo.
- Quando l’apparecchio è collegato alla rete
di alimentazione e soprattutto quando è in
funzione non introdurre le mani nelle bocche
di caricamento (
H);
- Non permettere che l’apparecchio sia usato
da bambini o che venga utilizzato incustodi-
to.
- Non toccare l’apparecchio con le mani
bagnate o umide.
- Durante il funzionamento le pareti metalliche
e le zone circostanti le bocche di caricamen-
to (H) sono calde: operare sull’apparecchio
toccando solo manopole e maniglie in plasti-
ca.
- Il pane è un alimento che può incendiarsi.
Non usare quindi questo apparecchio sotto o
accanto a tendaggi o altri materiali combu-
stibili.
- Non coprire l’apparecchio mentre è in uso.
-Non usare l’apparecchio a piedi nudi o
bagnati.
- Disinserire la spina dalla presa di corrente
quando l’apparecchio non viene utilizzato.
- Non lasciare l’apparecchio inutilmente acce-
so perché potenziale fonte di pericolo.
-Non sfilare la spina dalla presa tirando il
cavo di alimentazione.
- Non lasciare l’apparecchio esposto agli
agenti atmosferici (pioggia, sole, gelo, ecc.).
- Prima di effettuare qualsiasi operazione di
pulizia o di manutenzione, scollegare l’ap-
parecchio dalla rete di alimentazione elettri-
ca staccando la spina. Non immergere l’ap-
parecchio, il cavo di alimentazione o la spina
in acqua.
- In caso di guasto e/o di cattivo funziona-
mento, spegnere l’apparecchio senza mano-
metterlo. Per eventuali riparazioni e
per la
sostituzione del cavo di alimentazione
rivol-
gersi esclusivamente a Centri di Assistenza
tecnica autorizzati dal costruttore.
- Conservare con cura le presenti istruzioni per
ulteriori consultazioni.
Questo apparecchio è conforme alla Direttiva
89/336/CEE relativa alla compatibilità elettro-
magnetica.
I materiali e gli oggetti destinati al contatto con
prodotti alimentari sono conformi alle prescrizio-
ni della direttiva CEE 89/109 e al D.L. di attua-
zione 25 gennaio 1992, N. 108.
LEGGERE ATTENTAMENTE LE PRESENTI ISTRUZIONI PRIMA DI UTILIZZARE L’APPARECCHIO
I
int 7-08-2002 14:33 Pagina 12
13
DESCRIZIONE DELL’APPARECCHIO
A) Leva accensione
B) Indicatore grado di tostatura
C) Manopola regolazione grado di tostatura
D) Pulsante e spia ”scongelamento”
E) Pulsante stop/clear
F) Pulsante e spia ”riscaldamento”
G) Vassoio raccoglibriciole
H) Bocche di caricamento
I) Dispositivo “Warming Rack” removibile
USO DEI COMANDI
Assicurarsi che la leva (A) sia sollevata e che
la manopola (
C) sia impostata per il grado di
tostatura desiderata; al primo utilizzo si con-
siglia una tostatura media.
Collegare l’apparecchio alla presa di corrente.
Per eliminare l’odore di “nuovo” al primo
funzionamento, far funzionare l’apparec-
chio senza alimenti per almeno 5 minuti.
Aerare la stanza durante questa operazio-
ne.
Inserire le fette di pane nelle bocche di cari-
cammento e abbassare la leva (
A) fino a fine
corsa.
Nota: se l’apparecchio non è collegato alla
rete di alimentazione, la leva non si blocca.
Quando la tostatura è ultimata, la leva risale
facendo salire anche le fette di pane. Nel
caso di fette di pane di piccole dimensioni,
per favorirne l’estrazione, spingere la leva
verso l’alto fino a fine corsa.
Se il toast non è sufficientemente dorato,
selezionare un grado maggiore di tostatura
ruotando la manopola (
C). Se al contrario il
toast è troppo dorato, selezionare un grado
inferiore.
La tostatura può essere interrotta in qualsiasi
momento semplicemente premendo il tasto
stop (
E).
Funzione “Scongelamento”
Potete tostare le fette di pane congelate premen-
do il tasto defrost subito dopo aver abbassato la
leva (
A); il ciclo di cottura sarà allungato per rag-
giungere la doratura desiderata.
La spia luminosa rossa rimarrà accesa fintanto
che la funzione defrost sarà in uso.
Funzione riscaldamento
Abbassare la leva di accensione (A) e premere il
tasto di riscaldamento (F). La spia di riscalda-
mento rimarrà accesa durante l’uso di questa
funzione. Da notare che il tempo di riscaldamen-
to è fisso e non può essere modificato interve-
nendo sul controllo del grado di tostatura.
Dispositivo “WARMING RACK” (I)
Utilizzare questo dispositivo per riscaldare brioches.
Fissare la griglia all’apparecchio infilando
prima i ganci L e poi bloccando i ganci M
come illustrato nella figura a pag. 3.
Appoggiare la brioche sulla griglia.
Ruotare la manopola di controllo del grado
di tostatura (C) sulla regolazione desiderata.
Abbassare la leva di accensione (A) finché si
blocca.
Se la brioche non è sufficientemente calda, la
volta successiva selezionare un grado mag-
giore di tostatura.
CONSIGLI
Non fate funzionare l’apparecchio a vuoto
(ovvero senza fette di pane).
Non utilizzare fette di pane molto sottili o
rotte.
Non inserite alimenti che possono gocciolare
durante la cottura. Oltre a rendere impegna-
tive le operazioni di pulizia, possono essere
causa di incendi. É inoltre importante pulire il
vassoio raccoglibriciole da eventuali goccio-
lamenti prima di ogni utilizzo.
Non inserire (sforzando) alimenti troppo
grandi.
Non inserire forchette o altri utensili all’in-
terno del toaster per estrarre il pane
, in
quanto potrebbe danneggiare le resistenze
dell’apparecchio. Staccate la spina, capovol-
gete l’apparecchio e scuotetelo leggermente.
PULIZIA - MANUTENZIONE
Qualsiasi operazione di pulizia e manuten-
zione deve essere fatta dopo aver disinserito
la spina dalla presa di corrente.
Lasciare che l’apparecchio si raffreddi prima
di procedere alla pulizia.
La parte esterna dell’apparecchio dev’essere
pulita con un panno umido. Non usare deter-
genti abrasivi che potrebbero rovinare la
superficie.
int 7-08-2002 14:33 Pagina 13
NON IMMERGERE IN ACQUA.
Dopo ogni utilizzo, staccare la spina e svuo-
tare il vassoio raccogli-briciole che si trova sul
fondo dell’apparecchio.
Nel caso dei toast dovessero rimanere inca-
strati, staccare la spina, capovolgere e scuo-
tere leggermente il toaster.
NON TOCCARE MAI ALCUNA PARTE DEL
TOASTER CON UTENSILI TAGLIENTI, SPE-
CIALMENTE ALL’INTERNO DELLE BOCCHE
DI CARICAMENTO.
14
int 7-08-2002 14:33 Pagina 14
15
NL
AANDACHTIG DEZE GEBRUIKSAANWIJZING DOORLEZEN VOORDAT MEN HET APPARAAT GEBRUIKT
BELANGRIJKE AANWIJZINGEN
- Het apparaat dient uitsluitend gebruikt te
worden voor de doeleinden waarvoor het
ontworpen is. Elk ander gebruik dient als
oneigenlijk beschouwd te worden en derhal-
ve als gevaarlijk. De fabrikant kan niet
verantwoordelijk gesteld worden voor even-
tuele schade veroorzaakt door oneigenlijk,
verkeerd en onverantwoordelijk gebruik
en/of door reparaties uitgevoerd door niet
vakbekwaam personeel.
- Nadat de verpakking verwijderd is, dient
men te controleren of het apparaat in goede
staat verkeerd. In geval van twijfel, moet het
apparaat niet gebruikt te worden en dient
men zich te wenden tot vakbekwaam perso-
neel.
De plastic zak waarin het produkt verpakt is,
dient niet binnen het bereik van kinderen ach-
tergelaten te worden, omdat dit een bron van
gevaar zou kunnen opleveren.
-Voor het verwijderen van eventuele stof dat
zich gevormd zou kunnen hebben, is het vol-
doende het apparaat af te nemen met een
zachte doek.
- de netspanning overeenkomt met de waar-
de aangegeven op het kenmerkenplaatje
dat zich aan de onderkant van het appa-
raat bevindt.
- het stopcontact voorzien is van een aardlei-
ding: de fabrikant stelt zich niet
verantwoordelijk voor de gevolgen van het
niet in acht nemen van deze norm.
- Indien de stekker niet in het stopcontact past,
het stopcontact door een vakman laten ver-
vangen door een stopcontact van het juiste
soort. Het gebruik van aanpasstekkers, meer-
voudige stopcontacten en/of verlengsnoeren
wordt afgeraden. Indien het gebruik hiervan
noodzakelijk geacht wordt, uitsluitend enkel-
voudige of meervoudige aanpasstekkers of
verlengsnoeren gebruiken die overeenkom-
stig zijn met de van kracht zijnde veiligheid-
snormen, waarbij erop gelet moet worden dat
de vermogenslimiet aangegeven op de aan-
passtekker en/of het verlengsnoer niet over-
schreden wordt.
-Wanneer het apparaat aangesloten is op het
electriciteitsnet, en in het bijzonder wanneer
het apparaat aanstaat, nooit de handen te
steken in de broodsleuven. (H).
- Het apparaat niet laten gebruiken door kin-
deren of niet laten gebruiken zonder toezicht.
- Het apparaat niet aanraken met natte of
vochtige handen.
-Tijdens het gebruik worden de metalen wan-
den en de zone rondom de broodsleuven (H)
warm: het apparaat bedienen door uitslui-
tend de plastic knoppen en handvaten aan te
raken.
-Brood is een voedingswaar dat vlam kan vat-
ten. Daarom dient dit apparaat niet gebruikt
te worden in de buurt van gordijnen of van
ander brandbaar materiaal.
- Het apparaat niet bedekken tijdens het func-
tioneren.
- Het apparaat niet gebruiken op blote of natte
voeten.
- De stekker uit het stopcontact halen wanneer
het apparaat niet gebruikt wordt.
- Het apparaat niet onnodig aan laten staan,
omdat dit een bron van gevaar zou kunnen
opleveren.
- De stekker niet uit het stopcontact halen door
aan het snoer te trekken.
- Het apparaat niet blootstellen aan atmosferi-
sche krachten (regen, zon, vrieskou, etc.)
-Voordat men overgaat tot het schoonmaken of
het uitvoeren van onderhoud, altijd eerst de
stekker uit het stopcontact halen. Het apparaat,
het electriciteitssnoer of de stekker niet in water
dompelen.
- In geval van storing en/of slecht functioneren,
het apparaat afzetten zonder te proberen het
zelf te repareren. Voor eventuele reparaties
en voor het vervangen van het electriciteits-
snoer dient men zich uitsluitend te wenden tot
technische assistentie centra die geautori-
zeerd zijn door de fabrikant.
- Deze gebruiksaanwijzing goed bewaren om
deze eventueel in de toekomst te kunnen raad-
plegen.
Dit apparaat is overeenkomstig de EEG richtlijn
89/336 aangaande de electromagnetische vere-
nigbaarheid.
De materialen en de voorwerpen die bestemd
zijn voor het contact met etenswaren zijn ove-
reenkomstig de voorschriften van de EEG richtlijn
89/109
int 7-08-2002 14:33 Pagina 15
BESCHRIJVING VAN HET APPARAAT
A) Hendel voor het aanzetten
B) Aanduiding bruiningsgraad
C) Draaiknop regulering bruiningsgraad
D) Controlelampje en drukknop “defrost”
E) Drukknop Stop/clear
F) Controlelampje en drukknop “reheat”
G) Kruimelopvangblad
H) Broodsleuven
I) Uitneembaar element "Warming Rack"
HET GEBRUIK VAN DE BEDIENING
Controleren dat de hendel (A) naar boven
geschoven staat en dat de draaiknop C inge-
steld is op een gemiddelde bruiningsgraad.
De stekker van het apparaat in het stopcon-
tact steken.
Om de geur van “nieuwigheid”,
die vrijkomt tijdens de eerste keer dat het
apparaat gebruikt wordt, te verwijderen,
het apparaat gedurende minstens 5 minuten
laten functioneren zonder etenswaren. De
ruimte goed luchten tijdens deze operatie.
De sneden brood in de broodsleuven steken
en de hendel (A) naar beneden schuiven tot-
dat deze geblokkeerd raakt.
N.B.: Indien het apparaat niet aangesloten is op
het electriciteitsnet, raakt de hendel niet
geblokkeerd.
•Wanneer het brood geroosterd is, komt de
hendel weer omhoog waardoor tegelijkertijd
de sneden brood naar boven komen. Indien
kleine sneden brood gebruikt worden, om het
eruit halen te vereenvoudigen, de hendel (A)
naar boven schuiven tot hij niet verder kan.
•Wanneer het brood niet voldoende geroosterd
is, dient men een hogere bruiningsgraad te kie-
zen door aan knop (C) te draaien. Indien in het
tegenovergestelde geval het brood té veel geroo-
sterd is, een lagere bruiningsgraad kiezen.
Het roosteren kan op elk moment onder-
broken worden door eenvoudigweg op de
toets stop (E) te drukken.
Defrost Functie (ontdooien)
Bevroren boterhammen kunnen geroosterd wor-
den door de defrost toets in te drukken onmiddel-
lijk na de hendel (
A) naar beneden geschoven te
hebben, de bereidingscyclus zal verlengd worden
totdat de gewenste bruiningsgraad bereikt is. Het
rode controlelampje zal blijven branden zolang
de defrost functie in werking is.
Reheat Functie (verwarming)
Duw de bedieningshendel (A) helemaal naar
beneden en druk op de verwarmingsknop (H).
Het controlelampje blijft branden zolang deze
functie in gebruik is. De verwarmingstijd is steeds
dezelfde is kan niet veranderd worden met de
regelknop van de roostergraad.
Element "WARMING RACK" (I)
Gebruik dit element om brioches te roosteren.
Bevestig het rooster aan het apparaat door
eerst de haken L in te voeren en het rooster
vast te klikken met de haken M, zoals geïllus-
treerd op p. 3.
Plaats de brioche op het roostertje.
Draai de regelknop van de roostergraad (F)
op de gewenste stand.
Duw de bedieningshendel (D) naar beneden
tot deze zich blokkeert.
Als de brioche niet voldoende geroosterd is,
selecteert u de volgende keer een hogere
roostergraad.
RAADGEVINGEN
Het apparaat niet leeg laten functioneren
(oftewel zonder sneden brood)
•Geen hele dunne of gebroken sneden brood
gebruiken.
Geen etenswaren in de broodrooster doen
die tijdens het verwarmen kunnen lekken.
Afgezien van de moeilijkheden die dit veroor-
zaakt voor het schoonmaken, kan het ook
brandgevaar opleveren. Het is bovendien
belangrijk vóór elke gebruik eventuele gelek-
te etensresten te verwijderen van het kruime-
lopvangblad.
Geen té grote stukken (met geweld) in de
broodrooster drukken.
Geen vorken of andere voorwerpen in de
broodrooster steken om het brood eruit te
halen, omdat hierdoor de weerstanden van
het apparaat beschadigd zouden kunnen
worden. Indien nodig, de stekker uit het stop-
contact halen, het apparaat omkeren en
zachtjes schudden.
SCHOONMAKEN - ONDERHOUD
Elke handeling betreffende schoonmaken of
onderhoud dient te geschieden nadat de
stekker uit het stopcontact gehaald is.
Het apparaat laten afkoelen voordat men
begint met schoonmaken.
16
int 7-08-2002 14:33 Pagina 16
De buitenkant van het apparaat moet schoon-
gemaakt worden met een zachte doek. Geen
schurende schoonmaakmiddelen gebruiken
omdat hierdoor de buitenkant beschadigd
zou kunnen worden.
NIET IN WATER DOMPELEN.
•Na elk gebruik de stekker uit het stopcontact
halen en het kruimelopvangblad dat zich aan
de onderkant van het apparaat bevindt,
legen.
Indien een geroosterde boterham vast blijft zit-
ten in de sleuf, de stekker uit het stopcontact
halen, het apparaat omkeren en zachtjes
schudden.
NOOIT WELK ONDERDEEL DAN OOK VAN
DE BROODROOSTER AANRAKEN MET
SNIJDENDE VOORWERPEN, IN HET BIJ-
ZONDER NIET DE BINNENKANT VAN DE
BROODSLEUVEN.
17
int 7-08-2002 14:33 Pagina 17
18
E
LEER CON ATENCION LAS PRESENTES INSTRUCCIONES ANTES DE USAR EL APARATO
ADVERTENCIAS IMPORTANTES
- El aparato tendrá que estar destinado, exclu-
sivamente, para el uso para el cual ha sido
fabricado. Cualquier otro uso se tiene que
considerar incorrecto y, por lo tanto, peligro-
so. El fabricante declina toda responsabili-
dad por eventuales daños ocasionados por
uso incorrecto, erróneo e irresponsable y/o
reparaciones efectuadas por personal no
especializado. Después de haber quitado el
embalaje, asegurarse de la integridad del
producto. En caso de dudas, no usar el apa-
rato, dirigirse exclusivamente a personal
cualificado.
- La bolsa de plástico que envuelve el produc-
to no se debe dejar al alcance de los niños,
ya que podría ser una potencial fuente de
peligro.
Para quitar el polvo, que podría haberse
acumulado, es suficiente usar un paño suave.
- Antes de enchufarlo, controlar que:
- la tensión de alimentación corresponda al
valor indicado en la chapa datos, coloca-
da debajo del aparato.
- la toma corriente tenga una suficiente
descarga a tierra:
el fabricante declina
toda responsabilidad en el caso que esta
norma no se cumpla.
- En caso de incompatibilidad entre toma y
enchufe del aparato, hacer cambiar la toma
con otra de tipo adecuado, por personal cua-
lificado. No se aconseja el uso de adaptado-
res, tomas múltiples y/o prolongaciones. En
el caso que sea necesario, usar exclusiva-
mente adaptadores simples o múltiples y
prolongaciones conformes con las normas de
seguridad vigentes, poniendo atención a que
el límite de potencia marcado en el adapta-
dor y/o prolongación no sea superior.
- Cuando el aparato está conectado a la red
de alimentación y, sobre todo, cuando está
en funcionamiento, no introducir las manos
en las bocas de carga (H);
- No permitir que el aparato sea usado por
niños sin la debida vigilancia;
- No tocar el aparato con las manos mojadas
o húmedas;
- Durante el funcionamiento, las paredes metá-
licas y las zonas de alrededor de las bocas
de carga (H), están calientes: tocar sólo las
manoplas y manijas de plástico.
- El pan es un alimento que puede incendiarse.
No usar el aparato debajo de cortinados u
otros materiales combustibles;
- No tapar el aparato mientras se usa;
- No usar el aparato cuando se está descalzo o
con los pies mojados;
- Desenchufarlo cuando no se usa;
- No dejar el aparato inútilmente encendido,
porque potencialmente es una fuente de peli-
gro;
- No desenchufarlo tirando el cable de alimen-
tación;
-No dejar que el aparato esté expuesto a
agentes atmosféricos (lluvia, sol, hielo, etc.);
- Antes de realizar cualquier operación de lim-
pieza o mantenimiento, desenchufar el apa-
rato. No sumergir el aparato, el cable de ali-
mentación o el enchufe en agua;
- En el caso de avería y/o mal funcionamien-
to, apagar el aparato sin tratar de arreglar-
lo. En el caso de reparaciones y para el cam-
bio del cable de alimentación, dirigirse
exclusivamente a Centros de Asistencia
Técnica autorizadas por el fabricante;
- Guardar con atención las presentes instruc-
ciones para ulteriores consultaciones.
Este aparato es conforme a la Directiva
89/336/CEE relativa a la compatibilidad elec-
tromagnética.
Los materiales y los objetos destinados al contac-
to con productos alimenticios son conformes a
las prescripciones de la directiva CEE 89/109.
int 7-08-2002 14:33 Pagina 18
19
DESCRIPCION DEL APARATO
A) Palanca encendido
B) Visor grado de tostado
C) Manopla regulación grado de tostado
D) Señal luminosa y pulsador “defrost”
E) Pulsador stop/clear
F) Señal luminosa y pulsador “reheat”
G) Bandeja recoge migas
H) Bocas de carga
I) Dispositivo “Warming Rack” extraible
USO DE LOS MANDOS
Controlar que la palanca (A) esté levantada y
que la manopla (C) esté planteada para un
tostado medio.
Conectar el aparato a la toma corriente.
Para
eliminar el olor a “nuevo” en el primer fun-
cionamiento, hacer funcionar el aparato sin
alimentos por al menos 5 minutos. Ventilar
la habitación durante esta operación.
Poner las rodajas de pan en las bocas de
carga (H) y bajar la palanca (A) hasta blo-
quearla. Nota: si el aparato no está enchufa-
do, la palanca no se bloquea.
Cuando terminó de tostar, la palanca sube,
haciendo subir, también las rodajas de pan.
Si no está suficientemente doradas, seleccio-
nar un grado mayor de tostado, girando la
manopla (C). Si por el contrario, están dema-
siado doradas, seleccionar un grado inferior.
El tostado se puede interrumpir en cualquier
momento, simplemente apretando el botón stop
(E).
Función Defrost (descongelamiento)
Se pueden tostar las rodajas de pan congelado,
apretando el pulsador defrost inmediatamente
después de haber bajado la palanca (A): el ciclo
de cocción se prolongará para alcanzar el dora-
do deseado. La señal luminosa roja quedará
encendida durante la función defrost.
Función Reheat (calentamiento)
Baje la palanca de encendido (A) y pulse el
botón de calentado. El piloto de calentado per-
manecerá encendido mientras dure el uso de esta
función. Subrayamos que el tiempo de calentado
es fijo y no se puede modificar mediante el con-
trol del grado de tostado.
Dispositivo "WARMING RACK" (I)
Use este dispositivo para calentar bollos de leche
Fijar la rejilla al aparato introduciendo primero
los ganchos L y bloqueando después los ganchos
M como puede verse en la figura de la pág. 3.
Apoye el bollo de leche sobre la rejilla.
Gire la manecilla de control del grado de
tostado (C) hasta llegar al grado deseado
Empuje a fondo la palanca de encendido (A)
hasta que se bloquee.
Si el bollo de leche no está lo suficientemente
caliente, la próxima vez seleccione un grado
mayor de tostado.
CONSEJOS
No hacer funcionar el aparato al vacío (es
decir sin rodajas de pan).
No usar rodajas de pan muy finas o rotas.
No introducir alimentos que puedan gotear
durante l a cocción. Además de ser difícil la
limpieza, pueden ser causa de incendios.
Además, es importante limpiar la bandeja
que recoge las migas antes de cada uso.
No introducir, forzando, alimentos demasia-
do grandes.
No introducir tenedores u otros utensilios en
el interior de la tostadora para sacar el pan,
ya que se podrían dañar las resistencias del
aparato. Desenchufarlo, dar vuelta el apara-
to y sacudirlo ligeramente.
LIMPIEZA Y MANTENIMIENTO
Desenchufar el aparato antes de las opera-
ciones de limpieza y mantenimiento.
•Dejar que el aparato se enfríe antes de pro-
ceder a la limpieza.
Las partes externas del aparato se limpian
con un paño suave. No usar detergentes
abrasivos que podría arruinar la superficie
NO SUMERGIRLO EN AGUA.
•Después de cada uso, desenchufarlo y vaciar
la bandeja recoge migas, que se encuentra
en el fondo del aparato.
En el caso que la tostada quede encastrada,
desenchufarlo, dar vuelta el aparato y sacu-
dirlo ligeramente.
NO use objetos punzantes o afilados para
limpiar las partes internas a fin de no dañar
las resistencias. NO ponga NUNCA los
dedos u objetos metálicos dentro de las ranu-
ras para el pan.
int 7-08-2002 14:33 Pagina 19
20
P
LER COM ATENÇÃO ESTAS INSTRUÇÕES ANTES DE UTILIZAR O APARELHO
AVISOS IMPORTANTES
-O aparelho deverá ser utilizado somente com
a função para a qual foi expressamente rea-
lizado. Todo outro uso deve ser considerado
impróprio e perigoso. O fabricante não
poderá ser considerado responsável por
eventuais danos derivados do uso impróprio,
incorrecto e irresponsável e/ou por repa-
rações feitas por pessoa não qualificada.
- Após ter retirado o aparelho da embalagem,
certificar-se que o mesmo não tenha sofrido
danos. Em caso de dúvida, não utilizá-lo e
recorrer exclusivamente a pessoal qualificado.
O saquinho de plástico do produto não deve
ser deixado ao alcance das crianças, pois é
um perigo em potencial.
- Para retirar a poeira acumulada, basta pas-
sar um pano macio no aparelho.
- Antes de ligar a ficha na tomada de corren-
te, verificar que:
-a tensão de rede corresponda ao valor
indicado na placa de dados, que foi apli-
cada sob o aparelho;
-a tomada de corrente tenha uma ligação à
terra suficiente;
o fabricante declina toda e
qualquer responsabilidade que derive da
não observância desta norma.
- Em caso de incompatibilidade entre a tomada
e a ficha do aparelho, mandar substituir a
tomada por uma que seja do tipo apropriado.
Tal substituição deve ser feita por pessoal qua-
lificado.
Não é aconselhável o uso de adaptadores,
tomadas múltiplas e/ou extensões. Se o uso
de tais dispositivos for necessário, utilizar
somente adaptadores simples ou múltiplos e
extensões em conformidade com as normas
de segurança vigentes. Prestar atenção em
não superar o limite de potência marcado no
adaptador e/ou extensão.
- Quando o aparelho estiver ligado com a rede
de alimentação e principalmente quando esti-
ver a funcionar, não introduzir as mãos nas
aberturas (H).
- Não deixar que o aparelho seja utilizado por
crianças ou sem supervisão quando usado
pelas mesmas.
-Não tocar o aparelho com as mãos molhadas
ou húmidas.
- Durante o funcionamento, as paredes metáli-
cas e as zonas próximas das aberturas (H)
aquecem-se: tocar somente os botões e as
pegas de plástico ao utilizar o aparelho.
-O pão é um alimento que se pode incendiar.
Nunca usar este aparelho ao lado ou
embaixo de cortinas ou outros materiais com-
bustíveis.
- Nunca cobrir o aparelho quando estiver a ser
utilizado.
-O utente não deve utilizar o aparelho se estiver
descalço ou com os pés molhados.
- Desligar a ficha da tomada de corrente quan-
do o aparelho não estiver a ser utilizado.
- Nunca deixar o aparelho inutilmente ligado,
pois é uma fonte potencial de perigo.
- Não desligar a ficha da tomada puxando
pelo cabo de alimentação.
- Nunca deixar o aparelho exposto aos agen-
tes atmosféricos (chuva, sol, gelo, etc.).
- Antes de limpar ou fazer a manutenção,
desligar o aparelho da rede de alimentação
eléctrica. Para isto, desligar a ficha. Não
imergir o aparelho, o cabo de alimentação
ou a ficha em água.
- Em caso de avaria e/ou de funcionamento
irregular, desligar o aparelho sem tentar
repará-lo.
Para reparações e substituição do
cabo de alimentação
, recorrer exclusivamen-
te a um Centro de Assistência Técnica autori-
zado pelo fabricante.
- Conservar com atenção as presentes
instruções para outras consultas.
Este aparelho está em conformidade com a
Directriz 89/336/CEE relativa à compatibilidade
electromagnética.
Os materiais e os objectos destinados ao contac-
to com produtos alimentares estão em conformi-
dade com as prescrições da directriz CEE
89/109.
int 7-08-2002 14:33 Pagina 20
21
DESCRIÇÃO DO APARELHO
A) Alavancas de ligação
B) Indicador grau de torragem
C) Botão de controlo do grau de torragem
D) Luz-piloto e botão “defrost”
E) Pulsante stop/clear
F) Luz-piloto e botão “reheat”
G) Gaveta colectora de migalhas extraível
H) Bocas de carregamento
I) Dispositivo “Warming Rack” amovível
USO DOS COMANDOS
Certificar-se de que a alavanca (A) esteja
levantada e que o botão (C) esteja na
posição de torração média.
Ligar o aparelho com a tomada de corrente.
Para eliminar o odor de “novo” ao ligar
pela primeira vez, deixá-lo funcionar sem
alimentos por pelo menos 5 minutos. Arejar
a divisão durante esta operação.
•Colocar as fatias de pão nas aberturas e
abaixar a alavanca (A) até bloqueá-la.
Nota: se o aparelho não estiver ligado com a
rede de alimentação, a alavanca não se blo-
queia.
Quando a torração terminar, a alavanca
sobe e as fatias de pão também. Se as fatias
de pão forem pequenas, para que saiam
mais facilmente, empurrar a alavanca (A)
completamente para cima.
Se o pão não estiver suficientemente doura-
do, seleccionar o grau de torração mais forte
girando o botão C. Se o pão estiver muito
dourado, seleccionar um grau de torração
inferior.
•A torração pode ser interrompida a qualquer
momento, basta carregar na tecla stop (E).
Função Defrost (descongelação)
Pode-se torrar as fatias de pão congeladas,
basta carregar na tecla defrost logo após ter
abaixado a alavanca (
A); o ciclo de cozedura
será aumentado para alcançar a douradura
desejada. A luz-piloto vermelha ficará acesa
enquanto a função defrost estiver activada.
Função Reheat (aquecimento)
Abaixar a alavanca de ligação (A) e carregar na
tecla de aquecimento (F). A luz indicadora de
aquecimento permanecerá acesa enquanto esti-
ver activa esta função. Deve-se ter presente que o
tempo de aquecimento é fixo e não pode ser alte-
rado intervindo no controlo do grau de torragem.
Dispositivo "WARMING RACK" (I)
Utilizar este dispositivo para aquecer croissants.
•Fixar a grelha ao aparelho enfiando primeiro
os ganchos L e depois bloqueando os gan-
chos M como ilustrado na figura da pág. 3.
Apoiar o croissant na grelha.
Girar o manípulo de controlo do grau de tor-
ragem (C) para a regulação desejada.
Abaixar a alavanca de ligação (A) até que
fique presa.
Se o croissant não ficar suficientemente
quente, na próxima vez seleccionar um grau
de torragem superior.
CONSELHOS
Não deixar o aparelho funcionar vazio (ou
seja, sem fatias de pão).
Não utilizar fatias de pão muito finas ou que-
bradas.
•Não colocar alimentos que possam gotejar
durante a torração. Além de ser difícil de lim-
par, podem originar incêndios. Também é
importante limpar o tabuleiro de recolher
migalhas se algo tiver gotejado sobre o
mesmo. Limpar antes de utilizar o aparelho.
Não colocar (forçando) alimentos muito
grandes.
Não colocar facas ou outros utensílios den-
tro da torradeira para retirar o pão,
pois
isso pode avariar as resistências do apa-
relho. Desligar a ficha, inverter o aparelho e
movê-lo delicadamente.
LIMPEZA – MANUTENÇÃO
Qualquer limpeza ou manutenção deve ser
feita após ter desligado a ficha da tomada de
corrente.
Deixar que o aparelho arrefeça antes de lim-
par.
•A parte externa do aparelho deve ser limpa
com um pano macio. Não usar detergentes
abrasivos que podem estragar a superfície.
NÃO IMERGIR EM ÁGUA.
Após cada utilização, desligar a ficha e esva-
ziar o tabuleiro de recolher migalhas que se
encontra no fundo do aparelho.
Se o pão ficar preso na torradeira, desligar a
int 7-08-2002 14:33 Pagina 21
ficha, inverter e mover delicadamente a tor-
radeira.
NUNCA TOCAR AS PARTES DA TORRADEI-
RA COM UTENSÍLIOS CORTANTES, PRINCI-
PALMENTE A PARTE INTERNA DAS ABERTU-
RAS.
22
int 7-08-2002 14:33 Pagina 22
23
GR
¢π∞µ∞™∆∂ ¶ƒ√™∂∫∆π∫∞ ∆π™ √¢∏°π∂™ ∞À∆∂™ ¶ƒπ¡ Ã∏™πª√¶√π∏™∂∆∂ ∆∏ ™À™∫∂À∏
™∏ª∞¡∆π∫∂™ ¶ƒ√∂π¢√¶√π∏™∂π™
- ∏ Û˘Û΢‹ ·˘Ù‹ ÚÔÔÚ›˙ÂÙ·È
·ÔÎÏÂÈÛÙÈο Î·È ÌfiÓÔ ÁÈ· ÙË ¯Ú‹ÛË ÁÈ·
ÙËÓ ÔÔ›· ¤¯ÂÈ Û¯Â‰È·ÛÙ›. ∫¿ı ¿ÏÏË
¯Ú‹ÛË Ú¤ÂÈ Ó· ıˆÚÂ›Ù·È ·Î·Ù¿ÏÏËÏË
Î·È Û˘ÓÂÒ˜ ÂÈΛӉ˘ÓË. √
ηٷÛ΢·ÛÙ‹˜ ‰ÂÓ ÌÔÚ› Ó· ıˆÚËı›
˘‡ı˘ÓÔ˜ ÁÈ· Ù˘¯fiÓ ˙ËÌȤ˜ Ô˘ ÌÔÚ›
Ó· ÚÔÎÏËıÔ‡Ó ·fi ·Î·Ù¿ÏÏËÏË,
Ï·Óı·Ṳ̂ÓË Î·È ·ÏfiÁÈÛÙË ¯Ú‹ÛË, ηÈ/‹
·fi ÂÈÛ΢¤˜ Ô˘ ÂÎÙÂϤÛÙËÎ·Ó ·fi
·ÓÂȉ›Î¢ÙÔ ÚÔÛˆÈÎfi.
- ∞ÊÔ‡ ·Ê·ÈÚ¤ÛÂÙ ÙË Û˘Û΢·Û›·,
‚‚·Èˆı›Ù fiÙÈ Ë Û˘Û΢‹ Â›Ó·È ·Î¤Ú·ÈË
Î·È ‰ÂÓ ¤¯ÂÈ ˘ÔÛÙ› ˙ËÌȤ˜. ™Â ÂÚ›ÙˆÛË
·ÌÊÈ‚ÔÏÈÒÓ, ÌËÓ ÙË ¯ÚËÛÈÌÔÔÈ‹ÛÂÙ ηÈ
·¢ı˘Óı›Ù Û ÂȉÈÎÂ˘Ì¤ÓÔ
ËÏÂÎÙÚÔÏfiÁÔ.
- ∏ Ï·ÛÙÈ΋ Û·ÎԇϷ Ù˘ Û˘Û΢·Û›·˜
ÙÔ˘ ÚÔ˚fiÓÙÔ˜ ı· Ú¤ÂÈ Ó· Ê˘Ï¿ÛÛÂÙ·È
Ì·ÎÚÈ¿ ·fi ·È‰È¿ ÁÈ·Ù› ·ÔÙÂÏ› Èı·Ó‹
ÂÛÙ›· ÎÈÓ‰‡ÓÔ˘. °È· Ó· ·ÔÌ·ÎÚ‡ÓÂÙ ÙË
ÛÎfiÓË Ô˘ ÂӉ¯Ô̤ӈ˜ ¤¯ÂÈ
Û˘ÛÛˆÚ¢Ù›, ·ÚΛ Ó· ÍÂÛÎÔÓ›ÛÂÙ ÙË
Û˘Û΢‹ Ì ¤Ó· Ì·Ï·Îfi ·Ó›.
- ¶ÚÈÓ Û˘Ó‰¤ÛÂÙ ÙÔ ÊȘ Ù˘ Û˘Û΢‹˜ ÛÙËÓ
Ú›˙· ÙÔ˘ Ú‡̷ÙÔ˜, ‚‚·Èˆı›Ù fiÙÈ:
- Ë Ù¿ÛË ÙÔ˘ ‰ÈÎÙ‡Ô˘ ·ÓÙÈÛÙÔȯ› ÛÂ
ÂΛÓË Ô˘ ·Ó·ÁÚ¿ÊÂÙ·È ÛÙËÓ Ù·Ì¤Ï·
Ù˘ Û˘Û΢‹˜, Ë ÔÔ›· ›ӷÈ
ÙÔÔıÂÙË̤ÓË ÛÙÔ Î¿Ùˆ ̤ÚÔ˜ Ù˘
Û˘Û΢‹˜.
- Ë Ú›˙· ÙÔ˘ Ú‡̷ÙÔ˜ Â›Ó·È Î·Ù¿ÏÏËÏ·
ÁÂȈ̤ÓË:
Ô Î·Ù·Û΢·ÛÙÈÎfi˜ Ô›ÎÔ˜
·ÔÔÈÂ›Ù·È Î¿ı ¢ı‡Ó˘ Ô˘
ÚÔ¤Ú¯ÂÙ·È ·fi ÙËÓ ÌË-Ù‹ÚËÛË ÙÔ˘
ηÓÔÓÈÛÌÔ‡ ·˘ÙÔ‡.
- ™Â ÂÚ›ÙˆÛË Ô˘ Ë Ú›˙· ‰ÂÓ Ù·ÈÚÈ¿˙ÂÈ ÌÂ
ÙÔ ÊȘ Ù˘ Û˘Û΢‹˜, ηϤÛÙ ¤Ó·Ó
ËÏÂÎÙÚÔÏfiÁÔ ÁÈ· Ó· ·ÓÙÈηٷÛÙ‹ÛÂÈ ÙËÓ
Ú›˙· Ì ÌÈ· ¿ÏÏË ÙÔ˘ ηٿÏÏËÏÔ˘ Ù‡Ô˘.
¢ÂÓ Û˘ÓÈÛÙ¿Ù·È Ë ¯Ú‹ÛË ·ÓÙ¿ÙÔÚ·,
ÔχÚÈ˙Ô˘ ηÈ/‹ ÚÔ¤ÎÙ·Û˘ ηψ‰›Ô˘.
ŸÙ·Ó Ë ¯Ú‹ÛË ÙˆÓ ·Ú·¿Óˆ ›ӷÈ
·Ôχو˜ ··Ú·›ÙËÙË, ı· Ú¤ÂÈ Ó·
¯ÚËÛÈÌÔÔÈ‹ÛÂÙÂ ·Ïfi ‹ ÔÏÏ·Ïfi
·ÓÙ¿ÙÔÚ· Î·È ÚÔÂÎÙ¿ÛÂȘ Ô˘
Û˘ÌʈÓÔ‡Ó Ì ÙÔ˘˜ ÈÛ¯‡ÔÓÙ˜
ηÓÔÓÈÛÌÔ‡˜ ·ÛÊ·Ï›·˜, ÊÚÔÓÙ›˙ÔÓÙ·˜
Ó· ÌËÓ ˘Âڂ›Ù ÙÔ fiÚÈÔ Ù˘ ̤ÁÈÛÙ˘
ÈÛ¯‡Ô˜ Ô˘ ·Ó·ÁÚ¿ÊÂÙ·È Â¿Óˆ ÛÙÔÓ
·ÓÙ¿ÙÔÚ· ηÈ/‹ ÙËÓ ÚÔ¤ÎÙ·ÛË.
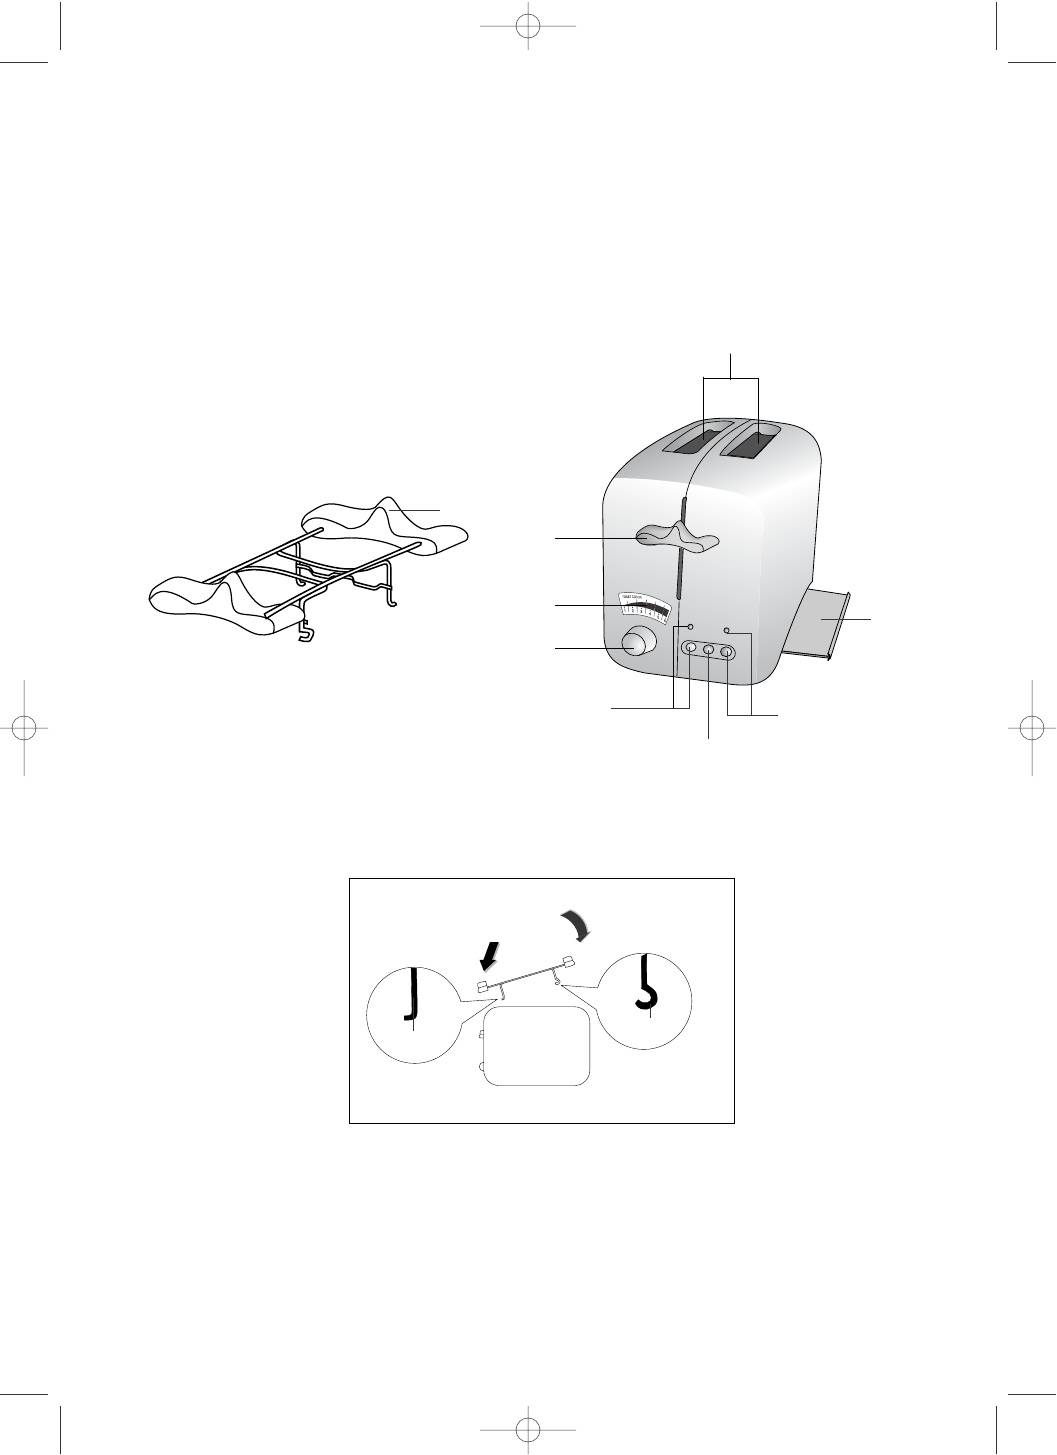
- ŸÙ·Ó Ë Û˘Û΢‹ Â›Ó·È Û˘Ó‰Â‰Â̤ÓË ÛÙÔ
ËÏÂÎÙÚÈÎfi ‰›ÎÙ˘Ô Î·È Î˘Ú›ˆ˜ fiÙ·Ó
‚Ú›ÛÎÂÙ·È ÛÂ ÏÂÈÙÔ˘ÚÁ›·, ÌË ‚¿˙ÂÙÂ Ù·
¯¤ÚÈ· Û·˜ ̤۷ ÛÙ· ÛÙfiÌÈ· ÂÈÛ·ÁˆÁ‹˜
Ù˘ Û˘Û΢‹˜
(∏).
- ªËÓ ·Ê‹ÓÂÙ ӷ ¯ÚËÛÈÌÔÔÈÔ‡Ó ÙË
Û˘Û΢‹ ·È‰È¿, Ô‡Ù ӷ ÏÂÈÙÔ˘ÚÁ› ¯ˆÚ›˜
Â›‚Ï„Ë.
- ªË ¯ÚËÛÈÌÔÔț٠ÙË Û˘Û΢‹ Ì ˘ÁÚ¿ ‹
‚ÚÂÁ̤ӷ ¯¤ÚÈ·.
- ∫·Ù¿ ÙË ‰È¿ÚÎÂÈ· ÏÂÈÙÔ˘ÚÁ›·˜, Ù·
ÌÂÙ·ÏÏÈο ÙÔȯÒÌ·Ù· Ù˘ Û˘Û΢‹˜
ηıÒ˜ Î·È Ë ÂÚÈÔ¯‹ Á‡Úˆ ·fi Ù· ÛÙfiÌÈ·
ÂÈÛ·ÁˆÁ‹˜
(∏) Â›Ó·È ˙ÂÛÙ¿: ηٿ ÙÔ
¯ÂÈÚÈÛÌfi ÏÔÈfiÓ Ù˘ Û˘Û΢‹˜ ÊÚÔÓÙ›ÛÙÂ
Ó· ·ÎÔ˘Ì¿Ù ÌfiÓÔÓ ÙÔ˘˜ ‰È·ÎfiÙ˜ ηÈ
Ù· Ï·ÛÙÈο ¯ÂÚÔ‡ÏÈ·.
- ∆Ô „ˆÌ› Â›Ó·È ÙÚfiÊÈÌÔ Ô˘ ÌÔÚ› Ó·
¿ÚÂÈ ÊˆÙÈ¿. ™˘ÓÂÒ˜, ‰ÂÓ Ú¤ÂÈ Ó·
¯ÚËÛÈÌÔÔț٠ÙË Û˘Û΢‹ ·˘Ù‹ οو ‹
‰›Ï· Û ÎÔ˘ÚÙ›Ó˜ ‹ ¿ÏÏ· ‡ÊÏÂÎÙ·
˘ÏÈο.
- ªË ÛÎÂ¿˙ÂÙ ÙË Û˘Û΢‹ fiÙ·Ó ‚Ú›ÛÎÂÙ·È
ÛÂ ÏÂÈÙÔ˘ÚÁ›·.
- ªË ¯ÚËÛÈÌÔÔț٠ÙË Û˘Û΢‹ Ì Á˘ÌÓ¿
‹ ‚ÚÂÁ̤ӷ fi‰È·.
- µÁ¿ÏÙ ÙÔ ÊȘ ·fi ÙËÓ Ú›˙· ÙÔ˘
Ú‡̷ÙÔ˜ fiÙ·Ó ‰ÂÓ ¯ÚËÛÈÌÔÔț٠ÙË
Û˘Û΢‹.
- ªËÓ ·Ê‹ÓÂÙ ¿ÛÎÔ· ·Ó·Ì̤ÓË ÙË
Û˘Û΢‹ ÁÈ·Ù› ·ÔÙÂÏ› Èı·Ó‹ ÂÛÙ›·
ÎÈÓ‰‡ÓÔ˘.
- ªËÓ ÙÚ·‚¿Ù ÙÔ Î·ÏÒ‰ÈÔ ÙÚÔÊÔ‰ÔÛ›·˜
Ù˘ Û˘Û΢‹˜ ÁÈ· Ó· ‚Á¿ÏÂÙ ÙÔ ÊȘ ·fi
ÙËÓ Ú›˙· ÙÔ˘ Ú‡̷ÙÔ˜.
- ªËÓ ·Ê‹ÓÂÙ ÙË Û˘Û΢‹ ÂÎÙÂıÂÈ̤ÓË ÛÂ
·ÙÌÔÛÊ·ÈÚÈÎÔ‡˜ ·Ú¿ÁÔÓÙ˜ (‚ÚÔ¯‹,
‹ÏÈÔ˜, ·ÁˆÓÈ¿, ÎÏ).
- ¶ÚÈÓ ÂÎÙÂϤÛÂÙ ÔÔÈ·‰‹ÔÙ ÂÚÁ·Û›·
ηı·ÚÈÛÌÔ‡ ‹ Û˘ÓÙ‹ÚËÛ˘, ·ÔÛ˘Ó‰¤ÛÙÂ
ÙË Û˘Û΢‹ ·fi ÙÔ ËÏÂÎÙÚÈÎfi ‰›ÎÙ˘Ô
ÙÚ·‚ÒÓÙ·˜ ÙÔ ÊȘ ·fi ÙËÓ Ú›˙·. ªË
‚˘ı›˙ÂÙ Û ÓÂÚfi ÙË Û˘Û΢‹, ÙÔ
ËÏÂÎÙÚÈÎfi ηÏÒ‰ÈÔ ‹ ÙÔ ÊȘ.
- ™Â ÂÚ›ÙˆÛË ‚Ï¿‚˘ ηÈ/‹
ÂÏ·Ùو̷ÙÈ΋˜ ÏÂÈÙÔ˘ÚÁ›·˜, Û‚‹ÛÙ ÙË
Û˘Û΢‹ Î·È ÌËÓ ÚÔÛ·ı‹ÛÂÙ ӷ ÙËÓ
·ÓÔ›ÍÂÙ ÁÈ· Ó· ÙËÓ ÂÈÛ΢¿ÛÂÙÂ. °È·
Èı·Ó¤˜ ÂÈÛ΢¤˜ ηÈ
ÁÈ· ÙËÓ
·ÓÙÈηٿÛÙ·ÛË ÙÔ˘ ËÏÂÎÙÚÈÎÔ‡ ηψ‰›Ô˘
·¢ı˘Óı›Ù ·ÔÎÏÂÈÛÙÈο Î·È ÌfiÓÔÓ ÛÂ
ÂÍÔ˘ÛÈÔ‰ÔÙË̤ӷ ·fi ÙÔÓ Î·Ù·Û΢·ÛÙ‹
∫¤ÓÙÚ· ™¤Ú‚Ș.
- º˘Ï¿ÍÙ Ì ÚÔÛÔ¯‹ ÙȘ Ô‰ËÁ›Â˜ ·˘Ù¤˜
ÁÈ· Ó· ÙȘ Û˘Ì‚Ô˘Ï‡ÂÛÙ Û ÂÚ›ÙˆÛË
Ô˘ ÙȘ ¯ÚÂÈ·ÛÙ›Ù ÛÙÔ Ì¤ÏÏÔÓ.
∏ Û˘Û΢‹ ·˘Ù‹ Â›Ó·È Û‡ÌʈÓË Ì ÙËÓ
Ô‰ËÁ›· 89/336/∂√∫ ÂÚ› ËÏÂÎÙÚÔÌ·ÁÓËÙÈ΋˜
Û˘Ì‚·ÙfiÙËÙ·˜.
∆· ˘ÏÈο Î·È Ù· ·ÓÙÈΛÌÂÓ· Ô˘ ¤Ú¯ÔÓÙ·È ÛÂ
Â·Ê‹ Ì ÚÔ˚fiÓÙ· ‰È·ÙÚÔÊ‹˜ ›ӷÈ
Û‡Ìʈӷ Ì ÙȘ ‰È·Ù¿ÍÂȘ Ù˘ √‰ËÁ›·˜ EOK
89/109.
int 7-08-2002 14:33 Pagina 23
¶∂ƒπ°ƒ∞º∏ ∆∏™ ™À™∫∂À∏™
A) ªÔ¯Ïfi˜ ·Ó¿ÌÌ·ÙÔ˜ Û˘Û΢‹˜
B) ¶·Ú·ı˘Ú¿ÎÈ ÔÙÈÎÔ‡ ÂϤÁ¯Ô˘
ÊÚ˘Á·Ó›ÛÌ·ÙÔ˜
C) ¢È·ÎfiÙ˘ Ú‡ıÌÈÛ˘ ‚·ıÌÔ‡ ÊÚ˘Á·Ó›ÛÌ·ÙÔ˜
D) ∂Ó‰ÂÈÎÙÈÎfi Ï·Ì¿ÎÈ Î·È ÎÔ˘Ì› "defrost"
E) ∫Ô˘Ì› stop/clear
F) ∂Ó‰ÂÈÎÙÈÎfi Ï·Ì¿ÎÈ Î·È ÎÔ˘Ì› "reheat"
G) ¢›ÛÎÔ˜ Û˘ÏÏÔÁ‹˜ „›¯Ô˘ÏˆÓ
H) ™ÙfiÌÈ· ÂÈÛ·ÁˆÁ‹˜
I) ∞Ê·ÈÚÔ‡ÌÓÔ Û‡ÛÙËÌ· "Warming Rack"
∆ƒ√¶√™ Ã∏™∏™ ∆ø¡ ¢π∞∫√¶∆ø¡
(ª√¡∆∂§√ CT02)
ñ µÂ‚·Èˆı›Ù fiÙÈ Ô ÌÔ¯Ïfi˜ (∞) ›ӷÈ
ÛËΈ̤ÓÔ˜ Î·È fiÙÈ Ô ‰È·ÎfiÙ˘
(C) ›ӷÈ
ÙÔÔıÂÙË̤ÓÔ˜ ÛÙË ı¤ÛË ÁÈ· ̤ÙÚÈÔ
ÊÚ˘Á¿ÓÈÛÌ·.
ñ ™˘Ó‰¤ÛÙ ÙË Û˘Û΢‹ ÛÙËÓ Ú›˙· ÙÔ˘
ڇ̷ÙÔ˜.
°È· Ó· Í·Ï›„Ù ÙËÓ ÔÛÌ‹ "ηÈÓÔ‡ÚÁÈÔ˘"
ÛÙËÓ ÚÒÙË ÏÈÙÔ˘ÚÁ›·, ·Ê‹ÛÙ ÙË Û˘Û΢‹
Ó· ÏÈÙÔ˘ÚÁ‹ÛÈ ¯ˆÚ›˜ ÙÚfiÊÈÌ·
ÙÔ˘Ï¿¯ÈÛÙÔÓ ÁÈ· 5 ÏÙ¿. ∞Ú›˙Ù ÙÔ ‰ˆÌ¿ÙÈÔ
ηٿ ÙË ‰È¿ÚÎÈ· Ù˘ Ó¤ÚÁÈ·˜ ·˘Ù‹˜
.
ñ µ¿ÏÙ ÙȘ ʤÙ˜ „ˆÌÈÔ‡ ÛÙ· ÛÙfiÌÈ·
ÂÈÛ·ÁˆÁ‹˜ Î·È ¯·ÌËÏÒÛÙ ÙÔ ÌÔ¯Ïfi
(∞)
̤¯ÚÈ Ó· ÌÏÔοÚÂÈ.
™ËÌ›ˆÛË: Â¿Ó Ë Û˘Û΢‹ ‰ÂÓ Â›Ó·È
Û˘Ó‰Â‰Â̤ÓË ÛÙÔ ËÏÂÎÙÚÈÎfi ‰›ÎÙ˘Ô ı·
‰È·ÈÛÙÒÛÂÙ fiÙÈ Ô ÌÔ¯Ïfi˜ ‰ÂÓ
ÌÏÔοÚÂÈ.
ñ ŸÙ·Ó ÙÔ ÊÚ˘Á¿ÓÈÛÌ· ÔÏÔÎÏËÚˆı›, Ô
ÌÔ¯Ïfi˜ ·Ó˘„ÒÓÂÙ·È Î·È Ù·˘Ùfi¯ÚÔÓ·
ÂÙ¿ÁÔÓÙ·È Î·È ÔÈ Ê¤Ù˜ „ˆÌÈÔ‡. ™
Ú›ÙˆÛË Ô˘ ÔÈ Ê¤Ù˜ „ˆÌ› ›Ó·È ÌÈÎÚ¤˜,
ÁÈ· Ó· ‰È˘ÎÔχÓÙ ÙËÓ ·Ê·›ÚÛË, ÛÚÒÍÙ ÙÔ
ÌÔ¯Ïfi (∞) ÚÔ˜ Ù· ¿Óˆ ̤¯ÚÈ Ù¤ÚÌ·.
ñ ∂¿Ó ÙÔ ÙÔÛÙ ‰ÂÓ Â›Ó·È ÈηÓÔÔÈËÙÈο
„Ë̤ÓÔ, ÂÈϤÍÙ ¤Ó·Ó ÌÂÁ·Ï‡ÙÂÚÔ ‚·ıÌfi
ÊÚ˘Á·Ó›ÛÌ·ÙÔ˜ Á˘Ú›˙ÔÓÙ·˜ ÙÔ ‰È·ÎfiÙË
(C). ∞ÓÙÈı¤Ùˆ˜ Â¿Ó ÙÔ ÙÔÛÙ ‚Á·›ÓÂÈ Ôχ
ÍÂÚÔ„Ë̤ÓÔ, ÂÈϤÍÙ ¤Ó·Ó ÌÈÎÚfiÙÂÚÔ
‚·ıÌfi ÊÚ˘Á·Ó›ÛÌ·ÙÔ˜.
ñ ∆Ô ÊÚ˘Á¿ÓÈÛÌ· ÌÔÚ› Ó· ‰È·ÎÔ›
ÔÔÈ·‰‹ÔÙ ÛÙÈÁÌ‹ Ì ¤Ó· ·Ïfi ¿ÙËÌ·
ÙÔ˘ ÎÔ˘ÌÈÔ‡ stop
(E).
§ÂÈÙÔ˘ÚÁ›· "Defrost" (ÍÂ¿ÁˆÌ·)
ªÔÚ›Ù Ó· ÊÚ˘Á·Ó›ÛÙ ÙȘ ηل˘Á̤Ә ʤ٘
„ˆÌÈÔ‡ Ȥ˙ÔÓÙ·˜ ÙÔ Ï‹ÎÙÚÔ defrost ·ÊÔ‡
ÚÒÙ· ηق¿ÛÙ ÙÔ ÌÔ¯Ïfi (∞). √ ·ÎÏÔ˜
„Ë̷ۛÙÔ˜ ·Ú·Ù›ÓÙ·È ÁÈ· Ó· ÈÙ˘¯ı› ÙÔ
Èı˘ÌËÙfi Úfi‰ÈÛÌ·. ∏ ÎfiÎÎÈÓË Ó‰ÈÎÙÈ΋ Ï˘¯Ó›·
·Ú·Ì¤ÓÈ ·Ó·Ì̤ÓË fiÛÔ ¯ÚËÛÈÌÔÔÈ›Ù·È Ë
ÏÈÙÔ˘ÚÁ›· defrost
§ÈÙÔ˘ÚÁ›· "Reheat" (ı¤ÚÌ·ÓÛË)
∫·Ù‚¿ÛÙ ÙÔ ÌÔ¯Ïfi ·Ó¿ÌÌ·ÙÔ˜ (A) ηÙÔ
Ï‹ÎÙÚÔ ı¤ÚÌ·ÓÛ˘ (F). ∏ Ï˘¯Ó›· ·Ú·Ì¤ÓÈ
·Ó·Ì̤ÓË fiÙ·Ó ¯ÚËÛÈÌÔÔÈ›Ù·È Ë ÏÈÙÔ˘ÚÁ›·
·˘Ù‹. ÀÓı˘Ì›˙Ô˘Ì fiÙÈ Ô ¯ÚfiÓÔ˜ ı¤ÚÌ·ÓÛ˘
›Ó·È ÛÙ·ıÚfi˜ Î·È ‰Ó ÌÙ·‚¿ÏÏÙ·È ·fi ÙÔ
‰È·ÎfiÙË ÈÏÔÁ‹˜ ÙÔ˘ ‚·ıÌÔ‡
ÊÚ˘Á·Ó›ÛÌ·ÙÔ˜.
™‡ÛÙËÌ· "WARMING RACK" (I)
ÃÚËÛÈÌÔÔÈ‹ÛÙ ÙÔ Û‡ÛÙËÌ· ÁÈ· Ó· ˙ÛÙ¿ÓÙ
ÎÚÔ˘·Û¿Ó.
- ™ÙÚÒÛÙ ÙË Û¯¿Ú· ÛÙË Û˘Û΢‹ ÚÓÒÓÙ·˜
ÚÒÙ· ÙÔ˘˜ Á¿ÓÙ˙Ô˘˜ L Î·È ·ÛÊ·Ï›˙ÔÓÙ·˜
ÛÙË Û˘Ó¤¯È· ÙÔ˘ Á¿ÓÙ˙Ô˘˜ M fiˆ˜ ÛÙËÓ
ÈÎfiÓ· Ù˘ ÛÏ›‰·˜ 3.
- ∞ÎÔ˘Ì‹ÛÙ ÙÔ ÎÚÔ˘·Û¿Ó ÛÙË Û¯¿Ú·.
- °˘Ú›ÛÙ ÙÔ ‰È·ÎfiÙË ÈÏÔÁ‹˜ ÙÔ˘ ‚·ıÌÔ‡
ÊÚ˘Á·Ó›ÛÌ·ÙÔ˜ (C) ÛÙËÓ Èı˘ÌËÙ‹ ı¤ÛË.
- ∫·Ù‚¿ÛÙ ÙÔ ÌÔ¯Ïfi on (A) ¤ˆ˜ fiÙÔ˘
ÌÏÔοÚÈ.
- ∞Ó ÙÔ ÎÚÔ˘·Û¿Ó ‰Ó ›Ó·È ·ÚÎÙ¿ ˙ÛÙfi, ÙËÓ
fiÌÓË ÊÔÚ¿ ÈϤÍÙ ÌÁ·Ï‡ÙÚÔ ‚·ıÌfi
ÊÚ˘Á·Ó›ÛÌ·ÙÔ˜.
™Àªµ√À§∂™
ñ ªËÓ ·Ê‹ÓÂÙ ÙË Û˘Û΢‹ Ó· ÏÂÈÙÔ˘ÚÁ›
ÂÓÒ Â›Ó·È ¿‰ÂÈ· (‰ËÏ·‰‹ ¯ˆÚ›˜ ʤÙ˜
„ˆÌÈÔ‡).
ñ ªË ¯ÚËÛÈÌÔÔț٠Ôχ ÏÂÙ¤˜ ‹
Û·Ṳ̂Ó˜ ʤÙ˜ „ˆÌÈÔ‡.
ñ ªËÓ ÂÈÛ¿ÁÂÙ ÛÙË Û˘Û΢‹ ÙÚfiÊÈÌ· Ô˘
ÌÔÚ› Ó· ‚Á¿˙Ô˘Ó ˘ÁÚ¿ ηٿ ÙË ‰È¿ÚÎÂÈ·
„Ë̷ۛÙÔ˜. ∂ÎÙfi˜ ÙÔ˘ fiÙÈ ÂÈ‚¿ÏÏÔ˘Ó
˘Ô¯ÚˆÙÈÎfi ηı·ÚÈÛÌfi Ù˘ Û˘Û΢‹˜,
Â›Ó·È ‰˘Ó·ÙfiÓ Ó· ÚÔηϤÛÔ˘Ó Î·È ÊˆÙÈ¿.
∂ÈϤÔÓ, Â›Ó·È ÛËÌ·ÓÙÈÎfi ÚÈÓ ·fi οıÂ
¯Ú‹ÛË Ù˘ Û˘Û΢‹˜ Ó· ηı·Ú›˙ÂÙ ÙÔÓ
‰›ÛÎÔ Û˘ÏÏÔÁ‹˜ „›¯Ô˘ÏˆÓ ·fi Èı·Ó¿
Ûٷ̷͛ٷ Î·È „›¯Ô˘Ï·.
ñ ªËÓ ÂÈÛ¿ÁÂÙ ÛÙË Û˘Û΢‹ ÙÚfiÊÈÌ·
ÌÂÁ¿ÏÔ˘ ÌÂÁ¤ıÔ˘˜ (·ÛÎÒÓÙ·˜ ›ÂÛË).
ñ
ªËÓ ÂÈÛ¿ÁÂÙ ÛÙÔ ÂÛˆÙÂÚÈÎfi Ù˘
ÊÚ˘Á·ÓȤڷ˜ ÈÚÔ‡ÓÈ· ‹ ¿ÏÏ· ·È¯ÌËÚ¿
ÂÚÁ·Ï›· ÁÈ· Ó· ‚Á¿ÏÂÙ ÙÔ „ˆÌ›,
ÁÈ·Ù›
¤ÙÛÈ ÌÔÚ› Ó· ηٷÛÙÚ¤„ÂÙ ÙȘ
·ÓÙÈÛÙ¿ÛÂȘ Ù˘ Û˘Û΢‹˜. µÁ¿ÏÙ ÙÔ ÊȘ
Ù˘ Û˘Û΢‹˜ ·fi ÙËÓ Ú›˙·,
·Ó·Ô‰ÔÁ˘Ú›ÛÙ ÙË Û˘Û΢‹ Î·È ÎÔ˘Ó‹ÛÙÂ
ÙËÓ ÂÏ·ÊÚ¿.
∫∞£∞ƒπ™ª√™ - ™À¡∆∏ƒ∏™∏
ñ ¶ÚÈÓ ÚÔ¯ˆÚ‹ÛÂÙ Û ÔÔÈ·‰‹ÔÙÂ
ÂÚÁ·Û›· ηı·ÚÈÛÌÔ‡ Î·È Û˘ÓÙ‹ÚËÛ˘,
‚Á¿ÏÙ ÙÔ ÊȘ Ù˘ Û˘Û΢‹˜ ·fi ÙËÓ Ú›˙·
ÙÔ˘ Ú‡̷ÙÔ˜.
24
int 7-08-2002 14:33 Pagina 24
ñ ∞Ê‹ÛÙ ÙË Û˘Û΢‹ Ó· ÎÚ˘ÒÛÂÈ ÚÈÓ
ÚÔ¯ˆÚ‹ÛÂÙ ÛÙË ‰È·‰Èηۛ· ηı·ÚÈÛÌÔ‡.
ñ ∫·ı·Ú›ÛÙ ÙÔ Â͈ÙÂÚÈÎfi Ù˘ Û˘Û΢‹˜
ÌfiÓÔÓ Ì ¤Ó· Ì·Ï·Îfi ·Ó›. ªË
¯ÚËÛÈÌÔÔț٠‰È·‚ÚˆÙÈο ηı·ÚÈÛÙÈο
Ô˘ ÌÔÚ› Ó· ηٷÛÙÚ¤„Ô˘Ó ÙËÓ
ÂÈÊ¿ÓÂÈ· Ù˘ Û˘Û΢‹˜.
ñ ª∏ µÀ£π∑∂∆∂ ∆∏ ™À™∫∂À∏ ™∂ ¡∂ƒ√.
ñ ªÂÙ¿ ·fi οı ¯Ú‹ÛË, ‚Á¿ÏÙ ÙÔ ÊȘ ·fi
ÙËÓ Ú›˙· Î·È ·‰ÂÈ¿ÛÙ ÙÔ Ù·„¿ÎÈ, Ô˘
‚Ú›ÛÎÂÙ·È ÛÙÔÓ ¿ÙÔ Ù˘ Û˘Û΢‹˜, ·fi
Ù· „›¯Ô˘Ï· Ô˘ Èı·ÓÒ˜ ¤¯Ô˘Ó
Û˘ÛÛˆÚ¢Ù›.
ñ ™Â ÂÚ›ÙˆÛË Ô˘ ÔÈ ÊÚ˘Á·ÓÈṲ̂Ó˜
ʤÙ˜ ·ÁÈ‰Â˘ÙÔ‡Ó ÛÙË ÊÚ˘Á·ÓȤڷ ηÈ
‰ÂÓ ‚Á·›ÓÔ˘Ó, ‚Á¿ÏÙ ÙÔ ÊȘ ·fi ÙËÓ
Ú›˙·, ·Ó·Ô‰ÔÁ˘Ú›ÛÙ ÙË Û˘Û΢‹ ηÈ
ÎÔ˘Ó‹ÛÙÂ ÙËÓ ÂÏ·ÊÚ¿.
ñ ª∏¡ ∞∫√Àª¶∞∆∂ ¶√∆∂ ª∂ ∫√º∆∂ƒ∞/
∞πê∏ƒ∞ ∂ƒ°∞§∂π∞ ∫∞¡∂¡∞ ª∂ƒ√™
∆∏™ ºƒÀ°∞¡π∂ƒ∞™, ∫∞π π¢πø™ ∆√
∂™ø∆∂ƒπ∫√ ∆ø¡ ™∆√ªπø¡ ∂π™∞°ø°∏™.
25
int 7-08-2002 14:33 Pagina 25
1

Hulp nodig? Stel uw vraag in het forum

Spelregels

Misbruik melden

Gebruikershandleiding.com neemt misbruik van zijn services uitermate serieus. U kunt hieronder aangeven waarom deze vraag ongepast is. Wij controleren de vraag en zonodig wordt deze verwijderd.

Product:

Bijvoorbeeld antisemitische inhoud, racistische inhoud, of materiaal dat gewelddadige fysieke handelingen tot gevolg kan hebben.

Bijvoorbeeld een creditcardnummer, een persoonlijk identificatienummer, of een geheim adres. E-mailadressen en volledige namen worden niet als privégegevens beschouwd.

Spelregels forum

Om tot zinvolle vragen te komen hanteren wij de volgende spelregels:

Belangrijk! Als er een antwoord wordt gegeven op uw vraag, dan is het voor de gever van het antwoord nuttig om te weten als u er wel (of niet) mee geholpen bent! Wij vragen u dus ook te reageren op een antwoord.

Belangrijk! Antwoorden worden ook per e-mail naar abonnees gestuurd. Laat uw emailadres achter op deze site, zodat u op de hoogte blijft. U krijgt dan ook andere vragen en antwoorden te zien.

Abonneren

Abonneer u voor het ontvangen van emails voor uw DeLonghi ct021 bij:


U ontvangt een email met instructies om u voor één of beide opties in te schrijven.


Ontvang uw handleiding per email

Vul uw emailadres in en ontvang de handleiding van DeLonghi ct021 in de taal/talen: Nederlands, Duits, Engels, Frans, Italiaans, Portugees, Spaans als bijlage per email.

De handleiding is 0,64 mb groot.


U ontvangt de handleiding per email binnen enkele minuten. Als u geen email heeft ontvangen, dan heeft u waarschijnlijk een verkeerd emailadres ingevuld of is uw mailbox te vol. Daarnaast kan het zijn dat uw internetprovider een maximum heeft aan de grootte per email. Omdat hier een handleiding wordt meegestuurd, kan het voorkomen dat de email groter is dan toegestaan bij uw provider.

Stel vragen via chat aan uw handleiding

Stel uw vraag over deze PDF

Uw handleiding is per email verstuurd. Controleer uw email

Als u niet binnen een kwartier uw email met handleiding ontvangen heeft, kan het zijn dat u een verkeerd emailadres heeft ingevuld of dat uw emailprovider een maximum grootte per email heeft ingesteld die kleiner is dan de grootte van de handleiding.

Er is een email naar u verstuurd om uw inschrijving definitief te maken.

Controleer uw email en volg de aanwijzingen op om uw inschrijving definitief te maken

U heeft geen emailadres opgegeven

Als u de handleiding per email wilt ontvangen, vul dan een geldig emailadres in.

Uw vraag is op deze pagina toegevoegd

Wilt u een email ontvangen bij een antwoord en/of nieuwe vragen? Vul dan hier uw emailadres in.


Info